
Excel for Microsoft 365 Word for Microsoft 365 Outlook for Microsoft 365 PowerPoint for Microsoft 365 Access for Microsoft 365 OneNote for Microsoft 365 Project Online Desktop Client Publisher for Microsoft 365 Visio Plan 2 Excel 2021 Word 2021 Outlook 2021 PowerPoint 2021 Access 2021 Project Professional 2021 Project Standard 2021 Publisher 2021 Visio Professional 2021 Visio Standard 2021 OneNote 2021 Excel 2019 Word 2019 Outlook 2019 PowerPoint 2019 Access 2019 Project Professional 2019 Project Standard 2019 Publisher 2019 Visio Professional 2019 Visio Standard 2019 Excel 2016 Word 2016 Outlook 2016 PowerPoint 2016 Access 2016 OneNote 2016 Project Professional 2016 Project Standard 2016 Publisher 2016 Visio Professional 2016 Visio Standard 2016 Excel 2013 Word 2013 Outlook 2013 PowerPoint 2013 Access 2013 OneNote 2013 Project Professional 2013 Project Standard 2013 Publisher 2013 Visio Professional 2013 Visio 2013 Excel 2010 Word 2010 Outlook 2010 PowerPoint 2010 Access 2010 OneNote 2010 Project 2010 Project Standard 2010 Publisher 2010 Visio Premium 2010 Visio 2010 Visio Standard 2010 Excel Starter 2010 Language Preferences Language Preferences 2010 Language Preferences 2013 Language Preferences 2016 More…Less
You can use the Office language options to add a language, to choose the UI display language, and to set the authoring and proofing language.
The language options are in the Set the Office Language Preferences section of the Office Options dialog box, which you can access by going to File > Options > Language. The display and authoring languages can be set independently. For example, you could have everything match the language of your operating system, or you could use a combination of languages for your operating system, authoring, and Office UI display.
The available languages depend on the language version of Office and any additional language pack, language interface pack, or ScreenTip languages that are installed on your computer.
Add a language
You can add a display language or an authoring language. A display language determines the language Office uses in the UI — ribbon, buttons, dialog boxes, etc. An authoring language influences text direction and layout for vertical, right-to-left, and mixed text. Authoring languages also include proofing tools such as dictionaries for spelling and grammar checking. (The preferred authoring language appears at the top of the list in bold. You can change this by choosing the language you want and selecting Set as Preferred.)
To add a display language:
-
Open an Office program, such as Word.
-
Select File > Options > Language.
-
Under Office display language, on the Set the Office Language Preferences, select Install additional display languages from Office.com.
-
Choose the desired language in the Add an authoring language dialog and then select Add. A browser page opens where you can download the installation file.
-
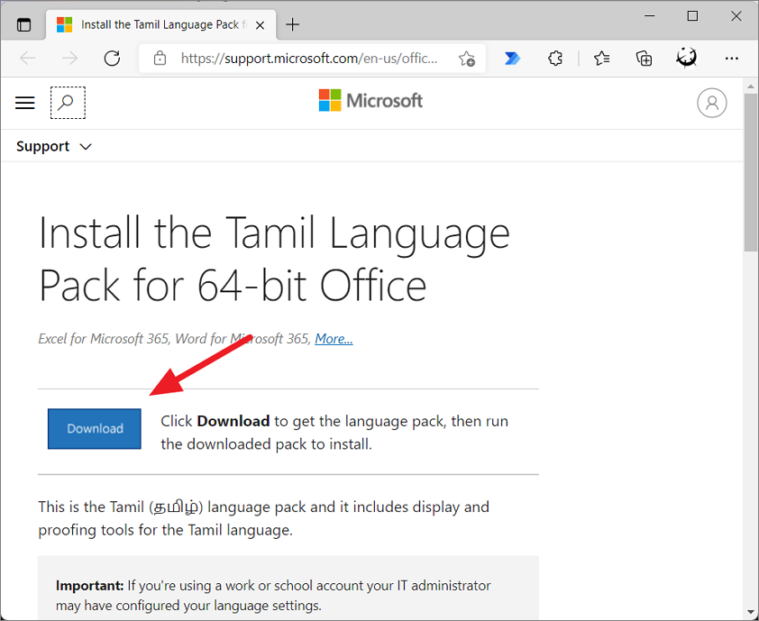
On the browser page, select Download and run the downloaded pack to complete installation.
-
The added language appears in the list of Office display languages.
To add an authoring language:
-
Open an Office program, such as Word.
-
Select File >Options >Language.
-
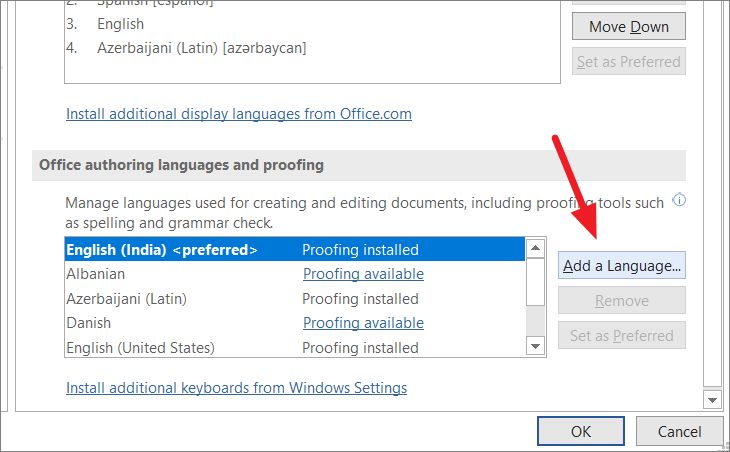
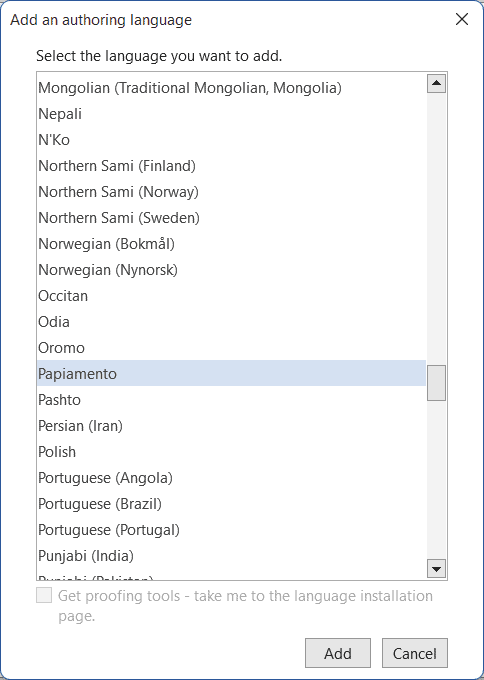
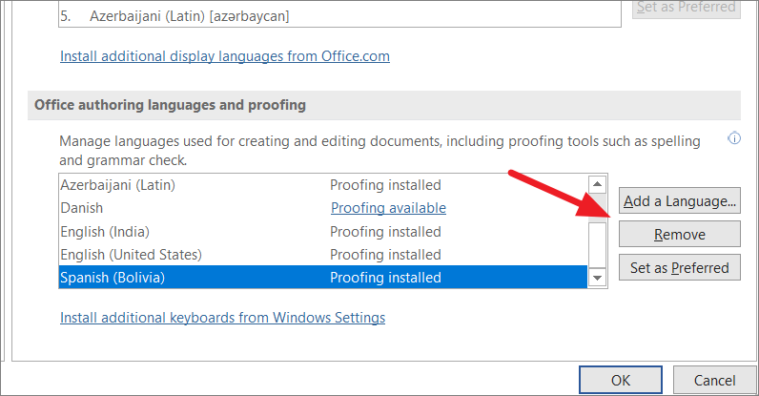
On the Set the Office Language Preferences, under Office authoring languages and proofing, select Add a Language….
-
Choose the desired language in the Add an authoring language dialog and then select Add. A browser page opens where you can download the installation file.
-
On the browser page, select Download and run the downloaded pack to complete installation.
-
The added language appears in the list of Office authoring languages.
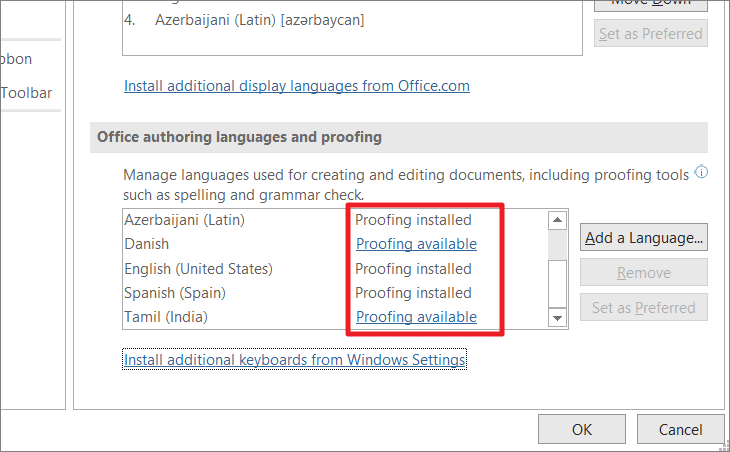
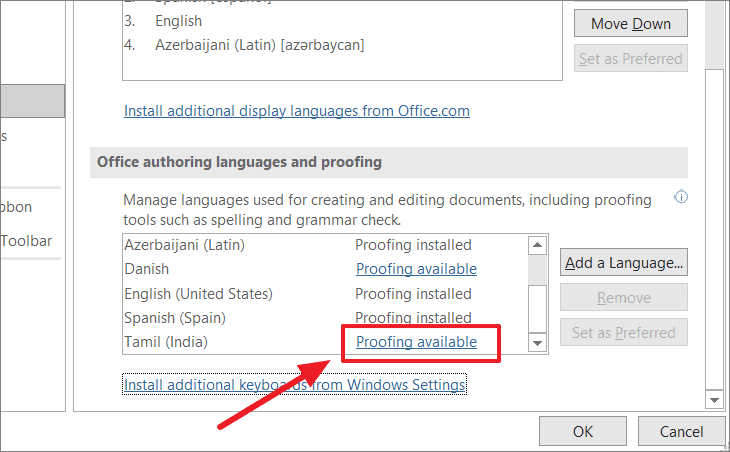
If Proofing available appears next to the language name, you can obtain a language pack with proofing tools for your language. If Proofing not available is next to the language name, then proofing tools are not available for that language. If Proofing installed appears next to the language name, you’re all set.
-
To go online and get the language pack you need, select the Proofing available link.
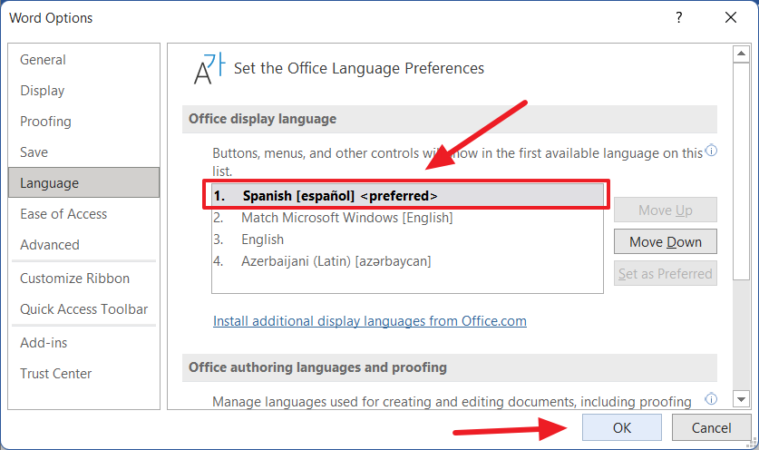
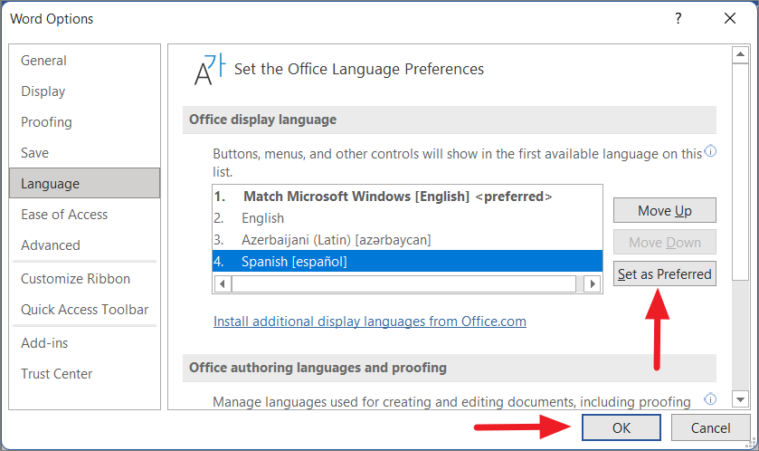
Both kinds of Office languages (display and authoring) have a preferred language that you can set independently.
The preferred language appears in bold at the top of each language list. The order of the languages in the list is the order in which languages are used by Office. For example, if your display language order is Spanish <preferred>, German, and Japanese, and the Spanish language resources are removed from your computer, German becomes your preferred display language.
To set the preferred language:
-
Open an Office program, such as Word.
-
Select File > Options > Language.
-
Under Set the Office Language Preferences, do one or both of the following:
-
Under Office display language, choose the language you want from the list and then select Set as Preferred.
-
Under Office authoring languages and proofing, choose the language you want from the list and then select Set as Preferred.
-
You can use the Office language options to add a language or to choose the language in which the Help and ScreenTips display.
The language options are in the Set the Office Language Preferences dialog box, which you can access by going to File > Options > Language. The display and help languages can be set independently. For example, you could have everything match the language of your operating system, or you could use a combination of languages for your operating system, editing, display, and Help.
The available languages depend on the language version of Office and any additional language pack, language interface pack, or ScreenTip languages that are installed on your computer.
Add a language
You can add a language to Office programs by adding an editing language. An editing language consists of the type direction and proofing tools for that language. The proofing tools include language-specific features, such as dictionaries for spelling and grammar checking. (The default editing language appears at the top of the list in bold. You can change this by choosing the language you want and selecting Set as Default.)
-
Open an Office program, such as Word.
-
Select File > Options > Language.
-
In the Set the Office Language Preferences dialog box, under Choose Editing Languages, choose the editing language that you want to add from the Add additional editing languages list, and then select Add.
The added language appears in the list of editing languages.
If Not enabled appears in the Keyboard Layout column, do the following:
-
Select the Not enabled link.
-
Windows settings will open to the Language page. In the Add Languages dialog box of Windows settings, select Add a language, choose your language in the list, and then select Add.
-
Close the Add Languages dialog box in Windows settings. In the Office dialog box, your language should display as Enabled under Keyboard Layout in the Choose Editing Languages section.
If Not Installed appears in the Proofing column, you might need to obtain a language pack or language interface pack to obtain the proofing tools for your language.
-
To go online and get the language pack you need, select the Not installed link.
The display and Help languages are the languages used in Office for display elements, such as menu items, commands, and tabs, in addition to the Help file display language.
The default language appears in bold at the top of the list. The order of the languages in the display and Help lists is the order in which languages are used by Office. For example, if your display language order is Spanish <default>, German, and Japanese, and the Spanish language tools are removed from your computer, German becomes your default display language.
To set the default language:
-
Open an Office program, such as Word.
-
Click File > Options > Language.
-
In the Set the Office Language Preferences dialog box, under Choose Display and Help Languages, choose the language that you want to use, and then select Set as Default.
Which display language is being used for which Office program?
If you use multiple languages and have customized Office so that it fits the way that you want to work, you can review all of the Office programs to see which language is the default display language for each.
-
In the Set the Office Language Preferences dialog box, under Choose Display and Help languages, select View display languages installed for each Microsoft Office program.
Note: This feature is available only for the following Office programs: Excel, OneNote, Outlook, PowerPoint, Publisher, Visio, and Word. It is not available for Office 2016 programs.
ScreenTips are small pop-up windows that provide brief, context-sensitive help when you rest the pointer on a display element, such as a button, tab, dialog box control, or menu. Setting the ScreenTip language in one Office program sets it for all of the Office programs that you have installed.
-
Open an Office program, such as Word.
-
Select File > Options > Language.
-
In the Set the Office Language Preferences dialog box, under Choose ScreenTip Language, choose your ScreenTip language.
Notes:
-
This feature is not available in Office 2016.
-
If the language that you want is not listed, you might need to add more language services. Select How do I get more ScreenTip languages from Office.com, and then follow the download and installation instructions.
-
After you install a new ScreenTip language, it becomes your default ScreenTip language.
-
For more information about ScreenTips, see Show or hide ScreenTips.
See also
Enable or change the keyboard layout language
Check spelling and grammar in a different language
Turn on automatic language detection
Need more help?
Want more options?
Explore subscription benefits, browse training courses, learn how to secure your device, and more.
Communities help you ask and answer questions, give feedback, and hear from experts with rich knowledge.
Find solutions to common problems or get help from a support agent.
Microsoft Word is used in different countries and many languages. For some documents such as international Agreements, you need to write the documents or just parts of the document in a different language.
To change the text language, select the text for which you want to change language and do one of the following:
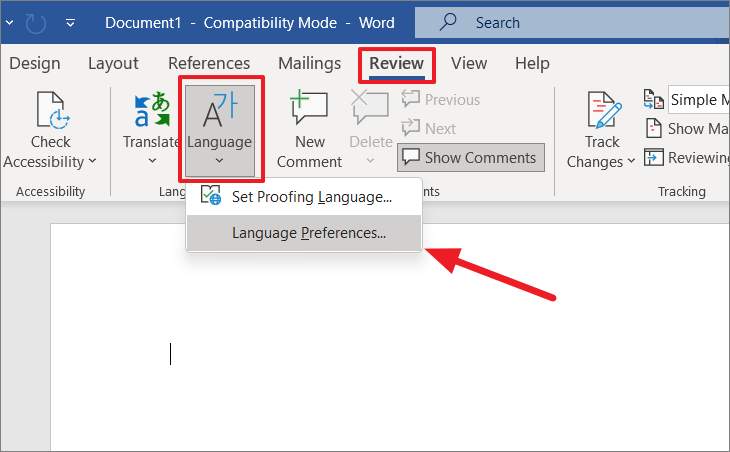
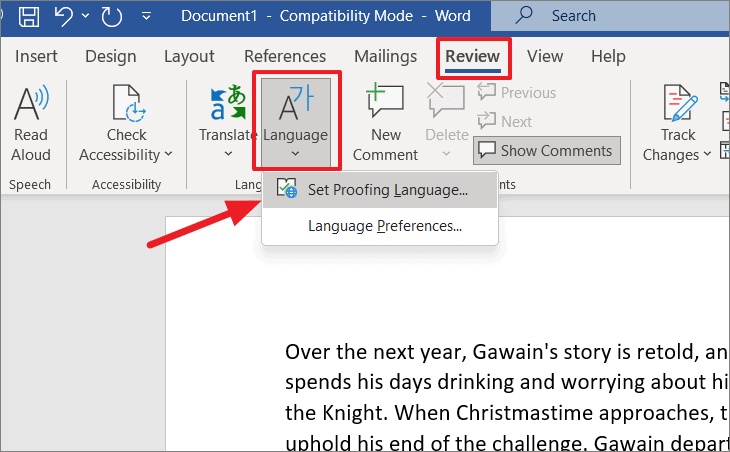
- On the Review tab, in the Language group, click the Language button, then choose Set Proofing Language…:

- On the status bar, click the Language icon:

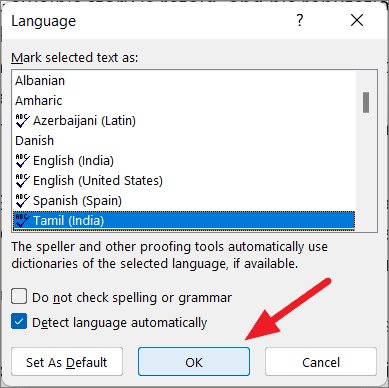
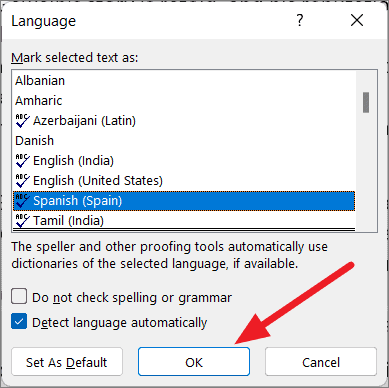
In the Language dialog box, choose the language you want to use for the selected text and click OK:

Notes:
- You can set different languages to different words, sentences, paragraphs, pages, or sections in the document.
- You can
skip some words or sentences from spelling and grammar checking or add them to the custom dictionary for some language.
Please, disable AdBlock and reload the page to continue
Today, 30% of our visitors use Ad-Block to block ads.We understand your pain with ads, but without ads, we won’t be able to provide you with free content soon. If you need our content for work or study, please support our efforts and disable AdBlock for our site. As you will see, we have a lot of helpful information to share.

This tutorial shows how to change the display language in Microsoft Word. The display language is the language that appears in the user interface, which includes the ribbon, Backstage view, dialog boxes, buttons, and menus.
Important Note: This process will change the display language for all your Office apps, including PowerPoint and Excel. It won’t change the language of the text in your documents.
Watch all the steps shown here in real time!
Explore more than 150 writing-related software tutorials on my YouTube channel.
The images below are from Word for Microsoft 365. These steps also apply to Word 2021 and Word 2019. These steps don’t apply to Word for Mac, which requires changing the language for the entire operating system.
- Select the Review tab in the ribbon.

- Select the Language button in the Language group.

- Select Language Preferences from the drop-down menu.

- Select the Add a Language button in the Word Options dialog box.
Important Note: If the language you want to use already appears in the Office display language text box, skip to step 10.

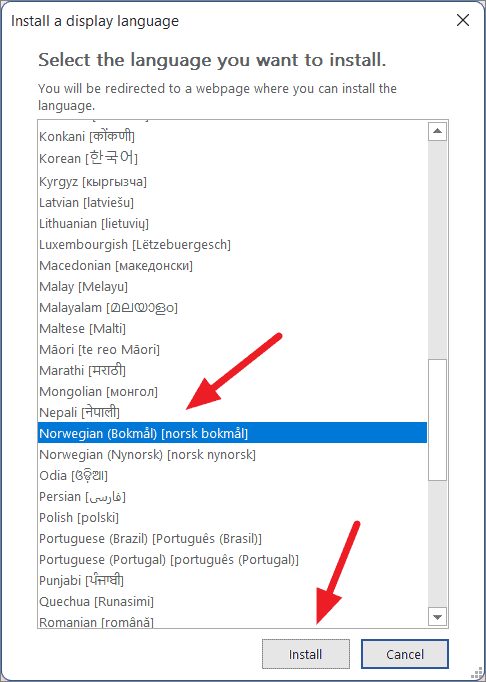
- Select the language from the Install a display language dialog box.

- Ensure that Set as Office display language is selected.

- Select the Install button.

- Select the OK button in the Install Office Language dialog box explaining that Office will ask you to restart your software to apply the new language.

A series of Windows dialog boxes will appear as the new language is downloading.

- Select the Continue button to save your open file, if requested.

Word will reopen with the new interface language.

Previously Installed Languages
- If the language is already installed on your computer, select it in the Office display language menu.

- Select the Set as Preferred button.

- Select the OK button.

- Select the OK button in the dialog box asking you to restart Office.

- Save your file and then restart Word or another of your Office apps.
Related Resources
How to Change the Proofing Language in Microsoft Word
How to Change the Color of the Interface in Microsoft Word (including Dark Mode)
![]()
Written by Allen Wyatt (last updated August 6, 2022)
This tip applies to Word 2007, 2010, 2013, 2016, 2019, Word in Microsoft 365, and 2021
Word includes many tools to make your writing better. A few of the tools make use of specialized dictionaries; for instance, the grammar and spelling checker. You can pick a language to be used on either a single paragraph, or on all instances of a particular paragraph style. To change which language is used for a particular paragraph, follow these steps:
- Select the paragraphs or defined style for which you want to change the language.
- Display the Review tab of the ribbon.
- If you are using Word 2007 click the Set Language tool in the Proofing group. If you are using Word 2010 or a later version, click the Language tool in the Language group and then click Set Proofing Language. Word displays the Language dialog box. (See Figure 1.)
- Select a language from those in the language list.
- Click on OK.

Figure 1. The Language dialog box.
If you want to specify that all paragraphs formatted with a particular style use a certain language, then follow these steps:
- Display the Home tab of the ribbon.
- Click the small icon at the bottom-right of the Styles group. Word displays the Styles pane at the right side of the desktop.
- In the list of styles, make sure the style you want to change is visible.
- Hover the mouse pointer over the name of the style you want to change. Notice that a downward-pointing arrow appears at the right side of the style name.
- Click on the downward-pointing arrow and choose the Modify option from the resulting menu. Word displays the Modify Style dialog box.
- Click on the Format button, then choose the Language option. Word displays the Language dialog box.
- Select a language from those in the language list.
- Click on OK, then on OK again.
- Close the Styles pane.
Any paragraphs currently using the style you specified in step 4 (or any paragraphs to which you apply that style in the future) will be formatted for the language you picked in step 7.
WordTips is your source for cost-effective Microsoft Word training.
(Microsoft Word is the most popular word processing software in the world.)
This tip (5938) applies to Microsoft Word 2007, 2010, 2013, 2016, 2019, Word in Microsoft 365, and 2021.
Author Bio
With more than 50 non-fiction books and numerous magazine articles to his credit, Allen Wyatt is an internationally recognized author. He is president of Sharon Parq Associates, a computer and publishing services company. Learn more about Allen…
MORE FROM ALLEN
Displaying the Selected Cell’s Address
Need to know the address of the cell that is currently selected? There is no worksheet function to return this …
Discover More
Clearing All Tab Stops
Tab stops allow you to modify the horizontal position at which text is positioned on a line. If you want to get rid of …
Discover More
Editing a Scenario
Once a scenario is defined and saved, you can later revisit the values you created for the scenario and modify them. …
Discover More
More WordTips (ribbon)
Changing the Language Setting for All Document Text
Word supports a number of different languages for documents you create. If you need to routinely change the language used …
Discover More
Converting Word to German
Want to convert your usage of Word from one language to another? It’s not as easy as one would hope, as you’ll discover …
Discover More
Pasting Text in a Specific Language
When copying information into a Word document, you may want to make sure that the information pasted is formatted as a …
Discover More
Need to write or read in a different language? Follow these tips
Updated on October 15, 2022
What to Know
- In Windows: Choose the desired Display and Help Languages in File > Options > Word Options > Language.
- Then, select Choose Editing Options in the same section to change the editing language.
- All but the proofing language in Office for Mac are the same as those for the operating system. To change it in Word: Tools > Language.
This article explains how to change display and/or editing languages in Word for Office 365, Word 2019, Word 2016, Word 2013, Word 2010, Word Online, and Word for Mac. In Windows—but not in macOS—you can choose them independently of the language installed for your operating system.
How to Change the Display Language
The display language in Word governs the ribbon, buttons, tabs, and other controls. To force a display language in Word that’s different from that of your operating system:
-
Select File > Options.
-
In the Word Options dialog box, select Language.
-
In the Choose Display Language section, choose the Display Language and Help Language you want to use. Languages installed in Windows 10 are listed.
-
If a specific language is not listed, select Get more display and help languages from Office.com. If necessary, install a Language Accessory Pack, then close and re-launch Word. You may need to reboot your computer, as well. After a language pack loads, go to the Word Options menu and choose that pack in the Display Language and Help Language lists.
-
Select Set as Default for both the Display Language and the Help Language lists.
-
Select OK to save your changes.
How to Change the Editing Language in Word
The editing language—which governs spelling, grammar, and word sorting—can be changed in the Word Options screen. Go to the Choose Editing Languages section, and select a language from the list. If the language isn’t listed, select the Add additional editing languages drop-down arrow and choose a language.
To proofread in the selected language, highlight the text, then go to the Review tab and select Language > Set proofing language. Choose a language from the list. Word will consider the highlighted selection to be the non-default, selected language and will check the spelling and grammar accordingly.
How to Change Language in Word Online
Language options for Office Online are similar to those in desktop versions of Office. In Office Online, highlight the text for proofing in the non-default language. Select Review > Spelling and Grammar > Set Proofing Language, then choose your alternative language. All proofing in that selected block will be governed by the rules of the alternative language.
How to Change Language in Word for Mac
The display and keyboard layout languages used in Office for Mac are the same as the ones for the operating system. You cannot use separate languages for the OS and Office applications. However, you can specify a different proofing language for Office for Mac.
To change the proofing language in Office for Mac, select Tools > Language in Word or another Office application. To change the proofing language for new documents, select Default.
If you select OK instead of Default, the proofing language you chose will only apply to the current file.
Normally, Word defaults to the language of the operating system. As a rule, you should use Windows to install language files rather than rely on an application like Word to do it for you.
FAQ
-
How do you delete a page in Word?
To delete a page in Word, select View, then go to the Show section and select Navigation Pane. In the left pane, select Pages, choose the page you want to delete and tap the delete or backspace key.
-
How do I check the word count in Word?
To check the word count in Microsoft Word, look at the status bar. If you don’t see the number of words, right-click the status bar and choose Word Count.
-
How do I insert a signature in Word?
To insert a signature in Microsoft Word, scan and insert a signature image into a new Word document and type your information beneath the signature. Then, select the signature block and go to Insert > Quick Parts > Save Selection to Quick Part Gallery. Name the signature > AutoText > OK.
Thanks for letting us know!
Get the Latest Tech News Delivered Every Day
Subscribe
Click the Display Language tab. Select the language that you want to use for the Ribbon, menus, and dialog boxes from the Display Microsoft Office menus and dialog boxes in list. Select the language that you want to use for Help from the Display Help in list.
Contents
- 1 How do I change the Language on Microsoft Word 2007?
- 2 How do I change the Language of my Word document?
- 3 How do I get the Language bar in Word 2007?
- 4 How do I change my Microsoft Office 2007 from French to English?
- 5 How can I use Hindi in MS Word?
- 6 How do you change the language back to English?
- 7 How do I permanently change the language in Word?
- 8 Why is my Microsoft Word in French?
- 9 What is the shortcut to change language on Microsoft Word 2007?
- 10 How do I show the language bar in Word?
- 11 Where is the language icon in Word?
- 12 How do I change the language in Outlook 2007?
- 13 How do I change word to UK English?
- 14 Where is settings in MS Word?
- 15 How can I convert English to Hindi in MS Word?
- 16 How can I type in Hindi in Windows 7?
- 17 How do I change my laptop language from Chinese to English Windows 7?
- 18 What is the Portuguese for language?
- 19 How can I change the language of Windows 10?
- 20 Why Does Word keep reverting to US English?
How do I change the Language on Microsoft Word 2007?
Click File > Options > Language. In the Set the Office Language Preferences dialog box, under Choose Display and Help Languages, choose the language that you want to use, and then select Set as Default.
How do I change the Language of my Word document?
Changing the Language Settings in Microsoft Word
- Go to the “Review” tab and find the “Language” section.
- Click on “Language” and select “Set Proofing Language…”
- Choose the language required in your document from the new window and click “OK”
How do I get the Language bar in Word 2007?
Go to the Quick Access Toolbar, click on the arrow on right and choose More Commands. That will open the QAT customize dialog. Change ‘Choose commands from …’ to All Commands then scroll down to the Language options. There are three called ‘Language’, we want the top one with the cursor/down arrow icon on the right.
How do I change my Microsoft Office 2007 from French to English?
Click the Display Language tab. Select the language that you want to use for the Ribbon, menus, and dialog boxes from the Display Microsoft Office menus and dialog boxes in list. Select the language that you want to use for Help from the Display Help in list.
How can I use Hindi in MS Word?
Step 1: Go to ‘time & language’ in settings. Step 2: Then, select the ‘language’ from the navigation menu. Step 3: Now, click on the ‘+ icon’. Step 4: Type the language name ‘Hindi’ in the search bar and add the preferred Indic language (by selecting into the search box and select it).
How do you change the language back to English?
Change the language on your Android device
- On your Android device, tap Settings .
- Tap System Languages & input. Languages. If you can’t find “System,” then under “Personal,” tap Languages & input Languages.
- Tap Add a language. and choose the language that you want to use.
- Drag your language to the top of the list.
How do I permanently change the language in Word?
If you’re wanting to change your proofing language permanently, here’s how you can change your default proofing language in word.
- Select ‘Review’ on the ribbon.
- Click ‘Language’
- Click ‘Set Proofing Language…’ and then choose the correct proofing language.
- Select ‘Set As Default’ and confirm.
Why is my Microsoft Word in French?
The AutoCorrect tab of the AutoCorrect dialog box displays the language as defined at the insertion point. Select the whole document and then click Review tab | Language | Set Proofing Language. In the Language dialog box, clear the “Detect language automatically” option.
What is the shortcut to change language on Microsoft Word 2007?
Keyboard shortcut: To switch between keyboard layouts, press Alt+Shift. icon is just an example; it shows that English is the language of the active keyboard layout. The actual icon shown on your computer depends on the language of the active keyboard layout and version of Windows.
How do I show the language bar in Word?
Open the Control Panel and go to the Region and Language applet. From the Keyboards and Languages tab click Change keyboards. In this new Text Services and Input Languages dialog, on the Language Bar tab, in the Language Bar section select Docked in taskbar or Floating On Desktop and click Apply.
Where is the language icon in Word?
From the Start menu, select Control Panel or Control. In the Control Panel, double-click the Regional and Language Options icon. Select the Keyboards and Languages tab. Select the desired language from the drop-down menu in the Display language section.
How do I change the language in Outlook 2007?
Step 1: Click the File > Options. Step 2: In the Outlook Options dialog box, click the Language in the left bar, and go to the Choose Display and Help Languages section, click to select a language from the Display Language box, and then click the Set as Default button below the box. Step 4: Click the OK button.
How do I change word to UK English?
Changing to UK English
- Choose Language from the Tools menu, then choose Set Language from the submenu. Word displays the Language dialog box.
- In the list of languages, select the one you want to use by default.
- Click on the Default button. You are asked to confirm you action.
- Close the Language dialog box.
Where is settings in MS Word?
When you open up Microsoft Word, you can find each one of its settings somewhere in the menu above the ribbon. Click on the File menu, then choose Options to bring up the many options necessary to alter Word’s features.
How can I convert English to Hindi in MS Word?
Translate a whole file in Word
- Select Review > Translate > Translate Document.
- Select your language to see the translation.
- Select Translate. A copy of the translated document will be opened in a separate window.
- Select OK in the original window to close translator.
How can I type in Hindi in Windows 7?
Go to Control Panel • Choose Region and Language • Click Keyboards & Languages tab > • For changing keyboards, click Change Keyboards >General>Add>Hindi Page 4 • Click on Add button and from the list, select Hindi(India) • Changing the keyboard back to English press Alt+Shift again.
How do I change my laptop language from Chinese to English Windows 7?
How to change the Windows 7 Display Language:
- Go to Start -> Control Panel -> Clock, Language, and Region / Change the display language.
- Switch the display language in the Choose a display language drop down menu.
- Click OK.
What is the Portuguese for language?
Portuguese
How can I change the language of Windows 10?
Change language settings
- Open Settings.
- Click on Time & Language.
- Click on Language.
- Under the “Preferred languages” section, click the Add a language button. Source: Windows Central.
- Search for the new language.
- Select the language package from the result.
- Click the Next button.
- Check the Install language pack option.
Why Does Word keep reverting to US English?
The language setting of text is defined separately from whatever version of Word you are running, or the language of the OS X. It’s just another attribute, like Bold, Size or Color. Choose your version of English. Make sure the bottom checkmark is absent.
Microsoft Word is one of the most popular and widely used programs for documentation purposes around the world. If you hail from a non-English speaking country, then you may want to use MS Word in your own language or any other language of your choice.
Sometimes, you may want to access accent marks or include special characters from a different language in your writing – this would require you to change the MS Word language itself. Fortunately, Microsoft Word allows you to change the editing language, proofing tools, and the user interface language (display language) and set a different display language while applying another language in editing and proofing documents.
In this article, we’ll show you how to change the display language as well as the editing and proofing language in Microsoft Word. Throughout the post, we’ll be using Microsoft 365 but most of the options are similar to the offline versions (2019, 2016, 2013, or 2010) and Office 365. So irrespective of the version you’re using, this article can surely help change or switch up the language(s) on your Microsoft Word.
Changing the Display and Help Languages
When you install Microsoft Office, it usually has English as its default language or the local/regional language of the location that powered the MS Word purchase. If you want to change this language(s) to any other, you would have to manually install it/them first.
A display language is the one that’s visible on all tabs, menus, buttons, preferences, dialog boxes and other controls on your Word application. If you want to use a different language instead of the default, follow these steps:
Open Microsoft Word and click the ‘File’ tab.
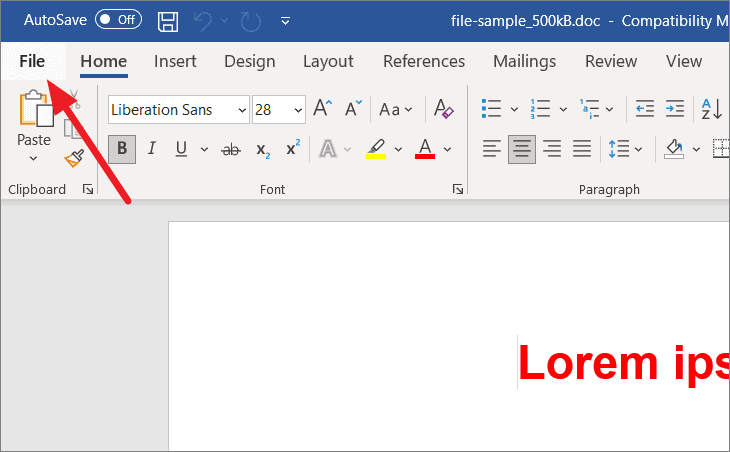
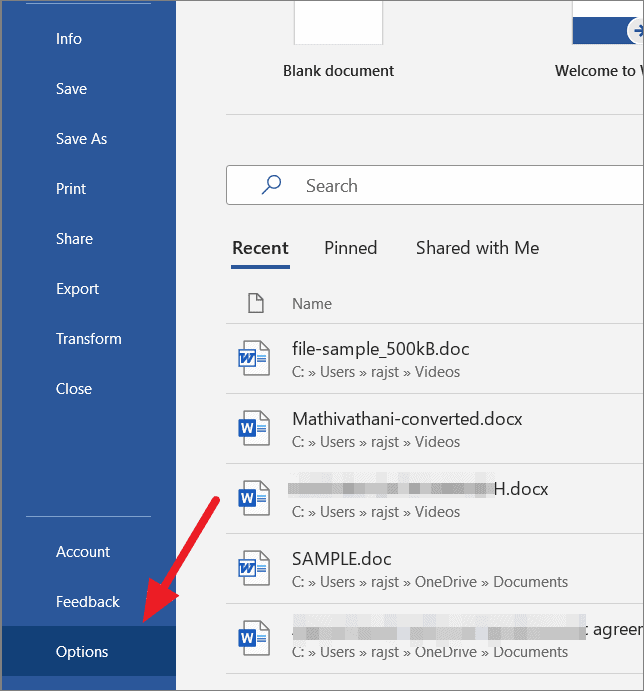
In the backstage view, click ‘Options’.
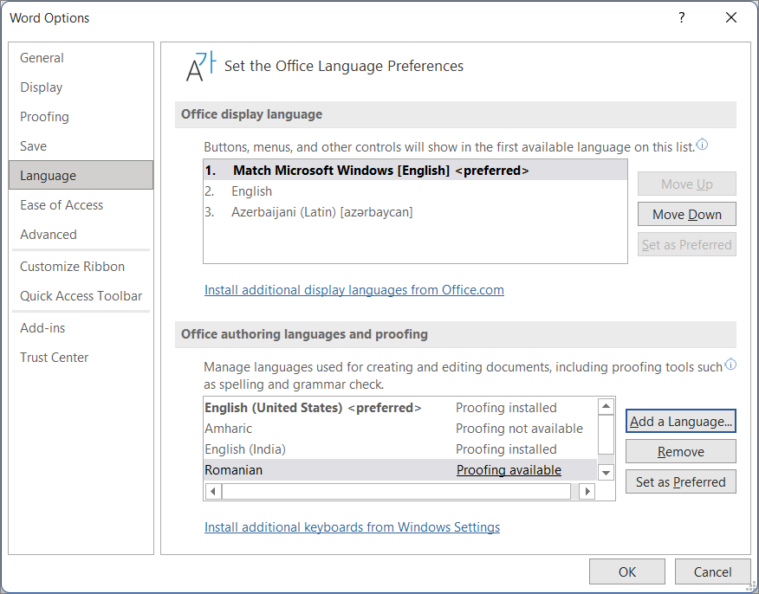
A Word Options dialog window will appear. Here, select the ‘Language’ tab. In the Language tab, you will see two sections – ‘Office display language’ and ‘Office authoring languages and proofing’.
If you are using Office 2019, 2016, 2013, or 2010, you will see ‘Choose Editing Languages’ and ‘Choose Display Languages’

‘Office display language’ or ‘Choose Display Languages’ section is where you can set the MS Word display (UI) language. You’ll see a list of installed languages under this section. If the language you’re looking for is not in the box, you would have to manually download and install that particular language pack.
Adding Language Packs on Office
If a specific language is not listed here, click the ‘Install additional display languages from Office.com’ link below the box (as shown below).
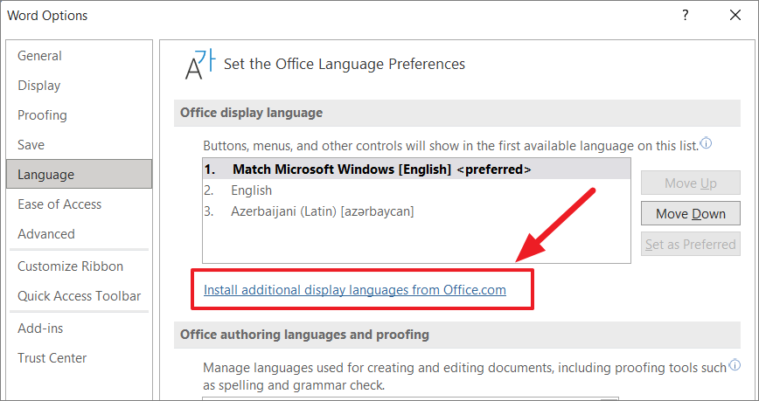
This will show you a ‘Install a display language’ dialog. Here, choose your language and click ‘Install’.
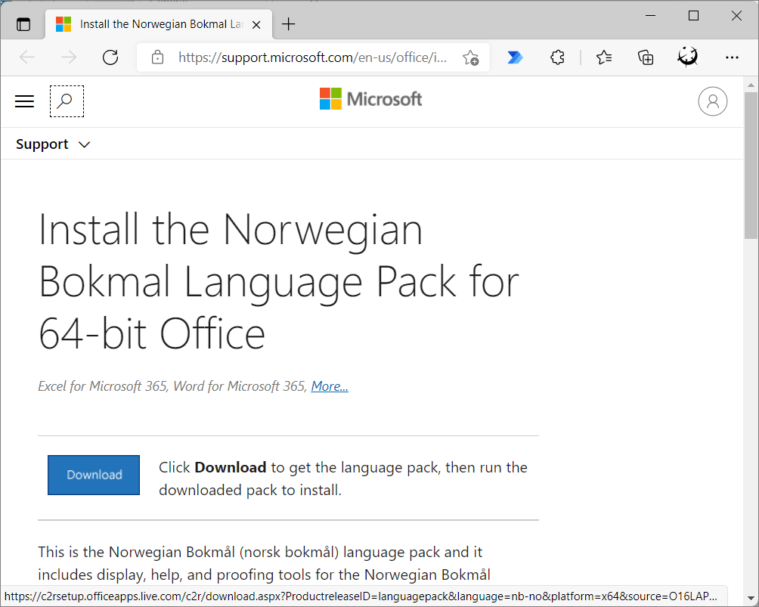
This will take you to the Microsoft website where you can download the language pack for the selected language as shown below. Here, click the ‘Download’ button.
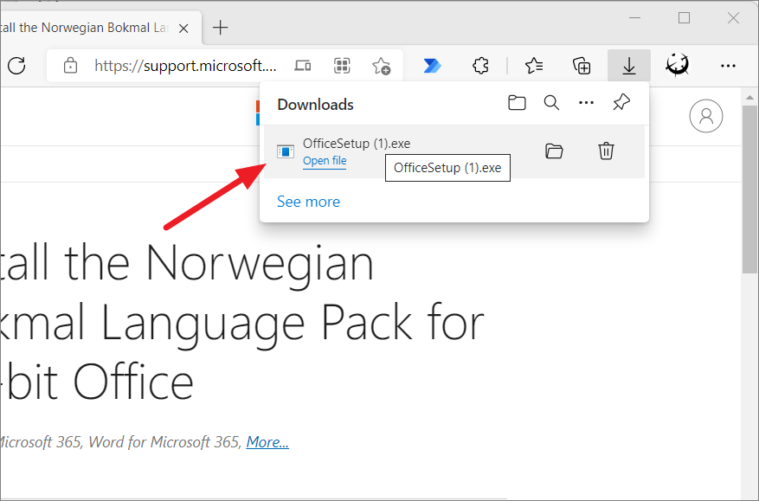
Run the downloaded setup file to install it.
Wait for the installation to complete, then close and re-launch Word. Sometimes, you may need to reboot your computer for smoother functioning.

Then, open the MS Word app again and go to File > Options > Language. As you can see, the ‘Office display language’ box lists the installed language. Now, select your desired language and click the ‘Set as Preferred’ or ‘Set as Default’ option (for Office 2019 and older versions).
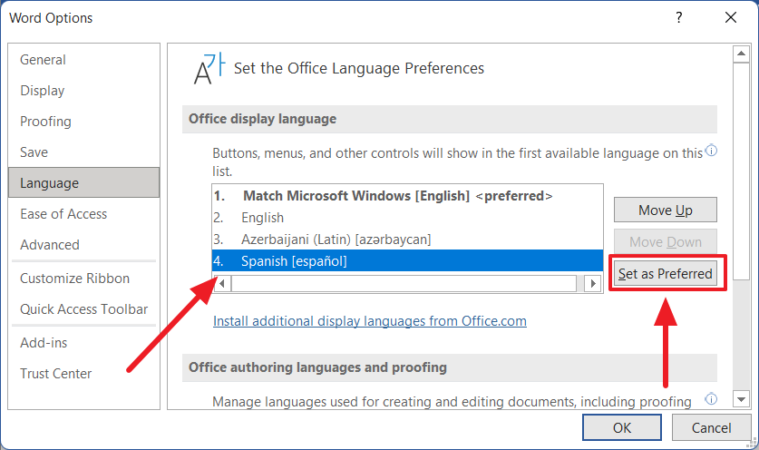
After you select the ‘Set as preferred’ or ‘Set as Default’ button, your selected language should show ‘<preferred>’ at the end as shown below. Then, click ‘OK’.
Adding Language Packs from Office Webpage
Alternatively, you can directly visit the MS Office’s Language pack for Office page, where you can download the language you wish to use. Microsoft Office offers over 100 additional language accessory packs which you can download and install for free.
Once you’re on Office’s language accessory pack webpage, scroll to see a section called ‘Step 1: Install the language accessory pack’. Under this section, select your Office version tab.
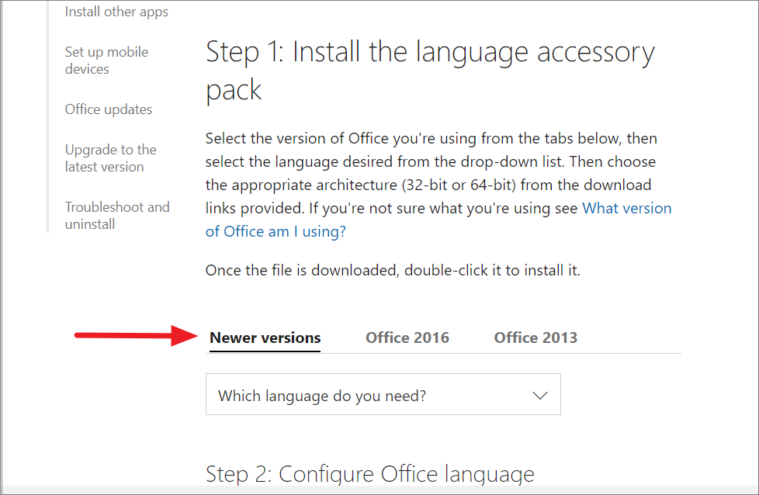
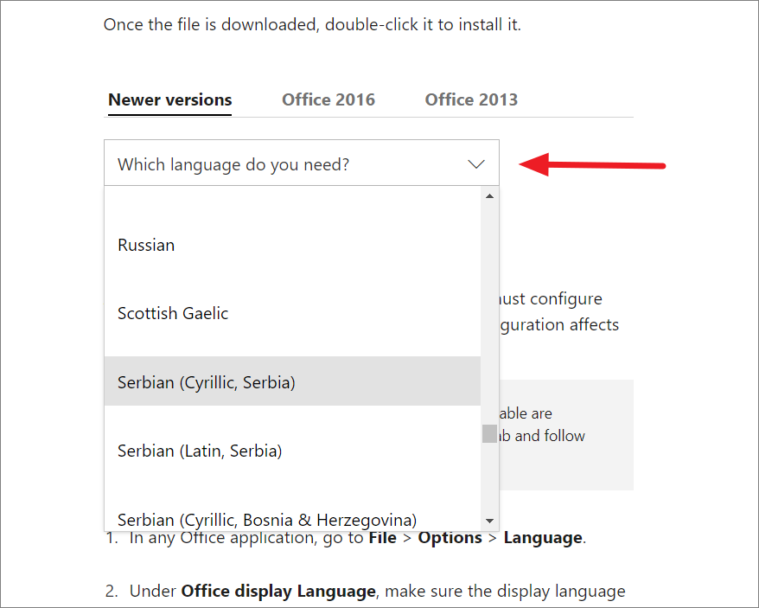
Then, choose your language from the ‘Which language do you need?’ drop-down.
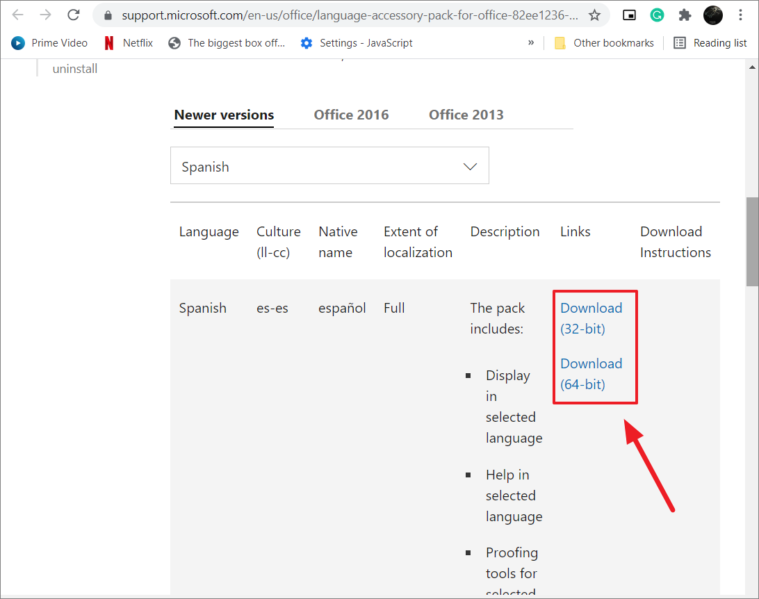
Once you select the language, you’ll notice the ’32-bit’ and ’64-bit’ download links. If your operating system is of 32-bit architecture, click ‘Download (32-bit)’. Or if your system uses 64-bit OS, then, select the ‘Download (64)’ bit.
After the file is downloaded, install the setup file, close, and re-open the Word app. Then, go to the Word Options menu, choose the language pack you installed under the ‘Office display language’ box and select ‘Set as Preferred or ‘Set as default’. Then, click ‘OK’.
Restart Word and you’ll see that the UI language is changed for MS Word.
Changing the Editing and Proofing Language
The editing/authoring language is the language in which you write and edit documents. This language also controls the text direction and arrangement for vertical, right-to-left, and mixed text. The Proofing tool checks for spelling and grammatical errors. If the editing/input and proofing language is already installed on your computer, you can easily change it. If not, you need to first manually install the language and then change it.
Open the Word application, click the ‘File’ tab and select ‘Options’ to open Word Options. You can also open the Word Options window by switching to the ‘Review’ tab in the Ribbon and clicking the ‘Language’ button and then selecting the ‘Language Preference’ option.
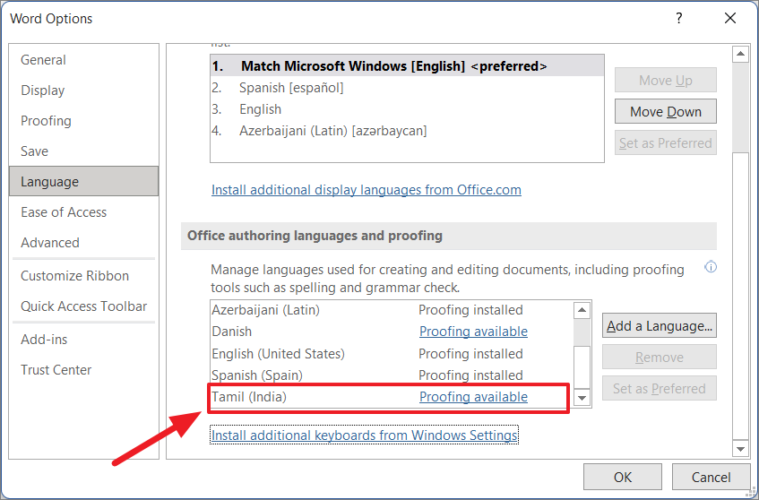
In the Word Options, select the ‘Language’ tab. You’ll see the ‘Office authoring languages and proofing’ or ‘Choose Editing language’ section where you can add and set the language for editing. When you install MS Word, the app will automatically be configured to use the default system language.
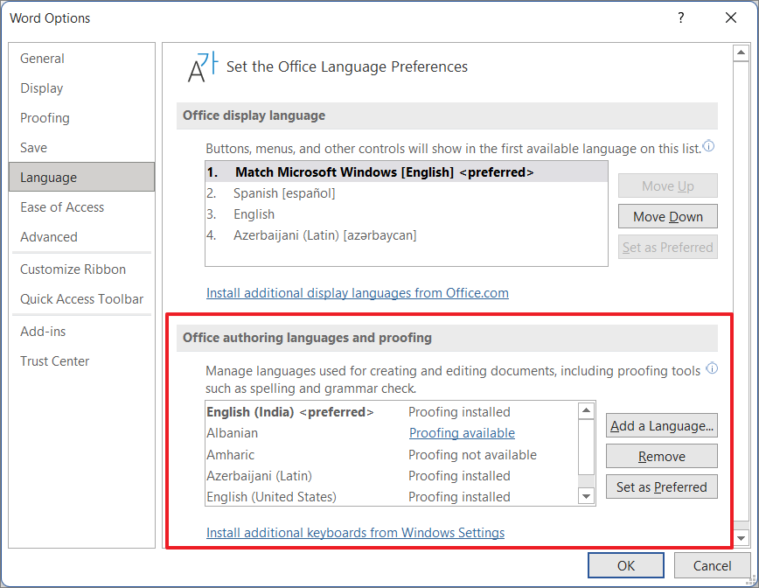
The ‘Office authoring languages and proofing’ box lists all installed system and Office languages. If the language you want to change is on the list, select the language and click ‘Set as Preferred’ or ‘Set as Default’.

Installing Additional Input Languages for Word
Follow these installation steps if a specific language is on the ‘Office authoring languages and proofing’ box.
To add an authoring language, click the ‘Add a Language..’ button.
Select the language you want to add and click ‘Add’.
Most of the time, even if you add the language, you still have to manually install the language or additional proofing tools on your Windows OS.
To install additional input/editing language on your computer, click the ‘Install additional keyboards from Windows Settings’ link below the Office authoring languages and proofing box.
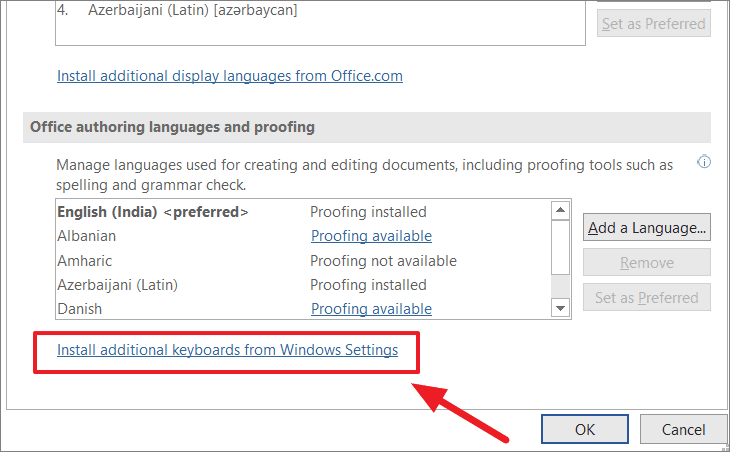
This will open the Windows Settings page where you can install languages on your system. Click the ‘Add a language’ button (if you have Windows 10 or 11).
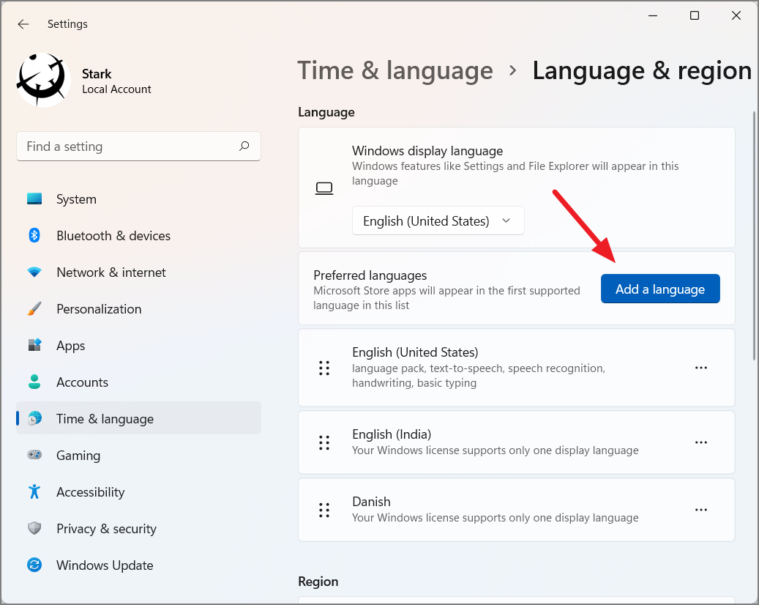
In the ‘Choose a language to install’ dialog box, choose a language and select ‘Next’.
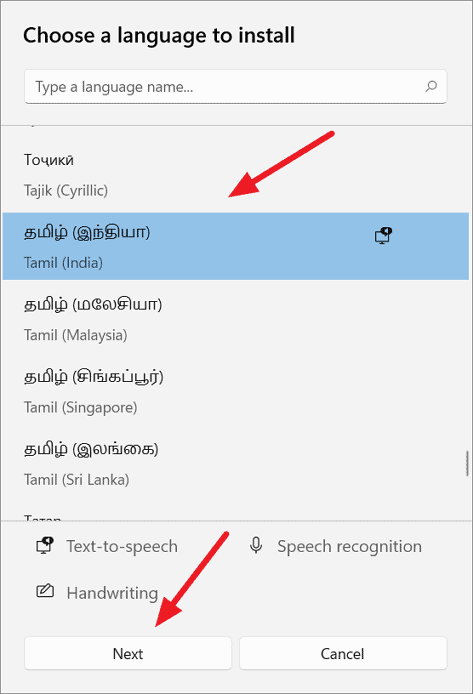
On the next page, select ‘Install’.

Once done, you’ll see the installed language in the list of languages.

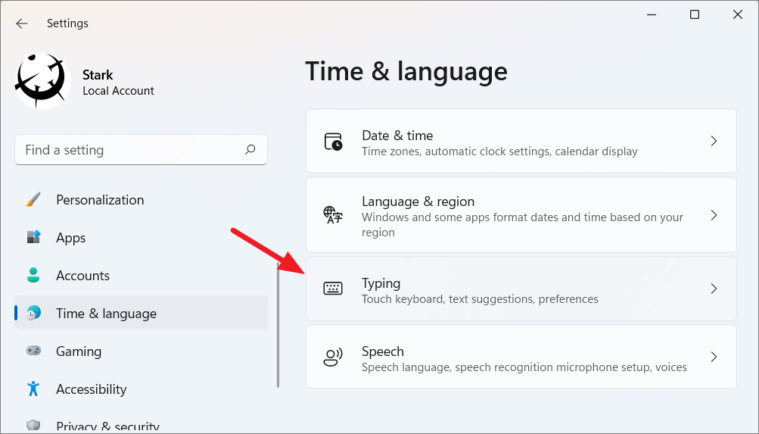
Usually, when you type on your computer, the system will use the default input language (first in this list) to input characters. So, you should change the input language to the recently installed language to actively use the latter. You can do this via the settings application or from the taskbar.
Via Settings App
To change the input keyboard layout, select the ‘Time & language’ settings, and click the ‘Typing’ option.
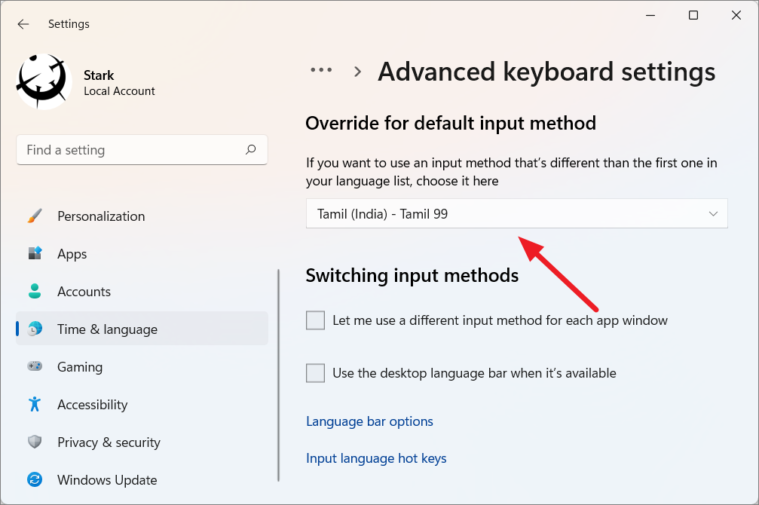
Then, select ‘Advanced keyboard settings’.

Now, choose your input method to use as a default.
Via Taskbar
OR, you can easily switch between the input method from the taskbar.
After you installed the language, go back to File > Options > Language. In the Word Options, you’ll notice the installed language in the ‘Office authoring and proofing language’ box.
To remove an editing language, first, select the language and then hit ‘Remove’.
Installing Proofing Tools
Sometimes, proofing tools may not be installed on Office even after installing the input language. If you’re using Microsoft 365, you would see three proofing tool statuses next to each language, namely – ‘Proofing available, Proofing not available, Proofing installed’. For other Office suites (like Office 2019, 2016, etc.), the status will be shown as ‘Enabled’ or ‘Not enabled’ under the Keyboard layout column.
‘Proofing not available’ means the proofing tools are not available for that particular language. ‘Proofing available’ suggests you download and install the language pack with proofing tools for that language. And ‘Proofing installed’ means the proofing tools are installed for that specific language and you are free to use them.
If Proofing tools are available but not installed, click the ‘Proofing available’ link next to the language you want to use to download the language pack.
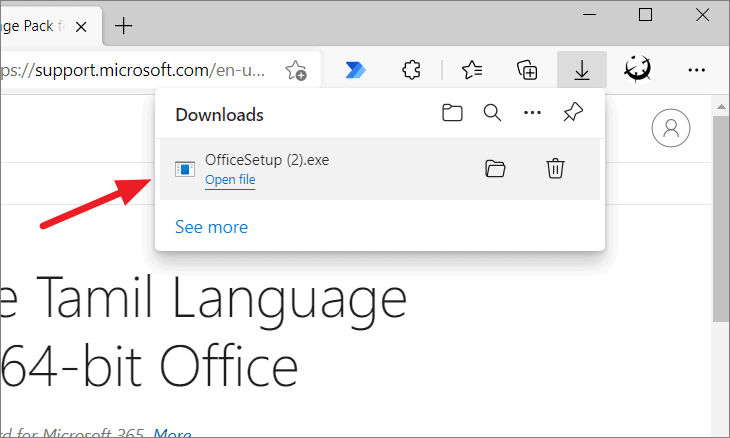
This will direct you to the Language pack download page on the Microsoft Office website. Here, click the ‘Download’ button.
After the download is complete, install the ‘OfficeSetup.exe’ file, wait for the installation to complete, then close and re-launch the Word app.
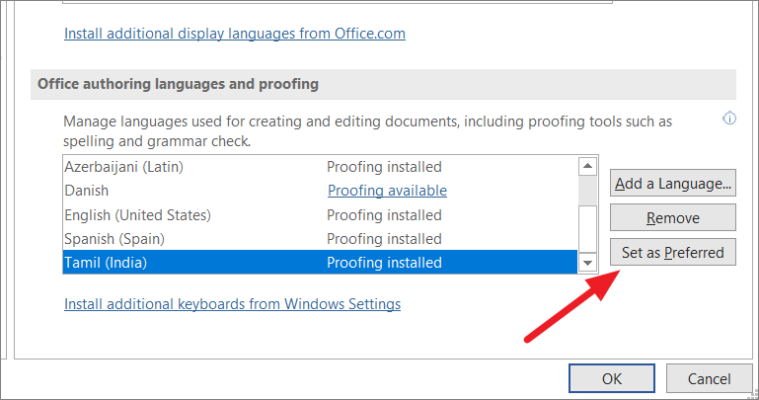
After re-launching the app, go to Word Options. You’ll now see ‘Proofing installed’ next to the chosen language. Now, select the language and click ‘Set as Preferred’.
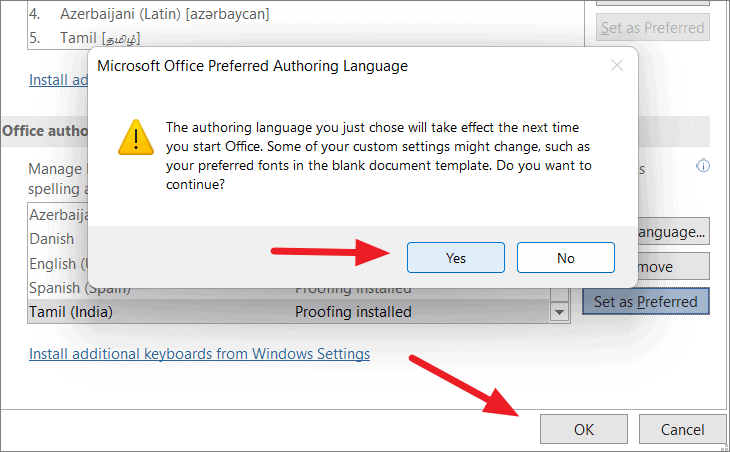
Word will show you a warning message to let you know that the authoring language you just chose will take effect the next time you launch Office. It also warns you of changes that may occur to custom settings (like your preferred default font). If you want to continue, click ‘Yes’. Then, click ‘OK’ to close the Word Options.
Now, restart your Microsoft Word, again, to change the editing and proofing language.
Once the Word editing language is changed, you would have to change your keyboard layout to type text in the changed language. Usually, the keyboard layout language matches the characters of a different language as the keys on your keyboard would automatically translate to the chosen different language on your screen. Essentially, the keyboard layout language controls and changes display characters when manually typed.
Switching Between Keyboard Layouts
When you install a new language on your OS, it comes with a keyboard for language-specific key layouts and input options. After you install more than one keyboard layout for different languages, you can easily switch between those keyboard languages using the language bar.
When you change/switch the keyboard language, the keyboard layout shifts to the keyboard for that particular language. For instance, if you are writing something in English and if you want to include content in a different language, you can quickly switch between keyboard layouts to write in different languages.
Here’s what you need to do to change the keyboard layout to a different language.
When you have more than one layout installed, the Language bar (language abbreviation) automatically appears in the ‘System Tray’ or ‘Notification Area’. To change the keyboard layout, click the language icon (ENG stands for English keyboard) and select the language you want to use from the list of available keyboards.
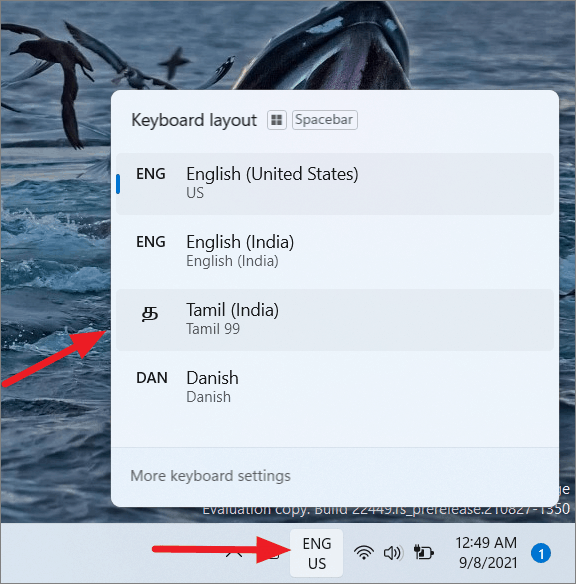
If you have Windows 10 or 11, you can press Windows+Spacebar to switch layouts. The language abbreviation represents the active keyboard layout of the system.
Now, you can easily write and edit Word documents using a different language.
Proofreading in Different Languages
MS Word also allows you to write or edit in one language and proofread text in another. To proofread in a different language, go to the ‘Review’ tab, select ‘Language’, and click the ‘Set Proofing Languages..’ option.
Then, select the language from the Language dialog box and click ‘OK’. Here, you also have options to ignore spelling/grammar errors, detect language automatically or set the default language.
For instance, if you want to include a word or phrase in a different language without showing grammatical errors, you should only change the proofing language for the particular word or phrase.
To do this, first, select the word or phrase, then go to the ‘Review’ tab, select ‘Language’ and click the ‘Set Proofing Languages..’ option. Then, choose a language from the list and click ‘OK’. Word will ignore spelling and grammar on the highlighted selection.
That’s it, folks! You can now easily change both the display and editing and proofreading languages on your MS Word to any language(s) of your choice.
Как поменять язык в Ворде
Методы изменения языка ввода текста в программе Ворд известны пользователям текстового редактора. Сочетания клавиш Ctrl+Alt или Shift+Alt используется в 90% используемых в мире ОС Windows, установленных на ПК. Изменение интерфейса программы Ворд – это другая усложненная задача. Эту задачу знают пользователи, которые установили на ПК программу Ворд, забыв поменять язык программы на родной. При установке пользователи не замечают меню выбора языка. Эта статья написана для того, чтобы справиться с описанным случаем, а также для тех пользователей, которым предстоит работать в Ворд на иностранном языке.
Изменение языка интерфейса в Word
В разных изданиях программы Ворд меню выбора языка интерфейса может отличаться. В программах от 2011-2017 года используется инструментарий, представленный в стартовом меню Ворд. В некоторых комплектациях программы, в подобное меню можно попасть через опцию «Файл» («File»).
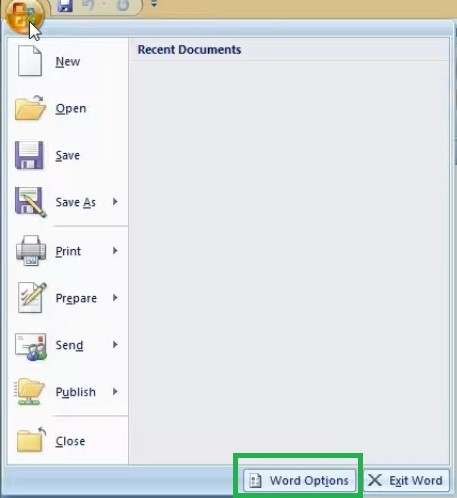
В нижней части меню расположена кнопка «Word Options». Нажмите на кнопку, чтобы открыть меню настроек программы.
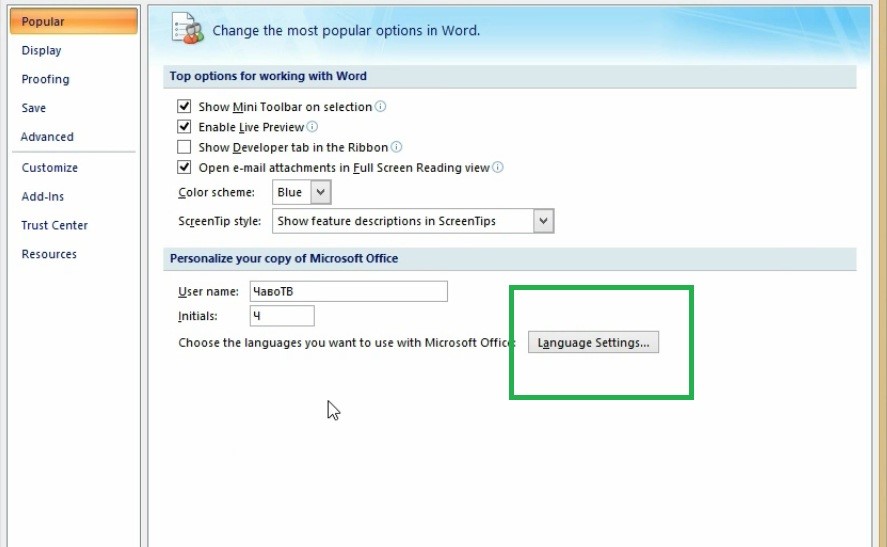
Программа откроет панель инструментов настроек. В «Основных настройках» расположена кнопка «Language settings». Нажмите на эту кнопку, чтобы открыть список доступных языков.
В открывшемся окне представлен функционал для настройки языка интерфейса и языков редактирования. Выбираем раздел Display language, а в опции «Display Microsoft office menus and dialog boxes in:» выбираем «Русский». Повторяем действие в разделе «Display help in».
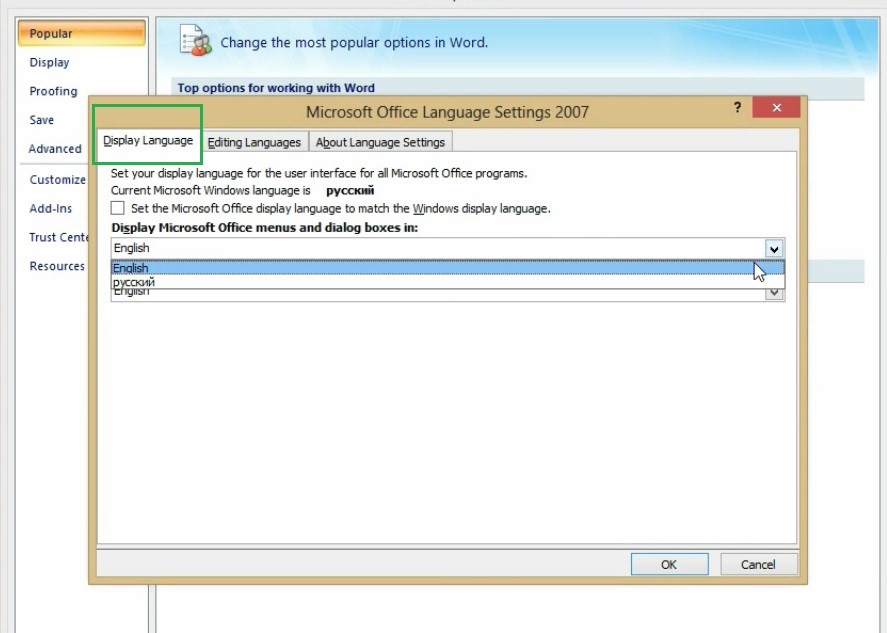
Нажав кнопку «Ок» пользователь возвращается в меню «Word options». В этом меню также нажимается кнопка «ОК».
Затем необходимо закрыть открытый файл и войти в программу снова. В программе поменялся язык интерфейса на русский.

Языковые пакеты в программе Ворд
Скачивание нелицензированных загрузочных файлов программы Ворд чревато отсутствием настройки «Display language» в меню «Word Options».
В таких случаях пользователь дополнительно скачивает языковые пакеты на компьютер и устанавливает их в файлы программы Word на диске С. Процедура осложняется, если сборка программных файлов произведена с ошибками.
Резюме
Пользователи лицензированных продуктов из серии Microsoft Office не испытают сложность при смене языка интерфейса программы Ворд. Имея лицензированный ключ активации, пользователь, может запросить установку языковой пакет с дополнительными настройками. Пакет будет установлен на ПК пользователя в фоновом режиме.
If you’ve been working in Word for a while, you may have noticed that sometimes a document set to your language reports spelling errors that it shouldn’t (e.g. I set my documents to English (Australia), but parts of the document may be set to English (US), and so the correct Australian spelling of words like ‘organisation’ may be flagged as errors).
Or perhaps when you do a spell check, you get a message saying that areas of your document were set to not check spelling.
What’s going on here?
Well, I don’t know the definitive answer. But I can tell you that there are NUMEROUS places where you can set language settings, both in Word, in Office, and in Windows. If Word finds a conflict in these settings, it does the best it can (no, I don’t know how it makes the decision about which setting to apply).
I’ll try to list as many as I know about — hopefully, these will help you troubleshoot language conflicts or strange spell check reports. (Note: Some of this information is repeated for the various versions of Windows, Office, and Word — I suspect those using Word 2010 and later won’t look at the Word 2003 information, so that’s why I’ve repeated it.)
Windows
- Start > Control Panel > Region and Language Options: Check the settings on all tabs and under all buttons in the dialog box. Make sure the selected location and language match. NOTE: Windows 10 has separate settings for Region and Language — check both.
- Start > Control Panel > Date and Time: Set your time zone. While not directly related to language, your time zone should match your location set in the Regional and Language Options (above), unless, of course, you use this computer when traveling.
Office 2003
- See: Set the default language: https://cybertext.wordpress.com/2009/03/11/office-2003-set-the-default-language/
Office 2007
- Start > All Programs > Microsoft Office > Microsoft Office Tools > Microsoft Office 2007 Language Settings: Set the Enabled editing languages AND your Primary editing language. (This dialog box can also be accessed from within Word Options.)
Office 2010
- Start > All Programs > Microsoft Office > Microsoft Office Tools > Microsoft Office 2010 Language Preferences: Choose the editing languages, set one as the default, and tell Windows which language to use for the interface elements such as buttons, tabs, Help, and tooltip text. (This dialog box can also be accessed from within Word’s Options, and from the Review tab — see below.)
Office 2016
- Start > Office 2016 Language Preferences: Choose the editing languages, set one as the default, and tell Windows which language to use for the interface elements such as buttons, tabs, Help, and tooltip text. (This dialog box can also be accessed from within Word’s Options, and from the Review tab — see below.)
Word 2003
- Tools > Language > Set Language: This supposedly sets the language for the entire document, but it can be overridden by settings at a more granular level, such as Styles. You can set the Default language here.
- Tools > Spelling and Grammar: Set the dictionary language here. Also, click Options on this dialog box, then click Settings to see what the grammar checker will check. If you think you’ve added something to the dictionary by mistake, click Options on the Spelling and Grammar dialog box, then Custom Dictionaries, then select the Dictionary Language you’re using and click Modify to edit the words stored in your custom dictionary.
- Tools > AutoCorrect Options: While not strictly related to language, if you see weird things happening like ‘ACN’ changing to ‘can’ (when you REALLY want ‘ACN’), it’s likely that there’s an AutoCorrect set up to make that change automatically. Check the list at the bottom of the AutoCorrect tab and delete any you don’t want.
- Styles: There’s an option to set the language for EVERY style! By default, no language is set. But if you think a setting on a style may be the issue, check the style (Format > Styles and Formatting). Right-click on the style and select Modify. On the Modify Style dialog box, click Format > Language to see what language — if any — is set for that particular style. Don’t forget that some styles inherit properties from other styles, so the language may not be set on the style you’re looking at. Also, if Do not check spelling or grammar is set for a particular style, that explains why some sections of your document may be skipped when you run the spell checker.
Word 2007
- Review tab > Proofing group > Set Language: This supposedly sets the language for the entire document, but it can be overridden by settings at a more granular level, such as Styles. You can set the Default language here.
- Office button > Word Options > Popular > Language Settings: Set the Enabled editing languages AND your Primary editing language. (Same dialog box as mentioned under Office 2007 above)
- Office button > Word Options > Proofing > AutoCorrect Options: While not strictly related to language, if you see weird things happening like ‘ACN’ changing to ‘can’ (when you REALLY want ‘ACN’), it’s likely that there’s an AutoCorrect set up to make that change automatically. Check the list at the bottom of the AutoCorrect tab and delete any you don’t want.
- Office button > Word Options > Proofing > Custom Dictionaries: If you think you’ve added something to the dictionary by mistake, click this button, then select the Dictionary Language you’re using and click Edit word list to edit the words stored in your custom dictionary. You set the Dictionary Language here too.
- Styles: There’s an option to set the language for EVERY style! By default, no language is set. But if you think a setting on a style may be the issue, check the style. Display the Styles pane, right-click on the style and select Modify. On the Modify Style dialog box, click Format > Language to see what language — if any — is set for that particular style. Don’t forget that some styles inherit properties from other styles, so the language may not be set on the style you’re looking at. Also, if Do not check spelling or grammar is set for a particular style, that explains why some sections of your document may be skipped when you run the spell checker.
Word 2010, Word 2013, Word 2016
- Review tab > Language group > Language > Set Proofing Language: This supposedly sets the language for the entire document, but it can be overridden by settings at a more granular level, such as Styles. You can set the Default language here.
- File > Options > Language: (Same dialog box as mentioned under Office 2010 above; also accessible via Review tab > Language group > Language > Language Preferences. )
- File > Options > Proofing > AutoCorrect Options: While not strictly related to language, if you see weird things happening like ‘ACN’ changing to ‘can’ (when you REALLY want ‘ACN’), it’s likely that there’s an AutoCorrect set up to make that change automatically. Check the list at the bottom of the AutoCorrect tab and delete any you don’t want.
- File > Options > Proofing > Custom Dictionaries: If you think you’ve added something to the dictionary by mistake, click this button, then select the Dictionary Language you’re using and click Edit word list to edit the words stored in your custom dictionary. You set the Dictionary Language here too.
- Styles: There’s an option to set the language for EVERY style! By default, no language is set. But if you think a setting on a style may be the issue, check the style. Display the Styles pane, right-click on the style and select Modify. On the Modify Style dialog box, click Format > Language to see what language — if any — is set for that particular style. Don’t forget that some styles inherit properties from other styles, so the language may not be set on the style you’re looking at. Also, if Do not check spelling or grammar is set for a particular style, that explains why some sections of your document may be skipped when you run the spell checker. (Update September 2018: I now have a macro to set the language for ALL styles at once: https://cybertext.wordpress.com/2018/09/21/word-macro-to-set-the-language-for-all-styles/)
See also:
- PowerPoint 2007: Set the language for all text: https://cybertext.wordpress.com/2009/12/30/powerpoint-2007-set-language-for-all-text/
- http://wordribbon.tips.net/Pages/T008715_Foreign_Language_Changes_while_Typing.html
- http://wordribbon.tips.net/Pages/T005938_Specifying_a_Language_for_Text.html
- http://wordribbon.tips.net/Pages/T008135_Ensuring_that_Spell_Checking_is_Enabled_in_All_Styles.html
- http://wordribbon.tips.net/Pages/T006278_Getting_SpellCheck_to_Work.html
- http://wordribbon.tips.net/Pages/T006026_What_to_Do_if_Spell_Check_Doesnt_Catch_Misspelled_Words.html
[Links last checked October 2017; updated to include information for Word 2010-2016, Windows 7 and Windows 10 (October 2017)]
Yes, obviously. Just select the text and press the language button in the status bar

If your document has been written in multiple languages then things are trickier.
- If different keyboard layouts were used for typing them, but the layout doesn’t match the language name then you may use VBA to fix that.
- If you’ve typed them with the same layout (like English and French with the French layout) then sometimes Word is able to guess the language. It does have a language detection feature as you can see in the Language dialog above, but it can only detect languages in the list you specify. Notice the part highlighted by me:
Detect language automatically
In 2010, 2013, and 2016 versions of Word and Outlook
- Open a new document or email message.
- On the Review tab, in the Language group, click Language.
- Click Set Proofing Language.
- In the Language dialog box, select the Detect language automatically check box.
- Review the languages shown above the double line in the Mark selected text as list. Office can detect only those languages listed above the double line. If the languages that you use are not shown above the double line, you must enable the editing language (turn on the language-specific options) so that Office can automatically detect them.
Turn on automatic language detection
However the «Detect language automatically» feature often fails to work when you switch language during typing, or when you paste text in another language. So unfortunately you’ll still have to use some VBA to change the language. You can call some external service or use the built-in language detection feature, but with finer tuning to make the result more desireable
See also
- Specifying a Language for Text
- Check spelling and grammar in a different language
- Change spelling check language for a Document in Microsoft Word 2010