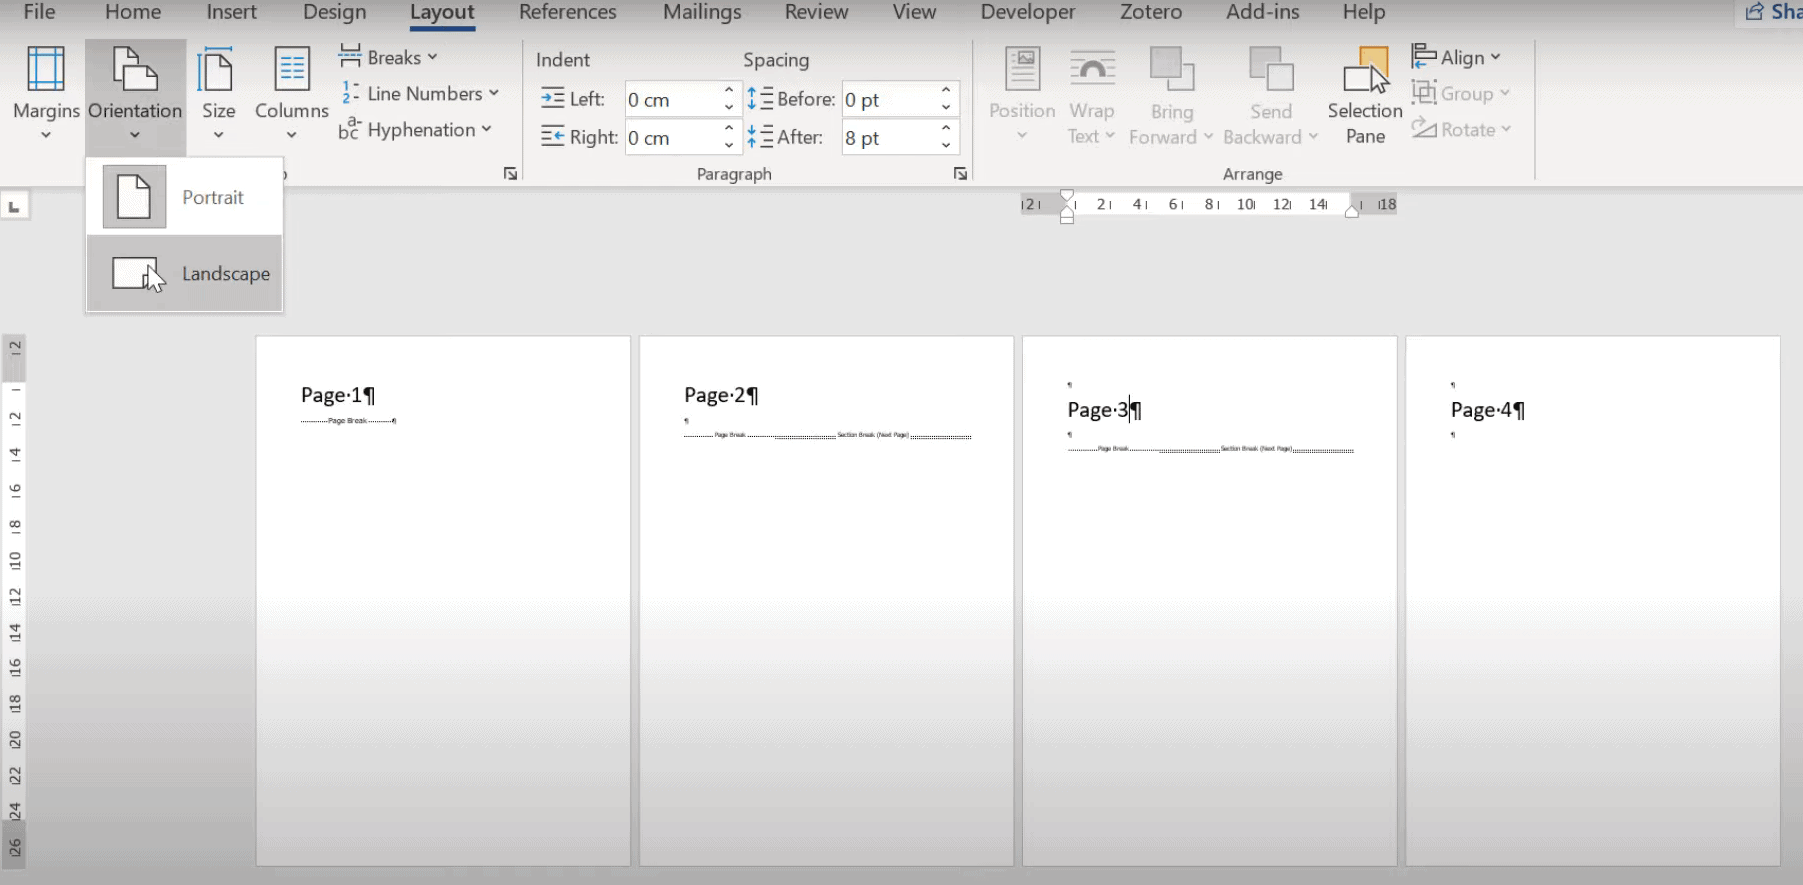
See how to use both landscape and portrait orientation in the same document.
Use different orientations in the same document
There may be times when you want certain pages or sections of your document to have a different orientation from the rest of it. Note that Word puts selected text on its own page, and the surrounding text on separate pages.
-
Select the pages or paragraphs whose orientation you want to change.
-
Click PAGE LAYOUT > Page Setup dialog box launcher.
-
In the Page Setup box, under Orientation, click Portrait or Landscape.
-
Click the Apply to box, and click Selected text.
Note: Word automatically inserts section breaks before and after the text that has the new page orientation. If your document is already divided into sections, you can click in a section (or select multiple sections), and then change the orientation for only the sections that you select. Read about how to find out where the section breaks are in documents.
Where are the section breaks in a document?
When you add section breaks in your document, the easiest way to see where they begin and end is to first display all formatting marks.
-
Click HOME > Show/Hide.
-
The section breaks that you have added will start and end with Section Break (Continuous). There are other kinds of section breaks and will be labeled as such.
Want more?
Add section breaks
Add different page numbers or number formats to different sections
Video: Headers and footers
Let’s say we are working on a long document that looks great in portrait orientation, except for a few pages that have big tables.
Well, rather than choose between nice-looking text and readable tables, we can have it both ways.
Right-click the Table Selection icon, and choose Table Properties.
On the Table tab, under Text wrapping, make sure None is selected, and click OK.
Next, go to the PAGE LAYOUT tab, and in the Page Setup group, click the dialog box launcher.
Go to it if you want to get into all the details of Page Setup in one place.
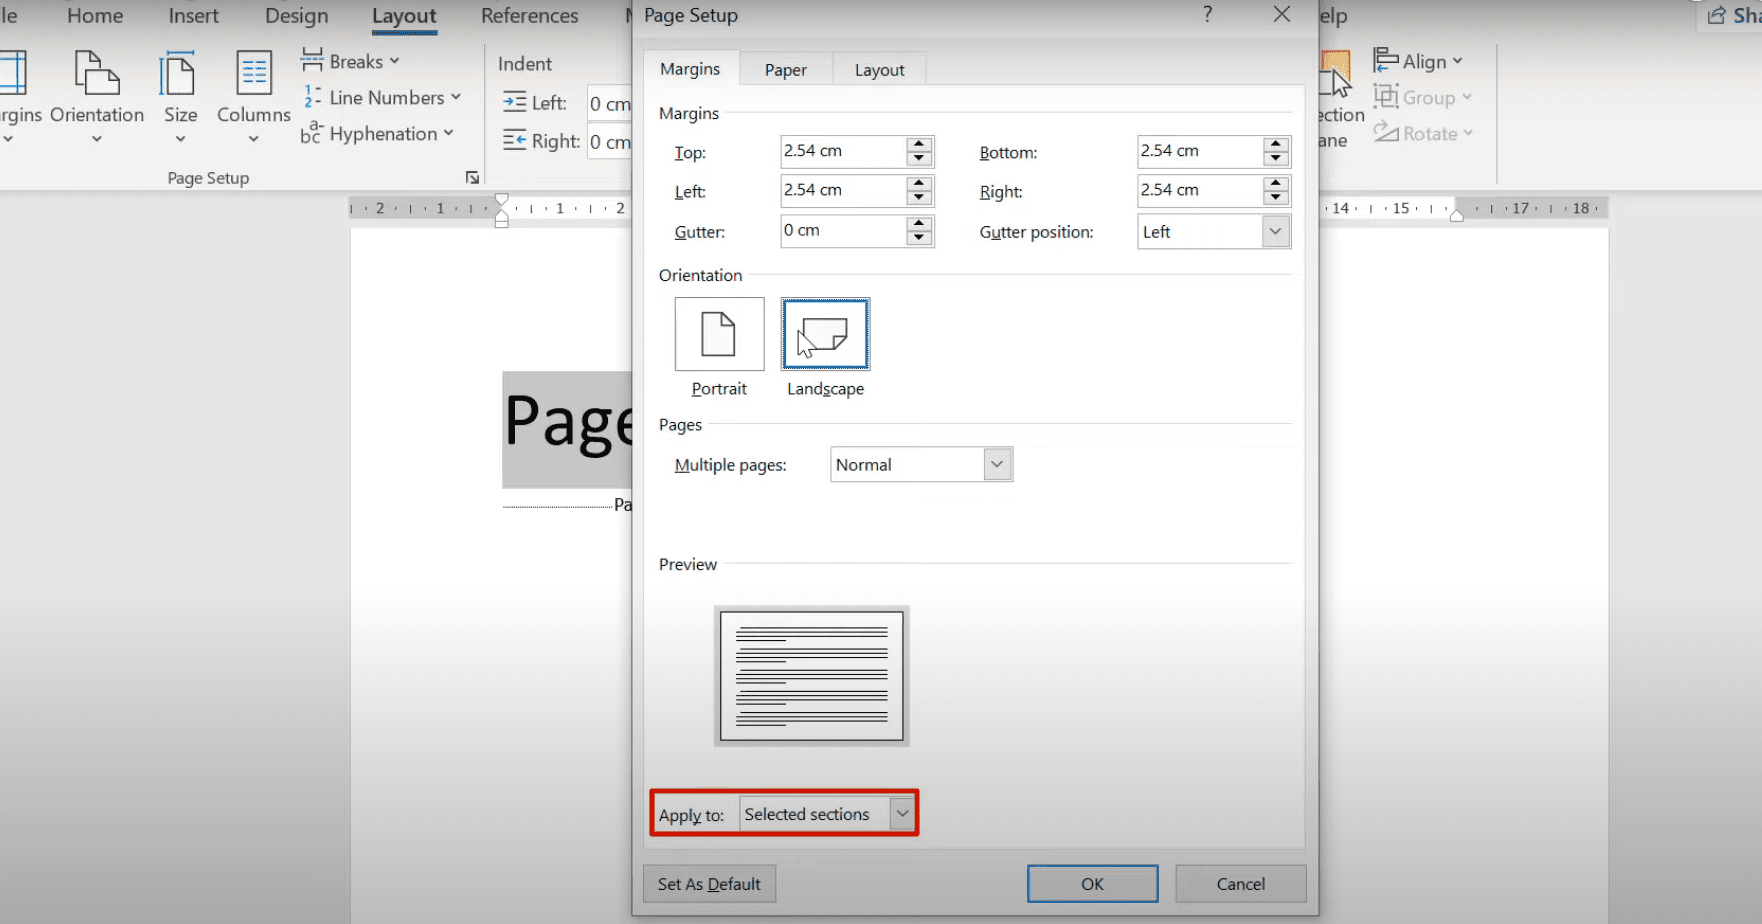
Margins, Paper, Layout, all right here. On the Margins tab, under Orientation, click Landscape.
Then, go down here and click the arrow next to Apply to, and choose Selected text.
Now the only thing that will change to landscape is the selected text. Click OK.
The table is now in landscape orientation on its own page, and when we scroll to another page, you can see that the rest of the document is still in portrait orientation.
Now we can go back to the table and adjust the column widths to stretch the table out to fit nicely on the page.
So, what exactly is going on here? First, go to the VIEW tab and let’s click Multiple Pages.
Now you can see the landscape page in the same view with the portrait pages.
Next, go to the HOME tab, and click Show/Hide Paragraph Marks.
And there’s the secret to mixing portrait and landscape in one document – Section Break (Next Page). I’ll zoom back a bit.
When we applied landscape to just the selected text, Word added section breaks before and after the table.
This placed the table in its own section, on a page by itself. Then, Word was able to change just that page to landscape.
By the way, section breaks also allow you to change the margins on the landscape pages without affecting the rest of the document.
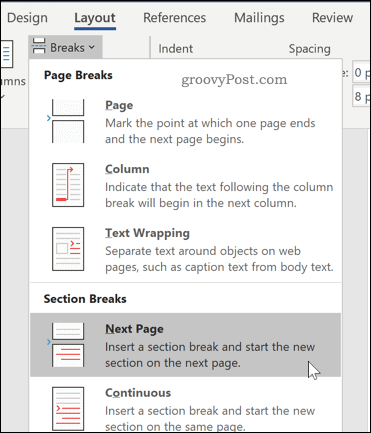
You can add the same type of section break manually, whenever you want to change the layout or formatting of a page or pages, by going to the PAGE LAYOUT tab and clicking Breaks. Then, go down to Section Breaks and click Next Page.
After you use multiple page orientations and margins to create the frames for your document, you can think about the best way to lay out your content within the frames.
Check out the next video in this course, Design considerations for orientation.
If you’re creating a Word document with multiple page layouts, you may wish to make a single page landscape. Here’s how.
Photo Credit — iStockPhoto
When you’re creating Word documents, you have two-page layout options available—landscape or portrait. Portrait mode is the default option, but you can switch to landscape mode instead if you want your text sideways.
If you want to use both types of layouts in Word, you’ll need to use a few workarounds using section breaks and Word’s own page formatting options to do so. Here’s how.
If you want to quickly make one page landscape in Word, here’s what you’ll need to do:
- Open your Word document and place the blinking cursor at the start of the page you wish to change to landscape mode.
- Click on the Layout menu in the ribbon bar.
- Select Breaks > Next Page in the Section Breaks section. This will insert a section break and push your text onto a new page.
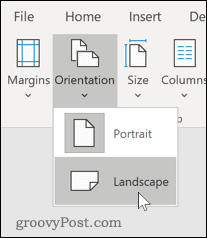
- In the Layout menu, press Orientation > Landscape. This will switch the current page and all the following pages to landscape mode.
- You’ll now need to turn the remaining pages back to portrait mode. Scroll down to the next page, then place the blinking cursor at the start of the page.
- Press Layout > Breaks > Next Page to insert a new section break.
- Click on Orientation > Portrait to switch the pages to portrait mode.
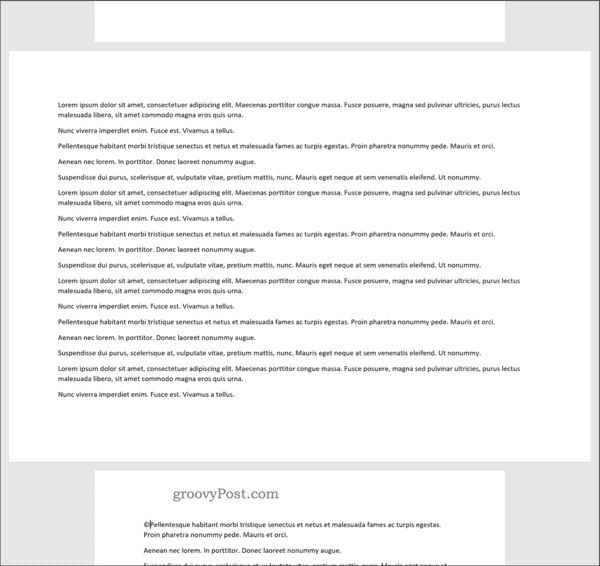
If you followed the steps correctly, you should now have one single landscape page, with all other pages remaining in portrait mode.
How to Make Specific Text Landscape in Word
If you don’t want all of the text on your page to appear on the landscape page, you can choose to make a landscape page that only contains specific text.
- To do this, start by highlighting the text that you want to appear on the landscape page.
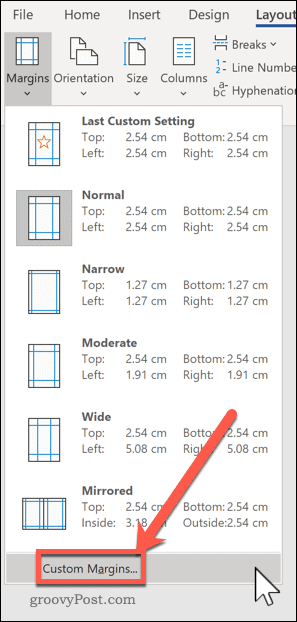
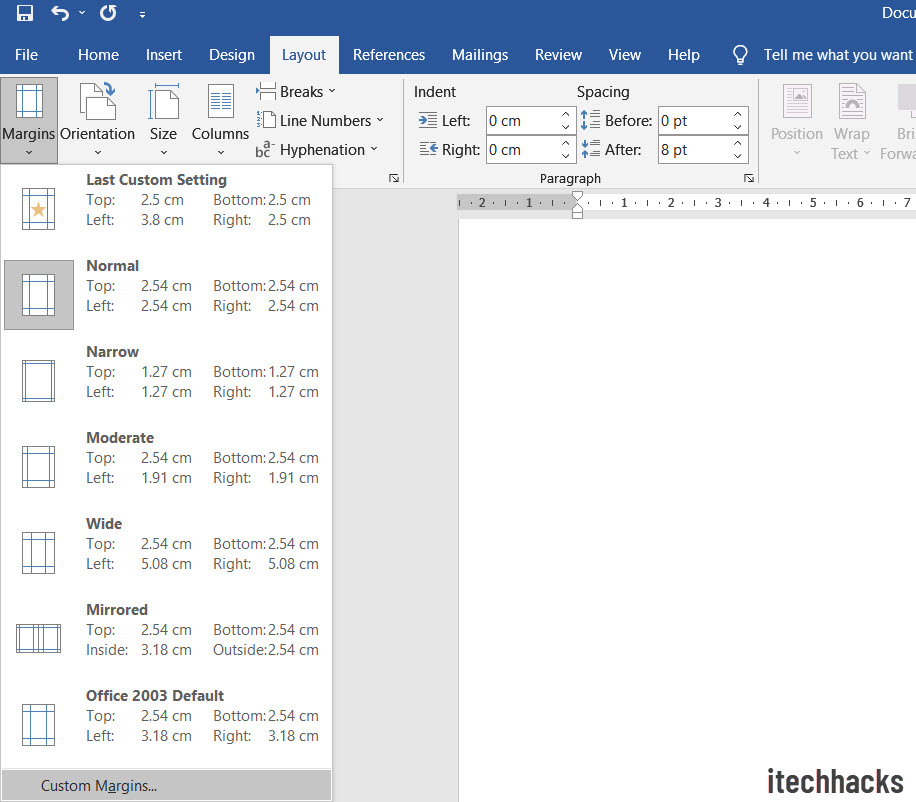
- In the Layout menu, click on Margins, then select the Custom Margins… option at the bottom of the drop-down menu.
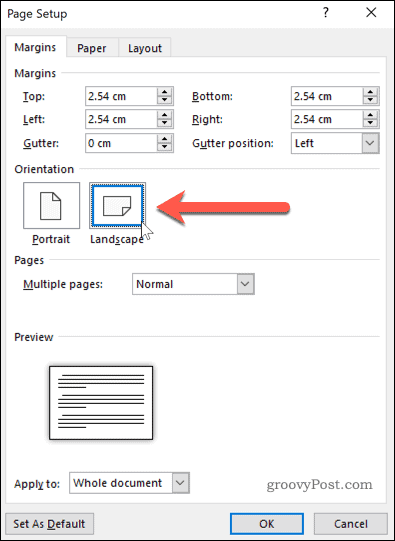
- In the Page Setup window, click on the Landscape option in the Margins tab, under the Orientation section.
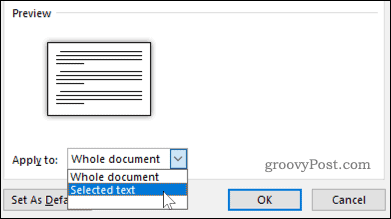
- In the Apply to box, choose Selected Text.
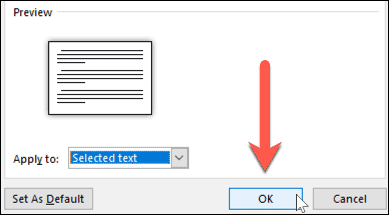
- Click OK to confirm the settings you’ve selected.
You should now have a landscape page that contains the text you previously highlighted, creating a section break that uses a different page layout to the rest of your Word document.
You can use this method to turn an entire page landscape—to do this, select all of the text on the page before you start and repeat the steps above to complete the change.
Formatting Microsoft Word Documents
Now that you know how to make a single page landscape in Word, you can start creating documents with as many combinations of landscape and portrait pages as you want. This is where learning how to rearrange pages in Word might just come in handy.
If you’re looking for other ways to take your Word documents further, why not learn how to insert an Excel table into Word. For academic documents, you may wish to create a table of contents in Word to keep your document organized.
Answer:Select the Page Layout tab in the toolbar at the top of the screen. Then in the Page Setup group, click on the Orientation button. Select Landscape from the popup menu. Now your Word document should be formatted as landscape.
Contents
- 1 How do I type in landscape mode in Word?
- 2 How do you change from portrait to landscape in Word?
- 3 How do I insert border in Word?
- 4 What is landscape layout?
- 5 How do I make one page landscape in Word 2013?
- 6 How do you put a decorative border around text in Word?
- 7 How do I put a border around a paragraph in Word?
- 8 How do I make a single page in a document landscape?
- 9 Is there a way to change the orientation of just one page in Word?
- 10 Can I mix portrait and landscape in Word?
- 11 How do you change the page to landscape on Microsoft Word Mac?
- 12 How do I make a page landscape in Word Mac?
- 13 How do I turn on landscape mode?
- 14 What is landscape mode in Microsoft document?
- 15 How do I make one page landscape in Word 2021?
- 16 How do I fix the layout of a Word document?
- 17 How do I turn a text box into a frame?
- 18 Can you put a border around a text box?
- 19 How do I Colour a box around text in Word?
- 20 How do you add a border and shading in Word?
Change page orientation to landscape or portrait
- To change the orientation of the whole document, select Layout > Orientation.
- Choose Portrait or Landscape.
How do you change from portrait to landscape in Word?
Use different orientations in the same document
- Select the pages or paragraphs whose orientation you want to change.
- Click PAGE LAYOUT > Page Setup dialog box launcher.
- In the Page Setup box, under Orientation, click Portrait or Landscape.
- Click the Apply to box, and click Selected text.
How do I insert border in Word?
Add a border to a page
- Go to Design > Page Borders.
- Make selections for how you want the border to look.
- To adjust the distance between the border and the edge of the page, select Options. Make your changes and select OK.
- Select OK.
What is landscape layout?
A landscape layout uses scaled dimensions to help determine where you should place all outdoor elements, from flowers, plants, and grass to furniture, hardscape areas, and water features.
How do I make one page landscape in Word 2013?
Click the Page Layout Launcher button on the Page Layout tab in the Page Setup group. Click Portrait or Landscape on the Margins tab in the Orientation section. Select Selected Text in the Apply To drop-down list. Click the OK button.
How do you put a decorative border around text in Word?
Go to Home > Borders, and then open the menu of border choices.
Add a border to selected text
- Select a word, line, or paragraph.
- On the Home tab, click the arrow next to the Borders button.
- In the Borders gallery, click the border style that you want to apply.
How do I put a border around a paragraph in Word?
To add borders to your paragraph, follow these steps:
- Position the insertion point in the paragraph to which you want the border added.
- Display the Home tab of the ribbon.
- Click the down-arrow next to the Borders tool, in the Paragraph group.
- Choose Borders and Shading.
- Make sure the Borders tab is selected.
How do I make a single page in a document landscape?
How to Make Just One Page Landscape in Google Docs
- In your browser, open Google Docs. Select the type of document you wish to create.
- In the menu above the document page, click “File”.
- From the dropdown menu, select “Page setup”.
- Choose the page orientation by ticking the checkbox beside “Landscape”.
- Click “OK” to save.
Is there a way to change the orientation of just one page in Word?
1: Select the entire page that you want to change the orientation, then click Page Layout> Margins and select Custom Margins. 2: In the Page Setup window, select the orientation you need in Oriention section, and choose Selected text in Apply to. Click OK.
Can I mix portrait and landscape in Word?
Normally, pages in a Word document have either a portrait or a landscape orientation. You might think that you can’t mix and match these two orientations in the same document, but you can indeed have both–here’s how.Select Layout > Breaks > Next Page to place a section break where you had your cursor.
How do you change the page to landscape on Microsoft Word Mac?
Answer:Select the Layout tab in the toolbar at the top of the screen. Then in the Page Setup group, click on the Orientation button. Select Landscape from the popup menu. Now your Word document should be formatted as landscape.
How do I make a page landscape in Word Mac?
To start a new page, from the Insert tab, select Page Break. In the Page Layout tab, from the Margins drop-down menu, select Custom Margins…. In the Page Setup window, click the Margins tab. Under “Orientation”, change the page orientation to the desired setting (Portrait or Landscape).
How do I turn on landscape mode?
1 Swipe down the screen to access your Quick Settings and tap on Auto Rotate, Portrait or Landscape to change your screen rotation settings. 2 By selecting Auto Rotate,you will easily be able to switch between Portrait and Landscape mode. 3 If you choose Portrait this will lock the screen from rotating to landscape.
What is landscape mode in Microsoft document?
When referring to printing, landscape mode is a horizontal orientation of a document or image. Landscape mode is commonly used to print charts, wider images, and text that may not fit properly if the page is oriented in portrait mode (vertically).
How do I make one page landscape in Word 2021?
How to Make One Page Landscape in Word
- Open your Word document and place the blinking cursor at the start of the page you wish to change to landscape mode.
- Click on the Layout menu in the ribbon bar.
- Select Breaks > Next Page in the Section Breaks section.
- In the Layout menu, press Orientation > Landscape.
How do I fix the layout of a Word document?
Change the default layout
- Open the template or a document based on the template whose default settings you want to change.
- On the Format menu, click Document, and then click the Layout tab.
- Make any changes that you want, and then click Default.
How do I turn a text box into a frame?
Converting a Text Box to a Frame
- Right-click on the text box. Word displays a Context menu.
- Choose the Format Text Box from the Context menu. Word displays the Format Text Box dialog box.
- Click on the Text Box tab. (See Figure 1.)
- Click on Convert to Frame.
- Click on OK.
Can you put a border around a text box?
Add a custom border
Right-click the text box, AutoShape, picture, or object that you want to add the border to. Select the appropriate Format
Download Article
An easy-to-follow guide on changing the direction of text in Microsoft Word
Download Article
- Rotating Text
- Making Text Vertical
- Mirroring Text
- Changing Paper Orientation
|
|
|
Do you want to type vertically in word? You can create vertical text by creating a textbox and adjusting its settings to set the position. You can change the text’s direction, rotate it, and mirror it. You could also change the document’s orientation from portrait to landscape mode. This wikiHow will show you how to write vertically in word on your Windows or Mac computer.
Things You Should Know
- Create a textbox with your text. Click «Shape Format» → «Text Direction» → «Rotate all text 90°».
- To make text vertical, drag the right-center circle of your textbox towards the left.
- To mirror text, right-click the textbox, then «Format Shape». Click «Effects», then input «180» into the X or Y Rotation field.
-
1
-
2
Create a textbox. To do this, click the Insert tab in the top toolbar, then click the Text Box icon in the Text section. You can select Simple Text Box from the presets.
Advertisement
-
3
Insert your text. Input the text you want to edit. You can copy and paste from another program into Microsoft Word.
- Make sure the textbox is still selected.
-
4
Click Shape Format. You can find this at the top toolbar, next to Help. Alternatively, double-click the edge of the textbox to be quickly redirected.
-
5
Click Text Direction. This will be in the Text section.
- A drop-down menu will open.
-
6
Select Rotate all text 90°. You can also select Rotate all text 270° if you want the top of the words to face the left side.
- Your text will be rotated.
- You can continue to edit your text in the textbox. The words will type in the direction set.
Advertisement
-
1
Open a project in Microsoft Word. This looks like a W on top of a blue square. Microsoft Word is available to install for Windows and Mac.
- You must have a subscription to use Office 365.
-
2
Create a textbox. To do this, click the Insert tab in the top toolbar, then click the Text Box icon in the Text section. You can select Simple Text Box from the presets.
-
3
Insert your text. Input the text you want to edit. You can copy and paste from another program into Microsoft Word.
- Make sure the textbox is still selected.
-
4
Click and drag the center circle on the right towards the left. With the textbox selected, you’ll see four circles at each point of the text box and one circle between each corner. Use the middle circle on the left side.
- As you drag the text box towards the left, it will become smaller. The text inside will adjust to fit the size of the box in vertical format.
- Make sure not to drag past the point of the left line. This could result in the words returning to their normal positions.
-
5
Remove the textbox lines (optional). If you want to remove the lines around the text, double-click the textbox to return to the Shape Format tab.
- Click Shape Outline, then select No Outline from the drop-down menu.
- The textbox lines will be hidden. Be sure to save your document if you need to return to it later.
Advertisement
-
1
Open a project in Microsoft Word. This looks like a W on top of a blue square. Microsoft Word is available to install for Windows and Mac.
- You must have a subscription to use Office 365.
-
2
Create a text box. To do this, click the Insert tab in the top toolbar, then click the Text Box icon in the Text section. You can select Simple Text Box from the presets.
-
3
Insert your text. Input the text you want to edit. You can copy and paste from another program into Microsoft Word.
- Make sure the textbox is still selected.
-
4
Right-click the textbox. A drop-down menu will open.
-
5
Click Format Shape…. This will be at the very bottom of the menu.
- A panel will open on the right side.
- If you don’t see this option, make sure the textbox is selected, not the text.
-
6
Click the «Effects» icon. This looks like a pentagon, next to the paint bucket icon.
-
7
Enter 180 in the X or Y field. If you want your text to be mirrored left-right, enter 180 into the X Rotation field. If you want your text to be mirrored up-down, enter 180 into the Y Rotation field.
- The changes will take effect immediately.
-
8
Remove the textbox lines (optional). If you want to remove the lines around the text, double-click the textbox to return to the Shape Format tab.
- Click Shape Outline, then select No Outline from the drop-down menu.
- The textbox lines will be hidden. You can print your document if needed.
Advertisement
-
1
Open a project in Microsoft Word. This looks like a W on top of a blue square. Microsoft Word is available to install for Windows and Mac.
- You must have a subscription to use Office 365.
- Use this method if you want to change your paper orientation from portrait to landscape.
-
2
Click Layout. This will be in the top toolbar, between Design and References.
-
3
Click Orientation. You can find this at the top, next to Margins.
- A drop-down menu will open.
-
4
Click Landscape. Your Microsoft Word document will change to landscape orientation.
- If you change back to portrait mode after inputting text, the text will follow the portrait mode orientation. It will not save in its landscape position.
Advertisement
Ask a Question
200 characters left
Include your email address to get a message when this question is answered.
Submit
Advertisement
Thanks for submitting a tip for review!
About This Article
Article SummaryX
1. Click Insert.
2. Click Text.
3. Click Text Box.
4. Click Draw Text Box.
5. Click and drag a text box.
6. Type text into the box.
7. Hover the mouse over the box outline.
8. Click the rotation icon and drag in any direction.
Did this summary help you?
Thanks to all authors for creating a page that has been read 1,279,262 times.
Is this article up to date?
Have you ever been putting together an essay or report and wanted to include a large image? Maybe a nice graph or chart? The answer is to put it on a page in landscape, or horizontal, layout. So you try that, but then all the pages go to landscape.
Here’s the fastest, easiest way to make one page landscape in Word.

Also, feel free to check out the video we posted to our YouTube channel below, where we walk you through the same steps as in this article, just with an accent!
HOW TO MAKE A SINGLE PAGE LANDSCAPE: In Word
The Point & Click Way To Make One Page Landscape In Word

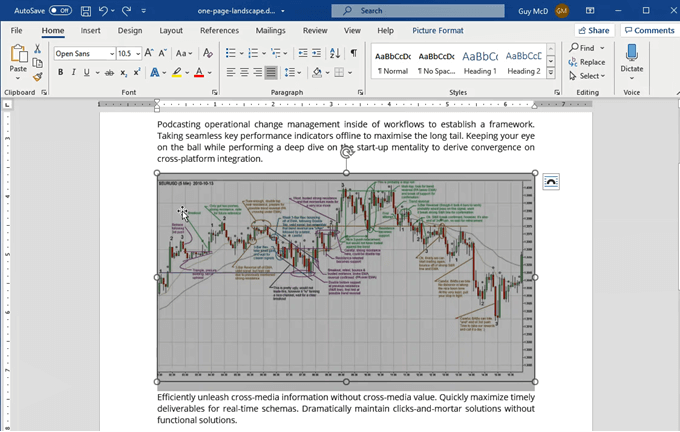
- Select the image or text that we want to be on a landscape-oriented page.
- Click on the Layout tab.

- Click on the down arrow under the Margins button.
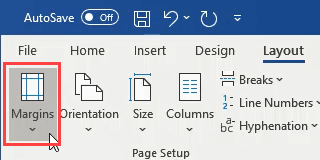
- Click on Custom Margins…
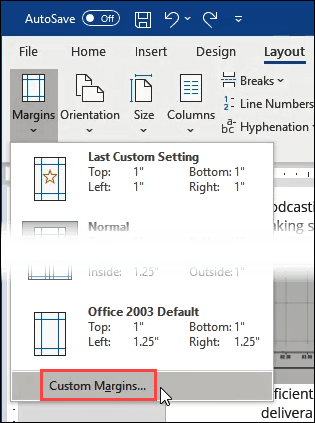
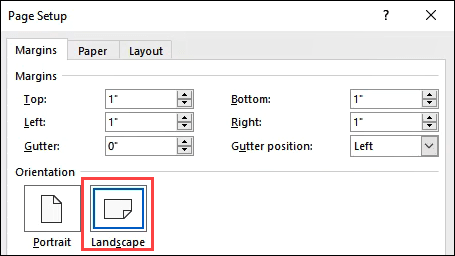
- In the middle of the Page Setup window, click on the Landscape button.
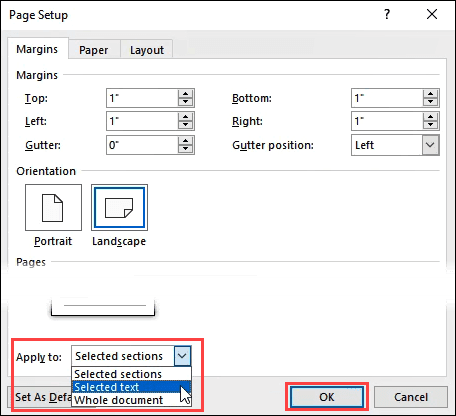
- At the bottom of the Page Setup window, in the Apply to: select box, change it to Selected Text. Click OK.
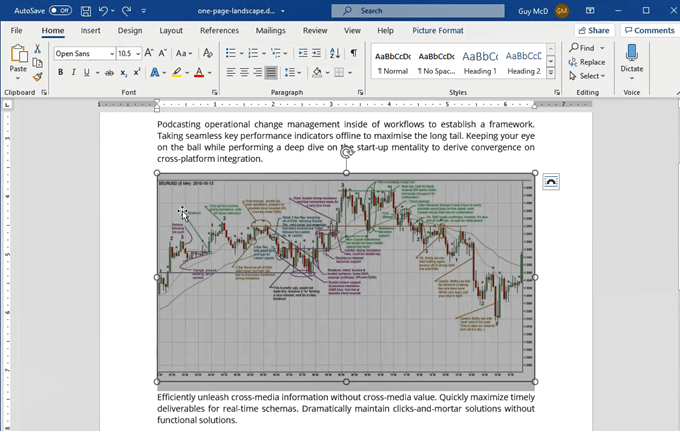
The selected image or text will now be on its own landscape-oriented page. Resize the chart for the best fit and we have a beautiful report.

As simple as that is, it can be done more quickly using keyboard shortcuts. Let’s go through how to use keyboard shortcuts to make the one-page landscape in Word.
The Fastest Way To Make One Page Landscape In Word
How much faster is this method? I timed myself using the point-and-click method and the shortcut keys-only method. Once I had practiced the shortcut keys a few times, it took less than 30 seconds, whereas the point-and-click method took closer to a minute.
Using shortcut keys to do your most frequent tasks not only saves time, but it can also save your health. Much peoples wrist pain from work is caused by using the mouse. The other added bonus is you’ll look like a superstar at work. You’ll be doing things in seconds when others take minutes.
Even though it may look like there’s more work, it’s just broken down to be very precise. A lot of people have never used shortcut keys in this way and we don’t want them getting frustrated and giving up because we missed anything.
- Select the image or text that we want to be on a landscape-oriented page.
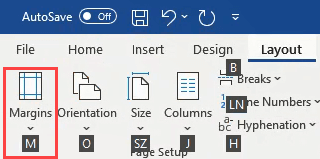
- Press the Alt key then press P to take us from the Home tab to the Layout tab.

- Press the M key to open the Margins button dropdown.
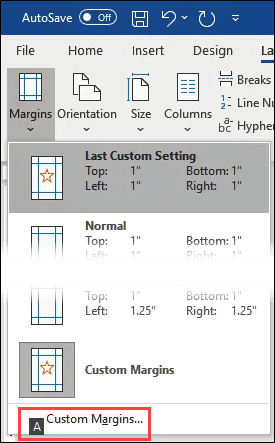
- Press the A key to choose the Custom Margins… and open the Page Setup window.
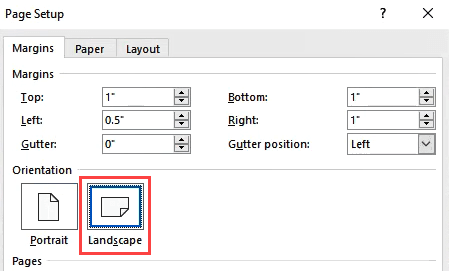
- Press Alt + S to choose Landscape orientation.
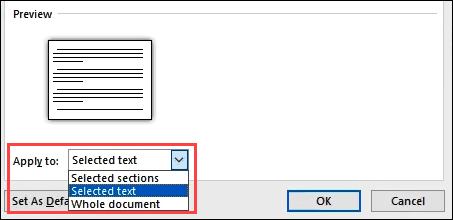
- Press Alt + Y to choose the Apply to: field, then tap the down arrow key once to choose Selected Text. Tap the Enter key once to set Selected Text as the choice, then tap Enter again to apply the setting.
The Page Setup window will close and the text or image will now be on a landscape layout page.

If you like how much faster the shortcut keys were, take a look at our other articles showing the magic of shortcut keys. You’ll wonder how you survived without these top 10 keyboard shortcuts for Windows 10. If you wish there was a shortcut for something, you also might be able to create custom keyboard shortcut for it in Windows 10.
Got some great shortcuts to share? Or questions about other ways to do tough things in Office or Windows? Pop it in the comments below. We’re all here to learn.
When producing Word documents, you can choose between two-page layouts: landscape or portrait. The default setting is portrait mode, but you can Make A Single Page Landscape In Word if you want your text to be sideways.
You’ll need to employ a few workarounds in Word to use both types of layouts, including section breaks and Word’s own page formatting choices.

When creating a Word document, you usually want it to be a landscape or portrait. However, there are occasions when you need a single-page landscape to display a picture. It’s not as simple as you may think. As I’ll demonstrate how to construct a one-page landscape in Word using a few methods.
- How To Make One Page Landscape In Word
- Make Specific Text Landscape In Word
- Formatting Microsoft Word Documents
- Print MS Word Document In Landscape
1. How To Make One Page Landscape In Word
When making rapid adjustments to your document display, you can switch one page of the entire file from portrait to landscape mode. This usually happens when you have to show tabular or graphical data. It only takes a few clicks if you use the appropriate settings on the MS Word software interface.
- On your PC, MAC, or smartphone, open the Microsoft Word application.
- To make changes, open your Word document. Place your cursor at the top of the page you want to transform to landscape mode.
- Locate and click the Layout menu on the Ribbon bar.

- This will bring up a selection of options; pick Breaks and scroll down the drop-down menu to Section Breaks, then click Next Page.

- Your page’s content would be transferred to a new page automatically.
- On the Layout menu, click the Orientation symbol. A drop-down selection will display, then select Landscape.
- This will quickly mark all the pages after the split you made and transform them to landscape so that the document will be shown in landscape from the beginning of the page you indicated to the end.
- You must return to portrait orientation to return the remaining pages following the single page.
- Select “Layout” > “Breaks” > “Next Page” with your pointer at the start of the next page or the next page.
- Select “Layout” > “Orientation” > “Portrait” from the drop-down menu. The rest of the document would be resized to fit in portrait orientation.

- Check if you can make a single-page landscape in word.
2. To Make Specific Text Landscape In Word
When editing a Word document, you may want to make only a piece of the text shown in landscape mode. This could be for various reasons, such as the necessity to present a specific quote, table, or graph.
The simplest way to generate and manage paperless documents on a large scale.
The following are the procedures for changing the text orientation in your Word document to landscape:
- Open a Word document with the document you want to format. Then, with your mouse, select the portion of the text you want to show on a landscape page.
- Select the Layout menu from the taskbar, then Margins. Select the Custom Margins option from a drop-down menu at the bottom of the list.

- The Page Setup will be displayed in a pop-up window on the screen. Locate the Orientation option under the Margins tab and select Landscape.
- Select Selected Text from the Apply to box by moving your cursor down to it.
- Click OK to complete the process. Your selected text should now be shown on a landscape page, with the remainder of your document remaining in portrait mode
- Check if you can make a single page landscape in word.
3. Formatting Microsoft Word Documents
In MS Word, how can I change the document’s orientation to landscape? You can change the orientation of your entire MS Word document in two ways. Here’s how to change the page orientation of a complete MS Word document:
- On your PC or MAC, open the Microsoft Word program. Then, open the document that has to be formatted.
- Select Layout from the taskbar above. Then locate and click on the Orientation option below; a drop-down selection will appear; select Portrait.

- Check if you can make a single page landscape in word.
Another option for changing the entire MS Word document’s orientation to landscape is to:
- On the Layout taskbar, select the Margins option.
- At the bottom of the list, look for the Custom Margins option.
- The Page Setup window will appear on the screen; locate the Orientation option under the Margins tab, and then click on Landscape.

- Underneath the Apply to option, move your cursor to the Apply to option. A drop-down menu will appear; select Whole Document from the menu.
- Click OK to save your document’s modifications.
- Check if you can make a single page landscape in word.
4. How To Print MS Word Document In Landscape
If you forget to convert the page orientation of your complete document to landscape while making final edits, you can do so now.
In your file tab’s Print option, you can change the page layout with a few clicks.
- To print a Microsoft Word document in landscape mode, follow these steps:
- Locate the File option on your Windows menu bar. It will lead you to a new screen.
- Select Print from the menu on the left side of the screen.

- The print settings and page setup would be displayed on the screen for reading and formatting.
- Locate the Portrait Orientation under Settings; an arrow will appear next to it, revealing a drop-down choice with Landscape Orientation; click on it.

- Changes to Landscape could be made to the entire document or individual pages. To complete it, click Print.
- Check if you can make a single page landscape in word.
Conclusion
Assume you’re working on a word document when you stumble upon an intriguing situation. You have multiple pages, but you only want to change one of them to landscape mode.
Although it may appear a simple task, it entails page breaks, section breaks, and orientation adjustments. To make this an easy task, I’ve produced a short and to-the-point article to guide you through the procedure. I will go over how to construct landscape-oriented pages from a bunch of them.
FAQs
Can You Make Just One Page Landscape In Word?
Click the arrow in the bottom right of the Page Setup area of the ribbon on the Layout tab. The Page Setup dialog box appears. Make sure you’re on the Margin tab. Select “Landscape” from the Orientation drop-down menu. Then, select “Selected Text” from the Apply To drop-down box at the bottom. “OK” should be selected.
How Do I Make One Page Portrait And Another Landscape In Word?
Choose the pages or paragraphs you want to change the orientation of. Launch the Page Setup dialog box by clicking PAGE LAYOUT > Page Setup. Click Portrait or Landscape under Orientation in the Page Setup box. Select Selected text from the Apply to box.
Can You Change The Page Orientation For One Page In Word?
Change the orientation of the pages or paragraphs you want to change. Launch the Page Setup dialog box by selecting PAGE LAYOUT > Page Setup. Click Portrait or Landscape in the Page Setup box’s Orientation field. Then select Selected text from the Apply to box.
How Do You Make Only One Page In A Word Document Landscape?
To access the Page Setup part of the ribbon, go to the Layout tab and click the arrow in the bottom right corner. The Page Setup dialog box appears once you click this. Verify that the Margins tab is selected. Choose “Landscape” under Orientation. Then, select “Selected Text” from the Apply To drop-down box at the bottom of the page. “OK” must be selected.
Microsoft Word is the go-to document editor for Windows users. If you use a Windows PC, you might use the Microsoft Office suite for all the document-related work. When you create a new document in Word, the page’s orientation is automatically set to portrait.
The portrait orientation of the page is best for text editing, but when it comes to adding images or graphs to the Word document, Landscape mode is what most people consider.
So now, how can you make just a one-page landscape in Word? Well, that’s not much of a difficult task to do. In this article, we will be discussing the step-by-step process of making a one-page landscape in Word.
When working with text, you can always go for portrait orientation, but if you have to add images and graphs, you will have to go for landscape orientation. To make only one-page landscape in Word, follow the steps given below-
- Open the Word document which you are working on. Once you open the MS Word document, place the cursor at the beginning of the page where you want to make the Landscape.
- After placing the cursor at the beginning of the page, click on the Layout option in the ribbon bar.
- Next, click on the Breaks option, and then click on the Next Page option in the Sections Page section.
- Now, click on the Orientation option in the Layout menu and click on the Landscape. This will turn the current page and all the pages before it to landscape mode.
- Next, you must turn all the remaining pages to the portrait orientation. To do so, scroll to the next page and place the cursor at its beginning.
- Again click on the Layout option in the Ribbon menu.
- Click on Breaks and then click on Next Page.
- After doing so, click on orientation and then click on Portrait.
- Doing so will switch the orientation of the other pages to portrait.
Make Specific Text Landscape In Word
If you want to make a specific text landscape in Word, you can also do that. To do so, follow the steps given below-
- Open the Word Document and highlight the text you want to make Landscape.
- Head to Layouts, and click on Margins.
- Next, click on Custom Margins at the bottom of the menu.
- In the Page Setup window, click on the Landscape option under the Orientation section in the Margins section.
- Click on the drop-down menu next to the Apply to box, and click the option for Selected Text.
- Click on OK to confirm changes.
- This will convert the particular text to the landscape mode in Word.
Final Words
This is how you can make one-page landscape in Word. We have also discussed making a specific text landscape in a Word document. Following the above steps, you can easily change the Orientation of Word.
RELATED ARTICLES:
- How to Download Microsoft Office 2021 For Free
- Microsoft Office 2019 Professional Free Download Full Version
- MS Office 2013 Professional Download Free Full Version
- How To Fix Microsoft Outlook Won’t Open In Windows 10/11
- Fix Microsoft Store Not Opening In Windows 11
- To make one page set in landscape orientation in Word, use the Layout menu to create a section break for that page, then set that section to landscape.
- You can customize the formatting in Word so there are portrait and landscape pages in the same document.
- Be sure to add another section for the rest of the document and set that section back to portrait.
It’s simple enough to create a document that’s formatted in portrait or landscape orientation, but what if you want to make a document in which only one page is landscape? It’s possible, but perhaps because it’s not that common, Microsoft Word doesn’t make that a one-click formatting option. Here are two ways to make a single page landscape within a document that is otherwise portrait.
How to make one page landscape in Word
1. In the Word document you want to format, place the cursor at the top of the page that you want to turn landscape.
2. Click Layout in the ribbon tabs.
3. In the Page Setup section, click Breaks.
4. In the Section Breaks section, click Next Page.
Dave Johnson
5. Still in the Page Setup section, choose Orientation, then click Landscape. You should see the entire rest of the document turn landscape.
Dave Johnson
6. Scroll down and place the cursor at the start of the next page.
7. In the Page Setup section, click Breaks.
8. In the Section Breaks section, choose Next Page.
9. Click Orientation, followed by Portrait.
Dave Johnson
How to make a selection of text landscape in Word
What if you don’t want to make all the text on a particular page landscape, but rather just a section of text? You can select some text and apply landscape formatting just to that.
1. Select the text on a page that you want to format as landscape.
2. Click Layout in the ribbon tabs.
3. In the Page Setup section, click Margins. At the bottom of the drop-down menu, choose Custom Margins.
Dave Johnson
4. In the Page Setup dialog box, in the Orientation section, click Landscape.
5. In the Preview section, click the Apply to menu and choose Selected text.
6. Click OK.
Dave Johnson
The selected text should now appear on its own page in landscape format.
Dave Johnson
Freelance Writer
Dave Johnson is a technology journalist who writes about consumer tech and how the industry is transforming the speculative world of science fiction into modern-day real life. Dave grew up in New Jersey before entering the Air Force to operate satellites, teach space operations, and do space launch planning. He then spent eight years as a content lead on the Windows team at Microsoft. As a photographer, Dave has photographed wolves in their natural environment; he’s also a scuba instructor and co-host of several podcasts. Dave is the author of more than two dozen books and has contributed to many sites and publications including CNET, Forbes, PC World, How To Geek, and Insider.
Read more
Read less
Affiliate disclosure: In full transparency – some of the links on our website are affiliate links, if you use them to make a purchase we will earn a commission at no additional cost for you (none whatsoever!).
You might want to create a master page when using Word’s page layout options. A one-page landscape in Microsoft word is something that you can create easily with our guide.
Word documents can be created in either a landscape or portrait orientation. Even though portrait mode is selected by default, landscape mode can be selected to make text appear in a horizontal orientation.
Some workarounds involving section breaks and Word’s built-in page formatting options will be required to combine both layout types in Word.
Let us learn how to do it step by step.
Follow me and you shall be a master by the end of this blog.
How to Make One Page Landscape in Word?
In Word, you can easily make a one-page landscape document by following these steps:
- Open your Word document and move the flashing cursor to the beginning of the page you want to switch to landscape mode.
- In the ribbon bar, select the Layout menu.
- In the Area Breaks section, go to Breaks > Next Page. This adds a section break and moves your text to a new page.
- Select Orientation > Landscape from the Layout menu. This will change the current page and all subsequent pages to landscape mode.
- You must now return the remaining pages to portrait mode. Scroll to the next page and position the flashing cursor at the top of the page.
- Insert a new section break by going to Layout > Breaks > Next Page.
- To turn the pages to portrait mode, go to Orientation > Portrait.
All other pages should remain in portrait mode if you followed the steps correctly.
You may also like to read:
- Top 15+ Best On-Page SEO Software
Using Word to create specific text landscapes
If you don’t want all your text visible on the landscape page, you can create a page that contains only specific text.
- To do so, highlight the text that you want to appear on the landscape page.
- To set custom margins, go to the Layout menu’s Margins drop-down menu and select Custom Margins…
- Within the Page Setup window, click the Landscape option under the Margins tab.
- Select Selected Text in the Apply to box.
- To confirm the options you’ve chosen, click OK.
You should now have a landscape page with the previously highlighted content, forming a section break with a distinct page layout than the remainder of your Word project.
You can use this procedure to flip a full page landscape; to do so, select all of the text on the page before beginning and then repeat the steps above to finish the transition.
Also, read:
- How To Become Copy Editor?
- How To Build A Brand- Step By Step New Guide
Conclusion- Landscape in Word 2023
You can now create documents with as many different combinations of landscape and portrait pages as you desire now that you know how to make a single-page landscape in Word.
If you still have questions, please leave them in the comments section and I will answer them.
Jitendra Vaswani
Jitendra Vaswani is the founder of SchemaNinja WordPress Plugin, prior to SchemaNinja he is the founder of big internet marketing blog BloggersIdeas.com. He is successful online marketer & award winning digital marketing consultant. He has been featured on HuffingtonPost, BusinessWorld, YourStory, Payoneer, Lifehacker & other leading publication as a successful blogger & digital marketer.
Jitendra Vaswani is also a frequent speaker & having 8+ yrs experience of in Digital Marketing field. Check out his portfolio( jitendra.co). Find him on Google+, Twitter, & Facebook.
How to make one page landscape in Word. Windows users have two-page layout options while creating a word document.
The Portrait Mode or Landscape Mode, and generally most of the MS word users prefer portrait mode which comes as default. But if you wanted to switch page layout to landscape mode in Word document.
If you wanted to use both page view options in MS Word, Then you’ve do use a few workarounds such as section breaks or Microsoft Word page formatting options. Well, you can also do that, using this article step by step instructions along with screenshots.
If you have an individual page containing images and text, you wanted to switch the page layout of that from portrait to landscape. Well, you can easily do that, all you’ve to do is insert a section break. Then change the page formatting option to landscape for the particular page.
Follow these steps to make one-page landscape in a word document file.
1. Open Microsoft Word app from the Start menu or desktop shortcut. Now from the “File” given at the navigation bar. Browser the word file and open it.
2. Now, to get started find the page that you wanted to switch into landscape format. Then place the cursor at the very origin of the page.
3. Click on the Layout menu from the toolbar, then choose “Break” and then “Next Page” in the section breaks.
This step will insert a section break which pushes the text and images of the page into the new page
4. Again, Go to the Layout menu, Select “Orientation ” and then “Landscape”.
This will change the current page along with other pages into the landscape format view.
Now all the pages after the section break will in landscape mode. But we needed to change only one page. For this, you’ve to change the remaining pages into portrait mode.
5. Go the next page after that page which you wanted in landscape mode. then click at the very beginning of the page to place the cursor.
6. We, follow a similar process, Go to the Layout menu, then select “Break” and then “Next Page” in section breaks.
7. After that, again select “Layout” Menu and then, Orientation > Portrait.
This will switch page all the other pages into Portrait mode again. Now you have the page that you wanted in Landscape mode.
Originating Particular Text Landscape In Word
If you don’t want all the text on the page will display in landscape page for this you can compose a landscape page that only contains the particular text.
1. To get started, firstly select all the text on the page that you wanted to display on the landscape page.
2. Go to the Layout menu, then select “Margins” and then “Custom Margins” given at the bottom of the menu.
3. In the Page Setup, select the “Landscape” option given under the Orientation section.
4. Go to the Apply To section box, then choose “Selected Text” and hit the “Ok” button.
Now you have the landscape page that contains the text which selected or highlighted. Create a section break to separate the page layout from the rest of the word document.
More likely, you can also use this method to convert inter-word document text into the landscape. For this, Press “CTRL+A” keys and then, Go to the Layout > Margins > Custom Margins > Landscape.
Frequently Asked Questions [FAQ]:-
How do I create a PDF with just one page?
Open Adobe Readers or Acrobat and select the View option. To shift the page view in 90-degree increments, locate the Rotate View option and select “Clockwise” or “Counterclockwise.” Pages are rotated from portrait to landscape, or the other way around.
Can the orientation of a page be changed?
You may quickly shift the page orientation for the entire document or just a single page on the Layout tab in the Home Tab group. Before and after the chosen page, Microsoft Word puts section breaks. You can later add extra pages to this section.
How can I make a Word document only one page wide?
Orient a portion of a document in landscape
Choose the articles you want to appear on a landscape page. Click the Page Setup dialogue box by going to Layout. Choose Landscape, then select Selected text in the Enter to box.
How can I create a PDF with a landscape orientation?
Go to the “View” fall menu at the the top of the screen and open the PDF with the desired orientation. Move the mouse pointer over “Rotate View” in the list of choices that appears. Adobe gives you the option of rotating in 90-degree increments either clockwise or counterclockwise.
Final Words
Now, you have a method to make one page landscape in Word document. Along with another method to change the particular text into the landscape.
Both methods are helpful for changing pages in word to landscape mode. Well, you can also try How to Turn ON Spell Check in Word which can be very useful.
Related Articles:
What is Android 21 What Should I Know About It?
Use Animoji or Memoji Stickers on WhatsApp (Android & iPhone)
5 Reasons Why You Should Use Google Meet
How to Read NFC Tags on iPhone
Cube Solitaire For Android: How To Play And Is It Legal?


