
In this tutorial, you will learn how to read or write data in a spreadsheet file of excel. You can also create a spreadsheet file using LabView as you will see shortly in this tutorial. At the start you are provided with an introduction to spreadsheet files why they are used and what is there use in LabView. After that a VI is designed which create a spreadsheet file write data to it and at the end read data from the same spreadsheet. At the end of the tutorial you are provided with an exercise to do it by yourself, and in the next tutorials I will assume that you have done those exercises and I will not explain the concept regarding them.
read and write data to excel files in labview
Data can be stored in organized cells, such as in rows and columns using a spreadsheet file. Certain type of data can be stored in each cell of the spreadsheet such as numeric, text data, strings or dates etc. Spreadsheet files can also be composed of cells which use formulas referring to other cells. A simple spreadsheet file extension is .xlsx, .ods, .numbers and .csv.
Text files also have subset specified as text-based spreadsheet files. Formatting a string data as a spreadsheet string is a must when you want to write data to a spreadsheet file, which included inserting delimiters in a string such as tabs and commas.

In LabView we can design a VI that can write different data types to a text file or a .csv file in the form of a spreadsheet. Writing data to a spreadsheet requires string type data separated by a delimiter (a parameter provided to the write to spreadsheet bloc). The function takes the value from the function in the form of timestamp data, numeric data and delimiters and writes the data in the form of strings in a spreadsheet file or a text file with data separated by the delimiter specified.
Examples read and write data to excel files in labview
- I will now try to explain the functionality of working with e spreadsheet in LabView using a VI. Create a VI as we have been doing from tutorial 1 and save it for future use. Create a nested loop that will return a 2D array of size 10×10 and containing random numbers generated between 0 and 1 as shown in the figure below,


Figure 1: 2D array loops
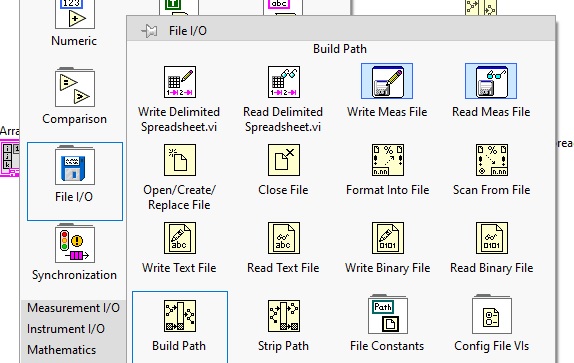
- These loops will generate a 2D array at the auto indexing terminal of the outer loop. Now from the function palette on the block diagram select file I/O and then select write delimiter spreadsheet as shown in the figure below,
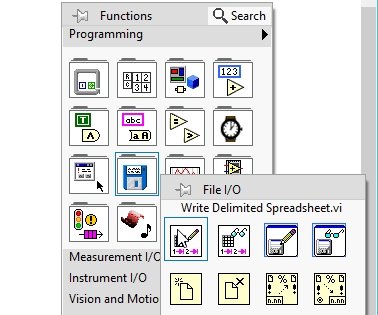
Figure 2: Writing to spreadsheet placement
- The write delimited spreadsheet block is shown in the figure below,


Figure 3: Write to spreadsheet block
- If you want to know the pins description of the write to spreadsheet block simply open the context help window as we have done in previous tutorial and hover over the block of write to spreadsheet. The pin description of the write to text block is shown in the figure below,

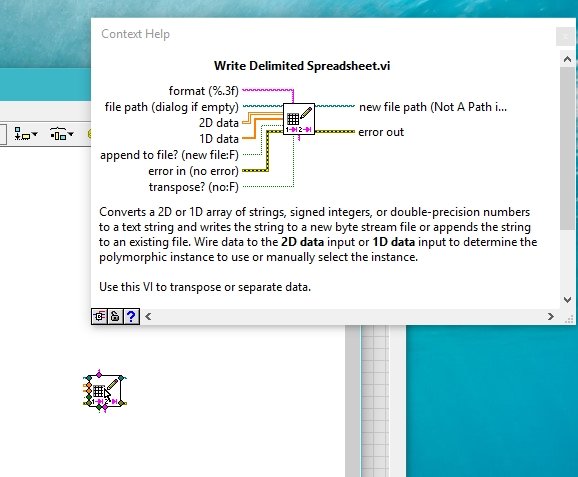
Figure 4: Pins description of block
- Connect the output of the nested loops we created at the start with the pin of the write to spreadsheet block named as 2D data in the pin description help window as shown in the figure below,

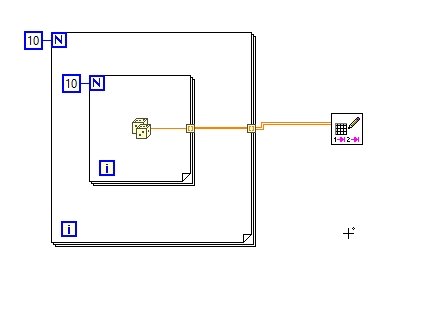
Figure 5: Block diagram
- On the pin of the write to spreadsheet block named as delimiter create a constant to provide the delimiter between the strings. By default the delimiter is set to tab (t) but if you want to write data to an excel sheet you must provide a delimiter comma (,) because tab (t) is not used for excel sheets. Create a constant at the delimiter as shown in the figure below,


Figure 6: Delimiter pin
- And place a comma inside the constant for to create a .csv file as shown in the figure below,
Figure 7: Comma delimiter
- To the pin named as file path specify the path of the file you want to write to. Otherwise a dialog box will appear as you will see shortly asking for you to create a spreadsheet file. This is the default property of write delimited spreadsheet block. Run the VI and the Vi will ask you where to save the spreadsheet you created. Select the folder where you want to save the spreadsheet and write the name of the spreadsheet with the file extension as shown in the figure below,


Figure 8: Creating spreadsheet file
- This will create a .csv file in the destination folder you select, as shown in the figure below,


Figure 9: Saved file in the destination
- The saved file will be located in the form of the file you gave the extension of previously. Open the file and you will see a 10×10 2D array stored in the spreadsheet file with extension .csv as shown in the figure below,


Figure 10: Spreadsheet.csv file
- Using the same block you can also write your spreadsheet data to a text ile changing your delimiter. You can also write data to a text file with the same delimiter but in case of text file tab (t) delimiter is preferred because it increases the understand ability of the data. Change the delimiter of the write to spreadsheet block from comma to tab (t) as sown in the figure below,


Figure 11: Tab delimiter
- Now run the program again a dialog box will appear, select the destination folder write the name of the file you want to create and this time, save the file with file extension .txt as shown in the figure below,

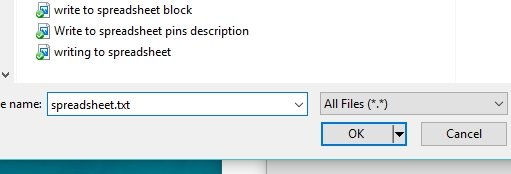
Figure 12: Saving to text file
- This will save the same data i.e. randomly generated 2D array in a text file with the delimiter as a tab (t) space between two entries. The file will be saved in the folder you designated it to be saved as shown in the figure below,


Figure 13: Saved text file
- Opening this file will show you the 2D randomly generated array of size 10×10 and delimiter as a tab space as shown in the figure below,

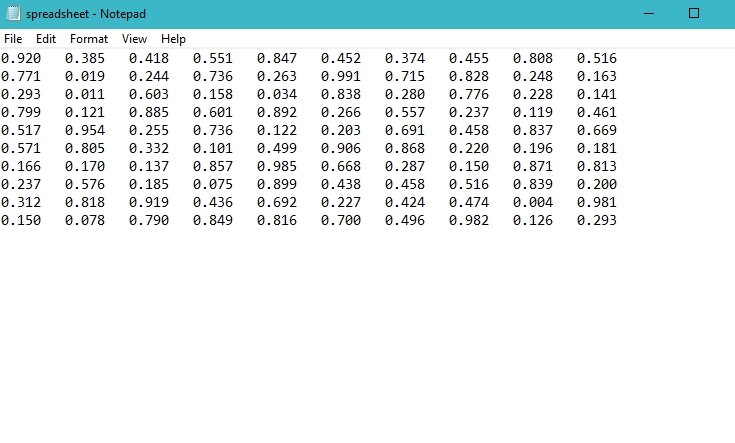
Figure 14: Saved text file
read data from excel spread sheets in labview
- We can also read data from a spreadsheet file we just created. From the function palette on the block diagram window select File I/O and then select Read delimited spreadsheet as shown in the figure below,


Figure 15: Read from spreadsheet placement
- The block of read delimited spreadsheet is shown in the figure below,


Figure 16: Read from spreadsheet block
- If you want to see the pins description of the read block, again use the context help window as you have done in case of seeing write block pins description. Open the help window and then hover over the read delimited spreadsheet block as shown in the figure below,

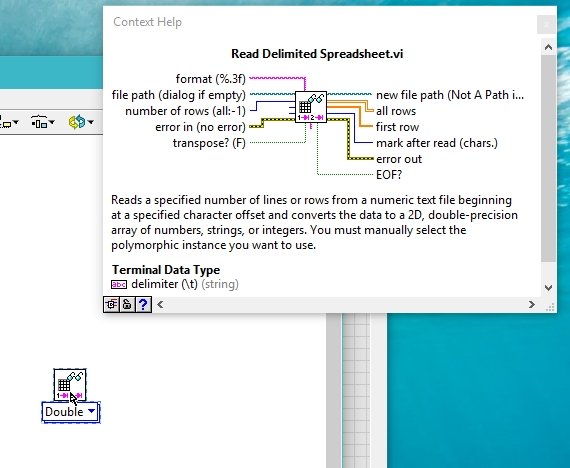
Figure 17: Pins description
- If you want to read all the rows from you spreadsheet file create an indicator at the all rows pin and if you are interested in reading only one row create an indicator at first row pin. Also create a constant at the file path as shown in the figure below. If you leave this pin at default then after running the VI the program will give you a dialog box and ask you to select the spreadsheet file whose data you want to read.

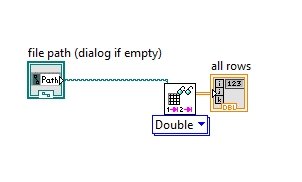
Figure 18: Reading data block diagram
- On the front panel browse the path of the file you want to read data from.

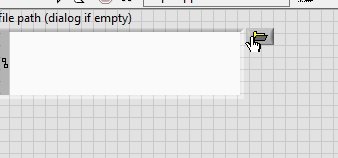
Figure 19: Browsing file path
- If you want to read data from the .csv file than select comma as a delimiter of the read delimited spreadsheet block as shown in the figure below,

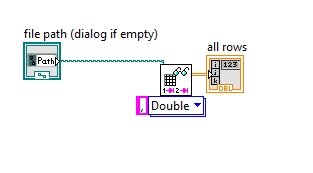
Figure 20: Reading from excel file
- When you run the VI the output will display the data of the spreadsheet file as shown in the figure below,

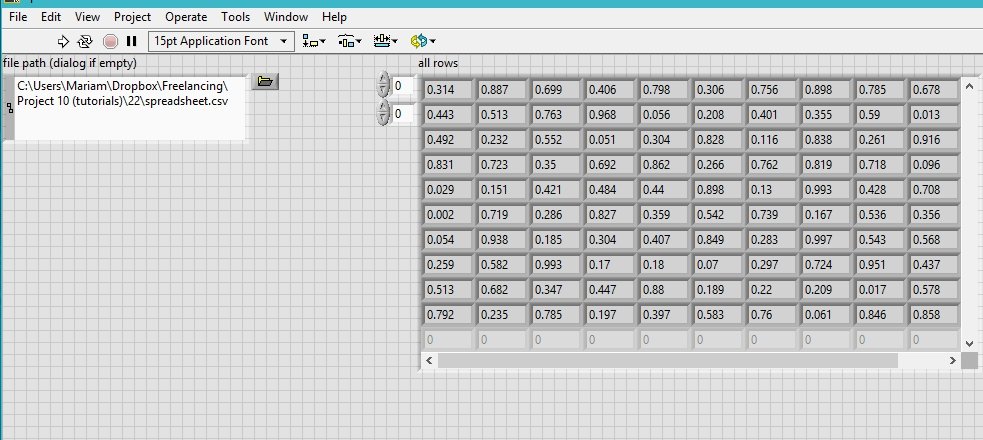
Figure 21: Csv file output
- By default the delimiter of the read block is also set to tab (t). For reading data from the text file you created previously set the delimiter to tab(t) or else leave it empty, as shown in the figure below,

Figure 22: Reading from text file block diagram
- When you run the VI by changing the path in the file path block to .txt file the output of the all rows indicator will display the data of the text file you created previously as shown in the figure below,
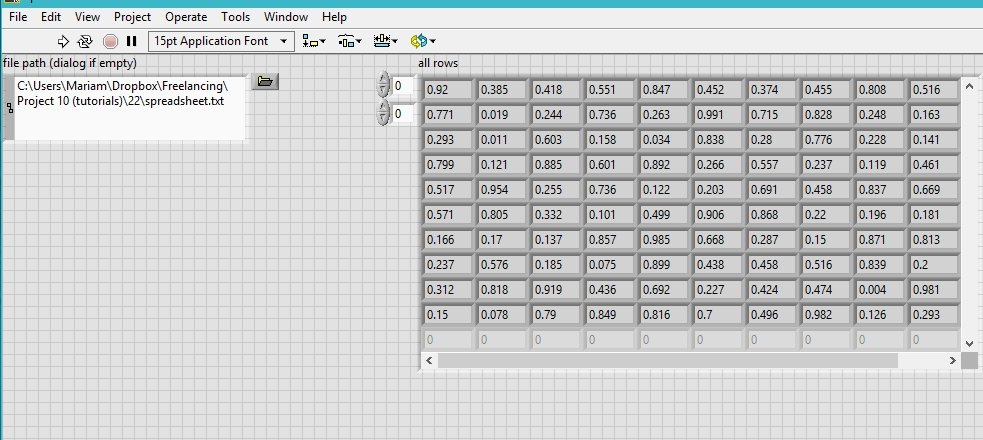
Figure 23: Output of text file
Exercise:
- Create and open a file using open/create/replace block, write data in it using write delimited spreadsheet block, read data from it using read delimited spreadsheet file block and then close it using close file block in a same VI
(Hint: Use the context help window to see the pin names of the blocks you haven’t used already)
<< Previous tutorial Next tutorial>>
Overview
This VI demonstrates how to write an array of strings to one column and an array of numbers to another column within Microsoft Excel.
Description
Reports are an essential part of a professional application. They must contain all the information that the user wants. In addition, reports must look professional and be carefully formatted. Microsoft Word (hereafter known as Word) and Microsoft Excel (hereafter known as Excel) are powerful report writers. Most users already know how to work with these tools. The applications’ complete ActiveX interface combined with LabVIEW ActiveX client capabilities make them appropriate options for adding report generation functionalities to LabVIEW applications.Thanks to this example you can do fast start about generating Excel report file using LabVIEW.
Requirements
Software:
- LabVIEW 2012 (or compatible)
- Report Generation Toolkit
Steps to Implement or Execute Code
1. Configure your Excel sheet on the front panel.
2. Run VI.
3. Save your temporary Excel file.
Additional Information or Resources

**This document has been updated to meet the current required format for the NI Code Exchange.**
LABVIEW обучение (1) читать и писать в EXCEL
инструмент:
LABVIEW2017 (с инструментом создания офисных отчетов)
Заметка:
1. См. Ссылку для установки и взлома LABVIEW2017:https://jingyan.baidu.com/article/6b97984de847421ca2b0bf96.html
2. Ссылка для обучения отчету LABVIEW:https://wenku.baidu.com/view/78c870237375a417876f8f08.html
3. Чтобы узнать о других методах создания Excel через LABVIEW, перейдите по ссылке:https://www.ni.com/newsletter/51339/zhs/
оглавление
LABVIEW обучение (1) читать и писать в EXCEL
текст
1. Прочтите данные файла EXCEL VI:
2. Записать данные в Excel.
3. Генерация адресов
текст
1. Прочтите данные файла EXCEL VI:
полныйVIСкриншот панели программы:

VIРасположение основных функций:
- Блок-схема → Палитра функций → Программирование → Создание отчета »Новый отчет (New Report.vi)«и»Отчет об утилизации (Dispose Report.vi)”


- Блок-схема → Функциональная палитра → Программирование → Создание отчета →Excel Specific→“Excel General«и»Excel Get Data.vi”

2. Записать данные в Excel.
полныйVIСкриншот панели программы:

VIРасположение основных функций:
Как и в «Чтении Excel» выше, ключевые функции находятся в «Блок-схема → Палитра функций → Программирование → Создание отчета».
Добавить примечание: Здесь необходимо добавить шаг, чтобы проверить, существует ли файл, на который указывает Путь к файлу (вы можете использовать «Проверить, существует ли файл или папка», упомянутый ниже), если он существует, то «Сохранить отчет в файл» заменяет файл (F), иначе он не заменяет (T).
3. Генерация адресов
полныйVIСкриншот панели программы:
Описание этого VI:
1. Адрес, по которому создается файл указанного типа;
2. Обозначенные типы: Excel, Word и TXT;
3. Если назначенная папка (папка) не существует, создайте соответствующую папку;
4. При необходимости определяется, следует ли создавать подпапку.

Введите sub vi на рисунке: в соответствии с выбранным типом файла сгенерируйте соответствующий суффикс, включая три формата Excel (.xlsx), Word (.docx) и TXT (.txt).


VIРасположение основных функций:
Примечания: полная загрузка файла проектаhttps://download.csdn.net/download/sinat_37710872/10644945
| VI Server Method Information | |
|---|---|
| Method ID | 6337C05 |
| Scope | Basic Development Environment |
| Data Name | Export Data to Excel |
| Short Name* | Export Data to Excel |
| Long Name* | Export Data to Excel |
| * Displayed here in English. Short and Long names appear in the language of the LabVIEW IDE. | |
| Owning Class ID | 13 |
| Owning Class Name | Table Class |
| Return Data Type | No return value |
| Invoke Node | |
| Available in Real-Time Operating System | Yes |
| Available in Run-Time Engine | Yes (Read/Write) |
| Loads the block diagram into memory | No |
| Loads the front panel into memory | No |
| Need to authenticate before use | No |
| Remote access allowed | Yes |
| Settable when the VI is running | Yes |
Exports the table data to Excel.
Parameters
This method has no parameters.
Uses
History
| Version | Change(s) |
|---|---|

|
This method was added in LabVIEW 2010. |
See Also
External Links
Содержание
- Русские Блоги
- LABVIEW обучение (1) читать и писать в EXCEL
- LABVIEW обучение (1) читать и писать в EXCEL
- текст
- 1. Прочтите данные файла EXCEL VI:
- 2. Записать данные в Excel.
- 3. Генерация адресов
- read and write data to excel files in labview : tutorial 22
- read and write data to excel files in labview
- Examples read and write data to excel files in labview
- read data from excel spread sheets in labview
Русские Блоги
LABVIEW обучение (1) читать и писать в EXCEL
LABVIEW обучение (1) читать и писать в EXCEL
инструмент:
LABVIEW2017 (с инструментом создания офисных отчетов)
Заметка:
3. Чтобы узнать о других методах создания Excel через LABVIEW, перейдите по ссылке:https://www.ni.com/newsletter/51339/zhs/
оглавление
текст
1. Прочтите данные файла EXCEL VI:
полныйVIСкриншот панели программы:
VIРасположение основных функций:
- Блок-схема → Палитра функций → Программирование → Создание отчета »Новый отчет (New Report.vi)«и»Отчет об утилизации (Dispose Report.vi)”
- Блок-схема → Функциональная палитра → Программирование → Создание отчета →Excel Specific→“Excel General«и»Excel Get Data.vi”
2. Записать данные в Excel.
полныйVIСкриншот панели программы:
VIРасположение основных функций:
Как и в «Чтении Excel» выше, ключевые функции находятся в «Блок-схема → Палитра функций → Программирование → Создание отчета».
Добавить примечание: Здесь необходимо добавить шаг, чтобы проверить, существует ли файл, на который указывает Путь к файлу (вы можете использовать «Проверить, существует ли файл или папка», упомянутый ниже), если он существует, то «Сохранить отчет в файл» заменяет файл (F), иначе он не заменяет (T).
3. Генерация адресов
полныйVIСкриншот панели программы:
Описание этого VI:
1. Адрес, по которому создается файл указанного типа;
2. Обозначенные типы: Excel, Word и TXT;
3. Если назначенная папка (папка) не существует, создайте соответствующую папку;
4. При необходимости определяется, следует ли создавать подпапку.
Введите sub vi на рисунке: в соответствии с выбранным типом файла сгенерируйте соответствующий суффикс, включая три формата Excel (.xlsx), Word (.docx) и TXT (.txt).
VIРасположение основных функций:
Источник
read and write data to excel files in labview : tutorial 22
In this tutorial, you will learn how to read or write data in a spreadsheet file of excel. You can also create a spreadsheet file using LabView as you will see shortly in this tutorial. At the start you are provided with an introduction to spreadsheet files why they are used and what is there use in LabView. After that a VI is designed which create a spreadsheet file write data to it and at the end read data from the same spreadsheet. At the end of the tutorial you are provided with an exercise to do it by yourself, and in the next tutorials I will assume that you have done those exercises and I will not explain the concept regarding them.
read and write data to excel files in labview
Data can be stored in organized cells, such as in rows and columns using a spreadsheet file. Certain type of data can be stored in each cell of the spreadsheet such as numeric, text data, strings or dates etc. Spreadsheet files can also be composed of cells which use formulas referring to other cells. A simple spreadsheet file extension is .xlsx, .ods, .numbers and .csv.
Text files also have subset specified as text-based spreadsheet files. Formatting a string data as a spreadsheet string is a must when you want to write data to a spreadsheet file, which included inserting delimiters in a string such as tabs and commas.
In LabView we can design a VI that can write different data types to a text file or a .csv file in the form of a spreadsheet. Writing data to a spreadsheet requires string type data separated by a delimiter (a parameter provided to the write to spreadsheet bloc). The function takes the value from the function in the form of timestamp data, numeric data and delimiters and writes the data in the form of strings in a spreadsheet file or a text file with data separated by the delimiter specified.
Examples read and write data to excel files in labview
- I will now try to explain the functionality of working with e spreadsheet in LabView using a VI. Create a VI as we have been doing fromtutorial 1 and save it for future use. Create a nested loop that will return a 2D array of size 10×10 and containing random numbers generated between 0 and 1 as shown in the figure below,
Figure 1: 2D array loops
- These loops will generate a 2D array at the auto indexing terminal of the outer loop. Now from the function palette on the block diagram select file I/O and then select write delimiter spreadsheet as shown in the figure below,
Figure 2: Writing to spreadsheet placement
- The write delimited spreadsheet block is shown in the figure below,
Figure 3: Write to spreadsheet block
- If you want to know the pins description of the write to spreadsheet block simply open the context help window as we have done in previous tutorial and hover over the block of write to spreadsheet. The pin description of the write to text block is shown in the figure below,
Figure 4: Pins description of block
- Connect the output of the nested loops we created at the start with the pin of the write to spreadsheet block named as 2D data in the pin description help window as shown in the figure below,
Figure 5: Block diagram
- On the pin of the write to spreadsheet block named as delimiter create a constant to provide the delimiter between the strings. By default the delimiter is set to tab (t) but if you want to write data to an excel sheet you must provide a delimiter comma (,) because tab (t) is not used for excel sheets. Create a constant at the delimiter as shown in the figure below,
Figure 6: Delimiter pin
- And place a comma inside the constant for to create a .csv file as shown in the figure below,
Figure 7: Comma delimiter
- To the pin named as file path specify the path of the file you want to write to. Otherwise a dialog box will appear as you will see shortly asking for you to create a spreadsheet file. This is the default property of write delimited spreadsheet block. Run the VI and the Vi will ask you where to save the spreadsheet you created. Select the folder where you want to save the spreadsheet and write the name of the spreadsheet with the file extension as shown in the figure below,
Figure 8: Creating spreadsheet file
- This will create a .csv file in the destination folder you select, as shown in the figure below,
Figure 9: Saved file in the destination
- The saved file will be located in the form of the file you gave the extension of previously. Open the file and you will see a 10×10 2D array stored in the spreadsheet file with extension .csv as shown in the figure below,
Figure 10: Spreadsheet.csv file
- Using the same block you can also write your spreadsheet data to a text ile changing your delimiter. You can also write data to a text file with the same delimiter but in case of text file tab (t) delimiter is preferred because it increases the understand ability of the data. Change the delimiter of the write to spreadsheet block from comma to tab (t) as sown in the figure below,
Figure 11: Tab delimiter
- Now run the program again a dialog box will appear, select the destination folder write the name of the file you want to create and this time, save the file with file extension .txt as shown in the figure below,
Figure 12: Saving to text file
- This will save the same data i.e. randomly generated 2D array in a text file with the delimiter as a tab (t) space between two entries. The file will be saved in the folder you designated it to be saved as shown in the figure below,
Figure 13: Saved text file
- Opening this file will show you the 2D randomly generated array of size 10×10 and delimiter as a tab space as shown in the figure below,
Figure 14: Saved text file
read data from excel spread sheets in labview
- We can also read data from a spreadsheet file we just created. From the function palette on the block diagram window select File I/O and then select Read delimited spreadsheet as shown in the figure below,
Figure 15: Read from spreadsheet placement
- The block of read delimited spreadsheet is shown in the figure below,
Figure 16: Read from spreadsheet block
- If you want to see the pins description of the read block, again use the context help window as you have done in case of seeing write block pins description. Open the help window and then hover over the read delimited spreadsheet block as shown in the figure below,
Figure 17: Pins description
- If you want to read all the rows from you spreadsheet file create an indicator at the all rows pin and if you are interested in reading only one row create an indicator at first row pin. Also create a constant at the file path as shown in the figure below. If you leave this pin at default then after running the VI the program will give you a dialog box and ask you to select the spreadsheet file whose data you want to read.
Figure 18: Reading data block diagram
- On the front panel browse the path of the file you want to read data from.
Figure 19: Browsing file path
- If you want to read data from the .csv file than select comma as a delimiter of the read delimited spreadsheet block as shown in the figure below,
Figure 20: Reading from excel file
- When you run the VI the output will display the data of the spreadsheet file as shown in the figure below,
Figure 21: Csv file output
- By default the delimiter of the read block is also set to tab (t). For reading data from the text file you created previously set the delimiter to tab(t) or else leave it empty, as shown in the figure below,
Figure 22: Reading from text file block diagram
- When you run the VI by changing the path in the file path block to .txt file the output of the all rows indicator will display the data of the text file you created previously as shown in the figure below,
Figure 23: Output of text file
Exercise:
- Create and open a file using open/create/replace block, write data in it using write delimited spreadsheet block, read data from it using read delimited spreadsheet file block and then close it using close file block in a same VI
(Hint: Use the context help window to see the pin names of the blocks you haven’t used already)
Источник
 Hello, readers welcome to the new post. In this post, we will discuss How to read and write data excel files LABVIEW. Labview is an industrial tool employed to make different projects implemented. In the previous tutorial, we discuss how we can read and write a data text file in LabVIEW and see practical implementation.
Now we will learn how we can read and write data from excel files with the details. So let get started.
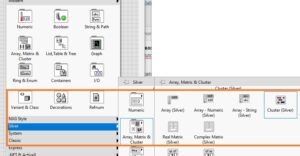
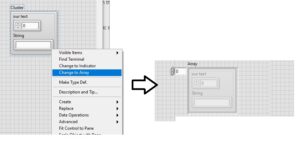
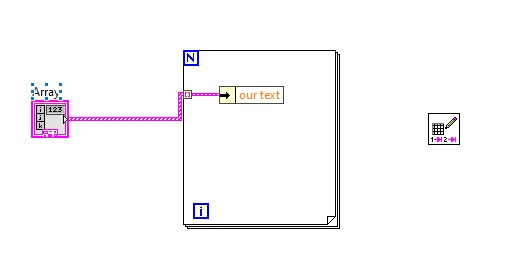
- For practical understating of this tutorial, we will see detailed overview for this move to the front panel then press right and move to string then array matrix cluster option then cluster silver tab and place in the front panel
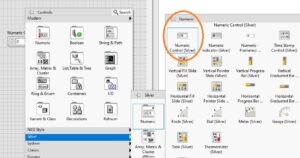
- Now move to the front panel press right then numeric and select the numeric silver
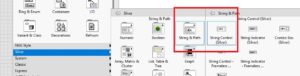
- Now select the string by following the below steps
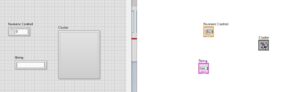
Now final interface looks like this
- Now place control and string in the cluster.

- After that press right on the cluster and change to carry option press.
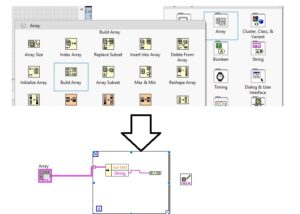
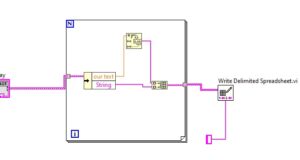
- Now move to block diagram press right open file I/o then choose to write delimited spreadsheet.
- Now press right in block diagram then structure and select the for loop
- Now select the unbundle by name by following the process explained.
- Now make the connection of all components in the block diagram then we have
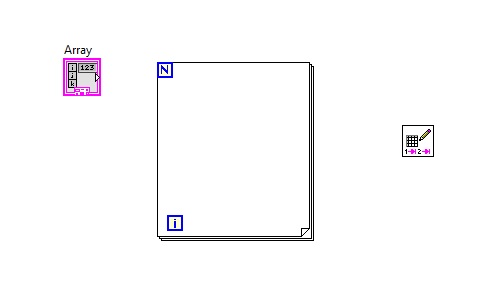
- Now press the right in block diagram and select the array and choose build array tab.
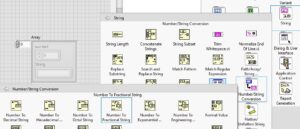
- Now follow the process and select the number to the fractional string process tab
- The final look of the circuit is like this
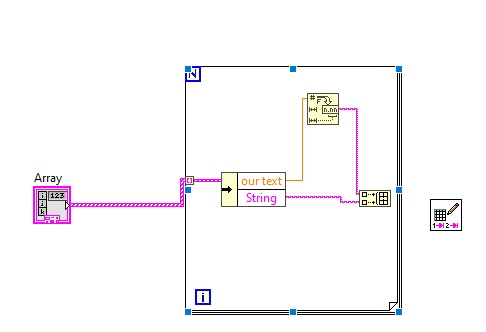
- Now on the delimited spreadsheet on delimiter tab pres right and selcet the constant and make circuit arrangements like this.
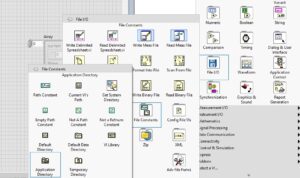
- Now select the build path according to below process
- Now choose the application directory according to the below steps
- After making the complete connection of components we have a final look of our project
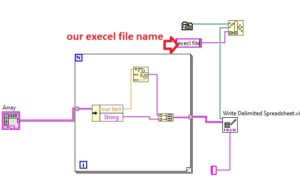
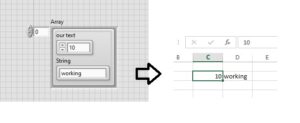
- Now run your program after writing the name of your file of excel according to the above figure. Then move to the front panel and change the values front panel in our text tab and run the program that will be changed in your excel file can see here.
That is all about the Write data in Excel Sheet LabVIEW if you have any further query ask in the comments Thanks for reading have a good day see you in the next tutorial
Author: Henry
http://www.theengineeringknowledge.com
I am a professional engineer and graduate from a reputed engineering university also have experience of working as an engineer in different famous industries. I am also a technical content writer my hobby is to explore new things and share with the world. Through this platform, I am also sharing my professional and technical knowledge to engineering students.
Exporting Logs to Microsoft Excel
You can export logged signals from LabVIEW SignalExpress to Microsoft Excel. LabVIEW SignalExpress exports the date, start time, and name of the log, and lists the values of every data point logged for every signal in the log. To export a log to Microsoft Excel, right-click a signal or group of signals in the Logged Data window and select Export to Microsoft Excel from the shortcut menu.
 |
Note When you export data to Microsoft Excel, LabVIEW SignalExpress copies data samples to a clipboard for export. Use the Maximum Clipboard Data Export Size option on the Data page of the Options dialog box to increase the number of data samples the clipboard can contain. Depending on the amount of memory on a machine, large log files might not export successfully. |
If Microsoft Excel is not running when you export a log file, LabVIEW SignalExpress opens Microsoft Excel and displays the exported data in a new book file. If Microsoft Excel is running when you export a log file, LabVIEW SignalExpress adds worksheets containing the exported data to the active book file. If a log contains multiple signals, each signal appears on a separate worksheet.
|
Note LabVIEW SignalExpress supports importing logged data from .tdms files or other LabVIEW SignalExpress projects only. You cannot import logged data from Microsoft Excel. |
LabVIEW SignalExpress does not save the Microsoft Excel file. You must save the exported file manually in Microsoft Excel.