
Create and print labels

Create and print a page of identical labels
-
Go to Mailings > Labels.
-
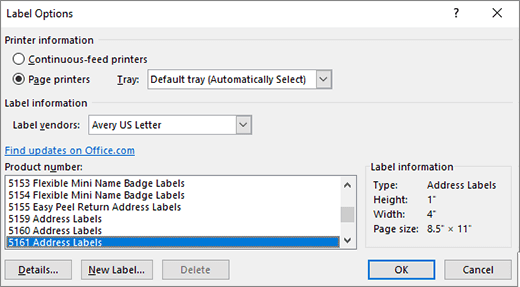
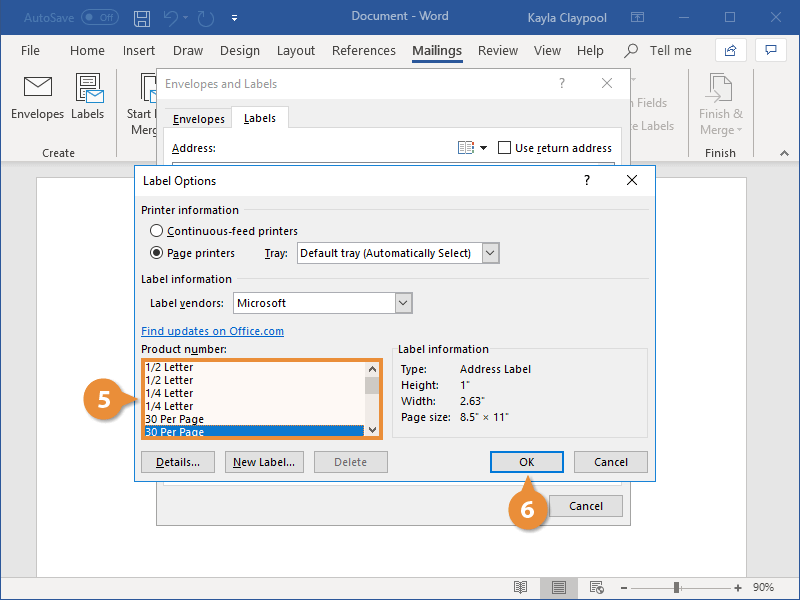
Select Options and choose a label vendor and product to use. Select OK.
If you don’t see your product number, select New Label and configure a custom label.

-
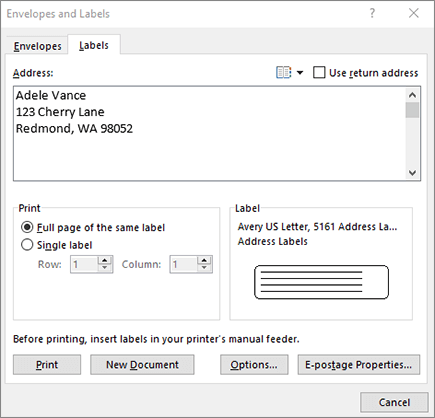
Type an address or other information in the Address box (text only).
To use an address from your contacts list select Insert Address
. -
To change the formatting, select the text, right-click, and make changes with Font or Paragraph.
-
Select OK.
-
Select Full page of the same label.
-
Select Print, or New Document to edit, save and print later.
 .
.If you need just one label, select Single label from the Mailings > Labels menu and the position on the label sheet where you want it to appear. Select OK, the destination, and Save.
Create and print a page of the same label
-
Go to Mailings > Labels.
-
In the Address box, type the text that you want.
To use an address from your contacts list select Insert Address
. -
To change the formatting, select the text, right-click, and make changes with Home > Font or Paragraph.
-
In the Label Options dialog box, make your choices, and then select OK.
If you don’t see your product number, select New Label and configure a custom label.
-
Select OK.
-
Select Full page of the same label.
-
Select Print, or New Document to edit, save and print later.
 .
.Set up and print a page of the same label
-
Go to Mailings > Labels.
-
Select Options.
-
Choose Printer type, Label products, and Product number.
If you don’t see your product number, select New Label and configure a custom label.
-
Select OK.
-
Type an address or other information in the Delivery Address box.
To use an address from your contacts list select Insert Address
. -
To change the formatting, select the text and then select Font to make changes.
-
Select Full page of the same label.
-
Select OK.
-
Select Print, or New Document to edit, save and print later.
 .
.For info about merging data with labels, see Create mailing labels in Word by using mail merge or Mail merge in Word for Mac.
If you want to make return address labels, see Create return address labels.
Word for the web doesn’t support directly creating labels. However you can create labels from a template.
-
Open Word for the web.
-
Select a label template when you create a new document. Select More templates if you don’t see what you want.
You can also go to templates.office.com, and search for label.
-
For a sheet of identical labels, fill out one label, and then copy/paste for the rest.
Tip: Print your labels to a sheet of paper before loading labels into the printer to make sure the text aligns with the labels.
See also
To create a page of different labels, see Create a sheet of nametags or address labels
To create a page of labels with graphics, see Add graphics to labels
To print one label on a partially used sheet, see Print one label on a partially used sheet
To create labels with a mailing list, see Print labels for your mailing list
To create labels using a template, see Microsoft label templates
Need more help?
Want more options?
Explore subscription benefits, browse training courses, learn how to secure your device, and more.
Communities help you ask and answer questions, give feedback, and hear from experts with rich knowledge.
-
1
Obtain the labels you need. Labels come in different sizes and for different purposes, for everything from regular, no. 10 envelopes to legal-sized mailings and CD covers. Get the labels that are best-suited for your project.
-
2
Create a new Microsoft Word document. Double-click the blue app that contains or is shaped like a «W«, then double-click Blank Document» in the upper-left part of the opening window.
Advertisement
-
3
Click the Mailings tab. It’s at the top of the window.
-
4
Click Labels under the «Create» menu. It’s at the far-left of the toolbar.
- If prompted, click OK to grant Word access to your contacts.
-
5
Add text to the label. Do so by typing a recipient’s address, name badge text, CD label, etc., in the Delivery Address field or by clicking the address book icon to the right of the field, selecting a recipient and clicking Insert.
-
6
Click Font…. This dialog box allows you to customize the look of the labels by selecting a font, text size, text color, and style.
-
7
Customize the label text and click OK.
-
8
Click Options…. It’s a button in the Label section of the dialog box.
-
9
Click the radio button next to your printer type.
-
10
Click the «Label products» drop-down menu.
-
11
Select your label manufacturer.
- If your manufacturer isn’t listed, examine the label packaging for the label dimensions and the number per sheet. With this information, you can select an equivalent product.
-
12
Click the «Product number» drop down.
-
13
Click the product number for your label. It should be clearly marked on the packaging.
-
14
Click OK.
-
15
Select the number of labels you’re printing.
- Click Full page of the same label to print a full sheet of the label
- Click Single label and then identify the row and the column on the label sheet where you’d like the label to be printed.
-
16
Insert the blank label sheet into your printer. Make sure you have them aligned correctly for your printer.
-
17
Click Print….
- Make sure the print preview of the labels looks the way you want it to.
-
18
Click Print. Your label(s) will print.
- Click File in the menu bar and Save if you want to save this label template for future use.


Advertisement
-
1
Obtain the labels you need. Labels come in different sizes and for different purposes, for everything from regular, no. 10 envelopes to legal-sized mailings. Get the labels that are best-suited for your project.
-
2
Prepare your mailing list. Word can pull names and addresses from an Excel spreadsheet, an Access database, your Outlook contacts, or on Mac, your Apple contacts or a FileMaker Pro database. You can also type a new mailing list during the merge, if you prefer.
-
3
Create a new Microsoft Word document. Double-click the blue app that contains or is shaped like a «W«, then double-click Blank Document» in the upper-left part of the opening window.
-
4
Click the Mailings tab. It’s at the top of the window.
-
5
Click Start Mail Merge and Labels…. It’s at the far-left of the toolbar.
- If prompted, click OK to grant Word access to your contacts.
-
6
Click the radio button next to your printer type.
-
7
Click the «Label products» drop-down menu.
-
8
Select your label manufacturer.
- If your manufacturer isn’t listed, examine the label packaging for the label dimensions and the number per sheet. With this information, you can select an equivalent product.
-
9
Click the «Product number» drop down.
-
10
Click the product number for your label. It should be clearly marked on the packaging.
-
11
Click OK.
-
12
Click Select Recipients…. It’s at the left of the toolbar.
-
13
Select your mailing list. Click on the source of the addresses you want to put on the labels.
- If you want to create a new list at this point, click Create a new List….
- If you don’t want to create labels for your entire mailing list, click Edit Recipient List and select the recipients you want to include.
-
14
Click Address Block.
- On Mac, click a line near the top of the first label, and click Insert Merge Field, then select a field you want to include, such as «First_Name.» Repeat this process for each field you want to include, adding the appropriate spacing and address formatting.
-
15
Select the elements you want to include on the labels. These include name format, business, name, etc.
-
16
Click OK.
-
17
Click Update Labels. It’s an icon in the toolbar with a green «refresh» symbol.
-
18
Click Preview Results in the toolbar. Make sure the labels look the way you want them to.
-
19
Insert the blank label sheets into your printer. Make sure you have them aligned correctly for your printer.
-
20
Click Finish & Merge and Print Documents…. It’s at the far right of the toolbar.
-
21
Click Print. Your label(s) will print.
- Click File in the menu bar and Save if you want to save this label template for future use.


Advertisement
Add New Question
-
Question
When I type a sheet of labels, sometimes a second blank page appears. How do I remove the second page?

Go to the bottom of the first page, and hit the ‘delete’ key — it should go away.
-
Question
How do I print labels that are all different addresses?
Use a mail merge. Add all of the different addresses, then print each one.
-
Question
How do I make a full page of address labels?
There should be an option called «mail merge.» You need a mailing list and your document; the list can be a spreadsheet, an Outlook directory etc.
See more answers
Ask a Question
200 characters left
Include your email address to get a message when this question is answered.
Submit
Advertisement
Thanks for submitting a tip for review!
About This Article
Article SummaryX
1. Create a new Word document.
2. Click Mailings.
3. Click Labels.
4. Add the label text.
5. Customize the printing layout.
6. Choose your label manufacturer.
7. Click OK.
8. Click Print.
Did this summary help you?
Thanks to all authors for creating a page that has been read 702,273 times.
Is this article up to date?
How to Print Labels from Word
Print a page of labels or design custom labels
Updated on February 12, 2021
What to Know
- In Word, go to the Mailings tab. Select Labels > Options. Choose your label brand and product number.
- Type the information for the address in the Address section.
- In the Print section, select Full Page of Same Label or Single Label (with row and column specified). Choose Print.
This article explains how to print labels from Word. It includes information for printing a single label or a page of the same labels, for printing a page of different labels, and for printing custom labels. These instructions apply to Word for Microsoft 365, Word 2019, 2016, 2013, 2010, and 2007, and Word for Mac 2019 and 2016.
Print a Single Label or a Page of the Same Labels
Microsoft Word isn’t just for documents, resumes, or letters. It’s also a powerful and versatile application for most of your mailing and labeling needs. There are multiple options for creating labels in Word, so choose the one that best fits your needs.
Here’s how to fill a sheet with return address labels or create a single, professional-looking mailing label in Word.
-
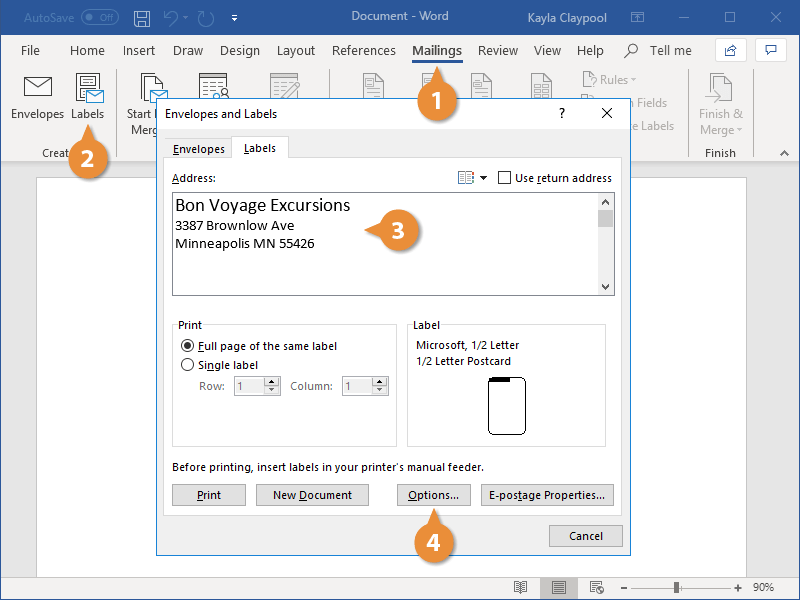
Go to the Mailings tab.
-
In the Create group, select Labels. The Envelopes and Labels dialog box opens with the Labels tab selected.
-
Select Options to open Label Options.
-
Choose the label brand in the Label Vendors or Label Products list, then select the product number matching the labels you want to print on.
-
Select OK.
-
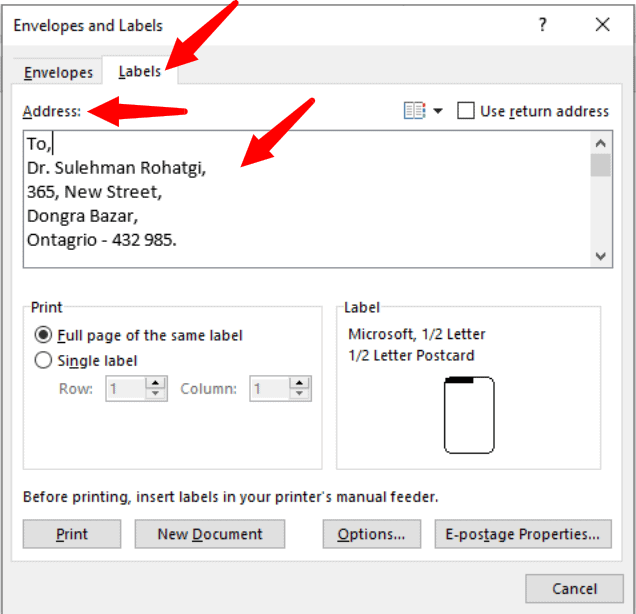
Type an address or other information in the Address box.
In Word for Mac 2019 and 2016, this box is called Delivery Address. In Word 2010, the Address box step comes before the Label Options selections.
-
In the Print section, select Full Page of the Same Label to print a page of the same address labels.
-
In the Print section, select Single Label to print one label. Choose the row and column corresponding with where you want the address printed on the sheet of labels.
The Single Label option is helpful if you have a partially used sheet of printer labels.
-
Make sure the label sheet is waiting in the printer and select Print, or save to print later.
Create a Page of Different Labels
To make a sheet of labels in Word with different addresses or other information, such as nametags, create a document in which you will type the information for each label.
-
Go to the Mailings tab.
-
In the Create group, select Labels. The Envelopes and Labels dialog box opens with the Labels tab selected.
In Word 2010, leave the Address box blank.
-
Select Options to open Label Options.
-
Choose the label brand in the Label Vendors or Label Products list, then select the product number matching the labels you want to print on.
Word for Mac 2019 and 2016 also ask for the type of printer.
-
Select OK.
-
Select New Document. Word creates a new document displaying a page of blank labels matching the dimensions of the brand and label size you selected.
In Word for Mac 2019 and 2016, you don’t have to select New Document. After selecting OK in the previous step, Word opens a new document that contains a table with dimensions that match that label product.
-
Go to the Layout tab under Table Tools and choose View Gridlines if the outlines of the labels do not appear.
-
Type the information you want into each label.
-
Go to the File tab, select Print, then select the Print button when you’re ready to print the labels. Save the document for future use.
Make Custom Labels
If you need to print labels that don’t match the dimensions of the label brands and products listed in the Label Options dialog box, create custom labels to match your specifications.
Before you begin, make sure you have the precise measurements of the labels you need, including the height and width of each label, the paper size, the number of labels down and across, and the margins.
-
Go to the Mailings tab.
-
In the Create group, select Labels. The Envelopes and Labels dialog box opens with the Labels tab selected.
-
Select Options to open Label Options.
-
Select New Label. The Label Details dialog box opens.
-
Enter a name for the labels.
-
Change the measurements to match the exact dimensions of the labels you need. An example of the label appears in the Preview box.
-
Select OK to create the custom labels. You can then use these for making labels in Word.
There is no Mailings tab in Word for Mac 2011. In this version, access label features from the Tools menu.
Thanks for letting us know!
Get the Latest Tech News Delivered Every Day
Subscribe
In general, a label is a sticker with something written on it. People place such stickers with printed information such as addresses on envelopes.
Your label may have one of two addresses—the recipient’s address or the sender’s address. Microsoft Word allows you to create and print such labels.
Here, we will explain the steps necessary for creating and printing labels in Word.
Step #1: Open a Blank Document in Word.
Open Word, and click on New on the left side. The right side shows the icon of a new blank document—click on it to open a new blank document.

Step #2: Open the Envelopes and Labels Dialog
Click on Mailings in the top menu bar, and the ribbon changes to show the mailing menus. Click on Labels to open the Envelopes and Labels dialog.

Step #3: Set Up Recipient/Sender Labels
Within the Envelopes and Labels dialog, click on the Labels tab.
Under Address, you can type in either the recipient’s address or the sender’s address within the box.
If you have created envelopes earlier, and would like to use the return address (sender’s address) already in your system, click on Use return address and ensure a tick-mark is present within the square box immediately on the left. Word will fill the return address in the Address box. If you do not have a return address in your system, type in the return address.

Step #4: Set Up Number of Prints
Once you are satisfied with the address entry, and want to print only one label on the entire page, click on Full page of the same label under the Print section.
If you want to print several labels on one page, click on Single label and select the number of rows and columns necessary.

Step #5: Set Up Paper Size
Here are some tips to customize and get maximum out of printing labels. :
- Click on Options to open the Label Options dialog. Under Printer Information, you can select the type of printer—Continuous-feed or Page Printers—and the type of Tray for the Page printers.
- Several vendors supply sticky papers for printing labels on, and you may select from the Label vendors list—click on the down arrow on the right of Label vendors, and click on the vendor of your choice.
- Depending on the vendor you have selected, you can choose from their list of products under Product number.
- Here, you are selecting the size of the paper on which you want to print the labels. For a specific product number, its related information appears on the right side under Label information.
- For additional settings, click on the Details tab to display the various measurements for printing the label.
- You can adjust the settings to your preference. Word also allows you to define your own measurements, for which you must click on New Label.
- Once you are satisfied with the settings, click on OK to exit the dialog. Word will return you to the Envelopes and Labels dialog.

Step #6: Print the Label
Ensure label papers are in your printer and the printer is turned on. Click on Print to start printing your labels.

Conclusion
A neatly printed address label looks good on an envelope and helps prevent wrong delivery. With Word, you can create and print professional-looking labels. Follow our seven-step method to make your task easier.
Keep everything in order with style when you use designer-made label templates
Labels make life easier in a lot of ways. Labels let us know what things (and sometimes people) are, where (or when) they’re from—all kinds of different data. No matter how you like to use labels, there is a designer-created, customizable label template to get you started on your next project. Labels love to help out in the office and the classroom, but they really love to party. You can find label templates for holiday gifts, birthday gifts, graduation gifts—any kind of gift you care to give for any occasion. Homemade labels are much more personal, don’t you think? Labels can also help you make the most of your hobbies by keeping you organized. Whatever your project or need, it’s easy to create your own labels when you start with a template.
A Label is the piece of paper that provides information about the product or item to which it is attached. Labels can be used for different purposes depending on the person/organization that wants to use it. In most common cases, labels are created and printed with Microsoft Word. However, many users have less knowledge about how to create and print labels in Microsoft Word. In this article, we will show you some methods of creating and printing labels in Microsoft Word.
There are many ways to create labels for your needs. Labels can be used differently for everyone. Printing the labels are the same as printing any other document, however, a user should know how to adjust the labels on the page before printing. We will show you some of the basic methods in which you can create and print labels easily.
Method 1: Creating and Printing Labels for Single Name and Address
You can create a single label or the same type of label with a repetitive number on a page. This is the simplest method for creating and printing labels. Make sure you select the correct vendor that you are using for printing. Follow the below steps:
- Open Microsoft Word by double-clicking the shortcut on the desktop or by searching it in the Windows search feature.
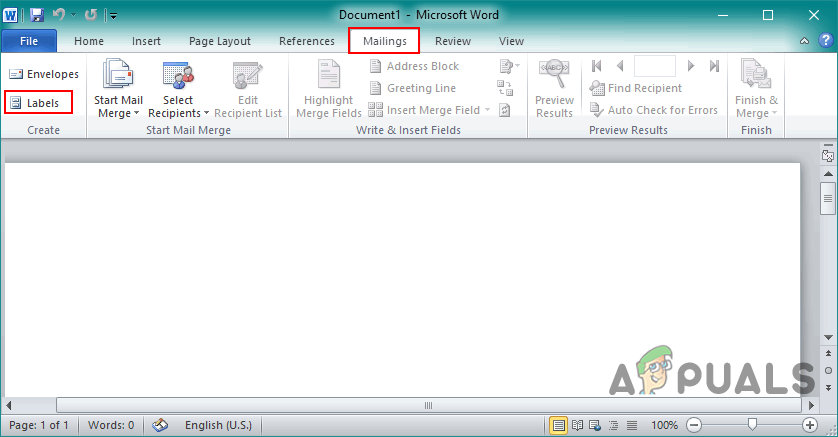
- Create a new document in your Word. Go to the Mailings tab and click on the Labels.

Opening labels in mailing tab - A new window will open with all the available options for labels. Click on Options at the bottom.
Note: You can select the single label option or choose to have the full page of the same label.
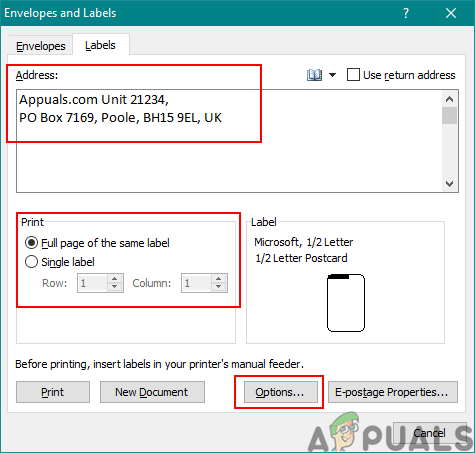
Opening options for label settings - Select the label vendor option and choose the vendor that you bought your labels from. Select the size of the product number list. If the size is not available in the list, you can click on the New Label button to manually add the size.

Choosing vendor and product size - Press the Ok button for label options. Now add your address information in the text box of the labels window. You can choose the full page option which will repeat the same label or you can choose a single label on a specific row and column.
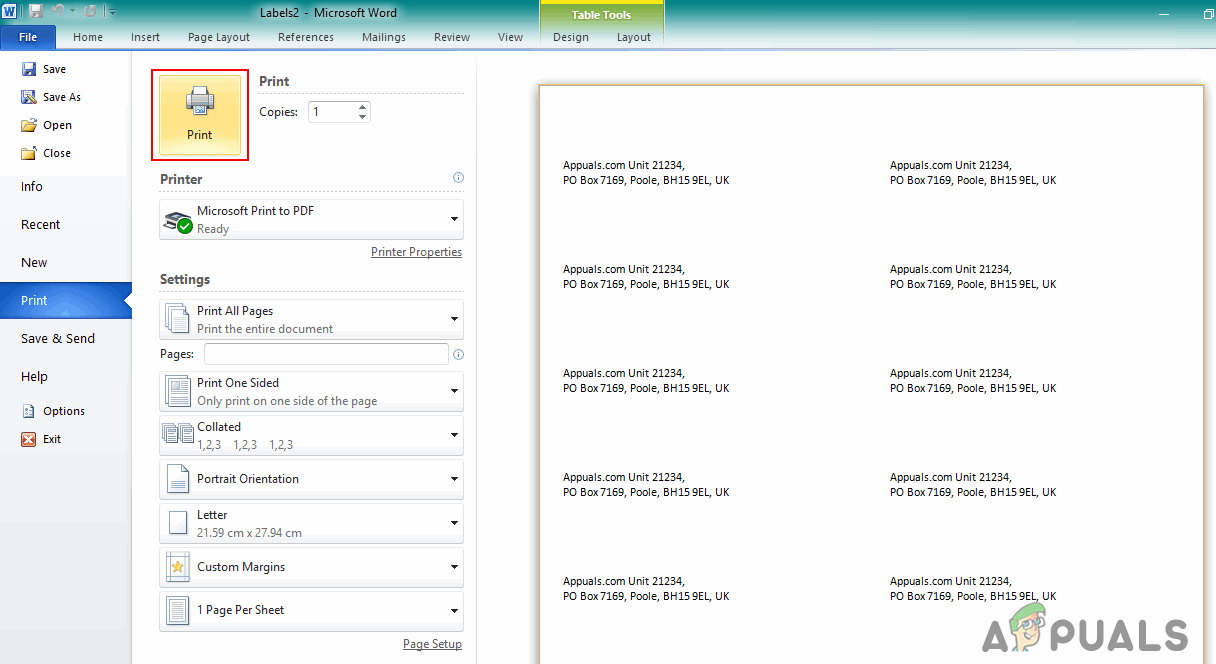
- Click on the New Document button. It will create a new document with your address available on the page.
- Hold Ctrl and press P to get to the print page. Click on the Print button and it will be printed.

Printing labels in Word

Method 2: Creating and Printing Labels for Different Names and Addresses
In this method, we will be using the excel file to import the information for labels. This can be used to create multiple labels with different names and addresses. It will create labels for all the rows in the table of the excel file. Follow the below steps to try it:
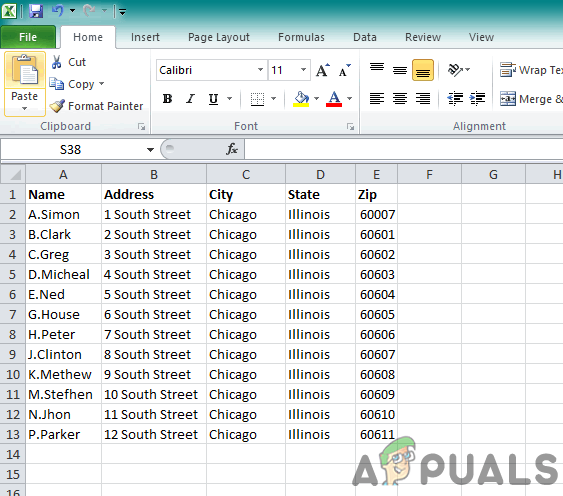
- Create a spreadsheet in Microsoft Excel with different columns for different information as shown below and save the file:

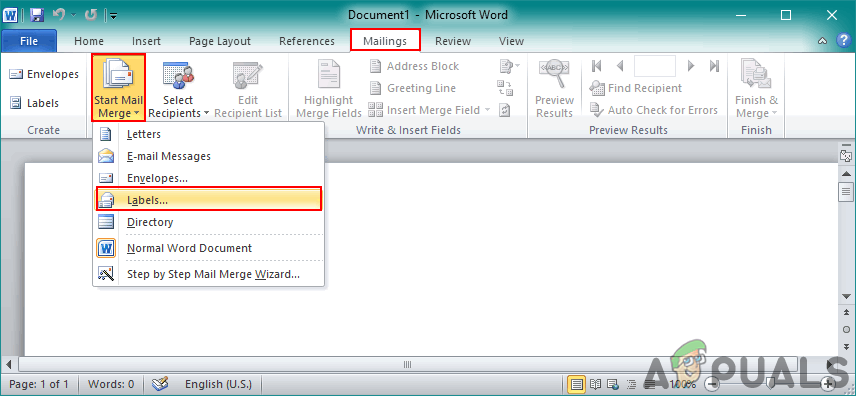
Creating an excel spreadsheet for information - Now open Microsoft Word by double-clicking the shortcut or searching in the Windows search feature. Select the Mailings tab, click on the Start Mail Merge and choose the Labels option.

Opening labels in the mail merge option - Select your Label vendor and product number that you are using. Click the Ok button after selecting options.

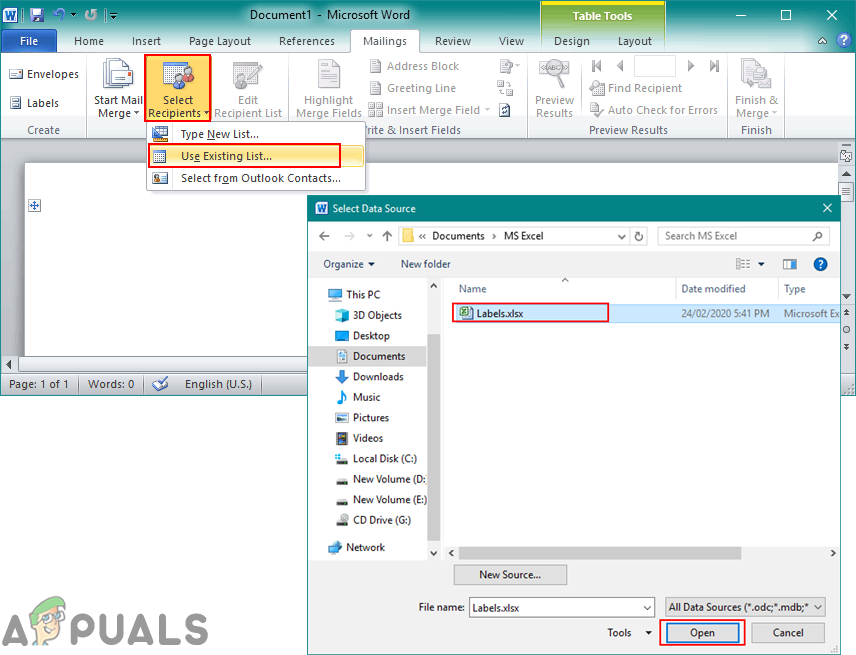
Selecting the vendor and product number - Click on Select Recipients and choose the Use an Existing List option. Locate and select the excel spreadsheet that you saved in step 1 and click on the Open button.

Opening the excel list - Select the Table, make sure you check the First row of data contains column headers option and Click Ok button.

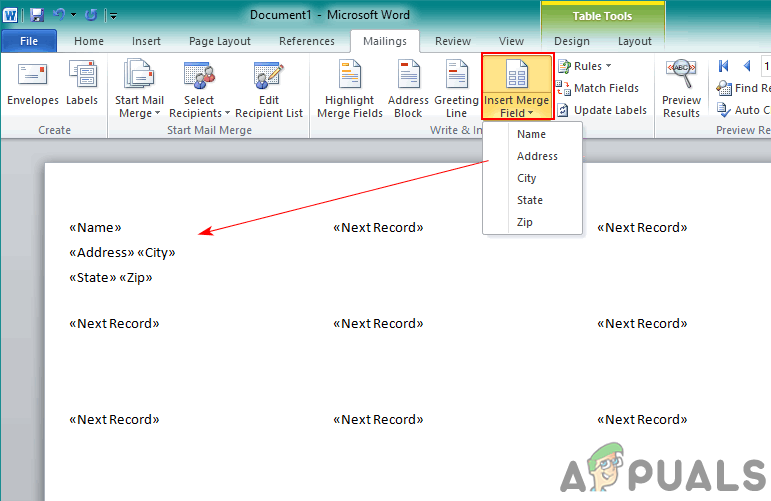
Choosing a table in the excel file and checking headers option - Click on Insert Merge Field and choose the columns information that you want to add to your labels.
Note: You can add space and next line between the Name, address and City columns.
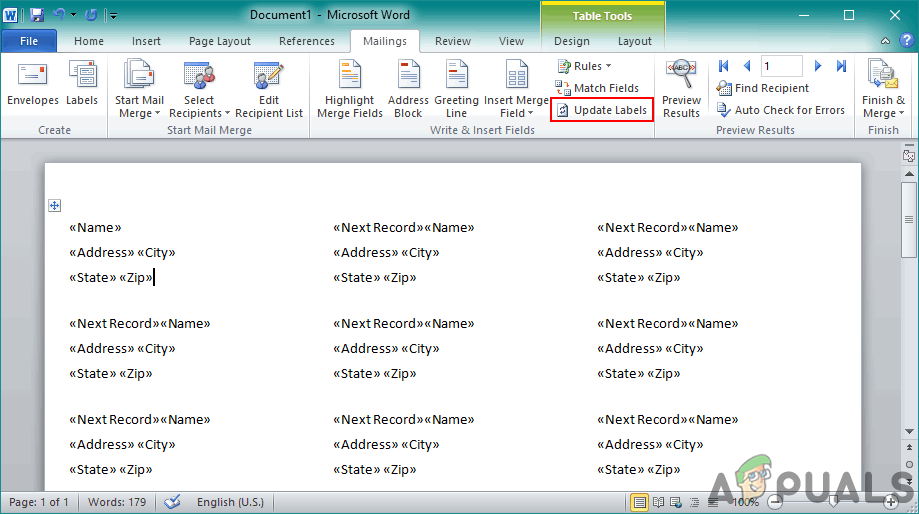
Adding the information available in columns - Click on the Update Labels button on the menu, it will change all the records to the same pattern that you made.

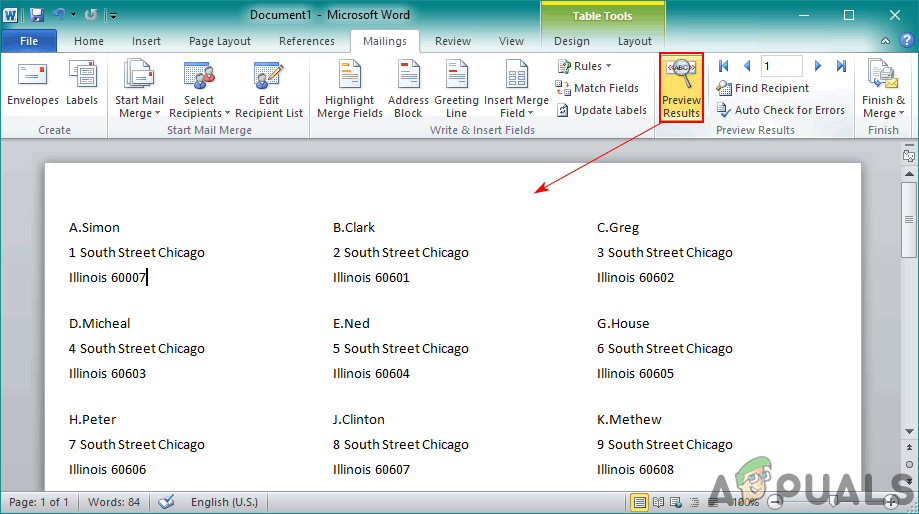
Updating all labels - Click on Preview Results in the menu. This will apply the information on the table that you created in excel to all the records.
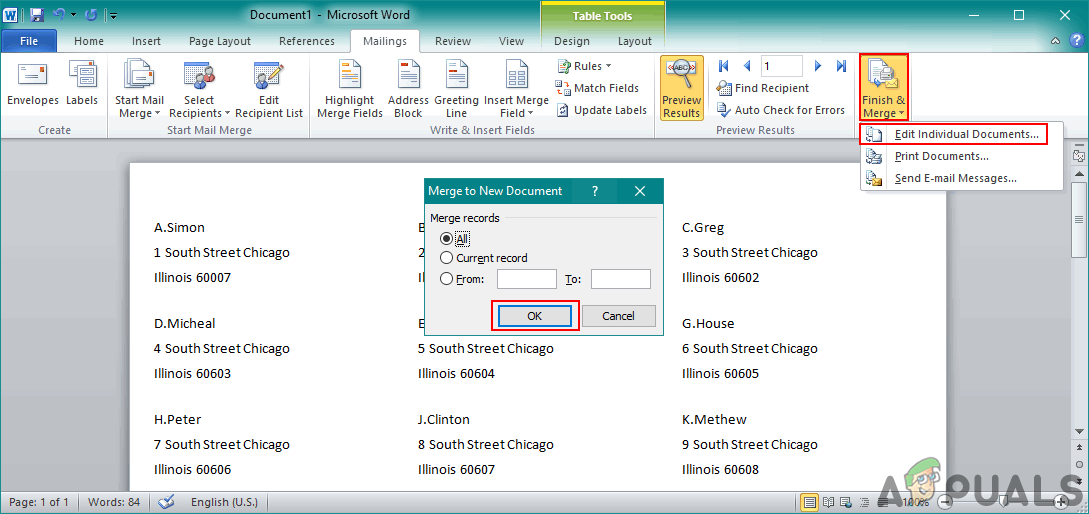
Changing the pattern into result with information - Finally, click on the Finish & Merge in the menu and choose Edit Individual Document option. This will merge all the records into a new document.

Finishing and merging labels - Hold the Ctrl key and press P to print the labels that you just created.


Kevin Arrows
Kevin Arrows is a highly experienced and knowledgeable technology specialist with over a decade of industry experience. He holds a Microsoft Certified Technology Specialist (MCTS) certification and has a deep passion for staying up-to-date on the latest tech developments. Kevin has written extensively on a wide range of tech-related topics, showcasing his expertise and knowledge in areas such as software development, cybersecurity, and cloud computing. His contributions to the tech field have been widely recognized and respected by his peers, and he is highly regarded for his ability to explain complex technical concepts in a clear and concise manner.
Back to top button
- Free Courses
- Microsoft Word
- How to Make Labels in Word

How to Print Labels in Word
You can create a sheet of labels that contains the same information. For example, return address labels or a single label on a sheet.
Create a Label
- Click the Mailings tab.
- Click the Labels button.
- Enter an address.
If you want to print only one label, select Single label in the Print box and specify the row and column where the label is located on the sheet.
- Click Options.
The Label Options dialog box opens. Here, set the type of label sheet you’re printing on.
For example, if you have a sheet of 30 labels, select one of the 30 Per Page options that matches your label dimensions.
Your labels package should tell you the type of label being used.

- Select your label options.
- Click OK.
- Click Print to print the labels, or New Document if you want to do any formatting or editing of individual labels.

The labels are automatically sent to the printer or open in a new document, depending on your action.
If you want to create labels from a data source so that you can create labels for a list of contacts, you can use the Mail Merge wizard to quickly generate labels.

FREE Quick Reference
Click to Download
Free to distribute with our compliments; we hope you will consider our paid training.