
Excel for Microsoft 365 Word for Microsoft 365 Outlook for Microsoft 365 PowerPoint for Microsoft 365 Excel 2021 Word 2021 Outlook 2021 PowerPoint 2021 Excel 2019 Word 2019 Outlook 2019 PowerPoint 2019 Excel 2016 Word 2016 Outlook 2016 PowerPoint 2016 Excel 2013 Word 2013 Outlook 2013 PowerPoint 2013 More…Less
The Insert Caption feature in Word makes it easy to systematically add captions to pictures in a document.
In other Office apps, such as PowerPoint, you manually add a text box near the image and then group the text box and image. See the instructions below. If you have multiple pictures in a series, you have to manually number them.
Word
-
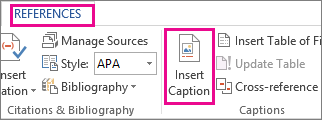
Click the picture you want to add a caption to.
-
Click References > Insert Caption.

-
To use the default label (Figure), type your caption in the Caption box.
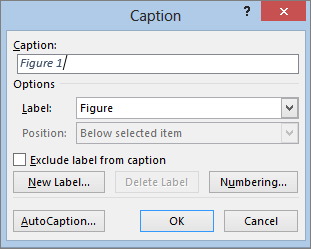
Tip: You can also create your own default caption label by clicking New Label, and then adding your caption in the Label box. Word automatically numbers the new labels for you.
All other Office apps
-
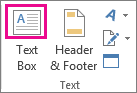
Use Insert > Text Box to draw a box near the picture. (See add a text box for additional details.)
-
Click inside the text box and type the text you want to use for a caption.
-
Select the text. On the Home tab, use the Font options to style the caption as you want.
-
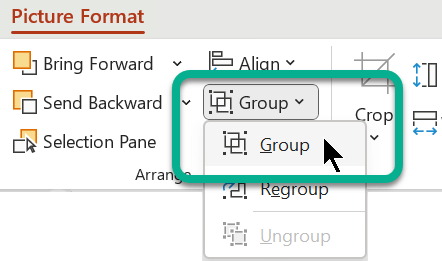
Use Ctrl+click to select the picture and text box, and then on the Picture Format tab, in the Arrange group, select Group > Group.
See Also
Group or ungroup objects
Need more help?
Want more options?
Explore subscription benefits, browse training courses, learn how to secure your device, and more.
Communities help you ask and answer questions, give feedback, and hear from experts with rich knowledge.
1. Right-click the image that you want to label and click the option Format Picture. 2.In the Format Picture window, click this icon.
- Click the picture you want to add a caption to.
- Click References > Insert Caption.
- To use the default label (Figure), type your caption in the Caption box.
Contents
- 1 How do I label my photos?
- 2 How do I create a picture label in Word?
- 3 How do I label digital photos?
- 4 Can you write on photos?
- 5 How do I fill a label in Word?
- 6 How do I create labels in Word 2016?
- 7 What is label in MS Word?
- 8 How do you label a JPEG?
- 9 How do I scan photos into labels?
- 10 How do I write on a JPEG image?
- 11 How do you write on photo paper?
- 12 How do you put captions on pictures?
- 13 How do I edit text in a picture in Word?
- 14 How do I make labels the same in Word?
- 15 How do I make decorative address labels in Word?
- 16 How can I turn a jpeg into a PDF?
- 17 How do I add text to a JPEG image in paint?
- 18 Can you write on a scanned document?
How do I label my photos?
Sorry for the confusion, but the original post was about Android.
Add a description.
- Select and open a photo in Google Photos.
- Select the overflow : menu in the upper right.
- Select Info.
- Add a description and exit to save.
How do I create a picture label in Word?
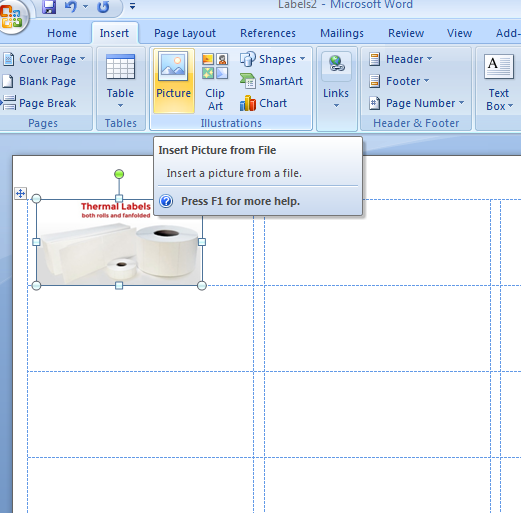
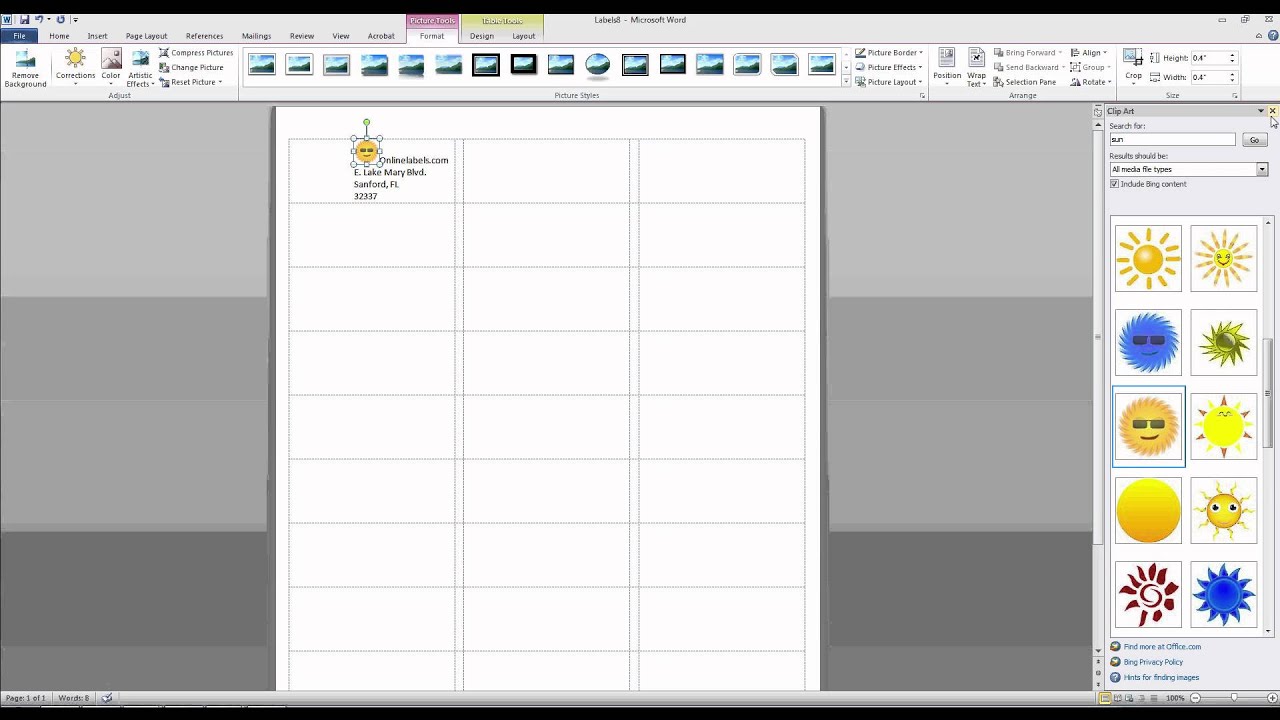
Create a single label with a graphic
- Start by creating a New Document of labels. For more info, see Create a sheet of nametags or address labels.
- Insert a graphic and then select it.
- Go to Picture Format > Text Wrapping, and select Square.
- Drag the image into position within the label.
- Save or print your label.
How do I label digital photos?
First of all, make sure that your open window is large enough to display the metadata at the bottom. Navigate to the folder where your photos reside. Select a photo or photos, find the “Title” field at the bottom of the screen (and also the “tag” field if you want to add tags or keywords), and type in your caption.
Can you write on photos?
Write on the back of your photos, along the edge, and keep your notes succinct. There are two main reasons why professional archivists recommend using a regular #2 pencil. It is reversible—it can usually be easily erased. Pen and marker ink is not reversible—it can’t be erased or undone.
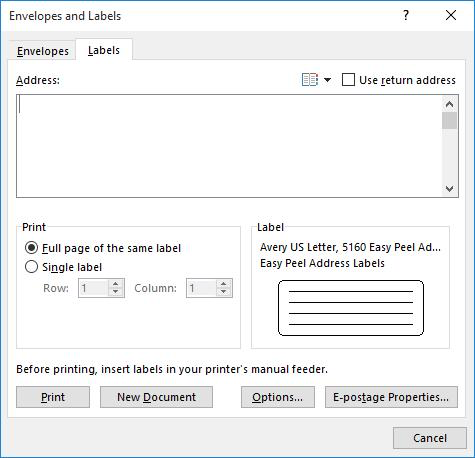
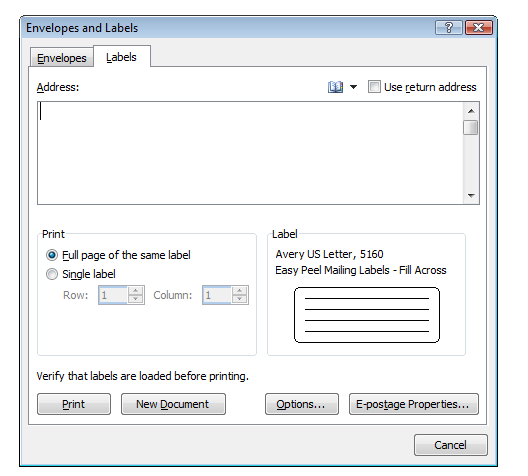
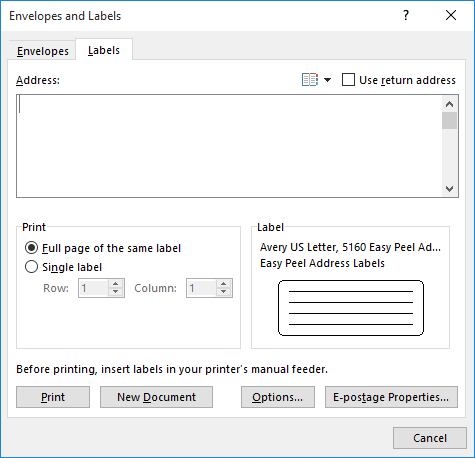
How do I fill a label in Word?
Formatting Labels
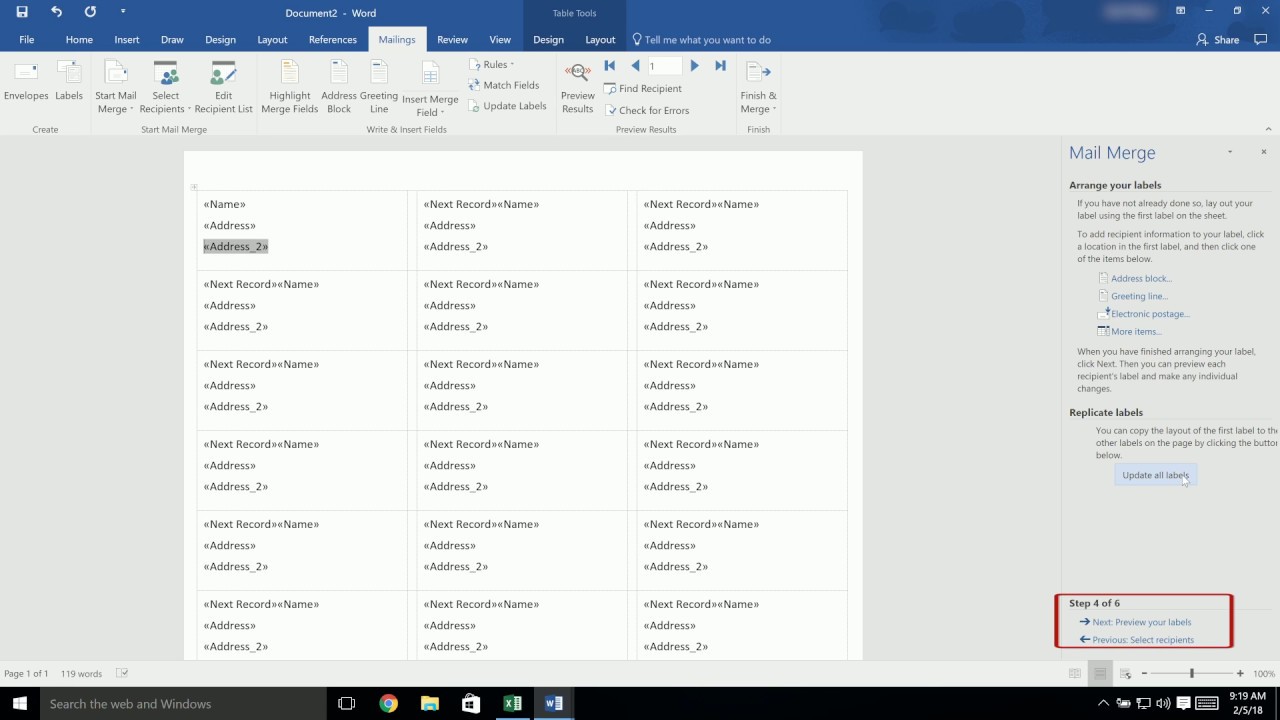
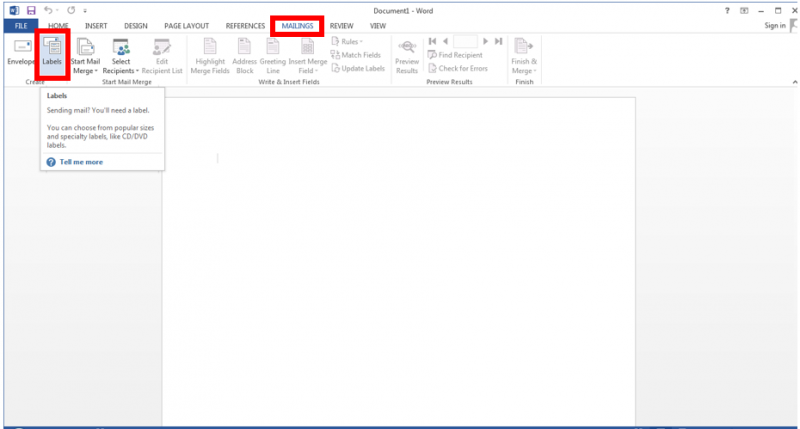
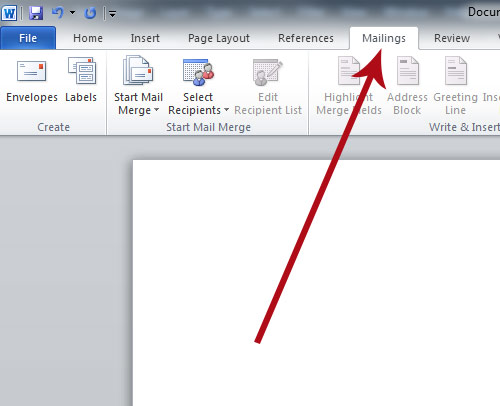
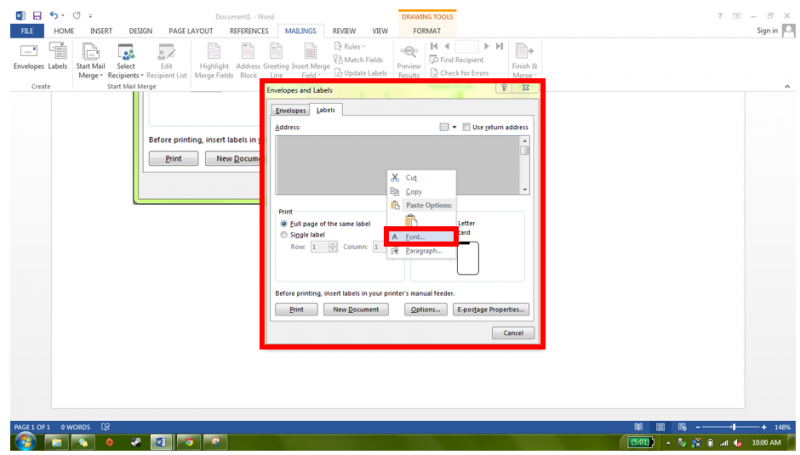
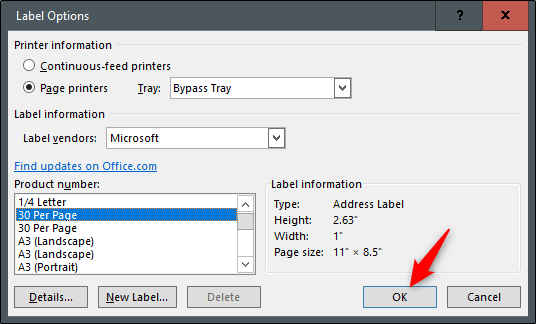
- Click or tap the “Mailings” tab on the command ribbon and then click or tap “Labels” in the Create group.
- Enter the text for your label in the Address box on the Labels tab.
- Click or tap the radio button for “Full page of the same label.”
- Click or tap “Options” to open the dialog box.
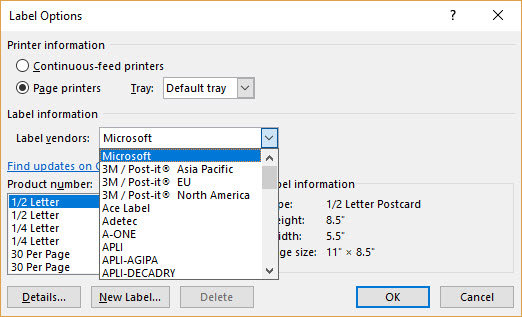
How do I create labels in Word 2016?
Follow these steps:
- Click the Mailings tab.
- In the Create group, click the Labels button.
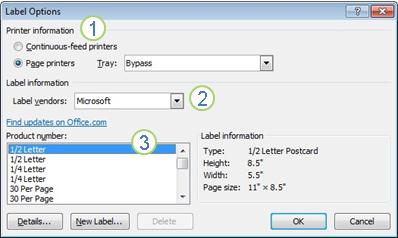
- Ensure that the proper label format is chosen in the lower-right part of the dialog box.
- Type the label’s text into the Address box.
- Ensure that the item Full Page of the Same Label is chosen.
- Click the New Document button.
What is label in MS Word?
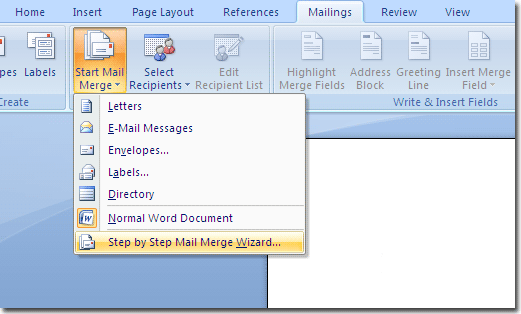
Labels refer to the information or Address (in particular) we want to get displayed on products, banners, etc. We can also set the quantity of the labels we want and can print them instantly. Follow the steps to get labels in MS Word: Step 1: Go to the Mailings bar and select the Labels option under the Create bar.
How do you label a JPEG?
Select “Markup,” tap the “+” icon and select “Text.” When the text box appears on the photo, double-tap it to raise the keyboard. Type the caption and use the options at the bottom of the screen to change the font, color and size. Drag the caption to wherever you want it and tap “Done.”
How do I scan photos into labels?
Get started scanning your pictures in five easy steps.
- Buy the Right Equipment. You’ll need a computer and a scanner to scan your old family photos.
- Clean Your Scanner and Prepare Photos for Scanning.
- Adjust Your Settings.
- Start Scanning.
- Label and Edit Your Images.
How do I write on a JPEG image?
How to Add Text to an JPG Image
- Open your photo editing program. How you open programs will depend on your operating system.
- Open the JPEG image.
- Click your program’s “Text” tool.
- Click on the image where you want to insert the text.
- Type your text.
- Select your font color, size and typeface.
How do you write on photo paper?
When it comes to writing on glossy paper, it’s best to go for those with alcohol or oil-based ink since they dry faster. It’s best to avoid gel pens when writing on photos. Gel pen ink, made from an oil and water emulsion, will likely smear on photographs.
How do you put captions on pictures?
- Choose a Photo Caption That Fits the Platform.
- Use a Conversational Tone and Present Tense.
- Decide on the Purpose of Your Caption.
- Know Who Your Audience Is.
- Identify the Main People in Your Photo.
- Use a Quote or Lyrics Wisely.
- Add Value with Your Photo Caption.
- Create Involvement With Your Photo Caption.
How do I edit text in a picture in Word?
Click the picture to reveal the “Format” tab. Press the “Corrections” option to reveal the dropdown. This will reveal to you how to edit image text in word. Apply the required correction to complete the process in full.
How do I make labels the same in Word?
Microsoft Word: Create a Sheet of the Same Label
- From the Mailings tab, click the Labels button in the Create group on the left.
- In the Address box at the top, type the address or other information that will be on each label.
- In the Print box on the left, select Full page of the same label.
How do I make decorative address labels in Word?
- Choose your shape. Beginning with a blank document, click on the “Insert” tab, select “Shapes,” and choose the desired shape for your label.
- Adjust your outline and fill settings.
- Add a layer, if desired.
- Add your text.
- “Group” your label.
How can I turn a jpeg into a PDF?
How to convert JPG to PDF online:
- Upload your image to the JPG to PDF converter.
- Adjust the letter size, orientation, and margin as you wish.
- Click ‘Create PDF now!’ and wait for the conversion to take place.
- And that’s all there is. Save the converted PDF to your computer.
How do I add text to a JPEG image in paint?
To add a text box in Paint, open an image with the program and locate the “A” symbol in the “Tools” group of the “Home” tab. Click the “A” and then click on the image and drag the mouse pointer to place a text box. To resize the text box, click and drag one of the small squares around the edge of the box.
Can you write on a scanned document?
Browse to the scanned document and double-click it, then click the “OK” button to insert it. Format the text in the text box the same way you would when typing text in a Word document, using the Font section of the ribbon. You can try to match the text in your text box with any text already on your scanned document.
The best way to spice up a label is to add a picture or other graphics. Obtain the labels you need.
![]() How To Insert Figure Captions And Table Titles In Microsoft Word
How To Insert Figure Captions And Table Titles In Microsoft Word
Try to spice things up by adding color fancy fonts and formatting.

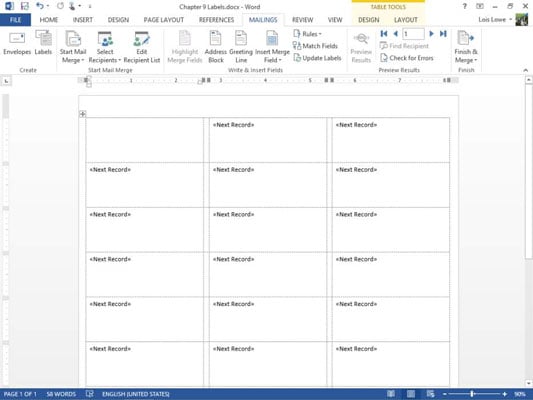
How to label pictures in word. All other office apps. To word those items are all the same thing whether you use a wizard or mail merge. Images and text can add a ton of value to your labels.
Insert a picture graphic clipart etc. Insert a caption for a picture. Word lets you print sheets of identical labels but they contain only boring text.
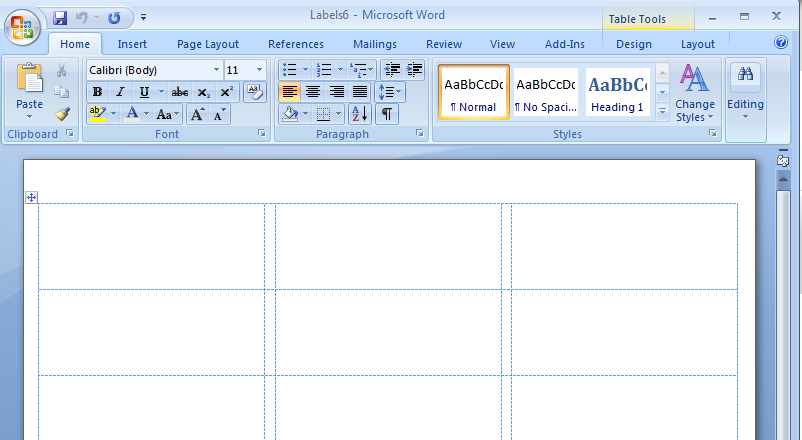
Create a blank new document. Images on labels in word are created in the mailings tab on the ribbon. Click the mailings tab.
This tutorial will explain how to format label text and add graphics into microsoft word. You can use words label wizard to generate business cards postcards event tickets shipping labels and more. For example have the text wrap around the photo or insert the picture inline with the document text.
You can also create your own default caption label by clicking new label and then adding your caption in the label box. Be sure to make it small enough to fit on the label you may have to guess at first. Add a text box under or near the picture to caption.
In the create group click the. That you want to use on your label. For instance you can add your logo to your business return address labels and add names to your product labels amongst many other uses.
How to format label text and add graphics in microsoft word. Word provides a variety of options that change the layout of pictures. Locate the tools menu.
This wikihow teaches you how to set up and print a template for a single label or multiple labels in microsoft word. Click on the letters and mailings and then click envelopes and. Labels come in different sizes and for different.
However doing this can be a bit complicated at first but once you get a hang of the process itll. Word will automatically number the new labels for you. Inserting images onto word label templates.
How to create labels in microsoft word. To change how the image appears in the document select the image then go to the layout tab.
 Don T Delete Office 365 Sensitivity Labels Office 365 For It Pros
 10 Things You Should Know About Printing Labels In Word 2010
 How To How To Print A Sheet Of Address Labels Using Create
 Adding An Image To Each Label
 How To Label Tables And Figures In Microsoft Word
 How To Format Label Text And Add Graphics In Microsoft Word
 Avery Templates In Microsoft Word Avery Com
 Using Office 365 Sensitivity Labels Petri
 How To Create Mailing Labels In Word
 Printing Envelopes And Labels Part 2 Labels Legal Office Guru
 Barcode Labels In Microsoft Word 2016 2013 2010 Or 2007 Mail Merge
:max_bytes(150000):strip_icc()/Untitled-5b74f70f46e0fb00505bf6df.jpg) How To Make And Print Mailing Labels In Microsoft Word
How To Make And Print Mailing Labels In Microsoft Word
 How To Make Beer Labels Beer Syndicate
 Microsoft Excel Create And Print Mailing Labels For An Address List
 How To Choose An Avery Label Template In Word 2010 Solve Your Tech
 How To Put A Picture On A Mailing Label In Microsoft Word Office Software Help
 Changing Default Label Settings Word 2013 It Services
 How To Create Mailing Labels In Word
 Solved Trying To Format Word To Use 4 X 2 Labels
:max_bytes(150000):strip_icc()/ScreenShot2019-12-05at8.52.06AM-4d5d44f67534444a8204fc7e0741720e.jpg) How To Make And Print Mailing Labels In Microsoft Word
How To Make And Print Mailing Labels In Microsoft Word
 How To Format A Label Template In Microsoft Word Chron Com
 3 8 X 5 8 Removable Label Template Ms 610 Macolabels
 Create Label In Word 2010
 Creating Custom Labels Microsoft Word
 Easily Create Labels With Microsoft Word Helpmerick Com
 Bar Coded Labels
Images On Labels In Word Mission Critical Training
 Solved Label The Word Window Elements Shown In Figure D 21
 How To Create Mail Merged Labels In Word 2013 Dummies
Create a blank new document. Inserting images onto word label templates.
Avery Templates In Microsoft Word Avery Com
You may need to drag the text box into the position you want.
How to label a picture in word. Word will automatically number the new labels for you. Add a text box under or near the picture to caption. Be sure to make it small enough to fit on the label you may have to guess at first.
In this video we show you how to label or tag an image inside a word document so that people who use screen readers can engage with the image. The best way to spice up a label is to add a picture or other graphics. Labels for tables and figures are known as captions or legends.
Images and text can add a ton of value to your labels. Images on labels in word are created in the mailings tab on the ribbon. Click the mailings tab.
How to insert a label in microsoft word. In the create group click the. This tutorial will explain how to format label text and add graphics into microsoft word.
That you want to use on your label. As with tables make sure to number the figures in your document sequentially and to use labels that explain the data clearly and accurately. Word lets you print sheets of identical labels but they contain only boring text.
Try to spice things up by adding color fancy fonts and formatting. Insert a caption for a picture. Click inside the text box and type the text you want to use for a caption.
You can use words label wizard to generate business cards postcards event tickets shipping labels and more. All other office apps. How to format label text and add graphics in microsoft word.
To word those items are all the same thing whether you. For instance you can add your logo to your business return address labels and add names to your product labels amongst many other uses. Figures and graphs usually need to have a label positioned below the figure or graph.
Click on the letters and mailings and then click envelopes and. Locate the tools menu. Insert a picture graphic clipart etc.
 How To Print Labels In Word 2011 With Mail Merge Gilsmethod Com
How To How To Print A Sheet Of Address Labels Using Create
 Create And Print Labels Office Support
 How To Create A Label Design In Word Label Templates Using Plain Text
 How To Mail Merge And Print Labels In Microsoft Word
Barcode Labels In Microsoft Word 2016 2013 2010 Or 2007 Mail Merge
How To Make And Print Mailing Labels In Microsoft Word
 Microsoft Word 2003 Label The Parts
 How To Make Pretty Labels In Microsoft Word
Easily Create Labels With Microsoft Word Helpmerick Com
 Microsoft Word Labels Template Misse Rsd7 Org
 How To Insert Graphics Into Word Label Documents Techrepublic
 99 1mm X 38 1mm Blank Label Template Microsoft Word Eu30011
 Changing Default Label Settings Word 2013 It Services
 Brother Label Printer And Microsoft Word
 Using Microsoft Word To Print Labels Label Line
 Microsoft Word Labels Mailmerge Problem Only Getting One Label
 How To Create And Print Labels In Word
 How To Make Pretty Labels In Microsoft Word
How To Format A Label Template In Microsoft Word Chron Com
How To Create Mailing Labels In Word
 Solved Label The Word Window Elements Shown In Figure F 25
 How To Add Images And Text To Label Templates In Microsoft Word
How To Label Tables And Figures In Microsoft Word
Solved Trying To Format Word To Use 4 X 2 Labels
How To Make Beer Labels Beer Syndicate
 How To Create Mailing Labels In Word
 How To Turn On The Label Template Gridlines In Ms Word Sheetlabels
 Create And Print Labels Without Using Mail Merge In Microsoft Word
 Changing Label Sizes Microsoft Word
 How To Print Address Labels From Word 2010 Solve Your Tech
 How To Print Labels In Word Pages And Google Docs
 Mail Merge For Dummies Creating Address Labels Using Word And
Microsoft Word is an excellent option for editing and revising documents, since its “Track Changes” and comment features make it easy to highlight revisions and leave notes for others. But if your document includes photos or other images, leaving specific feedback on those elements gets a little more complicated.
If you’re dealing with detailed photos or images, you need to be able to precisely point out key areas to make your feedback effective. Annotating a picture can help you do this, making it easy to mark up photos for others to review later.
Annotating images in Word isn’t difficult once you’re familiar with the process, and it saves you the hassle of having to use another platform to provide feedback on images. The following steps can help you annotate a picture in Word.
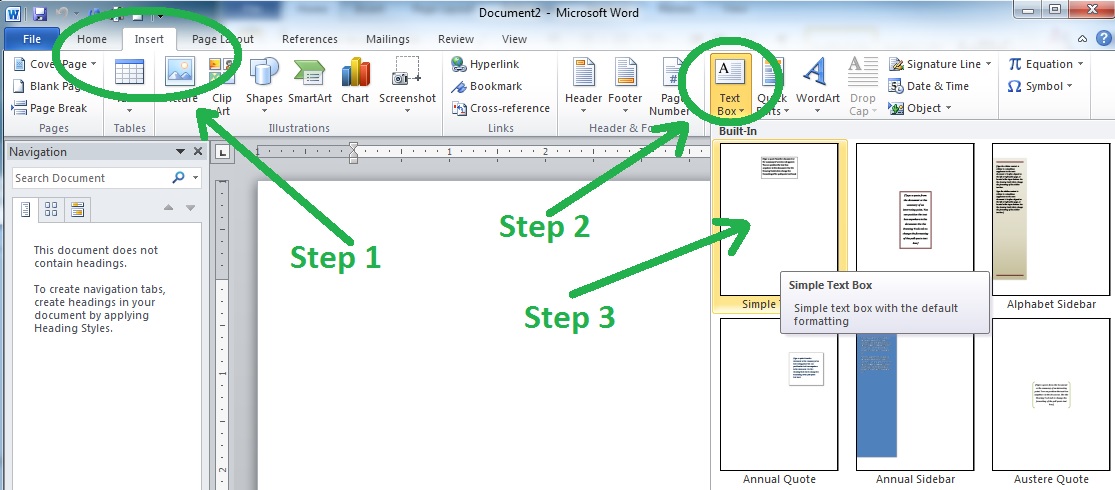
To start, you’ll need to insert a picture in a document.
- Open a new Microsoft Word document.
- Use the Insert tab in the top toolbar to select the Pictures option.
- Once the Insert Picture dialog box opens, you’ll need to locate the folder containing the image you want to use.
- Click on the photo and select Insert.
Once you’ve inserted your photo into the document, you can start the process of annotating the picture.
- Click on the photo so that handles (circles around the edges of the image) appear.
- Right-click on the image, then select Draw and Annotate.
- Click on Text Box, then click on the area of the image where you want to add a comment.
- Type your comment in the box. You can also add shapes like arrows to further clarify your notes.
- Click Save and Close.
Pro Tip
Annotate pictures with ease using Jotform’s free annotate picture widget.
Edit your annotations
In the Draw and Annotate screen, you can position your callout text box to draw attention to your comments and indicate which photo or area of a photo you’re referring to. Click on the image to drag the whole shape to reposition it.
It’s also possible to edit the annotation’s appearance. Using the menu in the Draw and Annotate screen, you change the font style, size, and color of the text, as well as the fill color for the box, for a customized look.
Use Annotate Picture
Microsoft Word isn’t the only platform that makes it easy to annotate images and illustrations. You can also annotate images right in Jotform. By equipping your forms with the ability to annotate pictures, you can quickly gather feedback and input from a variety of audiences. For example, you can
- Ask your design team for feedback on a new ad design.
- Get feedback from your customers about a new product idea or layout.
- Have your team collaborate on rebranding and logo design.
- Use photos as part of a quiz or test for students.
Jotform’s Annotate Picture widget makes it easy for users to write on your pictures right within your forms. Users can leave notes about the image or even draw on it to point out something.
The Annotate Picture widget is user-friendly. It features control buttons that are clear and intuitive, allowing users to add text, arrows, and shapes to a picture. Users can also change the color palette for the exact look that they want to create.
To use the Annotate Picture widget, all you have to do is select it from the list of widgets in Jotform’s Form Builder and drag and drop to add it to your form. You can add other form elements like e-signature fields, file uploads, and more, customizing the form to your needs.
Once you’ve added your form elements, you can design the form for the exact look you want. Change the colors or even add custom CSS to match your company branding.
After getting your form just like you want it, you can share it with a link, embed it into your website, or email it to your email lists. The form will include the Annotate Picture widget, allowing followers to comment on your images as needed.
Additional tips for annotating images
Annotating pictures can be a very helpful way to edit photos and collaborate with others. Keep in mind that if you’re working with multiple versions of Word documents, you’ll need to open each document to review the feedback.
Using Jotform makes that process a bit easier. You’ll receive all of your form responses in a single location, thanks to Jotform Tables, which functions like a database for all of your form responses. This centralized spreadsheet of responses makes it easier to organize and review feedback, so you’re less likely to overlook something important.
This article is originally published on Jun 09, 2022, and updated on Jan 27, 2023.
The labels would be in the textbox. Click inside the text box and type the text you want to use for a caption.
 Microsoft Word 2003 Label The Parts
Select the picture and text box and then on the picture tools format tab click group.
How to label parts of a picture in word. To set a specific size for the image. First and foremost open up your word. Click on the letters and mailings and then click envelopes and labelsstep 2 click the labels tab.
Click into the first label on your page. Right click the image then select size and position. In order to get to the drawing toolbar in my version of word you have to use the following sequence.
In insert picture window choose the picture which you want to remove its background. Click single label and then identify the row and the column on the label sheet where youd like the label to be printed. In the envelopes and labels dialog box use the.
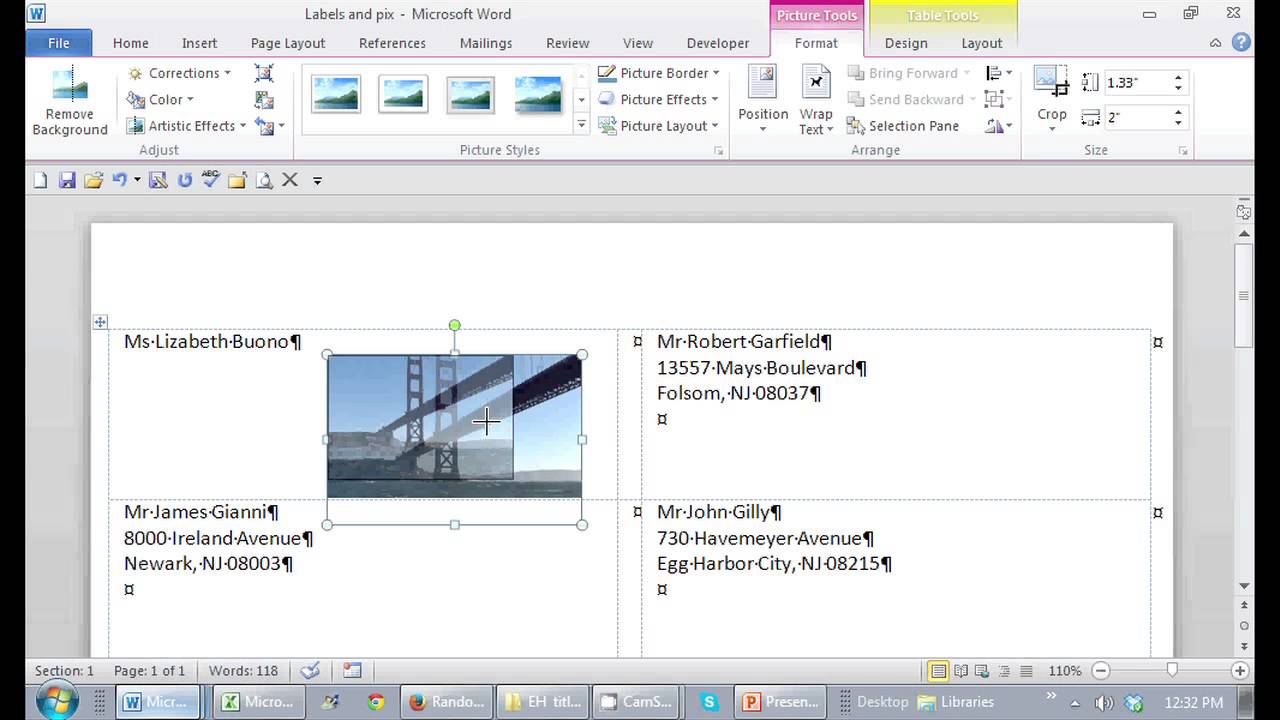
Does anyone know how to do this. To quickly resize a photo in word select the image then drag a sizing handle in or out to make the picture smaller or larger. Picture and clip art.
Next click picture icon in illustrations group. I am trying to insert arrows onto my pictures in word for mac but everytime i do the pictures move or reduce dramatically in size. Following are specific steps for you to get the result.
This thread is locked. Viewtoolsbarsdrawing so you basically would use the lines with or without arrows to point to the object in your picture which you wish to describe and connect the textbox to the other end of the line. Click full page of the same label to print a full sheet of the label.
From photographs to logos to clip art you can add virtually any type of image to your labels. Type in the address for each label note. Add a text box under or near the picture to caption.
Look at the office ribbon and click insert. You will see two options on the left hand side of the screen. If necessary enter or edit the label text in the address boxstep 3 select the text that you want to format.
Click the new document button note. Then click insert tab. Gratefully yours richard i cannot get the arrow to cross onto the picture without completely distorting the picture.
You may need to drag the text box into the position you want. Step 1 locate the tools menu. Well be adding a logo to our label so click on the picture option.
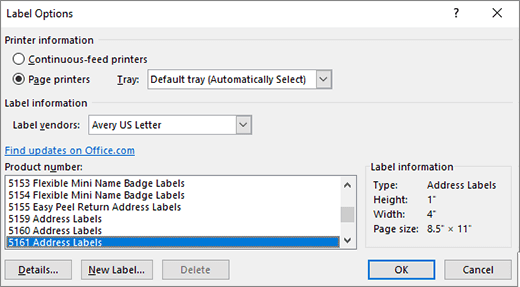
This will create a new page of labels with the graphic on each label. Button to select the type of labels you will be using for example avery 5261. Select the number of labels youre printing.
The labels are set up as a ms word table.
 Human Ear Anatomy Parts Of The Ear Word Search And Label By
 Solved 2 Parts Of Neuron Using The Provided Word List L
 Word 2007 Demo Part 1 Create Mailing Labels
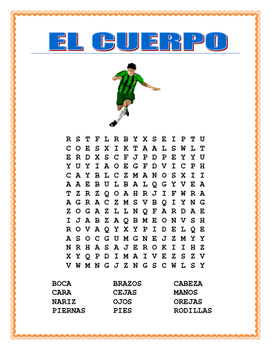 El Cuerpo Label El Futbolista Spanish Body Parts Amp Word Search Amp Puzzle
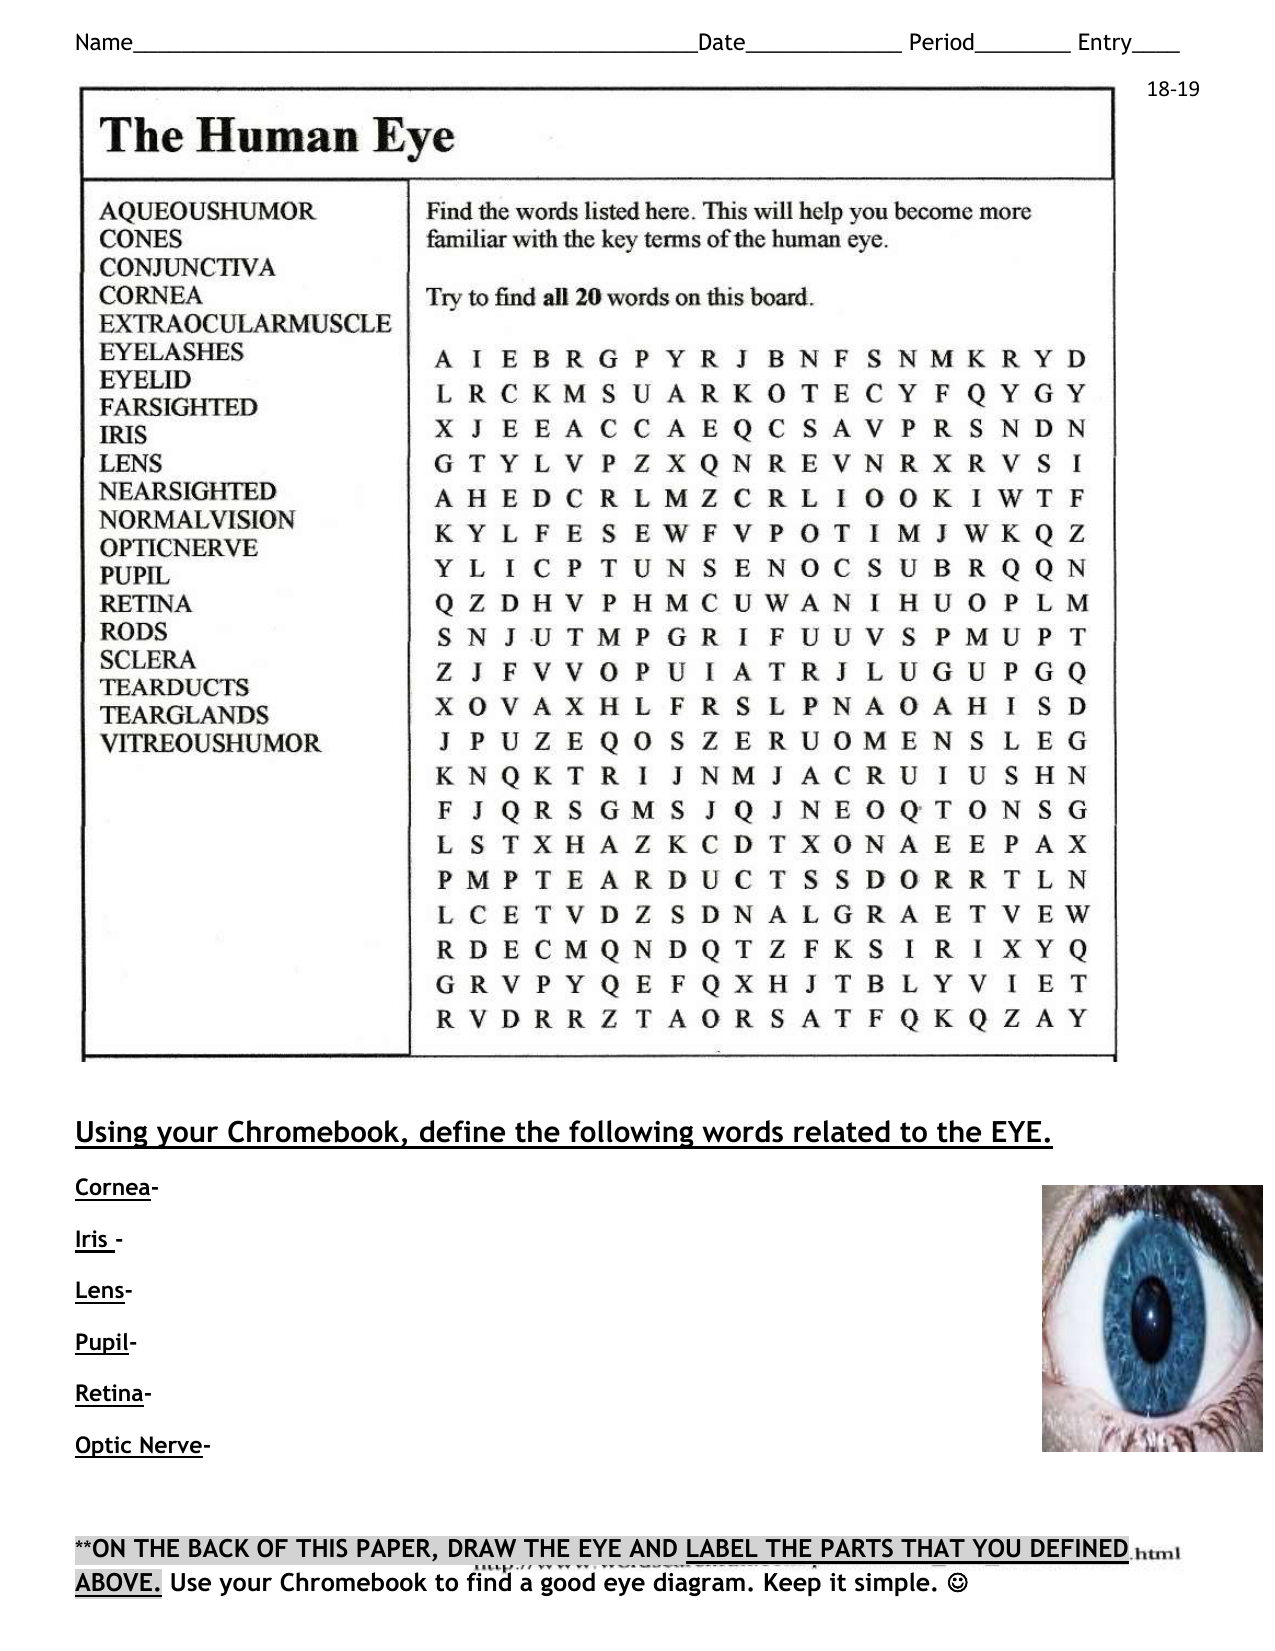 Human Eye Word Search And Vocab
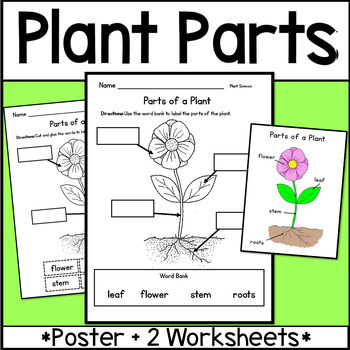 Parts Of A Plant Flower Label Parts
 Label The Parts Of A Book Parts Of A Book Kindergarten Books Books
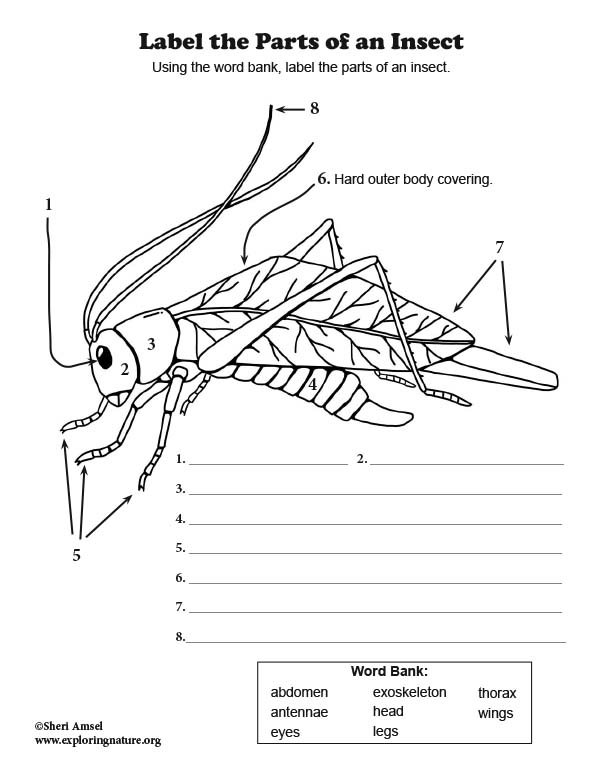 Label The Parts Of An Insect K 4
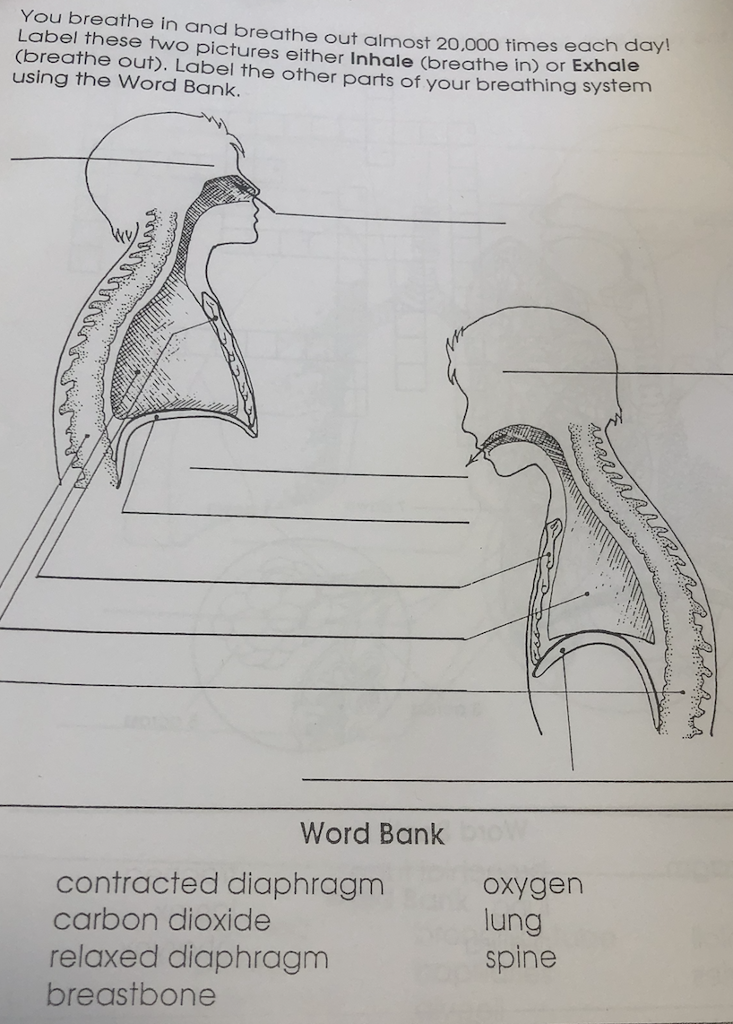 Solved You Breathe In And Breathe Out Almost 20 000 Times
 Word Business Letter Label
Word Business Letter Label
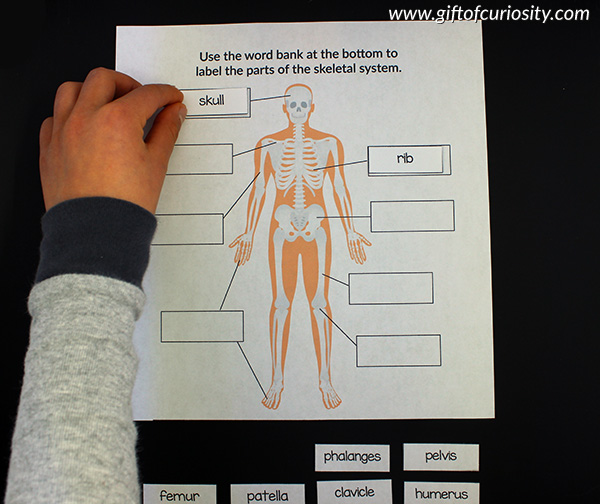 Label The Parts Of The Body System Gift Of Curiosity
 Label The Parts Of The Heart On The Diagram As Labeled On The
 Word 2007 Inserting Picture And Text On Label
 Can You Label The Parts Of A Book Parts Of A Book Kindergarten
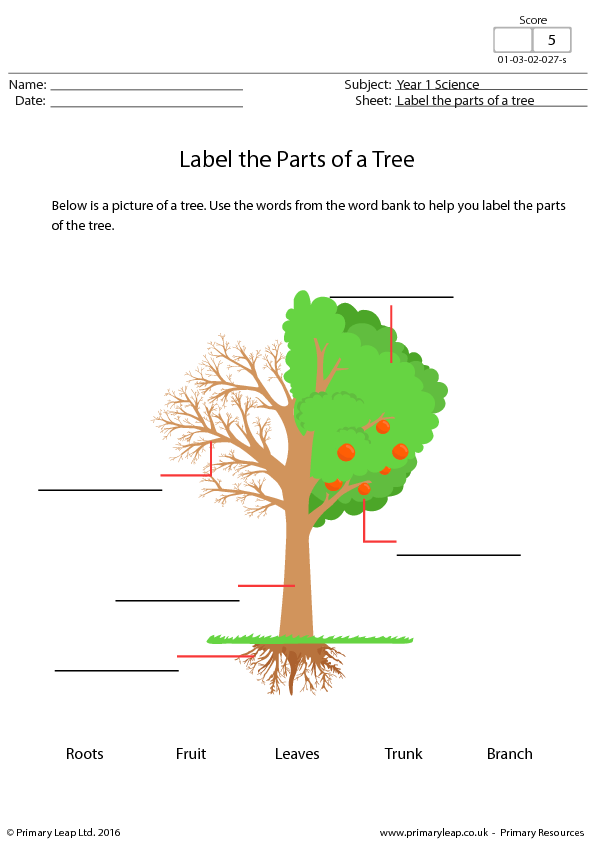 Label The Parts Of A Tree
 Getting Started With Microsoft Word 2010 The Word Interface
 Pin On School
 Label Parts Of A Seed Parts Of A Seed Plant Science Jack The
 01 Microsoft Office Word 2007 Introduction And Parts
Microsoft Word 2003 Label The Parts
 35mm Camera Parts
 Label Review Training Module 2 Parts Of The Label Page 4
 Label Body Parts
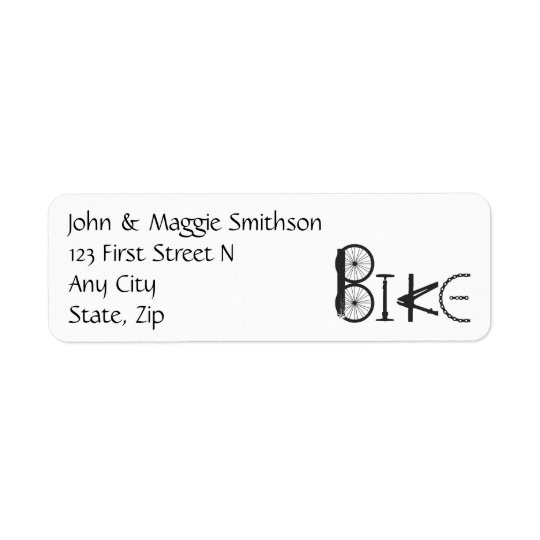
Bike Word Made Of Bike Parts Custom Address Label
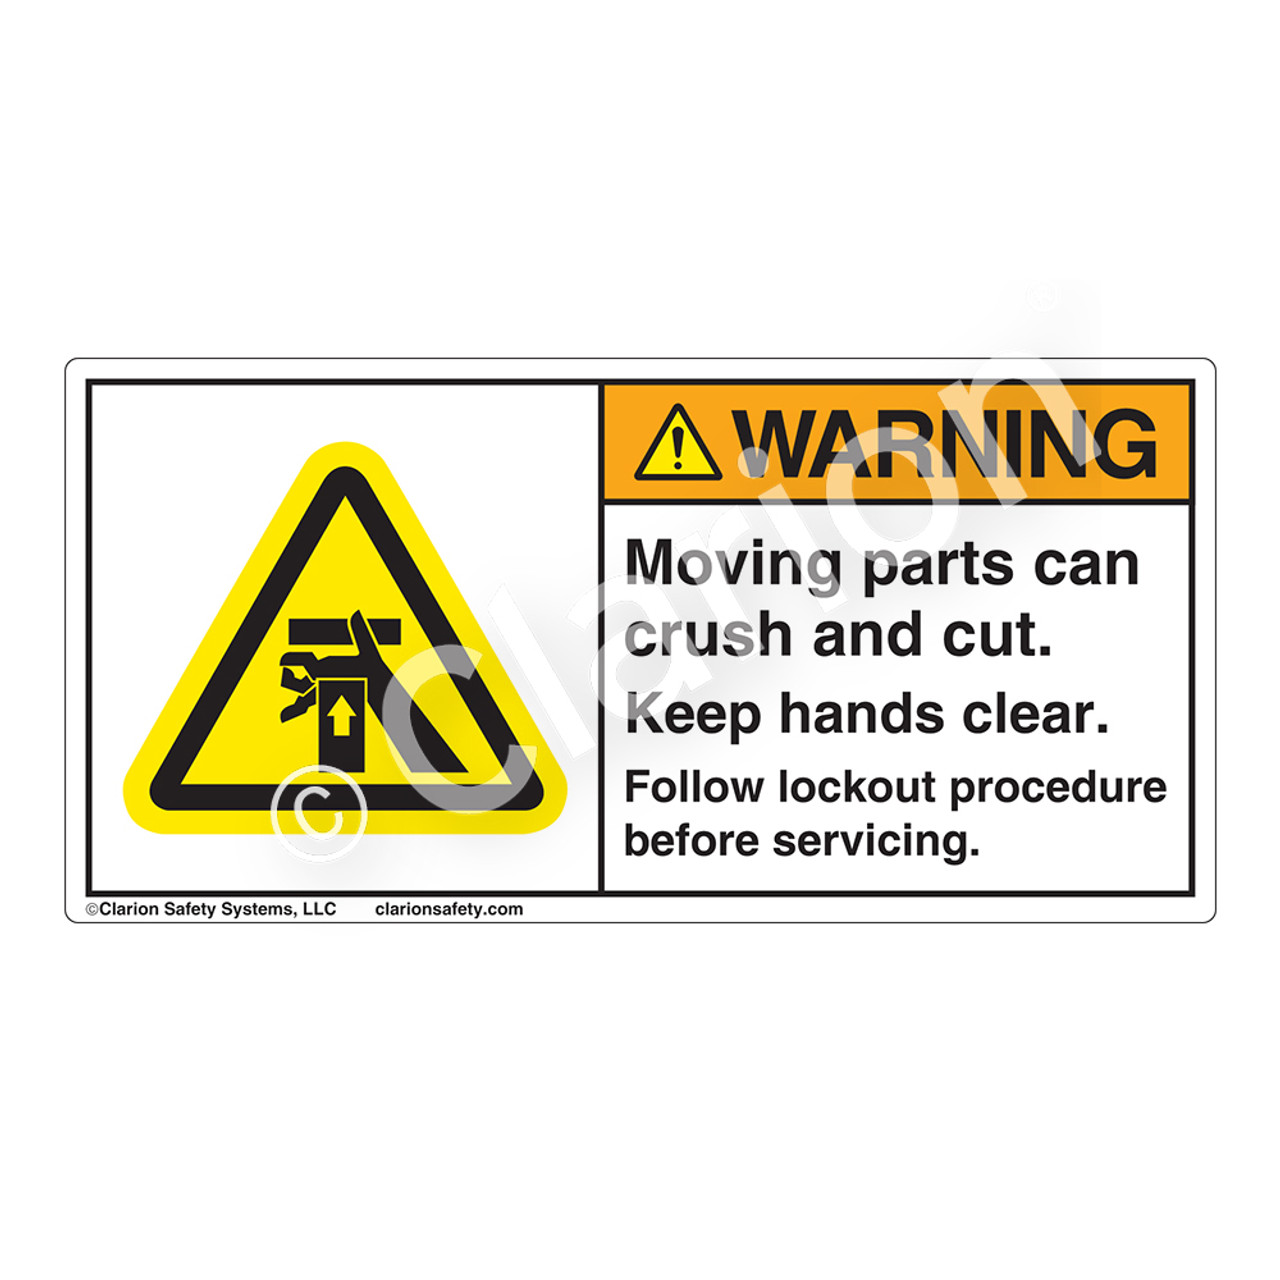 Warning Moving Parts Label H1054 388wh
 Parts Of A Map Worksheet Fill Online Printable Fillable Blank
 Worksheet Preview By Erin Flynn Blended Worksheets Wizer Me
 Labeling The Parts Of A Book Lessons By Sandy
 Fish Parts Activity Have Fun Teaching
 Label Parts Of Skin Human Body Activities Human Body Unit
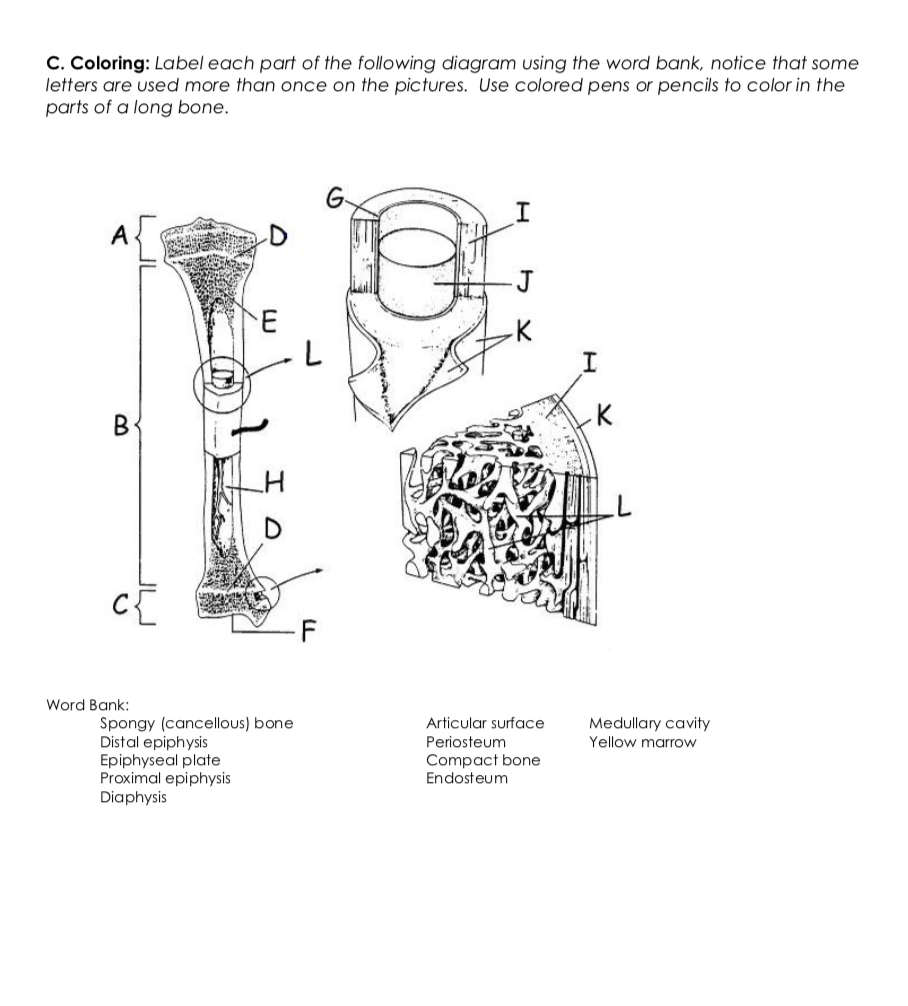 Solved C Coloring Label Each Part Of The Following Diag
 Type Bf Applied Parts Label Iec5333a
 Labeling The Parts Of The Microscope
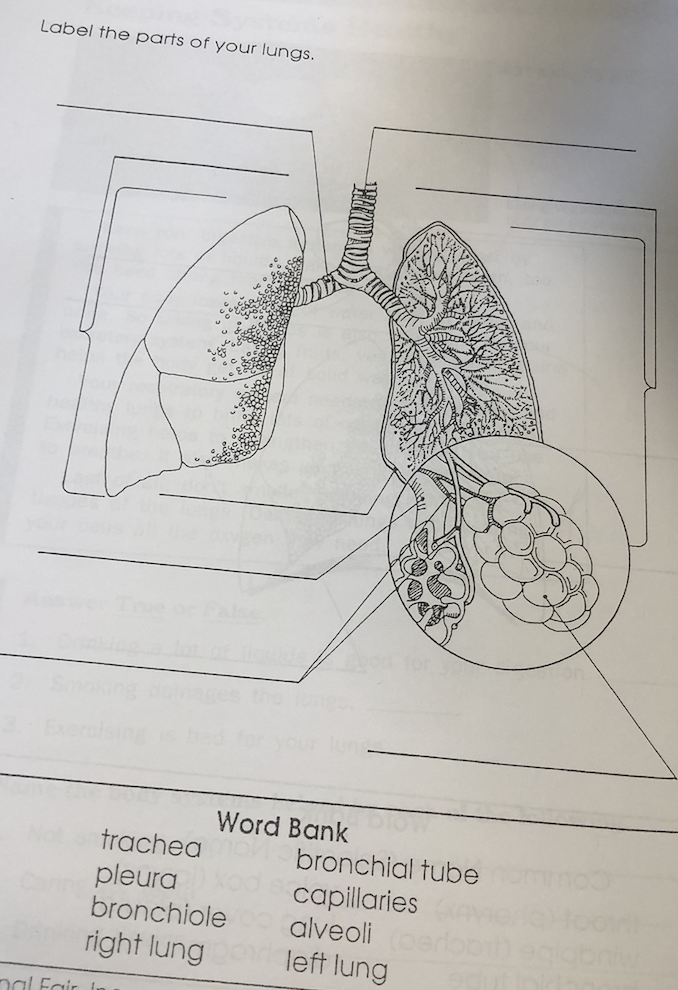 Solved Label The Parts Of Your Lungs Word Bank Trachea Pl
Microsoft Word offers functionality to create automatically updated numbers for figures, tables, and equations. You can define descriptions (captions) for figures in your document and reference them from the document content using the Captions feature. The numbering and links can be automatically updated on adding, moving, or deleting a figure.
In Microsoft Word, figures mean all visual objects other than tables and equations. You can add or create figures using:
- The Illustrations group of the Insert tab: pictures, images, drawings, charts, diagrams, screenshots, schemas, etc.,
- The Media group of the Insert tab: Online Video,
- The Text group of the Insert tab: text boxes, PowerPoint slides, Excel charts, diagrams, etc.
Note: Some publishers don’t use the term figure for maps (e.g., Chicago style).
Figures normally have the label Figure and a number followed by a caption. A caption is a short block of text that provides quick information about the figure:

and

Usually, figures have captions instead of titles. See how to create automatic numbers and titles for tables if you need to create titles instead of captions. See also:
- How to create captions and cross-references for equations,
- How to insert numbers, captions, and cutlines for photographs.
Note: You can create a custom label for some types of visual objects. See below how to do that. Remember that each type of object you label will be numbered sequentially within its group.
Attention! We highly recommend checking the formatting requirements, accepted by your college, university, company, or established on the project, etc.
Insert a caption for figures
To add automatically updated numbers and a short description (caption) for an object, select the object and do one of the following:
- On the References tab, in the Captions group, click the Insert Caption button:

- Right-click on the selection and select the Insert Caption… in the popup menu:
 or
or
 or
or


 or
or  or
or 
In the Caption dialog box:

If you are satisfied with the selected options, click the OK button. Otherwise, make any of the following optional actions:
Select the label and its position
- Under Options:
- From the Label dropdown list, select the item type you need:

- Figure (selected by default),
- Equation – see how to create captions for equations,
- Table – see how to create captions for tables,
- Another label (in this example, My Caption) was created using the New Label… button (see how to create a new label below).
Note: You may need to create a custom label according to the requirements. Some examples:
- If you have to follow the requirements such as the MLA (Modern Language Association) style, you need to use an abbreviation Fig. instead of a pre-defined Figure (e.g., “As shown in Fig. 7”).
- The Chicago style uses the word Example rather than Figure to identify samples of written music in a text (e.g., “As shown in Example 7”).
Remember, each type of object you label will be numbered sequentially within its group.
- From the Position dropdown list, select one of the options:
- Below selected item (selected by default for the Figure label), or
- Above selected item (selected by default for the Table label).
Notes:
- The captions are usually located under the figures.
- Some requirements, such as the APA (American Psychological Association) style, recommend placing captions above figures.
- From the Label dropdown list, select the item type you need:


Exclude label from caption
- Select the Exclude label from caption check box if you don’t need to add the label to the caption:
Some requirements (MLA and Chicago styles) recommend using the lowercase word figure (if it is not the first word in the sentence) instead of the automatically added Figure in Word cross-references.
When you insert a cross-reference in the text using the option Entire caption or Only label and number (see how to use cross-references in Word for more details), Word adds the capitalized label and number. You can see it in the Caption field of the Caption dialog box. E.g., “As shown in Figure 7” or “As shown in Figure 7 Masha in a new outfit”.
If the Exclude label from caption option is checked, Word adds the number without the label to the cross-reference. So, you need to type the word figure in the text (as required) and insert a cross-reference without the label (e.g., “As shown in figure 7”).

Add a new label
- Click the New Label… button to create a new label:
In the New Label dialog box, type a new label name:


Note: See also how to delete a custom label.
Modify caption numbering
- Click the Numbering… button if you want to change any of the numbering options:
In the Caption Numbering dialog box:

- In the Format dropdown list, select the numbering format you prefer:
- Select the Include chapter number check box to include the chapter number in the figure caption number. If you select this option, two more options will appear:
- From the Chapter starts with style dropdown list, select the heading level you need to include in the caption:
- In the Use separator dropdown list, select the punctuation you want to insert between the chapter number and the figure number:
- At the bottom of the dialog box, see how your choices will look in the Examples section. E.g., “Figure 2.7” means the seventh figure in chapter 2.
- Click the OK button.
- From the Chapter starts with style dropdown list, select the heading level you need to include in the caption:


Add a description
- To add the text of your caption, click after the figure number and enter your text. E.g.:
Notes:
- The caption is a short description of the object, indicating what it illustrates without reading anything else in the text.
- There is no official guideline for the length of this description. It may include additional information such as definitions of symbols, source citations, copyright statements, explanations of measurement units, etc.
- According to most requirements, if the caption for figures contains a complete sentence, it should end with a period. The period after the number is optional.

Using an AutoCaption
See Adding captions with AutoCaption.
Group a figure and its caption
According to all requirements, a figure and its caption should appear on the same page. Unfortunately, Word inserts captions without linking them to specific objects. A caption is like a separate paragraph that you can format to keep lines and paragraphs together, but this doesn’t help if you move an object. If you have a floating picture (pictures with the wrapping text options), you can see that paragraph with a caption moves separately from the picture.
To move objects with their caption as a single block, you need to group them. To group a figure and its caption, do the following:
1. Select the figure.
2. Make sure one of the With Text Wrapping choices is selected (see Text wrapping in the Word document):

Note: Word groups with text only floating objects. So, you should do this step before you insert your caption. If you have a caption already, copy its text to the Clipboard, delete it, do this step, then re-add a caption.
3. Add a caption using the steps of the section Insert a caption for figures above.
4. Select a caption, then hold down the Shift key and select the figure:

5. Do one of the following:
- On the Shape Format tab, in the Arrange group, click the Group command:

- Right-click one of the objects and choose Group -> Group from the popup menu:


Word puts a single box around the objects instead of separate boxes around each object:

After these steps, a text should flow around the figure and its caption, like one block. Also, the figure and its caption will stay together if you move them elsewhere on the page or document.
Edit or modify a caption
Microsoft Word creates caption numbers as fields.
![]()
See how to turn on or turn off highlighting of fields in a Word document to display all fields in a document with a gray background.
- Labels:
You can change the label if necessary. Be careful! Word for Microsoft 365 will:
- Update the reference if available,
- Not create a separate numbering since it does not perceive changes as a new label.
- Numbers:
DO NOT edit caption numbers! If you change a number:
- For non-critical changes, Word will update it, and you will lose your changes,
- Otherwise, the caption number may stop updating automatically.
- Text:
To add or modify a caption text, click on it and change what you need, like in a regular paragraph.
Do not forget to format a caption according to the requirements you use!
Delete a caption and an unnecessary label
If you need to remove some caption, select the full caption (full line or several lines) and press Delete. Do not forget to update fields in the document!
To remove the unnecessary label, do the following:
1. Open the Caption dialog box.
2. In the Label dropdown list, select the label you want to remove.
3. Click the Delete Label to remove a custom label:

Note: You can’t delete pre-defined labels: Equation, Figure, and Table.
Update caption numbering
Word doesn’t always keep up with changes in a document. Word automatically updates the caption numbers when you insert a new caption. After deleting or moving a caption, you should manually update a captions numbering.
To update fields in the document, select the entire document by clicking Ctrl+A, and do one of the following:
- Press F9,
- Right-click on any of the fields and select Update Field in the popup menu:


Note: Word doesn’t update a numbering in text boxes as in shapes! So, if you have floating pictures, their numbering doesn’t be updated until:
- You select every text box one-by-one and update numbering in each of them,
- Use a macro to update all fields (we don’t recommend macros due to security reasons),
- Update all fields by using the following workaround:
1. On the File tab, click the Options button:

2. In the Word Options dialog box, on the Display tab, under Printing options, select the Update fields before printing check box, then click OK to close the dialog box:

3. On the File tab, click Print (or press Ctrl+P):

You don’t need to print the document – only tell Word that you want to print!
4. Return to the document view by clicking the Return button:

All fields in the document should be updated.
So, your captions will be automatically updated, and you can be sure that the numbering and references are correct. We strongly recommend checking a document at least visually after changes!


If you’re writing a document that includes images, you may want to add annotations to those images to clarify what they represent. You can add callouts to your images to point out particular parts of the image and add text to describe those parts.
We will show you how to annotate an image directly in Word so you don’t have to use a third-party program.
First, insert an image into your document. To do this, click the “Insert” tab.

In the “Illustrations” section, click “Pictures”.
On the “Insert Picture” dialog box, navigate to the folder containing the image file you want to insert, select it, and click “Insert”.
Make sure the image is selected by clicking on it. In the “Illustrations” section of the “Insert” tab, click “Shapes”.
Click on one of the shapes in the “Callouts” section of the drop-down menu to select that shape.
The cursor changes to a big “+” symbol. Click and drag on the image to define the size and location of the callout.
Once you’ve defined the size of the callout, the cursor is automatically inserted into the center of the callout. Start typing to enter your text.
You can change the font, font size, and font style by selecting the text in the callout and selecting options from the mini toolbar that displays. If you’ve disabled the mini toolbar, you can use the formatting commands on the “Home” tab to format your text.
The fill color and outline color can also be changed. We’ll start with the fill color. Move your mouse toward the edge of the callout until it becomes a pointer with a crosshair.
Right-click on the callout and select “Fill” from the popup box above the popup menu.
Select a color from the “Theme Colors” section or the “Standard Colors” section of the drop-down menu. You can also access more colors or define a custom color by selecting “More Fill Colors”, experiment with a “Gradient” or a “Texture”, or use a “Picture” as the background on the callout.
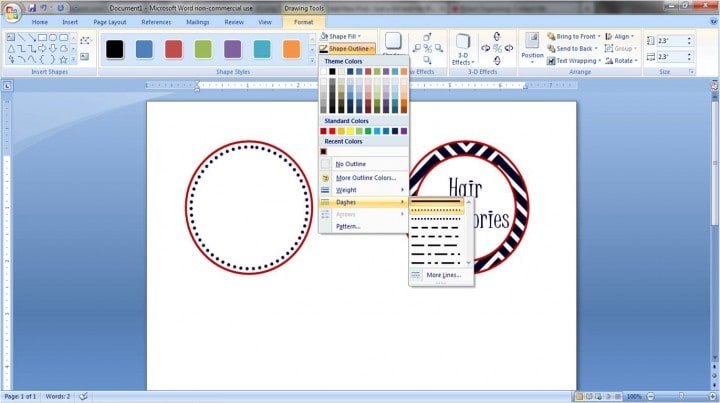
To change the outline color, right-click on the callout again and click “Outline”. Select a color for the outline of the callout, or select “No Outline” if you want to remove the outline. Select “More Outline Colors” to access additional colors or create a custom color for the outline. You can also specify the “Weight” of the line and whether the line is composed of “Dashes” rather than a solid line.
If you don’t like the position of the callout, move your mouse over the callout until it turns into a pointer with a crosshair. Click and drag the callout to the desired location.
Once you’ve moved the callout, you may need to reposition the callout arrow to point where you want. To do this, move the mouse over the callout until you see the pointer with the crosshair and then click on the callout to select it. Move the mouse over the handle at the end of the callout arrow until the cursor becomes a small arrow.
Click and drag the handle to move it where you want. The whole callout arrow moves to the appropriate side of the callout.
Use the other handles on the callout to resize the callout. When you move your mouse over a handle, the cursor turns into a double ended arrow. Click and drag to resize the callout.
Experiment with adding other types of shapes, lines, and text to your images using the “Shapes” on the “Insert” tab.
READ NEXT
- › How to Crop a Picture in Microsoft Word
- › How to Adjust and Change Discord Fonts
- › This New Google TV Streaming Device Costs Just $20
- › BLUETTI Slashed Hundreds off Its Best Power Stations for Easter Sale
- › The New NVIDIA GeForce RTX 4070 Is Like an RTX 3080 for $599
- › Google Chrome Is Getting Faster
- › HoloLens Now Has Windows 11 and Incredible 3D Ink Features
How-To Geek is where you turn when you want experts to explain technology. Since we launched in 2006, our articles have been read billions of times. Want to know more?