
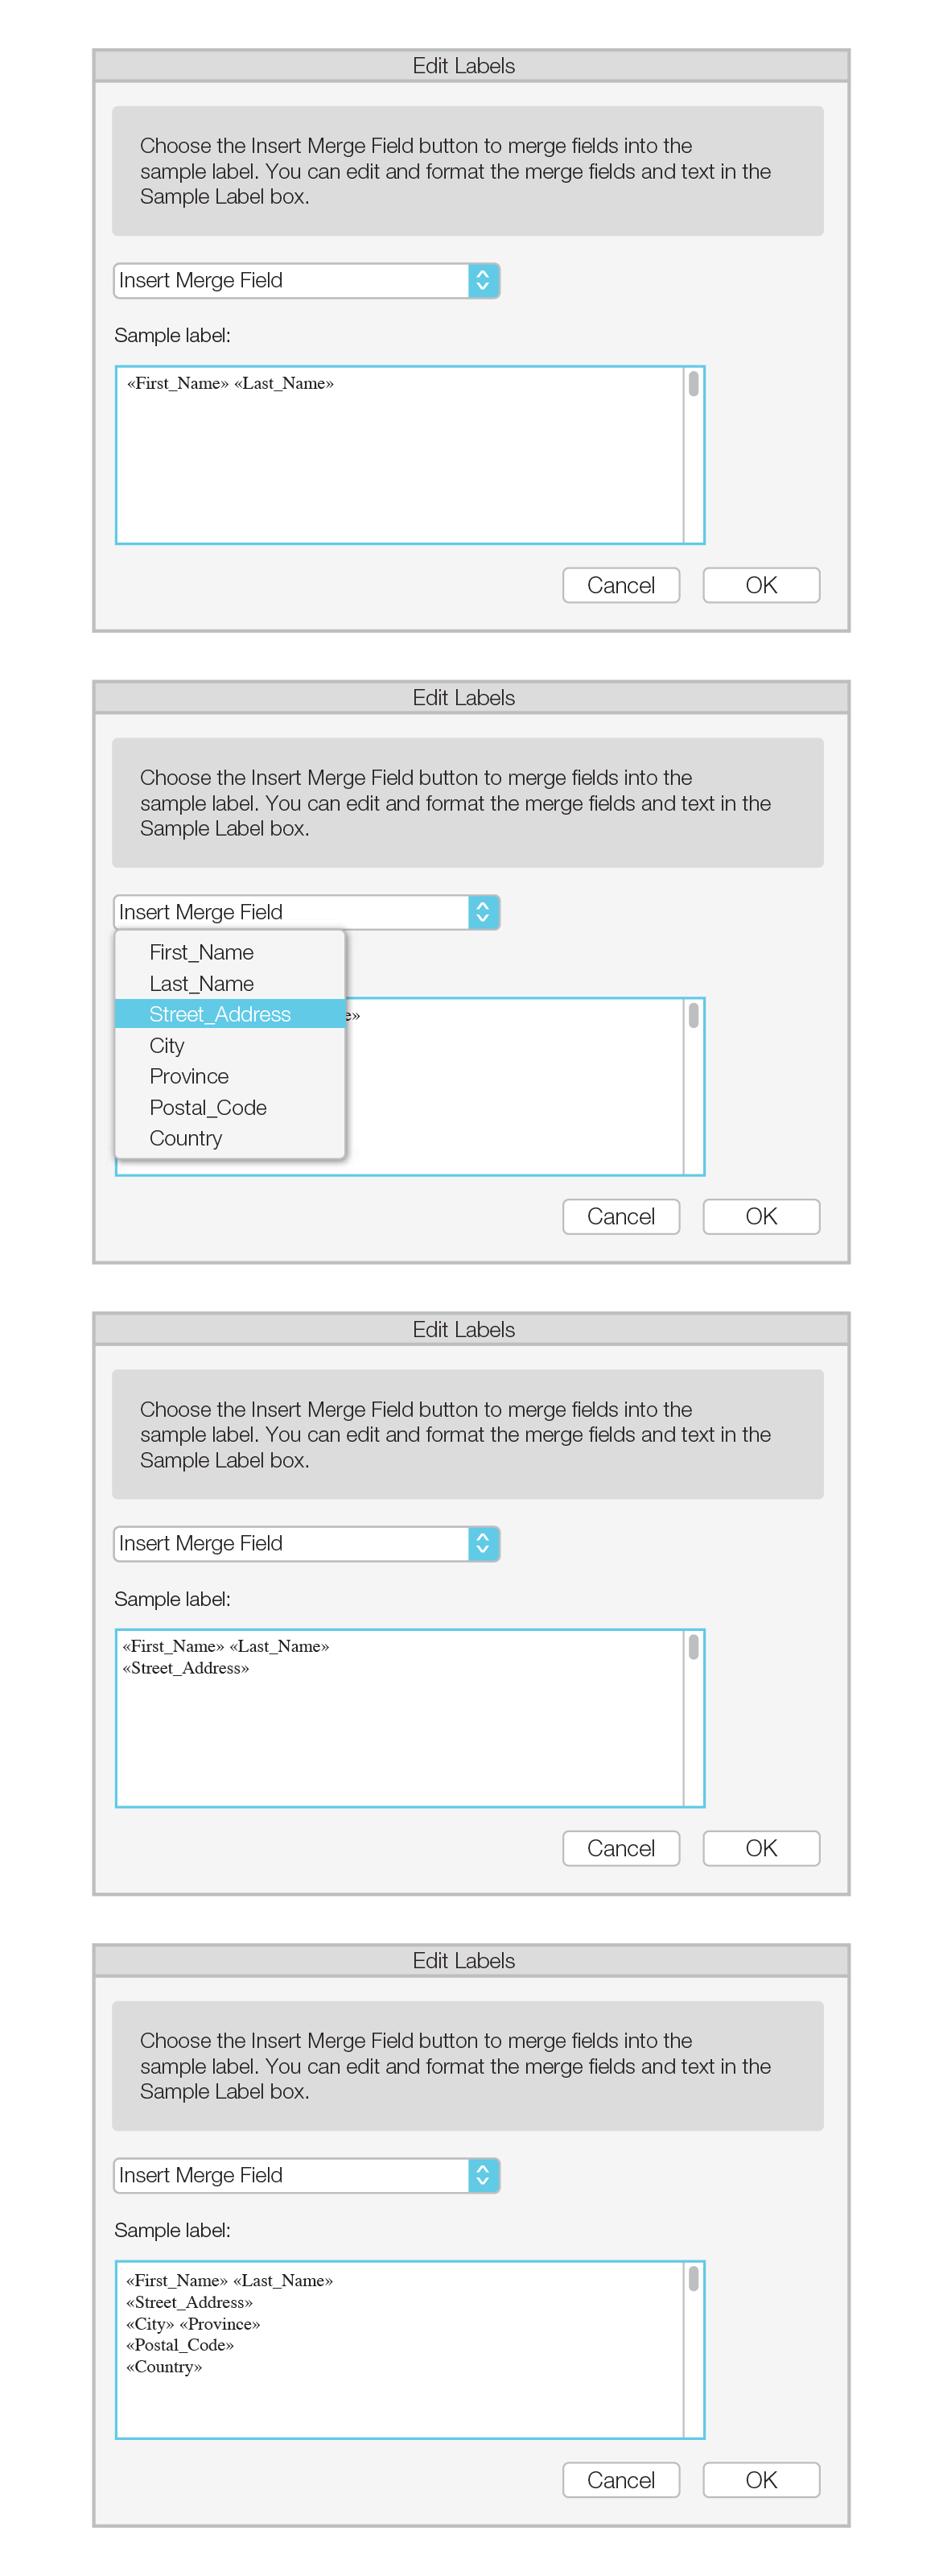
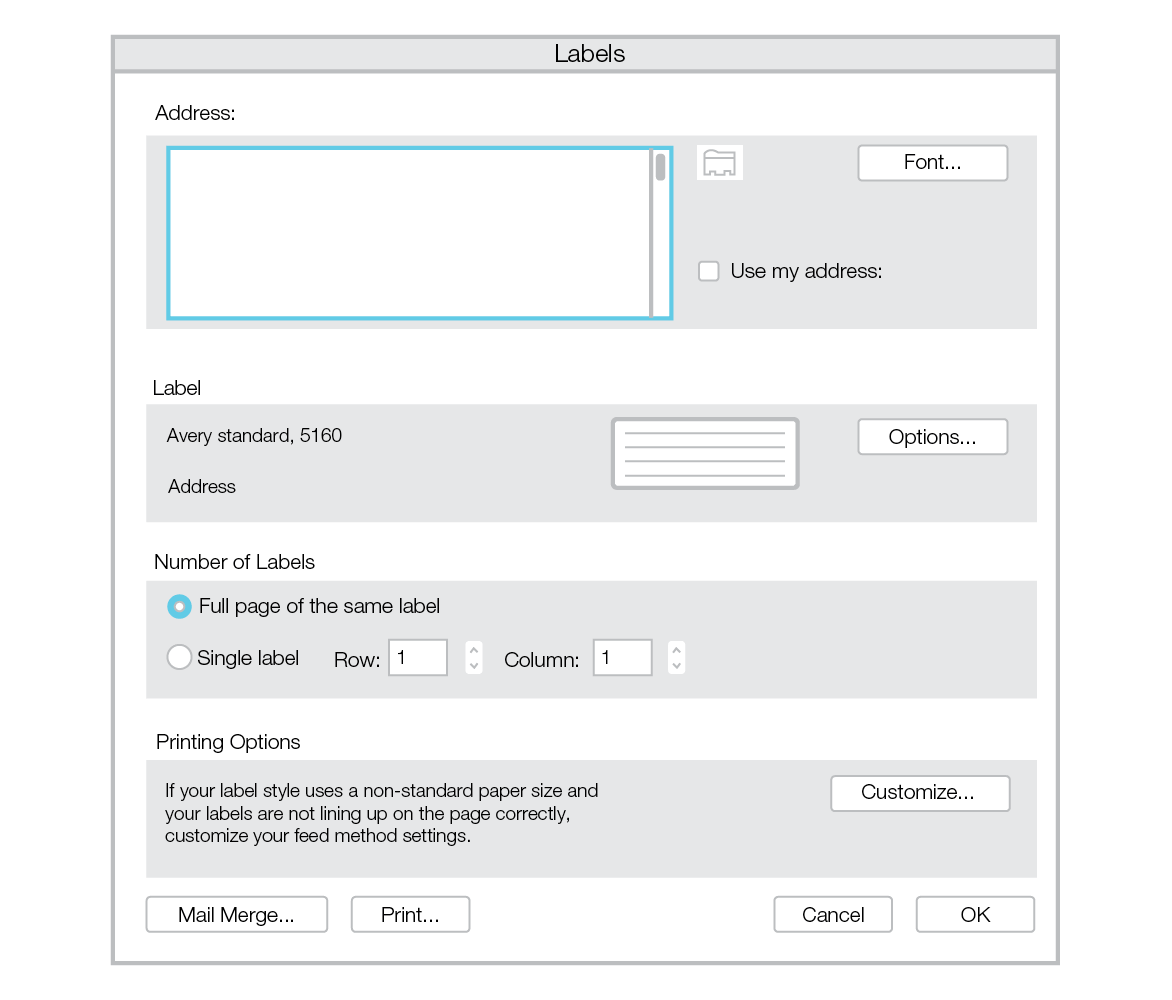
Create a single label with a graphic
-
Start by creating a New Document of labels. For more info, see Create a sheet of nametags or address labels.
-
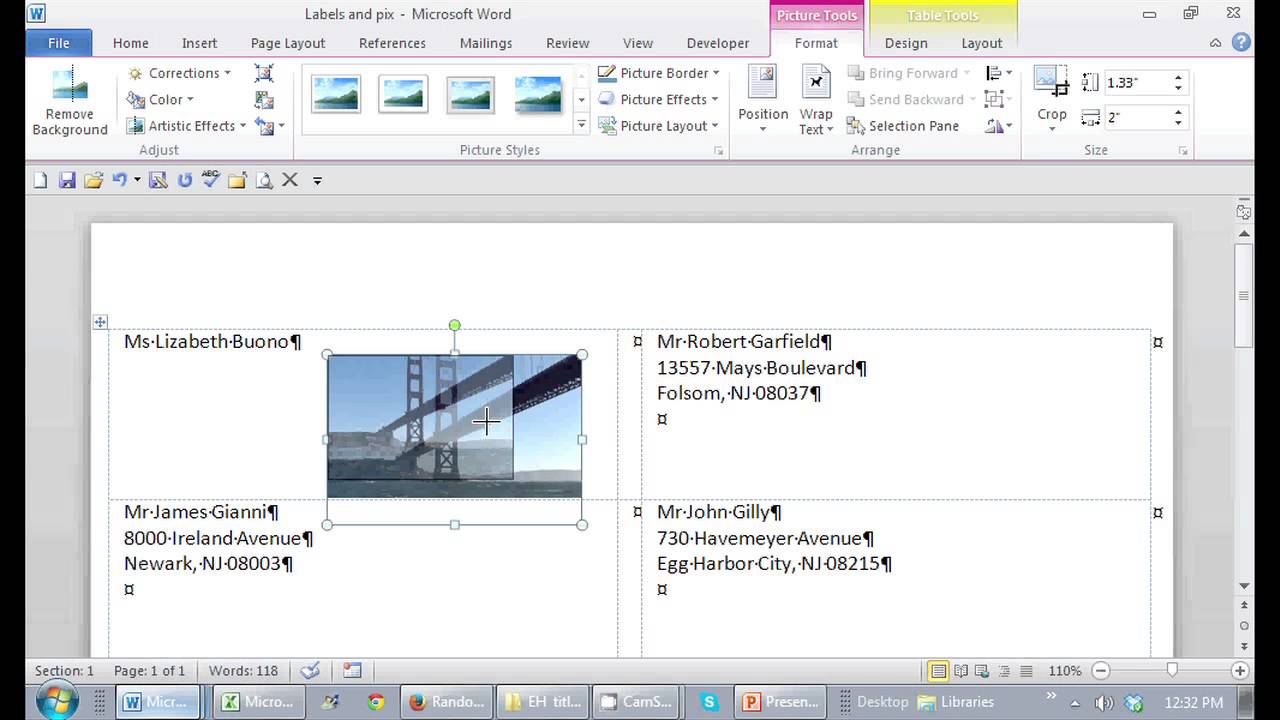
Insert a graphic and then select it.
-
Go to Picture Format > Text Wrapping, and select Square. Select X to close.
-
Drag the image into position within the label. and type your text.
-
Save or print your label.
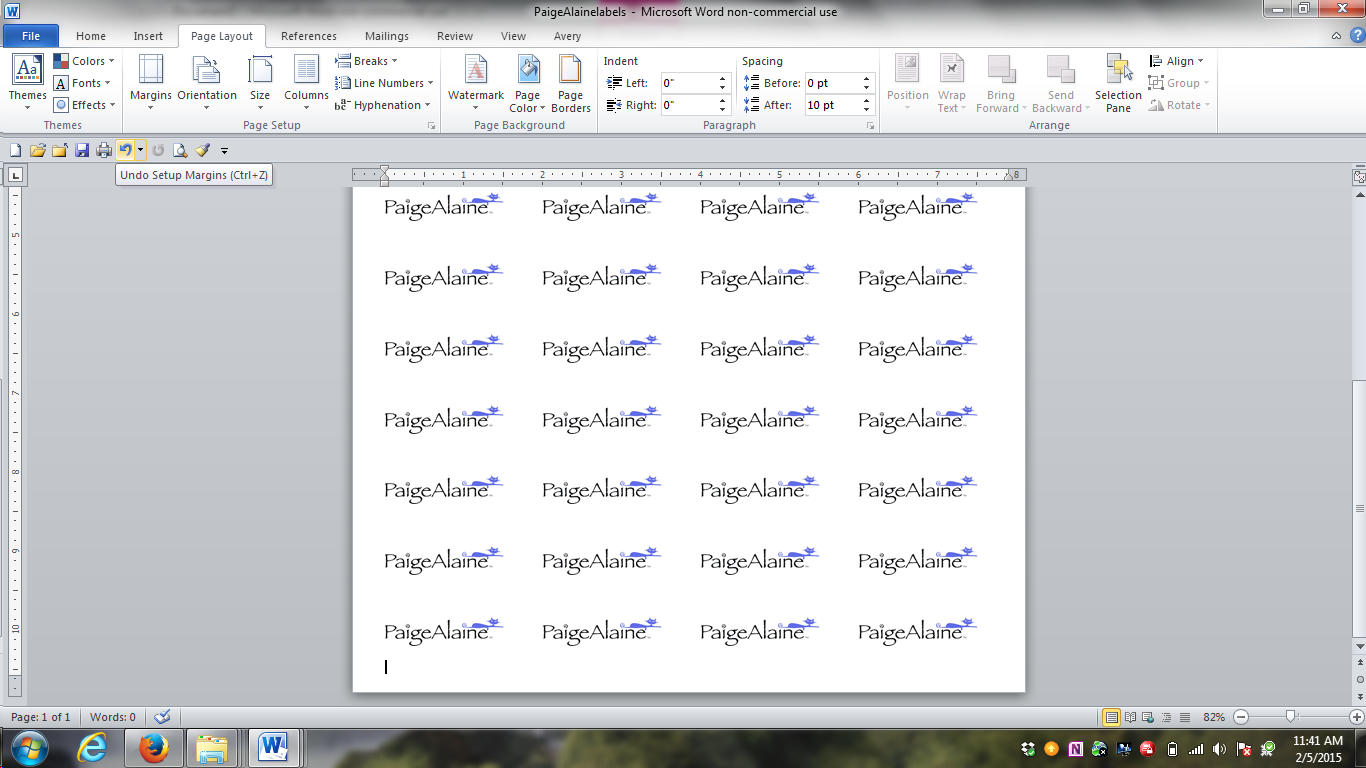
Note: To create a full sheet of labels, from your sheet with a single label, go to Mailings > Labels and select New Document again. This creates a sheet of labels with the graphic label repeated. Save or print that one, and delete the single label sheet.
You can create up to a full sheet of different labels with different graphics, just repeat each step with a different label.
This way is more involved than the previous method, but it sometimes works better on some graphic elements.
-
Follow the single label steps and create the label in the first position on the sheet.
-
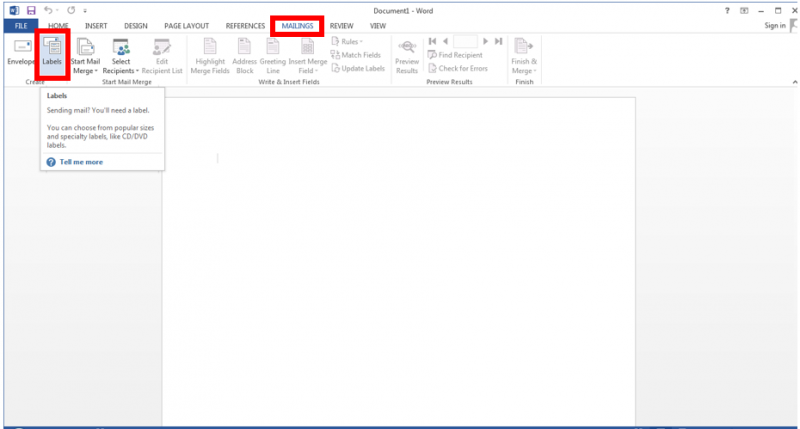
Go to Mailings > Start Mail Merge.
-
Select Labels, and then select Cancel (we’re not really doing a mail merge.)
-
Select Update Labels to create a full sheet of labels.
-
On one of the labels, highlight «Next Record», and press Ctrl + C.
If you see {NEXT} instead, right-click it, and select Toggle Field Codes. Then select and copy «Next Record».
-
Press Ctrl + H to open the replace dialog. You should see «Next Record» in the Find what field. If not, select the field and press Ctrl + V.
-
Clear the Replace with field if it’s not empty, and select Replace All.
-
Select Close.
-
You should now have a full sheet of labels ready to print or save.
See also
To create a page of different labels, see Create a sheet of nametags or address labels
To print one label on a partially used sheet, see Print one label on a partially used sheet
To create a page of the same labels, see Create and print labels
To create labels with a mailing list, see Print labels for your mailing list
Create a single label with a graphic
-
Start by creating a New Document of labels. For more info, see Create a sheet of nametags or address labels.
-
Insert a graphic and then select it.
-
Go to Picture Tools > Format > Wrap Text and select Square.
-
Drag the image into position within the label. and type your text.
-
Save or print your label.
You can create up to a full sheet of different labels with different graphics, just repeat each step with a different label.
This technique is a little tricky, but it allows you to create a single label with your text and graphics in the row 1, col 1 position, then multiply it to the whole page. It also lets you do more extensive formatting and editing on the label than the first procedure allows.
-
Follow the single label steps and create the label in the first position on the sheet.
-
Go to Mailings > Start Mail Merge.
-
Select Labels, and then select Cancel (we’re not really doing a mail merge.)
-
Select Update Labels. This creates a full sheet of labels.
-
On one of the labels, highlight «Next Record», and press Ctrl + C.
If you see {NEXT} instead, right-click it, and select Toggle Field Codes. Then select and copy «Next Record».
-
Press Ctrl + H to open the replace dialog. You should see «Next Record» in the Find what field. If not, select the field and press Ctrl + V.
-
Clear the Replace with field if it’s not empty, and select Replace All.
-
Select Close.
-
You should now have a full sheet of labels ready to print or save.
See also
To create a page of different labels, see Create a sheet of nametags or address labels
To print one label on a partially used sheet, see Print one label on a partially used sheet
To create a page of the same labels, see Create and print labels
To create labels with a mailing list, see Print labels for your mailing list
Create a single label with a graphic
-
Start by creating a New Document of labels. For more info, see Create a sheet of nametags or address labels.
-
Select Mail Merge (we’re creating a blank sheet).
-
Insert a graphic and then select it.
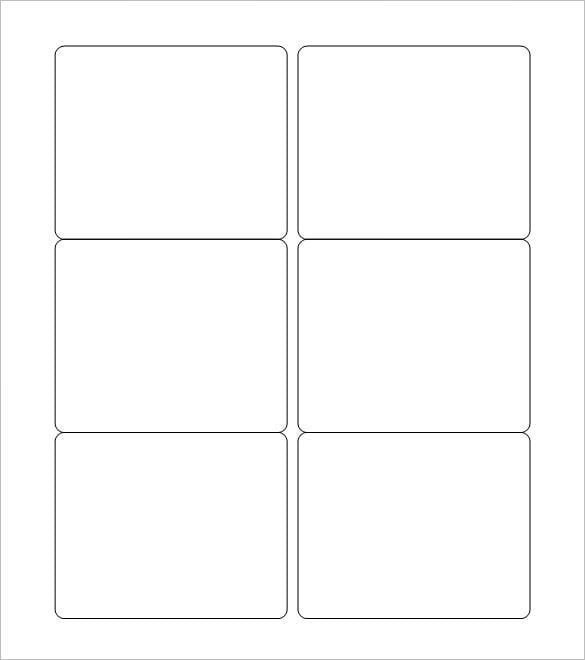
If you’re going to create a full page of the same labels, create the label in position Row 1, Col 1. Otherwise, create it anywhere.
-
Go to Picture Format > Wrap text and select Square.
-
Drag the image into position within the label. and type your text.
-
To just make a single label or you have different labels on the sheet, go save or print now.
Expand the single label to a full sheet
-
Follow the single label steps with the label in the first position on the sheet and then select Mailings > Update Labels.
-
On one of the labels, select «Next Record», and press Command (⌘)+ C.
If you see {NEXT} instead, Ctrl + click or right-click and select Toggle Field Codes. Then select and copy «Next Record».
-
Press Shift + Command (⌘)+ H to open the replace dialog. You should see «Next Record» in the Find what field. If not, select the field and press Command (⌘) + V.
-
Clear the Replace with field if it’s not empty, and select Replace All.
-
Select OK if you need to.
-
You should now have a full sheet of labels ready to print or save.
See also
To create a page of different labels, see Create a sheet of nametags or address labels
To print one label on a partially used sheet, see Print one label on a partially used sheet
To create a page of the same labels, see Create and print labels
To create labels with a mailing list, see Print labels for your mailing list
Word for the web doesn’t directly support creating labels, but you can create labels from a template. For label templates, go to templates.office.com and search for labels.
1. Right-click the image that you want to label and click the option Format Picture. 2.In the Format Picture window, click this icon.
- Click the picture you want to add a caption to.
- Click References > Insert Caption.
- To use the default label (Figure), type your caption in the Caption box.
Contents
- 1 How do I label my photos?
- 2 How do I create a picture label in Word?
- 3 How do I label digital photos?
- 4 Can you write on photos?
- 5 How do I fill a label in Word?
- 6 How do I create labels in Word 2016?
- 7 What is label in MS Word?
- 8 How do you label a JPEG?
- 9 How do I scan photos into labels?
- 10 How do I write on a JPEG image?
- 11 How do you write on photo paper?
- 12 How do you put captions on pictures?
- 13 How do I edit text in a picture in Word?
- 14 How do I make labels the same in Word?
- 15 How do I make decorative address labels in Word?
- 16 How can I turn a jpeg into a PDF?
- 17 How do I add text to a JPEG image in paint?
- 18 Can you write on a scanned document?
How do I label my photos?
Sorry for the confusion, but the original post was about Android.
Add a description.
- Select and open a photo in Google Photos.
- Select the overflow : menu in the upper right.
- Select Info.
- Add a description and exit to save.
How do I create a picture label in Word?
Create a single label with a graphic
- Start by creating a New Document of labels. For more info, see Create a sheet of nametags or address labels.
- Insert a graphic and then select it.
- Go to Picture Format > Text Wrapping, and select Square.
- Drag the image into position within the label.
- Save or print your label.
How do I label digital photos?
First of all, make sure that your open window is large enough to display the metadata at the bottom. Navigate to the folder where your photos reside. Select a photo or photos, find the “Title” field at the bottom of the screen (and also the “tag” field if you want to add tags or keywords), and type in your caption.
Can you write on photos?
Write on the back of your photos, along the edge, and keep your notes succinct. There are two main reasons why professional archivists recommend using a regular #2 pencil. It is reversible—it can usually be easily erased. Pen and marker ink is not reversible—it can’t be erased or undone.
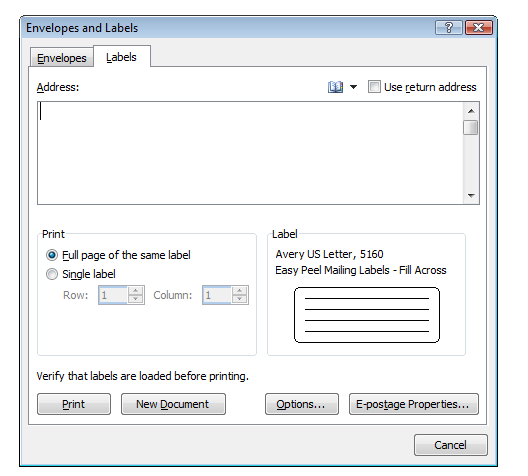
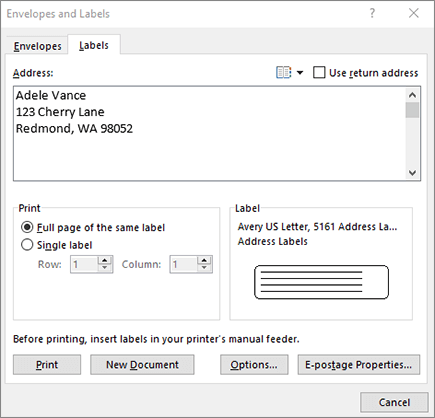
How do I fill a label in Word?
Formatting Labels
- Click or tap the “Mailings” tab on the command ribbon and then click or tap “Labels” in the Create group.
- Enter the text for your label in the Address box on the Labels tab.
- Click or tap the radio button for “Full page of the same label.”
- Click or tap “Options” to open the dialog box.
How do I create labels in Word 2016?
Follow these steps:
- Click the Mailings tab.
- In the Create group, click the Labels button.
- Ensure that the proper label format is chosen in the lower-right part of the dialog box.
- Type the label’s text into the Address box.
- Ensure that the item Full Page of the Same Label is chosen.
- Click the New Document button.
What is label in MS Word?
Labels refer to the information or Address (in particular) we want to get displayed on products, banners, etc. We can also set the quantity of the labels we want and can print them instantly. Follow the steps to get labels in MS Word: Step 1: Go to the Mailings bar and select the Labels option under the Create bar.
How do you label a JPEG?
Select “Markup,” tap the “+” icon and select “Text.” When the text box appears on the photo, double-tap it to raise the keyboard. Type the caption and use the options at the bottom of the screen to change the font, color and size. Drag the caption to wherever you want it and tap “Done.”
How do I scan photos into labels?
Get started scanning your pictures in five easy steps.
- Buy the Right Equipment. You’ll need a computer and a scanner to scan your old family photos.
- Clean Your Scanner and Prepare Photos for Scanning.
- Adjust Your Settings.
- Start Scanning.
- Label and Edit Your Images.
How do I write on a JPEG image?
How to Add Text to an JPG Image
- Open your photo editing program. How you open programs will depend on your operating system.
- Open the JPEG image.
- Click your program’s “Text” tool.
- Click on the image where you want to insert the text.
- Type your text.
- Select your font color, size and typeface.
How do you write on photo paper?
When it comes to writing on glossy paper, it’s best to go for those with alcohol or oil-based ink since they dry faster. It’s best to avoid gel pens when writing on photos. Gel pen ink, made from an oil and water emulsion, will likely smear on photographs.
How do you put captions on pictures?
- Choose a Photo Caption That Fits the Platform.
- Use a Conversational Tone and Present Tense.
- Decide on the Purpose of Your Caption.
- Know Who Your Audience Is.
- Identify the Main People in Your Photo.
- Use a Quote or Lyrics Wisely.
- Add Value with Your Photo Caption.
- Create Involvement With Your Photo Caption.
How do I edit text in a picture in Word?
Click the picture to reveal the “Format” tab. Press the “Corrections” option to reveal the dropdown. This will reveal to you how to edit image text in word. Apply the required correction to complete the process in full.
How do I make labels the same in Word?
Microsoft Word: Create a Sheet of the Same Label
- From the Mailings tab, click the Labels button in the Create group on the left.
- In the Address box at the top, type the address or other information that will be on each label.
- In the Print box on the left, select Full page of the same label.
How do I make decorative address labels in Word?
- Choose your shape. Beginning with a blank document, click on the “Insert” tab, select “Shapes,” and choose the desired shape for your label.
- Adjust your outline and fill settings.
- Add a layer, if desired.
- Add your text.
- “Group” your label.
How can I turn a jpeg into a PDF?
How to convert JPG to PDF online:
- Upload your image to the JPG to PDF converter.
- Adjust the letter size, orientation, and margin as you wish.
- Click ‘Create PDF now!’ and wait for the conversion to take place.
- And that’s all there is. Save the converted PDF to your computer.
How do I add text to a JPEG image in paint?
To add a text box in Paint, open an image with the program and locate the “A” symbol in the “Tools” group of the “Home” tab. Click the “A” and then click on the image and drag the mouse pointer to place a text box. To resize the text box, click and drag one of the small squares around the edge of the box.
Can you write on a scanned document?
Browse to the scanned document and double-click it, then click the “OK” button to insert it. Format the text in the text box the same way you would when typing text in a Word document, using the Font section of the ribbon. You can try to match the text in your text box with any text already on your scanned document.
Labels for tables and figures are known as captions or legends. In the create group click the.
 Mail Merge For Dummies Creating Address Labels Using Word And
As with tables make sure to number the figures in your document sequentially and to use labels that explain the data clearly and accurately.
How to label a picture in word. Figures and graphs usually need to have a label positioned below the figure or graph. All other office apps. Click inside the text box and type the text you want to use for a caption.
You can use words label wizard to generate business cards postcards event tickets shipping labels and more. In this video we show you how to label or tag an image inside a word document so that people who use screen readers can engage with the image. Add a text box under or near the picture to caption.
That you want to use on your label. Insert a picture graphic clipart etc. Insert a caption for a picture.
To word those items are all the same thing whether you. How to insert a label in microsoft word. Click on the letters and mailings and then click envelopes and.
You may need to drag the text box into the position you want. Be sure to make it small enough to fit on the label you may have to guess at first. Click the mailings tab.
The best way to spice up a label is to add a picture or other graphics. For instance you can add your logo to your business return address labels and add names to your product labels amongst many other uses. Images and text can add a ton of value to your labels.
Locate the tools menu. Create a blank new document. Word will automatically number the new labels for you.
This tutorial will explain how to format label text and add graphics into microsoft word. How to format label text and add graphics in microsoft word. Inserting images onto word label templates.
Try to spice things up by adding color fancy fonts and formatting. Images on labels in word are created in the mailings tab on the ribbon. Word lets you print sheets of identical labels but they contain only boring text.
:max_bytes(150000):strip_icc()/Untitled-5b74f70f46e0fb00505bf6df.jpg) How To Make And Print Mailing Labels In Microsoft Word
How To Make And Print Mailing Labels In Microsoft Word
 How To Create Mailing Labels In Word
 How To Create And Print Labels In Word
 Using Microsoft Word To Print Labels Label Line
 Create And Print Labels Office Support
 How To Put A Picture On A Mailing Label In Microsoft Word Office Software Help
 How To Print Labels In Word Pages And Google Docs
 Avery Labels In Word 2016 Microsoft Community
 How To Turn On The Label Template Gridlines In Ms Word Sheetlabels
 How To Print Address Labels From Word 2010 Solve Your Tech
How To Make Your Own Fabric Labels In Microsoft Word Sewmod
 How To Print Labels In Word 2011 With Mail Merge Gilsmethod Com
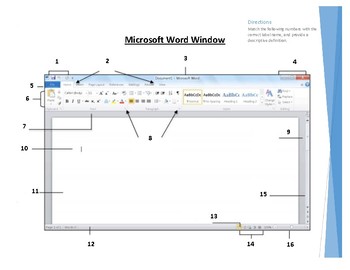
 Solved Label The Word Window Elements Shown In Figure D 21
 Word 2016 Label Outlines Microsoft Community
 How To Create Labels In Microsoft Word With Pictures Wikihow
 Microsoft Word Screen Labeling
 How To Create A Microsoft Word Label Template Label Template
 Shipping Label Template Templates For Microsoft Word
 Brother Label Printer And Microsoft Word
 Changing Default Label Settings Word 2013 It Services
 23 Microsoft Label Templates Free Word Excel Documents
 Staples Staples Ca
 Label Word Processing Diagram Quizlet
 How To Create A Label Design In Word Label Templates Using Plain Text
 Staples Staples Ca
 How To Create And Print Labels In Word
 How To Choose An Avery Label Template In Word 2010 Solve Your Tech
 How To Use Word To Create Different Address Labels In One Paper
 How To Make Pretty Labels In Microsoft Word
.jpg) How To Make Beer Labels Beer Syndicate
How To Make Beer Labels Beer Syndicate
With Microsoft Office Word, you can create labels for any purpose. The process of creating labels in Word is menu-driven and simple to execute. Word offers a variety of label templates that correspond to precut labels, such as those produced by Avery. You can also create a label with a logo, photo or picture in Word.
-
Open Microsoft Office Word, and then click the “Mailings” tab on the top navigation ribbon. The navigation ribbon displays Mailing options.
-
Click the “Labels” option on the left side of the navigation ribbon. The Labels dialog box opens.
-
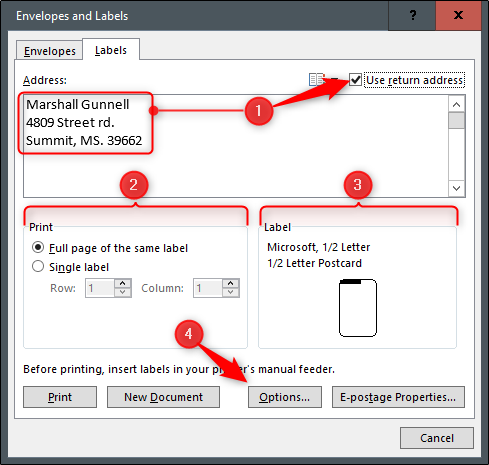
Type the first recipient’s address into the “Address” input box. Highlight the text and right-click to change the justification and font of the text. Click “OK.”
-
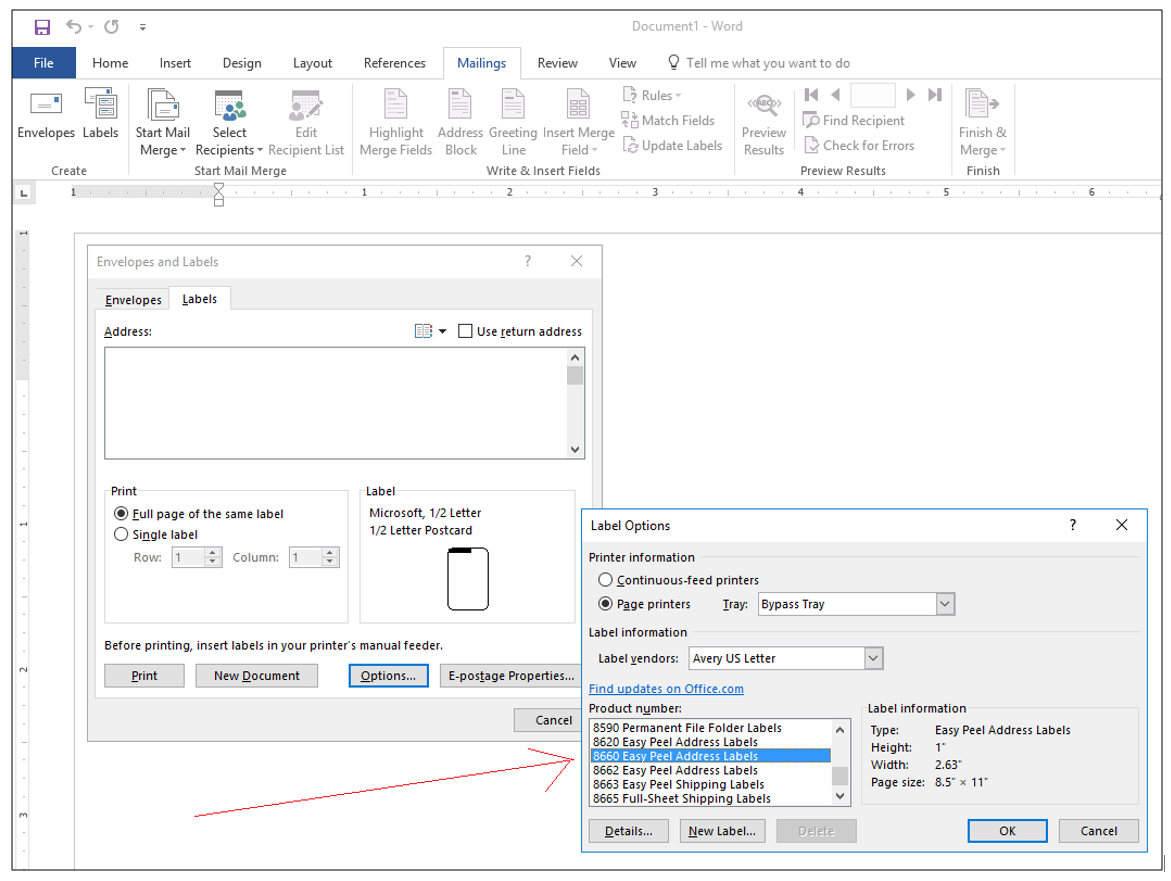
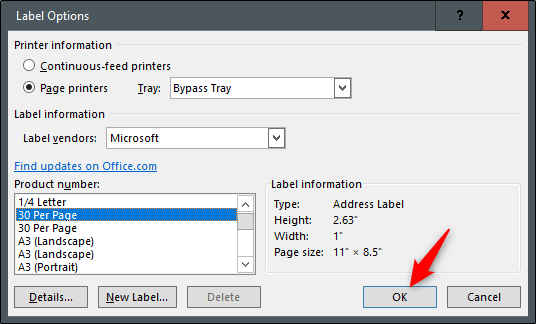
Click the “Options” button. A list of label vendors and product numbers opens.
-
Click the “Label Vendor” drop-down box and click the vendor of the labels you will print. The Product Number field populates with products produced by the specified vendor.
-
Click the “Product Number” for the label you will use. The new label you are creating is formatted for the template for the selected label product. Click “OK.”
-
Click the “New Document” button. The labels display in the selected template.
-
Click inside a label where the image will be placed, and then click the “Insert” tab on the top navigation ribbon.
-
Click the “Picture» option. A file navigation dialog box opens. Navigate to and click on the image to add to the label. Click “Open.”
-
Repeat the process of clicking inside each label and inserting the desired image.
Worksheets
Powerpoints
Video Lessons
Search
Filters
SORT BY
Most popular
TIME PERIOD
All-time
![]()
Herber

29808 uses
![]()
1mada

25104 uses
![]()
Herber

23566 uses
![]()
Errie

22947 uses
![]()
Herber

17783 uses
![]()
elvan

16159 uses
![]()
laprofeangela

15755 uses
![]()
james33

15490 uses
![]()
fafani

13106 uses
![]()
JanayeRose

12551 uses
![]()
michela1

12531 uses
![]()
sylviepieddaignel

11349 uses
Next
19
Blog
FAQ
About us
Terms of use
Your Copyright
поделиться знаниями или
запомнить страничку
- Все категории
-
экономические
43,632 -
гуманитарные
33,652 -
юридические
17,917 -
школьный раздел
611,700 -
разное
16,898
Популярное на сайте:
Как быстро выучить стихотворение наизусть? Запоминание стихов является стандартным заданием во многих школах.
Как научится читать по диагонали? Скорость чтения зависит от скорости восприятия каждого отдельного слова в тексте.
Как быстро и эффективно исправить почерк? Люди часто предполагают, что каллиграфия и почерк являются синонимами, но это не так.
Как научится говорить грамотно и правильно? Общение на хорошем, уверенном и естественном русском языке является достижимой целью.
Printing labels can save you a lot of time and energy IF you approach the job correctly. Since Microsoft Word is still the leading word processor, I will discuss how to print labels with it.
This tip will help you print a single label or a full sheet of labels with the same address or text.

- Start Microsoft Word.
- Click Tools —> Envelopes and Labels from the menus (in the newest version of Word, you will find it in the Letters and Mailings section of the Tools menu).
- Click the Labels tab in the box that pops up.
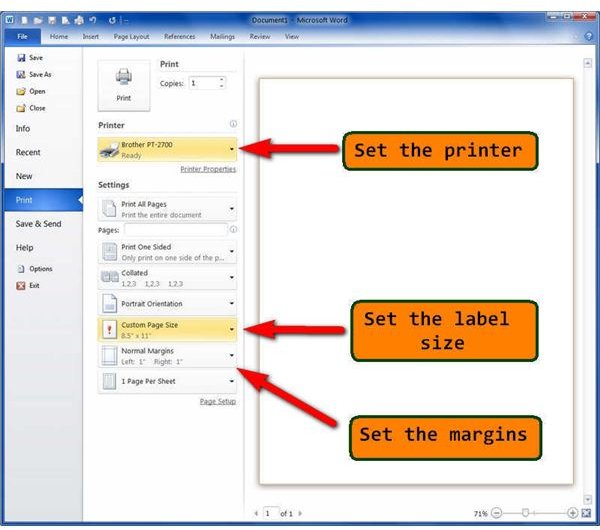
- Type the address you want to print on the label (see #1 in the illustration).
- Click the Options button (see #2 in the illustration) to choose the type of label you are printing (try to purchase Avery labels or labels that have Avery compatible numbers on them).
- Click whether you want a full sheet of labels or just a single label (see #3 in the illustration).
- If you are printing a single label, you can reuse a sheet of labels over and over by choosing the appropriate row and column that is next to print on your sheet.
- Before clicking Print, check to see if the address has spilled over onto the next line (in #1). If so, that indicates that the font size is too large for the chose label type. To correct this, highlight the entire address with your mouse, the RIGHT click it and choose font to make adjustments.
- Click New Document to see how the labels will look.
- Now print the labels on a regular sheet of paper and hold them up to a blank sheet of labels to make sure they will print appropriately. If it does, then load your labels in the printer tray (remember to load them the proper direction).
When finished printing, you can close and save the document if it is a sheet that you will use again in the future. Otherwise, just close and don’t save the document.
Tip within a tip (Word 2002 or newer):
![]()
If you want to add pictures or other elements to your Word labels, follow this procedure instead:
- Start Word.
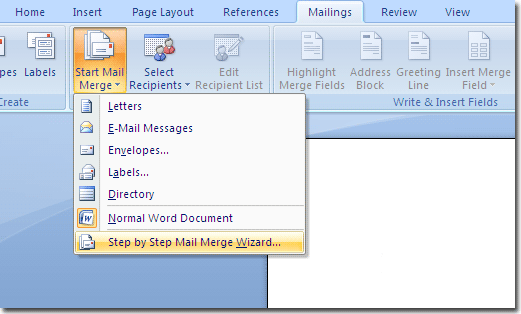
- Click View —> Toolbars —> Mail Merge.
- Click the left most tool from the new toolbar (see picture).
- Click Labels from the list.
- Choose your particular label and the click OK.
- Type and format the first label to specifications…complete with pictures if you like.
- When finished, click the Propagate button (again, see picture…it’s the right most circled button).
Today’s tip did not discuss Mail Merge, as that is another can of worms for another day.
However, if you have a copy of Microsoft Works or almost any card publishing program, you have the ability to create an electronic address book and produce mail merge style labels. Check out the help sections of these programs to learn how.
I like the Microsoft Works approach to labels. In Microsoft Works, use the Task Wizard to build an address book, then use the Task Wizard again to print your mailing labels.
If you would like some stand alone solutions, here are the top address book / mailing label downloads. All are free to download and try, but cost between $20-50 to keep.
My Mail List
All Pro Address Label Software
