
Create and print labels

Create and print a page of identical labels
-
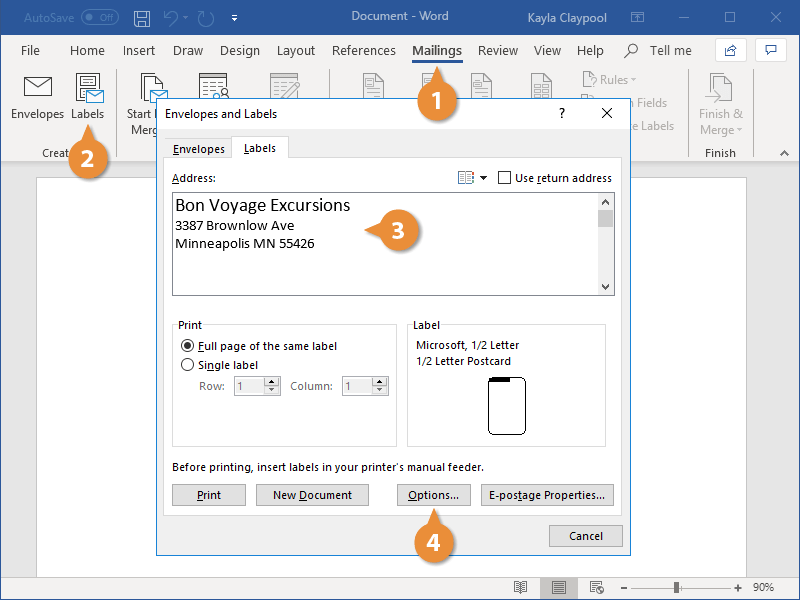
Go to Mailings > Labels.
-
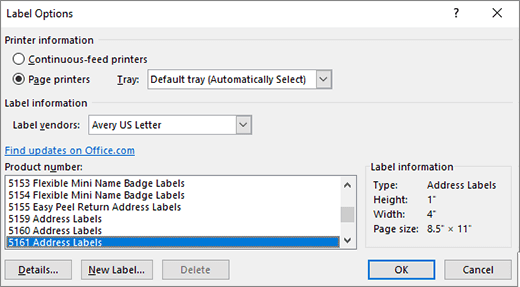
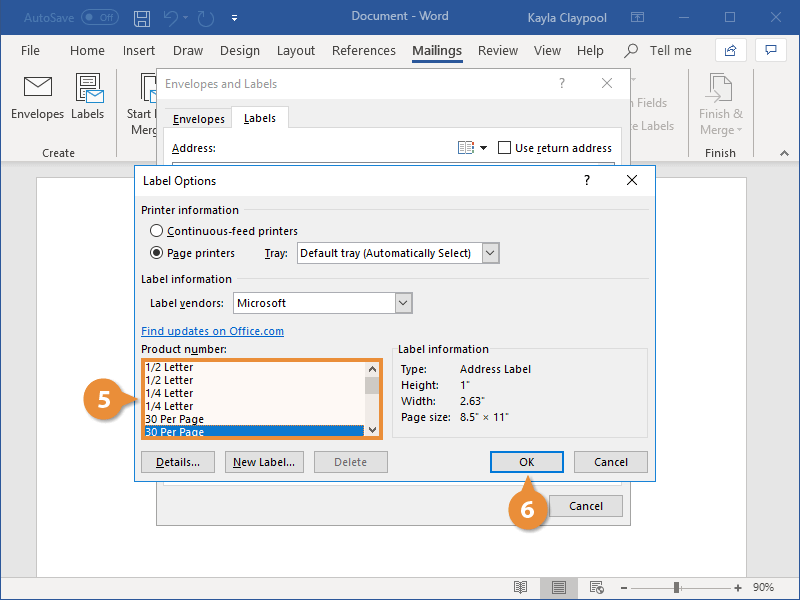
Select Options and choose a label vendor and product to use. Select OK.
If you don’t see your product number, select New Label and configure a custom label.

-
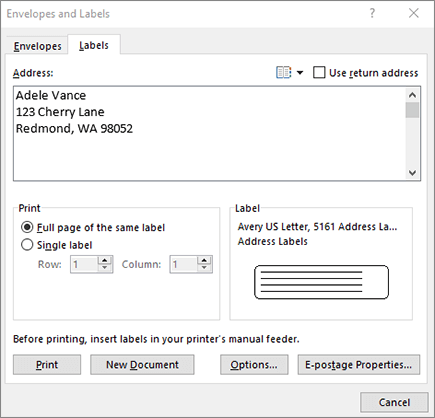
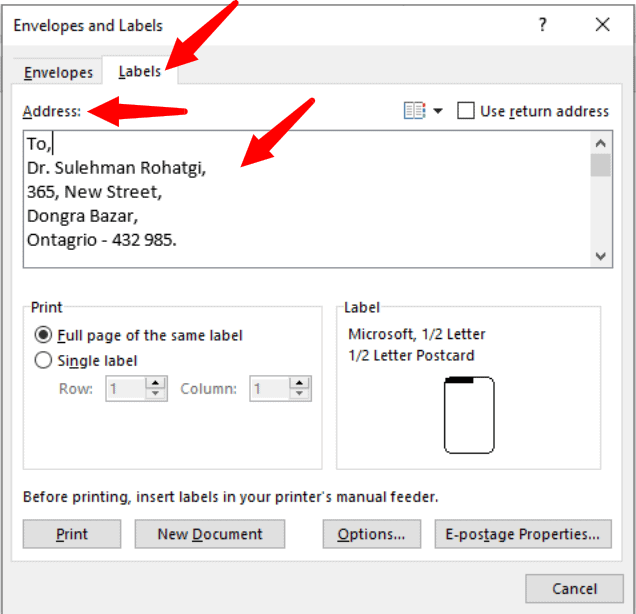
Type an address or other information in the Address box (text only).
To use an address from your contacts list select Insert Address
. -
To change the formatting, select the text, right-click, and make changes with Font or Paragraph.
-
Select OK.
-
Select Full page of the same label.
-
Select Print, or New Document to edit, save and print later.
 .
.If you need just one label, select Single label from the Mailings > Labels menu and the position on the label sheet where you want it to appear. Select OK, the destination, and Save.
Create and print a page of the same label
-
Go to Mailings > Labels.
-
In the Address box, type the text that you want.
To use an address from your contacts list select Insert Address
. -
To change the formatting, select the text, right-click, and make changes with Home > Font or Paragraph.
-
In the Label Options dialog box, make your choices, and then select OK.
If you don’t see your product number, select New Label and configure a custom label.
-
Select OK.
-
Select Full page of the same label.
-
Select Print, or New Document to edit, save and print later.
 .
.Set up and print a page of the same label
-
Go to Mailings > Labels.
-
Select Options.
-
Choose Printer type, Label products, and Product number.
If you don’t see your product number, select New Label and configure a custom label.
-
Select OK.
-
Type an address or other information in the Delivery Address box.
To use an address from your contacts list select Insert Address
. -
To change the formatting, select the text and then select Font to make changes.
-
Select Full page of the same label.
-
Select OK.
-
Select Print, or New Document to edit, save and print later.
 .
.For info about merging data with labels, see Create mailing labels in Word by using mail merge or Mail merge in Word for Mac.
If you want to make return address labels, see Create return address labels.
Word for the web doesn’t support directly creating labels. However you can create labels from a template.
-
Open Word for the web.
-
Select a label template when you create a new document. Select More templates if you don’t see what you want.
You can also go to templates.office.com, and search for label.
-
For a sheet of identical labels, fill out one label, and then copy/paste for the rest.
Tip: Print your labels to a sheet of paper before loading labels into the printer to make sure the text aligns with the labels.
See also
To create a page of different labels, see Create a sheet of nametags or address labels
To create a page of labels with graphics, see Add graphics to labels
To print one label on a partially used sheet, see Print one label on a partially used sheet
To create labels with a mailing list, see Print labels for your mailing list
To create labels using a template, see Microsoft label templates
Need more help?
Want more options?
Explore subscription benefits, browse training courses, learn how to secure your device, and more.
Communities help you ask and answer questions, give feedback, and hear from experts with rich knowledge.

We are going to explain how to create labels in Word. Microsoft’s text editor is a very versatile tool, a blank page on which you can do many things that go beyond writing texts. And one of them is, precisely, being able to design these labels.
The first thing you need to do is open a blank document in Word. Once you are inside, you have to click on the Mailings section at the top of the program’s toolbar. It is possible that in other versions, the name of the section may be different.
Then, you have to click on the Create option. When you do so, a menu will appear where you can click on the Labels option. It is possible that in other versions of Word, the labels option is separate or in another place, but in the latest versions, this should be the way.
The Labels page will open. Here, you should know that the labels are designed for printing and pasting on envelopes for addressing, although it is a flexible system to be used for other things.

If you click on the Options button, you will go to the page where you can configure the labels. Here, for example, under Product number, you can set how many labels per page you want to have. Also, under the Label brand, you can set the label page model that you are going to put in the printer, so Word will adapt to the specific sizes of those pages.
Once the label is written, click on the New Document button to open a Word page with the contents of your label. It may seem odd that the page opens separately instead of using the same page you start the process on. However, this is useful if you are writing a letter in Word and want to set up the labels separately, which is what the function is designed for, although you can use it for other things.
Finally, you should know that once you have generated the page of labels, you will be able to edit the text in them. This way you’ve learned how to create labels in Word, why don’t you try it out?
-
1
Obtain the labels you need. Labels come in different sizes and for different purposes, for everything from regular, no. 10 envelopes to legal-sized mailings and CD covers. Get the labels that are best-suited for your project.
-
2
Create a new Microsoft Word document. Double-click the blue app that contains or is shaped like a «W«, then double-click Blank Document» in the upper-left part of the opening window.
Advertisement
-
3
Click the Mailings tab. It’s at the top of the window.
-
4
Click Labels under the «Create» menu. It’s at the far-left of the toolbar.
- If prompted, click OK to grant Word access to your contacts.
-
5
Add text to the label. Do so by typing a recipient’s address, name badge text, CD label, etc., in the Delivery Address field or by clicking the address book icon to the right of the field, selecting a recipient and clicking Insert.
-
6
Click Font…. This dialog box allows you to customize the look of the labels by selecting a font, text size, text color, and style.
-
7
Customize the label text and click OK.
-
8
Click Options…. It’s a button in the Label section of the dialog box.
-
9
Click the radio button next to your printer type.
-
10
Click the «Label products» drop-down menu.
-
11
Select your label manufacturer.
- If your manufacturer isn’t listed, examine the label packaging for the label dimensions and the number per sheet. With this information, you can select an equivalent product.
-
12
Click the «Product number» drop down.
-
13
Click the product number for your label. It should be clearly marked on the packaging.
-
14
Click OK.
-
15
Select the number of labels you’re printing.
- Click Full page of the same label to print a full sheet of the label
- Click Single label and then identify the row and the column on the label sheet where you’d like the label to be printed.
-
16
Insert the blank label sheet into your printer. Make sure you have them aligned correctly for your printer.
-
17
Click Print….
- Make sure the print preview of the labels looks the way you want it to.
-
18
Click Print. Your label(s) will print.
- Click File in the menu bar and Save if you want to save this label template for future use.


Advertisement
-
1
Obtain the labels you need. Labels come in different sizes and for different purposes, for everything from regular, no. 10 envelopes to legal-sized mailings. Get the labels that are best-suited for your project.
-
2
Prepare your mailing list. Word can pull names and addresses from an Excel spreadsheet, an Access database, your Outlook contacts, or on Mac, your Apple contacts or a FileMaker Pro database. You can also type a new mailing list during the merge, if you prefer.
-
3
Create a new Microsoft Word document. Double-click the blue app that contains or is shaped like a «W«, then double-click Blank Document» in the upper-left part of the opening window.
-
4
Click the Mailings tab. It’s at the top of the window.
-
5
Click Start Mail Merge and Labels…. It’s at the far-left of the toolbar.
- If prompted, click OK to grant Word access to your contacts.
-
6
Click the radio button next to your printer type.
-
7
Click the «Label products» drop-down menu.
-
8
Select your label manufacturer.
- If your manufacturer isn’t listed, examine the label packaging for the label dimensions and the number per sheet. With this information, you can select an equivalent product.
-
9
Click the «Product number» drop down.
-
10
Click the product number for your label. It should be clearly marked on the packaging.
-
11
Click OK.
-
12
Click Select Recipients…. It’s at the left of the toolbar.
-
13
Select your mailing list. Click on the source of the addresses you want to put on the labels.
- If you want to create a new list at this point, click Create a new List….
- If you don’t want to create labels for your entire mailing list, click Edit Recipient List and select the recipients you want to include.
-
14
Click Address Block.
- On Mac, click a line near the top of the first label, and click Insert Merge Field, then select a field you want to include, such as «First_Name.» Repeat this process for each field you want to include, adding the appropriate spacing and address formatting.
-
15
Select the elements you want to include on the labels. These include name format, business, name, etc.
-
16
Click OK.
-
17
Click Update Labels. It’s an icon in the toolbar with a green «refresh» symbol.
-
18
Click Preview Results in the toolbar. Make sure the labels look the way you want them to.
-
19
Insert the blank label sheets into your printer. Make sure you have them aligned correctly for your printer.
-
20
Click Finish & Merge and Print Documents…. It’s at the far right of the toolbar.
-
21
Click Print. Your label(s) will print.
- Click File in the menu bar and Save if you want to save this label template for future use.


Advertisement
Add New Question
-
Question
When I type a sheet of labels, sometimes a second blank page appears. How do I remove the second page?

Go to the bottom of the first page, and hit the ‘delete’ key — it should go away.
-
Question
How do I print labels that are all different addresses?
Use a mail merge. Add all of the different addresses, then print each one.
-
Question
How do I make a full page of address labels?
There should be an option called «mail merge.» You need a mailing list and your document; the list can be a spreadsheet, an Outlook directory etc.
See more answers
Ask a Question
200 characters left
Include your email address to get a message when this question is answered.
Submit
Advertisement
Thanks for submitting a tip for review!
About This Article
Article SummaryX
1. Create a new Word document.
2. Click Mailings.
3. Click Labels.
4. Add the label text.
5. Customize the printing layout.
6. Choose your label manufacturer.
7. Click OK.
8. Click Print.
Did this summary help you?
Thanks to all authors for creating a page that has been read 702,273 times.
Is this article up to date?
How to Print Labels from Word
Print a page of labels or design custom labels
Updated on February 12, 2021
What to Know
- In Word, go to the Mailings tab. Select Labels > Options. Choose your label brand and product number.
- Type the information for the address in the Address section.
- In the Print section, select Full Page of Same Label or Single Label (with row and column specified). Choose Print.
This article explains how to print labels from Word. It includes information for printing a single label or a page of the same labels, for printing a page of different labels, and for printing custom labels. These instructions apply to Word for Microsoft 365, Word 2019, 2016, 2013, 2010, and 2007, and Word for Mac 2019 and 2016.
Print a Single Label or a Page of the Same Labels
Microsoft Word isn’t just for documents, resumes, or letters. It’s also a powerful and versatile application for most of your mailing and labeling needs. There are multiple options for creating labels in Word, so choose the one that best fits your needs.
Here’s how to fill a sheet with return address labels or create a single, professional-looking mailing label in Word.
-
Go to the Mailings tab.
-
In the Create group, select Labels. The Envelopes and Labels dialog box opens with the Labels tab selected.
-
Select Options to open Label Options.
-
Choose the label brand in the Label Vendors or Label Products list, then select the product number matching the labels you want to print on.
-
Select OK.
-
Type an address or other information in the Address box.
In Word for Mac 2019 and 2016, this box is called Delivery Address. In Word 2010, the Address box step comes before the Label Options selections.
-
In the Print section, select Full Page of the Same Label to print a page of the same address labels.
-
In the Print section, select Single Label to print one label. Choose the row and column corresponding with where you want the address printed on the sheet of labels.
The Single Label option is helpful if you have a partially used sheet of printer labels.
-
Make sure the label sheet is waiting in the printer and select Print, or save to print later.
Create a Page of Different Labels
To make a sheet of labels in Word with different addresses or other information, such as nametags, create a document in which you will type the information for each label.
-
Go to the Mailings tab.
-
In the Create group, select Labels. The Envelopes and Labels dialog box opens with the Labels tab selected.
In Word 2010, leave the Address box blank.
-
Select Options to open Label Options.
-
Choose the label brand in the Label Vendors or Label Products list, then select the product number matching the labels you want to print on.
Word for Mac 2019 and 2016 also ask for the type of printer.
-
Select OK.
-
Select New Document. Word creates a new document displaying a page of blank labels matching the dimensions of the brand and label size you selected.
In Word for Mac 2019 and 2016, you don’t have to select New Document. After selecting OK in the previous step, Word opens a new document that contains a table with dimensions that match that label product.
-
Go to the Layout tab under Table Tools and choose View Gridlines if the outlines of the labels do not appear.
-
Type the information you want into each label.
-
Go to the File tab, select Print, then select the Print button when you’re ready to print the labels. Save the document for future use.
Make Custom Labels
If you need to print labels that don’t match the dimensions of the label brands and products listed in the Label Options dialog box, create custom labels to match your specifications.
Before you begin, make sure you have the precise measurements of the labels you need, including the height and width of each label, the paper size, the number of labels down and across, and the margins.
-
Go to the Mailings tab.
-
In the Create group, select Labels. The Envelopes and Labels dialog box opens with the Labels tab selected.
-
Select Options to open Label Options.
-
Select New Label. The Label Details dialog box opens.
-
Enter a name for the labels.
-
Change the measurements to match the exact dimensions of the labels you need. An example of the label appears in the Preview box.
-
Select OK to create the custom labels. You can then use these for making labels in Word.
There is no Mailings tab in Word for Mac 2011. In this version, access label features from the Tools menu.
Thanks for letting us know!
Get the Latest Tech News Delivered Every Day
Subscribe
Create and Print Labels in Microsoft Word Using Mail Merge and an Excel List (Generate Bulk Address or Mailing Labels)
by Avantix Learning Team | Updated January 9, 2021
Applies to: Microsoft® Word® 2013, 2016, 2019 and 365 (Windows)
You can create labels in Microsoft Word by running a mail merge and using data in Excel. This is typically used to generate and print bulk mailing labels for names and addresses of clients or other contacts. You’ll need to create a main document for the labels in Word and then connect to a data set or list in an Excel worksheet (although you can use other data sources). When you run the mail merge, you can create a new merged file with a label for each contact or merge directly to a printer.
Typically, labels are purchased in sheets that you place in the tray or document feeder of your printer and a product code is printed on the label packaging. Address labels are often called mailing labels or shipping labels.
Recommended article: How to Use Mail Merge in Word for Form Letters
Do you want to learn more about Word? Check out our virtual classroom or live classroom Word courses >
Understanding the label mail merge process in Word
There are 8 steps in the Word mail merge process for mailing or address labels:
- In Word, start the merge and specify the main document for labels. You’ll be prompted to specify the type and / or size of labels you want to generate.
- Select the Excel source workbook containing the data set with names and addresses. Microsoft refers to a data set or database as a list. You would create the Excel source file before you begin the mail merge process.
- In Word, insert fields into the first cell of the table (which would be the first label). This table is created automatically by Word.
- Update or propagate the other labels on the sheet.
- Format the main label document (such as changing font and size).
- Select specific recipients or filter the recipient list (optional).
- Preview the merged labels (optional).
- Run the mail merge.
During the mail merge process, fields are inserted into the main document and appear in carets (such as <<Firstname>>). By default, when you click in a field, it is displayed with grey shading. When you run the merge, the fields are replaced by data from the source Excel file.
In this article, we’ll be using the Mailings tab in the Ribbon to set up and run a mail merge (not the Mail Merge Wizard).
Step 1: Start the merge and specify the main document as labels
The first step is to start the merge using Start Mail Merge on the Mailings tab in the Ribbon:

To start the merge and specify the main document for labels:
- Create a new blank Word document.
- Click the Mailings tab in the Ribbon and then click Start Mail Merge in the Start Mail Merge group.
- From the drop-down menu, select Labels. A dialog box appears.
- Select the product type and then the label code (which is printed on the label packaging). You may also select New Label and then enter a custom name and size.
- Click OK. Word creates a table in the main document. Next Record appears in each label cell to prompt Word to move to the next record in the data source.
- If table gridlines are not displayed, click in the table and click the Table Tools Layout tab or Table Layout tab (on the right side of the Ribbon) and click View Gridlines in the Table Group.
In the following example, Avery US letter was selected as the Label vendor with Avery 5163 address or shipping labels:

Step 2: Select the source Excel file containing the data set
The next step is to connect to an Excel source file containing a list of names and addresses using Select Recipients. In the Excel worksheet, the first row must contain field names such as FirstName, LastName, Company, Address and so on. There should be no blank rows in the data set.
Select Recipients appears on the Mailings tab in the Ribbon in the Start Mail Merge group as follows:
In the following Excel worksheet, note that the field names are in the first row of the sheet being used a source:
To select a Microsoft Excel source file containing a worksheet with names and addresses for the labels:
- In the main Word document, click the Mailings tab in the Ribbon and then click Select Recipients in the Start Mail Merge group. A dialog box appears.
- Click Use an Existing List from the drop-down menu. A dialog box appears.
- Navigate to the Excel file containing the names and addresses you want to use as the source.
- Double-click the Excel file. A dialog box appears.
- Ensure First row of data contains column headers is checked.
- Click the Excel worksheet containing the data you wish to use.
- Click OK.
The following dialog box appears when you select an Excel file as the source for a merge:

Step 3: Insert fields from the source file in the main document in Word
Once you have connected to a source file, you can insert fields into the main document (which contains a table for the labels). You have the option of using a special Word field called Address Block or inserting individual fields.
Address Block appears as follows in the Ribbon:

To insert the Address Block field:
- Click in the first cell of the table in the main document where you want to insert the recipient name and address.
- Click the Mailings tab in the Ribbon and select Address Block in the Write & Insert Fields group. A dialog box appears. Word will display an address based on the source data.
- In the samples on the left, select the address sample you prefer.
- Check or uncheck other options if necessary.
- Click OK. Word inserts an Address Block field into the main document.
In the Address Block dialog box, select a sample address in the area on the left:

To insert fields individually:
- Click in the first cell of the table in the main document where you want to insert the recipient name and address.
- Click the Mailings tab in the Ribbon and select Insert Merge Field in the Write & Insert Fields group.
- From the drop-down menu, select the field you want to insert.
- Press the spacebar, type text or press Enter if necessary.
- Repeat for other fields you want to insert.
Step 4: Update the labels
To populate all of the labels in the table:
- Click in the table in the main document.
- Click the Mailings tab in the Ribbon and then select Update Labels or Propogate Labels in the Write & Insert group. Word will insert the fields in all label cells and include <<Next Record>> to go to the next record in the source data.
Step 5: Format the labels
You may need to apply formatting to the labels such as changing the font and size, changing alignment, and adjusting paragraph spacing.
Below is a sample main document for address labels (Avery US Letter 5163 shipping labels):

Step 6: Select specific recipients or filter the recipient list (optional)
You have the option of choosing specific recipients or filtering the recipient list if you don’t want to create labels for all contacts in the data source.
To choose specific contacts:
- In the the main document in Word, click the Mailings tab in the Ribbon and then click Edit Recipient List in the Start Mail Merge group. A dialog box appears.
- Uncheck the check boxes beside the recipients you do not wish to include in the mail merge.
- Click OK.
To filter the source list:
- In the the main document in Word, click the Mailings tab in the Ribbon and then click Edit Recipient List in the Start Mail Merge group. A dialog box appears.
- Click Filter. A dialog box appears.
- Select / enter the desired filtering options.
- Click OK.
For example, below is a filter to display records from Toronto:

To remove the filter, repeat the process, but click Clear All in the Filter and Sort dialog box.
Step 7: Preview the results (optional)
Before you run the mail merge, to preview the results:
- In the the main document in Word, click the Mailings tab in the Ribbon and then click Preview Results in the Preview Results group.
- Click the arrows in the Preview Results group to go to the next or previous page.
- Click Preview Results to view the fields again.
Step 8: Run the mail merge to create a new file or print the labels
The final step is to run the merge. You can either create a new merged document or merge directly to a printer.
To run the mail merge and create a new merged label document:
- In the the main document in Word, click the Mailings tab in the Ribbon and then click Finish & Merge in the Finish group. A drop-down menu appears.
- Click Edit Individual Documents. A dialog box appears.
- Click Current Record or enter a selected range if necessary.
- Click OK. Word creates a new merged document that you can edit, print and save.
The following dialog box appears when you select Edit individual documents:

To run the mail merge and print the merged file:
- In the the main document in Word, click the Mailings tab in the Ribbon and then click Finish & Merge in the Finish group. A drop-down menu appears.
- Select Print Documents. A dialog box appears.
- Click Current Record or enter a selected range if necessary.
- Click OK. A dialog box appears.
- Select the desired printer and other printer options.
- Click OK.
The following dialog box appears when you select Print Documents:

You will typically want to save the main document and the source file. If you save the merged file, you will have a record of the labels that were created.
Subscribe to get more articles like this one
Did you find this article helpful? If you would like to receive new articles, join our email list.
More resources
How to Create a Table of Contents in Word
How to Remove Hard Returns in Word Documents
How to Add Page Numbers in Word (Step by Step)
How to Find and Replace in Word (and Use Wildcards)
How to Superscript or Subscript in Word (with Shortcuts)
Related courses
Microsoft Word: Intermediate / Advanced
Microsoft Word: Designing Dynamic Word Documents Using Fields
Microsoft Word: Long Documents Master Class
Microsoft Word: Accessible Word Documents
Microsoft PowerPoint: Intermediate / Advanced
VIEW MORE COURSES >
Our instructor-led courses are delivered in virtual classroom format or at our downtown Toronto location at 18 King Street East, Suite 1400, Toronto, Ontario, Canada (some in-person classroom courses may also be delivered at an alternate downtown Toronto location). Contact us at info@avantixlearning.ca if you’d like to arrange custom instructor-led virtual classroom or onsite training on a date that’s convenient for you.
Copyright 2023 Avantix® Learning
Microsoft, the Microsoft logo, Microsoft Office and related Microsoft applications and logos are registered trademarks of Microsoft Corporation in Canada, US and other countries. All other trademarks are the property of the registered owners.
Avantix Learning |18 King Street East, Suite 1400, Toronto, Ontario, Canada M5C 1C4 | Contact us at info@avantixlearning.ca
- Free Courses
- Microsoft Word
- How to Make Labels in Word

How to Print Labels in Word
You can create a sheet of labels that contains the same information. For example, return address labels or a single label on a sheet.
Create a Label
- Click the Mailings tab.
- Click the Labels button.
- Enter an address.
If you want to print only one label, select Single label in the Print box and specify the row and column where the label is located on the sheet.
- Click Options.
The Label Options dialog box opens. Here, set the type of label sheet you’re printing on.
For example, if you have a sheet of 30 labels, select one of the 30 Per Page options that matches your label dimensions.
Your labels package should tell you the type of label being used.

- Select your label options.
- Click OK.
- Click Print to print the labels, or New Document if you want to do any formatting or editing of individual labels.

The labels are automatically sent to the printer or open in a new document, depending on your action.
If you want to create labels from a data source so that you can create labels for a list of contacts, you can use the Mail Merge wizard to quickly generate labels.

FREE Quick Reference
Click to Download
Free to distribute with our compliments; we hope you will consider our paid training.
In general, a label is a sticker with something written on it. People place such stickers with printed information such as addresses on envelopes.
Your label may have one of two addresses—the recipient’s address or the sender’s address. Microsoft Word allows you to create and print such labels.
Here, we will explain the steps necessary for creating and printing labels in Word.
Step #1: Open a Blank Document in Word.
Open Word, and click on New on the left side. The right side shows the icon of a new blank document—click on it to open a new blank document.

Step #2: Open the Envelopes and Labels Dialog
Click on Mailings in the top menu bar, and the ribbon changes to show the mailing menus. Click on Labels to open the Envelopes and Labels dialog.

Step #3: Set Up Recipient/Sender Labels
Within the Envelopes and Labels dialog, click on the Labels tab.
Under Address, you can type in either the recipient’s address or the sender’s address within the box.
If you have created envelopes earlier, and would like to use the return address (sender’s address) already in your system, click on Use return address and ensure a tick-mark is present within the square box immediately on the left. Word will fill the return address in the Address box. If you do not have a return address in your system, type in the return address.

Step #4: Set Up Number of Prints
Once you are satisfied with the address entry, and want to print only one label on the entire page, click on Full page of the same label under the Print section.
If you want to print several labels on one page, click on Single label and select the number of rows and columns necessary.

Step #5: Set Up Paper Size
Here are some tips to customize and get maximum out of printing labels. :
- Click on Options to open the Label Options dialog. Under Printer Information, you can select the type of printer—Continuous-feed or Page Printers—and the type of Tray for the Page printers.
- Several vendors supply sticky papers for printing labels on, and you may select from the Label vendors list—click on the down arrow on the right of Label vendors, and click on the vendor of your choice.
- Depending on the vendor you have selected, you can choose from their list of products under Product number.
- Here, you are selecting the size of the paper on which you want to print the labels. For a specific product number, its related information appears on the right side under Label information.
- For additional settings, click on the Details tab to display the various measurements for printing the label.
- You can adjust the settings to your preference. Word also allows you to define your own measurements, for which you must click on New Label.
- Once you are satisfied with the settings, click on OK to exit the dialog. Word will return you to the Envelopes and Labels dialog.

Step #6: Print the Label
Ensure label papers are in your printer and the printer is turned on. Click on Print to start printing your labels.

Conclusion
A neatly printed address label looks good on an envelope and helps prevent wrong delivery. With Word, you can create and print professional-looking labels. Follow our seven-step method to make your task easier.
With the world moving paperless, I find myself hand-writing things less and less every day. However, one place that I still do find myself writing all the time is when creating labels, whether it be a shipping label, inventory label, or an address on a letter. Recently, I decided to purchase a label printer, only to find that the included label printing software was less than stellar.
Luckily, most productivity apps allow you to print labels, saving you time and making for a more professional looking package or letter. In this tutorial, I’ll show you how to print labels in Word, Pages, and Google Docs. We’ll cover two kinds of labels: name labels and address labels.
If you need help creating your labels in the first place, try some of the elegant label templates on Envato Market.
Printing Labels With Word
Printing labels using Word can be done in two ways: via your Contacts or via an applet called Mail Merge that pulls information out of an Excel spreadsheet. In this tutorial, I’ll show you how to do both.


First, open Word and open the Word Document Gallery. If the gallery doesn’t open automatically, go File > New from Template… from the Apple toolbar to open it. Look towards the left-hand side of the gallery and click on the button called Labels. Then, look towards the center of the screen and select the Label Wizard button and press Continue.
Using Contacts To Make Labels


Look towards the top of the menu under the Address header. Next to the address textbox, you will see a purple address book icon. Click on this to be brought to a screen where you can select contacts to make address labels for. Click on your contact’s name to add it to the list that can be viewed inside the address book textbox.
Note: If you’re making return address labels, check the box for Use my address to make all of the labels on the page have your name and address. That’s the easiest way to quickly make a sheet of your own return address labels.
Now that you’ve selected your contacts, you can customize your label using the Font button located to the right of the contacts button. Once you’re done customizing, look under the Label header, choose which type of label you’re printing to, and then use the Number of Labels box to choose how many labels you’d like to print. When you’re done, press the OK button to create your labels.
Using Mail Merge To Create Labels


To start, create a new Excel file and use the first row to name the columns that you’re using to collect information. For instance, if you’re creating address labels, name your columns “name”, “street”, etc. Under these label headings, input the information you’d like printed on your label. Make sure to keep all labels pertaining to one record on the same row.


Now, look towards the bottom left-hand corner of the Label Wizard and click on the button labeled Mail Merge. The Mail Merge popup window will now appear.


Under the first option in Mail Merge, click on the button labeled Create New. From the drop down menu, you’ll want to select the option labeled Labels. You will then be prompted to choose which type of label paper you’ll be printing to as well as the type of printer you’ll be printing to. If you can’t find your label on the list, look towards the bottom of the Label Options window and click on the button labeled New Label… and input your label’s dimensions. Once you’ve selected your label, click the OK button located towards the lower, right-hand corner of the screen.


Look under option two in the Mail Merge window and click on the button labeled Get List. From the drop-down menu, click on the option labeled Open Data Source. You will now be prompted to open an Excel file. Choose the one you just created.


A pop-up window will now appear, asking you to arrange your column names as to how you’d like them printed on your labels. You can arrange these labels by clicking on their names from the Insert Merge Field drop-down menu. Select the field you’d like to have on the top first and stack the rest in their respective order. When you’re done inputting these fields, click the OK button to be brought back to the Mail Merge window.


The fourth option in the Mail Merge window allows you to filter recipients. This comes in handy if your Excel document has, say, addresses from multiple states. If you only want to print labels for Illinois, you can filter the state field of your Excel document to only pull information equal to “IL”. You can do this by setting the Comparison to the “Equal to” option and then typing in “IL” into the Compare to box. When you’re done choosing your filters, press OK.
Now, use step five to preview your labels. Once you’re done previewing, click into step six. From here, you can choose to print your new labels by clicking on the printer icon or you can choose to view your new labels in Word by clicking on the paper icon.
Printing Labels With Pages
While Pages has a bunch of excellent built-in templates for business cards and letters, Apple didn’t include any templates for printing labels with the software. However, Apple does allow Pages users to install third-party templates, and the folks at Avery have developed some pretty awesome label templates that are available for free.
If you’d like to make a simple name-tag, or a tag to label boxes, I often find myself using the ID Label ID Label template. When I print address labels for shipping packages or sending letters, I usually use the Square Labels template that is also available for free.
Unfortunately, there currently isn’t a way to directly import information from Numbers to Pages for label creation, so you’ll have to type in label information by hand. However, if you’re creating single address labels or name tags, this likely won’t be too big of an issue.
Installing Templates To Pages
After you’ve downloaded the template you’d like to use for printing labels, you can simply open the downloaded file, modify the template, and print your labels. However, when you close Pages or want to create a new set of labels, you’ll have to reopen the blank Pages file you downloaded from your Downloads folder as they’re not accessible via the Pages start menu.


Adding an Avery template to iWork is surprisingly simple. All you need to do is open the downloaded template and look towards the Apple toolbar. From here, go to File > Save As Template… > Add To Template Chooser. You’ll now be prompted to rename your template.
Now, whenever you’d like to create a label in Pages, just select your template from the My templates option in the Pages Template chooser.
Printing Labels With Google Docs
Google Docs recently added the ability to print labels with the addition of Add-ons. Add-ons for Google Docs are made by third-party developers in order to make Google Docs do more. Think of it as an App Store of sorts for the web based productivity suite.


To print labels within Google Docs, first you’ll have to add the Avery Label Merge add-on to Google Docs. To do this, create a new document in Google Docs and look towards top of the window. You should see a button labeled Add-ons towards the top of the window. From the drop-down menu, click on the button labeled Get add-ons…


From the add-on window, use the search bar located towards the upper right-hand corner of the window to search for the Avery Label Merge add-on. Once you find the add-on, install it by clicking on the add button that is located towards the upper right-hand corner of the screen.


Now, use Google Docs to create a new spreadsheet using Google Sheets. This spreadsheet is where you’ll be putting all of the information you’d like to use in your labels. Use the first row of each spreadsheet as labels for the columns. So, if you’re making address labels, you’d want to label one column “name”, “street”, etc. After labeling these columns, enter the corresponding information that you’d like printed on labels below each label. Keep in mind that each row is it’s own label, so skip to a new row for each new label.


Now, go back to your new Document and click on the Add-ons label. Hover over the option labeled Avery Label Merge and click on New Merge. From the popup window, select which type of label you’d like to make: an address label or a name label. You’ll then be prompted to select which type of Avery label you’ll be printing on, and then you’ll be told to select which spreadsheet you’d like the Avery add-on to pull information from. Choose the spreadsheet you just created and press the Select button located towards the lower, left-hand corner of the window.


Look towards the right-hand corner of your Google Document under the Avery label manage box. From here, you’ll see a list of the names of your columns in the sheet you just created. Select the columns you’d like to include in your document by clicking on them. Then, look towards the bottom of the window next to the header labeled Rows and make sure you’re merging information from the correct rows from the sheet.


After you’ve ensured all of the information that you’ve input is correct, look towards the center of your Google Document. You should see a textbox shaped like a square label with the names of your columns in double brackets. Arrange these names around the label like you’d like to have them printed.
Now, you’re ready to create your labels. Look to the bottom of the Avery label manage box and click on the button labeled Merge. You will then be prompted to view your labels in a new Google Document where you can print your labels.
That’s it! Have Fun Printing Labels.
And that’s all there is to it, you can now print labels in most major productivity suites. That should cover most standard labels, since even non-Avery brand labels typically use the same sizes, so you can use these same tools to print on them as well. If you hit any snags in making labels, or have other tips to share, we’d love to hear them in the comments below!
Did you find this post useful?
.jpg)
Andrew Kunesh is a writer, IT professional, student, cyclist and coffee enthusiast from Chicago.