
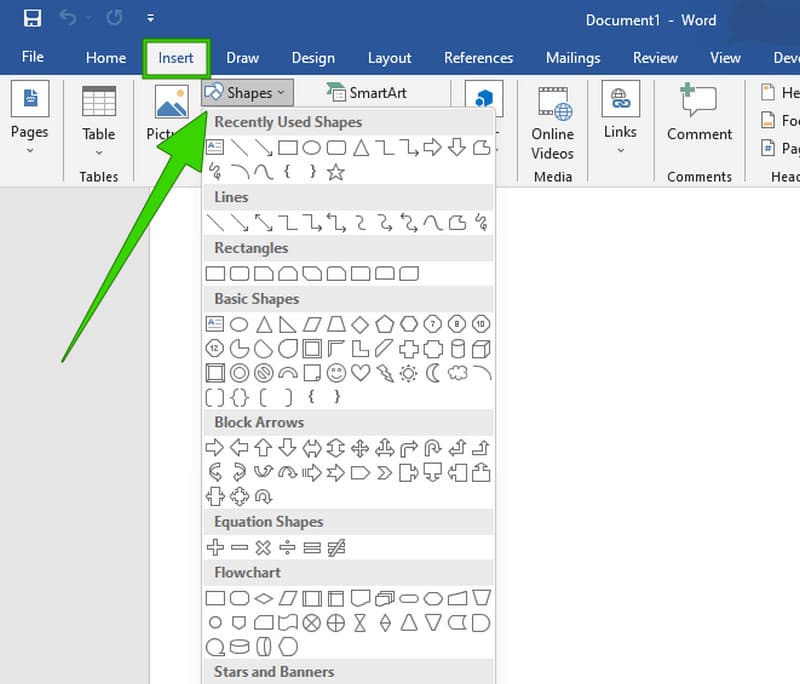
Click in your document where you want to create the drawing. On the Insert tab, in the Illustrations group, click Shapes.
Add a drawing to a document
- Insert a shape.
- Change a shape.
- Add text to a shape.
- Group selected shapes.
- Draw in the document.
- Adjust the size of the shapes.
Contents
- 1 How do I make a diagram in Word?
- 2 Is there a way to draw on Microsoft Word?
- 3 How do you draw a diagram on the computer?
- 4 How do you draw shapes in Word?
- 5 How do you draw a straight line in Word?
- 6 How can I draw a graph?
- 7 How do I draw a pen in Word?
- 8 How do I insert a pen in Word?
- 9 How do I label a diagram in Word?
- 10 Can you draw freehand in Word?
- 11 How do I make a block diagram in Word?
- 12 How do I make a graph in Word 2016?
- 13 How do you insert a draw tab in Word 2016?
- 14 How do you draw in Word 2020?
- 15 Why can’t I draw a straight line in Word?
- 16 How do you draw a straight vertical line in Word?
- 17 How do you make an XY graph in Word?
- 18 Where is the Drawing toolbar in Word 2016?
- 19 How do you draw in docs?
- 20 Where is the pen tool in Microsoft Word 2010?
How do I make a diagram in Word?
To create a diagram in a document
- Position the cursor in the document where you want to insert the diagram.
- Do either of the following to open the Choose a SmartArt Graphic dialog box:
- In the left pane, select a type of diagram.
- Click OK to insert the selected diagram at the cursor.
Is there a way to draw on Microsoft Word?
You can draw freely in Microsoft Word using the “Draw” feature whether you have Word for Mac or Windows. You can also insert customizable shapes into your document, or draw using the “Scribble” feature.
How do you draw a diagram on the computer?
8 Online Tools to Draw Diagrams and Flowcharts
- Lucidchart. Lucidchart allows you to create diagrams and flowcharts without installing any software easily.
- Draw.io. Draw.io is a completely free online tool for creating diagrams of all types.
- Cacoo.
- Gliffy.
- Sketchboard.
- Creately.
- DrawAnywhere.
- Google Drawings.
How do you draw shapes in Word?
Click in your document where you want to create the drawing. On the Insert tab, in the Illustrations group, click Shapes.
Add a drawing to a document
- Insert a shape.
- Change a shape.
- Add text to a shape.
- Group selected shapes.
- Draw in the document.
- Adjust the size of the shapes.
How do you draw a straight line in Word?
How to create a straight line in Microsoft Word
- Go to the Insert menu.
- Click on Shapes, and select which type of line you want to draw.
- Press the Shift button on the keyboard while dragging the pointer to form a straight line (horizontal or vertical).
- The straight line has created!
How can I draw a graph?
- Step 1: Identify the variables.
- Step 2: Determine the variable range.
- Step 3: Determine the scale of the graph.
- Step 4: Number and label each axis and title the graph.
- Step 5: Determine the data points and plot on the graph.
- Step 6: Draw the graph.
How do I draw a pen in Word?
On the Draw tab of the Ribbon, tap a pen to select it. In Word, you must be in Print layout to draw with ink. If the Draw tab is grayed out so that you can’t select a pen, go the View tab and select Print Layout. ; then you can select a pen to draw with.
How do I insert a pen in Word?
Click on File tab and select Options from the menu Page 2 3. Select All Tabs under Choose Commands from: 4. Select Pens under the Ink Tools and click the Add button to add the Pens tab as a main tab on the ribbon.
How do I label a diagram in Word?
Select the object (table, equation, figure, or another object) that you want to add a caption to. On the References tab, in the Captions group, click Insert Caption. In the Label list, select the label that best describes the object, such as a figure or equation.
Can you draw freehand in Word?
Creating Freehand Drawings in Word
To start, press the Draw tab on the ribbon bar. This will display the pen drawing tool options for you to use. Three drawing options are available under the Tools section.
How do I make a block diagram in Word?
Create a block diagram
- Click the File tab.
- Click New, under templates, or categories, click General, and then double-click Block Diagram.
- From the Blocks and Blocks Raised stencils, drag shapes onto the drawing page.
- To add text to a shape, select the shape and then type.
How do I make a graph in Word 2016?
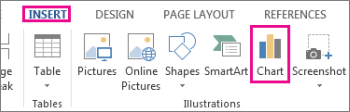
To create a simple chart from scratch in Word, click Insert > Chart, and pick the chart you want.
- Click Insert > Chart.
- Click the chart type and then double-click the chart you want.
- In the spreadsheet that appears, replace the default data with your own information.
- When you’ve finished, close the spreadsheet.
How do you insert a draw tab in Word 2016?
Adding the Draw tab to the Ribbon
- Right-click the Ribbon and select Customize the Ribbon.
- Check the box next to Draw, then click OK.
- The Draw tab will now be available in the Ribbon.
How do you draw in Word 2020?
How to draw in Word
- Click the ‘Shapes’ button and select ‘Scribble’ Open up your Microsoft Word document.
- Hold down your mouse to draw. Click and hold down your mouse to draw.
- Release the mouse. As soon as you release your mouse, the drawing will be finished.
- Edit your drawing. Double-click your drawing.
Why can’t I draw a straight line in Word?
To work around this problem and make the straight line horizontal, set the height to zero in the Size tab of the Layout dialog box. Similarly, to make the straight line vertical, set the width to zero. To display the Layout dialog box, right-click the line and choose More Layout Options.
How do you draw a straight vertical line in Word?
To add a vertical line using the shape tool, go to Insert | Shapes and select the Line tool. Place the cursor where you want the line to start, and drag to where you want the other end of the line to be. Holding the Shift key while you drag will ensure that the line is straight.
How do you make an XY graph in Word?
Step 1: Open the Word document. Step 2: Go to the Insert tab on the ribbon and click on the Chart option under the Illustrations group. Step 3: An Insert Charts dialog box will appear on the screen. Select the XY (Scatter) option from the left pane and pick a line graph that you want to insert.
Where is the Drawing toolbar in Word 2016?
Click View > Toolbars > Drawing. The Drawing toolbar is displayed or hidden. The Drawing toolbar contains a collection of icon buttons that allows the user to draw shapes and images in the document.
How do you draw in docs?
What to Know
- Open a document in Google Docs. Place the cursor where you want the drawing to appear.
- Select Insert > Drawing. Choose New to open the Drawing window.
- Choose a drawing type from the Actions menu. Options include word art, shapes, arrows, callouts, and equations.
Where is the pen tool in Microsoft Word 2010?
Click “File” > “Options” > “Customize Ribbon” > “Main Tabs” box > Review. The improved inking feature in Word 2010 lets you make ink annotations on your document on your Tablet PC and save those ink annotations together with the document.
Table of Contents
- How do I label a diagram in Word?
- How do you label a chart in a report?
- Does a diagram have labels?
- What is the difference between a diagram and a label?
- Is a table a diagram?
- What is the difference between a table and a chart?
- What is the difference between a chart a graph a diagram and a table?
- Why is a graph better than a table?
- What is a diagram in reading?
- How does a label help the reader?
- What is text diagram?
- What are the text features?
- What does diagram mean?
- Why do authors use diagrams in a text?
- How did the chart help you understand the text?
- What’s the purpose of text features?
- Is subheading a text feature?
- What is a fact box text feature?
- What is a subheading text feature?
- What is a fact box in a book?
- What does nonfiction mean?
- What are the 3 types of nonfiction?
- Does Nonfiction mean fake?
- What is the purpose of nonfiction?
Select the object (table, equation, figure, or another object) that you want to add a caption to. On the References tab, in the Captions group, click Insert Caption. In the Label list, select the label that best describes the object, such as a figure or equation.
How do you label a chart in a report?
Figures should be labeled with a number followed by a descriptive caption or title. Captions should be concise but comprehensive. They should describe the data shown, draw attention to important features contained within the figure, and may sometimes also include interpretations of the data.
Does a diagram have labels?
Lesson Summary Diagrams are visuals that are used to help the reader understand the text. They have titles, labels, and captions. Diagrams are used to show parts of a whole, steps of a process, and relationships.
What is the difference between a diagram and a label?
Labels are similar to captions in that they are located near photos or illustrations. However, labels are one or two words instead of one or two sentences. A diagram is a drawing or picture that has labels showing the important parts. A heading is a title found at the top of a page or section of text.
Is a table a diagram?
Overview. The term “diagram” in its commonly used sense can have a general or specific meaning: visual information device : Like the term “illustration”, “diagram” is used as a collective term standing for the whole class of technical genres, including graphs, technical drawings and tables.
What is the difference between a table and a chart?
The difference between table and chart is that table displays data in the form of row and columns whereas chart is the graphical representation of data in varied forms. This should be noted that tables represent the data whereas charts help to explain the larger concepts and the data in an easier way.
What is the difference between a chart a graph a diagram and a table?
Charts present information in the form of graphs, diagrams or tables. Graphs show the mathematical relationship between sets of data. Graphs are one type of chart, but not the only type of chart; in other words, all graphs are charts, but not all charts are graphs
Why is a graph better than a table?
According to Stephen Few, graphs reveal more than a collection of individual values. Because of their visual nature, they show the overall shape of your data. This is when you should use graphs instead of tables: The message is contained in the shape of the values (e.g. patterns, trends, exceptions)
What is a diagram in reading?
What is a diagram? A graphic aid that shows information visually so that the reader can better understand and remember the ideas. A diagram gives the reader a picture of how a process or relationship works. Some diagrams illustrate information in the text.
How does a label help the reader?
Teacher Introduction and Connecting the Concept to Text When we read nonfiction, the author will label a picture or photo so the reader knows what that is a picture of and/or can see the different parts of the object. This helps the reader to understand both the picture and the text better. Each picture is labeled.
What is text diagram?
In natural language processing (NLP), a text graph is a graph representation of a text item (document, passage or sentence). It is typically created as a preprocessing step to support NLP tasks such as text condensation term disambiguation (topic-based) text summarization, relation extraction and textual entailment.
What are the text features?
Text features include all the components of a story or article that are not the main body of text. These include the table of contents, index, glossary, headings, bold words, sidebars, pictures and captions, and labeled diagrams.
What does diagram mean?
(Entry 1 of 2) 1 : a graphic design that explains rather than represents especially : a drawing that shows arrangement and relations (as of parts) 2 : a line drawing made for mathematical or scientific purposes.
Sometimes words aren’t the most effective way to communicate. Using graphs, diagrams and charts can help your reader to get a clearer picture of your research findings and how they compare with other data. Making them different colours can help the reader to differentiate each result. …
How did the chart help you understand the text?
Answer. Answer: Diagrams helps reader understand the text as a whole since it can enhance communication, learning, and productivity. They are useful for documenting facts, drawing plans, and capturing ideas and enhance communication, learning, and productivity
What’s the purpose of text features?
Text features help you locate important information in a text. Knowing the purpose of the text feature helps you decide at which text feature to look when you want to understand your text better. Organized by purpose, the chart identifies text features and how they help the reader.
Is subheading a text feature?
Subheading. Subheadings also help us understand the organization of the thoughts contained in the section and the relationships of the parts. Title, subtitle, headings, and subheadings could be used to create guided notes, as they are pivotal parts of the author’s organization of the text.
What is a fact box text feature?
Textboxes. Text Feature. Purpose. A box or some other shape that contains text; Show the reader that information is important or interesting. A picture of what something looks like on the inside or from another point of view; Help the reader see all parts of something.
What is a subheading text feature?
Heading/Subheading A secondary heading that. divides a section of text; sometimes differentiated. from a title by font color.
What is a fact box in a book?
Fact boxes are short background texts that complement a longer text on a specific topic. Fact boxes are rarely coherent text, but rather presented like a table or as an enumeration with bullets.
What does nonfiction mean?
“Nonfiction” refers to literature based in fact. The Nonfiction Department has books and videos in many categories including biography, business, cooking, health and fitness, pets, crafts, home decorating, languages, travel, home improvement, religion, art and music, history, self-help, true crime, science and humor.
What are the 3 types of nonfiction?
Here are some of the most prominent types of nonfiction genres.
- History.
- Biographies, autobiographies, and memoirs.
- Travel guides and travelogues.
- Academic texts.
- Philosophy and insight.
- Journalism.
- Self-help and instruction.
- Guides and how-to manuals.
Does Nonfiction mean fake?
Non fiction means that it is not fake. Non-fiction is writing which accurately describes real events and actual people. The word fake implies deliberate deception whereas fiction is the proper label applied to writing which is up-front about being based at least partially on imagination.
What is the purpose of nonfiction?
Most nonfiction is written to express or to inform. If the author’s purpose is to express, the concepts expressed are always based on true, real-life situations. Because of this, one could argue all nonfiction serves to inform the reader, as well.
Diagrams visualise data and, unlike tables, can already provide initial interpretations. They also help to transform confusing numerical material into attractive lists. This chapter shows you how to create a diagram.
More detailed information on diagrams can be found here.
Insert diagram
In our example, we insert a diagram between two text fields. As in the screen shot below.

This is how we proceed: First, we navigate to the Insert tab in the Illustrations section and click on the Diagram button.

The Insert Diagram dialogue box appears. Select a chart type here. The most common chart is the column chart, which we also use in this example.

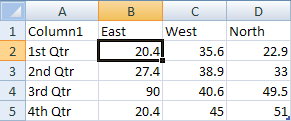
A bar chart with a mini-excel table appears. Here the data is entered directly and saved. Word does not give us an empty table, but sample data that we edit.

For example, like this: In column A car brands and in columns B to D rows of numbers symbolising turnover, costs or something else. Then we close the table with a click on the X at the top right.

The diagram is now integrated in our Word document. In the next steps we will show how to change the layout.

Layout options
The layout of a chart is important and determines how the chart is displayed. We select the chart and click on the bluish symbol with the arc (red arrow).

We see the layout options menu and select the option Square (with text wrap).

The diagram is now framed by the text.

Try the other settings in the layout options menu. For example, the option “top and bottom” where no text will appear to the left and right of the chart.

Align the diagram
With the Align function we can quickly bring the diagram into a certain position – for example, into the horizontal centre. In the Insert tab in the Arrange area we select the Align button (red arrow).

In the following menu we click on Centre Horizontally.

This is what the result looks like: the diagram is in the middle!

Excursus: Add diagram elements
As in Excel, the diagrams can be equipped with numerous elements.

Labelling
In a document it is often necessary to label diagrams. A caption is a text that is placed above or below the diagram and describes it in more detail.

Note: Labels can also be inserted for other elements such as pictures or tables.
In the dialogue box Label we select the option Figure in the field Label, if this is not already preset.

Next, we type a suitable name for the diagram in the field Label – for example, Sales Automobile. Then we click on OK.

And this is what a diagram in Word looks like with a label. The caption itself can still be changed afterwards. Just click on it and write something else. It’s as simple as that.

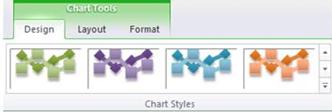
Change design
The appearance of a diagram is very important and should not be neglected. The quickest way to determine the appearance of a diagram is to use the diagram format templates of Office. To do this, we click on the Design tab (Chart Tools) in the Chart Format Templates area on the small black arrow with a dash (red arrow).

A menu opens with many format templates. We select one and immediately see our chart with the new design.

This is what our diagram looks like with a design format template. Try out the other templates!

1) Start Microsoft Word. 2) Click the New Document button. 3) From the Tools menu, select Letters and Mailings, then select Envelopes and Labels. 4) Select the Labels tab, click Options, select the type of labels you want to create and then click OK.
Just so, How do I get a plain label template in Word?
Open a blank document in Word, click on the “Mailings” tab at the top of the page, and click on “Labels”. This will open a box titled “Envelopes and Labels”. Click on the “Options” button to create a new label template.
Besides, How do I create a label template?
To create a template:
- Step 1: Click on Options; this opens a dialogue box called Label Options.
- Step 2: Click on New Label; this opens a dialogue box called Label Details.
- Step 3: Enter your required measurements. …
- Step 4: Give your template a name, and click OK.
How do I download Avery label templates for free? The fastest way to download an Avery template is to go to avery.com/templates and type your Avery product or template number into the white Search Bar at the top center of the page. (Your product or template number can be found on the bottom right of your Avery packaging).
Subsequently, How do I label a diagram in Word? On the References tab, in the Captions group, click Insert Caption. In the Label list, select the label that best describes the object, such as a figure or equation. If the list doesn’t provide the label you want, click New Label, type the new label in the Label box, and then click OK.
How do I make Labels using Word?
Create and print labels
- Go to Mailings > Labels.
- Select Options and choose a label vendor and product to use. …
- Type an address or other information in the Address box (text only). …
- To change the formatting, select the text, right-click, and make changes with Font or Paragraph.
- Select OK.
How do you label a sketch?
Put your name, class color, and date in the top RIGHT hand corner • Use a ruler to draw label lines • Do not use arrows for label lines • Label lines do not cross each other • Label lines should point to the center of the structure being labeled • Print all labels horizontally • Print, do not write in cursive • Label …
How do I print a shipping label at home?
Printing USPS Shipping Labels From Home With Stamps.com
- Create a Stamps.com account. …
- Login to your Stamps.com account to start printing labels. …
- Enter the destination address for your package. …
- Weigh your package. …
- Select a USPS mail class and shipping rate. …
- Print your shipping label from home.
How do I print multiple labels on one page?
Click either Before current page or After current page. Type the information that you want on each label. Click File > Print. On the Publication and Paper Settings tab, under Printing options, make sure to choose Multiple pages per sheet, and then click Print.
How do I make labels in pages?
What is a labeled sketch?
A labeled diagram is a drawing, chart or graph that is used to visualize a concept. Labeled diagrams can be used in math, science and language arts in order to help students understand the relationships among different parts of the diagram.
What is draw label?
This activity, where students draw and label a key scene in a text, works well as a pre-writing activity, and also as a reading comprehension activity. It helps students to develop a detailed visualization of a setting, and to attach words to the image.
What is the difference between a drawing and a diagram?
Drawing is the art or technique of representing an object or outlining a figure, plan, or sketch by means of lines. Diagram is a simplified illustration showing the appearance, structure, or workings of something.
Can you print shipping labels with a regular printer?
You don’t need a special label maker to print your own address and shipping labels. A standard printer and printer paper are all that’s required.
How can I make a free shipping label?
Sendcloud’s free Shipping Label Maker is a free tool to generate a shipping label for your business. Just fill in the origin and destination addresses, print it on an A6 (sticker) sheet and stick it to your box!
How can I get a free shipping label?
With USPS.com, your Post Office is where you are. To start Click-N-Ship® service, sign in to or sign up for a free USPS.com account. Follow the steps to enter your package details, pay for postage, and print your shipping label.
How do I print multiple names on labels?
Create and print a page of different labels
- Go to Mailings > Labels.
- Select Options.
- Select the type of printer you’re using.
- Select your label brand in Label products.
- Select the label type in Product number. …
- Select OK.
- Select OK in the Labels dialog box. …
- Type the information you want in each label.
How do you put multiple stickers on one page?
How Do I Make Different Stickers on One Sheet?
- Click File > New. …
- Choose from one of the available label templates. …
- Choose the multiple pages per sheet as the layout type. …
- Click on your custom sticker label’s name under “More Blank Page sizes.” Select the name to open the customized sticker file.
How do I print multiple shipping labels?
Printing Postage for Multiple Recipients
- Click Batch in the Left Navigation Bar.
- Select the profile containing the orders you want to print, or create and populate a new profile. …
- Ensure that all the information in each order you want to print is correct.
- Select the variety of label you want to print on.
Is there a template for labels in Pages?
There are only a relatively small number of built-in Avery templates for Pages. Fortunately, you can create your own labels in Pages if you know the size of the labels you want to make.
Does Apple Pages have a label template?
The Avery site has downloadable mailing label templates in Pages document format.
Is there an app for address labels?
“AddressLabels delivers an extremely effective way to manage card lists which means the ability to easily compose lists from your Contacts, get the labels printed, and keep track of cards received and sent!
Is it labeled or Labelled?
Labeled and labelled are both correct spellings. Labeled is the preferred spelling in American English. Labelled is the preferred spelling in British English.
What are charts and graphs used for?
Charts and graphs help to express complex data in a simple format. They can add value to your presentations and meetings, improving the clarity and effectiveness of your message. There are many chart and graph formats to choose from.
What are labels used for?
Labels may be used for any combination of identification, information, warning, instructions for use, environmental advice or advertising. They may be stickers, permanent or temporary labels or printed packaging.
- Reference 1
- Reference 2
- Reference 3
- Reference 4
- Reference 5
Содержание
- Создание блок-схемы
- Добавление и удаление фигур схемы
- Добавляем поле
- Удаляем поле
- Перемещаем фигуры блок-схемы
- Изменяем цвет блок-схемы
- Изменяем цвет линий или тип границы фигуры
- Изменяем цвет фона элементов блок-схемы
- Вопросы и ответы

Работа с документами в программе Microsoft Word довольно редко ограничивается одним только набором текста. Зачастую, помимо этого возникает необходимость создать таблицу, диаграмму или что-то еще. В этой статье мы расскажем о том, как нарисовать схему в Ворде.
Урок: Как в Word сделать диаграмму
Схема или, как это называется в среде офисного компонента от Microsoft, блок-схема представляет собой графическое отображение последовательных этапов выполнения той или иной задачи или процесса. В инструментарии Ворд имеется довольно много различных макетов, которые можно использовать для создания схем, некоторые из них могут содержать рисунки.
Возможности MS Word позволяют задействовать в процессе создания блок-схем уже готовые фигуры. К доступному ассортименту таковых относятся линии, стрелки, прямоугольники, квадраты, окружности и т.д.
Создание блок-схемы
1. Перейдите во вкладку “Вставка” и в группе “Иллюстрации” нажмите кнопку “SmartArt”.
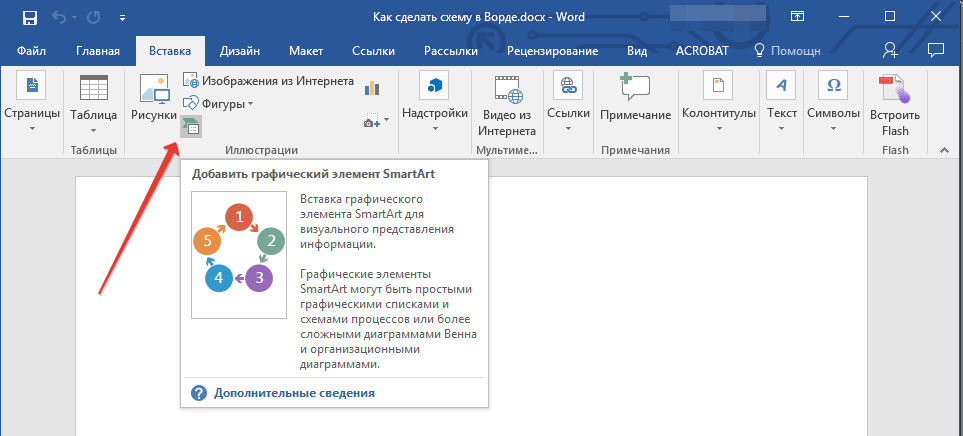
2. В появившемся диалоговом окне вы можете увидеть все объекты, которые можно использовать для создания схем. Они удобно рассортированы по типовым группам, так что найти необходимые вам не составит труда.

Примечание: Обратите внимание на то, что при нажатие левой кнопкой мышки на любую группу, в окне, в котором отображаются входящие в нее элементы, появляется также и их описание. Это особенно удобно в случае, когда вы не знаете, какие объекты вам нужны для создания той или иной блок-схемы или, наоборот, для чего конкретные объекты предназначены.
3. Выберите тип схемы, которую хотите создать, а затем выберет элементы, которые для этого будете использовать, и нажмите “ОК”.
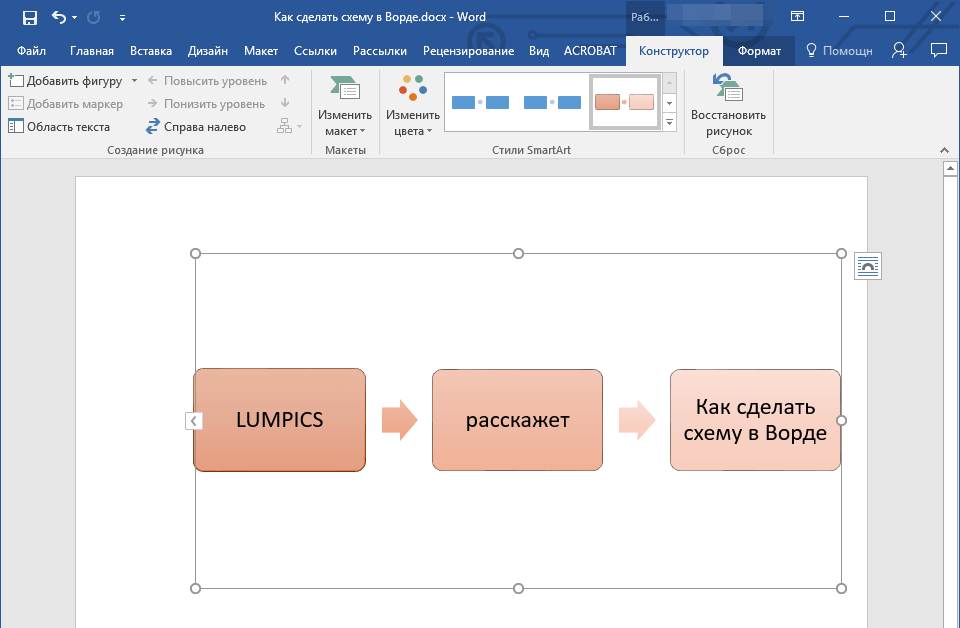
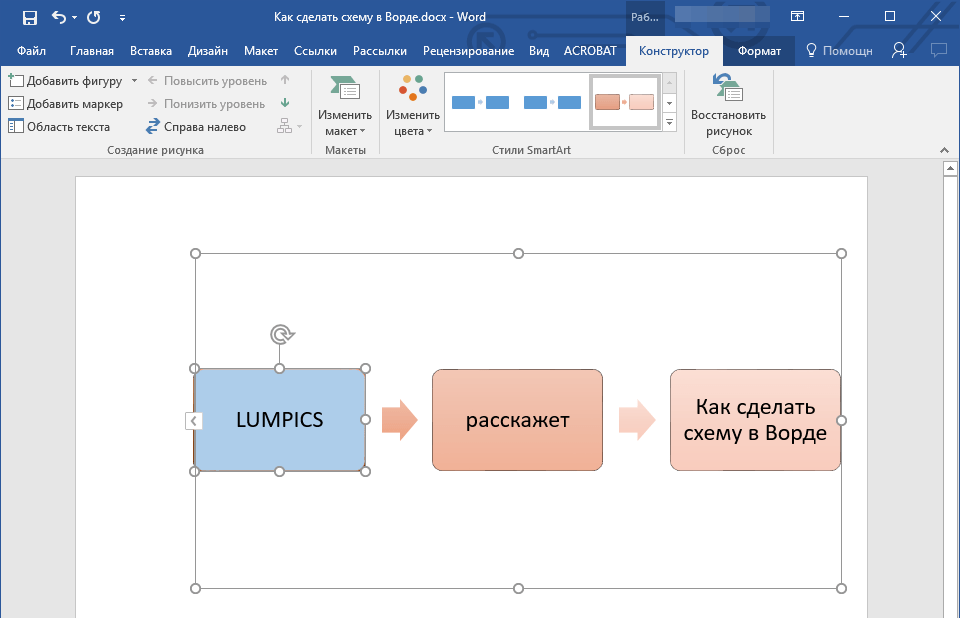
4. Блок-схема появится в рабочей области документа.

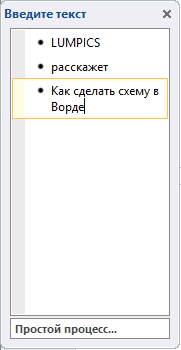
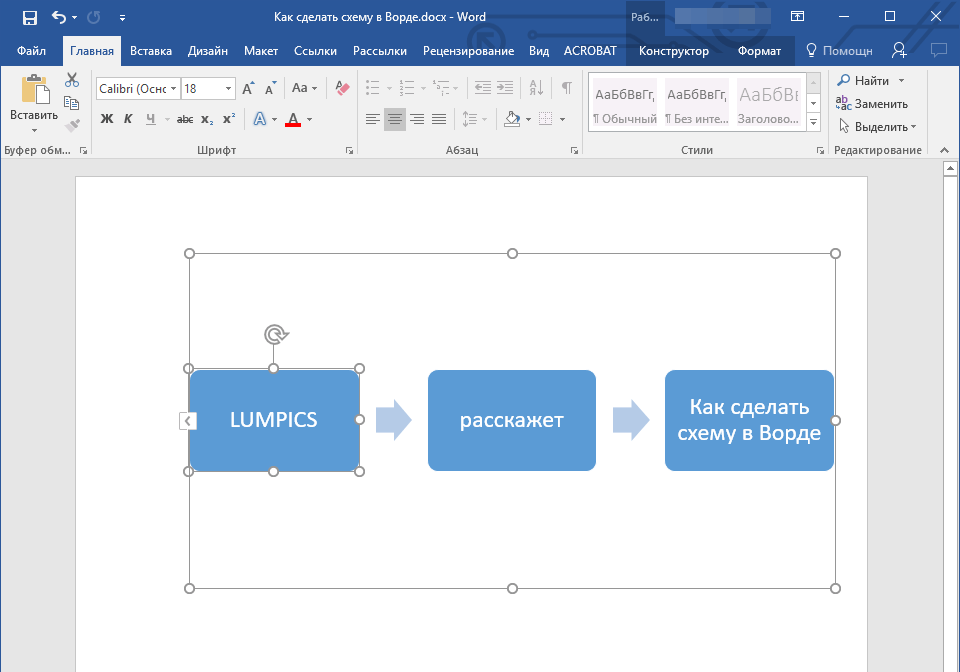
Вместе с добавившимися блоками схемы, на листе Ворд появится и окно для введения данных непосредственно в блок-схему, это также может быть заранее скопированный текст. Из этого же окна вы можете увеличить количество выбранных блоков, просто нажимая “Enter” после заполнения последнего.
При необходимости, вы всегда можете изменить размер схемы, просто потянув за один из кружков на ее рамке.

На панели управления в разделе “Работа с рисунками SmartArt”, во вкладке “Конструктор” вы всегда можете изменить внешний вид созданной вами блок-схемы, например, ее цвет. Более подробно обо всем этом мы расскажем ниже.
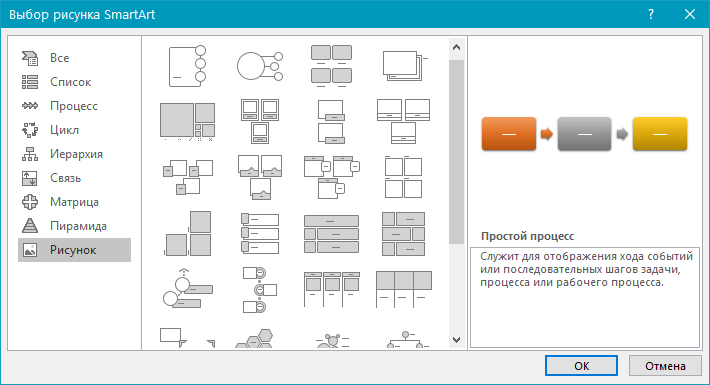
Совет 1: Если вы хотите добавить в документ MS Word блок-схему с рисунками, в диалоговом окне объектов SmartArt выберите “Рисунок” (“Процесс со смещенными рисунками” в более старых версиях программы).
Совет 2: При выборе составляющих объектов схемы и их добавление стрелки между блоками появляются автоматически (их вид зависит от типа блок-схемы). Однако, благодаря разделам того же диалогового окна “Выбор рисунков SmartArt” и представленным в них элементах, можно сделать схему со стрелками нестандартного вида в Ворде.
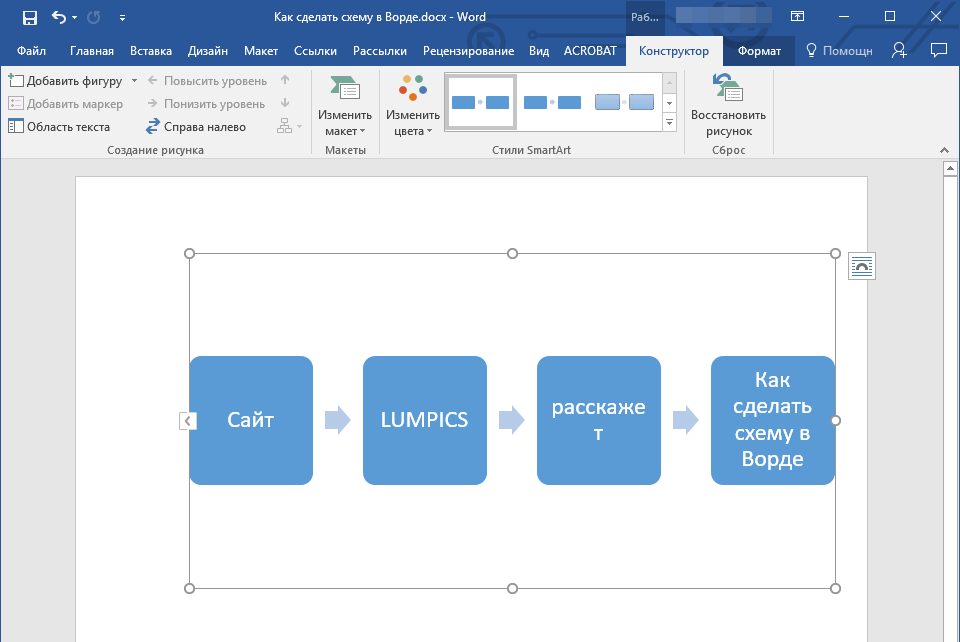
Добавление и удаление фигур схемы
Добавляем поле
1. Кликните по графическому элементу SmartArt (любой блок схемы), чтобы активировать раздел работы с рисунками.
2. В появившейся вкладке “Конструктор” в группе “Создание рисунка” нажмите на треугольник, расположенный возле пункта “Добавить фигуру”.
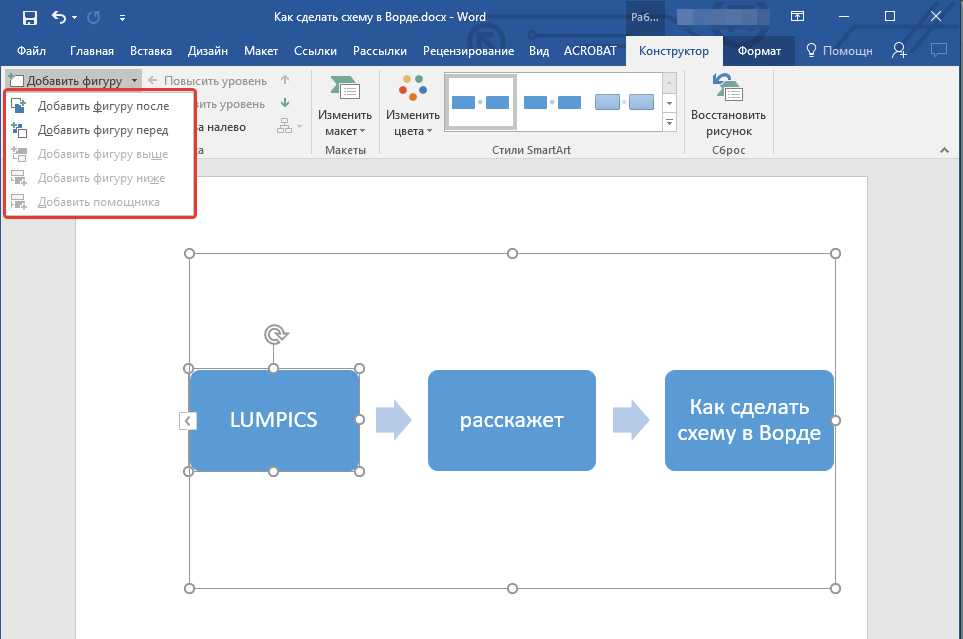
3. Выберите один из предложенных вариантов:
- “Добавить фигуру после” — поле будет добавлено на том же уровне, что и текущее, но после него.
- “Добавить фигуру перед” — поле будет добавлено на том же уровне, что и уже существующее, но перед ним.
Удаляем поле
Для удаления поля, как и для удаления большинства символов и элементов в MS Word, выделите необходимый объект, кликнув по нему левой кнопкой мышки, и нажмите клавишу “Delete”.
Перемещаем фигуры блок-схемы
1. Кликните левой кнопкой мышки по фигуре, которую хотите переместить.
2. Используйте для перемещения выделенного объекта стрелки на клавиатуре.
Совет: Чтобы перемещать фигуру малыми шагами, держите зажатой клавишу “Ctrl”.
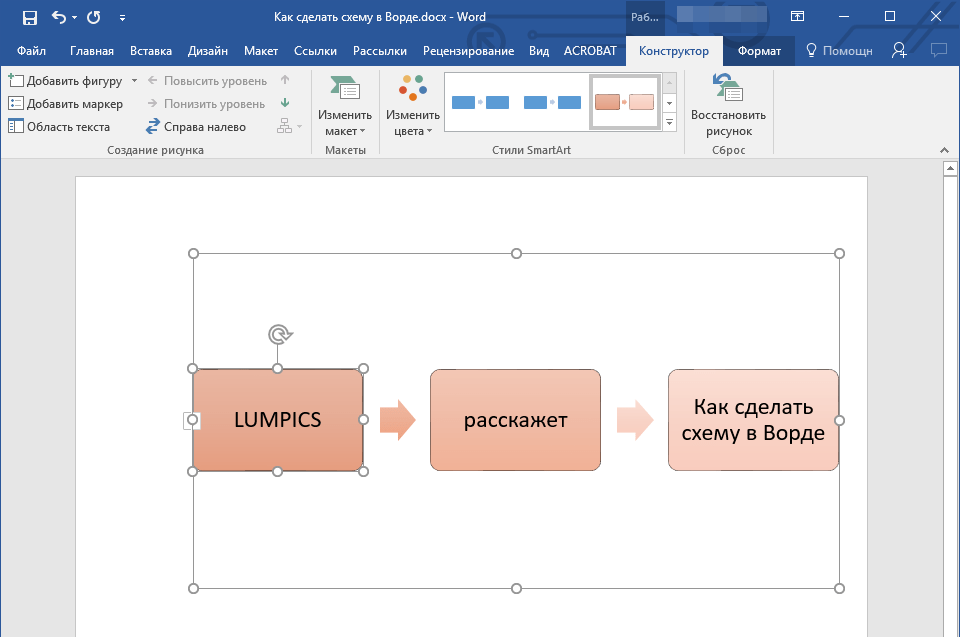
Изменяем цвет блок-схемы
Отнюдь не обязательно, чтобы элементы созданной вами схемы выглядели шаблонно. Вы можете изменить не только их цвет, но и стиль SmartArt (представлены в одноименной группе на панели управления во вкладке “Конструктор”).
1. Кликните по элементу схемы, цвет которого вы хотите изменить.
2. На панели управления во вкладке “Конструктор” нажмите кнопку “Изменить цвета”.
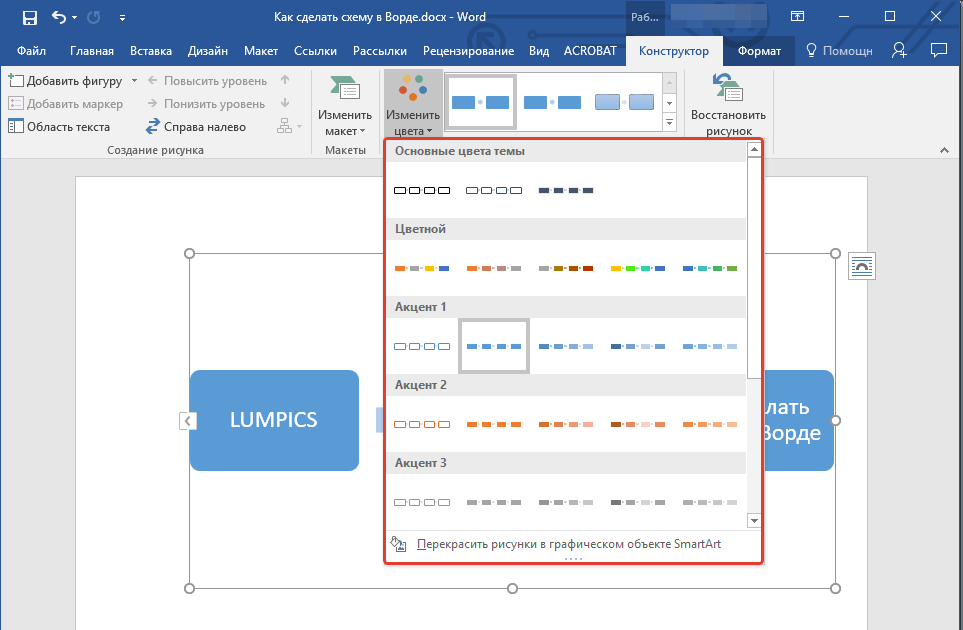
3. Выберите понравившийся цвет и нажмите на него.
4. Цвет блок-схемы сразу же изменится.
Совет: По наведению курсора мышки на цвета в окне их выбора, вы можете сразу увидеть, как будет выглядеть ваша блок-схема.
Изменяем цвет линий или тип границы фигуры
1. Кликните правой кнопкой мышки на границе элемента SmartArt , цвет которого вы хотите изменить.
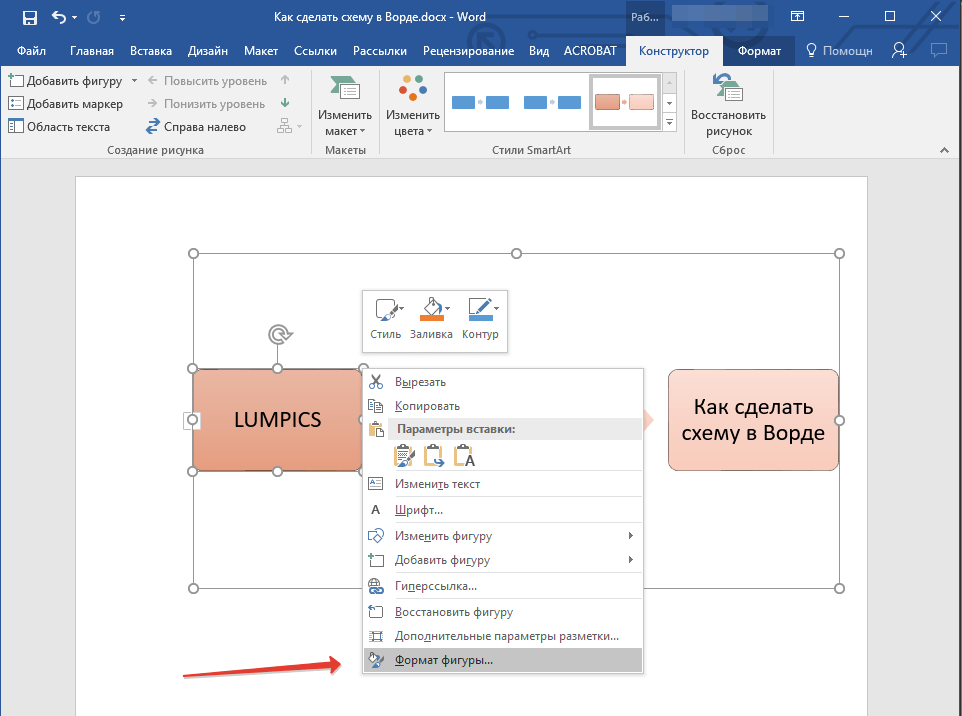
2. В появившемся контекстном меню выберите пункт “Формат фигуры”.
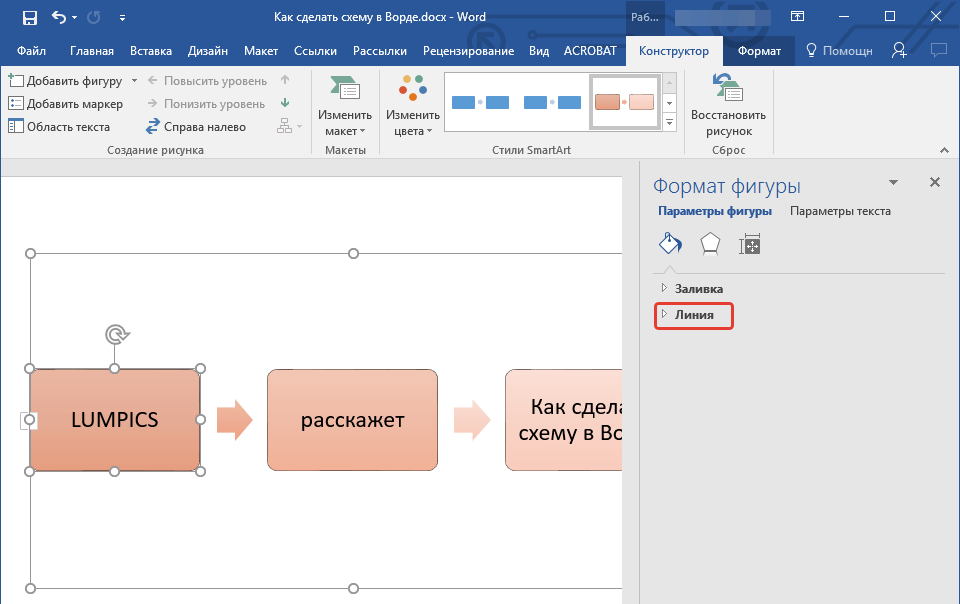
3. В окне, которое появится справа, выберите пункт “Линия”, выполните необходимые настройки в развернувшемся окне. Здесь вы можете изменить:
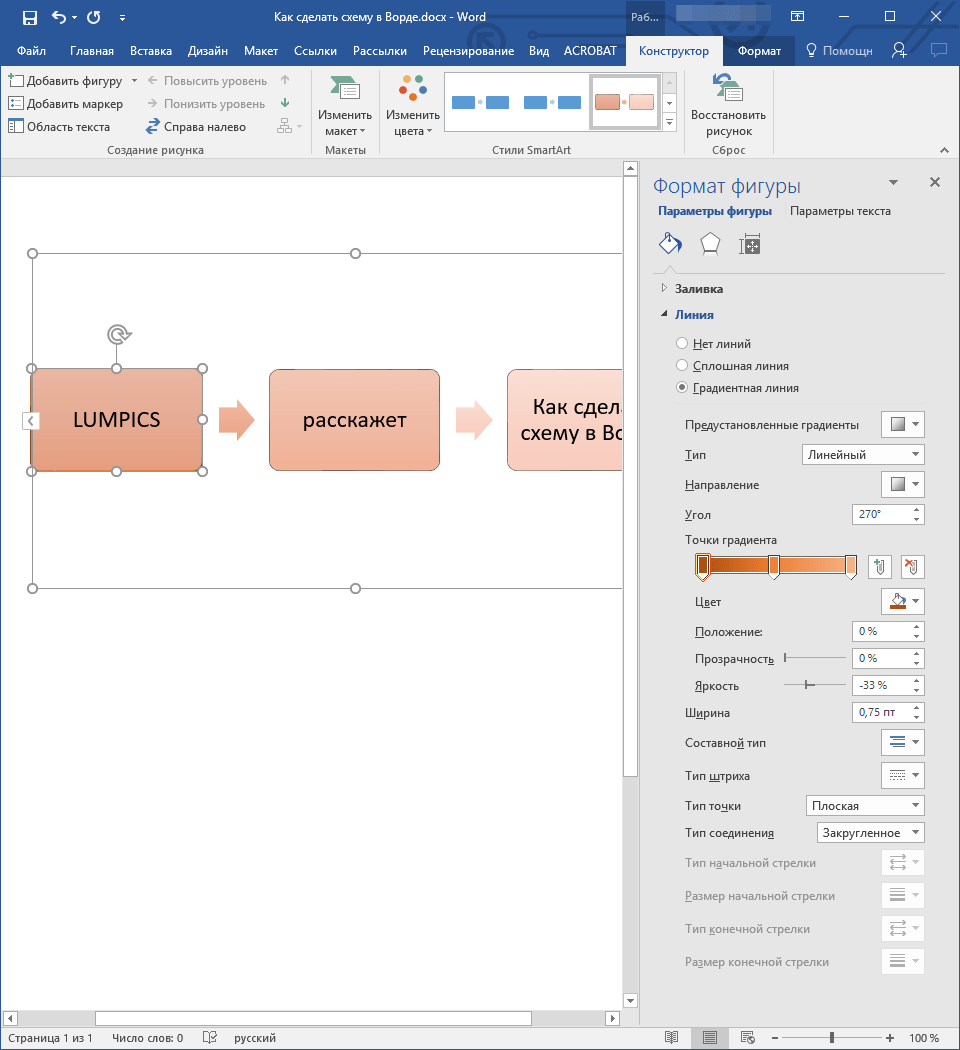
4. Выбрав желаемый цвет и/или тип линии, закройте окно “Формат фигуры”.
5. Внешний вид линии блок-схемы изменится.
Изменяем цвет фона элементов блок-схемы
1. Кликнув правой кнопкой мышки по элементу схемы, выберите в контекстном меню пункт “Формат фигуры”.
2. В открывшемся справа окне выберите элемент “Заливка”.
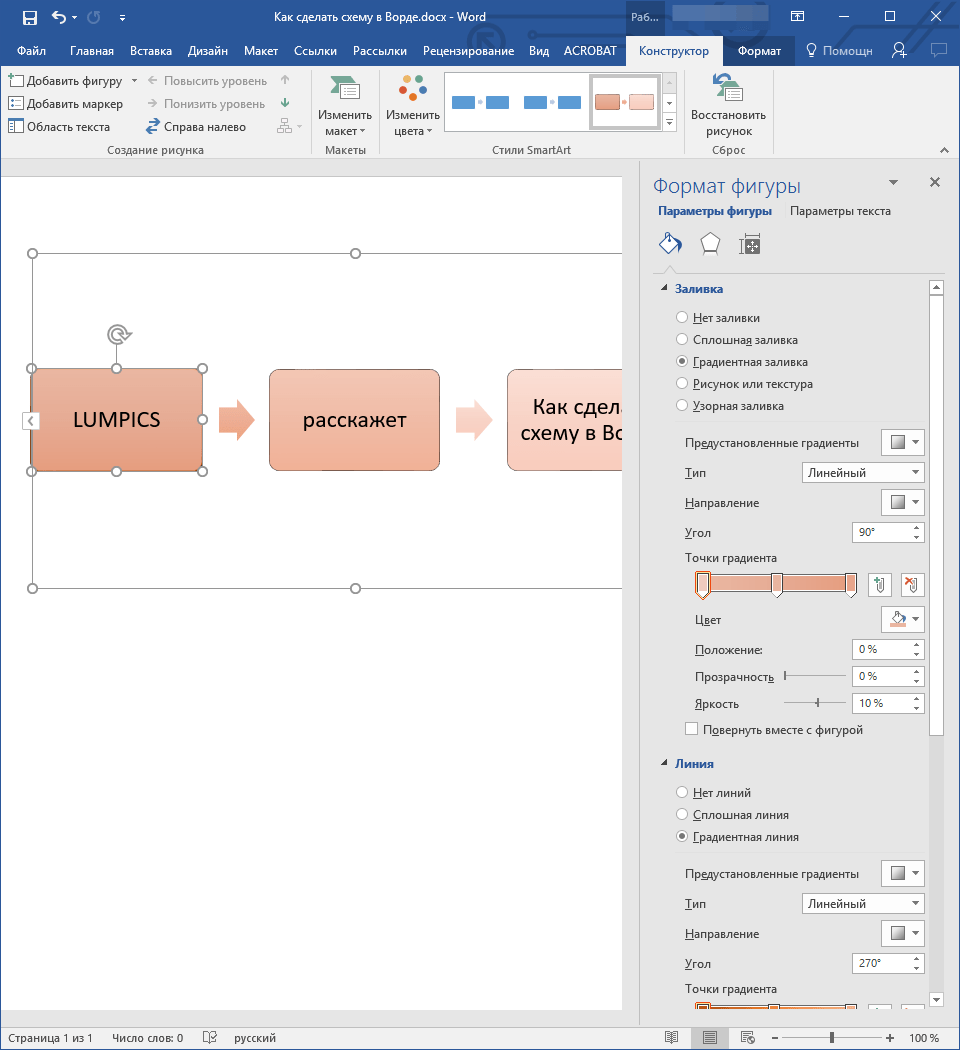
3. В развернувшемся меню выберите пункт “Сплошная заливка”.
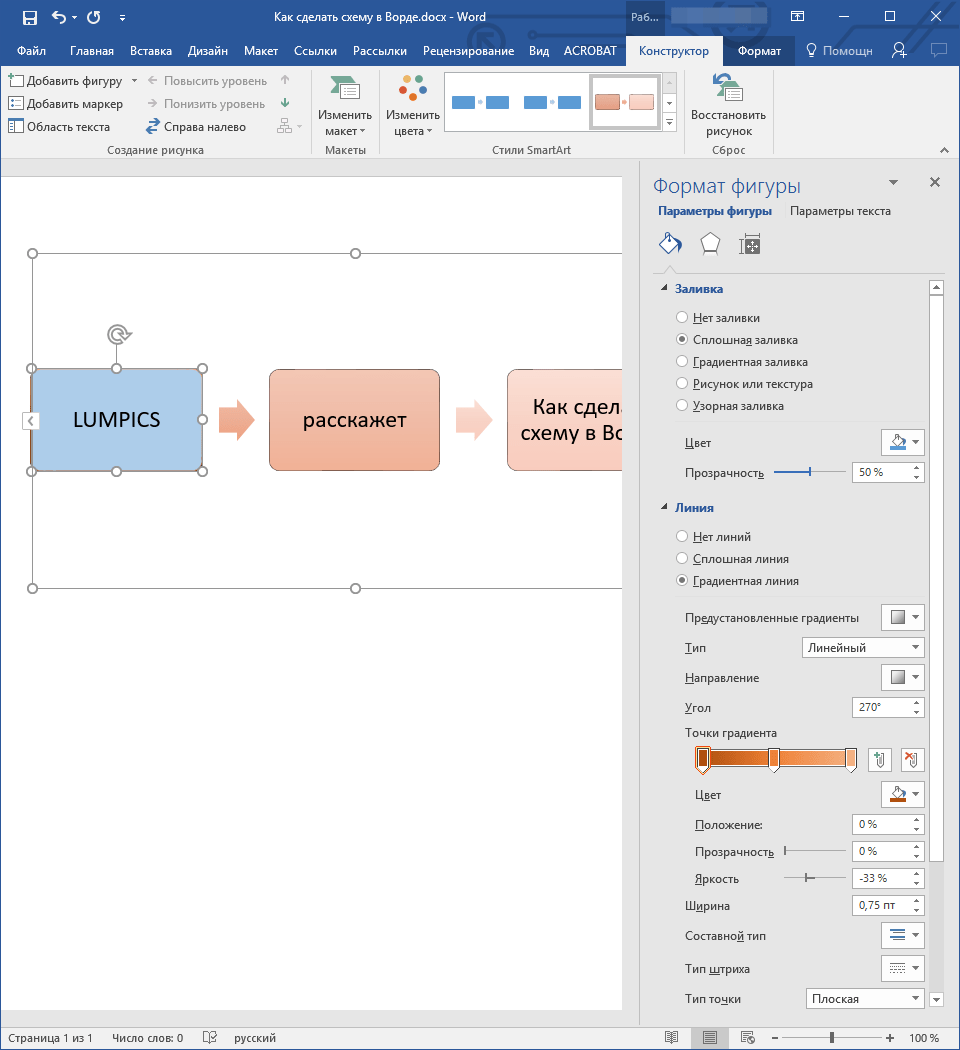
4. Нажав на значок “Цвет”, выберите желаемый цвет фигуры.
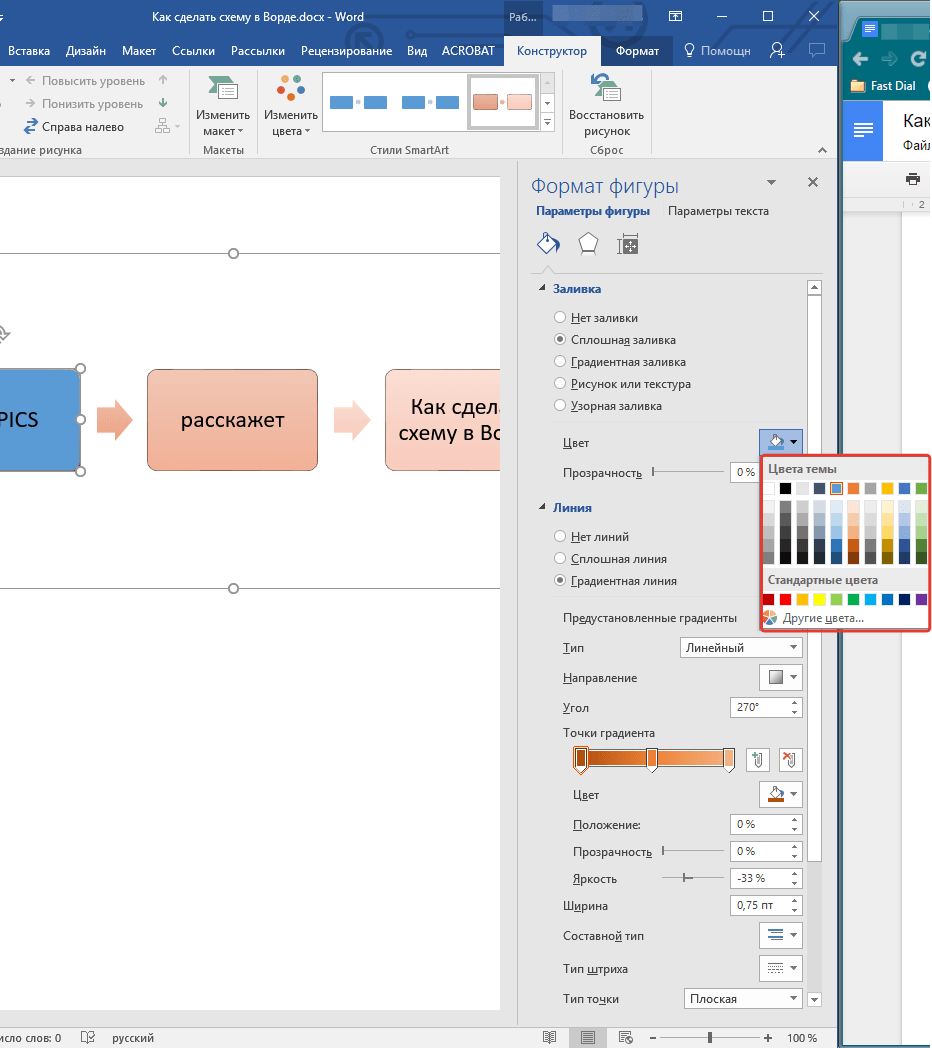
5. Кроме цвета вы также можете отрегулировать и уровень прозрачности объекта.
6. После того, как вы внесете необходимые изменения, окно “Формат фигуры” можно закрыть.
7. Цвет элемента блок-схемы будет изменен.
На этом все, ведь теперь вы знаете, как сделать схему в Ворде 2010 — 2016, а также и в более ранних версиях этой многофункциональной программы. Инструкция, описанная в данной статье является универсальной, и подойдет к любой версии офисного продукта от Microsoft. Желаем вам высокой продуктивности в работе и достижения только положительных результатов.

In this article you’ll learn what the basic symbols in flowcharts mean, and how to draw out these flowcharts in Microsoft Word.
In nearly every industry, people use flowcharts as part of troubleshooting, decision-making, and logical analysis.
If you learn how to make a flowchart in Microsoft Word, you’ll always have a tool at your disposal to do these kinds of thought experiments.
In this article, you’ll learn what the basic symbols in flowcharts mean, and how to draw out these flowcharts in Microsoft Word. If you already understand basic flowcharting, you can skip down to the section on how to make a flowchart in Word.
Basic Flowchart Symbols
Before you can draw out flowcharts in Word, it’s important to understand what those symbols mean.
The following simple guide will help with using the right symbols at the right time.
Start or Terminator

The oval block is known as the “terminator”. No, not the kind of terminator that saves the planet. This terminator is the kind you use to terminate a logical flowchart branch. It’s used to start the flowchart as well.
Step Blocks

The step block is one of the most common shapes used when you’re writing flowcharts. It represents a step where some process or work is done. For example, if you’re writing code that includes a module that’ll calculate something based on user input, you’d use a process block to represent “Calculate User Results”.
Decision Blocks

Frequently, in a flowchart logic flow, the process needs to make a logical decision. This is usually based on inputs, represented by the line or lines flowing into the top of the decision block. The decision then generates outputs based on the outcome of the logic, represented by lines flowing out of the bottom of the sides of the decision block.
Input/Output Data Blocks

There are a variety of blocks used to represent data that flows into and out of your flowchart processes. The most common ones are those displayed above. These include:
- Input/Output: Trapezoid blocks like the one on the left. This could be output from a process calculation block or an input from some other process in the flowchart.
- Manual Input: User input trapezoid for something like input from an entry form.
- General Data Storage: The shape displayed on the right is a general data storage block representing data you might write to some file or database.
There are also specific shapes for things like databases, documents, or internal storage. You can also find those in the Microsoft Word collection of flowchart shapes.
Miscellaneous Shapes

There are a few other common shapes you need to know before heading into Word to create your first flowchart. These include:
- Off-Page Connector: Allows you to continue your flowchart onto another page by pointing to the label for the start of the second-page flowchart here.
- Predefined Process: Reference a process block you’ve defined elsewhere that you want to reuse in this spot.
- Merge: Combine the output of two other flowchart lines into a single process using the Merge triangle.
You typically connect flowchart shapes with a line that terminates with an arrow. You can use any kind of line type, so long as you’re consistent with it throughout the entire flowchart.
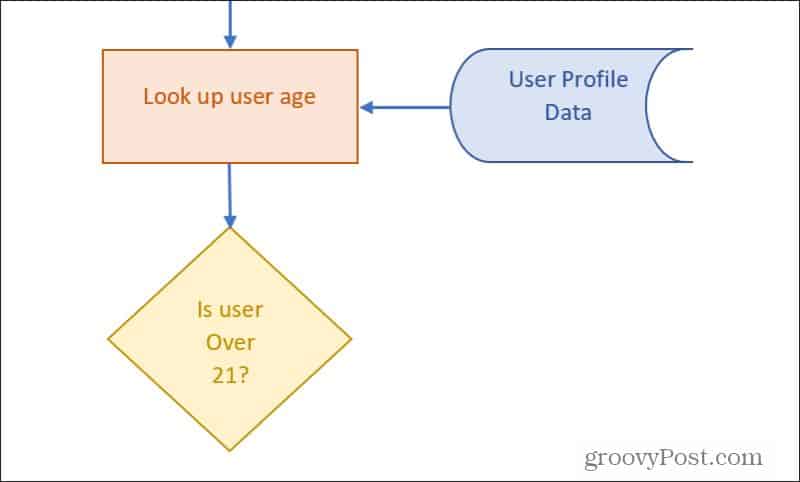
Now that you know the basic, most common flowchart symbols, you’re ready to make your own flowchart in Microsoft Word. The purpose of the example flowchart we’ll discuss here is to write a program to take manual input from a user form. The program will be used in a liquor store to allow customers to automatically confirm their legal ability to purchase alcohol.
The user will type their name and social security number into the form on the screen. Your program will look up their information from a database to obtain their age. If they’re over 21, the program will process their purchase for alcohol and output a receipt. If they’re under 21, it will display an error screen saying that they’re too young to purchase alcohol.
Let’s get started.
Start Flowchart with Manual Entry
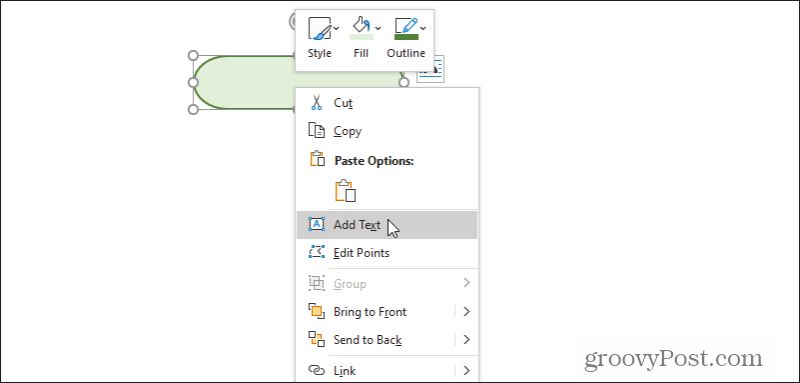
Open Microsoft Word and select the Insert menu. Select the Shapes dropdown to view all available flowchart shapes.
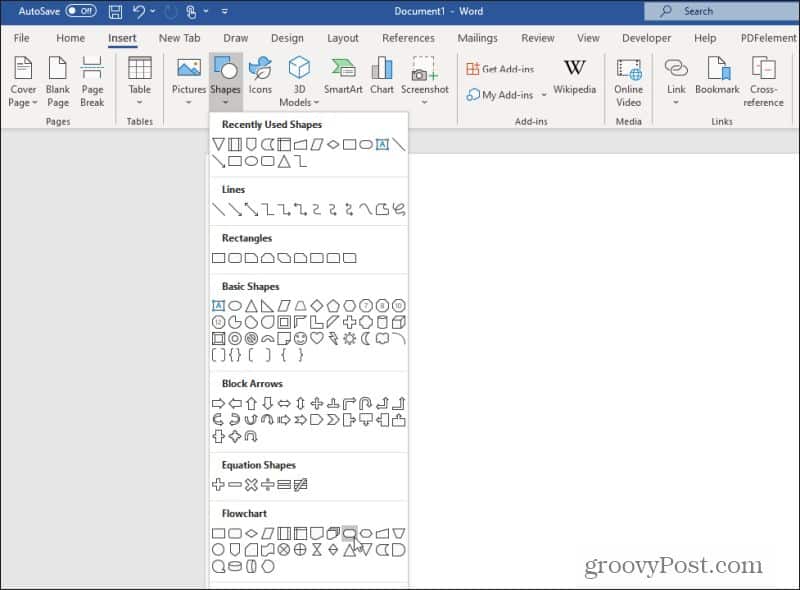
Look for and select the Terminator shape. Remember, the Terminator shape is also the one used to start a flowchart.
Draw the shape at the top of the Word page, and set the fill and outline coloring however you like. Right-click the shape and choose Add Text to enter text inside the shape.
Type something like “Program Launched” or even just “Start” for the text in this block.
Next, you’re going to want a block for user input. Select the Insert menu, select Shapes, and choose the manual input shape. Draw this into the Word document just under the start block. Right-click, select Edit Text and type the appropriate text to describe the manual data entry.
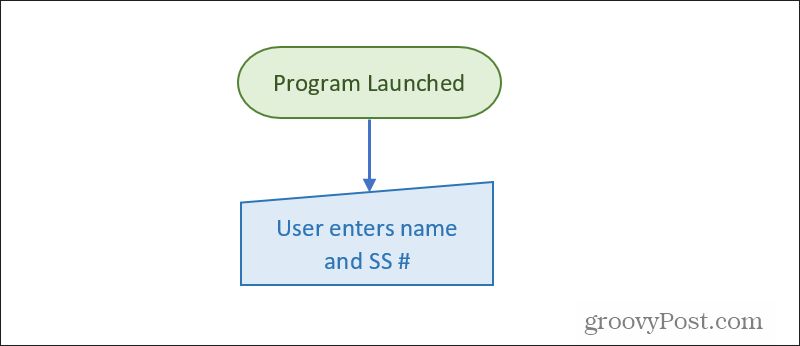
Draw a line with an arrow (using the same Insert menu), and format the line to whatever thickness you prefer.
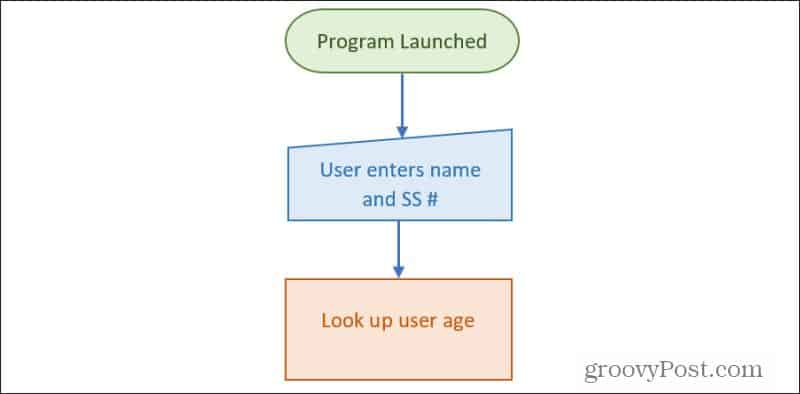
Next, you’ll need to have the process deal with the newly entered data.
Processing Data In Flowcharts
In the next step of your flowchart, you’ll want to manage entered data. This will require a process block.
Use the Insert menu and choose the Process block. Place it underneath the data entry and add an arrow line.
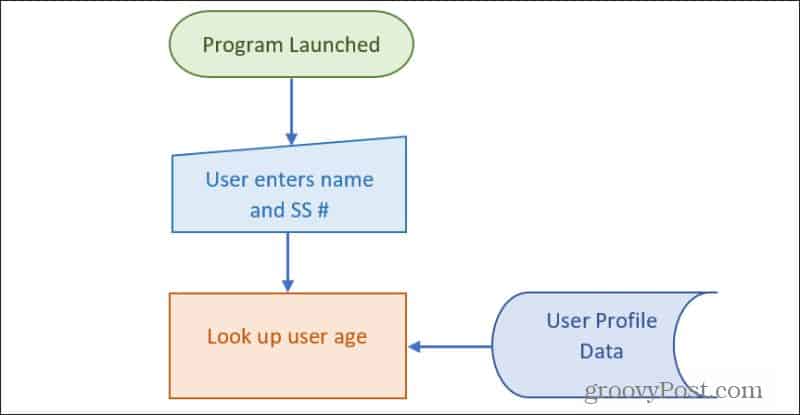
For this process to work properly, the process block needs to obtain the user’s age (based on name and SS# input) from a database. You could use either the special “database” block or the more generic General Data Storage block described above.
Add this block to the side of the process block and draw an arrow from it to the process block.
Now that the process has the right inputs, you’ll need to draw a process output line out of the bottom of the process. Typically a process needs to make a decision, such as in this case. So the next step of your flowchart will be the decision block.
Decision Blocks In a Word Flowchart
Draw the diamond decision block (from the Insert menu) right under the process block. Add text that describes the decision that the process needs to make.
As always, draw an arrow from the bottom of the process block down to the decision block.
As mentioned previously, decision blocks receive input. You’ll have an output for every possible result. In this case, there will be output for YES and one for NO.
Technically, this decision will be made inside the program. Decision blocks often represent process decisions, so typically almost always follow process blocks.
Draw a line with an arrow as an output from the bottom of the triangle. Label this line YES. Draw an angled line from the side of the decision block and label it NO. You can create the labels by adding a text box without a borderline.

Next, you’ll need to provide the logical flow on each output of the decision block.
Finishing Your Flowchart in Microsoft Word
Now you can just continue the process of building the rest of your flowchart using whatever flowchart blocks make the most sense.
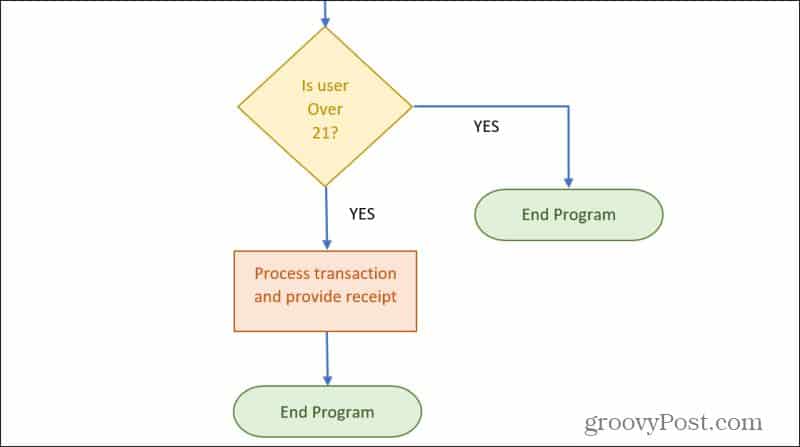
You can use either the Off-Page Connector block to continue any process flow onto another page. Or use the Terminator block to finish any logic lines in the flowchart.
Making Flowcharts in Word Is Easy
As you can see, making a flowchart in Word doesn’t have to be complicated. Word also provides all of the important logical blocks you need to create mostly any flowchart.
You can use flowcharts to brainstorm ideas, work through important decisions, or like in this example chart out the logic of your programming projects.
If you don’t want to use Word, there are plenty of other tools available to draw diagrams and flowcharts as well.
And if you’re running an old version of Word check out our article on how to make a flow chart in Word 2007.
![]()
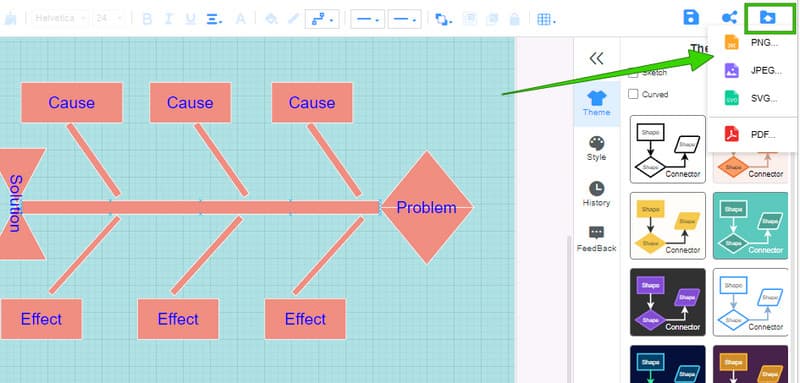
How to Build a Fishbone Diagram in Word: Solve with Complete Steps
Before we learn how to make a fishbone diagram in Word, let’s have a little insight into fishbone diagrams. If you want to get to the root of the problem, the fishbone diagram is the one to help. Fishbone diagrams depict the cause and effect of a situation, wherein the effects usually add to the main problem. Therefore, causes are analyzed and arranged to help you stop the issue. Furthermore, it is a diagram with a shape like a fish. It is where the causes are written on the top part of the body and the effects at the lower or at the tail.
On the other hand, Word, the document maker that we are used to, has been innovated to be a tool for making diagrams, maps, flowcharts, etc. To make a fishbone diagram, Word has functionalities such as its Shapes, Icons, Charts, and SmartArt. Thus, let’s witness how this document processing software can be good for fishbone diagramming.

- Part 1. Bonus: Create a Fishbone Diagram with the Best Alternative to Word
- Part 2. How to Build a Fishbone Diagram in Word
- Part 3. FAQs about Making a Fishbone Diagram in Word
Part 1. Bonus: Create a Fishbone Diagram with the Best Alternative to Word
Allow us to give the bonus part initially. This will give you a prior appreciation of the best alternative to Word, just in case you will need one. MindOnMap is what we are talking about. It is an online mind-mapping tool that lets you create a fishbone diagram for free. Furthermore, you will be glad to see the options of stencils that you can use when making a fishbone diagram in this Word’s alternative, for it comes with a great number of shapes, arrows, and icons. Through these stencils, it will be easier for you to be strategic and intuitive in making your illustration tasks, aside from the fishbone diagram.
Not just that, MindOnMap also comes with extensive cloud storage. It will let you keep copies of your projects for a longer time, which will be beneficial for you to save storage on your device. On top of that, you won’t need to pay anything, as you can use it for free without a limit. Since it’s free, does it mean you will bear annoying ads? Not at all, for it is free and safe from any ads out there!
How to Do a Fishbone Diagram in Word’s Alternative
1
Get into the Page
Before anything else, you must first visit MindOnMap’s official website. You don’t need to download anything. Just click the Create Your Map tab, sign in using your email account, and proceed with the next step.

2
Access the Flowchart Maker
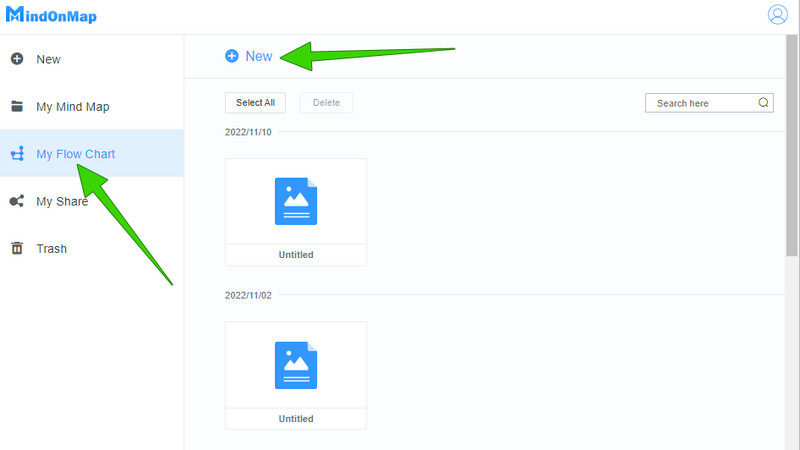
You can use the mind map maker by clicking the New tab. However, let’s use its flowchart maker this time. Click on the My Flow Chart selection, then hit the New dialog at the right side of the page.
3
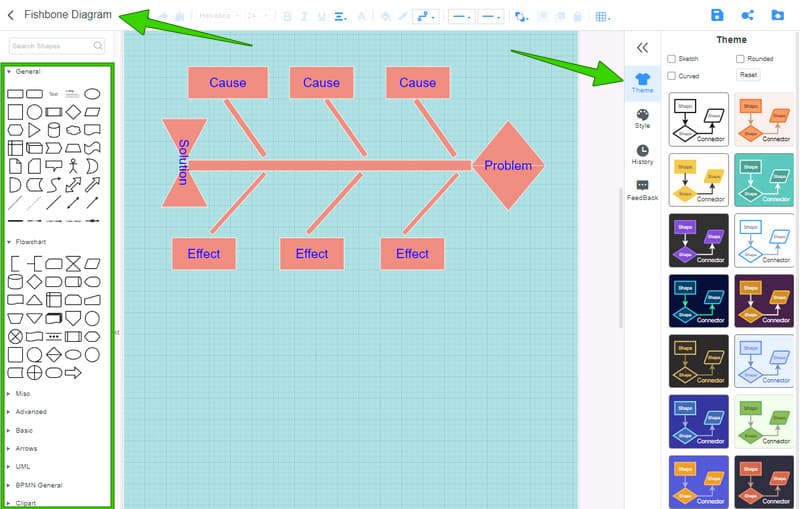
Create the Fishbone
On the main canvas, choose the theme you want to use from the right side. Then, start creating the fishbone diagram by choosing a shape from the left side of the interface. Work first for the head, then for the bones, then for the tail. Please, note that this is a free-will navigation, so you can include every shape you want as long as it looks like a fish.
4
Label the Fishbone
After drawing the diagram, you can label it according to the details you want to include. Also, please label your project in the upper right corner of the interface, as seen in the image above.
5
Export the diagram
Finally, you can press the CTRL+S on your keyboard to save the project on the cloud. Otherwise, if you want to download it, click the Export icon at the top left corner and choose its format.
Part 2. How to Build a Fishbone Diagram in Word
Now to answer one of the most asked questions, does Word have a fishbone diagram template? The answer is none. Even though Word contains a SmartArt feature with many templates, it is unfortunate that this feature doesn’t have one for the fishbone diagram. With this being said, you will need to exert effort and time to create one, for you will do it by inserting shapes individually. Unlike MindOnMap, in Word, you will need to access the shapes simultaneously after the other, which makes it more timely. On the other hand, we cannot disregard the devices this software offers, stencils that will help you build a friendly and elegant fishbone diagram. So, to see how it works, see the steps below.
How to Draw a Fishbone Diagram in Word
1
Open a Blank Document
Launch Word on your PC, then click on the Blank Document selection to open a neat page.
2
Access the Shapes
Next, on the main canvas of the blank document, go to the Insert menu. Then, choose the Shape icon among the element options there. Please note how you access it, for you will need to reassess the entire time.
3
Create the Fishbone Diagram
You can now start creating the fishbone diagram. Please note that aside from the shapes, you will also need arrows and lines. These arrows are also in the Shapes option. Then, you can put labels on the diagram during or after you make it.
4
Save the Diagram Anytime
You can design your fishbone diagram on Word during the creation. Anyways, if you are done creating it, save it accordingly. If you don’t know how to do it, click the File menu and select Save As tab.
Part 3. FAQs about Making a Fishbone Diagram in Word
Can I create a diagram in Word for free?
Yes. Word has a free trial that you can use for a month and will direct you to its paid version.
Is the fishbone diagram template free to download?
Unfortunately, Word does not come with a fishbone diagram template. Meanwhile, even the templates available in Word are not for downloading.
In what format can Word export my fishbone diagram?
Word can export your fishbone diagram as a word doc, template, PDF, web page, and other document formats. Unfortunately, aside from the doc and PDF, you can’t have different formats, especially images.
Conclusion
To wrap up, creating a fishbone diagram in Word is challenging since you will need to make it from scratch. Meanwhile, with its best alternative, the MindOnMap, even if you make the fishbone diagram from scratch, it is way easier than Word. In addition, you can also make it a lot easier by using the fishbone template under its mind-mapping function. Regardless of your function in MindOnMap, rest assured that you will still have the same procedure rate.
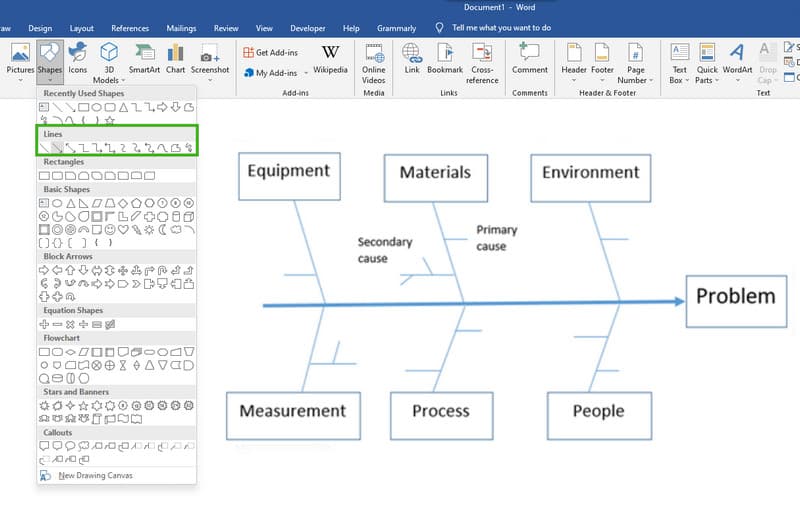
A flowchart or flow chart usually shows steps of the task, process, or workflow.
Microsoft Word provides many predefined SmartArt templates that you can use to make a flowchart,
including visually appealing basic flowchart templates with pictures. However, if you have a
process with a tangled flow or you need a custom layout, you can build a complex flowchart
in Word using rectangular, diamond, round, and other box types.

Managers, system analysts, programmers, and engineers adopted flowcharts as a mean of
communication for describing:
- Document workflows
- Data flows
- System operation flows
- Algorithms
No wonder that building blocks and rules of flow charts were standardized by the American
National Standards Institute (ANSI) and International Organization for Standards (ISO)
more than 50 years ago. The current standard defines the drawing direction from top to
bottom and left to right and specific symbols for different types of entities, actions,
etc. E.g.:
You can find all these shapes and other useful visual elements in the Shapes
dropdown list on the Insert tab of Microsoft Word.
The flowchart above is «cross-functional» and defines the responsibility zones of
different business units.
To create a diagram like the one above, follow the next steps (we recommend to check the
tip how to easily organize shapes in
Word,
which demonstrates easy tricks to simplify the drawing routine):
Add the drawing canvas
The drawing canvas is an essential element for the flow chart that you need to add before
adding the flow shapes because of flowchart connectors. You can add flowcharts connectors
only between the shapes within the drawing canvas:
1. On the Insert tab, in the Illustrations group, click
Shapes:

2. On the Shapes list, in the bottom, choose New Drawing
Canvas:

Word adds the new drawing canvas to your flow chart:

Draw the flowchart blocks
3. On the Shapes list, in the Flowchart group,
select the block you want to add:

4. To add text to the selected shape, just double-click in it and enter
the text.
Connect the flowchart blocks by connectors
5. To connect shapes, do the following:
- On the Insert tab, in the Illustrations group, click in the Shapes list and
then select one of the connectors in the Lines group:
- Select the beginning point on the border of the first shape (source) and the ending
point on the edge of the second shape (target):

For more customizations of shapes and connectors, see
how to change format of
diagram shapes in Word
and
how to change flowchart shapes
or
how to change connector
type for flowchart.
Top-to-down flowcharts are perfect for the Portrait page orientation in Microsoft word. For
the Landscape page orientation or the PowerPoint presentation, the preferred layout is
left-to-right. Sometimes left-to-right flow diagrams with delimited borders of organization unit
activities are called Swimlane diagrams or Swimlane flowcharts.
See also this tip in French:
Comment créer un organigramme des opérations dans Word.
Word for Microsoft 365 Word 2021 Word 2019 Word 2016 Word 2013 Word 2010 Word Starter 2010 More…Less
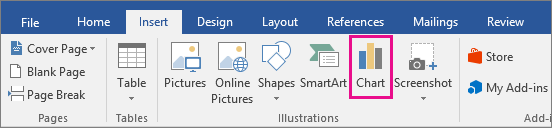
You can make a chart in Word. If you have lots of data to chart, create your chart in Excel, and then copy from Excel to another Office program. This is also the best way if your data changes regularly and you want your chart to always reflect the latest numbers. In that case, when you copy the chart, keep it linked to the original Excel file.
To create a simple chart from scratch in Word, click Insert > Chart, and pick the chart you want.
-
Click Insert > Chart.

-
Click the chart type and then double-click the chart you want.
-
In the spreadsheet that appears, replace the default data with your own information.
-
When you’ve finished, close the spreadsheet.
-
If you want, use the Layout Options button
to arrange the chart and text in your document.
 to arrange the chart and text in your document.
You can make a chart in Word or Excel. If you have lots of data to chart, create your chart in Excel, and then copy from Excel to another Office program. This is also the best way if your data changes regularly and you want your chart to always reflect the latest numbers. In that case, when you copy the chart, keep it linked to the original Excel file.
To create a simple chart from scratch in Word, click Insert > Chart and pick the chart you want.
-
Click Insert > Chart.
-
Click the chart type and then double-click the chart you want.
-
In the spreadsheet that appears, replace the default data with your own information.
-
When you’ve finished, close the spreadsheet.
-
If you want, use the Layout Options button
to arrange the chart and text in your document.
Important:
Office 2010 is no longer supported. Upgrade to Microsoft 365 to work anywhere from any device and continue to receive support.
Upgrade now
In Microsoft Word 2010, you can insert many kinds of data charts and graphs, such as column charts, line graphs, pie charts, bar charts, area graphs, scatter graphs, stock charts, surface charts, doughnut charts, bubble graphs, and radar graphs.
Notes:
-
Don’t see the chart that you want in this article? For more information about the variety of graphs and charts you can use, see Available chart types.
-
Want to create an organization chart? For more information about how to create organization charts, see Create an organization chart.
-
If Microsoft Excel 2010 isn’t installed on your computer, you will not be able to take advantage of the advanced data charting capabilities in the Microsoft Office 2010. Instead, when you create a new data chart in Word 2010, Microsoft Graph opens.
How?
|
|
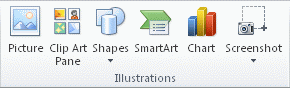
On the Insert tab, in the Illustrations group, click Chart.
|

|
|
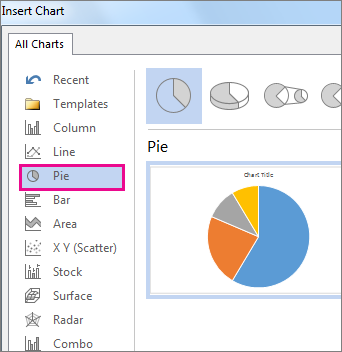
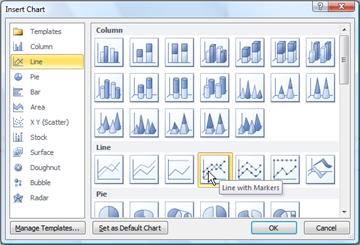
In the Insert Chart dialog box, click the arrows to scroll through the chart types. Select the type of chart that you want and then click OK.
When you rest the mouse pointer over any chart type, a ScreenTip displays its name. |

|
|
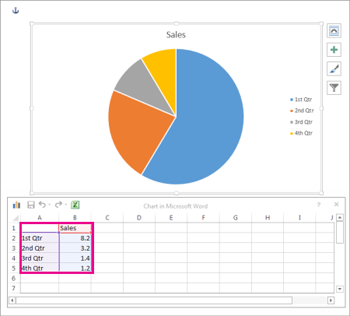
Edit the data in Excel 2010. When you are finished editing your data, you can close Excel.
Sample data in an Excel worksheet |

Tips
-
To get a good idea of what you can add to or change in your chart, under Chart Tools, click the Design, Layout, and Format tabs, and then explore the groups and options that are provided on each tab.
Note: If you don’t see the Chart Tools, make sure that you click anywhere inside the chart to activate it.
-
You can also access design, layout, and formatting features that are available for specific chart elements (such as chart axes or the legend) by right-clicking those chart elements.
More information
-
To learn about the available chart types, see Available chart types.
-
To edit data in your chart, see Change the data in an existing chart.
Top of Page
See also
Present data in a chart