
Create and print labels

Create and print a page of identical labels
-
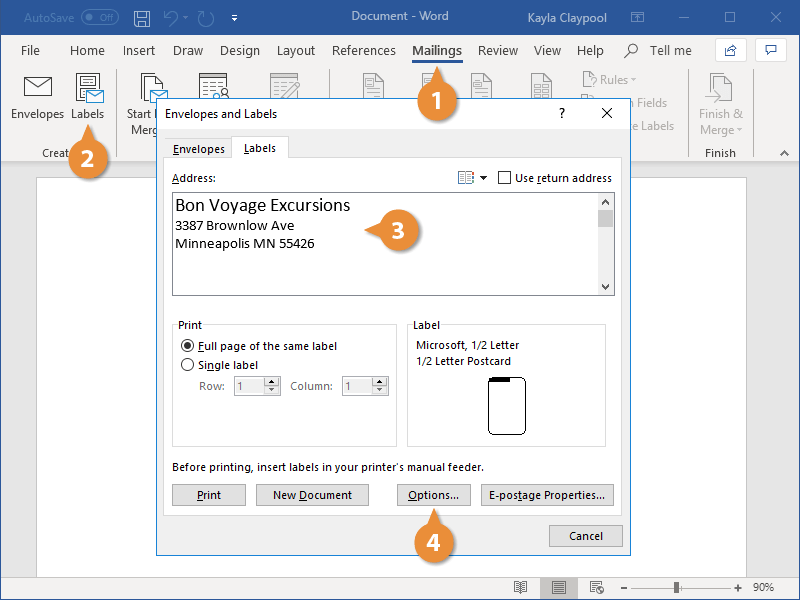
Go to Mailings > Labels.
-
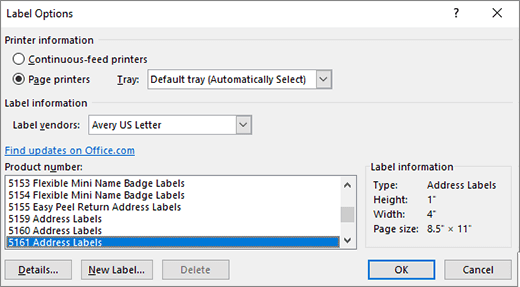
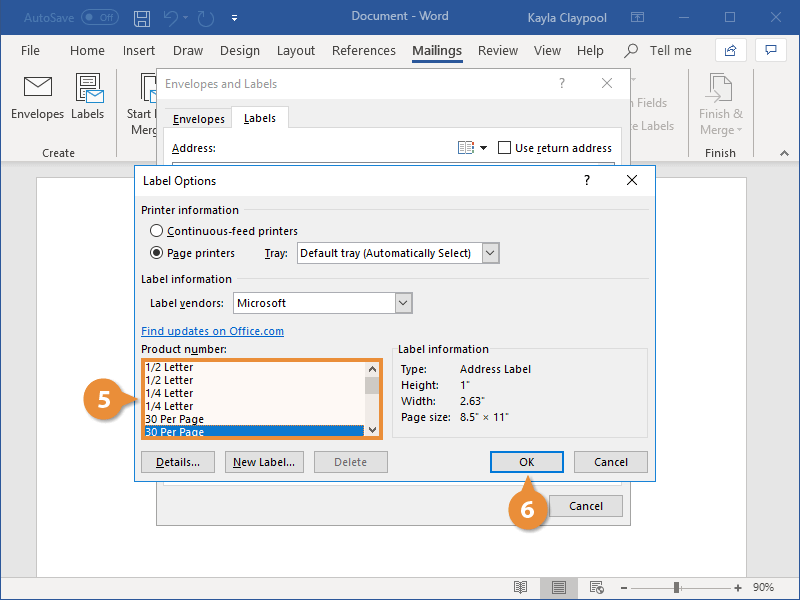
Select Options and choose a label vendor and product to use. Select OK.
If you don’t see your product number, select New Label and configure a custom label.

-
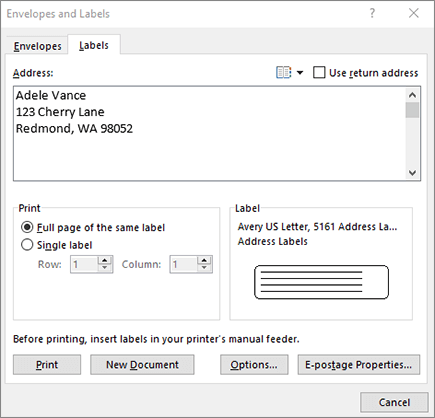
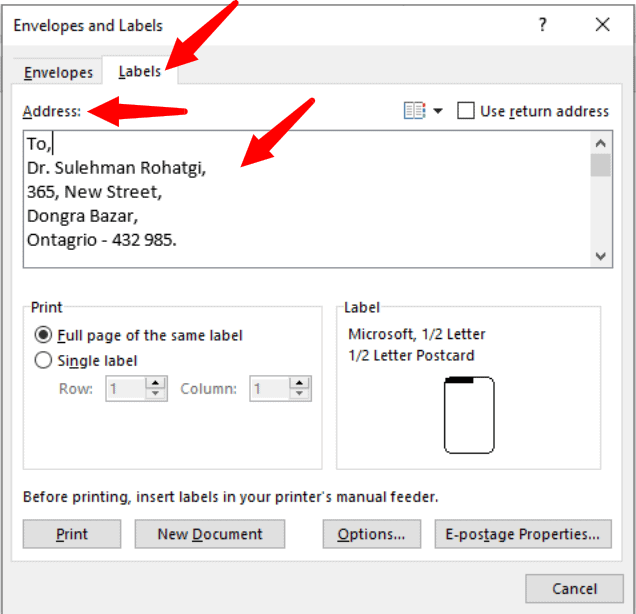
Type an address or other information in the Address box (text only).
To use an address from your contacts list select Insert Address
. -
To change the formatting, select the text, right-click, and make changes with Font or Paragraph.
-
Select OK.
-
Select Full page of the same label.
-
Select Print, or New Document to edit, save and print later.
 .
.If you need just one label, select Single label from the Mailings > Labels menu and the position on the label sheet where you want it to appear. Select OK, the destination, and Save.
Create and print a page of the same label
-
Go to Mailings > Labels.
-
In the Address box, type the text that you want.
To use an address from your contacts list select Insert Address
. -
To change the formatting, select the text, right-click, and make changes with Home > Font or Paragraph.
-
In the Label Options dialog box, make your choices, and then select OK.
If you don’t see your product number, select New Label and configure a custom label.
-
Select OK.
-
Select Full page of the same label.
-
Select Print, or New Document to edit, save and print later.
 .
.Set up and print a page of the same label
-
Go to Mailings > Labels.
-
Select Options.
-
Choose Printer type, Label products, and Product number.
If you don’t see your product number, select New Label and configure a custom label.
-
Select OK.
-
Type an address or other information in the Delivery Address box.
To use an address from your contacts list select Insert Address
. -
To change the formatting, select the text and then select Font to make changes.
-
Select Full page of the same label.
-
Select OK.
-
Select Print, or New Document to edit, save and print later.
 .
.For info about merging data with labels, see Create mailing labels in Word by using mail merge or Mail merge in Word for Mac.
If you want to make return address labels, see Create return address labels.
Word for the web doesn’t support directly creating labels. However you can create labels from a template.
-
Open Word for the web.
-
Select a label template when you create a new document. Select More templates if you don’t see what you want.
You can also go to templates.office.com, and search for label.
-
For a sheet of identical labels, fill out one label, and then copy/paste for the rest.
Tip: Print your labels to a sheet of paper before loading labels into the printer to make sure the text aligns with the labels.
See also
To create a page of different labels, see Create a sheet of nametags or address labels
To create a page of labels with graphics, see Add graphics to labels
To print one label on a partially used sheet, see Print one label on a partially used sheet
To create labels with a mailing list, see Print labels for your mailing list
To create labels using a template, see Microsoft label templates
Need more help?
Want more options?
Explore subscription benefits, browse training courses, learn how to secure your device, and more.
Communities help you ask and answer questions, give feedback, and hear from experts with rich knowledge.
-
1
Obtain the labels you need. Labels come in different sizes and for different purposes, for everything from regular, no. 10 envelopes to legal-sized mailings and CD covers. Get the labels that are best-suited for your project.
-
2
Create a new Microsoft Word document. Double-click the blue app that contains or is shaped like a «W«, then double-click Blank Document» in the upper-left part of the opening window.
Advertisement
-
3
Click the Mailings tab. It’s at the top of the window.
-
4
Click Labels under the «Create» menu. It’s at the far-left of the toolbar.
- If prompted, click OK to grant Word access to your contacts.
-
5
Add text to the label. Do so by typing a recipient’s address, name badge text, CD label, etc., in the Delivery Address field or by clicking the address book icon to the right of the field, selecting a recipient and clicking Insert.
-
6
Click Font…. This dialog box allows you to customize the look of the labels by selecting a font, text size, text color, and style.
-
7
Customize the label text and click OK.
-
8
Click Options…. It’s a button in the Label section of the dialog box.
-
9
Click the radio button next to your printer type.
-
10
Click the «Label products» drop-down menu.
-
11
Select your label manufacturer.
- If your manufacturer isn’t listed, examine the label packaging for the label dimensions and the number per sheet. With this information, you can select an equivalent product.
-
12
Click the «Product number» drop down.
-
13
Click the product number for your label. It should be clearly marked on the packaging.
-
14
Click OK.
-
15
Select the number of labels you’re printing.
- Click Full page of the same label to print a full sheet of the label
- Click Single label and then identify the row and the column on the label sheet where you’d like the label to be printed.
-
16
Insert the blank label sheet into your printer. Make sure you have them aligned correctly for your printer.
-
17
Click Print….
- Make sure the print preview of the labels looks the way you want it to.
-
18
Click Print. Your label(s) will print.
- Click File in the menu bar and Save if you want to save this label template for future use.


Advertisement
-
1
Obtain the labels you need. Labels come in different sizes and for different purposes, for everything from regular, no. 10 envelopes to legal-sized mailings. Get the labels that are best-suited for your project.
-
2
Prepare your mailing list. Word can pull names and addresses from an Excel spreadsheet, an Access database, your Outlook contacts, or on Mac, your Apple contacts or a FileMaker Pro database. You can also type a new mailing list during the merge, if you prefer.
-
3
Create a new Microsoft Word document. Double-click the blue app that contains or is shaped like a «W«, then double-click Blank Document» in the upper-left part of the opening window.
-
4
Click the Mailings tab. It’s at the top of the window.
-
5
Click Start Mail Merge and Labels…. It’s at the far-left of the toolbar.
- If prompted, click OK to grant Word access to your contacts.
-
6
Click the radio button next to your printer type.
-
7
Click the «Label products» drop-down menu.
-
8
Select your label manufacturer.
- If your manufacturer isn’t listed, examine the label packaging for the label dimensions and the number per sheet. With this information, you can select an equivalent product.
-
9
Click the «Product number» drop down.
-
10
Click the product number for your label. It should be clearly marked on the packaging.
-
11
Click OK.
-
12
Click Select Recipients…. It’s at the left of the toolbar.
-
13
Select your mailing list. Click on the source of the addresses you want to put on the labels.
- If you want to create a new list at this point, click Create a new List….
- If you don’t want to create labels for your entire mailing list, click Edit Recipient List and select the recipients you want to include.
-
14
Click Address Block.
- On Mac, click a line near the top of the first label, and click Insert Merge Field, then select a field you want to include, such as «First_Name.» Repeat this process for each field you want to include, adding the appropriate spacing and address formatting.
-
15
Select the elements you want to include on the labels. These include name format, business, name, etc.
-
16
Click OK.
-
17
Click Update Labels. It’s an icon in the toolbar with a green «refresh» symbol.
-
18
Click Preview Results in the toolbar. Make sure the labels look the way you want them to.
-
19
Insert the blank label sheets into your printer. Make sure you have them aligned correctly for your printer.
-
20
Click Finish & Merge and Print Documents…. It’s at the far right of the toolbar.
-
21
Click Print. Your label(s) will print.
- Click File in the menu bar and Save if you want to save this label template for future use.


Advertisement
Add New Question
-
Question
When I type a sheet of labels, sometimes a second blank page appears. How do I remove the second page?

Go to the bottom of the first page, and hit the ‘delete’ key — it should go away.
-
Question
How do I print labels that are all different addresses?
Use a mail merge. Add all of the different addresses, then print each one.
-
Question
How do I make a full page of address labels?
There should be an option called «mail merge.» You need a mailing list and your document; the list can be a spreadsheet, an Outlook directory etc.
See more answers
Ask a Question
200 characters left
Include your email address to get a message when this question is answered.
Submit
Advertisement
Thanks for submitting a tip for review!
About This Article
Article SummaryX
1. Create a new Word document.
2. Click Mailings.
3. Click Labels.
4. Add the label text.
5. Customize the printing layout.
6. Choose your label manufacturer.
7. Click OK.
8. Click Print.
Did this summary help you?
Thanks to all authors for creating a page that has been read 702,273 times.
Is this article up to date?
Create and Print Labels in Microsoft Word Using Mail Merge and an Excel List (Generate Bulk Address or Mailing Labels)
by Avantix Learning Team | Updated January 9, 2021
Applies to: Microsoft® Word® 2013, 2016, 2019 and 365 (Windows)
You can create labels in Microsoft Word by running a mail merge and using data in Excel. This is typically used to generate and print bulk mailing labels for names and addresses of clients or other contacts. You’ll need to create a main document for the labels in Word and then connect to a data set or list in an Excel worksheet (although you can use other data sources). When you run the mail merge, you can create a new merged file with a label for each contact or merge directly to a printer.
Typically, labels are purchased in sheets that you place in the tray or document feeder of your printer and a product code is printed on the label packaging. Address labels are often called mailing labels or shipping labels.
Recommended article: How to Use Mail Merge in Word for Form Letters
Do you want to learn more about Word? Check out our virtual classroom or live classroom Word courses >
Understanding the label mail merge process in Word
There are 8 steps in the Word mail merge process for mailing or address labels:
- In Word, start the merge and specify the main document for labels. You’ll be prompted to specify the type and / or size of labels you want to generate.
- Select the Excel source workbook containing the data set with names and addresses. Microsoft refers to a data set or database as a list. You would create the Excel source file before you begin the mail merge process.
- In Word, insert fields into the first cell of the table (which would be the first label). This table is created automatically by Word.
- Update or propagate the other labels on the sheet.
- Format the main label document (such as changing font and size).
- Select specific recipients or filter the recipient list (optional).
- Preview the merged labels (optional).
- Run the mail merge.
During the mail merge process, fields are inserted into the main document and appear in carets (such as <<Firstname>>). By default, when you click in a field, it is displayed with grey shading. When you run the merge, the fields are replaced by data from the source Excel file.
In this article, we’ll be using the Mailings tab in the Ribbon to set up and run a mail merge (not the Mail Merge Wizard).
Step 1: Start the merge and specify the main document as labels
The first step is to start the merge using Start Mail Merge on the Mailings tab in the Ribbon:

To start the merge and specify the main document for labels:
- Create a new blank Word document.
- Click the Mailings tab in the Ribbon and then click Start Mail Merge in the Start Mail Merge group.
- From the drop-down menu, select Labels. A dialog box appears.
- Select the product type and then the label code (which is printed on the label packaging). You may also select New Label and then enter a custom name and size.
- Click OK. Word creates a table in the main document. Next Record appears in each label cell to prompt Word to move to the next record in the data source.
- If table gridlines are not displayed, click in the table and click the Table Tools Layout tab or Table Layout tab (on the right side of the Ribbon) and click View Gridlines in the Table Group.
In the following example, Avery US letter was selected as the Label vendor with Avery 5163 address or shipping labels:

Step 2: Select the source Excel file containing the data set
The next step is to connect to an Excel source file containing a list of names and addresses using Select Recipients. In the Excel worksheet, the first row must contain field names such as FirstName, LastName, Company, Address and so on. There should be no blank rows in the data set.
Select Recipients appears on the Mailings tab in the Ribbon in the Start Mail Merge group as follows:
In the following Excel worksheet, note that the field names are in the first row of the sheet being used a source:
To select a Microsoft Excel source file containing a worksheet with names and addresses for the labels:
- In the main Word document, click the Mailings tab in the Ribbon and then click Select Recipients in the Start Mail Merge group. A dialog box appears.
- Click Use an Existing List from the drop-down menu. A dialog box appears.
- Navigate to the Excel file containing the names and addresses you want to use as the source.
- Double-click the Excel file. A dialog box appears.
- Ensure First row of data contains column headers is checked.
- Click the Excel worksheet containing the data you wish to use.
- Click OK.
The following dialog box appears when you select an Excel file as the source for a merge:

Step 3: Insert fields from the source file in the main document in Word
Once you have connected to a source file, you can insert fields into the main document (which contains a table for the labels). You have the option of using a special Word field called Address Block or inserting individual fields.
Address Block appears as follows in the Ribbon:

To insert the Address Block field:
- Click in the first cell of the table in the main document where you want to insert the recipient name and address.
- Click the Mailings tab in the Ribbon and select Address Block in the Write & Insert Fields group. A dialog box appears. Word will display an address based on the source data.
- In the samples on the left, select the address sample you prefer.
- Check or uncheck other options if necessary.
- Click OK. Word inserts an Address Block field into the main document.
In the Address Block dialog box, select a sample address in the area on the left:

To insert fields individually:
- Click in the first cell of the table in the main document where you want to insert the recipient name and address.
- Click the Mailings tab in the Ribbon and select Insert Merge Field in the Write & Insert Fields group.
- From the drop-down menu, select the field you want to insert.
- Press the spacebar, type text or press Enter if necessary.
- Repeat for other fields you want to insert.
Step 4: Update the labels
To populate all of the labels in the table:
- Click in the table in the main document.
- Click the Mailings tab in the Ribbon and then select Update Labels or Propogate Labels in the Write & Insert group. Word will insert the fields in all label cells and include <<Next Record>> to go to the next record in the source data.
Step 5: Format the labels
You may need to apply formatting to the labels such as changing the font and size, changing alignment, and adjusting paragraph spacing.
Below is a sample main document for address labels (Avery US Letter 5163 shipping labels):

Step 6: Select specific recipients or filter the recipient list (optional)
You have the option of choosing specific recipients or filtering the recipient list if you don’t want to create labels for all contacts in the data source.
To choose specific contacts:
- In the the main document in Word, click the Mailings tab in the Ribbon and then click Edit Recipient List in the Start Mail Merge group. A dialog box appears.
- Uncheck the check boxes beside the recipients you do not wish to include in the mail merge.
- Click OK.
To filter the source list:
- In the the main document in Word, click the Mailings tab in the Ribbon and then click Edit Recipient List in the Start Mail Merge group. A dialog box appears.
- Click Filter. A dialog box appears.
- Select / enter the desired filtering options.
- Click OK.
For example, below is a filter to display records from Toronto:

To remove the filter, repeat the process, but click Clear All in the Filter and Sort dialog box.
Step 7: Preview the results (optional)
Before you run the mail merge, to preview the results:
- In the the main document in Word, click the Mailings tab in the Ribbon and then click Preview Results in the Preview Results group.
- Click the arrows in the Preview Results group to go to the next or previous page.
- Click Preview Results to view the fields again.
Step 8: Run the mail merge to create a new file or print the labels
The final step is to run the merge. You can either create a new merged document or merge directly to a printer.
To run the mail merge and create a new merged label document:
- In the the main document in Word, click the Mailings tab in the Ribbon and then click Finish & Merge in the Finish group. A drop-down menu appears.
- Click Edit Individual Documents. A dialog box appears.
- Click Current Record or enter a selected range if necessary.
- Click OK. Word creates a new merged document that you can edit, print and save.
The following dialog box appears when you select Edit individual documents:

To run the mail merge and print the merged file:
- In the the main document in Word, click the Mailings tab in the Ribbon and then click Finish & Merge in the Finish group. A drop-down menu appears.
- Select Print Documents. A dialog box appears.
- Click Current Record or enter a selected range if necessary.
- Click OK. A dialog box appears.
- Select the desired printer and other printer options.
- Click OK.
The following dialog box appears when you select Print Documents:

You will typically want to save the main document and the source file. If you save the merged file, you will have a record of the labels that were created.
Subscribe to get more articles like this one
Did you find this article helpful? If you would like to receive new articles, join our email list.
More resources
How to Create a Table of Contents in Word
How to Remove Hard Returns in Word Documents
How to Add Page Numbers in Word (Step by Step)
How to Find and Replace in Word (and Use Wildcards)
How to Superscript or Subscript in Word (with Shortcuts)
Related courses
Microsoft Word: Intermediate / Advanced
Microsoft Word: Designing Dynamic Word Documents Using Fields
Microsoft Word: Long Documents Master Class
Microsoft Word: Accessible Word Documents
Microsoft PowerPoint: Intermediate / Advanced
VIEW MORE COURSES >
Our instructor-led courses are delivered in virtual classroom format or at our downtown Toronto location at 18 King Street East, Suite 1400, Toronto, Ontario, Canada (some in-person classroom courses may also be delivered at an alternate downtown Toronto location). Contact us at info@avantixlearning.ca if you’d like to arrange custom instructor-led virtual classroom or onsite training on a date that’s convenient for you.
Copyright 2023 Avantix® Learning
Microsoft, the Microsoft logo, Microsoft Office and related Microsoft applications and logos are registered trademarks of Microsoft Corporation in Canada, US and other countries. All other trademarks are the property of the registered owners.
Avantix Learning |18 King Street East, Suite 1400, Toronto, Ontario, Canada M5C 1C4 | Contact us at info@avantixlearning.ca
- Free Courses
- Microsoft Word
- How to Make Labels in Word

How to Print Labels in Word
You can create a sheet of labels that contains the same information. For example, return address labels or a single label on a sheet.
Create a Label
- Click the Mailings tab.
- Click the Labels button.
- Enter an address.
If you want to print only one label, select Single label in the Print box and specify the row and column where the label is located on the sheet.
- Click Options.
The Label Options dialog box opens. Here, set the type of label sheet you’re printing on.
For example, if you have a sheet of 30 labels, select one of the 30 Per Page options that matches your label dimensions.
Your labels package should tell you the type of label being used.

- Select your label options.
- Click OK.
- Click Print to print the labels, or New Document if you want to do any formatting or editing of individual labels.

The labels are automatically sent to the printer or open in a new document, depending on your action.
If you want to create labels from a data source so that you can create labels for a list of contacts, you can use the Mail Merge wizard to quickly generate labels.

FREE Quick Reference
Click to Download
Free to distribute with our compliments; we hope you will consider our paid training.
How to Print Labels from Word
Print a page of labels or design custom labels
Updated on February 12, 2021
What to Know
- In Word, go to the Mailings tab. Select Labels > Options. Choose your label brand and product number.
- Type the information for the address in the Address section.
- In the Print section, select Full Page of Same Label or Single Label (with row and column specified). Choose Print.
This article explains how to print labels from Word. It includes information for printing a single label or a page of the same labels, for printing a page of different labels, and for printing custom labels. These instructions apply to Word for Microsoft 365, Word 2019, 2016, 2013, 2010, and 2007, and Word for Mac 2019 and 2016.
Print a Single Label or a Page of the Same Labels
Microsoft Word isn’t just for documents, resumes, or letters. It’s also a powerful and versatile application for most of your mailing and labeling needs. There are multiple options for creating labels in Word, so choose the one that best fits your needs.
Here’s how to fill a sheet with return address labels or create a single, professional-looking mailing label in Word.
-
Go to the Mailings tab.
-
In the Create group, select Labels. The Envelopes and Labels dialog box opens with the Labels tab selected.
-
Select Options to open Label Options.
-
Choose the label brand in the Label Vendors or Label Products list, then select the product number matching the labels you want to print on.
-
Select OK.
-
Type an address or other information in the Address box.
In Word for Mac 2019 and 2016, this box is called Delivery Address. In Word 2010, the Address box step comes before the Label Options selections.
-
In the Print section, select Full Page of the Same Label to print a page of the same address labels.
-
In the Print section, select Single Label to print one label. Choose the row and column corresponding with where you want the address printed on the sheet of labels.
The Single Label option is helpful if you have a partially used sheet of printer labels.
-
Make sure the label sheet is waiting in the printer and select Print, or save to print later.
Create a Page of Different Labels
To make a sheet of labels in Word with different addresses or other information, such as nametags, create a document in which you will type the information for each label.
-
Go to the Mailings tab.
-
In the Create group, select Labels. The Envelopes and Labels dialog box opens with the Labels tab selected.
In Word 2010, leave the Address box blank.
-
Select Options to open Label Options.
-
Choose the label brand in the Label Vendors or Label Products list, then select the product number matching the labels you want to print on.
Word for Mac 2019 and 2016 also ask for the type of printer.
-
Select OK.
-
Select New Document. Word creates a new document displaying a page of blank labels matching the dimensions of the brand and label size you selected.
In Word for Mac 2019 and 2016, you don’t have to select New Document. After selecting OK in the previous step, Word opens a new document that contains a table with dimensions that match that label product.
-
Go to the Layout tab under Table Tools and choose View Gridlines if the outlines of the labels do not appear.
-
Type the information you want into each label.
-
Go to the File tab, select Print, then select the Print button when you’re ready to print the labels. Save the document for future use.
Make Custom Labels
If you need to print labels that don’t match the dimensions of the label brands and products listed in the Label Options dialog box, create custom labels to match your specifications.
Before you begin, make sure you have the precise measurements of the labels you need, including the height and width of each label, the paper size, the number of labels down and across, and the margins.
-
Go to the Mailings tab.
-
In the Create group, select Labels. The Envelopes and Labels dialog box opens with the Labels tab selected.
-
Select Options to open Label Options.
-
Select New Label. The Label Details dialog box opens.
-
Enter a name for the labels.
-
Change the measurements to match the exact dimensions of the labels you need. An example of the label appears in the Preview box.
-
Select OK to create the custom labels. You can then use these for making labels in Word.
There is no Mailings tab in Word for Mac 2011. In this version, access label features from the Tools menu.
Thanks for letting us know!
Get the Latest Tech News Delivered Every Day
Subscribe
In general, a label is a sticker with something written on it. People place such stickers with printed information such as addresses on envelopes.
Your label may have one of two addresses—the recipient’s address or the sender’s address. Microsoft Word allows you to create and print such labels.
Here, we will explain the steps necessary for creating and printing labels in Word.
Step #1: Open a Blank Document in Word.
Open Word, and click on New on the left side. The right side shows the icon of a new blank document—click on it to open a new blank document.

Step #2: Open the Envelopes and Labels Dialog
Click on Mailings in the top menu bar, and the ribbon changes to show the mailing menus. Click on Labels to open the Envelopes and Labels dialog.

Step #3: Set Up Recipient/Sender Labels
Within the Envelopes and Labels dialog, click on the Labels tab.
Under Address, you can type in either the recipient’s address or the sender’s address within the box.
If you have created envelopes earlier, and would like to use the return address (sender’s address) already in your system, click on Use return address and ensure a tick-mark is present within the square box immediately on the left. Word will fill the return address in the Address box. If you do not have a return address in your system, type in the return address.

Step #4: Set Up Number of Prints
Once you are satisfied with the address entry, and want to print only one label on the entire page, click on Full page of the same label under the Print section.
If you want to print several labels on one page, click on Single label and select the number of rows and columns necessary.

Step #5: Set Up Paper Size
Here are some tips to customize and get maximum out of printing labels. :
- Click on Options to open the Label Options dialog. Under Printer Information, you can select the type of printer—Continuous-feed or Page Printers—and the type of Tray for the Page printers.
- Several vendors supply sticky papers for printing labels on, and you may select from the Label vendors list—click on the down arrow on the right of Label vendors, and click on the vendor of your choice.
- Depending on the vendor you have selected, you can choose from their list of products under Product number.
- Here, you are selecting the size of the paper on which you want to print the labels. For a specific product number, its related information appears on the right side under Label information.
- For additional settings, click on the Details tab to display the various measurements for printing the label.
- You can adjust the settings to your preference. Word also allows you to define your own measurements, for which you must click on New Label.
- Once you are satisfied with the settings, click on OK to exit the dialog. Word will return you to the Envelopes and Labels dialog.

Step #6: Print the Label
Ensure label papers are in your printer and the printer is turned on. Click on Print to start printing your labels.

Conclusion
A neatly printed address label looks good on an envelope and helps prevent wrong delivery. With Word, you can create and print professional-looking labels. Follow our seven-step method to make your task easier.
Learn how to create pretty, custom labels in Microsoft Word that can be printed in just about any shape, size, or color scheme!
This post contains affiliate links. For more information, see my disclosures here.
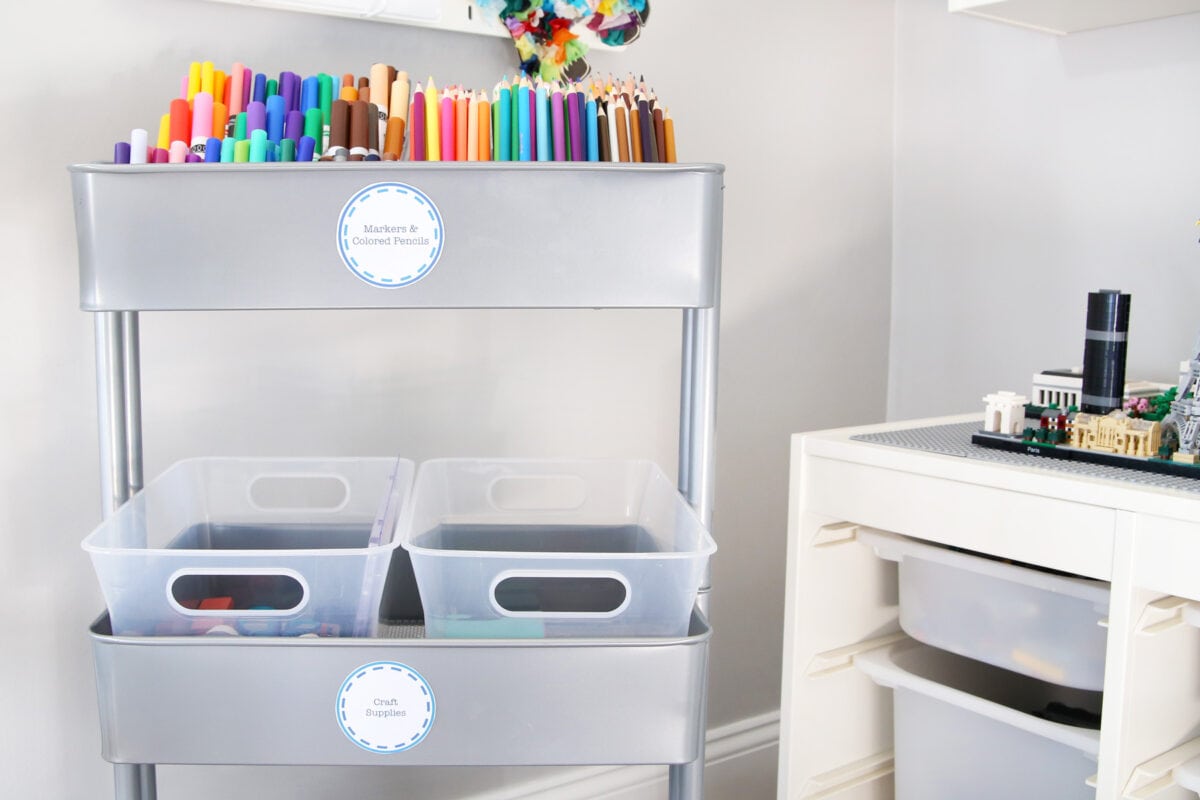
I must admit, I am just a teensy bit obsessed with labels. I put them on just about everything in our house. They’re perfect for getting organized, helping the boys find what they need, and adding a pretty touch to a basket or gift.
If I’m making labels with adhesive vinyl, I typically use my Cricut cutting machine. When it comes to creating pretty paper labels, though, I can’t help but head back to my old stand by, Microsoft Word, for all of my label-making needs.
Word is great because it’s super-simple to use. And almost everybody has it, so it’s really easy to email and share projects. I’m sure there are about a million ways to create pretty labels in Microsoft Word, but here is my tried-and-true method.

Get 300+ pages of free printables!
Become one of our VIP newsletter subscribers and gain access to our exclusive free printables vault!
How to Make a Label in Word Step-by-Step
1. Choose your shape.
Beginning with a blank document, click on the “Insert” tab, select “Shapes,” and choose the desired shape for your label. I picked the circle.

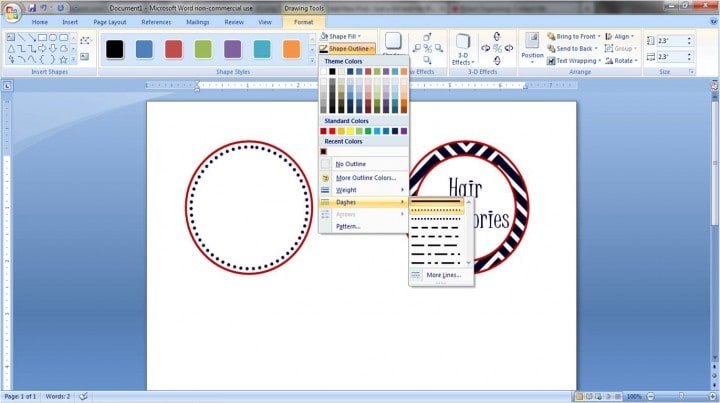
2. Adjust your outline and fill settings.
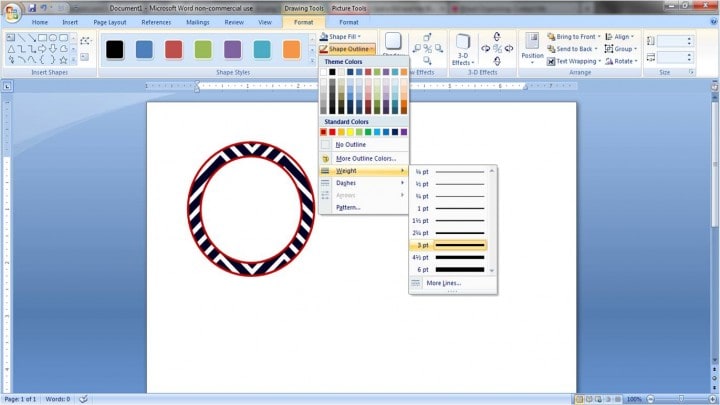
Once you’ve drawn your shape to your desired size (I chose 2.5″ x 2.5″.), you’ll want to make it look pretty! I usually like to make the outline of my shape a little thicker so that it is well defined when I print it out.
To do that, go to the “Format” tab, and under the “Shape Outline” drop down, you will see “Weight.” I chose 3 pt; you can make yours thinner or thicker depending on your preference.
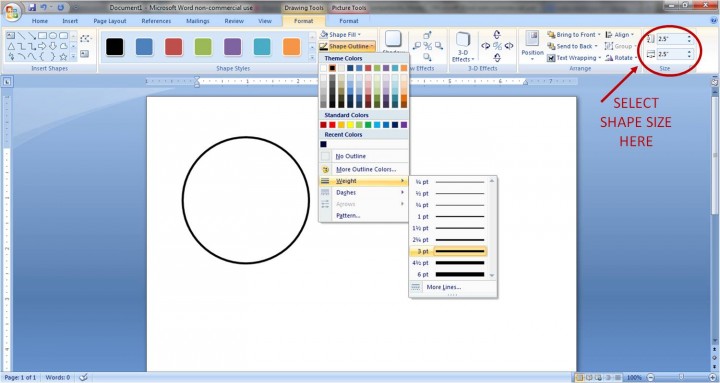
You can also change the color of your outline in the “Shape Outline” drop down. I picked dark red.
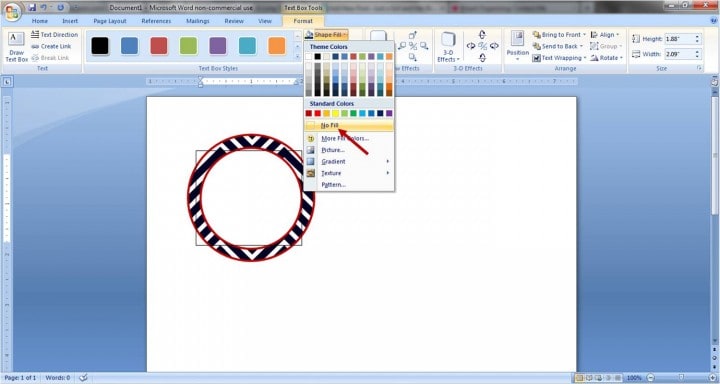
While we’re changing colors, let’s go ahead and change our fill color as well. Right above “Shape Outline,” you’ll see the “Shape Fill” option. You have a few choices here. You can fill your shape with a solid color.
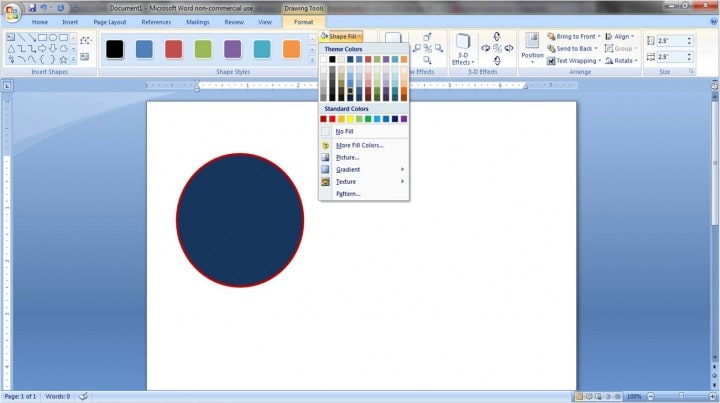
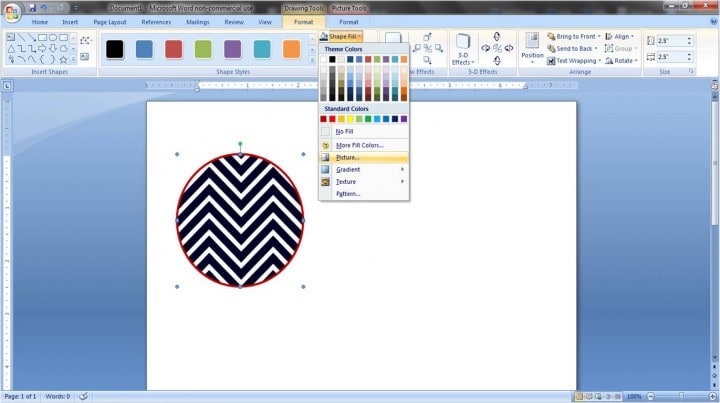
Or you may want to put a design inside your shape. By choosing the “Picture” option from the “Shape Fill” drop down, you can use any picture file on your computer as your shape’s background.
You can also play with the “Gradient” and “Texture” options until you find the background of your choice.
3. Add a layer, if desired.
I think it always looks nice to add a second layer to your label. You get to have a fun color or pattern in the background, but you also get a clean white surface for your wording. To add a layer, you’ll go through a similar process: choose your shape (“Insert” tab, “Shapes” button), and size it correctly. I did 2″ x 2″.
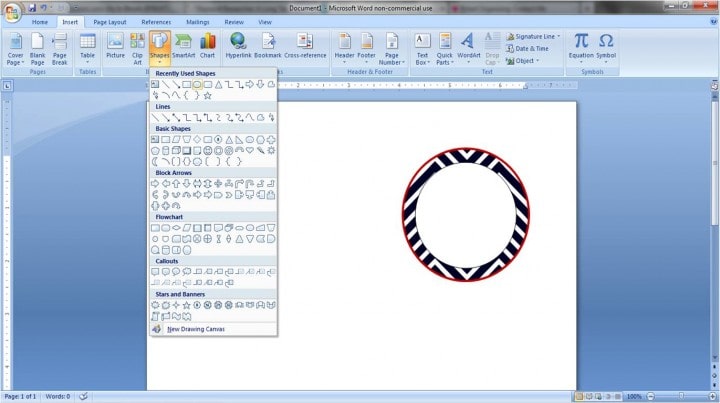
Then adjust your outline width and outline and fill colors. I went with the 3 pt dark red outline again, and I chose to keep the fill color white, but you could always pick a color.
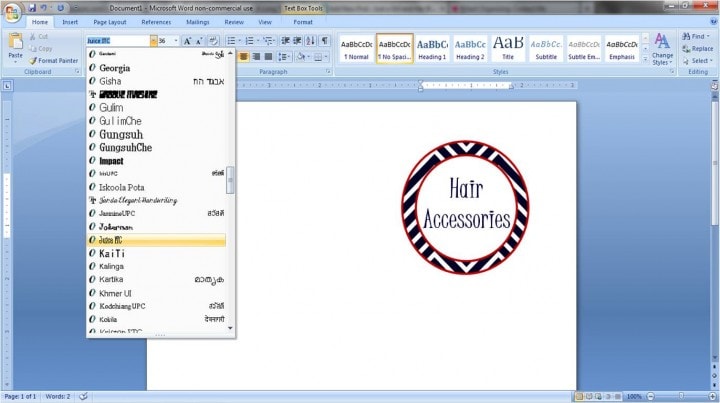
4. Add your text.
To do this, you’ll want to go to the “Insert” tab and select “Text Box.” Choose the “Draw Text Box” option at the bottom of the drop down menu.
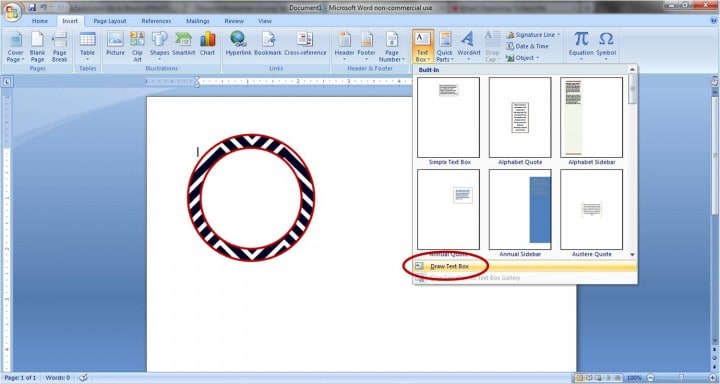
Draw your text box over your existing shape. Then, so the text box doesn’t block the beautiful label you’ve made, you’ll want to make it transparent. With the text box selected, go to the “Text Box” tab, and under “Shape Fill” choose “No Fill.” You will also want to choose “No Fill” for the “Shape Outline.”
Once your text box is transparent, you’re ready to type. Add your words, and change the size, font, and alignment like you would in a regular Word document. You can also play with color! I used a 36 pt font called “Juice ITC” in dark blue.
5. “Group” your label.
The last thing I like to do when I get the label the way I want it is to group it together. This allows me to move it around the page as one unit rather than trying to move each piece individually.
To use the group feature, hold down the “Ctrl” key on a Windows computer or “Command” on Mac and click on each element of your label so they are all selected.

Next you’ll want to right click on your selection and under “Grouping” choose “Group.”
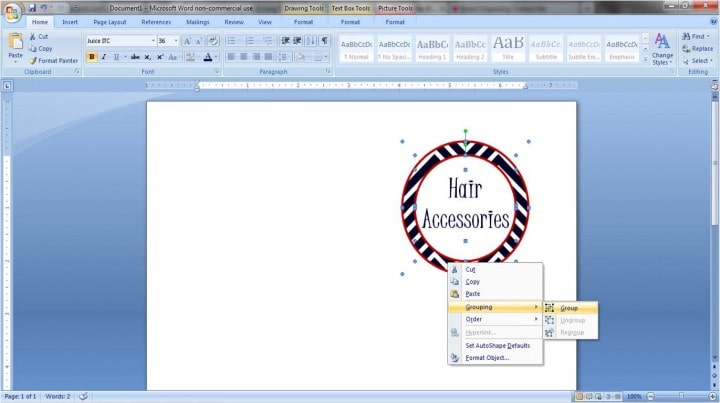
TA-DA! Your label is now one cohesive unit! You can move it around the page, copy and paste it, change the text, go crazy with it!
Now for all you overachievers out there…
Making Labels in Microsoft Word: The Bonus Round
Another fun thing to play with is the outline style. I’ll start out with the same white circle with a dark red outline, but instead of using a colored background, I’ll add interest with the second layer.
For the “Shape Outline” of the inner circle, go down to “Dashes.” You will be able to choose dots (as I did), squares, dashed lines, etc. Just another cute dimension to add to your labels!
Though fancy programs and machines can be really great, it is possible to make pretty labels just using Microsoft Word. In my opinion, it is the simplest program to navigate, and it still gives beautiful, fully-custom results.
How to Print Labels From Word
After you’ve created your cute labels, what’s next? I typically print mine out (with my home ink jet printer) on white card stock so that they’re sturdy, and then cut them out by hand.
If my labels are going to be in a higher traffic area, I’ll laminate them to protect them a little bit more. Laminated or not, I typically just attach my labels with tape or velcro dots.
My Favorite Laminator
I have used this laminator for years, and it is always my go-to when I want to make my labels or other printables a little sturdier.

![]()
If you want to use a label that is more like a sticker, Avery has many templates for their stickers. You would simply head to their website, find the template that matches the stickers that you purchased (you can search by the number on the pack), download the template, and create your design within the guides they provide.
My Favorite Labeling Supplies
- Printer
- White Card Stock
- Laminator + Laminating Pouches
- Velcro Dots
- Sticker Sheets
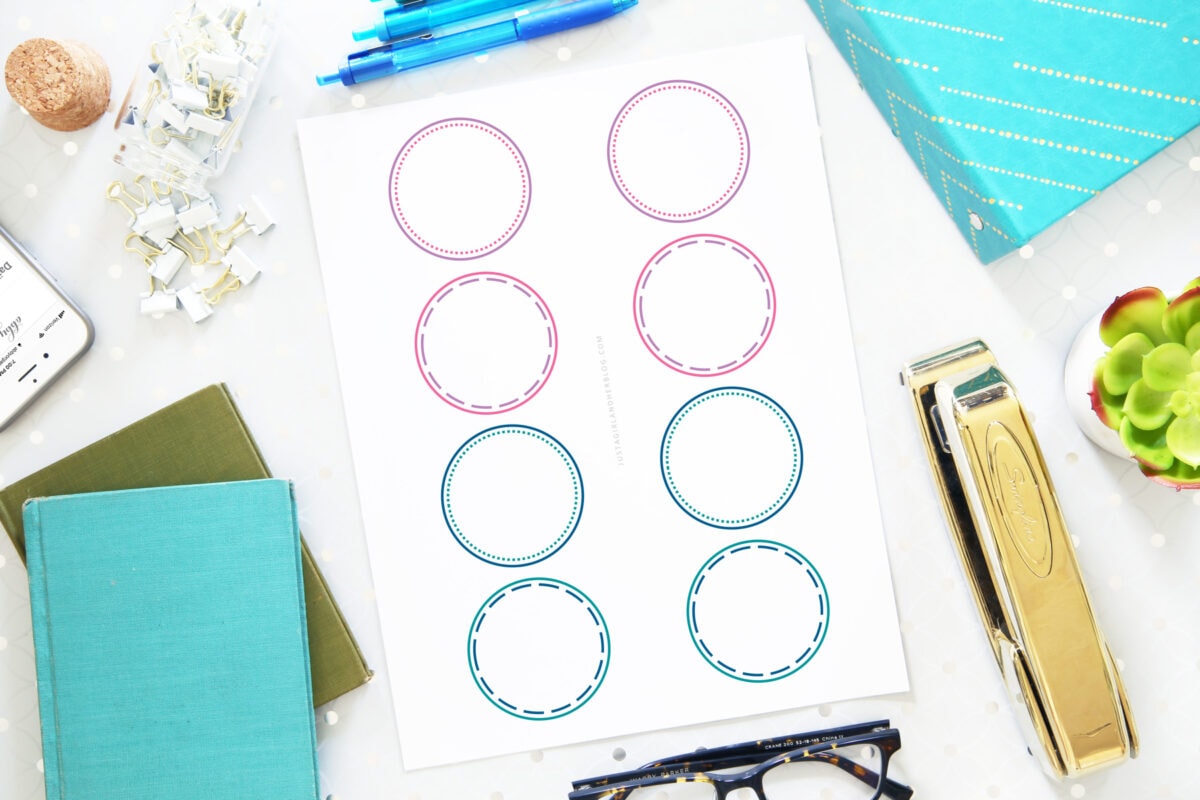
And just for fun, I’ve included a page of simple printable labels to get you started. Happy labeling!
Making Labels in Microsoft Word: Frequently Asked Questions
Want to save this post to revisit later? Be sure to pin the image below so you can find it easily!
- How to Make DIY Iron On Labels
- How to Make Your Own Party Invitations
- How to Make Vinyl Labels with a Cricut Cutting Machine
- 16 Creative Projects for Label Lovers {The Thinking Closet}
- How to Create a Monogram in Word
- How to Make Pretty Labels with a Silhouette Machine
- How to Use Labels to Organize Your Whole House
What is your favorite way to make labels?

This post contains affiliate links. For more information, see my disclosures here.
Home > Microsoft Word > How to Print Labels in Word (Text + Video Tutorial)
This How to Print Labels in Word tutorial is suitable for users of Word 2013, 2016, 2019, and Word for Microsoft 365.
Objective
Use the Mailings tab in Word to create and print a set of address labels.
Printing Labels Explained
In a world where packages through the mail are becoming increasingly popular, you may find yourself having to ship items more than usual. In the US, consumers spent $211.5 billion on e-commerce in Q2 2020. While in China, consumers spent $1.94 trillion(!) on e-commerce in 2019 alone.
Luckily, Microsoft Word provides a comprehensive set of utilities to make professional-looking, customized labels and print them. The labels can be used on packages or envelopes and are a convenient way of addressing items for delivery to a recipient.
Video Tutorial
To see a demo of how to create and print labels in Word, please watch the following video tutorial.
Creating and Printing Labels in Word Video (9:03)
Creating Custom Labels
It is quick, and easy to create a set of custom labels in Word.
- On the Mailings tab, in the Create group, and click Labels.
The Envelopes and Labels dialog box will open and take you straight to the Labels tab. Type the address or information you want on the label into the Address box.

In the Print section, you can specify if you would like to print a full page of the same label or just a single label. If you choose to print a single label, you can specify the number of rows or columns if you have a fixed number of labels you need to print.
The Label section tells you the current label selection. There are many types of labels available to purchase, and you will need to ensure that you have the correct brand/product number selected here. To make changes, you will need to go into Options.
Want to print envelopes in Word instead?
- Click Options
Here you can tell Word how you will be printing the labels and select the brand/product number. This information should be easy to find on the packaging of the labels. If you cannot find your specific labels, select ‘New Label’ and enter the details manually.

- Make your selections and click OK
- Load your labels into the printer
- To send your labels to the printer immediately, click Print. If you want to add them to a document prior to printing, click New Document.
In this example, I have selected to add them to a document so I can save the document to reuse another time. This is what my labels look like based on my selections.
Create a Page of Different Labels
In the previous example, we created a page of labels using the same address. However, you may want to have a page of labels that contain different addresses. You can approach this in two ways.
If you have a lot of labels to create and maybe you have the recipient details saved off to an Excel file, a good option would be to utilize the Mail Merge facility in Word. To learn how to Mail Merge labels, check out the following link:
How to Mail Merge in Word
If you do not have that many labels to create, at least not enough to justify a merge, you can create a blank label template and manually type in the information.
- On the Mailings tab, in the Create group, click Labels
- Click Options
- Select the appropriate label vendor and product number
- Click OK
- Click New Document
A new Word document will appear with a blank label template based on your selections. You can now go ahead and manually type the information into each label.

For further information and extra tips and tricks like inserting graphics/logos into labels, check out the following links:
- Labelplanet – How to Print a Sheet of Address Labels Using Create Labels in Word
- TechRepublic – How to insert graphics into Word label documents
For more Free Microsoft Office tutorials from Simon Sez IT. Take a look at our MS Office Resource Center.
To learn Word with Simon Sez IT. Take a look at the Word courses available on Simon Sez IT.
Deborah Ashby

Deborah Ashby is a TAP Accredited IT Trainer, specializing in the design, delivery, and facilitation of Microsoft courses both online and in the classroom.She has over 11 years of IT Training Experience and 24 years in the IT Industry. To date, she’s trained over 10,000 people in the UK and overseas at companies such as HMRC, the Metropolitan Police, Parliament, SKY, Microsoft, Kew Gardens, Norton Rose Fulbright LLP.She’s a qualified MOS Master for 2010, 2013, and 2016 editions of Microsoft Office and is COLF and TAP Accredited and a member of The British Learning Institute.
It is easy to have great success with Microsoft Word and your labels by knowing a few tips and tricks working with image placement.
Table of Contents:
-
Open Your Template
-
How to Wrap Your Images
-
Working with Text Boxes
-
Setting Precise Positions for Text & Images
-
Changing the Size of Your Images
-
Copy and Paste your Label
open your template
![]()
Dashleigh Label and Hangtag templates now compatible with Canva Online Designer.
Sign up for free.
Use our “Find your Template” page to download your label or hang tag Word template.
We recommend using the “Tables” version of our Word templates.
Un-hiding Gridlines
Certain versions of Microsoft Word hide the grid-lines of tables upon opening the file.
To un-hide your grid-lines:
-
TABLE > Show Grid-lines
-
LAYOUT > View Grid-lines
Now that you have opened your Microsoft Word template, you are ready to start designing.
Adding an image
-
Click the place in your document where you want the picture to appear.
-
Access the «Insert Picture» dialog box.
-
Browse to the photo you want to insert.
-
Click the file, then click «Insert.»
-
Modify the picture as necessary.
Print a Test Page
Before you add your label sheets to your printer, we recommend printing a test page before hand.
-
Make sure the printer settings are set to “Actual Size”
-
All margins and spacing measurements are available on the template download page of your specific labels.
Extra Tips & Tricks
How to Wrap Your Images:
Sometimes adding a new image can cause your previously placed images to move around your template.
The best way to make sure your images to stay in place is to change the «wrapping».
Best Image Layout Options:
Select the image after adding it to your template. Right click to select «Wrap Text» from the menu.

1. Set your Image to «Behind Text«. This is allow you to place an image in an exact place regardless of new images or text that you add to your template.
2. Set the image «fix position on page«. This will allow you to type into your template and the text will move around your image.
You can also set these wrapping conditions under the top menu select Format under the Drawing Tools tab. Select Wrap Text > More Layout Options.

Working with Text
We highly recommend adding your text to a text box instead of typing directly in the table cell. By adding your text to a text box, you can treat it like an image. This will allow you to move the text, rotate it and have the text float above or next to your image.
Select the text box after adding it to your template.
1. Add a text box from the Insert. Set the fill color to «No Fill» and set the outline to «no outline».

2. Set your Text Box to «In Front Text». This is allow you to place an image in an exact place regardless of new images or text that you add to your template.
3. Set the image «Fix Position on Page». This will allow you to type into your template and the text will move around your image.

Setting Precise Positions for Your Images and Text
If you want to be ultra precise with your images, we recommend setting the images in the Layout Options > Position Window.

You can find the exact margins and dimensions of your template on the same page that you downloading your templates. You can use these margins to define exactly where you want your images to place on the page.
Select the Image. In the top menu select Format under the Drawing Tools tab. Select Wrap Text > More Layout Options.
Use the specifications below to set your image in an exact spot. Change the inches in the absolute positions to move your images exactly into place. Use the «page» option under the absolute position dropdown to set your image exactly from the right and top borders of your page.
Selecting «Lock Anchor» will guarantee that the image does not move as you add new images.
Unselect «Move Object with Text» will also help keeping the image in place.
Changing the Size of Your Image

Select the Image. In the top menu select Format under the Drawing Tools tab.
Select Wrap Text > More Layout Options. In the Size Tab- use either the Absolute checkbox to use the inches.
Check the «lock aspect ratio» if you do not want the image to stretch or distort.
Moving the Image Behind the Template Outlines

Right Click the image you want to move. From the fly out menu select «Send to Back».
Select «Send to Back» again to move the image behind object on your Microsoft Word template.
How to Copy and Paste Your Label
Now that you have created your first label, you are ready to paste this label into the other template spaces on the page.

1. Select all components that you want to copy. While holding the «shift» key on the keyboard, select with your mouse all of the images and text boxes that are included in your label.
If you are having trouble selected all of the elements, you will need to set the Text Wrap to «Tight» for all components. (Picture Tools > Format > Text Wrap > Tight)

When all elements are selected.

2. Once everything is selected- you will want to group them as one image. To do this, while the elements are selected, in Picture Tools > Format > Group > Group. This will make the individual components look like one.
3. Once grouped, you image is now ready to copy. Select Ctrl+C on your keyboard to copy the element. Click into the next label. Select Ctrl+P to paste the grouped label. Continue this throughout the template.


 Please Note:
This article is written for users of the following Microsoft Word versions: 97, 2000, 2002, and 2003. If you are using a later version (Word 2007 or later), this tip may not work for you. For a version of this tip written specifically for later versions of Word, click here: Creating Labels.
![]()
Written by Allen Wyatt (last updated August 14, 2021)
This tip applies to Word 97, 2000, 2002, and 2003
Word includes a handy feature that allows you to easily create labels containing any wording you would like. For instance, you might like to have some labels that contain your return address, or others that serve as labels for products or collection items.
The first step in creating labels, believe it or not, doesn’t even require Word. It involves running down to your local office supply store (OK—you can use a catalog or shop online if you want) and picking up the labels you want to use. If you haven’t looked lately, it seems there are hundreds of different types of labels, each designed for a different purpose.
To use labels with Word, I’ve always had the best success when using Avery labels, although you can look for their equivalent. The numbers assigned by Avery to their labels have in some sense become a standard for labels. In fact, many other vendors produce labels that use the same part numbers as Avery labels. These numbers will come in very handy when you start using Word to create your labels.
Once you have the labels you are ready to sit down and become creative. Simply follow these steps within Word:
- Display the Envelopes and Labels dialog box. You do this in Word 97 and Word 2000 by choosing Tools | Envelopes and Labels. You do this in Word 2002 and Word 2003 by choosing Tools | Letters and Mailings | Envelopes and Labels.
- Make sure the Labels tab is selected. (See Figure 1.)
- In the Address box, enter the text you want to appear on the label. Regardless of what Word says, this does not have to be an actual address, but can be any text. (If you want to use your actual return address, you can click the Use Return Address check box.)
- Click once on the label in the lower-right corner of the dialog box, or click on the Options button. Word displays the Label Options dialog box. (See Figure 2.)
- At the top of the dialog box, specify the characteristics of the printer you will use to create your labels.
- If you did not get Avery labels (or labels that include an Avery number), use the Label Products drop-down list to select who made your labels.
- In the Product Number list, select your label from those provided. Notice that the labels represent the product lines of the label manufacturer you selected in step 6.
- Click on OK. Word closes the Label Options dialog box.
- In the Print area at the lower-left corner of the dialog box, specify whether you want to print an entire sheet of labels or a single label. (If you are going to reuse this label at all, it is much easier to print an entire sheet of the labels.)
- If you chose to print a single label, specify the position on the page where the single label should print.
- If you chose to print a single label, click on Print. The dialog box is closed and the label is printed.
- If you chose to print a full sheet of labels in step 9 click on New Document. Word closes the dialog box and creates an entire document that represent what your label sheets will look like. (You could choose Print if you wanted, but the New Document option is much more versatile.)
- Make any adjustments to the contents of the document. This means you can individualize each label, change fonts, change positioning, or do any other formatting task you want.
- Print your document (the labels) as you normally would any other document.
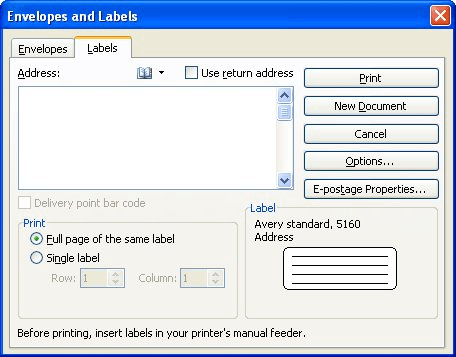
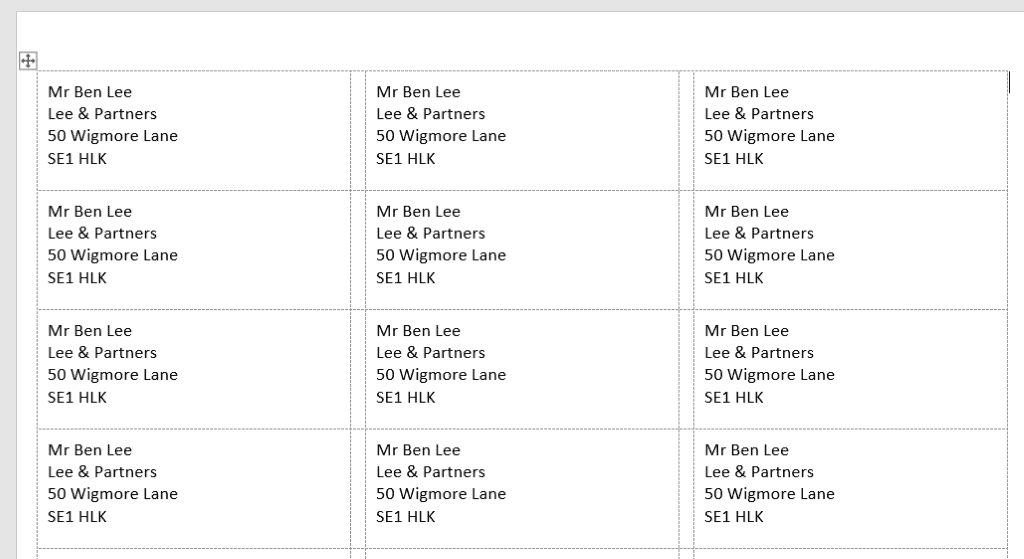
Figure 1. The Labels tab of the Envelopes and Labels dialog box.
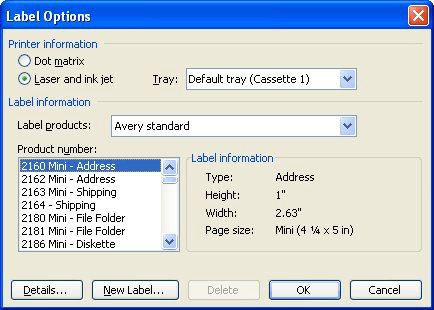
Figure 2. The Label Options dialog box.
WordTips is your source for cost-effective Microsoft Word training.
(Microsoft Word is the most popular word processing software in the world.)
This tip (1840) applies to Microsoft Word 97, 2000, 2002, and 2003. You can find a version of this tip for the ribbon interface of Word (Word 2007 and later) here: Creating Labels.
Author Bio
With more than 50 non-fiction books and numerous magazine articles to his credit, Allen Wyatt is an internationally recognized author. He is president of Sharon Parq Associates, a computer and publishing services company. Learn more about Allen…
MORE FROM ALLEN
Pointing PivotTables to Different Data
Changing the data source PivotTables go to can be a bit tricky. This tip explains what can happen when you re-point your …
Discover More
ExcelTips: Amazing Array Formulas (Special Offer)
ExcelTips: Amazing Array Formulas lets you harness the power in these special types of formulas. Ratchet up your …
Discover More
Numbered Lists without Indentation
Do you want to modify how your numbered lists (or bulleted lists) are created? The key is to use styles to create your …
Discover More
More WordTips (menu)
Finding Changes by Editor
Creating a Macro to find changes made by different editors.
Discover More
Automatic Scrolling
Spend a lot of time scrolling around in your document? You might find one of Word’s hidden scrolling commands to be a …
Discover More
Ignoring Punctuation in Names
If you have a word that includes punctuation as part of the word itself, then you may be frustrated by how Word treats …
Discover More