
Word for Microsoft 365 Word 2021 Word 2019 Word 2016 Word 2013 Word 2010 More…Less
You can customize keyboard shortcuts (or shortcut keys) by assigning them to a command, macro, font, style, or frequently used symbol. You can also remove keyboard shortcuts. You can assign or remove keyboard shortcuts by using a mouse or just the keyboard.
Use a mouse to assign or remove a keyboard shortcut
-
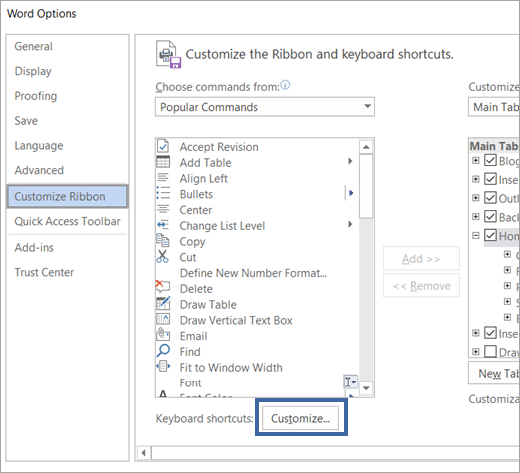
Go to File > Options > Customize Ribbon.
-
At the bottom of the Customize the Ribbon and keyboard shortcuts pane, select Customize.

-
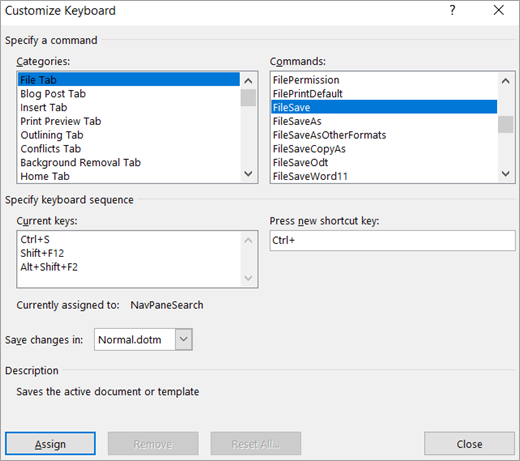
In the Save changes in box, select the current document name or template that you want to save the keyboard shortcut changes in.
-
In the Categories box, select the category that contains the command or other item that you want to assign a keyboard shortcut to or remove a keyboard shortcut from.
-
In the Commands box, select the name of the command or other item that you want to assign a keyboard shortcut to or remove a keyboard shortcut from.
Any keyboard shortcuts that are currently assigned to that command or other item appear in the Current keys box, or below the box with the label Currently assigned to.
-
To assign a keyboard shortcut do the following:
Begin keyboard shortcuts with CTRL or a function key.
-
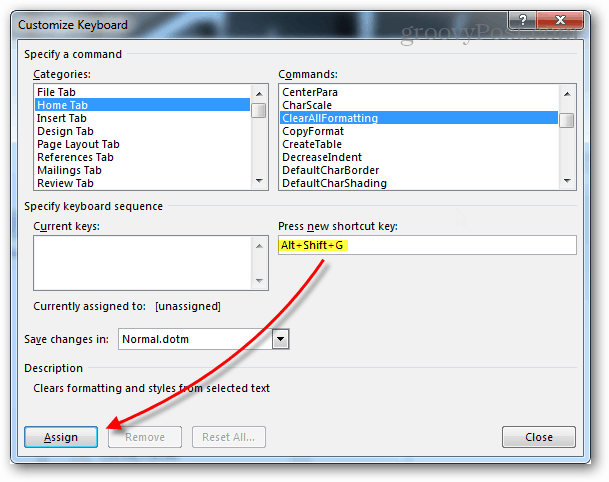
In the Press new shortcut key box, press the combination of keys that you want to assign. For example, press CTRL plus the key that you want to use.
-
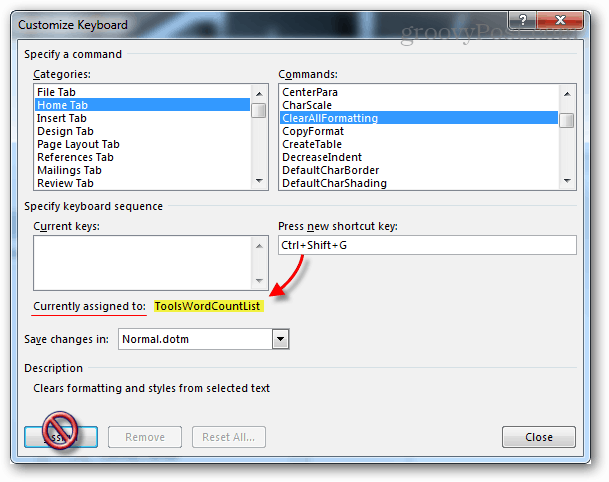
Look at Current keys (or Currently assigned to) to see whether the combination of keys is already assigned to a command or other item. If the combination is already assigned, type a different combination.
Important: Reassigning a combination of keys means that you can no longer use the combination for its original purpose. For example, pressing CTRL+B changes selected text to bold. If you reassign CTRL+B to a new command or other item, you will not be able to make text bold by pressing CTRL+B unless you restore the keyboard shortcut assignments to their original settings by selecting Reset All at the bottom of the Customize Keyboard dialog box.
-
Select Assign.
Note: If you use a programmable keyboard, the key combination CTRL+ALT+F8 might already be reserved for initiating keyboard programming.
Remove a keyboard shortcut
-
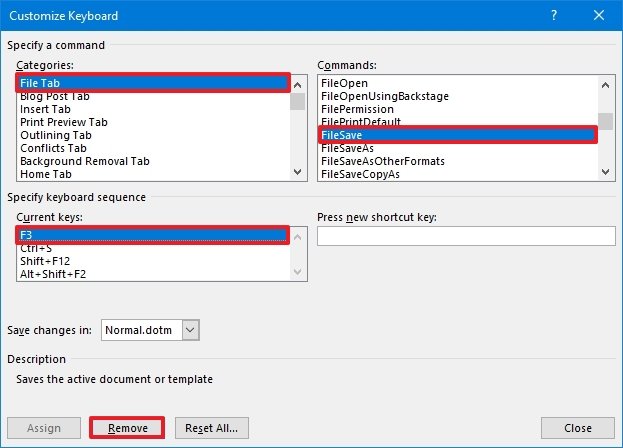
In the Current keys box, select the keyboard shortcut that you want to remove.
-
Select Remove.
-
Use just the keyboard to assign or remove a keyboard shortcut
-
Press ALT+F, T to open the Word Options dialog box.
-
Press DOWN ARROW to select Customize Ribbon.
-
Press the TAB key repeatedly until Customize is selected at the bottom of the dialog box, and then press ENTER.
-
In the Categories box, press DOWN ARROW or UP ARROW to select the category that contains the command or other item that you want to assign a keyboard shortcut to or remove a keyboard shortcut from.
-
Press the TAB key to move to the Commands box.
-
Press DOWN ARROW or UP ARROW to select the name of the command or other item that you want to assign a keyboard shortcut to or remove a keyboard shortcut from.
Any keyboard shortcuts that are currently assigned to that command or item appear in the Current keys box, or below the box with the label Currently assigned to.
-
To assign a keyboard shortcut do the following:
Begin keyboard shortcuts with CTRL or a function key.
-
Press the TAB key repeatedly until the cursor is in the Press new shortcut key box.
-
Press the combination of keys that you want to assign. For example, press CTRL plus the key that you want to use.
-
Look at Current keys (or Currently assigned to) to see whether the combination of keys is already assigned to a command or other item. If the combination is already assigned, type a different combination.
Important: Reassigning a combination of keys means that you can no longer use the combination for its original purpose. For example, pressing CTRL+B changes selected text to bold. If you reassign CTRL+B to a new command or other item, you will not be able to make text bold by pressing CTRL+B unless you restore the keyboard shortcut assignments to their original settings by selecting Reset All at the bottom of the Customize Keyboard dialog box.
-
Press the TAB key repeatedly until the Save changes in box is selected.
-
Press DOWN ARROW or UP ARROW to highlight the current document name or template in which you want to save the keyboard shortcut changes, and then press ENTER.
-
Press the TAB key repeatedly until Assign is selected, and then press ENTER.
Note: If you use a programmable keyboard, the key combination CTRL+ALT+F8 might already be reserved for initiating keyboard programming.
To remove a keyboard shortcut
-
Press the TAB key repeatedly until the Save changes in box is selected.
-
Press DOWN ARROW or UP ARROW to highlight the current document name or template in which you want to save the keyboard shortcut changes, and then press ENTER.
-
Press the SHIFT+TAB key repeatedly until the cursor is in the Current keys box.
-
Press DOWN ARROW or UP ARROW to select the keyboard shortcut that you want to remove.
-
Press the TAB key repeatedly until Remove is selected, and then press ENTER.
-
Need more help?
Want more options?
Explore subscription benefits, browse training courses, learn how to secure your device, and more.
Communities help you ask and answer questions, give feedback, and hear from experts with rich knowledge.
Return to the original settings in just a few easy steps
Updated on November 19, 2021
What to Know
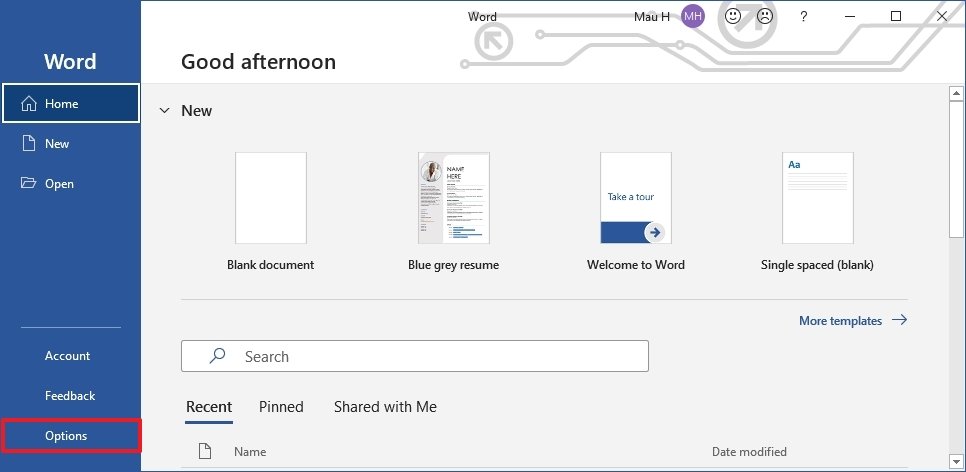
- In Word, select the File tab. Select Options at the bottom of the left pane. Choose Customize Ribbon in the left pane.
- In the Choose commands from list, select Customize next to Keyboard Shortcuts.
- Select Reset All > Yes > Close > OK.
This article explains how to reset the keyboard shortcuts and keys to the defaults in Microsoft Word. This information applies to Word for Microsoft 365, Word 2021, Word 2019, Word 2016, Word 2013, and Word 2010.
Reset the Keyboard Shortcuts in Word
If you’re a regular Word user, you may have altered some of the keyboard shortcuts to suit the way you use the program. If so, and you want to return to the original shortcuts, here’s how to do it.
-
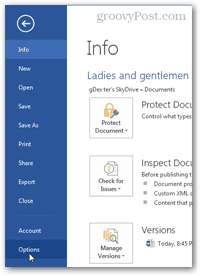
Open Word and select the File tab.
-
Select Options at the bottom of the left pane of the File window. Word Options will open.
-
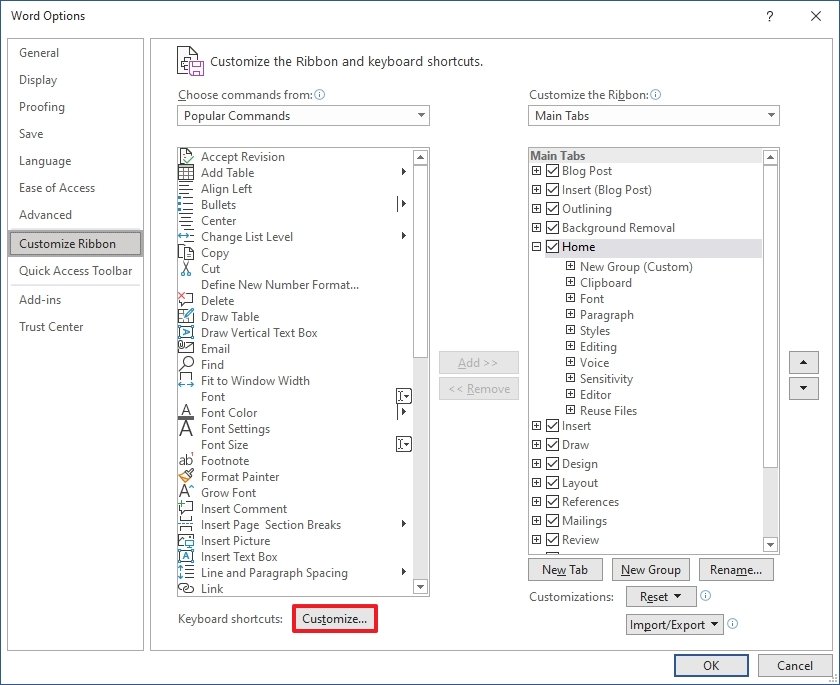
Select Customize Ribbon in the left pane.
-
Select Customize next to Keyboard Shortcuts beneath the Choose Commands From list. The Customize Keyboard window will open.
-
Select the Reset All button at the bottom of the Customize Keyboard window.
-
Select Yes to confirm that you want to reset the key assignments.
-
Select Close and then select OK to exit the Word Options window. All custom keyboard shortcuts will be removed and any default shortcuts that had been changed will be restored to their initial settings.
Resetting customized keyboard shortcuts will remove all shortcut keys currently assigned to any macros or styles in the default Word template. This action cannot be undone, so be sure you want to remove these before continuing. It is wise to review the customizations you have made. If in doubt, reassign keystrokes and command keys individually.
About Word’s Shortcut Keys
Now that your Word shortcuts are reset take the time to memorize a few of the most useful ones. If you get used to using them, you’ll increase your productivity. Here are a few of the most helpful and commonly used keyboard shortcuts for Word:
- Ctrl+W closes the active document or window.
- Ctr+S saves the document.
- Ctrl+P prints the document.
- Ctrl+Z undoes an action.
- Ctrl+Y redoes an action.
- Ctrl+K inserts a hyperlink.
- Ctrl+B applies or removes bold format.
- Ctrl+I applies or removes italic format.
- Alt, F, A is Save As.
- Alt, W, R shows or hides the ruler.
- Alt+Left Arrow goes back one page.
- Alt+Right Arrow goes forward one page.
- Ctrl+Shift+A changes the text to all capitals.
There are plenty more shortcuts where these came from, but this selection will get you started.
Thanks for letting us know!
Get the Latest Tech News Delivered Every Day
Subscribe

The new Office 2013 suite doesn’t have to be used on a touch screen. It works just as well with the keyboard as any of its predecessors. If you want to customize the keyboard experience, this groovy guide will show you the way.
While other applications in the Office 2013 (365 Home Premium) Preview don’t offer a way to adjust hotkeys, Word is ahead of the game as usual and lets you customize everything. If you don’t like the way a shortcut key works, just change it. Unfortunately, changes made in Word don’t seem to affect other applications from the Office suite. But hopefully, we’ll see some support on this from Microsoft before Office 2013 goes retail. Here’s how to get the edge on customizing hotkeys in Word.
Launch Word 2013, then click the File Menu.

From the Backstage view click the Options button.
In Word Options, click the Customize Ribbon button. Then click the Customize button at the bottom adjacent to the “Keyboard shortcuts” label.
Select a category, and then browse through the commands. You’ll see that the majority of the commands in Word 2013 don’t have any keyboard shortcuts assigned. This is mostly because there are nearly one thousand commands in total and it would be crazy to remember hotkeys for all of them.
If a command does have a hotkey, it will be listed under Current Keys.

To add a new shortcut key, select the command you’d like to add it to. Next, click the empty white box under the “Press new shortcut key” label. While the text cursor is blinking in this box, press the keyboard combination you’d like to set as the shortcut key. Pressing multiple different combinations will allow you to add numerous hotkeys at once to a command. Each command is separated by commas. You can use the Backspace button on your keyboard to remove them if you type too many.
Once entered, click the Assign button to bind (save) the shortcut key to the command.
If you enter a keyboard shortcut that’s already used by a different command, you’ll see the name of the attached command listed after the “Currently assigned to” label.
Note that you can’t double dip with shortcut keys, assigning a key command that’s already being used will unbind it from the original command.
If you feel like you’ve messed something up, in the worst case scenario there’s a reset button that will restore all hotkeys to defaults. It’ll be the same as when you first installed Office 2013.

New shortcut keys will appear as tooltips just like the original commands do. So if you ever forget which hotkey goes where just hover over the tool in question on the ribbon.

![]()
 Please Note:
This article is written for users of the following Microsoft Word versions: 97, 2000, 2002, and 2003. If you are using a later version (Word 2007 or later), this tip may not work for you. For a version of this tip written specifically for later versions of Word, click here: Keyboard Changes to Unwanted Foreign Language.
![]()
Written by Allen Wyatt (last updated February 11, 2021)
This tip applies to Word 97, 2000, 2002, and 2003
Erica wonders why Word all of a sudden change the keys to «foreign» lettering. For example, without warning when she presses the question mark she’ll get an «e» with an accent, and the «~» (tilde) produces a «#». All of the keys seem to be remapped to the foreign language and Erica don’t understand why. The only way she knows to stop it is to close the document and open it again.
In all likelihood, this problem needs to be addressed in both the operating system and in Word. Windows systems can have multiple language configurations installed on them. For instance, it is not unusual to have both English and French installed on a given system. (This may happen when the user is in a country—such as Canada—that has two dominant languages.)
When there are multiple languages installed in the operating system, then the system provides a way to easily switch between the languages. On most systems this is instigated by pressing Alt+Shift. If you press this shortcut inadvertently, you can find yourself typing in a language you didn’t intend. The solution is to press the shortcut again so that you return to the language configuration you want to use.
You should remember, however, that the Alt+Shift shortcut may not work on all systems. For some language combinations Windows may use a different shortcut (such as Ctrl+Spacebar), and it is possible that a different shortcut than these was specified by a previous user of your system. (The shortcut can be modified in the Control Panel, under the heading of regional and language options.)
The thing that you might check within Word is whether the program is configured to automatically detect languages or not. If it is, then it is possible that the language switching is occurring because of the words you are typing within your document. You can check this configuration setting by following these steps. (These steps will only work in Word 2000, Word 2002, and Word 2003. The feature was not available before Word 2002.)
- Choose Language from the Tools menu, then Set Language from the resulting submenu. Word displays the Language dialog box. (See Figure 1.)
- Clear the Detect Language Automatically check box.
- Click OK.
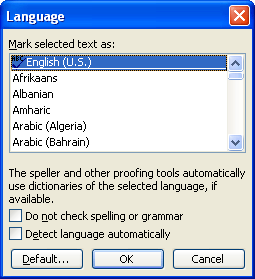
Figure 1. The Language dialog box.
When you make the language setting change in Word, it is applicable only to the document or template that you have open at the time. If you want the change to be applicable to all your future documents, you’ll want to open the Normal template before making the change and then save the template after the change is made.
WordTips is your source for cost-effective Microsoft Word training.
(Microsoft Word is the most popular word processing software in the world.)
This tip (7534) applies to Microsoft Word 97, 2000, 2002, and 2003. You can find a version of this tip for the ribbon interface of Word (Word 2007 and later) here: Keyboard Changes to Unwanted Foreign Language.
Author Bio
With more than 50 non-fiction books and numerous magazine articles to his credit, Allen Wyatt is an internationally recognized author. He is president of Sharon Parq Associates, a computer and publishing services company. Learn more about Allen…
MORE FROM ALLEN
Understanding Picas
Word can understand many different measurement units. One common unit understood by Word is the pica, described in this tip.
Discover More
Specifying a Time Server for Windows to Use
Windows can utilize resources on the Internet to make sure that your computer’s internal clock is working at the right …
Discover More
Leaving Minimized Documents Minimized
If you have open documents minimized on the Taskbar and then open another document, all of the previously minimized …
Discover More
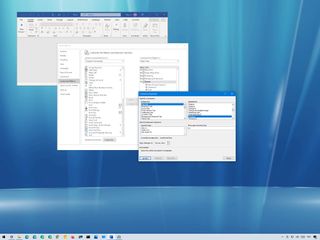
(Image credit: Windows Central)
Microsoft Word allows you to create custom keyboard shortcuts to quickly use a combination of keys to execute a command or macro, apply a style, and insert a symbol without the need of extra steps utilizing a mouse.
In addition to creating new shortcuts, whether you use the version of Office from Microsoft 365 or Office 2019, Microsoft Word also lets you modify existing shortcuts or remove those you do not want.
In this Windows 10 guide, we will walk you through the steps of creating a custom keyboard shortcut for your most frequent Word commands. In addition, we will also outline the steps of removing a specific shortcut and resetting all custom settings to their defaults.
- How to create custom keyboard shortcut in Word
- How to remove custom keyboard shortcut in Word
- How to reset custom keyboard shortcut settings in Word
How to create custom keyboard shortcut in Word
To assign a custom keyboard shortcut to a command or item in Word, use these steps:
- Open Microsoft Word.
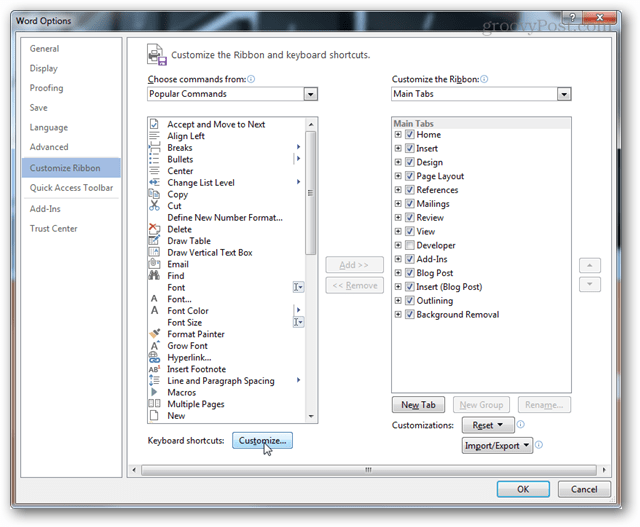
- Click on Options from the bottom-left corner.Quick note: If you have a blank document open, click the File menu to access the Options button. Alternatively, you can also right-click anywhere in the Ribbon and select the Customize the Ribbon option to access the settings.
- Click on Customize Ribbon.
- Under the «Customize the Ribbon and keyboard shortcuts» section, click the Customize button for «Keyboard shortcuts.»
- In the Categories section, select the category that contains the command, macro, or style you want to customize.
- In the Command section, select the item to which you want to add a custom keyboard shortcut.Quick note: If the command has a shortcut already assigned, it will be listed under the «Current keys» section. You can always add more shortcuts for the same command or remove shortcuts as needed (see steps below).
- In the Press new shortcut key box, confirm the keyboard shortcut you want to use.Quick tip: You can use a number of key combinations. For example, you can use a function key, such as F3 and F4, Alt and/or Ctrl + other keys like Alt + Ctrl + F7. If the shortcut is already in use, you can still use it, but the keyboard shortcut will no longer be available for the other item.
- In the «Save changes in» option, select the Normal.dotm option to make the keyboard available for all documents.
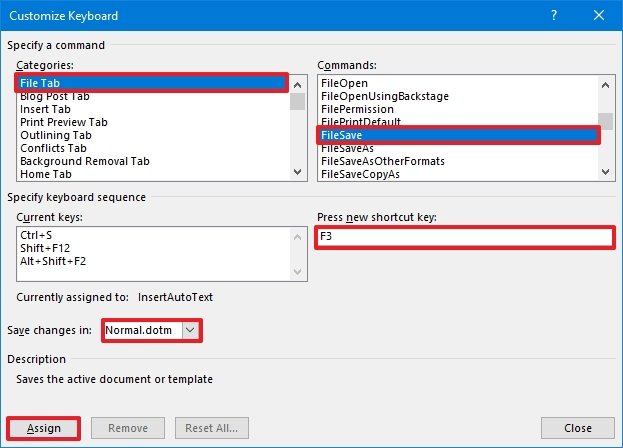
- Click the Assign button.
- Click the Close button.
Once you complete the steps, you can now start using the keyboard shortcut to quickly run command, macro, style, font, or symbol.
While the ability to customize shortcuts is available in older versions, you should consider upgrading to Office from Microsoft 365. The subscription-based service offers a free upgrade and other benefits, such as sharing the apps with up to six family members and friends, and you get access to services like Microsoft Teams, Family Safety, Microsoft Editor, and 1TB of OneDrive storage.
 Get subscribed
Microsoft 365 gives you full access to all the Office apps and benefits like 1TB OneDrive storage and Skype minutes. You can also install Word, Excel, PowerPoint, Outlook, and other apps on up to five devices, and depending on the subscription, you can share the account with up to six people.
How to remove custom keyboard shortcut in Word
To remove a keyboard shortcut in Word, use these steps:
- Open Microsoft Word.
- Click on Options from the bottom-left corner.
- Click on Customize Ribbon.
- Under the «Customize the Ribbon and keyboard shortcuts» section, click the Customize button for «Keyboard shortcuts.»
- In the Categories section, select the category that contains the command you want to customize.
- In the Command section, select the item from which you want to remove a custom keyboard shortcut.
- Under the «Current keys» section, select the shortcut you want to remove.
- Click the Remove button.
- Click the Close button.
After you complete the steps, the shortcut will no longer be available in Microsoft Word.
How to reset custom keyboard shortcut settings in Word
To reset all the shortcut settings in Word, use these steps:
- Open Microsoft Word.
- Click on Options from the bottom-left corner.
- Click on Customize Ribbon.
- Under the «Customize the Ribbon and keyboard shortcuts» section, click the Customize button for «Keyboard shortcuts.»
- Click the Reset All button.
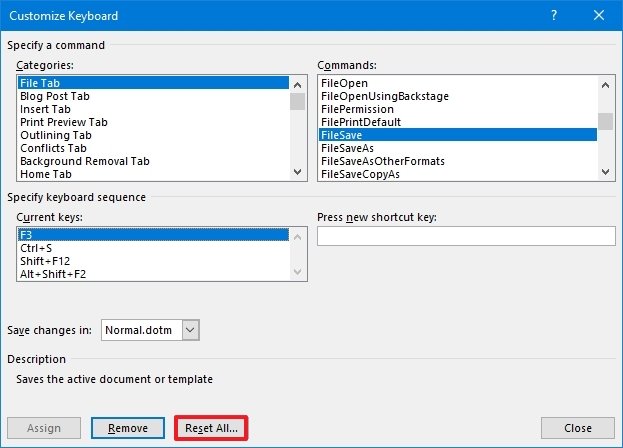
- Click the Yes button.
- Click the Close button.
Once you complete the steps, the keyboard settings will reset to their original configuration.
More Windows 10 resources
For more helpful articles, coverage, and answers to common questions about Windows 10, visit the following resources:
- Windows 10 on Windows Central — All you need to know
- Windows 10 help, tips, and tricks
- Windows 10 forums on Windows Central
All the latest news, reviews, and guides for Windows and Xbox diehards.
Mauro Huculak is technical writer for WindowsCentral.com. His primary focus is to write comprehensive how-tos to help users get the most out of Windows 10 and its many related technologies. He has an IT background with professional certifications from Microsoft, Cisco, and CompTIA, and he’s a recognized member of the Microsoft MVP community.
Most Popular
- Remove From My Forums
-
Question
-
Dear All
I have been able to change the Input language in my word Addin but there are two problems
1. I am using a dropdown list of languages to select and change the input language programmatically in word addin. It works fine. If the user changes the input language using Alt+Shift then the language is changed. I want to reflect that change in my
dropdown as well. Because otherwise my selected input language and system’s input languages are different. How to capture
language change done using Alt+Shift key.2. One language may have many keyboards (Layouts) associated with it. I have been able to get different layouts for a selected language. But can’t find the way of changing the keyboard layout for the selected language. How to do this? Please suggest.
Thanks in advance.
Regards
Dharam Veer Sharma
Answers
-
Thanks Eugene
I have been able to do this using a crude method, the code is as under
Dim KBName As String = ddKeyboards.SelectedItem.Label
For Each lang In InputLanguage.InstalledInputLanguages
If lang.LayoutName = KBName Then
InputLanguage.CurrentInputLanguage = lang
Exit For
End If
Next langHere ddKeyboards (dropdown) contains the list of installed keyboards for different languages. It’s working perfectly.
Dharam Veer Sharma
-
Marked as answer by
Friday, January 9, 2015 6:44 PM
-
Marked as answer by
Download PC Repair Tool to quickly find & fix Windows errors automatically
It is very easy to customize keyboard shortcuts for Microsoft Word. This is an efficient way of saving time when you are working on your PC. All you have to do is to assign these shortcut keys to a font, command, macro, or any frequently used key. Windows has made it very convenient to assign keyboard shortcuts that will automatically launch programs. Most programs like Excel, Chrome, and Word already have their own shortcuts for different menu options, however, customizing them could make it easier for users who have their own specifications.
Making one-key combos with the use of AutoHotkey can speed up and amplify your computing life. You can easily assign or remove keyboard shortcuts with the use of your keyboard or mouse. You can create custom shortcuts on your keyboard by doing the following steps:
Open Word Options by clicking on ALT+F and T. Click on the Down Arrow key to choose Customize Ribbon option. Now repeatedly click on the TAB key until the Customize option is selected then hit ENTER.

Now under Categories, press on the UP ARROW and DOWN ARROW in order to highlight and select the category want to either assign a certain command or keyboard shortcut to or to delete or remove a keyboard shortcut.
Next, go to Commands dialog box by pressing the TAB key and click on the UP ARROW or DOWN ARROW to highlight the specific command or item that you would want to assign the keyboard shortcut on or delete the keyboard shortcut to which it is assigned from. You can check on the commands assigned to particular keyboard shortcuts by clicking on the Current Keys box or Currently Assigned To box.
Read: Keyboard Shortcuts not working in Word.
To assign a keyboard shortcut, keep pressing the TAB button, on the left of the keyboard till the cursor moves to the Press New Shortcut Key box. Click on the arrangement of keys that you wish to assign by hitting on CTRL and then the specific key that you would want to use.
Finally, check on the Currently Assigned To or Current Keys to verify whether the key combinations are already taken or assigned to a particular item or command. If a key combination is already assigned, then you must try typing a different set of combinations.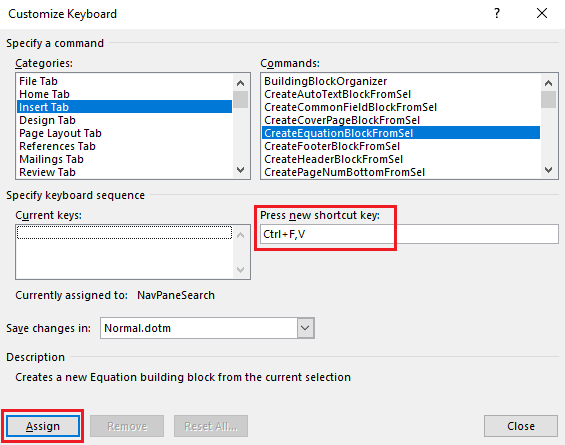
Next, press the TAB key continuously until Save Changes In is highlighted. After you have done this, press the UP ARROW and DOWN ARROW keys in order to select the name of the document that you would want to save the changes in keyboard settings in and then hit ENTER. Finally, repeatedly press the TAB key to highlight Assign and then hit ENTER.
To remove a keyboard shortcut, continuously press the TAB key until the Save Changes In option is selected. Next, click on the UP ARROW or DOWN ARROW to select the document name that you would want to save keyboard shortcut in and then hit ENTER.
Now, click on SHIFT+TAB key continuously until the cursor is in the Current Keys. Next, click on UP ARROW or DOWN ARROW to choose the keyboard shortcut that you would want to delete. Finally, click on the TAB key continuously until Remove is highlighted, and then click on ENTER.
That is all there is to it!
Here is the complete list of Windows 10 keyboard shortcuts, if you want to take a look at it.

Karan is a B.Tech, with several years of experience as an IT Analyst. He is a passionate Windows user who loves troubleshooting problems and writing about Microsoft technologies.
For some strange reason, and since a very long time, every time I open word, the keyboard is automatically changed to Japanese Hiragana. Obviously, being Italian, I do not at all want such an auto change. Is there any way to reverse this? Is this a Word problem or something related to the OS, or perhaps something to do with both?
Update
Following comments, I tried unchecking the box in Word > Preferences > Edit for «Match font with keyboard». No change, but I found out that the change takes place during the opening of Word, stays there while the Project Gallery is open, and is reversed as soon as the new document gets opened, so once the new document appears, the keyboard changes back to the correct US Extended keyboard.
Update copied from the forum
Neither the Normal.dotm, nor the Match font with keyboard box in Preferences>Edit, nor Tools>Language and selecting Italian, none of this did anything. This issue is mysterious…
Another copied update
The Language and Text thing (System preferences > L&T > put Italian at the top of the language list) did not work at all. Plus, I want my Mac to speak English, and this change makes System Preferences speak Italian, which I decidedly do not like. Which is why I reversed it.
Somehow on my wife computer the default Microsoft keyboard shortcut scheme was changed into some «legacy scheme».
This is the 2nd time she managed to do it and the last time I was only able to resolve it by opening a new user account for her.
This only applies to Word, other office applications still have the normal shortcuts.
Any ideas?
Update: some more details.
The OS is Windows 7 x64. Office 2000 is not fully compatible with it but it is good enough.
Now, it is possible to change the keyboard shortcuts one by one via «Customize Keyboard» but obviously this is not how she changed it in the first place. She is not an advanced user and doesn’t go to the options menu. My wild speculations are:
- Since Word keeps some of the settings in the files perhaps some file she opened changed the default settings.
- Some mysterious keystroke sequence that her fingers tend to like.
- Some website that manages to change it.
The 2 things I hope to find out are:
- How did she enter this mode.
- How do I revert it in a single shot by copying over some file or importing a registry file. So basically where does Word keep its keyboard shortcuts.
I did try to copy the normal.dot template from my account over hers but it didn’t solve the issue.
asked Jan 13, 2012 at 10:00
![]()
GurGur
2292 silver badges4 bronze badges
If it’s happened recently then you could rollback to a System Restore point? Or use the Restore Point Manager to investigate if some installation caused it? (ie rollback to before the fault, then see what’s been installed since)
answered Jan 13, 2012 at 11:14
![]()
HaydnWVNHaydnWVN
3,2683 gold badges25 silver badges49 bronze badges
Does she have Word Perfect Mode enabled? Is there a WPM indicator in the bottom of the window that looks like it is enabled? Double click it to disable.
answered Jan 13, 2012 at 13:21
![]()
daxleroddaxlerod
3,1053 gold badges21 silver badges23 bronze badges
1
If your Windows language is not (only) English then read on:
Try to select English as the default keyboard language (control panel -> regional settings -> keyboard) and re-start word to see if the issue is gone (see https://superuser.com/a/659310/257859).
If you don’t want to change the default keyboard language there is another workaround but this time you’ll have to change the language of the menus and help of Word (see https://superuser.com/a/662368/257859)
BTW it’s indeed a legacy scheme from Windows 3 era and it is called IBM Common User Access mode.
![]()
answered Sep 28, 2015 at 11:00
![]()
ndemoundemou
1,0101 gold badge10 silver badges18 bronze badges
Log in as Administrator, then go to your Wife’s profile under C:UserWifey and delete the file ntuser.dat (you might need to enable show hidden files).
Log In with your Wife’s account.
answered Sep 28, 2015 at 11:05
![]()
KarmaEDVKarmaEDV
2,3594 gold badges15 silver badges30 bronze badges