
Press Ctrl+F, and then type your search words.
Contents
- 1 Which key is used for search?
- 2 What are the 20 shortcut keys?
- 3 How do you use Ctrl H?
- 4 How do you do a word search?
- 5 What is Ctrl F used for?
- 6 What does Ctrl C do?
- 7 What is F7 used for?
- 8 What is Ctrl E in word?
- 9 What does Ctrl k do in word?
- 10 How do I search for all words in a word?
- 11 How do you search for words fast?
- 12 How do I find a word in the dictionary?
- 13 What is L Ctrl?
- 14 How do I search without Ctrl F?
- 15 What is Ctrl L used for?
- 16 What does Alt Tab do?
- 17 What do the F1 to F12 keys do?
- 18 What does Alt enter do in Word?
- 19 What is Control G?
- 20 What does Ctrl R do in Word?
Which key is used for search?
CTRL + F
The correct answer is CTRL + F. In Microsoft Word, and other word processors and text editors, Ctrl+F opens a find box that allows you to search for characters, text, and phrases in the current document. In Word specifically, Ctrl+F opens a search box in the Navigation task pane.
What are the 20 shortcut keys?
Basic Windows keyboard shortcuts
- Ctrl+Z: Undo. No matter what program you’re running, Ctrl+Z will roll back your last action.
- Ctrl+W: Close.
- Ctrl+A: Select all.
- Alt+Tab: Switch apps.
- Alt+F4: Close apps.
- Win+D: Show or hide the desktop.
- Win+left arrow or Win+right arrow: Snap windows.
- Win+Tab: Open the Task view.
How do you use Ctrl H?
To use the keyboard shortcut Ctrl+H, press and hold either Ctrl key on the keyboard and while continuing to hold, press the “H” key with either hand. On Apple computer keyboards, the Ctrl key is labeled as “control.” On most Internet browsers (e.g., Chrome, Edge, Firefox, IE), pressing Ctrl+H opens the browser history.
How do you do a word search?
To open the Find pane from the Edit View, press Ctrl+F, or click Home > Find. Find text by typing it in the Search the document for… box. Word Web App starts searching as soon as you start typing.
What is Ctrl F used for?
Ctrl-F is the shortcut in your browser or operating system that allows you to find words or phrases quickly. You can use it browsing a website, in a Word or Google document, even in a PDF. You can also select Find under the Edit menu of your browser or app.
What does Ctrl C do?
(1) In a Windows PC, holding down the Ctrl key and pressing the C key copies the currently highlighted object. The Mac equivalent is Command-C. See Ctrl-V. (2) In a DOS or Windows PC, holding down the Ctrl key and pressing the C key cancels the running program or batch file.
What is F7 used for?
The F7 key is commonly used to spell check and grammar check a document in Microsoft programs such as Microsoft Excel, Microsoft Word, Microsoft Outlook, and other Office products. Shift + F7 runs a Thesaurus check on the highlighted word.
What is Ctrl E in word?
Ctrl+E. Align the text to the left. Ctrl+L. Align the text to the right. Ctrl+R.
What does Ctrl k do in word?
In Microsoft Word and other word processors, pressing Ctrl + K inserts a hyperlink at the text cursor’s current location.
How do I search for all words in a word?
Either go into the base folder of your Word documents or have all word documents you want to search through in the same folder. In the address bar to the right is a ‘search box’. Just type in the word/phrase you’re looking for in there and Windows will list you the documents where the word/phrase appears.
How do you search for words fast?
Here are some effective scanning tips.
- Scan each row. By simply scanning each row from left to right you’ll find a fair amount of words.
- Seek out strange letters.
- Focus on letters that stand out to you.
- Search for letter pairs.
- Check surrounding letters.
- Scan with your finger.
How do I find a word in the dictionary?
Step-by-step guide to using a dictionary
STEP 1 – Find the word you want to look up. STEP 2 – Find the letter that the word begins with. STEP 3 – Open the dictionary to the page with the relevant letter, in this case the letter C. STEP 4 – Now look at the second letter in the word you are looking for.
What is L Ctrl?
Alternatively referred to as Control+L and C-l, Ctrl+L is a keyboard shortcut whose function differs depending on the program being. For example, in Microsoft Word, Ctrl+L is used to align text with the left edge of a document (margin).Ctrl+L in Excel and other spreadsheet programs.
How do I search without Ctrl F?
If you don’t like the Ctrl-F shortcut, in most browsers you can use F3 instead. In Firefox, you can also use a slash (‘/’).
What is Ctrl L used for?
In Microsoft Word, Ctrl+L is used to left align a paragraph. Also referred to as Control L and C-l, Ctrl+L is a shortcut key that varies depending on the program being used. In Microsoft Word, Ctrl+L is used to left align a paragraph.
What does Alt Tab do?
Pressing Alt-Tab switches between all open applications in the Taskbar. The Alt key is held down while the Tab key is pressed to cycle through the icons of all the windows. When the Tab key is released, the highlighted window is brought to the foreground.
What do the F1 to F12 keys do?
The function keys or F keys are lined across the top of the keyboard and labeled F1 through F12. These keys act as shortcuts, performing certain functions, like saving files, printing data, or refreshing a page. For example, the F1 key is often used as the default help key in many programs.
What does Alt enter do in Word?
Alt+Enter in Windows
In Windows, press Alt + Enter when any file, shortcut, or other object is highlighted to open the Properties window for that object.
What is Control G?
Alternatively known as Control+G and C-g, Ctrl+G is a keyboard shortcut often used to advance through Find results or move to a specific line in a document, spreadsheet, or text file.Ctrl+G in Chrome, Firefox, Edge, and Opera. Ctrl+G in Excel and other spreadsheet programs.
What does Ctrl R do in Word?
In Microsoft Word and other word processor programs, pressing Ctrl+R aligns the line or selected text to the right of the screen. Also referred to as Control R and C-r, Ctrl+R is a shortcut key most often used to refresh the page in a browser.
This article describes the keyboard shortcuts and function keys in Word for Windows.
Notes:
-
To quickly find a shortcut in this article, you can use Search. Press Ctrl+F, and then type your search words.
-
If an action that you use often does not have a shortcut key, you can record a macro to create one. For instructions, go to Create or run a macro or Use a screen reader to create a macro in Word.
-
If you are using Microsoft Word Starter, be aware that not all the features listed for Word are supported in Word Starter. For more information about the features available in Word Starter, go to Word features that are not fully supported in Word Starter.
-
Get these keyboard shortcuts in a Word document at this link: Word 2016 for Windows keyboard shortcuts.
In this topic
-
Frequently used shortcuts
-
Ribbon keyboard shortcuts
-
Navigate the document
-
Preview and print documents
-
Select text and graphics
-
Edit text and graphics
-
Work with web content
-
Work with tables
-
Review a document
-
Work with references, citations, and indexing
-
Work with mail merge and fields
-
Work with text in other languages
-
Work with document views
-
Use function key shortcuts
Frequently used shortcuts
This table shows the most frequently used shortcuts in Microsoft Word.
|
To do this |
Press |
|---|---|
|
Open a document. |
Ctrl+O |
|
Create a new document. |
Ctrl+N |
|
Save the document. |
Ctrl+S |
|
Close the document. |
Ctrl+W |
|
Cut the selected content to the Clipboard. |
Ctrl+X |
|
Copy the selected content to the Clipboard. |
Ctrl+C |
|
Paste the contents of the Clipboard. |
Ctrl+V |
|
Select all document content. |
Ctrl+A |
|
Apply bold formatting to text. |
Ctrl+B |
|
Apply italic formatting to text. |
Ctrl+I |
|
Apply underline formatting to text. |
Ctrl+U |
|
Decrease the font size by 1 point. |
Ctrl+Left bracket ([) |
|
Increase the font size by 1 point. |
Ctrl+Right bracket (]) |
|
Center the text. |
Ctrl+E |
|
Align the text to the left. |
Ctrl+L |
|
Align the text to the right. |
Ctrl+R |
|
Cancel a command. |
Esc |
|
Undo the previous action. |
Ctrl+Z |
|
Redo the previous action, if possible. |
Ctrl+Y |
|
Adjust the zoom magnification. |
Alt+W, Q, then use the Tab key in the Zoom dialog box to go to the value you want. |
|
Split the document window. |
Ctrl+Alt+S |
|
Remove the document window split. |
Alt+Shift+C or Ctrl+Alt+S |
Top of Page
Close a task pane
To close a task pane using the keyboard:
-
Press F6 until the task pane is selected.
-
Press Ctrl+Spacebar.
-
Use the arrow keys to select Close, and then press Enter.
Ribbon keyboard shortcuts
The ribbon groups related options on tabs. For example, on the Home tab, the Font group includes the Font Color option. Press the Alt key to display the ribbon shortcuts, called Key Tips, as letters in small images next to the tabs and options as shown in the image below.

Note: Add-ins and other programs can add new tabs to the ribbon and might provide access keys for those tabs.
You can combine the Key Tips letters with the Alt key to make shortcuts called Access Keys for the ribbon options. For example, press Alt+H to open the Home tab, and Alt+Q to move to the Tell Me or Search field. Press Alt again to see Key Tips for the options for the selected tab.
Depending on the version of Microsoft 365 you are using, the Search text field at the top of the app window might be called Tell Me instead. Both offer a largely similar experience, but some options and search results can vary.
In Office 2013 and Office 2010, most of the old Alt key menu shortcuts still work, too. However, you need to know the full shortcut. For example, press Alt, and then press one of the old menu keys E (Edit), V (View), I (Insert), and so on. A notification pops up saying you’re using an access key from an earlier version of Microsoft 365. If you know the entire key sequence, go ahead and use it. If you don’t know the sequence, press Esc and use Key Tips instead.
Use the Access Keys for ribbon tabs
To go directly to a tab on the ribbon, press one of the following access keys. Additional tabs might appear depending on your selection in the document.
|
To do this |
Press |
|---|---|
|
Move to the Tell Me or Search field on the Ribbon to search for assistance or Help content. |
Alt+Q, then enter the search term. |
|
Open the File page to use Backstage view. |
Alt+F |
|
Open the Home tab to use common formatting commands, paragraph styles, and the Find tool. |
Alt+H |
|
Open the Insert tab to insert tables, pictures and shapes, headers, or text boxes. |
Alt+N |
|
Open the Design tab to use themes, colors, and effects, such as page borders. |
Alt+G |
|
Open the Layout tab to work with page margins, page orientation, indentation, and spacing. |
Alt+P |
|
Open the References tab to add a table of contents, footnotes, or a table of citations. |
Alt+S |
|
Open the Mailings tab to manage Mail Merge tasks and to work with envelopes and labels. |
Alt+M |
|
Open the Review tab to use Spell Check, set proofing languages, and to track and review changes to your document. |
Alt+R |
|
Open the View tab to choose a document view or mode, such as Read Mode or Outline view. You can also set the zoom magnification and manage multiple document windows. |
Alt+W |
Top of Page
Work in the ribbon with the keyboard
|
To do this |
Press |
|---|---|
|
Select the active tab on the ribbon and activate the access keys. |
Alt or F10. To move to a different tab, use access keys or the arrow keys. |
|
Move the focus to commands on the ribbon. |
Tab key or Shift+Tab |
|
Move between command groupings on the ribbon. |
Ctrl+Left or Right arrow key |
|
Move among the items on the ribbon. |
Arrow keys |
|
Show the tooltip for the ribbon element currently in focus. |
Ctrl+Shift+F10 |
|
Activate the selected button. |
Spacebar or Enter |
|
Open the list for the selected command. |
Down arrow key |
|
Open the menu for the selected button. |
Alt+Down arrow key |
|
When a menu or submenu is open, move to the next command. |
Down arrow key |
|
Expand or collapse the ribbon. |
Ctrl+F1 |
|
Open the context menu. |
Shift+F10 Or, on a Windows keyboard, the Windows Menu key (between the right Alt and right Ctrl keys) |
|
Move to the submenu when a main menu is open or selected. |
Left arrow key |
Top of Page
Navigate the document
|
To do this |
Press |
|---|---|
|
Move the cursor one word to the left. |
Ctrl+Left arrow key |
|
Move the cursor one word to the right. |
Ctrl+Right arrow key |
|
Move the cursor up by one paragraph. |
Ctrl+Up arrow key |
|
Move the cursor down by one paragraph. |
Ctrl+Down arrow key |
|
Move the cursor to the end of the current line. |
End |
|
Move the cursor to the beginning the current line. |
Home |
|
Move the cursor to the top of the screen. |
Ctrl+Alt+Page up |
|
Move the cursor to the bottom of the screen. |
Ctrl+Alt+Page down |
|
Move the cursor by scrolling the document view up by one screen. |
Page up |
|
Move the cursor by scrolling the document view down by one screen. |
Page down |
|
Move the cursor to the top of the next page. |
Ctrl+Page down |
|
Move the cursor to the top of the previous page. |
Ctrl+Page up |
|
Move the cursor to the end of the document. |
Ctrl+End |
|
Move the cursor to the beginning of the document. |
Ctrl+Home |
|
Move the cursor to the location of the previous revision. |
Shift+F5 |
|
Move the cursor to the location of the last revision made before the document was last closed. |
Shift+F5, immediately after opening the document. |
|
Cycle through floating shapes, such as text boxes or images. |
Ctrl+Alt+5, and then the Tab key repeatedly |
|
Exit the floating shape navigation and return to the normal navigation. |
Esc |
|
Display the Navigation task pane, to search within the document content. |
Ctrl+F |
|
Display the Go To dialog box, to navigate to a specific page, bookmark, footnote, table, comment, graphic, or other location. |
Ctrl+G |
|
Cycle through the locations of the four previous changes made to the document. |
Ctrl+Alt+Z |
Top of Page
Navigate the document using the browse options in Word 2007 and 2010
In Word 2007 and 2010, you can browse the document by various types of objects, such as fields, footnotes, headings, and graphics.
|
To do this |
Press |
|---|---|
|
Open the list of browse options to define the type of object to browse by. |
Ctrl+Alt+Home |
|
Move to the previous object of the defined type. |
Ctrl+Page up |
|
Move to the next object of the defined type. |
Ctrl+Page down |
Top of Page
Preview and print documents
|
To do this |
Press |
|---|---|
|
Print the document. |
Ctrl+P |
|
Switch to print preview. |
Ctrl+Alt+I |
|
Move around the preview page when zoomed in. |
Arrow keys |
|
Move by one preview page when zoomed out. |
Page up or Page down |
|
Move to the first preview page when zoomed out. |
Ctrl+Home |
|
Move to the last preview page when zoomed out. |
Ctrl+End |
Top of Page
Select text and graphics
|
To do this |
Press |
|---|---|
|
Select text. |
Shift+Arrow keys |
|
Select the word to the left. |
Ctrl+Shift+Left arrow key |
|
Select the word to the right. |
Ctrl+Shift+Right arrow key |
|
Select from the current position to the beginning of the current line. |
Shift+Home |
|
Select from the current position to the end of the current line. |
Shift+End |
|
Select from the current position to the beginning of the current paragraph. |
Ctrl+Shift+Up arrow key |
|
Select from the current position to the end of the current paragraph. |
Ctrl+Shift+Down arrow key |
|
Select from the current position to the top of the screen. |
Shift+Page up |
|
Select from the current position to the bottom of the screen. |
Shift+Page down |
|
Select from the current position to the beginning of the document. |
Ctrl+Shift+Home |
|
Select from the current position to the end of the document. |
Ctrl+Shift+End |
|
Select from the current position to the bottom of the window. |
Ctrl+Alt+Shift+Page down |
|
Select all document content. |
Ctrl+A |
Top of Page
Extend a selection
|
To do this |
Press |
|---|---|
|
Start extending the selection. |
F8 In the extend selection mode, clicking a location in the document extends the current selection to that location. |
|
Select the nearest character to the left or right. |
F8, Left or Right arrow key |
|
Expand the selection. |
F8 repeatedly to expand the selection to the entire word, sentence, paragraph, section, and document. |
|
Reduce the selection. |
Shift+F8 |
|
Select a vertical block of text. |
Ctrl+Shift+F8, then press the arrow keys |
|
Stop extending the selection. |
Esc |
Top of Page
Edit text and graphics
|
To do this |
Press |
|---|---|
|
Delete one word to the left. |
Ctrl+Backspace |
|
Delete one word to the right. |
Ctrl+Delete |
|
Open the Clipboard task pane and enable the Office Clipboard, which allows you to copy and paste content between Microsoft 365 apps. |
Alt+H, F, O |
|
Cut the selected content to the Clipboard. |
Ctrl+X |
|
Copy the selected content to the Clipboard. |
Ctrl+C |
|
Paste the contents of the Clipboard. |
Ctrl+V |
|
Move the selected content to a specific location. |
F2, move the cursor to the destination, and then press Enter. |
|
Copy the selected content to a specific location. |
Shift+F2, move the cursor to the destination, and then press Enter. |
|
Define an AutoText block with the selected content. |
Alt+F3 |
|
Insert an AutoText block. |
The first few characters of the AutoText block, and then press Enter when the ScreenTip appears. |
|
Cut the selected content to the Spike. |
Ctrl+F3 |
|
Paste the contents of the Spike. |
Ctrl+Shift+F3 |
|
Copy the selected formatting. |
Ctrl+Shift+C |
|
Paste the selected formatting. |
Ctrl+Shift+V |
|
Copy the header or footer used in the previous section of the document. |
Alt+Shift+R |
|
Display the Replace dialog box, to find and replace text, specific formatting, or special items. |
Ctrl+H |
|
Display the Object dialog box, to insert a file object into the document. |
Alt+N, J, J |
|
Insert a SmartArt graphic. |
Alt+N, M |
|
Insert a WordArt graphic. |
Alt+N, W |
Top of Page
Align and format paragraphs
|
To do this |
Press |
|---|---|
|
Center the paragraph. |
Ctrl+E |
|
Justify the paragraph. |
Ctrl+J |
|
Align the paragraph to the left. |
Ctrl+L |
|
Align the paragraph to the right. |
Ctrl+R |
|
Indent the paragraph. |
Ctrl+M |
|
Remove a paragraph indent. |
Ctrl+Shift+M |
|
Create a hanging indent. |
Ctrl+T |
|
Remove a hanging indent. |
Ctrl+Shift+T |
|
Remove paragraph formatting. |
Ctrl+Q |
|
Apply single spacing to the paragraph. |
Ctrl+1 |
|
Apply double spacing to the paragraph. |
Ctrl+2 |
|
Apply 1.5-line spacing to the paragraph. |
Ctrl+5 |
|
Add or remove space before the paragraph. |
Ctrl+0 (zero) |
|
Enable AutoFormat. |
Ctrl+Alt+K |
|
Apply the Normal style. |
Ctrl+Shift+N |
|
Apply the Heading 1 style. |
Ctrl+Alt+1 |
|
Apply the Heading 2 style. |
Ctrl+Alt+2 |
|
Apply the Heading 3 style. |
Ctrl+Alt+3 |
|
Display the Apply Styles task pane. |
Ctrl+Shift+S |
|
Display the Styles task pane. |
Ctrl+Alt+Shift+S |
Top of Page
Format characters
|
To do this |
Press |
|---|---|
|
Display the Font dialog box. |
Ctrl+D or Ctrl+Shift+F |
|
Increase the font size. |
Ctrl+Shift+Right angle bracket (>) |
|
Decrease the font size. |
Ctrl+Shift+Left angle bracket (<) |
|
Increase the font size by 1 point. |
Ctrl+Right bracket (]) |
|
Decrease the font size by 1 point. |
Ctrl+Left bracket ([) |
|
Switch the text between upper case, lower case, and title case. |
Shift+F3 |
|
Change the text to all upper case. |
Ctrl+Shift+A |
|
Hide the selected text. |
Ctrl+Shift+H |
|
Apply bold formatting. |
Ctrl+B |
|
Add a bulleted list. |
Ctrl+Shift+L |
|
Apply underline formatting. |
Ctrl+U |
|
Apply underline formatting to the words, but not the spaces. |
Ctrl+Shift+W |
|
Apply double-underline formatting. |
Ctrl+Shift+D |
|
Apply italic formatting. |
Ctrl+I |
|
Apply small caps formatting. |
Ctrl+Shift+K |
|
Apply subscript formatting. |
Ctrl+Equal sign ( = ) |
|
Apply superscript formatting. |
Ctrl+Shift+Plus sign (+) |
|
Remove manual character formatting. |
Ctrl+Spacebar |
|
Change the selected text to the Symbol font. |
Ctrl+Shift+Q |
Top of Page
Manage text formatting
|
To do this |
Press |
|---|---|
|
Display all nonprinting characters. |
Ctrl+Shift+8 (do not use the numeric keypad) |
|
Display the Reveal Formatting task pane. |
Shift+F1 |
Top of Page
Insert special characters
|
To do this |
Press |
|---|---|
|
Insert a line break. |
Shift+Enter |
|
Insert a page break. |
Ctrl+Enter |
|
Insert a column break. |
Ctrl+Shift+Enter |
|
Insert an em dash (—). |
Ctrl+Alt+Minus sign (on the numeric keypad) |
|
Insert an en dash (–). |
Ctrl+Minus sign (on the numeric keypad) |
|
Insert an optional hyphen. |
Ctrl+Hyphen (-) |
|
Insert a nonbreaking hyphen. |
Ctrl+Shift+Hyphen (-) |
|
Insert a nonbreaking space. |
Ctrl+Shift+Spacebar |
|
Insert a copyright symbol (©). |
Ctrl+Alt+C |
|
Insert a registered trademark symbol (®). |
Ctrl+Alt+R |
|
Insert a trademark symbol (™). |
Ctrl+Alt+T |
|
Insert an ellipsis (…) |
Ctrl+Alt+Period (.) |
|
Insert the Unicode character for the specified Unicode (hexadecimal) character code. For example, to insert the euro currency symbol ( Tip: To find out the Unicode character code for a selected character, press Alt+X. |
The character code, then press Alt+X |
|
Insert the ANSI character for the specified ANSI (decimal) character code. For example, to insert the euro currency symbol, hold down Alt and press 0128 on the numeric keypad. |
Alt+the character code (on the numeric keypad) |
 ), type
 Top of Page
Work with web content
|
To do this |
Press |
|---|---|
|
Insert a hyperlink. |
Ctrl+K |
|
Go back one page. |
Alt+Left arrow key |
|
Go forward one page. |
Alt+Right arrow key |
|
Refresh the page. |
F9 |
Top of Page
Work with tables
Move around in a table
|
To do this |
Press |
|---|---|
|
Move to the next cell in the row and select its content. |
Tab key |
|
Move to the previous cell in the row and select its content. |
Shift+Tab |
|
Move to the first cell in the row. |
Alt+Home |
|
Move to the last cell in the row. |
Alt+End |
|
Move to the first cell in the column. |
Alt+Page up |
|
Move to the last cell in the column. |
Alt+Page down |
|
Move to the previous row. |
Up arrow key |
|
Move to the next row. |
Down arrow key |
|
Move one row up. |
Alt+Shift+Up arrow key |
|
Move one row down. |
Alt+Shift+Down arrow key |
Top of Page
Select table content
|
To do this |
Press |
|---|---|
|
Select the content in the next cell. |
Tab key |
|
Select the content in the previous cell. |
Shift+Tab |
|
Extend a selection to adjacent cells. |
Shift+Arrow keys |
|
Select a column. |
Select the top or bottom cell of the column, and then press Shift+Up or Down arrow key |
|
Select a row. |
Select the first or last cell in the row, and then press Shift+Alt+End or Home. |
|
Select the whole table. |
Alt+5 on the numeric keypad, with Num Lock switched off |
Top of Page
Insert paragraphs and tab characters in a table
|
To do this |
Press |
|---|---|
|
Insert a new paragraph in a cell. |
Enter |
|
Insert a tab character in a cell. |
Ctrl+Tab |
Top of Page
Review a document
|
To do this |
Press |
|---|---|
|
Insert a comment. |
Ctrl+Alt+M |
|
Turn change tracking on or off. |
Ctrl+Shift+E |
|
Close the Reviewing Pane. |
Alt+Shift+C |
Top of Page
Work with references, citations, and indexing
Use the following shortcuts to add references to your document, such as a table of contents, footnotes, and citations.
|
To do this |
Press |
|---|---|
|
Mark a table of contents entry. |
Alt+Shift+O |
|
Mark a table of authorities entry (citation). |
Alt+Shift+I |
|
Choose citation options. |
Alt+Shift+F12, Spacebar |
|
Mark an index entry. |
Alt+Shift+X |
|
Insert a footnote. |
Ctrl+Alt+F |
|
Insert an endnote. |
Ctrl+Alt+D |
|
Go to the next footnote. |
Alt+Shift+Right angle bracket (>) |
|
Go to the previous footnote. |
Alt+Shift+Left angle bracket (<) |
Top of Page
Work with mail merge and fields
To use the following keyboard shortcuts, the Mailings ribbon tab must be selected. To select the Mailings tab, press Alt+M.
Perform a mail merge
|
To do this |
Press |
|---|---|
|
Preview the mail merge. |
Alt+Shift+K |
|
Merge a document. |
Alt+Shift+N |
|
Print the merged document. |
Alt+Shift+M |
|
Edit a mail-merge data document. |
Alt+Shift+E |
|
Insert a merge field. |
Alt+Shift+F |
Top of Page
Work with fields
|
To do this |
Press |
|---|---|
|
Insert a DATE field. |
Alt+Shift+D |
|
Insert a LISTNUM field. |
Ctrl+Alt+L |
|
Insert a PAGE field. |
Alt+Shift+P |
|
Insert a TIME field. |
Alt+Shift+T |
|
Insert an empty field. |
Ctrl+F9 |
|
Update the linked information in a Word source document. |
Ctrl+Shift+F7 |
|
Update the selected fields. |
F9 |
|
Unlink a field. |
Ctrl+Shift+F9 |
|
Switch between a selected field code and its result. |
Shift+F9 |
|
Switch between all field codes and their results. |
Alt+F9 |
|
Run GOTOBUTTON or MACROBUTTON from a field displaying field results. |
Alt+Shift+F9 |
|
Go to the next field. |
F11 |
|
Go to the previous field. |
Shift+F11 |
|
Lock a field. |
Ctrl+F11 |
|
Unlock a field. |
Ctrl+Shift+F11 |
Top of Page
Work with text in other languages
Set the proofing language
Every document has a default language, typically the same default language as your computer’s operating system. If your document also contains words or phrases in a different language, it’s a good idea to set the proofing language for those words. This not only makes it possible to check spelling and grammar for those phrases, but it also enables assistive technologies like screen readers to handle them appropriately.
|
To do this |
Press |
|---|---|
|
Display the Language dialog box to set the proofing language. |
Alt+R, U, L |
|
Set default languages. |
Alt+R, L |
Top of Page
Insert international characters
To type a lowercase character by using a key combination that includes the Shift key, hold down the Ctrl+Shift+symbol keys simultaneously, and then release them before you type the letter.
Note: If you type extensively in another language, you might prefer to switch to a different keyboard instead.
|
To insert this |
Press |
|---|---|
|
à, è, ì, ò, ù, |
Ctrl+Grave accent (`), the letter |
|
á, é, í, ó, ú, ý |
Ctrl+Single quotation mark (‘), the letter |
|
â, ê, î, ô, û |
Ctrl+Shift+Caret (^), the letter |
|
ã, ñ, õ |
Ctrl+Shift+Tilde (~), the letter |
|
ä, ë, ï, ö, ü, ÿ, |
Ctrl+Shift+Colon (:), the letter |
|
å, Å |
Ctrl+Shift+At sign (@), a or A |
|
æ, Æ |
Ctrl+Shift+Ampersand (&), a or A |
|
œ, Œ |
Ctrl+Shift+Ampersand (&), o or O |
|
ç, Ç |
Ctrl+Comma (,), c or C |
|
ð, Ð |
Ctrl+Single quotation mark (‘), d or D |
|
ø, Ø |
Ctrl+Forward slash (/), o or O |
|
¿ |
Ctrl+Alt+Shift+Question mark (?) |
|
¡ |
Ctrl+Alt+Shift+Exclamation point (!) |
|
ß |
Ctrl+Shift+Ampersand (&), s |
Top of Page
Use Input Method Editors for East Asian languages
|
To do this |
Press |
|---|---|
|
Switch to the Japanese Input Method Editor (IME) for a 101-key keyboard, if available. |
Alt+Tilde (~) |
|
Switch to the Korean Input Method Editor (IME) for a 101-key keyboard, if available. |
Right Alt |
|
Switch to the Chinese Input Method Editor (IME) for a 101-key keyboard, if available. |
Ctrl+Spacebar |
Top of Page
Work with document views
Word offers several different views of a document. Each view makes it easier to do certain tasks. For example, Read Mode enables you view the document as a horizontal sequence of pages, which you can quickly browse using the Left and Right arrow keys.
Switch the document view
|
To do this |
Press |
|---|---|
|
Switch to the Read Mode view. In Word 2007 and 2010, this is called Full Screen Reading view. |
Alt+W, F |
|
Switch to the Print Layout view. |
Ctrl+Alt+P |
|
Switch to the Outline view. |
Ctrl+Alt+O |
|
Switch to the Draft view. |
Ctrl+Alt+N |
Top of Page
Outline a document
These shortcuts only apply when the document is in the Outline view.
|
To do this |
Press |
|---|---|
|
Promote a paragraph. |
Alt+Shift+Left arrow key |
|
Demote a paragraph. |
Alt+Shift+Right arrow key |
|
Demote the paragraph to body text. |
Ctrl+Shift+N |
|
Move the selected paragraphs up. |
Alt+Shift+Up arrow key |
|
Move the selected paragraphs down. |
Alt+Shift+Down arrow key |
|
Expand the text under a heading. |
Alt+Shift+Plus sign (+) |
|
Collapse the text under a heading. |
Alt+Shift+Minus sign (-) |
|
Expand or collapse all text or headings. |
Alt+Shift+A |
|
Hide or display the character formatting. |
Forward slash (/) (on the numeric keypad) |
|
Switch between showing the first line of body text and showing all body text. |
Alt+Shift+L |
|
Show all headings with the Heading 1 style. |
Alt+Shift+1 |
|
Show all headings with the specified heading level. |
Alt+Shift+Heading level number |
|
Insert a tab character. |
Ctrl+Tab |
Top of Page
Move through the document in Read Mode
|
To do this |
Press |
|---|---|
|
Move to the beginning of the document. |
Home |
|
Move to the end of the document. |
End |
|
Go to a specific page. |
Type the page number, then press Enter |
|
Exit Read Mode. |
Esc |
Top of Page
Use function key shortcuts
|
Key |
Description |
|---|---|
|
F1 |
|
|
F2 |
|
|
F3 |
|
|
F4 |
|
|
F5 |
|
|
F6 |
|
|
F7 |
|
|
F8 |
|
|
F9 |
|
|
F10 |
|
|
F11 |
|
|
F12 |
|
Top of Page
See also
Word help center
Basic tasks using a screen reader with Word
Use a screen reader to explore and navigate Word
Screen reader support for Word
This article describes the keyboard shortcuts and function keys in Word for Mac.
Notes:
-
The settings in some versions of the Mac operating system (OS) and some utility applications might conflict with keyboard shortcuts and function key operations in Microsoft 365 for Mac. For information about changing the key assignment for a keyboard shortcut, see Mac Help for your version of macOS, your utility application, or refer to Shortcut conflicts.
-
If you don’t find a keyboard shortcut here that meets your needs, you can create a custom keyboard shortcut. For instructions, go to Create a custom keyboard shortcut for Office for Mac.
-
Many of the shortcuts that use the Ctrl key on a Windows keyboard also work with the Control key in Word for Mac. However, not all do.
-
To quickly find a shortcut in this article, you can use Search. Press Command+F, and then type your search words.
For the best experience using your keyboard with the ribbon, enable your keyboard to access all controls.
-
To open the System Preferences, press
 +Spacebar, type system preferences, and press Return.
 -
To go to Keyboard Settings, type keyboard and press Return.
-
In the Shortcuts tab, press Control+F7 to change the Full Keyboard Access setting from Text boxes and lists only to All Controls.
In this topic
-
Frequently used shortcuts
-
Shortcut conflicts
-
Navigate the document
-
Select text and graphics
-
Edit text and graphics
-
Work with tables
-
Drawing
-
Work with fields
-
Outline a document
-
Review a document
-
Use footnotes and endnotes
-
Work with right-to-left languages
-
Use function key shortcuts
Frequently used shortcuts
This table lists frequently used shortcuts in Word for Mac.
|
To do this |
Press |
|---|---|
|
Undo the previous action. |
|
|
Redo the previous action, if possible. |
|
|
Cut the selected content to the Clipboard. |
|
|
Copy the selected content to the Clipboard. |
|
|
Paste the contents of the Clipboard. |
|
|
Display the shortcut menu for the selected item. * |
Shift+F10 |
|
Display the Go To dialog box. |
|
|
Display the Spelling and Grammar dialog box. |
|
|
Enable extended selection mode. |
F8 |
|
Switch to the next window. |
|
|
Switch to the previous window. |
|
|
Display the Save As dialog box. |
|
|
Find text (move focus to the Search in Document box). |
|
|
Display the Find and Replace pane. |
Control+H |
|
Display the Print dialog box. |
|
|
Close the current document. |
|
|
Expand or minimize the ribbon. |
|
|
Find the next spelling or grammatical error. The Check spelling as you type feature must be enabled. |
Option+F7 |
|
Open the Dictionary. |
In Word 2011, Option+Shift+F7 |
Top of Page
Shortcut conflicts
Some Word for Mac keyboard shortcuts conflict with default macOS keyboard shortcuts. This topic flags such shortcuts with an asterisk ( * ). To use these shortcuts, you may have to change your Mac keyboard settings to change the shortcut for the key.
Change system preferences for keyboard shortcuts
-
From the Apple menu, select System Preferences.
-
Select Keyboard.
-
Select the Shortcuts tab.
-
Select Mission Control.
-
Clear the check box for the keyboard shortcut conflicting with the Word for Mac shortcut that you want to use.
Navigate the document
|
To do this |
Press |
|---|---|
|
Move the cursor one word to the left. |
Option+Left arrow key |
|
Move the cursor one word to the right. |
Option+Right arrow key |
|
Move the cursor up by one paragraph. |
|
|
Move the cursor down by one paragraph. |
|
|
Move the cursor to the beginning of the current line. |
Home |
|
Move the cursor to the end of the current line. |
End |
|
Move the cursor to the top of the previous page. |
On a MacBook, press |
|
Move the cursor to the top of the next page. |
On a MacBook, press |
|
Move the cursor to the beginning of the document. |
On a MacBook, press |
|
Move the cursor to the end of the document. |
On a MacBook, press |
|
Move the cursor to the previous insertion point. |
Shift+F5 |
|
Move the cursor by scrolling the document view up by one screen. |
Page up |
|
Move the cursor by scrolling the document view down by one screen. |
Page down |
Top of Page
Select text and graphics
Tip: If you know the key combination to move the cursor, you can generally select the text by using the same key combination while holding down Shift. For example,  +Right arrow moves the cursor to the next word, and +Shift+Right arrow selects the text from the cursor to the beginning of the next word.
|
To do this |
Press |
|---|---|
|
Select multiple items that are not next to each other. |
Select the first item that you want, hold down |
|
Select text. |
Shift+Arrow keys |
|
Select the word to the left. |
Shift+Option+Left arrow key |
|
Select the word to the right. |
Shift+Option+Right arrow key |
|
Select from the current position to the beginning of the current line. |
Shift+Home |
|
Select from the current position to the end of the current line. |
Shift+End |
|
Select from the current position to the beginning of the current paragraph. |
|
|
Select from the current position to the end of the current paragraph. |
|
|
Select from the current position to the top of the screen. |
Shift+Page up |
|
Select from the current position to the bottom of the screen. |
Shift+Page down |
|
Select from the current position to the beginning of the document. |
|
|
Select from the current position to the end of the document. |
|
|
Select from the current position to the bottom of the window. |
|
|
Select all document content. |
|
Top of Page
Extend a selection
|
To do this |
Press |
|---|---|
|
Start extending the selection. * |
F8 In the extend selection mode, clicking a location in the document extends the current selection to that location. |
|
Select the nearest character to the left. |
F8, Left arrow key |
|
Select the nearest character to the right. |
F8, Right arrow key |
|
Expand the selection. |
F8 repeatedly to expand the selection to the entire word, sentence, paragraph, section, and document. |
|
Reduce the selection. * |
Shift+F8 |
|
Select a vertical block of text. |
|
|
Stop extending the selection. |
Esc |
Top of Page
Edit text and graphics
|
To do this |
Press |
|---|---|
|
Cut the selected content to the Clipboard. |
F2 |
|
Copy the selected content to the Clipboard. |
F3 |
|
Paste the contents of the Clipboard. |
F4 |
|
Display the Paste Special dialog box. |
|
|
Cut the selected content to the Spike. |
|
|
Paste the contents of the Spike. |
|
|
Copy the selected formatting. |
|
|
Paste the copied formatting. |
|
|
Create an AutoText entry. |
Option+F3 |
Top of Page
Align and format paragraphs
|
To do this |
Press |
|---|---|
|
Center the paragraph. |
|
|
Justify the paragraph. |
|
|
Align the paragraph to the left. |
|
|
Align the paragraph to the right. |
|
|
Indent the paragraph. |
Control+Shift+M |
|
Remove a paragraph indent. |
|
|
Create a hanging indent. |
|
|
Remove a hanging indent. |
|
|
Apply single-spacing to the paragraph. |
|
|
Apply double-spacing to the paragraph. |
|
|
Apply 1.5-line spacing to the paragraph. |
|
|
Enable AutoFormat. |
|
|
Apply the Normal style. |
|
|
Apply the Heading 1 style. |
|
|
Apply the Heading 2 style. |
|
|
Apply the Heading 3 style. |
|
|
Apply the List style. |
|
|
Insert a nonbreaking space. |
Option+Spacebar |
Top of Page
Format characters
|
To do this |
Press |
|---|---|
|
Increase the font size. |
|
|
Decrease the font size. |
|
|
Increase the font size by 1 point. |
|
|
Decrease the font size by 1 point. |
|
|
Display the Font dialog box. |
|
|
Switch the text between upper case, lower case, and title case. |
Shift+F3 |
|
Change the text to all upper case. |
|
|
Apply bold formatting. |
|
|
Add a bulleted list. |
|
|
Apply underline formatting. |
|
|
Apply underline formatting to the words, but not the spaces. |
|
|
Apply double-underline formatting. |
|
|
Apply italics formatting. |
|
|
Apply small caps formatting. |
|
|
Apply strike-through formatting. |
|
Top of Page
Insert special characters
|
To do this |
Press |
|---|---|
|
Insert an empty field. |
|
|
Insert a line break. |
Shift+Return |
|
Insert a page break. |
|
|
Insert a column break. |
|
|
Insert a nonbreaking hyphen. |
|
|
Insert a registered trademark symbol (®). |
Option+R |
|
Insert a trademark symbol (™). |
Option+2 |
Top of Page
Work with tables
Move around in a table
|
To do this |
Press |
|---|---|
|
Move to the next cell and select its content. |
Tab key |
|
Move to the previous cell and select its content. |
Shift+Tab |
|
Move to the next row. |
Down arrow key |
|
Move to the previous row. |
Up arrow key |
|
Move to the first cell in the row. |
Control+Home |
|
Move to the last cell in the row. |
Control+End |
|
Move to the first cell in the column. |
Control+Page up |
|
Move to the last cell in the column. |
Control+Page down |
|
Add a new row to the bottom of the table. |
Tab key, at the end of the last row |
|
Insert a row. |
|
Top of Page
Select table content
|
To do this |
Press |
|---|---|
|
Select the content in the next cell. |
Tab key |
|
Select the content in the previous cell. |
Shift+Tab |
|
Extend a selection to adjacent cells. |
Shift+Arrow keys |
|
Select a row. |
Select the first or last cell in the row, and then press Shift+Alt+End or Home. |
Top of Page
Resize table columns with the ruler
|
To do this |
Press |
|---|---|
|
Retain the column sizes to the right and change the table width. |
Drag the column boundary in the ruler |
|
Move a single column line and retain the table width. |
Shift+Drag the column boundary in the ruler |
|
Equally resize all columns to the right and retain the table width. |
|
|
Proportionally resize all columns to the right and retain the table width. |
|
Top of Page
Resize table columns directly in a table
Tip: To finely adjust the column width and display the column’s measurements in the ruler when you resize the column, turn off the snap-to functionality by pressing Option with the shortcut keys.
|
To do this |
Press |
|---|---|
|
Move a single column line and retain the table width. |
Drag the column boundary |
|
Retain column sizes to the right and change the table width. |
Shift+Drag the column boundary |
|
Equally resize all columns to the right and retain the table width. |
|
|
Proportionally resize all columns to the right and retain the table width. |
|
Top of Page
Insert paragraphs and tab characters in a table
|
To do this |
Press |
|---|---|
|
Insert a new paragraph in a cell. |
Return |
|
Insert a Tab character in a cell. |
Option+Tab |
Top of Page
Drawing
|
To do this |
Press |
|---|---|
|
Toggle drawing mode. |
|
Top of Page
Work with fields
|
To do this |
Press |
|---|---|
|
Insert a DATE field. |
Control+Shift+D |
|
Insert a LISTNUM field. |
|
|
Insert a PAGE field. |
Control+Shift+P |
|
Insert a TIME field. |
Control+Shift+T |
|
Insert an empty field. |
|
|
Update the selected fields. * |
F9 |
|
Switch between a field code and its result. * |
Shift+F9 |
|
Switch between all field codes and their results. |
Option+F9 |
|
Run GOTOBUTTON or MACROBUTTON from a field displaying field results. |
Option+Shift+F9 |
|
Lock a field. |
|
|
Unlock a field. |
|
Top of Page
Outline a document
These shortcuts only apply when the document is in the Outline view.
|
To do this |
Press |
|---|---|
|
Promote a paragraph. |
Control+Shift+Left arrow key |
|
Demote a paragraph. |
Control+Shift+Right arrow key |
|
Demote the paragraph to body text. |
|
|
Move the selected paragraphs up. * |
Control+Shift+Up arrow key |
|
Move the selected paragraphs down. * |
Control+Shift+Down arrow key |
|
Expand the text under a heading. |
Control+Shift+Plus sign (+) |
|
Collapse text under a heading. * |
Control+Shift+Minus sign (-) |
|
Expand all body text and headings, or collapse all body text. |
Control+Shift+A |
|
Switch between showing the first line of body text and showing all body text. |
Control+Shift+L |
|
Show all headings with the specified heading level. |
Control+Shift+Heading level number |
Top of Page
Review a document
|
To do this |
Press |
|---|---|
|
Insert a comment. |
|
|
Turn change tracking on or off. |
|
|
Move to the beginning of a comment. |
Home |
|
Move to the end of a comment. |
End (The End key is not available on all keyboards.) |
|
Move to the beginning of the list of comments. |
|
|
Move to the end of the list of comments. |
|
Top of Page
Use footnotes and endnotes
|
To do this |
Press |
|---|---|
|
Insert a footnote. |
|
|
Insert an endnote. |
|
Top of Page
Work with right-to-left languages
Word supports right-to-left functionality for languages that work in a right-to-left or a combined right-to-left, left-to-right environment for writing, editing, and displaying text. In this context, right-to-left languages refers to any writing system that is written from right to left and includes languages that require contextual shaping, such as Arabic, and languages that do not.
Before you can use these keyboard shortcuts, you need to ensure keyboard shortcuts are enabled for the language you are using:
-
Go to Apple > System Preferences > Keyboard.
-
On the Input Sources tab, select the language for which you want to enable shortcuts.
-
On the right side of the tab, select the check box for Enable keyboard shortcuts.
|
To do this |
Press |
|---|---|
|
Switch the writing direction to right-to-left. |
Control+ |
|
Switch the writing direction to left-to-right. |
Control+ |
Top of Page
Use function key shortcuts
Word for Mac uses the function keys for common commands, including Copy and Paste. For quick access to these shortcuts, you can change your Apple system preferences so you don’t have to press the Fn key every time you use a function key shortcut.
Note: Changing system function key preferences affects how the function keys work on your Mac, not just in Word. After changing this setting, you can still perform the special features printed on a function key. Just press the Fn key. For example, to use the F12 key to change your volume, press Fn+F12.
If a function key doesn’t work as you expect it to, press the Fn key in addition to the function key. If you don’t want to press the Fn key each time, you can change your Apple system preferences. For instructions, go to Change function key preferences.
The following table provides the function key shortcuts for Word for Mac.
|
Key |
Description |
|---|---|
|
F1 |
|
|
F2 |
|
|
F3 |
|
|
F4 |
|
|
F5 |
|
|
F6 |
|
|
F7 |
|
|
F8 |
|
|
F9 |
|
|
F10 |
|
|
F11 |
|
Top of Page
Change function key preferences
-
In the Apple menu, select System Preferences.
-
Select Keyboard.
-
On the Keyboard tab, select the check box for Use all F1, F2, etc. keys as standard function keys.
See also
Word help center
Basic tasks using a screen reader with Word
Use a screen reader to explore and navigate Word
Screen reader support for Word
This article describes the keyboard shortcuts in Word for the web.
Notes:
-
If you use Narrator with the Windows 10 Fall Creators Update, you have to turn off scan mode in order to edit documents, spreadsheets, or presentations with Microsoft 365 for the web. For more information, refer to Turn off virtual or browse mode in screen readers in Windows 10 Fall Creators Update.
-
To quickly find a shortcut in this article, you can use Search. Press Ctrl+F and then type your search words.
-
When you use Word for the web, we recommend that you use Microsoft Edge as your web browser. Because Word for the web runs in your web browser, the keyboard shortcuts are different from those in the desktop program. For example, you’ll use Ctrl+F6 instead of F6 for jumping in and out of the commands. Also, common shortcuts like F1 (Help) and Ctrl+O (Open) apply to the web browser – not Word for the web.
In this topic
-
Frequently used shortcuts
-
Ribbon keyboard shortcuts
-
Navigate the document
-
Edit and format the document
-
Work with comments
Frequently used shortcuts
This table lists the most frequently used shortcuts in Word for the web.
Tip: To quickly create a new document in Word for the web, open your browser, type Word.new in the address bar, and then press Enter.
|
To do this |
Press |
|---|---|
|
In the Reading view, open a PDF-based view tagged to work with screen readers. |
Press the Tab key until you reach the Accessibility Mode button, and then press Enter |
|
Find text in the Reading view. |
Ctrl+F or F3 |
|
Find text in the Editing view. |
Ctrl+F or Ctrl+G |
|
Find and replace text in the Editing view. |
Ctrl+H |
|
Hide the task pane, if one is open. |
Esc |
|
Switch to the Zoom control. |
Alt+Period, W, then Q or Alt+Windows logo key, W, then Q |
|
Print the document. |
Ctrl+P |
|
Move to the next landmark region. |
Ctrl+F6 |
|
Go to the Tell Me or Search text field. |
Alt+Q |
Top of Page
Ribbon keyboard shortcuts
Word for the web offers shortcuts called access keys to navigate the ribbon. If you’ve used access keys to save time on Word for desktop computers, you’ll find access keys very similar in Word for the web.
On a Windows computer, access keys all start with Alt+Period (.) or Alt+Windows logo key, then add a letter for the ribbon tab. For example, to go to the Review tab, press Alt+Period, R or Alt+Windows logo key, R.
If you’re using Word for the web on a Mac computer, press Control+Period (.) to start.

-
To get to the ribbon, press Alt+Period or Alt+Windows logo key. You can alternatively press Ctrl+F6 until you reach the Home tab.
-
To move between tabs on the ribbon, press the Tab key.
-
To hide the ribbon so you have more room to work, press Ctrl+F3. Repeat to display the ribbon again.
Go to the access keys for the ribbon
To go directly to a tab on the ribbon, press one of the following access keys:
|
To do this |
Press |
|---|---|
|
Open the Tell Me or Search text field on the ribbon to type a search term. |
Alt+Period, Q or Alt+Windows logo key, Q |
|
Open the File tab to use the Backstage view. |
Alt+Period, F or Alt+Windows logo key, F |
|
Open the Home tab to format text and use the Find tool. |
Alt+Period, H or Alt+Windows logo key, H |
|
Open the Insert tab to insert a picture, link, comment, header or footer, or a page number. You can also access the Symbol gallery. |
Alt+Period, N or Alt+Windows logo key, N |
|
Open the Page Layout tab to set page margins, orientation, and size, and paragraph spacing. |
Alt+Period, A or Alt+Windows logo key, A |
|
Open the References tab to insert a table of contents, footnotes, or endnotes. |
Alt+Period, S or Alt+Windows logo key, S |
|
Open the Review tab to check spelling, add comments, or track and review changes to your document. |
Alt+Period, R or Alt+Windows logo key, R |
|
Open the View tab to choose a view, open the Navigation pane, edit the Header & Footer, and to Zoom the document view. |
Alt+Period, W or Alt+Windows logo key, W |
Top of Page
Use Search
To find an option or perform an action quickly, use the Search text field. To learn more about the Search feature, go to Find what you need with Microsoft Search.
Note: Depending on the version of Microsoft 365 you are using, the Search text field at the top of the app window might be called Tell Me instead. Both offer a largely similar experience, but some options and search results can vary.
-
Select the item or place in your document, presentation, or spreadsheet where you want to perform an action.
-
To go to the Search text field, press Alt+Q.
-
Type the search words for the action that you want to perform. For example, if you want to add a bulleted list, type bullets.
-
Press the Down arrow key to browse through the search results.
-
Once you’ve found the result that you want, press Enter to select it and to perform the action.
Work in the ribbon tabs and menus
The following shortcuts can save time when you work with the ribbon tabs and ribbon menus.
|
To do this |
Press |
|---|---|
|
Select the active tab on the ribbon, and activate the access keys. |
Alt+Period or Alt+Windows logo key. To move to a different tab, use an access key or the Tab key. |
|
When a Ribbon tab is selected, move the focus to the tab commands. |
Enter, then Tab key or Shift+Tab |
|
Activate a selected button. |
Spacebar or Enter |
|
Open the list for a selected command. |
Spacebar or Enter |
|
Open the menu for a selected button. |
Alt+Down arrow key |
|
When a menu or submenu is open, move to the next command. |
Down arrow key |
|
Collapse or expand the ribbon. |
Ctrl+F3 |
Top of Page
Navigate the document
|
To do this |
Press |
|---|---|
|
Move the cursor right by one word. |
Ctrl+Right arrow key |
|
Move the cursor left by one word. |
Ctrl+Left arrow key |
|
Move the cursor up by one paragraph. |
Ctrl+Up arrow key |
|
Move the cursor down by one paragraph. |
Ctrl+Down arrow key |
|
Move the cursor to the beginning of the current line. |
Home |
|
Move the cursor to the end of the current line. |
End |
|
Move the cursor to the beginning of the document. |
Ctrl+Home |
|
Move the cursor to the end of the document. |
Ctrl+End |
|
Select text. |
Shift+Arrow keys |
|
Select the word to the right. |
Shift+Ctrl+Right arrow key |
|
Select the word to the left. |
Shift+Ctrl+Left arrow key |
|
Select the paragraph above. |
Shift+Ctrl+Up arrow key |
|
Select the paragraph below. |
Shift+Ctrl+Down arrow key |
|
Select from the current position to the beginning of the line. |
Shift+Home |
|
Select from the current position to the end of the line. |
Shift+End |
|
Select from the current position to the beginning of the document. |
Shift+Ctrl+Home |
|
Select from the current position to the end of the document. |
Shift+Ctrl+End |
|
Select all document content. |
Ctrl+A |
Top of Page
Edit and format the document
|
To do this |
Press |
|---|---|
|
Cut the selected content to the Clipboard. |
Ctrl+X |
|
Copy the selected content to the Clipboard. |
Ctrl+C |
|
Paste the content from the Clipboard. |
Ctrl+V |
|
Undo the previous action. |
Ctrl+Z |
|
Redo the previous action. |
Ctrl+Y |
|
Shrink the font size. |
Ctrl+Left bracket ([) |
|
Grow the font size. |
Ctrl+Right bracket (]) |
|
Apply bold formatting to the selected text. |
Ctrl+B |
|
Apply italic formatting to the selected text. |
Ctrl+I |
|
Underline the selected text. |
Ctrl+U |
|
Align the paragraph to the left. |
Ctrl+L |
|
Align the paragraph to the right. |
Ctrl+R |
|
Center the paragraph. |
Ctrl+E |
|
Justify the paragraph. |
Ctrl+J |
|
Create a bulleted list. |
Ctrl+Period (.) |
|
Create a numbered list. |
Ctrl+Slash (/) |
Top of Page
See also
Word help center
Basic tasks using a screen reader with Word
Use a screen reader to explore and navigate Word
Screen reader support for Word


- You can search for a word on a page using keyboard shortcuts or web browser controls.
- You can also use Google to search for a word on specific sites or web pages.
- Using the search function to find specific words or phrases can help you find information faster.
The internet is vast, but sometimes you need to cut to the chase to get things done. Searching for a word on a page can drastically reduce the amount of time it takes to get the information you need.
There are several methods you can use to search for a word on a web page, program, or website, depending on the kind of computer you have.
Try Command+F or Control+F keyboard shortcuts
On most web pages, word processors, and other programs, you can use the keyboard shortcut Command + F on a Mac, or Control + F on Windows to find what you need.
MacFormat Magazine / Contributor/Getty Images
A text box will then appear toward the top of the screen where you can enter the desired search term. Then, simply hit Enter to find instances of that word or phrase on the page. You can use the up and down arrows on the search box to find each instance.
Grace Eliza Goodwin/Insider
Find your web browser controls
Browsers also come with their own built-in search functions. Here’s how to access these tools whether you’re using Google Chrome, Firefox or Microsoft Edge.
1. Click the More button, which looks like three horizontal lines, located in the top-right corner of the web browser, next to the address bar.
2. Select Find or Find in This Page.
Grace Eliza Goodwin/Insider
3. In the pop-up, type in your search term or phrase and hit Enter.
Use Google to search sites
1. Go to google.com.
2. Type site: and then the name of the website you want to search, followed by a space and then your search term or phrase.
Devon Delfino
3. Hit Enter. From here, you’ll be able to find all the pages on that site that include the search term or phrase you’ve specified.
Devon Delfino is a Brooklyn-based freelance journalist specializing in personal finance, culture, politics, and identity. Her work has been featured in publications such as The Los Angeles Times, Teen Vogue, Business Insider, and CNBC. Follow her on Twitter at @devondelfino.
Read more
Read less
Usually, you can use Ctrl/Command + F
Updated on February 9, 2021
What to Know
- Web page: press Ctrl+F (Windows and Linux) or Command+F (Mac). Enter search term and press Enter.
- Use the Mac Menu Bar to search by selecting Edit > Find in This Page (or Find).
- Type site followed by a colon, a website’s URL, and a search term in a browser address bar.
When you want to find something specific on a web page, you can search for it. This article explains how to search for a word using either the Find Word function found in most major web browsers or a search engine such as Google.
How to Search For a Word Using Command/Ctrl+F
The simplest way to find a word on a page is to use the Find Word function. It is available in the major web browsers, including Chrome, Microsoft Edge, Safari, and Opera.
Here’s the keyboard shortcut method:
-
When you’re on the web page, press Ctrl+F in Windows and Linux. Press Command+F on a Mac.
-
Type the word (or phrase) you want to find.
-
Press Enter.
-
The web page scrolls to the nearest occurrence of the word. If the word occurs more than once on the web page you’re searching, press Enter to go to the next occurrence. Or, select the arrows on the right (or left) side of the Find Word window.
How to Search for a Word With the Mac Menu Bar
Another way to search web pages is to use a relevant menu bar. On a Mac, use the following process, regardless of the browser you use. Use this process when using either Safari or Opera.
How to Search for a Word on Mac
-
Go to the menu bar at the top of the page, then select Edit.
-
Choose Find in This Page. Some browsers may have the option Find.
-
Depending on the browser you use, you may have to take four steps rather than three. For example, with Google Chrome, hover the mouse cursor over Find, then select Find.
How to Search For a Word Using the Browser Controls
If you use a Windows PC or Linux, or if you want to use the web browser rather than the operating system, here’s what you do for each major browser (excluding Safari and Opera).
These instructions should work for the corresponding mobile browsers as well.
For Google Chrome, Mozilla Firefox, and Microsoft Edge:
-
Select the More icon (it’s located in the upper-right corner of the browser window).
-
Choose Find or Find in This Page.
-
Type your search term and press Enter.
How to Search for a Word Using Google
If you don’t know the specific page on which a desired word or phrase could be located, use Google to search for a certain word or phrase, and target the site you want to find it in. Google has special characters and features to narrow and control your search.
-
Go to Google or use the browser’s search function if it’s configured to use Google as its search engine.
-
Type site followed by a colon ( : ) and the name of the website you want to search. It should look like this:
site:lifewire.com
-
After that, leave a space and enter the search terms. Altogether, it should be something like this:
site:lifewire.com Android apps
-
Press Enter to display the search results.
-
The search results come from the website that you entered.
-
To narrow your search results further, enclose the search terms in quotation marks, which makes the search engine look for that exact phrase.
Thanks for letting us know!
Get the Latest Tech News Delivered Every Day
Subscribe
Sometimes, you may hope to find out specific words on a webpage on Google Chrome, Microsoft Edge, Internet Explorer, and Firefox. Just like the screenshots above searching windows in windows10skill.com on Google Chrome, you are able to find any words on a web page on browsers.
In order to assist you in searching within a website on Google, here come the detailed procedures on Windows 10.
How to Search for Words on a Web Page Windows 10?
To search a website for a word using Google, Firefox, or Internet Explorer, you are just required to make some changes in the webpage on the browser Windows 10.
Case 1: Search for a Word within a Webpage on Google Chrome
If you are using chrome to search for something, you may as well manage to find a word on a webpage in Chrome Windows 10. It is rather simple and quick.
1. Double click Google Chrome on your Desktop to open it.
2. In Google Chrome, on a certain web page, press Ctrl + F combination key.
Here try to locate Windows on windows10skill.com, just hit Ctrl + F key and then enter Windows in the search bar.
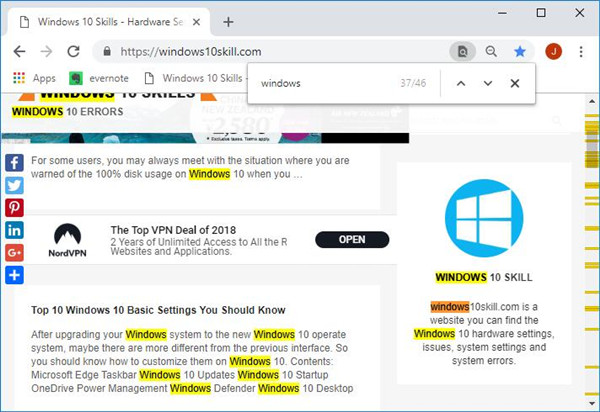
Then you will see all the searched words will be highlighted with color.
By default, Google Chrome has set to search in the whole webpage for the word you are finding. That is why here you can notice all Windows in the webpage displays themselves.
Now you will have mastered the way how to search for a word on a web page using Chrome.
Case 2: Locate Words on a Web page in Microsoft Edge Windows 10
For Microsoft Edge users, even if you are using Windows 10 embedded-in browser, it is also available for you to search for a word on a webpage in Microsoft Edge.
What you are to do is rather similar to what you do in Google Chrome.
1. Type in Microsoft Edge in the search box and then press Enter to move into it.
2. In Microsoft Edge, navigate to the website you want to use and then hit Ctrl + F to elevate the search bar.
Here take windows10skill as an example and try to search for Windows in this web page as well.
But here you can obviously observe the differences in Microsoft Edge. You can either choose to Match whole world or Match case.
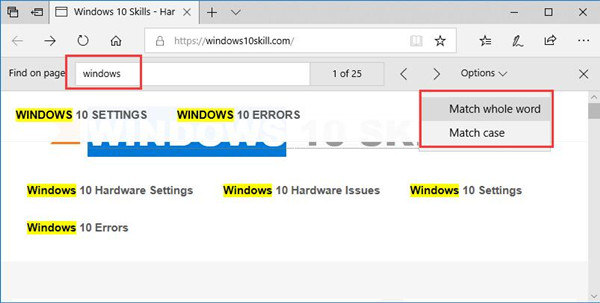
If you decide to Match whole world, all the results will be colored.
While if you are to Match case, the searched result will highlight themselves one by one until you scroll down the web page to locate them.
In this situation, it is possible that you are enabled to find out the words you want on a web page on Microsoft Edge.
Case 3: Search a Website for a Word on Firefox
Beside Google Chrome, Microsoft Edge, you are also able to find out words on a web page on Firefox.
The steps are extremely similar to that in chrome and Microsoft Edge.
1. Open Firefox from the Desktop and then go to site windows10skill.com.
2. On that website, press Ctrl + F to open the search options in Firefox.
Then enter Windows in it and hit Enter to search for it on windows10skill.com.
After that, all the results will be highlighted if you set to highlight the results.
Unlike on chrome and Microsoft Edge, on Firefox, you are able to match not only the words but the capital or small letters of the words.
In summary, this post focuses on telling you how to search for words on a webpage on Google Chrome, Microsoft Edge, and Firefox, you can simply learn it well as long as you follow it earnestly.
If you are using Internet Explorer or any other browser on Windows 10, it is accessible that you press Ctrl + F combination key to search for a word within a webpage.