
In Q3 2014 release of our Kendo UI, we added one of the most sought out feature in the Grid. Exporting grid data was one of the top ask feature for Kendo UI Grid. We are happy to say that with the Q3 release Kendo UI Grid now supports exporting to Excel or PDF document out of the box. In this blog post we will take a look at how to use the Excel export feature of the Kendo UI Grid.
Creating a Grid:
First we will create a simple Kendo UI Grid. I will connect to one of our demo service which is based on Northwind database. I will use the Products table and display Product Name, Units on Order and Units in Stock and will have a page size of 7. Here is the code snippet for the grid:
<div id="grid"></div>
<script>
    $("#grid").kendoGrid({
        dataSource: {
            type: "odata",
            transport: {
                read: "http://demos.telerik.com/kendo-ui/service/Northwind.svc/Products"
            },
            pageSize: 7
        },
        sortable: true,
        pageable: true,
        columns: [
            { width: 300, field: "ProductName", title: "Product Name" },
            { field: "UnitsOnOrder", title: "Units On Order" },
            { field: "UnitsInStock", title: "Units In Stock" }
        ]
    });
</script>
And here is the output of the above code snippet:

Providing Export Option on the Grid:
Before we proceed with enabling the export to excel option of the grid, there is one prerequisite that needs to be taken care of. Excel Export relies on a JavaScript library called “jszip”. This library needs to be referenced before Kendo UI JavaScript reference. JSZip is part of the Kendo UI distribution and is also available via the Kendo UI CDN:
<script src=”http://cdn.kendostatic.com/2014.3.1029/js/jszip.min.js”></script>
Kendo UI Grid provides one of the easiest way to configure the export button options. If you have used Kendo UI Grid before, you will be familiar with the concept of Toolbars on Grid. We have provided a simple command which can be used in toolbar and provide export to excel or export to pdf option. Yes with just one setting you can now provide export capability on your grid. Let’s see the code to believe it:
<script>
    $("#grid").kendoGrid({
        toolbar:[“excel”]
        ….
        //code omitted for brevity
    });
</script>
And here is the output of the above code:

Let’s go ahead and click on the Excel export button. You should see a file named “Export.xslx” being download to your machine. Here is the screenshot of the excel file on my machine:

Customizing the Exported Excel File:
So far we saw how simple it was to provide an export to excel capability on the Grid. But the exported file was named “Export.xslx”. Well that name is not intuitive. Better would be to provide a meaning full name to the excel file that’s gets exported. Fortunately, the Kendo UI team has thought about it and the Grid API has exposed certain options for Excel export feature. Let’s take a look at the options we have on hand:
| Property | Type | Description |
| excel | Object | Configure the Kendo UI Grid Excel export settings |
| excel.fileName | String | Configure the file name of the exported excel file |
| excel.filterable | Boolean | Configure whether exported excel file will have column filtering or not |
| Excel.allPages | Boolean | Configure if all pages data need to be exported. Default is false |
Let’s see the above excel options in action. Here is a code snippet which sets the excel options on the Grid:
<script>
    $("#grid").kendoGrid({
        toolbar:[“excel”],
        excel:{
	filename:”Northwind Products Stick List.xslx”,
	filterable:true,
	allPages:false
        },
        ….
        //code omitted for brevity
    });
</script>
Now, when we click on the Export to Excel button – the exported file will be named as “Northwind Products Stock List” and will have data filters on in the worksheet. Here is a screenshot of the exported excel file on my machine:

Well that how easy it is to configure your excel export options.
Programmatically Export to Excel:
So far we have seen how the inbuilt feature of toolbar helps you to provide the excel export capability with juts a single setting. What if you have a scenario where you don’t need a toolbar button the grid rather you need a button outside the grid and on click of this external button excel file should be exported. Well even this scenario is covered by the export feature of Kendo UI Grid. Grid API exposes a single method called “saveAsExcel()” which can be invoked on the Grid at runtime and the excel file will be exported. Let’s see this in action. Here is the code snippet to do this:
<div id="grid"></div>
<button id="btnExport">Export to Excel</button>
<script>
  $("#btnExport").kendoButton({
    click: function()
    {
      $("#grid").data("kendoGrid").saveAsExcel()
    }
  })

    $("#grid").kendoGrid({
        excel: {
          fileName: "Northwind Products Stock List.xlsx",
          filterable:true,
          allPages:false
        },
        …
        //code omitted for brevity
    });
Lets take a closer look at what we have done here. I have placed a button outside the grid. I have gone ahead and set excel export options on the grid. When the button is clicked, I obtain a reference to kendo grid and call “saveAsExcel()” method on the grid instance. And the behavior is the same i.e. an excel file is exported according to the options set on the grid.
I hope this blog post excites you with the new feature of Kendo UI Grid namely Excel Export. If you have followed along the blog post, you would have realized that providing excel export option on a grid is as simple as setting couple of properties on the Grid itself. It cannot get any easier than this. Do give it a try and let us know your feedback or suggestion on Excel Export feature of Kendo UI Grid.
Note: The complete code of this blog post is made available as a Kendo UI DOJO here: http://dojo.telerik.com/@kashyapa/umuWI
Till next time, Happy Coding!
The built-in behavior of the Grid is designed to export only the its current state—filtered, sorted, paged, and grouped. This means that to export all the data (without the query), you need to intercept the excelExport event and modify the created workbook.
excelExport: function(e){
  var sheet = e.workbook.sheets[0];
  var data = grid.dataSource.data();
  var gridColumns = grid.columns;
  var columns = gridColumns.map(function(col){
      return {
        value: col.title ? col.title : col.field,
        autoWidth:true,
        background: "#7a7a7a",
        color: "#fff"
      };
  });

  var rows = [{cells:columns, type: "header"}];

  for (var i = 0; i < data.length; i++){
    var rowCells = [];
    for(var j=0;j < gridColumns.length;j++){
      var cellValue = data[i][gridColumns[j].field];
      rowCells.push({value: cellValue});
    }
    rows.push({cells: rowCells, type: "data"});
  }
  sheet.rows = rows;
}
The following example demonstrates the implementation of the approach.
<div id="example">
      <div id="grid"></div>

      <script>
        $(document).ready(function () {
          var dataSource = new kendo.data.DataSource({
            transport: {
              read:  {
                url: "https://demos.telerik.com/kendo-ui/service/Products",
                dataType: "jsonp"
              },
              parameterMap: function(options, operation) {
                if (operation !== "read" && options.models) {
                  return {models: kendo.stringify(options.models)};
                }
              }
            },
            pageSize: 20,
            schema: {
              model: {
                id: "ProductID",
                fields: {
                  ProductID: { editable: false, nullable: true },
                  ProductName: { validation: { required: true } },
                  UnitPrice: { type: "number", validation: { required: true, min: 1} },
                  Discontinued: { type: "boolean" },
                  UnitsInStock: { type: "number", validation: { min: 0, required: true } }
                }
              }
            }
          });

          var grid = $("#grid").kendoGrid({
            dataSource: dataSource,
            excel:{
              allPages:true
            },
            pageable: true,
            height: 550,
            toolbar:["excel"],
            columns: [
              "ProductName",
              { field: "UnitPrice", title: "Unit Price", format: "{0:c}", width: "120px" },
              { field: "UnitsInStock", title:"Units In Stock", width: "120px" },
              { field: "Discontinued", width: "120px" }],
            filterable: true,
            excelExport: function(e){
              var sheet = e.workbook.sheets[0];
              var data = grid.dataSource.data();
              var gridColumns = grid.columns;
              var columns = gridColumns.map(function(col){
                  return {
                    value: col.title ? col.title : col.field,
                    autoWidth:true,
                    background: "#7a7a7a",
                    color: "#fff"
                  };
              });

              var rows = [{cells:columns, type: "header"}];

              for (var i = 0; i < data.length; i++){
                var rowCells = [];
                for(var j=0;j < gridColumns.length;j++){
                  var cellValue = data[i][gridColumns[j].field];
                  rowCells.push({value: cellValue});
                }
                rows.push({cells: rowCells, type: "data"});
              }
              sheet.rows = rows;
            }
          }).data("kendoGrid");
        });
      </script>
    </div>
I have configured the kendo grid and configured all the table rows and header.When I click export button it is generating an excel file.But where the problem occur I don’t know with same configuration I have done in
IE there instead of generating file it was showing the data format in URL with data:application/vnd.ms-excel,<table><tr><th>OrderID</th><th>Freight</th>.....
   var grid = $("#grid").kendoGrid({
        dataSource: {
            type           : "odata",
            transport      : {
                read: "http://demos.kendoui.com/service/Northwind.svc/Orders"
            },
            schema         : {
                model: {
                    fields: {
                        OrderID  : { type: "number" },
                        Freight  : { type: "number" },
                        ShipName : { type: "string" },
                        OrderDate: { type: "date" },
                        ShipCity : { type: "string" }
                    }
                }
            },
            pageSize       : 10
        },
        filterable: true,
        sortable  : true,
        pageable  : true,
        columns   : [
            {
                field     : "OrderID",
                filterable: false
            },
            "Freight",
            {
                field : "OrderDate",
                title : "Order Date",
                width : 100,
                format: "{0:MM/dd/yyyy}"
            },
            {
                field: "ShipName",
                title: "Ship Name",
                width: 200
            },
            {
                field: "ShipCity",
                title: "Ship City"
            }
        ]
    }).data("kendoGrid");
Button click for Export Grid data to Excel.
$("#btnExport").click(function(e) {

 var dataSource =  $("#grid").data("kendoGrid").dataSource;
     var filteredDataSource = new kendo.data.DataSource( {
         data: dataSource.data(),
         filter: dataSource.filter()
     });

 filteredDataSource.read();
 var data = filteredDataSource.view();

 var result = "data:application/vnd.ms-excel,";

 result += "<table><tr><th>OrderID</th><th>Freight</th><th>Order Date</th><th>Ship Name</th><th>Ship City</th></tr>";

 for (var i = 0; i < data.length; i++) {
     result += "<tr>";

     result += "<td>";
     result += data[i].OrderID;
     result += "</td>";

     result += "<td>";
     result += data[i].Freight;
     result += "</td>";

     result += "<td>";
     result += kendo.format("{0:MM/dd/yyyy}", data[i].OrderDate);
     result += "</td>";

     result += "<td>";
     result += data[i].ShipName;
     result += "</td>";

     result += "<td>";
     result += data[i].ShipCity;
     result += "</td>";

     result += "</tr>";
 }

 result += "</table>";
 if (window.navigator.msSaveBlob) {
        window.navigator.msSaveBlob(new Blob([result]),'export.xls');
    } else {
        window.open(result);
    }


 e.preventDefault();
});
This article demonstrates, how to export Kendo Grid to PDF and Excel. Kendo UI gives us the built-in functionality to export the Grid to Excel or Pdf and we just need to configure the Grid correctly. In the article Crud with Kendo Grid we have already discussed to bind grid with server side data. Please go through that article before going through this article , as here we will only discuss the export functionality of Grid.
Step 1. Add the Excel and Pdf command to the toolbar of Grid as shown below.
               .ToolBar(toolbar =>
                {
                    toolbar.Excel();
                    toolbar.Pdf();
                })
Step 2.Define the proxy url and other settings for Excel and Pdf as shown below.
      .Excel(excel => excel
            .FileName("Kendo UI Grid Export.xlsx")
            .Filterable(true)
            .ProxyURL(Url.Action("Export_Save", "Home"))
               )
                  .Pdf(pdf => pdf
                .AllPages()
                .AvoidLinks()
                .PaperSize("A4")
                .Scale(0.8)
                .Margin("2cm", "1cm", "1cm", "1cm")
                .Landscape()
                .RepeatHeaders()
                .TemplateId("page-template")
                .FileName("Kendo UI Grid Export.pdf")
                .ProxyURL(Url.Action("Export_Save", "Grid"))
            )
Step 3. Create a Method in the controller to download the excel or Pdf , this method goes to the ProxyUrl() extension method of Grid.
     [HttpPost]
        public ActionResult Export_Save(string contentType, string base64, string fileName)
        {
            var fileContents = Convert.FromBase64String(base64);

            return File(fileContents, contentType, fileName);
        }
Step 4.Add the reference of jszip library in the layout page or view page
<script src="//cdnjs.cloudflare.com/ajax/libs/jszip/2.4.0/jszip.min.js"></script>
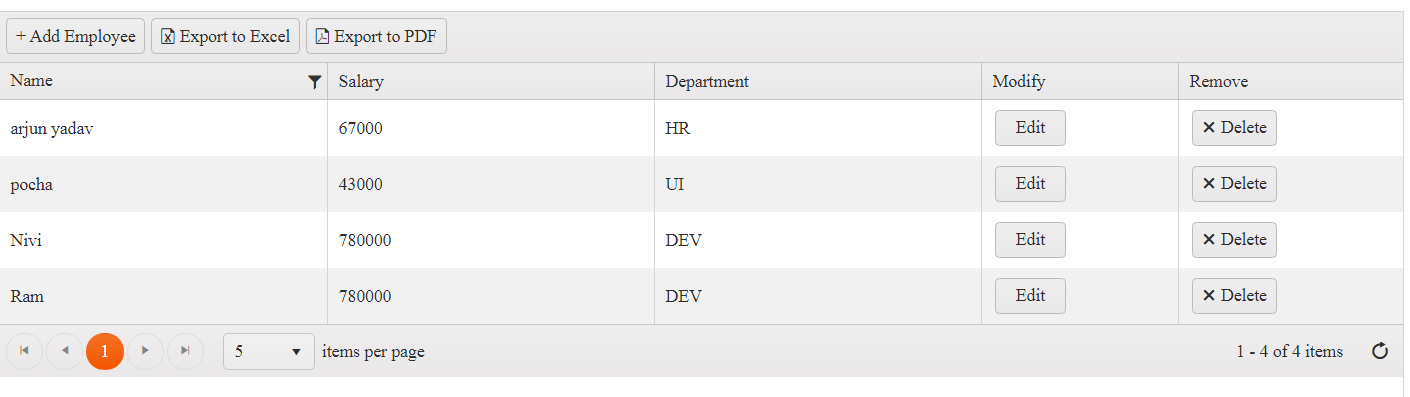
The complete Grid including all columns and commands for insert, update, Delete, Read , Pdf Export and Excel Export will look like as shown below.
<script src="//cdnjs.cloudflare.com/ajax/libs/jszip/2.4.0/jszip.min.js"></script>
  @(Html.Kendo().Grid<KendoExamples.ViewModel.GridVM>()
            .Name("grid")
            .Columns(columns =>
            {
                columns.Bound(c => c.Id).Title("Id").Visible(false);
                columns.Bound(c => c.Name).Title("Name").Width(150);
                columns.Bound(c => c.Salary).Title("Salary").Width(150).Filterable(false);
                columns.Bound(c => c.Department).Title("Department").Width(150).Filterable(false);


                columns.Command(command => command.Custom("Edit").Click("editDetails")).Title("Modify").Width(30);
                columns.Command(c => { c.Destroy(); }).Title("Remove").Width(30);

            }).HtmlAttributes(new { style = "height: 550px;" })
                           .Sortable()
                    .Filterable()
                .DataSource(dataSource => dataSource
                .Ajax()
                .Model(model => model.Id(p => p.Id))
                .PageSize(5)
                                                 .Create(update => update.Action("AddEmployee", "Home"))
                                               .Update(update => update.Action("UpdateEmployee", "Home"))
                                                .Read(read => read.Action("GetEmployees", "Home"))
                                          .Destroy(destroy => destroy.Action("DeleteEmployee", "Home"))
                )
                 .Resizable(resize => resize
                 .Columns(true)
              )

               .ToolBar(toolbar =>
                {
                    toolbar.Custom().Name("newAdd").Text("+ Add Employee ").Url("#").HtmlAttributes(new { id = "newAdd" });
                    toolbar.Excel();
                    toolbar.Pdf();
                })

                    .Excel(excel => excel
            .FileName("Kendo UI Grid Export.xlsx")
            .Filterable(true)
            .ProxyURL(Url.Action("Export_Save", "Home"))
               )
                  .Pdf(pdf => pdf
                .AllPages()
                .AvoidLinks()
                .PaperSize("A4")
                .Scale(0.8)
                .Margin("2cm", "1cm", "1cm", "1cm")
                .Landscape()
                .RepeatHeaders()
                .TemplateId("page-template")
                .FileName("Kendo UI Grid Export.pdf")
                .ProxyURL(Url.Action("Export_Save", "Grid"))
            )

                .Pageable(pageable =>
                {
                    pageable.Refresh(true);
                    pageable.PageSizes(true);
                })
   )
Now run the application and you will be successfully able to download the Grid as PDF and Excel.
Содержание
- Excel Export
- Getting Started
- Configuration
- Exporting All Pages
- Customizing Exported Files
- Exporting Right-to-Left Content
- Exporting Multiple Grids
- Saving Files on the Server
- Server-Side Processing
- Exclude Column From Exporting
- Known Limitations
- Selection & Export
- Getting Started
- Enabling Excel Export
- Initializing a ContextMenu
- Copying Selected Data
- Exporting Selected Data to Excel
- Exporting Selected Data to Chart
- Selection Types
- Exporting the Kendo UI Grid Data to Excel
- Getting Started
- Modifying Excel.cs
- Modifying the HomeController.cs
- ExportToExcel
- GetExcelFile
- Creating the ExcelGrid Widget
- Deriving from the Grid Widget
- Adding the Export to Excel Functionality
- Implementing the ExcelGrid
- Conclusion
- Exporting the Kendo UI Grid Data to Excel
- Getting Started
- Modifying Excel.cs
- Modifying the HomeController.cs
- ExportToExcel
- GetExcelFile
- Creating the ExcelGrid Widget
- Deriving from the Grid Widget
- Adding the Export to Excel Functionality
- Implementing the ExcelGrid
- Conclusion
Excel Export
As of the Kendo UI Q3 2014 (2014.3.1119) release, the Grid component provides built-in Excel export functionality.
For runnable examples, refer to:
Getting Started
To enable the Excel export option of the Grid:
- Include the corresponding toolbar command and set the export settings.
- Toolbar configuration
- Excel export configuration
- Include the JSZip script on the page. For more information, refer to the article with the requirements.
To initiate Excel export through code, call the saveAsExcel method.
- By default, the Grid exports the current page of the data with sorting, filtering, grouping, and aggregates applied.
- The Grid uses the current column order, visibility, and dimensions to generate the Excel file.
- The Grid does not export the current CSS theme in the Excel file. For more information on how to change the visual appearance of the Excel document, refer to the below section about customization of the Excel document.
- The Grid exports only data-bound columns. All columns that do not have their field option set are ignored.
- The format option is not used during export. For more information, refer to the section on column formats.
- The template option is not used during export. For more information, refer to the section on column templates.
- The detailTemplate option is not used during export. For more information, refer to the section on detail templates.
For more information, refer to the online demo on Excel export.
The following example demonstrates how to enable the Excel export functionality of the Grid.
Configuration
With regard to its Excel export, the Grid enables you to:
Exporting All Pages
By default, the Grid exports only the current page of data. To export all pages, set the allPages option to true .
When the allPages option is set to true and serverPaging is enabled, the Grid will make a «read» request for all data. If the data items are too many, the browser may become unresponsive. In such cases, use server-side export.
Customizing Exported Files
To customize the generated Excel file, use the excelExport event. The workbook event argument exposes the generated Excel workbook configuration.
- For more information on Excel export, refer to the introductory article on Excel and the Excel Export Appearance article.
- For more information on setting the background color of alternating rows while exporting the Grid to Excel, refer to this example.
Exporting Right-to-Left Content
The excelExport event allows you to reverse the cells and set the text alignment to support right-to-left (RTL) languages. To render the document in the right-to-left flow in Excel, enable the rtl option of the workbook.
Each row has a type field that can be used to distinguish between the various row types in the Grid. The supported values are:
Exporting Multiple Grids
By default, each Grid exports its content in a separate Excel sheet. For more information, refer to the example on exporting multiple Grids in a single Excel document.
Saving Files on the Server
To send the generated file to a remote service, prevent the default file saving and post the base64 encoded contents.
Server-Side Processing
- For examples on exporting Excel files, refer to the RadSpreadProcessing library.
- For more information on the Grid server-side processing, refer to this article.
Exclude Column From Exporting
In some scenarios, you might want to hide given column or multiple columns from being exported. This can be achieved using the Exportable setting.
It can also be set to an Object containing different values for Excel and PDF exporting modes, providing separate options for each:
Known Limitations
- The Grid and its DataSource contain only the data items from the current page during client-side export. As a result, either make the export in chunks, or disable the paging feature.
- The maximum size of the exported file has a system-specific limit. For large data sets, use the server-side solution which is provided by the RadSpreadStreamProcessing as part of the Document Processing Library.
- Exporting the Grid to Excel in older browsers, such as Internet Explorer 9 and Safari, requires the implementation of a server proxy. For more information, refer to the proxyUrl configuration section.
- If you use Kendo UI Q2 2014 SP2 (2014.2.1008) or earlier, the export requires a custom implementation. To achieve that task, either:
- Use a server-side implementation to directly export the data that is otherwise displayed by the Grid, or
- Use a client-side implementation to export the table HTML markup or the dataSource items of the Grid.
- The Grid does not use column templates during the Excel export—it exports only the data. The reason for this behavior is that a column template might contain arbitrary HTML which cannot be converted to Excel column values. For more information on how to use a column template that does not contain HTML, refer to this column template example.
- The Grid does not export its detail template for the same reason as it does not export its column templates. If the detail template contains another Grid, follow the example on the exporting a detail Grid.
-
The Grid does not use column formats during the Excel export because some Kendo UI formats are incompatible with Excel. To format the cell values, set the format option of the cells.
For more information on the formats that are supported by Excel, refer to this page. For more information on how to format cell values, refer to this example.
Источник
Selection & Export
The Grid component allows users to select specific cells and then export them to MS Excel or a Kendo UI Chart.
Getting Started
The following sections provide step-by-step instructions and examples on getting started with the Grid Selection Export functionality.
Enabling Excel Export
Include the JSZip script on the page. For more information, refer to the article with the requirements.
Set the selectable option of the grid to multiple, cell .
Create an unordered list element using html.
Create an icon for the ContextMenu . The icon can be appended to a Grid cell as demonstrated in the demo.
Initialize the ContextMenu component.
Copying Selected Data
To enable users to copy the selected data, call the copySelectionToClipboard method.
Exporting Selected Data to Excel
To enable users to export the selected data, call the exportSelectedToExcel method.
Exporting Selected Data to Chart
To enable users to export the selected data to a Kendo UI Chart:
Create an empty div element which will hold the chart.
Call the getSelectedData method and initialize a Chart component with the data.
Selection Types
The following selection types are supported:
- Cell selection — the user holds down the CTRL key ( Command key on Mac) and uses the left-click of the mouse to select cells.
- Range selection — the user holds down the left-click on the mouse and drags across a range of cells.
- Range and Cell selection — the user can combine the two approaches from above and select both a range and separate cells.
- Range combination selection — the user performs a range selection and while holding the CTRL key ( Command key on Mac), they perform another range selection.
Источник
Exporting the Kendo UI Grid Data to Excel
On my current project, I have been asked to provide the users with the ability to export the contents of any grid to Excel. To do this, I decided to use the XML SDK 2.0 for Microsoft Office to create the Excel spreadsheet. I’ve used the XML SDK 2.0 for Microsoft Office plenty of times for generating Word documents, but this was my first time using it to generate Excel spreadsheets. I found a great article by Mike Wendelius called Creating basic Excel workbook with Open XML that provided what I needed to get started with the XML SDK 2.0 for Microsoft Office.
Since I needed to do provide the ability to Export to Excel for any grid, I decided to create a generic REST end point that would receive any data from any grid and generate the Excel Spreadsheet. Fortunately this is possible to do since JSON.NET supports deserializing JSON data into the dynamic data type.
I am using the Grid widget in Kendo UI Web and didn’t want to have to write code for each grid to handle sending the data to a REST end point to create the Excel spreadsheet and then download the Excel spreadsheet. The Kendo UI framework supports inheritance. I was able to derive from the Grid widget to create a new widget called ExcelGrid. Once I created the ExcelGrid, all I had to do was switch the initialization of all my grids from kendoGrid to kendoExcelGrid.
Getting Started
To get started, you will need to do the following:
Modifying Excel.cs
First, I needed to make a few changes to Mike Wendelius’ Excel.cs. I wanted to leave his code alone, so I changed his Excel class to be a partial class and added a new Excel partial class to the end of the Excel.cs code file. Since I wanted to create the spreadsheet in memory, I added a new CreateWorkbook method that takes a Stream as the parameter. I also wanted to add some additional styles for the column headers, so I added an AddAdditionalStyles method. Here is the code:
Modifying the HomeController.cs
The process of exporting to Excel required 2 calls to the server. The first call creates the Excel spreadsheet, and the second call downloads the Excel spreadsheet. In the HomeController I added 2 Controller Actions, ExportToExcel and GetExcelFile.
ExportToExcel
The ExportToExcel Action Method takes 3 parameters:
- model — contains the column definitions
- data — data from the grid
- title — title for the Spreadsheet
In ExportToExcel I created a MemoryStream and call Excel.CreateWorkbook to create the workbook in memory. I them called the methods needed to add the basic styles and additional styles for the column headers and then I add the worksheet. Using JSON.NET, I converted the model and data parameters to dynamic objects. For each of the columns passed in as the model parameter, I created the columns and set the column width for each column in the spreadsheet. Next I add all the data to the spreadsheet. Finally, I store the spreadsheet in Session to be retrieved. Here is the code:
GetExcelFile
The GetExcelFile takes one parameter, title which is the title of the spreadsheet.
In GetExcelFile, I check session for the spreadsheet. If it exists, I retrieve the spreadsheet from session and then remove it from session . Finally I return the spreadsheet. Here is the code:
Deriving from the Grid Widget
When deriving from an existing Kendo UI widget, there a few things that need to be done:
- Use the extend method to derive from the existing Kendo UI widget.
- Implement the init function and call the base class init function.
- implement the options JSON object with the name attribute set to the name of the new widget.
- «Register» the new widget using the kendo.ui.plugin function.
Here is the ExcelGrid that inherits from the Grid widget, but doesn’t implement any of the new functionality yet:
The kendo.ui.plugin function creates a new kendoExcelGrid function to initialize the widget. To use the ExcelGrid, all you have to do is use the kendoExcelGrid function like this:
Adding the Export to Excel Functionality
To add the Export to Excel functionality, I need to pass in a few extra configuration settings to the ExcelGrid. The new settings will be containing within a JSON object that will be called export. Here is the definition of the new export configuration setting:
In the init function, I check to see if the export configuration setting has been passed in. If it has, then I create a toolbar button configuration setting for the Export toolbar button. Next I then initialize the grid. Finally I add the click event handler for the export toolbar button that will call a new function called exportToExcel. Here is the code:
The exportToExcel function sends the columns, data and the title for the spreadsheet to the server using the url set in the export.createUrl configuration setting. When the server is finished creating the Excel spreadsheet, the spreadsheet is downloaded using the export.downloadUrl configuration setting. Here is the code:
Implementing the ExcelGrid
To use the ExcelGrid with the export configuration settings, simply pass in the export configuration setting along with all the other configuration settings for the Grid. Here is the code:
Conclusion
Now every grid where I want to be able to export the data to Excel, I change kendoGrid to kendoExcelGrid and pass in the export settings. That’s it.
Источник