
Word for Microsoft 365 Word 2021 Word 2019 Word 2016 Word 2013 Word 2010 Word 2007 More…Less
You can often improve the look of your document by keeping certain words and paragraphs together on the page or across page breaks. Also, you can use hyphenation to improve overall readability.
Word automatically breaks the text at a space or a hyphen at the end of a line. To keep two words or a hyphenated word together on one line, you can use a nonbreaking space or nonbreaking hyphen instead of a regular space or hyphen.
-
Click where you want to insert the nonbreaking space.
-
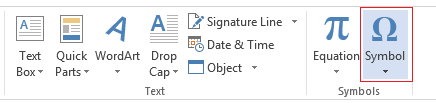
On the Insert tab, in the Symbols group, click Symbol.

-
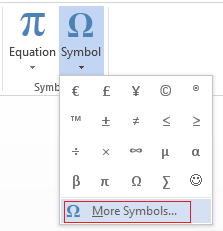
In the box that opens, click More Symbols.
-
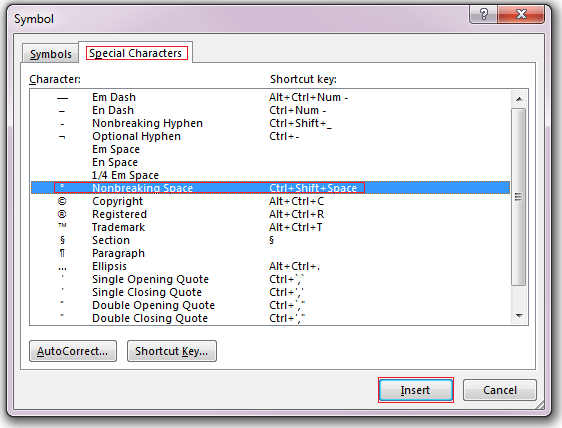
In the Symbol dialog box, on the Special Characters tab, click the Nonbreaking Space row to highlight it, and then click Insert.
-
Click Close.
Tip: You can also use the keyboard shortcut. Click where you want to insert the nonbreaking space, and press Ctrl+Shift+Spacebar.
Sometimes you want a hyphenated word to stay together on one line, without it breaking across lines.
-
Click where you want to insert the nonbreaking hyphen.
-
On the Insert tab, in the Symbols group, click Symbol.
-
In the box that opens, click More Symbols.
-
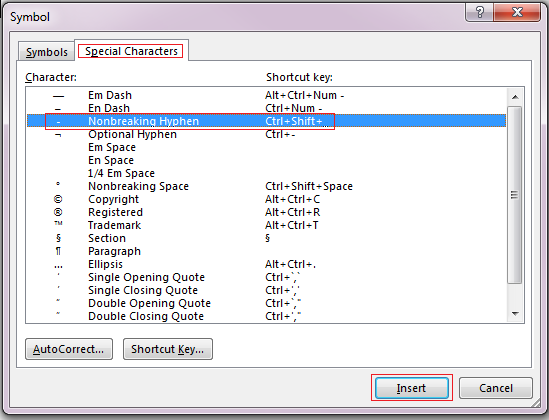
In the Symbol dialog box, on the Special Characters tab, click the Nonbreaking Hyphen row to highlight it, and then click Insert.
-
Click Close.
Tip: You can also use the keyboard shortcut. Click where you want to insert the nonbreaking hyphen, and press Ctrl+Shift+Minus Sign.
Word automatically breaks paragraphs at the end of a page, so a paragraph that started on one page continues on to the next page. To keep the whole paragraph on the same page, follow these steps.
-
Right-click the paragraph that you want to keep together. In the box that opens, select Paragraph.
-
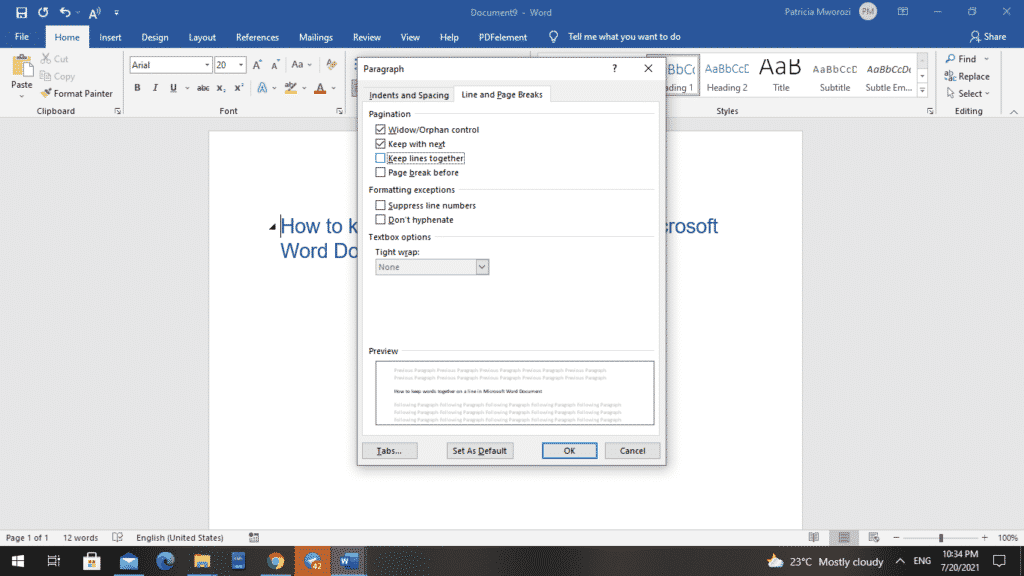
In the Paragraph dialog box, click the Line and Page Breaks tab.
-
In the Pagination section, select the Keep lines together check box, and click OK.
If two consecutive paragraphs or a subhead and a paragraph are closely related, you might want to keep them on the same page.
-
Right-click the paragraph or subhead that you want to keep with the content that follows it. In the box that opens, select Paragraph.
-
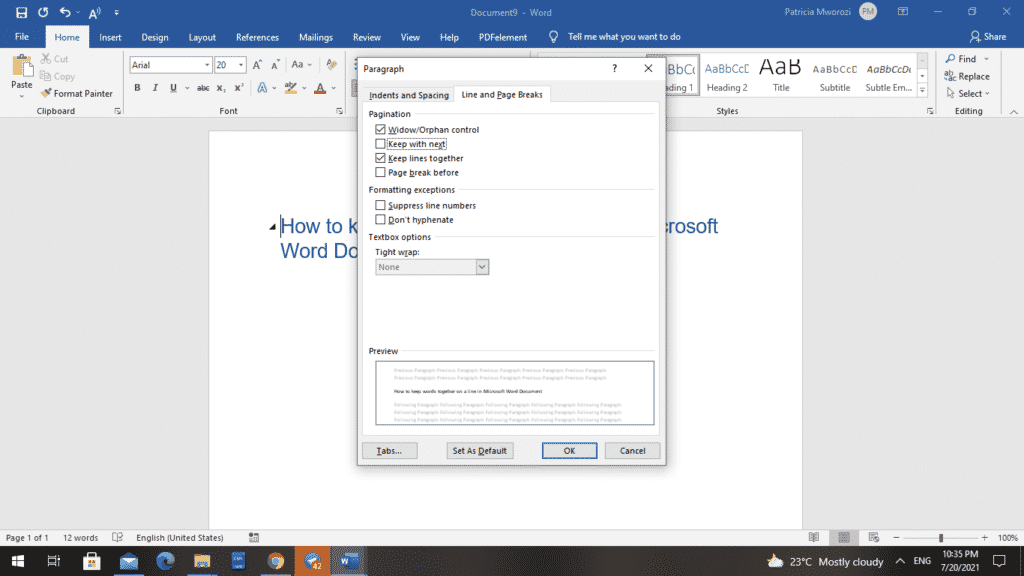
In the Paragraph dialog box, click the Line and Page Breaks tab.
-
In the Pagination section, select the Keep with next check box, and click OK.
Tip: It’s best not to add additional line breaks between your paragraphs because Word interprets each line break as a beginning of a new paragraph, and page breaks might not occur properly. If you want spaces between paragraphs, use the Paragraph Spacing controls. For more information, see Change spacing between paragraphs.
If a paragraph has a page break in the middle so that only the last line appears at the top of the following page, this lonely line is called a “widow.” If, on the other hand, a paragraph has a page break in the middle so that only the first line appears at the bottom of a page while the rest of the paragraph appears on the next page, this lonely line is called an “orphan.”
If you want to avoid widow and orphan lines in your document, follow these steps.
-
Right-click the paragraph in which you want to avoid widows and orphans. In the box that opens, select Paragraph.
-
Click the Line and page breaks tab.
-
In the Pagination section, select the Widow/Orphan control check box.
-
Click OK.
If a word is too long to fit at the end of a line, Microsoft Office Word 2007 moves the word to the beginning of the next line instead of hyphenating it. However, you can use the Hyphenation feature to automatically or manually hyphenate the text, insert optional or nonbreaking hyphens, and set the maximum amount of space allowed between a word and the right margin without hyphenating the word.
With automatic hyphenation, Office Word 2007 automatically inserts hyphens where they are needed. If you edit the document later and change line breaks, Office Word 2007 will re-hyphenate the document.
-
Make sure that no text is selected.
-
On the Page Layout tab, in the Page Setup group, click Hyphenation, and then click Automatic.
An optional hyphen is a hyphen that is used to control where a word or phrase breaks if it falls at the end of a line. For example, you can specify that the word «nonprinting» breaks as «non-printing» instead of «nonprint-ing.» When you insert an optional hyphen in a word that is not at the end of a line, the hyphen will be visible only if you turn on Show/Hide.
-
On the Home tab, in the Paragraph group, click Show/Hide.
-
Click in the word where you want to insert the optional hyphen.
-
Press CTRL+HYPHEN.

To automatically hyphenate part of a document, do the following:
-
Select the text that you want to hyphenate.
-
On the Page Layout tab, in the Page Setup group, click Hyphenation, and then click Automatic.
When you manually hyphenate text, Office Word 2007 searches for text to hyphenate. After you indicate where you want to hyphenate the text, Word inserts an optional hyphen. If you later edit the document and change line breaks, Office Word 2007 displays and prints only the optional hyphens that still fall at the end of lines. Word doesn’t re-hyphenate the document.
-
Select the text you want to hyphenate.
-
On the Page Layout tab, in the Page Setup group, click Hyphenation, and then click Manual.
-
If Office Word identifies a word or phrase to hyphenate, do one of the following:
-
To insert an optional hyphen in the location that Office Word proposes, click Yes.
-
To insert an optional hyphen in another part of the word, move the insertion point to that location, and then click Yes.
-
Nonbreaking hyphens prevent hyphenated words, numbers, or phrases from breaking if they fall at the end of a line of text. For example, you can prevent 555-0123 from breaking; instead, the entire item will move to the beginning of the next line.
-
Click where you want to insert a nonbreaking hyphen.
-
Press CTRL+SHIFT+HYPHEN.
The hyphenation zone is the maximum amount of space Office Word 2007 allows between a word and the right margin without hyphenating the word. You can change the hyphenation zone to make it wider or narrower. To reduce the number of hyphens, make the hyphenation zone wide. To reduce the raggedness of the right margin, make the hyphenation zone narrower.
-
On the Page Layout tab, in the Page Setup group, click Hyphenation, and then click Hyphenation Options.
-
In the Hyphenation zone, type the amount of space you want.
You can remove all automatic hyphenation and each instance of manual hyphenation, such as optional and nonbreaking hyphens.
-
To remove automatic hyphenation, on the Page Layout tab, in the Page Setup group, click Hyphenation, and then click None.

-
To remove manual hyphenation, on the Home tab, in the Editing group, click Replace.
-
If you don’t see the Special button, click More.
-
Click Special, and then click either Optional Hyphen to remove manual hyphens, or Nonbreaking Hyphen to remove nonbreaking hyphens.
-
Leave the Replace box empty.
-
Click Fix Next, Replace, or Replace All.
See Also
Line and page breaks
Insert a page break
Change spacing between paragraphs
Need more help?
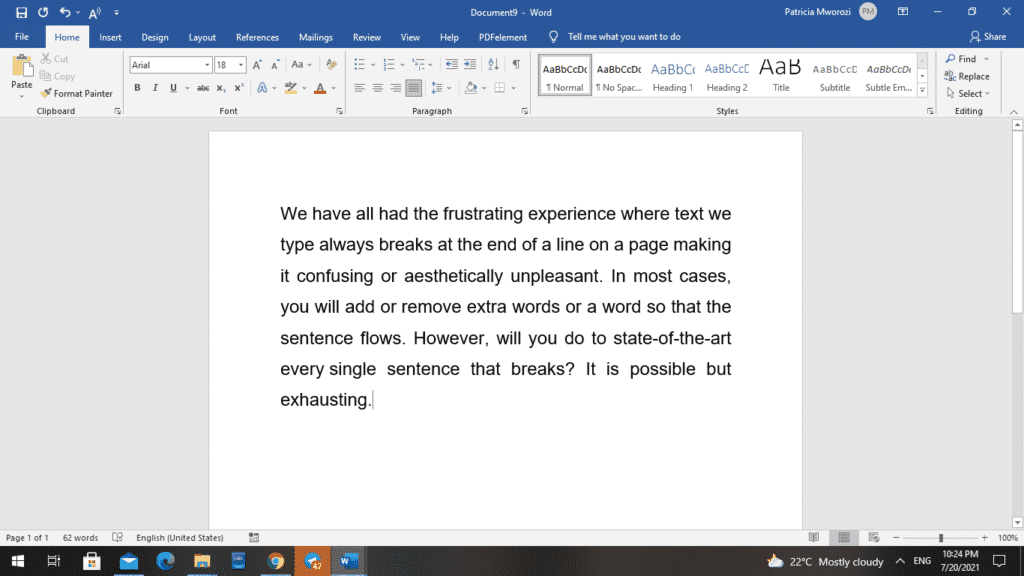
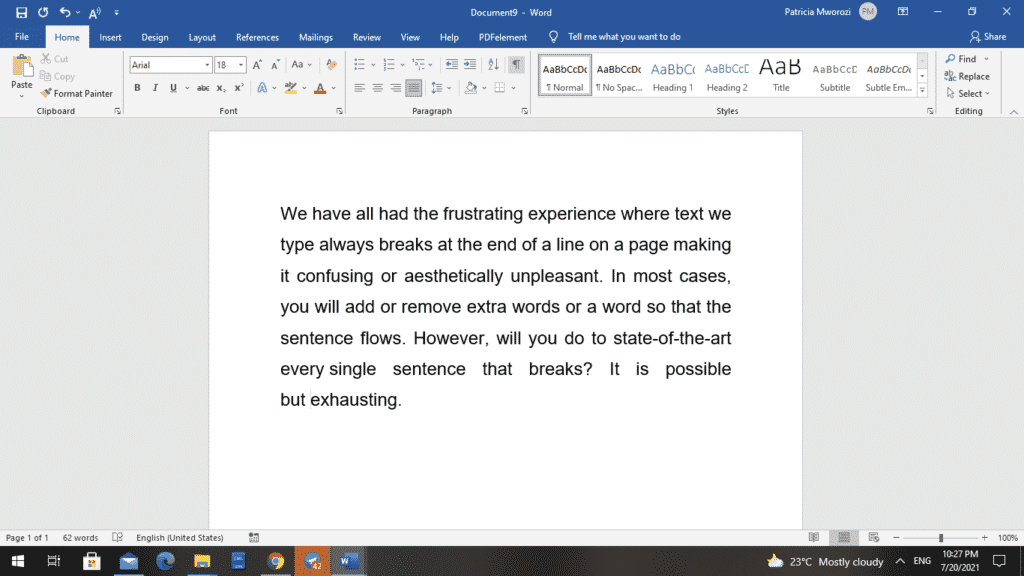
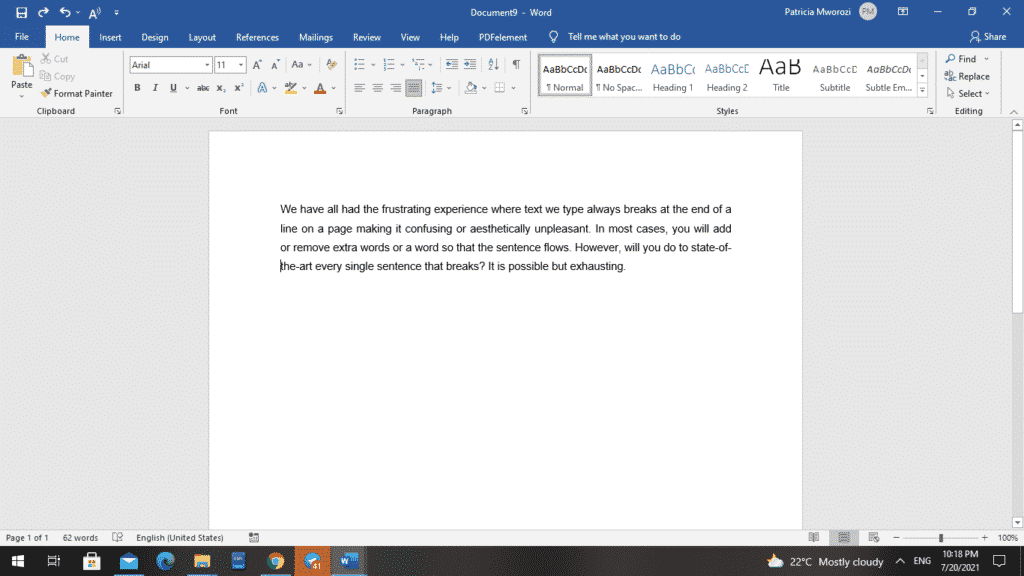
We have all had the frustrating experience where the text breaks at the end of a line on a page, making it confusing or aesthetically unpleasant. In most cases, you will add or remove extra words or a word so that the sentence flows. However, will you do this for every single sentence that breaks? It is possible but exhausting.
Below are three ways to keep words together on a line.
1. Non-breaking space
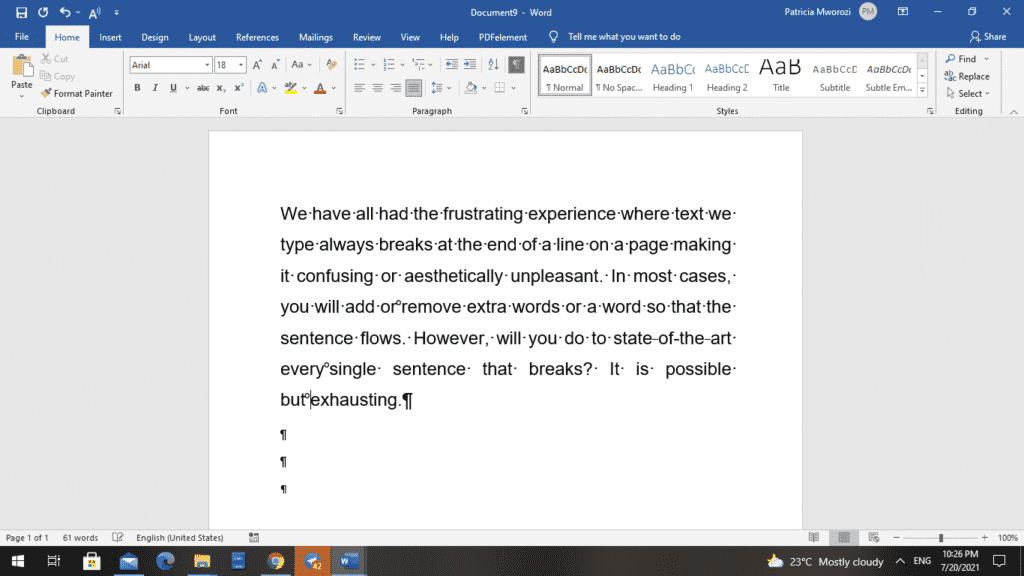
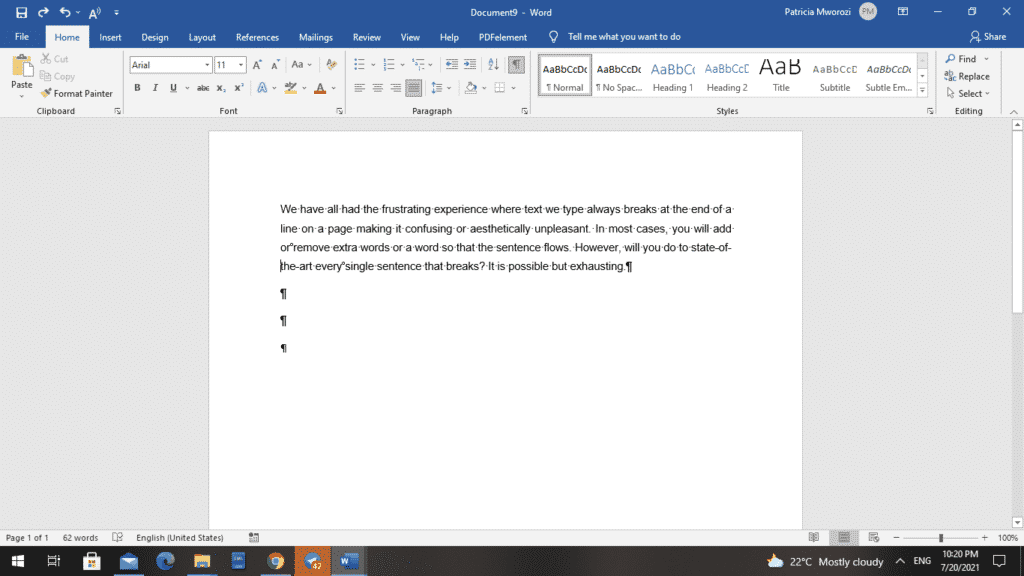
The first step is to turn on a feature called ‘Show Hide in the Home tab in the group for paragraph features. This will display non-printing characters. However, they won’t be displayed when the document is printed. By enabling this, we can see that we have what is called soft spaces: that is, where dots appear between those words. We are going to delete them where we want to put a non-breaking space.
- Go to the end of the sentence where you want to keep words together.
- Remove the space between the two words you want to keep together.

- Turn on ‘Show Hide.’
- Place the cursor between the words.
- Press CTRL +Shift + Space
The two words will remain together, regardless of the changes you make to the paragraph.
Doing this adds a character that looks like the degree symbol. This is your non-breaking space. It is only visible when you turn on Show Hide.
2. Non-breaking hyphens
This is the same with non-breaking spaces but for words that are separated by hyphens. Such words breaking at the end of a sentence are aesthetically displeasing. To make sure the words stay together, we will follow these simple steps using state-of-the-art.
- Remove the hyphens between ‘state-of-the-art.’
- Turn on ‘Show Hide.’
Before
After
- After removing the first hyphen, press CTRL + Shift + Hyphen.
- Repeat this for the remaining hyphens as this does not work for all the hyphens at once.
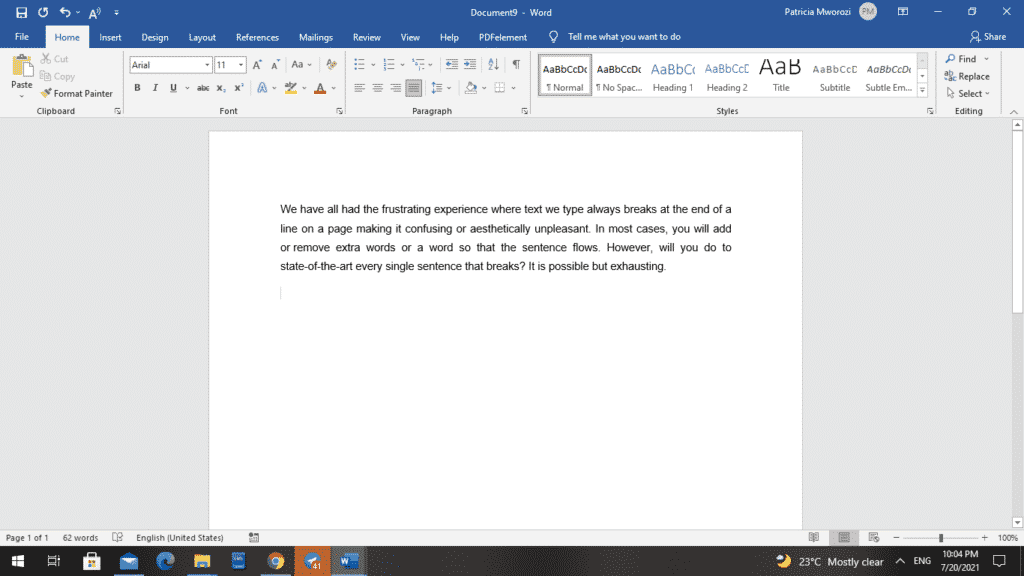
The block will then remain unaffected regardless of the changes made to the paragraph.
3. Non-breaking lines and paragraphs
Another challenge we might have with line breaks and page breaks is when we might have headings on one page, and the rest of the content is on another or where paragraphs might split between two different pages.
The goal is to keep that heading attached to or glued to the paragraph below it.
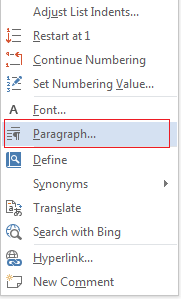
In the Home tab, we can click on the downward-facing arrow in the corner to take us to the dialog paragraph box.

Another option would be to right-click anywhere on that paragraph, and on your shortcut menu, left-click on the paragraph.
In this dialog box, you can adjust indents, line spacing. However, our interest is in the line, and the page breaks on the other tab.
What we are interested in is ‘Keep with next.’ By selecting ‘Keep with next,’ this heading will automatically move to the following line.
Another thing to try is ‘Keep lines together.’ This means if you have one or more paragraphs highlighted, the lines within that paragraph will stay on one page together.
Are you physically unable to do group work during the pandemic because of the lockdowns?
Simul Docs is here to help you smoothly work with your classmates. With Simul Docs, it will feel like you are in the library compiling ideas and notes.
With Simul Docs, even your initial thoughts can be documented and retained. After writing your first draft in Microsoft Word, upload it to Simul Docs. This will automatically make it the first version. Now, another colleague can open it and make their edits. This will create another version different from the first. Every time another person opens a version and makes edits, a new version is created, with the latest changes. The best part is, even if you forget to turn on tracked changes, they are automatically documented!
If another co-worker is supposed to include their input, but they do not have Simul Docs. All you have to do is download the document or forward it by email. Alternatively, you can upload it to any storage software like one drive, and once their changes have been made, they can forward it to you once again, and you can open it in Simul Docs.
Once all the necessary edits have been made, you can save the final version containing all the modifications with one click.
Visit simuldocs.com and simplify your group edits today.
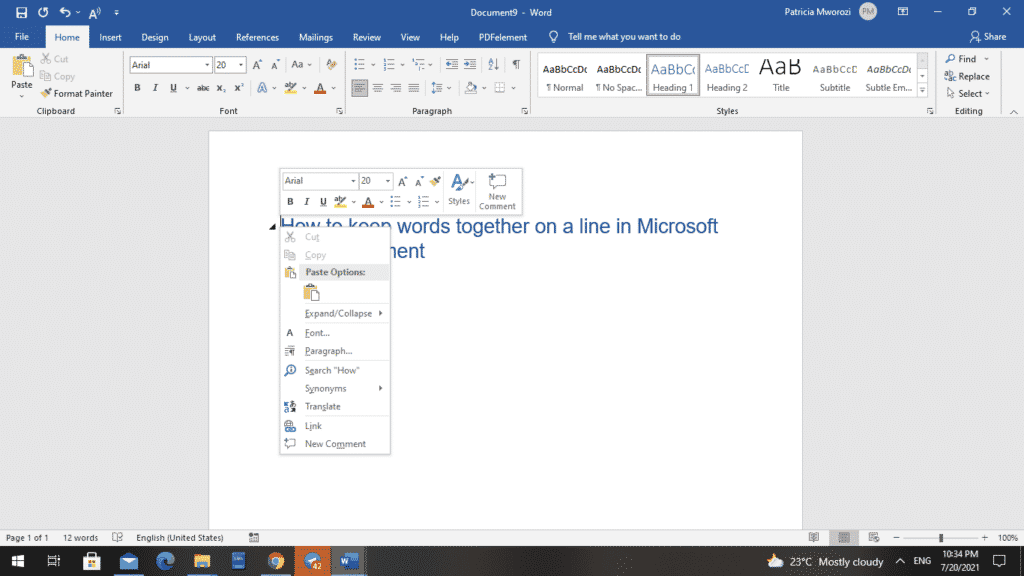
3 Ways to Keep Text Together in Microsoft Word Documents
by Avantix Learning Team | Updated April 5, 2021
Applies to: Microsoft® Word® 2010, 2013, 2016, 2019, 2021 and 365 (Windows)
You can keep text together in several ways in Word. If you want to keep words or characters together, you can use nonbreaking spaces or nonbreaking hyphens or dashes and insert them using a dialog box or a keyboard shortcut. If you want to keep lines or paragraphs together on the same page, you can apply settings in the Paragraph dialog box (which can be built into styles if you use styles).
You may want to keep the lines in a paragraph together so that the paragraph doesn’t break across pages or you may want to keep a paragraph with the next paragraph and avoid inserting manual page breaks. This can be accomplished easily using the Paragraph dialog box (and can be built into styles if you use styles).
It’s important to understand some key paragraph concepts:
- A paragraph in Word is anything with a hard return after it (you have pressed Enter or Return).
- It’s best to eliminate any blank paragraphs in a long document.
- You can view paragraph marks or symbols by clicking Show/Hide ¶ on the Home tab in the Ribbon in the Paragraph group.
Recommended article: 14 Timesaving Microsoft Word Selection Shortcuts to Quickly Select Text
Do you want to learn more about Microsoft Word? Check out our virtual classroom or live classroom Word courses >
Keeping lines together in a paragraph
To keep the lines in a paragraph together on the same page in Word using the Ribbon:
- Select the paragraph in the Word document with the text you want to keep together. You can simply click in the paragraph to select it.
- Click the Home tab in the Ribbon and click the dialog box launcher on the bottom right of the Paragraph group. The Paragraph dialog box appears.
- Select the Line and Page breaks tab. Word displays options to keep the lines of the paragraph together or to keep the paragraph with the next paragraph.
- Check Keep lines together.
- Click OK. The paragraph will no longer break across pages.
Below is the Paragraph dialog box in Word with Keep lines together selected:

You can also use a context menu to access the Paragraph dialog box (right-click in a paragraph and choose Paragraph from the drop-down menu).
Keeping a paragraph with the next paragraph
To keep a paragraph on the same page with the next paragraph using the Ribbon:
- Click in the paragraph you want to keep with the next paragraph (the next paragraph should not be a blank paragraph).
- Click the Home tab in the Ribbon.
- Click the dialog box launcher on the bottom right of the Paragraph group. The Paragraph dialog box appears.
- Select the Line and Page breaks tab.
- Check Keep with next.
- Click OK.
You can also use a context menu to access the Paragraph dialog box (right-click in a paragraph and choose Paragraph from the drop-down menu).
Keeping text together with nonbreaking spaces
If you want specific words or characters to stay together on the same line (such as De Marco), you can use nonbreaking spaces instead of regular spaces.
To insert a nonbreaking space between two words or characters using a keyboard shortcut:
- Position the cursor between the two words or characters you want to keep together (there should be no space between these characters).
- Press Ctrl + Shift + Spacebar. Word inserts a nonbreaking space.
To insert a nonbreaking space between two words or letters using the Ribbon:
- Position the cursor between the two words or characters you want to keep together (there should be no space between these characters).
- Click the Insert tab in the Ribbon.
- Click Insert Symbol and then More Symbols in the drop-down menu. A dialog box appears.
- Select the Special Characters tab.
- Select Nonbreaking space and click Insert.
- Click Close. Word inserts a nonbreaking space.
Below is the Insert Symbol dialog box to insert a non-breaking space:

Keeping text together with nonbreaking hyphens or dashes
You can also use nonbreaking hyphens or dashes to keep words or characters together (such as co-ordinator or 416‑222‑9999).
To insert a nonbreaking hyphen between two words or characters using a keyboard shortcut:
- Position the cursor between the two words or characters you want to keep together (there should be no space between these characters).
- Press Ctrl + Shift + Underscore (_). Word inserts a nonbreaking hyphen.
To insert a nonbreaking hyphen between two words or characters using the Ribbon:
- Position the cursor between the two words or characters you want to keep together (there should be no space between these characters).
- Click the Insert tab in the Ribbon.
- Click Insert Symbol and then More Symbols in the drop-down menu. A dialog box appears.
- Select the Special Characters tab.
- Select Nonbreaking hyphen and click Insert.
- Click Close. Word inserts a nonbreaking hyphen.
To view nonbreaking spaces, nonbreaking hyphens and paragraph marks:
- Click the Home tab in the Ribbon.
- Click the Show/Hide ¶ in the Paragraph group.
You can turn off the symbols by clicking on the same button.
You can also quickly find and remove nonbreaking spaces or hyphens using the Replace dialog box.
To find and remove nonreaking spaces or hyphens:
- Press Ctrl + H. The Replace dialog box appears. You can also click the Home tab in the Ribbon and click Replace in the Editing group.
- Click More to expand the dialog box if necessary.
- Click in the Find What box.
- Click Special. A drop-down menu appears.
- Select nonbreaking space or nonbreaking hyphen.
- Ensure the Replace with box is empty.
- Click Find Next. Word should find the first nonbreaking space or nonbreaking hyphen.
- Click Replace or Replace All.
- Click Close.
Below is the Replace dialog box:

Although all of these techniques will keep text together, keeping paragraphs together is the most important. If you start using paragraph formatting to keep specific paragraphs together, you can avoid using manual page breaks for pagination.
This article was originally published on July 14, 2017 and has been updated for clarity and content.
Subscribe to get more articles like this one
Did you find this article helpful? If you would like to receive new articles, JOIN our email list.
More resources
How to Center Text Vertically on a Page in Word
How to Insert an Em Dash in Word (4 Ways with Shortcuts)
How to Quickly Remove Hard Returns in Word Documents
How to Insert, Format and Update Cross-References in Word
How to Convert a PDF to Word in Microsoft Word (for Free – No Third Party Programs Needed)
Related courses
Microsoft Word: Intermediate / Advanced
Microsoft Excel: Intermediate / Advanced
Microsoft PowerPoint: Intermediate / Advanced
Microsoft Word: Long Documents Master Class
Microsoft Word: Styles, Templates and Tables of Contents
Microsoft Word: Designing Dynamic Word Documents Using Fields
VIEW MORE COURSES >
To request this page in an alternate format, contact us.
Our instructor-led courses are delivered in virtual classroom format or at our downtown Toronto location at 18 King Street East, Suite 1400, Toronto, Ontario, Canada (some in-person classroom courses may also be delivered at an alternate downtown Toronto location). Contact us at info@avantixlearning.ca if you’d like to arrange custom instructor-led virtual classroom or onsite training on a date that’s convenient for you.
Copyright 2023 Avantix® Learning
Microsoft, the Microsoft logo, Microsoft Office and related Microsoft applications and logos are registered trademarks of Microsoft Corporation in Canada, US and other countries. All other trademarks are the property of the registered owners.
Avantix Learning |18 King Street East, Suite 1400, Toronto, Ontario, Canada M5C 1C4 | Contact us at info@avantixlearning.ca
When you create a Word document, often you need to add some words that should be kept together even if
Word wants to put them on different lines.
The most popular example is an abbreviation and a name such as:
- An organization — Plexico LLC, W. H. Allen & Co.
- The address — N Rengstorff Ave, N Shoreline Blvd.
- The person — Dr. S. Hawking, prof. Smith.
It will be correct to see these words always on the same line.
When you type the text, usually you separate words (sentences or even syllables in some languages) by
pressing the Space key (also known as Spacebar):

To keep words together, you can use a Nonbreaking space (also called non-breaking
space, no-break space, non-breakable space (NBSP),
hard space, or fixed space):

To add the nonbreaking space to your document, do one of the following:
- On the Insert tab, in the Symbols group, click on the Symbol drop-down list
and then choose More Symbols…:
In the Symbol dialog box, on the Special Characters tab, choose the
Nonbreaking Space:
After choosing the symbol, press the Insert button and close the Symbol dialog
box. - Or simply press Ctrl+Shift+Space.


If you toggle on showing of non-printable symbols, you will see a regular space as a little dot between
words ˙, and a nonbreaking space as a degree symbol between words °:

Note: In this mode you can see spaces or other special symbols (see
How to show/hide nonprintable symbols in a Word document),
but they are still non-printable!
See also this tip in French:
Comment garder deux ou plusieurs mots ensemble dans un document Word.
Please, disable AdBlock and reload the page to continue
Today, 30% of our visitors use Ad-Block to block ads.We understand your pain with ads, but without ads, we won’t be able to provide you with free content soon. If you need our content for work or study, please support our efforts and disable AdBlock for our site. As you will see, we have a lot of helpful information to share.
Right-click the paragraph or subhead that you want to keep with the content that follows it. In the box that opens, select Paragraph. In the Paragraph dialog box, click the Line and Page Breaks tab. In the Pagination section, select the Keep lines together check box, and click OK.
Contents
- 1 How do I keep text together in Word?
- 2 How do I stop words splitting in a text box?
- 3 How do I lock text so it doesn’t move in Word?
- 4 Why are my words cut off in word?
- 5 What is it called when a word is split between two lines?
- 6 Can I lock text in Word?
- 7 How do I lock something in place in Word?
- 8 What does lock anchor do in Word?
- 9 How do you paste without line breaks?
- 10 How do you go to the next line?
- 11 How do you insert a line break?
- 12 Why is word going to next line?
- 13 What is compatibility mode in Word?
- 14 What do em dashes do?
- 15 When should you hyphenate words?
- 16 What is dash used for?
- 17 How do I protect part of a Word document?
- 18 What does object anchor mean in Word?
- 19 Can you lock image in Word?
- 20 How do you lock pages from moving in Word?
How do I keep text together in Word?
Non-Breaking Paragraphs and Lines
- Select the paragraph or section of text you want to keep together.
- On the Home tab in Word, click the Paragraph group’s dialog launcher (the small arrow at the bottom-right of the group).
- Pick the Line and Page Breaks.
- Check the Keep lines together option and click OK.
How do I stop words splitting in a text box?
Manual fix. To fix this problem manually, turn off hyphenation and delete the hyphens. Click the Text Box Tools Format tab, and then click Hyphenation. In the Hyphenation dialog box, clear the Automatically hyphenate this story check box.
How do I lock text so it doesn’t move in Word?
Make sure the Lock Anchor check box is selected. Make sure the Allow Overlap check box is selected.
Figure 2.
- Click the Office button and then click Word Options.
- Click Display at the left side of the dialog box.
- Select the Object Anchors check box.
- Click on OK.
- In Print Layout view, select the shape (the block arrow).
Why are my words cut off in word?
The line spacing of your text may be set to an exact height. When you set the line spacing to Exactly and select a measurement that is equal to or less than the height of the font, underscore characters may not be displayed and characters that have an ascender, descender, or an umlaut may be cut off.
What is it called when a word is split between two lines?
Hyphenation (properly called word division) is breaking long words between lines. The purpose of hyphenation is to reduce the white space between words.But another sign of amateur design is bad hyphenation. Follow these rules: Hyphenate only between syllables.
Can I lock text in Word?
Open a Word document that has text boxes. Click the “Review” tab, then click the “Restrict Editing” button in the Protect group. Word displays a pane allowing you to manage editing permissions for specific parts of the document, including text boxes.
How do I lock something in place in Word?
Follow these steps to anchor an object in Word:
- Select an object.
- On the Ribbon’s Format tab, go to the Arrange group and choose Position→More Layout Options.
- Click the Position tab.
- (Optional) Set the position of an object precisely using controls in this dialog.
- Under Options, select the Lock Anchor check box.
What does lock anchor do in Word?
When you turn on “Lock Anchor,” you can then move your image to any position on the same page as the anchor paragraph, and the object will stay in that position. However, if you move the anchor paragraph to another page, the object will also move to that page, but stay in the same relative position on the page.
How do you paste without line breaks?
Step 1: First, copy the text from the content and paste it in MS Word. Step 2: Then select the whole content. Step 3: Press Ctrl+h.
How do you go to the next line?
Move the text cursor to where you want the new line to begin, press the Enter key, hold down the Shift key, and then press Enter again. You can continue to press Shift + Enter to move to each new line, and when ready to move to the next paragraph, press Enter .
How do you insert a line break?
To add spacing between lines or paragraphs of text in a cell, use a keyboard shortcut to add a new line. Click the location where you want to break the line. Press ALT+ENTER to insert the line break.
Why is word going to next line?
This happens if you accidentally change the paragraph indentation for the document. Ensure that Indentation, both before and after text, are set to zero and that no special formatting has been set.
What is compatibility mode in Word?
When you’re using a version of Word that’s newer than the version used to create your document, you typically see Compatibility Mode in the title bar. Compatibility Mode temporarily disables new or enhanced Word features so that the document can still be edited by people using the earlier version of Word.
What do em dashes do?
The em dash can function like a comma, a colon, or parenthesis. Like commas and parentheses, em dashes set off extra information, such as examples, explanatory or descriptive phrases, or supplemental facts. Like a colon, an em dash introduces a clause that explains or expands upon something that precedes it.
When should you hyphenate words?
Generally, you need the hyphen only if the two words are functioning together as an adjective before the noun they’re describing. If the noun comes first, leave the hyphen out. This wall is load bearing. It’s impossible to eat this cake because it is rock hard.
What is dash used for?
A dash is a little horizontal line that floats in the middle of a line of text (not at the bottom: that’s an underscore). It’s longer than a hyphen and is commonly used to indicate a range or a pause. Dashes are used to separate groups of words, not to separate parts of words like a hyphen does.
How do I protect part of a Word document?
Protect a document and mark the parts that can be changed
- On the Review tab, in the Protect group, click Restrict Editing.
- In the Editing restrictions area, select the Allow only this type of editing in the document check box.
- In the list of editing restrictions, click No changes (Read only).
What does object anchor mean in Word?
An object anchor is an indicator that shows the document paragraph with which a floating object is associated.Make sure you are viewing your document in Print Layout view. (This view is called Page Layout view in Word 97.)
Can you lock image in Word?
Go to the Design tab and click the Watermark button under the Page Background group. From the list of options below, select Custom Watermark. This will launch a dialog box.You’ve successfully used the Watermark tool to lock an image in MS Word.
How do you lock pages from moving in Word?
Replies (2)
- In Word, select the content on Page 1 that you want to be editable.
- Click on the Review tab, then select Restrict Editing.
- Under Editing Restrictions, check Allow only this type of editing in the document.
- Under Exceptions, check Everyone.
- Click on Yes, Start Enforcing Protection.