
Word for Microsoft 365 Word 2021 Word 2019 Word 2016 Word 2013 Word 2010 Word 2007 More…Less
You can often improve the look of your document by keeping certain words and paragraphs together on the page or across page breaks. Also, you can use hyphenation to improve overall readability.
Word automatically breaks the text at a space or a hyphen at the end of a line. To keep two words or a hyphenated word together on one line, you can use a nonbreaking space or nonbreaking hyphen instead of a regular space or hyphen.
-
Click where you want to insert the nonbreaking space.
-
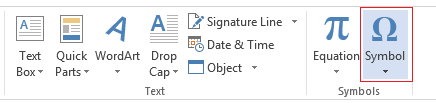
On the Insert tab, in the Symbols group, click Symbol.

-
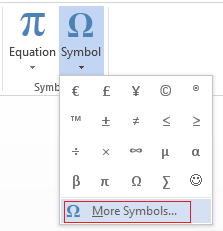
In the box that opens, click More Symbols.
-
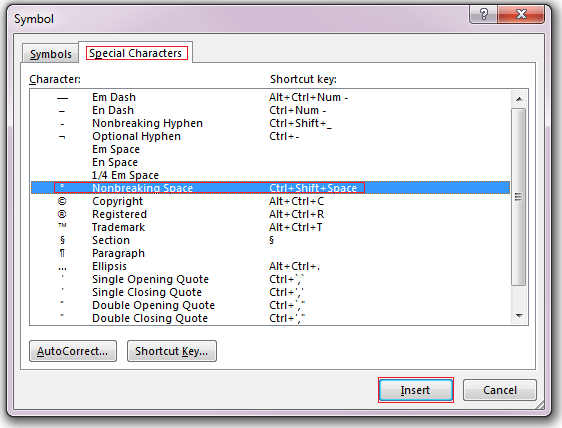
In the Symbol dialog box, on the Special Characters tab, click the Nonbreaking Space row to highlight it, and then click Insert.
-
Click Close.
Tip: You can also use the keyboard shortcut. Click where you want to insert the nonbreaking space, and press Ctrl+Shift+Spacebar.
Sometimes you want a hyphenated word to stay together on one line, without it breaking across lines.
-
Click where you want to insert the nonbreaking hyphen.
-
On the Insert tab, in the Symbols group, click Symbol.
-
In the box that opens, click More Symbols.
-
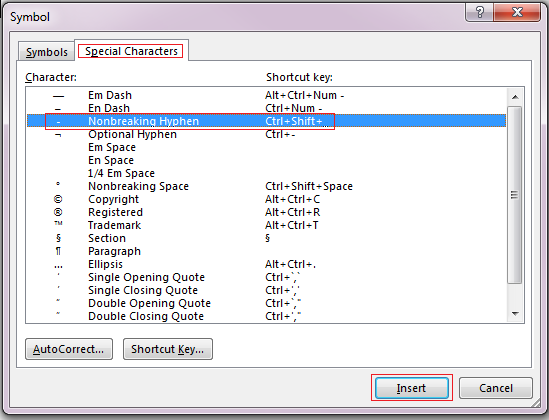
In the Symbol dialog box, on the Special Characters tab, click the Nonbreaking Hyphen row to highlight it, and then click Insert.
-
Click Close.
Tip: You can also use the keyboard shortcut. Click where you want to insert the nonbreaking hyphen, and press Ctrl+Shift+Minus Sign.
Word automatically breaks paragraphs at the end of a page, so a paragraph that started on one page continues on to the next page. To keep the whole paragraph on the same page, follow these steps.
-
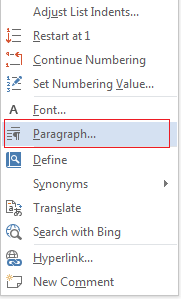
Right-click the paragraph that you want to keep together. In the box that opens, select Paragraph.
-
In the Paragraph dialog box, click the Line and Page Breaks tab.
-
In the Pagination section, select the Keep lines together check box, and click OK.
If two consecutive paragraphs or a subhead and a paragraph are closely related, you might want to keep them on the same page.
-
Right-click the paragraph or subhead that you want to keep with the content that follows it. In the box that opens, select Paragraph.
-
In the Paragraph dialog box, click the Line and Page Breaks tab.
-
In the Pagination section, select the Keep with next check box, and click OK.
Tip: It’s best not to add additional line breaks between your paragraphs because Word interprets each line break as a beginning of a new paragraph, and page breaks might not occur properly. If you want spaces between paragraphs, use the Paragraph Spacing controls. For more information, see Change spacing between paragraphs.
If a paragraph has a page break in the middle so that only the last line appears at the top of the following page, this lonely line is called a “widow.” If, on the other hand, a paragraph has a page break in the middle so that only the first line appears at the bottom of a page while the rest of the paragraph appears on the next page, this lonely line is called an “orphan.”
If you want to avoid widow and orphan lines in your document, follow these steps.
-
Right-click the paragraph in which you want to avoid widows and orphans. In the box that opens, select Paragraph.
-
Click the Line and page breaks tab.
-
In the Pagination section, select the Widow/Orphan control check box.
-
Click OK.
If a word is too long to fit at the end of a line, Microsoft Office Word 2007 moves the word to the beginning of the next line instead of hyphenating it. However, you can use the Hyphenation feature to automatically or manually hyphenate the text, insert optional or nonbreaking hyphens, and set the maximum amount of space allowed between a word and the right margin without hyphenating the word.
With automatic hyphenation, Office Word 2007 automatically inserts hyphens where they are needed. If you edit the document later and change line breaks, Office Word 2007 will re-hyphenate the document.
-
Make sure that no text is selected.
-
On the Page Layout tab, in the Page Setup group, click Hyphenation, and then click Automatic.
An optional hyphen is a hyphen that is used to control where a word or phrase breaks if it falls at the end of a line. For example, you can specify that the word «nonprinting» breaks as «non-printing» instead of «nonprint-ing.» When you insert an optional hyphen in a word that is not at the end of a line, the hyphen will be visible only if you turn on Show/Hide.
-
On the Home tab, in the Paragraph group, click Show/Hide.
-
Click in the word where you want to insert the optional hyphen.
-
Press CTRL+HYPHEN.

To automatically hyphenate part of a document, do the following:
-
Select the text that you want to hyphenate.
-
On the Page Layout tab, in the Page Setup group, click Hyphenation, and then click Automatic.
When you manually hyphenate text, Office Word 2007 searches for text to hyphenate. After you indicate where you want to hyphenate the text, Word inserts an optional hyphen. If you later edit the document and change line breaks, Office Word 2007 displays and prints only the optional hyphens that still fall at the end of lines. Word doesn’t re-hyphenate the document.
-
Select the text you want to hyphenate.
-
On the Page Layout tab, in the Page Setup group, click Hyphenation, and then click Manual.
-
If Office Word identifies a word or phrase to hyphenate, do one of the following:
-
To insert an optional hyphen in the location that Office Word proposes, click Yes.
-
To insert an optional hyphen in another part of the word, move the insertion point to that location, and then click Yes.
-
Nonbreaking hyphens prevent hyphenated words, numbers, or phrases from breaking if they fall at the end of a line of text. For example, you can prevent 555-0123 from breaking; instead, the entire item will move to the beginning of the next line.
-
Click where you want to insert a nonbreaking hyphen.
-
Press CTRL+SHIFT+HYPHEN.
The hyphenation zone is the maximum amount of space Office Word 2007 allows between a word and the right margin without hyphenating the word. You can change the hyphenation zone to make it wider or narrower. To reduce the number of hyphens, make the hyphenation zone wide. To reduce the raggedness of the right margin, make the hyphenation zone narrower.
-
On the Page Layout tab, in the Page Setup group, click Hyphenation, and then click Hyphenation Options.
-
In the Hyphenation zone, type the amount of space you want.
You can remove all automatic hyphenation and each instance of manual hyphenation, such as optional and nonbreaking hyphens.
-
To remove automatic hyphenation, on the Page Layout tab, in the Page Setup group, click Hyphenation, and then click None.

-
To remove manual hyphenation, on the Home tab, in the Editing group, click Replace.
-
If you don’t see the Special button, click More.
-
Click Special, and then click either Optional Hyphen to remove manual hyphens, or Nonbreaking Hyphen to remove nonbreaking hyphens.
-
Leave the Replace box empty.
-
Click Fix Next, Replace, or Replace All.
See Also
Line and page breaks
Insert a page break
Change spacing between paragraphs
Need more help?
Want more options?
Explore subscription benefits, browse training courses, learn how to secure your device, and more.
Communities help you ask and answer questions, give feedback, and hear from experts with rich knowledge.
3 Ways to Keep Text Together in Microsoft Word Documents
by Avantix Learning Team | Updated April 5, 2021
Applies to: Microsoft® Word® 2010, 2013, 2016, 2019, 2021 and 365 (Windows)
You can keep text together in several ways in Word. If you want to keep words or characters together, you can use nonbreaking spaces or nonbreaking hyphens or dashes and insert them using a dialog box or a keyboard shortcut. If you want to keep lines or paragraphs together on the same page, you can apply settings in the Paragraph dialog box (which can be built into styles if you use styles).
You may want to keep the lines in a paragraph together so that the paragraph doesn’t break across pages or you may want to keep a paragraph with the next paragraph and avoid inserting manual page breaks. This can be accomplished easily using the Paragraph dialog box (and can be built into styles if you use styles).
It’s important to understand some key paragraph concepts:
- A paragraph in Word is anything with a hard return after it (you have pressed Enter or Return).
- It’s best to eliminate any blank paragraphs in a long document.
- You can view paragraph marks or symbols by clicking Show/Hide ¶ on the Home tab in the Ribbon in the Paragraph group.
Recommended article: 14 Timesaving Microsoft Word Selection Shortcuts to Quickly Select Text
Do you want to learn more about Microsoft Word? Check out our virtual classroom or live classroom Word courses >
Keeping lines together in a paragraph
To keep the lines in a paragraph together on the same page in Word using the Ribbon:
- Select the paragraph in the Word document with the text you want to keep together. You can simply click in the paragraph to select it.
- Click the Home tab in the Ribbon and click the dialog box launcher on the bottom right of the Paragraph group. The Paragraph dialog box appears.
- Select the Line and Page breaks tab. Word displays options to keep the lines of the paragraph together or to keep the paragraph with the next paragraph.
- Check Keep lines together.
- Click OK. The paragraph will no longer break across pages.
Below is the Paragraph dialog box in Word with Keep lines together selected:

You can also use a context menu to access the Paragraph dialog box (right-click in a paragraph and choose Paragraph from the drop-down menu).
Keeping a paragraph with the next paragraph
To keep a paragraph on the same page with the next paragraph using the Ribbon:
- Click in the paragraph you want to keep with the next paragraph (the next paragraph should not be a blank paragraph).
- Click the Home tab in the Ribbon.
- Click the dialog box launcher on the bottom right of the Paragraph group. The Paragraph dialog box appears.
- Select the Line and Page breaks tab.
- Check Keep with next.
- Click OK.
You can also use a context menu to access the Paragraph dialog box (right-click in a paragraph and choose Paragraph from the drop-down menu).
Keeping text together with nonbreaking spaces
If you want specific words or characters to stay together on the same line (such as De Marco), you can use nonbreaking spaces instead of regular spaces.
To insert a nonbreaking space between two words or characters using a keyboard shortcut:
- Position the cursor between the two words or characters you want to keep together (there should be no space between these characters).
- Press Ctrl + Shift + Spacebar. Word inserts a nonbreaking space.
To insert a nonbreaking space between two words or letters using the Ribbon:
- Position the cursor between the two words or characters you want to keep together (there should be no space between these characters).
- Click the Insert tab in the Ribbon.
- Click Insert Symbol and then More Symbols in the drop-down menu. A dialog box appears.
- Select the Special Characters tab.
- Select Nonbreaking space and click Insert.
- Click Close. Word inserts a nonbreaking space.
Below is the Insert Symbol dialog box to insert a non-breaking space:

Keeping text together with nonbreaking hyphens or dashes
You can also use nonbreaking hyphens or dashes to keep words or characters together (such as co-ordinator or 416‑222‑9999).
To insert a nonbreaking hyphen between two words or characters using a keyboard shortcut:
- Position the cursor between the two words or characters you want to keep together (there should be no space between these characters).
- Press Ctrl + Shift + Underscore (_). Word inserts a nonbreaking hyphen.
To insert a nonbreaking hyphen between two words or characters using the Ribbon:
- Position the cursor between the two words or characters you want to keep together (there should be no space between these characters).
- Click the Insert tab in the Ribbon.
- Click Insert Symbol and then More Symbols in the drop-down menu. A dialog box appears.
- Select the Special Characters tab.
- Select Nonbreaking hyphen and click Insert.
- Click Close. Word inserts a nonbreaking hyphen.
To view nonbreaking spaces, nonbreaking hyphens and paragraph marks:
- Click the Home tab in the Ribbon.
- Click the Show/Hide ¶ in the Paragraph group.
You can turn off the symbols by clicking on the same button.
You can also quickly find and remove nonbreaking spaces or hyphens using the Replace dialog box.
To find and remove nonreaking spaces or hyphens:
- Press Ctrl + H. The Replace dialog box appears. You can also click the Home tab in the Ribbon and click Replace in the Editing group.
- Click More to expand the dialog box if necessary.
- Click in the Find What box.
- Click Special. A drop-down menu appears.
- Select nonbreaking space or nonbreaking hyphen.
- Ensure the Replace with box is empty.
- Click Find Next. Word should find the first nonbreaking space or nonbreaking hyphen.
- Click Replace or Replace All.
- Click Close.
Below is the Replace dialog box:

Although all of these techniques will keep text together, keeping paragraphs together is the most important. If you start using paragraph formatting to keep specific paragraphs together, you can avoid using manual page breaks for pagination.
This article was originally published on July 14, 2017 and has been updated for clarity and content.
Subscribe to get more articles like this one
Did you find this article helpful? If you would like to receive new articles, JOIN our email list.
More resources
How to Center Text Vertically on a Page in Word
How to Insert an Em Dash in Word (4 Ways with Shortcuts)
How to Quickly Remove Hard Returns in Word Documents
How to Insert, Format and Update Cross-References in Word
How to Convert a PDF to Word in Microsoft Word (for Free – No Third Party Programs Needed)
Related courses
Microsoft Word: Intermediate / Advanced
Microsoft Excel: Intermediate / Advanced
Microsoft PowerPoint: Intermediate / Advanced
Microsoft Word: Long Documents Master Class
Microsoft Word: Styles, Templates and Tables of Contents
Microsoft Word: Designing Dynamic Word Documents Using Fields
VIEW MORE COURSES >
To request this page in an alternate format, contact us.
Our instructor-led courses are delivered in virtual classroom format or at our downtown Toronto location at 18 King Street East, Suite 1400, Toronto, Ontario, Canada (some in-person classroom courses may also be delivered at an alternate downtown Toronto location). Contact us at info@avantixlearning.ca if you’d like to arrange custom instructor-led virtual classroom or onsite training on a date that’s convenient for you.
Copyright 2023 Avantix® Learning
Microsoft, the Microsoft logo, Microsoft Office and related Microsoft applications and logos are registered trademarks of Microsoft Corporation in Canada, US and other countries. All other trademarks are the property of the registered owners.
Avantix Learning |18 King Street East, Suite 1400, Toronto, Ontario, Canada M5C 1C4 | Contact us at info@avantixlearning.ca
Вы можете обнаружить, что иногда, когда вы печатаете тексты в документе Word, тексты не могут храниться вместе. Если вам нужно сохранить вместе несколько важных текстов, вы можете получить это с помощью следующих приемов.
Храните текст вместе с неразрывным пробелом
Храните текст вместе с неразрывным дефисом
Держите абзац и строку вместе с неразрывными абзацами и строками
 Храните текст вместе с неразрывным пробелом
Если вы хотите, чтобы некоторые слова отображались в одной строке, вы можете использовать неразрывный пробел вместо обычного пробела между словами.
1. Выделите пространство между словами, которые вы хотите оставить в строке. Смотрите скриншот:

2. Держать Ctrl и Shift кнопки и нажмите Space одновременно нажмите кнопку, тогда слова будут в одной строке. Смотрите скриншот:

Храните текст вместе с неразрывным дефисом
Если вы хотите сохранить в строке слова, соединенные дефисом, вы можете использовать неразрывный дефис вместо дефисных символов.
1. Выберите символ дефиса среди слов, которые вы хотите объединить, см. Скриншоты:

2. Держать Ctrl и Shift кнопки, затем нажмите  одновременно нажмите кнопку, чтобы вставить неразрывный дефис вместо обычного символа дефиса.
3. Повторите шаг 1 и шаг 2, чтобы вместо всех дефисов среди слов использовать неразрывные дефисы, тогда слова сохраняются в строке. Смотрите скриншот:
Держите абзац и строку вместе с неразрывными абзацами и строками
Если вы хотите сохранить на одной странице целый абзац или несколько строк, вы можете сделать следующее:
1. Поместите курсор в любое место абзаца и нажмите Главная > Настройка абзаца для открытия Пункт диалог. Смотрите скриншот:

2. Нажмите Разрывы строк и страниц и проверьте Держите линии вместе , затем нажмите OK. Смотрите скриншот:

Вы можете видеть, что абзац сохраняется на странице.
Относительные статьи:
- Удалить все отступы первой строки в Word
- Убрать все отступы справа в Word
- Убрать все левые отступы в Word
- Убрать все отступы в Word
Рекомендуемые инструменты для повышения производительности Word


Kutools For Word — Более 100 расширенных функций для Word, сэкономьте 50% времени
- Сложные и повторяющиеся операции можно производить разово за секунды.
- Вставляйте сразу несколько изображений из папок в документ Word.
- Объединяйте и объединяйте несколько файлов Word из папок в одну в желаемом порядке.
- Разделите текущий документ на отдельные документы в соответствии с заголовком, разрывом раздела или другими критериями.
- Преобразование файлов между Doc и Docx, Docx и PDF, набор инструментов для общих преобразований и выбора и т. Д.
Комментарии (1)
Оценок пока нет. Оцените первым!