
Some users may not have the ability to use your DatePicker if their Excel is not formatted correctly. I developed code that will create a dateGetter userform, get the user’s date selection as a Global variable, and then delete the form. It should be compatible with most systems, though I haven’t tested it on others than my own. Give it a shot. If it works for you, give me a shout out….
August 2020:
Fixed a glitch — when selecting the original date that opened with the form the returning date was «00:00:00 AM» — I fixed that below to return the date showing in the label2 caption.
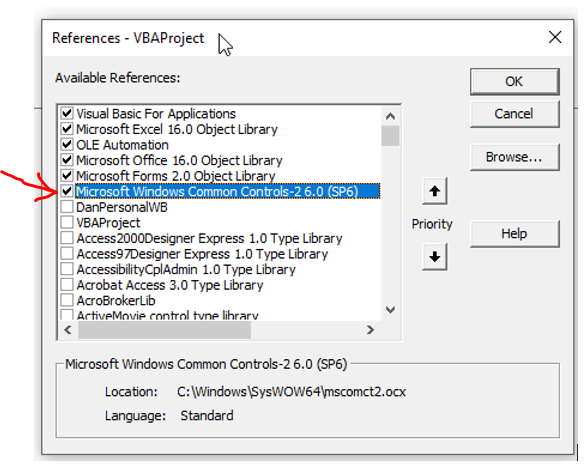
Also — MSForms reference is necessary for the dateGetter() subroutine to work properly or you get an error message when the forms objects are declared. I’ve added another subroutine that can add that reference through VBA code, or in the VBA Editor goto «Tools —> References» and select the MSForms refwerence. You must do this before attempting to run the dateGetter macro.
Public absDate As Date ' This Public Variable is necessary to pass selected date

Sub setGUIDReferences()
'   NOTE:  The dateGetter() sub will not work until the MSForms Reference is added to this workbook project
'   You can add the MSForms reference by running this sub first
'   Or go to Tools --> References and select the MSForms reference there
'   included below are several other common references you can use for other projects just uncomment them to add
'   *************************************************************************************************************

    On Error Resume Next
    'ThisWorkbook.VBProject.References.AddFromGuid "{000204EF-0000-0000-C000-000000000046}", 0, 0    '       Visual Basic For Applications
    'ThisWorkbook.VBProject.References.AddFromGuid "{00020813-0000-0000-C000-000000000046}", 0, 0    '       Microsoft Excel 16.0 Object Library
    'ThisWorkbook.VBProject.References.AddFromGuid "{00020430-0000-0000-C000-000000000046}", 0, 0    '       OLE Automation
    'ThisWorkbook.VBProject.References.AddFromGuid "{2DF8D04C-5BFA-101B-BDE5-00AA0044DE52}", 0, 0    '       Microsoft Office 16.0 Object Library
    ThisWorkbook.VBProject.References.AddFromGuid "{0D452EE1-E08F-101A-852E-02608C4D0BB4}", 0, 0    '       Microsoft Forms 2.0 Object Library
    'ThisWorkbook.VBProject.References.AddFromGuid "{3050F1C5-98B5-11CF-BB82-00AA00BDCE0B}", 0, 0    '       Microsoft HTML Object Library
    'ThisWorkbook.VBProject.References.AddFromGuid "{EAB22AC0-30C1-11CF-A7EB-0000C05BAE0B}", 0, 0    '       Microsoft Internet Controls
    'ThisWorkbook.VBProject.References.AddFromGuid "{420B2830-E718-11CF-893D-00A0C9054228}", 0, 0    '       Microsoft Scripting Runtime
    'ThisWorkbook.VBProject.References.AddFromGuid "{86CF1D34-0C5F-11D2-A9FC-0000F8754DA1}", 0, 0    '       Microsoft Windows Common Controls-2 6.0 (SP6)
    'ThisWorkbook.VBProject.References.AddFromGuid "{4AFFC9A0-5F99-101B-AF4E-00AA003F0F07}", 0, 0    '       Microsoft Access 16.0 Object Library
    'ThisWorkbook.VBProject.References.AddFromGuid "{0002E157-0000-0000-C000-000000000046}", 0, 0    '       Microsoft Visual Basic for Applications Extensibility 5.3
    'ThisWorkbook.VBProject.References.AddFromGuid "{F5078F18-C551-11D3-89B9-0000F81FE221}", 0, 0    '       Microsoft MSXML2 for XML Scraping
    On Error GoTo 0
End Sub

Sub dateGetter()
'   This creates dategetter userform for those without access to date picker
'   Bug Fixed: Aug 2020, Selecting Original Date was resulting in 12:00:00 AM

'*********
'   Note: MSForms Reference in Tools menu must be added to workbook first before this calendar script will work
'   You can add several commonly used references by running the "setGUIDReferences()" subroutine above.
'   Or go to Tools --> References and select the MSForms reference there
'*********

Dim myForm As Object, calendarForm As Object, newLabel As MSForms.Label, newSpinner As MSForms.SpinButton
Dim NewFrame As MSForms.Frame
Dim NewButton As MSForms.CommandButton, newButton2 As MSForms.CommandButton
Dim NewListBox As MSForms.ListBox
Dim smallDayArray
Dim xDiff As Long
Dim smallTextArray
Dim startDate As Date
Dim endDate As Date

    Set myForm = ThisWorkbook.VBProject.VBComponents.Add(3)

    'Create the User Form
    With myForm
        .Properties("Caption") = "Select Date Range"
        .Properties("Width") = 247.5
        .Properties("Height") = 350
    End With

    'create button
    Set NewButton = myForm.designer.Controls.Add("Forms.commandbutton.1")
    With NewButton
        .Name = "CommandButton1"
        .Top = 288
        .Left = 138
        .Width = 42
        .Height = 24
        .Font.Size = 10
        .Font.Name = "Tahoma"
        .Caption = "Cancel"
    End With

    'create button
    Set NewButton = myForm.designer.Controls.Add("Forms.commandbutton.1")
    With NewButton
        .Name = "CommandButton2"
        .Top = 288
        .Left = 186
        .Width = 42
        .Height = 24
        .Font.Size = 10
        .Font.Name = "Tahoma"
        .Caption = "Select"
    End With


    'create frame
    Set NewFrame = myForm.designer.Controls.Add("Forms.frame.1")
    With NewFrame
        .Name = "Frame1"
        .Top = 54
        .Left = 24
        .Width = 192
        .Height = 180
        .Font.Size = 9
        .Font.Name = "Tahoma"
    End With

    'Create label1
    Set newLabel = myForm.designer.Controls.Add("Forms.Label.1")
    With newLabel
        .Name = "Label1"
        .Top = 30
        .Left = 30
        .Width = 102
        .Height = 18
        .Font.Size = 12
        .Font.Name = "Tahoma"
        .ForeColor = RGB(128, 0, 0)
        .BackColor = RGB(256, 256, 256)
        .Caption = "November 2017"
    End With

    'Create label2
    Set newLabel = myForm.designer.Controls.Add("Forms.Label.1")
    With newLabel
        .Name = "Label2"
        .Top = 258
        .Left = 36
        .Width = 174
        .Height = 18
        .Font.Size = 12
        .Font.Name = "Tahoma"
        .ForeColor = RGB(0, 0, 0)
        .Caption = "01/01/2017"
    End With


    'Create SpinButton1
    Set newSpinner = myForm.designer.Controls.Add("Forms.spinbutton.1")
    With newSpinner
        .Name = "SpinButton1"
        .Top = 24
        .Left = 144
        .Width = 12.75
        .Height = 25
    End With

    'Create Calendar Header Labels
    smallDayArray = Array("S", "M", "T", "W", "T", "F", "S")
    smallTextArray = Array("day1", "day2", "day3", "day4", "day5", "day6", "day7")
    xDiff = 18
    For i = LBound(smallDayArray) To UBound(smallDayArray)
        Set lbl = NewFrame.Controls.Add("Forms.Label.1")
        With lbl
            .Name = smallTextArray(i)
            .Top = 6
            .Left = xDiff
            .Width = 12
            .Height = 18
            .Font.Size = 11
            .Font.Name = "Tahoma"
            .Caption = smallDayArray(i)
        End With
        xDiff = xDiff + 24
    Next i

    'Create Calendar boxes labels
    arrCounter = 1
    For j = 1 To 6
        xDiff = 12
        For k = 1 To 7
            Set lbl = NewFrame.Controls.Add("Forms.Label.1")
            With lbl
                .Name = "lb_" & arrCounter
                Select Case j
                    Case 1
                        .Top = 24
                    Case 2
                        .Top = 48
                    Case 3
                        .Top = 72
                    Case 4
                        .Top = 96
                    Case 5
                        .Top = 120
                    Case 6
                        .Top = 144
                End Select
                .Left = xDiff
                .Width = 18
                .Height = 18
                .Font.Size = 11
                .Font.Name = "Tahoma"
                .Caption = " " & arrCounter
                .ForeColor = RGB(128, 0, 0)
                .BackColor = RGB(256, 256, 256)
            End With
            arrCounter = arrCounter + 1
            xDiff = xDiff + 24
        Next k
    Next j
    ''add code for form module
    myForm.codemodule.insertlines 1, "Private Sub CommandButton1_Click()"
    myForm.codemodule.insertlines 2, "absDate = 0"
    myForm.codemodule.insertlines 3, "Unload Me"
    myForm.codemodule.insertlines 4, "End Sub"
    myForm.codemodule.insertlines 5, ""
    myForm.codemodule.insertlines 6, "Private Sub SpinButton1_SpinDown()"
    myForm.codemodule.insertlines 7, "Dim newDate1 As Date"
    myForm.codemodule.insertlines 8, "    newDate1 = DateValue(Left(Label1.Caption, Len(Label1.Caption) - 5) & " & Chr(34) & " 1, " & Chr(34) & " & Right(Label1.Caption, 4))"
    myForm.codemodule.insertlines 9, "    newDate1 = DateAdd(" & Chr(34) & "m" & Chr(34) & ", -1, newDate1)"
    myForm.codemodule.insertlines 10, "    Label1.Caption = MonthName(Month(newDate1)) & " & Chr(34) & " " & Chr(34) & " & Year(newDate1)"
    myForm.codemodule.insertlines 11, "    Call clearBoxes"
    myForm.codemodule.insertlines 12, "   Run fillCal(newDate1)"
    myForm.codemodule.insertlines 13, "End Sub"
    myForm.codemodule.insertlines 14, "Private Sub SpinButton1_SpinUp()"
    myForm.codemodule.insertlines 15, "Dim newDate1 As Date"
    myForm.codemodule.insertlines 16, "    newDate1 = DateValue(Left(Label1.Caption, Len(Label1.Caption) - 5) & " & Chr(34) & " 1, " & Chr(34) & " & Right(Label1.Caption, 4))"
    myForm.codemodule.insertlines 17, "    newDate1 = DateAdd(" & Chr(34) & "m" & Chr(34) & ", 1, newDate1)"
    myForm.codemodule.insertlines 18, "    Label1.Caption = MonthName(Month(newDate1)) & " & Chr(34) & " " & Chr(34) & " & Year(newDate1)"
    myForm.codemodule.insertlines 19, "    Call clearBoxes"
    myForm.codemodule.insertlines 20, "    Run fillCal(newDate1)"
    myForm.codemodule.insertlines 21, "End Sub"
    myForm.codemodule.insertlines 22, "Function dhDaysInMonth2(Optional dtmDate As Date = 0) As Integer"
    myForm.codemodule.insertlines 23, "    ' Return the number of days in the specified month.  Written by Chip Pierson"
    myForm.codemodule.insertlines 24, "    If dtmDate = 0 Then"
    myForm.codemodule.insertlines 25, "        ' Did the caller pass in a date? If not, use"
    myForm.codemodule.insertlines 26, "        ' the current date."
    myForm.codemodule.insertlines 27, "        dtmDate = Date"
    myForm.codemodule.insertlines 28, "    End If"
    myForm.codemodule.insertlines 29, "    dhDaysInMonth2 = DateSerial(Year(dtmDate), _ "
    myForm.codemodule.insertlines 30, "     Month(dtmDate) + 1, 1) - _ "
    myForm.codemodule.insertlines 31, "     DateSerial(Year(dtmDate), Month(dtmDate), 1)"
    myForm.codemodule.insertlines 32, "End Function"
    myForm.codemodule.insertlines 33, "Public Sub UserForm_Activate()"
    myForm.codemodule.insertlines 34, "Dim currentDate As Date"
    myForm.codemodule.insertlines 35, ""
    myForm.codemodule.insertlines 36, " For i = 1 To 42" & vbNewLine
    myForm.codemodule.insertlines 37, "     txt = txt & " & Chr(34) & "Private Sub lb_" & Chr(34) & " & i & " & Chr(34) & "_Click()" & Chr(34) & " & vbNewLine" & vbNewLine
    myForm.codemodule.insertlines 38, "     txt = txt & " & Chr(34) & "Dim newDate As Date" & Chr(34) & " & vbNewLine" & vbNewLine
    myForm.codemodule.insertlines 39, " txt = txt & " & Chr(34) & "newDate = DateValue(Mid(Label1.Caption, 1, Len(Label1.Caption) - 5) &" & Chr(34) & " & Chr(34) &   " & Chr(34) & Chr(34) & " & lb_" & " & i & " & Chr(34) & ".Caption & " & Chr(34) & " & Chr(34) & " & Chr(34) & ", " & Chr(34) & " & Chr(34) & " & Chr(34) & " & Right(Label1.Caption, 4))" & Chr(34) & " & vbNewLine" & vbNewLine
    myForm.codemodule.insertlines 40, "     txt = txt & " & Chr(34) & "Label2.Caption = " & Chr(34) & " & Chr(34) & " & Chr(34) & "Date:  " & Chr(34) & " & Chr(34) & " & Chr(34) & " & newDate" & Chr(34) & " & vbNewLine" & vbNewLine
    myForm.codemodule.insertlines 41, "txt = txt & " & Chr(34) & "End Sub" & Chr(34) & " & vbNewLine" & vbNewLine
    myForm.codemodule.insertlines 42, "Next i" & vbNewLine
    myForm.codemodule.insertlines 43, ""
    myForm.codemodule.insertlines 44, "Label2.Caption =  Chr(34) &  Chr(34) "
    myForm.codemodule.insertlines 45, "currentDate = DateValue(Month(Date) & " & Chr(34) & " 1" & Chr(34) & " & " & Chr(34) & ", " & Chr(34) & " & Year(Date))"
    myForm.codemodule.insertlines 46, "Run fillCal(currentDate)"
    myForm.codemodule.insertlines 47, "End Sub"
    myForm.codemodule.insertlines 48, "Function fillCal(startDate As Date)"
    myForm.codemodule.insertlines 49, "Dim currentDayOfMonth As Integer, i As Integer"
    myForm.codemodule.insertlines 50, "currentDayOfMonth = Day(Date)"
    myForm.codemodule.insertlines 51, "Dim startCal As Date, currentMonth as Integer"
    myForm.codemodule.insertlines 52, "Dim labelArray, sumVar3 As Long"
    myForm.codemodule.insertlines 53, "    Label2.Caption = " & Chr(34) & "" & Chr(34)
    myForm.codemodule.insertlines 54, "    labelArray = Array(" & Chr(34) & "lb_1" & Chr(34) & ", " & Chr(34) & "lb_2" & Chr(34) & ", " & Chr(34) & "lb_3" & Chr(34) & ", " & Chr(34) & "lb_4" & Chr(34) & ", " & Chr(34) & "lb_5" _
                                                                & Chr(34) & ", " & Chr(34) & "lb_6" & Chr(34) & ", " & Chr(34) & "lb_7" & Chr(34) & ", " & Chr(34) & "lb_8" & Chr(34) & ", " & Chr(34) & "lb_9" & Chr(34) & ", " & Chr(34) _
                                                                & "lb_10" & Chr(34) & ", " & Chr(34) & "lb_11" & Chr(34) & ", " & Chr(34) & "lb_12" & Chr(34) & ", " & Chr(34) & "lb_13" & Chr(34) & ", " & Chr(34) & "lb_14" & Chr(34) & ", " & Chr(34) & "lb_15" & Chr(34) & ",  _"
    myForm.codemodule.insertlines 55, "                      " & Chr(34) & "lb_16" & Chr(34) & ", " & Chr(34) & "lb_17" & Chr(34) & ", " & Chr(34) & "lb_18" & Chr(34) & ", " & Chr(34) & "lb_19" & Chr(34) & ", " & Chr(34) & "lb_20" & Chr(34) & ", " & _
                                                                Chr(34) & "lb_21" & Chr(34) & ", " & Chr(34) & "lb_22" & Chr(34) & ", " & Chr(34) & "lb_23" & Chr(34) & ", " & Chr(34) & "lb_24" & Chr(34) & ", " & Chr(34) & "lb_25" & Chr(34) & ", " & _
                                                                Chr(34) & "lb_26" & Chr(34) & ", " & Chr(34) & "lb_27" & Chr(34) & ", " & Chr(34) & "lb_28" & Chr(34) & ", " & Chr(34) & "lb_29" & Chr(34) & ", " & Chr(34) & "lb_30" & Chr(34) & ", " & Chr(34) & "lb_31" & Chr(34) & ", _"
    myForm.codemodule.insertlines 56, "                      " & Chr(34) & "lb_32" & Chr(34) & ", " & Chr(34) & "lb_33" & Chr(34) & ", " & Chr(34) & "lb_34" & Chr(34) & ", " & Chr(34) & "lb_35" & Chr(34) & ", " & Chr(34) & "lb_36" & Chr(34) & ", " & _
                                                                Chr(34) & "lb_37" & Chr(34) & ", " & Chr(34) & "lb_38" & Chr(34) & ", " & Chr(34) & "lb_39" & Chr(34) & ", " & Chr(34) & "lb_40" & Chr(34) & ", " & Chr(34) & "lb_41" & Chr(34) & ", " & Chr(34) & "lb_42" & Chr(34) & ")"
    myForm.codemodule.insertlines 57, "    Label1 = MonthName(Month(startDate)) & " & Chr(34) & " " & Chr(34) & " & Year(startDate)"
    myForm.codemodule.insertlines 58, "    sumVar3 = Weekday(startDate) - 1"
    myForm.codemodule.insertlines 59, "    "
    myForm.codemodule.insertlines 60, "    For i = LBound(labelArray) To UBound(labelArray)"
    myForm.codemodule.insertlines 61, "            Me.Controls(labelArray(i)).Caption = " & Chr(34) & "" & Chr(34) & ""
    myForm.codemodule.insertlines 62, "    Next i"
    myForm.codemodule.insertlines 63, "    "
    myForm.codemodule.insertlines 64, "     For i = 1 To dhDaysInMonth2(startDate)"
    myForm.codemodule.insertlines 65, "         Me.Controls(labelArray(sumVar3)).Caption = i"
    myForm.codemodule.insertlines 66, "         If currentDayOfMonth = i And month(Date) = Month(StartDate)  And Year(Date) = Year(StartDate) Then"
    myForm.codemodule.insertlines 67, "             Me.Controls(labelArray(sumVar3)).BackColor = RGB(256, 0, 0)"
    myForm.codemodule.insertlines 68, "             Me.Controls(labelArray(sumVar3)).ForeColor = RGB(256, 256, 256)"
    myForm.codemodule.insertlines 69, "             Label2.Caption = " & Chr(34) & "Date:  " & Chr(34) & " & DateValue(Month(startDate) & " & Chr(34) & "/" & Chr(34) & " & i & " & Chr(34) & "/" & Chr(34) & " & Year(startDate))"
    myForm.codemodule.insertlines 70, "        End If"
    myForm.codemodule.insertlines 71, "        sumVar3 = sumVar3 + 1"
    myForm.codemodule.insertlines 72, "     Next i"
    myForm.codemodule.insertlines 73, "    "
    myForm.codemodule.insertlines 74, "End Function"
    myForm.codemodule.insertlines 75, "Private Sub CommandButton2_Click()"
    myForm.codemodule.insertlines 76, "    absDate = Replace(Me.Label2.Caption, " & Chr(34) & "Date:  " & Chr(34) & ", " & Chr(34) & Chr(34) & "):Unload Me"
    myForm.codemodule.insertlines 77, "End Sub"
    myForm.codemodule.insertlines 78, "Private Sub clearBoxes()"
    myForm.codemodule.insertlines 79, "Dim labelArray"
    myForm.codemodule.insertlines 80, "     Label2.Caption = " & Chr(34) & "" & Chr(34)
    myForm.codemodule.insertlines 81, "    labelArray = Array(" & Chr(34) & "lb_1" & Chr(34) & ", " & Chr(34) & "lb_2" & Chr(34) & ", " & Chr(34) & "lb_3" & Chr(34) & ", " & Chr(34) & "lb_4" & Chr(34) & ", " & Chr(34) & "lb_5" _
                                                                & Chr(34) & ", " & Chr(34) & "lb_6" & Chr(34) & ", " & Chr(34) & "lb_7" & Chr(34) & ", " & Chr(34) & "lb_8" & Chr(34) & ", " & Chr(34) & "lb_9" & Chr(34) & ", " & Chr(34) _
                                                                & "lb_10" & Chr(34) & ", " & Chr(34) & "lb_11" & Chr(34) & ", " & Chr(34) & "lb_12" & Chr(34) & ", " & Chr(34) & "lb_13" & Chr(34) & ", " & Chr(34) & "lb_14" & Chr(34) & ", " & Chr(34) & "lb_15" & Chr(34) & ",  _"
    myForm.codemodule.insertlines 82, "                      " & Chr(34) & "lb_16" & Chr(34) & ", " & Chr(34) & "lb_17" & Chr(34) & ", " & Chr(34) & "lb_18" & Chr(34) & ", " & Chr(34) & "lb_19" & Chr(34) & ", " & Chr(34) & "lb_20" & Chr(34) & ", " & _
                                                                Chr(34) & "lb_21" & Chr(34) & ", " & Chr(34) & "lb_22" & Chr(34) & ", " & Chr(34) & "lb_23" & Chr(34) & ", " & Chr(34) & "lb_24" & Chr(34) & ", " & Chr(34) & "lb_25" & Chr(34) & ", " & _
                                                                Chr(34) & "lb_26" & Chr(34) & ", " & Chr(34) & "lb_27" & Chr(34) & ", " & Chr(34) & "lb_28" & Chr(34) & ", " & Chr(34) & "lb_29" & Chr(34) & ", " & Chr(34) & "lb_30" & Chr(34) & ", " & Chr(34) & "lb_31" & Chr(34) & ", _"
    myForm.codemodule.insertlines 83, "                      " & Chr(34) & "lb_32" & Chr(34) & ", " & Chr(34) & "lb_33" & Chr(34) & ", " & Chr(34) & "lb_34" & Chr(34) & ", " & Chr(34) & "lb_35" & Chr(34) & ", " & Chr(34) & "lb_36" & Chr(34) & ", " & _
                                                                Chr(34) & "lb_37" & Chr(34) & ", " & Chr(34) & "lb_38" & Chr(34) & ", " & Chr(34) & "lb_39" & Chr(34) & ", " & Chr(34) & "lb_40" & Chr(34) & ", " & Chr(34) & "lb_41" & Chr(34) & ", " & Chr(34) & "lb_42" & Chr(34) & ")"
    myForm.codemodule.insertlines 84, "      For i = lbound(labelArray) to ubound(labelArray)"
    myForm.codemodule.insertlines 85, "         Me.Controls(labelArray(i)).BackColor = RGB(256, 256, 256)"
    myForm.codemodule.insertlines 86, "         Me.Controls(labelArray(i)).ForeColor = RGB(0, 0, 0)"
    myForm.codemodule.insertlines 87, "      next i"
    myForm.codemodule.insertlines 88, "End Sub"
    '   add click controls for date label boxes
    Dim myCounter As Long
    myCounter = 89
        For i = 1 To 42
            myForm.codemodule.insertlines myCounter, "Private Sub lb_" & i & "_Click()"
            myCounter = myCounter + 1
            myForm.codemodule.insertlines myCounter, "Dim newDate As Date"
            myCounter = myCounter + 1
            myForm.codemodule.insertlines myCounter, "Call clearBoxes"
            myCounter = myCounter + 1
            myForm.codemodule.insertlines myCounter, "absDate = DateValue(Left(Label1.Caption, Len(Label1.Caption) - 5) & " & Chr(34) & Chr(32) & Chr(34) & " & lb_" & i & ".Caption & " & Chr(34) & ", " & Chr(34) & Chr(38) & " Right(Label1.Caption, 4))"
            myCounter = myCounter + 1
            myForm.codemodule.insertlines myCounter, "Label2.Caption = " & Chr(34) & "Date:  " & Chr(34) & " & absDate" & vbNewLine
            myCounter = myCounter + 1
            myForm.codemodule.insertlines myCounter, "lb_" & i & ".backcolor = rgb(256,0,0)"
            myCounter = myCounter + 1
            myForm.codemodule.insertlines myCounter, "lb_" & i & ".forecolor = rgb(256,256,256)"
            myCounter = myCounter + 1
            myForm.codemodule.insertlines myCounter, "End Sub" & vbNewLine
            myCounter = myCounter + 1
    Next i
    'Add and show new userform
    absDate = Format(Date, "mm/dd/yyyy")
    Set calendarForm = VBA.UserForms.Add(myForm.Name)
    calendarForm.Show


    If absDate <> 0 Then
    '   Here is where you put your code to to use the selected date
    '   whhich is in the global variabole "absDate"
        startDate = absDate
        Debug.Print "Your First Date is " & startDate
    Else
        Beep
        MsgBox "You did not select a date"
        GoTo endItAll
    End If


endItAll:
    '   Uncomment the following line if you want to delete the form after using it
    ThisWorkbook.VBProject.VBComponents.Remove myForm
End Sub
Function dhDaysInMonth(Optional dtmDate As Date = 0) As Integer
    ' Return the number of days in the specified month.  Written by Chip Pierson
    If dtmDate = 0 Then
        ' Did the caller pass in a date? If not, use
        ' the current date.
        dtmDate = Date
    End If
    dhDaysInMonth2 = DateSerial(Year(dtmDate), _
     Month(dtmDate) + 1, 1) - _
     DateSerial(Year(dtmDate), Month(dtmDate), 1)
End Function
Date Picker Calendar in Excel VBA
Oftentimes, users want to click a button and select a date. This is no different for Excel developers. Check out this ActiveX control by Microsoft that allows users to do just that. It’s a little old school looking, but actually has quite a nice feel to it.
Start by creating a userform and enabling the control by Right-clicking on the Tools menu and click Add additional tools
Now, let’s add this to the userform!
In the downloadable workbook, you’ll see the control was renamed to ‘fCal’. When you double-click the control you’ll see the following code which is the DateClick event of that control:
code snippet
This userform cleverly has two labels to store relevant info on the Userform that summoned it. 1.) The name of the userform that called it and 2.) The name of the control or textbox that needs the date sent to it.
Then, this code above loops through all userforms in your project until it finds one that matches the label for the Userform (lblUF) and the label for the textbox needed (lblCtrlName).
Also, you may need to enable Microsoft Windows Common Controls -2 6.0 (SP6) by using Tools->References and clicking:
s
Stop Wasting Your Time
Experience Ultimate Excel Automation & Learn to “Make Excel Do Your Work For You”
s
Watch Us Make a Calendar In Excel On YouTube:
This website uses cookies to improve your experience. We’ll assume you’re ok with this, but you can opt-out if you wish. Cookie settingsACCEPT
Wait A Second!
Thank you for visiting! Here’s a FREE gift for you!
Enroll In My FREE VBA Crash Course For FREE!
Learn how to write macros from scratch, make buttons and simple procedures to automate tasks.

Элемент управления пользовательской формы DTPicker (поле с календарем), предназначенный для выбора и ввода даты. Примеры кода VBA Excel с DTPicker.
UserForm.DTPicker – это элемент управления пользовательской формы, представляющий из себя отформатированное текстовое поле с раскрывающимся календарем, клик по выбранной дате в котором записывает ее в текстовое поле.

При вызове календаря пользовательская форма теряет фокус – это видно на изображении. При редактировании даты непосредственно в текстовом поле DTPicker, формат поля позволяет изменять элементы даты (день, месяц, год) по отдельности.
Чтобы перемещаться между элементами даты, необходимо, или выбирать элемент мышью, или нажимать любой знак разделителя («.», «,» или «/») на клавиатуре. А клик по знаку «+» или «-», соответственно, увеличит или уменьшит значение элемента даты на единицу.
Если в элемент «год» ввести однозначное число или двузначное число, не превышающее двузначный остаток текущего года, через пару секунд автоматически добавятся первые две цифры текущего столетия (20). Если вводимое двузначное число превысит двузначный остаток текущего года, автоматически добавятся первые две цифры прошлого столетия (19).
DTPicker – это сокращение от слова DateTimePicker, не являющегося в VBA Excel ключевым словом, как и DatePicker.
Добавление DTPicker на Toolbox
Изначально на панели инструментов Toolbox нет ссылки на элемент управления DTPicker, поэтому ее нужно добавить самостоятельно.
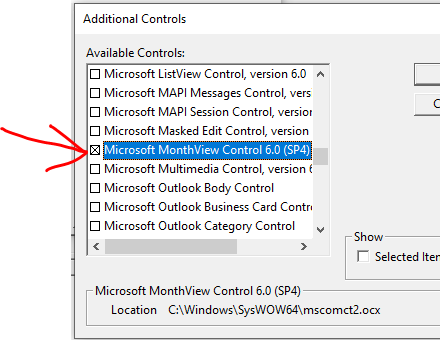
Чтобы добавить DTPicker на панель инструментов Toolbox, кликните по ней правой кнопкой мыши и выберите из контекстного меню ссылку «Additional Controls…»:

В открывшемся окне «Additional Controls» из списка дополнительных элементов управления выберите строку «Microsoft Date and Time Picker Control»:

Нажмите кнопку «OK» и значок элемента управления DTPicker появится на панели инструментов Toolbox:

Свойства поля с календарем
| Свойство | Описание |
|---|---|
| CalendarBackColor | Заливка (фон) календаря без заголовка. |
| CalendarForeColor | Цвет шрифта чисел выбранного в календаре месяца. |
| CalendarTitleBackColor | Заливка заголовка календаря и фон выбранной даты. |
| CalendarTitleForeColor | Цвет шрифта заголовка (месяц и год) и выбранного в календаре числа. |
| CalendarTrailingForeColor | Цвет шрифта чисел предыдущего и следующего месяца. |
| CheckBox | В значении True отображает встроенный в DTPicker элемент управления CheckBox. По умолчанию – False. |
| ControlTipText | Текст всплывающей подсказки при наведении курсора на DTPicker. |
| CustomFormat | Пользовательский формат даты и времени. Работает, когда свойству Format присвоено значение dtpCustom (3). |
| Day (Month, Year) | Задает или возвращает день (месяц, год). |
| DayOfWeek | Задает или возвращает день недели от 1 до 7, отсчет начинается с воскресенья. |
| Enabled | Возможность раскрытия календаря, ввода и редактирования даты/времени. True – все перечисленные опции включены, False – выключены (элемент управления становится серым). |
| Font | Шрифт отображаемого значения в отформатированном поле элемента управления. |
| Format | Формат отображаемого значения в поле элемента управления DTPicker, может принимать следующие значения: dtpCustom (3), dtpLongDate (0), dtpShortDate (1) (по умолчанию) и dtpTime (2). |
| Height | Высота элемента управления DTPicker с нераскрытым календарем. |
| Hour (Minute, Second) | Задает или возвращает часы (минуты, секунды). |
| Left | Расстояние от левого края внутренней границы пользовательской формы до левого края элемента управления. |
| MaxDate | Максимальное значение даты, которое может быть выбрано в элементе управления (по умолчанию – 31.12.9999). |
| MinDate | Минимальное значение даты, которое может быть выбрано в элементе управления (по умолчанию – 01.01.1601). |
| TabIndex | Определяет позицию элемента управления в очереди на получение фокуса при табуляции, вызываемой нажатием клавиш «Tab», «Enter». Отсчет начинается с нуля. |
| Top | Расстояние от верхнего края внутренней границы пользовательской формы до верхнего края элемента управления. |
| UpDown | Отображает счетчик вместо раскрывающегося календаря. True – отображается SpinButton, False – отображается календарь (по умолчанию). |
| Value | Задает или возвращает значение (дата и/или время) элемента управления. |
| Visible | Видимость поля с календарем. True – DTPicker отображается на пользовательской форме, False – DTPicker скрыт. |
| Width | Ширина элемента управления DTPicker с нераскрытым календарем. |
DTPicker – это сокращение от слова DateTimePicker, не являющегося в VBA Excel ключевым словом, как и DatePicker.
Примеры кода VBA Excel с DTPicker
Программное создание DTPicker
Динамическое создание элемента управления DTPicker с помощью кода VBA Excel на пользовательской форме с любым именем:
|
1 2 3 4 5 6 7 8 9 10 11 12 13 14 15 16 17 |
Private Sub UserForm_Initialize() Dim myDTPicker As DTPicker With Me .Height = 100 .Width = 200 ‘Следующая строка создает новый экземпляр DTPicker Set myDTPicker = .Controls.Add(«MSComCtl2.DTPicker», «dtp», True) End With With myDTPicker .Top = 24 .Left = 54 .Height = 18 .Width = 72 .Font.Size = 10 End With Set myDTPicker = Nothing End Sub |
Данный код должен быть размещен в модуле формы. Результат работы кода:

Применение свойства CustomFormat
Чтобы задать элементу управления DTPicker пользовательский формат отображения даты и времени, сначала необходимо присвоить свойству Format значение dtpCustom. Если этого не сделать, то, что бы мы не присвоили свойству CustomFormat, будет применен формат по умолчанию (dtpShortDate) или тот, который присвоен свойству Format.
В данном примере создается пользовательский формат для полей с календарем DTPicker1 и DTPicker2, размещенных на пользовательской форме, и отображаются в них текущие дата и время.
|
Private Sub UserForm_Initialize() With DTPicker1 .Format = dtpCustom .CustomFormat = «Год: yyyy; месяц: M; день: d» .Value = Now End With With DTPicker2 .Format = dtpCustom .CustomFormat = «Часы: H; минуты: m; секунды: s» .Value = Now End With End Sub |
Результат работы кода:

Таблица специальных символов и строк, задающих пользовательский формат даты и времени (регистр символов имеет значение):
| Символы и строки | Описание |
|---|---|
| d | День месяца из одной или двух цифр. |
| dd | День месяца из двух цифр. К числу из одной цифры впереди добавляется ноль. |
| ddd | Сокращенное название дня недели из двух символов (Пн, Вт и т.д.). |
| dddd | Полное название дня недели. |
| h | Час из одной или двух цифр в 12-часовом формате. |
| hh | Час из двух цифр в 12-часовом формате. К часу из одной цифры впереди добавляется ноль. |
| H | Час из одной или двух цифр в 24-часовом формате. |
| HH | Час из двух цифр в 24-часовом формате. К часу из одной цифры впереди добавляется ноль. |
| m | Минута из одной или двух цифр. |
| mm | Минута из двух цифр. К минуте из одной цифры впереди добавляется ноль. |
| M | Месяц из одной или двух цифр. |
| MM | Месяц из двух цифр. К месяцу из одной цифры впереди добавляется ноль. |
| MMM | Сокращенное название месяца из трех символов. |
| MMMM | Полное название месяца. |
| s | Секунда из одной или двух цифр. |
| ss | Секунда из двух цифр. К секунде из одной цифры впереди добавляется ноль. |
| y | Год из одной или двух последних цифр. |
| yy | Год из двух последних цифр. |
| yyyy | Год из четырех цифр. |
Создание границ интервала дат
Простенький пример, как задать интервал дат с начала месяца до текущего дня с помощью двух элементов управления DTPicker:
|
Private Sub UserForm_Initialize() DTPicker1.Value = Now DTPicker1.Day = 1 DTPicker2.Value = Now End Sub |
Результат работы кода, запущенного 23.11.2020:

DTPicker – это сокращение от слова DateTimePicker, не являющегося в VBA Excel ключевым словом, как и DatePicker.
Ah, The complexities of automation! The versatile and multifaceted world of Excel VBA offers an array of tools and functionalities to streamline tasks and make life easier. Yet, despite its vast offerings, not all versions of Excel VBA come equipped with the desired calendar control, one that would allow for the selection of dates in a visually appealing manner, instead of the tedious manual input of dates into cells or text boxes. But fear not! For we shall embark on a journey, one that will unravel the mysteries of crafting a customized, dynamic calendar in Excel VBA using VBA User Forms and Command Buttons.
Step 1: Baffling Beginnings
Our journey begins with the creation of a User Form, a task achieved by navigating to the VBA editor and right-clicking on the ‘Project’ option in the Project Explorer, selecting ‘Insert’, followed by ‘User Form’. Voila! A new User Form will mysteriously appear, waiting to be customized to your whims and fancies.
Step 2: Commanding Conundrum
Next, we add a series of Command Buttons to the User Form, buttons that will act as our navigational tools, leading us through the calendar and enabling us to switch between months and years. And, to further confuse the matter, we add combo boxes, providing the option for the user to choose the month and year.
Step 3: Cryptic Code
With the controls in place, it’s time to delve into the code, to bring our dynamic calendar to life. To start, we write a function to generate the calendar based on the selected month and year, populating it with the correct number of days and illuminating the current date. And, as a bonus, we add a feature to highlight already existing dates in the text box or label by comparing the dates and marking them with a small star symbol, making the calendar even more user-friendly.
Watch the step-by-step video tutorials to learn the design and coding
Step 4: Calling the Calendar
Finally, with the dynamic calendar fully functional, we can summon it in our VBA project by using the ‘SelectedDate’ function. There are two methods to call this function:
Method 1: Call Calendar.SelectedDate(Me.TextBox1)
Method 2: Me.TextBox1.Value = Calendar.SelectedDate
The first method calls the calendar control and passes the value of the text box to the ‘SelectedDate’ function, while the second method calls the calendar control and assigns the selected date to the text box.
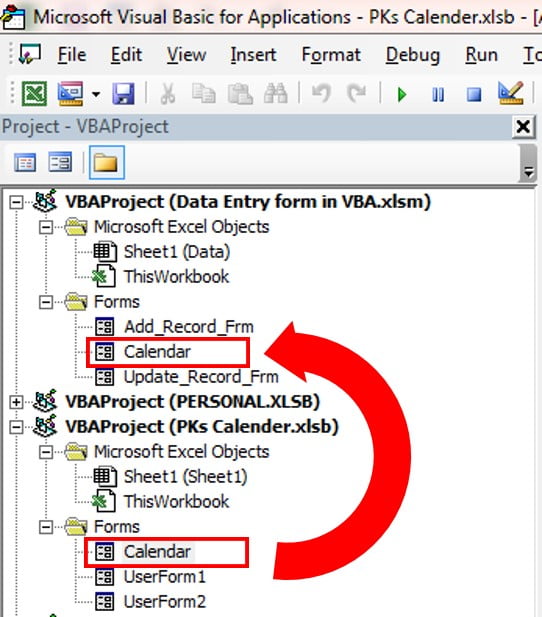
Move the Calendar control in from One to another VBA Project:
Just move this calendar form in your VBA project just drag it using mouse
Bursting with Conclusions
And there you have it, a perplexing puzzle solved, a dynamic calendar crafted with the use of Excel VBA User Forms and Command Buttons. The calendar control, now at your beck and call, can be used in various VBA projects, and is easily summoned using the ‘SelectedDate’ function. And, with a few modifications, additional functionality, such as highlighting of existing dates or changes in style and appearance, can be added to further confuse and bewilder.
This Fully Functional Dynamic Calendar Control in VBA, we have designed to use in VBA project. You can use it for Excel Cells, Textbox, Label and Command Button etc. It is extremely easy to call this Calendar for your VBA Project. You can call this with two methods.
Click here to download this Fully Function Calendar Control
This is a guest post by Vijay, our in-house VBA Expert.
There are times when we are entering dates into several columns and would like to select a date from a popup calendar instead of manually typing.
Today, lets understand how we can set up a pop-up calendar in Excel so that your users can easily input dates by right clicking on a cell and inserting a date.
Keep in mind:
1. This code is only supported on the 32-Bit versions of Excel.
2. You need to have admin rights to be able to install the ActiveX Control
First, take a look at pop-up calendar
Here is a short demo of how our pop-up calendar behaves.

What we need to do this
1. Design user form that contains our calendar.
2. Create a Data Table
3. Put some VBA code to get this done
Design user form that contains our calendar.
First let’s design the user form, so start up Excel and bring up the Visual Basic editor and add an user form in the project.
We would need the Microsoft Date and Time Picker control for this project, so please ensure that you have the required file available on your system. If it is not available you may download the MSCOMCT2.OCX from this link.
http://activex.microsoft.com/controls/vb6/mscomct2.cab
Installing this file is pretty simple, you need to extract the contents form the CAB file and then copy this into your System32 folder and then register using the REGSVR32 utility.
If you are using Windows 7 or above you would need to copy this file into the SysWOW64 folder and then register.
For Windows 7 and above, please make sure you are running the Command Prompt (Admin) to be able to successfully register the ActiveX control.
Windows 7: Click on Start, All Programs, Accessories, Command Prompt (right click and choose Run as Administrator
Windows 8: Windows Key + X, then choose Command Prompt (Admin)

Okay, let’s get back to designing the user form.
Insert a new Userfrom on the VBA project and then click on Addition Controls on the Tools menu.

Once the Additional controls dialog box is on the screen, locate the above highlighted entry and then select the same by clicking the box on the left. Now click Ok to close this dialog box.
Now place one Monthview control on the userform and one Command button.
Below are the properties that we need to change for the Commandbutton
• Caption = “Close”
• Cancel = True
• Name = cmdClose
Place this command button anywhere you like on the userfrom, we will place the Monthview on top of this to avoid show this to the user.
Since we have specified the Cancel = True for the commandbutton, the click event can be triggered by pressing the Escape key to handle the code that we will write for the Close button.
Now place the Monthview control as show in the picture below

We are done designing the Userform, now we need to write the code to handle the events.
Below is the code
Close Button
Private Sub cmdClose_Click()

    Unload Me

End Sub
Userfrom
Private Sub UserForm_Initialize()

    'matching the date in the calendar with the date of the active cell

    'if there is a date,

    If IsDate(ActiveCell.Value) Then

        Me.MonthView1.Value = ActiveCell.Value

    Else

        Me.MonthView1.Value = Now

    End If

End Sub
Private Sub MonthView1_DateClick(ByVal DateClicked As Date)

    On Error Resume Next

    Dim cell As Object

    For Each cell In Selection.Cells

        cell.Value = DateClicked

    Next cell

    Unload Me

End Sub
What the above code does?
1. The close button code will simply unload the userform and take it off the screen.
2. The userform initialize event code will check if the current cell on which we are right clicking the mouse contains any date, if there is a date then it will set the date on the calendar as the one on the cell, otherwise it will show today’s date.
3. The dateclick event of the Monthview control occurs when we click on any date, this code is responsible for populating the cell with the date we have selected. If there are multiple cells selected the code will populate all of them with the date selected.
Adding the context menu option
Now comes the interesting part of adding the context menu option, one thing I would like to specify here as the name suggests “Context menu” these options change depending on what and where we are right clicking the mouse. You will see a different context menu when you right click on a cell, table, shape etc. as shown in the example below

Since every object has a different type of context menu associated we need to make site we are adding our option to the right place.
I would recommend reading this article to know more about the types of commandbars available and how to use them. http://msdn.microsoft.com/en-us/library/office/aa141001(v=office.10).aspx
Also this link provides a list of available names http://www.mrexcel.com/forum/excel-questions/525939-visual-basic-applications-list-available-commandbars-excel-2010-a.html
We wanted to add the right click context option to a data table which is called as “List Range Popup”.
Create a Data Table
Type the heading in Cells
B2 = ID
C2 = Start Date
D2 = End Date
E2 = Name
Now click on cell B2, and press CTRL + T shortcut from the keyboard. Make sure to select the option My Table has headers and then click Ok.
We would need the add the below code to the Open event of our workbook so that this option is available to us every time we need to work here.
Private Sub Workbook_Open()

    On Error Resume Next

    Dim NewControl As CommandBarControl

    Application.OnKey "+^{C}", "Module1.OpenCalendar"

    Application.CommandBars("List Range Popup").Controls("Insert Date").Delete

    Set NewControl = Application.CommandBars("List Range Popup").Controls.Add(Before:=1)

    With NewControl

        .Caption = "Insert Date"

        .OnAction = "Module1.OpenCalendar"

        .BeginGroup = True

    End With

End Sub
We have also assigned a shortcut key of CTRL + SHIFT + C to this, for those who love to work more using the keyboard.
The above code will add the “Insert Date” context menu option to our data table(s) in the active workbook whenever we open this file.
Next is cleanup
We need to make sure that the context menu we have added is also removed when the file is close, the below code will do that for us.
Private Sub Workbook_BeforeClose(Cancel As Boolean)

    On Error Resume Next

    Application.OnKey "+^{C}"

    Application.CommandBars("List Range Popup").Controls("Insert Date").Delete

End Sub
Note: I have seen the project code left over in the VBA project explorer even after we have close this file, and did some research on the same. The common reason for this is having some COM addins installed. Please share if you also run into this issue and if you were able to find any other reasons or ways to eliminate this issue.
Download Demo File
Click here to download the demo file & use it to understand this technique.
What about you? Do you use them often? Please share your experiences, techniques & ideas using comments.
If you are new to VBA, Excel macros, go thru these links to learn more.
- What is VBA & Macros? Introduction
- Excel VBA Example Macros
- VBA tutorial videos
Join our VBA Classes
If you want to learn how to develop applications like these and more, please consider joining our VBA Classes. It is a step-by-step program designed to teach you all concepts of VBA so that you can automate & simplify your work.
Click here to learn more about VBA Classes & join us.
About Vijay
Vijay (many of you know him from VBA Classes), joined chandoo.org full-time this February. He will be writing more often on using VBA, data analysis on our blog. Also, Vijay will be helping us with consulting & training programs. You can email Vijay at sharma.vijay1 @ gmail.com. If you like this post, say thanks to Vijay.