
Ваши документы доступны там, где есть доступ к Интернету, но иногда вам нужно выполнить работу, когда вы не подключены к веб-приложению. Хорошая новость состоит в том, что вы можете скачать копию документа и работать с ним без подключения к Интернету, после чего вы сможете добавить его позже.
Совет: Если у вас есть классическое приложение OneDrive, вам не нужно загружать копию, так как у вас уже есть файлы OneDrive на компьютере. Любые изменения, внесенные в файлы в папке OneDrive на компьютере, будут автоматически синхронизироваться при следующем подключении к Интернету.
-
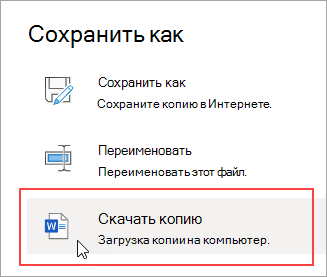
Выберите Файл > Сохранить как.
-
Выберите скачать копию.

-
Выберите расположение, в котором нужно сохранить файл, и нажмите кнопку сохранить.
Сочетание клавиш
Если вы уже знаете, какой документ вам нужен, вам не нужно открывать его, чтобы сохранить копию на своем компьютере. Просто Скачайте копию прямо из OneDrive.
Совет: Кроме того, это простой способ одновременной загрузки нескольких документов.
-
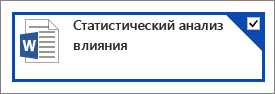
Выберите документ, который вы хотите загрузить.
-
В меню OneDrive выберите пункт скачать.
-
Выберите расположение, в котором нужно сохранить файл, и нажмите кнопку сохранить.

Нужна дополнительная помощь?
Word Online является интернет-версией программы для Windows. Данный инструмент очень удобен, и позволяет работать с документами, не перемещая их на флэшку. Все происходит в онлайн-режиме, а доступ к файлу можно предоставить сразу нескольким пользователям. Внутри приложения можно создавать отдельные документы, но доступны и другие варианты. О том, как загрузить документ в Ворд Онлайн, какие варианты для этого предусмотрены, и где хранятся загруженные файлы.

Как загрузить документ в Ворд Онлайн
Сервис от Microsoft в интернете мало чем отличается от самой программы. Большинство инструментов, применяемых в классической версии, добавлено и в Ворд Онлайн. Поэтому особых сложностей у пользователей при работе с ней не возникает.
Его главное преимущество – возможность работать с файлами на любом устройстве, при этом не нужно перекидывать документы на флешку. Все документы, которые попадают в Word Online, автоматически сохраняются на облачном диске OneDrive. Сюда собираются, как созданные в процессе работы файлы, так и загруженные в приложение. У Ворд Онлайн есть полный комплект инструментов, который позволяет:
- Редактировать тексты.
- Создавать таблицы и диаграммы.
- Загружать документ в редактор, и работать с ним в любое время.
- Подгрузить файл с жесткого диска компьютера
Обратите внимание! Ворд Онлайн является полнофункциональным аналогом версии Word, которой вы пользуетесь на стационарных компьютерах. Отличается лишь облегченных набором опций.
Два способа, как загрузить документ в Word Online
Загрузку любых файлов в сервис можно выполнить, используя готовые инструкции. Они не являются экстрасложными, поэтому никаких специальных навыков вам не потребуется. Первый метод, как загрузить документ в Ворд Онлайн следующий:
- Откройте приложение через браузер, или сохраненную для него закладку.
- В верхней панели меню нажмите вкладку «Файл».
- Перейдите на пункт «Открыть».
- Откроется окно, в котором следует выбрать закладку «Загрузка».
- Через проводник найдите файл, который требуется добавить.
- Перетащите нужный файл на вкладку «Загрузка», для этого подхватите его мышкой.
Документ не только загрузится в облачное хранилище, но и откроется сразу в рабочем окне редактора. С ним можно сразу работать. Если этого пока не требуется, просто закройте окно. Все изменения, которые вы вносите, будут сохранены автоматически. Есть и еще одна методика, чтобы загрузить документ в Ворд Онлайн:
- В редакторе Word Online кликните на «Файл» в меню, и сразу на строку «Открыть».
- В окошке кликните на вкладку «Загрузка».
- Вы увидите пункт «Выбрать файл на устройстве», нажмите на него.
- Найдите нужный вам документ, и два раза кликните на него мышью.
- Начнется автоматическая загрузка в редактор. Как и в предыдущем случае, файл откроется в окне, и будет загружен в облако.
Такие простые действия позволят быстро добавить необходимые файлы в облачное хранилище, и работать с ними в любое время, без привязки к конкретному ПК. При необходимости можно скачать документ после редакции снова на жесткий диск компьютера. Выполняется это через меню «Файл/Скачать». Документ сохранится в папку «Загрузки», либо для него можно указать конкретный адрес.
![]()
Download Article
![]()
Download Article
No matter your platform, there’s no shortage of ways to send a Microsoft Word document to anyone on the Internet. Most cloud services (such as Google Drive and Dropbox) feature the ability to send documents directly from their desktop and mobile apps. You can also attach a document to an email or Facebook chat. And if you have mail program set up on your computer, you can even send your document without leaving Microsoft Word.
-
1
Sign in to your Gmail or Yahoo! Mail account. You can attach your Word document to a message in Gmail or Yahoo! Mail on a computer or by using either service’s app for mobile devices.
- Most free mail sites and apps are similar. These instructions may also help you use providers other than Gmail and Yahoo.
-
2
Click or tap “Compose”. In both mobile apps, the “Compose” icon is a pencil.[1]
A new message window will appear.Advertisement
-
3
Click or tap the paperclip icon. The file selection box will appear on most platforms.[2]
- If you’re using the Yahoo! Mail app on a mobile device, tap the + sign, and then tap the second icon (a sheet of paper) in the resulting toolbar.[3]
The file selection window should now appear.
- If you’re using the Yahoo! Mail app on a mobile device, tap the + sign, and then tap the second icon (a sheet of paper) in the resulting toolbar.[3]
-
4
Tap “Attach File” or “Insert from Drive”. You can skip this step if you’re not using the Gmail app on a mobile device.
- Choose “Insert from Drive” if the document is saved to your Google Drive.
- Choose “Attach File” if the document is saved to your phone or tablet.
-
5
Navigate to the document you want to attach. Browse to the location of your Word document and double-click (or tap) to attach it.
- If you’re attaching from Google Drive, tap the file you want to attach, and then tap “Select”.
-
6
Address the email to the recipient. Enter the desired recipient’s email address into the “To:” field, then add your subject and message content.
-
7
Click or tap “Send”. When the recipient opens the email, they’ll find the option to open or download the file to their computer or mobile device.


Advertisement
-
1
Open the Mail app on your device. To use this method, make sure Mail is properly configured to send mail from your email account.[4]
- You’ll be able to attach a document that’s on your device or in your iCloud Drive.
- If you have the Dropbox, Google Drive, or OneDrive apps installed on your device, you’ll have the option to attach a document from one of those accounts.
-
2
Tap the “Compose” icon. The icon looks like a square with a pencil.
-
3
Type an email address into the “To:” field. This should be the address of the person to whom you’ll be sending the document.
-
4
Type your message. Enter a subject into the “Subject” field and type a note to the recipient in the main text area.
-
5
Touch and hold your finger in the body of the message. A black bar will appear containing several options from which to choose.[5]
-
6
Tap “Add Attachment”. The file navigator will open to your iCloud drive by default.
-
7
Tap “Locations” to switch to another location. If the document is not located in your iCloud drive, choose it from any of the folders listed (including Google Drive, Dropbox, or OneDrive, if applicable).
- If you don’t see an icon for the cloud service you use, tap “More,” and then select your service. Flip the switch to the “On” position to enable it, and then use the back button to return to the Locations screen.
-
8
Select the file and tap “Add Attachment.” You’ll be returned to the email message you previously composed. This message now has your document attached.
-
9
Tap “Send.” The file will be delivered to the appropriate email account.


Advertisement
-
1
Launch the Mail app on your Apple device. To use this method, you’ll need to have the Mail app configured to send mail through your email account. If you haven’t already done so, do it now.
-
2
Press ⌘ Cmd+N to compose a new message. You could also click the New Message icon (a square with a pencil) or click File > New Message.[6]
-
3
Click the paperclip icon. This icon appears in the upper right area of the New Message Window.
-
4
Select the document and click “Choose File”. You can hold down the ⌘ Cmd key as you click if you want to select multiple files.
-
5
Address the email to the recipient. Type the recipient’s email address into the “To:” field, a subject in the “Subject:” field, and a note in the large text area.
-
6
Send the email. Click the paper airplane icon at the top left corner of the message to send the email and its attached document.


Advertisement
-
1
Open your Google Drive. If your Word document is located in your Google Drive, it’s easy to share it with others. Accessing your Drive is different depending on your platform:[7]
- Mobile: Launch the Google Drive app on your device.
- Desktop: Log in to http://drive.google.com in your web browser.
-
2
Navigate to the document you want to share. If you don’t see it in the main folder, you may have to look in some of the subfolders.
- If you haven’t yet uploaded the document from your computer, click New > File Upload, and then double-click the Word document.[8]
- If you haven’t yet uploaded the document from your computer, click New > File Upload, and then double-click the Word document.[8]
-
3
Click the ⋮ icon and tap “Add People.” Skip this step if you’re using the web version of Drive.
-
4
Right-click the file and select “Share.” Skip this step if you’re using the mobile app.
- Another way to do this is to single-click the document and then click the Share icon (the outline of a person’s head with a plus sign.)
-
5
Type the email address of the person you want to receive your file. If this person is one of your Google contacts, you can just start typing their name and then select the correct person from the search results.
-
6
Control whether the person can edit the copy in your Google Drive. By default, Drive gives the person permission to edit the document in your Google Drive.
- Leave this alone if you’re sharing the document with someone and you both plan to make edits.
-
7
Change “Can Edit” to “Can View” if you want the person to be able to download their own copy but not edit yours.
-
8
Select “Done” or “Share” to share the document. An email will be sent to the recipient containing information on how to access the document. They’ll be able to view it online or download it to their computer.


Advertisement
-
1
Open Dropbox on your computer or mobile device. If you’re a Dropbox user, you can use the service to share documents with anyone on the web. Using this method will send a message to the recipient that includes a link to the document. The recipient will be able to download the document by accessing that link (and they won’t need a Dropbox account).
- You’ll need to have a Dropbox account to use this method.
- You should also have the application installed on your device. If you’re using a computer, you can use the web version by signing in to http://www.dropbox.com.
-
2
Add the document to your Dropbox. If you haven’t uploaded the Word document to your Dropbox, do so now.
- Mobile app: Tap the “+” icon and then select “Upload files.” Navigate to the document you want to upload, and then tap “Upload File.”
- Desktop app: If the folder where the file’s stored is not already synced with Dropbox, drag the file from its current location to the Dropbox folder.
- Dropbox.com: Navigate to the folder where you’d like to store the file, then click the “Upload” icon to select your document.
-
3
Open the “Share” window. This step is a little different depending on your platform:[9]
- Mobile: Tap the downward-pointing arrow next to your Document and select “Share.”
- Desktop: Right-click (or Ctrl+Click) the document in the Dropbox application, then click “Share…”
- Dropbox.com: Hover the mouse over the document file and select “Share” (when the menu appears).
-
4
Select “Can View” from the permissions options. If you’re using a mobile device, you’ll see this option under “These People”.[10]
-
5
Type the email address of the person to whom you’d like to send the file. Enter this into the “To:” field. To add multiple recipients, separate each email address with a comma (,).
-
6
Select the “Invite” or “Send” button. The button name depends on your application.[11]
- If you’re using the Dropbox.com site, the button will say “Share.” An email will now be sent to the email address(es) you provided.


Advertisement
-
1
Log into Facebook. If you have a Word document on your computer that you want to send to someone else, you can do so using the web version of Facebook.[12]
- For this method to work, both you and the person to whom you’d like to send the document need to have Facebook accounts.
- The Facebook Messenger app does not support attaching documents saved to your phone, other than photos or videos
-
2
Open a chat window with the recipient. You will be attaching the document to a chat message.
- Click the mail icon at the top right area of Facebook and select “New Message.”
- Start typing the person’s name into the “To:” field and then click their name when it appears in the search results.
-
3
Click the paperclip icon at the bottom of the chat window. Now you’ll be able to navigate to the Word document on your computer.
-
4
Select the document and click “Open”. If you’re using a Mac, the button will say “Choose File.”
-
5
Press ↵ Enter or ⏎ Return to send the document. The recipient will be able to download the document by double-clicking the icon that appeared in the chat window.


Advertisement
-
1
Open your document in Word Online. If you’re using the free version of Microsoft Word available online, you can share the document right from the program.
- This method is similar to sharing a document from your OneDrive account. If your document is in OneDrive, navigate to the document to open it in Word Online.
-
2
Click the “Share” button. This button is at the top right corner of the screen.
-
3
Select “Invite People.” Here you can enter the email address of the person you’re sharing with.
-
4
Enter the recipient’s email address in the “To:” field. To add multiple recipients, separate each email address with a comma (,).
-
5
Select editing permissions for the document. By default, the recipient of the document will have the ability to make changes to your document. This is noted by the “Recipients can edit” dropdown on the Invite screen.
- If you want to share ongoing access to this document and want everyone on the Invite list to be able to make edits, leave this option alone.
- To share a read-only version of the document (cannot be edited by anyone else), click “Recipients can edit” and select “Recipients can only view.”
-
6
Type a note into the “Note” field. Think of this field as the body of an email. Type something here that will alert the recipient to what the email and document are about.
-
7
Click “Share.” An email will be sent to the recipient that contains a link to the document. With that link, the recipient can make changes to the document on Word Online (if you gave them permission to do so) or download the file to their computer.


Advertisement
-
1
Open your document in Microsoft Word. If you’re using Word 2016 for Windows or Mac, you’ll be able to use the built-in “Share” feature to send your document from the app.
- If you’re using an older version of Word, just click the File menu (or Office button in 2007) and select “Send” or “Send To” to send a Document.
-
2
Save changes to your document. To avoid sending an outdated version of your document, click “File” and then “Save”.
-
3
Click the “Share” icon. You’ll see this icon in the top right corner of Word. It looks like the silhouette of a person with a + sign.[13]
-
4
Click “Save to Cloud” if prompted. If you haven’t saved the document to the cloud, you’ll be prompted to do so. Word attempts to save your document to the cloud in case you want to share the document for editing instead of sending it as an attachment (more on this soon).
-
5
Click “Send as Attachment.” You may have to click “Share” again to see this option. “Send as Attachment” will allow you to email a copy of the document to a recipient.
- If, instead of sending the file to the recipient, you’d like to be able to share online editing access of the document, choose “Invite People” instead.[14]
Type the person’s email address when prompted, then click “Send” to email them an invitation to edit the document.
- If, instead of sending the file to the recipient, you’d like to be able to share online editing access of the document, choose “Invite People” instead.[14]
-
6
Select an attachment type. You have two options from which to choose:[15]
- Send a copy: Choose this option if the person to whom you’re sending the document needs to edit or add to the document.
- Send a PDF: Choose this option if you don’t want the document to be modified.
-
7
Address the email to the recipient. Once you select an attachment option, a new email message will open in your default email program (e.g., Outlook, Apple Mail). Enter the recipient’s email address into the “To:” field, type a subject line, and a description of the file in the body.
- To send the document to multiple people, separate each email addresses with a comma (,).
-
8
Click “Send.” Your document will arrive at its destination in a few moments.


Advertisement
Ask a Question
200 characters left
Include your email address to get a message when this question is answered.
Submit
Advertisement
-
Most cloud services include the ability to send documents via email or mobile applications. The instructions for the majority of cloud services are similar.
-
If you don’t have Microsoft Word, you can use Microsoft Office Online. The service includes a free, up-to-date version of Word accessible only on the web.
Thanks for submitting a tip for review!
Advertisement
About This Article
Thanks to all authors for creating a page that has been read 93,330 times.
Is this article up to date?
Как загрузить текстовый файл в Ворд Онлайн
Онлайн-редактор Word Online отличается тем, что не потребует мощного ПК, или ноутбука для работы с ним. Работать он сможет даже на самом простом нетбуке, и запускается в любом современном браузере. Не нужна ему и высокая скорость передачи данных, редактор можно быстро подгрузить даже через подключение по мобильному интернету. О том, как загрузить файл в Ворд Онлайн, работает ли он с фалами, находящими непосредственно на ПК, и что требуется для работы с этим редактором.

Как загрузить файл в Ворд Онлайн
Обычно со всеми документами приходится работать непосредственно с ноутбука или компьютера. Но иногда требуется перекинуть документ в онлайн-сервис Word Online, чтобы предоставить к нему доступ другим пользователям, либо для работы в дороге. Вам не придется устанавливать никакого дополнительного программного обеспечения, достаточно открыть браузер, и перейти на нужный ресурс.
Обратите внимание! Word Онлайн не работает с документами, хранящимися на компьютере или внешних накопителях. Поэтому файлы для работы сначала требуется в него загрузить.
Загрузить файл в Врод Онлайн очень просто. Для начала перейдите по ссылке через любой браузер https://office.live.com/start/word.aspx?ui=ru-ru. Дальнейший порядок действий будет таким:
- Нажмите на значок «Папки». Он расположен под шаблонами новых документов на стартовой странице Ворд Онлайн.
- Откроется окно, в котором кликните на вкладку «Загрузки».
- После ее открытия нажмите на кнопку «Выбрать файл на устройстве».
- Укажите путь, по которому находится нужный для загрузки документ.
- Подтвердите выбор кнопкой «Открыть».
После этих действий документ загрузится, и будет открыт в новой вкладке браузера. Здесь его можно редактировать, а любые внесенные корректировки, автоматически сохранятся на Google Диске. Открыть документ можно и через сам редактор. Инструкция будет практически аналогичной. Достать его можно через маршрут «Файл/Открыть».
Как начать работу в сервисе Word Online
Облегченная версия редактора MS Ворд Онлайн – максимально удобный инструмент для работы с текстовыми файлами в режиме реального времени. Вам нужны будут всего три вещи:
- Учетная запись в Google.
- Ноутбук с выходом в интернет.
- Любой современный браузер.
Для регистрации учетки перейдите на главную страницу сервиса Word Online. Появится форма для авторизации, но у вас нет данных, поэтому нажмите «Создать аккаунт». Далее выполните несколько несложных действия:
- В списке выберите пункт «Для себя».
- Укажите имя и фамилию.
- Придумайте свой никнейм, который станет адресом почтового ящика на @gmail.com.
- Дважды введите придуманный пароль для входа. Он должен состоять из спецсимволов, цифр и букв.
- Укажите резервный электронный адрес.
- Впишите номер вашего мобильного.
- В следующей строке – ваш пол и дату рождения.
- Нажмите кнопку «Принимаю», согласившись с условиями соглашения.
На этом регистрация закончена. В следующий раз, чтобы не искать сервис через браузер – добавьте Врод Онлайн в закладки.
Вставка документа в Word
Вставка документа
Вы можете вставить содержимое ранее созданных документов Word в новый или другой документ Word.
Щелкните или нажмите место, куда нужно вставить содержимое существующего документа.
На вкладке «Вставка» выберите стрелку рядом с объектом .
Выберите текст из файла.
Найдите нужный файл и дважды щелкните его.
Чтобы добавить содержимое других документов Word, повторите эти действия.
Важно: Если вы также хотите добавить колонтитулы, вставьте текст из файла в новый раздел, чтобы колонтитулы применялись только к этим страницам. Дополнительные сведения о разделах см. в статье «Вставка разрыва раздела».
Конвертер DOCX (WORD) в DOC (WORD)
Сконвертируйте ваши docx-файлы в doc онлайн и бесплатно
- Image
- Document
- Ebook
- Audio
- Archive
- Video
- Presentation
- Font
- Vector
- CAD
- abc
- abw
- csv
- dbk
- djvu
- dng
- doc
- docm
- docx
- erf
- ebm
- ewm
- emw
- gzip
- kwd
- odt
- oxps
- ppt
- pptx
- rtf
- rar
- txt
- wps
- xls
- xlsx
- zip
- Image
- Document
- Ebook
- Audio
- Archive
- Video
- Presentation
- Font
- Vector
- CAD
- abc
- abw
- csv
- dbk
- djvu
- dng
- doc
- docm
- docx
- erf
- ebm
- ewm
- emw
- gzip
- kwd
- odt
- oxps
- ppt
- pptx
- rtf
- rar
- txt
- wps
- xls
- xlsx
- zip
Microsoft Office Open XML
Документ Microsoft Word
Как сконвертировать DOCX в DOC
Загрузите docx-файл(ы)
Выберите файлы с компьютера, Google Диска, Dropbox, по ссылке или перетащив их на страницу.
Выберите «в doc»
Выберите doc или любой другой формат, который вам нужен (более 200 поддерживаемых форматов)
Загрузите ваш doc-файл
Позвольте файлу сконвертироваться и вы сразу сможете скачать ваш doc-файл
Вставляем один документ MS Word в другой

Если вы работаете с большим по объему текстовым документом MS Word, для ускорения рабочего процесса вы можете принять решение разбить его на отдельные главы и разделы. Каждая из этих составляющих может находиться в разных документах, которые явно придется объединить в один файл, когда работа над ним будет близиться к концу. О том, как это сделать, мы расскажем в данной статье.
Наверняка, первое, что вам приходит в голову, когда возникает необходимость объединить два и более документов, то есть, вставить один в другой, это просто копировать текст из одного файла и вставлять его в другой. Решение так себе, ведь данный процесс может занять немало времени, да и все форматирование в тексте, вероятнее всего, будет испорчено.
Другой метод — создание одного основного документа их вложенных в него “составляющих” документов. Метод тоже не самый удобный, да и весьма запутанный. Хорошо, что есть еще один — самый удобный, да и просто логичный. Это вставка содержимого составляющих файлов в главный документ. О том, как это сделать, читайте ниже.
1. Откройте тот файл, с которого должен начинаться документ. Для наглядности мы назовем его “Документ 1”.

2. Установите указатель курсора в том месте, куда необходимо вставить содержимое другого документа.

- Совет: Рекомендуем в этом месте добавить разрыв страницы — в таком случае “Документ 2” будет начат с новой страницы, а не сразу за “Документом 1”.
3. Перейдите во вкладку “Вставка”, где в группе “Текст” разверните меню кнопки “Объект”.
4. Выберите пункт “Текст из файла”.

5. Выберите файл (так называемый “Документ 2”), содержимое которого вы хотите вставить в основной документ (“Документ 1”).

Примечание: В нашем примере используется программа Microsoft Word 2016, в предыдущих версиях этой программы во вкладке “Вставка” нужно выполнить следующие действия:
- кликнуть по команде “Файл”;
- в окне “Вставка файла” найти необходимый текстовый документ;
- нажать на кнопку “Вставить”.
6. Если в основной документ вы хотите добавить более одного файла, повторите вышеописанные действия (2-5) необходимое количество раз.
7. Содержимое сопутствующих документов будет добавлено в основной файл.

В конечном итоге вы получите целостный документ, состоящий из двух или более файлов. Если в сопутствующих файлах у вас были колонтитулы, к примеру, с номерами страниц, они тоже будут добавлены в основной документ.
- Совет: Если форматирование текстового содержимого разных файлов отличается, лучше привести его к единому стилю (конечно,если это необходимо) до того, как вы будете вставлять один файл в другой.
На этом все, из этой статьи вы узнали, как вставить содержимое одного (или нескольких) документа Ворд в другой. Теперь вы можете работать еще продуктивнее.
Мы рады, что смогли помочь Вам в решении проблемы.
Помимо этой статьи, на сайте еще 11902 инструкций.
Добавьте сайт Lumpics.ru в закладки (CTRL+D) и мы точно еще пригодимся вам.
Отблагодарите автора, поделитесь статьей в социальных сетях.
Опишите, что у вас не получилось. Наши специалисты постараются ответить максимально быстро.