
Импорт данных SQL в Excel
Небольшой экскурс в MS SQL
Добрый день, уважаемые читатели и подписчики блога. Как вы уже догадались из названия статьи, речь сегодня пойдёт об импорте данных SQL в таблицу Excel.
Небольшое предисловие. Имеется база данных MS SQL, в которой содержится определённая таблица, её нужно загрузить в Excel.
Зачем использовать такую модель? Базы данных SQL могут быть объёмом гораздо больше чем файлы Excel и работают гораздо быстрее, а Excel используется как инструмент тонкой настройки загруженной таблицы.
Задача проста, но есть несколько моментов: необходимо знать, как называется инстанс (экземпляр) где находится база данных, естественно, нужно знать учётные данные, нужно знать название таблицы. Что ж, приступим.
Я предпочитаю в таких случаях использовать Microsoft Management Studio, для поиска основных данных. Найти ярлык можно в меню Пуск.

В консоли MS SQL есть несколько полей:
Server Type — можно выбрать тип подключения (в этом случаем остаётся Database Engine);
- Analysis Services — сервисы аналитики;
- Reporting Services — сервисы отчётов;
- Integration Services — сервисы интеграции (встраивания).
Далее следует имя сервера (его можно задать на этапе установки).
Тип аутентификации — WIndows Authentication или SQL Server Authentication, эти пункты позволяют выбрать тип проверки пользователя. Windows — можно войти под логином и паролем для операционной системы, SQL Server — под специальной учётной записью sa и заданным для неё паролем.
Оставим первый вариант — он проще (но запомните — только для тестов!). Хорошим тоном считается смешанная аутентификация и смена пароля для учётки sa на случай непредвиденных ситуаций.
Видно, что имя сервера — BLACKPRINCE, логин axiro. Пароль не скажу:) Осталось нажать кнопку «Connect» и зайти в базу данных.

Поди цифрой 1 — список баз данных, под 2 — тестовая база с именем Test, под 3 — запущенный SQL Server Agent — он должен быть запущен иначе база данных может быть не видна для других программ, если на нем стоит крест — щёлкнуть правой кнопкой мышки и выбрать «Start».
Исходные данные есть, теперь необходимо создать таблицу с данными. Это можно сделать через графический интерфейс, но лучше воспользоваться запросом — «New Query».

Откроется окно запроса.

Все запросы будут производиться на языке Transact SQL. У него очень много общего с синтаксисом SQL, но есть и много отличий.
Создаём базу данных
Если необходимо создать новую базу данных, например, магазины (SHOPS), синтаксис будет следующий:
CREATE DATABASE SHOPS
Обязательно после написания запроса нажать «Execute» или F5! В противном случае запрос не будет выполнен.

Под цифрой 1 — «Execute», под 2 — текст запроса, под 3 — результат выполнения. Если в процессе выполнения будут выявлены ошибки, они незамедлительно будут показаны. Пока всё идёт по плану.
Создаём таблицу
Если необходимо выполнить запрос к определённой базе данных — щёлкаем правой кнопкой на неё и выбираем «New query».

В окне запроса введём текст запроса. Цель — создать таблицу с четырьмя столбцами: номер магазина, название магазина, выручка магазина, менеджер. Лучше все столбцы называть по английски (хотя бы на первоначальном этапе).
CREATE TABLE dbo.Shops
(ShopID int PRIMARY KEY NOT NULL,
ShopName varchar(25) NOT NULL,
Revenue money NULL,
Manager text NULL)
GO

Нажать «Execute». Таблица создалась. Проверить можно раскрыв дерево базы данных и раскрыть группу «Tables».

Цель достигнута. В запросе также были упомянуты типы данных (varchar(25), money, text, PRIMARY KEY). Соответственно — varchar это длина текста, в скобках указано, что длина названия магазина может быть до 25 символов включительно, money — тип данных, представляющий денежные (валютные) значения, text — обычный текст, PRIMARY KEY — ограничение, позволяющее однозначно идентифицировать каждую запись в таблице SQL. Также есть атрибут NULL и NOT NULL — позволяет значениям принимать нулевое значение или не принимать (может в поле стоять ноль или не может).
Добавим в таблицу одну строчку (пока). Открываем окно нового запроса базе данных и добавляем запрос.
INSERT INTO dbo.Shops VALUES ( ‘1’, ‘Ручеёк’, ‘120000’, ‘Петров В.И.’)

Добавилась одна строка.
Импорт данных SQL в Excel
Со стороны Excel действий будет гораздо меньше. Переходим на вкладку «Данные», нажимаем кнопку «Получение внешних данных», «Из других источников», «С сервера SQL Server».

Как было написано выше, нужно указать имя сервера SQL — BLACKPRINCE, и выбрать проверку подлинности — Windows. Нажать «Далее».

В следующем окне выберем базу данных SHOPS и отметим галкой таблицу Shops. Если нужно выбрать несколько таблиц — отметить галкой соответствующую настройку. Нажать «Далее».

В следующем окне Excel предложит сохранить файл для подключения к базе данных с настройками. Нажать «Готово».

Теперь можно выбрать расположение загруженной таблицы и указать необходимые настройки. Я пока указывать их не буду, просто нажму «ОК». Таблица будет размещена в ячейку A1.

Цель достигнута! Таблица из базы данных перекочевала в Excel и теперь над ней можно совершать привычные действия.
В следующих уроках мы поговорим о более сложных манипуляциях с запросами к базам данных.
Вас может заинтересовать — Анализ план факт в Excel.
One of the main aspects of modern business is gathering and sharing information with others.
In this article, several ways to export/import MySQL data to an Excel file will be explained. The first method will show the exporting process when the SELECT INTO … OUTFILE statement is used. After that, the Excel features for export/import MySQL data, as well as MySQL add-in for Excel, will be explained, and in the end, the Export to Excel option from the ApexSQL Database Power Tools for VS Code extension will be shown.
The following methods will be used:
- The SELECT INTO … OUTFILE statement
- The From Database feature in Excel
- The MySQL for Excel add-in
- Export to Excel using a third-party software
Export/Import MySQL data to Excel using the SELECT INTO … OUTFILE statement
One of the commonly used MySQL statement which can be included in the SELECT statements for exporting data to specific (e.g., .txt, .CSV) file format is SELECT INTO … OUTFILE statement. This statement writes a selected row to a file. Columns and line terminators can be specified to produce a specific output format.
In a query editor, execute a SELECT statement which results want to be exported, add the location where data should be exported, and specify the file format. In the example below, the .txt file format is used:
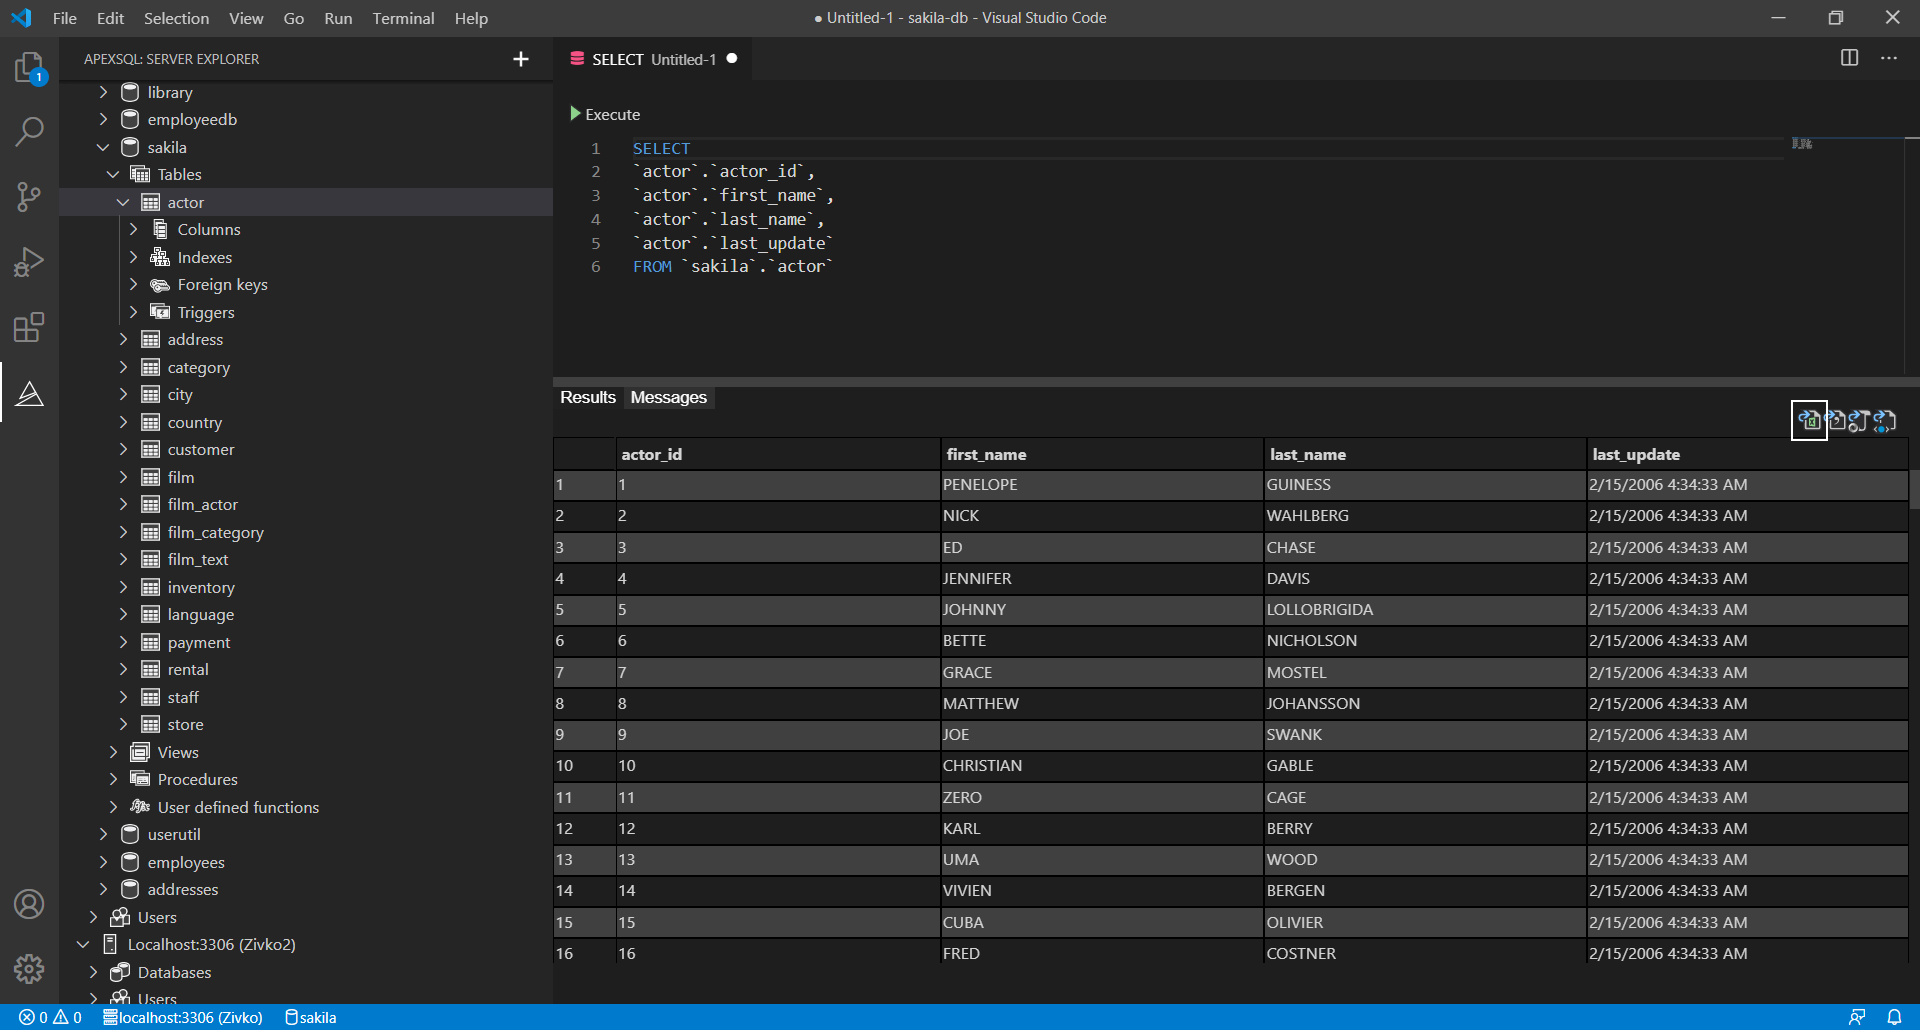
SELECT `actor`.`actor_id`
   ,`actor`.`first_name`
   ,`actor`.`last_name`
   ,`actor`.`last_update`
 FROM `sakila`.`actor`
 INTO OUTFILE 'C:/ProgramData/MySQL/MySQL Server 8.0/Uploads/actor.txt' FIELDS TERMINATED BY ',' ENCLOSED BY '"' LINES TERMINATED BY 'rn'
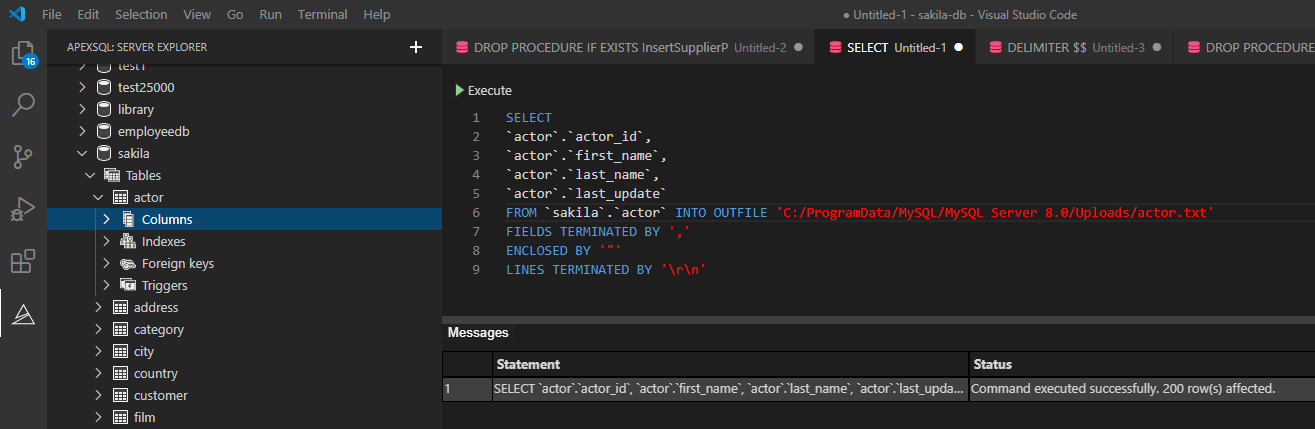
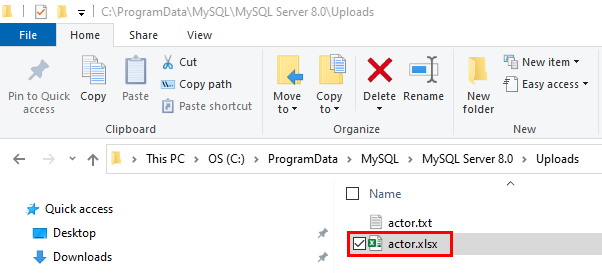
When the above statement is executed, all exported data will be in the actor.txt file:
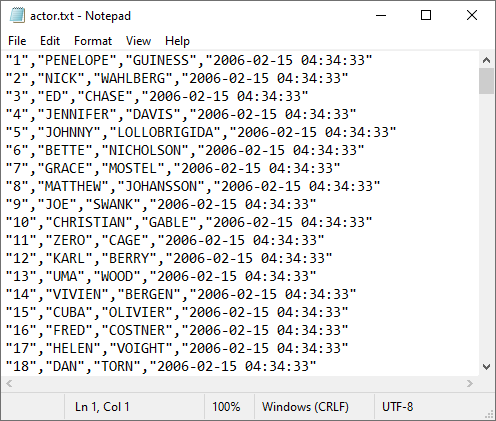
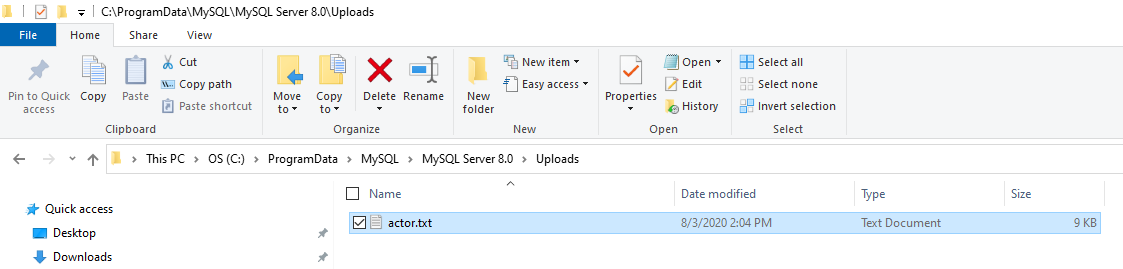
Under the specified location:
-
For more details about SELECT INTO … OUTFILE statement, see How to export MySQL data to CSV article.
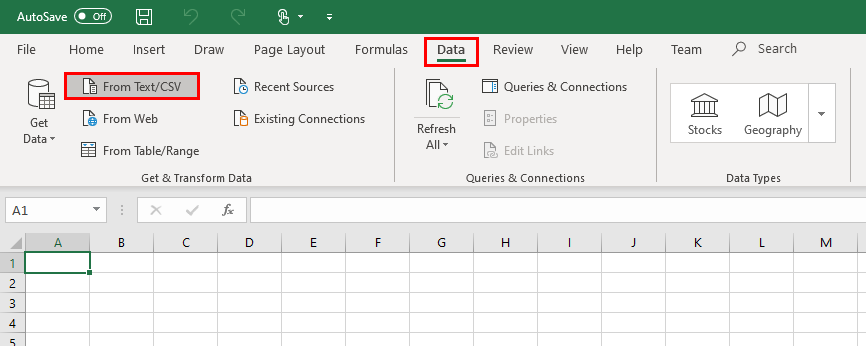
When the data is exported, let’s open it in Excel and save it in .xlsx file format.
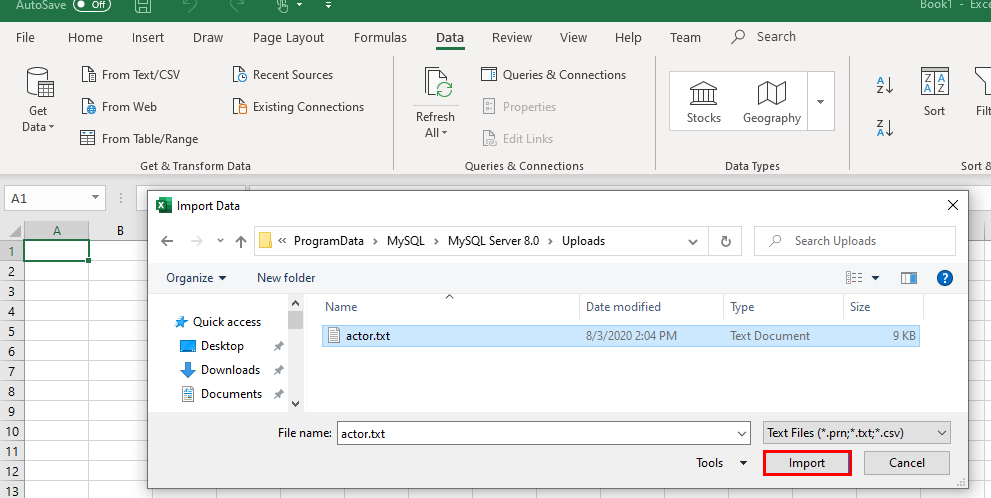
Open Excel and under the Data tab, click the From Text/CSV button:
Navigate to the location of the exported .txt file and click Import:
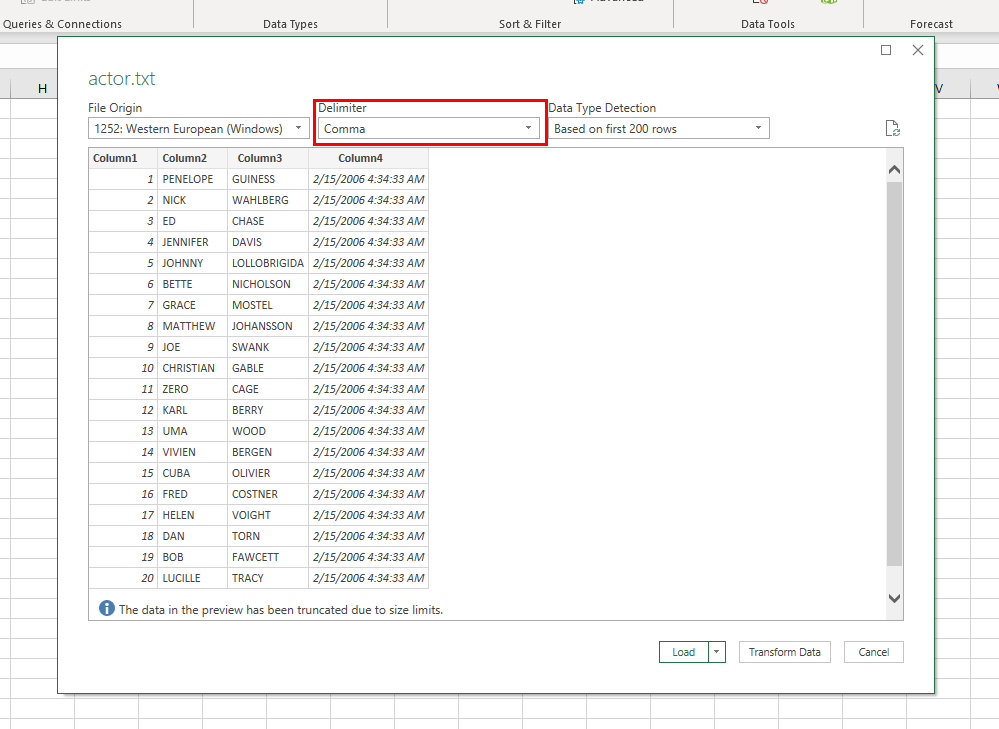
In the newly opened dialog, choose appropriate delimiter and click Transform Data:
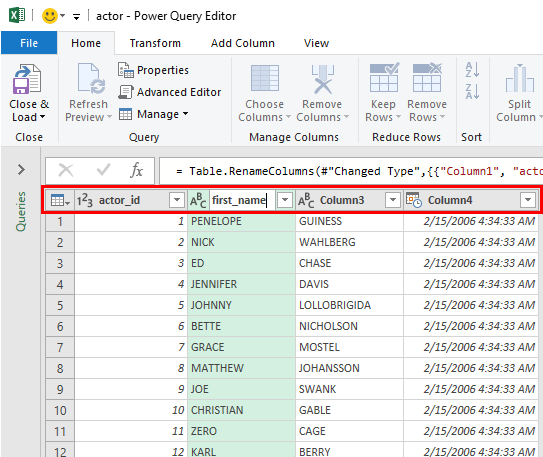
In the Power Query Editor window, it is necessary to set some additional settings (e.g., add the name of the columns):
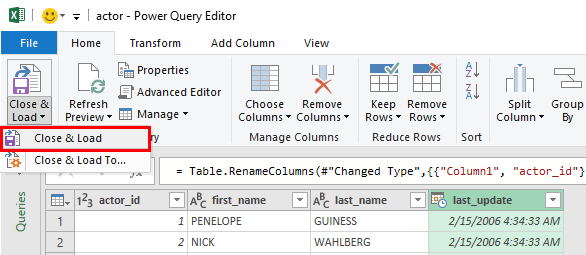
When all is set, click the Close & Load command:
The data will be loaded in a separate sheet:
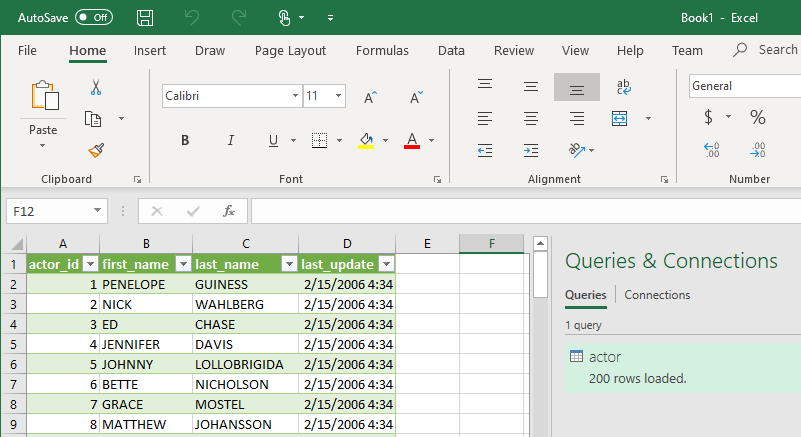
Save newly imported data in .xlsx file format:
Export/Import MySQL data to Excel using the From Database feature
Similar to the method in the section above, Excel provides one more option to load data from the MySQL database to Excel.
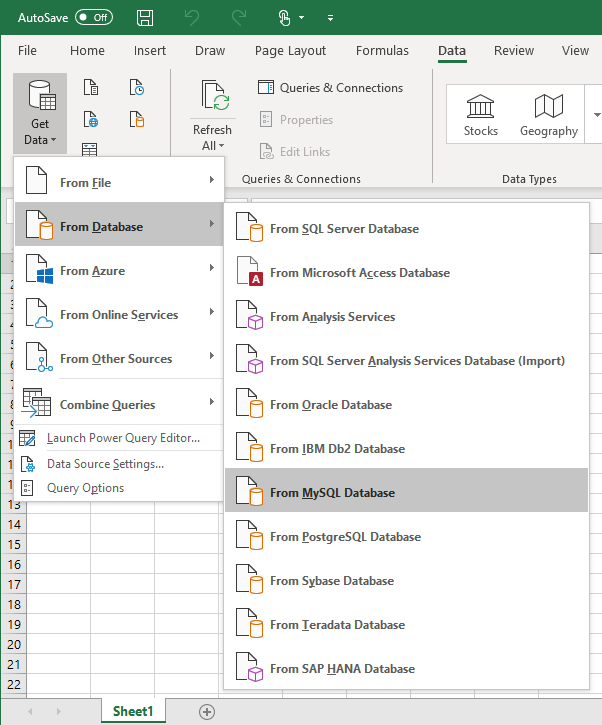
In the Data tab, under the Get Data list, choose the From MySQL Database command:
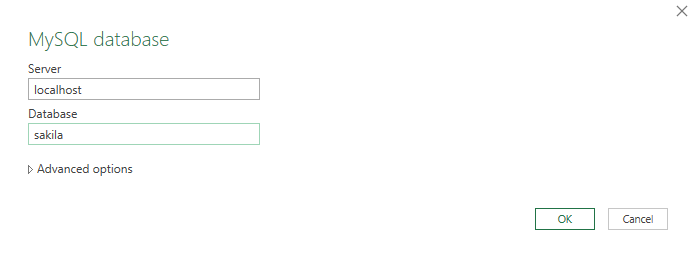
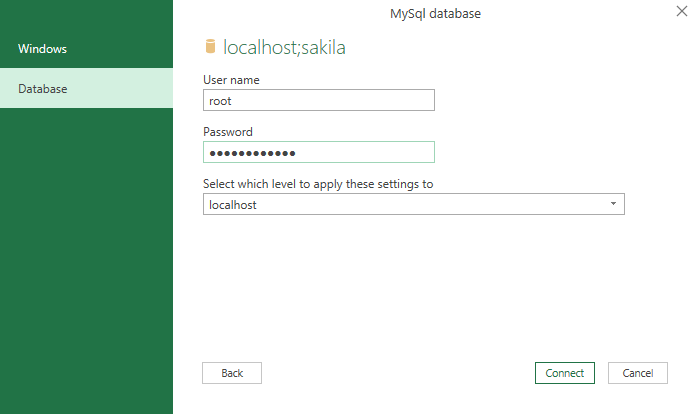
In the MySQL database dialog, enter server and database name from which you want to load data and click the OK button:
On the next window, under the Database tab, enter credentials for the user that have permission to access the targeted database and click the Connect button:
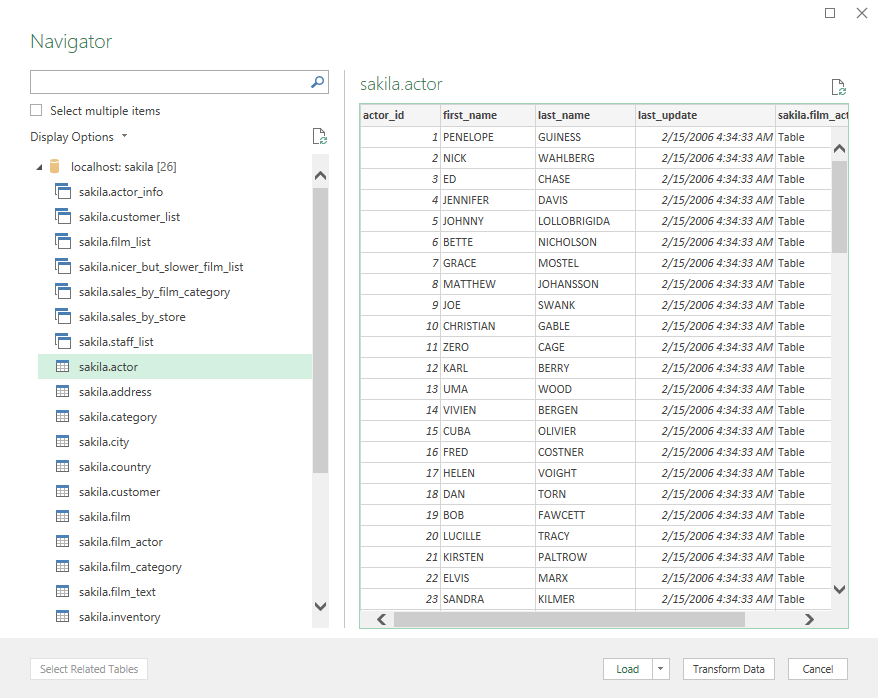
From the Navigator window, choose the tables, views, etc. from which to load data:
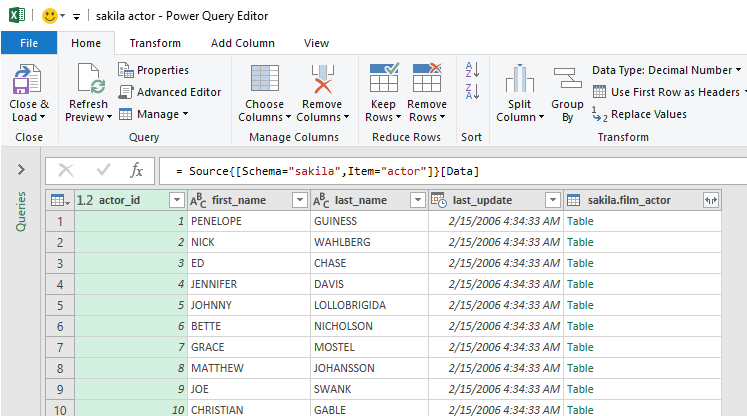
Click the Transform Data button. The Power Query Editor window will appear with desired data in it. Now, the steps for loading data are the same as we explained in the previous section:
Use MySQL for Excel add-in
MySQL for Excel is the Windows-based add-in that integrates into Excel under the Data tab that provides export/import MySQL data capabilities.
To install MySQL for Excel add-in first download the MySQL for Excel MSI file. Before starting with installation, please check that the following requirements are fulfilled:
- .NET Framework 4.5.2 (Client or Full Profile)
- Microsoft Office Excel 2007 or later (for Microsoft Windows)
- Visual Studio 2010 Tools for Office Runtime. MySQL Installer may install this for you. This requirement is different than Office Developer Tools for Visual Studio, which is not a substitute
- An available MySQL server connection
(source: MySQL for Excel Guide / Installation)
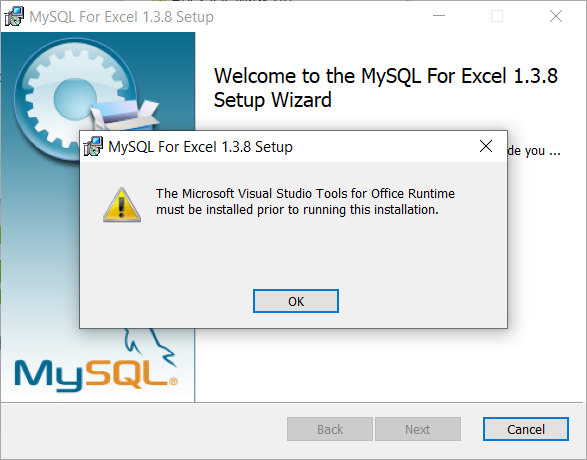
Otherwise, some errors may occur during the installation process, like that one from the image below, when the Visual Studio 2010 Tools for Office Runtime is not installed:
Note: The Microsoft Visual Studio Tools for Office Runtime must be installed prior to running this installation.
Installation
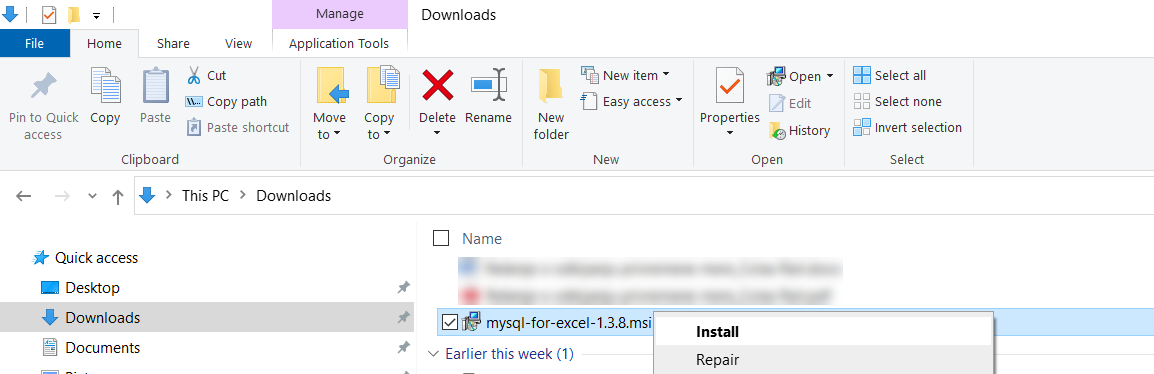
The installation process is straightforward. Go to the location where the installer (mysql-for-excel-1.3.8.msi) is downloaded, right-click on it, and from the context menu, choose the Install command:
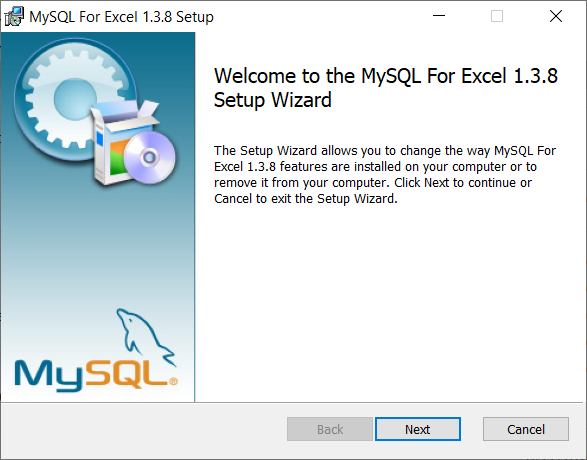
When the installation wizard is launched, click Next:
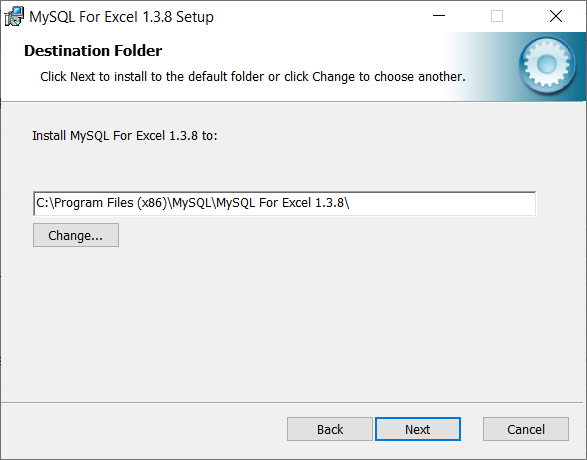
On the Destination Folder step, choose a location where the MySQL For Excel 1.3.8 will be installed and click Next:
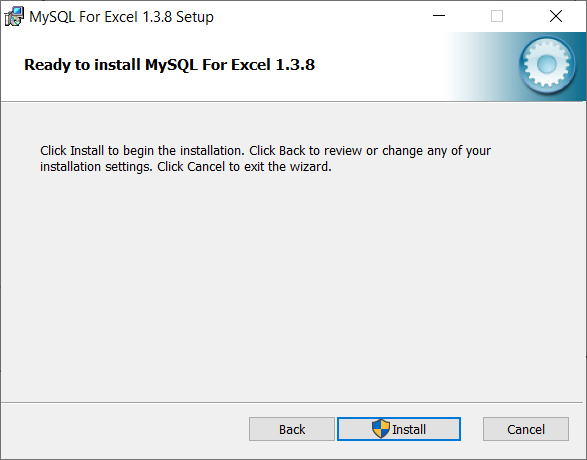
On the next step, click the Install button to start the installation of MySQL For Excel 1.3.8:
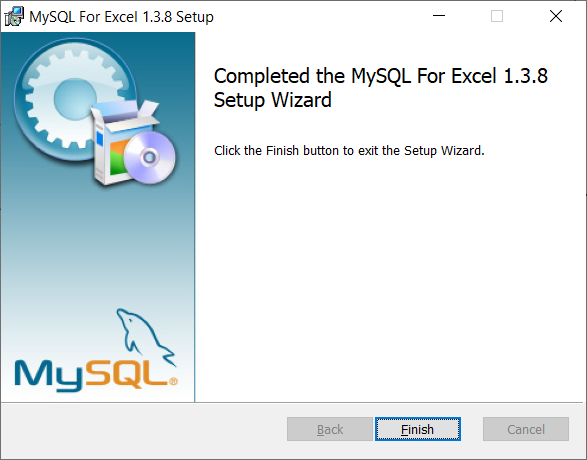
On the last step, click the Finish button to close the setup wizard:
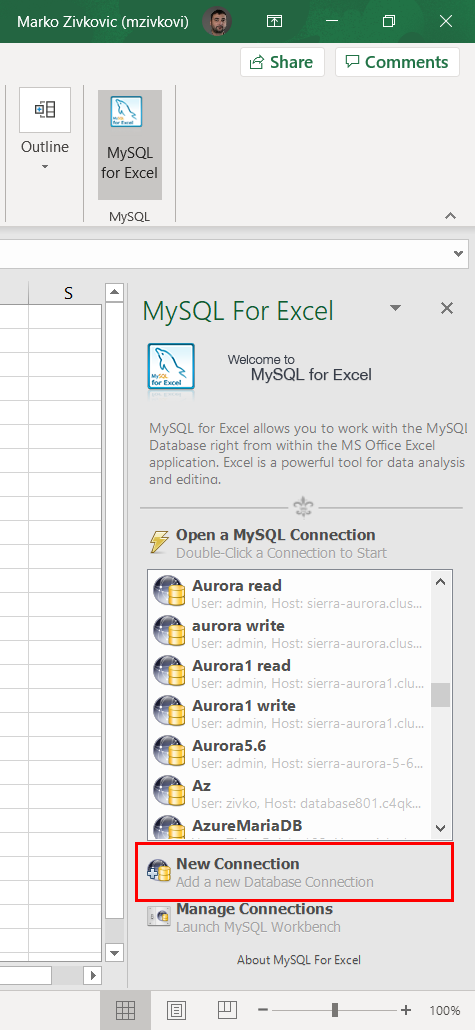
Now when Excel is launched, the MySQL for Excel add-in will appear in the top-right corner of the Data tab:

Connect to MySQL database
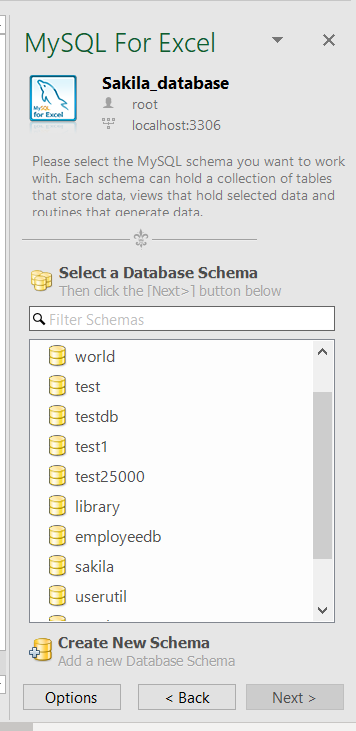
To start MySQL for Excel, click on the MySQL for Excel icon under the Data tab. In the panel that shows find and click the New Connection button:
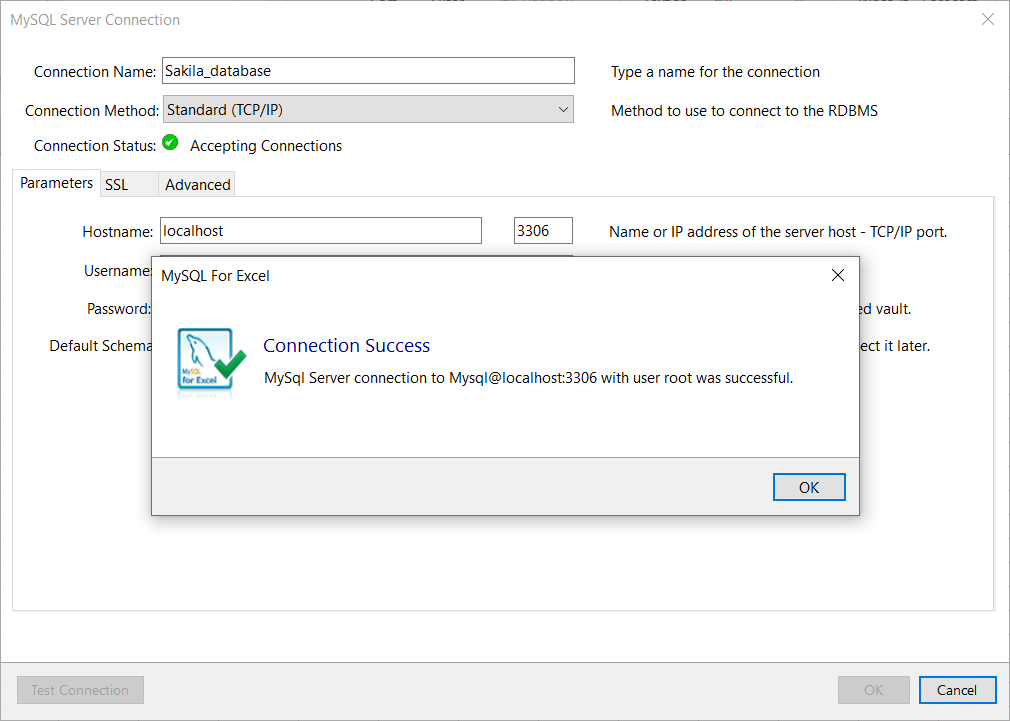
In the MySQL Server Connection window, enter the name for the connection in the Connection Name box (e.g., Sakila_database).
From the Connection Method drop-down list, chose the method to connect to RDBMS (e.g., Standard (TCP/IP)).
In the Hostname box, enter a name or IP address of the server host (e.g., localhost). Under the Port box, enter the TCP/IP port number (e.g., 3306). For the Username and Password fields, enter the credentials for the user that have access to the specified server in the Hostname field:

Optional, from the Default Schema drop-down list, the default schema can be selected.
To confirm that connection to the MySQL Server works properly, click the Test Connection button:
Click the OK button on the MySQL Server Connection window for MySQL for Excel to create a connection in MySQL for Excel panel:
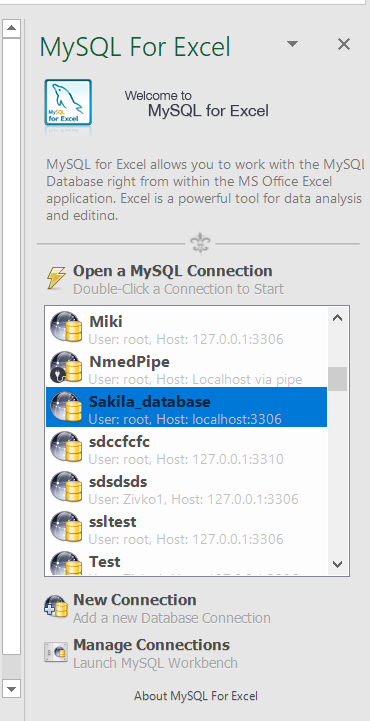
Double-click on the newly created connection will list all available databases from that MySQL server:
Double-click on a database, in the MySQL for Excel panel, will list all tables, views, and procedures from that database:
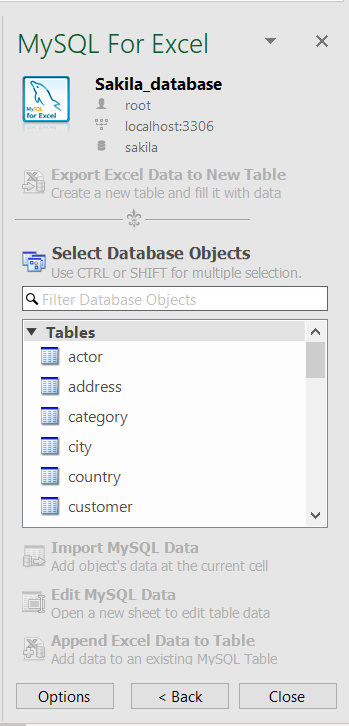
To import data, on the MySQL for Excel panel, select the desired table, and click the Import MySQL Data button. The Import Data window will appear:
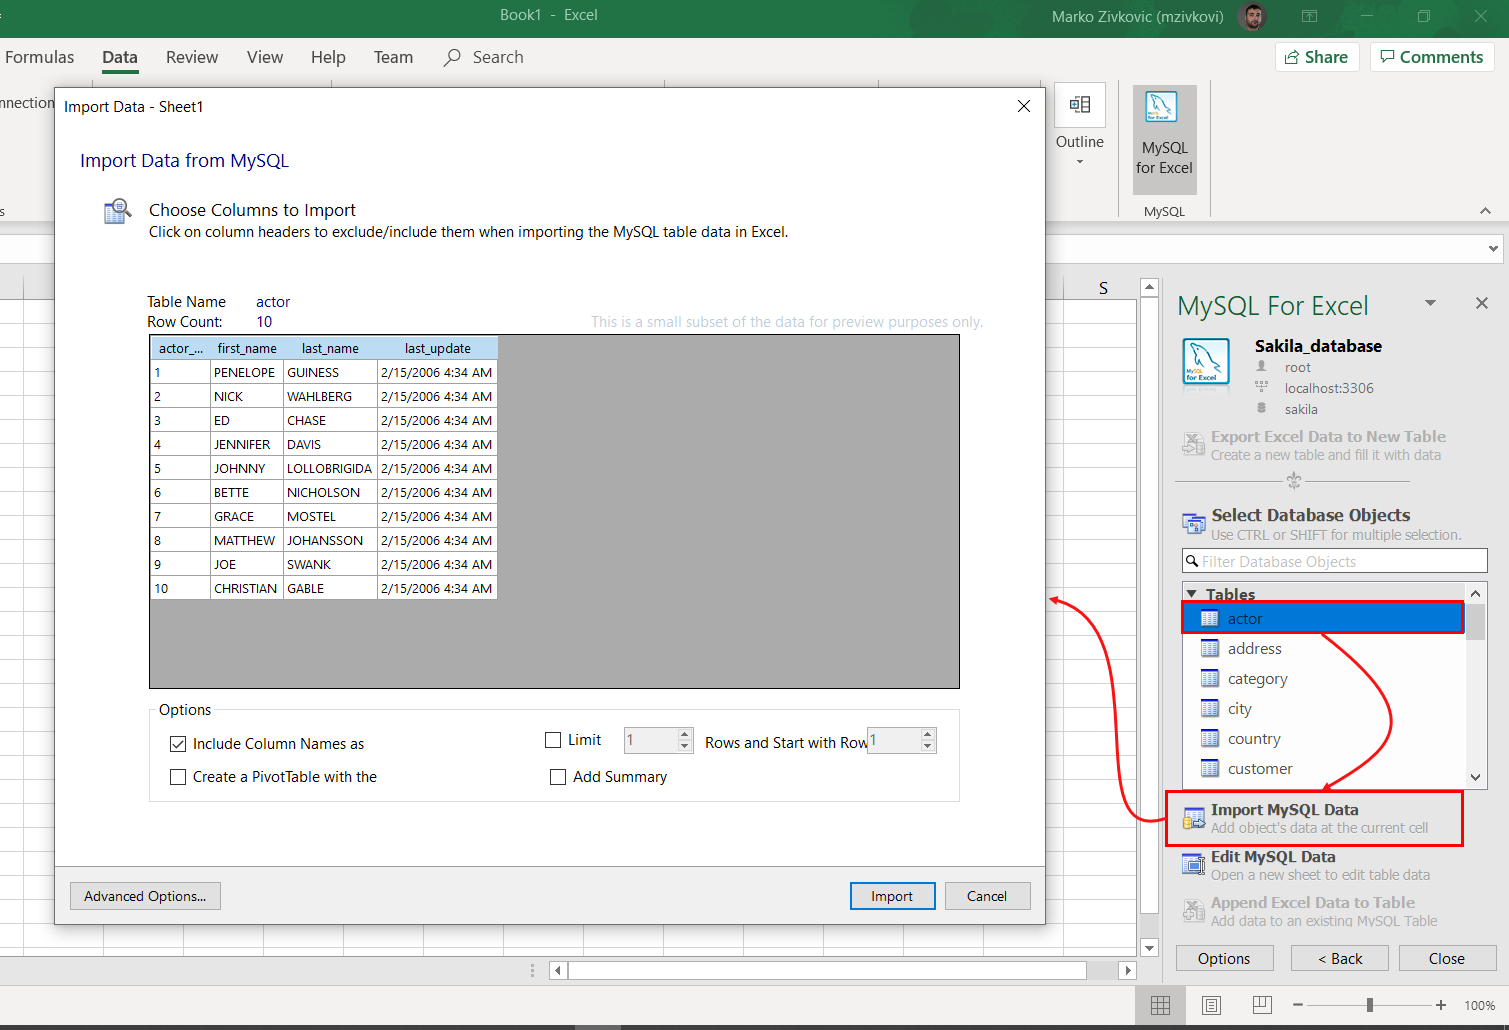
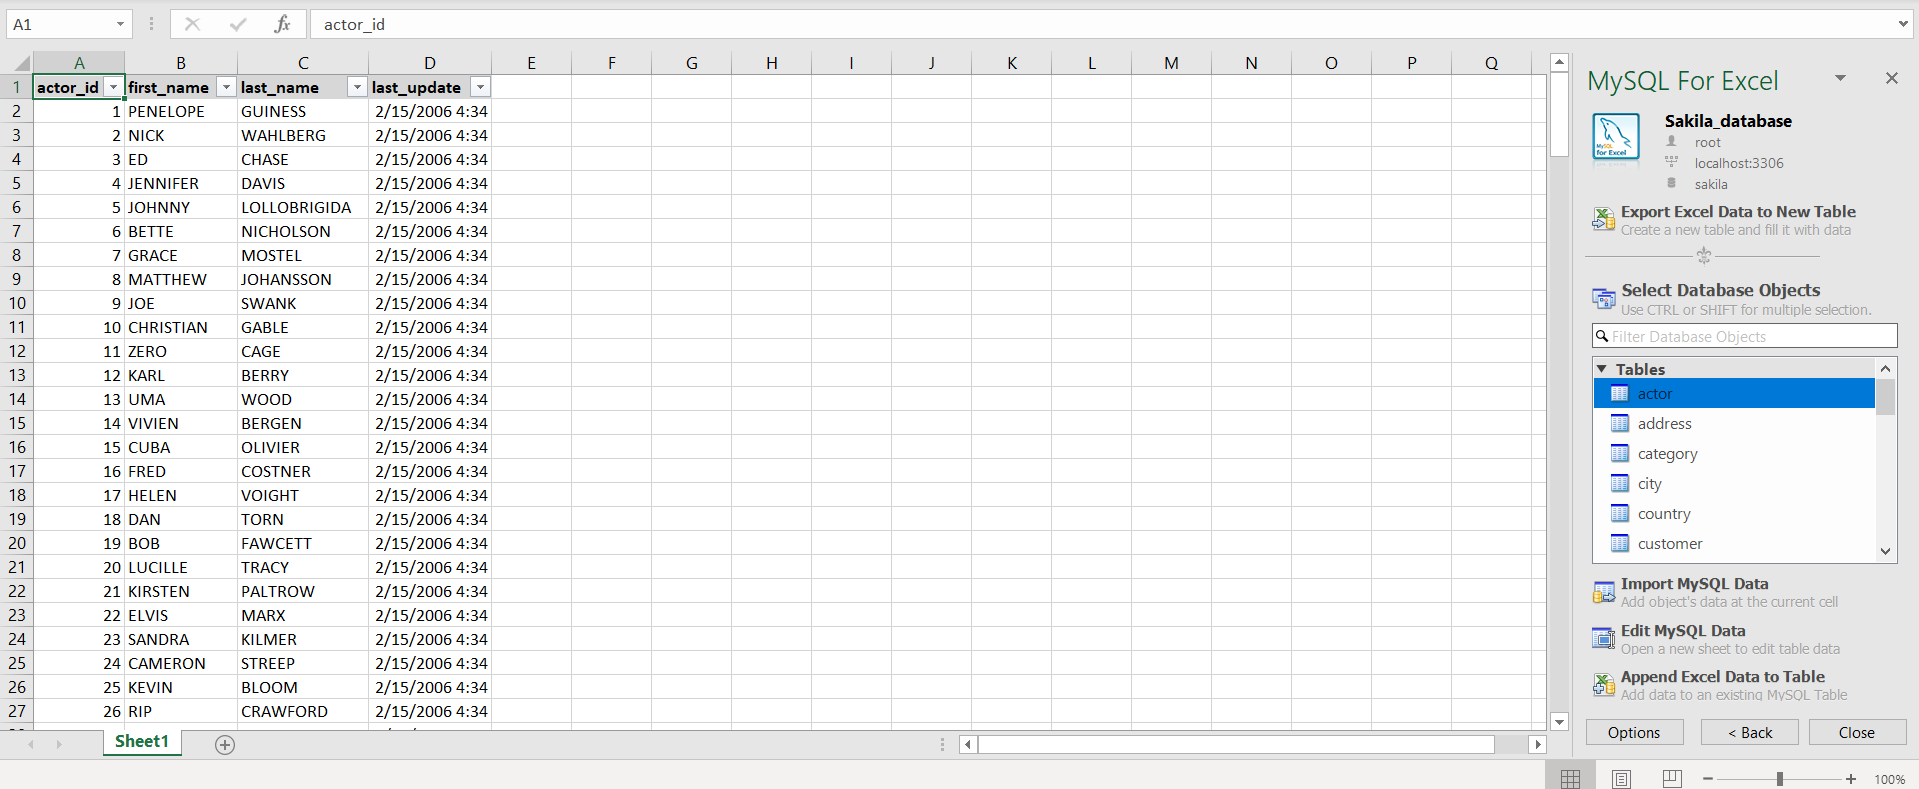
When all settings are set, click the Import button. The imported data will look something like this:
This add-in can return all rows, or a specified range of rows, from a specified table. It cannot import data stored in two different tables, perform table joins, or filter data.
More details about MySQL for Excel tool can be found on the MySQL for Excel page.
Export to Excel using a third-party software
Using the Export to Excel feature from ApexSQL Database Power Tools for VS Code, query results can be exported to MySQL data from the results grid in just a few steps. Besides exporting data to Excel, this VS Code extension provides a couple of more exporting options, such as export data to JSON, CSV, and HTML file format.
In a query editor of the VS Code extension, execute a query from which you want to be data exported. In the top right corner of the Results grid, click the Export to Excel button:
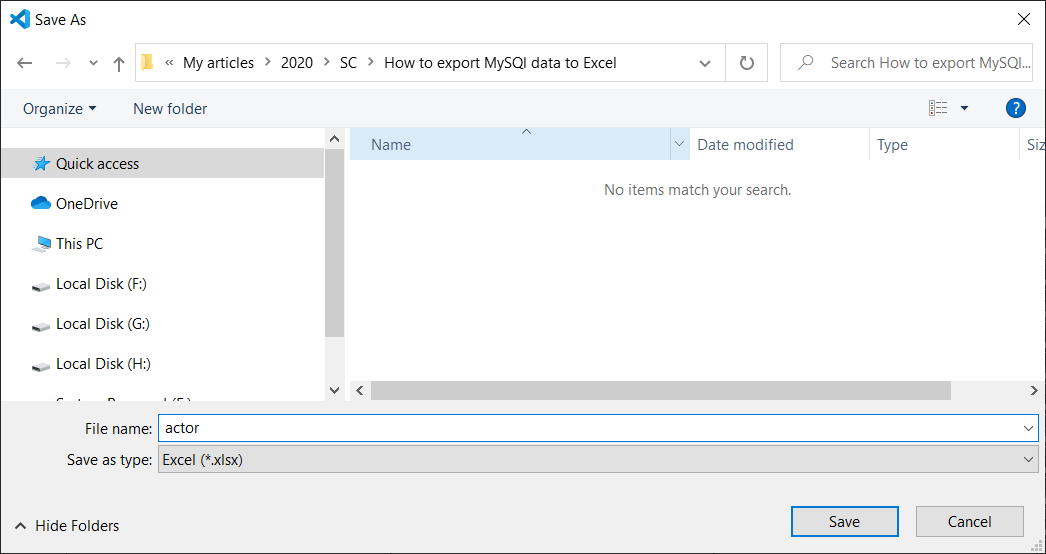
In the Save as window, enter a name and location for a new Excel file and click the Save button:
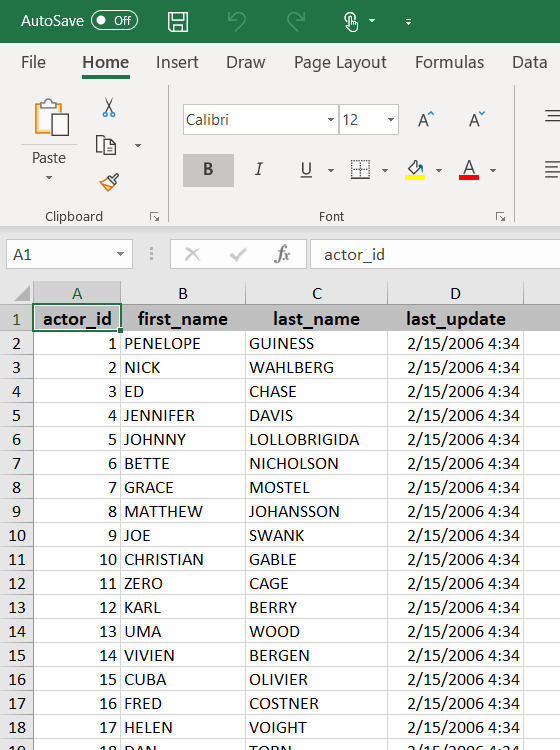
The exported data will look like this:
August 12, 2020
SQL Server is very popular in Relational Database and it is used across many software industries. Portability of data is a much-required feature of any database. i.e. Database should support features like exporting database data to Excel/CSV/JSON and also should import data from them. In this article, let us see how to import and export SQL Server Data to an Excel file. Azure data studio is a very useful tool for export options and the best part is it can run on Windows/Linux/Mac Operating system.
Method 1: exporting data to Excel via Azure DataStudio
Step 1: Database creation
We should have a database to proceed further. Let us keep ‘GEEKSFORGEEKS’ as the database name.
Syntax:
--Command to create database:
 - CREATE DATABASE <dbname>;
Create Database GEEKSFORGEEKS:
Query:
--Make the database active
USE GEEKSFORGEEKS;

Step 2: Adding the tables to the database
Creating a table with a Primary Key. Each author will have their unique ID and hence it is a Primary Key.
Query:
CREATE TABLE Posts (
    ID INT IDENTITY NOT NULL PRIMARY KEY,
    PostName VARCHAR(255) NOT NULL,
    Category VARCHAR(255),
    Likes INT,
    Shares INT
);
GO

Step 3: Inserting rows in the table. We can add only the necessary columns.
Query:
insert into Posts(PostName,Category,Likes,Shares)
 VALUES ('Core Java Programming','Java',10,5);
insert into Posts(PostName,Category,Likes,Shares)
VALUES ('SQLServer Programming','Java',20,8);
insert into Posts(PostName,Category,Likes,Shares)
 VALUES ('Oracle Programming','Java',25,12);
insert into Posts(PostName,Category,Likes,Shares)
 VALUES ('MongoDB Programming','Java',50,18);
insert into Posts(PostName,Category,Likes,Shares)
VALUES ('Python Programming','Java',15,10);

Step 4: Let us do a general query
Query:
SELECT * FROM Posts;
Output:

Step 5: Suppose if we want to exporting data to Excel via Azure Datastudio
Azure Datastudio has come with rich features for exporting data to Excel. Even exporting to CSV/JSON/XML/Chart are also possible. As given in below screenshot, need to click the option in the right corner
Output:

On clicking on “Save As Excel”, the resultant output is saved in excel format. We can see the saved contents below:

Step 6: We can write queries as per our needs and those data alone also can be exported. i.e. ultimately whatever results are in the “Results” pane are saved into excel format.
Query:
-- To get the details of Posts in
which category is like Database

SELECT PostName,Category,Likes,Shares FROM Posts
WHERE Category LIKE '%Database%'
ORDER BY PostName
Output:

This output can be exported to excel by clicking on “Save as Excel”, upon completion we can see the results as

Method 2: Import data from EXCEL into SQL server using SQL Server Management Studio
Importing data via SQL Server Management Studio. This is an easier option.
Step 1: Click on “Tasks” and choose “Import Data” option.

Step 2: The below screens are self-explanatory. Let us see one by one.

Step 3:Click on “Microsoft Excel” option.

Step 4: Source location can be selected as given below

Step 5: Destination location can be chosen from this window


Step 6: We can see that a table with the name “dataFromExcelForPostsByCategory” is created. If we compare the contents of excel data, they are the same.

In every database, portability is much important. In SQL server, by above-mentioned ways, they are done. For export, using Azure data studio it is explained and for import, by using SQL Server Management Studio, it is explained.
Рассмотрим два случая:
- Когда нам нужно генерировать все данные для файла каждый раз заново
- Когда нам нужно один раз записать данные в файл и потом их периодически обновлять
Первый случай
Чистим файл перед записью и записываем новые данные
UPDATE t
  SET
      t.Артикул = '',
      t.Наименование = '',
      t.Цена = '',
      t.Дата = ''
FROM OPENROWSET('Microsoft.ACE.OLEDB.12.0', 'Excel 12.0;HDR=YES;Database=filepathsales.xlsx;', 'SELECT * FROM [Лист1$]') AS t;

INSERT INTO OPENROWSET('Microsoft.ACE.OLEDB.10.0', 'Excel 12.0;HDR=YES;Database=filepathsales.xlsx;', 'SELECT * FROM [Лист1$]')
       SELECT s.code [Артикул],
              s.name [Наименование],
              s.price [Цена],
              s.date [Дата]
       FROM _table AS s;
Это решение хоть и работает, но работает иногда криво — бывает, что новые данные инсертятся после очищенных строк. Поэтому я предпочитаю работать так:
EXEC master..xp_cmdshell
     'del filepathsales.xlsx';
GO

EXEC master..xp_cmdshell
     'copy filepathtemplate.xlsx filepathsales.xlsx';
GO

INSERT INTO OPENROWSET('Microsoft.ACE.OLEDB.10.0', 'Excel 12.0;HDR=YES;Database=filepathsales.xlsx;', 'SELECT * FROM [Лист1$]')
       SELECT s.code [Артикул],
              s.name [Наименование],
              s.price [Цена],
              s.date [Дата]
       FROM _table AS s;
Храню шаблон файла и каждый раз перед записью удаляю старый файл и создаю новый по шаблону.
Второй случай
Обновляем данные в файле, идентифицируя строки по (в данном случае) артикулу.
UPDATE t
  SET
      t.Артикул = s.[Артикул],
      t.Наименование = s.[Наименование],
      t.Цена = s.[Цена],
      t.Дата = s.[Дата]
FROM OPENROWSET('Microsoft.ACE.OLEDB.10.0', 'Excel 12.0;HDR=YES;Database=filepathsales.xlsx;', 'SELECT * FROM [Лист1$]') AS t
     JOIN
(
    SELECT code AS Артикул,
           name AS Наименование,
           price AS Цена,
           date AS Дата
    FROM _table
) AS s ON s.Артикул = t.Артикул;
При этом в обоих случаях должны быть выполнены следующие условия:
- Файл должен быть закрыт.
- Колонки в файле должны называться именно так, как в запросе и идти в том же порядке.
P.S.
Microsoft.ACE.OLEDB — 64-битный провайдер. В случае, если нужен 32-битный, следует использовать Microsoft.Jet.OLEDB.
The main difference between Microsoft.Jet.OLEDB.4 & Microsoft.ACE.OLEDB.12 is that the Microsoft.Jet.OLEDB.4.0 provider is used with 32-bit SQL Server for Excel 2003 files & the Microsoft.ACE.OLEDB.12.0 provider is used with 64-bit SQL Server for any Excel files or 32-bit SQL Server for Excel 2007 files.
Тут можно скачать драйверы для провайдера.
Узнать версию своего сервера SELECT @@VERSION.
Export SQL Data to Excel from Microsoft SQL Server
Let’s go over three ways to export an SQL Query to an Excel File Using MSSQL
Despite the pushback from Database aficionados, sometimes it makes sense to export data from SQL to an Excel file. It really depends on who is the audience of the information. Not everyone is great with SQL Analysis. Few people require access to the database.
And lots of times the boss just needs to see the information in Excel.
So, if Excel is the Output required this article is here to help you Export SQL Queries to Excel.
Here are three ways to Export a SQL query to Excel format. The last one can be kind of tricky. I’ll provide a condensed version followed by a detailed version with screenshots.
Three quick ways to Export SQL Data to Excel:
Choose the Summarized Version and then scroll to further down to use the SQL Export Version to Excel that works best for you.
Method Number 1 – Copy Grid results and Paste into Excel
Under Query, Make sure results to Grid are selected.
After Running your query, right-click the top right corner of the grid.
Copy With Headers.
Paste into an Excel File
Possible Issues:
I’ve seen formatting issues with this strategy. For Example, there are situations where the spreadsheet drops preceding zeroes after the copy-paste.
I’ve also noticed lengthy fields, (think of a really long free text field) end up running into the next line.
For the reasons above, I prefer this next method for a clean Excel file.
Method Number 2: Export the Query Results as a Task
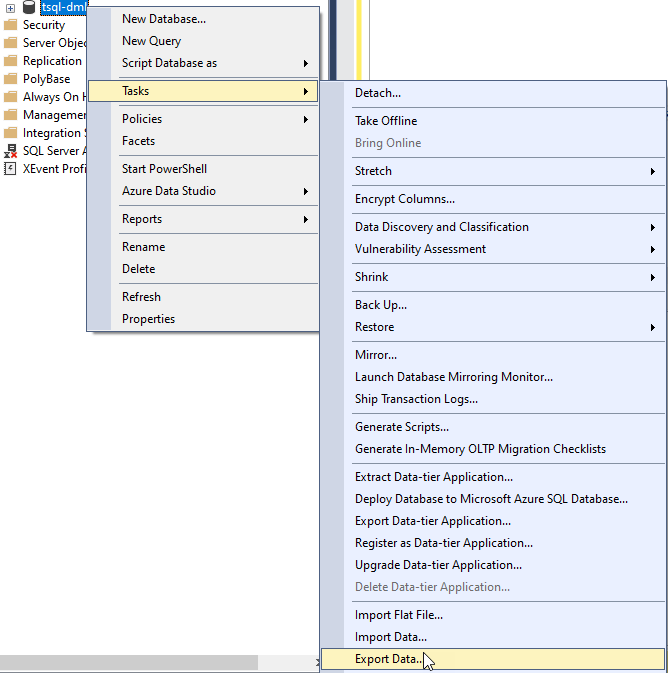
In the object explorer window, find the database you want to export from.
Right Click the Database, Click Tasks, and Export Data
The Wizard walks you through the rest of the steps but I have included screenshots below.
Method Number 3 – Use Good Old fashioned TSQL to send the data to an excel file
For those who value speed above all use the following script format.
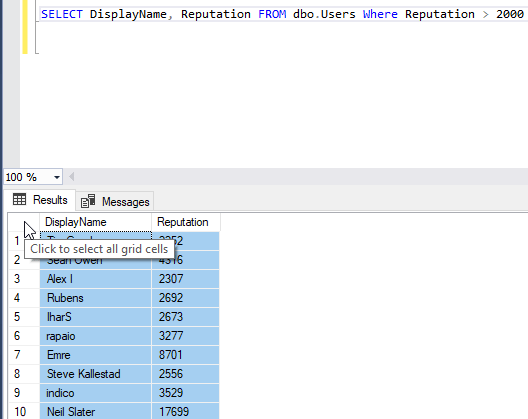
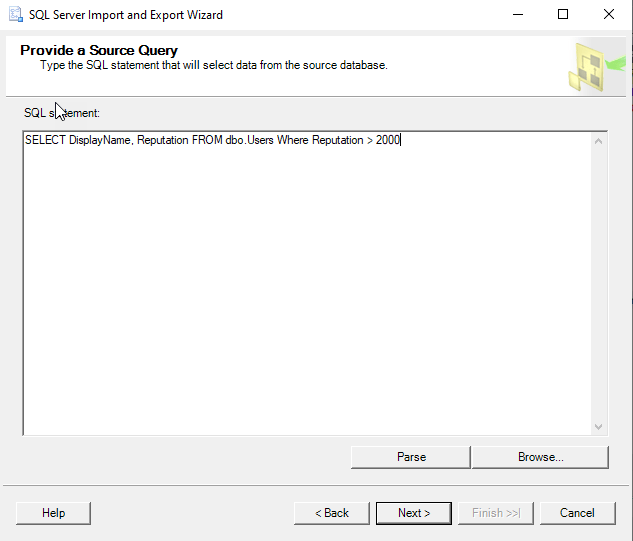
INSERT INTO OPENROWSET(‘Microsoft.ACE.OLEDB.12.0′,’Excel 12.0; Database=C:SQL2019ReportsUsernames.xlsx;’,’SELECT * FROM [Sheet1$]’) SELECT DisplayName FROM dbo.Users Where Reputation > 2000
Possible Issues – Configuring this might not be your type of fun and getting this straight deserves its own article.
Step by Step instructions with screenshots
Method Number 1 – Copy Grid results and paste into Excel
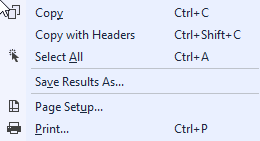
After ensuring results to grid turned on, Execute your query, right-click the top left-hand corner of the results grid.
Choose Copy with Headers and then you are ready to paste in Excel with Ctrl + C
Method 2 – Export Via the Export Wizard
Right-click on the database you want to export from. Then Select tasks and “Export Data”.
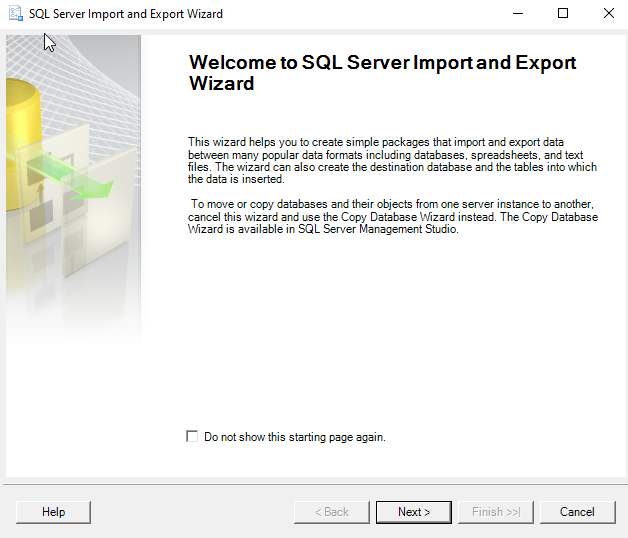
The SQL Server Wizard will startup. Click Next through the prompts.
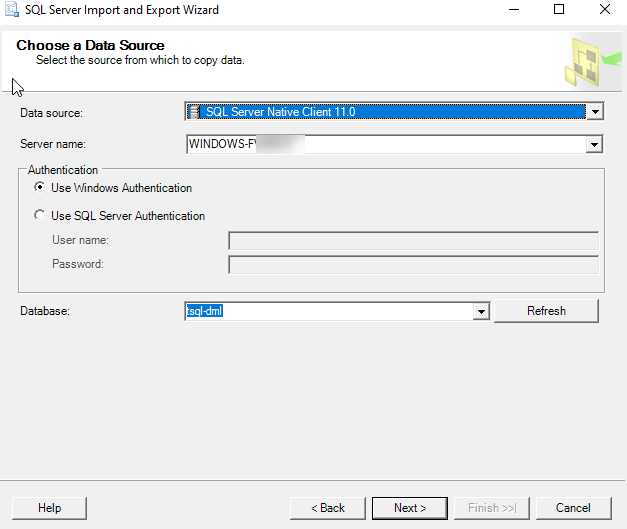
Select the appropriate Native client, your server name, and database and choose “Next”.
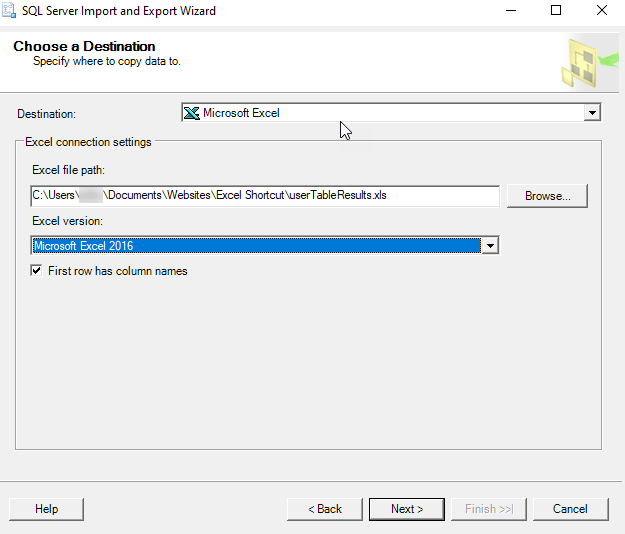
Next, Select Microsoft Excel and the file path where you want to import the data. The .xls file that you name will be created by this process.
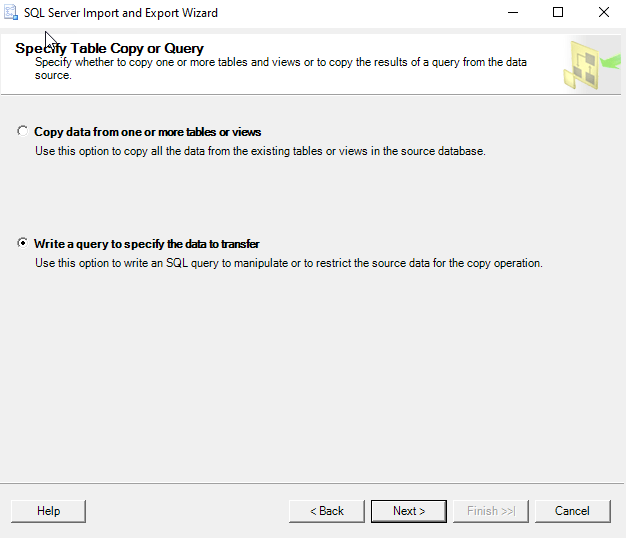
Now you can choose to export a whole table or a query. For the purpose of this exercise, we are creating a query.
Paste the query into the SQL Statement field. Make sure every output field has a unique name.
Click Next on the “Select Source Tables and Views” screen.

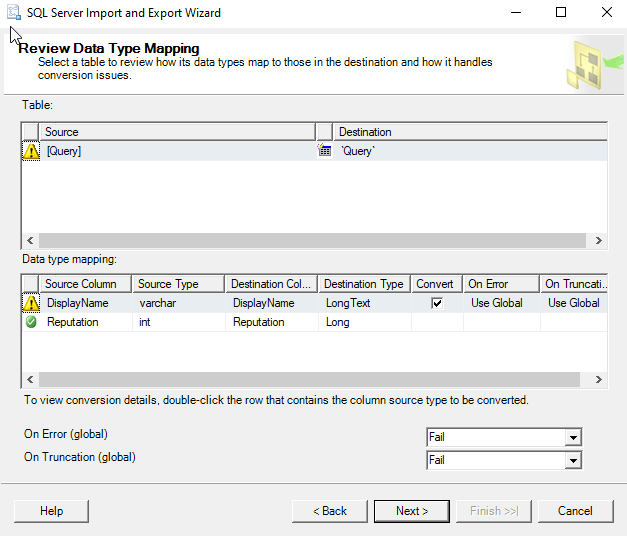
I use the default settings on the “conversion issues and data type mapping screen”
Now you can choose to Run immediately or Save an SSIS Package for later reuse.
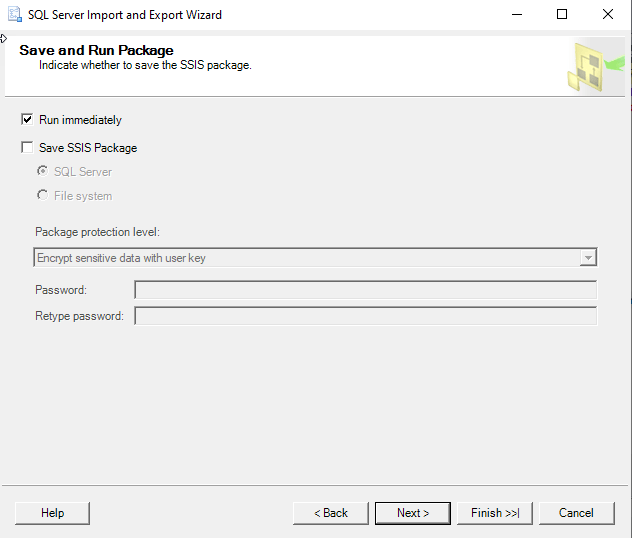
Double Check your settings and click finish.
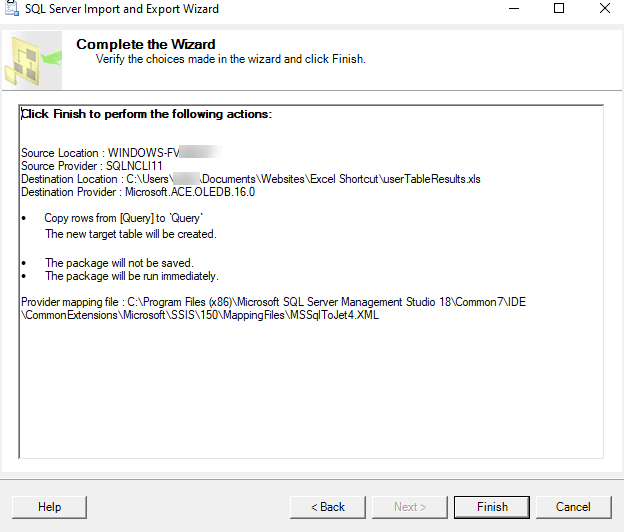
Make sure there were no errors in the Export.
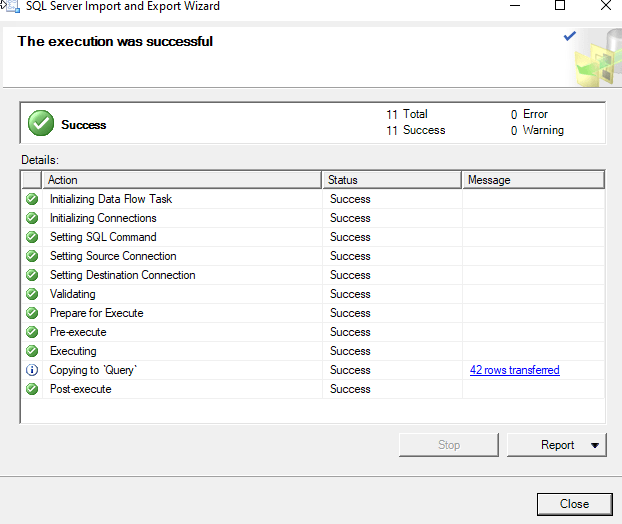
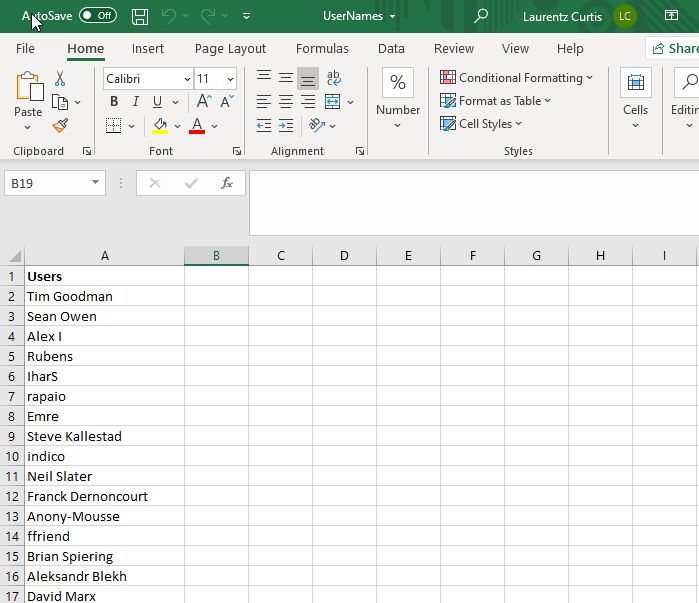
Now Go to the directory you choose earlier and make sure you have a sweet-looking Excel File at that location!
Method Number 3 – Use TSQL to send the data to an excel file
This method is the quickest once you get it set up but the configuration is the tricky part. Permissions can be a limiting factor.
Also with the script below, you have to make sure the file exists before you run the query for it to import properly.
First, create a blank excel file at the directory of your choosing.
C:SQL2019ReportsUsernames.xlsx
Then run this script below.
INSERT INTO OPENROWSET(‘Microsoft.ACE.OLEDB.12.0’,’Excel 12.0;
Database=C:SQL2019ReportsUsernames.xlsx;’,’SELECT * FROM [Sheet1$]’)
SELECT DisplayName FROM dbo.Users Where Reputation > 2000

Configuring this can be tricky and dependent on your level of permissions. Make sure you have the correct Linked Server/Provider installed (‘Microsoft.ACE.OLEDB.12.0’) And check your Database user settings to this server .
