
Export SQL Data to Excel from Microsoft SQL Server
Let’s go over three ways to export an SQL Query to an Excel File Using MSSQL
Despite the pushback from Database aficionados, sometimes it makes sense to export data from SQL to an Excel file. It really depends on who is the audience of the information. Not everyone is great with SQL Analysis. Few people require access to the database.
And lots of times the boss just needs to see the information in Excel.
So, if Excel is the Output required this article is here to help you Export SQL Queries to Excel.
Here are three ways to Export a SQL query to Excel format. The last one can be kind of tricky. I’ll provide a condensed version followed by a detailed version with screenshots.
Three quick ways to Export SQL Data to Excel:
Choose the Summarized Version and then scroll to further down to use the SQL Export Version to Excel that works best for you.
Method Number 1 – Copy Grid results and Paste into Excel
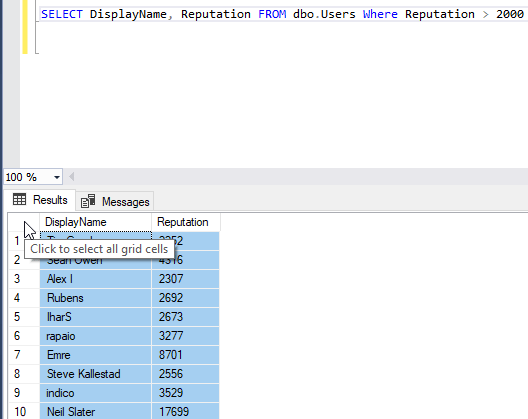
Under Query, Make sure results to Grid are selected.
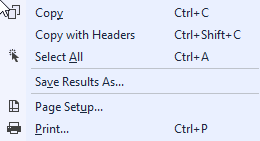
After Running your query, right-click the top right corner of the grid.
Copy With Headers.
Paste into an Excel File
Possible Issues:
I’ve seen formatting issues with this strategy. For Example, there are situations where the spreadsheet drops preceding zeroes after the copy-paste.
I’ve also noticed lengthy fields, (think of a really long free text field) end up running into the next line.
For the reasons above, I prefer this next method for a clean Excel file.
Method Number 2: Export the Query Results as a Task
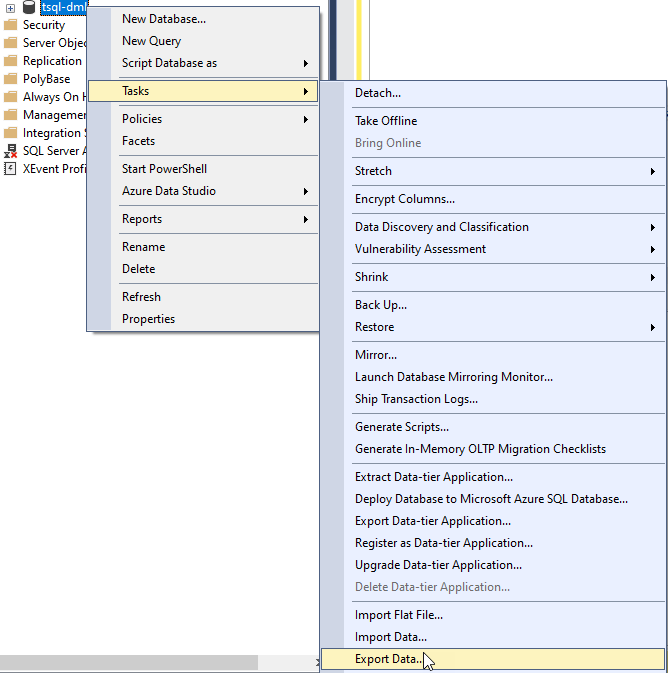
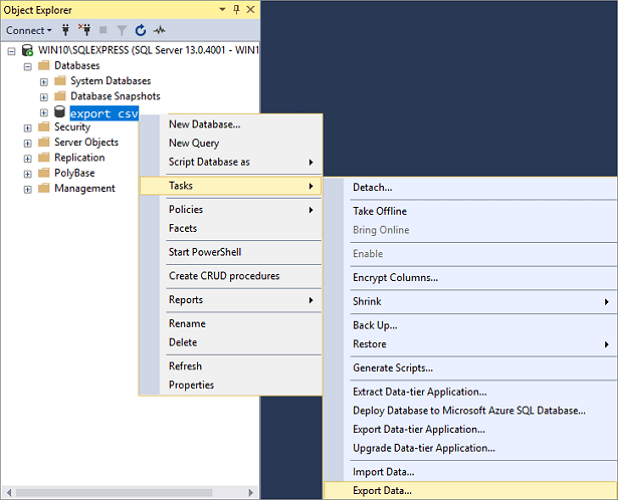
In the object explorer window, find the database you want to export from.
Right Click the Database, Click Tasks, and Export Data
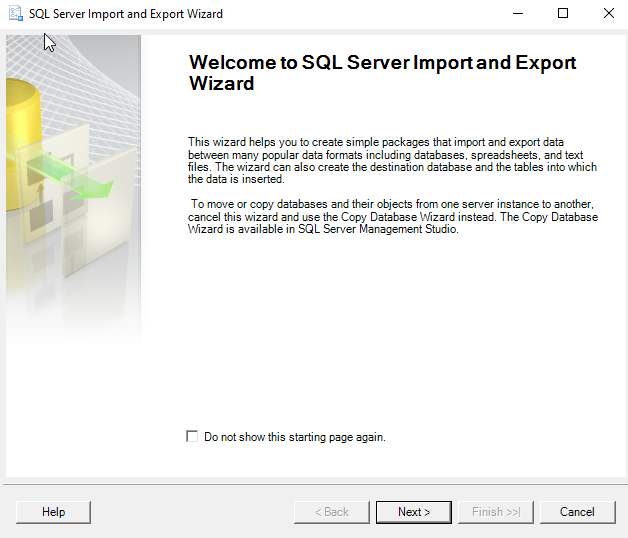
The Wizard walks you through the rest of the steps but I have included screenshots below.
Method Number 3 – Use Good Old fashioned TSQL to send the data to an excel file
For those who value speed above all use the following script format.
INSERT INTO OPENROWSET(‘Microsoft.ACE.OLEDB.12.0′,’Excel 12.0; Database=C:SQL2019ReportsUsernames.xlsx;’,’SELECT * FROM [Sheet1$]’) SELECT DisplayName FROM dbo.Users Where Reputation > 2000
Possible Issues – Configuring this might not be your type of fun and getting this straight deserves its own article.
Step by Step instructions with screenshots
Method Number 1 – Copy Grid results and paste into Excel
After ensuring results to grid turned on, Execute your query, right-click the top left-hand corner of the results grid.
Choose Copy with Headers and then you are ready to paste in Excel with Ctrl + C
Method 2 – Export Via the Export Wizard
Right-click on the database you want to export from. Then Select tasks and “Export Data”.
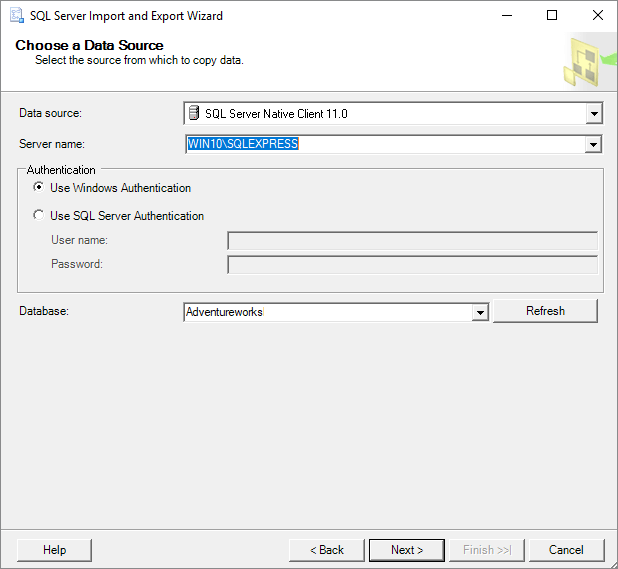
The SQL Server Wizard will startup. Click Next through the prompts.
Select the appropriate Native client, your server name, and database and choose “Next”.
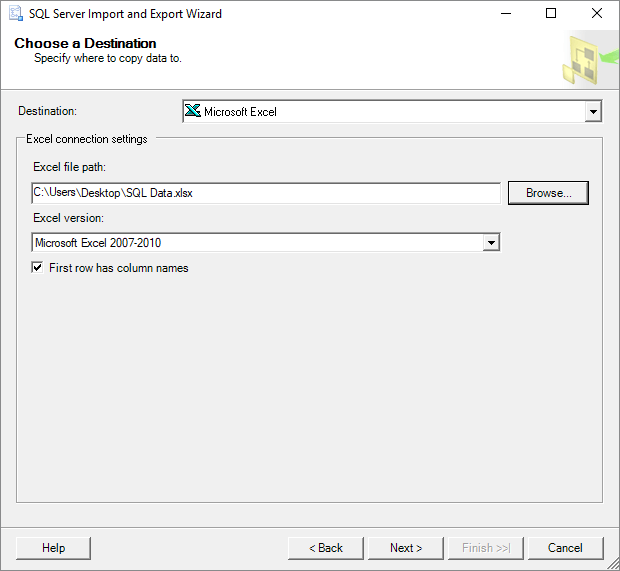
Next, Select Microsoft Excel and the file path where you want to import the data. The .xls file that you name will be created by this process.
Now you can choose to export a whole table or a query. For the purpose of this exercise, we are creating a query.
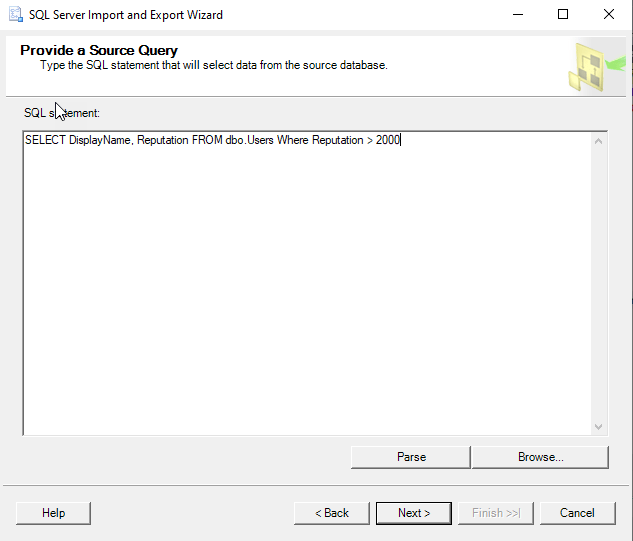
Paste the query into the SQL Statement field. Make sure every output field has a unique name.
Click Next on the “Select Source Tables and Views” screen.

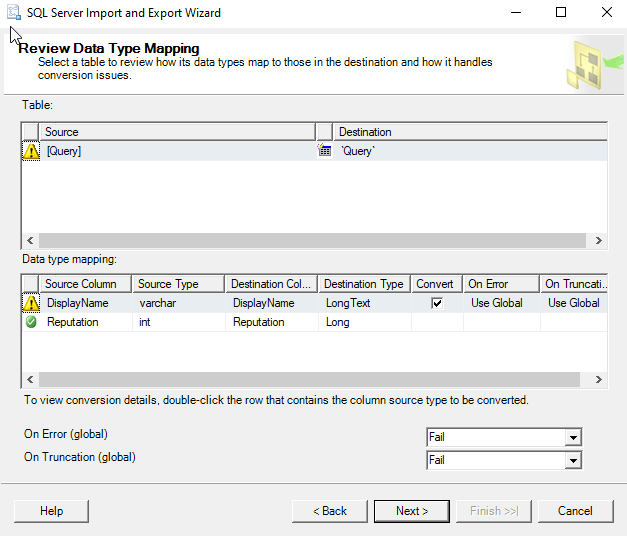
I use the default settings on the “conversion issues and data type mapping screen”
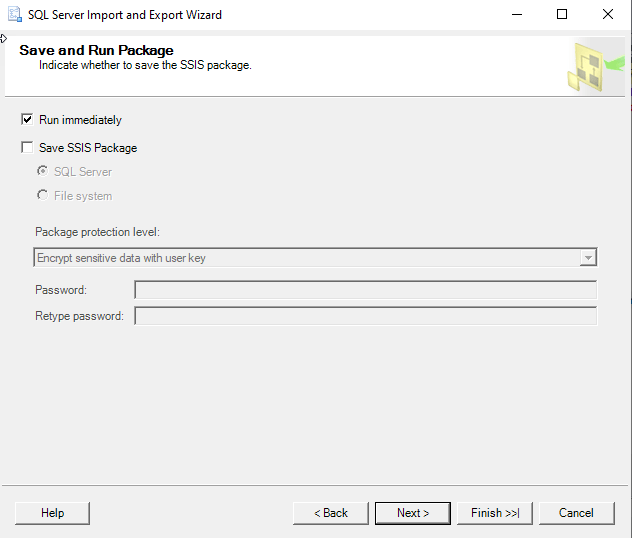
Now you can choose to Run immediately or Save an SSIS Package for later reuse.
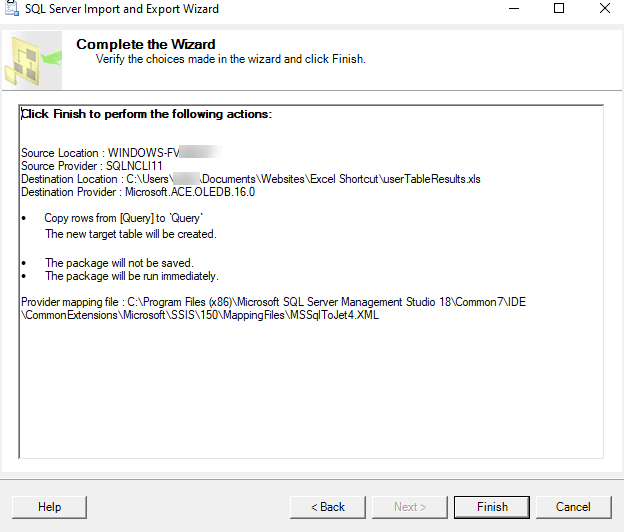
Double Check your settings and click finish.
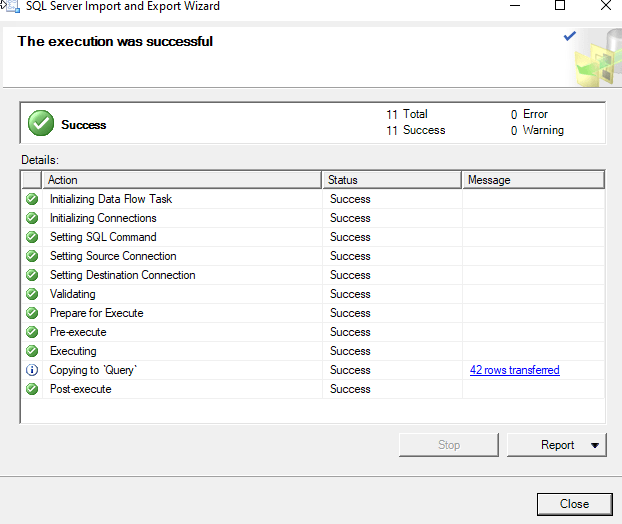
Make sure there were no errors in the Export.
Now Go to the directory you choose earlier and make sure you have a sweet-looking Excel File at that location!
Method Number 3 – Use TSQL to send the data to an excel file
This method is the quickest once you get it set up but the configuration is the tricky part. Permissions can be a limiting factor.
Also with the script below, you have to make sure the file exists before you run the query for it to import properly.
First, create a blank excel file at the directory of your choosing.
C:SQL2019ReportsUsernames.xlsx
Then run this script below.
INSERT INTO OPENROWSET(‘Microsoft.ACE.OLEDB.12.0’,’Excel 12.0;
Database=C:SQL2019ReportsUsernames.xlsx;’,’SELECT * FROM [Sheet1$]’)
SELECT DisplayName FROM dbo.Users Where Reputation > 2000

Configuring this can be tricky and dependent on your level of permissions. Make sure you have the correct Linked Server/Provider installed (‘Microsoft.ACE.OLEDB.12.0’) And check your Database user settings to this server .

For anyone coming here looking for how to do this in C#, I have tried the following method and had success in dotnet core 2.0.3 and entity framework core 2.0.3
First create your model class.
public class User
{
    public string Name { get; set; }
    public int Address { get; set; }
    public int ZIP { get; set; }
    public string Gender { get; set; }
}
Then install EPPlus Nuget package. (I used version 4.0.5, probably will work for other versions as well.)
Install-Package EPPlus -Version 4.0.5
The create ExcelExportHelper class, which will contain the logic to convert dataset to Excel rows. This class do not have dependencies with your model class or dataset.
public class ExcelExportHelper
    {
        public static string ExcelContentType
        {
            get
            { return "application/vnd.openxmlformats-officedocument.spreadsheetml.sheet"; }
        }

        public static DataTable ListToDataTable<T>(List<T> data)
        {
            PropertyDescriptorCollection properties = TypeDescriptor.GetProperties(typeof(T));
            DataTable dataTable = new DataTable();

            for (int i = 0; i < properties.Count; i++)
            {
                PropertyDescriptor property = properties[i];
                dataTable.Columns.Add(property.Name, Nullable.GetUnderlyingType(property.PropertyType) ?? property.PropertyType);
            }

            object[] values = new object[properties.Count];
            foreach (T item in data)
            {
                for (int i = 0; i < values.Length; i++)
                {
                    values[i] = properties[i].GetValue(item);
                }

                dataTable.Rows.Add(values);
            }
            return dataTable;
        }

        public static byte[] ExportExcel(DataTable dataTable, string heading = "", bool showSrNo = false, params string[] columnsToTake)
        {

            byte[] result = null;
            using (ExcelPackage package = new ExcelPackage())
            {
                ExcelWorksheet workSheet = package.Workbook.Worksheets.Add(String.Format("{0} Data", heading));
                int startRowFrom = String.IsNullOrEmpty(heading) ? 1 : 3;

                if (showSrNo)
                {
                    DataColumn dataColumn = dataTable.Columns.Add("#", typeof(int));
                    dataColumn.SetOrdinal(0);
                    int index = 1;
                    foreach (DataRow item in dataTable.Rows)
                    {
                        item[0] = index;
                        index++;
                    }
                }


                // add the content into the Excel file
                workSheet.Cells["A" + startRowFrom].LoadFromDataTable(dataTable, true);

                // autofit width of cells with small content
                int columnIndex = 1;
                foreach (DataColumn column in dataTable.Columns)
                {
                    int maxLength;
                    ExcelRange columnCells = workSheet.Cells[workSheet.Dimension.Start.Row, columnIndex, workSheet.Dimension.End.Row, columnIndex];
                    try
                    {
                        maxLength = columnCells.Max(cell => cell.Value.ToString().Count());
                    }
                    catch (Exception) //nishanc
                    {
                        maxLength = columnCells.Max(cell => (cell.Value +"").ToString().Length);
                    }

                    //workSheet.Column(columnIndex).AutoFit();
                    if (maxLength < 150)
                    {
                        //workSheet.Column(columnIndex).AutoFit();
                    }


                    columnIndex++;
                }

                // format header - bold, yellow on black
                using (ExcelRange r = workSheet.Cells[startRowFrom, 1, startRowFrom, dataTable.Columns.Count])
                {
                    r.Style.Font.Color.SetColor(System.Drawing.Color.White);
                    r.Style.Font.Bold = true;
                    r.Style.Fill.PatternType = OfficeOpenXml.Style.ExcelFillStyle.Solid;
                    r.Style.Fill.BackgroundColor.SetColor(Color.Brown);
                }

                // format cells - add borders
                using (ExcelRange r = workSheet.Cells[startRowFrom + 1, 1, startRowFrom + dataTable.Rows.Count, dataTable.Columns.Count])
                {
                    r.Style.Border.Top.Style = ExcelBorderStyle.Thin;
                    r.Style.Border.Bottom.Style = ExcelBorderStyle.Thin;
                    r.Style.Border.Left.Style = ExcelBorderStyle.Thin;
                    r.Style.Border.Right.Style = ExcelBorderStyle.Thin;

                    r.Style.Border.Top.Color.SetColor(System.Drawing.Color.Black);
                    r.Style.Border.Bottom.Color.SetColor(System.Drawing.Color.Black);
                    r.Style.Border.Left.Color.SetColor(System.Drawing.Color.Black);
                    r.Style.Border.Right.Color.SetColor(System.Drawing.Color.Black);
                }

                // removed ignored columns
                for (int i = dataTable.Columns.Count - 1; i >= 0; i--)
                {
                    if (i == 0 && showSrNo)
                    {
                        continue;
                    }
                    if (!columnsToTake.Contains(dataTable.Columns[i].ColumnName))
                    {
                        workSheet.DeleteColumn(i + 1);
                    }
                }

                if (!String.IsNullOrEmpty(heading))
                {
                    workSheet.Cells["A1"].Value = heading;
                   // workSheet.Cells["A1"].Style.Font.Size = 20;

                    workSheet.InsertColumn(1, 1);
                    workSheet.InsertRow(1, 1);
                    workSheet.Column(1).Width = 10;
                }

                result = package.GetAsByteArray();
            }

            return result;
        }

        public static byte[] ExportExcel<T>(List<T> data, string Heading = "", bool showSlno = false, params string[] ColumnsToTake)
        {
            return ExportExcel(ListToDataTable<T>(data), Heading, showSlno, ColumnsToTake);
        }
    }
Now add this method where you want to generate the excel file, probably for a method in the controller. You can pass parameters for your stored procedure as well. Note that the return type of the method is FileContentResult. Whatever query you execute, important thing is you must have the results in a List.
[HttpPost]
public async Task<FileContentResult> Create([Bind("Id,StartDate,EndDate")] GetReport getReport)
{
    DateTime startDate = getReport.StartDate;
    DateTime endDate = getReport.EndDate;

    // call the stored procedure and store dataset in a List.
    List<User> users = _context.Reports.FromSql("exec dbo.SP_GetEmpReport @start={0}, @end={1}", startDate, endDate).ToList();
    //set custome column names
    string[] columns = { "Name", "Address", "ZIP", "Gender"};
    byte[] filecontent = ExcelExportHelper.ExportExcel(users, "Users", true, columns);
    // set file name.
    return File(filecontent, ExcelExportHelper.ExcelContentType, "Report.xlsx");
}
More details can be found here
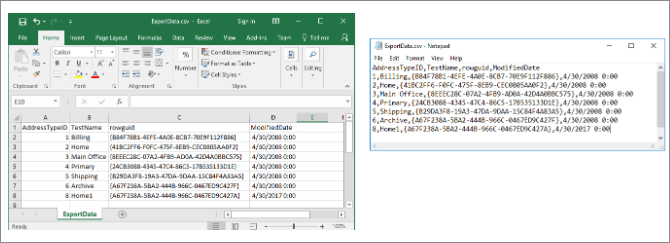
The typical way to achieve this is to export to CSV and then load the CSV into Excel.
TL;DR:
-
For a server-side Excel-friendly CSV file from a
SELECTquery, run this:SELECT ... FROM someTable WHERE etc INTO OUTFILE 'someTableExport.csv' CHARACTER SET utf8mb4 FIELDS TERMINATED BY ',' OPTIONALLY ENCLOSED BY '"' ESCAPED BY '' LINES TERMINATED BY 'rn'; -
For a server-side Excel-friendly CSV file use
mysqldumplike so:mysqldump -h serverHostName -u mysqlUserName -p --tab="someTableExport.csv" --fields-optionally-enclosed-by=0x22 --fields-escaped-by='' --fields-terminated-by=0x2C --lines-terminated-by=0x0D0A --databases databaseName --tables table1 table2 table3 -
For a client-side Excel-friendly CSV file using
mysqlsh(MySQL Shell) like so:mysqlsh --user="mysqlUserName" --host="serverHostName" --port=3306 --schema="databaseName" # Once connected, run this: util.exportTable("tableName", "file:///C:/Users/You/Desktop/test.csv", { dialect: "csv", fieldsEscapedBy: ""})
First, a caution about Excel:
Excel’s vs. MySQL’s default CSV formats:
Remember that Excel has its own underdocumented ideas about how CSV files should be formatted and these stand in-contrast to MySQL’s own ideas about CSV files; though Excel is largely compliant with RFC 4180 you still need to prod and poke MySQL and its associated tooling to generate CSV files that Excel won’t misinterpret:
| Excel | MySQL (default) | MySQL (when configured) | |
|---|---|---|---|
SQL NULL |
Zero-length value | Literal N |
Literal NULL |
| Text values that don’t contain commas, quotes, or line-breaks | Not enclosed | Not enclosed | Enclosed in " |
| Text values that contain commas, quotes, or line-breaks | Enclosed in " |
Not enclosed | Enclosed in " |
| Non-text values | Not enclosed | Not enclosed | Not enclosed |
| Line-breaks and tabs in text values | Literal | Escaped as [r]n |
Literal |
| Double-quotes in text values | Doubled-up "" |
Escaped as " |
Doubled-up "" |
| Field separator | , |
t (Tab) |
, |
| Record separator | rn |
n |
rn |
| Commas inside non-quoted text values | (Results in broken table data) | Not escaped | Will always be quoted if the value contains a comma |
| UTF-8 support |
|
Use utf8mb4.Do not specify the older broken utf8 or utf8mb3 encodings. |
Use utf8mb4 |
As per the table above, MySQL can generate Excel-friendly CSV files, excepting that SQL NULLs will always be interpreted by Excel as literal text, though it’s trivial to use PowerQuery or even just Find-and-Replace in Excel to replace them with empty cells.
Excel and special CSV text markers
- If any of your text values start with
=then you’ll need to manually fudge those as even when quoted Excel will interpret the text following=as a formula instead of literal text. - Also watch out for leading text like
sep=too.
Excel and UTF-8 encoding:
Surprisingly, it wasn’t until Excel was 31 years old (Excel 2016) when Excel added built-in support for UTF-8 encoding in files without needing a BOM, but it still defaults to importing and exporting CSV files using your system-default non-Unicode encoding (e.g. Windows-1252).
- When importing CSV into Excel, be sure to select Codepage
65001for correct UTF-8 handling as Excel still defaults to non-Unicode-based codepages for some reason.-
Note that opening a CSV file in Excel won’t display the Text Import Wizard. (As of Excel 2021) you need to copy-and-paste CSV text into Excel and use the popup menu to use the legacy (frozen-in-1994) wizard, or use Data > From Text/CSV on the ribbon to use the newer (but less flexible, imo) PowerQuery-based CSV import wizard:
-
Your options:
| Option | SELECT INTO OUTFILE |
mysqldump --tab |
mysqldump > file.csv |
mysqlsh |
MySQL Workbench |
|---|---|---|---|---|---|
| Server-side CSV | True | True | True | True | Broken |
| Remote (client-side) CSV | False | False | False | True | Broken |
| MySQL Server version support | All versions | All versions | All versions | Only 5.7 and later | All versions |
Option 1: Exporting an Excel-friendly CSV using INTO OUTFILE:
- You can do a server-side CSV export by using the
INTO OUTFILEclause of aSELECTquery.- Because this is «normal» SQL that’s executed by the MySQL server this works regardless of whatever MySQL client tool you’re using, so you don’t need to install MySQL Workbench.
- …but because this is a server-side export you need to have permission to write to the server’s filesystem which you might not have, in which case consider using specialty export tools like
mysqldump(see below).
- MySQL’s
OUTFILEclause has a number of optional subclauses that must be specified for some-level of compatibility with Excel’s own CSV reader:FIELDS...TERMINATED BY(default:'t', for Excel use',')[OPTIONALLY] ENCLOSED BY(default:'', should be'"'with theOPTIONALLYkeyword)ESCAPED BY(default:'\', for Excel use'')
LINES...TERMINATED BY(default:'n', for Excel use'rn')STARTING BY(default:'', for Excel you can omit this or use the MySQL default).
- Do not use
ENCLOSED BY(without the precedingOPTIONALLYkeyword) as that will enquote all values, regardless of type (i.e. it will enquoteintvalues which will cause Excel (by default) to interpret them as text (strings) instead of numbers).
- Note that there is no option to instruct MySQL to output SQL
NULLs as empty-fields, and so Excel will interpet them as unquoted strings of text (i.e. as"NULL"), so you’ll want to do a Find-and-Replace in Excel after importing the file. - If your
INTO OUTFILE <fileName>filename (e.g.'someTableExport.csv'above) is not an absolute path then it will be saved into your database’sdatadirdirectory. RunSHOW VARIABLES LIKE 'datadir';to get the path. Note that you might not necessarily have read/write permission for new files under that directory.
So your query (SELECT * FROM document WHERE documentid...) would look something like this:
SELECT
    *
FROM
    document
WHERE
    documentid IN ( SELECT documentid FROM TaskResult WHERE taskResult = 2429 )
INTO
    OUTFILE 'someTableExport.csv'
    FIELDS TERMINATED BY ',' OPTIONALLY ENCLOSED BY '"', ESCAPED BY ''
    LINES TERMINATED BY 'rn';
Option 2: Exporting an Excel-friendly CSV using mysqldump:
- To store dump into CSV file using the
--tabcommand-line option, as permysqldump‘s documentation. - Unfortunately
mysqldump‘s--tab=option won’t work for remote MySQL servers: this is because--tab="fileName.csv"can only represent a path on the server.- While you can use
stdoutredirection to generate a local file (i.e.mysqldump --etc > output.csv) you cannot use the--fields-terminated-byand other format options withstdout, making it useless for Excel-compatible output. So if you’re remote and cannotssh-in then you will need to use MySQL Shell (mysqlsh) instead (see below).
- While you can use
- Note that
mysqldumpdoes not supportSELECTqueries for dumping data: it does support simpleWHERE-style filters with the--where=<expr>option but this doesn’t support things like filtering using anINNER JOIN(though as a workaround you couldSELECTinto a new table, then runmysqldumpon that new table. Note that you cannot useTEMPORARY TABLEwithmysqldumpas Temporary Tables are connection-scoped).
In the OP’s case, due to limitations inherent in how the --where= command-line option works, they’ll want to export both tables (document and TaskResult) and apply their filter logic in Excel PowerQuery or similar. Perform the export like so:
mysqldump -h serverHostName -u mysqlUserName -p --tab="someTableExport.csv" --fields-optionally-enclosed-by=0x22 --fields-escaped-by='' --fields-terminated-by=0x2C --lines-terminated-by=0x0D0A --databases databaseName --tables document TaskResult
-
The above command-line should work without modification in Windows’
cmd.exe, macOS’szsh, andbashon Linux — providedmysqldumpis in yourPATH. -
The use of hex-encoded chars means sidestepping the hassle of figurig out how to pass double-quotes and line-breaks as literals in your shell and terminal (
0x22is",0x2Cis,, and0x0D0Aisrn). -
Avoid using the
--password=<value>(aka-p<value>) option on
themysqldumpcommand-line, as it will mean your password will be saved in plaintext to your terminal or console history file, which is an obvious massive security risk.- So if you’re in an interactive command-line session need to specify a password then
mysqldumpwill prompt you for the password immediately when the program runs so it won’t be saved to your history file. - If you want to run
mysqldumpin a non-interactive context (e.g. from within a web-application, daemon, or other process) then there’s (normally) no history file to worry about, but you should still consider alternative approaches before resorting to handling passwords in an insecure way.
- So if you’re in an interactive command-line session need to specify a password then
-
If you don’t specify an absolute path but use a short (unqualified) filename like
INTO OUTFILE 'output.csv'orINTO OUTFILE './output.csv'theb it will store the output file to the directory specified bySHOW VARIABLES LIKE 'datadir';.
Option 3: Exporting an Excel-friendly CSV using MySQL Workbench:
Unfortunately, you can’t (unless you don’t have any double-quotes anywhere in your data): As of late 2022 MySQL Workbench has an open bug regarding its own CSV export feature: output files never escape double-quote characters in text, so pretty much all CSV-handling software out there will report a malformed CSV file or import data to the wrong columns — so this makes it completely unsuitable for use with Excel.
Option 4: Exporting an Excel-friendly CSV using MySQL Shell (aka mysqlsh):
- This is probably the simplest option, but you might need to install the MySQL Shell as it doesn’t come in-box in most MySQL installations.
- MySQL Shell supports connecting to MySQL Server 5.7 and later (but not older versions). If you’re still using MySQL Server 5.6 or earlier (then you really should update to 5.7 or later anyway) you’ll have to stick with
mysqldumprun locally on the MySQL Server itself (but you can use ansshsession, of course).- The new «MySQL X» protocol (
mysqlx://user@host/schema) is not supported by MySQL 5.7, butmysqlshsupports non-X connections with old-style command-line parameters.
- The new «MySQL X» protocol (
- Install MySQL Shell if it isn’t already installed.
- If you start MySQL Shell without any command-line arguments (e.g. because you use the Start Menu shortcut on Windows)) then use the
connectcommand to connect.-
For MySQL 5.7 use
connect mysql://username@hostname -
For MySQL 8.0+ there are a variety of ways to connect, including the «MySQL X» protocol as well as «Classic» connections. Consult the docs for more info.
-
If your username contains literal
@characters then you need to percent-encode them (e.g. if you’re using Azure MySQL then your full username will be likeusername%40servername@servername.mysql.database.azure.com). -
Immediately after you submit the
connectcommand you will be prompted for your password interactively.
-
- If you can start
mysqlshwith arguments, then you can runmysqlsh --user="userName" --host="hostName" --port=3306 --schema="dbName"directly without using theconnectcommand. - Once connected, run the
util.exportTable(tableName, outputUri, options)command with the following arguments:tableName: your table name.- Unfortunately there doesn’t seem to be a way to apply a
WHEREfilter or export the results of aSELECTquery, (though as withmysqldumpyou could always save your query results to a newTABLE, then export that table, thenDROP TABLEwhen you’re done with it. Remember thatTEMPORARY TABLEwon’t work here as tables created in one session aren’t visible from any other session — andmysqlshwill have its own session.
- Unfortunately there doesn’t seem to be a way to apply a
outputUri: To save the file locally use afile:///URI.- On Windows you can use a forward-slash as a directory-name separator instead of a backslash. e.g.
file:///C:/Users/Me/Desktop/export.csv.
- On Windows you can use a forward-slash as a directory-name separator instead of a backslash. e.g.
options: To ensure compatibility with Excel specify{ dialect: "csv", fieldsEscapedBy: ""}.- The
dialect: "csv"option sets Excel-compatible defaults for all-but-one of theOUTFILEparameters, so you must also specifyfieldsEscapedBy: "", otherwise SQLNULLwill be be rendered asN(literally) while double-quotes and line-breaks inside text values will be backslash-escaped, which Excel doesn’t support.
- The
«Hello, I am new to SQL. We use SQL query in SQL 2016 Server. And then we are exporting the output to excel. Could you please guide me on how to make the process automated for exporting data from SQL to Excel. Since I don’t want to do the task manually any longer. «
If you come across the same problem as mentioned above and want to find a way to export SQL Server data to Excel, don’t fret. This page covers two possible ways to help you export data from SQL Server automatically.
Two Ways to Export Data from SQL Server to Excel
You can use the SQL Server Import and Export Wizard and Data Connection Wizard in Excel to export data from SQL Server to Excel. See the details below.
Solution 1. Use the SQL Server Import and Export Wizard
1. Open SQL Server Management Studio and connect to the database.
2. Go to «Object Explorer», find the server database you want to export to Excel. Right-click on it and choose «Tasks» > «Export Data» to export table data in SQL. Then, the SQL Server Import and Export Wizard welcome window pop up.
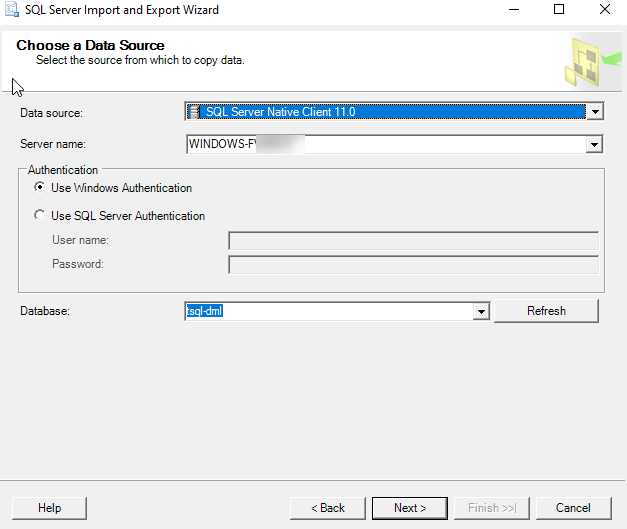
3. Now, you need to click on the Data source drop-down button to choose the data source you want to copy. Here, select «SQL Server Native Client 11.0». In the Server name drop-down box, select a SQL Server instance. In the Authentication section, choose authentication for the data source connection and from the Database drop-down box, select a database from which data will be copied. After everything is set, press the «Next» button.
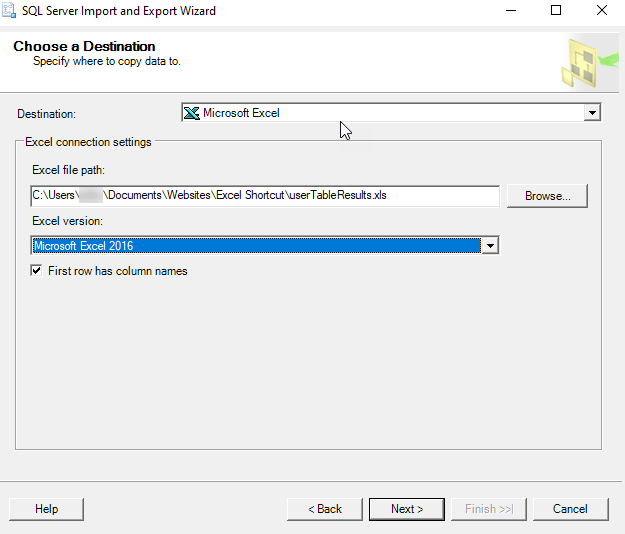
4. On the «Choose a Destination» window, in the Destination box, choose Microsoft Excel item for exporting data from SQL Server to Excel. Choose the Excel file path and version as you need. Then, click the «Next» button to continue.
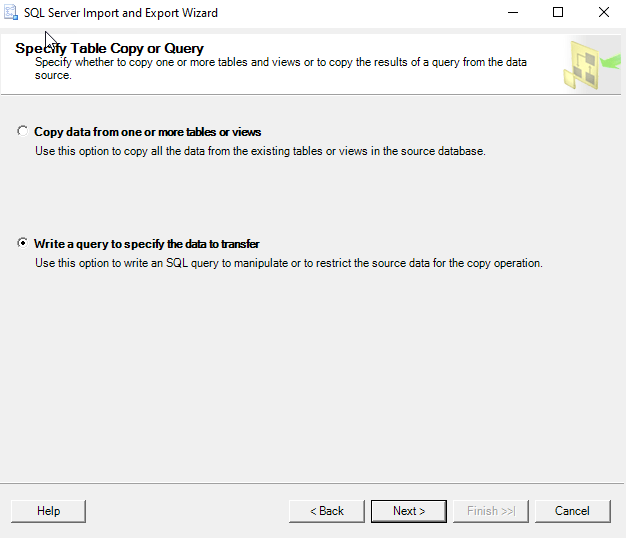
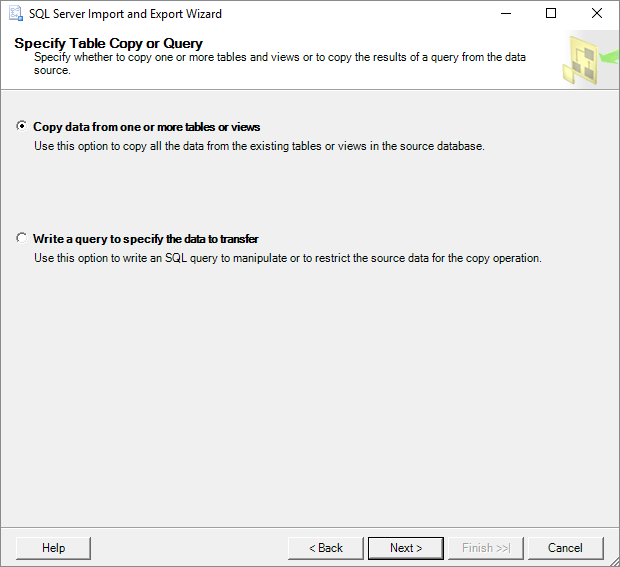
5. On the Specify Table Copy or Query screen, you can choose «Copy data from one or more tables or views». Then, click «Next» to go on.
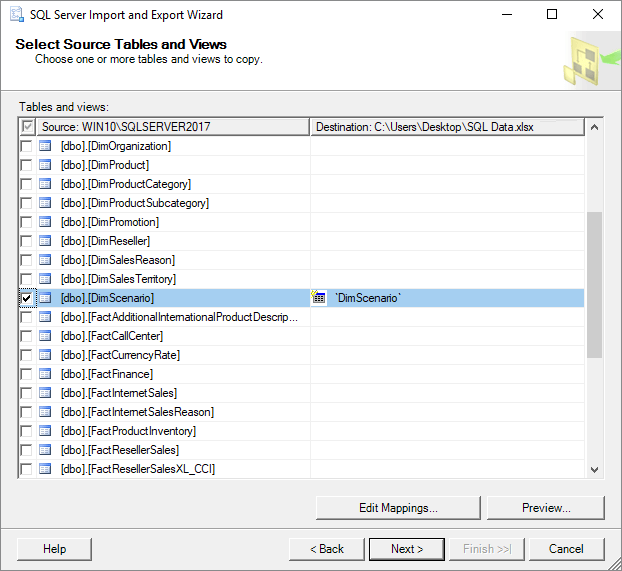
6. In the «Select Source Table and Views» window, you can choose one or more tables and views from which you want to export SQL Server data to an Excel. Click the «Preview» button to preview which data will be generated to an Excel file. Click the «Next» button to move on.
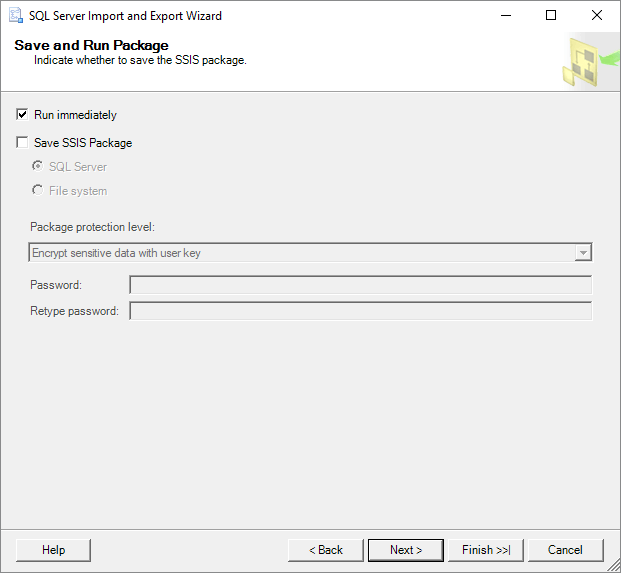
7. Here, on the «Save and Run Package» window, check the «Run immediately» and click the «Next» button.
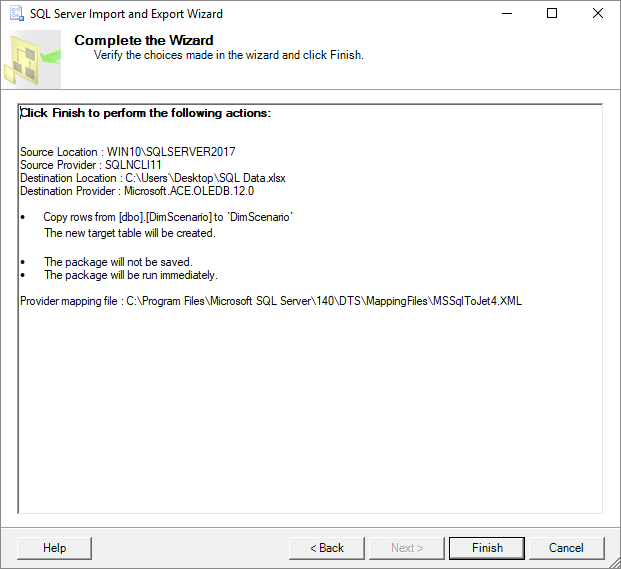
8. On the «Complete» Wizard window, you can check all the settings set during of exporting process. If everything is right, click «Finish» to start exporting SQL database to Excel.
9. You can view the exporting process in this step. When it completes, click on «Report» drop-down button.
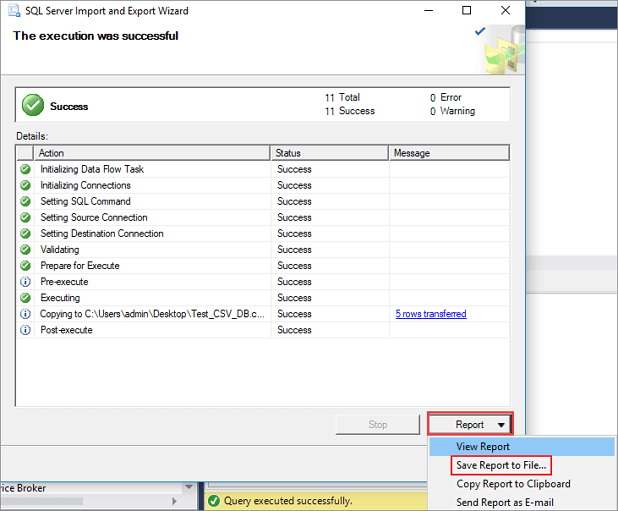
10. You can choose «Save Report to File…» (including Excel, Notepad) to save the report. Here, you need to choose Excel as the target file format.
How to Repair SQL Server Database
SQL Server Management Studio (SSMS) offers the Import and Export Wizard feature to export data from one data source to another data source. Namely, you can apply this function to export SQL to Excel. For exporting SQL Server database to CSV, link to check the details.
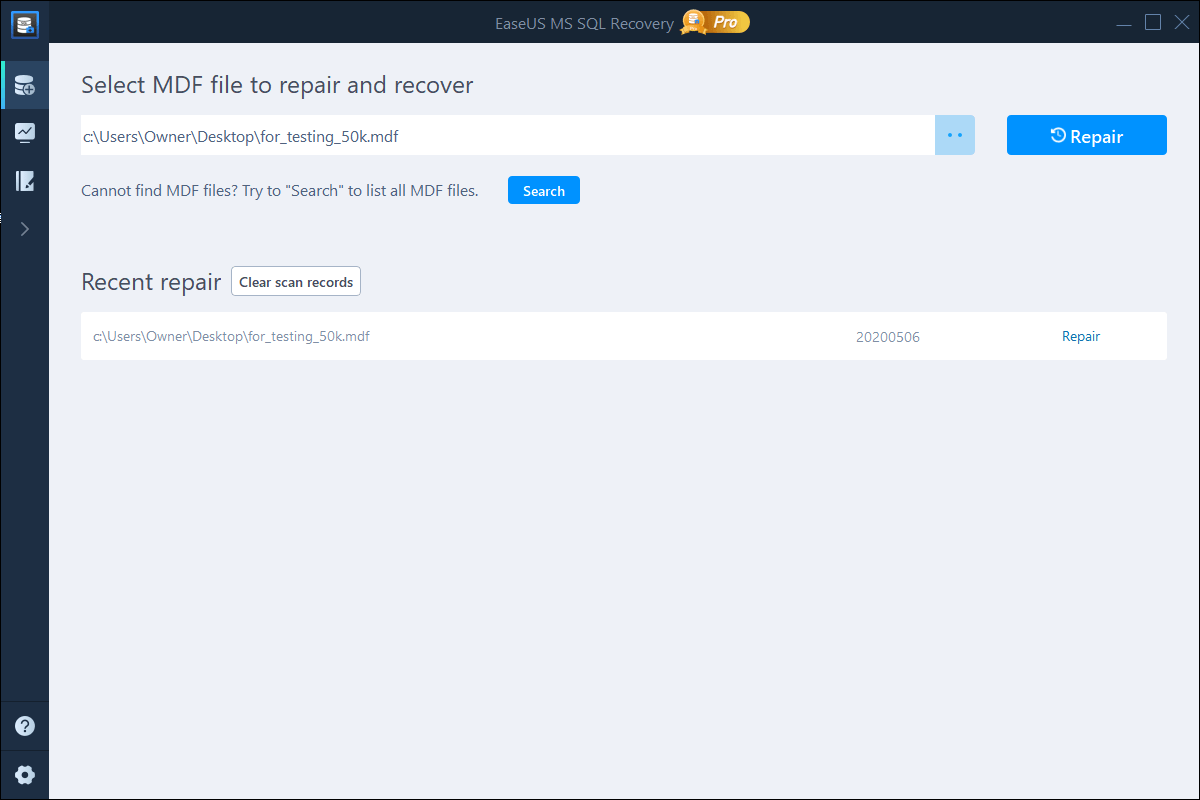
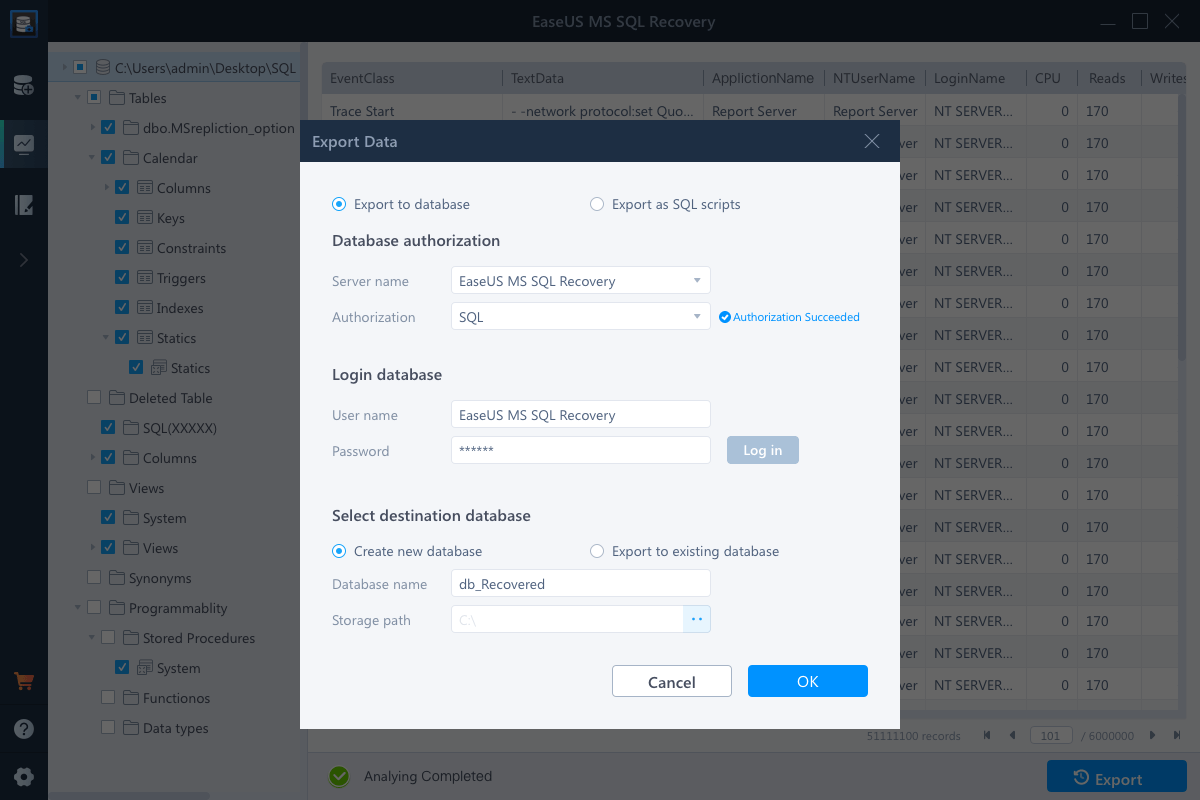
Step 1. Close the SQL Service in Task Manager or SQL Server Manager Console.
Step 2. Run EaseUS MS SQL Recovery, click «Browse» (the two dots) or «Search» to choose the location where you saved your corrupted database. Afterward, Click «Repair» to start analyzing the specified database.
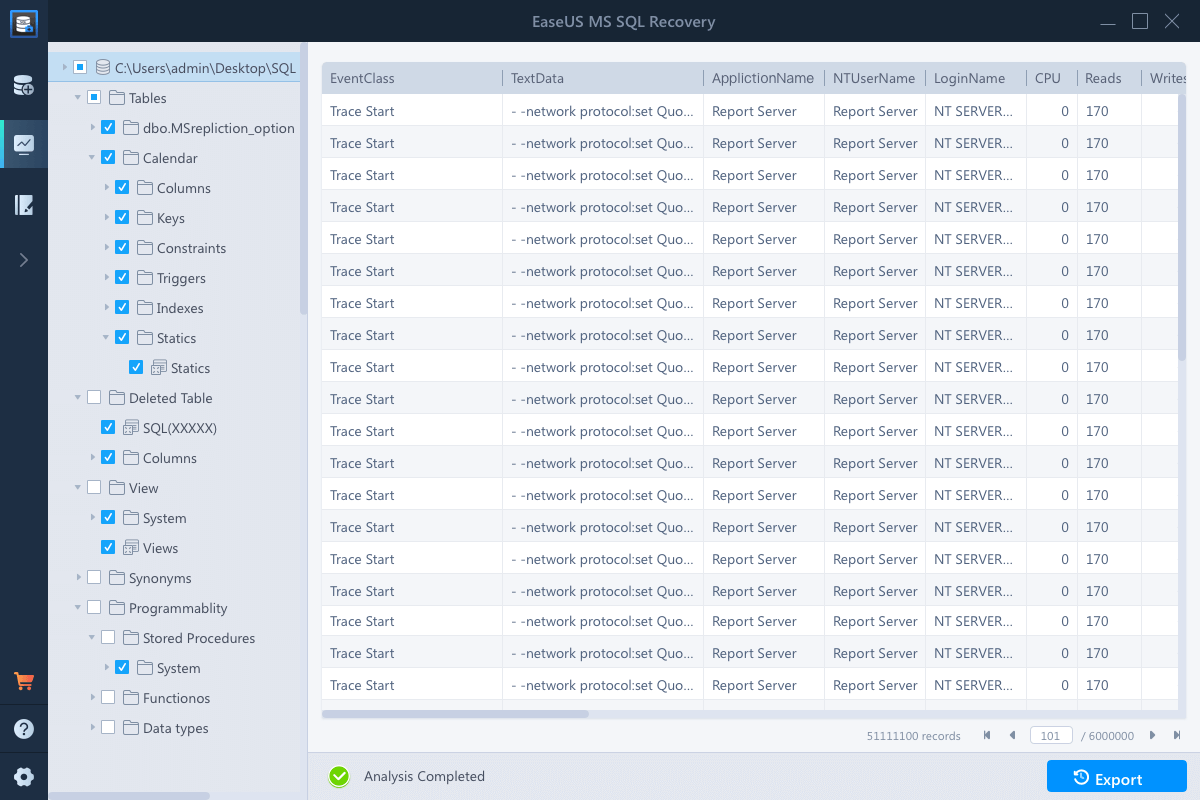
Step 3. When it has done, choose the files you want to repair and click «Export».
Step 4. Turn on the SQL service, you can choose to export the repaired files to database to export it as SQL scripts.
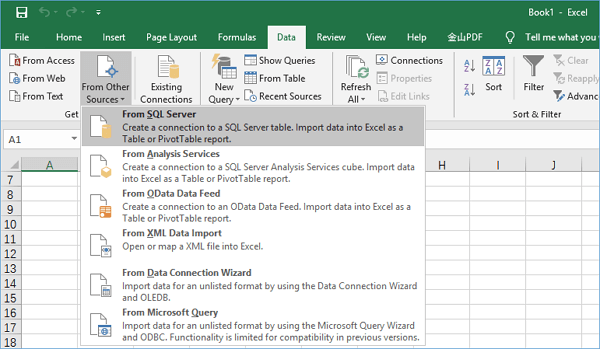
Solution 2. Using the Data Connection Wizard in Excel
Another way to export data from SQL Server to Excel file is to use the Data Connection Wizard dialog in Excel.
1. Launch Excel, open an Excel file in which you want to export SQL Server data. On the toolbar, click the «Data» tab > select «From Other Sources» > choose «From SQL Server».
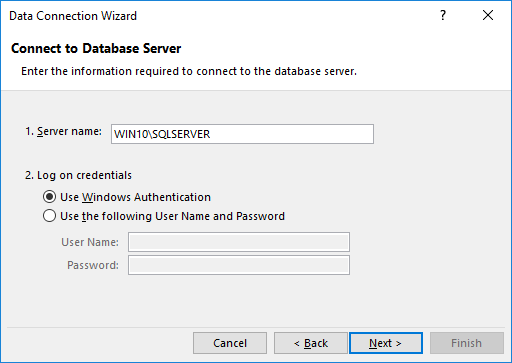
2. The «Data Connection Wizard» window will pop up. Enter the name of the SQL Server instance from which data need to export. In the «Log on credentials» section, choose «Use Windows Authentication» mode for the data source connection and click the «Next» button.
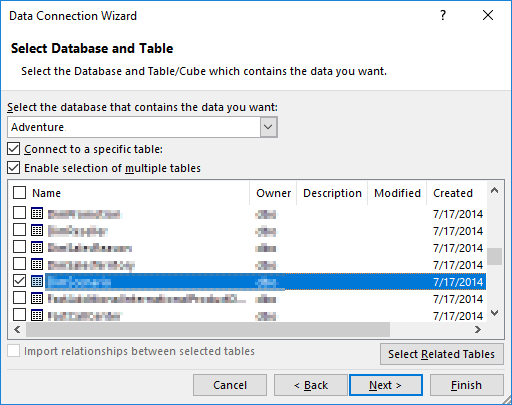
3. Choose the database from which the data will be exported. And click the «Next» button to proceed. On the next window, leave everything as it is and press the «Finish» button.
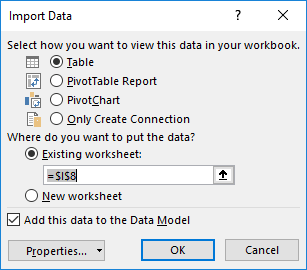
4. In the Import Data dialog, choose «Table» and «Existing worksheet» as the screenshot shows. Press the «OK» button. After this, the SQL Server data will be exported to Excel file.
Сколько раз вам приходилось писать быстрый запрос в SQL Management Studio для кого-то, а затем экспортировать данные в Excel? Экспорт данных из SQL Server — это довольно длительный процесс, состоящий из нескольких этапов, но если вы сделаете это несколько раз, это неплохо.
Из сохранения результатов SQL-запроса в формате Excel или CSV я узнал, что лучше всего использовать мастер импорта и экспорта SQL, а не пытаться щелкнуть правой кнопкой мыши результаты и сохранить их.

Вы всегда можете щелкнуть правой кнопкой мыши и выбрать «Сохранить результаты как», однако полученный CSV-файл не будет содержать заголовков столбцов! Это королевская боль, если у вас есть 50 столбцов.
Чтобы правильно экспортировать данные SQL, щелкните правой кнопкой мыши базу данных (не таблицу) и выберите Задачи, Экспорт данных.
Далее вам нужно выбрать источник данных. Если вы щелкнули правой кнопкой мыши на имени базы данных, то все должно появиться автоматически.
Теперь вам нужно выбрать пункт назначения. Идите вперед и выберите Microsoft Excel из выпадающего списка. После этого вам нужно будет нажать кнопку «Обзор» и выбрать местоположение для выходного файла Excel. Также не забудьте установить флажок «У первой строки есть имена столбцов».
Затем вы можете либо экспортировать всю таблицу / представление в Excel, либо написать собственный запрос. В моем случае я напишу конкретный запрос для данных, которые я хочу экспортировать.
Введите свой запрос и затем нажмите Parse, чтобы убедиться, что все правильно.
Наконец, нажмите Далее, а затем нажмите Готово. Ваши данные SQL будут выведены в файл Excel, и он будет также включать все заголовки столбцов! Наслаждайтесь!