

Need to tidy up your documents? Read this article to learn how to quickly remove all content between square brackets in Microsoft Word.
When working in Microsoft Word, sometimes you may find that you have content between brackets in your document. This can make your document look unprofessional and difficult to read, but fortunately, there is a simple way to remove all content between brackets from your document.
Whether you’re using Microsoft Word to create a document or to create a form, there’s an easy way to remove all the content between square brackets. Using a wildcard, you can replace all the text in a specified range. You can even apply a format or style to the range of text.
1. Replace Text With a Wildcard
Using the Find and Replace feature in Microsoft Word, you can use wildcards to find and replace text between square brackets. Wildcards can be used to replace any character, such as a space character, a letter case, or a number. Wildcards can also be used to replace complex text patterns.
What Are Wildcards in Microsoft Word?
Microsoft Word’s wildcards can be useful, but they can also be used incorrectly. For example, an incorrect search could accidentally remove commas from a book. It is important to test the search and confirm that the changes you make are appropriate and adhere to the style you want. In addition, Word files can be treated differently depending on the circumstances, so it is a good idea to back up the file before applying global changes.
Wildcards can also be used to add or remove the content in your document, and to change the order of the text. Wildcards are similar to regular expressions. They can be used to define groups of text, define repeats, and define ranges. They can also be used to find common patterns in text.
When you have a wildcard expression in the Find and Replace dialog box, you can use the More button to expand the dialog. You can also use the Replace All button to see the number of replacements. This will display the number of occurrences of your wildcard.
If you’re not sure whether to use a wildcard or a regular expression, it’s a good idea to experiment with both. Using a wildcard can save you a lot of time. However, using a regular expression can be more precise and can help you find and replace text between square brackets in Word.
In addition to replacing text between square brackets, wildcards can also be used to find and replace special characters, such as hyphens and square brackets. These can also be used to replace sequences of numbers or letter cases.
How To Use Wildcards To Remove Content Between Brackets in Word
If you need to use a wildcard to find and replace text between square brackets, the first step is to turn on wildcards in the Find and Replace dialog box. You can do this by clicking on the Use wildcards checkbox. Then, you must select the Replace option and click OK.
The more advanced Find and Replace function is called Advanced Find. It’s located in the Editing group on the Home tab of the ribbon. It’s also easy to access with the Ctrl + H shortcut. It also has a Find What box that can display the search text and a Replace with a box that contains the text you’ll replace.
Using the Find and Replace function in Word with wildcards is fairly simple. The most common use for wildcards is to replace text between square brackets. However, it is important to use a wildcard correctly. You can also use wildcards to replace a specific number of occurrences of a character or to change the order of the text.
2. Remove All Brackets From Text Strings in the Selected Range
Getting all the brackets out of a text string in Word can be a daunting task. There are a few different tricks of the trade that you can use to get the job done. The easiest one is to turn on the wildcards in the Find and Replace dialog box. This allows you to see which brackets you need to remove to get to your desired text string.
The best part about this process is you can do it while you’re writing your document. If you’re not a whiz at Word, you can have the software do the dirty work for you. This saves you from having to go through the same grueling pains that most word aficionados go through. This also allows you to get more done in less time.
This process is particularly useful if you need to make a quick change to a string in the middle of a lengthy discussion. It’s also a good way to avoid the dreaded cursor jibe, or worse, having to re-type a paragraph while you’re engrossed in a discussion.
You can also use this trick to clean up a string that you’ve been writing in Word for years without a hitch. The trick is to select a string that you’ve written many times before and to turn on the wildcards in the Find and Replace dialog box. This will ensure that your text string is properly formatted.
3. Apply a Format or Style
Using a format or style to remove all the content between square brackets in Word can be useful if you need to edit a document. For instance, you may want to change the formatting of a paragraph, but don’t want to make changes to the text. This is a common issue in Microsoft Word. If you use a format or style to remove all the contents between square brackets, Word will retain the formatting you make while updating your document. This makes it easier to make changes.
The first step is to select the text you want to change. Click on the text to bring up the formatting options. If you do not see a formatting option, you can use the «What is This?» command. This will open the Find and Replace dialog box. It offers more functionality than the regular Find dialog box.
The Find command is located on the Home tab. If you are using Word 2007, you can find it in the font group of the Home tab. You can also use the Advanced Find command. The advanced find command is located on the home tab. Using this command is similar to using the «What is This?» command, but the advanced find dialog will open. You can use this command to select multiple words or paragraphs and replace them with one word or paragraph.
If you are using Word 2000, you can use the Paragraph command to select and indent a paragraph. You can also use the Tab Alignment box to set indents.
The Style command is located in the Format menu. When you select a style, you will see more information about the style in the Styles gallery. The Style gallery will also display a list of paragraph styles and character styles that are available in your document. Selecting a style will also make it easier to apply formatting to the text.
If you don’t want to apply a style to all of your text, you can use the Clear Formatting command. This will remove all formatting and bring your text back to its original format. You can also remove formatting by using the Delete button. If you use the Delete button, you will remove all the spaces between square brackets, including those that are inserted in the text.
One of the most useful features of Word is its cross-references. These links are formatted the same way as a footnote reference mark. The cross-reference is a bold symbol that appears on the same line as the referenced text. If you would like to change the way cross-references are formatted, you can use the Find and Replace dialog box. However, this feature is not included by default in Word. If you would like to add this feature to your document, you can click on the Replace dialog box and select More.
The Find command is located in the Home tab. If you are using Word 2007 or earlier, you can find it in the font group of your Home tab.
Conclusion
Editing your document in Word to remove content between square brackets is a quick and easy process that can be done in a few different ways. We hope that these tips will help you easily edit your document without any hassle. If you have any questions or need assistance, our team at SoftwareKeep is always here to help. Reach out to us today and we’ll be more than happy to assist you!
One More Thing
Looking for more tips? Check out our other guides in the SoftwareKeep Blog and our Help Center! You’ll find a wealth of information on how to troubleshoot various issues and find solutions to your tech problems.
Sign up for our newsletter and get early access to our blog posts, promotions, and discount codes. Plus, you’ll be the first to know about our latest guides, deals, and other exciting updates!
Recommended Articles
» MS Word: The Definitive Microsoft Word User Guide
» How Do I Insert or Delete a Page Break in Word?
» How to Edit Your Word Documents Faster
Feel free to reach out with questions or requests you’d like us to cover.
Петр спрашивает:
Помогите, как заменить в Word 2003 много различных предложений, которые находятся внутри скобок, на пробел? Например: а- (перед гласными ан-; греч. a-, an-); или Аарона симптом (Ch. D. Aaron, 1866—1951, амер. врач). Вот то, что внути скобок и надо заменить на пробел.
Такую задачу можно решить вручную с использованием диалогового окна «Найти и заменить», либо посредством макроса (код ниже).
Чтобы заменить текст в скобках на пробелы через диалоговое окно «Найти и заменить», откройте это окно («Ctrl+H»).
В поле Найти введите такое выражение: (*),
а в поле Заменить: ( ).
Затем установите флажок на опции «Подстановочные знаки» и нажмите кнопку Заменить все.
Кроме того, можете воспользоваться следующим макросом:
Sub delTextBetweenBrackets()
'заменяем текст в скобках на пробел в скобках
With Selection.Find
   .ClearFormatting
   .Replacement.ClearFormatting
   .Text = "(*)"
   .Replacement.Text = "( )"
   .Forward = True
   .Wrap = wdFindContinue
   .MatchWildcards = True
   .Execute Replace:=wdReplaceAll
End With
End Sub
При работе с программой Ворд (Word) иногда возникает необходимость изменять нумерацию в документе.
Например, требуется изменить стиль номера и его положение на странице, формат номера и др.
Также нередко бывает необходимо исключить из нумерации первые страницы документа (обычно 1 и 2 страницы).
Рассмотрим, как это можно сделать.
<hr />
Как изменить нумерацию (параметры нумерации) страниц в Ворде (Word)
Для того, чтобы изменить параметры нумерации в документе, нужно:
1) Выбрать пункт главного меню «Вставка».
2) Далее выбираем «Номер страницы» -> «Формат номеров страниц».
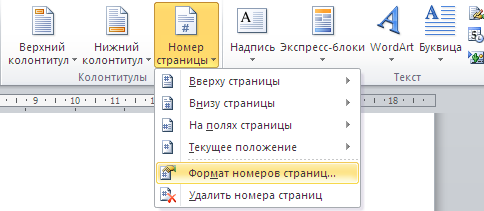
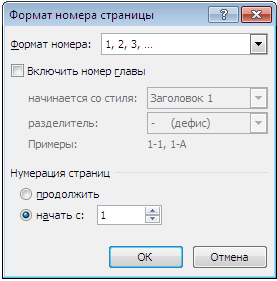
Откроется окно, в котором можно изменять формат номера и номер, с которого начинается нумерация страниц.
Чтобы изменить расположение номера на странице, нужно выбрать необходимый пункт в том же самом меню.

<hr />
Как изменить внешний вид номера страницы в Ворде
Для того, чтобы изменить оформление нумерации на странице (шрифт, цвет, размер и др.) документа Ворд, нужно:
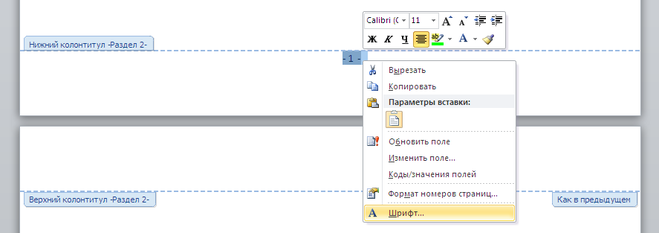
1) Щёлкнуть на любом номере левой кнопкой мыши, после чего откроется окно колонтитулов.
2) Нужно выделить номер и с помощью стандартных инструментов сделать нужное вам оформление.
Также можно щёлкнуть правой кнопкой мыши на номере — откроется окно форматирования, с помощью которого вы сможете поменять оформление номера страницы Word.
<hr />
Как сделать нумерацию со 2 страницы в Ворде
При оформлении научных работ в Ворде нередко возникает необходимость сделать нумерацию не с 1 страницы, а со 2.
Для этого нужно:
1) Зайти в конструктор колонтитулов (щёлкнуть мышкой на номере страницы).
2) На верхней панели инструментов выбрать пункт «Особый колонтитул для первой страницы».

В результате этого нумерация в документе Word будет со 2 страницы.
Если вам нужно не убрать номер страницы с 1 листа, а вообще исключить его из нумерации, то нужно зайти в параметры нумерации и выбрать пункт «Начать с 0». В этом случае на 2 странице будет стоять цифра 1 — как раз то, что нужно.
<hr />
Как сделать нумерацию с 3 страницы в Ворде
Если вам нужно, чтобы номер отсутствовал не только на 1 странице, но и на 2 странице (а в некоторых случаях требуется сделать нумерацию даже с 4 листа), то необходимо будет создать новый раздел.
Порядок действий:
1) Нужно поставить курсор в конец 2 страницы.
2) В главном меню Word выбрать пункт «Разметка страницы».
3) На панели инструментов выбрать «Разрывы» -> «Следующая страница».
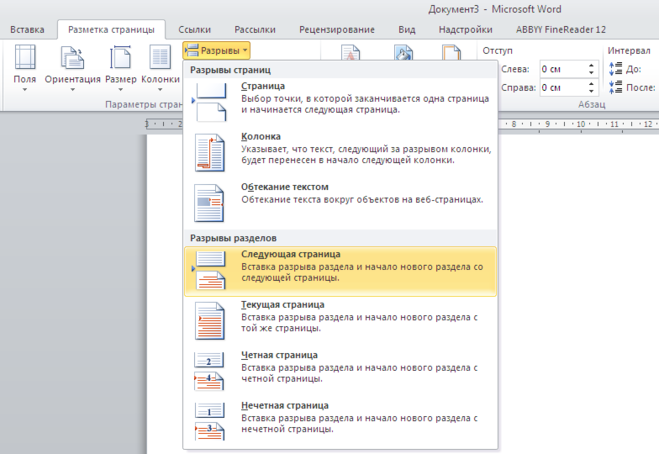
Таким образом, с 3 страницы начнётся новый раздел.
4) Теперь заходим в конструктор колонтитулов — щёлкаем мышкой по номеру на 3 странице.
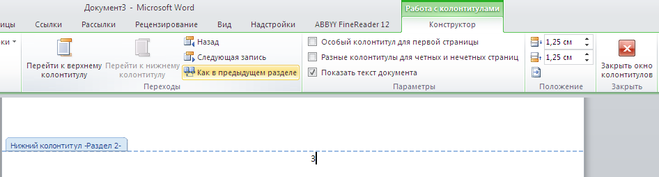
Отключаем опцию «Как в предыдущем разделе».
В результате этого, на 1 и 2 странице будут одни колонтитулы, на 3 странице и последующих страницах — другие колонтитулы.
Теперь осталось убрать номера с первых двух страниц.
Если требуется сделать, чтобы на 3 странице нумерация начиналась не с цифры 3, а с 1, то нужно:
1) Поставить курсор на 3 страницу.
2) Зайти в «Формат номеров страниц» и в разделе «Нумерация страниц» выбрать: «Начать с 1».
В результате этого, нумерация страниц в Ворде будет начинаться с 3 страницы.
<hr />
Как сделать нумерацию с 4 страницы в Ворде
В некоторых случаях бывает нужно сделать нумерацию с 4 страницы. Порядок действий аналогичен:
1) Ставим курсор в конец 3 страницы и создаём новый раздел. Он начнётся с 4 страницы.
2) Заходим в колонтитулы, расположенные на 4 странице.
3) Отключаем опцию «Как в предыдущем разделе».
4) Убираем номера с первых страниц. Ставим курсор на 4 страницу и устанавливаем начало нумерации.

Серые квадратные скобки в документе Word, обрамляющие серое поле в тексте, которые к тому же видны при печати, появляются при некорректном снятии защиты с документа.
Убрать скобки и серое поле можно удалив из документа полностью весь текст, который обрамлён ими и перенабрать его снова. Это решение подойдёт, если таких полей в документе одно или два. Если же таких полей в документе много, или перенабирать даже одно нет никакого желания, то нужно сделать следующее (последовательность описана для Word 2016, но она аналогична и для других версий):
- Выделить весь текст в документе;
- Перейти во вкладку ленты Рецензирование;
- Нажать кнопку Ограничить редактирование в группе Защитить;
- Поставить и убрать галочку напротив пункта Все в разделе Группы:;
- Снять выделение с текста.

После этого все серые поля и квадратные скобки исчезнут из документа. Аналогичные действия нужно выполнить, если серые поля со скобками содержатся в колонтитулах.
Квадратные скобки в Word 2013 — как удалить
Дано: программа MS Word 2013, редактирование текстового документа, созданного не Вами.
Проблема: в документе часть текста выделена серым и обрамлена в квадратные скобки [], и данные скобки не удаляются.

Также вертикальная черта видна и при печати документа (непосредственно на бумаге, как ни странно, но при предпросмотре их не видно):

Варианты решения:
Самый простой вариант (если не принципиальна потеря форматирования) — скопировать текст в блокнот, а затем скопировать и вставить текст из блокнота, в этом случае потеряются все привязки и квадратные скобки исчезнут.
Если все-таки разбираться в причинах, то можно попробовать следующие варианты.
Возможно эта часть текста является закладкой. Необходимо проверить какие закладки присутствуют в документе: вкладка Вставка — кнопка Закладка. Будет отображено окно со списком всех закладок в документе. Можно удалить закладки, связанные с данным текстом.
Либо можно отключить в настройках режим показа закладок: Параметры — Дополнительно — отключить «галку» Показывать закладки:

Если это не помогло, либо в документе закладки отсутствуют, то возможно включена защита документа.
Перейдите к параметрам защиты: вкладка Рецензирование — кнопка Ограничить редактирование. Если установлены какие-либо галочки (см. рисунок), то нужно их «снять», тогда скобки исчезнут:

Если все «галки» уже были сняты, то возможен вариант, что защита когда-то была установлена, а затем некорректно снята (например, при преобразовании формата doc в docx).
В моем случае так и было. При открытии чужого документа появлялись эти скобки и выводились при печати. Закладок не было, защита также была снята.
Помогла только установка и снятие защиты: установите защиту, как показано на рисунке выше. Сохраните и закройте документ. Затем откройте его и снимите ранее установленную защиту. При такой операции скобки исчезли.
См. также Word 2016. Как защитить часть документа от редактирования
Если Вам понравилась статья, пожалуйста, поставьте лайк, сделайте репост или оставьте комментарий. Если у Вас есть какие-либо замечания, также пишите комментарии.