
В статье представлены различные PHP-расширения для чтения файлов XLS, XLSX, описаны их плюсы и минусы, а также примеры чтения.
1
PHPExcel
https://github.com/PHPOffice/PHPExcel
Огромная библиотека читает и формирует фалы xls, xlsx, csv.
- Для файлов xlsx потребует расширение ZipArchive.
- Потребляет много памяти.
Пример чтения файла в массив:
require_once __DIR__ . '/PHPExcel-1.8/Classes/PHPExcel/IOFactory.php';

// Файл xlsx
$xls = PHPExcel_IOFactory::load(__DIR__ . '/test.xlsx');

// Первый лист
$xls->setActiveSheetIndex(0);
$sheet = $xls->getActiveSheet();

foreach ($sheet->toArray() as $row) {
   print_r($row);
}
PHP
2
SimpleXLSX
https://www.phpclasses.org/package/6279-PHP-Parse-and-retrieve-data-from-Excel-XLS-files.html
simple-xlsx.zip (2017-09-25)
Читает только файлы xlsx.
- Менее прожорлив к памяти.
- Не всегда может прочитать файл, например файл сформированный PHPExcel.
require_once __DIR__ . '/simple-xlsx/simplexlsx.class.php';

// Файл xlsx
$xlsx = new SimpleXLSX(__DIR__ . '/test.xlsx');

// Первый лист
$sheet = $xlsx->rows(1);

foreach ($sheet as $row) {
   print_r($row);
}
PHP
3
PHP-ExcelReader
https://sourceforge.net/projects/phpexcelreader/
phpExcelReader.zip (исправленный)
- Прочтёт только XLS файлы.
- Есть проблемы с кодировкой.
require_once __DIR__ . '/phpExcelReader/Excel/reader.php';

$data = new Spreadsheet_Excel_Reader();
$data->setOutputEncoding('UTF-8');

// Файл xls
$data->read(__DIR__ . '/test.xls');

// Первый лист
$sheet = $data->sheets[0]['cells'];

foreach ($sheet as $row) {
	print_r($row);
}
PHP
4
PHP-Excel-Reader
https://code.google.com/archive/p/php-excel-reader/
php-excel-reader.zip (2.21)
Форк библиотеки «PHP Excel Reader» с SourceForge предназначенный для вывода таблицы в HTML.
Например файл example.xls выведет следующим образом:
<style>
table.excel {
	border: 1px solid #CCCCCC;
	border-collapse:collapse;
	font-family:sans-serif;
	font-size:12px;
	margin: 0 auto;
}
table.excel thead th, table.excel tbody th {
	border: 1px solid #CCCCCC;
	text-align: center;
	vertical-align:bottom;
}
table.excel tbody th {
	text-align:center;
	width:20px;
}
table.excel tbody td {
	vertical-align:bottom;
}
table.excel tbody td {
	padding: 0 3px;
	border: 1px solid #EEEEEE;
}
</style>

<?php
require_once __DIR__ . '/php-excel-reader/excel_reader2.php';
$data = new Spreadsheet_Excel_Reader(__DIR__ . '/example.xls');
echo $data->dump(true, true);
?>
HTML
Также у библиотеки есть методы для получения формата и содержания каждой ячейки по отдельности.
5
Nuovo Spreadsheet-Reader
https://github.com/nuovo/spreadsheet-reader
spreadsheet-reader.zip
Читает файлы XLSX, XLS, CSV и OpenOffice ods. Для чтения XLS используется предыдущая библиотека php-excel-reader.
require_once __DIR__ . '/spreadsheet-reader/php-excel-reader/excel_reader2.php';
require_once __DIR__ . '/spreadsheet-reader/SpreadsheetReader.php';

// Файл xlsx, xls, csv, ods.
$Reader = new SpreadsheetReader(__DIR__ . '/test.xlsx');

// Номер листа.
$Reader -> ChangeSheet(0);

foreach ($Reader as $Row) {
	print_r($Row);
}
PHP
6
PHP-Spreadsheetreader
https://code.google.com/archive/p/php-spreadsheetreader/
SpreadsheetReader.rar
Откроет только файлы в формате XML Excel 2004.
$file = __DIR__ . '/test.xml';

require_once __DIR__ . '/SpreadsheetReader/SpreadsheetReader.php';
$reader = new SpreadsheetReader;

// Файл xml
$sheets = $reader->read(__DIR__ . '/test.xml');

// Выводим Первый лист
foreach ($sheets[0] as $row) {
   print_r($row);
}
PHP
Reading and writing to file
As you already know from the architecture,
reading and writing to a persisted storage is not possible using the base PhpSpreadsheet classes.
For this purpose, PhpSpreadsheet provides readers and writers, which are
implementations of PhpOfficePhpSpreadsheetReaderIReader and
PhpOfficePhpSpreadsheetWriterIWriter.
PhpOfficePhpSpreadsheetIOFactory
The PhpSpreadsheet API offers multiple methods to create a
PhpOfficePhpSpreadsheetReaderIReader or
PhpOfficePhpSpreadsheetWriterIWriter instance:
Direct creation via PhpOfficePhpSpreadsheetIOFactory. All examples
underneath demonstrate the direct creation method. Note that you can
also use the PhpOfficePhpSpreadsheetIOFactory class to do this.
Creating PhpOfficePhpSpreadsheetReaderIReader using PhpOfficePhpSpreadsheetIOFactory
There are 2 methods for reading in a file into PhpSpreadsheet: using
automatic file type resolving or explicitly.
Automatic file type resolving checks the different
PhpOfficePhpSpreadsheetReaderIReader distributed with
PhpSpreadsheet. If one of them can load the specified file name, the
file is loaded using that PhpOfficePhpSpreadsheetReaderIReader.
Explicit mode requires you to specify which
PhpOfficePhpSpreadsheetReaderIReader should be used.
You can create a PhpOfficePhpSpreadsheetReaderIReader instance using
PhpOfficePhpSpreadsheetIOFactory in automatic file type resolving
mode using the following code sample:
$spreadsheet = PhpOfficePhpSpreadsheetIOFactory::load("05featuredemo.xlsx");
A typical use of this feature is when you need to read files uploaded by
your users, and you don’t know whether they are uploading xls or xlsx
files.
If you need to set some properties on the reader, (e.g. to only read
data, see more about this later), then you may instead want to use this
variant:
$reader = PhpOfficePhpSpreadsheetIOFactory::createReaderForFile("05featuredemo.xlsx");
$reader->setReadDataOnly(true);
$reader->load("05featuredemo.xlsx");
You can create a PhpOfficePhpSpreadsheetReaderIReader instance using
PhpOfficePhpSpreadsheetIOFactory in explicit mode using the following
code sample:
$reader = PhpOfficePhpSpreadsheetIOFactory::createReader("Xlsx");
$spreadsheet = $reader->load("05featuredemo.xlsx");
Note that automatic type resolving mode is slightly slower than explicit
mode.
Creating PhpOfficePhpSpreadsheetWriterIWriter using PhpOfficePhpSpreadsheetIOFactory
You can create a PhpOfficePhpSpreadsheetWriterIWriter instance using
PhpOfficePhpSpreadsheetIOFactory:
$writer = PhpOfficePhpSpreadsheetIOFactory::createWriter($spreadsheet, "Xlsx");
$writer->save("05featuredemo.xlsx");
Excel 2007 (SpreadsheetML) file format
Xlsx file format is the main file format of PhpSpreadsheet. It allows
outputting the in-memory spreadsheet to a .xlsx file.
PhpOfficePhpSpreadsheetReaderXlsx
Reading a spreadsheet
You can read an .xlsx file using the following code:
$reader = new PhpOfficePhpSpreadsheetReaderXlsx();
$spreadsheet = $reader->load("05featuredemo.xlsx");
Read data only
You can set the option setReadDataOnly on the reader, to instruct the
reader to ignore styling, data validation, … and just read cell data:
$reader = new PhpOfficePhpSpreadsheetReaderXlsx();
$reader->setReadDataOnly(true);
$spreadsheet = $reader->load("05featuredemo.xlsx");
Read specific sheets only
You can set the option setLoadSheetsOnly on the reader, to instruct the
reader to only load the sheets with a given name:
$reader = new PhpOfficePhpSpreadsheetReaderXlsx();
$reader->setLoadSheetsOnly(["Sheet 1", "My special sheet"]);
$spreadsheet = $reader->load("05featuredemo.xlsx");
Read specific cells only
You can set the option setReadFilter on the reader, to instruct the
reader to only load the cells which match a given rule. A read filter
can be any class which implements
PhpOfficePhpSpreadsheetReaderIReadFilter. By default, all cells are
read using the PhpOfficePhpSpreadsheetReaderDefaultReadFilter.
The following code will only read row 1 and rows 20 – 30 of any sheet in
the Excel file:
class MyReadFilter implements PhpOfficePhpSpreadsheetReaderIReadFilter {

    public function readCell($columnAddress, $row, $worksheetName = '') {
        // Read title row and rows 20 - 30
        if ($row == 1 || ($row >= 20 && $row <= 30)) {
            return true;
        }
        return false;
    }
}

$reader = new PhpOfficePhpSpreadsheetReaderXlsx();
$reader->setReadFilter( new MyReadFilter() );
$spreadsheet = $reader->load("06largescale.xlsx");
Read Filtering does not renumber cell rows and columns. If you filter to read only rows 100-200, cells that you read will still be numbered A100-A200, not A1-A101. Cells A1-A99 will not be loaded, but if you then try to call getCell() for a cell outside your loaded range, then PHPSpreadsheet will create a new cell with a null value.
Methods such as toArray() assume that all cells in a spreadsheet has been loaded from A1, so will return null values for rows and columns that fall outside your filter range: it is recommended that you keep track of the range that your filter has requested, and use rangeToArray() instead.
PhpOfficePhpSpreadsheetWriterXlsx
Writing a spreadsheet
You can write an .xlsx file using the following code:
$writer = new PhpOfficePhpSpreadsheetWriterXlsx($spreadsheet);
$writer->save("05featuredemo.xlsx");
Formula pre-calculation
By default, this writer pre-calculates all formulas in the spreadsheet.
This can be slow on large spreadsheets, and maybe even unwanted. You can
however disable formula pre-calculation:
$writer = new PhpOfficePhpSpreadsheetWriterXlsx($spreadsheet);
$writer->setPreCalculateFormulas(false);
$writer->save("05featuredemo.xlsx");
Note Formulas will still be calculated in any column set to be autosized
even if pre-calculated is set to false
Office 2003 compatibility pack
Because of a bug in the Office2003 compatibility pack, there can be some
small issues when opening Xlsx spreadsheets (mostly related to formula
calculation). You can enable Office2003 compatibility with the following
code:
$writer = new PhpOfficePhpSpreadsheetWriterXlsx($spreadsheet);
$writer->setOffice2003Compatibility(true);
$writer->save("05featuredemo.xlsx");
Office2003 compatibility option should only be used when needed because
it disables several Office2007 file format options, resulting in a
lower-featured Office2007 spreadsheet.
Form Control Fields
PhpSpreadsheet offers limited support for Forms Controls (buttons,
checkboxes, etc.). The support is available only for Excel 2007 format,
and is offered solely to allow loading a spreadsheet with such controls
and saving it as a new file.
Support is not available for adding such elements to the spreadsheet,
nor even to locate them to determine their properties
(so you can’t modify or delete them).
Modifications to a worksheet with controls are «caveat emptor»;
some modifications will work correctly,
but others are very likely to cause problems,
e.g. adding a comment to the worksheet,
or inserting or deleting rows or columns in a manner that would
cause the controls to change location.
Excel 5 (BIFF) file format
Xls file format is the old Excel file format, implemented in
PhpSpreadsheet to provide a uniform manner to create both .xlsx and .xls
files. It is basically a modified version of PEAR
Spreadsheet_Excel_Writer,
although it has been extended and has fewer limitations and more
features than the old PEAR library. This can read all BIFF versions that
use OLE2: BIFF5 (introduced with office 95) through BIFF8, but cannot
read earlier versions.
Xls file format will not be developed any further, it just provides an
additional file format for PhpSpreadsheet.
Excel5 (BIFF) limitations Please note that BIFF file format has some
limits regarding to styling cells and handling large spreadsheets via
PHP.
PhpOfficePhpSpreadsheetReaderXls
Reading a spreadsheet
You can read an .xls file using the following code:
$reader = new PhpOfficePhpSpreadsheetReaderXls();
$spreadsheet = $reader->load("05featuredemo.xls");
Read data only
You can set the option setReadDataOnly on the reader, to instruct the
reader to ignore styling, data validation, … and just read cell data:
$reader = new PhpOfficePhpSpreadsheetReaderXls();
$reader->setReadDataOnly(true);
$spreadsheet = $reader->load("05featuredemo.xls");
Read specific sheets only
You can set the option setLoadSheetsOnly on the reader, to instruct the
reader to only load the sheets with a given name:
$reader = new PhpOfficePhpSpreadsheetReaderXls();
$reader->setLoadSheetsOnly(["Sheet 1", "My special sheet"]);
$spreadsheet = $reader->load("05featuredemo.xls");
Read specific cells only
You can set the option setReadFilter on the reader, to instruct the
reader to only load the cells which match a given rule. A read filter
can be any class which implements
PhpOfficePhpSpreadsheetReaderIReadFilter. By default, all cells are
read using the PhpOfficePhpSpreadsheetReaderDefaultReadFilter.
The following code will only read row 1 and rows 20 to 30 of any sheet
in the Excel file:
class MyReadFilter implements PhpOfficePhpSpreadsheetReaderIReadFilter {

    public function readCell($columnAddress, $row, $worksheetName = '') {
        // Read title row and rows 20 - 30
        if ($row == 1 || ($row >= 20 && $row <= 30)) {
            return true;
        }
        return false;
    }
}

$reader = new PhpOfficePhpSpreadsheetReaderXls();
$reader->setReadFilter( new MyReadFilter() );
$spreadsheet = $reader->load("06largescale.xls");
PhpOfficePhpSpreadsheetWriterXls
Writing a spreadsheet
You can write an .xls file using the following code:
$writer = new PhpOfficePhpSpreadsheetWriterXls($spreadsheet);
$writer->save("05featuredemo.xls");
Excel 2003 XML file format
Excel 2003 XML file format is a file format which can be used in older
versions of Microsoft Excel.
Excel 2003 XML limitations Please note that Excel 2003 XML format
has some limits regarding to styling cells and handling large
spreadsheets via PHP.
Also, only files using charset UTF-8 are supported.
PhpOfficePhpSpreadsheetReaderXml
Reading a spreadsheet
You can read an Excel 2003 .xml file using the following code:
$reader = new PhpOfficePhpSpreadsheetReaderXml();
$spreadsheet = $reader->load("05featuredemo.xml");
Read specific cells only
You can set the option setReadFilter on the reader, to instruct the
reader to only load the cells which match a given rule. A read filter
can be any class which implements
PhpOfficePhpSpreadsheetReaderIReadFilter. By default, all cells are
read using the PhpOfficePhpSpreadsheetReaderDefaultReadFilter.
The following code will only read row 1 and rows 20 to 30 of any sheet
in the Excel file:
class MyReadFilter implements PhpOfficePhpSpreadsheetReaderIReadFilter {

    public function readCell($columnAddress, $row, $worksheetName = '') {
        // Read title row and rows 20 - 30
        if ($row == 1 || ($row >= 20 && $row <= 30)) {
            return true;
        }
        return false;
    }

}

$reader = new PhpOfficePhpSpreadsheetReaderXml();
$reader->setReadFilter( new MyReadFilter() );
$spreadsheet = $reader->load("06largescale.xml");
Symbolic LinK (SYLK)
Symbolic Link (SYLK) is a Microsoft file format typically used to
exchange data between applications, specifically spreadsheets. SYLK
files conventionally have a .slk suffix. Composed of only displayable
ANSI characters, it can be easily created and processed by other
applications, such as databases.
SYLK limitations Please note that SYLK file format has some limits
regarding to styling cells and handling large spreadsheets via PHP.
PhpOfficePhpSpreadsheetReaderSlk
Reading a spreadsheet
You can read an .slk file using the following code:
$reader = new PhpOfficePhpSpreadsheetReaderSlk();
$spreadsheet = $reader->load("05featuredemo.slk");
Read specific cells only
You can set the option setReadFilter on the reader, to instruct the
reader to only load the cells which match a given rule. A read filter
can be any class which implements
PhpOfficePhpSpreadsheetReaderIReadFilter. By default, all cells are
read using the PhpOfficePhpSpreadsheetReaderDefaultReadFilter.
The following code will only read row 1 and rows 20 to 30 of any sheet
in the SYLK file:
class MyReadFilter implements PhpOfficePhpSpreadsheetReaderIReadFilter {

    public function readCell($columnAddress, $row, $worksheetName = '') {
        // Read title row and rows 20 - 30
        if ($row == 1 || ($row >= 20 && $row <= 30)) {
            return true;
        }
        return false;
    }

}

$reader = new PhpOfficePhpSpreadsheetReaderSlk();
$reader->setReadFilter( new MyReadFilter() );
$spreadsheet = $reader->load("06largescale.slk");
Open/Libre Office (.ods)
Open Office or Libre Office .ods files are the standard file format for
Open Office or Libre Office Calc files.
PhpOfficePhpSpreadsheetReaderOds
Reading a spreadsheet
You can read an .ods file using the following code:
$reader = new PhpOfficePhpSpreadsheetReaderOds();
$spreadsheet = $reader->load("05featuredemo.ods");
Read specific cells only
You can set the option setReadFilter on the reader, to instruct the
reader to only load the cells which match a given rule. A read filter
can be any class which implements
PhpOfficePhpSpreadsheetReaderIReadFilter. By default, all cells are
read using the PhpOfficePhpSpreadsheetReaderDefaultReadFilter.
The following code will only read row 1 and rows 20 to 30 of any sheet
in the Calc file:
class MyReadFilter implements PhpOfficePhpSpreadsheetReaderIReadFilter {

    public function readCell($columnAddress, $row, $worksheetName = '') {
        // Read title row and rows 20 - 30
        if ($row == 1 || ($row >= 20 && $row <= 30)) {
            return true;
        }
        return false;
    }

}

$reader = new PhpOfficePhpSpreadsheetReaderOds();
$reader->setReadFilter( new MyReadFilter() );
$spreadsheet = $reader->load("06largescale.ods");
CSV (Comma Separated Values)
CSV (Comma Separated Values) are often used as an import/export file
format with other systems. PhpSpreadsheet allows reading and writing to
CSV files.
CSV limitations Please note that CSV file format has some limits
regarding to styling cells, number formatting, …
PhpOfficePhpSpreadsheetReaderCsv
Reading a CSV file
You can read a .csv file using the following code:
$reader = new PhpOfficePhpSpreadsheetReaderCsv();
$spreadsheet = $reader->load('sample.csv');
You can also treat a string as if it were the contents of a CSV file as follows:
$reader = new PhpOfficePhpSpreadsheetReaderCsv();
$spreadsheet = $reader->loadSpreadsheetFromString($data);
Setting CSV options
Often, CSV files are not really «comma separated», or use semicolon (;)
as a separator. You can set some options before reading a CSV
file.
The separator will be auto-detected, so in most cases it should not be necessary
to specify it. But in cases where auto-detection does not fit the use-case, then
it can be set manually.
Note that PhpOfficePhpSpreadsheetReaderCsv by default assumes that
the loaded CSV file is UTF-8 encoded. If you are reading CSV files that
were created in Microsoft Office Excel the correct input encoding may
rather be Windows-1252 (CP1252). Always make sure that the input
encoding is set appropriately.
$reader = new PhpOfficePhpSpreadsheetReaderCsv();
$reader->setInputEncoding('CP1252');
$reader->setDelimiter(';');
$reader->setEnclosure('');
$reader->setSheetIndex(0);

$spreadsheet = $reader->load("sample.csv");
You may also let PhpSpreadsheet attempt to guess the input encoding.
It will do so based on a test for BOM (UTF-8, UTF-16BE, UTF-16LE, UTF-32BE,
or UTF-32LE),
or by doing heuristic tests for those encodings, falling back to a
specifiable encoding (default is CP1252) if all of those tests fail.
$reader = new PhpOfficePhpSpreadsheetReaderCsv();
$encoding = PhpOfficePhpSpreadsheetReaderCsv::guessEncoding('sample.csv');
// or, e.g. $encoding = PhpOfficePhpSpreadsheetReaderCsv::guessEncoding(
//                      'sample.csv', 'ISO-8859-2');
$reader->setInputEncoding($encoding);
$reader->setDelimiter(';');
$reader->setEnclosure('');
$reader->setSheetIndex(0);

$spreadsheet = $reader->load('sample.csv');
You can also set the reader to guess the encoding
rather than calling guessEncoding directly. In this case,
the user-settable fallback encoding is used if nothing else works.
$reader = new PhpOfficePhpSpreadsheetReaderCsv();
$reader->setInputEncoding(PhpOfficePhpSpreadsheetReaderCsv::GUESS_ENCODING);
$reader->setFallbackEncoding('ISO-8859-2');  // default CP1252 without this statement
$reader->setDelimiter(';');
$reader->setEnclosure('');
$reader->setSheetIndex(0);

$spreadsheet = $reader->load('sample.csv');
The CSV reader will normally not load null strings into the spreadsheet.
To load them:
$reader->setPreserveNullString(true);
Finally, you can set a callback to be invoked when the constructor is executed,
either through new Csv() or IOFactory::load,
and have that callback set the customizable attributes to whatever
defaults are appropriate for your environment.
function constructorCallback(PhpOfficePhpSpreadsheetReaderCsv $reader): void
{
    $reader->setInputEncoding(PhpOfficePhpSpreadsheetReaderCsv::GUESS_ENCODING);
    $reader->setFallbackEncoding('ISO-8859-2');
    $reader->setDelimiter(',');
    $reader->setEnclosure('"');
    // Following represents how Excel behaves better than the default escape character
    $reader->setEscapeCharacter((version_compare(PHP_VERSION, '7.4') < 0) ? "x0" : '');
}

PhpOfficePhpSpreadsheetReaderCsv::setConstructorCallback('constructorCallback');
$spreadsheet = PhpSpreadsheetIOFactory::load('sample.csv');
Read a specific worksheet
CSV files can only contain one worksheet. Therefore, you can specify
which sheet to read from CSV:
$reader->setSheetIndex(0);
Read into existing spreadsheet
When working with CSV files, it might occur that you want to import CSV
data into an existing Spreadsheet object. The following code loads a
CSV file into an existing $spreadsheet containing some sheets, and
imports onto the 6th sheet:
$reader = new PhpOfficePhpSpreadsheetReaderCsv();
$reader->setDelimiter(';');
$reader->setEnclosure('"');
$reader->setSheetIndex(5);

$reader->loadIntoExisting("05featuredemo.csv", $spreadsheet);
Line endings
Line endings for Unix (n) and Windows (rn) are supported.
Mac line endings (r) are supported as long as PHP itself
supports them, which it does through release 8.0.
Support for Mac line endings is deprecated for 8.1,
and is scheduled to remain deprecated for all later PHP8 releases;
PhpSpreadsheet will continue to support them for 8.*.
Support is scheduled to be dropped with release 9;
PhpSpreadsheet will then no longer handle CSV files
with Mac line endings correctly.
You can suppress testing for Mac line endings as follows:
$reader = new PhpOfficePhpSpreadsheetReaderCsv();
$reader->setTestAutoDetect(false);
PhpOfficePhpSpreadsheetWriterCsv
Writing a CSV file
You can write a .csv file using the following code:
$writer = new PhpOfficePhpSpreadsheetWriterCsv($spreadsheet);
$writer->save("05featuredemo.csv");
Setting CSV options
Often, CSV files are not really «comma separated», or use semicolon (;)
as a separator. You can set some options before writing a CSV
file:
$writer = new PhpOfficePhpSpreadsheetWriterCsv($spreadsheet);
$writer->setDelimiter(';');
$writer->setEnclosure('"');
$writer->setLineEnding("rn");
$writer->setSheetIndex(0);

$writer->save("05featuredemo.csv");
CSV enclosures
By default, all CSV fields are wrapped in the enclosure character,
which defaults to double-quote.
You can change to use the enclosure character only when required:
$writer = new PhpOfficePhpSpreadsheetWriterCsv($spreadsheet);
$writer->setEnclosureRequired(false);

$writer->save("05featuredemo.csv");
Write a specific worksheet
CSV files can only contain one worksheet. Therefore, you can specify
which sheet to write to CSV:
$writer->setSheetIndex(0);
Formula pre-calculation
By default, this writer pre-calculates all formulas in the spreadsheet.
This can be slow on large spreadsheets, and maybe even unwanted. You can
however disable formula pre-calculation:
$writer = new PhpOfficePhpSpreadsheetWriterCsv($spreadsheet);
$writer->setPreCalculateFormulas(false);
$writer->save("05featuredemo.csv");
Writing UTF-8 CSV files
CSV files are written in UTF-8. If they do not contain characters
outside the ASCII range, nothing else need be done.
However, if such characters are in the file,
or if the file starts with the 2 characters ‘ID’,
it should explicitly include a BOM file header;
if it doesn’t, Excel will not interpret those characters correctly.
This can be enabled by using the following code:
$writer = new PhpOfficePhpSpreadsheetWriterCsv($spreadsheet);
$writer->setUseBOM(true);
$writer->save("05featuredemo.csv");
Writing CSV files with desired encoding
It can be set to output with the encoding that can be specified by PHP’s mb_convert_encoding.
This looks like the following code:
$writer = new PhpOfficePhpSpreadsheetWriterCsv($spreadsheet);
$writer->setUseBOM(false);
$writer->setOutputEncoding('SJIS-WIN');
$writer->save("05featuredemo.csv");
Decimal and thousands separators
If the worksheet you are exporting contains numbers with decimal or
thousands separators then you should think about what characters you
want to use for those before doing the export.
By default PhpSpreadsheet looks up in the server’s locale settings to
decide what characters to use. But to avoid problems it is recommended
to set the characters explicitly as shown below.
English users will want to use this before doing the export:
PhpOfficePhpSpreadsheetSharedStringHelper::setDecimalSeparator('.');
PhpOfficePhpSpreadsheetSharedStringHelper::setThousandsSeparator(',');
German users will want to use the opposite values.
PhpOfficePhpSpreadsheetSharedStringHelper::setDecimalSeparator(',');
PhpOfficePhpSpreadsheetSharedStringHelper::setThousandsSeparator('.');
Note that the above code sets decimal and thousand separators as global
options. This also affects how HTML and PDF is exported.
HTML
PhpSpreadsheet allows you to read or write a spreadsheet as HTML format,
for quick representation of the data in it to anyone who does not have a
spreadsheet application on their PC, or loading files saved by other
scripts that simply create HTML markup and give it a .xls file
extension.
HTML limitations Please note that HTML file format has some limits
regarding to styling cells, number formatting, …
Also, only files using charset UTF-8 are supported.
PhpOfficePhpSpreadsheetReaderHtml
Reading a spreadsheet
You can read an .html or .htm file using the following code:
$reader = new PhpOfficePhpSpreadsheetReaderHtml();

$spreadsheet = $reader->load("05featuredemo.html");
HTML limitations Please note that HTML reader is still experimental
and does not yet support merged cells or nested tables cleanly
PhpOfficePhpSpreadsheetWriterHtml
Please note that PhpOfficePhpSpreadsheetWriterHtml only outputs the
first worksheet by default.
Writing a spreadsheet
You can write a .htm file using the following code:
$writer = new PhpOfficePhpSpreadsheetWriterHtml($spreadsheet);

$writer->save("05featuredemo.htm");
Write all worksheets
HTML files can contain one or more worksheets. If you want to write all
sheets into a single HTML file, use the following code:
$writer->writeAllSheets();
Write a specific worksheet
HTML files can contain one or more worksheets. Therefore, you can
specify which sheet to write to HTML:
$writer->setSheetIndex(0);
Setting the images root of the HTML file
There might be situations where you want to explicitly set the included
images root. For example, instead of:
<img src="./images/logo.jpg">
You might want to see:
<img src="http://www.domain.com/images/logo.jpg">
You can use the following code to achieve this result:
$writer->setImagesRoot('http://www.example.com');
Formula pre-calculation
By default, this writer pre-calculates all formulas in the spreadsheet.
This can be slow on large spreadsheets, and maybe even unwanted. You can
however disable formula pre-calculation:
$writer = new PhpOfficePhpSpreadsheetWriterHtml($spreadsheet);
$writer->setPreCalculateFormulas(false);

$writer->save("05featuredemo.htm");
Embedding generated HTML in a web page
There might be a situation where you want to embed the generated HTML in
an existing website. PhpOfficePhpSpreadsheetWriterHtml provides
support to generate only specific parts of the HTML code, which allows
you to use these parts in your website.
Supported methods:
generateHTMLHeader()generateStyles()generateSheetData()generateHTMLFooter()generateHTMLAll()
Here’s an example which retrieves all parts independently and merges
them into a resulting HTML page:
$writer = new PhpOfficePhpSpreadsheetWriterHtml($spreadsheet);
$hdr = $writer->generateHTMLHeader();
$sty = $writer->generateStyles(false); // do not write <style> and </style>
$newstyle = <<<EOF
<style type='text/css'>
$sty
body {
    background-color: yellow;
}
</style>
EOF;
echo preg_replace('@</head>@', "$newstylen</head>", $hdr);
echo $writer->generateSheetData();
echo $writer->generateHTMLFooter();
Editing HTML during save via a callback
You can also add a callback function to edit the generated html
before saving. For example, you could change the gridlines
from a thin solid black line:
function changeGridlines(string $html): string
{
    return str_replace('{border: 1px solid black;}',
        '{border: 2px dashed red;}',
        $html);
}
$writer = new PhpOfficePhpSpreadsheetWriterHtml($spreadsheet);
$writer->setEditHtmlCallback('changeGridlines');
$writer->save($filename);
Decimal and thousands separators
See section PhpOfficePhpSpreadsheetWriterCsv how to control the
appearance of these.
PhpSpreadsheet allows you to write a spreadsheet into PDF format, for
fast distribution of represented data.
PDF limitations Please note that PDF file format has some limits
regarding to styling cells, number formatting, …
PhpOfficePhpSpreadsheetWriterPdf
PhpSpreadsheet’s PDF Writer is a wrapper for a 3rd-Party PDF Rendering
library such as TCPDF, mPDF or Dompdf. You must now install a PDF
rendering library yourself; but PhpSpreadsheet will work with a number
of different libraries.
Currently, the following libraries are supported:
| Library | Downloadable from | PhpSpreadsheet writer |
|---|---|---|
| TCPDF | https://github.com/tecnickcom/tcpdf | Tcpdf |
| mPDF | https://github.com/mpdf/mpdf | Mpdf |
| Dompdf | https://github.com/dompdf/dompdf | Dompdf |
The different libraries have different strengths and weaknesses. Some
generate better formatted output than others, some are faster or use
less memory than others, while some generate smaller .pdf files. It is
the developers choice which one they wish to use, appropriate to their
own circumstances.
You can instantiate a writer with its specific name, like so:
$writer = PhpOfficePhpSpreadsheetIOFactory::createWriter($spreadsheet, 'Mpdf');
Or you can register which writer you are using with a more generic name,
so you don’t need to remember which library you chose, only that you want
to write PDF files:
$class = PhpOfficePhpSpreadsheetWriterPdfMpdf::class;
PhpOfficePhpSpreadsheetIOFactory::registerWriter('Pdf', $class);
$writer = PhpOfficePhpSpreadsheetIOFactory::createWriter($spreadsheet, 'Pdf');
Or you can instantiate directly the writer of your choice like so:
$writer = new PhpOfficePhpSpreadsheetWriterPdfMpdf($spreadsheet);
Custom implementation or configuration
If you need a custom implementation, or custom configuration, of a supported
PDF library. You can extends the PDF library, and the PDF writer like so:
class My_Custom_TCPDF extends TCPDF
{
	// ...
}

class My_Custom_TCPDF_Writer extends PhpOfficePhpSpreadsheetWriterPdfTcpdf
{
	protected function createExternalWriterInstance($orientation, $unit, $paperSize)
	{
		$instance = new My_Custom_TCPDF($orientation, $unit, $paperSize);

		// more configuration of $instance

		return $instance;
	}
}

PhpOfficePhpSpreadsheetIOFactory::registerWriter('Pdf', MY_TCPDF_WRITER::class);
Writing a spreadsheet
Once you have identified the Renderer that you wish to use for PDF generation, you can write a .pdf file using the following code:
$writer = new PhpOfficePhpSpreadsheetWriterPdfMpdf($spreadsheet);
$writer->save("05featuredemo.pdf");
Please note that PhpOfficePhpSpreadsheetWriterPdf only outputs the
first worksheet by default.
Write all worksheets
PDF files can contain one or more worksheets. If you want to write all sheets into a single PDF file, use the following code:
$writer->writeAllSheets();
Write a specific worksheet
PDF files can contain one or more worksheets. Therefore, you can specify
which sheet to write to PDF:
$writer->setSheetIndex(0);
Setting Orientation and PaperSize
PhpSpreadsheet will attempt to honor the orientation and paper size specified
in the worksheet for each page it prints, if the renderer supports that. However, you can set all pages
to have the same orientation and paper size, e.g.
$writer->setOrientation(PhpOfficePhpSpreadsheetWorksheetPageSetup::ORIENTATION_LANDSCAPE);
Formula pre-calculation
By default, this writer pre-calculates all formulas in the spreadsheet.
This can be slow on large spreadsheets, and maybe even unwanted. You can
however disable formula pre-calculation:
$writer = new PhpOfficePhpSpreadsheetWriterPdfMpdf($spreadsheet);
$writer->setPreCalculateFormulas(false);

$writer->save("05featuredemo.pdf");
Editing Pdf during save via a callback
You can also add a callback function to edit the html used to
generate the Pdf before saving.
See under Html.
Decimal and thousands separators
See section PhpOfficePhpSpreadsheetWriterCsv how to control the
appearance of these.
Generating Excel files from templates (read, modify, write)
Readers and writers are the tools that allow you to generate Excel files
from templates. This requires less coding effort than generating the
Excel file from scratch, especially if your template has many styles,
page setup properties, headers etc.
Here is an example how to open a template file, fill in a couple of
fields and save it again:
$spreadsheet = PhpOfficePhpSpreadsheetIOFactory::load('template.xlsx');

$worksheet = $spreadsheet->getActiveSheet();

$worksheet->getCell('A1')->setValue('John');
$worksheet->getCell('A2')->setValue('Smith');

$writer = PhpOfficePhpSpreadsheetIOFactory::createWriter($spreadsheet, 'Xls');
$writer->save('write.xls');
Notice that it is ok to load an xlsx file and generate an xls file.
Generating Excel files from HTML content
If you are generating an Excel file from pre-rendered HTML content you can do so
automatically using the HTML Reader. This is most useful when you are generating
Excel files from web application content that would be downloaded/sent to a user.
For example:
$htmlString = '<table>
                  <tr>
                      <td>Hello World</td>
                  </tr>
                  <tr>
                      <td>Hello<br />World</td>
                  </tr>
                  <tr>
                      <td>Hello<br>World</td>
                  </tr>
              </table>';

$reader = new PhpOfficePhpSpreadsheetReaderHtml();
$spreadsheet = $reader->loadFromString($htmlString);

$writer = PhpOfficePhpSpreadsheetIOFactory::createWriter($spreadsheet, 'Xls');
$writer->save('write.xls');
Suppose you have multiple worksheets you’d like created from html. This can be
accomplished as follows.
$firstHtmlString = '<table>
                  <tr>
                      <td>Hello World</td>
                  </tr>
              </table>';
$secondHtmlString = '<table>
                  <tr>
                      <td>Hello World</td>
                  </tr>
              </table>';

$reader = new PhpOfficePhpSpreadsheetReaderHtml();
$spreadsheet = $reader->loadFromString($firstHtmlString);
$reader->setSheetIndex(1);
$spreadhseet = $reader->loadFromString($secondHtmlString, $spreadsheet);

$writer = PhpOfficePhpSpreadsheetIOFactory::createWriter($spreadsheet, 'Xls');
$writer->save('write.xls');
Reader/Writer Flags
Some Readers and Writers support special «Feature Flags» that need to be explicitly enabled.
An example of this is Charts in a spreadsheet. By default, when you load a spreadsheet that contains Charts, the charts will not be loaded. If all you want to do is read the data in the spreadsheet, then loading charts is an overhead for both speed of loading and memory usage.
However, there are times when you may want to load any charts in the spreadsheet as well as the data. To do so, you need to tell the Reader explicitly to include Charts.
$reader = PhpOfficePhpSpreadsheetIOFactory::createReaderForFile("05featuredemo.xlsx");
$reader->setIncludeCharts(true);
$reader->load("spreadsheetWithCharts.xlsx");
Alternatively, you can specify this in the call to load the spreadsheet:
$reader = PhpOfficePhpSpreadsheetIOFactory::createReaderForFile("spreadsheetWithCharts.xlsx");
$reader->load("spreadsheetWithCharts.xlsx", $reader::LOAD_WITH_CHARTS);
If you wish to use the IOFactory load() method rather than instantiating a specific Reader, then you can still pass these flags.
$spreadsheet = PhpOfficePhpSpreadsheetIOFactory::load("spreadsheetWithCharts.xlsx", PhpOfficePhpSpreadsheetReaderIReader::LOAD_WITH_CHARTS);
Flags that are available that can be passed to the Reader in this way include:
- $reader::LOAD_WITH_CHARTS
- $reader::READ_DATA_ONLY
- $reader::IGNORE_EMPTY_CELLS
- $reader::SKIP_EMPTY_CELLS (synonym for IGNORE_EMPTY_CELLS)
| Readers | LOAD_WITH_CHARTS | READ_DATA_ONLY | IGNORE_EMPTY_CELLS |
|---|---|---|---|
| Xlsx | YES | YES | YES |
| Xls | NO | YES | YES |
| Xml | NO | NO | NO |
| Ods | NO | YES | NO |
| Gnumeric | NO | YES | NO |
| Html | N/A | N/A | N/A |
| Slk | N/A | NO | NO |
| Csv | N/A | NO | NO |
Likewise, when saving a file using a Writer, loaded charts will not be saved unless you explicitly tell the Writer to include them:
$writer = IOFactory::createWriter($spreadsheet, 'Xlsx');
$writer->setIncludeCharts(true);
$writer->save('mySavedFileWithCharts.xlsx');
As with the load() method, you can also pass flags in the save() method:
$writer = IOFactory::createWriter($spreadsheet, 'Xlsx');
$writer->save('mySavedFileWithCharts.xlsx', PhpOfficePhpSpreadsheetWriterIWriter::SAVE_WITH_CHARTS);
Flags that are available that can be passed to the Reader in this way include:
- $reader::SAVE_WITH_CHARTS
- $reader::DISABLE_PRECALCULATE_FORMULAE
| Writers | SAVE_WITH_CHARTS | DISABLE_PRECALCULATE_FORMULAE |
|---|---|---|
| Xlsx | YES | YES |
| Xls | NO | NO |
| Ods | NO | YES |
| Html | YES | YES |
| YES | YES | |
| Csv | N/A | YES |
Combining Flags
One benefit of flags is that you can pass several flags in a single method call.
Two or more flags can be passed together using PHP’s | operator.
$reader = PhpOfficePhpSpreadsheetIOFactory::createReaderForFile("myExampleFile.xlsx");
$reader->load("spreadsheetWithCharts.xlsx", $reader::READ_DATA_ONLY | $reader::SKIP_EMPTY_CELLS);
I’m trying to read an Excel file (Office 2003). There is an Excel file that needs to be uploaded and its contents parsed.
Via Google, I can only find answers to these related (and insufficient topics): generating Excel files, reading Excel XML files, reading Excel CSV files, or incomplete abandoned projects. I own Office 2003 so if I need any files from there, they are available. It’s installed on my box but isn’t and can’t be installed on my shared host.
Edit: so far all answers point to PHP-ExcelReader and/or this additional article about how to use it.
![]()
Kangel
231 silver badge8 bronze badges
asked Feb 19, 2009 at 1:53
![]()
3
You have 2 choices as far as I know:
- Spreadsheet_Excel_Reader, which knows the Office 2003 binary format
- PHPExcel, which knows both Office 2003 as well as Excel 2007 (XML). (Follow the link, and you’ll see they upgraded this library to PHPSpreadSheet)
PHPExcel uses Spreadsheet_Excel_Reader for the Office 2003 format.
Update: I once had to read some Excel files but I used the Office 2003 XML format in order to read them and told the people that were using the application to save and upload only that type of Excel file.
![]()
answered Feb 19, 2009 at 1:57
![]()
Ionuț G. StanIonuț G. Stan
175k18 gold badges188 silver badges201 bronze badges
3
I use PHP-ExcelReader to read xls files, and works great.
![]()
user229044♦
231k40 gold badges331 silver badges336 bronze badges
answered Feb 19, 2009 at 3:07
![]()
Luis MelgrattiLuis Melgratti
11.8k3 gold badges30 silver badges32 bronze badges
7
Read XLSX (Excel 2003+)
https://github.com/shuchkin/simplexlsx
if ( $xlsx = SimpleXLSX::parse('book.xlsx') ) {
    print_r( $xlsx->rows() );
} else {
    echo SimpleXLSX::parseError();
}
Output
Array (
    [0] => Array
        (
            [0] => ISBN
            [1] => title
            [2] => author
            [3] => publisher
            [4] => ctry
        )
    [1] => Array
        (
            [0] => 618260307
            [1] => The Hobbit
            [2] => J. R. R. Tolkien
            [3] => Houghton Mifflin
            [4] => USA
       )

)
Read XLS (Excel 97-2003)
https://github.com/shuchkin/simplexls
if ( $xls = SimpleXLS::parse('book.xls') ) {
    print_r( $xls->rows() );
} else {
    echo SimpleXLS::parseError();
}
CSV php reader
https://github.com/shuchkin/simplecsv
if ( $csv = SimpleCSV::import('book.csv') ) {
    print_r( $csv );
}
answered Dec 28, 2018 at 17:56
![]()
1
It depends on how you want to use the data in the excel file. If you want to import it into mysql, you could simply save it as a CSV formatted file and then use fgetcsv to parse it.
![]()
Larry K
47.2k14 gold badges86 silver badges138 bronze badges
answered Apr 21, 2013 at 21:09
![]()
JimboJimbo
4914 silver badges5 bronze badges
// Here is the simple code using COM object in PHP
class Excel_ReadWrite{

    private $XLSHandle;
    private $WrkBksHandle;
    private $xlBook;

    function __construct() {
        $this->XLSHandle = new COM("excel.application") or die("ERROR: Unable to instantaniate COM!rn");
    }

    function __destruct(){
        //if already existing file is opened
        if($this->WrkBksHandle != null)
        {
            $this->WrkBksHandle->Close(True);
            unset($this->WrkBksHandle);
            $this->XLSHandle->Workbooks->Close();
        }
        //if created new xls file
        if($this->xlBook != null)
        {
            $this->xlBook->Close(True);
            unset($this->xlBook);
        }
        //Quit Excel Application
        $this->XLSHandle->Quit();
        unset($this->XLSHandle);
    }

    public function OpenFile($FilePath)
    {
        $this->WrkBksHandle = $this->XLSHandle->Workbooks->Open($FilePath);
    }

    public function ReadData($RowNo, $ClmNo)
    {
       $Value = $this->XLSHandle->ActiveSheet->Cells($RowNo, $ClmNo)->Value;
       return $Value;
    }

    public function SaveOpenedFile()
    {
        $this->WrkBksHandle->Save();
    }

    /***********************************************************************************
    * Function Name:- WriteToXlsFile() will write data based on row and column numbers
    * @Param:- $CellData- cell data
    * @Param:- $RowNumber- xlsx file row number
    * @Param:- $ColumnNumber- xlsx file column numbers
   ************************************************************************************/
   function WriteToXlsFile($CellData, $RowNumber, $ColumnNumber)
   {
       try{
               $this->XLSHandle->ActiveSheet->Cells($RowNumber,$ColumnNumber)->Value = $CellData;
           }
       catch(Exception $e){
               throw new Exception("Error:- Unable to write data to xlsx sheet");
           }
   }


   /****************************************************************************************
    * Function Name:- CreateXlsFileWithClmName() will initialize xls file with column Names
    * @Param:- $XlsColumnNames- Array of columns data
    * @Param:- $XlsColumnWidth- Array of columns width
   *******************************************************************************************/
   function CreateXlsFileWithClmNameAndWidth($WorkSheetName = "Raman", $XlsColumnNames = null, $XlsColumnWidth = null)
   {
       //Hide MS Excel application window
       $this->XLSHandle->Visible = 0;
       //Create new document
       $this->xlBook = $this->XLSHandle->Workbooks->Add();

       //Create Sheet 1
       $this->xlBook->Worksheets(1)->Name = $WorkSheetName;
       $this->xlBook->Worksheets(1)->Select;

       if($XlsColumnWidth != null)
       {
           //$XlsColumnWidth = array("A1"=>15,"B1"=>20);
           foreach($XlsColumnWidth as $Clm=>$Width)
           {
               //Set Columns Width
               $this->XLSHandle->ActiveSheet->Range($Clm.":".$Clm)->ColumnWidth = $Width;
           }
       }
       if($XlsColumnNames != null)
       {
           //$XlsColumnNames = array("FirstColumnName"=>1, "SecondColumnName"=>2);
           foreach($XlsColumnNames as $ClmName=>$ClmNumber)
           {
               // Cells(Row,Column)
               $this->XLSHandle->ActiveSheet->Cells(1,$ClmNumber)->Value = $ClmName;
               $this->XLSHandle->ActiveSheet->Cells(1,$ClmNumber)->Font->Bold = True;
               $this->XLSHandle->ActiveSheet->Cells(1,$ClmNumber)->Interior->ColorIndex = "15";
           }
       }
   }
   //56 is for xls 8
    public function SaveCreatedFile($FileName, $FileFormat = 56)
    {
        $this->xlBook->SaveAs($FileName, $FileFormat);
    }

    public function MakeFileVisible()
    {
       //Hide MS Excel application window`enter code here`
       $this->XLSHandle->Visible = 1;
    }
}//end of EXCEL class
answered Sep 30, 2015 at 23:40
![]()
VickyVicky
871 silver badge5 bronze badges
1
Try this…
I have used following code to read «xls and xlsx»
    <?php
    include 'excel_reader.php';       // include the class
    $excel = new PhpExcelReader;      // creates object instance of the class
    $excel->read('excel_file.xls');   // reads and stores the excel file data

    // Test to see the excel data stored in $sheets property
    echo '<pre>';
    var_export($excel->sheets);

    echo '</pre>';

    or

 echo '<pre>';
    print_r($excel->sheets);

    echo '</pre>';
Reference:http://coursesweb.net/php-mysql/read-excel-file-data-php_pc
answered Jul 4, 2015 at 11:42
![]()
2
I’m using below excel file url: https://github.com/inventorbala/Sample-Excel-files/blob/master/sample-excel-files.xlsx
Output:
Array
    (
        [0] => Array
            (
                [store_id] => 3716
                [employee_uid] => 664368
                [opus_id] => zh901j
                [item_description] => PRE ATT $75 PNLS 90EXP
                [opus_transaction_date] => 2019-10-18
                [opus_transaction_num] => X2MBV1DJKSLQW
                [opus_invoice_num] => O3716IN3409
                [customer_name] => BILL PHILLIPS
                [mobile_num] => 4052380136
                [opus_amount] => 75
                [rq4_amount] => 0
                [difference] => -75
                [ocomment] => Re-Upload: We need RQ4 transaction for October.  If you're unable to provide the October invoice, it will be counted as EPin shortage.
                [mark_delete] => 0
                [upload_date] => 2019-10-20
            )

        [1] => Array
            (
                [store_id] => 2710
                [employee_uid] => 75899
                [opus_id] => dc288t
                [item_description] => PRE ATT $50 PNLS 90EXP
                [opus_transaction_date] => 2019-10-18
                [opus_transaction_num] => XJ90419JKT9R9
                [opus_invoice_num] => M2710IN868
                [customer_name] => CALEB MENDEZ
                [mobile_num] => 6517672079
                [opus_amount] => 50
                [rq4_amount] => 0
                [difference] => -50
                [ocomment] => No Response.  Re-Upload
                [mark_delete] => 0
                [upload_date] => 2019-10-20
            )

        [2] => Array
            (
                [store_id] => 0136
                [employee_uid] => 70167
                [opus_id] => fv766x
                [item_description] => PRE ATT $50 PNLS 90EXP
                [opus_transaction_date] => 2019-10-18
                [opus_transaction_num] => XQ57316JKST1V
                [opus_invoice_num] => GONZABP25622
                [customer_name] => FAUSTINA CASTILLO
                [mobile_num] => 8302638628
                [opus_amount] => 100
                [rq4_amount] => 50
                [difference] => -50
                [ocomment] => Re-Upload: We have been charged in opus for $100. Provide RQ4 invoice number for remaining amount
                [mark_delete] => 0
                [upload_date] => 2019-10-20
            )

        [3] => Array
            (
                [store_id] => 3264
                [employee_uid] => 23723
                [opus_id] => aa297h
                [item_description] => PRE ATT $25 PNLS 90EXP
                [opus_transaction_date] => 2019-10-19
                [opus_transaction_num] => XR1181HJKW9MP
                [opus_invoice_num] => C3264IN1588
                [customer_name] => SOPHAT VANN
                [mobile_num] => 9494668372
                [opus_amount] => 70
                [rq4_amount] => 25
                [difference] => -45
                [ocomment] => No Response.  Re-Upload
                [mark_delete] => 0
                [upload_date] => 2019-10-20
            )

        [4] => Array
            (
                [store_id] => 4166
                [employee_uid] => 568494
                [opus_id] => ab7598
                [item_description] => PRE ATT $40 RTR
                [opus_transaction_date] => 2019-10-20
                [opus_transaction_num] => X8F58P3JL2RFU
                [opus_invoice_num] => I4166IN2481
                [customer_name] => KELLY MC GUIRE
                [mobile_num] => 6189468180
                [opus_amount] => 40
                [rq4_amount] => 0
                [difference] => -40
                [ocomment] => Re-Upload: The invoice number that you provided (I4166IN2481) belongs to September transaction.  We need RQ4 transaction for October.  If you're unable to provide the October invoice, it will be counted as EPin shortage.
                [mark_delete] => 0
                [upload_date] => 2019-10-21
            )

        [5] => Array
            (
                [store_id] => 4508
                [employee_uid] => 552502
                [opus_id] => ec850x
                [item_description] => $30 RTR
                [opus_transaction_date] => 2019-10-20
                [opus_transaction_num] => XPL7M1BJL1W5D
                [opus_invoice_num] => M4508IN6024
                [customer_name] => PREPAID CUSTOMER
                [mobile_num] => 6019109730
                [opus_amount] => 30
                [rq4_amount] => 0
                [difference] => -30
                [ocomment] => Re-Upload: The invoice number you provided (M4508IN7217) belongs to a different phone number.  We need RQ4 transaction for the phone number in question.  If you're unable to provide the RQ4 invoice for this transaction, it will be counted as EPin shortage.
                [mark_delete] => 0
                [upload_date] => 2019-10-21
            )

        [6] => Array
            (
                [store_id] => 3904
                [employee_uid] => 35818
                [opus_id] => tj539j
                [item_description] => PRE $45 PAYG PINLESS REFILL
                [opus_transaction_date] => 2019-10-20
                [opus_transaction_num] => XM1PZQSJL215F
                [opus_invoice_num] => N3904IN1410
                [customer_name] => DORTHY JONES
                [mobile_num] => 3365982631
                [opus_amount] => 90
                [rq4_amount] => 45
                [difference] => -45
                [ocomment] => Re-Upload: Please email the details to Treasury and confirm
                [mark_delete] => 0
                [upload_date] => 2019-10-21
            )

        [7] => Array
            (
                [store_id] => 1820
                [employee_uid] => 59883
                [opus_id] => cb9406
                [item_description] => PRE ATT $25 PNLS 90EXP
                [opus_transaction_date] => 2019-10-20
                [opus_transaction_num] => XTBJO14JL25OE
                [opus_invoice_num] => SEVIEIN19013
                [customer_name] => RON NELSON
                [mobile_num] => 8653821076
                [opus_amount] => 25
                [rq4_amount] => 5
                [difference] => -20
                [ocomment] => Re-Upload: We have been charged in opus for $25. Provide RQ4 invoice number for remaining amount
                [mark_delete] => 0
                [upload_date] => 2019-10-21
            )

        [8] => Array
            (
                [store_id] => 0178
                [employee_uid] => 572547
                [opus_id] => ms5674
                [item_description] => PRE $45 PAYG PINLESS REFILL
                [opus_transaction_date] => 2019-10-21
                [opus_transaction_num] => XT29916JL4S69
                [opus_invoice_num] => T0178BP1590
                [customer_name] => GABRIEL LONGORIA JR
                [mobile_num] => 4322133450
                [opus_amount] => 45
                [rq4_amount] => 0
                [difference] => -45
                [ocomment] => Re-Upload: Please email the details to Treasury and confirm
                [mark_delete] => 0
                [upload_date] => 2019-10-22
            )

        [9] => Array
            (
                [store_id] => 2180
                [employee_uid] => 7842
                [opus_id] => lm854y
                [item_description] => $30 RTR
                [opus_transaction_date] => 2019-10-21
                [opus_transaction_num] => XC9U712JL4LA4
                [opus_invoice_num] => KETERIN1836
                [customer_name] => PETE JABLONSKI
                [mobile_num] => 9374092680
                [opus_amount] => 30
                [rq4_amount] => 40
                [difference] => 10
                [ocomment] => Re-Upload: Credit the remaining balance to customers account in OPUS and email confirmation to Treasury
                [mark_delete] => 0
                [upload_date] => 2019-10-22
            )


      .
      .
      .
 [63] => Array
            (
                [store_id] => 0175
                [employee_uid] => 33738
                [opus_id] => ph5953
                [item_description] => PRE ATT $40 RTR
                [opus_transaction_date] => 2019-10-21
                [opus_transaction_num] => XE5N31DJL51RA
                [opus_invoice_num] => T0175IN4563
                [customer_name] => WILLIE TAYLOR
                [mobile_num] => 6822701188
                [opus_amount] => 40
                [rq4_amount] => 50
                [difference] => 10
                [ocomment] => Re-Upload: Credit the remaining balance to customers account in OPUS and email confirmation to Treasury
                [mark_delete] => 0
                [upload_date] => 2019-10-22
            )

    )
![]()
Milo
3,3379 gold badges29 silver badges44 bronze badges
answered Nov 5, 2019 at 18:45
![]()
I have used following code to read «xls and xlsx» :
    include 'PHPExcel/IOFactory.php';

    $location='sample-excel-files.xlsx';

    $objPHPExcel = PHPExcel_IOFactory::load($location);
    $sheet = $objPHPExcel->getSheet(0);
    $total_rows = $sheet->getHighestRow();
    $total_columns = $sheet->getHighestColumn();
    $set_excel_query_all=array();
    for($row =2; $row <= $total_rows; $row++) {
        $singlerow = $sheet->rangeToArray('A' . $row . ':' . $total_columns . $row, NULL, TRUE, FALSE);
        $single_row=$singlerow[0];
        $set_excel_query['store_id']=$single_row[0];
        $set_excel_query['employee_uid']=$single_row[1];
        $set_excel_query['opus_id']=$single_row[2];
        $set_excel_query['item_description']=$single_row[3];
        if($single_row[4])
        {
            $set_excel_query['opus_transaction_date']= date('Y-m-d', PHPExcel_Shared_Date::ExcelToPHP($single_row[4]));
        }
        $set_excel_query['opus_transaction_num']=$single_row[5];
        $set_excel_query['opus_invoice_num']=$single_row[6];
        $set_excel_query['customer_name']=$single_row[7];
        $set_excel_query['mobile_num']=$single_row[8];
        $set_excel_query['opus_amount']=$single_row[9];
        $set_excel_query['rq4_amount']=$single_row[10];
        $set_excel_query['difference']=$single_row[11];
        $set_excel_query['ocomment']=$single_row[12];
        $set_excel_query['mark_delete']=$single_row[13];
        if($single_row[14])
        {
            $set_excel_query['upload_date']= date('Y-m-d', PHPExcel_Shared_Date::ExcelToPHP($single_row[14]));
        }
        $set_excel_query_all[]=$set_excel_query;
    }

   print_r($set_excel_query_all);
![]()
Awais Qarni
17.1k24 gold badges75 silver badges137 bronze badges
answered Nov 5, 2019 at 18:41
![]()
PHPExcel – библиотека, предназначенная для обработки данных формата MS Excel. С её помощью можно производить чтение и запись информации в файлы, форматировать их содержимое, выполнять операции с формулами, стилями и т.д.
Для работы PHPExcel требуется версия PHP 5.2 или выше, а так же наличие подключенных расширений ZIP, XML и GD2.
Примечание: расширение php_zip нужно только при использовании классов PHPExcel_Reader_Excel2007, PHPExcel_Writer_Excel2007 и PHPExcel_Reader_OOCalc. То есть если вы хотите использовать PHPExcel для полноценной работы с файлами форматов .xlsx или .ods, то вам потребуется zip-расширение.
Возможности библиотеки PHPExcel:
1. PHPExcel может читать различные форматы файлов электронных таблиц:
- Excel5
- Excel2003XML
- Excel2007
- OOCalc
- SYLK
- Gnumeric
- CSV
2. Создание и обработка документов средствами PHP
Установка PHPExcel:
1) Скачать библиотеку с официального сайта http://phpexcel.codeplex.com/
2) В скачанном архиве, из папки classes скопировать содержимое в корень сайта
Состав Архива:
/classes                    // Каталог библиотеки PHPExcel
/classess/PHPExcel/         // Каталог классов библиотеки PHPExcel
/classess/PHPExcel.php      // Файл для include?содержит ключевые  методы для обработки данных
/documentation		    // Полная документация по использованию библиотеки
/license.txt                // Лицензионное соглашение
/install.txt                // Краткая инструкция по установке
/examples            	    // Каталог с примерами по использованию PHPExcel
/changelog.txt              // Список изменений в текущей версии
Для чтения данных с Excel файла необходимо подключить файл библиотеки PHPExcel и используется метод load() класса PHPExcel_IOFactory. Этот метод собирает данные всех со всех листов текущего документа:
require_once '/путь/до/файла/PHPExcel.php';
$excel = PHPExcel_IOFactory::load('/путь/до/файла/simple.xlsx');
Далее формируем массив из всех листов Excel файла с помощью цикла:
Foreach($excel ->getWorksheetIterator() as $worksheet) {
 $lists[] = $worksheet->toArray();
}
Вывод сформированного массива в виде HTML таблиц(ы) :
foreach($lists as $list){
 echo '<table border="1">';
 // Перебор строк
 foreach($list as $row){
   echo '<tr>';
   // Перебор столбцов
   foreach($row as $col){
     echo '<td>'.$col.'</td>';
 }
 echo '</tr>';
 }
 echo '</table>';
}
Основные методы и свойства класса PHPExcel
Класс PHPExcel – это ядро PHPExcel. Он содержит ссылки на содержащиеся листы, параметры безопасности документов и мета-данные документов. Помимо вышеизложенного, этот класс включает в себя множество других полезных методов для обработки получаемых данных. Некоторые из них будут описаны ниже.
getSheetCount() – возвратит количество листов в книге;
getSheetNames() – возвращает список всех листов в рабочей книге, индексируя их в порядке, в котором их «вкладки» появляются при открытии в MS Excel (или других программах для обработки электронных таблиц);
getSheet(N) – используется для доступа к листу по индексу. Индекс позиции (N) представляет собой порядок, в котором отображаются вкладки листов, когда книга открыта в MS Excel (или других программах для обработки электронных таблиц);
getSheetByName(list_name) – метод используется для доступа к листу по его имени (list_name);
getActiveSheet() – этот метод позволяет получить доступ к активному листу документа напрямую. Активным листом является тот, который будет активен, когда откроется книга в MS Excel (или другой соответствующей программе электронных таблиц);
setActiveSheetIndex() и setActiveSheetIndexByName() – с помощью этих методов можно назначить лист, который будет активным по его индексу или имени.
Получение значения ячейки по координатам
Для получения значения ячейки, сперва должна быть найдена ячейка путем использования метода getCell. Значение ячейки может быть получено с помощью следующей команды:
$objPHPExcel->getActiveSheet()->getCell('B8')->getValue();
В случае если вам нужны подсчитанные значения ячейки, вместо getValue(), используйте метод getCalculatedValue():
$objPHPExcel->getActiveSheet()->getCell('B8')->getCalculatedValue();
Получение значения ячейки по строкам и столбцам
Для получения значения ячейки, в листе сначала должна быть найдена ячейка с использованием метода getCellByColumnAndRow. Значение ячейки может быть получено с помощью следующей команды:
$objPHPExcel->getActiveSheet()->getCellByColumnAndRow(1, 8)->getValue();
Заключение
В этой статье были рассмотрены основные возможности библиотеки PHPExcel в области чтения excel файлов. Помимо всего выше изложенного, есть возможность более гибко использовать эту библиотеку для работы с различными параметрами таблицы. По этим вопросам рекомендуется обращаться к документации. Библиотека PHPExcel так же адаптирована для работы с другими типами файлов, таких как Excel (BIFF). XLS, Excel 2007 (OfficeOpenXML). XLSX, CSV, Libre / OpenOffice Calc. ODS, Gnumeric, PDF и HTML.
PHPExcel — библиотека для создания и чтения данных из файлов формата OpenXML (который используется в MS Excel 2007). С ее помощью можно считывать из файлов, записывать в файлы, форматировать содержимое, работать с формулами и т.д. Для работы PHPExcel требуется версия PHP 5.2 или выше, с установленными библиотеками Zip, XML и GD2.
Установка PHPExcel
Первым делом библиотеку необходимо скачать. Для этого переходим на официальный сайт библиотеки и скачиваем архив PHPExcel-1.7.8.zip. После распаковки мы получим несколько файлов и папок:
- Classes
- Documentation
- Tests
- changelog.txt
- install.txt
- license.txt
Файлы — это различные описания по предыдущим версиям, лицензионное соглашение и очень краткая инструкция по установке. Далее, в папке Classes, содержится непосредственно сама библиотека PHPExcel — эту папку необходимо скопировать в корень нашего скрипта.
В папке Documentation содержится документация по библиотеке на английском языке. В папке Tests — примеры по использованию библиотеки.
Создание Excel-файла
Итак, давайте создадим файл makeexcel.php и начинаем работать с ним. Для начала нам необходимо подключить главный файл библиотеки PHPExcel.php (который находится в папке Classes) и создать объект класса PHPExcel:
require_once 'Classes/PHPExcel.php';
$pExcel = new PHPExcel();
Настройки листа книги Excel
Документ Excel состоит из книг, а каждая книга в свою очередь, состоит из листов. Далее лист состоит из набора ячеек, доступ к которым осуществляется по координатам. То есть у нас есть столбцы, которые имеют буквенные имена (А, В, С и т.д) и есть строки, которые пронумерованы. Значит, что бы получить доступ к первой ячейке нужно указать код А1. Точно также мы с помощью библиотеки будем получать доступ к каждой ячейке.
Итак, первым делом необходимо выбрать активный лист, на который мы будем выводить данные и получить объект этого листа:
$pExcel->setActiveSheetIndex(0);
$aSheet = $pExcel->getActiveSheet();
С помощью метода setActiveSheetIndex(0) указываем индекс (номер) активного листа. Нумерация листов начинается с нуля. Далее с помощью метода getActiveSheet() получаем объект этого активного листа, то есть другими словами получаем доступ к нему для работы. И сохраняем этот объект в переменную $aSheet.
Если Вы захотите указать активным какой то другой лист, то вначале его необходимо создать, при помощи метода:
$pExcel->createSheet();
Затем, по аналогии, указываем индекс и получаем объект активного листа.
// Ориентация страницы и  размер листа
$aSheet->getPageSetup()
       ->setOrientation(PHPExcel_Worksheet_PageSetup::ORIENTATION_PORTRAIT);
$aSheet->getPageSetup()
       ->SetPaperSize(PHPExcel_Worksheet_PageSetup::PAPERSIZE_A4);
// Поля документа
$aSheet->getPageMargins()->setTop(1);
$aSheet->getPageMargins()->setRight(0.75);
$aSheet->getPageMargins()->setLeft(0.75);
$aSheet->getPageMargins()->setBottom(1);
// Название листа
$aSheet->setTitle('Прайс-лист');
// Шапка и футер (при печати)
$aSheet->getHeaderFooter()
       ->setOddHeader('&CТД ТИНКО: прайс-лист');
$aSheet->getHeaderFooter()
       ->setOddFooter('&L&B'.$aSheet->getTitle().'&RСтраница &P из &N');
// Настройки шрифта
$pExcel->getDefaultStyle()->getFont()->setName('Arial');
$pExcel->getDefaultStyle()->getFont()->setSize(8);
Вначале задаем ориентацию листа при помощи метода setOrientation(), которому передаем константу класса PHPExcel_Worksheet_PageSetup:
- ORIENTATION_PORTRAIT — книжная
- ORIENTATION_LANDSCAPE — альбомная
Обратите внимание, что перед методом setOrientation() необходимо вызвать метод getPageSetup(), который предоставляет доступ к настройкам страницы.
Далее вызываем метод SetPaperSize(), который позволяет задать размер страницы для печати. Ему передаем параметром константу PAPERSIZE_A4 класса PHPExcel_Worksheet_PageSetup. Что означает, что размер листа страницы будет установлен А4.
Далее устанавливаем поля документа, то есть отступы от краев документа. Отступы задаются в специальных символьных единицах. Вначале, обратите внимание, вызываем у объекта $aSheet метод getPageMargins(), который вернет объект класса, отвечающего за настройки полей страницы. Затем вызываем методы setTop(), setRight(), setLeft() и setBottom().
Далее при помощи метода setTitle(‘Прайс лист’) задаем название нашего листа.
Если нужно, можно при печати выводить шапку и подвал листа:
- setOddHeader();
- setOddFooter();
Обратите внимание на передаваемые параметры:
- для шапки передаем строку ‘&CТД ТИНКО: прайс-лист’; метка &C означает, что текст нужно расположить по центру.
- для подвала передаем строку ‘&L&B’.$aSheet->getTitle().’&RСтраница &P из &N’; это означает, что нужно вывести слева и жирным шрифтом (&L&B) название листа (метод $aSheet->getTitle()), затем справа (&R) вывести номер страницы (&P) из общего количества страниц (&N).
Затем указываем настройки шрифта по умолчанию:
- setName(‘Arial’) — задаем имя шрифта;
- setSize(8) — задаем размер шрифта.
Наполнение документа данными
Для начала давайте зададим ширину столбцов (в символьных единицах), которые нам понадобятся:
$aSheet->getColumnDimension('A')->setWidth(3);
$aSheet->getColumnDimension('B')->setWidth(7);
$aSheet->getColumnDimension('C')->setWidth(20);
$aSheet->getColumnDimension('D')->setWidth(40);
$aSheet->getColumnDimension('E')->setWidth(10);
Теперь заполним несколько ячеек текстом:
$aSheet->mergeCells('A1:E1');
$aSheet->getRowDimension('1')->setRowHeight(20);
$aSheet->setCellValue('A1','ТД ТИНКО');
$aSheet->mergeCells('A2:E2');
$aSheet->setCellValue('A2','Поставка технических средств безопасности');
$aSheet->mergeCells('A4:C4');
$aSheet->setCellValue('A4','Дата создания прайс-листа');
Здесь мы сначала объеденяем ячейки с А1 до E1 при помощи метода mergeCells(), далее задаем высоту строки: вначале получаем доступ к строке 1 при помощи метода getRowDimension(‘1’), затем задаем высоту — setRowHeight(20). Далее при помощи метода setCellValue(‘A1′,’ТД ТИНКО’), устанавливаем значение ячейки А1.
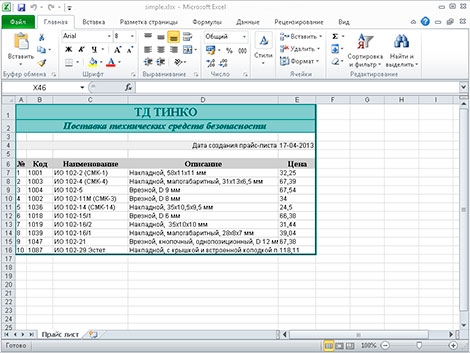
Далее давайте в ячейку D4 запишем текущую дату:
// Записываем данные в ячейку
$date = date('d-m-Y');
$aSheet->setCellValue('D4',$date);
// Устанавливает формат данных в ячейке (дата вида дд-мм-гггг)
$aSheet->getStyle('D4')->getNumberFormat()
->setFormatCode(PHPExcel_Style_NumberFormat::FORMAT_DATE_XLSX14);
С помощью констант, определенных в классе PHPExcel_Style_NumberFormat, можно задать формат ячейки: FORMAT_GENERAL (общий), FORMAT_TEXT (текст), FORMAT_NUMBER (число), FORMAT_NUMBER_00 (число с дробной частью), FORMAT_PERCENTAGE (процент), FORMAT_PERCENTAGE_00 (процент с дробной частью) и т.п.
Теперь, используя метод setCellValue(), а также цикл while() наполним данными наш прайс-лист:
mysql_connect(DB_HOST, DB_USER, DB_PASS);
mysql_query('SET NAMES utf8');
mysql_select_db(DB_NAME);

// Создаем шапку таблички данных
$aSheet->setCellValue('A6','№');
$aSheet->setCellValue('B6','Код');
$aSheet->setCellValue('C6','Наименование');
$aSheet->setCellValue('D6','Описание');
$aSheet->setCellValue('E6','Цена');

$query = "SELECT `code`, `name`, `description`, `price` FROM `products` WHERE 1 LIMIT 10";
$res = mysql_query( $query );

$i = 1;
while( $prd = mysql_fetch_assoc($res) ) {
    $aSheet->setCellValue('A'.($i+6), $i);
    $aSheet->setCellValue('B'.($i+6), $prd['code']);
    $aSheet->setCellValue('C'.($i+6), $prd['name']);
    $aSheet->setCellValue('D'.($i+6), $prd['description']);
    $aSheet->setCellValue('E'.($i+6), $prd['price']);
    $i++;
}
Стилизация данных
Давайте немного украсим наш прайс-лист, то есть каждой ячейке добавим стилей. Для этого необходимо создать массив со стилями и при помощи метода applyFromArray(), применить этот массив к ячейке (или ячейкам):
// массив стилей
$style_wrap = array(
    // рамки
    'borders'=>array(
        // внешняя рамка
        'outline' => array(
            'style'=>PHPExcel_Style_Border::BORDER_THICK,
            'color' => array(
                'rgb'=>'006464'
            )
        ),
        // внутренняя
        'allborders'=>array(
            'style'=>PHPExcel_Style_Border::BORDER_THIN,
            'color' => array(
                'rgb'=>'CCCCCC'
            )
        )
    )
);

$aSheet->getStyle('A1:F'.($i+5))->applyFromArray($style_wrap);
Теперь, по аналогии, применим стили к остальным ячейкам:
// Стили для верхней надписи (первая строка)
$style_header = array(
    // Шрифт
    'font'=>array(
        'bold' => true,
        'name' => 'Times New Roman',
        'size' => 15,
        'color'=>array(
            'rgb' => '006464'
        )
    ),
    // Выравнивание
    'alignment' => array(
        'horizontal' => PHPExcel_STYLE_ALIGNMENT::HORIZONTAL_CENTER,
        'vertical' => PHPExcel_STYLE_ALIGNMENT::VERTICAL_CENTER,
    ),
    // Заполнение цветом
    'fill' => array(
        'type' => PHPExcel_STYLE_FILL::FILL_SOLID,
        'color'=>array(
            'rgb' => '99CCCC'
        )
    ),
    'borders'=>array(
        'bottom'=>array(
            'style'=>PHPExcel_Style_Border::BORDER_THIN,
            'color' => array(
                'rgb'=>'006464'
            )
        )
    )
);
$aSheet->getStyle('A1:E1')->applyFromArray($style_header);

// Стили для слогана компании (вторая строка)
$style_slogan = array(
    // шрифт
    'font'=>array(
        'bold' => true,
        'italic' => true,
        'name' => 'Times New Roman',
        'size' => 12,
        'color'=>array(
            'rgb' => '006464'
        )
    ),
    // выравнивание
    'alignment' => array(
        'horizontal' => PHPExcel_STYLE_ALIGNMENT::HORIZONTAL_CENTER,
        'vertical' => PHPExcel_STYLE_ALIGNMENT::VERTICAL_CENTER,
    ),
    // заполнение цветом
    'fill' => array(
        'type' => PHPExcel_STYLE_FILL::FILL_SOLID,
        'color'=>array(
            'rgb' => '99CCCC'
        )
    ),
    //рамки
    'borders' => array(
        'bottom' => array(
            'style'=>PHPExcel_Style_Border::BORDER_THIN,
            'color' => array(
                'rgb'=>'006464'
            )
        )
    )
);
$aSheet->getStyle('A2:E2')->applyFromArray($style_slogan);

// Стили для текта возле даты
$style_tdate = array(
    // выравнивание
    'alignment' => array(
        'horizontal' => PHPExcel_STYLE_ALIGNMENT::HORIZONTAL_RIGHT,
    ),
    // заполнение цветом
    'fill' => array(
        'type' => PHPExcel_STYLE_FILL::FILL_SOLID,
        'color'=>array(
            'rgb' => 'EEEEEE'
        )
    ),
    // рамки
    'borders' => array(
        'right' => array(
            'style'=>PHPExcel_Style_Border::BORDER_NONE
        )
    )
);
$aSheet->getStyle('A4:D4')->applyFromArray($style_tdate);

// Стили для даты
$style_date = array(
    // заполнение цветом
    'fill' => array(
        'type' => PHPExcel_STYLE_FILL::FILL_SOLID,
        'color'=>array(
            'rgb' => 'EEEEEE'
        )
    ),
    // рамки
    'borders' => array(
        'left' => array(
            'style'=>PHPExcel_Style_Border::BORDER_NONE
        )
    ),
);
$aSheet->getStyle('E4')->applyFromArray($style_date);

// Стили для шапки таблицы (шестая строка)
$style_hprice = array(
    // выравнивание
    'alignment' => array(
    'horizontal' => PHPExcel_STYLE_ALIGNMENT::HORIZONTAL_CENTER,
    ),
    // заполнение цветом
    'fill' => array(
        'type' => PHPExcel_STYLE_FILL::FILL_SOLID,
        'color'=>array(
            'rgb' => 'CFCFCF'
        )
    ),
    // шрифт
    'font'=>array(
        'bold' => true,
        /* 'italic' => true, */
        'name' => 'Times New Roman',
        'size' => 10
    ),
);
$aSheet->getStyle('A6:E6')->applyFromArray($style_hprice);

// Cтили для данных в таблице прайс-листа
$style_price = array(
    'alignment' => array(
    'horizontal' => PHPExcel_STYLE_ALIGNMENT::HORIZONTAL_LEFT,
    )
);
$aSheet->getStyle('A7:E'.($i+5))->applyFromArray($style_price);
Сохранение документа
Осталось только сохранить наш документ:
/*
$objWriter = PHPExcel_IOFactory::createWriter($pExcel, 'Excel5');
$objWriter->save('simple.xls');
*/
$objWriter = PHPExcel_IOFactory::createWriter($pExcel, 'Excel2007');
$objWriter->save('simple.xlsx');
или так
/*
$objWriter = new PHPExcel_Writer_Excel5($pExcel);
$objWriter->save('simple.xls');
*/
$objWriter = new PHPExcel_Writer_Excel2007($pExcel);
$objWriter->save('simple.xlsx');
Если нужно вывести документ в браузер
/*
header('Content-Type:application/vnd.ms-excel');
header('Content-Disposition:attachment;filename="simple.xls"');
$objWriter = new PHPExcel_Writer_Excel5($pExcel);
*/
header('Content-Type:xlsx:application/vnd.openxmlformats-officedocument.spreadsheetml.sheet');
header('Content-Disposition:attachment;filename="simple.xlsx"');
$objWriter = new PHPExcel_Writer_Excel2007($pExcel);
$objWriter->save('php://output');
Первый заголовок указывает браузеру тип открываемого контента — это документ формата Excel. Второй — говорит браузеру, что документ необходимо отдать пользователю на скачивание под именем simple.xlsx.
Добавление формул
Формула Excel — это математическое выражение, которое создается для вычисления результата и которое может зависеть от содержимого других ячеек. Формула в ячейке Excel может содержать данные, ссылки на другие ячейки, а также обозначение действий, которые необходимо выполнить.
Использование ссылок на ячейки позволяет пересчитывать результат по формулам, когда происходят изменения содержимого ячеек, включенных в формулы. Формулы Excel начинаются со знака =. Скобки ( ) могут использоваться для определения порядка математических операции.
Примеры формул Excel: =27+36, =А1+А2-АЗ, =SUM(А1:А5), =MAX(АЗ:А5), =(А1+А2)/АЗ.
PHPExcel тоже поддерживает добавление формул в ячейки. Установить формулу можно так:
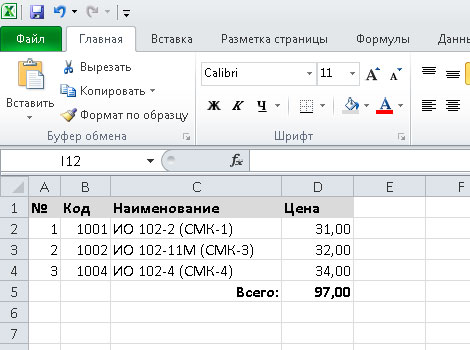
// формула для вычисления суммы
$formula = '=SUM(D2:D4)';
$aSheet->setCellValue('D5', $formula);
Чтение Excel-файла
Самый простой вариант — считать все таблицы (на всех листах) и записать данные в трехмерный массив:
// Подключаем библиотеку
require_once 'Classes/PHPExcel.php';
$pExcel = PHPExcel_IOFactory::load('simple.xlsx');

// Цикл по листам Excel-файла
foreach ($pExcel->getWorksheetIterator() as $worksheet) {
    // выгружаем данные из объекта в массив
    $tables[] = $worksheet->toArray();
}
Теперь можно вывести массив:
// Цикл по листам Excel-файла
foreach( $tables as $table ) {
    echo '<table border="1">';
    // Цикл по строкам
    foreach($table as $row) {
        echo '<tr>';
        // Цикл по колонкам
        foreach( $row as $col ) {
            echo '<td>'.$col.'</td>';
        }
        echo '</tr>';
    }
    echo '</table>';
}
Для получения значения отдельной ячейки:
// выбираем лист, с которым будем работать
$pExcel->setActiveSheetIndex(0);
$aSheet = $pExcel->getActiveSheet();
// получаем доступ к ячейке по номеру строки
// (нумерация с единицы) и столбца (нумерация с нуля)
$cell = $aSheet->getCellByColumnAndRow($col, $row);
// читаем значение ячейки
$value = $cell->getValue()
или так:
$value = $pExcel->getActiveSheet()->getCellValue('B2')
Еще два примера:
// Цикл по листам Excel-файла
foreach( $pExcel->getWorksheetIterator() as $worksheet ) {
    echo '<h2>Лист «'.$worksheet->getTitle().'»</h2>';
    echo '<table border="1">';
    // Цикл по строкам
    foreach( $worksheet->getRowIterator() as $row ) {
        echo '<tr>';
        // Цикл по колонкам
        foreach( $row->getCellIterator() as $cell ) {
            $value = $cell->getValue();
            // $calcValue = $cell->getCalculatedValue()
            // $dataType = PHPExcel_Cell_DataType::dataTypeForValue($value);
            echo '<td>'.$value.'</td>';
        }
        echo '</tr>';
    }
    echo '</table>';
}
// Цикл по листам Excel-файла
foreach ($pExcel->getWorksheetIterator() as $worksheet) {
    $worksheetTitle     = $worksheet->getTitle();
    $highestRow         = $worksheet->getHighestRow(); // например, 10
    $highestColumn      = $worksheet->getHighestColumn(); // например, 'E'
    $highestColumnIndex = PHPExcel_Cell::columnIndexFromString($highestColumn);
    $nrColumns = ord($highestColumn) - 64;
    echo '<h2>Лист «'.$worksheetTitle.'» ';
    echo $nrColumns . ' колонок (A-' . $highestColumn . ') ';
    echo ' и ' . $highestRow . ' строк.</h2>';
    echo '<table border="1">';
    // Цикл по строкам
    for ($row = 1; $row <= $highestRow; $row++) {
        echo '<tr>';
        // Цикл по колонкам
        for ($col = 0; $col < $highestColumnIndex; $col++) {
            $cell = $worksheet->getCellByColumnAndRow($col, $row);
            echo '<td>'.$cell->getValue().'</td>';
        }
        echo '</tr>';
    }
    echo '</table>';
}
Дополнительно
- Документация разработчика PHPExcel на русском
- Блог на Laravel 7, часть 17. Временная зона для пользователей, деплой на хостинг TimeWeb
- Блог на Laravel 7, часть 16. Роль нового пользователя, сообщение админу о новом посте
- Блог на Laravel 7, часть 15. Восстановление постов, slug для категории, поста и страницы
- Блог на Laravel 7, часть 14. Валидация данных и права доступа при загрузке изображений
- Блог на Laravel 7, часть 13. Загрузка и ресайз изображений для категорий и постов блога
- Блог на Laravel 7, часть 12. Доп.страницы сайта в панели управления и в публичной части
- Блог на Laravel 7, часть 11. Панель управления — назначение ролей и прав для пользователей
Поиск:
Excel • MS • PHP • Web-разработка
Каталог оборудования
Lorem ipsum dolor sit amet, consectetur adipiscing elit, sed do eiusmod tempor incididunt ut labore et dolore magna aliqua.
Производители
Lorem ipsum dolor sit amet, consectetur adipiscing elit, sed do eiusmod tempor incididunt ut labore et dolore magna aliqua.
Функциональные группы
Lorem ipsum dolor sit amet, consectetur adipiscing elit, sed do eiusmod tempor incididunt ut labore et dolore magna aliqua.
При построении различных сервисов, иногда бывает необходимость прочитать xlsx документ и с данными, которые в нем содержатся что-то сделать, записать в базу, вывести на страницу или переформатировать и снова записать в файл, вариантов много. В предыдущей статье, был описан процесс создания excel документов при помощи php, почитать можно здесь В этой статье будет использоваться тот же пакет phpoffice/phpspreadsheet, для работы с документами excel.
Структура проекта
├── Файл index.php
├── Файл composer.json
├── Обрабатываемый файл xlsx
Шаг 1 — установка пакета phpoffice/phpspreadsheet
Данная статья написана, с учетом того, что composer у Вас установлен, поэтому переходим к созданию файла composer.json, его содержание:
{
    "require": {
      "phpoffice/phpspreadsheet": "^1.18"
    }
}
В этой же директории запускаем команду composer require
После успешного выполнения этой команды, произойдет установка необходимых пакетов, с зависимостями, структура немного изменится, будет такой:
├── Файл index.php
├── Файл composer.json
├── Файл composer.lock
├── Обрабатываемый файл xlsx
├── Директория vendor
   └── Директории с файлами пакетов
Файл xlsx у меня с таким содержимым:
В самом простом примере прочитаем файл xlsx в массив и выведем функцией print_r, для этого необходимо написать index.php, код будет такой:
<?php
set_include_path(__DIR__);

require './vendor/autoload.php';


use PhpOfficePhpSpreadsheetReaderXlsx;

$inputFileName = __DIR__ . '/file32342.xlsx';

$reader = new Xlsx();
$spreadsheet = $reader->load($inputFileName);

$sheetData = $spreadsheet->getActiveSheet()->toArray(null, true, true, true);


echo '<pre>';
print_r($sheetData);
echo '</pre>';
В результате выполнения этого кода, увидим вот такой распечатанный массив:
Array
(
[1] => Array
(
[A] => Значение А1
[B] => Значение В1
[C] => Значение С1
[D] => Значение D1
[E] => Значение E1
[F] => Значение F1
[G] => Значение G1
[H] => Значение H1
[I] => Значение I1
[J] => Значение J1
[K] => Значение K1
[L] => Значение L1
[M] => Значение M1
)
[2] => Array
(
[A] => Значение А2
[B] => Значение В2
[C] => Значение С2
[D] => Значение D2
[E] => Значение E2
[F] => Значение F2
[G] => Значение G2
[H] => Значение H2
[I] => Значение I2
[J] => Значение J2
[K] => Значение K2
[L] => Значение L2
[M] => Значение M2
)
[3] => Array
(
[A] => Значение А3
[B] => Значение В3
[C] => Значение С3
[D] => Значение D3
[E] => Значение E3
[F] => Значение F3
[G] => Значение G3
[H] => Значение H3
[I] => Значение I3
[J] => Значение J3
[K] => Значение K3
[L] => Значение L3
[M] => Значение M3
)
[4] => Array
(
[A] => Значение А4
[B] => Значение В4
[C] => Значение С4
[D] => Значение D4
[E] => Значение E4
[F] => Значение F4
[G] => Значение G4
[H] => Значение H4
[I] => Значение I4
[J] => Значение J4
[K] => Значение K4
[L] => Значение L4
[M] => Значение M4
)
[5] => Array
(
[A] => Значение А5
[B] => Значение В5
[C] => Значение С5
[D] => Значение D5
[E] => Значение E5
[F] => Значение F5
[G] => Значение G5
[H] => Значение H5
[I] => Значение I5
[J] => Значение J5
[K] => Значение K5
[L] => Значение L5
[M] => Значение M5
)
[6] => Array
(
[A] => Значение А6
[B] => Значение В6
[C] => Значение С6
[D] => Значение D6
[E] => Значение E6
[F] => Значение F6
[G] => Значение G6
[H] => Значение H6
[I] => Значение I6
[J] => Значение J6
[K] => Значение K6
[L] => Значение L6
[M] => Значение M6
)
[7] => Array
(
[A] => Значение А7
[B] => Значение В7
[C] => Значение С7
[D] => Значение D7
[E] => Значение E7
[F] => Значение F7
[G] => Значение G7
[H] => Значение H7
[I] => Значение I7
[J] => Значение J7
[K] => Значение K7
[L] => Значение L7
[M] => Значение M7
)
[8] => Array
(
[A] => Значение А8
[B] => Значение В8
[C] => Значение С8
[D] => Значение D8
[E] => Значение E8
[F] => Значение F8
[G] => Значение G8
[H] => Значение H8
[I] => Значение I8
[J] => Значение J8
[K] => Значение K8
[L] => Значение L8
[M] => Значение M8
)
[9] => Array
(
[A] => Значение А9
[B] => Значение В9
[C] => Значение С9
[D] => Значение D9
[E] => Значение E9
[F] => Значение F9
[G] => Значение G9
[H] => Значение H9
[I] => Значение I9
[J] => Значение J9
[K] => Значение K9
[L] => Значение L9
[M] => Значение M9
)
[10] => Array
(
[A] => Значение А10
[B] => Значение В10
[C] => Значение С10
[D] => Значение D10
[E] => Значение E10
[F] => Значение F10
[G] => Значение G10
[H] => Значение H10
[I] => Значение I10
[J] => Значение J10
[K] => Значение K10
[L] => Значение L10
[M] => Значение M10
)
[11] => Array
(
[A] => Значение А11
[B] => Значение В11
[C] => Значение С11
[D] => Значение D11
[E] => Значение E11
[F] => Значение F11
[G] => Значение G11
[H] => Значение H11
[I] => Значение I11
[J] => Значение J11
[K] => Значение K11
[L] => Значение L11
[M] => Значение M11
)
[12] => Array
(
[A] => Значение А12
[B] => Значение В12
[C] => Значение С12
[D] => Значение D12
[E] => Значение E12
[F] => Значение F12
[G] => Значение G12
[H] => Значение H12
[I] => Значение I12
[J] => Значение J12
[K] => Значение K12
[L] => Значение L12
[M] => Значение M12
)
[13] => Array
(
[A] => Значение А13
[B] => Значение В13
[C] => Значение С13
[D] => Значение D13
[E] => Значение E13
[F] => Значение F13
[G] => Значение G13
[H] => Значение H13
[I] => Значение I13
[J] => Значение J13
[K] => Значение K13
[L] => Значение L13
[M] => Значение M13
)
[14] => Array
(
[A] => Значение А14
[B] => Значение В14
[C] => Значение С14
[D] => Значение D14
[E] => Значение E14
[F] => Значение F14
[G] => Значение G14
[H] => Значение H14
[I] => Значение I14
[J] => Значение J14
[K] => Значение K14
[L] => Значение L14
[M] => Значение M14
)
[15] => Array
(
[A] => Значение А15
[B] => Значение В15
[C] => Значение С15
[D] => Значение D15
[E] => Значение E15
[F] => Значение F15
[G] => Значение G15
[H] => Значение H15
[I] => Значение I15
[J] => Значение J15
[K] => Значение K15
[L] => Значение L15
[M] => Значение M15
)
[16] => Array
(
[A] => Значение А16
[B] => Значение В16
[C] => Значение С16
[D] => Значение D16
[E] => Значение E16
[F] => Значение F16
[G] => Значение G16
[H] => Значение H16
[I] => Значение I16
[J] => Значение J16
[K] => Значение K16
[L] => Значение L16
[M] => Значение M16
)
[17] => Array
(
[A] => Значение А17
[B] => Значение В17
[C] => Значение С17
[D] => Значение D17
[E] => Значение E17
[F] => Значение F17
[G] => Значение G17
[H] => Значение H17
[I] => Значение I17
[J] => Значение J17
[K] => Значение K17
[L] => Значение L17
[M] => Значение M17
)
[18] => Array
(
[A] => Значение А18
[B] => Значение В18
[C] => Значение С18
[D] => Значение D18
[E] => Значение E18
[F] => Значение F18
[G] => Значение G18
[H] => Значение H18
[I] => Значение I18
[J] => Значение J18
[K] => Значение K18
[L] => Значение L18
[M] => Значение M18
)
[19] => Array
(
[A] => Значение А19
[B] => Значение В19
[C] => Значение С19
[D] => Значение D19
[E] => Значение E19
[F] => Значение F19
[G] => Значение G19
[H] => Значение H19
[I] => Значение I19
[J] => Значение J19
[K] => Значение K19
[L] => Значение L19
[M] => Значение M19
)
[20] => Array
(
[A] => Значение А20
[B] => Значение В20
[C] => Значение С20
[D] => Значение D20
[E] => Значение E20
[F] => Значение F20
[G] => Значение G20
[H] => Значение H20
[I] => Значение I20
[J] => Значение J20
[K] => Значение K20
[L] => Значение L20
[M] => Значение M20
)
[21] => Array
(
[A] => Значение А21
[B] => Значение В21
[C] => Значение С21
[D] => Значение D21
[E] => Значение E21
[F] => Значение F21
[G] => Значение G21
[H] => Значение H21
[I] => Значение I21
[J] => Значение J21
[K] => Значение K21
[L] => Значение L21
[M] => Значение M21
)
[22] => Array
(
[A] => Значение А22
[B] => Значение В22
[C] => Значение С22
[D] => Значение D22
[E] => Значение E22
[F] => Значение F22
[G] => Значение G22
[H] => Значение H22
[I] => Значение I22
[J] => Значение J22
[K] => Значение K22
[L] => Значение L22
[M] => Значение M22
)
[23] => Array
(
[A] => Значение А23
[B] => Значение В23
[C] => Значение С23
[D] => Значение D23
[E] => Значение E23
[F] => Значение F23
[G] => Значение G23
[H] => Значение H23
[I] => Значение I23
[J] => Значение J23
[K] => Значение K23
[L] => Значение L23
[M] => Значение M23
)
[24] => Array
(
[A] => Значение А24
[B] => Значение В24
[C] => Значение С24
[D] => Значение D24
[E] => Значение E24
[F] => Значение F24
[G] => Значение G24
[H] => Значение H24
[I] => Значение I24
[J] => Значение J24
[K] => Значение K24
[L] => Значение L24
[M] => Значение M24
)
[25] => Array
(
[A] => Значение А25
[B] => Значение В25
[C] => Значение С25
[D] => Значение D25
[E] => Значение E25
[F] => Значение F25
[G] => Значение G25
[H] => Значение H25
[I] => Значение I25
[J] => Значение J25
[K] => Значение K25
[L] => Значение L25
[M] => Значение M25
)
[26] => Array
(
[A] => Значение А26
[B] => Значение В26
[C] => Значение С26
[D] => Значение D26
[E] => Значение E26
[F] => Значение F26
[G] => Значение G26
[H] => Значение H26
[I] => Значение I26
[J] => Значение J26
[K] => Значение K26
[L] => Значение L26
[M] => Значение M26
)
[27] => Array
(
[A] => Значение А27
[B] => Значение В27
[C] => Значение С27
[D] => Значение D27
[E] => Значение E27
[F] => Значение F27
[G] => Значение G27
[H] => Значение H27
[I] => Значение I27
[J] => Значение J27
[K] => Значение K27
[L] => Значение L27
[M] => Значение M27
)
[28] => Array
(
[A] => Значение А28
[B] => Значение В28
[C] => Значение С28
[D] => Значение D28
[E] => Значение E28
[F] => Значение F28
[G] => Значение G28
[H] => Значение H28
[I] => Значение I28
[J] => Значение J28
[K] => Значение K28
[L] => Значение L28
[M] => Значение M28
)
[29] => Array
(
[A] => Значение А29
[B] => Значение В29
[C] => Значение С29
[D] => Значение D29
[E] => Значение E29
[F] => Значение F29
[G] => Значение G29
[H] => Значение H29
[I] => Значение I29
[J] => Значение J29
[K] => Значение K29
[L] => Значение L29
[M] => Значение M29
)
[30] => Array
(
[A] => Значение А30
[B] => Значение В30
[C] => Значение С30
[D] => Значение D30
[E] => Значение E30
[F] => Значение F30
[G] => Значение G30
[H] => Значение H30
[I] => Значение I30
[J] => Значение J30
[K] => Значение K30
[L] => Значение L30
[M] => Значение M30
)
)
В итоге все достаточно просто, каждая линия будет соответствовать номеру многомерного массива, где именами ключей будут выступать колонки их excel файла.

About
In this code snippet, we’ll learn how to read and write excel files in PHP.
We will use the PHPSpreadsheet library to read/write Excel files and we’ll learn how to read cells, find a specific string in a row or column, write to cells, set cell styling and formatting(like setting the border, background color, etc) and we’ll see how to insert images.
Let’s see how to do it in the example below.
Installing PHPSpreadsheet:
Install PHPSpreadsheet using Composer by opening your project directory in cmd and running this:
composer require phpoffice/phpspreadsheet
If you don’t know what Composer is or how to use it check out this post I made.
Note:
You might have to enable the gd PHP extension for this to work. I first got this error:
Problem 1
– Root composer.json requires phpoffice/phpspreadsheet ^1.18 -> satisfiable by phpoffice/phpspreadsheet[1.18.0].
– phpoffice/phpspreadsheet 1.18.0 requires ext-gd * -> it is missing from your system. Install or enable PHP’s gd extension.
FIX: If you are using XAMPP like I am open up your php.ini file and add this: extension=gd to the bottom of it. Then save the file and restart the Apache webserver and try to install the package again.
Reading Excel Files Code:
ReadExcel.php
<?php

//Include the dependencies using Composer.
require_once(dirname(__FILE__) ."\vendor\autoload.php");
require_once(dirname(__FILE__) ."\helperFunctions.php");


//Setup Excel reader///////////////////////////////////////////

//File to be read.
$inputFileName = dirname(__FILE__) . "\readme.xlsx";
$sheetname = "First Sheet";

//Make a new instance of the Xlsx rader.
$reader = new PhpOfficePhpSpreadsheetReaderXlsx();
//Load the excel file to be read.
$spreadsheet = $reader->load($inputFileName);
//Get the sheet by name.
$sheet = $spreadsheet->getSheetByName($sheetname);

///////////////////////////////////////////////////////////////


//Reading file/////////////////////////////////////////////////

//The row number of the header.
$columnNameRow = 1;
//The row number where our data starts.
$dataRow = $columnNameRow+1;

//If you don't know the exact column number you search for it with this helper function.
$column = findColumn($sheet, "greetings", $columnNameRow);
//Or if you need to search the rows:
//$row = findRow($sheet, "text to find", $column);

//Data array that will store the read data.
$readSheetData = [];

//Read rows until an empty one is hit.
$currentCellData = "/";
for($i = $dataRow; $currentCellData != ""; $i++){
    //Get cell data.
    $currentCellData = $sheet->getCellByColumnAndRow($column, $i)->getCalculatedValue();
    //If data is present add it to the data array.
    if($currentCellData != null)
        $readSheetData[] = $currentCellData;
}

//Display data array.
foreach($readSheetData as $item)
    echo $item . "<br>";

////////////////////////////////////////////////////////////////
HelperFunctions.php
<?php

//Helper functions//////////////////////////////////////////////

function findColumn($spreadsheet, $word, $row){
    $column = 1;
    $cellContent = $spreadsheet->getCellByColumnAndRow($column, $row)->getValue();

    while($cellContent != $word){
        $column++;
        $cellContent = $spreadsheet->getCellByColumnAndRow($column, $row)->getValue();
    }

    return $column;
}

function findRow($spreadsheet, $word, $column){
    $row = 1;
    $cellContent = $spreadsheet->getCellByColumnAndRow($column, $row)->getValue();

    while($cellContent != $word) {
        $row++;
        $cellContent = $spreadsheet->getCellByColumnAndRow($column, $row)->getValue();
    }

    return $row;
}

////////////////////////////////////////////////////////////////
Resulting Output:
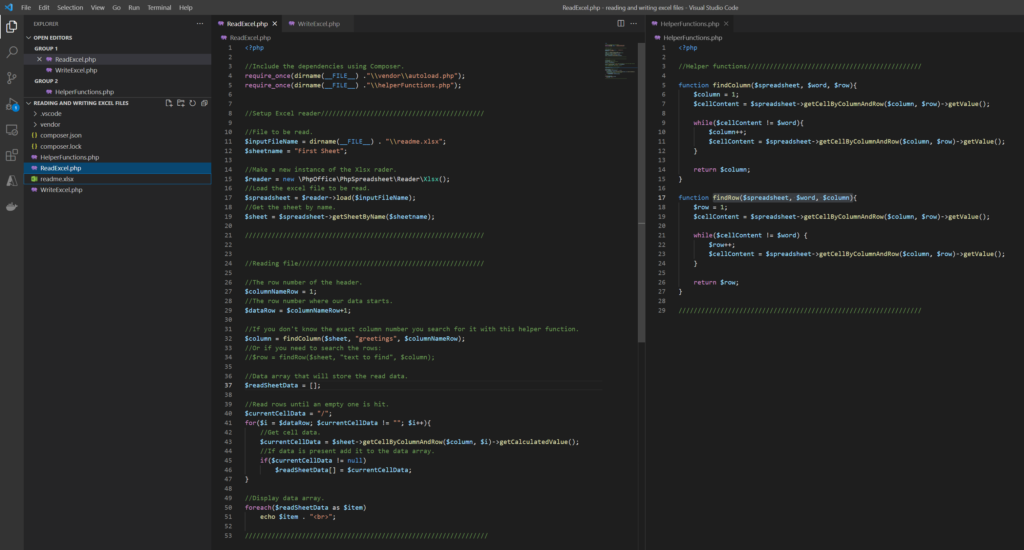
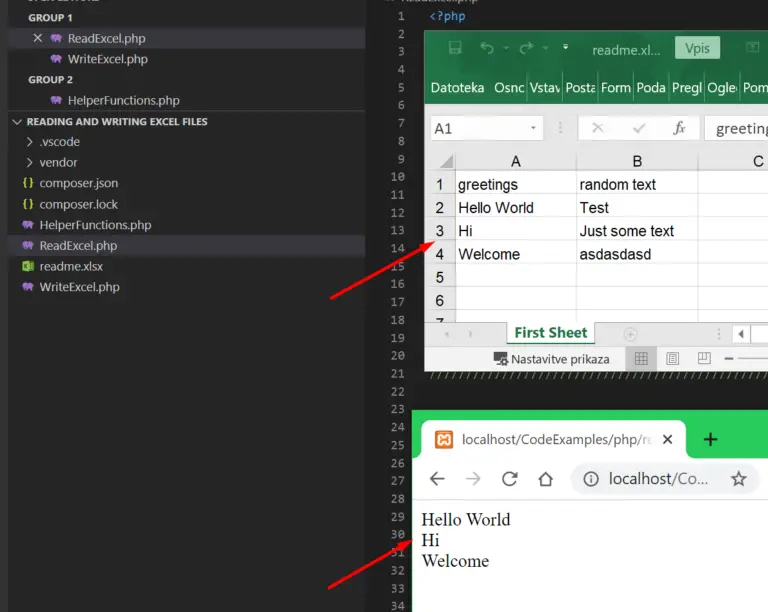
Writing Excel Files Code:
WriteExcel.php
<?php

//Include the dependencies using Composer.
require_once(dirname(__FILE__) ."\vendor\autoload.php");

use PhpOfficePhpSpreadsheetSpreadsheet;
use PhpOfficePhpSpreadsheetWriterXlsx;
use PhpOfficePhpSpreadsheetWriterDrawing;


//Setup Excel writer////////////////////////////////////////////

//File to be read.
$inputFileName = dirname(__FILE__) . "readme.xlsx";
$sheetname = "First Sheet";

//Make a new spreadsheet.
$spreadsheet = new Spreadsheet();
//Get active sheet.
$sheet = $spreadsheet->getActiveSheet();
//Set sheet name.
$sheet->setTitle('Data');

////////////////////////////////////////////////////////////////


//Writing file//////////////////////////////////////////////////

$dataToWrite1 = [ 15465, 532185, 2566, 54886 ];
$dataToWrite2 = [ 5694, 56964, 321789, 45623 ];

//Make header(optional).
$sheet->setCellValue('A1', "Data Set 1");
$sheet->setCellValue('B1', "Data Set 2");
//Make a bottom border(optional).
$sheet->getStyle('A1:B1')->getBorders()->getBottom()->setBorderStyle(PhpOfficePhpSpreadsheetStyleBorder::BORDER_THIN);
//Set header background color(optional).
$sheet->getStyle('A1:B1')->getFill()->setFillType(PhpOfficePhpSpreadsheetStyleFill::FILL_SOLID)->getStartColor()->setRGB('d2d3d1');
//Set text bold.
$sheet->getStyle("A1:B1")->getFont()->setBold(true);
//Set auto resize(optional).
$sheet->getColumnDimension('A')->setAutoSize(true);

//For more styling/formatting info. check out the official documentation: https://phpspreadsheet.readthedocs.io/en/latest/

//Write data 1.
$i = 2;
foreach($dataToWrite1 as $item){
    //Write value into cell.
    $sheet->setCellValue('A'.$i, $item);
    //Set cell alignment(optional).
    $sheet->getStyle('A'.$i)->getAlignment()->setHorizontal(PhpOfficePhpSpreadsheetStyleAlignment::HORIZONTAL_CENTER);

    $i++;
}

//Write data 2.
$i = 2;
foreach($dataToWrite2 as $item){
    //Write value into cell.
    $sheet->setCellValue('B'.$i, $item);
    //Set cell alignment(optional).
    $sheet->getStyle('B'.$i)->getAlignment()->setHorizontal(PhpOfficePhpSpreadsheetStyleAlignment::HORIZONTAL_CENTER);

    $i++;
}

//Adding an image.

//Create drawing.
$objDrawing = new PhpOfficePhpSpreadsheetWorksheetMemoryDrawing();


//Get image path.
$imgPathName = dirname(__FILE__) . "\PHP Reading And Writing Excel Files.jpg";

//Create gdImage from image.
$gdImage = imagecreatefromjpeg($imgPathName);
//Set gdImage as a property to drawing.
$objDrawing->setImageResource($gdImage);

//Set drawing properties.
$objDrawing->setName('Thumbnail');
$objDrawing->setDescription('PHP Reading And Writing Excel Files');
//Set file type.
$objDrawing->setRenderingFunction(PhpOfficePhpSpreadsheetWorksheetMemoryDrawing::RENDERING_JPEG);
$objDrawing->setMimeType(PhpOfficePhpSpreadsheetWorksheetMemoryDrawing::MIMETYPE_DEFAULT);

//Set position.
$objDrawing->setCoordinates('D1');
//Set position offset.
$objDrawing->setOffsetX(50);
$objDrawing->setOffsetY(50);
//Set width and height.
$objDrawing->setWidth(400);
$objDrawing->setHeight(100);

$objDrawing->setWorksheet($sheet);

//Write excel file.
$savePath = dirname(__FILE__);

$writer = new Xlsx($spreadsheet);
$writer->save($savePath . "\New File.xlsx");

////////////////////////////////////////////////////////////////
Resulting Output:
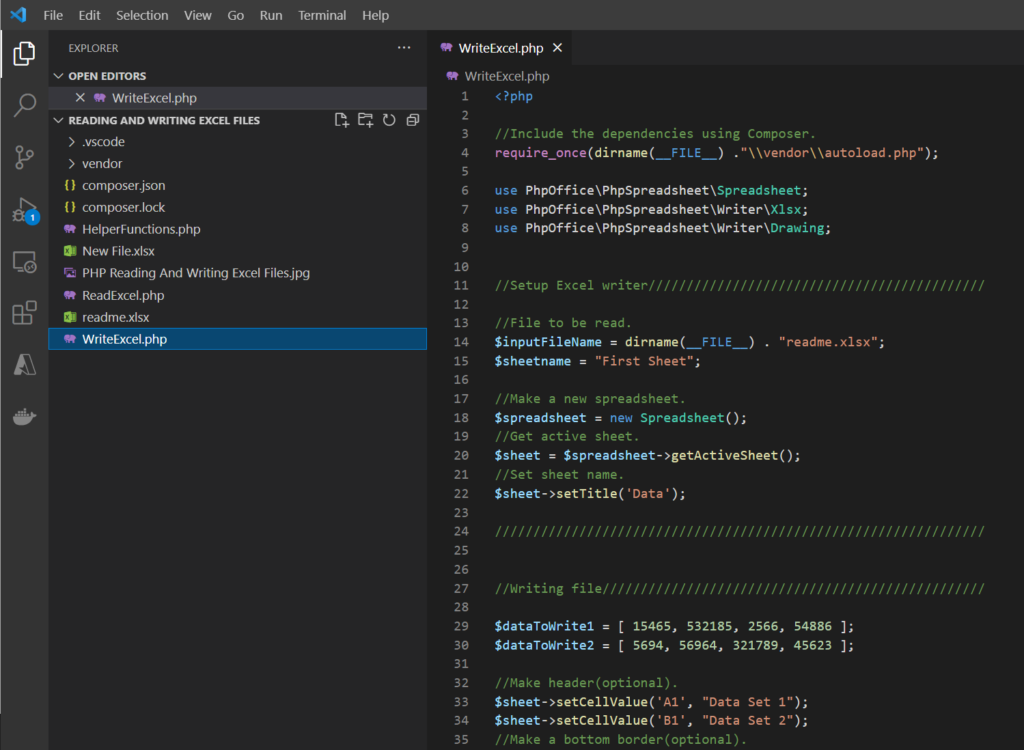
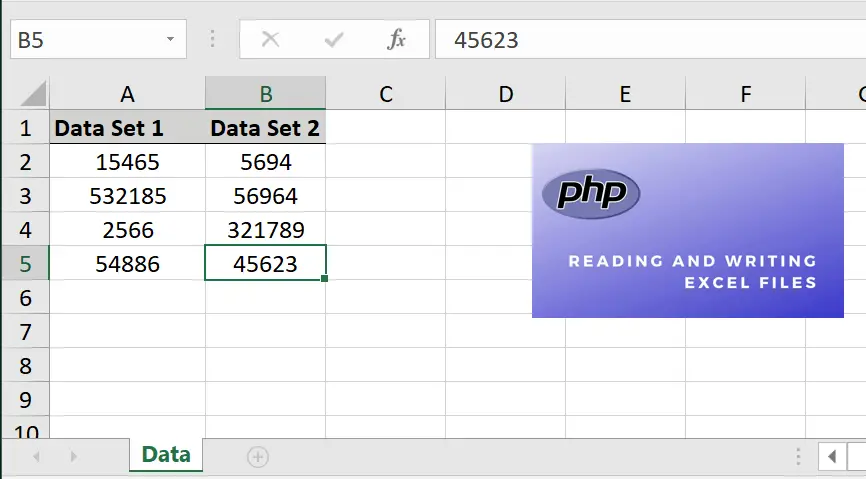
Related Posts:
 report this ad