
Время на прочтение
16 мин
Количество просмотров 54K
Задача обработки документов в формате docx, а также таблиц xlsx и презентаций pptx является весьма нетривиальной. В этой статье расскажу как научиться парсить, создавать и обрабатывать такие документы используя только XSLT и ZIP архиватор.
Зачем?
docx — самый популярный формат документов, поэтому задача отдавать информацию пользователю в этом формате всегда может возникнуть. Один из вариантов решения этой проблемы — использование готовой библиотеки, может не подходить по ряду причин:
- библиотеки может просто не существовать
- в проекте не нужен ещё один чёрный ящик
- ограничения библиотеки по платформам и т.п.
- проблемы с лицензированием
- скорость работы
Поэтому в этой статье будем использовать только самые базовые инструменты для работы с docx документом.
Структура docx
Для начала разоберёмся с тем, что собой представляет docx документ. docx это zip архив который физически содержит 2 типа файлов:
- xml файлы с расширениями
xmlиrels - медиа файлы (изображения и т.п.)
А логически — 3 вида элементов:
- Типы (Content Types) — список типов медиа файлов (например png) встречающихся в документе и типов частей документов (например документ, верхний колонтитул).
- Части (Parts) — отдельные части документа, для нашего документа это document.xml, сюда входят как xml документы так и медиа файлы.
- Связи (Relationships) идентифицируют части документа для ссылок (например связь между разделом документа и колонтитулом), а также тут определены внешние части (например гиперссылки).
Они подробно описаны в стандарте ECMA-376: Office Open XML File Formats, основная часть которого — PDF документ на 5000 страниц, и ещё 2000 страниц бонусного контента.
Минимальный docx
Простейший docx после распаковки выглядит следующим образом
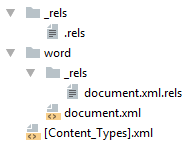
Давайте посмотрим из чего он состоит.
[Content_Types].xml
Находится в корне документа и перечисляет MIME типы содержимого документа:
<Types xmlns="http://schemas.openxmlformats.org/package/2006/content-types">
    <Default Extension="rels" ContentType="application/vnd.openxmlformats-package.relationships+xml"/>
    <Default Extension="xml" ContentType="application/xml"/>
    <Override PartName="/word/document.xml"
              ContentType="application/vnd.openxmlformats-officedocument.wordprocessingml.document.main+xml"/>
</Types>
_rels/.rels
Главный список связей документа. В данном случае определена всего одна связь — сопоставление с идентификатором rId1 и файлом word/document.xml — основным телом документа.
<Relationships xmlns="http://schemas.openxmlformats.org/package/2006/relationships">
    <Relationship
        Id="rId1"
        Type="http://schemas.openxmlformats.org/officeDocument/2006/relationships/officeDocument"
        Target="word/document.xml"/>
</Relationships>
word/document.xml
Основное содержимое документа.
word/document.xml
<w:document xmlns:wpc="http://schemas.microsoft.com/office/word/2010/wordprocessingCanvas"
            xmlns:mc="http://schemas.openxmlformats.org/markup-compatibility/2006"
            xmlns:o="urn:schemas-microsoft-com:office:office"
            xmlns:r="http://schemas.openxmlformats.org/officeDocument/2006/relationships"
            xmlns:m="http://schemas.openxmlformats.org/officeDocument/2006/math"
            xmlns:v="urn:schemas-microsoft-com:vml"
            xmlns:wp14="http://schemas.microsoft.com/office/word/2010/wordprocessingDrawing"
            xmlns:wp="http://schemas.openxmlformats.org/drawingml/2006/wordprocessingDrawing"
            xmlns:w10="urn:schemas-microsoft-com:office:word"
            xmlns:w="http://schemas.openxmlformats.org/wordprocessingml/2006/main"
            xmlns:w14="http://schemas.microsoft.com/office/word/2010/wordml"
            xmlns:wpg="http://schemas.microsoft.com/office/word/2010/wordprocessingGroup"
            xmlns:wpi="http://schemas.microsoft.com/office/word/2010/wordprocessingInk"
            xmlns:wne="http://schemas.microsoft.com/office/word/2006/wordml"
            xmlns:wps="http://schemas.microsoft.com/office/word/2010/wordprocessingShape"
            mc:Ignorable="w14 wp14">
    <w:body>
        <w:p w:rsidR="005F670F" w:rsidRDefault="005F79F5">
            <w:r>
                <w:t>Test</w:t>
            </w:r>
            <w:bookmarkStart w:id="0" w:name="_GoBack"/>
            <w:bookmarkEnd w:id="0"/>
        </w:p>
        <w:sectPr w:rsidR="005F670F">
            <w:pgSz w:w="12240" w:h="15840"/>
            <w:pgMar w:top="1440" w:right="1440" w:bottom="1440" w:left="1440"
                     w:header="720" w:footer="720" w:gutter="0"/>
            <w:cols w:space="720"/>
            <w:docGrid w:linePitch="360"/>
        </w:sectPr>
    </w:body>
</w:document>
Здесь:
<w:document>— сам документ<w:body>— тело документа<w:p>— параграф<w:r>— run (фрагмент) текста<w:t>— сам текст<w:sectPr>— описание страницы
Если открыть этот документ в текстовом редакторе, то увидим документ из одного слова Test.
word/_rels/document.xml.rels
Здесь содержится список связей части word/document.xml. Название файла связей создаётся из названия части документа к которой он относится и добавления к нему расширения rels. Папка с файлом связей называется _rels и находится на том же уровне, что и часть к которой он относится. Так как связей в word/document.xml никаких нет то и в файле пусто:
<Relationships xmlns="http://schemas.openxmlformats.org/package/2006/relationships">
</Relationships>
Даже если связей нет, этот файл должен существовать.
docx и Microsoft Word
docx созданный с помощью Microsoft Word, да в принципе и с помощью любого другого редактора имеет несколько дополнительных файлов.
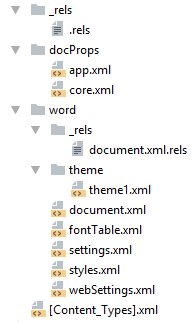
Вот что в них содержится:
docProps/core.xml— основные метаданные документа согласно Open Packaging Conventions и Dublin Core [1], [2].docProps/app.xml— общая информация о документе: количество страниц, слов, символов, название приложения в котором был создан документ и т.п.word/settings.xml— настройки относящиеся к текущему документу.word/styles.xml— стили применимые к документу. Отделяют данные от представления.word/webSettings.xml— настройки отображения HTML частей документа и настройки того, как конвертировать документ в HTML.word/fontTable.xml— список шрифтов используемых в документе.word/theme1.xml— тема (состоит из цветовой схемы, шрифтов и форматирования).
В сложных документах частей может быть гораздо больше.
Реверс-инжиниринг docx
Итак, первоначальная задача — узнать как какой-либо фрагмент документа хранится в xml, чтобы потом создавать (или парсить) подобные документы самостоятельно. Для этого нам понадобятся:
- Архиватор zip
- Библиотека для форматирования XML (Word выдаёт XML без отступов, одной строкой)
- Средство для просмотра diff между файлами, я буду использовать git и TortoiseGit
Инструменты
- Под Windows: zip, unzip, libxml2, git, TortoiseGit
- Под Linux:
apt-get install zip unzip libxml2 libxml2-utils git
Также понадобятся скрипты для автоматического (раз)архивирования и форматирования XML.
Использование под Windows:
unpack file dir— распаковывает документfileв папкуdirи форматирует xmlpack dir file— запаковывает папкуdirв документfile
Использование под Linux аналогично, только ./unpack.sh вместо unpack, а pack становится ./pack.sh.
Использование
Поиск изменений происходит следующим образом:
- Создаём пустой docx файл в редакторе.
- Распаковываем его с помощью
unpackв новую папку. - Коммитим новую папку.
- Добавляем в файл из п. 1. изучаемый элемент (гиперссылку, таблицу и т.д.).
- Распаковываем изменённый файл в уже существующую папку.
- Изучаем diff, убирая ненужные изменения (перестановки связей, порядок пространств имён и т.п.).
- Запаковываем папку и проверяем что получившийся файл открывается.
- Коммитим изменённую папку.
Пример 1. Выделение текста жирным
Посмотрим на практике, как найти тег который определяет форматирование текста жирным шрифтом.
- Создаём документ
bold.docxс обычным (не жирным) текстом Test. - Распаковываем его:
unpack bold.docx bold. - Коммитим результат.
- Выделяем текст Test жирным.
- Распаковываем
unpack bold.docx bold. - Изначально diff выглядел следующим образом:
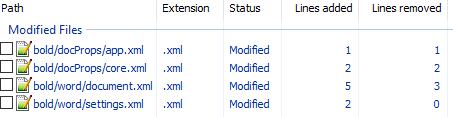
Рассмотрим его подробно:
docProps/app.xml
@@ -1,9 +1,9 @@
-  <TotalTime>0</TotalTime>
+  <TotalTime>1</TotalTime>
Изменение времени нам не нужно.
docProps/core.xml
@@ -4,9 +4,9 @@
-  <cp:revision>1</cp:revision>
+  <cp:revision>2</cp:revision>
   <dcterms:created xsi:type="dcterms:W3CDTF">2017-02-07T19:37:00Z</dcterms:created>
-  <dcterms:modified xsi:type="dcterms:W3CDTF">2017-02-07T19:37:00Z</dcterms:modified>
+  <dcterms:modified xsi:type="dcterms:W3CDTF">2017-02-08T10:01:00Z</dcterms:modified>
Изменение версии документа и даты модификации нас также не интересует.
word/document.xml
diff
@@ -1,24 +1,26 @@
    <w:body>
-    <w:p w:rsidR="0076695C" w:rsidRPr="00290C70" w:rsidRDefault="00290C70">
+    <w:p w:rsidR="0076695C" w:rsidRPr="00F752CF" w:rsidRDefault="00290C70">
       <w:pPr>
         <w:rPr>
+          <w:b/>
           <w:lang w:val="en-US"/>
         </w:rPr>
       </w:pPr>
-      <w:r>
+      <w:r w:rsidRPr="00F752CF">
         <w:rPr>
+          <w:b/>
           <w:lang w:val="en-US"/>
         </w:rPr>
         <w:t>Test</w:t>
       </w:r>
       <w:bookmarkStart w:id="0" w:name="_GoBack"/>
       <w:bookmarkEnd w:id="0"/>
     </w:p>
-    <w:sectPr w:rsidR="0076695C" w:rsidRPr="00290C70">
+    <w:sectPr w:rsidR="0076695C" w:rsidRPr="00F752CF">
Изменения в w:rsidR не интересны — это внутренняя информация для Microsoft Word. Ключевое изменение тут
         <w:rPr>
+          <w:b/>
в параграфе с Test. Видимо элемент <w:b/> и делает текст жирным. Оставляем это изменение и отменяем остальные.
word/settings.xml
@@ -1,8 +1,9 @@
+  <w:proofState w:spelling="clean"/>
@@ -17,10 +18,11 @@
+    <w:rsid w:val="00F752CF"/>
Также не содержит ничего относящегося к жирному тексту. Отменяем.
7 Запаковываем папку с 1м изменением (добавлением <w:b/>) и проверяем что документ открывается и показывает то, что ожидалось.
8 Коммитим изменение.
Пример 2. Нижний колонтитул
Теперь разберём пример посложнее — добавление нижнего колонтитула.
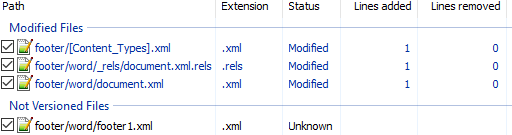
Вот первоначальный коммит. Добавляем нижний колонтитул с текстом 123 и распаковываем документ. Такой diff получается первоначально:

Сразу же исключаем изменения в docProps/app.xml и docProps/core.xml — там тоже самое, что и в первом примере.
[Content_Types].xml
@@ -4,10 +4,13 @@
   <Default Extension="xml" ContentType="application/xml"/>
   <Override PartName="/word/document.xml" ContentType="application/vnd.openxmlformats-officedocument.wordprocessingml.document.main+xml"/>
+  <Override PartName="/word/footnotes.xml" ContentType="application/vnd.openxmlformats-officedocument.wordprocessingml.footnotes+xml"/>
+  <Override PartName="/word/endnotes.xml" ContentType="application/vnd.openxmlformats-officedocument.wordprocessingml.endnotes+xml"/>
+  <Override PartName="/word/footer1.xml" ContentType="application/vnd.openxmlformats-officedocument.wordprocessingml.footer+xml"/>
footer явно выглядит как то, что нам нужно, но что делать с footnotes и endnotes? Являются ли они обязательными при добавлении нижнего колонтитула или их создали заодно? Ответить на этот вопрос не всегда просто, вот основные пути:
- Посмотреть, связаны ли изменения друг с другом
- Экспериментировать
- Ну а если совсем не понятно что происходит:

Идём пока что дальше.
word/_rels/document.xml.rels
Изначально diff выглядит вот так:
diff
@@ -1,8 +1,11 @@
 <?xml version="1.0" encoding="UTF-8" standalone="yes"?>
 <Relationships xmlns="http://schemas.openxmlformats.org/package/2006/relationships">
+  <Relationship Id="rId5" Type="http://schemas.openxmlformats.org/officeDocument/2006/relationships/theme" Target="theme/theme1.xml"/>
   <Relationship Id="rId3" Type="http://schemas.openxmlformats.org/officeDocument/2006/relationships/webSettings" Target="webSettings.xml"/>
+  <Relationship Id="rId4" Type="http://schemas.openxmlformats.org/officeDocument/2006/relationships/fontTable" Target="fontTable.xml"/>
   <Relationship Id="rId2" Type="http://schemas.openxmlformats.org/officeDocument/2006/relationships/settings" Target="settings.xml"/>
   <Relationship Id="rId1" Type="http://schemas.openxmlformats.org/officeDocument/2006/relationships/styles" Target="styles.xml"/>
-  <Relationship Id="rId5" Type="http://schemas.openxmlformats.org/officeDocument/2006/relationships/theme" Target="theme/theme1.xml"/>
-  <Relationship Id="rId4" Type="http://schemas.openxmlformats.org/officeDocument/2006/relationships/fontTable" Target="fontTable.xml"/>
+  <Relationship Id="rId6" Type="http://schemas.openxmlformats.org/officeDocument/2006/relationships/footer" Target="footer1.xml"/>
+  <Relationship Id="rId7" Type="http://schemas.openxmlformats.org/officeDocument/2006/relationships/endnotes" Target="endnotes.xml"/>
+  <Relationship Id="rId8" Type="http://schemas.openxmlformats.org/officeDocument/2006/relationships/footnotes" Target="footnotes.xml"/>
 </Relationships>
Видно, что часть изменений связана с тем, что Word изменил порядок связей, уберём их:
@@ -3,6 +3,9 @@
+  <Relationship Id="rId6" Type="http://schemas.openxmlformats.org/officeDocument/2006/relationships/footer" Target="footer1.xml"/>
+  <Relationship Id="rId7" Type="http://schemas.openxmlformats.org/officeDocument/2006/relationships/endnotes" Target="endnotes.xml"/>
+  <Relationship Id="rId8" Type="http://schemas.openxmlformats.org/officeDocument/2006/relationships/footnotes" Target="footnotes.xml"/>
Опять появляются footer, footnotes, endnotes. Все они связаны с основным документом, перейдём к нему:
word/document.xml
@@ -15,10 +15,11 @@
       </w:r>
       <w:bookmarkStart w:id="0" w:name="_GoBack"/>
       <w:bookmarkEnd w:id="0"/>
     </w:p>
     <w:sectPr w:rsidR="0076695C" w:rsidRPr="00290C70">
+      <w:footerReference w:type="default" r:id="rId6"/>
       <w:pgSz w:w="11906" w:h="16838"/>
       <w:pgMar w:top="1134" w:right="850" w:bottom="1134" w:left="1701" w:header="708" w:footer="708" w:gutter="0"/>
       <w:cols w:space="708"/>
       <w:docGrid w:linePitch="360"/>
     </w:sectPr>
Редкий случай когда есть только нужные изменения. Видна явная ссылка на footer из sectPr. А так как ссылок в документе на footnotes и endnotes нет, то можно предположить что они нам не понадобятся.
word/settings.xml
diff
@@ -1,19 +1,30 @@
 <?xml version="1.0" encoding="UTF-8" standalone="yes"?>
 <w:settings xmlns:mc="http://schemas.openxmlformats.org/markup-compatibility/2006" xmlns:o="urn:schemas-microsoft-com:office:office" xmlns:r="http://schemas.openxmlformats.org/officeDocument/2006/relationships" xmlns:m="http://schemas.openxmlformats.org/officeDocument/2006/math" xmlns:v="urn:schemas-microsoft-com:vml" xmlns:w10="urn:schemas-microsoft-com:office:word" xmlns:w="http://schemas.openxmlformats.org/wordprocessingml/2006/main" xmlns:w14="http://schemas.microsoft.com/office/word/2010/wordml" xmlns:w15="http://schemas.microsoft.com/office/word/2012/wordml" xmlns:sl="http://schemas.openxmlformats.org/schemaLibrary/2006/main" mc:Ignorable="w14 w15">
   <w:zoom w:percent="100"/>
+  <w:proofState w:spelling="clean"/>
   <w:defaultTabStop w:val="708"/>
   <w:characterSpacingControl w:val="doNotCompress"/>
+  <w:footnotePr>
+    <w:footnote w:id="-1"/>
+    <w:footnote w:id="0"/>
+  </w:footnotePr>
+  <w:endnotePr>
+    <w:endnote w:id="-1"/>
+    <w:endnote w:id="0"/>
+  </w:endnotePr>
   <w:compat>
     <w:compatSetting w:name="compatibilityMode" w:uri="http://schemas.microsoft.com/office/word" w:val="15"/>
     <w:compatSetting w:name="overrideTableStyleFontSizeAndJustification" w:uri="http://schemas.microsoft.com/office/word" w:val="1"/>
     <w:compatSetting w:name="enableOpenTypeFeatures" w:uri="http://schemas.microsoft.com/office/word" w:val="1"/>
     <w:compatSetting w:name="doNotFlipMirrorIndents" w:uri="http://schemas.microsoft.com/office/word" w:val="1"/>
     <w:compatSetting w:name="differentiateMultirowTableHeaders" w:uri="http://schemas.microsoft.com/office/word" w:val="1"/>
   </w:compat>
   <w:rsids>
     <w:rsidRoot w:val="00290C70"/>
+    <w:rsid w:val="000A7B7B"/>
+    <w:rsid w:val="001B0DE6"/>
А вот и появились ссылки на footnotes, endnotes добавляющие их в документ.
word/styles.xml
diff
@@ -480,6 +480,50 @@
       <w:rFonts w:ascii="Times New Roman" w:hAnsi="Times New Roman"/>
       <w:b/>
       <w:sz w:val="28"/>
     </w:rPr>
   </w:style>
+  <w:style w:type="paragraph" w:styleId="a4">
+    <w:name w:val="header"/>
+    <w:basedOn w:val="a"/>
+    <w:link w:val="a5"/>
+    <w:uiPriority w:val="99"/>
+    <w:unhideWhenUsed/>
+    <w:rsid w:val="000A7B7B"/>
+    <w:pPr>
+      <w:tabs>
+        <w:tab w:val="center" w:pos="4677"/>
+        <w:tab w:val="right" w:pos="9355"/>
+      </w:tabs>
+      <w:spacing w:after="0" w:line="240" w:lineRule="auto"/>
+    </w:pPr>
+  </w:style>
+  <w:style w:type="character" w:customStyle="1" w:styleId="a5">
+    <w:name w:val="Верхний колонтитул Знак"/>
+    <w:basedOn w:val="a0"/>
+    <w:link w:val="a4"/>
+    <w:uiPriority w:val="99"/>
+    <w:rsid w:val="000A7B7B"/>
+  </w:style>
+  <w:style w:type="paragraph" w:styleId="a6">
+    <w:name w:val="footer"/>
+    <w:basedOn w:val="a"/>
+    <w:link w:val="a7"/>
+    <w:uiPriority w:val="99"/>
+    <w:unhideWhenUsed/>
+    <w:rsid w:val="000A7B7B"/>
+    <w:pPr>
+      <w:tabs>
+        <w:tab w:val="center" w:pos="4677"/>
+        <w:tab w:val="right" w:pos="9355"/>
+      </w:tabs>
+      <w:spacing w:after="0" w:line="240" w:lineRule="auto"/>
+    </w:pPr>
+  </w:style>
+  <w:style w:type="character" w:customStyle="1" w:styleId="a7">
+    <w:name w:val="Нижний колонтитул Знак"/>
+    <w:basedOn w:val="a0"/>
+    <w:link w:val="a6"/>
+    <w:uiPriority w:val="99"/>
+    <w:rsid w:val="000A7B7B"/>
+  </w:style>
 </w:styles>
Изменения в стилях нас интересуют только если мы ищем как поменять стиль. В данном случае это изменение можно убрать.
Посмотрим теперь собственно на сам нижний колонтитул (часть пространств имён опущена для читабельности, но в документе они должны быть):
<w:ftr xmlns:w="http://schemas.openxmlformats.org/wordprocessingml/2006/main">
  <w:p w:rsidR="000A7B7B" w:rsidRDefault="000A7B7B">
    <w:pPr>
      <w:pStyle w:val="a6"/>
    </w:pPr>
    <w:r>
      <w:t>123</w:t>
    </w:r>
  </w:p>
</w:ftr>
Тут виден текст 123. Единственное, что надо исправить — убрать ссылку на <w:pStyle w:val="a6"/>.
В результате анализа всех изменений делаем следующие предположения:
- footnotes и endnotes не нужны
- В
[Content_Types].xmlнадо добавить footer - В
word/_rels/document.xml.relsнадо добавить ссылку на footer - В
word/document.xmlв тег<w:sectPr>надо добавить<w:footerReference>
Уменьшаем diff до этого набора изменений:
Затем запаковываем документ и открываем его.
Если всё сделано правильно, то документ откроется и в нём будет нижний колонтитул с текстом 123. А вот и итоговый коммит.
Таким образом процесс поиска изменений сводится к поиску минимального набора изменений, достаточного для достижения заданного результата.
Практика
Найдя интересующее нас изменение, логично перейти к следующему этапу, это может быть что-либо из:
- Создания docx
- Парсинг docx
- Преобразования docx
Тут нам потребуются знания XSLT и XPath.
Давайте напишем достаточно простое преобразование — замену или добавление нижнего колонтитула в существующий документ. Писать я буду на языке Caché ObjectScript, но даже если вы его не знаете — не беда. В основном будем вызовать XSLT и архиватор. Ничего более. Итак, приступим.
Алгоритм
Алгоритм выглядит следующим образом:
- Распаковываем документ.
- Добавляем наш нижний колонтитул.
- Прописываем ссылку на него в
[Content_Types].xmlиword/_rels/document.xml.rels. - В
word/document.xmlв тег<w:sectPr>добавляем тег<w:footerReference>или заменяем в нём ссылку на наш нижний колонтитул. - Запаковываем документ.
Приступим.
Распаковка
В Caché ObjectScript есть возможность выполнять команды ОС с помощью функции $zf(-1, oscommand). Вызовем unzip для распаковки документа с помощью обёртки над $zf(-1):
/// Используя %3 (unzip) распаковать файл %1 в папку %2
Parameter UNZIP = "%3 %1 -d %2";

/// Распаковать архив source в папку targetDir
ClassMethod executeUnzip(source, targetDir) As %Status
{
    set timeout = 100
    set cmd = $$$FormatText(..#UNZIP, source, targetDir, ..getUnzip())
    return ..execute(cmd, timeout)
}
Создаём файл нижнего колонтитула
На вход поступает текст нижнего колонтитула, запишем его в файл in.xml:
<xml>TEST</xml>В XSLT (файл — footer.xsl) будем создавать нижний колонтитул с текстом из тега xml (часть пространств имён опущена, вот полный список):
<xsl:stylesheet
  xmlns:xsl="http://www.w3.org/1999/XSL/Transform"
  xmlns="http://schemas.openxmlformats.org/package/2006/relationships" version="1.0">
    <xsl:output method="xml" omit-xml-declaration="no" indent="yes" standalone="yes"/>
    <xsl:template match="/">

        <w:ftr xmlns:w="http://schemas.openxmlformats.org/wordprocessingml/2006/main">
            <w:p>
                <w:r>
                    <w:rPr>
                        <w:lang w:val="en-US"/>
                    </w:rPr>
                    <w:t>
                        <xsl:value-of select="//xml/text()"/>
                    </w:t>
                </w:r>
            </w:p>
        </w:ftr>
    </xsl:template>
</xsl:stylesheet>
Теперь вызовем XSLT преобразователь:
do ##class(%XML.XSLT.Transformer).TransformFile("in.xml", "footer.xsl", footer0.xml") В результате получится файл нижнего колонтитула footer0.xml:
<w:ftr xmlns:w="http://schemas.openxmlformats.org/wordprocessingml/2006/main">
    <w:p>
        <w:r>
            <w:rPr>
                <w:lang w:val="en-US"/>
            </w:rPr>
            <w:t>TEST</w:t>
        </w:r>
    </w:p>
</w:ftr>
Добавляем ссылку на колонтитул в список связей основного документа
Сссылки с идентификатором rId0 как правило не существует. Впрочем можно использовать XPath для получения идентификатора которого точно не существует.
Добавляем ссылку на footer0.xml c идентификатором rId0 в word/_rels/document.xml.rels:
XSLT
<xsl:stylesheet  xmlns:xsl="http://www.w3.org/1999/XSL/Transform"  xmlns="http://schemas.openxmlformats.org/package/2006/relationships"  version="1.0">
    <xsl:output method="xml" omit-xml-declaration="yes" indent="no"  />
    <xsl:param name="new">
        <Relationship
           Id="rId0"
           Type="http://schemas.openxmlformats.org/officeDocument/2006/relationships/footer"
           Target="footer0.xml"/>
    </xsl:param>

    <xsl:template match="/*">
        <xsl:copy>
            <xsl:copy-of select="$new"/>
            <xsl:copy-of select="@* | node()"/>
        </xsl:copy>
    </xsl:template>
</xsl:stylesheet>
Прописываем ссылки в документе
Далее надо в каждый тег <w:sectPr> добавить тег <w:footerReference> или заменить в нём ссылку на наш нижний колонтитул. Оказалось, что у каждого тега <w:sectPr> может быть 3 тега <w:footerReference> — для первой страницы, четных страниц и всего остального:
XSLT
<xsl:stylesheet xmlns:xsl="http://www.w3.org/1999/XSL/Transform"
xmlns:r="http://schemas.openxmlformats.org/officeDocument/2006/relationships"
xmlns:w="http://schemas.openxmlformats.org/wordprocessingml/2006/main"
version="1.0">
    <xsl:output method="xml" omit-xml-declaration="yes" indent="yes" />
    <xsl:template match="//@* | //node()">
        <xsl:copy>
            <xsl:apply-templates select="@*"/>
            <xsl:apply-templates select="node()"/>
        </xsl:copy>
    </xsl:template>
    <xsl:template match="//w:sectPr">
        <xsl:element name="{name()}" namespace="{namespace-uri()}">
            <xsl:copy-of select="./namespace::*"/>
            <xsl:apply-templates select="@*"/>
            <xsl:copy-of select="./*[local-name() != 'footerReference']"/>
            <w:footerReference w:type="default" r:id="rId0"/>
            <w:footerReference w:type="first" r:id="rId0"/>
            <w:footerReference w:type="even" r:id="rId0"/>
        </xsl:element>
    </xsl:template>
</xsl:stylesheet>
Добавляем колонтитул в [Content_Types].xml
Добавляем в [Content_Types].xml информацию о том, что /word/footer0.xml имеет тип application/vnd.openxmlformats-officedocument.wordprocessingml.footer+xml:
XSLT
<xsl:stylesheet  xmlns:xsl="http://www.w3.org/1999/XSL/Transform"  xmlns="http://schemas.openxmlformats.org/package/2006/content-types"  version="1.0">
    <xsl:output method="xml" omit-xml-declaration="yes" indent="no"  />
    <xsl:param name="new">
        <Override
         PartName="/word/footer0.xml"
         ContentType="application/vnd.openxmlformats-officedocument.wordprocessingml.footer+xml"/>
    </xsl:param>

    <xsl:template match="/*">
        <xsl:copy>
            <xsl:copy-of select="@* | node()"/>
            <xsl:copy-of select="$new"/>
        </xsl:copy>
    </xsl:template>
</xsl:stylesheet>
В результате
Весь код опубликован. Работает он так:
do ##class(Converter.Footer).modifyFooter("in.docx", "out.docx", "TEST")Где:
in.docx— исходный документout.docx— выходящий документTEST— текст, который добавляется в нижний колонтитул
Выводы
Используя только XSLT и ZIP можно успешно работать с документами docx, таблицами xlsx и презентациями pptx.
Открытые вопросы
- Изначально хотел использовать 7z вместо zip/unzip т… к. это одна утилита и она более распространена на Windows. Однако я столкнулся с такой проблемой, что документы запакованные 7z под Linux не открываются в Microsoft Office. Я попробовал достаточно много вариантов вызова, однако положительного результата добиться не удалось.
- Ищу XSD со схемами ECMA-376 версии 5 и комментариями. XSD версии 5 без комментариев доступен к загрузке на сайте ECMA, но без комментариев в нём сложно разобраться. XSD версии 2 с комментариями доступен к загрузке.
Ссылки
- ECMA-376
- Описание docx
- Подробная статья про docx
- Репозиторий со скриптами
- Репозиторий с преобразователем нижнего колонтитула

If you ever had a need to programmatically examine the text in a Microsoft Word document, getting the text out in the first place can be challenging. Sure, you can manually save your document to a plain text file that’s much easier to process, but if you have multiple documents to examine, that can be painful.
Recently I had such a need and found this Toward Data Science article quite helpful. But let’s take the challenge a little further: suppose you had a document with multiple sections and need to pull the text from specific sections.


Let’s suppose I need to pull just the text from the “sub-sections”. In my example, I have three sub-sections: Sub-Section 1, Sub-Section 2, and Sub-Section 3. In my Word document, I’ve styled these headers as “Heading 2” text. Here’s how I went about pull out the text for each of these sections.
Step 1: Import your packages
For my needs, I only need to import zipfile and ElementTree, which is nice as I didn’t need to install any third party packages:
import zipfile
import xml.etree.ElementTree as ET
Step 2: Parse the document XML
doc = zipfile.ZipFile('./data/test.docx').read('word/document.xml')
root = ET.fromstring(doc)
Step 3: Explore the XML for the sections and text you want
You’ll spend most of your time here, trying to figure out what elements hold the contents in which you are interested. The XML of Microsoft documents follows the WordprocessingML standard, which can be quite complicated. I spent a lot of time manually reviewing my XML looking for the elements I needed. You can write out the XML like so:
Step 4: Find all the paragraphs
To solve my problem, I first decided to pull together a collection of all the paragraphs in the document so that I could later iterate across them and make decisions. To make that work a little easier, I also declared a namespace object used by Microsoft’s WordprocessingML standard:
# Microsoft's XML makes heavy use of XML namespaces; thus, we'll need to reference that in our code
ns = {'w': 'http://schemas.openxmlformats.org/wordprocessingml/2006/main'}
body = root.find('w:body', ns)  # find the XML "body" tag
p_sections = body.findall('w:p', ns)  # under the body tag, find all the paragraph sections
It can be helpful to actually see the text in each of these sections. Through researching Microsoft’s XML standard, I know that document text is usually contained in “t” elements. So, if I write an XPath query to find all the “t” elements within a given section, I can join the text of all those elements together to get the full text of the paragraph. This code does that:
for p in p_sections:
    text_elems = p.findall('.//w:t', ns)
    print(''.join([t.text for t in text_elems]))
    print()
Step 5: Find all the “Heading 2” sections
Now, let’s iterate through each paragraph section and see if we can figure out which sections have been styled with “Heading 2”. If we can find those Heading 2 sections, we’ll then know that the subsequent text is the text we need.
Through researching more the XML standard, I found that if I search for pStyle elements that contain the value “Heading2”, these will be the sections I’m after. To make my code a little cleaner, I wrote functions to both evaluate each section for the Heading 2 style and extract the full text of the section:
def is_heading2_section(p):
    """Returns True if the given paragraph section has been styled as a Heading2"""
    return_val = False
    heading_style_elem = p.find(".//w:pStyle[@w:val='Heading2']", ns)
    if heading_style_elem is not None:
        return_val = True
    return return_val


def get_section_text(p):
    """Returns the joined text of the text elements under the given paragraph tag"""
    return_val = ''
    text_elems = p.findall('.//w:t', ns)
    if text_elems is not None:
        return_val = ''.join([t.text for t in text_elems])
    return return_val


section_labels = [get_section_text(s) if is_heading2_section(s) else '' for s in p_sections]
Now, if I print out my section_labels list, I see this:

Step 6: Finally, extract the Heading 2 headers and subsequent text
Now, I can use simple list comprehension to glue together both the section headers and associated text of the three sub-sections I’m after:
section_text = [{'title': t, 'text': get_section_text(p_sections[i+1])} for i, t in enumerate(section_labels) if len(t) > 0]
And that list looks like this:

You can download my code here.
В процессе анализа информации часто возникает потребность в обработке данных из документов в форматах MS Word или Excel. Как считывать информации из таких файлов с использованием языка C #.
Из практического опыта сотрудника, который всегда успешно решает поставленные задачи.
Для работы с файлами Word и Excel я решил выбрать библиотеки Microsoft.Office.Interop.Word и Microsoft.Office.Interop.Excel, предоставляющие программные интерфейсы для взаимодействия с объектами MS Word и Excel.
Преимущества использования этих библиотек:
- созданы корпорацией Microsoft, следовательно, взаимодействие с объектами программ пакета MS Office реализовано наиболее оптимально,
- нужный пакет Visual Studio Tool for Office поставляется вместе с Visual Studio (достаточно отметить его при установке VS).
Также следует заметить, что у такого похода есть и недостаток: для того, чтобы написанная программа работала на ПК пользователя необходимо, чтобы на нём были установлены программы MS Office и MS Excel. Поэтому такой подход плохо подходит для серверных решений. Также такая программа не будет являться кроссплатформенной.
Добавление библиотек в проект Visual Studio
Библиотеки поставляются вместе с пакетом Visual Studio Tool for Office (платформа .NET Framework).
Для использования библиотеки нужно:
- добавить ссылку на неё: в обозревателе решений необходимо кликнуть правой кнопкой мыши по пункту Ссылки (Рис. 1) и найти нужную библиотеку по ключевым словам (после добавления ссылка появится в списке),
- указать используемое пространство имён в файле программы (в примере ему назначен алиас Word): (Рис. 2):
Можно прочитать основные форматы: .doc,. docx,. rtf.
Ниже приведён листинг с примером считывания текста из документа MS Word:
object FileName = @»C:test.doc»;
object rOnly = true;
object SaveChanges = false;
object MissingObj = System.Reflection.Missing.Value;
Word.Application app = new Word.Application();
Word.Document doc = null;
Word.Range range = null;
try
{
doc = app.Documents.Open(ref FileName, ref MissingObj, ref rOnly, ref MissingObj,
ref MissingObj, ref MissingObj, ref MissingObj, ref MissingObj,
ref MissingObj, ref MissingObj, ref MissingObj, ref MissingObj,
ref MissingObj, ref MissingObj, ref MissingObj, ref MissingObj);
object StartPosition = 0;
object EndPositiojn = doc.Characters.Count;
range = doc.Range(ref StartPosition, ref EndPositiojn);
// Получение основного текста со страниц (без учёта сносок и колонтитулов)
string MainText = (range == null || range.Text == null) ? null : range.Text;
if (MainText != null)
{
/* Обработка основного текста документа*/
}
// Получение текста из нижних и верхних колонтитулов
foreach (Word.Section section in doc.Sections)
{
// Нижние колонтитулы
foreach (Word.HeaderFooter footer in section.Footers)
{
string FooterText = (footer.Range == null || footer.Range.Text == null) ? null : footer.Range.Text;
if (FooterText != null)
{
/* Обработка текста */
}
}
// Верхние колонтитулы
foreach (Word.HeaderFooter header in section.Headers)
{
string HeaderText = (header.Range == null || header.Range.Text == null) ? null : header.Range.Text;
if (HeaderText != null)
{
/* Обработка текста */
}
}
}
// Получение текста сносок
if (doc.Footnotes.Count != 0)
{
foreach (Word.Footnote footnote in doc.Footnotes)
{
string FooteNoteText = (footnote.Range == null || footnote.Range.Text == null) ? null : footnote.Range.Text;
if (FooteNoteText != null)
{
/* Обработка текста */
}
}
}
} catch (Exception ex)
{
/* Обработка исключений */
}
finally
{
/* Очистка неуправляемых ресурсов */
if(doc != null)
{
doc.Close(ref SaveChanges);
}
if(range != null)
{
Marshal.ReleaseComObject(range);
range = null;
}
if(app != null)
{
app.Quit();
Marshal.ReleaseComObject(app);
app = null;
}
}
Примечания:
- в коде приводится пример считывания основного текста документа, текста верхних и нижних колонтитулов, а также текста сносок,
- в коде производится очистка неуправляемых ресурсов с использованием класса Marshal
Пример парсинга файла MS Excel
Можно прочитать основные форматы: .xls,. xlsx.
Ниже приведён листинг с примером считывания текста из документа MS Excel (по ячейкам):
string FileName = @»C:UsersbeeDownloadstest.xlsx»;
object rOnly = true;
object SaveChanges = false;
object MissingObj = System.Reflection.Missing.Value;
Excel.Application app = new Excel.Application();
Excel.Workbooks workbooks = null;
Excel.Workbook workbook = null;
Excel.Sheets sheets = null;
try
{
workbooks = app.Workbooks;
workbook = workbooks.Open(FileName, MissingObj, rOnly, MissingObj, MissingObj,
MissingObj, MissingObj, MissingObj, MissingObj, MissingObj,
MissingObj, MissingObj, MissingObj, MissingObj, MissingObj);
// Получение всех страниц докуента
sheets = workbook.Sheets;
foreach(Excel.Worksheet worksheet in sheets)
{
// Получаем диапазон используемых на странице ячеек
Excel.Range UsedRange = worksheet.UsedRange;
// Получаем строки в используемом диапазоне
Excel.Range urRows = UsedRange.Rows;
// Получаем столбцы в используемом диапазоне
Excel.Range urColums = UsedRange.Columns;
// Количества строк и столбцов
int RowsCount = urRows.Count;
int ColumnsCount = urColums.Count;
for(int i = 1; i <= RowsCount; i++)
{
for(int j = 1; j <= ColumnsCount; j++)
{
Excel.Range CellRange = UsedRange.Cells[i, j];
// Получение текста ячейки
string CellText = (CellRange == null || CellRange.Value2 == null) ? null :
(CellRange as Excel.Range).Value2.ToString();
if(CellText != null)
{
/* Обработка текста */
}
}
}
// Очистка неуправляемых ресурсов на каждой итерации
if (urRows != null) Marshal.ReleaseComObject(urRows);
if (urColums != null) Marshal.ReleaseComObject(urColums);
if (UsedRange != null) Marshal.ReleaseComObject(UsedRange);
if (worksheet != null) Marshal.ReleaseComObject(worksheet);
}
} catch (Exception ex)
{
/* Обработка исключений */
}
finally
{
/* Очистка оставшихся неуправляемых ресурсов */
if (sheets != null) Marshal.ReleaseComObject(sheets);
if (workbook != null)
{
workbook.Close(SaveChanges);
Marshal.ReleaseComObject(workbook);
workbook = null;
}
if (workbooks != null)
{
workbooks.Close();
Marshal.ReleaseComObject(workbooks);
workbooks = null;
}
if (app != null)
{
app.Quit();
Marshal.ReleaseComObject(app);
app = null;
}
}
Примечания:
- при обработке текста каждой ячейки приходится заранее знать количество задействованных строк и столбцов на текущем листе документа,
- такой перебор не совсем оптимален (временная сложность алгоритма O(n2)): при желании его можно ускорить (например, разбив обработку на несколько потоков): в данной статье приводится лишь пример получения текста из каждой ячейки,
- при таком переборе ячеек необходимо на каждой итерации освобождать неуправляемые ресурсы, чтобы избежать утечек памяти (аналогично предыдущему примеру, используется класс Marshal).
Приведенные примеры хорошо подходят для реализации приложения по обработке документов Word и Excel на платформе .NET Framework.
С помощью указанных библиотек можно не только читать текст из документов, но и создавать новые файлы форматов MS Word и Excel.
Есть задача, распарсить некое количество docx файлов и разложить их в базе, сами по себе файлы большие, имеют общую структуру, вида:
Оглавление
Текст
Некоторые данные вида маркированнного списка
Контактная информация
Попробовал разобраться с xml, но не пойму, за что там можно зацепиться.
Реализовывать буду на ruby, посмотрел гемы, но ничего подходящего не нашел, может есть у кого мысли по этому поводу.
![]()
Kromster
13.5k12 золотых знаков42 серебряных знака72 бронзовых знака
задан 16 мая 2017 в 20:18
![]()
8
Вообще docx это zip архив, содержащий xml файлы, в соответствии с которыми ворд рендерит весь файл. Вы можете анзипнуть ваш файл, пройтись по нужной xml парсером (в Qt например QXmlReader), вытащить необходимые вам данные и запаковать назад. Чтобы лучше понять структуру docx можете скачать MS Office Open Xml SDK.
ответ дан 17 мая 2017 в 11:41
![]()
awesomeawesome
2461 серебряный знак7 бронзовых знаков
4
Вот простой пример, для более точного извлечения откройте свой XML и ищите теги которые Вас интересуют, подставляйте вместо «//w:t» или «//w14:checkbox»
require 'nokogiri'
@doc = Nokogiri::XML(File.open("document.xml"))
# Тексты, заголовки и т.п.
strings = @doc.xpath("//w:t")
puts strings
# чебоксы
checkboxes = @doc.xpath("//w14:checkbox")
puts checkboxes.to_s
ответ дан 25 мая 2017 в 2:36
![]()
1
In this article we will be discussing about ways and techniques to read word documents in Java using Apache POI library. The word document may contain images, tables or plain text. Apart from this a standard word file has header and footers too. Here in the following examples we will be parsing a word document by reading its different paragraph, runs, images, tables along with headers and footers. We will also take a look into identifying different styles associated with the paragraphs such as font-size, font-family, font-color etc.

Maven Dependencies
Following is the poi maven depedency required to read word documents. For latest artifacts visit here
pom.xml
	<dependencies>
		<dependency>
                     <groupId>org.apache.poi</groupId>
                     <artifactId>poi-ooxml</artifactId>
		     <version>3.16</version>
                 </dependency>
	</dependencies>
Reading Complete Text from Word Document
The class XWPFDocument has many methods defined to read and extract .docx file contents. getText() can be used to read all the texts in a .docx word document. Following is an example.
TextReader.java
public class TextReader {

	public static void main(String[] args) {
	 try {
		   FileInputStream fis = new FileInputStream("test.docx");
		   XWPFDocument xdoc = new XWPFDocument(OPCPackage.open(fis));
		   XWPFWordExtractor extractor = new XWPFWordExtractor(xdoc);
		   System.out.println(extractor.getText());
		} catch(Exception ex) {
		    ex.printStackTrace();
		}
 }

}
Reading Headers and Foooters of Word Document
Apache POI provides inbuilt methods to read headers and footers of a word document. Following is an example that reads and prints header and footer of a word document. The example .docx file is available in the source which can be downloaded at the end of thos article.
HeaderFooter.java
public class HeaderFooterReader {

	public static void main(String[] args) {

		try {
			FileInputStream fis = new FileInputStream("test.docx");
			XWPFDocument xdoc = new XWPFDocument(OPCPackage.open(fis));
			XWPFHeaderFooterPolicy policy = new XWPFHeaderFooterPolicy(xdoc);

			XWPFHeader header = policy.getDefaultHeader();
			if (header != null) {
				System.out.println(header.getText());
			}

			XWPFFooter footer = policy.getDefaultFooter();
			if (footer != null) {
				System.out.println(footer.getText());
			}
		} catch (Exception ex) {
			ex.printStackTrace();
		}

	}

}
Output
This is Header
This is footer
 Other Interesting Posts
Java 8 Lambda Expression
Java 8 Stream Operations
Java 8 Datetime Conversions
Random Password Generator in Java
Read Each Paragraph of a Word Document
Among the many methods defined in XWPFDocument class, we can use getParagraphs() to read a .docx word document paragraph wise.This method returns a list of all the paragraphs(XWPFParagraph) of a word document. Again the XWPFParagraph has many utils method defined to extract information related to any paragraph such as text alignment, style associated with the paragrpahs.
To have more control over the text reading of a word document,each paragraph is again divided into multiple runs. Run defines a region of text with a common set of properties.Following is an example to read paragraphs from a .docx word document.
ParagraphReader.java
public class ParagraphReader {

	public static void main(String[] args) {
		try {
			FileInputStream fis = new FileInputStream("test.docx");
			XWPFDocument xdoc = new XWPFDocument(OPCPackage.open(fis));

			List paragraphList = xdoc.getParagraphs();

			for (XWPFParagraph paragraph : paragraphList) {

				System.out.println(paragraph.getText());
				System.out.println(paragraph.getAlignment());
				System.out.print(paragraph.getRuns().size());
				System.out.println(paragraph.getStyle());

				// Returns numbering format for this paragraph, eg bullet or lowerLetter.
				System.out.println(paragraph.getNumFmt());
				System.out.println(paragraph.getAlignment());

				System.out.println(paragraph.isWordWrapped());

				System.out.println("********************************************************************");
			}
		} catch (Exception ex) {
			ex.printStackTrace();
		}
	}
}
Reading Tables from Word Document
Following is an example to read tables present in a word document. It will print all the text rows wise.
TableReader.java
public class TableReader {

	public static void main(String[] args) {
		try {
			FileInputStream fis = new FileInputStream("test.docx");
			XWPFDocument xdoc = new XWPFDocument(OPCPackage.open(fis));
			Iterator bodyElementIterator = xdoc.getBodyElementsIterator();
			while (bodyElementIterator.hasNext()) {
				IBodyElement element = bodyElementIterator.next();

				if ("TABLE".equalsIgnoreCase(element.getElementType().name())) {
					List tableList = element.getBody().getTables();
					for (XWPFTable table : tableList) {
						System.out.println("Total Number of Rows of Table:" + table.getNumberOfRows());
						for (int i = 0; i < table.getRows().size(); i++) {

							for (int j = 0; j < table.getRow(i).getTableCells().size(); j++) {
								System.out.println(table.getRow(i).getCell(j).getText());
							}
						}
					}
				}
			}
		} catch (Exception ex) {
			ex.printStackTrace();
		}
	}
}
Reading Styles from Word Document
Styles are associated with runs of a paragraph. There are many methods available in the XWPFRun class to identify the styles associated with the text.There are methods to identify boldness, highlighted words, capitalized words etc.
StyleReader.java
public class StyleReader {

	public static void main(String[] args) {
		try {
			FileInputStream fis = new FileInputStream("test.docx");
			XWPFDocument xdoc = new XWPFDocument(OPCPackage.open(fis));

			List paragraphList = xdoc.getParagraphs();

			for (XWPFParagraph paragraph : paragraphList) {

				for (XWPFRun rn : paragraph.getRuns()) {

					System.out.println(rn.isBold());
					System.out.println(rn.isHighlighted());
					System.out.println(rn.isCapitalized());
					System.out.println(rn.getFontSize());
				}

				System.out.println("********************************************************************");
			}
		} catch (Exception ex) {
			ex.printStackTrace();
		}

	}

}
Reading Image from Word Document
Following is an example to read image files from a word document.
public class ImageReader {

	public static void main(String[] args) {

		try {
			FileInputStream fis = new FileInputStream("test.docx");
			XWPFDocument xdoc = new XWPFDocument(OPCPackage.open(fis));
			List pic = xdoc.getAllPictures();
			if (!pic.isEmpty()) {
				System.out.print(pic.get(0).getPictureType());
				System.out.print(pic.get(0).getData());
			}

		} catch (Exception ex) {
			ex.printStackTrace();
		}
	}

}
Conclusion
I hope this article served you that you were looking for. If you have anything that you want to add or share then please share it below in the comment section.