
В Python данные из файла Excel считываются в объект DataFrame. Для этого используется функция read_excel() модуля pandas.
Лист Excel — это двухмерная таблица. Объект DataFrame также представляет собой двухмерную табличную структуру данных.
- Пример использования Pandas read_excel()
- Список заголовков столбцов листа Excel
- Вывод данных столбца
- Пример использования Pandas to Excel: read_excel()
- Чтение файла Excel без строки заголовка
- Лист Excel в Dict, CSV и JSON
- Ресурсы

Предположим, что у нас есть документ Excel, состоящий из двух листов: «Employees» и «Cars». Верхняя строка содержит заголовок таблицы.

Ниже приведен код, который считывает данные листа «Employees» и выводит их.
import pandas

excel_data_df = pandas.read_excel('records.xlsx', sheet_name='Employees')

# print whole sheet data
print(excel_data_df)
Вывод:
   EmpID    EmpName EmpRole
0      1     Pankaj     CEO
1      2  David Lee  Editor
2      3   Lisa Ray  Author
Первый параметр, который принимает функция read_excel ()— это имя файла Excel. Второй параметр (sheet_name) определяет лист для считывания данных.
При выводе содержимого объекта DataFrame мы получаем двухмерные таблицы, схожие по своей структуре со структурой документа Excel.
Чтобы получить список заголовков столбцов таблицы, используется свойство columns объекта Dataframe. Пример реализации:
print(excel_data_df.columns.ravel())
Вывод:
['Pankaj', 'David Lee', 'Lisa Ray']
Мы можем получить данные из столбца и преобразовать их в список значений. Пример:
print(excel_data_df['EmpName'].tolist())
Вывод:
['Pankaj', 'David Lee', 'Lisa Ray']
Можно указать имена столбцов для чтения из файла Excel. Это потребуется, если нужно вывести данные из определенных столбцов таблицы.
import pandas

excel_data_df = pandas.read_excel('records.xlsx', sheet_name='Cars', usecols=['Car Name', 'Car Price'])
print(excel_data_df)
Вывод:
         Car Name      Car Price
0      Honda City     20,000 USD
1  Bugatti Chiron  3 Million USD
2     Ferrari 458   2,30,000 USD
Если в листе Excel нет строки заголовка, нужно передать его значение как None.
excel_data_df = pandas.read_excel('records.xlsx', sheet_name='Numbers', header=None)
Если вы передадите значение заголовка как целое число (например, 3), тогда третья строка станет им. При этом считывание данных начнется со следующей строки. Данные, расположенные перед строкой заголовка, будут отброшены.
Объект DataFrame предоставляет различные методы для преобразования табличных данных в формат Dict , CSV или JSON.
excel_data_df = pandas.read_excel('records.xlsx', sheet_name='Cars', usecols=['Car Name', 'Car Price'])

print('Excel Sheet to Dict:', excel_data_df.to_dict(orient='record'))
print('Excel Sheet to JSON:', excel_data_df.to_json(orient='records'))
print('Excel Sheet to CSV:n', excel_data_df.to_csv(index=False))
Вывод:
Excel Sheet to Dict: [{'Car Name': 'Honda City', 'Car Price': '20,000 USD'}, {'Car Name': 'Bugatti Chiron', 'Car Price': '3 Million USD'}, {'Car Name': 'Ferrari 458', 'Car Price': '2,30,000 USD'}]
Excel Sheet to JSON: [{"Car Name":"Honda City","Car Price":"20,000 USD"},{"Car Name":"Bugatti Chiron","Car Price":"3 Million USD"},{"Car Name":"Ferrari 458","Car Price":"2,30,000 USD"}]
Excel Sheet to CSV:
 Car Name,Car Price
Honda City,"20,000 USD"
Bugatti Chiron,3 Million USD
Ferrari 458,"2,30,000 USD"
- Документы API pandas read_excel()
Хотя многие Data Scientist’ы больше привыкли работать с CSV-файлами, на практике очень часто приходится сталкиваться с обычными Excel-таблицами. Поэтому сегодня мы расскажем, как читать Excel-файлы в Pandas, а также рассмотрим основные возможности Python-библиотеки OpenPyXL для чтения метаданных ячеек.
Дополнительные зависимости для возможности чтения Excel таблиц
Для чтения таблиц Excel в Pandas требуются дополнительные зависимости:
- xlrd поддерживает старые и новые форматы MS Excel [1];
- OpenPyXL поддерживает новые форматы MS Excel (.xlsx) [2];
- ODFpy поддерживает свободные форматы OpenDocument (.odf, .ods и .odt) [3];
- pyxlsb поддерживает бинарные MS Excel файлы (формат .xlsb) [4].
Мы рекомендуем установить только OpenPyXL, поскольку он нам пригодится в дальнейшем. Для этого в командной строке прописывается следующая операция:
pip install openpyxl
Затем в Pandas нужно указать путь к Excel-файлу и одну из установленных зависимостей. Python-код выглядит следующим образом:
import pandas as pd
pd.read_excel(io='temp1.xlsx', engine='openpyxl')
#
     Name  Age  Weight
0    Alex   35      87
1   Lesha   57      72
2  Nastya   21      64
Читаем несколько листов
Excel-файл может содержать несколько листов. В Pandas, чтобы прочитать конкретный лист, в аргументе нужно указать sheet_name. Можно указать список названий листов, тогда Pandas вернет словарь (dict) с объектами DataFrame:
dfs = pd.read_excel(io='temp1.xlsx',
                    engine='openpyxl',
                    sheet_name=['Sheet1', 'Sheet2'])
dfs
#
{'Sheet1':      Name  Age  Weight
 0    Alex   35      87
 1   Lesha   57      72
 2  Nastya   21      64,
 'Sheet2':     Name  Age  Weight
 0  Gosha   43      95
 1   Anna   24      65
 2   Lena   22      78}
Если таблицы в словаре имеют одинаковые атрибуты, то их можно объединить в один DataFrame. В Python это выглядит так:
pd.concat(dfs).reset_index(drop=True)
     Name  Age  Weight
0    Alex   35      87
1   Lesha   57      72
2  Nastya   21      64
3   Gosha   43      95
4    Anna   24      65
5    Lena   22      78
Указание диапазонов
Таблицы могут размещаться не в самом начале, а как, например, на рисунке ниже. Как видим, таблица располагается в диапазоне A:F.
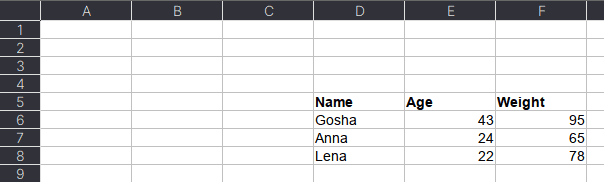
Чтобы прочитать такую таблицу, нужно указать диапазон в аргументе usecols. Также дополнительно можно добавить header — номер заголовка таблицы, а также nrows — количество строк, которые нужно прочитать. В аргументе header всегда передается номер строки на единицу меньше, чем в Excel-файле, поскольку в Python индексация начинается с 0 (на рисунке это номер 5, тогда указываем 4):
pd.read_excel(io='temp1.xlsx',
              engine='openpyxl',
              usecols='D:F',
              header=4, # в excel это №5
              nrows=3)
#
    Name  Age  Weight
0  Gosha   43      95
1   Anna   24      65
2   Lena   22      78
Читаем таблицы в OpenPyXL
Pandas прочитывает только содержимое таблицы, но игнорирует метаданные: цвет заливки ячеек, примечания, стили таблицы и т.д. В таком случае пригодится библиотека OpenPyXL. Загрузка файлов осуществляется через функцию load_workbook, а к листам обращаться можно через квадратные скобки:
from openpyxl import load_workbook
wb = load_workbook('temp2.xlsx')
ws = wb['Лист1']
type(ws)
# openpyxl.worksheet.worksheet.Worksheet
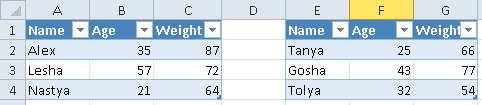
Допустим, имеется Excel-файл с несколькими таблицами на листе (см. рисунок выше). Если бы мы использовали Pandas, то он бы выдал следующий результат:
pd.read_excel(io='temp2.xlsx',
              engine='openpyxl')
#
     Name  Age  Weight  Unnamed: 3 Name.1  Age.1  Weight.1
0    Alex   35      87         NaN  Tanya     25        66
1   Lesha   57      72         NaN  Gosha     43        77
2  Nastya   21      64         NaN  Tolya     32        54
Можно, конечно, заняться обработкой и привести таблицы в нормальный вид, а можно воспользоваться OpenPyXL, который хранит таблицу и его диапазон в словаре. Чтобы посмотреть этот словарь, нужно вызвать ws.tables.items. Вот так выглядит Python-код:
ws.tables.items()
wb = load_workbook('temp2.xlsx')
ws = wb['Лист1']
ws.tables.items()
#
[('Таблица1', 'A1:C4'), ('Таблица13', 'E1:G4')]
Обращаясь к каждому диапазону, можно проходить по каждой строке или столбцу, а внутри них – по каждой ячейке. Например, следующий код на Python таблицы объединяет строки в список, где первая строка уходит на заголовок, а затем преобразует их в DataFrame:
dfs = []
for table_name, value in ws.tables.items():
    table = ws[value]
    header, *body = [[cell.value for cell in row]
                      for row in table]
    df = pd.DataFrame(body, columns=header)
    dfs.append(df)
Если таблицы имеют одинаковые атрибуты, то их можно соединить в одну:
pd.concat(dfs)
#
     Name  Age  Weight
0    Alex   35      87
1   Lesha   57      72
2  Nastya   21      64
0   Tanya   25      66
1   Gosha   43      77
2   Tolya   32      54
Сохраняем метаданные таблицы
Как указано в коде выше, у ячейки OpenPyXL есть атрибут value, который хранит ее значение. Помимо value, можно получить тип ячейки (data_type), цвет заливки (fill), примечание (comment) и др.
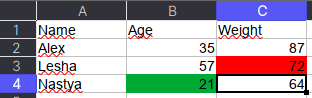
Например, требуется сохранить данные о цвете ячеек. Для этого мы каждую ячейку с числами перезапишем в виде <значение,RGB>, где RGB — значение цвета в формате RGB (red, green, blue). Python-код выглядит следующим образом:
# _TYPES = {int:'n', float:'n', str:'s', bool:'b'}
data = []
for row in ws.rows:
    row_cells = []
    for cell in row:
        cell_value = cell.value
        if cell.data_type == 'n':
            cell_value = f"{cell_value},{cell.fill.fgColor.rgb}"
        row_cells.append(cell_value)
    data.append(row_cells)
Первым элементом списка является строка-заголовок, а все остальное уже значения таблицы:
pd.DataFrame(data[1:], columns=data[0])
#
     Name          Age       Weight
0    Alex  35,00000000  87,00000000
1   Lesha  57,00000000  72,FFFF0000
2  Nastya  21,FF00A933  64,00000000
Теперь представим атрибуты в виде индексов с помощью метода stack, а после разобьём все записи на значение и цвет методом str.split:
(pd.DataFrame(data[1:], columns=data[0])
 .set_index('Name')
 .stack()
 .str.split(',', expand=True)
)
#
                0         1
Name
Alex   Age     35  00000000
       Weight  87  00000000
Lesha  Age     57  00000000
       Weight  72  FFFF0000
Nastya Age     21  FF00A933
       Weight  64  0000000
Осталось только переименовать 0 и 1 на Value и Color, а также добавить атрибут Variable, который обозначит Вес и Возраст. Полный код на Python выглядит следующим образом:
(pd.DataFrame(data[1:], columns=data[0])
 .set_index('Name')
 .stack()
 .str.split(',', expand=True)
 .set_axis(['Value', 'Color'], axis=1)
 .rename_axis(index=['Name', 'Variable'])
 .reset_index()
)
#
     Name Variable Value     Color
0    Alex      Age    35  00000000
1    Alex   Weight    87  00000000
2   Lesha      Age    57  00000000
3   Lesha   Weight    72  FFFF0000
4  Nastya      Age    21  FF00A933
5  Nastya   Weight    64  00000000
Ещё больше подробностей о работе с таблицами в Pandas, а также их обработке на реальных примерах Data Science задач, вы узнаете на наших курсах по Python в лицензированном учебном центре обучения и повышения квалификации IT-специалистов в Москве.
Источники
- https://xlrd.readthedocs.io/en/latest/
- https://openpyxl.readthedocs.io/en/latest/
- https://github.com/eea/odfpy
- https://github.com/willtrnr/pyxlsb
Pandas можно использовать для чтения и записи файлов Excel с помощью Python. Это работает по аналогии с другими форматами. В этом материале рассмотрим, как это делается с помощью DataFrame.
Помимо чтения и записи рассмотрим, как записывать несколько DataFrame в Excel-файл, как считывать определенные строки и колонки из таблицы и как задавать имена для одной или нескольких таблиц в файле.
Установка Pandas
Для начала Pandas нужно установить. Проще всего это сделать с помощью pip.
Если у вас Windows, Linux или macOS:
pip install pandas # или pip3В процессе можно столкнуться с ошибками ModuleNotFoundError или ImportError при попытке запустить этот код. Например:
ModuleNotFoundError: No module named 'openpyxl'В таком случае нужно установить недостающие модули:
pip install openpyxl xlsxwriter xlrd # или pip3Будем хранить информацию, которую нужно записать в файл Excel, в DataFrame. А с помощью встроенной функции to_excel() ее можно будет записать в Excel.
Сначала импортируем модуль pandas. Потом используем словарь для заполнения DataFrame:
import pandas as pd

df = pd.DataFrame({'Name': ['Manchester City', 'Real Madrid', 'Liverpool',

                            'FC Bayern München', 'FC Barcelona', 'Juventus'],

                   'League': ['English Premier League (1)', 'Spain Primera Division (1)',

                              'English Premier League (1)', 'German 1. Bundesliga (1)',

                              'Spain Primera Division (1)', 'Italian Serie A (1)'],

                   'TransferBudget': [176000000, 188500000, 90000000,

                                      100000000, 180500000, 105000000]})
Ключи в словаре — это названия колонок. А значения станут строками с информацией.
Теперь можно использовать функцию to_excel() для записи содержимого в файл. Единственный аргумент — это путь к файлу:
df.to_excel('./teams.xlsx')
А вот и созданный файл Excel:

Стоит обратить внимание на то, что в этом примере не использовались параметры. Таким образом название листа в файле останется по умолчанию — «Sheet1». В файле может быть и дополнительная колонка с числами. Эти числа представляют собой индексы, которые взяты напрямую из DataFrame.
Поменять название листа можно, добавив параметр sheet_name в вызов to_excel():
df.to_excel('./teams.xlsx', sheet_name='Budgets', index=False)
Также можно добавили параметр index со значением False, чтобы избавиться от колонки с индексами. Теперь файл Excel будет выглядеть следующим образом:

Запись нескольких DataFrame в файл Excel
Также есть возможность записать несколько DataFrame в файл Excel. Для этого можно указать отдельный лист для каждого объекта:
salaries1 = pd.DataFrame({'Name': ['L. Messi', 'Cristiano Ronaldo', 'J. Oblak'],
'Salary': [560000, 220000, 125000]})
salaries2 = pd.DataFrame({'Name': ['K. De Bruyne', 'Neymar Jr', 'R. Lewandowski'],
'Salary': [370000, 270000, 240000]})
salaries3 = pd.DataFrame({'Name': ['Alisson', 'M. ter Stegen', 'M. Salah'],
'Salary': [160000, 260000, 250000]})
salary_sheets = {'Group1': salaries1, 'Group2': salaries2, 'Group3': salaries3}
writer = pd.ExcelWriter('./salaries.xlsx', engine='xlsxwriter')
for sheet_name in salary_sheets.keys():
salary_sheets[sheet_name].to_excel(writer, sheet_name=sheet_name, index=False)
writer.save()
Здесь создаются 3 разных DataFrame с разными названиями, которые включают имена сотрудников, а также размер их зарплаты. Каждый объект заполняется соответствующим словарем.
Объединим все три в переменной salary_sheets, где каждый ключ будет названием листа, а значение — объектом DataFrame.
Дальше используем движок xlsxwriter для создания объекта writer. Он и передается функции to_excel().
Перед записью пройдемся по ключам salary_sheets и для каждого ключа запишем содержимое в лист с соответствующим именем. Вот сгенерированный файл:
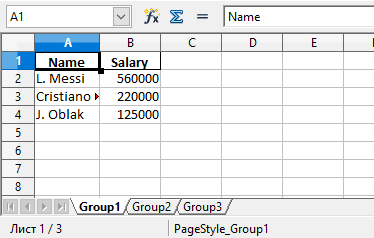
Можно увидеть, что в этом файле Excel есть три листа: Group1, Group2 и Group3. Каждый из этих листов содержит имена сотрудников и их зарплаты в соответствии с данными в трех DataFrame из кода.
Параметр движка в функции to_excel() используется для определения модуля, который задействуется библиотекой Pandas для создания файла Excel. В этом случае использовался xslswriter, который нужен для работы с классом ExcelWriter. Разные движка можно определять в соответствии с их функциями.
В зависимости от установленных в системе модулей Python другими параметрами для движка могут быть openpyxl (для xlsx или xlsm) и xlwt (для xls). Подробности о модуле xlswriter можно найти в официальной документации.
Наконец, в коде была строка writer.save(), которая нужна для сохранения файла на диске.
Чтение файлов Excel с python
По аналогии с записью объектов DataFrame в файл Excel, эти файлы можно и читать, сохраняя данные в объект DataFrame. Для этого достаточно воспользоваться функцией read_excel():
top_players = pd.read_excel('./top_players.xlsx')

top_players.head()
Содержимое финального объекта можно посмотреть с помощью функции head().
Примечание:
Этот способ самый простой, но он и способен прочесть лишь содержимое первого листа.
Посмотрим на вывод функции head():
| Name | Age | Overall | Potential | Positions | Club | |
|---|---|---|---|---|---|---|
| 0 | L. Messi | 33 | 93 | 93 | RW,ST,CF | FC Barcelona |
| 1 | Cristiano Ronaldo | 35 | 92 | 92 | ST,LW | Juventus |
| 2 | J. Oblak | 27 | 91 | 93 | GK | Atlético Madrid |
| 3 | K. De Bruyne | 29 | 91 | 91 | CAM,CM | Manchester City |
| 4 | Neymar Jr | 28 | 91 | 91 | LW,CAM | Paris Saint-Germain |
Pandas присваивает метку строки или числовой индекс объекту DataFrame по умолчанию при использовании функции read_excel().
Это поведение можно переписать, передав одну из колонок из файла в качестве параметра index_col:
top_players = pd.read_excel('./top_players.xlsx', index_col='Name')

top_players.head()
Результат будет следующим:
| Name | Age | Overall | Potential | Positions | Club |
|---|---|---|---|---|---|
| L. Messi | 33 | 93 | 93 | RW,ST,CF | FC Barcelona |
| Cristiano Ronaldo | 35 | 92 | 92 | ST,LW | Juventus |
| J. Oblak | 27 | 91 | 93 | GK | Atlético Madrid |
| K. De Bruyne | 29 | 91 | 91 | CAM,CM | Manchester City |
| Neymar Jr | 28 | 91 | 91 | LW,CAM | Paris Saint-Germain |
В этом примере индекс по умолчанию был заменен на колонку «Name» из файла. Однако этот способ стоит использовать только при наличии колонки со значениями, которые могут стать заменой для индексов.
Чтение определенных колонок из файла Excel
Иногда удобно прочитать содержимое файла целиком, но бывают случаи, когда требуется получить доступ к определенному элементу. Например, нужно считать значение элемента и присвоить его полю объекта.
Это делается с помощью функции read_excel() и параметра usecols. Например, можно ограничить функцию, чтобы она читала только определенные колонки. Добавим параметр, чтобы он читал колонки, которые соответствуют значениям «Name», «Overall» и «Potential».
Для этого укажем числовой индекс каждой колонки:
cols = [0, 2, 3]
top_players = pd.read_excel('./top_players.xlsx', usecols=cols)
top_players.head()
Вот что выдаст этот код:
| Name | Overall | Potential | |
|---|---|---|---|
| 0 | L. Messi | 93 | 93 |
| 1 | Cristiano Ronaldo | 92 | 92 |
| 2 | J. Oblak | 91 | 93 |
| 3 | K. De Bruyne | 91 | 91 |
| 4 | Neymar Jr | 91 | 91 |
Таким образом возвращаются лишь колонки из списка cols.
В DataFrame много встроенных возможностей. Легко изменять, добавлять и агрегировать данные. Даже можно строить сводные таблицы. И все это сохраняется в Excel одной строкой кода.
Рекомендую изучить DataFrame в моих уроках по Pandas.
Выводы
В этом материале были рассмотрены функции read_excel() и to_excel() из библиотеки Pandas. С их помощью можно считывать данные из файлов Excel и выполнять запись в них. С помощью различных параметров есть возможность менять поведение функций, создавая нужные файлы, не просто копируя содержимое из объекта DataFrame.
In this tutorial, you’ll learn how to use Python and Pandas to read Excel files using the Pandas read_excel function. Excel files are everywhere – and while they may not be the ideal data type for many data scientists, knowing how to work with them is an essential skill.
By the end of this tutorial, you’ll have learned:
- How to use the Pandas read_excel function to read an Excel file
- How to read specify an Excel sheet name to read into Pandas
- How to read multiple Excel sheets or files
- How to certain columns from an Excel file in Pandas
- How to skip rows when reading Excel files in Pandas
- And more
Let’s get started!
The Quick Answer: Use Pandas read_excel to Read Excel Files
To read Excel files in Python’s Pandas, use the read_excel() function. You can specify the path to the file and a sheet name to read, as shown below:
# Reading an Excel File in Pandas
import pandas as pd

df = pd.read_excel('/Users/datagy/Desktop/Sales.xlsx')

# With a Sheet Name
df = pd.read_excel(
   io='/Users/datagy/Desktop/Sales.xlsx'
   sheet_name ='North'
)
In the following sections of this tutorial, you’ll learn more about the Pandas read_excel() function to better understand how to customize reading Excel files.
Understanding the Pandas read_excel Function
The Pandas read_excel() function has a ton of different parameters. In this tutorial, you’ll learn how to use the main parameters available to you that provide incredible flexibility in terms of how you read Excel files in Pandas.
| Parameter | Description | Available Option |
|---|---|---|
io= |
The string path to the workbook. | URL to file, path to file, etc. |
sheet_name= |
The name of the sheet to read. Will default to the first sheet in the workbook (position 0). | Can read either strings (for the sheet name), integers (for position), or lists (for multiple sheets) |
usecols= |
The columns to read, if not all columns are to be read | Can be strings of columns, Excel-style columns (“A:C”), or integers representing positions columns |
dtype= |
The datatypes to use for each column | Dictionary with columns as keys and data types as values |
skiprows= |
The number of rows to skip from the top | Integer value representing the number of rows to skip |
nrows= |
The number of rows to parse | Integer value representing the number of rows to read |
.read_excel() functionThe table above highlights some of the key parameters available in the Pandas .read_excel() function. The full list can be found in the official documentation. In the following sections, you’ll learn how to use the parameters shown above to read Excel files in different ways using Python and Pandas.
As shown above, the easiest way to read an Excel file using Pandas is by simply passing in the filepath to the Excel file. The io= parameter is the first parameter, so you can simply pass in the string to the file.
The parameter accepts both a path to a file, an HTTP path, an FTP path or more. Let’s see what happens when we read in an Excel file hosted on my Github page.
# Reading an Excel file in Pandas
import pandas as pd

df = pd.read_excel('https://github.com/datagy/mediumdata/raw/master/Sales.xlsx')
print(df.head())

# Returns:
#         Date Customer  Sales
# 0 2022-04-01        A    191
# 1 2022-04-02        B    727
# 2 2022-04-03        A    782
# 3 2022-04-04        B    561
# 4 2022-04-05        A    969
If you’ve downloaded the file and taken a look at it, you’ll notice that the file has three sheets? So, how does Pandas know which sheet to load? By default, Pandas will use the first sheet (positionally), unless otherwise specified.
In the following section, you’ll learn how to specify which sheet you want to load into a DataFrame.
How to Specify Excel Sheet Names in Pandas read_excel
As shown in the previous section, you learned that when no sheet is specified, Pandas will load the first sheet in an Excel workbook. In the workbook provided, there are three sheets in the following structure:
Sales.xlsx
|---East
|---West
|---North
Because of this, we know that the data from the sheet “East” was loaded. If we wanted to load the data from the sheet “West”, we can use the sheet_name= parameter to specify which sheet we want to load.
The parameter accepts both a string as well as an integer. If we were to pass in a string, we can specify the sheet name that we want to load.
Let’s take a look at how we can specify the sheet name for 'West':
# Specifying an Excel Sheet to Load by Name
import pandas as pd

df = pd.read_excel(
    io='https://github.com/datagy/mediumdata/raw/master/Sales.xlsx',
    sheet_name='West')
print(df.head())

# Returns:
#         Date Customer  Sales
# 0 2022-04-01        A    504
# 1 2022-04-02        B    361
# 2 2022-04-03        A    694
# 3 2022-04-04        B    702
# 4 2022-04-05        A    255
Similarly, we can load a sheet name by its position. By default, Pandas will use the position of 0, which will load the first sheet. Say we wanted to repeat our earlier example and load the data from the sheet named 'West', we would need to know where the sheet is located.
Because we know the sheet is the second sheet, we can pass in the 1st index:
# Specifying an Excel Sheet to Load by Position
import pandas as pd

df = pd.read_excel(
    io='https://github.com/datagy/mediumdata/raw/master/Sales.xlsx',
    sheet_name=1)
print(df.head())

# Returns:
#         Date Customer  Sales
# 0 2022-04-01        A    504
# 1 2022-04-02        B    361
# 2 2022-04-03        A    694
# 3 2022-04-04        B    702
# 4 2022-04-05        A    255
We can see that both of these methods returned the same sheet’s data. In the following section, you’ll learn how to specify which columns to load when using the Pandas read_excel function.
How to Specify Columns Names in Pandas read_excel
There may be many times when you don’t want to load every column in an Excel file. This may be because the file has too many columns or has different columns for different worksheets.
In order to do this, we can use the usecols= parameter. It’s a very flexible parameter that lets you specify:
- A list of column names,
- A string of Excel column ranges,
- A list of integers specifying the column indices to load
Most commonly, you’ll encounter people using a list of column names to read in. Each of these columns are comma separated strings, contained in a list.
Let’s load our DataFrame from the example above, only this time only loading the 'Customer' and 'Sales' columns:
# Specifying Columns to Load by Name
import pandas as pd

df = pd.read_excel(
    io='https://github.com/datagy/mediumdata/raw/master/Sales.xlsx',
    usecols=['Customer', 'Sales'])
print(df.head())

# Returns:
#   Customer  Sales
# 0        A    191
# 1        B    727
# 2        A    782
# 3        B    561
# 4        A    969
We can see that by passing in the list of strings representing the columns, we were able to parse those columns only.
If we wanted to use Excel changes, we could also specify columns 'B:C'. Let’s see what this looks like below:
# Specifying Columns to Load by Excel Range
import pandas as pd

df = pd.read_excel(
    io='https://github.com/datagy/mediumdata/raw/master/Sales.xlsx',
    usecols='B:C')
print(df.head())

# Returns:
#   Customer  Sales
# 0        A    191
# 1        B    727
# 2        A    782
# 3        B    561
# 4        A    969
Finally, we can also pass in a list of integers that represent the positions of the columns we wanted to load. Because the columns are the second and third columns, we would load a list of integers as shown below:
# Specifying Columns to Load by Their Position
import pandas as pd

df = pd.read_excel(
    io='https://github.com/datagy/mediumdata/raw/master/Sales.xlsx',
    usecols=[1,2])
print(df.head())

# Returns:
#   Customer  Sales
# 0        A    191
# 1        B    727
# 2        A    782
# 3        B    561
# 4        A    969
In the following section, you’ll learn how to specify data types when reading Excel files.
How to Specify Data Types in Pandas read_excel
Pandas makes it easy to specify the data type of different columns when reading an Excel file. This serves three main purposes:
- Preventing data from being read incorrectly
- Speeding up the read operation
- Saving memory
You can pass in a dictionary where the keys are the columns and the values are the data types. This ensures that data are ready correctly. Let’s see how we can specify the data types for our columns.
# Specifying Data Types for Columns When Reading Excel Files
import pandas as pd

df = pd.read_excel(
    io='https://github.com/datagy/mediumdata/raw/master/Sales.xlsx',
    dtype={'date':'datetime64', 'Customer': 'object', 'Sales':'int'})
print(df.head())

# Returns:
#   Customer  Sales
#         Date Customer  Sales
# 0 2022-04-01        A    191
# 1 2022-04-02        B    727
# 2 2022-04-03        A    782
# 3 2022-04-04        B    561
# 4 2022-04-05        A    969
It’s important to note that you don’t need to pass in all the columns for this to work. In the next section, you’ll learn how to skip rows when reading Excel files.
How to Skip Rows When Reading Excel Files in Pandas
In some cases, you’ll encounter files where there are formatted title rows in your Excel file, as shown below:
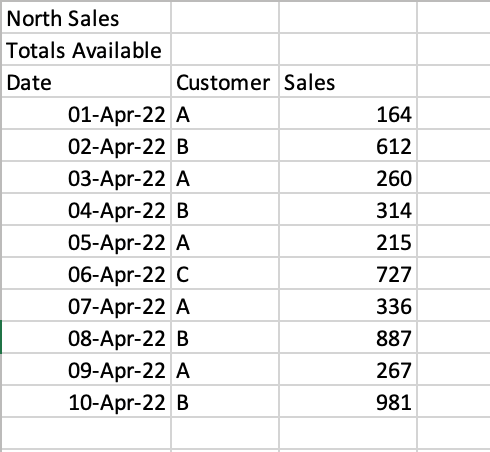
If we were to read the sheet 'North', we would get the following returned:
# Reading a poorly formatted Excel file
import pandas as pd

df = pd.read_excel(
    io='https://github.com/datagy/mediumdata/raw/master/Sales.xlsx',
    sheet_name='North')
print(df.head())

# Returns:
#            North Sales Unnamed: 1 Unnamed: 2
# 0     Totals Available        NaN        NaN
# 1                 Date   Customer      Sales
# 2  2022-04-01 00:00:00          A        164
# 3  2022-04-02 00:00:00          B        612
# 4  2022-04-03 00:00:00          A        260
Pandas makes it easy to skip a certain number of rows when reading an Excel file. This can be done using the skiprows= parameter. We can see that we need to skip two rows, so we can simply pass in the value 2, as shown below:
# Reading a Poorly Formatted File Correctly
import pandas as pd

df = pd.read_excel(
    io='https://github.com/datagy/mediumdata/raw/master/Sales.xlsx',
    sheet_name='North',
    skiprows=2)
print(df.head())

# Returns:
#         Date Customer  Sales
# 0 2022-04-01        A    164
# 1 2022-04-02        B    612
# 2 2022-04-03        A    260
# 3 2022-04-04        B    314
# 4 2022-04-05        A    215
This read the file much more accurately! It can be a lifesaver when working with poorly formatted files. In the next section, you’ll learn how to read multiple sheets in an Excel file in Pandas.
How to Read Multiple Sheets in an Excel File in Pandas
Pandas makes it very easy to read multiple sheets at the same time. This can be done using the sheet_name= parameter. In our earlier examples, we passed in only a single string to read a single sheet. However, you can also pass in a list of sheets to read multiple sheets at once.
Let’s see how we can read our first two sheets:
# Reading Multiple Excel Sheets at Once in Pandas
import pandas as pd

dfs = pd.read_excel(
    io='https://github.com/datagy/mediumdata/raw/master/Sales.xlsx',
    sheet_name=['East', 'West'])

print(type(dfs))

# Returns: <class 'dict'>
In the example above, we passed in a list of sheets to read. When we used the type() function to check the type of the returned value, we saw that a dictionary was returned.
Each of the sheets is a key of the dictionary with the DataFrame being the corresponding key’s value. Let’s see how we can access the 'West' DataFrame:
# Reading Multiple Excel Sheets in Pandas
import pandas as pd

dfs = pd.read_excel(
    io='https://github.com/datagy/mediumdata/raw/master/Sales.xlsx',
    sheet_name=['East', 'West'])

print(dfs.get('West').head())

# Returns:
#         Date Customer  Sales
# 0 2022-04-01        A    504
# 1 2022-04-02        B    361
# 2 2022-04-03        A    694
# 3 2022-04-04        B    702
# 4 2022-04-05        A    255
You can also read all of the sheets at once by specifying None for the value of sheet_name=. Similarly, this returns a dictionary of all sheets:
# Reading Multiple Excel Sheets in Pandas
import pandas as pd

dfs = pd.read_excel(
    io='https://github.com/datagy/mediumdata/raw/master/Sales.xlsx',
    sheet_name=None)
In the next section, you’ll learn how to read multiple Excel files in Pandas.
How to Read Only n Lines When Reading Excel Files in Pandas
When working with very large Excel files, it can be helpful to only sample a small subset of the data first. This allows you to quickly load the file to better be able to explore the different columns and data types.
This can be done using the nrows= parameter, which accepts an integer value of the number of rows you want to read into your DataFrame. Let’s see how we can read the first five rows of the Excel sheet:
# Reading n Number of Rows of an Excel Sheet
import pandas as pd

df = pd.read_excel(
    io='https://github.com/datagy/mediumdata/raw/master/Sales.xlsx',
    nrows=5)
print(df)

# Returns:
#         Date Customer  Sales
# 0 2022-04-01        A    191
# 1 2022-04-02        B    727
# 2 2022-04-03        A    782
# 3 2022-04-04        B    561
# 4 2022-04-05        A    969
Conclusion
In this tutorial, you learned how to use Python and Pandas to read Excel files into a DataFrame using the .read_excel() function. You learned how to use the function to read an Excel, specify sheet names, read only particular columns, and specify data types. You then learned how skip rows, read only a set number of rows, and read multiple sheets.
Additional Resources
To learn more about related topics, check out the tutorials below:
- Pandas Dataframe to CSV File – Export Using .to_csv()
- Combine Data in Pandas with merge, join, and concat
- Introduction to Pandas for Data Science
- Summarizing and Analyzing a Pandas DataFrame
.xlsx – это расширение документа Excel, который может хранить большой объем данных в табличной форме. Более того, в электронной таблице Excel можно легко выполнять многие виды арифметических и логических вычислений.
Иногда программистам требуется прочитать данные из документа Excel. В Python для этого есть множество различных библиотек, например, xlrd, openpyxl и pandas. Сегодня мы поговорим о том, как читать excel-файлы (xlsx) при помощи Python, и рассмотрим примеры использования различных библиотек для этих целей.
Для начала
Для проверки примеров этого руководства потребуется какой-нибудь файл Excel с расширением .xlsx, содержащий какие-либо исходные данные. Вы можете использовать любой существующий файл Excel или создать новый. Мы создадим новый файл с именем sales.xlsx со следующими данными:
sales.xlsx
| Sales Date | Sales Person | Amount |
|---|---|---|
| 12/05/18 | Sila Ahmed | 60000 |
| 06/12/19 | Mir Hossain | 50000 |
| 09/08/20 | Sarmin Jahan | 45000 |
| 07/04/21 | Mahmudul Hasan | 30000 |
Этот файл мы и будем читать с помощью различных библиотек Python в следующей части этого руководства.
Чтение Excel-файла с помощью xlrd
Библиотека xlrd не устанавливается вместе с Python по умолчанию, так что ее придется установить. Последняя версия этой библиотеки, к сожалению, не поддерживает Excel-файлы с расширением .xlsx. Поэтому устанавливаем версию 1.2.0. Выполните следующую команду в терминале:
pip install xlrd == 1.2.0
После завершения процесса установки создайте Python-файл, в котором мы будем писать скрипт для чтения файла sales.xlsx с помощью модуля xlrd.
Воспользуемся функцией open_workbook() для открытия файла xlsx для чтения. Этот файл Excel содержит только одну таблицу. Поэтому функция workbook.sheet_by_index() используется в скрипте со значением аргумента 0.
Затем используем вложенный цикл for. С его помощью мы будем перемещаться по ячейкам, перебирая строки и столбцы. Также в скрипте используются две функции range() для определения количества строк и столбцов в таблице.
Для чтения значения отдельной ячейки таблицы на каждой итерации цикла воспользуемся функцией cell_value() . Каждое поле в выводе будет разделено одним пробелом табуляции.
import xlrd

# Open the Workbook
workbook = xlrd.open_workbook("sales.xlsx")

# Open the worksheet
worksheet = workbook.sheet_by_index(0)

# Iterate the rows and columns
for i in range(0, 5):
    for j in range(0, 3):
        # Print the cell values with tab space
        print(worksheet.cell_value(i, j), end='t')
    print('')
Запустим наш код и получим следующий результат.

Чтение Excel-файла с помощью openpyxl
Openpyxl – это еще одна библиотека Python для чтения файла .xlsx, и она также не идет по умолчанию вместе со стандартным пакетом Python. Чтобы установить этот модуль, выполните в терминале следующую команду:
pip install openpyxl
После завершения процесса установки можно начинать писать код для чтения файла sales.xlsx.
Как и модуль xlrd, модуль openpyxl имеет функцию load_workbook() для открытия excel-файла для чтения. В качестве значения аргумента этой функции используется файл sales.xlsx.
Объект wookbook.active служит для чтения значений свойств max_row и max_column. Эти свойства используются во вложенных циклах for для чтения содержимого файла sales.xlsx.
Функцию range() используем для чтения строк таблицы, а функцию iter_cols() — для чтения столбцов. Каждое поле в выводе будет разделено двумя пробелами табуляции.
import openpyxl

# Define variable to load the wookbook
wookbook = openpyxl.load_workbook("sales.xlsx")

# Define variable to read the active sheet:
worksheet = wookbook.active

# Iterate the loop to read the cell values
for i in range(0, worksheet.max_row):
    for col in worksheet.iter_cols(1, worksheet.max_column):
        print(col[i].value, end="tt")
    print('')
Запустив наш скрипт, получим следующий вывод.

Чтение Excel-файла с помощью pandas
Если вы не пользовались библиотекой pandas ранее, вам необходимо ее установить. Как и остальные рассматриваемые библиотеки, она не поставляется вместе с Python. Выполните следующую команду, чтобы установить pandas из терминала.
pip install pandas
После завершения процесса установки создаем файл Python и начинаем писать следующий скрипт для чтения файла sales.xlsx.
В библиотеке pandas есть функция read_excel(), которую можно использовать для чтения .xlsx-файлов. Ею мы и воспользуемся в нашем скрипте для чтения файла sales.xlsx.
Функция DataFrame() используется для чтения содержимого нашего файла и преобразования имеющейся там информации во фрейм данных. После мы сохраняем наш фрейм в переменной с именем data. А дальше выводим то, что лежит в data, в консоль.
import pandas as pd

# Load the xlsx file
excel_data = pd.read_excel('sales.xlsx')
# Read the values of the file in the dataframe
data = pd.DataFrame(excel_data, columns=['Sales Date', 'Sales Person', 'Amount'])
# Print the content
print("The content of the file is:n", data)
После запуска кода мы получим следующий вывод.

Результат работы этого скрипта отличается от двух предыдущих примеров. В первом столбце печатаются номера строк, начиная с нуля. Значения даты выравниваются по центру. Имена продавцов выровнены по правому краю, а сумма — по левому.
Заключение
Программистам довольно часто приходится работать с файлами .xlsx. Сегодня мы рассмотрели, как читать excel-файлы при помощи Python. Мы разобрали три различных способа с использованием трех библиотек. Все эти библиотеки имеют разные функции и свойства.
Надеемся, теперь у вас не возникнет сложностей с чтением этих файлов в ваших скриптах.