
В статье представлены различные PHP-расширения для чтения файлов XLS, XLSX, описаны их плюсы и минусы, а также примеры чтения.
1
PHPExcel
https://github.com/PHPOffice/PHPExcel
Огромная библиотека читает и формирует фалы xls, xlsx, csv.
- Для файлов xlsx потребует расширение ZipArchive.
- Потребляет много памяти.
Пример чтения файла в массив:
require_once __DIR__ . '/PHPExcel-1.8/Classes/PHPExcel/IOFactory.php';

// Файл xlsx
$xls = PHPExcel_IOFactory::load(__DIR__ . '/test.xlsx');

// Первый лист
$xls->setActiveSheetIndex(0);
$sheet = $xls->getActiveSheet();

foreach ($sheet->toArray() as $row) {
   print_r($row);
}
PHP
2
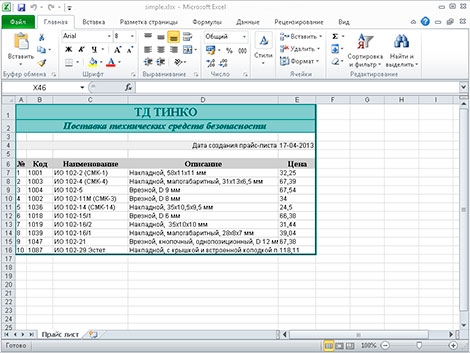
SimpleXLSX
https://www.phpclasses.org/package/6279-PHP-Parse-and-retrieve-data-from-Excel-XLS-files.html
simple-xlsx.zip (2017-09-25)
Читает только файлы xlsx.
- Менее прожорлив к памяти.
- Не всегда может прочитать файл, например файл сформированный PHPExcel.
require_once __DIR__ . '/simple-xlsx/simplexlsx.class.php';

// Файл xlsx
$xlsx = new SimpleXLSX(__DIR__ . '/test.xlsx');

// Первый лист
$sheet = $xlsx->rows(1);

foreach ($sheet as $row) {
   print_r($row);
}
PHP
3
PHP-ExcelReader
https://sourceforge.net/projects/phpexcelreader/
phpExcelReader.zip (исправленный)
- Прочтёт только XLS файлы.
- Есть проблемы с кодировкой.
require_once __DIR__ . '/phpExcelReader/Excel/reader.php';

$data = new Spreadsheet_Excel_Reader();
$data->setOutputEncoding('UTF-8');

// Файл xls
$data->read(__DIR__ . '/test.xls');

// Первый лист
$sheet = $data->sheets[0]['cells'];

foreach ($sheet as $row) {
	print_r($row);
}
PHP
4
PHP-Excel-Reader
https://code.google.com/archive/p/php-excel-reader/
php-excel-reader.zip (2.21)
Форк библиотеки «PHP Excel Reader» с SourceForge предназначенный для вывода таблицы в HTML.
Например файл example.xls выведет следующим образом:
<style>
table.excel {
	border: 1px solid #CCCCCC;
	border-collapse:collapse;
	font-family:sans-serif;
	font-size:12px;
	margin: 0 auto;
}
table.excel thead th, table.excel tbody th {
	border: 1px solid #CCCCCC;
	text-align: center;
	vertical-align:bottom;
}
table.excel tbody th {
	text-align:center;
	width:20px;
}
table.excel tbody td {
	vertical-align:bottom;
}
table.excel tbody td {
	padding: 0 3px;
	border: 1px solid #EEEEEE;
}
</style>

<?php
require_once __DIR__ . '/php-excel-reader/excel_reader2.php';
$data = new Spreadsheet_Excel_Reader(__DIR__ . '/example.xls');
echo $data->dump(true, true);
?>
HTML
Также у библиотеки есть методы для получения формата и содержания каждой ячейки по отдельности.
5
Nuovo Spreadsheet-Reader
https://github.com/nuovo/spreadsheet-reader
spreadsheet-reader.zip
Читает файлы XLSX, XLS, CSV и OpenOffice ods. Для чтения XLS используется предыдущая библиотека php-excel-reader.
require_once __DIR__ . '/spreadsheet-reader/php-excel-reader/excel_reader2.php';
require_once __DIR__ . '/spreadsheet-reader/SpreadsheetReader.php';

// Файл xlsx, xls, csv, ods.
$Reader = new SpreadsheetReader(__DIR__ . '/test.xlsx');

// Номер листа.
$Reader -> ChangeSheet(0);

foreach ($Reader as $Row) {
	print_r($Row);
}
PHP
6
PHP-Spreadsheetreader
https://code.google.com/archive/p/php-spreadsheetreader/
SpreadsheetReader.rar
Откроет только файлы в формате XML Excel 2004.
$file = __DIR__ . '/test.xml';

require_once __DIR__ . '/SpreadsheetReader/SpreadsheetReader.php';
$reader = new SpreadsheetReader;

// Файл xml
$sheets = $reader->read(__DIR__ . '/test.xml');

// Выводим Первый лист
foreach ($sheets[0] as $row) {
   print_r($row);
}
PHP
PHPExcel — библиотека для создания и чтения данных из файлов формата OpenXML (который используется в MS Excel 2007). С ее помощью можно считывать из файлов, записывать в файлы, форматировать содержимое, работать с формулами и т.д. Для работы PHPExcel требуется версия PHP 5.2 или выше, с установленными библиотеками Zip, XML и GD2.
Установка PHPExcel
Первым делом библиотеку необходимо скачать. Для этого переходим на официальный сайт библиотеки и скачиваем архив PHPExcel-1.7.8.zip. После распаковки мы получим несколько файлов и папок:
- Classes
- Documentation
- Tests
- changelog.txt
- install.txt
- license.txt
Файлы — это различные описания по предыдущим версиям, лицензионное соглашение и очень краткая инструкция по установке. Далее, в папке Classes, содержится непосредственно сама библиотека PHPExcel — эту папку необходимо скопировать в корень нашего скрипта.
В папке Documentation содержится документация по библиотеке на английском языке. В папке Tests — примеры по использованию библиотеки.
Создание Excel-файла
Итак, давайте создадим файл makeexcel.php и начинаем работать с ним. Для начала нам необходимо подключить главный файл библиотеки PHPExcel.php (который находится в папке Classes) и создать объект класса PHPExcel:
require_once 'Classes/PHPExcel.php';
$pExcel = new PHPExcel();
Настройки листа книги Excel
Документ Excel состоит из книг, а каждая книга в свою очередь, состоит из листов. Далее лист состоит из набора ячеек, доступ к которым осуществляется по координатам. То есть у нас есть столбцы, которые имеют буквенные имена (А, В, С и т.д) и есть строки, которые пронумерованы. Значит, что бы получить доступ к первой ячейке нужно указать код А1. Точно также мы с помощью библиотеки будем получать доступ к каждой ячейке.
Итак, первым делом необходимо выбрать активный лист, на который мы будем выводить данные и получить объект этого листа:
$pExcel->setActiveSheetIndex(0);
$aSheet = $pExcel->getActiveSheet();
С помощью метода setActiveSheetIndex(0) указываем индекс (номер) активного листа. Нумерация листов начинается с нуля. Далее с помощью метода getActiveSheet() получаем объект этого активного листа, то есть другими словами получаем доступ к нему для работы. И сохраняем этот объект в переменную $aSheet.
Если Вы захотите указать активным какой то другой лист, то вначале его необходимо создать, при помощи метода:
$pExcel->createSheet();
Затем, по аналогии, указываем индекс и получаем объект активного листа.
// Ориентация страницы и  размер листа
$aSheet->getPageSetup()
       ->setOrientation(PHPExcel_Worksheet_PageSetup::ORIENTATION_PORTRAIT);
$aSheet->getPageSetup()
       ->SetPaperSize(PHPExcel_Worksheet_PageSetup::PAPERSIZE_A4);
// Поля документа
$aSheet->getPageMargins()->setTop(1);
$aSheet->getPageMargins()->setRight(0.75);
$aSheet->getPageMargins()->setLeft(0.75);
$aSheet->getPageMargins()->setBottom(1);
// Название листа
$aSheet->setTitle('Прайс-лист');
// Шапка и футер (при печати)
$aSheet->getHeaderFooter()
       ->setOddHeader('&CТД ТИНКО: прайс-лист');
$aSheet->getHeaderFooter()
       ->setOddFooter('&L&B'.$aSheet->getTitle().'&RСтраница &P из &N');
// Настройки шрифта
$pExcel->getDefaultStyle()->getFont()->setName('Arial');
$pExcel->getDefaultStyle()->getFont()->setSize(8);
Вначале задаем ориентацию листа при помощи метода setOrientation(), которому передаем константу класса PHPExcel_Worksheet_PageSetup:
- ORIENTATION_PORTRAIT — книжная
- ORIENTATION_LANDSCAPE — альбомная
Обратите внимание, что перед методом setOrientation() необходимо вызвать метод getPageSetup(), который предоставляет доступ к настройкам страницы.
Далее вызываем метод SetPaperSize(), который позволяет задать размер страницы для печати. Ему передаем параметром константу PAPERSIZE_A4 класса PHPExcel_Worksheet_PageSetup. Что означает, что размер листа страницы будет установлен А4.
Далее устанавливаем поля документа, то есть отступы от краев документа. Отступы задаются в специальных символьных единицах. Вначале, обратите внимание, вызываем у объекта $aSheet метод getPageMargins(), который вернет объект класса, отвечающего за настройки полей страницы. Затем вызываем методы setTop(), setRight(), setLeft() и setBottom().
Далее при помощи метода setTitle(‘Прайс лист’) задаем название нашего листа.
Если нужно, можно при печати выводить шапку и подвал листа:
- setOddHeader();
- setOddFooter();
Обратите внимание на передаваемые параметры:
- для шапки передаем строку ‘&CТД ТИНКО: прайс-лист’; метка &C означает, что текст нужно расположить по центру.
- для подвала передаем строку ‘&L&B’.$aSheet->getTitle().’&RСтраница &P из &N’; это означает, что нужно вывести слева и жирным шрифтом (&L&B) название листа (метод $aSheet->getTitle()), затем справа (&R) вывести номер страницы (&P) из общего количества страниц (&N).
Затем указываем настройки шрифта по умолчанию:
- setName(‘Arial’) — задаем имя шрифта;
- setSize(8) — задаем размер шрифта.
Наполнение документа данными
Для начала давайте зададим ширину столбцов (в символьных единицах), которые нам понадобятся:
$aSheet->getColumnDimension('A')->setWidth(3);
$aSheet->getColumnDimension('B')->setWidth(7);
$aSheet->getColumnDimension('C')->setWidth(20);
$aSheet->getColumnDimension('D')->setWidth(40);
$aSheet->getColumnDimension('E')->setWidth(10);
Теперь заполним несколько ячеек текстом:
$aSheet->mergeCells('A1:E1');
$aSheet->getRowDimension('1')->setRowHeight(20);
$aSheet->setCellValue('A1','ТД ТИНКО');
$aSheet->mergeCells('A2:E2');
$aSheet->setCellValue('A2','Поставка технических средств безопасности');
$aSheet->mergeCells('A4:C4');
$aSheet->setCellValue('A4','Дата создания прайс-листа');
Здесь мы сначала объеденяем ячейки с А1 до E1 при помощи метода mergeCells(), далее задаем высоту строки: вначале получаем доступ к строке 1 при помощи метода getRowDimension(‘1’), затем задаем высоту — setRowHeight(20). Далее при помощи метода setCellValue(‘A1′,’ТД ТИНКО’), устанавливаем значение ячейки А1.
Далее давайте в ячейку D4 запишем текущую дату:
// Записываем данные в ячейку
$date = date('d-m-Y');
$aSheet->setCellValue('D4',$date);
// Устанавливает формат данных в ячейке (дата вида дд-мм-гггг)
$aSheet->getStyle('D4')->getNumberFormat()
->setFormatCode(PHPExcel_Style_NumberFormat::FORMAT_DATE_XLSX14);
С помощью констант, определенных в классе PHPExcel_Style_NumberFormat, можно задать формат ячейки: FORMAT_GENERAL (общий), FORMAT_TEXT (текст), FORMAT_NUMBER (число), FORMAT_NUMBER_00 (число с дробной частью), FORMAT_PERCENTAGE (процент), FORMAT_PERCENTAGE_00 (процент с дробной частью) и т.п.
Теперь, используя метод setCellValue(), а также цикл while() наполним данными наш прайс-лист:
mysql_connect(DB_HOST, DB_USER, DB_PASS);
mysql_query('SET NAMES utf8');
mysql_select_db(DB_NAME);

// Создаем шапку таблички данных
$aSheet->setCellValue('A6','№');
$aSheet->setCellValue('B6','Код');
$aSheet->setCellValue('C6','Наименование');
$aSheet->setCellValue('D6','Описание');
$aSheet->setCellValue('E6','Цена');

$query = "SELECT `code`, `name`, `description`, `price` FROM `products` WHERE 1 LIMIT 10";
$res = mysql_query( $query );

$i = 1;
while( $prd = mysql_fetch_assoc($res) ) {
    $aSheet->setCellValue('A'.($i+6), $i);
    $aSheet->setCellValue('B'.($i+6), $prd['code']);
    $aSheet->setCellValue('C'.($i+6), $prd['name']);
    $aSheet->setCellValue('D'.($i+6), $prd['description']);
    $aSheet->setCellValue('E'.($i+6), $prd['price']);
    $i++;
}
Стилизация данных
Давайте немного украсим наш прайс-лист, то есть каждой ячейке добавим стилей. Для этого необходимо создать массив со стилями и при помощи метода applyFromArray(), применить этот массив к ячейке (или ячейкам):
// массив стилей
$style_wrap = array(
    // рамки
    'borders'=>array(
        // внешняя рамка
        'outline' => array(
            'style'=>PHPExcel_Style_Border::BORDER_THICK,
            'color' => array(
                'rgb'=>'006464'
            )
        ),
        // внутренняя
        'allborders'=>array(
            'style'=>PHPExcel_Style_Border::BORDER_THIN,
            'color' => array(
                'rgb'=>'CCCCCC'
            )
        )
    )
);

$aSheet->getStyle('A1:F'.($i+5))->applyFromArray($style_wrap);
Теперь, по аналогии, применим стили к остальным ячейкам:
// Стили для верхней надписи (первая строка)
$style_header = array(
    // Шрифт
    'font'=>array(
        'bold' => true,
        'name' => 'Times New Roman',
        'size' => 15,
        'color'=>array(
            'rgb' => '006464'
        )
    ),
    // Выравнивание
    'alignment' => array(
        'horizontal' => PHPExcel_STYLE_ALIGNMENT::HORIZONTAL_CENTER,
        'vertical' => PHPExcel_STYLE_ALIGNMENT::VERTICAL_CENTER,
    ),
    // Заполнение цветом
    'fill' => array(
        'type' => PHPExcel_STYLE_FILL::FILL_SOLID,
        'color'=>array(
            'rgb' => '99CCCC'
        )
    ),
    'borders'=>array(
        'bottom'=>array(
            'style'=>PHPExcel_Style_Border::BORDER_THIN,
            'color' => array(
                'rgb'=>'006464'
            )
        )
    )
);
$aSheet->getStyle('A1:E1')->applyFromArray($style_header);

// Стили для слогана компании (вторая строка)
$style_slogan = array(
    // шрифт
    'font'=>array(
        'bold' => true,
        'italic' => true,
        'name' => 'Times New Roman',
        'size' => 12,
        'color'=>array(
            'rgb' => '006464'
        )
    ),
    // выравнивание
    'alignment' => array(
        'horizontal' => PHPExcel_STYLE_ALIGNMENT::HORIZONTAL_CENTER,
        'vertical' => PHPExcel_STYLE_ALIGNMENT::VERTICAL_CENTER,
    ),
    // заполнение цветом
    'fill' => array(
        'type' => PHPExcel_STYLE_FILL::FILL_SOLID,
        'color'=>array(
            'rgb' => '99CCCC'
        )
    ),
    //рамки
    'borders' => array(
        'bottom' => array(
            'style'=>PHPExcel_Style_Border::BORDER_THIN,
            'color' => array(
                'rgb'=>'006464'
            )
        )
    )
);
$aSheet->getStyle('A2:E2')->applyFromArray($style_slogan);

// Стили для текта возле даты
$style_tdate = array(
    // выравнивание
    'alignment' => array(
        'horizontal' => PHPExcel_STYLE_ALIGNMENT::HORIZONTAL_RIGHT,
    ),
    // заполнение цветом
    'fill' => array(
        'type' => PHPExcel_STYLE_FILL::FILL_SOLID,
        'color'=>array(
            'rgb' => 'EEEEEE'
        )
    ),
    // рамки
    'borders' => array(
        'right' => array(
            'style'=>PHPExcel_Style_Border::BORDER_NONE
        )
    )
);
$aSheet->getStyle('A4:D4')->applyFromArray($style_tdate);

// Стили для даты
$style_date = array(
    // заполнение цветом
    'fill' => array(
        'type' => PHPExcel_STYLE_FILL::FILL_SOLID,
        'color'=>array(
            'rgb' => 'EEEEEE'
        )
    ),
    // рамки
    'borders' => array(
        'left' => array(
            'style'=>PHPExcel_Style_Border::BORDER_NONE
        )
    ),
);
$aSheet->getStyle('E4')->applyFromArray($style_date);

// Стили для шапки таблицы (шестая строка)
$style_hprice = array(
    // выравнивание
    'alignment' => array(
    'horizontal' => PHPExcel_STYLE_ALIGNMENT::HORIZONTAL_CENTER,
    ),
    // заполнение цветом
    'fill' => array(
        'type' => PHPExcel_STYLE_FILL::FILL_SOLID,
        'color'=>array(
            'rgb' => 'CFCFCF'
        )
    ),
    // шрифт
    'font'=>array(
        'bold' => true,
        /* 'italic' => true, */
        'name' => 'Times New Roman',
        'size' => 10
    ),
);
$aSheet->getStyle('A6:E6')->applyFromArray($style_hprice);

// Cтили для данных в таблице прайс-листа
$style_price = array(
    'alignment' => array(
    'horizontal' => PHPExcel_STYLE_ALIGNMENT::HORIZONTAL_LEFT,
    )
);
$aSheet->getStyle('A7:E'.($i+5))->applyFromArray($style_price);
Сохранение документа
Осталось только сохранить наш документ:
/*
$objWriter = PHPExcel_IOFactory::createWriter($pExcel, 'Excel5');
$objWriter->save('simple.xls');
*/
$objWriter = PHPExcel_IOFactory::createWriter($pExcel, 'Excel2007');
$objWriter->save('simple.xlsx');
или так
/*
$objWriter = new PHPExcel_Writer_Excel5($pExcel);
$objWriter->save('simple.xls');
*/
$objWriter = new PHPExcel_Writer_Excel2007($pExcel);
$objWriter->save('simple.xlsx');
Если нужно вывести документ в браузер
/*
header('Content-Type:application/vnd.ms-excel');
header('Content-Disposition:attachment;filename="simple.xls"');
$objWriter = new PHPExcel_Writer_Excel5($pExcel);
*/
header('Content-Type:xlsx:application/vnd.openxmlformats-officedocument.spreadsheetml.sheet');
header('Content-Disposition:attachment;filename="simple.xlsx"');
$objWriter = new PHPExcel_Writer_Excel2007($pExcel);
$objWriter->save('php://output');
Первый заголовок указывает браузеру тип открываемого контента — это документ формата Excel. Второй — говорит браузеру, что документ необходимо отдать пользователю на скачивание под именем simple.xlsx.
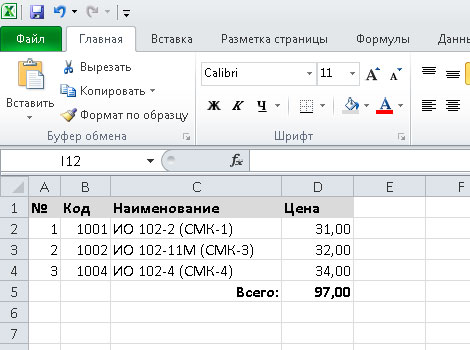
Добавление формул
Формула Excel — это математическое выражение, которое создается для вычисления результата и которое может зависеть от содержимого других ячеек. Формула в ячейке Excel может содержать данные, ссылки на другие ячейки, а также обозначение действий, которые необходимо выполнить.
Использование ссылок на ячейки позволяет пересчитывать результат по формулам, когда происходят изменения содержимого ячеек, включенных в формулы. Формулы Excel начинаются со знака =. Скобки ( ) могут использоваться для определения порядка математических операции.
Примеры формул Excel: =27+36, =А1+А2-АЗ, =SUM(А1:А5), =MAX(АЗ:А5), =(А1+А2)/АЗ.
PHPExcel тоже поддерживает добавление формул в ячейки. Установить формулу можно так:
// формула для вычисления суммы
$formula = '=SUM(D2:D4)';
$aSheet->setCellValue('D5', $formula);
Чтение Excel-файла
Самый простой вариант — считать все таблицы (на всех листах) и записать данные в трехмерный массив:
// Подключаем библиотеку
require_once 'Classes/PHPExcel.php';
$pExcel = PHPExcel_IOFactory::load('simple.xlsx');

// Цикл по листам Excel-файла
foreach ($pExcel->getWorksheetIterator() as $worksheet) {
    // выгружаем данные из объекта в массив
    $tables[] = $worksheet->toArray();
}
Теперь можно вывести массив:
// Цикл по листам Excel-файла
foreach( $tables as $table ) {
    echo '<table border="1">';
    // Цикл по строкам
    foreach($table as $row) {
        echo '<tr>';
        // Цикл по колонкам
        foreach( $row as $col ) {
            echo '<td>'.$col.'</td>';
        }
        echo '</tr>';
    }
    echo '</table>';
}
Для получения значения отдельной ячейки:
// выбираем лист, с которым будем работать
$pExcel->setActiveSheetIndex(0);
$aSheet = $pExcel->getActiveSheet();
// получаем доступ к ячейке по номеру строки
// (нумерация с единицы) и столбца (нумерация с нуля)
$cell = $aSheet->getCellByColumnAndRow($col, $row);
// читаем значение ячейки
$value = $cell->getValue()
или так:
$value = $pExcel->getActiveSheet()->getCellValue('B2')
Еще два примера:
// Цикл по листам Excel-файла
foreach( $pExcel->getWorksheetIterator() as $worksheet ) {
    echo '<h2>Лист «'.$worksheet->getTitle().'»</h2>';
    echo '<table border="1">';
    // Цикл по строкам
    foreach( $worksheet->getRowIterator() as $row ) {
        echo '<tr>';
        // Цикл по колонкам
        foreach( $row->getCellIterator() as $cell ) {
            $value = $cell->getValue();
            // $calcValue = $cell->getCalculatedValue()
            // $dataType = PHPExcel_Cell_DataType::dataTypeForValue($value);
            echo '<td>'.$value.'</td>';
        }
        echo '</tr>';
    }
    echo '</table>';
}
// Цикл по листам Excel-файла
foreach ($pExcel->getWorksheetIterator() as $worksheet) {
    $worksheetTitle     = $worksheet->getTitle();
    $highestRow         = $worksheet->getHighestRow(); // например, 10
    $highestColumn      = $worksheet->getHighestColumn(); // например, 'E'
    $highestColumnIndex = PHPExcel_Cell::columnIndexFromString($highestColumn);
    $nrColumns = ord($highestColumn) - 64;
    echo '<h2>Лист «'.$worksheetTitle.'» ';
    echo $nrColumns . ' колонок (A-' . $highestColumn . ') ';
    echo ' и ' . $highestRow . ' строк.</h2>';
    echo '<table border="1">';
    // Цикл по строкам
    for ($row = 1; $row <= $highestRow; $row++) {
        echo '<tr>';
        // Цикл по колонкам
        for ($col = 0; $col < $highestColumnIndex; $col++) {
            $cell = $worksheet->getCellByColumnAndRow($col, $row);
            echo '<td>'.$cell->getValue().'</td>';
        }
        echo '</tr>';
    }
    echo '</table>';
}
Дополнительно
- Документация разработчика PHPExcel на русском
- Блог на Laravel 7, часть 17. Временная зона для пользователей, деплой на хостинг TimeWeb
- Блог на Laravel 7, часть 16. Роль нового пользователя, сообщение админу о новом посте
- Блог на Laravel 7, часть 15. Восстановление постов, slug для категории, поста и страницы
- Блог на Laravel 7, часть 14. Валидация данных и права доступа при загрузке изображений
- Блог на Laravel 7, часть 13. Загрузка и ресайз изображений для категорий и постов блога
- Блог на Laravel 7, часть 12. Доп.страницы сайта в панели управления и в публичной части
- Блог на Laravel 7, часть 11. Панель управления — назначение ролей и прав для пользователей
Поиск:
Excel • MS • PHP • Web-разработка
Каталог оборудования
Lorem ipsum dolor sit amet, consectetur adipiscing elit, sed do eiusmod tempor incididunt ut labore et dolore magna aliqua.
Производители
Lorem ipsum dolor sit amet, consectetur adipiscing elit, sed do eiusmod tempor incididunt ut labore et dolore magna aliqua.
Функциональные группы
Lorem ipsum dolor sit amet, consectetur adipiscing elit, sed do eiusmod tempor incididunt ut labore et dolore magna aliqua.
Security
XML-based formats such as OfficeOpen XML, Excel2003 XML, OASIS and
Gnumeric are susceptible to XML External Entity Processing (XXE)
injection attacks when reading spreadsheet files. This can lead to:
- Disclosure whether a file is existent
- Server Side Request Forgery
- Command Execution (depending on the installed PHP wrappers)
To prevent this, by default every XML-based Reader looks for XML
entities declared inside the DOCTYPE and if any is found an exception
is raised.
Read more about of XXE injection.
Loading a Spreadsheet File
The simplest way to load a workbook file is to let PhpSpreadsheet’s IO
Factory identify the file type and load it, calling the static load()
method of the PhpOfficePhpSpreadsheetIOFactory class.
$inputFileName = './sampleData/example1.xls';

/** Load $inputFileName to a Spreadsheet Object  **/
$spreadsheet = PhpOfficePhpSpreadsheetIOFactory::load($inputFileName);
See samples/Reader/01_Simple_file_reader_using_IOFactory.php for a working
example of this code.
The load() method will attempt to identify the file type, and
instantiate a loader for that file type; using it to load the file and
store the data and any formatting in a Spreadsheet object.
The method makes an initial guess at the loader to instantiate based on
the file extension; but will test the file before actually executing the
load: so if (for example) the file is actually a CSV file or contains
HTML markup, but that has been given a .xls extension (quite a common
practise), it will reject the Xls loader that it would normally use for
a .xls file; and test the file using the other loaders until it finds
the appropriate loader, and then use that to read the file.
If you know that this is an xls file, but don’t know whether it is a
genuine BIFF-format Excel or Html markup with an xls extension, you can
limit the loader to check only those two possibilities by passing in an
array of Readers to test against.
$inputFileName = './sampleData/example1.xls';
$testAgainstFormats = [
    PhpOfficePhpSpreadsheetIOFactory::READER_XLS,
    PhpOfficePhpSpreadsheetIOFactory::READER_HTML,
];

/** Load $inputFileName to a Spreadsheet Object  **/
$spreadsheet = PhpOfficePhpSpreadsheetIOFactory::load($inputFileName, 0, $testAgainstFormats);
While easy to implement in your code, and you don’t need to worry about
the file type; this isn’t the most efficient method to load a file; and
it lacks the flexibility to configure the loader in any way before
actually reading the file into a Spreadsheet object.
Creating a Reader and Loading a Spreadsheet File
If you know the file type of the spreadsheet file that you need to load,
you can instantiate a new reader object for that file type, then use the
reader’s load() method to read the file to a Spreadsheet object. It is
possible to instantiate the reader objects for each of the different
supported filetype by name. However, you may get unpredictable results
if the file isn’t of the right type (e.g. it is a CSV with an extension
of .xls), although this type of exception should normally be trapped.
$inputFileName = './sampleData/example1.xls';

/** Create a new Xls Reader  **/
$reader = new PhpOfficePhpSpreadsheetReaderXls();
//    $reader = new PhpOfficePhpSpreadsheetReaderXlsx();
//    $reader = new PhpOfficePhpSpreadsheetReaderXml();
//    $reader = new PhpOfficePhpSpreadsheetReaderOds();
//    $reader = new PhpOfficePhpSpreadsheetReaderSlk();
//    $reader = new PhpOfficePhpSpreadsheetReaderGnumeric();
//    $reader = new PhpOfficePhpSpreadsheetReaderCsv();
/** Load $inputFileName to a Spreadsheet Object  **/
$spreadsheet = $reader->load($inputFileName);
See samples/Reader/02_Simple_file_reader_using_a_specified_reader.php
for a working example of this code.
Alternatively, you can use the IO Factory’s createReader() method to
instantiate the reader object for you, simply telling it the file type
of the reader that you want instantiating.
$inputFileType = 'Xls';
//    $inputFileType = 'Xlsx';
//    $inputFileType = 'Xml';
//    $inputFileType = 'Ods';
//    $inputFileType = 'Slk';
//    $inputFileType = 'Gnumeric';
//    $inputFileType = 'Csv';
$inputFileName = './sampleData/example1.xls';

/**  Create a new Reader of the type defined in $inputFileType  **/
$reader = PhpOfficePhpSpreadsheetIOFactory::createReader($inputFileType);
/**  Load $inputFileName to a Spreadsheet Object  **/
$spreadsheet = $reader->load($inputFileName);
See samples/Reader/03_Simple_file_reader_using_the_IOFactory_to_return_a_reader.php
for a working example of this code.
If you’re uncertain of the filetype, you can use the IOFactory::identify()
method to identify the reader that you need, before using the
createReader() method to instantiate the reader object.
$inputFileName = './sampleData/example1.xls';

/**  Identify the type of $inputFileName  **/
$inputFileType = PhpOfficePhpSpreadsheetIOFactory::identify($inputFileName);
/**  Create a new Reader of the type that has been identified  **/
$reader = PhpOfficePhpSpreadsheetIOFactory::createReader($inputFileType);
/**  Load $inputFileName to a Spreadsheet Object  **/
$spreadsheet = $reader->load($inputFileName);
See samples/Reader/04_Simple_file_reader_using_the_IOFactory_to_identify_a_reader_to_use.php
for a working example of this code.
As with the IOFactory load() method, you can also pass an array of formats
for the identify() method to check against if you know that it will only
be in a subset of the possible formats that PhpSpreadsheet supports.
$inputFileName = './sampleData/example1.xls';
$testAgainstFormats = [
    PhpOfficePhpSpreadsheetIOFactory::READER_XLS,
    PhpOfficePhpSpreadsheetIOFactory::READER_HTML,
];

/**  Identify the type of $inputFileName  **/
$inputFileType = PhpOfficePhpSpreadsheetIOFactory::identify($inputFileName, $testAgainstFormats);
You can also use this to confirm that a file is what it claims to be:
$inputFileName = './sampleData/example1.xls';

try {
    /**  Verify that $inputFileName really is an Xls file **/
    $inputFileType = PhpOfficePhpSpreadsheetIOFactory::identify($inputFileName, [PhpOfficePhpSpreadsheetIOFactory::READER_XLS]);
} catch (PhpOfficePhpSpreadsheetReaderException $e) {
    // File isn't actually an Xls file, even though it has an xls extension
}
Spreadsheet Reader Options
Once you have created a reader object for the workbook that you want to
load, you have the opportunity to set additional options before
executing the load() method.
Reading Only Data from a Spreadsheet File
If you’re only interested in the cell values in a workbook, but don’t
need any of the cell formatting information, then you can set the reader
to read only the data values and any formulae from each cell using the
setReadDataOnly() method.
$inputFileType = 'Xls';
$inputFileName = './sampleData/example1.xls';

/**  Create a new Reader of the type defined in $inputFileType  **/
$reader = PhpOfficePhpSpreadsheetIOFactory::createReader($inputFileType);
/**  Advise the Reader that we only want to load cell data  **/
$reader->setReadDataOnly(true);
/**  Load $inputFileName to a Spreadsheet Object  **/
$spreadsheet = $reader->load($inputFileName);
See samples/Reader/05_Simple_file_reader_using_the_read_data_only_option.php
for a working example of this code.
It is important to note that most Workbooks (and PhpSpreadsheet) store dates
and times as simple numeric values: they can only be distinguished from
other numeric values by the format mask that is applied to that cell.
When setting read data only to true, PhpSpreadsheet doesn’t read the
cell format masks, so it is not possible to differentiate between
dates/times and numbers.
The Gnumeric loader has been written to read the format masks for date
values even when read data only has been set to true, so it can
differentiate between dates/times and numbers; but this change hasn’t
yet been implemented for the other readers.
Reading Only Data from a Spreadsheet File applies to Readers:
| Reader | Y/N | Reader | Y/N | Reader | Y/N |
|---|---|---|---|---|---|
| Xlsx | YES | Xls | YES | Xml | YES |
| Ods | YES | SYLK | NO | Gnumeric | YES |
| CSV | NO | HTML | NO |
Reading Only Named WorkSheets from a File
If your workbook contains a number of worksheets, but you are only
interested in reading some of those, then you can use the
setLoadSheetsOnly() method to identify those sheets you are interested
in reading.
To read a single sheet, you can pass that sheet name as a parameter to
the setLoadSheetsOnly() method.
$inputFileType = 'Xls';
$inputFileName = './sampleData/example1.xls';
$sheetname = 'Data Sheet #2';

/**  Create a new Reader of the type defined in $inputFileType  **/
$reader = PhpOfficePhpSpreadsheetIOFactory::createReader($inputFileType);
/**  Advise the Reader of which WorkSheets we want to load  **/
$reader->setLoadSheetsOnly($sheetname);
/**  Load $inputFileName to a Spreadsheet Object  **/
$spreadsheet = $reader->load($inputFileName);
See samples/Reader/07_Simple_file_reader_loading_a_single_named_worksheet.php
for a working example of this code.
If you want to read more than just a single sheet, you can pass a list
of sheet names as an array parameter to the setLoadSheetsOnly() method.
$inputFileType = 'Xls';
$inputFileName = './sampleData/example1.xls';
$sheetnames = ['Data Sheet #1','Data Sheet #3'];

/**  Create a new Reader of the type defined in $inputFileType  **/
$reader = PhpOfficePhpSpreadsheetIOFactory::createReader($inputFileType);
/**  Advise the Reader of which WorkSheets we want to load  **/
$reader->setLoadSheetsOnly($sheetnames);
/**  Load $inputFileName to a Spreadsheet Object  **/
$spreadsheet = $reader->load($inputFileName);
See samples/Reader/08_Simple_file_reader_loading_several_named_worksheets.php
for a working example of this code.
To reset this option to the default, you can call the setLoadAllSheets()
method.
$inputFileType = 'Xls';
$inputFileName = './sampleData/example1.xls';

/**  Create a new Reader of the type defined in $inputFileType  **/
$reader = PhpOfficePhpSpreadsheetIOFactory::createReader($inputFileType);
/**  Advise the Reader to load all Worksheets  **/
$reader->setLoadAllSheets();
/**  Load $inputFileName to a Spreadsheet Object  **/
$spreadsheet = $reader->load($inputFileName);
See samples/Reader/06_Simple_file_reader_loading_all_worksheets.php for a
working example of this code.
Reading Only Named WorkSheets from a File applies to Readers:
| Reader | Y/N | Reader | Y/N | Reader | Y/N |
|---|---|---|---|---|---|
| Xlsx | YES | Xls | YES | Xml | YES |
| Ods | YES | SYLK | NO | Gnumeric | YES |
| CSV | NO | HTML | NO |
Reading Only Specific Columns and Rows from a File (Read Filters)
If you are only interested in reading part of a worksheet, then you can
write a filter class that identifies whether or not individual cells
should be read by the loader. A read filter must implement the
PhpOfficePhpSpreadsheetReaderIReadFilter interface, and contain a
readCell() method that accepts arguments of $column, $row and
$worksheetName, and return a boolean true or false that indicates
whether a workbook cell identified by those arguments should be read or
not.
$inputFileType = 'Xls';
$inputFileName = './sampleData/example1.xls';
$sheetname = 'Data Sheet #3';

/**  Define a Read Filter class implementing PhpOfficePhpSpreadsheetReaderIReadFilter  */
class MyReadFilter implements PhpOfficePhpSpreadsheetReaderIReadFilter
{
    public function readCell($columnAddress, $row, $worksheetName = '') {
        //  Read rows 1 to 7 and columns A to E only
        if ($row >= 1 && $row <= 7) {
            if (in_array($column,range('A','E'))) {
                return true;
            }
        }
        return false;
    }
}

/**  Create an Instance of our Read Filter  **/
$filterSubset = new MyReadFilter();

/**  Create a new Reader of the type defined in $inputFileType  **/
$reader = PhpOfficePhpSpreadsheetIOFactory::createReader($inputFileType);
/**  Tell the Reader that we want to use the Read Filter  **/
$reader->setReadFilter($filterSubset);
/**  Load only the rows and columns that match our filter to Spreadsheet  **/
$spreadsheet = $reader->load($inputFileName);
See samples/Reader/09_Simple_file_reader_using_a_read_filter.php for a
working example of this code.
This example is not particularly useful, because it can only be used in
a very specific circumstance (when you only want cells in the range
A1:E7 from your worksheet. A generic Read Filter would probably be more
useful:
/**  Define a Read Filter class implementing PhpOfficePhpSpreadsheetReaderIReadFilter  */
class MyReadFilter implements PhpOfficePhpSpreadsheetReaderIReadFilter
{
    private $startRow = 0;
    private $endRow   = 0;
    private $columns  = [];

    /**  Get the list of rows and columns to read  */
    public function __construct($startRow, $endRow, $columns) {
        $this->startRow = $startRow;
        $this->endRow   = $endRow;
        $this->columns  = $columns;
    }

    public function readCell($columnAddress, $row, $worksheetName = '') {
        //  Only read the rows and columns that were configured
        if ($row >= $this->startRow && $row <= $this->endRow) {
            if (in_array($column,$this->columns)) {
                return true;
            }
        }
        return false;
    }
}

/**  Create an Instance of our Read Filter, passing in the cell range  **/
$filterSubset = new MyReadFilter(9,15,range('G','K'));
See samples/Reader/10_Simple_file_reader_using_a_configurable_read_filter.php
for a working example of this code.
This can be particularly useful for conserving memory, by allowing you
to read and process a large workbook in «chunks»: an example of this
usage might be when transferring data from an Excel worksheet to a
database.
Read Filtering does not renumber cell rows and columns. If you filter to read only rows 100-200, cells that you read will still be numbered A100-A200, not A1-A101. Cells A1-A99 will not be loaded, but if you then try to call getCell() for a cell outside your loaded range, then PHPSpreadsheet will create a new cell with a null value.
Methods such as toArray() assume that all cells in a spreadsheet has been loaded from A1, so will return null values for rows and columns that fall outside your filter range: it is recommended that you keep track of the range that your filter has requested, and use rangeToArray() instead.
$inputFileType = 'Xls';
$inputFileName = './sampleData/example2.xls';

/**  Define a Read Filter class implementing PhpOfficePhpSpreadsheetReaderIReadFilter  */
class ChunkReadFilter implements PhpOfficePhpSpreadsheetReaderIReadFilter
{
    private $startRow = 0;
    private $endRow   = 0;

    /**  Set the list of rows that we want to read  */
    public function setRows($startRow, $chunkSize) {
        $this->startRow = $startRow;
        $this->endRow   = $startRow + $chunkSize;
    }

    public function readCell($columnAddress, $row, $worksheetName = '') {
        //  Only read the heading row, and the configured rows
        if (($row == 1) || ($row >= $this->startRow && $row < $this->endRow)) {
            return true;
        }
        return false;
    }
}

/**  Create a new Reader of the type defined in $inputFileType  **/
$reader = PhpOfficePhpSpreadsheetIOFactory::createReader($inputFileType);

/**  Define how many rows we want to read for each "chunk"  **/
$chunkSize = 2048;
/**  Create a new Instance of our Read Filter  **/
$chunkFilter = new ChunkReadFilter();

/**  Tell the Reader that we want to use the Read Filter  **/
$reader->setReadFilter($chunkFilter);

/**  Loop to read our worksheet in "chunk size" blocks  **/
for ($startRow = 2; $startRow <= 65536; $startRow += $chunkSize) {
    /**  Tell the Read Filter which rows we want this iteration  **/
    $chunkFilter->setRows($startRow,$chunkSize);
    /**  Load only the rows that match our filter  **/
    $spreadsheet = $reader->load($inputFileName);
    //    Do some processing here
}
See samples/Reader/12_Reading_a_workbook_in_chunks_using_a_configurable_read_filter_
for a working example of this code.
Using Read Filters applies to:
| Reader | Y/N | Reader | Y/N | Reader | Y/N |
|---|---|---|---|---|---|
| Xlsx | YES | Xls | YES | Xml | YES |
| Ods | YES | SYLK | NO | Gnumeric | YES |
| CSV | YES | HTML | NO |
Combining Multiple Files into a Single Spreadsheet Object
While you can limit the number of worksheets that are read from a
workbook file using the setLoadSheetsOnly() method, certain readers also
allow you to combine several individual «sheets» from different files
into a single Spreadsheet object, where each individual file is a
single worksheet within that workbook. For each file that you read, you
need to indicate which worksheet index it should be loaded into using
the setSheetIndex() method of the $reader, then use the
loadIntoExisting() method rather than the load() method to actually read
the file into that worksheet.
$inputFileType = 'Csv';
$inputFileNames = [
    './sampleData/example1.csv',
    './sampleData/example2.csv'
    './sampleData/example3.csv'
];

/**  Create a new Reader of the type defined in $inputFileType  **/
$reader = PhpOfficePhpSpreadsheetIOFactory::createReader($inputFileType);

/**  Extract the first named file from the array list  **/
$inputFileName = array_shift($inputFileNames);
/**  Load the initial file to the first worksheet in a `Spreadsheet` Object  **/
$spreadsheet = $reader->load($inputFileName);
/**  Set the worksheet title (to the filename that we've loaded)  **/
$spreadsheet->getActiveSheet()
    ->setTitle(pathinfo($inputFileName,PATHINFO_BASENAME));

/**  Loop through all the remaining files in the list  **/
foreach($inputFileNames as $sheet => $inputFileName) {
    /**  Increment the worksheet index pointer for the Reader  **/
    $reader->setSheetIndex($sheet+1);
    /**  Load the current file into a new worksheet in Spreadsheet  **/
    $reader->loadIntoExisting($inputFileName,$spreadsheet);
    /**  Set the worksheet title (to the filename that we've loaded)  **/
    $spreadsheet->getActiveSheet()
        ->setTitle(pathinfo($inputFileName,PATHINFO_BASENAME));
}
See samples/Reader/13_Simple_file_reader_for_multiple_CSV_files.php for a
working example of this code.
Note that using the same sheet index for multiple sheets won’t append
files into the same sheet, but overwrite the results of the previous
load. You cannot load multiple CSV files into the same worksheet.
Combining Multiple Files into a Single Spreadsheet Object applies to:
| Reader | Y/N | Reader | Y/N | Reader | Y/N |
|---|---|---|---|---|---|
| Xlsx | NO | Xls | NO | Xml | NO |
| Ods | NO | SYLK | YES | Gnumeric | NO |
| CSV | YES | HTML | NO |
Combining Read Filters with the setSheetIndex() method to split a large CSV file across multiple Worksheets
An Xls BIFF .xls file is limited to 65536 rows in a worksheet, while the
Xlsx Microsoft Office Open XML SpreadsheetML .xlsx file is limited to
1,048,576 rows in a worksheet; but a CSV file is not limited other than
by available disk space. This means that we wouldn’t ordinarily be able
to read all the rows from a very large CSV file that exceeded those
limits, and save it as an Xls or Xlsx file. However, by using Read
Filters to read the CSV file in «chunks» (using the ChunkReadFilter
Class that we defined in the above section,
and the setSheetIndex() method of the $reader, we can split the CSV
file across several individual worksheets.
$inputFileType = 'Csv';
$inputFileName = './sampleData/example2.csv';

echo 'Loading file ',pathinfo($inputFileName,PATHINFO_BASENAME),' using IOFactory with a defined reader type of ',$inputFileType,'<br />';
/**  Create a new Reader of the type defined in $inputFileType  **/
$reader = PhpOfficePhpSpreadsheetIOFactory::createReader($inputFileType);

/**  Define how many rows we want to read for each "chunk"  **/
$chunkSize = 65530;
/**  Create a new Instance of our Read Filter  **/
$chunkFilter = new ChunkReadFilter();

/**  Tell the Reader that we want to use the Read Filter  **/
/**    and that we want to store it in contiguous rows/columns  **/

$reader->setReadFilter($chunkFilter)
    ->setContiguous(true);

/**  Instantiate a new Spreadsheet object manually  **/
$spreadsheet = new PhpOfficePhpSpreadsheetSpreadsheet();

/**  Set a sheet index  **/
$sheet = 0;
/**  Loop to read our worksheet in "chunk size" blocks  **/
/**  $startRow is set to 2 initially because we always read the headings in row #1  **/
for ($startRow = 2; $startRow <= 1000000; $startRow += $chunkSize) {
    /**  Tell the Read Filter which rows we want to read this loop  **/
    $chunkFilter->setRows($startRow,$chunkSize);

    /**  Increment the worksheet index pointer for the Reader  **/
    $reader->setSheetIndex($sheet);
    /**  Load only the rows that match our filter into a new worksheet  **/
    $reader->loadIntoExisting($inputFileName,$spreadsheet);
    /**  Set the worksheet title for the sheet that we've justloaded)  **/
    /**    and increment the sheet index as well  **/
    $spreadsheet->getActiveSheet()->setTitle('Country Data #'.(++$sheet));
}
See samples/Reader/14_Reading_a_large_CSV_file_in_chunks_to_split_across_multiple_worksheets.php
for a working example of this code.
This code will read 65,530 rows at a time from the CSV file that we’re
loading, and store each «chunk» in a new worksheet.
The setContiguous() method for the Reader is important here. It is
applicable only when working with a Read Filter, and identifies whether
or not the cells should be stored by their position within the CSV file,
or their position relative to the filter.
For example, if the filter returned true for cells in the range B2:C3,
then with setContiguous set to false (the default) these would be loaded
as B2:C3 in the Spreadsheet object; but with setContiguous set to
true, they would be loaded as A1:B2.
Splitting a single loaded file across multiple worksheets applies to:
| Reader | Y/N | Reader | Y/N | Reader | Y/N |
|---|---|---|---|---|---|
| Xlsx | NO | Xls | NO | Xml | NO |
| Ods | NO | SYLK | NO | Gnumeric | NO |
| CSV | YES | HTML | NO |
Pipe or Tab Separated Value Files
The CSV loader will attempt to auto-detect the separator used in the file. If it
cannot auto-detect, it will default to the comma. If this does not fit your
use-case, you can manually specify a separator by using the setDelimiter()
method.
$inputFileType = 'Csv';
$inputFileName = './sampleData/example1.tsv';

/**  Create a new Reader of the type defined in $inputFileType  **/
$reader = PhpOfficePhpSpreadsheetIOFactory::createReader($inputFileType);
/**  Set the delimiter to a TAB character  **/
$reader->setDelimiter("t");
//    $reader->setDelimiter('|');

/**  Load the file to a Spreadsheet Object  **/
$spreadsheet = $reader->load($inputFileName);
See samples/Reader/15_Simple_file_reader_for_tab_separated_value_file_using_the_Advanced_Value_Binder.php
for a working example of this code.
In addition to the delimiter, you can also use the following methods to
set other attributes for the data load:
| Method | Default |
|---|---|
| setEnclosure() | " |
| setInputEncoding() | UTF-8 |
Setting CSV delimiter applies to:
| Reader | Y/N | Reader | Y/N | Reader | Y/N |
|---|---|---|---|---|---|
| Xlsx | NO | Xls | NO | Xml | NO |
| Ods | NO | SYLK | NO | Gnumeric | NO |
| CSV | YES | HTML | NO |
Reading formatted Numbers from a CSV File
Unfortunately, numbers in a CSV file may be formatted as strings.
If that number is a simple integer or float (with a decimal . separator) without any thousands separator, then it will be treated as a number.
However, if the value has a thousands separator (e.g. 12,345), or a decimal separator that isn’t a . (e.g. 123,45 for a European locale), then it will be loaded as a string with that formatting.
If you want the Csv Reader to convert that value to a numeric when it loads the file, the you need to tell it to do so. The castFormattedNumberToNumeric() lets you do this.
(Assuming that our server is configured with German locale settings: otherwise it may be necessary to call setlocale() before loading the file.)
$inputFileType = 'Csv';
$inputFileName = './sampleData/example1.de.csv';

/** It may be necessary to call setlocale() first if this is not your default locale  */
// setlocale(LC_ALL, 'de_DE.UTF-8', 'deu_deu');

/**  Create a new Reader of the type defined in $inputFileType  **/
$reader = PhpOfficePhpSpreadsheetIOFactory::createReader($inputFileType);
/**  Enable loading numeric values formatted with German , decimal separator and . thousands separator  **/
$reader->castFormattedNumberToNumeric(true);

/**  Load the file to a Spreadsheet Object  **/
$spreadsheet = $reader->load($inputFileName);
This will attempt to load those formatted numeric values as numbers, based on the server’s locale settings.
If you want to load those values as numbers, but also to retain the formatting as a number format mask, then you can pass a boolean true as a second argument to the castFormattedNumberToNumeric() method to tell the Reader to identify the format masking to use for that value. This option does have an arbitrary limit of 6 decimal places.
If your Csv file includes other formats for numbers (currencies, scientific format, etc); then you should probably also use the Advanced Value Binder to handle these cases.
Applies to:
| Reader | Y/N | Reader | Y/N | Reader | Y/N |
|---|---|---|---|---|---|
| Xlsx | NO | Xls | NO | Xml | NO |
| Ods | NO | SYLK | NO | Gnumeric | NO |
| CSV | YES | HTML | NO |
A Brief Word about the Advanced Value Binder
When loading data from a file that contains no formatting information,
such as a CSV file, then data is read either as strings or numbers
(float or integer). This means that PhpSpreadsheet does not
automatically recognise dates/times (such as 16-Apr-2009 or 13:30),
booleans (true or false), percentages (75%), hyperlinks
(https://www.example.com), etc as anything other than simple strings.
However, you can apply additional processing that is executed against
these values during the load process within a Value Binder.
A Value Binder is a class that implement the
PhpOfficePhpSpreadsheetCellIValueBinder interface. It must contain a
bindValue() method that accepts a PhpOfficePhpSpreadsheetCellCell and a
value as arguments, and return a boolean true or false that indicates
whether the workbook cell has been populated with the value or not. The
Advanced Value Binder implements such a class: amongst other tests, it
identifies a string comprising «TRUE» or «FALSE» (based on locale
settings) and sets it to a boolean; or a number in scientific format
(e.g. «1.234e-5») and converts it to a float; or dates and times,
converting them to their Excel timestamp value – before storing the
value in the cell object. It also sets formatting for strings that are
identified as dates, times or percentages. It could easily be extended
to provide additional handling (including text or cell formatting) when
it encountered a hyperlink, or HTML markup within a CSV file.
So using a Value Binder allows a great deal more flexibility in the
loader logic when reading unformatted text files.
/**  Tell PhpSpreadsheet that we want to use the Advanced Value Binder  **/
PhpOfficePhpSpreadsheetCellCell::setValueBinder( new PhpOfficePhpSpreadsheetCellAdvancedValueBinder() );

$inputFileType = 'Csv';
$inputFileName = './sampleData/example1.tsv';

$reader = PhpOfficePhpSpreadsheetIOFactory::createReader($inputFileType);
$reader->setDelimiter("t");
$spreadsheet = $reader->load($inputFileName);
See samples/Reader/15_Simple_file_reader_for_tab_separated_value_file_using_the_Advanced_Value_Binder.php
for a working example of this code.
Loading using a Value Binder applies to:
| Reader | Y/N | Reader | Y/N | Reader | Y/N |
|---|---|---|---|---|---|
| Xlsx | NO | Xls | NO | Xml | NO |
| Ods | NO | SYLK | NO | Gnumeric | NO |
| CSV | YES | HTML | YES |
Error Handling
Of course, you should always apply some error handling to your scripts
as well. PhpSpreadsheet throws exceptions, so you can wrap all your code
that accesses the library methods within Try/Catch blocks to trap for
any problems that are encountered, and deal with them in an appropriate
manner.
The PhpSpreadsheet Readers throw a
PhpOfficePhpSpreadsheetReaderException.
$inputFileName = './sampleData/example-1.xls';

try {
    /** Load $inputFileName to a Spreadsheet Object  **/
    $spreadsheet = PhpOfficePhpSpreadsheetIOFactory::load($inputFileName);
} catch(PhpOfficePhpSpreadsheetReaderException $e) {
    die('Error loading file: '.$e->getMessage());
}
See samples/Reader/16_Handling_loader_exceptions_using_TryCatch.php for a
working example of this code.
Helper Methods
You can retrieve a list of worksheet names contained in a file without
loading the whole file by using the Reader’s listWorksheetNames()
method; similarly, a listWorksheetInfo() method will retrieve the
dimensions of worksheet in a file without needing to load and parse the
whole file.
listWorksheetNames
The listWorksheetNames() method returns a simple array listing each
worksheet name within the workbook:
$reader = PhpOfficePhpSpreadsheetIOFactory::createReader($inputFileType);

$worksheetNames = $reader->listWorksheetNames($inputFileName);

echo '<h3>Worksheet Names</h3>';
echo '<ol>';
foreach ($worksheetNames as $worksheetName) {
    echo '<li>', $worksheetName, '</li>';
}
echo '</ol>';
See samples/Reader/18_Reading_list_of_worksheets_without_loading_entire_file.php
for a working example of this code.
listWorksheetInfo
The listWorksheetInfo() method returns a nested array, with each entry
listing the name and dimensions for a worksheet:
$reader = PhpOfficePhpSpreadsheetIOFactory::createReader($inputFileType);

$worksheetData = $reader->listWorksheetInfo($inputFileName);

echo '<h3>Worksheet Information</h3>';
echo '<ol>';
foreach ($worksheetData as $worksheet) {
    echo '<li>', $worksheet['worksheetName'], '<br />';
    echo 'Rows: ', $worksheet['totalRows'],
         ' Columns: ', $worksheet['totalColumns'], '<br />';
    echo 'Cell Range: A1:',
    $worksheet['lastColumnLetter'], $worksheet['totalRows'];
    echo '</li>';
}
echo '</ol>';
See samples/Reader/19_Reading_worksheet_information_without_loading_entire_file.php
for a working example of this code.
I’m trying to read an Excel file (Office 2003). There is an Excel file that needs to be uploaded and its contents parsed.
Via Google, I can only find answers to these related (and insufficient topics): generating Excel files, reading Excel XML files, reading Excel CSV files, or incomplete abandoned projects. I own Office 2003 so if I need any files from there, they are available. It’s installed on my box but isn’t and can’t be installed on my shared host.
Edit: so far all answers point to PHP-ExcelReader and/or this additional article about how to use it.
![]()
Kangel
231 silver badge8 bronze badges
asked Feb 19, 2009 at 1:53
![]()
3
You have 2 choices as far as I know:
- Spreadsheet_Excel_Reader, which knows the Office 2003 binary format
- PHPExcel, which knows both Office 2003 as well as Excel 2007 (XML). (Follow the link, and you’ll see they upgraded this library to PHPSpreadSheet)
PHPExcel uses Spreadsheet_Excel_Reader for the Office 2003 format.
Update: I once had to read some Excel files but I used the Office 2003 XML format in order to read them and told the people that were using the application to save and upload only that type of Excel file.
![]()
answered Feb 19, 2009 at 1:57
![]()
Ionuț G. StanIonuț G. Stan
175k18 gold badges188 silver badges201 bronze badges
3
I use PHP-ExcelReader to read xls files, and works great.
![]()
user229044♦
231k40 gold badges331 silver badges336 bronze badges
answered Feb 19, 2009 at 3:07
![]()
Luis MelgrattiLuis Melgratti
11.8k3 gold badges30 silver badges32 bronze badges
7
Read XLSX (Excel 2003+)
https://github.com/shuchkin/simplexlsx
if ( $xlsx = SimpleXLSX::parse('book.xlsx') ) {
    print_r( $xlsx->rows() );
} else {
    echo SimpleXLSX::parseError();
}
Output
Array (
    [0] => Array
        (
            [0] => ISBN
            [1] => title
            [2] => author
            [3] => publisher
            [4] => ctry
        )
    [1] => Array
        (
            [0] => 618260307
            [1] => The Hobbit
            [2] => J. R. R. Tolkien
            [3] => Houghton Mifflin
            [4] => USA
       )

)
Read XLS (Excel 97-2003)
https://github.com/shuchkin/simplexls
if ( $xls = SimpleXLS::parse('book.xls') ) {
    print_r( $xls->rows() );
} else {
    echo SimpleXLS::parseError();
}
CSV php reader
https://github.com/shuchkin/simplecsv
if ( $csv = SimpleCSV::import('book.csv') ) {
    print_r( $csv );
}
answered Dec 28, 2018 at 17:56
![]()
1
It depends on how you want to use the data in the excel file. If you want to import it into mysql, you could simply save it as a CSV formatted file and then use fgetcsv to parse it.
![]()
Larry K
47.2k14 gold badges86 silver badges138 bronze badges
answered Apr 21, 2013 at 21:09
![]()
JimboJimbo
4914 silver badges5 bronze badges
// Here is the simple code using COM object in PHP
class Excel_ReadWrite{

    private $XLSHandle;
    private $WrkBksHandle;
    private $xlBook;

    function __construct() {
        $this->XLSHandle = new COM("excel.application") or die("ERROR: Unable to instantaniate COM!rn");
    }

    function __destruct(){
        //if already existing file is opened
        if($this->WrkBksHandle != null)
        {
            $this->WrkBksHandle->Close(True);
            unset($this->WrkBksHandle);
            $this->XLSHandle->Workbooks->Close();
        }
        //if created new xls file
        if($this->xlBook != null)
        {
            $this->xlBook->Close(True);
            unset($this->xlBook);
        }
        //Quit Excel Application
        $this->XLSHandle->Quit();
        unset($this->XLSHandle);
    }

    public function OpenFile($FilePath)
    {
        $this->WrkBksHandle = $this->XLSHandle->Workbooks->Open($FilePath);
    }

    public function ReadData($RowNo, $ClmNo)
    {
       $Value = $this->XLSHandle->ActiveSheet->Cells($RowNo, $ClmNo)->Value;
       return $Value;
    }

    public function SaveOpenedFile()
    {
        $this->WrkBksHandle->Save();
    }

    /***********************************************************************************
    * Function Name:- WriteToXlsFile() will write data based on row and column numbers
    * @Param:- $CellData- cell data
    * @Param:- $RowNumber- xlsx file row number
    * @Param:- $ColumnNumber- xlsx file column numbers
   ************************************************************************************/
   function WriteToXlsFile($CellData, $RowNumber, $ColumnNumber)
   {
       try{
               $this->XLSHandle->ActiveSheet->Cells($RowNumber,$ColumnNumber)->Value = $CellData;
           }
       catch(Exception $e){
               throw new Exception("Error:- Unable to write data to xlsx sheet");
           }
   }


   /****************************************************************************************
    * Function Name:- CreateXlsFileWithClmName() will initialize xls file with column Names
    * @Param:- $XlsColumnNames- Array of columns data
    * @Param:- $XlsColumnWidth- Array of columns width
   *******************************************************************************************/
   function CreateXlsFileWithClmNameAndWidth($WorkSheetName = "Raman", $XlsColumnNames = null, $XlsColumnWidth = null)
   {
       //Hide MS Excel application window
       $this->XLSHandle->Visible = 0;
       //Create new document
       $this->xlBook = $this->XLSHandle->Workbooks->Add();

       //Create Sheet 1
       $this->xlBook->Worksheets(1)->Name = $WorkSheetName;
       $this->xlBook->Worksheets(1)->Select;

       if($XlsColumnWidth != null)
       {
           //$XlsColumnWidth = array("A1"=>15,"B1"=>20);
           foreach($XlsColumnWidth as $Clm=>$Width)
           {
               //Set Columns Width
               $this->XLSHandle->ActiveSheet->Range($Clm.":".$Clm)->ColumnWidth = $Width;
           }
       }
       if($XlsColumnNames != null)
       {
           //$XlsColumnNames = array("FirstColumnName"=>1, "SecondColumnName"=>2);
           foreach($XlsColumnNames as $ClmName=>$ClmNumber)
           {
               // Cells(Row,Column)
               $this->XLSHandle->ActiveSheet->Cells(1,$ClmNumber)->Value = $ClmName;
               $this->XLSHandle->ActiveSheet->Cells(1,$ClmNumber)->Font->Bold = True;
               $this->XLSHandle->ActiveSheet->Cells(1,$ClmNumber)->Interior->ColorIndex = "15";
           }
       }
   }
   //56 is for xls 8
    public function SaveCreatedFile($FileName, $FileFormat = 56)
    {
        $this->xlBook->SaveAs($FileName, $FileFormat);
    }

    public function MakeFileVisible()
    {
       //Hide MS Excel application window`enter code here`
       $this->XLSHandle->Visible = 1;
    }
}//end of EXCEL class
answered Sep 30, 2015 at 23:40
![]()
VickyVicky
871 silver badge5 bronze badges
1
Try this…
I have used following code to read «xls and xlsx»
    <?php
    include 'excel_reader.php';       // include the class
    $excel = new PhpExcelReader;      // creates object instance of the class
    $excel->read('excel_file.xls');   // reads and stores the excel file data

    // Test to see the excel data stored in $sheets property
    echo '<pre>';
    var_export($excel->sheets);

    echo '</pre>';

    or

 echo '<pre>';
    print_r($excel->sheets);

    echo '</pre>';
Reference:http://coursesweb.net/php-mysql/read-excel-file-data-php_pc
answered Jul 4, 2015 at 11:42
![]()
2
I’m using below excel file url: https://github.com/inventorbala/Sample-Excel-files/blob/master/sample-excel-files.xlsx
Output:
Array
    (
        [0] => Array
            (
                [store_id] => 3716
                [employee_uid] => 664368
                [opus_id] => zh901j
                [item_description] => PRE ATT $75 PNLS 90EXP
                [opus_transaction_date] => 2019-10-18
                [opus_transaction_num] => X2MBV1DJKSLQW
                [opus_invoice_num] => O3716IN3409
                [customer_name] => BILL PHILLIPS
                [mobile_num] => 4052380136
                [opus_amount] => 75
                [rq4_amount] => 0
                [difference] => -75
                [ocomment] => Re-Upload: We need RQ4 transaction for October.  If you're unable to provide the October invoice, it will be counted as EPin shortage.
                [mark_delete] => 0
                [upload_date] => 2019-10-20
            )

        [1] => Array
            (
                [store_id] => 2710
                [employee_uid] => 75899
                [opus_id] => dc288t
                [item_description] => PRE ATT $50 PNLS 90EXP
                [opus_transaction_date] => 2019-10-18
                [opus_transaction_num] => XJ90419JKT9R9
                [opus_invoice_num] => M2710IN868
                [customer_name] => CALEB MENDEZ
                [mobile_num] => 6517672079
                [opus_amount] => 50
                [rq4_amount] => 0
                [difference] => -50
                [ocomment] => No Response.  Re-Upload
                [mark_delete] => 0
                [upload_date] => 2019-10-20
            )

        [2] => Array
            (
                [store_id] => 0136
                [employee_uid] => 70167
                [opus_id] => fv766x
                [item_description] => PRE ATT $50 PNLS 90EXP
                [opus_transaction_date] => 2019-10-18
                [opus_transaction_num] => XQ57316JKST1V
                [opus_invoice_num] => GONZABP25622
                [customer_name] => FAUSTINA CASTILLO
                [mobile_num] => 8302638628
                [opus_amount] => 100
                [rq4_amount] => 50
                [difference] => -50
                [ocomment] => Re-Upload: We have been charged in opus for $100. Provide RQ4 invoice number for remaining amount
                [mark_delete] => 0
                [upload_date] => 2019-10-20
            )

        [3] => Array
            (
                [store_id] => 3264
                [employee_uid] => 23723
                [opus_id] => aa297h
                [item_description] => PRE ATT $25 PNLS 90EXP
                [opus_transaction_date] => 2019-10-19
                [opus_transaction_num] => XR1181HJKW9MP
                [opus_invoice_num] => C3264IN1588
                [customer_name] => SOPHAT VANN
                [mobile_num] => 9494668372
                [opus_amount] => 70
                [rq4_amount] => 25
                [difference] => -45
                [ocomment] => No Response.  Re-Upload
                [mark_delete] => 0
                [upload_date] => 2019-10-20
            )

        [4] => Array
            (
                [store_id] => 4166
                [employee_uid] => 568494
                [opus_id] => ab7598
                [item_description] => PRE ATT $40 RTR
                [opus_transaction_date] => 2019-10-20
                [opus_transaction_num] => X8F58P3JL2RFU
                [opus_invoice_num] => I4166IN2481
                [customer_name] => KELLY MC GUIRE
                [mobile_num] => 6189468180
                [opus_amount] => 40
                [rq4_amount] => 0
                [difference] => -40
                [ocomment] => Re-Upload: The invoice number that you provided (I4166IN2481) belongs to September transaction.  We need RQ4 transaction for October.  If you're unable to provide the October invoice, it will be counted as EPin shortage.
                [mark_delete] => 0
                [upload_date] => 2019-10-21
            )

        [5] => Array
            (
                [store_id] => 4508
                [employee_uid] => 552502
                [opus_id] => ec850x
                [item_description] => $30 RTR
                [opus_transaction_date] => 2019-10-20
                [opus_transaction_num] => XPL7M1BJL1W5D
                [opus_invoice_num] => M4508IN6024
                [customer_name] => PREPAID CUSTOMER
                [mobile_num] => 6019109730
                [opus_amount] => 30
                [rq4_amount] => 0
                [difference] => -30
                [ocomment] => Re-Upload: The invoice number you provided (M4508IN7217) belongs to a different phone number.  We need RQ4 transaction for the phone number in question.  If you're unable to provide the RQ4 invoice for this transaction, it will be counted as EPin shortage.
                [mark_delete] => 0
                [upload_date] => 2019-10-21
            )

        [6] => Array
            (
                [store_id] => 3904
                [employee_uid] => 35818
                [opus_id] => tj539j
                [item_description] => PRE $45 PAYG PINLESS REFILL
                [opus_transaction_date] => 2019-10-20
                [opus_transaction_num] => XM1PZQSJL215F
                [opus_invoice_num] => N3904IN1410
                [customer_name] => DORTHY JONES
                [mobile_num] => 3365982631
                [opus_amount] => 90
                [rq4_amount] => 45
                [difference] => -45
                [ocomment] => Re-Upload: Please email the details to Treasury and confirm
                [mark_delete] => 0
                [upload_date] => 2019-10-21
            )

        [7] => Array
            (
                [store_id] => 1820
                [employee_uid] => 59883
                [opus_id] => cb9406
                [item_description] => PRE ATT $25 PNLS 90EXP
                [opus_transaction_date] => 2019-10-20
                [opus_transaction_num] => XTBJO14JL25OE
                [opus_invoice_num] => SEVIEIN19013
                [customer_name] => RON NELSON
                [mobile_num] => 8653821076
                [opus_amount] => 25
                [rq4_amount] => 5
                [difference] => -20
                [ocomment] => Re-Upload: We have been charged in opus for $25. Provide RQ4 invoice number for remaining amount
                [mark_delete] => 0
                [upload_date] => 2019-10-21
            )

        [8] => Array
            (
                [store_id] => 0178
                [employee_uid] => 572547
                [opus_id] => ms5674
                [item_description] => PRE $45 PAYG PINLESS REFILL
                [opus_transaction_date] => 2019-10-21
                [opus_transaction_num] => XT29916JL4S69
                [opus_invoice_num] => T0178BP1590
                [customer_name] => GABRIEL LONGORIA JR
                [mobile_num] => 4322133450
                [opus_amount] => 45
                [rq4_amount] => 0
                [difference] => -45
                [ocomment] => Re-Upload: Please email the details to Treasury and confirm
                [mark_delete] => 0
                [upload_date] => 2019-10-22
            )

        [9] => Array
            (
                [store_id] => 2180
                [employee_uid] => 7842
                [opus_id] => lm854y
                [item_description] => $30 RTR
                [opus_transaction_date] => 2019-10-21
                [opus_transaction_num] => XC9U712JL4LA4
                [opus_invoice_num] => KETERIN1836
                [customer_name] => PETE JABLONSKI
                [mobile_num] => 9374092680
                [opus_amount] => 30
                [rq4_amount] => 40
                [difference] => 10
                [ocomment] => Re-Upload: Credit the remaining balance to customers account in OPUS and email confirmation to Treasury
                [mark_delete] => 0
                [upload_date] => 2019-10-22
            )


      .
      .
      .
 [63] => Array
            (
                [store_id] => 0175
                [employee_uid] => 33738
                [opus_id] => ph5953
                [item_description] => PRE ATT $40 RTR
                [opus_transaction_date] => 2019-10-21
                [opus_transaction_num] => XE5N31DJL51RA
                [opus_invoice_num] => T0175IN4563
                [customer_name] => WILLIE TAYLOR
                [mobile_num] => 6822701188
                [opus_amount] => 40
                [rq4_amount] => 50
                [difference] => 10
                [ocomment] => Re-Upload: Credit the remaining balance to customers account in OPUS and email confirmation to Treasury
                [mark_delete] => 0
                [upload_date] => 2019-10-22
            )

    )
![]()
Milo
3,3379 gold badges29 silver badges44 bronze badges
answered Nov 5, 2019 at 18:45
![]()
I have used following code to read «xls and xlsx» :
    include 'PHPExcel/IOFactory.php';

    $location='sample-excel-files.xlsx';

    $objPHPExcel = PHPExcel_IOFactory::load($location);
    $sheet = $objPHPExcel->getSheet(0);
    $total_rows = $sheet->getHighestRow();
    $total_columns = $sheet->getHighestColumn();
    $set_excel_query_all=array();
    for($row =2; $row <= $total_rows; $row++) {
        $singlerow = $sheet->rangeToArray('A' . $row . ':' . $total_columns . $row, NULL, TRUE, FALSE);
        $single_row=$singlerow[0];
        $set_excel_query['store_id']=$single_row[0];
        $set_excel_query['employee_uid']=$single_row[1];
        $set_excel_query['opus_id']=$single_row[2];
        $set_excel_query['item_description']=$single_row[3];
        if($single_row[4])
        {
            $set_excel_query['opus_transaction_date']= date('Y-m-d', PHPExcel_Shared_Date::ExcelToPHP($single_row[4]));
        }
        $set_excel_query['opus_transaction_num']=$single_row[5];
        $set_excel_query['opus_invoice_num']=$single_row[6];
        $set_excel_query['customer_name']=$single_row[7];
        $set_excel_query['mobile_num']=$single_row[8];
        $set_excel_query['opus_amount']=$single_row[9];
        $set_excel_query['rq4_amount']=$single_row[10];
        $set_excel_query['difference']=$single_row[11];
        $set_excel_query['ocomment']=$single_row[12];
        $set_excel_query['mark_delete']=$single_row[13];
        if($single_row[14])
        {
            $set_excel_query['upload_date']= date('Y-m-d', PHPExcel_Shared_Date::ExcelToPHP($single_row[14]));
        }
        $set_excel_query_all[]=$set_excel_query;
    }

   print_r($set_excel_query_all);
![]()
Awais Qarni
17.1k24 gold badges75 silver badges137 bronze badges
answered Nov 5, 2019 at 18:41
![]()
PHPExcel – библиотека, предназначенная для обработки данных формата MS Excel. С её помощью можно производить чтение и запись информации в файлы, форматировать их содержимое, выполнять операции с формулами, стилями и т.д.
Для работы PHPExcel требуется версия PHP 5.2 или выше, а так же наличие подключенных расширений ZIP, XML и GD2.
Примечание: расширение php_zip нужно только при использовании классов PHPExcel_Reader_Excel2007, PHPExcel_Writer_Excel2007 и PHPExcel_Reader_OOCalc. То есть если вы хотите использовать PHPExcel для полноценной работы с файлами форматов .xlsx или .ods, то вам потребуется zip-расширение.
Возможности библиотеки PHPExcel:
1. PHPExcel может читать различные форматы файлов электронных таблиц:
- Excel5
- Excel2003XML
- Excel2007
- OOCalc
- SYLK
- Gnumeric
- CSV
2. Создание и обработка документов средствами PHP
Установка PHPExcel:
1) Скачать библиотеку с официального сайта http://phpexcel.codeplex.com/
2) В скачанном архиве, из папки classes скопировать содержимое в корень сайта
Состав Архива:
/classes                    // Каталог библиотеки PHPExcel
/classess/PHPExcel/         // Каталог классов библиотеки PHPExcel
/classess/PHPExcel.php      // Файл для include?содержит ключевые  методы для обработки данных
/documentation		    // Полная документация по использованию библиотеки
/license.txt                // Лицензионное соглашение
/install.txt                // Краткая инструкция по установке
/examples            	    // Каталог с примерами по использованию PHPExcel
/changelog.txt              // Список изменений в текущей версии
Для чтения данных с Excel файла необходимо подключить файл библиотеки PHPExcel и используется метод load() класса PHPExcel_IOFactory. Этот метод собирает данные всех со всех листов текущего документа:
require_once '/путь/до/файла/PHPExcel.php';
$excel = PHPExcel_IOFactory::load('/путь/до/файла/simple.xlsx');
Далее формируем массив из всех листов Excel файла с помощью цикла:
Foreach($excel ->getWorksheetIterator() as $worksheet) {
 $lists[] = $worksheet->toArray();
}
Вывод сформированного массива в виде HTML таблиц(ы) :
foreach($lists as $list){
 echo '<table border="1">';
 // Перебор строк
 foreach($list as $row){
   echo '<tr>';
   // Перебор столбцов
   foreach($row as $col){
     echo '<td>'.$col.'</td>';
 }
 echo '</tr>';
 }
 echo '</table>';
}
Основные методы и свойства класса PHPExcel
Класс PHPExcel – это ядро PHPExcel. Он содержит ссылки на содержащиеся листы, параметры безопасности документов и мета-данные документов. Помимо вышеизложенного, этот класс включает в себя множество других полезных методов для обработки получаемых данных. Некоторые из них будут описаны ниже.
getSheetCount() – возвратит количество листов в книге;
getSheetNames() – возвращает список всех листов в рабочей книге, индексируя их в порядке, в котором их «вкладки» появляются при открытии в MS Excel (или других программах для обработки электронных таблиц);
getSheet(N) – используется для доступа к листу по индексу. Индекс позиции (N) представляет собой порядок, в котором отображаются вкладки листов, когда книга открыта в MS Excel (или других программах для обработки электронных таблиц);
getSheetByName(list_name) – метод используется для доступа к листу по его имени (list_name);
getActiveSheet() – этот метод позволяет получить доступ к активному листу документа напрямую. Активным листом является тот, который будет активен, когда откроется книга в MS Excel (или другой соответствующей программе электронных таблиц);
setActiveSheetIndex() и setActiveSheetIndexByName() – с помощью этих методов можно назначить лист, который будет активным по его индексу или имени.
Получение значения ячейки по координатам
Для получения значения ячейки, сперва должна быть найдена ячейка путем использования метода getCell. Значение ячейки может быть получено с помощью следующей команды:
$objPHPExcel->getActiveSheet()->getCell('B8')->getValue();
В случае если вам нужны подсчитанные значения ячейки, вместо getValue(), используйте метод getCalculatedValue():
$objPHPExcel->getActiveSheet()->getCell('B8')->getCalculatedValue();
Получение значения ячейки по строкам и столбцам
Для получения значения ячейки, в листе сначала должна быть найдена ячейка с использованием метода getCellByColumnAndRow. Значение ячейки может быть получено с помощью следующей команды:
$objPHPExcel->getActiveSheet()->getCellByColumnAndRow(1, 8)->getValue();
Заключение
В этой статье были рассмотрены основные возможности библиотеки PHPExcel в области чтения excel файлов. Помимо всего выше изложенного, есть возможность более гибко использовать эту библиотеку для работы с различными параметрами таблицы. По этим вопросам рекомендуется обращаться к документации. Библиотека PHPExcel так же адаптирована для работы с другими типами файлов, таких как Excel (BIFF). XLS, Excel 2007 (OfficeOpenXML). XLSX, CSV, Libre / OpenOffice Calc. ODS, Gnumeric, PDF и HTML.