
Содержание
- Выгружаем данные в Excel. Цивилизованно
- Parsing XML in Microsoft Excel VBA
- Importance of an XML Parser
- Build XML Parser Using VBA
- Conclusion
Выгружаем данные в Excel. Цивилизованно
Есть в IT-отрасли задачи, которые на фоне успехов в big data, machine learning, blockchain и прочих модных течений выглядят совершенно непривлекательно, но на протяжении десятков лет не перестают быть актуальными для целой армии разработчиков. Речь пойдёт о старой как мир задаче формирования и выгрузки Excel-документов, с которой сталкивался каждый, кто когда-либо писал приложения для бизнеса.

Какие возможности построения файлов Excel существуют в принципе?
- VBA-макросы. В наше время по соображениям безопасности идея использовать макросы чаще всего не подходит.
- Автоматизация Excel внешней программой через API. Требует наличия Excel на одной машине с программой, генерирующей Excel-отчёты. Во времена, когда клиенты были толстыми и писались в виде десктопных приложений Windows, такой способ годился (хотя не отличался скоростью и надёжностью), в нынешних реалиях это с трудом достижимый случай.
- Генерация XML-Excel-файла напрямую. Как известно, Excel поддерживает XML-формат сохранения документа, который потенциально можно сгенерировать/модифицировать с помощью любого средства работы с XML. Этот файл можно сохранить с расширением .xls, и хотя он, строго говоря, при этом не является xls-файлом, Excel его хорошо открывает. Такой подход довольно популярен, но к недостаткам следует отнести то, что всякое решение, основанное на прямом редактировании XML-Excel-формата, является одноразовым «хаком», лишенным общности.
- Наконец, возможна генерация Excel-файлов с использованием open source библиотек, из которых особо известна Apache POI. Разработчики Apache POI проделали титанический труд по reverse engineering бинарных форматов документов MS Office, и продолжают на протяжении многих лет поддерживать и развивать эту библиотеку. Результат этого reverse engineering-а, например, используется в Open Office для реализации сохранения документов в форматах, совместимых с MS Office.
На мой взгляд, именно последний из способов является сейчас предпочтительным для генерации MS Office-совместимых документов. С одной стороны, он не требует установки никакого проприетарного ПО на сервер, а с другой стороны, предоставляет богатый API, позволяющий использовать все функциональные возможности MS Office.
Но у прямого использования Apache POI есть и недостатки. Во-первых, это Java-библиотека, и если ваше приложение написано не на одном из JVM-языков, вы ей вряд ли сможете воспользоваться. Во-вторых, это низкоуровневая библиотека, работающая с такими понятиями, как «ячейка», «колонка», «шрифт». Поэтому «в лоб» написанная процедура генерации документа быстро превращается в обильную «лапшу» трудночитаемого кода, где отсутствует разделение на модель данных и представление, трудно вносить изменения и вообще — боль и стыд. И прекрасный повод делегировать задачу самому неопытному программисту – пусть ковыряется.
Но всё может быть совершенно иначе. Проект Xylophone под лицензией LGPL, построенный на базе Apache POI, основан на идее, которая имеет примерно 15-летнюю историю. В проектах, где я участвовал, он использовался в комбинации с самыми разными платформами и языками – а счёт разновидностей форм, сделанных с его помощью в самых разнообразных проектах, идёт, наверное, уже на тысячи. Это Java-проект, который может работать как в качестве утилиты командной строки, так и в качестве библиотеки (если у вас код на JVM-языке — вы можете подключить её как Maven-зависимость).
Xylophone реализует принцип отделения модели данных от их представления. В процедуре выгрузки необходимо сформировать данные в формате XML (не беспокоясь о ячейках, шрифтах и разделительных линиях), а Xylophone, при помощи Excel-шаблона и дескриптора, описывающего порядок обхода вашего XML-файла с данными, сформирует результат, как показано на диаграмме:

Шаблон документа (xls/xlsx template) выглядит примерно следующим образом:

Как правило, заготовку такого шаблона предоставляет сам заказчик. Вовлечённый заказчик с удовольствием принимает участие в создании шаблона: начиная с выбора нужной формы из «Консультанта» или придумывания собственной с нуля, и заканчивая размерами шрифтов и ширинами разделительных линий. Преимущество шаблона в том, что мелкие правки в него легко вносить уже тогда, когда отчёт полностью разработан.
Когда «оформительская» работа выполнена, разработчику остаётся
- Создать процедуру выгрузки необходимых данных в формате XML.
- Создать дескриптор, описывающий порядок обхода элементов XML-файла и копирования фрагментов шаблона в результирующий отчёт
- Обеспечить привязку ячеек шаблона к элементам XML-файла с помощью XPath-выражений.
С выгрузкой в XML всё более-менее понятно: достаточно выбрать адекватное XML-представление данных, необходимых для заполнения формы. Что такое дескриптор?
Если бы в форме, которую мы создаём, не было повторяющихся элементов с разным количеством (таких, как строки накладной, которых разное количество у разных накладных), то дескриптор выглядел бы следующим образом:
Здесь root – название корневого элемента нашего XML-файла с данными, а диапазон A1:Z100 – это прямоугольный диапазон ячеек из шаблона, который будет скопирован в результат. При этом, как можно видеть из предыдущей иллюстрации, подстановочные поля, значения которых заменяются на данные из XML-файла, имеют формат
(тильда, фигурная скобка, XPath-выражение относительно текущего элемента XML, закрывающая фигурная скобка).
Что делать, если в отчёте нам нужны повторяющиеся элементы? Естественным образом их можно представить в виде элементов XML-файла с данными, а помочь проитерировать по ним нужным образом помогает дескриптор. Повторение элементов в отчёте может иметь как вертикальное направление (когда мы вставляем строки накладной, например), так и горизонтальное (когда мы вставляем столбцы аналитического отчёта). При этом мы можем пользоваться вложенностью элементов XML, чтобы отразить сколь угодно глубокую вложенность повторяющихся элементов отчёта, как показано на диаграмме:
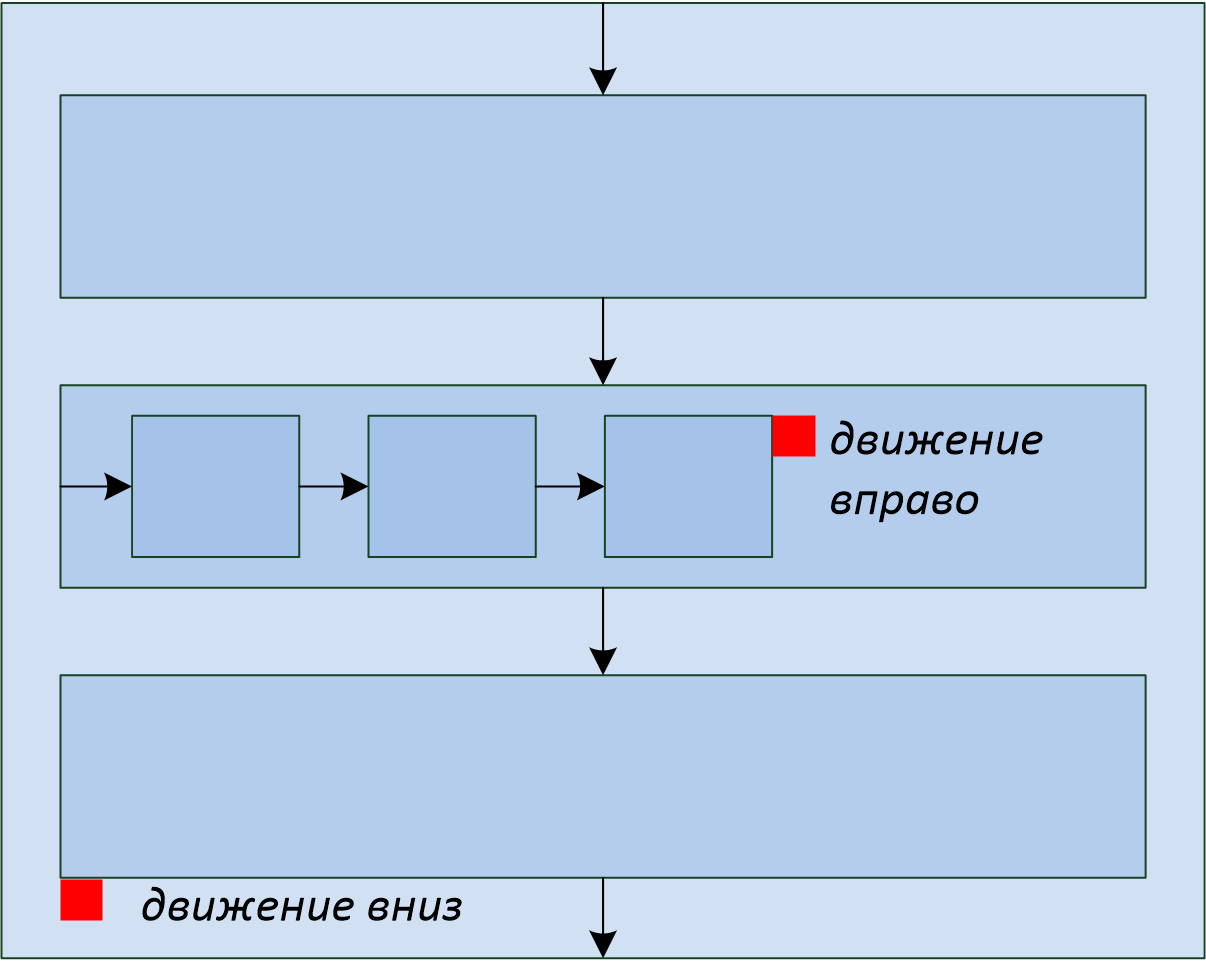
Красными квадратиками отмечены ячейки, которые будут являться левым верхним углом очередного прямоугольного фрагмента, который пристыковывает генератор отчёта.
Есть и ещё один возможный вариант повторяющихся элементов: листы в книге Excel. Возможность организовать такую итерацию тоже имеется.
Рассмотрим чуть более сложный пример. Допустим, нам надо получить сводный отчёт наподобие следующего:

Пусть диапазон лет для выгрузки выбирает пользователь, поэтому в этом отчёте динамически создаваемыми являются как строки, так и столбцы. XML-представление данных для такого отчёта может выглядеть следующим образом:
Мы вольны выбирать названия тэгов по своему вкусу, структура также может быть произвольной, но с оглядкой на простоту конвертации в отчёт. Например, выводимые на лист значения я обычно записываю в атрибуты, потому что это упрощает XPath-выражения (удобно, когда они имеют вид @имяатрибута ).
Шаблон такого отчёта будет выглядеть так (сравните XPath-выражения с именами атрибутов соответствующих тэгов):

Теперь наступает самая интересная часть: создание дескриптора. Т. к. это практически полностью динамически собираемый отчёт, дескриптор довольно сложен, на практике (когда у нас есть только «шапка» документа, его строки и «подвал») всё обычно гораздо проще. Вот какой в данном случае необходим дескриптор:
Полностью элементы дескриптора описаны в документации. Вкратце, основные элементы дескриптора означают следующее:
- element — переход в режим чтения элемента XML-файла. Может или являться корневым элементом дескриптора, или находиться внутри iteration . С помощью атрибута name могут быть заданы разнообразные фильтры для элементов, например
- name=»foo» — элементы с именем тэга foo
- name=»*» — все элементы
- name=»tagname[@attribute=’value’]» — элементы с определённым именем и значением атрибута
- name=»(before)» , name=»(after)» — «виртуальные» элементы, предшествующие итерации и закрывающие итерацию.
- iteration — переход в режим итерации. Может находиться только внутри element . Могут быть выставлены различные параметры, например
- mode=»horizontal» — режим вывода по горизонтали (по умолчанию — vertical)
- index=0 — ограничить итерацию только самым первым встреченным элементом
- output — переход в режим вывода. Основные атрибуты следующие:
- sourcesheet —лист книги шаблона, с которого берётся диапазон вывода. Если не указывать, то применяется текущий (последний использованный) лист.
- range – диапазон шаблона, копируемый в результирующий документ, например “A1:M10”, или “5:6”, или “C:C”. (Применение диапазонов строк типа “5:6” в режиме вывода horizontal и диапазонов столбцов типа “C:C” в режиме вывода vertical приведёт к ошибке).
- worksheet – если определён, то в файле вывода создаётся новый лист и позиция вывода смещается в ячейку A1 этого листа. Значение этого атрибута, равное константе или XPath-выражению, подставляется в имя нового листа.
В действительности всевозможных опций в дескрипторе гораздо больше, смотрите документацию.
Ну что же, настало время скачать Xylophone и запустить формирование отчёта.
Возьмите архив с bintray или Maven Central (NB: на момент прочтения этой статьи возможно наличие более свежих версий). В папке /bin находится shell-скрипт, при запуске которого без параметров вы увидите подсказку о параметрах командной строки. Для получения результата нам надо «скормить» ксилофону все приготовленные ранее ингредиенты:
Открываем файл report.xlsx и убеждаемся, что получилось именно то, что нам нужно:
Так как библиотека ru.curs:xylophone доступна на Maven Central под лицензией LGPL, её можно без проблем использовать в программах на любом JVM-языке. Пожалуй, самый компактный полностью рабочий пример получается на языке Groovy, код в комментариях не нуждается:
У класса XML2Spreadsheet есть несколько перегруженных вариантов статического метода process , но все они сводятся к передаче всё тех же «ингредиентов», необходимых для подготовки отчёта.
Важная опция, о которой я до сих пор не упомянул — это возможность выбора между DOM и SAX парсерами на этапе разбора файла с XML-данными. Как известно, DOM-парсер загружает весь файл в память целиком, строит его объектное представление и даёт возможность обходить его содержимое произвольным образом (в том числе повторно возвращаясь в один и тот же элемент). SAX-парсер никогда не помещает файл с данными целиком в память, вместо этого обрабатывает его как «поток» элементов, не давая возможности вернуться к элементу повторно.
Использование SAX-режима в Xylophone (через параметр командной строки -sax или установкой в true параметра useSax метода XML2Spreadsheet.process ) бывает критически полезно в случаях, когда необходимо генерировать очень большие файлы. За счёт скорости и экономичности к ресурсам SAX-парсера скорость генерации файлов возрастает многократно. Это даётся ценой некоторых небольших ограничений на дескриптор (описано в документации), но в большинстве случаев отчёты удовлетворяют этим ограничениям, поэтому я бы рекомендовал использование SAX-режима везде, где это возможно.
Надеюсь, что способ выгрузки в Excel через Xylophone вам понравился и сэкономит много времени и нервов — как сэкономил нам.
Источник
Parsing XML in Microsoft Excel VBA
This article will teach us how to parse XML files in VBA.
Importance of an XML Parser
As a Microsoft Excel user, it is common that you might receive some data in the form of an XML file. You will have to retrieve the information from the XML file and use it in your sheets or VBA macros according to your requirement.
A way to do this is to treat it as a text file and parse the information. But this is not an elegant way to parse XML files since the information is stored well-structured using tags, and treating it as a text file negates this concept.
Therefore, we will have to make use of an XML Parser. An XML Parser reads the XML file and retrieves the relevant data so it can be used readily.
Build XML Parser Using VBA
We can parse an XML file using VBA and convert the data into our Excel sheet. The method we will be using uses the XML DOM implementation, short for the XML Document Object Model, and this model allows us to represent the XML file as an object we can then manipulate as required.
To start parsing your XML file through VBA, you must perform a simple sequence of steps. These are explained below.
To parse XML through VBA, you need to have MSXML.4.0 or greater on your system.
Add Reference to Microsoft XML
First, you need to add a reference to Microsoft XML, V6.0 in the VBA Editor. This is how it is done:
Open the VBA Editor from the Developer tab in Excel.
In the menu, go to Tools > References.
Scroll down and check Microsoft XML, V6.0 , then click on OK .

Note that the version of Microsoft XML depends on the operating system and Microsoft Office installed on your computer.
Write VBA Code to Load the XML File Into XML DOM
Suppose we have the following XML file:
We can use the following code to parse this XML file through VBA by making an XML DOM object in the following way:
In the code above, we have first created a variable xDoc of the MSXML2.DOMDocument60 type. Here, we have appended 60 at the end because we are using version 6.0 of Microsoft XML , and without the 60 , this code will generate a compile-time error of User-defined type not found .
Next, we have specified that we are working with the xDoc variable using the With statement. The .async property defines permission for asynchronous downloads, and the .validateOnParse property indicates if the parser should validate the XML document.
After that, we use the .Load function to load the specified XML file into the DOM variable. Here, you can change the path and file name to the one on your computer.
The next two lines are for error handling in case the XML file is not loaded properly. To test if the loading has worked, we take one node from the file and specify its name as price .
You should note that the node name is case-sensitive and must be specified according to your XML file. Finally, we display the price using the node.Text property in a message box.
This shows that the loading has worked perfectly fine.
One way to use the XML file data is to store it in an Excel sheet. Let us make a few changes to the code above to store the data in the Excel sheet:
Here, we are retrieving all the price nodes and storing them in the sheet. In this example, we have only one price node that will be saved into the sheet as follows:
You can tweak the code according to your XML file and requirements.
Conclusion
This sums up our discussion on the method to parse XML files through VBA. In this article, we have learned how to build an XML parser using XML DOM in VBA.
Hello, I am Bilal, a research enthusiast who tends to break and make code from scratch. I dwell deep into the latest issues faced by the developer community and provide answers and different solutions. Apart from that, I am just another normal developer with a laptop, a mug of coffee, some biscuits and a thick spectacle!
Источник
- Importance of an XML Parser
- Build XML Parser Using VBA
- Conclusion

This article will teach us how to parse XML files in VBA.
Importance of an XML Parser
As a Microsoft Excel user, it is common that you might receive some data in the form of an XML file. You will have to retrieve the information from the XML file and use it in your sheets or VBA macros according to your requirement.
A way to do this is to treat it as a text file and parse the information. But this is not an elegant way to parse XML files since the information is stored well-structured using tags, and treating it as a text file negates this concept.
Therefore, we will have to make use of an XML Parser. An XML Parser reads the XML file and retrieves the relevant data so it can be used readily.
Build XML Parser Using VBA
We can parse an XML file using VBA and convert the data into our Excel sheet. The method we will be using uses the XML DOM implementation, short for the XML Document Object Model, and this model allows us to represent the XML file as an object we can then manipulate as required.
To start parsing your XML file through VBA, you must perform a simple sequence of steps. These are explained below.
To parse XML through VBA, you need to have MSXML.4.0 or greater on your system.
-
Add Reference to Microsoft XML
First, you need to add a reference to
Microsoft XML, V6.0in the VBA Editor. This is how it is done:Open the VBA Editor from the Developer tab in Excel.
-

-
Scroll down and check
Microsoft XML, V6.0, then click onOK.Note that the version of Microsoft XML depends on the operating system and Microsoft Office installed on your computer.
-
Write VBA Code to Load the XML File Into
XML DOMSuppose we have the following XML file:
<?xml version="1.0" encoding="ISO8859-1" ?>
<menu>
<food>
<name> Halwa Puri </name>
<price> $7.50 </price>
<description> Halwa Puri is from Indian and Pakistani cuisines, having the sweet Halwa and the savory Puri which is a fried flatbread. </description>
<calories> 900 </calories>
</food>
</menu>
We can use the following code to parse this XML file through VBA by making an
XML DOMobject in the following way:Sub XMLParser() Dim xDoc As New MSXML2.DOMDocument60 Dim node As IXMLDOMElement Set xDoc = New MSXML2.DOMDocument60 With xDoc .async = False .validateOnParse = True If xDoc.Load("D:VBAexample.xml") = False Then Debug.Print .parseError.reason, .parseError.ErrorCode Exit Sub End If Set node = xDoc.SelectSingleNode("//price") MsgBox node.Text End With End Sub

In the code above, we have first created a variable xDoc of the MSXML2.DOMDocument60 type. Here, we have appended 60 at the end because we are using version 6.0 of Microsoft XML, and without the 60, this code will generate a compile-time error of User-defined type not found.
Next, we have specified that we are working with the xDoc variable using the With statement. The .async property defines permission for asynchronous downloads, and the .validateOnParse property indicates if the parser should validate the XML document.
After that, we use the .Load function to load the specified XML file into the DOM variable. Here, you can change the path and file name to the one on your computer.
The next two lines are for error handling in case the XML file is not loaded properly. To test if the loading has worked, we take one node from the file and specify its name as price.
You should note that the node name is case-sensitive and must be specified according to your XML file. Finally, we display the price using the node.Text property in a message box.
Output:

This shows that the loading has worked perfectly fine.
One way to use the XML file data is to store it in an Excel sheet. Let us make a few changes to the code above to store the data in the Excel sheet:
Sub XMLParser()

Dim xDoc As New MSXML2.DOMDocument60
Set xDoc = New MSXML2.DOMDocument60
Dim list As MSXML2.IXMLDOMNodeList
Dim osh As Worksheet
Set osh = ThisWorkbook.Sheets("Sheet1")
oRow = 1

With xDoc
.async = False
.validateOnParse = True

If xDoc.Load("D:VBAexample.xml") = False Then
Debug.Print .parseError.reason, .parseError.ErrorCode
Exit Sub
End If

Set list = xDoc.SelectNodes("//price")
loopCount = 0
For Each node In list
oRow = oRow + 1
osh.Range("A" & oRow) = node.Text
Next
End With

End Sub
Here, we are retrieving all the price nodes and storing them in the sheet. In this example, we have only one price node that will be saved into the sheet as follows:

You can tweak the code according to your XML file and requirements.
Conclusion
This sums up our discussion on the method to parse XML files through VBA. In this article, we have learned how to build an XML parser using XML DOM in VBA.
- Парсеры файлов XML, DOC, TXT, PDF
- Парсеры для обучения настройке под сайты

Задача:
Обработать все файлы XML в выбранной папке, и сформировать отчёт в формате Excel (одна строка таблицы Excel соответствует одному XML файлу)
Описание:
При запуске, парсер создаёт новый файл Excel (из 46 столбцов), и выводит диалоговое окно выбора папки с файлами XML
(файлы XML могут находиться в подпапках, — парсер проверяет подпапки до 10 уровней вложенности)
Для извлечения нужных данных, парсер использует действие «HTML: поиск тегов»
Ищется заданный тег со свойством, равным названию очередного столбца парсера, и из найденного тега берется значение нужного атрибута.
Для тестирования работы парсера, извлеките обрабатываемые файлы XML из архива в любую папку,
и после запуска парсера выберите эту папку в диалоговом окне.
По вопросам настройки программы для парсинга файлов XML обращайтесь ко мне на почту order@excelvba.ru или в скайп ExcelVBA.ru
- 21606 просмотров
Read XML using Excel VBA
XML is the file format that is widely used to transfer data over internet or between 2 systems with different platforms. The most widely used & familiar xml file in the internet world is the Sitemap.xml. This file has the major links to a website.
Other widely used file formats for data transfer are JSON, CSV. In this article, we are going to learn how to read the xml file using XML DOM (Data Object Model).
Excel VBA XML Parser
Using this tutorial you can build a XML parser using Excel VBA. Lets start with this step by step procedure. Open an Excel Workbook & Open VB Editor by pressing Alt + F11. Then follow these important steps.
- Add reference to “Microsoft XML, V6.0” from Excel VB editor.
- VB Editor -> Menu->Tools -> Reference
- Scroll down till Microsoft XML, V2.0 or 3.0 or 6.0 appears. The version of XML depends on the OS & Office version installed in your machine.
- Click Ok.
- Now, Copy paste the code to your VBE.
- Download a file from Internet or if you have a file already, Modify the xml file path in the code.
- Run the code by pressing F5.
'--------------------------------------------------------------------------------
'Code by author@officetricks.com
'Visit https://officetricks.com to get more Free & Fully Functional VBA Codes
'--------------------------------------------------------------------------------
Public Sub Xml_To_Excel()
    Dim myURL As String, sFileNamePath As String, dsh As Worksheet, osh As Worksheet
    Dim WinHttpReq As Object, Node As IXMLDOMNode
    Dim xDoc As MSXML2.DOMDocument
    Dim list As MSXML2.IXMLDOMNodeList

    'Create XML DOM Object
    Set xDoc = New MSXML2.DOMDocument
    Set osh = ThisWorkbook.Sheets("Sheet2")
    oRow = 1

    'This is only a sample xml file - Change the File path to your Xml file path
    fname = "http://www.xmlfiles.com/examples/simple.xml"

    'Load Xml file to Object & Process Each node.
    If xDoc.Load(fname) Then
        Set list = xDoc.SelectNodes("//breakfast-menu/food")
        loopCount = 0
        Application.Wait DateAdd("s", 5, Now)
        DoEvents
        For Each Node In list
            oRow = oRow + 1
            '***Note: node names are Casesensitive***
            osh.Range("A" & oRow) = Node.SelectSingleNode("name").Text
            osh.Range("B" & oRow) = Node.Text
        Next
    Else
        MsgBox "Error Occured"
    End If

    MsgBox "Process Completed"
End Sub
This code uses XML DOM model to parse each node from input xml file. Then write it to the Excel file one by one.
In my previous articles, we discussed how VBA in Excel can be used for reporting, creating ribbons for your macros, and how to connect an Excel file as a database with SQL support. Working with a database within Excel is a very convenient feature you may use for gathering and storing of data. Nowadays, however, modern object databases and big data platforms prefer formats like JSON (Avro) or XML in general.
Definitions and Declarations
Most modern languages like Python or Ruby have standard XML parsers in-built. As VBA has been here for decades, neither much maintained, nor developed, the support is not that straight-forward. There is, however, a good tool set you may use for processing XMLs in your macros. Firstly, let’s define the objects we will work with:
Public Function ParseXML(p_path As String) As Object
    Dim objDom As Object                                    '// DOMDocument
    Dim strData As String
    Dim objStream As ADODB.Stream

    Set objDom = CreateObject("Msxml2.DOMDocument.3.0")     '// Using MSXML 3.0;
        'you may use DOMDocument.4.0 for MSXML 4.0
    Set objStream = New ADODB.Stream 'CreateObject("ADODB.Stream")

    objStream.Charset = "UTF-8"
    objStream.Open
    objStream.LoadFromFile (p_path)

    strData = objStream.ReadText()

    objStream.Close
    Set objStream = Nothing

    objDom.LoadXML strData

    Set ParseXML = objDom
End Function
The code is quite self-explanatory. I pasted the whole function, so feel free to use it directly as-is, just pass the source XML file path as an argument and don’t forget about error handling.
Accessing XML Data
Now let’s have a look at the functions we may use for data extraction. The basic looping through the XML nodes may be implemented as follows:
For Each listNode In rootNode.ChildNodes
    If listNode.HasChildNodes Then
        ' do something
    End If
Next listNode
Accessing the data of the actual node:
<SingleNode Id="N1" Text="NodeValue" Required="true" Look="Standard">
    TheText
</SingleNode>
Would follow the below syntax:
str = listNode.BaseName            ' Extracts "SingleNode" value
str = listNode.Attributes(0).Text  ' Extracts "N1" value
str = listNode.Text                ' Extracts "TheText" value
Other standard traversing methods you might need are also supported – for a more comprehensive overview, you may want to check this article. Node referencing:

XML representation:
<?xml version="1.0" encoding="utf-8"?>
<RootElement>
    <Node ID="1">
        <Node ID="1.1" />
    </Node>
    <Node ID="2">
        <Node ID="2.1" />
        <Node ID="2.2" />
        <Node ID="2.3" />
        <Node ID="2.4" />
    </Node>
    <Node ID="3" />
</RootElement>
In case you need to access a specific node directly and you don’t need control of the actual traversing, you may also use the XPath methods.
That is it for now, have fun working with your XMLs. Is there anything else you would like to know about VBA and macros in MS Office? Just drop me a message and I might discuss it in the next article. Thanks for reading!