
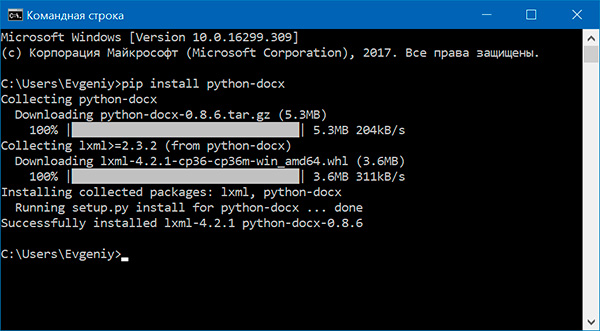
С помощью модуля python-docx можно создавать и изменять документы MS Word с расширением .docx. Чтобы установить этот модуль, выполняем команду
> pip install python-docx
При установке модуля надо вводить python-docx, а не docx (это другой модуль). В то же время при импортировании модуля python-docx следует использовать import docx, а не import python-docx.
Чтение документов MS Word
Файлы с расширением .docx обладают развитой внутренней структурой. В модуле python-docx эта структура представлена тремя различными типами данных. На самом верхнем уровне объект Document представляет собой весь документ. Объект Document содержит список объектов Paragraph, которые представляют собой абзацы документа. Каждый из абзацев содержит список, состоящий из одного или нескольких объектов Run, представляющих собой фрагменты текста с различными стилями форматирования.

import docx

doc = docx.Document('example.docx')

# количество абзацев в документе
print(len(doc.paragraphs))

# текст первого абзаца в документе
print(doc.paragraphs[0].text)

# текст второго абзаца в документе
print(doc.paragraphs[1].text)

# текст первого Run второго абзаца
print(doc.paragraphs[1].runs[0].text)
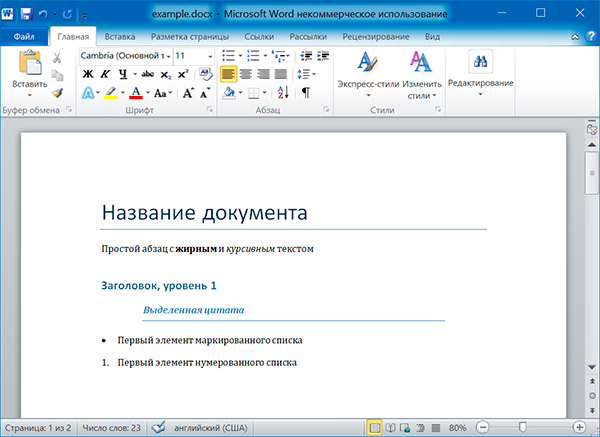
6
Название документа
Простой абзац с жирным и курсивным текстом
Простой абзац с
Получаем весь текст из документа:
text = []
for paragraph in doc.paragraphs:
    text.append(paragraph.text)
print('n'.join(text))
Название документа
Простой абзац с жирным и курсивным текстом
Заголовок, уровень 1
Выделенная цитата
Первый элемент маркированного списка
Первый элемент нумерованного списка
Стилевое оформление
В документах MS Word применяются два типа стилей: стили абзацев, которые могут применяться к объектам Paragraph, стили символов, которые могут применяться к объектам Run. Как объектам Paragraph, так и объектам Run можно назначать стили, присваивая их атрибутам style значение в виде строки. Этой строкой должно быть имя стиля. Если для стиля задано значение None, то у объекта Paragraph или Run не будет связанного с ним стиля.
Стили абзацев
NormalBody TextBody Text 2Body Text 3CaptionHeading 1Heading 2Heading 3Heading 4Heading 5Heading 6Heading 7Heading 8Heading 9Intense QuoteListList 2List 3List BulletList Bullet 2List Bullet 3List ContinueList Continue 2List Continue 3List NumberList Number 2List Number 3List ParagraphMacro TextNo SpacingQuoteSubtitleTOCHeadingTitle
Стили символов
EmphasisStrongBook TitleDefault Paragraph FontIntense EmphasisSubtle EmphasisIntense ReferenceSubtle Reference
paragraph.style = 'Quote'
run.style = 'Book Title'
Атрибуты объекта Run
Отдельные фрагменты текста, представленные объектами Run, могут подвергаться дополнительному форматированию с помощью атрибутов. Для каждого из этих атрибутов может быть задано одно из трех значений: True (атрибут активизирован), False (атрибут отключен) и None (применяется стиль, установленный для данного объекта Run).
bold— Полужирное начертаниеunderline— Подчеркнутый текстitalic— Курсивное начертаниеstrike— Зачеркнутый текст
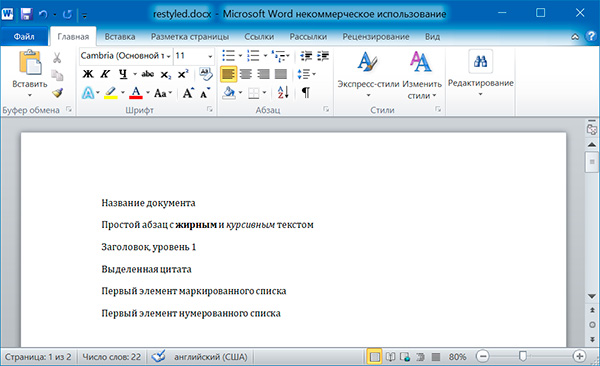
Изменим стили для всех параграфов нашего документа:
import docx

doc = docx.Document('example.docx')

# изменяем стили для всех параграфов
for paragraph in doc.paragraphs:
    paragraph.style = 'Normal'

doc.save('restyled.docx')
А теперь восстановим все как было:
import docx

os.chdir('C:\example')

doc1 = docx.Document('example.docx')
doc2 = docx.Document('restyled.docx')

# получаем из первого документа стили всех абзацев
styles = []
for paragraph in doc1.paragraphs:
    styles.append(paragraph.style)

# применяем стили ко всем абзацам второго документа
for i in range(len(doc2.paragraphs)):
    doc2.paragraphs[i].style = styles[i]

doc2.save('restored.docx')

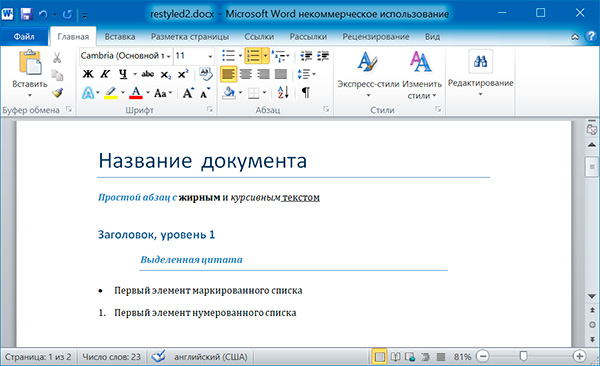
Изменим форматирвание объектов Run второго абзаца:
import docx

doc = docx.Document('example.docx')

# добавляем стиль символов для runs[0]
doc.paragraphs[1].runs[0].style = 'Intense Emphasis'
# добавляем подчеркивание для runs[4]
doc.paragraphs[1].runs[4].underline = True

doc.save('restyled2.docx')
Запись докуменов MS Word
Добавление абзацев осуществляется вызовом метода add_paragraph() объекта Document. Для добавления текста в конец существующего абзаца, надо вызвать метод add_run() объекта Paragraph:
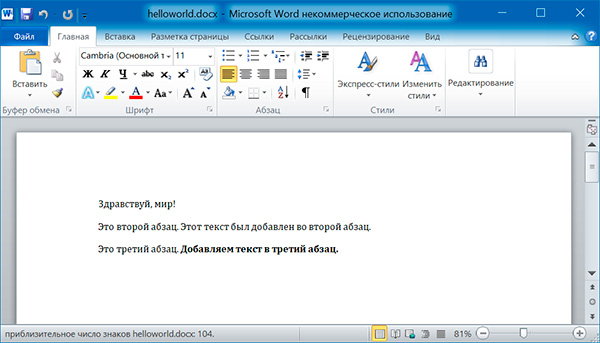
import docx

doc = docx.Document()

# добавляем первый параграф
doc.add_paragraph('Здравствуй, мир!')

# добавляем еще два параграфа
par1 = doc.add_paragraph('Это второй абзац.')
par2 = doc.add_paragraph('Это третий абзац.')

# добавляем текст во второй параграф
par1.add_run(' Этот текст был добавлен во второй абзац.')

# добавляем текст в третий параграф
par2.add_run(' Добавляем текст в третий абзац.').bold = True

doc.save('helloworld.docx')
Оба метода, add_paragraph() и add_run() принимают необязательный второй аргумент, содержащий строку стиля, например:
doc.add_paragraph('Здравствуй, мир!', 'Title')
Добавление заголовков
Вызов метода add_heading() приводит к добавлению абзаца, отформатированного в соответствии с одним из возможных стилей заголовков:
doc.add_heading('Заголовок 0', 0)
doc.add_heading('Заголовок 1', 1)
doc.add_heading('Заголовок 2', 2)
doc.add_heading('Заголовок 3', 3)
doc.add_heading('Заголовок 4', 4)
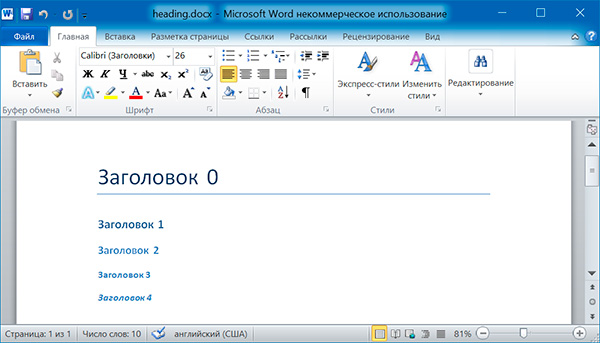
Аргументами метода add_heading() являются строка текста и целое число от 0 до 4. Значению 0 соответствует стиль заголовка Title.
Добавление разрывов строк и страниц
Чтобы добавить разрыв строки (а не добавлять новый абзац), нужно вызвать метод add_break() объекта Run. Если же требуется добавить разрыв страницы, то методу add_break() надо передать значение docx.enum.text.WD_BREAK.PAGE в качестве единственного аргумента:
import docx

doc = docx.Document()

doc.add_paragraph('Это первая страница')
doc.paragraphs[0].runs[0].add_break(docx.enum.text.WD_BREAK.PAGE)
doc.add_paragraph('Это вторая страница')

doc.save('pages.docx')
Добавление изображений
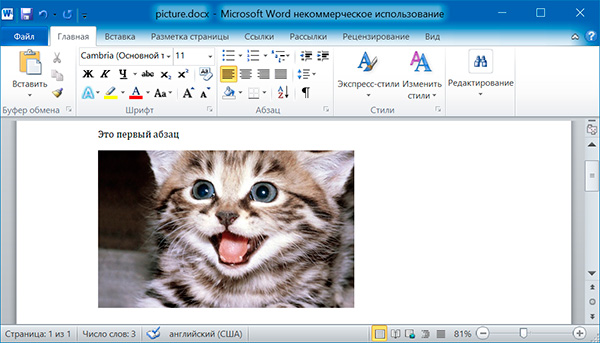
Метод add_picture() объекта Document позволяет добавлять изображения в конце документа. Например, добавим в конец документа изображение kitten.jpg шириной 10 сантиметров:
import docx

doc = docx.Document()

doc.add_paragraph('Это первый абзац')
doc.add_picture('kitten.jpg', width = docx.shared.Cm(10))

doc.save('picture.docx')
Именованные аргументы width и height задают ширину и высоту изображения. Если их опустить, то значения этих аргументов будут определяться размерами самого изображения.
Добавление таблицы
import docx

doc = docx.Document()

# добавляем таблицу 3x3
table = doc.add_table(rows = 3, cols = 3)
# применяем стиль для таблицы
table.style = 'Table Grid'

# заполняем таблицу данными
for row in range(3):
    for col in range(3):
        # получаем ячейку таблицы
        cell = table.cell(row, col)
        # записываем в ячейку данные
        cell.text = str(row + 1) + str(col + 1)

doc.save('table.docx')
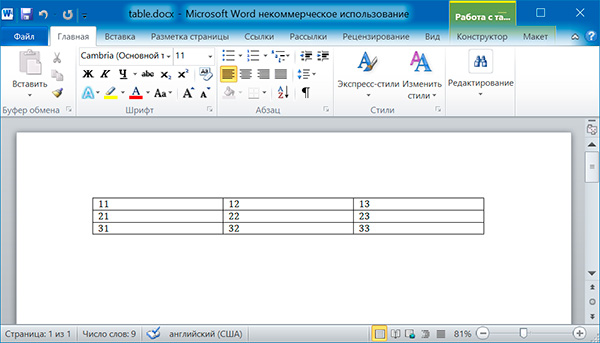
import docx

doc = docx.Document('table.docx')

# получаем первую таблицу в документе
table = doc.tables[0]

# читаем данные из таблицы
for row in table.rows:
    string = ''
    for cell in row.cells:
        string = string + cell.text + ' '
    print(string)
11 12 13
21 22 23
31 32 33
Дополнительно
- Документация python-docx
Поиск:
MS • Python • Web-разработка • Word • Модуль
Каталог оборудования
Lorem ipsum dolor sit amet, consectetur adipiscing elit, sed do eiusmod tempor incididunt ut labore et dolore magna aliqua.
Производители
Lorem ipsum dolor sit amet, consectetur adipiscing elit, sed do eiusmod tempor incididunt ut labore et dolore magna aliqua.
Функциональные группы
Lorem ipsum dolor sit amet, consectetur adipiscing elit, sed do eiusmod tempor incididunt ut labore et dolore magna aliqua.
В этой статье вы узнаете, как в Python считывать и записывать файлы MS Word.
- Установка библиотеки Python-Docx
- Чтение файлов MS Word с помощью модуля Python-Docx
- Чтение параграфов
- Чтение прогонов
- Написание файлов MS Word с помощью модуля Python-Docx
- Запись абзацев
- Запись прогонов
- Запись заголовков
- Добавление изображений
- Заключение
Существует несколько библиотек, которые можно использовать для чтения и записи в Python файлов MS Word. Мы будем использовать модуль python-docx .
Выполните приведенную ниже pip команду в терминале, чтобы загрузить модуль python-docx:
$ pip install python-docx
Создайте новый файл MS Word и переименуйте его в my_word_file.docx. Я сохранил файл в корне диска E. Файл my_word_file.docx должен иметь следующее содержимое

Чтобы считать указанный файл, импортируйте модуль docx, а затем создайте объект класса Document из модуля docx. Затем передайте путь к файлу my_word_file.docx в конструктор класса Document:
import docx

doc = docx.Document("E:/my_word_file.docx")
Объект doc класса Document теперь можно использовать для чтения содержимого файла my_word_file.docx.
С помощью объекта класса Document и пути к файлу можно получить доступ ко всем абзацам документа с помощью атрибута paragraphs. Пустая строка также читается как абзац.
Извлечем все абзацы из файла my_word_file.docx и затем отобразим общее количество абзацев документа:
all_paras = doc.paragraphs
len(all_paras)
Вывод:
Теперь поочередно выведем все абзацы, присутствующие в файле my_word_file.docx:
for para in all_paras:
    print(para.text)
    print("-------")
Вывод:
-------
Introduction
-------

-------
Welcome to stackabuse.com
-------
The best site for learning Python and Other Programming Languages
-------
Learn to program and write code in the most efficient manner
-------

-------
Details
-------

-------
This website contains useful programming articles for Java, Python, Spring etc.
-------
Вывод демонстрирует все абзацы, присутствующие в файле my_word_file.docx.
Также можно получить доступ к определенному абзацу, индексируя свойство paragraphs как массив. Давайте выведем пятый абзац в файле:
single_para = doc.paragraphs[4]
print(single_para.text)
Вывод:
The best site for learning Python and Other Programming Languages
Прогон в текстовом документе представляет собой непрерывную последовательность слов, имеющих схожие свойства. Например, одинаковые размеры шрифта, формы шрифта и стили шрифта.
Вторая строка файла my_word_file.docx содержит текст «Welcome to stackabuse.com». Слова «Welcome to» написаны простым шрифтом, а текст «stackabuse.com» — жирным. Следовательно, текст «Welcome to» считается одним прогоном, а текст, выделенный жирным шрифтом «stackabuse.com», считается другим прогоном.
Чтобы получить все прогоны в абзаце, можно использовать свойство run атрибута paragraphобъекта doc.
Считаем все прогоны из абзаца №5 (четвертый указатель) в тексте:
single_para = doc.paragraphs[4]
for run in single_para.runs:
    print(run.text)
Вывод:
The best site for
learning Python
 and Other
Programming Languages
Аналогичным образом приведенный ниже скрипт выводит все прогоны из 6-го абзаца файла my_word_file.docx:
second_para = doc.paragraphs[5]
for run in second_para.runs:
    print(run.text)
Вывод:
Learn to program and write code in the
most efficient manner
Чтобы записать файлы MS Word, создайте объект класса Document с пустым конструктором.
Для записи абзацев используйте метод add_paragraph() объекта класса Document. После добавления абзаца нужно вызвать метод save(). Путь к файлу, в который нужно записать абзац, передается в качестве параметра методу save(). Если файл не существует, то будет создан новый файл. Иначе абзац будет добавлен в конец существующего файла MS Word.
Приведенный ниже скрипт записывает простой абзац во вновь созданный файл my_written_file.docx.
mydoc.add_paragraph("This is first paragraph of a MS Word file.")
mydoc.save("E:/my_written_file.docx")
После выполнения этого скрипта вы должны увидеть новый файл my_written_file.docx в каталоге, который указали в методе save(). Внутри файла должен быть один абзац, который гласит: «This is first paragraph of a MS Word file.».
Добавим в файл my_written_file.docx еще один абзац:
mydoc.add_paragraph("This is the second paragraph of a MS Word file.")
mydoc.save("E:/my_written_file.docx")
Этот абзац будет добавлен в конец файла my_written_file.docx.
Вы также можете записать прогоны с помощью модуля python-docx. Для этого нужно создать дескриптор абзаца, к которому хотите добавить прогон:
third_para = mydoc.add_paragraph("This is the third paragraph.")
third_para.add_run(" this is a section at the end of third paragraph")
mydoc.save("E:/my_written_file.docx")
В приведенном выше скрипте записывается абзац с помощью метода add_paragraph()объекта mydoc класса Document. Метод add_paragraph() возвращает дескриптор для вновь добавленного пункта.
Чтобы добавить прогон к новому абзацу, необходимо вызвать метод add_run() для дескриптора абзаца. Текст прогона передается в виде строки в метод add_run(). Затем необходимо вызвать метод save() для создания фактического файла.
В файлы MS Word также можно добавлять заголовки. Для этого нужно вызвать метод add_heading(). Первым параметром метода add_heading() является текстовая строка для заголовка, а вторым – размер заголовка.
Приведенный ниже скрипт добавляет в файл my_written_file.docx три заголовка уровня 0, 1 и 2:
mydoc.add_heading("This is level 1 heading", 0)
mydoc.add_heading("This is level 2 heading", 1)
mydoc.add_heading("This is level 3 heading", 2)
mydoc.save("E:/my_written_file.docx")
Чтобы добавить в файлы MS Word изображения, используется метод add_picture(). Путь к изображению передается как параметр метода add_picture(). Также можно указать ширину и высоту изображения с помощью атрибута docx.shared.Inches().
Приведенный ниже скрипт добавляет изображение из локальной файловой системы в файл my_written_file.docx. Ширина и высота изображения будут 5 и 7 дюймов:
mydoc.add_picture("E:/eiffel-tower.jpg", width=docx.shared.Inches(5), height=docx.shared.Inches(7))
mydoc.save("E:/my_written_file.docx")
После выполнения всех скриптов, рассмотренных в этой статье, окончательный файл my_written_file.docx должен выглядеть следующим образом:

Он должен содержать три абзаца, три заголовка и одно изображение.
И этой статьи вы узнали, как читать и записывать файлы MS Word с помощью модуля python-docx.
Модуль python-docx предназначен для создания и обновления файлов с расширением .docx — Microsoft Word. Этот модуль имеет одну зависимость: сторонний модуль lxml.
Модуль python-docx размещен на PyPI, поэтому установка относительно проста.
# создаем виртуальное окружение, если нет
$ python3 -m venv .venv --prompt VirtualEnv
# активируем виртуальное окружение
$ source .venv/bin/activate
# ставим модуль python-docx
(VirtualEnv):~$ python3 -m pip install -U python-docx
Основы работы с файлами Microsoft Word на Python.
- Открытие/создание документа;
- Добавление заголовка документа;
- Добавление абзаца;
- Применение встроенного стиля в Microsoft Word к абзацу;
- Жирный, курсив и подчеркнутый текст в абзаце;
- Применение стилей Microsoft Word к символам текста (к прогону);
- Пользовательский стиль символов текста;
- Добавление разрыва страницы;
- Добавление картинки в документ;
- Чтение документов MS Word.
Открытие/создание документа.
Первое, что вам понадобится, это документ, над которым вы будете работать. Самый простой способ:
from docx import Document

# создание документа
document = Document()
# открытие документа
document = Document('/path/to/document.docx')
При этом создается пустой документ, основанный на «шаблоне» по умолчанию. Другими словами, происходит примерно то же самое, когда пользователь нажимает на иконку в Microsoft Word «Новый документ» с использованием встроенных значений по умолчанию.
При этом шрифт документа и его размер по умолчанию для всего документа можно задать следующим образом:
from docx import Document
from docx.shared import Pt

doc = Document()
# задаем стиль текста по умолчанию
style = doc.styles['Normal']
# название шрифта
style.font.name = 'Arial'
# размер шрифта
style.font.size = Pt(14)
document.add_paragraph('Текст документа')
Так же, можно открывать существующий документ Word и работать с ним при помощи модуля python-docx. Для этого, в конструктор класса Document() необходимо передать путь к существующему документу Microsoft Word.
Добавление заголовка документа.
В любом документе, основной текст делится на разделы, каждый из которых начинается с заголовка. Название таких разделов можно добавить методом Document.add_heading():
# без указания аргумента `level`
# добавляется заголовок "Heading 1"
head = document.add_heading('Основы работы с файлами Microsoft Word на Python.')
from docx.enum.text import WD_ALIGN_PARAGRAPH
# выравнивание посередине
head.alignment = WD_ALIGN_PARAGRAPH.CENTER
По умолчанию, добавляется заголовок верхнего уровня, который отображается в Word как «Heading 1». Если нужен заголовок для подраздела, то просто указываем желаемый уровень в виде целого числа от 1 до 9:
document.add_heading('Добавление заголовка документа', level=2)
Если указать level=0, то будет добавлен текст с встроенным стилем титульной страницы. Такой стиль может быть полезен для заголовка относительно короткого документа без отдельной титульной страницы.
Так же, заголовки разделов можно добавлять методом document.add_paragraph().add_run(), с указанным размером шрифта.
Например:
from docx import Document
from docx.shared import Pt

doc = Document()
# добавляем текст прогоном
run = doc.add_paragraph().add_run('Заголовок, размером 24 pt.')
# размер шрифта
run.font.size = Pt(24)
run.bold = True
doc.save('test.docx')
Добавление абзаца.
Абзацы в Word имеют основополагающее значение. Они используются для добавления колонтитулов, основного текста, заголовков, элементов списков, картинок и т.д.
Смотрим самый простой способ добавить абзац/параграф:
p = document.add_paragraph('Абзацы в Word имеют основополагающее значение.')
Метод Document.add_paragraph() возвращает ссылку на только что добавленный абзац (объект Paragraph). Абзац добавляется в конец документа. Эту ссылку можно использовать в качестве своеобразного «курсора» и например, вставить новый абзац прямо над ним:
prior_p = p.insert_paragraph_before(
          'Объект `paragraph` - это ссылка на только что добавленный абзац.')
Такое поведение позволяет вставить абзац в середину документа, это важно при изменении существующего документа, а не при его создании с нуля.
Ссылка на абзац, так же используется для его форматирования встроенными в MS Word стилями или для кастомного/пользовательского форматирования.
Пользовательское форматирование абзаца.
Форматирование абзацев происходит при помощи объекта ParagraphFormat.
Простой способ форматировать абзац/параграф:
from docx import Document
from docx.shared import Mm
from docx.enum.text import WD_ALIGN_PARAGRAPH

doc = Document()
# Добавляем абзац
p = doc.add_paragraph('Новый абзац с отступами и красной строкой.')
# выравниваем текст абзаца
p.alignment = WD_ALIGN_PARAGRAPH.JUSTIFY
# получаем объект форматирования
fmt = p.paragraph_format
# Форматируем:
# добавляем отступ слева
fmt.first_line_indent = Mm(15)
# добавляем отступ до
fmt.space_before = Mm(20)
# добавляем отступ слева
fmt.space_after = Mm(10)
doc.add_paragraph('Новый абзац.')
doc.add_paragraph('Еще новый абзац.')
doc.save('test.docx')
Чтобы узнать, какие параметры абзаца еще можно настроить/изменить, смотрите материал «Объект ParagraphFormat»
Очень часто в коде, с возвращенной ссылкой (в данном случае p) ничего делать не надо, следовательно нет смысла ее присваивать переменной.
Применение встроенного стиля в Microsoft Word к абзацу.
Стиль абзаца — это набор правил форматирования, который заранее определен в Microsoft Word, и храниться в редакторе в качестве переменной. По сути, стиль позволяет сразу применить к абзацу целый набор параметров форматирования.
Можно применить стиль абзаца, прямо при его создании:
document.add_paragraph('Стиль абзаца как цитата', style='Intense Quote')
document.add_paragraph('Стиль абзаца как список.', style='List Bullet')
В конкретном стиле 'List Bullet', абзац отображается в виде маркера. Также можно применить стиль позже. Две строки, в коде ниже, эквивалентны примеру выше:
document.add_paragraph('Другой стиль абзаца.').style = 'List Number'

# Эквивалентно

paragraph = document.add_paragraph('Другой стиль абзаца.')
# применяем стиль позже
paragraph.style = 'List Number'
Стиль указывается с использованием его имени, в этом примере имя стиля — 'List'. Как правило, имя стиля точно такое, как оно отображается в пользовательском интерфейсе Word.
Обратите внимание, что можно установить встроенный стиль прямо на результат document.add_paragraph(), без использования возвращаемого объекта paragraph
Жирный, курсив и подчеркнутый текст в абзаце.
Разберемся, что происходит внутри абзаца:
- Абзац содержит все форматирование на уровне блока, такое как — отступ, высота строки, табуляции и так далее.
- Форматирование на уровне символов, например полужирный и курсив, применяется на уровне прогона
paragraph.add_run(). Все содержимое абзаца должно находиться в пределах цикла, но их может быть больше одного. Таким образом, для абзаца с полужирным словом посередине требуется три прогона: обычный, полужирный — содержащий слово, и еще один нормальный для текста после него.
Когда создается абзац методом Document.add_paragraph(), то передаваемый текст добавляется за один прогон Run. Пустой абзац/параграф можно создать, вызвав этот метод без аргументов. В этом случае, наполнить абзац текстом можно с помощью метода Paragraph.add_run(). Метод абзаца .add_run() можно вызывать несколько раз, тем самым добавляя информацию в конец данного абзаца:
paragraph = document.add_paragraph('Абзац содержит форматирование ')
paragraph.add_run('на уровне блока.')
В результате получается абзац, который выглядит так же, как абзац, созданный из одной строки. Если не смотреть на полученный XML, то не очевидно, где текст абзаца разбивается на части. Обратите внимание на конечный пробел в конце первой строки. Необходимо четко указывать, где появляются пробелы в начале и в конце прогона, иначе текст будет слитный (без пробелов). Они (пробелы) автоматически не вставляются между прогонами paragraph.add_run(). Метод paragraph.add_run() возвращает ссылку на объект прогона Run, которую можно использовать, если она нужна.
Объекты прогонов имеют следующие свойства, которые позволяют установить соответствующий стиль:
.bold: полужирный текст;.underline: подчеркнутый текст;.italic: курсивный (наклонный) текст;.strike: зачеркнутый текст.
paragraph = document.add_paragraph('Абзац содержит ')
paragraph.add_run('форматирование').bold = True
paragraph.add_run(' на уровне блока.')
Получится текст, что то вроде этого: «Абзац содержит форматирование на уровне блока».
Обратите внимание, что можно установить полужирный или курсив прямо на результат paragraph.add_run(), без использования возвращаемого объекта прогона:
paragraph.add_run('форматирование').bold = True
# или
run = paragraph.add_run('форматирование')
run.bold = True
Передавать текст в метод Document.add_paragraph() не обязательно. Это может упростить код, если строить абзац из прогонов:
paragraph = document.add_paragraph()
paragraph.add_run('Абзац содержит ')
paragraph.add_run('форматирование').bold = True
paragraph.add_run(' на уровне блока.')
Пользовательское задание шрифта прогона.
from docx import Document
from docx.shared import Pt, RGBColor

# создание документа
doc = Document()
# добавляем текст прогоном
run = doc.add_paragraph().add_run('Заголовок, размером 24 pt.')
# название шрифта
run.font.name = 'Arial'
# размер шрифта
run.font.size = Pt(24)
# цвет текста
run.font.color.rgb = RGBColor(0, 0, 255)
# + жирный и подчеркнутый
run.font.bold = True
run.font.underline = True
doc.save('test.docx')
Применение стилей Microsoft Word к символам текста (к прогону).
В дополнение к встроенным стилям абзаца, которые определяют группу параметров уровня абзаца, Microsoft Word имеет стили символов, которые определяют группу параметров уровня прогона paragraph.add_run(). Другими словами, можно думать о стиле текста как об указании шрифта, включая его имя, размер, цвет, полужирный, курсив и т. д.
Подобно стилям абзацев, стиль символов текста будет определен в документе, который открывается с помощью вызова Document() (см. Общие сведения о стилях).
Стиль символов можно указать при добавлении нового прогона:
paragraph = document.add_paragraph('Обычный текст, ')
paragraph.add_run('текст с акцентом.', 'Emphasis')
Также можете применить стиль к прогону после его добавления. Этот код дает тот же результат, что и строки выше:
paragraph = document.add_paragraph()
paragraph.add_run('Обычный текст, ')
paragraph.add_run('текст с акцентом.').style = 'Emphasis'
Как и в случае со стилем абзаца, имя стиля текста такое, как оно отображается в пользовательском интерфейсе Word.
Пользовательский стиль символов текста.
from docx import Document
from docx.shared import Pt, RGBColor

# создание документа
doc = Document()
# задаем стиль текста по умолчанию
style = doc.styles['Normal']
# название шрифта
style.font.name = 'Calibri'
# размер шрифта
style.font.size = Pt(14)
p = doc.add_paragraph('Пользовательское ')
# добавляем текст прогоном
run = p.add_run('форматирование ')
# размер шрифта
run.font.size = Pt(16)
# курсив
run.font.italic = True
# добавляем еще текст прогоном
run = p.add_run('символов текста.')
# Форматируем:
# название шрифта
run.font.name = 'Arial'
# размер шрифта
run.font.size = Pt(18)
# цвет текста
run.font.color.rgb = RGBColor(255, 0, 0)
# + жирный и подчеркнутый
run.font.bold = True
run.font.underline = True
doc.save('test.docx')
Добавление разрыва страницы.
При создании документа, время от времени нужно, чтобы следующий текст выводился на отдельной странице, даже если последняя не заполнена. Жесткий разрыв страницы можно сделать следующим образом:
document.add_page_break()
Если вы обнаружите, что используете это очень часто, это, вероятно, знак того, что вы могли бы извлечь выгоду, лучше разбираясь в стилях абзацев. Одно свойство стиля абзаца, которое вы можете установить, — это разрыв страницы непосредственно перед каждым абзацем, имеющим этот стиль. Таким образом, вы можете установить заголовки определенного уровня, чтобы всегда начинать новую страницу. Подробнее о стилях позже. Они оказываются критически важными для получения максимальной отдачи от Word.
Жесткий разрыв страницы можно привязать к стилю абзаца, и затем применять его для определенных абзацев, которые должны начинаться с новой страницы. Так же можно установить жесткий разрыв на стиль заголовка определенного уровня, чтобы с него всегда начинать новую страницу. В общем, стили, оказываются критически важными для того, чтобы получить максимальную отдачу от модуля python-docx.
Добавление картинки в документ.
Microsoft Word позволяет разместить изображение в документе с помощью пункта меню «Вставить изображение«. Вот как это сделать при помощи модуля python-docx:
document.add_picture('/path/to/image-filename.png')
В этом примере используется путь, по которому файл изображения загружается из локальной файловой системы. В качестве пути можно использовать файловый объект, по сути, любой объект, который действует как открытый файл. Такое поведение может быть полезно, если изображение извлекается из базы данных или передается по сети.
Размер изображения.
По умолчанию, изображение добавляется с исходными размерами, что часто не устраивает пользователя. Собственный размер рассчитывается как px/dpi. Таким образом, изображение размером 300×300 пикселей с разрешением 300 точек на дюйм появляется в квадрате размером один дюйм. Проблема в том, что большинство изображений не содержат свойства dpi, и по умолчанию оно равно 72 dpi. Следовательно, то же изображение будет иметь одну сторону, размером 4,167 дюйма, что означает половину страницы.
Чтобы получить изображение нужного размера, необходимо указывать его ширину или высоту в удобных единицах измерения, например, в миллиметрах или сантиметрах:
from docx.shared import Mm

document.add_picture('/path/to/image-filename.png', width=Mm(35))
Если указать только одну из сторон, то модуль python-docx использует его для вычисления правильно масштабированного значения другой стороны изображения. Таким образом сохраняется соотношение сторон и изображение не выглядит растянутым.
Классы Mm() и Cm() предназначены для того, чтобы можно было указывать размеры в удобных единицах. Внутри python-docx используются английские метрические единицы, 914400 дюймов. Так что, если просто указать размер, что-то вроде width=2, то получится очень маленькое изображение. Классы Mm() и Cm() импортируются из подпакета docx.shared. Эти классы можно использовать в арифметике, как если бы они были целыми числами. Так что выражение, width=Mm(38)/thing_count, работает нормально.
Чтение документов Microsoft Word.
В модуле python-docx, структура документа Microsoft Word представлена тремя различными типами данных. На самом верхнем уровне объект Document() представляет собой весь документ. Объект Document() содержит список объектов Paragraph(), которые представляют собой абзацы документа. Каждый из абзацев содержит список, состоящий из одного или нескольких объектов Run(), представляющих собой фрагменты текста с различными стилями форматирования.
Например:
>>> from docx import Document
>>> doc = Document('/path/to/example.docx')
# количество абзацев в документе
>>> len(doc.paragraphs)
# текст первого абзаца в документе
>>> doc.paragraphs[0].text
# текст второго абзаца в документе
>>> doc.paragraphs[1].text
# текст первого прогона второго абзаца
>>> doc.paragraphs[1].runs[0].text
Используя следующий код, можно получить весь текст документа:
text = []
for paragraph in doc.paragraphs:
    text.append(paragraph.text)
print('nn'.join(text))
А так можно получить стили всех параграфов:
styles = []
for paragraph in doc.paragraphs:
    styles.append(paragraph.style)
Использовать полученные стили можно следующим образом:
# изменим стиль 1 параграфа на
# стиль взятый из 3 параграфа
doc.paragraphs[0].style = styles[2]
Getting started with |docx| is easy. Let’s walk through the basics.
Opening a document
First thing you’ll need is a document to work on. The easiest way is this:
from docx import Document

document = Document()
This opens up a blank document based on the default «template», pretty much
what you get when you start a new document in Word using the built-in
defaults. You can open and work on an existing Word document using |docx|,
but we’ll keep things simple for the moment.
Adding a paragraph
Paragraphs are fundamental in Word. They’re used for body text, but also for
headings and list items like bullets.
Here’s the simplest way to add one:
paragraph = document.add_paragraph('Lorem ipsum dolor sit amet.')
This method returns a reference to a paragraph, newly added paragraph at the
end of the document. The new paragraph reference is assigned to paragraph
in this case, but I’ll be leaving that out in the following examples unless
I have a need for it. In your code, often times you won’t be doing anything
with the item after you’ve added it, so there’s not a lot of sense in keep
a reference to it hanging around.
It’s also possible to use one paragraph as a «cursor» and insert a new
paragraph directly above it:
prior_paragraph = paragraph.insert_paragraph_before('Lorem ipsum')
This allows a paragraph to be inserted in the middle of a document, something
that’s often important when modifying an existing document rather than
generating one from scratch.
Adding a heading
In anything but the shortest document, body text is divided into sections, each
of which starts with a heading. Here’s how to add one:
document.add_heading('The REAL meaning of the universe')
By default, this adds a top-level heading, what appears in Word as ‘Heading 1’.
When you want a heading for a sub-section, just specify the level you want as
an integer between 1 and 9:
document.add_heading('The role of dolphins', level=2)
If you specify a level of 0, a «Title» paragraph is added. This can be handy to
start a relatively short document that doesn’t have a separate title page.
Adding a page break
Every once in a while you want the text that comes next to go on a separate
page, even if the one you’re on isn’t full. A «hard» page break gets this
done:
document.add_page_break()
If you find yourself using this very often, it’s probably a sign you could
benefit by better understanding paragraph styles. One paragraph style property
you can set is to break a page immediately before each paragraph having that
style. So you might set your headings of a certain level to always start a new
page. More on styles later. They turn out to be critically important for really
getting the most out of Word.
Adding a table
One frequently encounters content that lends itself to tabular presentation,
lined up in neat rows and columns. Word does a pretty good job at this. Here’s
how to add a table:
table = document.add_table(rows=2, cols=2)
Tables have several properties and methods you’ll need in order to populate
them. Accessing individual cells is probably a good place to start. As
a baseline, you can always access a cell by its row and column indicies:
cell = table.cell(0, 1)
This gives you the right-hand cell in the top row of the table we just created.
Note that row and column indicies are zero-based, just like in list access.
Once you have a cell, you can put something in it:
cell.text = 'parrot, possibly dead'
Frequently it’s easier to access a row of cells at a time, for example when
populating a table of variable length from a data source. The .rows
property of a table provides access to individual rows, each of which has a
.cells property. The .cells property on both Row and Column
supports indexed access, like a list:
row = table.rows[1]
row.cells[0].text = 'Foo bar to you.'
row.cells[1].text = 'And a hearty foo bar to you too sir!'
The .rows and .columns collections on a table are iterable, so you
can use them directly in a for loop. Same with the .cells sequences
on a row or column:
for row in table.rows:
    for cell in row.cells:
        print(cell.text)
If you want a count of the rows or columns in the table, just use len() on
the sequence:
row_count = len(table.rows)
col_count = len(table.columns)
You can also add rows to a table incrementally like so:
row = table.add_row()
This can be very handy for the variable length table scenario we mentioned
above:
# get table data -------------
items = (
    (7, '1024', 'Plush kittens'),
    (3, '2042', 'Furbees'),
    (1, '1288', 'French Poodle Collars, Deluxe'),
)

# add table ------------------
table = document.add_table(1, 3)

# populate header row --------
heading_cells = table.rows[0].cells
heading_cells[0].text = 'Qty'
heading_cells[1].text = 'SKU'
heading_cells[2].text = 'Description'

# add a data row for each item
for item in items:
    cells = table.add_row().cells
    cells[0].text = str(item.qty)
    cells[1].text = item.sku
    cells[2].text = item.desc
The same works for columns, although I’ve yet to see a use case for it.
Word has a set of pre-formatted table styles you can pick from its table style
gallery. You can apply one of those to the table like this:
table.style = 'LightShading-Accent1'
The style name is formed by removing all the spaces from the table style name.
You can find the table style name by hovering your mouse over its thumbnail in
Word’s table style gallery.
Adding a picture
Word lets you place an image in a document using the Insert > Photo > Picture menu item. Here’s how to do it in |docx|:
from file...
document.add_picture('image-filename.png')
This example uses a path, which loads the image file from the local filesystem.
You can also use a file-like object, essentially any object that acts like an
open file. This might be handy if you’re retrieving your image from a database
or over a network and don’t want to get the filesystem involved.
Image size
By default, the added image appears at native size. This is often bigger than
you want. Native size is calculated as pixels / dpi. So a 300×300 pixel
image having 300 dpi resolution appears in a one inch square. The problem is
most images don’t contain a dpi property and it defaults to 72 dpi. This would
make the same image appear 4.167 inches on a side, somewhere around half the
page.
To get the image the size you want, you can specify either its width or height
in convenient units, like inches or centimeters:
from docx.shared import Inches

document.add_picture('image-filename.png', width=Inches(1.0))
You’re free to specify both width and height, but usually you wouldn’t want to.
If you specify only one, |docx| uses it to calculate the properly scaled value
of the other. This way the aspect ratio is preserved and your picture doesn’t
look stretched.
The Inches and Cm classes are provided to let you specify measurements
in handy units. Internally, |docx| uses English Metric Units, 914400 to the
inch. So if you forget and just put something like width=2 you’ll get an
extremely small image :). You’ll need to import them from the docx.shared
sub-package. You can use them in arithmetic just like they were an integer,
which in fact they are. So an expression like width = Inches(3) works just fine.
/ thing_count
Applying a paragraph style
If you don’t know what a Word paragraph style is you should definitely check it
out. Basically it allows you to apply a whole set of formatting options to
a paragraph at once. It’s a lot like CSS styles if you know what those are.
You can apply a paragraph style right when you create a paragraph:
document.add_paragraph('Lorem ipsum dolor sit amet.', style='ListBullet')
This particular style causes the paragraph to appear as a bullet, a very handy
thing. You can also apply a style afterward. These two lines are equivalent to
the one above:
paragraph = document.add_paragraph('Lorem ipsum dolor sit amet.')
paragraph.style = 'List Bullet'
The style is specified using its style name, ‘List Bullet’ in this example.
Generally, the style name is exactly as it appears in the Word user interface
(UI).
Applying bold and italic
In order to understand how bold and italic work, you need to understand
a little about what goes on inside a paragraph. The short version is this:
- A paragraph holds all the block-level formatting, like indentation, line
height, tabs, and so forth. - Character-level formatting, such as bold and italic, are applied at the
run level. All content within a paragraph must be within a run, but there
can be more than one. So a paragraph with a bold word in the middle would
need three runs, a normal one, a bold one containing the word, and another
normal one for the text after.
When you add a paragraph by providing text to the .add_paragraph() method,
it gets put into a single run. You can add more using the .add_run() method
on the paragraph:
paragraph = document.add_paragraph('Lorem ipsum ')
paragraph.add_run('dolor sit amet.')
This produces a paragraph that looks just like one created from a single
string. It’s not apparent where paragraph text is broken into runs unless you
look at the XML. Note the trailing space at the end of the first string. You
need to be explicit about where spaces appear at the beginning and end of
a run. They’re not automatically inserted between runs. Expect to be caught by
that one a few times :).
|Run| objects have both a .bold and .italic property that allows you to
set their value for a run:
paragraph = document.add_paragraph('Lorem ipsum ')
run = paragraph.add_run('dolor')
run.bold = True
paragraph.add_run(' sit amet.')
which produces text that looks like this: ‘Lorem ipsum dolor sit amet.’
Note that you can set bold or italic right on the result of .add_run() if
you don’t need it for anything else:
paragraph.add_run('dolor').bold = True

# is equivalent to:

run = paragraph.add_run('dolor')
run.bold = True

# except you don't have a reference to `run` afterward
It’s not necessary to provide text to the .add_paragraph() method. This can
make your code simpler if you’re building the paragraph up from runs anyway:
paragraph = document.add_paragraph()
paragraph.add_run('Lorem ipsum ')
paragraph.add_run('dolor').bold = True
paragraph.add_run(' sit amet.')
Applying a character style
In addition to paragraph styles, which specify a group of paragraph-level
settings, Word has character styles which specify a group of run-level
settings. In general you can think of a character style as specifying a font,
including its typeface, size, color, bold, italic, etc.
Like paragraph styles, a character style must already be defined in the
document you open with the Document() call (see
:ref:`understanding_styles`).
A character style can be specified when adding a new run:
paragraph = document.add_paragraph('Normal text, ')
paragraph.add_run('text with emphasis.', 'Emphasis')
You can also apply a style to a run after it is created. This code produces
the same result as the lines above:
paragraph = document.add_paragraph('Normal text, ')
run = paragraph.add_run('text with emphasis.')
run.style = 'Emphasis'
As with a paragraph style, the style name is as it appears in the Word UI.
I got a test for job application, my deal is read some .doc files. Does anyone know a library to do this? I had started with a raw python code:
f = open('test.doc', 'r')
f.read()
but this does not return a friendly string I need to convert it to utf-8
Edit: I just want get the text from this file
![]()
asked Mar 15, 2016 at 2:11
![]()
1
One can use the textract library.
It take care of both «doc» as well as «docx»
import textract
text = textract.process("path/to/file.extension")
You can even use ‘antiword’ (sudo apt-get install antiword) and then convert doc to first into docx and then read through docx2txt.
antiword filename.doc > filename.docx
Ultimately, textract in the backend is using antiword.
answered Mar 31, 2017 at 8:18
![]()
Shivam KotwaliaShivam Kotwalia
1,3712 gold badges14 silver badges20 bronze badges
11
You can use python-docx2txt library to read text from Microsoft Word documents. It is an improvement over python-docx library as it can, in addition, extract text from links, headers and footers. It can even extract images.
You can install it by running: pip install docx2txt.
Let’s download and read the first Microsoft document on here:
import docx2txt
my_text = docx2txt.process("test.docx")
print(my_text)
Here is a screenshot of the Terminal output the above code:

EDIT:
This does NOT work for .doc files. The only reason I am keep this answer is that it seems there are people who find it useful for .docx files.
answered Mar 15, 2016 at 7:04
![]()
Billal BegueradjBillal Begueradj
20k43 gold badges110 silver badges129 bronze badges
6
I was trying to do the same, and I found lots of information on reading .docx but much less on .doc ; Anyway, I managed to read the text using the following:
import win32com.client

word = win32com.client.Dispatch("Word.Application")
word.visible = False
wb = word.Documents.Open("myfile.doc")
doc = word.ActiveDocument
print(doc.Range().Text)
Edit:
To close everything completely, it is better to append this:
# close the document
doc.Close(False)

# quit Word
word.Quit()
Also, note that you should use absolute path for your .doc file, not the relative one. So use this to get the absolute path:
import os

# for example, ``rel_path`` could be './myfile.doc'
full_path = os.path.abspath(rel_path)
![]()
answered Jun 11, 2018 at 10:54
![]()
10SecTom10SecTom
2,4143 gold badges21 silver badges26 bronze badges
5
The answer from Shivam Kotwalia works perfectly. However, the object is imported as a byte type. Sometimes you may need it as a string for performing REGEX or something like that.
I recommend the following code (two lines from Shivam Kotwalia’s answer) :
import textract

text = textract.process("path/to/file.extension")
text = text.decode("utf-8")
The last line will convert the object text to a string.
answered Nov 8, 2019 at 18:02
![]()
lucas Flucas F
3133 silver badges5 bronze badges
1
I agree with Shivam’s answer except for textract doesn’t exist for windows.
And, for some reason antiword also fails to read the ‘.doc’ files and gives an error:
'filename.doc' is not a word document. # This happens when the file wasn't generated via MS Office. Eg: Web-pages may be stored in .doc format offline.
So, I’ve got the following workaround to extract the text:
from bs4 import BeautifulSoup as bs
soup = bs(open(filename).read())
[s.extract() for s in soup(['style', 'script'])]
tmpText = soup.get_text()
text = "".join("".join(tmpText.split('t')).split('n')).encode('utf-8').strip()
print text
This script will work with most kinds of files.
Have fun!
answered Jun 14, 2019 at 5:53
![]()
2
Prerequisites :
install antiword : sudo apt-get install antiword
install docx : pip install docx
from subprocess import Popen, PIPE

from docx import opendocx, getdocumenttext
from cStringIO import StringIO
def document_to_text(filename, file_path):
    cmd = ['antiword', file_path]
    p = Popen(cmd, stdout=PIPE)
    stdout, stderr = p.communicate()
    return stdout.decode('ascii', 'ignore')

print document_to_text('your_file_name','your_file_path')
Notice – New versions of python-docx removed this function. Make sure to pip install docx and not the new python-docx
![]()
answered Dec 26, 2017 at 6:32
![]()
Aslam ShaikAslam Shaik
1,5311 gold badge9 silver badges10 bronze badges
I looked for solution so long. Materials about .doc file is not enough, finally I solved this problem by changing type .doc to .docx
from win32com import client as wc
w = wc.Dispatch('Word.Application')
# Or use the following method to start a separate process:
# w = wc.DispatchEx('Word.Application')
doc=w.Documents.Open(os.path.abspath('test.doc'))
doc.SaveAs("test_docx.docx",16)
answered Jul 28, 2021 at 8:36
![]()
I had to do the same to search through a ton of *.doc files for a specific number and came up with:
special_chars = {
    "b'\t'": 't',
    "b'\r'": 'n',
    "b'\x07'": '|',
    "b'\xc4'": 'Ä',
    "b'\xe4'": 'ä',
    "b'\xdc'": 'Ü',
    "b'\xfc'": 'ü',
    "b'\xd6'": 'Ö',
    "b'\xf6'": 'ö',
    "b'\xdf'": 'ß',
    "b'\xa7'": '§',
    "b'\xb0'": '°',
    "b'\x82'": '‚',
    "b'\x84'": '„',
    "b'\x91'": '‘',
    "b'\x93'": '“',
    "b'\x96'": '-',
    "b'\xb4'": '´'
}


def get_string(path):
    string = ''
    with open(path, 'rb') as stream:
        stream.seek(2560) # Offset - text starts after byte 2560
        current_stream = stream.read(1)
        while not (str(current_stream) == "b'\xfa'"):
            if str(current_stream) in special_chars.keys():
                string += special_chars[str(current_stream)]
            else:
                try:
                    char = current_stream.decode('UTF-8')
                    if char.isalnum():
                        string += char
                except UnicodeDecodeError:
                    string += ''
            current_stream = stream.read(1)
    return string
I’m not sure how ‘clean’ this solution is, but it works well with regex.
answered Jul 7, 2021 at 9:25
![]()
!pip install python-docx
import docx

#Creating a word file object
doc = open("file.docx","rb")

#creating word reader object
document = docx.Document(doc)
![]()
answered Feb 27, 2022 at 9:19
![]()
1
This code will run when if you are looking for how to read the doc file in python install the all related packages first and see the result.
if doc_file:
    _file=requests.get(request.values['MediaUrl0'])

    doc_file_link=BytesIO(_file.content)

    file_path=os.getcwd()+'+data.doc'

    E=open(file_path,'wb')
    E.write(doc_file_link.getbuffer())
    E.close()

    word = win32.gencache.EnsureDispatch('Word.Application',pythoncom.CoInitialize())
    doc = word.Documents.Open(file_path)
    doc.Activate()
    doc_data=doc.Range().Text
    print(doc_data)
    doc.Close(False)

    if os.path.exists(file_path):
       os.remove(file_path)
answered Dec 27, 2022 at 15:26
![]()
1

This post will talk about how to read Word Documents with Python. We’re going to cover three different packages – docx2txt, docx, and my personal favorite: docx2python.
The docx2txt package
Let’s talk about docx2text first. This is a Python package that allows you to scrape text and images from Word Documents. The example below reads in a Word Document containing the Zen of Python. As you can see, once we’ve imported docx2txt, all we need is one line of code to read in the text from the Word Document. We can read in the document using a method in the package called process, which takes the name of the file as input. Regular text, listed items, hyperlink text, and table text will all be returned in a single string.
import docx2txt

# read in word file
result = docx2txt.process("zen_of_python.docx")

What if the file has images? In that case we just need a minor tweak to our code. When we run the process method, we can pass an extra parameter that specifies the name of an output directory. Running docx2txt.process will extract any images in the Word Document and save them into this specified folder. The text from the file will still also be extracted and stored in the result variable.
import docx2txt

result = docx2txt.process("zen_of_python_with_image.docx", "C:/path/to/store/files")
Sample Image

docx2txt will also scrape any text from tables. Again, this will be returned into a single string with any other text found in the document, which means this text can more difficult to parse. Later in this post we’ll talk about docx2python, which allows you to scrape tables in a more structured format.
The docx package
The source code behind docx2txt is derived from code in the docx package, which can also be used to scrape Word Documents. docx is a powerful library for manipulating and creating Word Documents, but can also (with some restrictions) read in text from Word files.
In the example below, we open a connection to our sample word file using the docx.Document method. Here we just input the name of the file we want to connect to. Then, we can scrape the text from each paragraph in the file using a list comprehension in conjunction with doc.paragraphs. This will include scraping separate lines defined in the Word Document for listed items. Unlike docx2txt, docx, cannot scrape images from Word Documents. Also, docx will not scrape out hyperlinks and text in tables defined in the Word Document.
import docx

# open connection to Word Document
doc = docx.Document("zen_of_python.docx")

# read in each paragraph in file
result = [p.text for p in doc.paragraphs]

The docx2python package
docx2python is another package we can use to scrape Word Documents. It has some additional features beyond docx2txt and docx. For example, it is able to return the text scraped from a document in a more structured format. Let’s test out our Word Document with docx2python. We’re going to add a simple table in the document so that we can extract that as well (see below).

docx2python contains a method with the same name. If we call this method with the document’s name as input, we get back an object with several attributes.
from docx2python import docx2python

# extract docx content
doc_result = docx2python('zen_of_python.docx')
Each attribute provides either text or information from the file. For example, consider that our file has three main components – the text containing the Zen of Python, a table, and an image. If we call doc_result.body, each of these components will be returned as separate items in a list.
# get separate components of the document
doc_result.body

# get the text from Zen of Python
doc_result[0]

# get the image
doc_result[1]

# get the table text
doc_result[2]
Scraping a word document table with docx2python
The table text result is returned as a nested list, as you can see below. Each row (including the header) gets returned as a separate sub-list. The 0th element of the list refers to the header – or 0th row of the table. The next element refers to the next row in the table and so on. In turn, each value in a row is returned as an individual sub-list within that row’s corresponding list.

We can convert this result into a tabular format using pandas. The data frame is still a little messy – each cell in the data frame is a list containing a single value. This value also has quite a few “t”‘s (which represent tab spaces).
pd.DataFrame(doc_result.body[1][1:])

Here, we use the applymap method to apply the lambda function below to every cell in the data frame. This function gets the individual value within the list in each cell and removes all instances of “t”.
import pandas as pd


pd.DataFrame(doc_result.body[1][1:]).
                            applymap(lambda val: val[0].strip("t"))

Next, let’s change the column headers to what we see in the Word file (which was also returned to us in doc_result.body).
df.columns = [val[0].strip("t") for val in doc_result.body[1][0]]

Extracting images
We can extract the Word file’s images using the images attribute of our doc_result object. doc_result.images consists of a dictionary where the keys are the names of the image files (not automatically written to disk) and the corresponding values are the images files in binary format.
type(doc_result.images) # dict

doc_result.images.keys() # dict_keys(['image1.png'])
We can write the binary-formatted image out to a physical file like this:
for key,val in doc_result.images.items():
    f = open(key, "wb")
    f.write(val)
    f.close()
Above we’re just looping through the keys (image file names) and values (binary images) in the dictionary and writing each out to file. In this case, we only have one image in the document, so we just get one written out.
Other attributes
The docx2python result has several other attributes we can use to extract text or information from the file. For example, if we want to just get all of the file’s text in a single string (similar to docx2txt) we can run doc_result.text.
# get all text in a single string
doc_result.text
In addition to text, we can also get metadata about the file using the properties attribute. This returns information such as the creator of the document, the created / last modified dates, and number of revisions.
doc_result.properties
If the document you’re scraping has headers and footers, you can also scrape those out like this (note the singular version of “header” and “footer”):
# get the headers
doc_result.header

# get the footers
doc_result.footer
Footnotes can also be extracted like this:
doc_result.footnotes
Getting HTML returned with docx2python
We can also specify that we want to get an HTML object returned with the docx2python method that supports a few types of tags including font (size and color), italics, bold, and underline text. We just need to specify the parameter “html = True”. In the example below we see The Zen of Python in bold and underlined print. Corresponding to this, we can see the HTML version of this in the second snapshot below. The HTML feature does not currently support table-related tags, so I would recommend using the method we went through above if you’re looking to scrape tables from Word documents.
doc_html_result = docx2python('zen_of_python.docx', html = True)


Hope you enjoyed this post! Please check out other Python posts of mine below or by clicking here.
The MS Word utility from Microsoft Office suite is one of the most commonly used tools for writing text documents, both simple and complex. Though humans can easily read and write MS Word documents, assuming you have the Office software installed, often times you need to read text from Word documents within another application.
For instance, if you are developing a natural language processing application in Python that takes MS Word files as input, you will need to read MS Word files in Python before you can process the text. Similarly, often times you need to write text to MS Word documents as output, which could be a dynamically generated report to download, for example.
In this article, article you will see how to read and write MS Word files in Python.
Installing Python-Docx Library
Several libraries exist that can be used to read and write MS Word files in Python. However, we will be using the python-docx module owing to its ease-of-use. Execute the following pip command in your terminal to download the python-docx module as shown below:
$ pip install python-docx
Reading MS Word Files with Python-Docx Module
In this section, you will see how to read text from MS Word files via the python-docx module.
Create a new MS Word file and rename it as «my_word_file.docx». I saved the file in the root of my «E» directory, although you can save the file anywhere you want. The my_word_file.docx file should have the following content:
To read the above file, first import the docx module and then create an object of the Document class from the docx module. Pass the path of the my_word_file.docx to the constructor of the Document class, as shown in the following script:
import docx

doc = docx.Document("E:/my_word_file.docx")
The Document class object doc can now be used to read the content of the my_word_file.docx.
Reading Paragraphs
Once you create an object of the Document class using the file path, you can access all the paragraphs in the document via the paragraphs attribute. An empty line is also read as a paragraph by the Document. Let’s fetch all the paragraphs from the my_word_file.docx and then display the total number of paragraphs in the document:
all_paras = doc.paragraphs
len(all_paras)
Output:
10
Now we’ll iteratively print all the paragraphs in the my_word_file.docx file:
for para in all_paras:
    print(para.text)
    print("-------")
Output:
-------
Introduction
-------

-------
Welcome to stackabuse.com
-------
The best site for learning Python and Other Programming Languages
-------
Learn to program and write code in the most efficient manner
-------

-------
Details
-------

-------
This website contains useful programming articles for Java, Python, Spring etc.
-------
The output shows all of the paragraphs in the Word file.
We can even access a specific paragraph by indexing the paragraphs property like an array. Let’s print the 5th paragraph in the file:
single_para = doc.paragraphs[4]
print(single_para.text)
Output:
The best site for learning Python and Other Programming Languages
Reading Runs
A run in a word document is a continuous sequence of words having similar properties, such as similar font sizes, font shapes, and font styles. For example, if you look at the second line of the my_word_file.docx, it contains the text «Welcome to stackabuse.com», here the text «Welcome to» is in plain font, while the text «stackabuse.com» is in bold face. Hence, the text «Welcome to» is considered as one run, while the bold faced text «stackabuse.com» is considered as another run.
Check out our hands-on, practical guide to learning Git, with best-practices, industry-accepted standards, and included cheat sheet. Stop Googling Git commands and actually learn it!
Similarly, «Learn to program and write code in the» and «most efficient manner» are treated as two different runs in the paragraph «Learn to program and write code in the most efficient manner».
To get all the runs in a paragraph, you can use the run property of the paragraph attribute of the doc object.
Let’s read all the runs from paragraph number 5 (4th index) in our text:
single_para = doc.paragraphs[4]
for run in single_para.runs:
    print(run.text)
Output:
The best site for
learning Python
 and Other
Programming Languages
In the same way, the following script prints all the runs from the 6th paragraph of the my_word_file.docx file:
second_para = doc.paragraphs[5]
for run in second_para.runs:
    print(run.text)
Output:
Learn to program and write code in the
most efficient manner
Writing MS Word Files with Python-Docx Module
In the previous section, you saw how to read MS Word files in Python using the python-docx module. In this section, you will see how to write MS Word files via the python-docx module.
To write MS Word files, you have to create an object of the Document class with an empty constructor, or without passing a file name.
mydoc = docx.Document()
Writing Paragraphs
To write paragraphs, you can use the add_paragraph() method of the Document class object. Once you have added a paragraph, you will need to call the save() method on the Document class object. The path of the file to which you want to write your paragraph is passed as a parameter to the save() method. If the file doesn’t already exist, a new file will be created, otherwise the paragraph will be appended at the end of the existing MS Word file.
The following script writes a simple paragraph to a newly created MS Word file named «my_written_file.docx».
mydoc.add_paragraph("This is first paragraph of a MS Word file.")
mydoc.save("E:/my_written_file.docx")
Once you execute the above script, you should see a new file «my_written_file.docx» in the directory that you specified in the save() method. Inside the file, you should see one paragraph which reads «This is first paragraph of a MS Word file.»
Let’s add another paragraph to the my_written_file.docx:
mydoc.add_paragraph("This is the second paragraph of a MS Word file.")
mydoc.save("E:/my_written_file.docx")
This second paragraph will be appended at the end of the existing content in my_written_file.docx.
Writing Runs
You can also write runs using the python-docx module. To write runs, you first have to create a handle for the paragraph to which you want to add your run. Take a look at the following example to see how it’s done:
third_para = mydoc.add_paragraph("This is the third paragraph.")
third_para.add_run(" this is a section at the end of third paragraph")
mydoc.save("E:/my_written_file.docx")
In the script above we write a paragraph using the add_paragraph() method of the Document class object mydoc. The add_paragraph() method returns a handle for the newly added paragraph. To add a run to the new paragraph, you need to call the add_run() method on the paragraph handle. The text for the run is passed in the form of a string to the add_run() method. Finally, you need to call the save() method to create the actual file.
You can also add headers to MS Word files. To do so, you need to call the add_heading() method. The first parameter to the add_heading() method is the text string for header, and the second parameter is the header size. The header sizes start from 0, with 0 being the top level header.
The following script adds three headers of level 0, 1, and 2 to the file my_written_file.docx:
mydoc.add_heading("This is level 1 heading", 0)
mydoc.add_heading("This is level 2 heading", 1)
mydoc.add_heading("This is level 3 heading", 2)
mydoc.save("E:/my_written_file.docx")
Adding Images
To add images to MS Word files, you can use the add_picture() method. The path to the image is passed as a parameter to the add_picture() method. You can also specify the width and height of the image using the docx.shared.Inches() attribute. The following script adds an image from the local file system to the my_written_file.docx Word file. The width and height of the image will be 5 and 7 inches, respectively:
mydoc.add_picture("E:/eiffel-tower.jpg", width=docx.shared.Inches(5), height=docx.shared.Inches(7))
mydoc.save("E:/my_written_file.docx")
After executing all the scripts in the Writing MS Word Files with Python-Docx Module section of this article, your final my_written_file.docx file should look like this:
In the output, you can see the three paragraphs that you added to the MS word file, along with the three headers and one image.
Conclusion
The article gave a brief overview of how to read and write MS Word files using the python-docx module. The article covers how to read paragraphs and runs from within a MS Word file. Finally, the process of writing MS Word files, adding a paragraph, runs, headers, and images to MS Word files have been explained in this article.