
Quick Navigation: How to Open Bak File
Overview of the methods to open SQL .BAK file in Excel.
Q 1: Does anyone know how to open the SQL .bak file in Excel? I’m new to SQL, and I’m not quite familiar with SQL queries. It always takes me so long to access the SQL file. Is it possible to open the SQL .bak file in Excel in a simple way?
Q 2: Can I check the SQL .back file when SQL database corrupted? Can I open it in Excel file and restore the .bak file into SQL?
| Workable Solutions | Step-by-step Troubleshooting |
|---|---|
| 1. Convert SQL .bak to Excel |
|
| 2. Restore .BAK to SQL Server |
|
| 3. Use .BAK to Excel Convert Tool | Use a third-party SQL .bak to Excel converter tool to convert SQL to Excel and open SQL .BAK…Full steps |
Most new MS SQL administrators all have the same feeling that it’s complex to use SQL queries or SQL applications to check or open specific SQL .bak files. Also, sometimes, when the SQL database corrupted, the request for restoring .bak file to SQL Server makes some new administrators confused.
If you are one of these new Administrators, who are having issues with opening SQL .bak file in Excel, select reliable methods in the following two parts to resolve your issue with ease.
Part 1. How to Open SQL .BAK File in Excel (3 Ways)
Before you start, locate the directory of .bak file on your SQL Server computer. Here is the default path where SQL Server saves the .bak file:
- Program Files > Microsoft SQL Server > MSSQL 1.0 > MSSQL > BACKUP
- C:Program FilesMicrosoft SQL ServerMSSQL10.MSSQLSERVERMSSQLBackup
Let’s see how to open your SQL database backup file in Excel with below three methods:
Way 1. Manually Convert SQL .bak to Excel
Note: This method is provided by a third-party website as a quick way to convert .BAK file to Excel.
And you may try this way to open your SQL Server .bak file in Excel.
Let’s start:
Step 1. Locate and find the SQL .bak file on your local drive.
If you didn’t see the .bak file in the above-provided location, run the below command in SSMS to find the directory of your SQL database backup file — .bak:
SELECT DatabaseName = x.database_name
LastBackupFileName = x.physical_device_name
LastBackupDatetime = x.backup_start_date
FROM ( SELECT bs.database_name
bs.backup_start_date
bmf.physical_device_name
Ordinal = ROW_NUMBER() OVER( PARTITION BY bs.database_name ORDER BY bs.backup_start_date DESC )
FROM msdb.dbo.backupmediafamily bmf
JOIN msdb.dbo.backupmediaset bms ON bmf.media_set_id = bms.media_set_id
JOIN msdb.dbo.backupset bs ON bms.media_set_id = bs.media_set_id
WHERE bs.[type] = ‘D’
AND bs.is_copy_only = 0 ) x
WHERE x.Ordinal = 1
ORDER BY DatabaseName
Step 2. Copy and save the .bak file to another secure device.
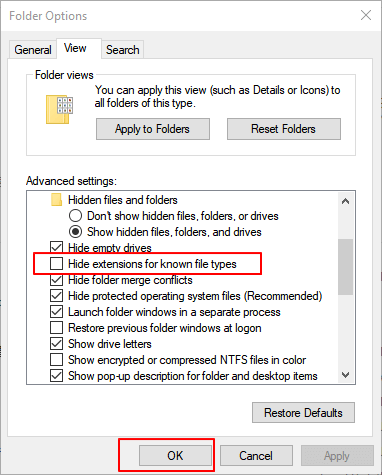
Step 3. Open File Explorer > View > Options > uncheck «Hide Extensions for Known File Types» and click «OK».
Step 4. Open the device with copied SQL database backup .bak file and right-click on it.
Step 5. Select «Rename» > change the «.bak» file extension into «.xls» or «.xlsx».
Step 6. Double-click the renamed file and open it in Excel.
Then, you can check the SQL .bak data in an Excel spreadsheet and even edit the database as you wish.
Way 2. Restore .BAK to SQL Server and Export Database to Excel
This method includes two processes — 1. You need to restore the .bak database backup file into SQL Server; 2. Export the restored database into Excel.
Here are the detailed guidelines:
# 1. Restore .BAK to SQL Server via SQL Server Management Studio
Follow the below steps to restore a .bak file with SQL Server Management Studio:
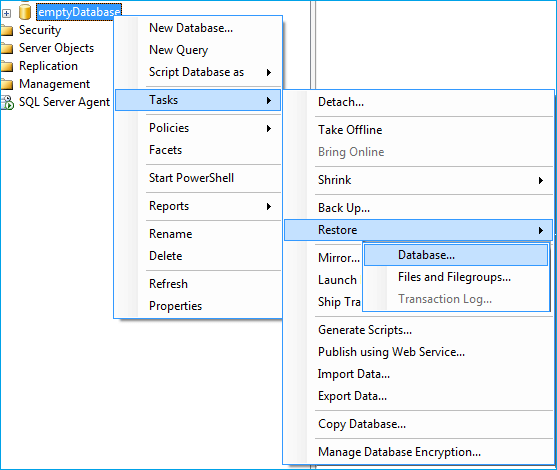
Step 1. Open SSMS (SQL Server Management Studio), right-click on the database where you want to restore the .bak data to and select «Tasks» > «Restore» > «Database».
Step 2. Click the three dots button next to the «From device» section, browse to choose the .bak file saved on your local drive.
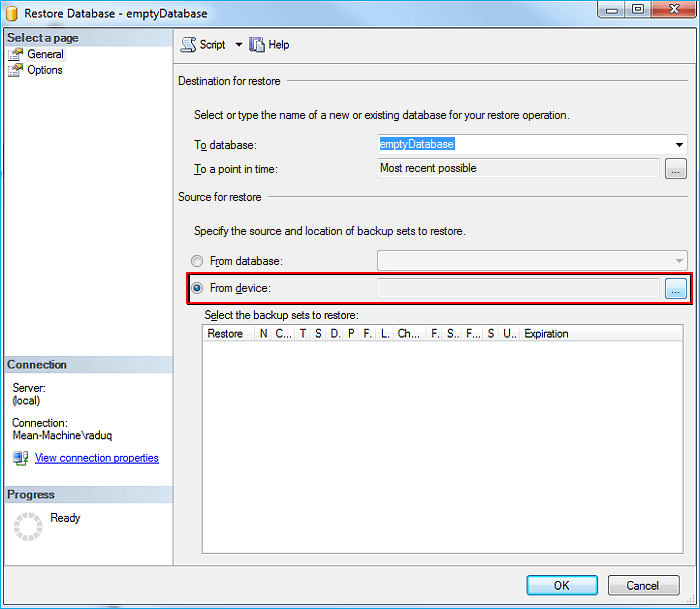
Step 3. Click «Add» to specify the exact location where you saved the .bak file, select it and click «OK» to confirm.

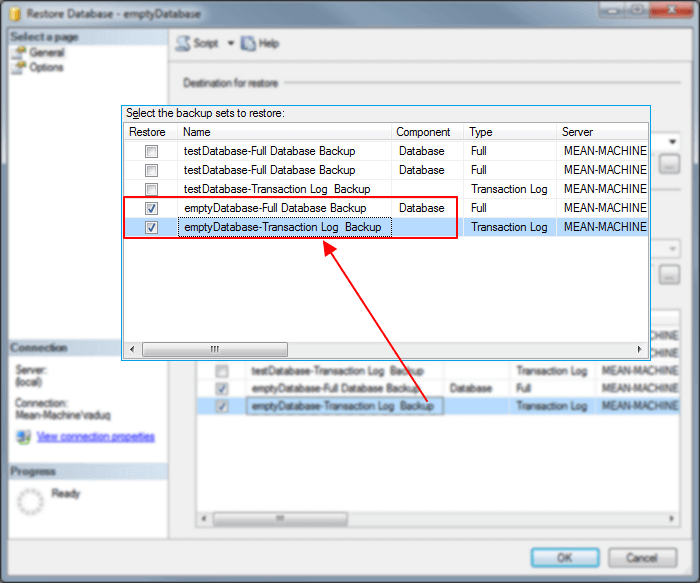
Step 4. Tick «Full Database Backup» and «Transaction Log Backup», click «OK» to confirm.
When the restore process completes, click «OK» to finish.
Note: If the .bak file contains the backup of your SQL database, the whole process also works to restore your corrupted SQL Server database from backup.
# 2. Export Restored .bak File — SQL Database to Excel
SQL Server Management Studio, with its Import and Export Wizard, enables you to export the restored .bak file — SQL database into Excel.
Be careful with the below manual steps to export the SQL database:
Step 1. Open SQL Server Management Studio and log in with your administrator account.
Step 2. Go to Object Explorer, right-click any database that you wish to open in Excel, and select «Tasks» > «Export Data…».
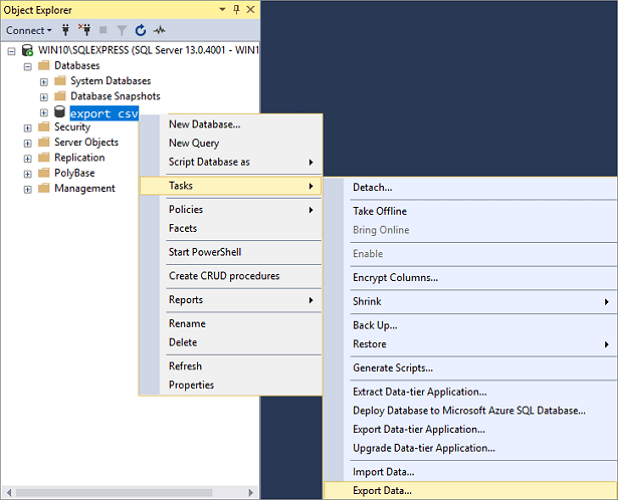
Step 3. Enter the SQL Server Import and Export Wizard, and click «Next» to continue.
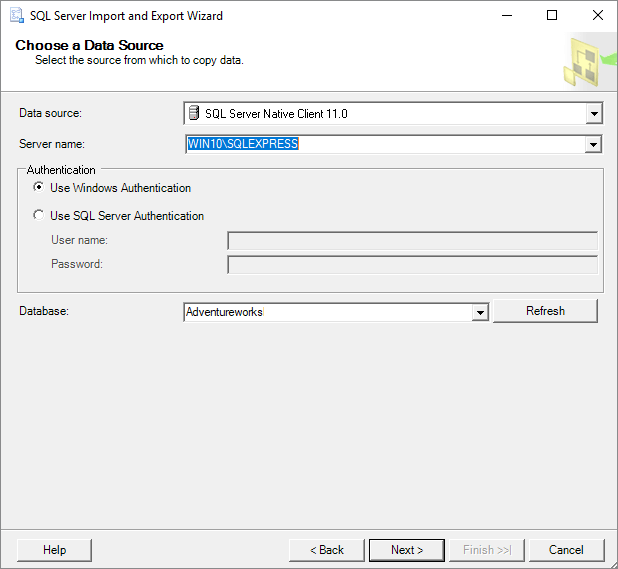
Step 4. Choose a data source from which you want to copy data as shown below and click «Next» to continue:
- Data source — SQL Server Native Client 11.0
- Server name — SQL Server from which data need to be copied
- Authentication — Use Windows Authentication as the data source connection
- Database — Choose the database which you’ve restored from the .bak file.
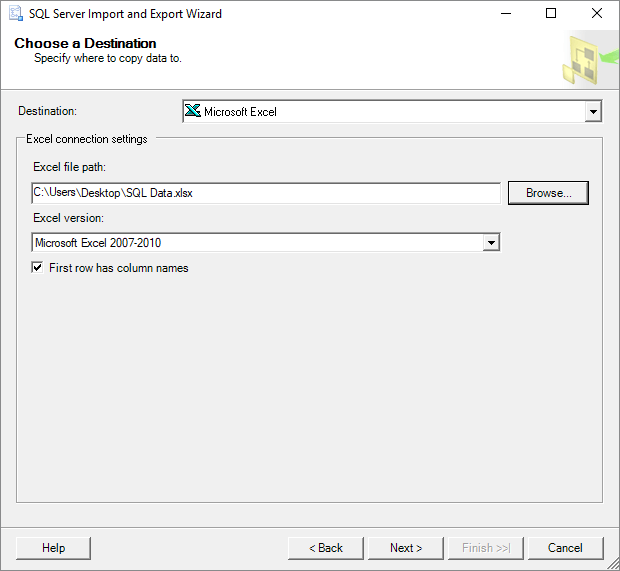
Step 5. Choose a destination to copy database data to Excel and click «Next» to continue:
- Destination — Microsoft Excel
- Excel file path — Choose the destination for copied data from the SQL Server data source
- Excel version — specify the Excel version that you are using on your PC
Step 6. Specify Table Copy or Query — select «Copy data from one or more tables or views», click «Next» to continue.
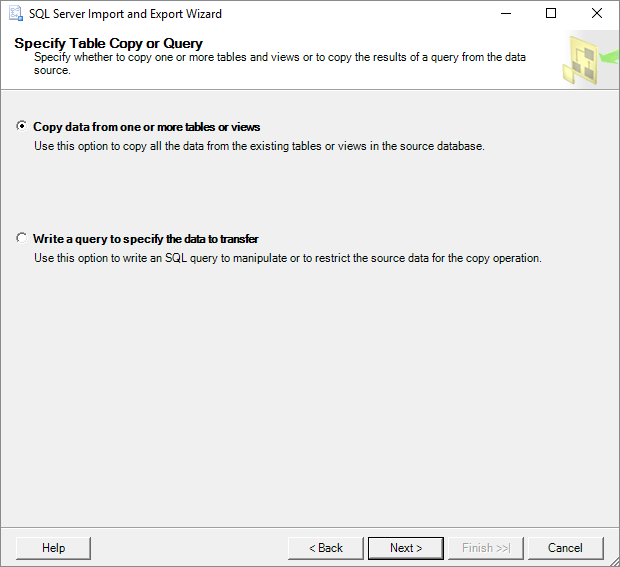
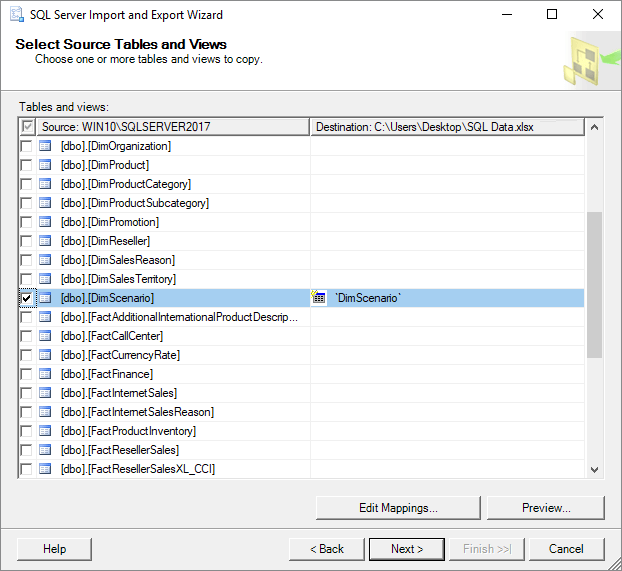
Step 7. Select Source Tables and Views — select the exact tables and views that you want to open in Excel, and click «Next» to continue.
You can also select a specific table and click «Preview» to check the data in advance.
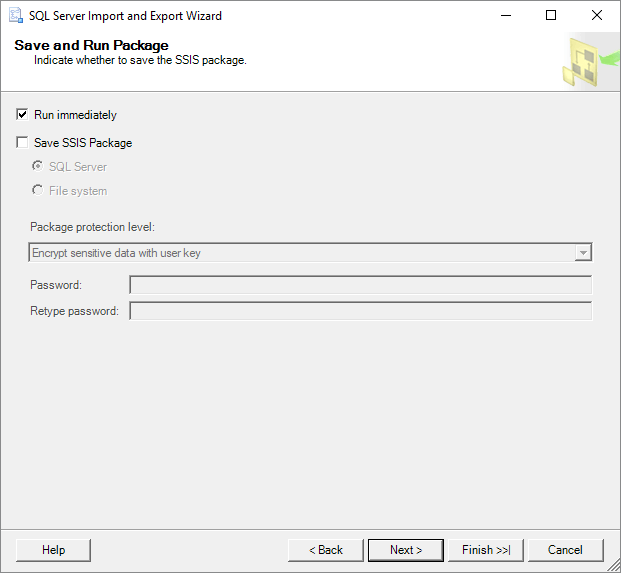
Step 8. Select «Run immediately» on the Save and Run Package, and click «Next» to continue.
Step 9. Click «Finish» on the Complete Wizard.
Step 10. Click the Report drop-down button and select «Save Report to File…» to continue.
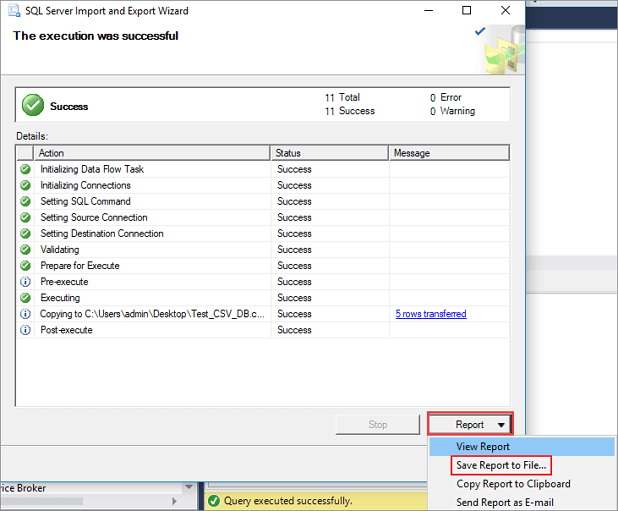
Step 11. Choose Excel as the target file, and then you can open the exported SQL database in Excel.
Way 3. Use Third-Party SQL .BAK to Excel Convert Tool
On some open source websites, some developers also generate a third-party SQL .bak to Excel converter tool.
It’s easy and practical to convert the SQL .bak file into Excel. If you want to try this tool, search online, and you’ll get it. For example, SQL to Excel convert.
Also read:
- How to Export Data from SQL Server to Excel Automatically
- SQL Database Recovery Pending Access Denied
- How to Rebuild Master Database in SQL Server
Part 2. Repair Corrupted SQL Database Without .BAK File (Database Backup)
In Way 1, the restoring process of .bak file to SQL Server via SSMS can help to restore corrupted or deleted databases to SQL.
However, if you accidentally deleted records in the SQL database or the SQL database corrupted for some reason, what will you do? How will you bring back the deleted records or repair the corrupted database? Fortunately, a professional SQL recovery tool can help. EaseUS MS SQL Recovery, with its powerful feature, can effectively bring your lost database records back.
EaseUS MS SQL Recovery
- It supports all versions of MS SQL Servers, including SQL Server 2017/2016/2014/2012/2008.
- It is capable of locating and restoring deleted data and records.
- It fixes a corrupt log file while it repairs the rest of the database.
- Users can encrypt their database to protect it from unauthorized access after using EaseUS MS SQL Recovery.
Follow the detailed guide below to repair your corrupted SQL Server database with ease:
Step 1: Select the corrupted database for recovery
- Launch EaseUS MS SQL Recovery.
- Select the corrupted database file by clicking «Browse» (the two dots) or «Search».
- After selecting the file, click the «Repair» button to start the Analyzing process.
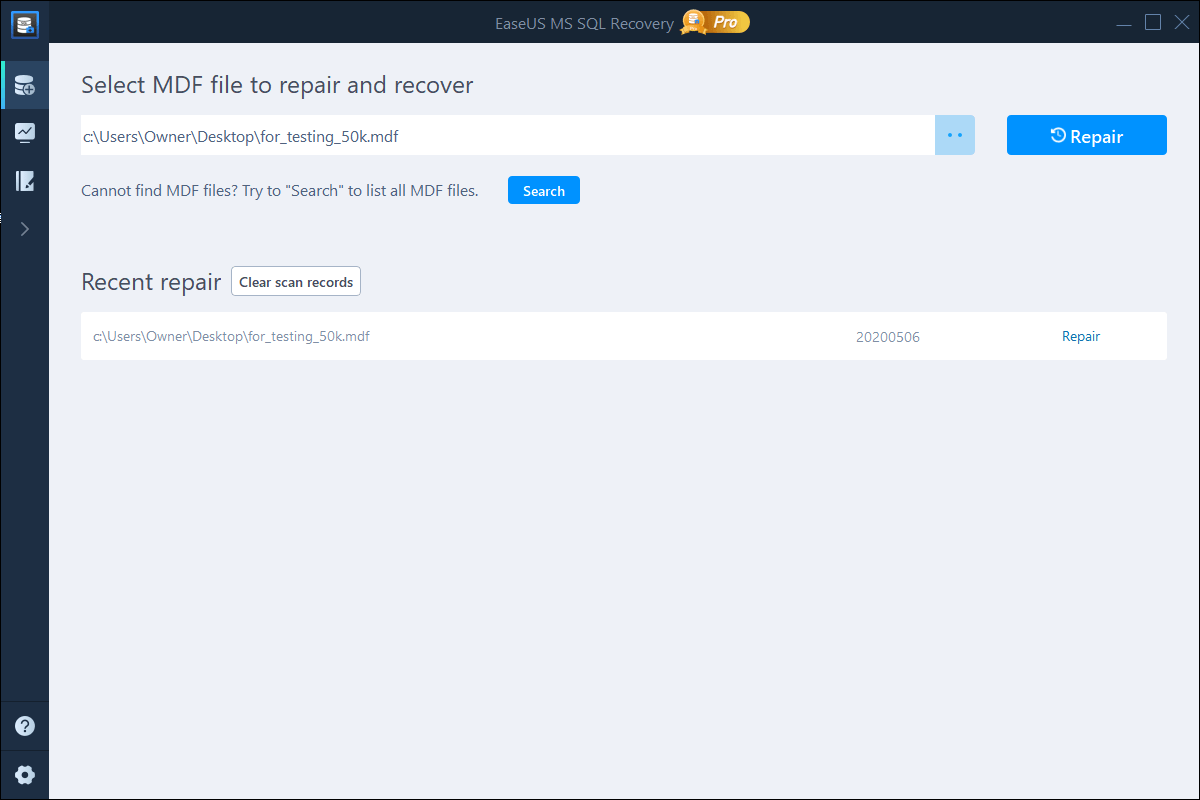
Note: To use this software, you need to stop the SQL Server service.
Step 2: Repair the corrupted database
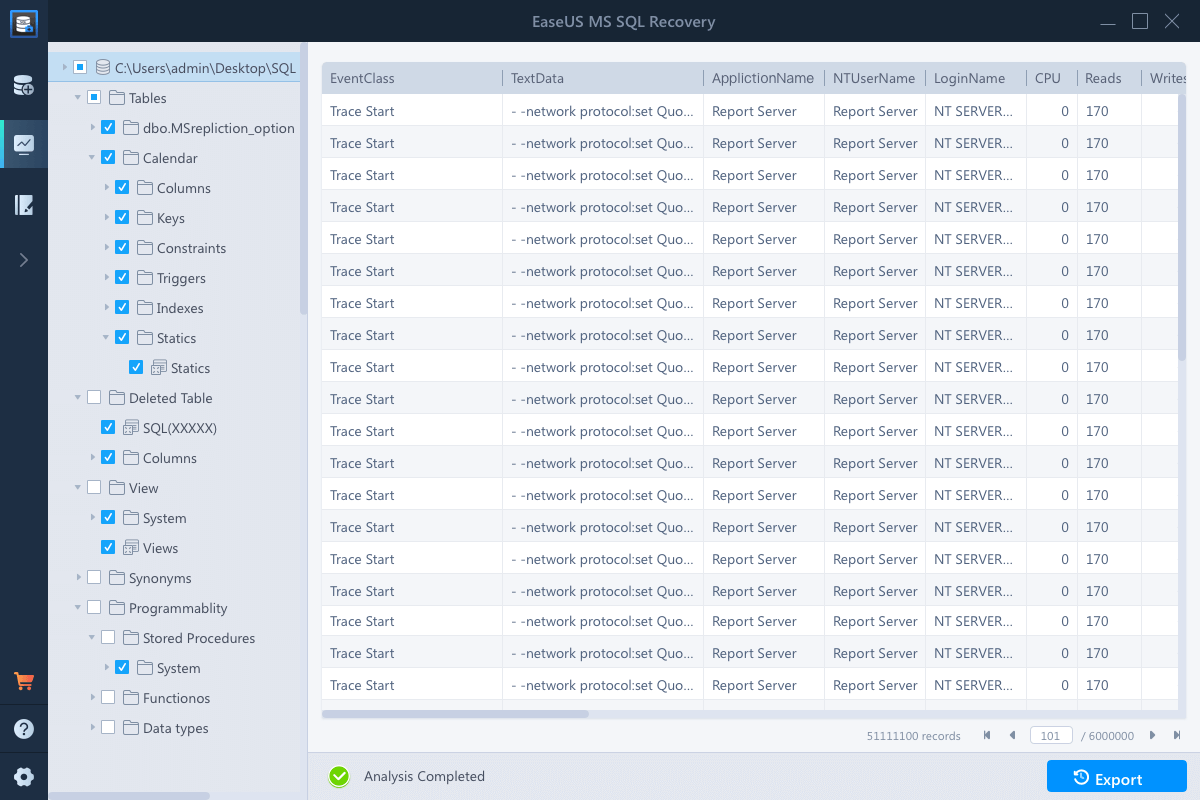
- The software displays all the recoverable items in a tree-like structure. The items are shown in a left pane.
- Select the desired component to be recovered. From the window, click the «Export» button.
Step 3: Export to the database or as scripts
- Choose to export the database objects to database or export the items as scripts
- If you choose «Export to database», enter the information required and choose the target database.
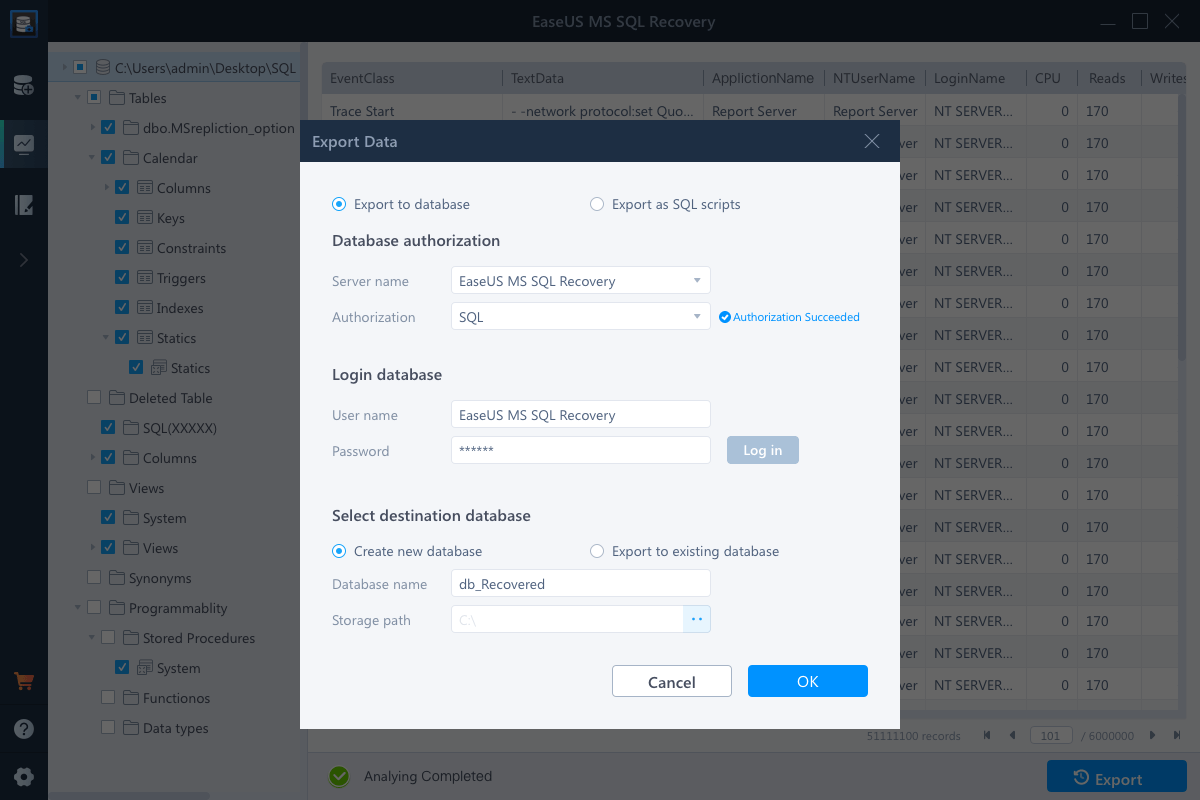
- A window appears up asking you to provide credentials to connect to the server and the destination to save the recovered items. In order to begin the repairing process, click «OK».
Note: Before clicking «OK», you need to restart the SQL Server service.
Input file
Our API uses a .BAK file as input.
This file is a Microsoft SQL Server database backup file.
Max file size for web uploads: 50 GB
Register to upload big files via Amazon S3.
Output file
The API will return a ZIP archive of .XLSX files, one for each table in the given database file.
Since Excel has a limit of about one million rows,
it could be that the rows are divided into several files.
Conversion methods
Using our Java tool
Download the
RebaseData client Java tool
.
To convert your database using RebaseData, run the following command:
java -jar client-0.0.5.jar convert --output-format=xlsx database.bak output-dir/
Using CURL
Replace database.bak with the path to the database you want to convert.
The file output.zip will contain a Excel file, one for each table in the given database file. If something went wrong, output.zip contains the error message.
curl -F files[]=@database.bak 'https://www.rebasedata.com/api/v1/convert?outputFormat=xlsx&errorResponse=zip' -o output.zip
Options
- You can add omitSchemeName=1 to the URL to omit the scheme name in the XLSX filenames.
- You can add password=value to specify the backup’s password. This is only needed if the backup was created with a password. Only relevant for backups created by versions prior to SQL Server 2012.
- You can add mediapassword=value to specify the backup’s media password. This is only needed if the backup was created with a media password. Only relevant for backups created by versions prior to SQL Server 2012.
How long does it take?
The conversion process takes between 15 seconds and multiple minutes. It depends on the size of the database.
Supported versions
- SQL Server 2019
- SQL Server 2017
- SQL Server 2016
- SQL Server 2014
- SQL Server 2012
- SQL Server 2008 R2
- SQL Server 2008
- SQL Server 2005
- SQL Server 2000
You can also use your favourite tool
- Read BAK using PHP
- Read BAK using Python
- Read BAK using Ubuntu
Why use RebaseData?
- Strong security.
- Convert online without installing MS SQL Server.
- Works with Windows, Mac and Linux.
- Use an API to convert your databases.
- Professional support.
Terms
- We don’t guarantee for the success or correctness of the conversion
- You are only allowed to convert your own database files
- By using RebaseData, you agree to our general terms
Лучшая платформа для организации профессиональных данных и оптимизации их производительности в SQL Server, где можно легко создавать и поддерживать несколько баз данных. Среди таблиц базы данных есть возможность создать множество отношений, зависимостей, первичный ключ, триггеры, процедуры и т. д. Вы можете запускать несколько видов команд и получать желаемый результат. Кроме того, когда предприятиям необходимо проанализировать данные, присутствующие в базе данных, они требуют, чтобы они экспортировали те же данные в Excel.
MS Excel имеет лучшую среду для анализа информации, поскольку он имеет множество функций, таких как определяемые пользователем формулы, создание различных диаграмм, аудит формул, автоматическая сортировка и т. д.
Действия по экспорту таблиц базы данных SQL в Microsoft Excel
Если вы можете экспортировать данные SQL во внешнюю электронную таблицу MS Excel, вы можете использовать все ее функции. Мы представляем вам пошаговую процедуру экспорта таблиц базы данных в файл MS Excel в среде SQL Server Management Studio.
- В приложении SQL Server Management Studio перейдите к Обозреватель объектов и выберите базу данных, которую вы хотите экспортировать. Щелкните правой кнопкой мыши базу данных и щелкните значок Экспорт данных вариант присутствует в последнем.
- Мастер импорта и экспорта SQL Server теперь открыт. Нажмите на Следующий кнопка.
- В раскрывающемся списке Источник данных выберите Клиент SQL Server и Редакция SQL Server что вы используете. Выберите Метод аутентификации которые вы регулярно используете для открытия приложения. Затем нажмите Следующий.
- В раскрывающемся списке «Назначение» вы должны выбрать Майкрософт Эксель.
- Нажмите на Просматривать кнопку, чтобы выбрать Файл Excel где вы хотите сохранить файлы базы данных.
- Выберите файл и нажмите кнопку Открыть кнопка.
- Выберите любую версию Excel и нажмите кнопку Следующий кнопка.
- Ошибка не позволяет вам экспортировать содержимое, поскольку требуемый поставщик не добавлен на локальный компьютер.
- Теперь нужно открыть Импорт и экспорт данных SQL Server инструмент прямо из меню «Пуск».
- Нажмите Следующий после открытия мастера и выполните те же шаги, которые вы выполняли ранее.
- В пункте назначения выберите MS Эксель в качестве места назначения и выберите файл Excel из пути и версии. Нажмите на Следующий кнопка.
- Выберите вариант копирования данных из одной или нескольких таблиц или представлений. Затем нажмите Следующий.
- Выберите таблицы из базы данных, которые вы хотите экспортировать в файл Excel. Нажмите Следующий.
- Установите флажок, чтобы запустить процесс немедленно, и нажмите Следующий.
- Отображается сводка, показывающая все выбранные данные и параметры для запуска процесса. Нажмите на Заканчивать кнопка.
- Процесс завершен успешно. Мастер показывает в общей сложности одиннадцать действий, необходимых для завершения процесса. Наконец, вы можете нажать кнопку Закрывать кнопку, чтобы закрыть мастер экспорта и импорта.
Когда содержимое базы данных SQL сохраняется в файле Excel, вы можете проверить информацию, представленную в таблице, и легко ее проанализировать. Вы также можете рассматривать его как резервную копию базы данных SQL.
Заключение
MS SQL Server имеет идеальную среду для создания профессиональных баз данных, и вы можете создавать в них неограниченное количество баз данных. Когда вам нужно экспортировать базу данных в Excel, вам нужно выбрать таблицу вместе с ее столбцами. Мастер экспорта и импорта предоставляет различные свойства отображения и атрибутов.
Но вы видели, что процесс может дать вам некоторые ошибки, и начинающий пользователь может допустить ошибку во время сопоставления или выбора правильной таблицы и столбцов. Чтобы сделать работу по экспорту базы данных более эффективной, у вас должно быть в резерве профессиональное программное обеспечение. Если файл базы данных поврежден, профессиональное программное обеспечение для восстановления базы данных восстановит всю базу данных из файла MDF. Файл MDF — это файл данных, в котором хранятся все базы данных, созданные в SQL Server Management Studio. Профессиональное программное обеспечение для восстановления SQL позволит вам получить доступ к вашим бизнес-данным и сохранить их вместе с их отношениями и свойствами.
Скачать сейчас
Are you looking for a way to open SQL .bak file in Excel which got corrupted? If so, then your query will be resolved in this article. Here we will explain step by step method for how to repair corrupt SQL Server backup file and open in Excel. Before describing the solution, first let’s know some general information about SQL Server and the BAK file. If you already know about SQL Server and the Backup (.bak) file, then you can simply skip the below section. Or else, if you are new in IT sector and want to know what is SQL Server and BAK file, then read the following section.
Brief Introduction of SQL Server
SQL Server is a relational database management system developed by Microsoft. SQL (Structure Query Language) is used to manage, update and retrieve data from the database. It stores its data in MDF, NDF and LDF (log) File. Microsoft has launched various versions of SQL server such as SQL Server 2017, 2016, 2014, 2012, 2008, and 2000.
What is .Bak File?
Basically, .bak is a file extension of the backup file. When we create a backup of any data, all data stored in a .bak file. Same as SQL server offers its users the ability to automatically backup their important data and all their data will be stored in a .bak (backup) file. An SQL backup file stores MDF, NDF, and LOG file data. However, sometimes the SQL .bak file may be corrupt, damage and inaccessible, and there can be many reasons for backup file corruption. Now, in the below section, we are going to provide the complete solution to recover corrupt SQL backup file and how can users open SQL .bak file in Excel spreadsheet.
Can You Open SQL .bak File in Excel which Got Corrupted?
The answer to the above question is NO, because there is no way to open and restore corrupted SQL .bak file in Excel. But, you can fix the corrupt SQL backup file and export it into your SQL Server database using SysTools SQL Backup Recovery tool. This software is helpful to repair damaged SQL .bak file and import it directly into your SQL Server database. It recover MDF, NDF and LDF data files saved in an SQL backup file. The tool helps you to repair the full database backup in just a few clicks without having any technical knowledge.
SQL Backup Recovery Tool to Repair Corrupt SQL Backup File
This software is a professional utility that easily repair damaged or corrupted SQL Server backup files. It supports all versions of SQL server to recover a .bak file. The tool does not support to open SQL .back file in Excel which got corrupted, but it restore damaged data back into their SQL Server database. This is a Windows based tool which can be easily installed on Windows 10, Windows 8.1, Windows 8, Windows 7 and other below editions. The application offers various unbeatable features and benefits to its users for recovering damaged or inaccessible SQL backup file. The working of the tool is easy to use and understand to all types of users.
Follow all the steps to repair corrupt SQL backup file and directly export in SQL Server Database.
Step 1. Download, Install and Run the software on your Windows machine.

Step 2. Click Open from the top and then click on Browse button to load SQL .bak file.

Step 3. Select version of .bak file and click on “Multiple Backup File Option” and add the multiple .bak files by clicking on Add Files and Add Folder option.

Step 4. Select the backup files and click on Recover to start the recovery process.

Step 5. Once the backup file successfully recovered, click on Export button to export the backup database in SQL Server.

Step 6. Choose Export to “SQL Server Database” or “SQL Server Compatible SQL Scripts” option. And also choose Database Authentication mode. If you select Windows Authentication, then fill the Server name. Or select SQL Server Authentication, then enter the login credentials of SQL Server.

Step 7. Select required destination database and select “With only schema” Or select “With schema & data” to export. After, click on the Export button to start the recovery process.

Step 8. Once the task is complete “Export Completed Successfully” message will appear on your screen. Click on Close button.

Step 9. The software asks you to “Export the Details to a .csv file”. Click on Yes and select the required folder to save .csv file.

Step 10. To review the recovered database in SQL Server, simply expand the databases.

Note: SQL Server must be installed on your machine to export recovery SQL backup file into SQL Server database.
Best Features & Benefits of SQL Server Backup Software
The tool offers several advanced featured to it users. Some of them are as follows.
- The software provides dual option for loading the SQL backup (.bak) file. Select Add file to load single file and Add Folder to load multiple file.
- This utility recover MDF, NDF and LDF data files stored in a damaged SQL Server .bak file.
- With this tool, you can repair and export any size of SQL backup file without file size limitations.
- The SQL backup repair tool recover all files saved in the SQL backup (.bak) file like MDF, NDF, and LDF files.
- The tool provides the option to directly import recovered SQL backup data file into the SQL Server database. It does not open SQL .bak file in Excel which got corrupted because there is no solution to do this.
- The application enables you to repair complete data from the SQL Server backup file, including all components like Tables, Views, Store Procedures, Rules, Triggers, etc.
- This utility gives the option to export deleted records from the SQL Server Backup (.bak) file.
- The software supports .bak file of SQL Server 2017, 2016, 2014, 2010, 2008 and other below editions.
The
Concluding Words
Recover and open SQL .bak file in Excel which got corrupted is the hardest task because there is no method for resolving it. To overcome this problem, we have suggested you the best SQL Server Backup Recovery software that successfully recovers damaged SQL .bak file and imports it directly into SQL Server. The software comes with a free trial version, so you can easily check the efficiency and working process. The Free edition allows you to repair some damaged SQL Server backup files. If you want to recover corrupt SQL backup file and import it into SQL Server, then you must buy the license key of the tool.
Frequently Asked Questions
How Can I Take SQL Backup and Restore in SQL Database?
You can easily take a backup of SQL Server database using SSMS software and T-SQL command. Both methods are also helpful for restoring BAK file in SQL Database. But, in case the BAK file is corrupted due to any reasons, try SysTools SQL BAK File Repair Tool for a quick solution.
Is it Possible to Restore Corrupt .BAK File?
No, first you must fix damaged database backup and for that use SQL Backup Repair tool. After recovering data from BAK file, you can easily restore the BAK file.
Why SQL Damaged .BAK File Is Not Opened in Excel?
The SQL backup file is only open and restore in SQL Database. There is no option or method to open backup in excel.
How Can I Open SQL Backup File Without Restoring?
You can use SQL Server BAK file repair tool that helps you to open backup file. It provides a preview of complete data which saved in BAK file.
Содержание
- Расположение временных файлов
- Размещение файлов автосохранения
- Размещение несохраненных книг
- Вопросы и ответы

Если в Excel включено автосохранение, то данная программа периодически сохраняет свои временные файлы в определенную директорию. В случае непредвиденных обстоятельств или сбоев в работе программы их можно восстановить . По умолчанию автосохранение включено с периодичностью в 10 минут, но этот период можно изменить или вообще отключить данную функцию.
Как правило, после сбоев Эксель через свой интерфейс предлагает пользователю произвести процедуру восстановления. Но, в некоторых случаях с временными файлами нужно работать напрямую. Вот тогда и настает необходимость знать, где они расположены. Давайте разберемся с этим вопросом.
Расположение временных файлов
Сразу нужно сказать, что временные файлы в Excel делятся на два типа:
- Элементы автосохранения;
- Несохраненные книги.
Таким образом, даже если у вас не включено автосохранение, то все равно имеется возможность восстановления книги. Правда, файлы этих двух типов расположены в разных директориях. Давайте узнаем, где они размещаются.
Размещение файлов автосохранения
Трудность указания конкретного адреса состоит в том, что в различных случаях может быть не только разная версия операционной системы, но и наименование учетной записи пользователя. А от последнего фактора тоже зависит, где располагается папка с нужными нам элементами. Благо, существует универсальный подходящий для всех способ узнать данную информацию. Для этого нужно выполнить следующие действия.
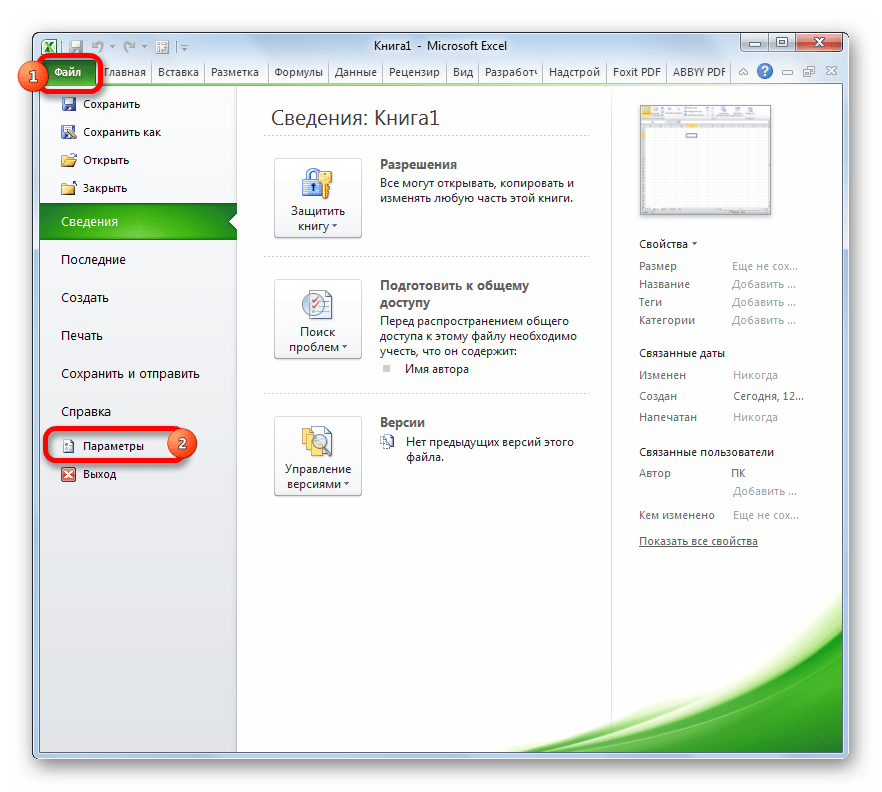
- Переходим во вкладку «Файл» Excel. Щелкаем по наименованию раздела «Параметры».
- Открывается окно параметров Эксель. Переходим в подраздел «Сохранение». В правой части окна в группе настроек «Сохранение книг» нужно найти параметр «Каталог данных для автовосстановления». Именно тот адрес, который указан в этом поле, указывает на директорию расположения временных файлов.

Например, для пользователей операционной системы Windows 7 шаблон адреса будет следующим:
C:Usersимя_пользователяAppDataRoamingMicrosoftExcel
Естественно, вместо значения «имя_пользователя» нужно указать наименование своей учетной записи в данном экземпляре Windows. Впрочем, если вы сделаете все так, как указано выше, то ничего дополнительного вам подставлять не нужно, так как полный путь к каталогу будет отображен в соответствующем поле. Оттуда вы можете его скопировать и вставить в Проводник или выполнить любые другие действия, которые считаете нужными.
Внимание! Место размещения файлов автосохранения через интерфейс Excel важно посмотреть ещё и потому, что оно могло быть изменено вручную в поле «Каталог данных для автовосстановления», а поэтому может не соответствовать шаблону, который был указан выше.
Урок: Как настроить автосохранение в Excel
Размещение несохраненных книг
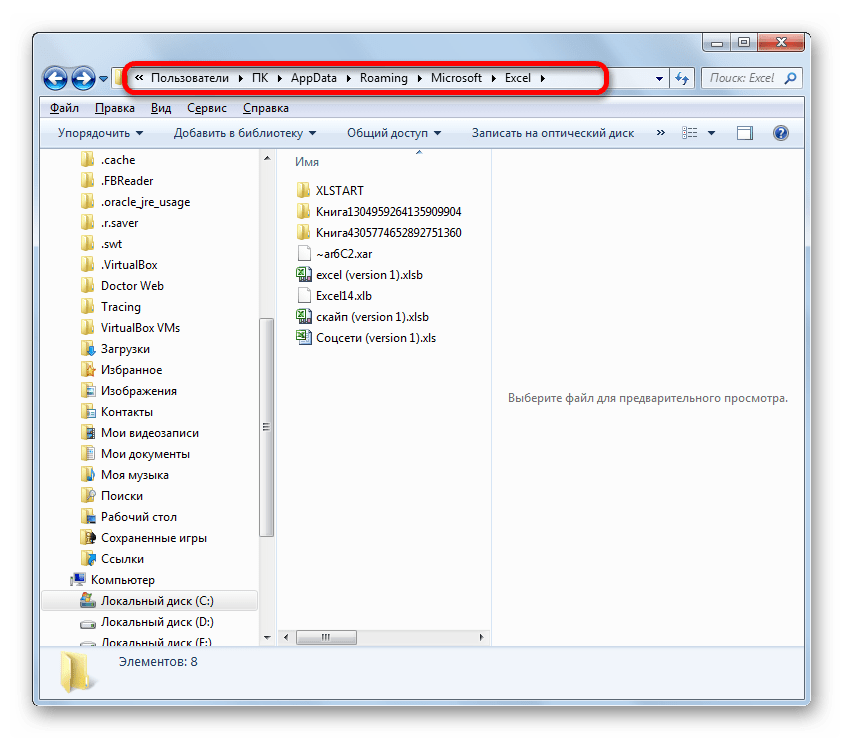
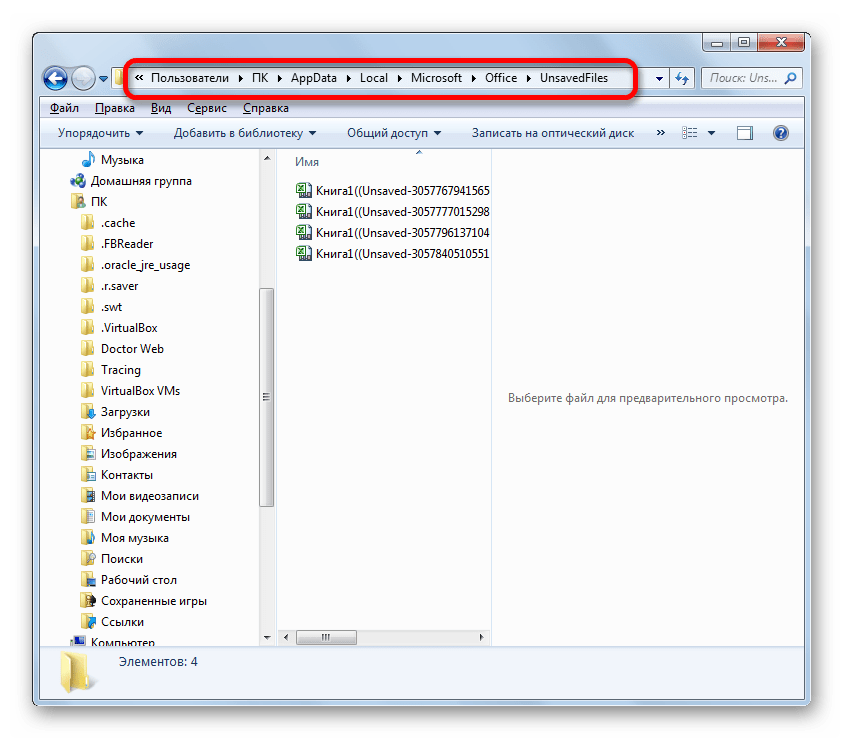
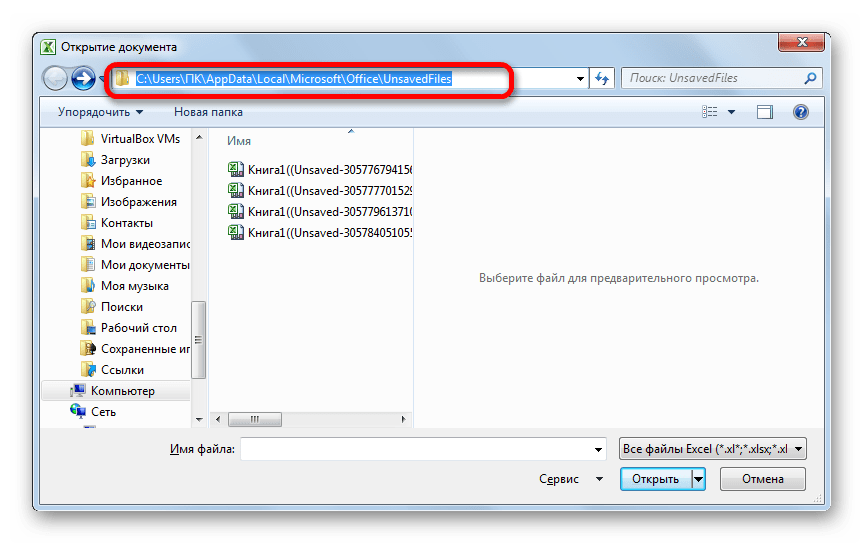
Немного сложнее дело обстоит с книгами, у которых не настроено автосохранение. Адрес места хранения таких файлов через интерфейс Эксель узнать можно только выполнив имитацию процедуры восстановления. Они находятся не в отдельной папке Excel, как в предыдущем случае, а в общей для хранения несохраненных файлов всех программных продуктов пакета Microsoft Office. Несохраненные книги будут располагаться в директории, которая находится по адресу следующего шаблона:

C:Usersимя_пользователяAppDataLocalMicrosoftOfficeUnsavedFiles
Вместо значения «Имя_пользователя», как и в предыдущий раз, нужно подставить наименование учетной записи. Но, если в отношении места расположения файлов автосохранения мы не заморачивались с выяснением названия учетной записи, так как могли получить полный адрес директории, то в этом случае его обязательно нужно знать.
Узнать наименование своей учетной записи довольно просто. Для этого жмем кнопку «Пуск» в левом нижнем углу экрана. В верхней части появившейся панели и будет указана ваша учетная запись.
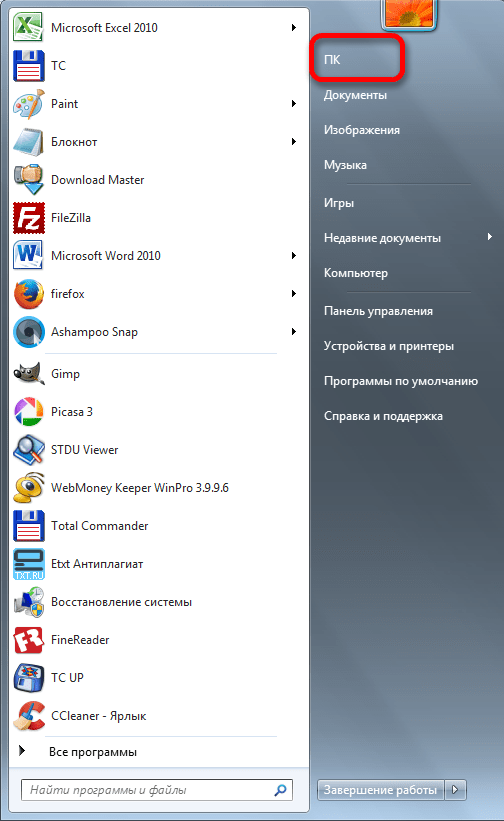
Просто подставьте её в шаблон вместо выражения «имя_пользователя».
Получившийся адрес можно, например, вставить в Проводник, чтобы перейти в нужную директорию.
Если же вам нужно открыть место хранения несохраненных книг, созданных на данном компьютере под иной учетной записью, то перечень имен пользователей можно узнать, выполнив следующие инструкции.
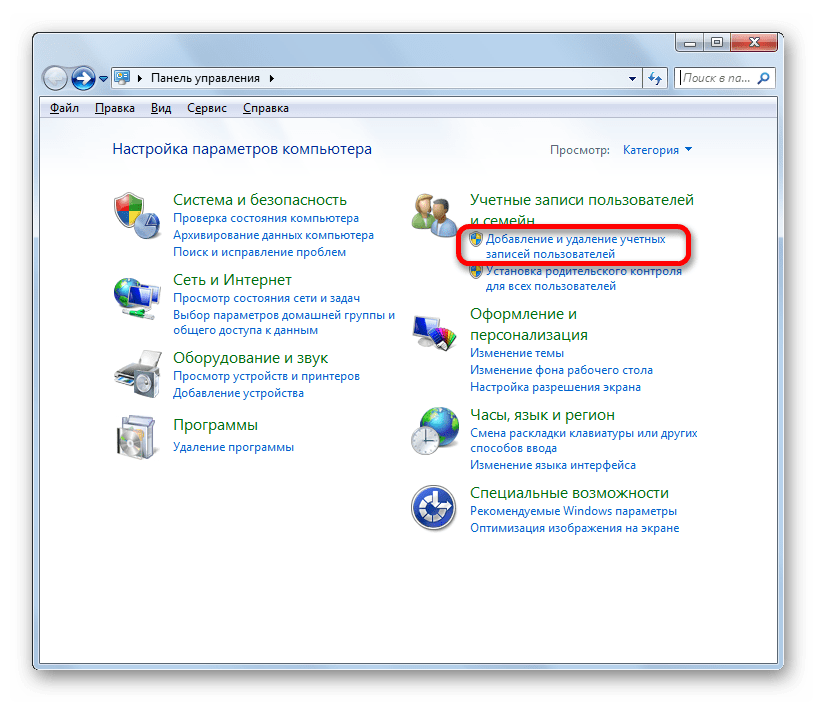
- Открываем меню «Пуск». Переходим по пункту «Панель управления».
- В открывшемся окне перемещаемся в раздел «Добавление и удаление записей пользователей».
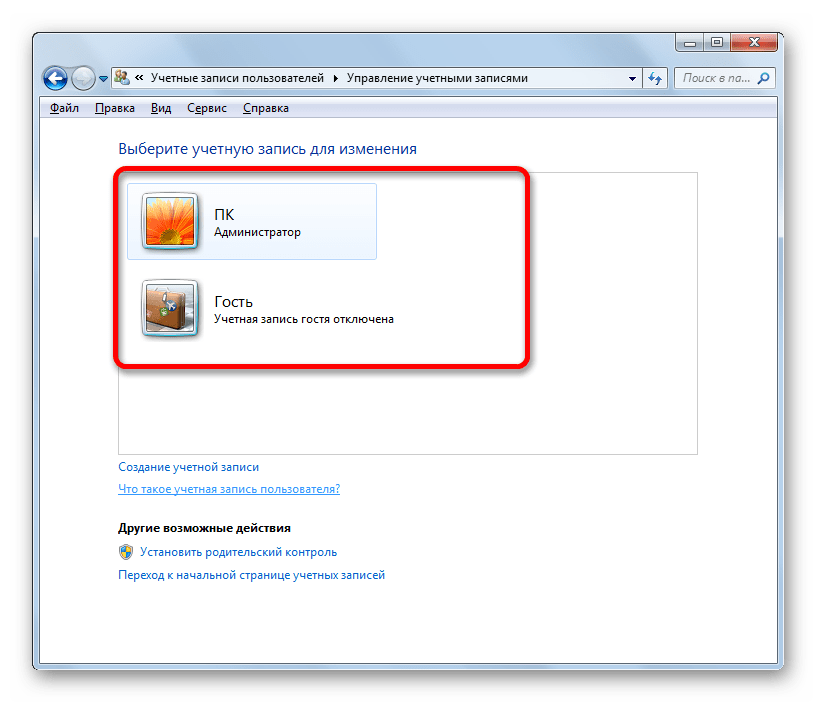
- В новом окне никаких дополнительных действий делать не нужно. Вы там можете посмотреть, какие имена пользователей на данном ПК имеются и выбрать подходящее, чтобы использовать его для перехода в директорию хранения несохраненных книг Excel, подставив в шаблон адреса вместо выражения «имя_пользователя».

Как уже говорилось выше, место хранения несохраненных книг можно узнать также, проведя имитацию процедуры восстановления.
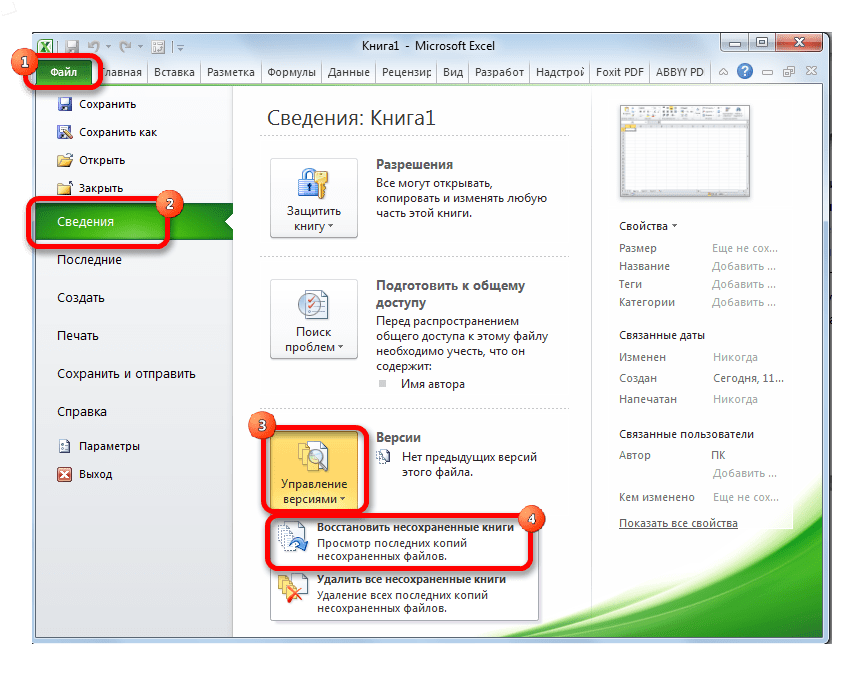
- Переходим в программе Excel во вкладку «Файл». Далее перемещаемся в раздел «Сведения». В правой части окна жмем на кнопку «Управление версиями». В открывшемся меню выбираем пункт «Восстановить несохраненные книги».
- Открывается окно восстановления. Причем оно открывается именно в той директории, где хранятся файлы несохраненных книг. Нам остается только выделить адресную строку данного окна. Именно её содержимое и будет являться адресом директории расположения несохраненных книг.
Далее мы можем в этом же окне провести процедуру восстановления или воспользоваться полученной информацией об адресе в других целях. Но нужно учесть, что данный вариант подходит для того, чтобы узнать адрес расположения несохраненных книг, которые были созданы под той учетной записью, под какой вы работаете сейчас. Если нужно узнать адрес в другой учетной записи, то применяйте метод, который был описан чуть ранее.
Урок: Восстановление несохраненной книги Excel
Как видим, точный адрес расположения временных файлов Excel можно узнать через интерфейс программы. Для файлов автосохранения это делается через параметры программы, а для несохраненных книг через имитацию восстановления. Если же вы хотите узнать место расположения временных файлов, которые были сформированы под другой учетной записью, то в этом случае нужно узнать и указать наименование конкретного имени пользователя.