Introduction
This is a tutorial about writing code in Excel spreadsheets using Visual Basic for Applications (VBA).
Excel is one of Microsoft’s most popular products. In 2016, the CEO of Microsoft said «Think about a world without Excel. That’s just impossible for me.” Well, maybe the world can’t think without Excel.
- In 1996, there were over 30 million users of Microsoft Excel (source).
- Today, there are an estimated 750 million users of Microsoft Excel. That’s a little more than the population of Europe and 25x more users than there were in 1996.
We’re one big happy family!
In this tutorial, you’ll learn about VBA and how to write code in an Excel spreadsheet using Visual Basic.
Prerequisites
You don’t need any prior programming experience to understand this tutorial. However, you will need:
- Basic to intermediate familiarity with Microsoft Excel
- If you want to follow along with the VBA examples in this article, you will need access to Microsoft Excel, preferably the latest version (2019) but Excel 2016 and Excel 2013 will work just fine.
- A willingness to try new things
Learning Objectives
Over the course of this article, you will learn:
- What VBA is
- Why you would use VBA
- How to get set up in Excel to write VBA
- How to solve some real-world problems with VBA
Important Concepts
Here are some important concepts that you should be familiar with to fully understand this tutorial.
Objects: Excel is object-oriented, which means everything is an object — the Excel window, the workbook, a sheet, a chart, a cell. VBA allows users to manipulate and perform actions with objects in Excel.
If you don’t have any experience with object-oriented programming and this is a brand new concept, take a second to let that sink in!
Procedures: a procedure is a chunk of VBA code, written in the Visual Basic Editor, that accomplishes a task. Sometimes, this is also referred to as a macro (more on macros below). There are two types of procedures:
- Subroutines: a group of VBA statements that performs one or more actions
- Functions: a group of VBA statements that performs one or more actions and returns one or more values
Note: you can have functions operating inside of subroutines. You’ll see later.
Macros: If you’ve spent any time learning more advanced Excel functionality, you’ve probably encountered the concept of a “macro.” Excel users can record macros, consisting of user commands/keystrokes/clicks, and play them back at lightning speed to accomplish repetitive tasks. Recorded macros generate VBA code, which you can then examine. It’s actually quite fun to record a simple macro and then look at the VBA code.
Please keep in mind that sometimes it may be easier and faster to record a macro rather than hand-code a VBA procedure.
For example, maybe you work in project management. Once a week, you have to turn a raw exported report from your project management system into a beautifully formatted, clean report for leadership. You need to format the names of the over-budget projects in bold red text. You could record the formatting changes as a macro and run that whenever you need to make the change.
What is VBA?
Visual Basic for Applications is a programming language developed by Microsoft. Each software program in the Microsoft Office suite is bundled with the VBA language at no extra cost. VBA allows Microsoft Office users to create small programs that operate within Microsoft Office software programs.
Think of VBA like a pizza oven within a restaurant. Excel is the restaurant. The kitchen comes with standard commercial appliances, like large refrigerators, stoves, and regular ole’ ovens — those are all of Excel’s standard features.
But what if you want to make wood-fired pizza? Can’t do that in a standard commercial baking oven. VBA is the pizza oven.
Yum.
Why use VBA in Excel?
Because wood-fired pizza is the best!
But seriously.
A lot of people spend a lot of time in Excel as a part of their jobs. Time in Excel moves differently, too. Depending on the circumstances, 10 minutes in Excel can feel like eternity if you’re not able to do what you need, or 10 hours can go by very quickly if everything is going great. Which is when you should ask yourself, why on earth am I spending 10 hours in Excel?
Sometimes, those days are inevitable. But if you’re spending 8-10 hours everyday in Excel doing repetitive tasks, repeating a lot of the same processes, trying to clean up after other users of the file, or even updating other files after changes are made to the Excel file, a VBA procedure just might be the solution for you.
You should consider using VBA if you need to:
- Automate repetitive tasks
- Create easy ways for users to interact with your spreadsheets
- Manipulate large amounts of data
Getting Set Up to Write VBA in Excel
Developer Tab
To write VBA, you’ll need to add the Developer tab to the ribbon, so you’ll see the ribbon like this.
To add the Developer tab to the ribbon:
- On the File tab, go to Options > Customize Ribbon.
- Under Customize the Ribbon and under Main Tabs, select the Developer check box.
After you show the tab, the Developer tab stays visible, unless you clear the check box or have to reinstall Excel. For more information, see Microsoft help documentation.
VBA Editor
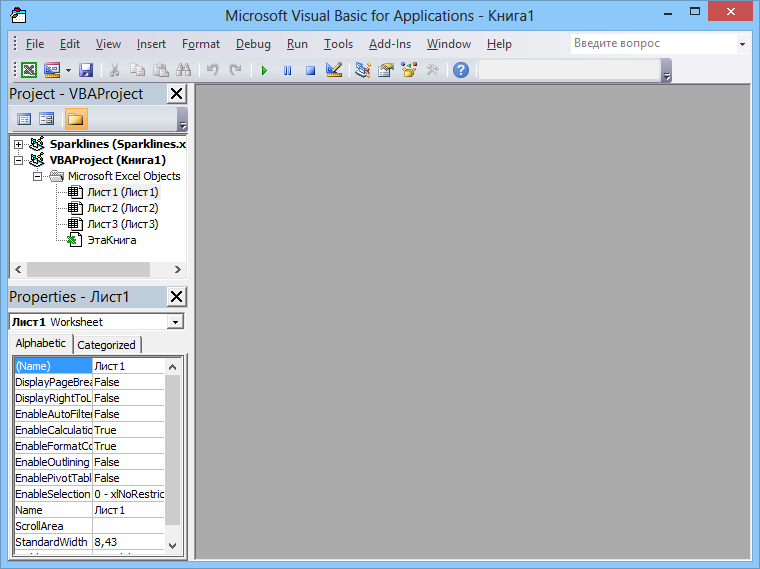
Navigate to the Developer Tab, and click the Visual Basic button. A new window will pop up — this is the Visual Basic Editor. For the purposes of this tutorial, you just need to be familiar with the Project Explorer pane and the Property Properties pane.
Excel VBA Examples
First, let’s create a file for us to play around in.
- Open a new Excel file
- Save it as a macro-enabled workbook (. xlsm)
- Select the Developer tab
- Open the VBA Editor
Let’s rock and roll with some easy examples to get you writing code in a spreadsheet using Visual Basic.
Example #1: Display a Message when Users Open the Excel Workbook
In the VBA Editor, select Insert -> New Module
Write this code in the Module window (don’t paste!):
Sub Auto_Open()
MsgBox («Welcome to the XYZ Workbook.»)
End Sub
Save, close the workbook, and reopen the workbook. This dialog should display.
Ta da!
How is it doing that?
Depending on your familiarity with programming, you may have some guesses. It’s not particularly complex, but there’s quite a lot going on:
- Sub (short for “Subroutine): remember from the beginning, “a group of VBA statements that performs one or more actions.”
- Auto_Open: this is the specific subroutine. It automatically runs your code when the Excel file opens — this is the event that triggers the procedure. Auto_Open will only run when the workbook is opened manually; it will not run if the workbook is opened via code from another workbook (Workbook_Open will do that, learn more about the difference between the two).
- By default, a subroutine’s access is public. This means any other module can use this subroutine. All examples in this tutorial will be public subroutines. If needed, you can declare subroutines as private. This may be needed in some situations. Learn more about subroutine access modifiers.
- msgBox: this is a function — a group of VBA statements that performs one or more actions and returns a value. The returned value is the message “Welcome to the XYZ Workbook.”
In short, this is a simple subroutine that contains a function.
When could I use this?
Maybe you have a very important file that is accessed infrequently (say, once a quarter), but automatically updated daily by another VBA procedure. When it is accessed, it’s by many people in multiple departments, all across the company.
- Problem: Most of the time when users access the file, they are confused about the purpose of this file (why it exists), how it is updated so often, who maintains it, and how they should interact with it. New hires always have tons of questions, and you have to field these questions over and over and over again.
- Solution: create a user message that contains a concise answer to each of these frequently answered questions.
Real World Examples
- Use the MsgBox function to display a message when there is any event: user closes an Excel workbook, user prints, a new sheet is added to the workbook, etc.
- Use the MsgBox function to display a message when a user needs to fulfill a condition before closing an Excel workbook
- Use the InputBox function to get information from the user
Example #2: Allow User to Execute another Procedure
In the VBA Editor, select Insert -> New Module
Write this code in the Module window (don’t paste!):
Sub UserReportQuery()
Dim UserInput As Long
Dim Answer As Integer
UserInput = vbYesNo
Answer = MsgBox(«Process the XYZ Report?», UserInput)
If Answer = vbYes Then ProcessReport
End Sub
Sub ProcessReport()
MsgBox («Thanks for processing the XYZ Report.»)
End Sub
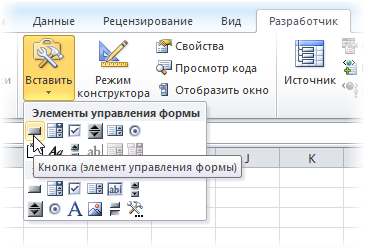
Save and navigate back to the Developer tab of Excel and select the “Button” option. Click on a cell and assign the UserReportQuery macro to the button.
Now click the button. This message should display:
Click “yes” or hit Enter.
Once again, tada!
Please note that the secondary subroutine, ProcessReport, could be anything. I’ll demonstrate more possibilities in example #3. But first…
How is it doing that?
This example builds on the previous example and has quite a few new elements. Let’s go over the new stuff:
- Dim UserInput As Long: Dim is short for “dimension” and allows you to declare variable names. In this case, UserInput is the variable name and Long is the data type. In plain English, this line means “Here’s a variable called “UserInput”, and it’s a Long variable type.”
- Dim Answer As Integer: declares another variable called “Answer,” with a data type of Integer. Learn more about data types here.
- UserInput = vbYesNo: assigns a value to the variable. In this case, vbYesNo, which displays Yes and No buttons. There are many button types, learn more here.
- Answer = MsgBox(“Process the XYZ Report?”, UserInput): assigns the value of the variable Answer to be a MsgBox function and the UserInput variable. Yes, a variable within a variable.
- If Answer = vbYes Then ProcessReport: this is an “If statement,” a conditional statement, which allows us to say if x is true, then do y. In this case, if the user has selected “Yes,” then execute the ProcessReport subroutine.
When could I use this?
This could be used in many, many ways. The value and versatility of this functionality is more so defined by what the secondary subroutine does.
For example, maybe you have a file that is used to generate 3 different weekly reports. These reports are formatted in dramatically different ways.
- Problem: Each time one of these reports needs to be generated, a user opens the file and changes formatting and charts; so on and so forth. This file is being edited extensively at least 3 times per week, and it takes at least 30 minutes each time it’s edited.
- Solution: create 1 button per report type, which automatically reformats the necessary components of the reports and generates the necessary charts.
Real World Examples
- Create a dialog box for user to automatically populate certain information across multiple sheets
- Use the InputBox function to get information from the user, which is then populated across multiple sheets
Example #3: Add Numbers to a Range with a For-Next Loop
For loops are very useful if you need to perform repetitive tasks on a specific range of values — arrays or cell ranges. In plain English, a loop says “for each x, do y.”
In the VBA Editor, select Insert -> New Module
Write this code in the Module window (don’t paste!):
Sub LoopExample()
Dim X As Integer
For X = 1 To 100
Range(«A» & X).Value = X
Next X
End Sub
Save and navigate back to the Developer tab of Excel and select the Macros button. Run the LoopExample macro.
This should happen:
Etc, until the 100th row.
How is it doing that?
- Dim X As Integer: declares the variable X as a data type of Integer.
- For X = 1 To 100: this is the start of the For loop. Simply put, it tells the loop to keep repeating until X = 100. X is the counter. The loop will keep executing until X = 100, execute one last time, and then stop.
- Range(«A» & X).Value = X: this declares the range of the loop and what to put in that range. Since X = 1 initially, the first cell will be A1, at which point the loop will put X into that cell.
- Next X: this tells the loop to run again
When could I use this?
The For-Next loop is one of the most powerful functionalities of VBA; there are numerous potential use cases. This is a more complex example that would require multiple layers of logic, but it communicates the world of possibilities in For-Next loops.
Maybe you have a list of all products sold at your bakery in Column A, the type of product in Column B (cakes, donuts, or muffins), the cost of ingredients in Column C, and the market average cost of each product type in another sheet.
You need to figure out what should be the retail price of each product. You’re thinking it should be the cost of ingredients plus 20%, but also 1.2% under market average if possible. A For-Next loop would allow you to do this type of calculation.
Real World Examples
- Use a loop with a nested if statement to add specific values to a separate array only if they meet certain conditions
- Perform mathematical calculations on each value in a range, e.g. calculate additional charges and add them to the value
- Loop through each character in a string and extract all numbers
- Randomly select a number of values from an array
Conclusion
Now that we’ve talked about pizza and muffins and oh-yeah, how to write VBA code in Excel spreadsheets, let’s do a learning check. See if you can answer these questions.
- What is VBA?
- How do I get set up to start using VBA in Excel?
- Why and when would you use VBA?
- What are some problems I could solve with VBA?
If you have a fair idea of how to you could answer these questions, then this was successful.
Whether you’re an occasional user or a power user, I hope this tutorial provided useful information about what can be accomplished with just a bit of code in your Excel spreadsheets.
Happy coding!
Learning Resources
- Excel VBA Programming for Dummies, John Walkenbach
- Get Started with VBA, Microsoft Documentation
- Learning VBA in Excel, Lynda
A bit about me
I’m Chloe Tucker, an artist and developer in Portland, Oregon. As a former educator, I’m continuously searching for the intersection of learning and teaching, or technology and art. Reach out to me on Twitter @_chloetucker and check out my website at chloe.dev.
Learn to code for free. freeCodeCamp’s open source curriculum has helped more than 40,000 people get jobs as developers. Get started
В процессе программирования на VBA в Excel вы будете проводить много времени, работая в окнах VBE. Чтобы сделать редактор более удобным, вам понадобится настройка среды Visual Basic Editor под ваши предпочтения.[1] Находясь в Excel, перейдите в окно VBE, например, нажав Alt+F11. В строке меню окна VBE выберите команду Tools –> Options. Появится диалоговое окно Options (Параметры) с четырьмя вкладками: Editor (Редактор), Editor Format (Формат редактора), General (Общие) и Docking (Прикрепление). Кстати, не путайте это окно с диалоговым окном Параметры Excel программы Excel, которое можно открыть в Excel с помощью команды Файл –> Параметры Excel.
Рис. 1. Вкладка Editor диалогового окна VBE Options (Параметры)
Скачать заметку в формате Word или pdf
Вкладка Editor
На рис. 1 показаны параметры, доступ к которым можно получить, щелкнув на вкладке Editor (Редактор).
Настройка Auto Syntax Check (Автоматическая проверка синтаксиса) определяет, будет ли появляться диалоговое окно, когда VBE обнаружит синтаксическую ошибку в коде VBA. В этом диалоговом окне указывается тип допущенной ошибки. Если отменить установку этого флажка, то VBE выделит синтаксические ошибки, отобразив соответствующие фрагменты кода другим цветом, и вам не придется работать в диалоговых окнах, которые появляются на экране. Начинающим программистам рекомендуется установить эту опцию.
При установленном параметре Require Variable Declaration (Обязательное декларирование переменных) VBE вставляет в начале каждого нового модуля оператор Option Explicit. Если в модуле задан этот оператор, то вы должны явно определить каждую используемую в нем переменную. Таким образом, у вас вырабатывается хорошая привычка, которая, правда, требует дополнительных усилий. Если вы не объявляете переменные, все они имеют тип данных Variant; это достаточно гибко, но неэффективно с точки зрения использования аппаратных ресурсов и скорости выполнения кода. Имейте ввиду, что изменение параметра Require Variable Declaration влияет на новые модули, а не на существующие.
Если выбрана опция Auto List Members (Автоматическая вставка объектов), VBE предоставляет помощь при вводе кода VBA, отображая список элементов текущего объекта. К этим элементам относятся методы и свойства объекта, название которого вводится вручную. Данный параметр весьма полезен, поэтому его рекомендуется всегда активизировать. На рис. 2 показан пример использования этого параметра – VBE отображает список элементов объекта Application. Можете выбрать элемент из списка, чтобы не вводить его с помощью клавиатуры (в результате название элемента будет введено без ошибок).
Рис. 2. Автоматическая вставка объектов при ручном вводе кода
Если включен параметр Auto Quick Info (Отображать краткие сведения), VBE будет отображать информацию об аргументах функций, свойств и методов, названия которых вы вводите с клавиатуры. Рекомендуется всегда оставлять эту настройку включенной. На рис. 3 отображается синтаксис свойства Cells.
Рис. 3. Автоматическое отображение кратких сведений о синтаксисе
Если включен параметр Auto Data Tips, VBE отображает при отладке кода значение переменной, над которой находится указатель мыши. Рекомендуется всегда держать его включенным.
Настройка Auto Indent (Автоматический отступ) определяет, располагает ли автоматически VBE каждую новую строку программы с тем же отступом, который задан для предыдущей строки. Тем, кто использует отступы в программных кодах, советуем всегда обращаться к этому параметру. Вы можете также задать количество символов в отступе (по умолчанию указано значение 4). Используйте клавишу <Таb>, а не пробел, чтобы задать отступ в коде. При использовании клавиши <Таb> отступы получаются более «правильными». Кроме того, для отмены отступа в конкретной строке воспользуйтесь комбинацией клавиш <Shift+Tab>. Она может применяться при выделении нескольких строк.
При выборе параметра Drag-and-Drop Text Editing (Включить редактирование перетаскиванием) вы можете копировать и перемещать текст, перетаскивая его с помощью мыши. Если вы любите такой метод работы, оставьте этот параметр включенным. Я никогда не пользуюсь функцией перетаскивания, так как предпочитаю для копирования и вставки обращаться к комбинациям клавиш.
Параметр Default to Full Module View (По умолчанию использовать полный режим просмотра) определяет принцип просмотра процедуры. Если он включен, процедуры в окне кода помещаются в одно окно с полосой прокрутки. Если же он отключен, то вы можете просмотреть в определенный момент только одну процедуру. Рекомендуем активизировать этот параметр.
Когда параметр Procedure Separator (Разделение процедур) включен, в конце каждой процедуры в окне кода отображаются специальные разделители. Если вам нравятся эти визуальные подсказки окончания процедуры, выставляйте данный флажок.
Вкладка Editor Format
Параметры на этой вкладке определяют формат шрифта кода в VBE и некоторые иные свойства (рис. 4).
Рис. 4. Вкладка Editor Format в диалоговом окне Options
Параметр Code Colors (Цвета кода). Предоставляет возможность выбрать цвета кода (текста и фона) и индикатора, который используется для выделения разных элементов программы VBA. Цвета, конечно, выбираются в зависимости от личных предпочтений. Вы можете согласиться с цветами, принятыми по умолчанию. Для разнообразия можете изменить эти настройки.
Параметр Font (Шрифт). Предоставляет возможность указать шрифт, используемый в модулях VBA. Наибольшая эффективность достигается при работе с моноширинным шрифтом (например, Courier New). В таком шрифте все символы имеют одинаковую ширину, что делает программу более удобной для восприятия и анализа, так как все символы одинаково выровнены; кроме того, хорошо видны пробелы между словами.
Список Size (Размер). Определяет размер шрифта кода модулей VBA. Эта настройка зависит от личных предпочтений, которые, в свою очередь, определяются разрешением монитора и вашим зрением. По умолчанию размер задан равным 10.
Параметр Margin Indicator Ваг (Полоса индикатора границы). Отображает вертикальную полосу вдоль левой границы окна кода, на которой высвечиваются всевозможные индикаторы. Его необходимо выставить; в противном случае вы не увидите полезные графические извещения при отладке кода.
Вкладка General
На рис. 5 показаны параметры, доступные на вкладке General (Общие) диалогового окна Options.
Рис. 5. Вкладка General в диалоговом окне Options
Раздел Form Grid Settings (Параметры сетки формы). Находящиеся в этом разделе параметры предназначены для настройки пользовательских диалоговых окон; с их помощью определяются параметры сетки, которая облегчает позиционирование элементов управления в окне UserForm.
Флажок Show ToolTips (Показать подсказки). Определяет поведение кнопок панели инструментов. Рекомендуется всегда его устанавливать.
Флажок Collapse Proj. Hides Windows (Скрывать окна при сворачивании проектов). Установка этого флажка приведет к автоматическому закрытию окон в случае сворачивания проекта в окне Project. Рекомендуется установить этот флажок.
Раздел Edit and Continue (Редактировать и продолжать). Содержит единственный флажок, который может оказаться полезным в процессе отладки. В случае установки этого флажка VBA отображает сообщение, если переменные теряют присвоенные им значения в результате появления каких-либо проблем.
Раздел Error Trapping (Перехват ошибок). Находящиеся в этом разделе параметры определяют, что происходит при возникновении ошибки. Если вы создаете процедуры обработки ошибок, убедитесь в том, что установлен переключатель Break on Unhandled Errors (Остановка при возникновении неисправимой ошибки). При заданном параметре Break on All Errors (Остановка при возникновении любой ошибки) процедуры обработки ошибок игнорируются (вряд ли это нужно).
Раздел Compile (Компиляция). Находящиеся в этом разделе два параметра управляют процессом компиляции кода. Рекомендуется установить оба этих параметра. На современных компьютерах компиляция кода происходит практически мгновенно, если его размеры сравнительно невелики.
Вкладка Docking
На рис. 6 показана вкладка Docking (Прикрепление) диалогового окна Options. Ее параметры определяют поведение нескольких окон редактора VBE. На вкладке отображаются окна, которые могут быть прикреплены. Когда окно прикреплено, оно фиксируется по отношению к одной из границ окна VBE. В результате намного легче найти вспомогательное окно, так как оно отображается в строго определенной области. Если вы отключите все параметры прикрепления, то окна перемешаются между собой, а это усложнит работу. Как правило, идеальным выбором будут настройки по умолчанию.
Рис. 6. Вкладка Docking диалогового окна Options
Для прикрепления окна просто перетащите его в новое место. Например, вам может понадобиться присоединить окно Project Explorer к левой границе окна. Захватите его за заголовок и переместите влево. Отпустите кнопку мыши в момент, когда окно прилипнет к левому краю экрана. Прикрепление окна в VBE всегда было основной проблемой при настройке рабочей среды, однако после многочисленных попыток вам, будем надеяться, все же удастся решить эту задачу.
[1] По материалам книги Джон Уокенбах. Excel 2010. Профессиональное программирование на VBA. – М: Диалектика, 2013. – С. 177–183.
Visual Basic for Applications (VBA) is a form of the Visual Basic programming language integrated into all Microsoft Office products. You can create add-on components within your basic Excel 2019 spreadsheet to create additional functionality. VBA can get complicated, but knowing how to create basic code and functionality can improve your spreadsheet’s usefulness and automate certain activity that would take hours of time.
Enabling the Developer Tab in Excel 2019
To use VBA, you need the «Developer» tab enabled. The «Developer» tab has several buttons and features that enhance the way you create spreadsheets. If you don’t have the «Developer» tab enabled, follow these next steps to enable it.
Click the «File» ribbon tab, and then click the «Options» link that shows in the bottom-left section of the Excel window. This opens a new configuration window where you can set preference for different elements of Excel. Click the «Customize Ribbon» option in the left panel.
(Excel options and configuration window)
In the image above, notice that the developer option is checked in the far right panel. This check box enables the «Developer» tab in your Excel view. Click «OK» to enable the tab and return to your Excel 2019 interface.
(VBA button location)
You should now see an additional tab marked «Developer» in the list of Excel 2019 menu options. Click this tab, and you’ll see the VBA button available on the left side.
Creating a Button on Your Spreadsheet
When you want to use VBA on your spreadsheet, buttons are one of the most common elements that you add to your document. With a button, you can trigger an event and use it to perform an action.
Components for VBA actions are found in the «Developer» tab in the «Insert» button dropdown.
(Form and ActiveX components for VBA)
When you click the «Insert» button, a dropdown displays all of the available components that you can add to your spreadsheets. The top-left control in the «Form Controls» section has the button control. You can hover your mouse over each of the components in the list to see what you can add to a spreadsheet. If you are familiar with HTML web page components, then you will recognize most of the available components in the dropdown.
Click the button control and then you can draw the button on your spreadsheet. Drawing a button lets you make it as large as small as you want. After you draw the button, a window opens where you can assign a macro.
(Assign macro window)
Click «OK» and the window closes. Now you see a button on your spreadsheet with the label «Button 1.» You can change the label on the newly created button by right-clicking the button and selecting «Edit Text.» This action prompts you for the new button name. Type a new name for your button. In this example, we’ve used the text «My Button» for the button text.
(A new button with custom text)
You can click the button if you want, and an error message with display telling you that you haven’t created a macro for it yet. This is because you haven’t created the code that will run when the button is clicked. The button serves no purpose, but you can create the macro that runs when it’s pushed, which then removes the error when you click the button.
Right click the button and choose «Assign Macro.» This action opens a Visual Basic for Applications workspace. The workspace is tied to the workbook that you have open, but you can make full applications that tie with your spreadsheet using VBA. In this workspace, you can create, test, and run any code that you assign to components in your application.
Working in the VBA Workspace
The VBA workspace looks the same whether you program macros in Word or Excel. It’s a workspace where you can program the macro and view all other code that you’ve previously created.
(VBA workspace)
The image above shows the VBA workspace. When you right click a component such as a button and choose «Edit Code,» VBA opens to the location where code is triggered when you click the button. VBA gives names to these functions that help you identify what happens should you perform an activity on it. Since a button is usually triggered by a click event, the function is given the original name of the button, an underscore, and then the word «Click.» For your first button created in your spreadsheet, the name for a click event is «Button1_Click()» and you add any code between the «Sub» and «End Sub» phrases.
The «Sub» keyword indicates that you are starting an event. The next part is the name of the event, and the last statement in a trigger event is the «End Sub» statement.
In the left panel of the workspace, you can see other objects in a tree view. The top object is always the workbook. If you recall, a workbook contains worksheet. Under the «Book1» main project header, you see «ThisWorkbook» which represents the workbook that you have opened, and the «Sheet1» represents the worksheet in the workbook. You can write VBA that works directly on a workbook or a worksheet activity such as when you open the workbook, a macro automatically runs.
The «Modules» section holds the files that you store containing VBA code. You can have several of these in your VBA code, or you can just have one file that contains all of the functions used to run macros.
Writing Some Simple VBA Code
With the VBA editor open, you now have a function ready to edit for your button. Anything you type in the «Sub» and «End Sub» statements will run when you click the Button1 component. When you start working with VBA, you want to create easy function statements so that you can follow what is going on as the code runs. In this example, we’ll add some text to a cell within the current spreadsheet.
Within the sub start and end phrases, type the following code:
Sub Button1_Click()
Range(«A1»).Value = «My Test»
End Sub
The code above tells Excel 2019 that you want to change the value contained in the cell «A1» in the current sheet to «My Test.» The «Range» indicates that you want to apply changes to a cell range set in the functions parameters. You can assign any value to a range, but in this example we apply text. Any formatting already set on the cell will also still apply, so if you have a cell set to bold text, then this value will have the bold format applied.
At the top of the VBA workspace, notice that there are three start, pause and stop buttons. You can use these buttons to test your new code. The «start» button will run the current function and apply changes to the spreadsheet, which in this example is changing content to «My Test.»
(The start button in the VBA workspace)
Click the start button and watch the text in the A1 cell change to «My Test.» Should you have a long list of statements within your function, you might want to pause the procedure. The stop button stops execution, so should you resume it then execution will start where it left off. With the pause button, execution resumes where the last statement left off.
The «MsgBox» function is extremely common in any application. The MsgBox function displays a warning or a message to the user. In any software application, you’ve seen pop-up windows that display a message that provides information. Even web applications display messages as pop-ups and warnings. The MsgBox function in VBA is the equivalent of all of these pop-ups that you’ve seen across different applications.
Suppose that you want to show a confirmation to the user that the button’s function completed execution. In this example, only one statement executes, but you might have hundreds of lines of code that must execute and you want to show the user that it’s completed. You might have a procedure that takes an unusual amount of time to complete, so users must wait for it to complete and then you display the message to confirm when the procedure is over.
Add the next line of code to the same VBA function Button1_Click():
Sub Button1_Click()
Range(«A1»).Value = «My Test»
MsgBox «Cell value change finished»
End Sub
In the code above, the cell A1 has its value changed to «My Test.» After the text is changed in the A1 cell, a message box opens and displays the text «Cell value change finished.» This is just a small example of how you can use the MsgBox function. After you finished changing your VBA code, click the play button again. You will see the two statements run, and the program will stop.
After you are finished writing your code, you still need to save it and test it within the spreadsheet. Your users won’t open the VBA workspace, so you need to make sure that the code executes outside of the VBA workspace.
Close the VBA workspace. You now need to assign the macro to the button. Right-click the button and click «Assign Macro.» Choose the Button1_Click value and click «OK.» Should you ever want to go back and change the statements executed by the macro. Use this screen to click the macro name, and then click «Edit» to again open the VBA workspace with the function code shown in the workspace window.
After the window closes, click the button. Notice that the text in cell A1 changes and then a window displays with a message that the procedure has completed. You’ve just created your first VBA macro that runs in your spreadsheet. You can create much more complex applications with VBA that run across several spreadsheets and can affect several other workbooks that aren’t even open on your desktop.
One issue to remember with VBA is that it’s a powerful tool that can do harm if it’s used the wrong way. Malware writers use VBA macros to download malicious software and install it on your computer. When you work with macros, your recipients of any spreadsheet must give your macros permission to run on their machines. Most users are trained not to open spreadsheets with macros, so they are mostly used within the same organization.
In this Article
- Opening the Visual Basic Editor
- To enable the Developer Ribbon
- Understanding the VBE Screen
- Inserting a module or form into your code
- Removing a Module or Form from the Project Explorer
- The Properties Window
- The Code Window
- Understanding the Code
- Sub Procedures
- Function Procedures
- Creating a new Procedure
- Writing Code that is easy to understand and navigate
- Adding Comments
- Indenting
- UpperCase vs LowerCase
- AutoComplete
- Error trapping and Debugging
- Syntax errors
- Compilation Errors
- Runtime Errors
- Logical Errors
- On Error Go To
- On Error Resume Next
This tutorial will show you how to open and program in the Visual Basic Editor in VBA.
Opening the Visual Basic Editor
There are a few ways to access the Visual Basic Editor (VBE) in Excel.
Press Alt + F11 on your keyboard.
OR
Click View > Macros > View Macros. From here you can Edit an existing macro or Create a new one. Either option opens up the VB Editor.
OR
Developer > Visual Basic
Note: If you don’t see the Developer Ribbon, you’ll need to enable it.
To enable the Developer Ribbon
Click on the File tab in the Ribbon, and go down to Options. In the Customize Ribbon options, tick the Developer check box. This is switched off by default so you will need to switch it on to see the tab on the ribbon.
Click OK.
The Developer tab will appear on the main ribbon. Click on Visual Basic at the start of the ribbon to access the Visual Basic Editor.
Understanding the VBE Screen
The VBE Screen is shown in the graphic below.
The Project Explorer
The Project Explorer enables you to see how the Project in which you are working is organized. You can see how many modules and forms are stored in the project, and can navigate between these modules and forms. A module is where the code in your workbook is stored, when you record a macro, it will be stored in a standard module – which will by default be named ‘Module1’.
Each of the worksheets in your Excel file also has module behind it, as does the workbook itself. When you insert a new sheet into the workbook via the main Excel screen, you will see an additional sheet module appear in the Project Explorer.
Double-click on a module to move to the code for that module.
You can also click on the Window menu on the toolbar and select the module there to move to the code for that module.
Type of Modules
The modules are organized into 5 different types.
- Standard modules – most of your code will go into this type of module. When you record a macro, it gets put into a standard module. When you write a general procedure to be used throughout your workbook, it also normally goes into a standard module.
- Workbook modules – this module holds the code the is unique to that individual workbook. Most of the code in these type of modules are known as EVENTS. An event can occur when a workbook is opened or closed for example. The module can also contain code that is written by yourself and used by the events.
- Sheet modules – this module holds the code that is unique to that individual sheet. They can occur when a sheet is clicked on for example (the Click Event), or when you change data in a cell. This module can also hold code that is written by yourself and called by the Events.
- Form modules – this is the module behind a custom form that you may create. For example you may create a form to hold details for an invoice, with an OK button, the code behind the button (the Click Event) contains the code that will run when the button is clicked.
- Class modules – this module is used to create objects at run time. Class module are used by Advanced VBA programmers and will be covered at a later stage.
Inserting a module or form into your code
To insert a new module into your code, click on the Insert option on the menu bar, and click Module.
Or, click on the Insert Module button which you will find on the standard ribbon.
To insert a new user form into your code, select the UserForm option.
A new user form will appear in the Project Explorer and will be shown in the Code Window on the right.
You can also insert a Class Module
A class module is used to insert objects into your VBA project.
Removing a Module or Form from the Project Explorer
Right-click on the module or form you wish to remove to show the right click short cut menu.
Click Remove (in this case UserForm1…)
OR
Click on the File menu, and then click on Remove (UserForm1).
A warning box will appear asking if you want to Export the form or module before you remove it. Exporting the form or module enables you to save it as an individual file for use in a different Excel project at some other time.
More often than not when you remove a module or form it is because you do not need it, so click No.
The Properties Window
You will see the properties window below the Project Explorer. You may need to switch this on.
Press F4 or click View, Properties Window.
The properties window enables you to see the properties for the particular module or form that is selected in the Project Explorer. When you are working in modules, you can use the properties window to change the name of the module. This is the only property available to a module. However, when you are working with forms, there will be far more properties available and the Properties window is then used extensively to control the behavior of forms and the controls contained in the form.
When you record a macro, it is automatically put into a standard module. The module will named ‘Module1’ and any code that is contained in that module is available to be used throughout your project. You should rename your module to something that is significant, that would make your code easy to find if you were to add multiple modules to the project.
You can also rename your forms.
If you have renamed your sheet in Excel, the name of the sheet will show up as the name of the sheet in brackets after Sheet1.
If you want to change the name of the module behind the sheet, you can change it in the same way you change the module and user form name – by changing the Name property in the Properties Window.
VBA Coding Made Easy
Stop searching for VBA code online. Learn more about AutoMacro — A VBA Code Builder that allows beginners to code procedures from scratch with minimal coding knowledge and with many time-saving features for all users!
Learn More
The Code Window
The code window shows you the sub procedures and functions that are contained in your modules – it shows you the actual code. When you record a macro, a sub procedure will be created for you. If you add a short cut key to the macro, it will show up as a comment in the macro to let you know what the short cut key is that you assigned to the macro.
At the top of the code window are two combo boxes. These allow you to see which object (if any) within the Module that you might be working on, and which Procedure you might be working on.
In the example above, we are not working on any object – thus this is set to general, but we are working within the Gridlines procedure.
If we had more than one procedure in this module, we could use the combo box above to navigate to the other procedures.
Understanding the Code
There are 2 types of procedures – Sub procedures and Function procedures.
Sub Procedures
The macro recorder can only record Sub procedures. A Sub procedure does things. They perform actions such as formatting a table or creating a pivot table, or in the gridline example, changing the view settings of your active window. The majority of procedures written are Sub procedures. All macros are Sub procedures.
A sub procedure begins with a Sub statement and ends with an End Sub statement. The procedure name is always followed by parentheses.
Sub HideGridLines()
   ActiveWindow.DisplayGridlines  = False
End Sub
VBA Programming | Code Generator does work for you!
Function Procedures
A Function procedure returns a value. This value may be a single value, an array, a range of cells or an object. Functions usually perform some type of calculation. Functions in Excel can be used with the Function Wizard or they can be called from Sub Procedures.
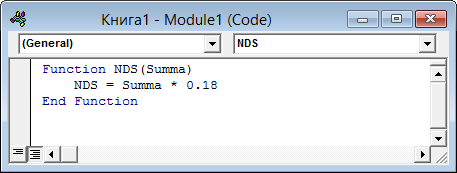
Function Kilos(pounds as Double)
  Kilos = (pounds/2.2)
End Function
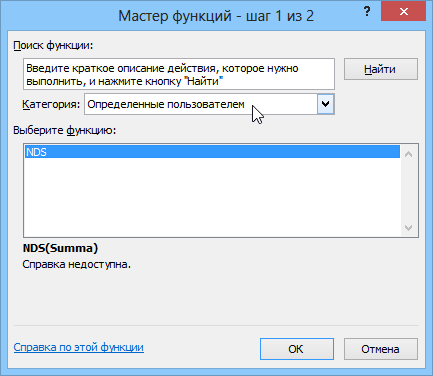
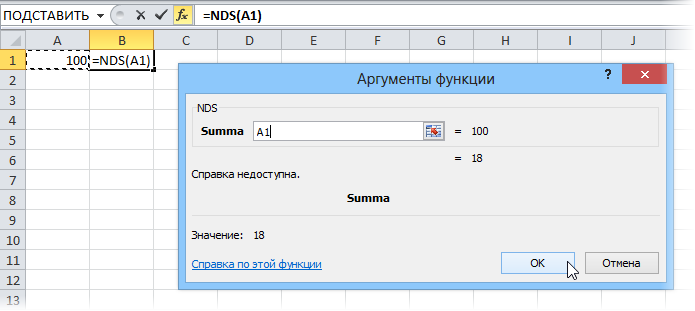
This function could be used within the Insert Function dialog box in Excel to convert Pounds to Kilograms.
Creating a new Procedure
Before you create your new procedure, make sure you are in the module in which you wish to store the procedure. You can create a new procedure by clicking on the Insert menu, Procedure;
or you can click on the icon on the toolbar
The following dialog box will appear
- Type the name of your new procedure in the name box – this must start with a letter of the alphabet and can contain letters and number and be a maximum of 64 characters.
- You can have a Sub procedure, a Function procedure or a Property procedure. (Properties are used in Class modules and set properties for ActiveX controls that you may have created).
- You can make the scope of the procedure either Public or Private. If the procedure is public (default), then it can be used by all the modules in the project while if the procedure is private, it will only be able to be used by this module.
- You can declare local variables in this procedure as Statics (this is to do with the Scope of the variable and makes a local procedure level variable public to the entire module). We will not use this option.
When you have filled in all the relevant details, click on OK.
You then type your code between the Sub and End Sub statements.
ALTERNATIVELY – you can type the Sub and End Sub statements in your module exactly as it appears above. You do not need to put the word Public in front of the word sub – if this word is omitted, all procedures in the module are automatically assumed to be Public.
Then you type Sub and then the name of your procedure followed by parenthesis.
ie:
Sub test()
The End Sub statement will appear automatically.
Writing Code that is easy to understand and navigate
Get into the habit of putting in comments in your code in order to remind yourself at a later stage of the functionality of the code.
You can insert a comment in your code but typing an apostrophe on the keyboard or you can switch on the Edit toolbar, and use the comment button which appears on that toolbar.
Right-click on the toolbars.
Select Edit.
Click on the comment button to insert a comment into your code.
NOTE: You usually only use the comment block button when you have a few lines of code you wish to comment out (and not delete). It is easier for a single comment to use an apostrophe.
Indenting
A good habit to get into is to indent your code making it easy to read through the code and see the different parts of the code.
There can be many levels of indenting, depending on the logic of your code.
AutoMacro | Ultimate VBA Add-in | Click for Free Trial!
UpperCase vs LowerCase
VBA adjusts all code to Proper Case so if you type ALL IN UPPERCASE or all in lowercase it will Readjust Your Code To Be In Proper Case!
AutoComplete
When you adjust your code, you will notice that VBA tries to help you by suggesting the code that you can type. This is known as AutoComplete.
Error trapping and Debugging
There are 4 types of errors that can occur when you write VBA code – Syntax errors, Compilation errors, Runtime errors and Logical Errors.
Syntax errors
These occur when you write the code incorrectly. This is largely prevented by VBA by having the Syntax check option switch on. This is normally on by default but if your is switch off, then switch it on by going to Tools, Options and click Auto Syntax Check.
If you type the code incorrectly (for example excluding something that should be in the code), a message box will pop up while you are writing the code giving you the opportunity to amend the code.
AutoMacro | Ultimate VBA Add-in | Click for Free Trial!
Compilation Errors
These occur when something is missing from the code that prevents the code from running. The error does not come up when you write the code, but it occurs when you try and run the code.
Runtime Errors
These occur when you run the code, and the syntax and compilation is correct, but something else occurs to prevent the code from running correctly.
In this case, Sheet4 does not exist. This error message is more useful than the compile error messages as it gives you the opportunity to Debug the code and see why it is not working.
Click Debug. The code will stop at the error and highlight the error in yellow enabling you to correct your error.
Amend Sheet4 to Sheet2 (as Sheet 2 exists and Sheet 4 does not exist).
Press F5 or click on the Continue button on the toolbar.
Logical Errors
These are the most difficult to find. In their case, the code is written correctly but the actual logic of the code is flawed, so you may not get the result that you want from the code. For logical errors, error trapping is essential.
There are 2 types of error traps
On Error Go To
The following code is to open the File Open Dialog box – it will give us an error if the user clicks Cancel.
When you run the code the File Open dialog box appears.
When you then click cancel, the error will occur.
The following Error trap will continue the code to the Exit Function of the code, and return message.
This makes use of On Error GoTo to exit the function.
When you run the code and click cancel, the message box will appear.
On Error Resume Next
If you put the On Error Resume Next Statement into your code, the line that contains the error will be ignored and the code will continue.
For example, if the user clicks Cancel in the code below, the code will not give you a run-time error, it will just end without the code doing anything further.
There are times when this is very useful but it can also be very dangerous in some circumstances as it does not return a message as to why you obtained an error.
The first step to working with VBA in Excel is to get yourself familiarized with the Visual Basic Editor (also called the VBA Editor or VB Editor).
In this tutorial, I will cover all there is to know about the VBA Editor and some useful options that you should know when coding in Excel VBA.
What is Visual Basic Editor in Excel?
Visual Basic Editor is a separate application that is a part of Excel and opens whenever you open an Excel workbook. By default, it’s hidden and to access it, you need to activate it.
VB Editor is the place where you keep the VB code.
There are multiple ways you get the code in the VB Editor:
- When you record a macro, it automatically creates a new module in the VB Editor and inserts the code in that module.
- You can manually type VB code in the VB editor.
- You can copy a code from some other workbook or from the internet and paste it in the VB Editor.
Opening the VB Editor
There are various ways to open the Visual Basic Editor in Excel:
- Using a Keyboard Shortcut (easiest and fastest)
- Using the Developer Tab.
- Using the Worksheet Tabs.
Let’s go through each of these quickly.
Keyboard Shortcut to Open the Visual Basic Editor
The easiest way to open the Visual Basic editor is to use the keyboard shortcut – ALT + F11 (hold the ALT key and press the F11 key).
As soon as you do this, it will open a separate window for the Visual Basic editor.
This shortcut works as a toggle, so when you use it again, it will take you back to the Excel application (without closing the VB Editor).
The shortcut for the Mac version is Opt + F11 or Fn + Opt + F11
Using the Developer Tab
To open the Visual Basic Editor from the ribbon:
- Click the Developer tab (if you don’t see a developer tab, read this on how to get it).
- In the Code group, click on Visual Basic.
Using the Worksheet Tab
This is a less used method to open the Vb Editor.
Go to any of the worksheet tabs, right-click, and select ‘View Code’.
This method wouldn’t just open the VB Editor, it will also take you to the code window for that worksheet object.
This is useful when you want to write code that works only for a specific worksheet. This is usually the case with worksheet events.
Anatomy of the Visual Basic Editor in Excel
When you open the VB Editor for the first time, it may look a bit overwhelming.
There are different options and sections that may seem completely new at first.
Also, it still has an old Excel 97 days look. While Excel has improved tremendously in design and usability over the years, the VB Editor has not seen any change in the way it looks.
In this section, I will take you through the different parts of the Visual Basic Editor application.
Note: When I started using VBA years ago, I was quite overwhelmed with all these new options and windows. But as you get used to working with VBA, you would get comfortable with most of these. And most of the time, you’ll not be required to use all the options, only a hand full.
Below is an image of the different components of the VB Editor. These are then described in detail in the below sections of this tutorial.
Now let’s quickly go through each of these components and understand what it does:
Menu Bar
This is where you have all the options that you can use in the VB Editor. It is similar to the Excel ribbon where you have tabs and options with each tab.
You can explore the available options by clicking on each of the menu element.
You will notice that most of the options in VB Editor have keyboard shortcuts mentioned next to it. Once you get used to a few keyboard shortcuts, working with the VB Editor becomes really easy.
Tool Bar
By default, there is a toolbar in the VB Editor which has some useful options that you’re likely to need most often. This is just like the Quick Access Toolbar in Excel. It gives you quick access to some of the useful options.
You can customize it a little by removing or adding options to it (by clicking on the small downward pointing arrow at the end of the toolbar).
In most cases, the default toolbar is all you need when working with the VB Editor.
You can move the toolbar above the menu bar by clicking on the three gray dots (at the beginning of the toolbar) and dragging it above the menu bar.
Note: There are four toolbars in the VB Editor – Standard, Debug, Edit, and User form. What you see in the image above (which is also the default) is the standard toolbar. You can access other toolbars by going to the View option and hovering the cursor on the Toolbars option. You can add one or more toolbars to the VB Editor if you want.
Project Explorer
Project Explorer is a window on the left that shows all the objects currently open in Excel.
When you’re working with Excel, every workbook or add-in that is open is a project. And each of these projects can have a collection of objects in it.
For example, in the below image, the Project Explorer shows the two workbooks that are open (Book1 and Book2) and the objects in each workbook (worksheets, ThisWorkbook, and Module in Book1).
There is a plus icon to the left of objects that you can use to collapse the list of objects or expand and see the complete list of objects.
The following objects can be a part of the Project Explorer:
- All open Workbooks – within each workbook (which is also called a project), you can have the following objects:
- Worksheet object for each worksheet in the workbook
- ThisWorkbook object which represents the workbook itself
- Chartsheet object for each chart sheet (these are not as common as worksheets)
- Modules – This is where the code that is generated with a macro recorder goes. You can also write or copy-paste VBA code here.
- All open Add-ins
Consider the Project Explorer as a place that outlines all the objects open in Excel at the given time.
The keyboard shortcut to open the Project Explorer is Control + R (hold the control key and then press R). To close it, simply click the close icon at the top right of the Project Explorer window.
Note: For every object in Project Explorer, there is a code window in which you can write the code (or copy and paste it from somewhere). The code window appears when you double click on the object.
Properties Window
Properties window is where you get to see the properties of the select object. If you don’t have the Properties window already, you can get it by using the keyboard shortcut F4 (or go to the View tab and click Properties window).
Properties window is a floating window which you can dock in the VB Editor. In the below example, I have docked it just below the Project Explorer.
Properties window allows us to change the properties of a selected object. For example, if I want to make a worksheet hidden (or very hidden), I can do that by changing the Visible Property of the selected worksheet object.
Related: Hiding a Worksheet in Excel (that can not be un-hidden easily)
Code Window
There is a code window for each object that is listed in the Project Explorer. You can open the code window for an object by double-clicking on it in the Project Explorer area.
Code window is where you’ll write your code or copy paste a code from somewhere else.
When you record a macro, the code for it goes into the code window of a module. Excel automatically inserts a module to place the code in it when recording a macro.
Related: How to Run a Macro (VBA Code) in Excel.
Immediate Window
The Immediate window is mostly used when debugging code. One way I use the Immediate window is by using a Print.Debug statement within the code and then run the code.
It helps me to debug the code and determine where my code gets stuck. If I get the result of Print.Debug in the immediate window, I know the code worked at least till that line.
If you’re new to VBA coding, it may take you some time to be able to use the immediate window for debugging.
By default, the immediate window is not visible in the VB Editor. You can get it by using the keyboard shortcut Control + G (or can go to the View tab and click on ‘Immediate Window’).
Where to Add Code in the VB Editor
I hope you now have a basic understanding of what VB Editor is and what all parts it has.
In this section of this tutorial, I will show you where to add a VBA code in the Visual Basic Editor.
There are two places where you can add the VBA code in Excel:
- The code window for an object. These objects can be a workbook, worksheet, User Form, etc.
- The code window of a module.
Module Code Window Vs Object Code Window
Let me first quickly clear the difference between adding a code in a module vs adding a code in an object code window.
When you add a code to any of the objects, it’s dependent on some action of that object that will trigger that code. For example, if you want to unhide all the worksheets in a workbook as soon as you open that workbook, then the code would go in the ThisWorkbook object (which represents the workbook).
The trigger, in this case, is opening the workbook.
Similarly, if you want to protect a worksheet as soon as some other worksheet is activated, the code for that would go in the worksheet code window.
These triggers are called events and you can associate a code to be executed when an event occurs.
Related: Learn more about Events in VBA.
On the contrary, the code in the module needs to be executed either manually (or it can be called from other subroutines as well).
When you record a macro, Excel automatically creates a module and inserts the recorded macro code in it. Now if you have to run this code, you need to manually execute the macro.
Adding VBA Code in Module
While recording a macro automatically creates a module and inserts the code in it, there are some limitations when using a macro recorder. For example, it can not use loops or If Then Else conditions.
In such cases, it’s better to either copy and paste the code manually or write the code yourself.
A module can be used to hold the following types of VBA codes:
- Declarations: You can declare variables in a module. Declaring variables allows you to specify what type of data a variable can hold. You can declare a variable for a sub-routine only or for all sub-routines in the module (or all modules)
- Subroutines (Procedures): This is the code that has the steps you want VBA to perform.
- Function Procedures: This is a code that returns a single value and you can use it to create custom functions (also called User Defined Functions or UDFs in VBA)
By default, a module is not a part of the workbook. You need to insert it first before using it.
Adding a Module in the VB Editor
Below are the steps to add a module:
- Right-click on any object of the workbook (in which you want the module).
- Hover the cursor on the Insert option.
- Click on Module.
This would instantly create a folder called Module and insert an object called Module 1. If you already have a module inserted, the above steps would insert another module.
Once the module is inserted, you can double click on the module object in the Project Explorer and it will open the code window for it.
Now you can copy-paste the code or write it yourself.
Removing the Module
Below are the steps to remove a module in Excel VBA:
- Right-click on the module that you want to remove.
- Click on Remove Module option.
- In the dialog box that opens, click on No.
Note: You can export a module before removing it. It gets saved as a .bas file and you can import it in some other project. To export a module, right-click on the module and click on ‘Export file’.
Adding Code to the Object Code Window
To open the code window for an object, simply double-click on it.
When it opens, you can enter the code manually or copy-paste the code from other modules or from the internet.
Note that some of the objects allow you to choose the event for which you want to write the code.
For example, if you want to write a code for something to happen when selection is changed in the worksheet, you need to first select worksheets from the drop-down at the top left of the code window and then select the change event from the drop-down on the right.
Note: These events are specific to the object. When you open the code window for a workbook, you will see the events related to the workbook object. When you open the code window for a worksheet, you will see the events related to the worksheet object.
Customizing the VB Editor
While the default settings of the Visual Basic Editor are good enough for most users, it does allow you to further customize the interface and a few functionalities.
In this section of the tutorial, I will show you all the options you have when customizing the VB Editor.
To customize the VB Editor environment, click Tools in the menu bar and then click on Options.
This would open the Options dialog box which will give you all the customization options in the VB Editor. The ‘Options’ dialog box has four tabs (as shown below) that have various customizations options for the Visual Basic Editor.
Let’s quickly go through each of these tabs and the important options in each.
Editor Tab
While the inbuilt settings work fine in most cases, let me still go through the options in this tab.
As you get more proficient working with VBA in Excel, you may want to customize the VB Editor using some of these options.
Auto Syntax Check
When working with VBA in Excel, as soon as you make a syntax error, you will be greeted by a pop-up dialog box (with some description about the error). Something as shown below:
If you disable this option, this pop-up box will not appear even when you make a syntax error. However, there would be a change in color in the code text to indicate that there is an error.
If you’re a beginner, I recommend you keep this option enabled. As you get more experienced with coding, you may start finding these pop-up boxes irritating, and then you can disable this option.
Require Variable Declaration
This is one option I recommend enabling.
When you’re working with VBA, you would be using variables to hold different data types and objects.
When you enable this option, it automatically inserts the ‘Option Explicit’ statement at the top of the code window. This forces you to declare all the variables that you’re using in your code. If you don’t declare a variable and try to execute the code, it will show an error (as shown below).
In the above case, I used the variable Var, but I didn’t declare it. So when I try to run the code, it shows an error.
This option is quite useful when you have a lot of variables. It often helps me find misspelled variables names as they are considered as undeclared and an error is shown.
Note: When you enable this option, it does not impact the existing modules.
Auto List Member
This option is quite useful as it helps you get a list of properties of methods for an object.
For example, if I want to delete a worksheet (Sheet1), I need to use the line Sheet1.Delete.
While I am typing the code, as soon as I type the dot, it will show me all the methods and properties associated with the Worksheet object (as shown below).
Auto list feature is great as it allows you to:
- Quickly select the property and method from the list and saves time
- Shows you all the properties and methods which you may not be aware of
- Avoid making spelling errors
This option is enabled by default and I recommend keeping it that way.
Auto Quick Info Options
When you type a function in Excel worksheet, it shows you some information about the function – such as the arguments it takes.
Similarly, when you type a function in VBA, it shows you some information (as shown below). But for that to happen, you need to make sure the Auto Quick Info option is enabled (which it is by default).
Auto Data Tips Options
When you’re going through your code line by line and place your cursor above a variable name, it will show you the value of the variable.
I find it quite useful when debugging the code or going through the code line by line which has loops in it.
In the above example, as soon as I put the cursor over the variable (var), it shows the value it holds.
This option is enabled by default and I recommend you keep it that way.
Auto Indent
Since VBA codes can get long and messy, using indentation increases the readability of the code.
When writing code, you can indent using the tab key.
This option ensures that when you are done with the indented line and hit enter, the next line doesn’t start from the very beginning, but has the same indentation as the previous line.
In the above example, after I write the Debug.Print line and hit enter, it will start right below it (with the same indentation level).
I find this option useful and turning this off would mean manually indenting each line in a block of code that I want indented.
You can change the indentation value if you want. I keep it at the default value.
Drag and Drop Text Editing
When this option is enabled, it allows you to select a block of code and drag and drop it.
It saves time as you don’t have to first cut and then paste it. You can simply select and drag it.
This option is enabled by default and I recommend you keep it that way.
Default to Full Module View
When this option is enabled, you will be able to see all the procedures in a module in one single scrollable list.
If you disable this option, you will only be able to see one module at a time. You will have to make a selection of the module you want to see from the drop-down at the top right of the code window.
This option is enabled by default and I recommend keeping it that way.
One reason you may want to disable it when you have multiple procedures that are huge and scrolling across these is taking time, or when you have a lot of procedures and you want to quickly find it instead of wasting time in scrolling.
Procedure Separator
When this option is enabled, you will see a line (a kind of divider) between two procedures.
I find this useful as it visually shows when one procedure ends and the other one starts.
It’s enabled by default and I recommend keeping it that way.
Editor Format Tab
With the options in the Editor Format tab, you can customize the way your code looks in the code window.
Personally, I keep all the default options as I am fine with it. If you want, you can tweak this based on your preference.
To make a change, you need to first select an option in the Code Colors box. Once an option is selected, you can modify the foreground, background, and indicator color for it.
The font type and font size can also be set in this tab. It’s recommended to use a fixed-width font such as Courier New, as it makes the code more readable.
Note that the font type and size setting will remain the same for all code types (i.e., all the code types shown in the code color box).
Below is an image where I have selected Breakpoint, and I can change the formatting of it.
Note: The Margin Indicator Bar option when enabled shows a little margin bar to the left of the code. It’s helpful as it shows useful indicators when executing the code. In the above example, when you set a breakpoint, it will automatically show a red dot to the left of the line in the margin bar. Alternatively, to set a breakpoint, you can simply click on the margin bar on the left of the code line that you want as the breakpoint.
By default, Margin Indicator Bar is enabled and I recommend keeping it that way.
One of my VBA course students found this customization options useful and she was color blind. Using the options here, she was able to set the color and formats that made it easy for her to work with VBA.
General Tab
The General tab has many options but you don’t need to change any of it.
I recommend you keep all the options as is.
One important option to know about in this tab is Error Handling.
By default, ‘Break on Unhandled Errors’ is selected and I recommend keeping it that way.
This option means that if your code encounters an error, and you have not handled that error in your code already, then it will break and stop. But if you have addressed the error (such as by using On Error Resume Next or On Error Goto options), then it will not break (as the errors are not unhandled).
Docking Tab
In this tab, you can specify which windows you want to get docked.
Docking means that you can fix the position of a window (such as project explorer or the Properties window) so that it doesn’t float around and you can view all the different windows at the same time.
If you don’t dock, you will be able to view one window at a time in full-screen mode and will have to switch to the other one.
I recommend keeping the default settings.
Other Excel tutorials you may like:
- How to Remove Macros From an Excel Workbook
- Comments in Excel VBA (Add, Remove, Block Commenting)
- Using Active Cell in VBA in Excel (Examples)
Введение
Всем нам приходится — кому реже, кому чаще — повторять одни и те же действия и операции в Excel. Любая офисная работа предполагает некую «рутинную составляющую» — одни и те же еженедельные отчеты, одни и те же действия по обработке поступивших данных, заполнение однообразных таблиц или бланков и т.д. Использование макросов и пользовательских функций позволяет автоматизировать эти операции, перекладывая монотонную однообразную работу на плечи Excel. Другим поводом для использования макросов в вашей работе может стать необходимость добавить в Microsoft Excel недостающие, но нужные вам функции. Например функцию сборки данных с разных листов на один итоговый лист, разнесения данных обратно, вывод суммы прописью и т.д.
Макрос — это запрограммированная последовательность действий (программа, процедура), записанная на языке программирования Visual Basic for Applications (VBA). Мы можем запускать макрос сколько угодно раз, заставляя Excel выполнять последовательность любых нужных нам действий, которые нам не хочется выполнять вручную.
В принципе, существует великое множество языков программирования (Pascal, Fortran, C++, C#, Java, ASP, PHP…), но для всех программ пакета Microsoft Office стандартом является именно встроенный язык VBA. Команды этого языка понимает любое офисное приложение, будь то Excel, Word, Outlook или Access.
Способ 1. Создание макросов в редакторе Visual Basic
Для ввода команд и формирования программы, т.е. создания макроса необходимо открыть специальное окно — редактор программ на VBA, встроенный в Microsoft Excel.
- В старых версиях (Excel 2003 и старше) для этого идем в меню Сервис — Макрос — Редактор Visual Basic (Toos — Macro — Visual Basic Editor).
- В новых версиях (Excel 2007 и новее) для этого нужно сначала отобразить вкладку Разработчик (Developer). Выбираем Файл — Параметры — Настройка ленты (File — Options — Customize Ribbon) и включаем в правой части окна флажок Разработчик (Developer). Теперь на появившейся вкладке нам будут доступны основные инструменты для работы с макросами, в том числе и нужная нам кнопка Редактор Visual Basic (Visual Basic Editor)
:
К сожалению, интерфейс редактора VBA и файлы справки не переводятся компанией Microsoft на русский язык, поэтому с английскими командами в меню и окнах придется смириться:
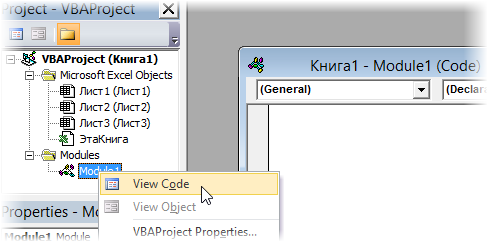
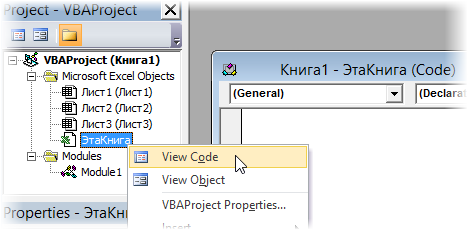
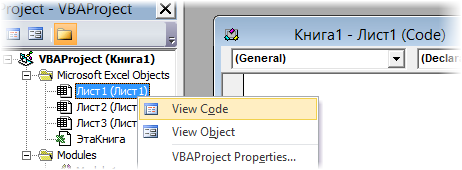
Макросы (т.е. наборы команд на языке VBA) хранятся в программных модулях. В любой книге Excel мы можем создать любое количество программных модулей и разместить там наши макросы. Один модуль может содержать любое количество макросов. Доступ ко всем модулям осуществляется с помощью окна Project Explorer в левом верхнем углу редактора (если его не видно, нажмите CTRL+R). Программные модули бывают нескольких типов для разных ситуаций:
- Обычные модули — используются в большинстве случаев, когда речь идет о макросах. Для создания такого модуля выберите в меню Insert — Module. В появившееся окно нового пустого модуля можно вводить команды на VBA, набирая их с клавиатуры или копируя их из другого модуля, с этого сайта или еще откуда нибудь:
- Модуль Эта книга — также виден в левом верхнем углу редактора Visual Basic в окне, которое называется Project Explorer. В этот модуль обычно записываются макросы, которые должны выполнятся при наступлении каких-либо событий в книге (открытие или сохранение книги, печать файла и т.п.):
- Модуль листа — доступен через Project Explorer и через контекстное меню листа, т.е. правой кнопкой мыши по ярлычку листа — команда Исходный текст (View Source). Сюда записывают макросы, которые должны выполняться при наступлении определенных событий на листе (изменение данных в ячейках, пересчет листа, копирование или удаление листа и т.д.)
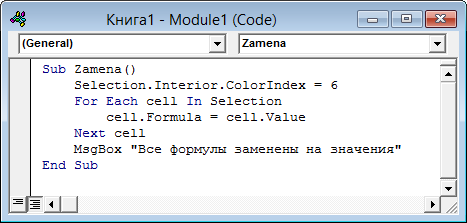
Обычный макрос, введенный в стандартный модуль выглядит примерно так:
Давайте разберем приведенный выше в качестве примера макрос Zamena:
- Любой макрос должен начинаться с оператора Sub, за которым идет имя макроса и список аргументов (входных значений) в скобках. Если аргументов нет, то скобки надо оставить пустыми.
- Любой макрос должен заканчиваться оператором End Sub.
- Все, что находится между Sub и End Sub — тело макроса, т.е. команды, которые будут выполняться при запуске макроса. В данном случае макрос выделяет ячейку заливает выделенных диапазон (Selection) желтым цветом (код = 6) и затем проходит в цикле по всем ячейкам, заменяя формулы на значения. В конце выводится окно сообщения (MsgBox).
С ходу ясно, что вот так сразу, без предварительной подготовки и опыта в программировании вообще и на VBA в частности, сложновато будет сообразить какие именно команды и как надо вводить, чтобы макрос автоматически выполнял все действия, которые, например, Вы делаете для создания еженедельного отчета для руководства компании. Поэтому мы переходим ко второму способу создания макросов, а именно…
Способ 2. Запись макросов макрорекордером
Макрорекордер — это небольшая программа, встроенная в Excel, которая переводит любое действие пользователя на язык программирования VBA и записывает получившуюся команду в программный модуль. Если мы включим макрорекордер на запись, а затем начнем создавать свой еженедельный отчет, то макрорекордер начнет записывать команды вслед за каждым нашим действием и, в итоге, мы получим макрос создающий отчет как если бы он был написан программистом. Такой способ создания макросов не требует знаний пользователя о программировании и VBA и позволяет пользоваться макросами как неким аналогом видеозаписи: включил запись, выполнил операци, перемотал пленку и запустил выполнение тех же действий еще раз. Естественно у такого способа есть свои плюсы и минусы:
- Макрорекордер записывает только те действия, которые выполняются в пределах окна Microsoft Excel. Как только вы закрываете Excel или переключаетесь в другую программу — запись останавливается.
- Макрорекордер может записать только те действия, для которых есть команды меню или кнопки в Excel. Программист же может написать макрос, который делает то, что Excel никогда не умел (сортировку по цвету, например или что-то подобное).
- Если во время записи макроса макрорекордером вы ошиблись — ошибка будет записана. Однако смело можете давить на кнопку отмены последнего действия (Undo) — во время записи макроса макрорекордером она не просто возрвращает Вас в предыдущее состояние, но и стирает последнюю записанную команду на VBA.
Чтобы включить запись необходимо:
- в Excel 2003 и старше — выбрать в меню Сервис — Макрос — Начать запись (Tools — Macro — Record New Macro)
- в Excel 2007 и новее — нажать кнопку Запись макроса (Record macro) на вкладке Разработчик (Developer)
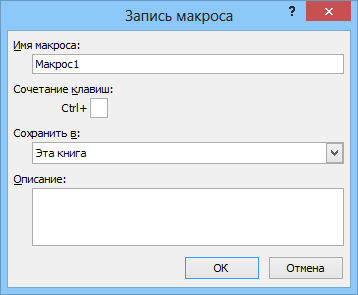
Затем необходимо настроить параметры записываемого макроса в окне Запись макроса:
- Имя макроса — подойдет любое имя на русском или английском языке. Имя должно начинаться с буквы и не содержать пробелов и знаков препинания.
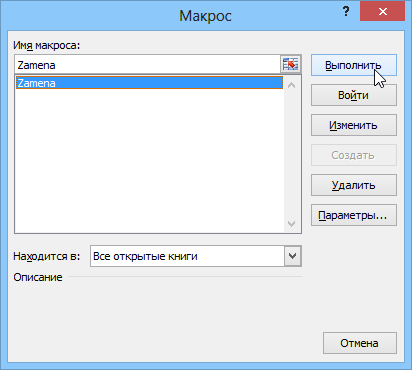
- Сочетание клавиш — будет потом использоваться для быстрого запуска макроса. Если забудете сочетание или вообще его не введете, то макрос можно будет запустить через меню Сервис — Макрос — Макросы — Выполнить (Tools — Macro — Macros — Run) или с помощью кнопки Макросы (Macros) на вкладке Разработчик (Developer) или нажав ALT+F8.
- Сохранить в… — здесь задается место, куда будет сохранен текст макроса, т.е. набор команд на VBA из которых и состоит макрос.:
- Эта книга — макрос сохраняется в модуль текущей книги и, как следствие, будет выполнятся только пока эта книга открыта в Excel
- Новая книга — макрос сохраняется в шаблон, на основе которого создается любая новая пустая книга в Excel, т.е. макрос будет содержаться во всех новых книгах, создаваемых на данном компьютере начиная с текущего момента
- Личная книга макросов — это специальная книга Excel с именем Personal.xls, которая используется как хранилище макросов. Все макросы из Personal.xls загружаются в память при старте Excel и могут быть запущены в любой момент и в любой книге.
После включения записи и выполнения действий, которые необходимо записать, запись можно остановить командой Остановить запись (Stop Recording).
Запуск и редактирование макросов
Управление всеми доступными макросами производится в окне, которое можно открыть с помощью кнопки Макросы (Macros) на вкладке Разработчик (Developer) или — в старых версиях Excel — через меню Сервис — Макрос — Макросы (Tools — Macro — Macros):
- Любой выделенный в списке макрос можно запустить кнопкой Выполнить (Run).
- Кнопка Параметры (Options) позволяет посмотреть и отредактировать сочетание клавиш для быстрого запуска макроса.
- Кнопка Изменить (Edit) открывает редактор Visual Basic (см. выше) и позволяет просмотреть и отредактировать текст макроса на VBA.
Создание кнопки для запуска макросов
Чтобы не запоминать сочетание клавиш для запуска макроса, лучше создать кнопку и назначить ей нужный макрос. Кнопка может быть нескольких типов:
Кнопка на панели инструментов в Excel 2003 и старше
Откройте меню Сервис — Настройка (Tools — Customize) и перейдите на вкладку Команды (Commands). В категории Макросы легко найти веселый желтый «колобок» — Настраиваемую кнопку (Custom button):
Перетащите ее к себе на панель инструментов и затем щелкните по ней правой кнопкой мыши. В контекстом меню можно назначить кнопке макрос, выбрать другой значок и имя:
Кнопка на панели быстрого доступа в Excel 2007 и новее
Щелкните правой кнопкой мыши по панели быстрого доступа в левом верхнем углу окна Excel и выберите команду Настройка панели быстрого доступа (Customise Quick Access Toolbar):
Затем в открывшемся окне выберите категорию Макросы и при помощи кнопки Добавить (Add) перенесите выбранный макрос в правую половину окна, т.е. на панель быстрого доступа:
Кнопка на листе
Этот способ подходит для любой версии Excel. Мы добавим кнопку запуска макроса прямо на рабочий лист, как графический объект. Для этого:
- В Excel 2003 и старше — откройте панель инструментов Формы через меню Вид — Панели инструментов — Формы (View — Toolbars — Forms)
- В Excel 2007 и новее — откройте выпадающий список Вставить (Insert) на вкладке Разработчик (Developer)
Выберите объект Кнопка (Button):
Затем нарисуйте кнопку на листе, удерживая левую кнопку мыши. Автоматически появится окно, где нужно выбрать макрос, который должен запускаться при щелчке по нарисованной кнопке.
Создание пользовательских функций на VBA
Создание пользовательских функций или, как их иногда еще называют, UDF-функций (User Defined Functions) принципиально не отличается от создания макроса в обычном программном модуле. Разница только в том, что макрос выполняет последовательность действий с объектами книги (ячейками, формулами и значениями, листами, диаграммами и т.д.), а пользовательская функция — только с теми значениями, которые мы передадим ей как аргументы (исходные данные для расчета).
Чтобы создать пользовательскую функцию для расчета, например, налога на добавленную стоимость (НДС) откроем редактор VBA, добавим новый модуль через меню Insert — Module и введем туда текст нашей функции:
Обратите внимание, что в отличие от макросов функции имеют заголовок Function вместо Sub и непустой список аргументов (в нашем случае это Summa). После ввода кода наша функция становится доступна в обычном окне Мастера функций (Вставка — Функция) в категории Определенные пользователем (User Defined):
После выбора функции выделяем ячейки с аргументами (с суммой, для которой надо посчитать НДС) как в случае с обычной функцией:


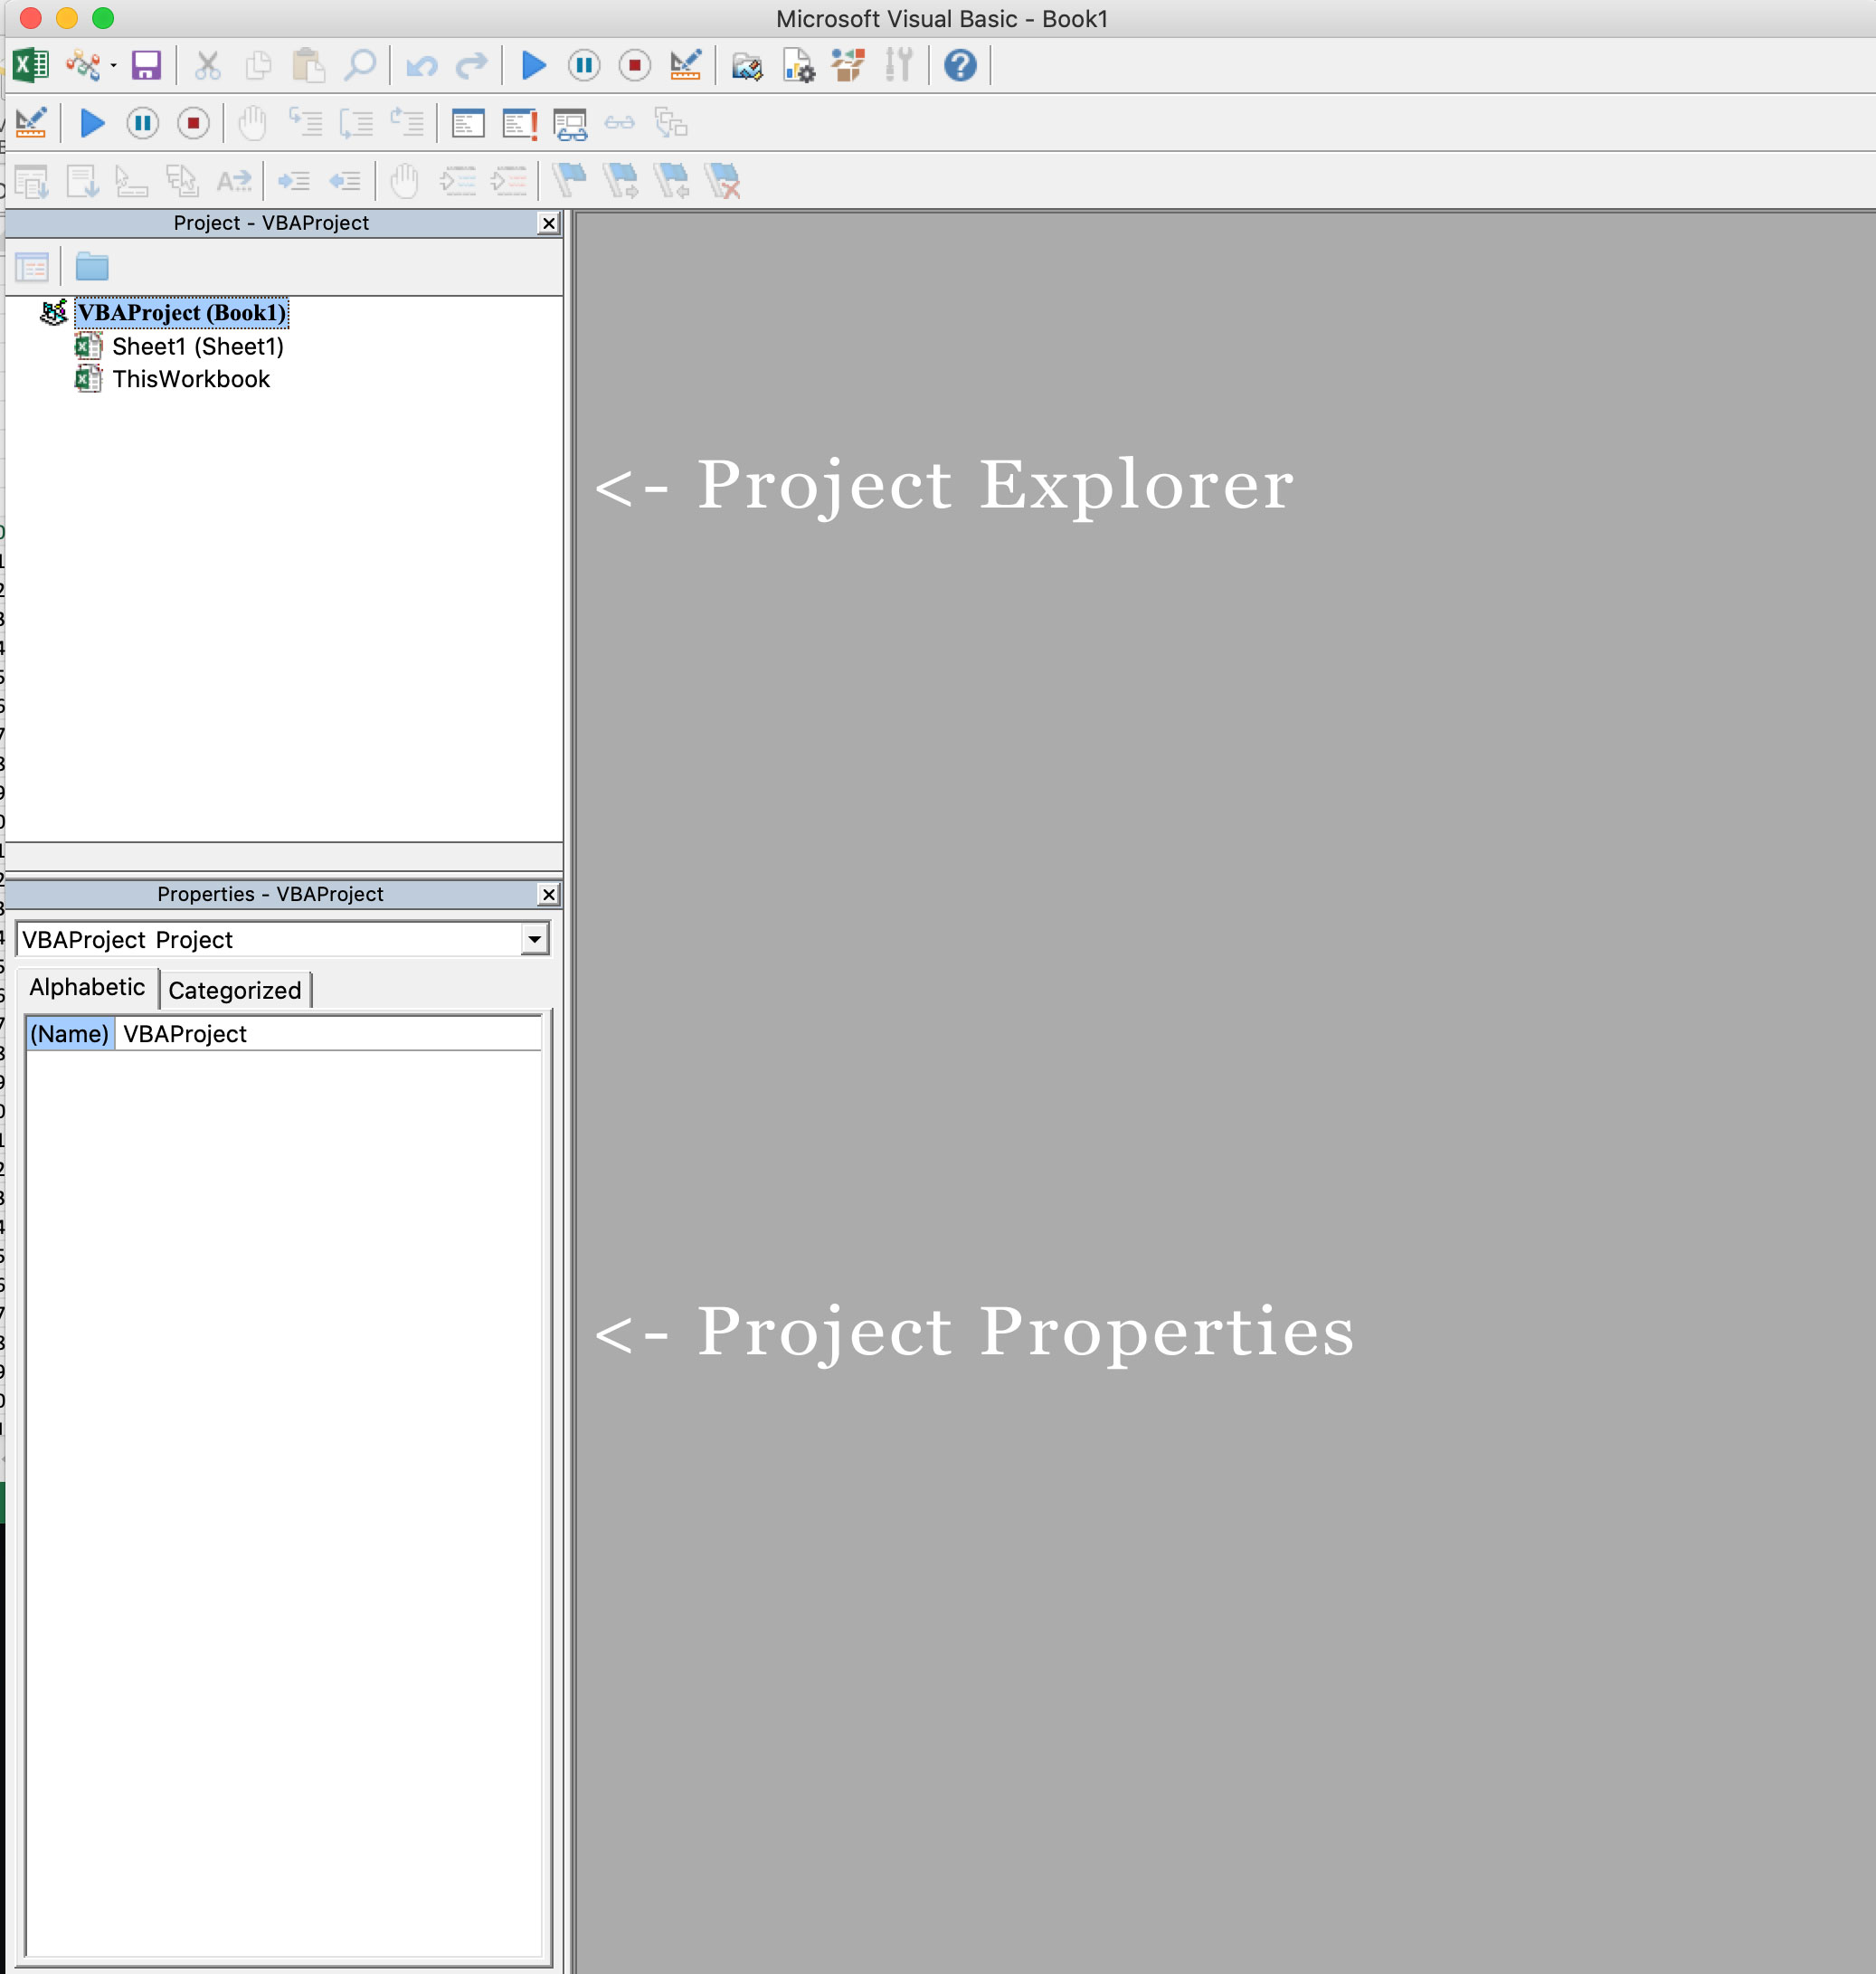
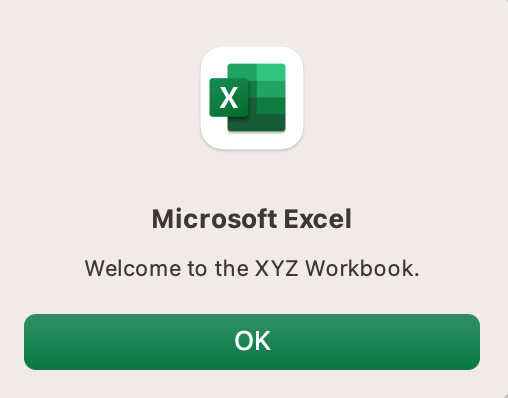
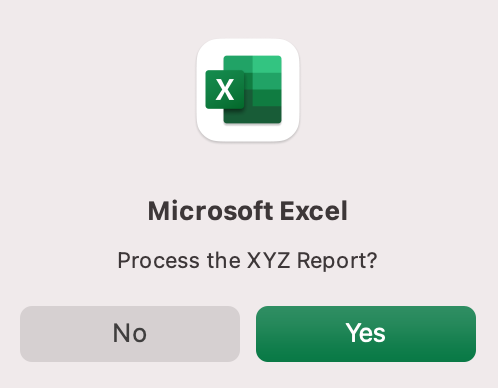
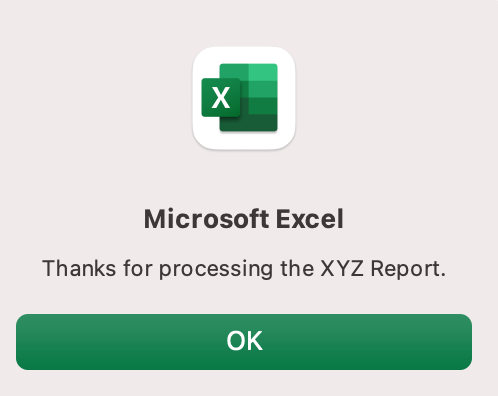


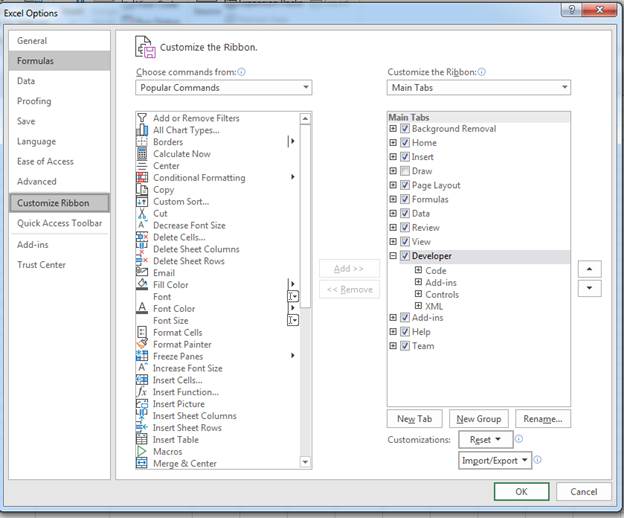
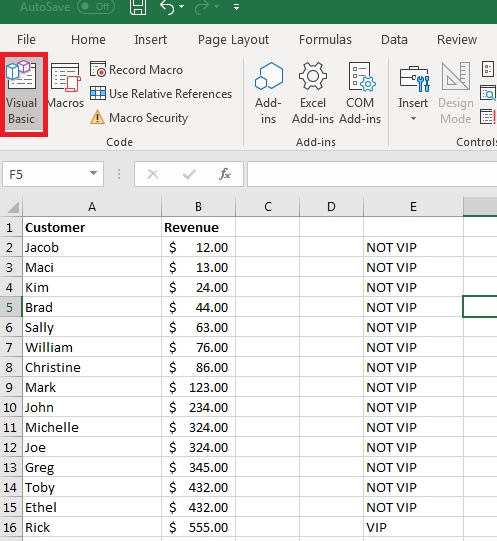
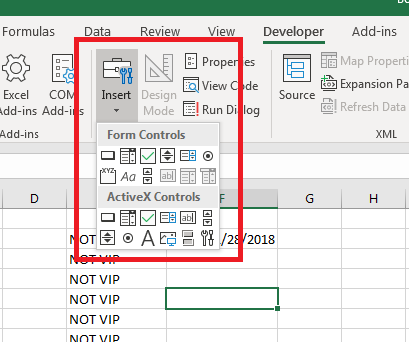
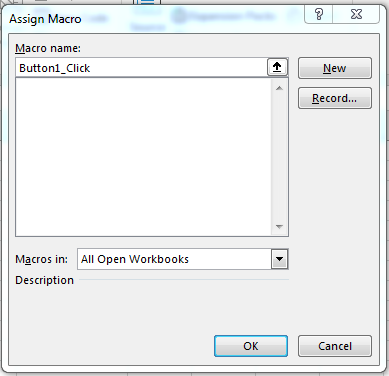
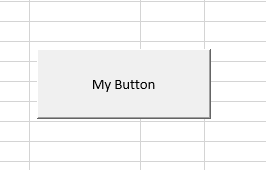
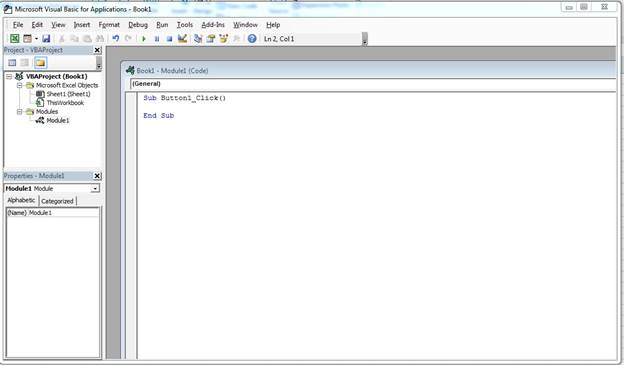


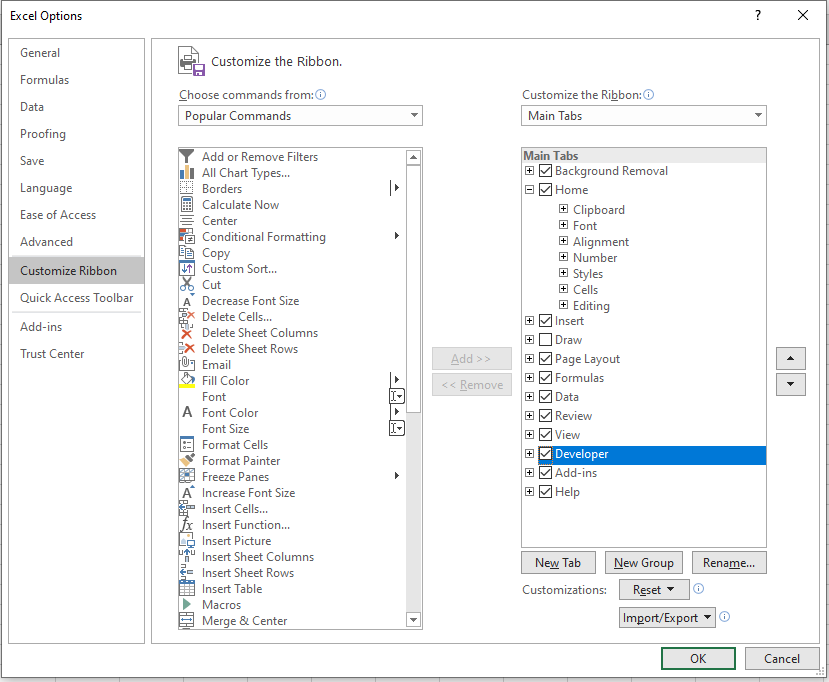

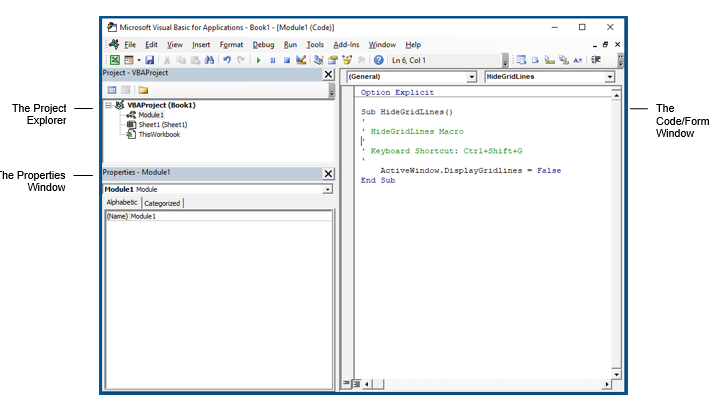
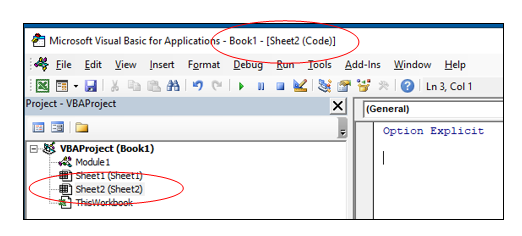
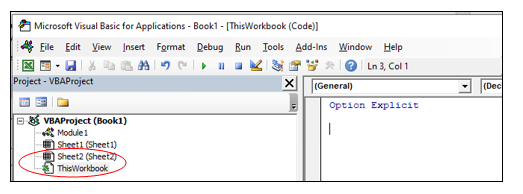
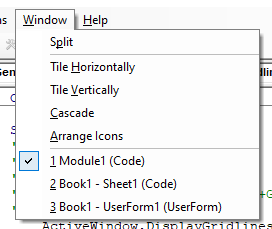
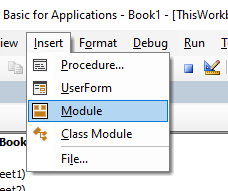
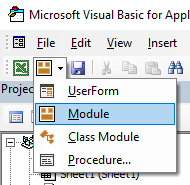
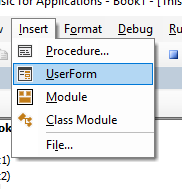
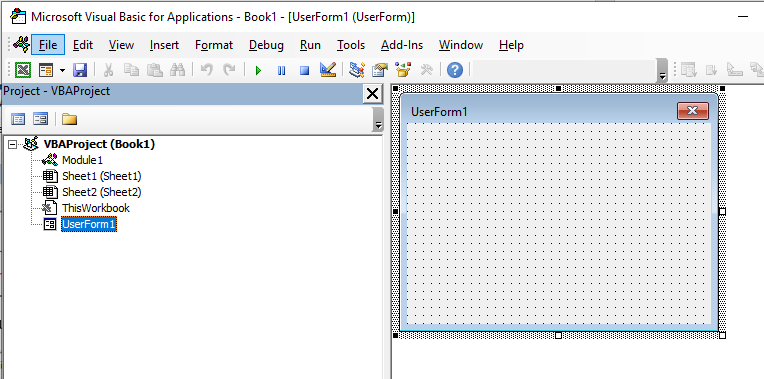
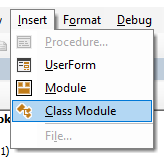
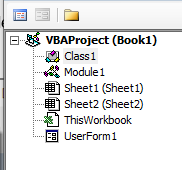
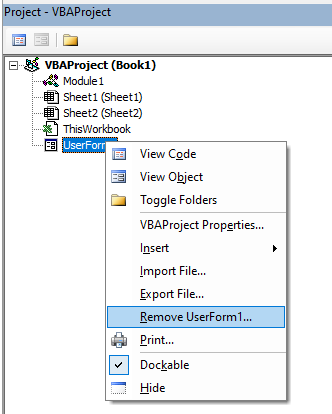
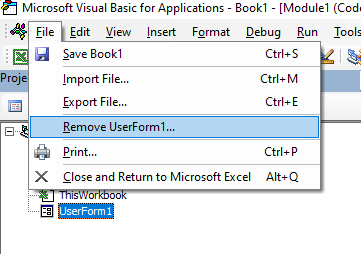
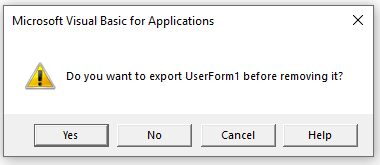
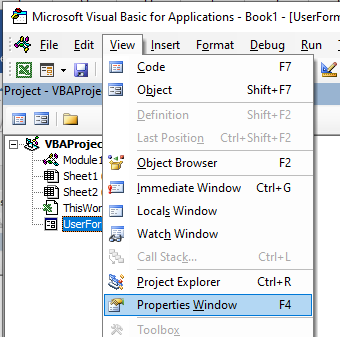
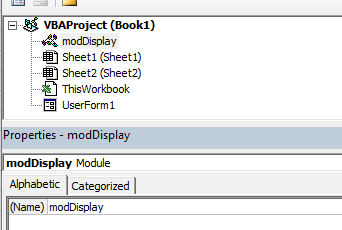
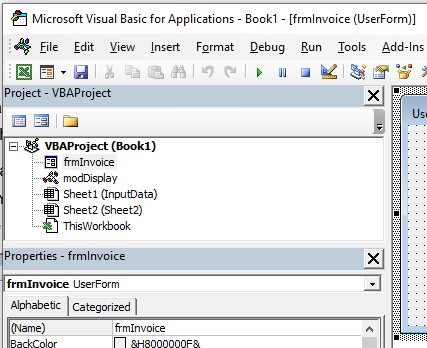
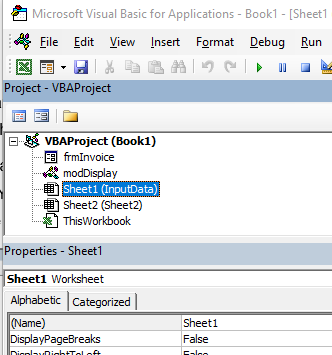
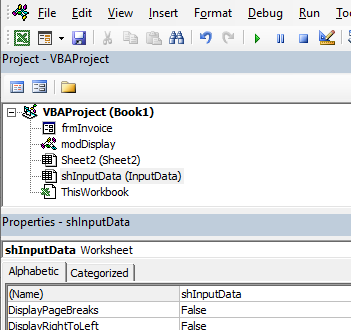

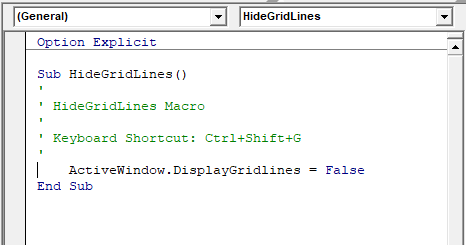
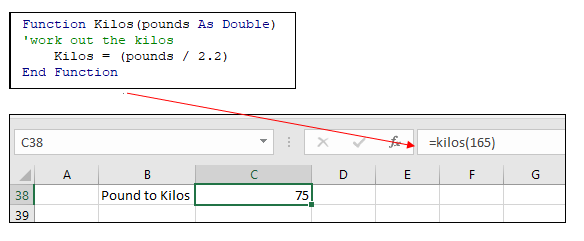
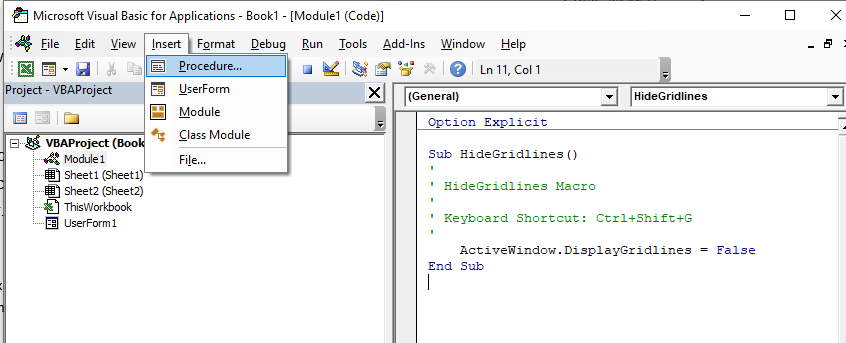
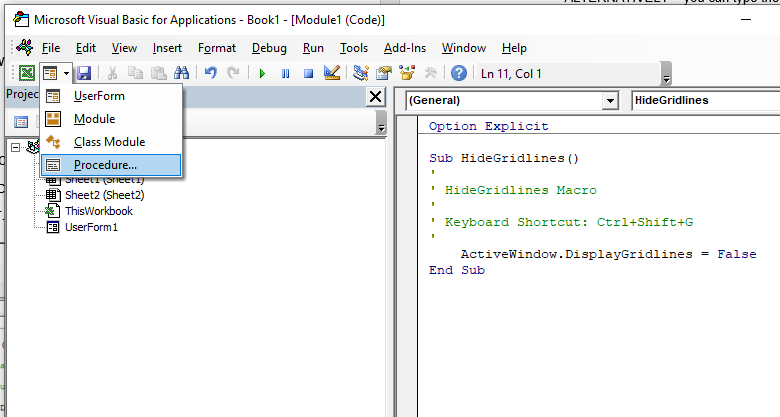
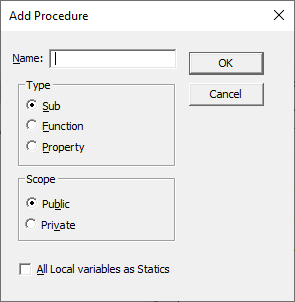


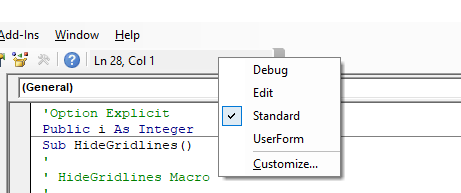


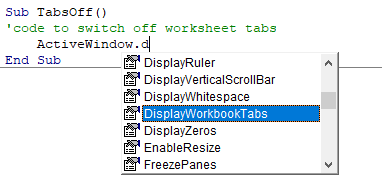
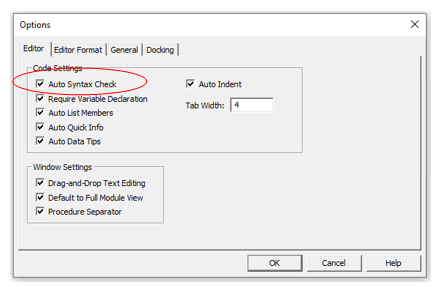

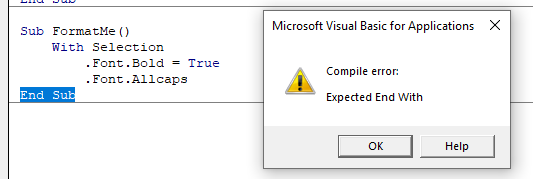
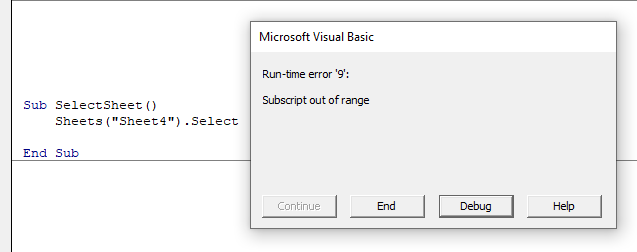
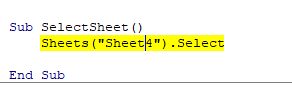

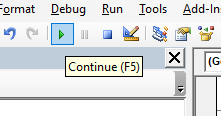
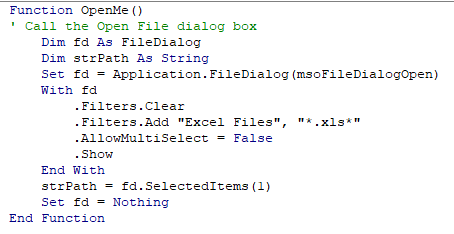
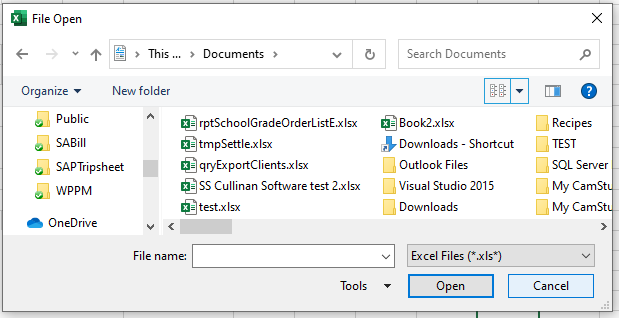
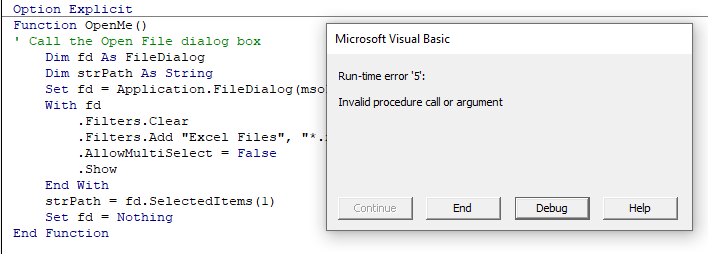
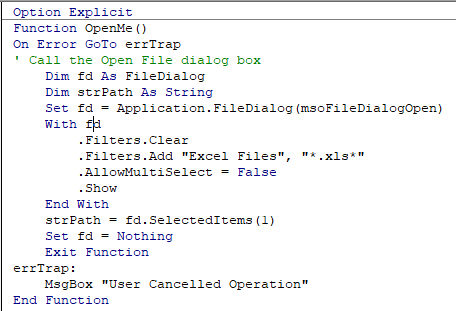
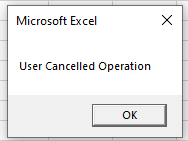
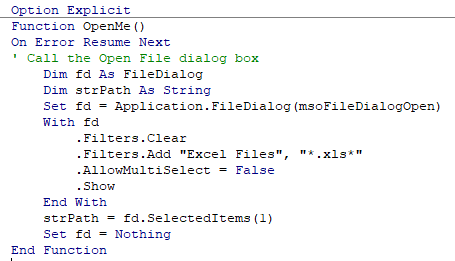


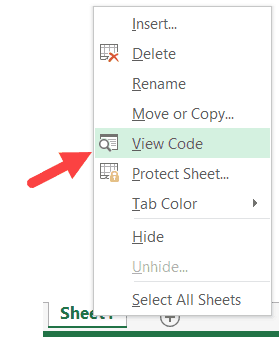
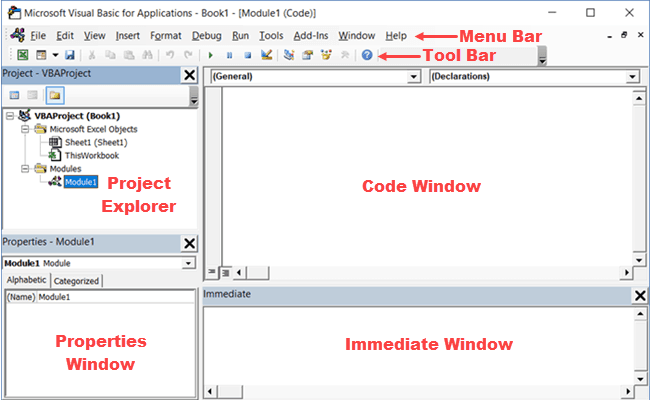

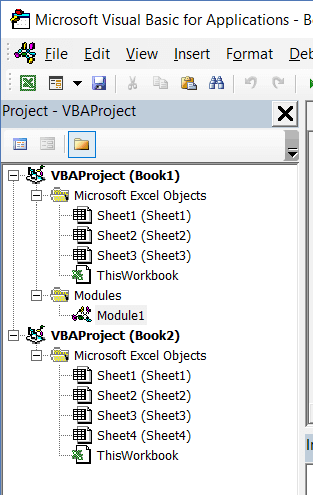
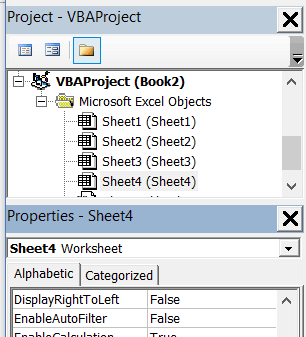
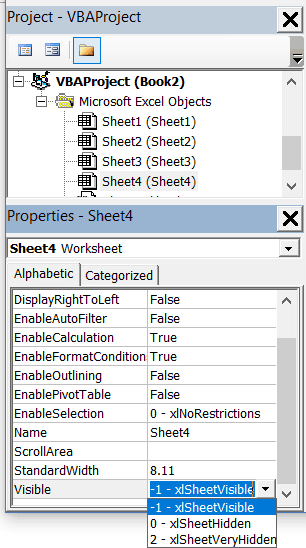


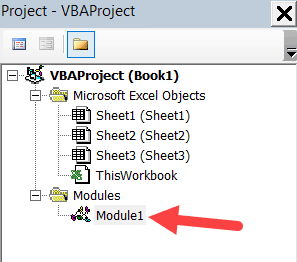


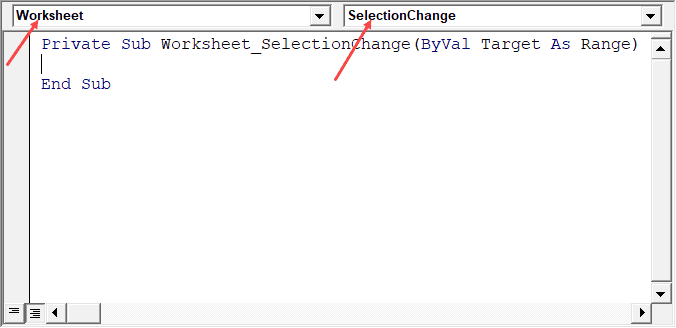
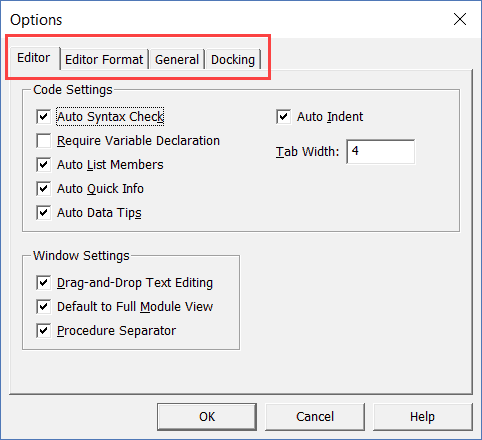
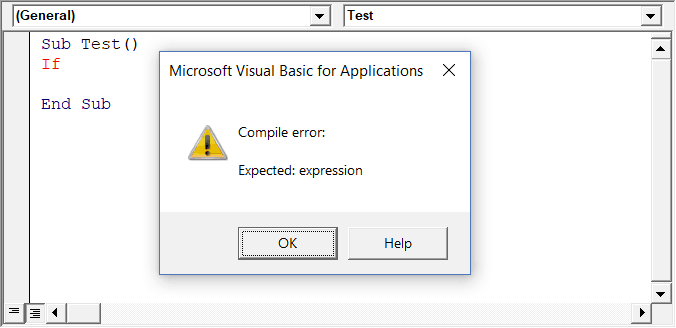
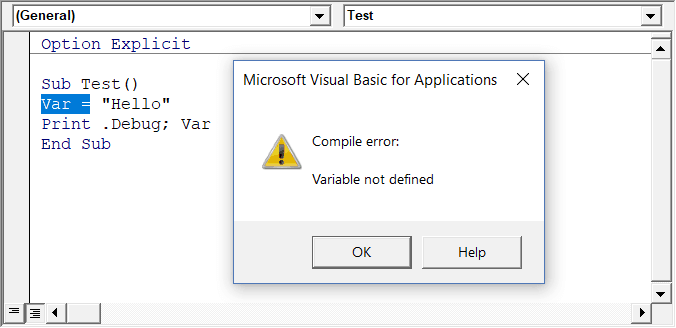
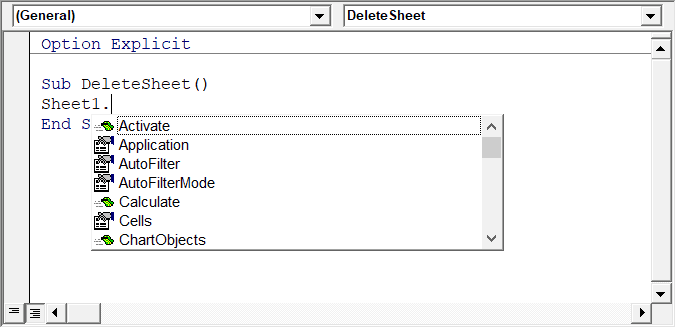

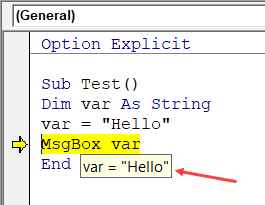
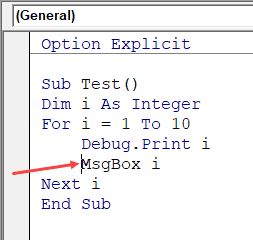
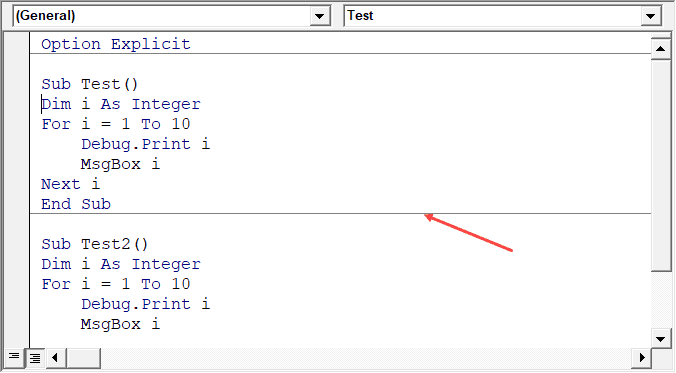
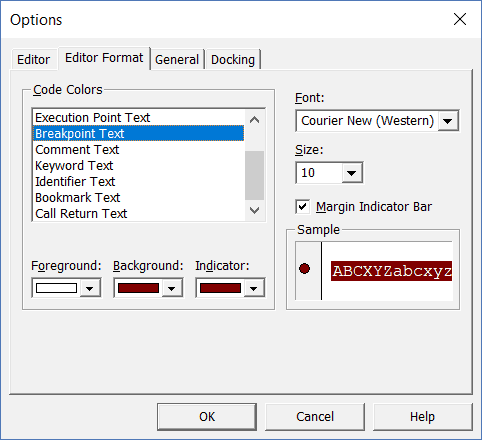
 :
: