Вставка диапазона со сдвигом ячеек вправо или вниз методом Insert объекта Range. Вставка и перемещение строк и столбцов из кода VBA Excel. Примеры.
Range.Insert – это метод, который вставляет диапазон пустых ячеек (в том числе одну ячейку) на рабочий лист Excel в указанное место, сдвигая существующие в этом месте ячейки вправо или вниз. Если в буфере обмена содержится объект Range, то вставлен будет он со своими значениями и форматами.
Синтаксис
|
Expression.Insert(Shift, CopyOrigin) |
Expression – выражение (переменная), возвращающее объект Range.
Параметры
| Параметр | Описание | Значения |
|---|---|---|
| Shift | Необязательный параметр. Определяет направление сдвига ячеек. Если параметр Shift опущен, направление выбирается в зависимости от формы* диапазона. | xlShiftDown (-4121) – ячейки сдвигаются вниз; xlShiftToRight (-4161) – ячейки сдвигаются вправо. |
| CopyOrigin | Необязательный параметр. Определяет: из каких ячеек копировать формат. По умолчанию формат копируется из ячеек сверху или слева. | xlFormatFromLeftOrAbove (0) – формат копируется из ячеек сверху или слева; xlFormatFromRightOrBelow (1) – формат копируется из ячеек снизу или справа. |
* Если диапазон горизонтальный или квадратный (количество строк меньше или равно количеству столбцов), ячейки сдвигаются вниз. Если диапазон вертикальный (количество строк больше количества столбцов), ячейки сдвигаются вправо.
Примеры
Простая вставка диапазона
Вставка диапазона ячеек в диапазон «F5:K9» со сдвигом исходных ячеек вправо:
|
Range(«F5:K9»).Insert Shift:=xlShiftToRight |
Если бы параметр Shift не был указан, сдвиг ячеек, по умолчанию, произошел бы вниз, так как диапазон горизонтальный.
Вставка вырезанного диапазона
Вставка диапазона, вырезанного в буфер обмена методом Range.Cut, из буфера обмена со сдвигом ячеек по умолчанию:
|
Range(«A1:B6»).Cut Range(«D2»).Insert |
Обратите внимание, что при использовании метода Range.Cut, точка вставки (в примере: Range("D2")) не может находится внутри вырезанного диапазона, а также в строке или столбце левой верхней ячейки вырезанного диапазона вне вырезанного диапазона (в примере: строка 1 и столбец «A»).
Вставка скопированного диапазона
Вставка диапазона, скопированного в буфер обмена методом Range.Copy, из буфера обмена со сдвигом ячеек по умолчанию:
|
Range(«B2:D10»).Copy Range(«F2»).Insert |
Обратите внимание, что при использовании метода Range.Copy, точка вставки (в примере: Range("F2")) не может находится внутри скопированного диапазона, но в строке или столбце левой верхней ячейки скопированного диапазона вне скопированного диапазона находится может.
Вставка и перемещение строк
Вставка одной строки на место пятой строки со сдвигом исходной строки вниз:
Вставка четырех строк на место пятой-восьмой строк со сдвигом исходных строк вниз:
Вставка строк с использованием переменных, указывающих над какой строкой осуществить вставку и количество вставляемых строк:
|
1 2 3 4 5 6 7 8 9 10 11 12 13 14 15 16 17 18 19 20 21 22 |
Sub Primer1() Dim n As Long, k As Long, s As String ‘Номер строки, над которой необходимо вставить строки n = 8 ‘Количесто вставляемых строк k = 4 ‘Указываем адрес диапазона строк s = n & «:» & (n + k — 1) ‘Вставляем строки Rows(s).Insert End Sub ‘или то же самое с помощью цикла Sub Primer2() Dim n As Long, k As Long, i As Long n = 8 k = 4 For i = 1 To k Rows(n).Insert Next End Sub |
Перемещение второй строки на место шестой строки:
|
Rows(2).Cut Rows(6).Insert |
Вторая строка окажется на месте пятой строки, так как третья строка заместит вырезанную вторую строку, четвертая встанет на место третьей и т.д.
Перемещение шестой строки на место второй строки:
|
Rows(6).Cut Rows(2).Insert |
В этом случае шестая строка окажется на месте второй строки.
Вставка и перемещение столбцов
Вставка одного столбца на место четвертого столбца со сдвигом исходного столбца вправо:
Вставка трех столбцов на место четвертого-шестого столбцов со сдвигом исходных столбцов вправо:
Перемещение третьего столбца на место седьмого столбца:
|
Columns(3).Cut Columns(7).Insert |
Третий столбец окажется на месте шестого столбца, так как четвертый столбец заместит вырезанный третий столбец, пятый встанет на место четвертого и т.д.
Перемещение седьмого столбца на место третьего столбца:
|
Columns(7).Cut Columns(3).Insert |
В этом случае седьмой столбец окажется на месте третьего столбца.

The information and examples in this VBA Tutorial should allow you to insert rows in a variety of circumstances.
This VBA Tutorial is accompanied by Excel workbooks containing the data and macros I use in the examples below. You can get immediate free access to these example workbooks by clicking the button below.
Use the following Table of Contents to navigate to the section you’re interested in.
Insert Rows in Excel
When working manually with Excel, you can insert rows in the following 2 steps:
- Select the row or rows above which to insert the row or rows.
- Do one of the following:
- Right-click and select Insert.
- Go to Home > Insert > Insert Sheet Rows.
- Use the “Ctrl + Shift + +” keyboard shortcut.
You can use the VBA constructs and structures I describe below to automate this process to achieve a variety of results.
Excel VBA Constructs to Insert Rows
Insert Rows with the Range.Insert Method
Purpose of Range.Insert
Use the Range.Insert method to insert a cell range into a worksheet. The 2 main characteristics of the Range.Insert method are the following:
- Range.Insert can insert a single cell or a cell range. For purposes of this VBA Tutorial, you’re interested in inserting entire rows.
- To make space for the newly-inserted cells, Range.Insert shifts other cells away.
Syntax of Range.Insert
expression.Insert(Shift, CopyOrigin)
“expression” is a Range object. Therefore, I simplify as follows:
Range.Insert(Shift, CopyOrigin)
Parameters of Range.Insert
- Parameter: Shift.
- Description: Specifies the direction in which cells are shifted away to make space for the newly-inserted row.
- Optional/Required: Optional.
- Data type: Variant.
- Values: Use a constant from the xlInsertShiftDirection Enumeration:
- xlShiftDown or -4121: Shifts cells down.
- xlShiftToRight or -4161: Shifts cells to the right.
- Default: Excel decides based on the range’s shape.
- Usage notes: When you insert a row: (i) use xlShiftDown or -4121, or (ii) omit parameter and rely on the default behavior.
- Parameter: CopyOrigin.
- Description: Specifies from where (the origin) is the format for the cells in the newly inserted row copied.
- Optional/Required: Optional.
- Data type: Variant.
- Values: A constant from the xlInsertFormatOrigin Enumeration:
- xlFormatFromLeftOrAbove or 0: Newly-inserted cells take formatting from cells above or to the left.
- xlFormatFromRightOrBelow or 1: Newly-inserted cells take formatting from cells below or to the right.
- Default: xlFormatFromLeftOrAbove or 0. Newly-inserted cells take the formatting from cells above or to the left.
How to Use Range.Insert to Insert Rows
Use the Range.Insert method to insert a row into a worksheet. Use a statement with the following structure:
Range.Insert Shift:=xlShiftDown CopyOrigin:=xlInsertFormatOriginConstant
For these purposes:
- Range: Range object representing an entire row. Use the Worksheet.Rows or Range.EntireRow properties to return a Range object that represents the entire row. Please refer to the sections about the Rows and EntireRow properties below.
- xlInsertFormatOriginConstant: xlFormatFromLeftOrAbove or xlFormatFromRightOrBelow. xlFormatFromLeftOrAbove is the default value. Therefore, when inserting rows with formatting from row above, you can usually omit the CopyOrigin parameter.
You can usually omit the Shift parameter. By default, VBA decides how to shift the cells based on the range’s shape. When inserting a row, this usually results in Excel shifting the cells down.
Specify Rows with the Worksheet.Rows Property
Purpose of Worksheet.Rows
Use the Worksheet.Rows property to return a Range object representing all the rows within the worksheet the property works with.
Worksheet.Rows is read-only.
Syntax of Worksheet.Rows
expression.Rows
“expression” is a Worksheet object. Therefore, I simplify as follows:
Worksheet.Rows
How to Use Worksheet.Rows to Insert Rows
Use the Worksheet.Rows property to specify the row or rows above which new rows are inserted.
To insert a row, use a statement with the following structure:
Worksheets.Rows(row#).Insert
“row#” is the number of the row above which the row is inserted.
To insert multiple rows, use a statement with the following structure:
Worksheet.Rows("firstRow#:lastRow#").Insert
“firstRow#” is the row above which the rows are inserted. The number of rows VBA inserts is calculated as follows:
lastRow# - firstRow# + 1
Specify the Active Cell with the Application.ActiveCell Property
Purpose of Application.ActiveCell
Use the Application.ActiveCell property to return a Range object representing the active cell.
Application.ActiveCell is read-only.
Syntax of Application.ActiveCell
expression.ActiveCell
“expression” is the Application object. Therefore, I simplify as follows:
Application.ActiveCell
How to Use Application.ActiveCell To Insert Rows
When you insert a row, use the Application.ActiveCell property to return the active cell. This allows you to use the active cell as reference for the row insertion operation.
Use the Range.Offset property to return a Range object a specific number of rows above or below the active cell. Use the Range.EntireRow property to return a Range object representing the entire row or rows above which to insert the new row. Please refer to the sections about the Offset and EntireRow properties below.
To insert a row above the active cell, use the following statement:
ActiveCell.EntireRow.Insert Shift:=xlShiftDown
To insert a row a specific number of rows above or below the active cell, use a statement with the following structure:
ActiveCell.Offset(RowOffset).EntireRow.Insert Shift:=xlShiftDown
Specify a Cell Range with the Worksheet.Range Property
Purpose of Worksheet.Range
Use the Worksheet.Range property to return a Range object representing a single cell or a cell range.
Syntax of Worksheet.Range
expression.Range(Cell1, Cell2)
“expression” is a Worksheet object. Therefore, I simplify as follows:
Worksheet.Range(Cell1, Cell2)
Parameters of Worksheet.Range
- Parameter: Cell1.
- Description:
- If you use Cell1 alone (omit Cell2), Cell1 specifies the cell range.
- If you use Cell1 and Cell2, Cell1 specifies the cell in the upper-left corner of the cell range.
- Required/Optional: Required.
- Data type: Variant.
- Values:
- If you use Cell1 alone (omit Cell2): (i) range address as an A1-style reference in language of macro, or (ii) range name.
- If you use Cell1 and Cell2: (i) Range object, (ii) range address, or (iii) range name.
- Description:
- Parameter: Cell2.
- Description: Cell in the lower-right corner of the cell range.
- Required/Optional: Optional.
- Data type: Variant.
- Values: (i) Range object, (ii) range address, or (iii) range name.
How to Use Worksheet.Range to Insert Rows
When you insert a row, use the Worksheet.Range property to return a cell or cell range. This allows you to use a specific cell or cell range as reference for the row insertion operation.
Use the Range.Offset property to return a Range object a specific number of rows above or below the cell or cell range. Use the Range.EntireRow property to return a Range object representing the entire row or rows above which to insert the new row or rows. Please refer to the sections about the Offset and EntireRow properties below.
To insert rows above the cell range specified by Worksheet.Range, use a statement with the following structure:
Worksheet.Range(Cell1, Cell2).EntireRow.Insert Shift:=xlShiftDown
To insert rows a specific number of rows above or below the cell range specified by Worksheet.Range use a statement with the following structure:
Worksheet.Range(Cell1, Cell2).Offset(RowOffset).EntireRow.Insert Shift:=xlShiftDown
If the cell range represented by the Worksheet.Range property spans more than 1 row, the Insert method inserts several rows. The number of rows inserted is calculated as follows:
lastRow# - firstRow# + 1
Please refer to the section about the Worksheet.Rows property above for further information about this calculation.
Specify a Cell with the Worksheet.Cells and Range.Item Properties
Purpose of Worksheet.Cells and Range.Item
Use the Worksheet.Cells property to return a Range object representing all the cells within a worksheet.
Once your macro has all the cells within the worksheet, use the Range.Item property to return a Range object representing one of those cells.
Syntax of Worksheet.Cells and Range.Item
Worksheet.Cells
expression.Cells
“expression” is a Worksheet object. Therefore, I simplify as follows:
Worksheet.Cells
Range.Item
expression.Item(RowIndex, ColumnIndex)
“expression” is a Range object. Therefore, I simplify as follows:
Range.Item(RowIndex, ColumnIndex)
Worksheet.Cells and Range.Item Together
Considering the above:
Worksheet.Cells.Item(RowIndex, ColumnIndex)
However, Item is the default property of the Range object. Therefore, you can generally omit the Item keyword before specifying the RowIndex and ColumnIndex arguments. I simplify as follows:
Worksheet.Cells(RowIndex, ColumnIndex)
Parameters of Worksheet.Cells and Range.Item
- Parameter: RowIndex.
- Description:
- If you use RowIndex alone (omit ColumnIndex), RowIndex specifies the index of the cell you work with. Cells are numbered from left-to-right and top-to-bottom.
- If you use RowIndex and ColumnIndex, RowIndex specifies the row number of the cell you work with.
- Required/Optional: Required.
- Data type: Variant.
- Values: You usually specify RowIndex as a value.
- Description:
- Parameter: ColumnIndex.
- Description: Column number or letter of the cell you work with.
- Required/Optional: Optional.
- Data type: Variant.
- Values: You usually specify ColumnIndex as a value (column number) or letter within quotations (“”).
How to use Worksheet.Cells and Range.Item to Insert Rows
When you insert a row, use the Worksheet.Cells and Range.Item properties to return a cell. This allows you to use a specific cell as reference for the row insertion operation.
Use the Range.Offset property to return a Range object a specific number of rows above or below the cell. Use the Range.EntireRow property to return a Range object representing the entire row above which to insert the row. Please refer to the sections about the Offset and EntireRow properties below.
To insert a row above the cell specified by Worksheet.Cells, use a statement with the following structure:
Worksheet.Cells(RowIndex, ColumnIndex).EntireRow.Insert Shift:=xlShiftDown
To insert a row a specific number of rows above or below the cell specified by Worksheet.Cells, use a statement with the following structure:
Worksheet.Cells(RowIndex, ColumnIndex).Offset(RowOffset).EntireRow.Insert Shift:=xlShiftDown
Specify a Cell Range a Specific Number of Rows Below or Above a Cell or Cell Range with the Range.Offset Property
Purpose of Range.Offset
Use the Range.Offset property to return a Range object representing a cell range located a number of rows or columns away from the range the property works with.
Syntax of Range.Offset
expression.Offset(RowOffset, ColumnOffset)
“expression” is a Range object. Therefore, I simplify as follows:
Range.Offset(RowOffset, ColumnOffset)
Parameters of Range.Offset
- Parameter: RowOffset.
- Description: Number of rows by which cell or cell range is offset.
- Required/Optional: Optional.
- Data type: Variant.
- Values:
- Positive number: Moves down the worksheet.
- Negative number: Moves up the worksheet.
- 0: Stays on the same row.
- Default: 0. Stays on the same row.
- Parameter: ColumnOffset.
- Description: Number of columns by which cell or cell range is offset.
- Required/Optional: Optional.
- Data type: Variant.
- Values:
- Positive number: Moves towards the right of the worksheet.
- Negative number: Moves towards the left of the worksheet.
- 0: Stays on the same column.
- Default: 0. Stays on the same column.
- Usage notes: When you insert a row, you can usually omit the ColumnOffset parameter. You’re generally interested in moving a number of rows (not columns) above or below.
How to Use Range.Offset to Insert Rows
When you insert a row, use the Range.Offset property to specify a cell or cell range located a specific number of rows below above another cell or cell range. This allows you to use this new cell or cell range as reference for the row insertion operation.
Use properties such as Application.ActiveCell, Worksheet.Range and Worksheet.Cells to specify the base range the Offset property works with. Please refer to the sections about the ActiveCell, Range and Cells properties above.
Specify Entire Row with the Range.EntireRow Property
Purpose of Range.EntireRow
Use the Range.EntireRow property to return a Range object representing the entire row or rows containing the cell range the property works with.
Range.EntireRow is read-only.
Syntax of Range.EntireRow
expression.EntireRow
“expression” is a Range object. Therefore, I simplify as follows:
Range.EntireRow
How to Use Range.EntireRow to Insert Rows
When you insert a row, use the Range.EntireRow property to return the entire row or rows above which the new row or rows are inserted.
Use properties such as Application.ActiveCell, Worksheet.Range and Worksheet.Cells to specify the range the EntireRow property works with. Please refer to the sections about the ActiveCell, Range and Cells properties above.
Clear Row Formatting with the Range.ClearFormats Method
Purpose of Range.ClearFormats
Use the Range.ClearFormats method to clear the formatting of a cell range.
Syntax of Range.ClearFormats
expression.ClearFormats
“expression” is a Range object. Therefore, I simplify as follows:
Range.ClearFormats
How to Use Range.ClearFormats to Insert Rows
The format of the newly-inserted row is specified by the CopyOrigin parameter of the Range.Insert method. Please refer to the description of Range.Insert and CopyOrigin above.
When you insert a row, use the Range.ClearFormats method to clear the formatting of the newly-inserted rows. Use a statement with the following structure after the statement that inserts the new row (whose formatting you want to clear):
Range.ClearFormats
“Range” is a Range object representing the newly-inserted row.
Use the Worksheet.Rows or Range.EntireRow properties to return a Range object that represents the newly-inserted row. Please refer to the sections about the Rows and EntireRow properties above.
Copy Rows with the Range.Copy Method
Purpose of Range.Copy
Use the Range.Copy method to copy a cell range to another cell range or the Clipboard.
Syntax of Range.Copy
expression.Copy(Destination)
“expression” is a Range object. Therefore, I simplify as follows:
Range.Copy(Destination)
Parameters of Range.Copy
- Parameter: Destination.
- Description: Specifies the destination cell range to which the copied cell range is copied.
- Required/Optional: Optional parameter.
- Data type: Variant.
- Values: You usually specify Destination as a Range object.
- Default: Cell range is copied to the Clipboard.
- Usage notes: When you insert a copied row, omit the Destination parameter to copy the row to the Clipboard.
How to Use Range.Copy to Insert Rows
Use the Range.Copy method to copy a row which you later insert.
Use a statement with the following structure before the statement that inserts the row:
Range.Copy
“Range” is a Range object representing an entire row.
Use the Worksheet.Rows or Range.EntireRow properties to return a Range object that represents a row. Please refer to the sections about the Rows and EntireRow properties above.
Related VBA and Macro Tutorials
- General VBA constructs and structures:
- Introduction to Excel VBA constructs and structures.
- The Excel VBA Object Model.
- How to declare variables in Excel VBA.
- Excel VBA data types.
- Practical VBA applications and macro examples:
- How to copy and paste with Excel VBA.
You can find additional VBA and Macro Tutorials in the Archives.
Example Workbooks
This VBA Tutorial is accompanied by Excel workbooks containing the data and macros I explain below. If you want to follow and practice, you can get immediate free access to these example workbooks by clicking the button below.
Each worksheet within the workbook contains a single data range. Most of the entries simply state “Data”.
Example #1: Excel VBA Insert Row
VBA Code to Insert Row
The following macro inserts a row below row 5 of the worksheet named “Insert row”.
Sub insertRow()
    'Source: powerspreadsheets.com/
    'For further information: https://powerspreadsheets.com/excel-vba-insert-row/
    Worksheets("Insert row").Rows(6).Insert Shift:=xlShiftDown
End Sub
Process Followed by Macro
VBA Statement Explanation
Worksheets(“Insert row”).Rows(6).Insert Shift:=xlShiftDown
- Item: Worksheets(“Insert row”).
- VBA construct: Workbook.Worksheets property.
- Description: Returns a Worksheet object representing the “Insert row” worksheet.
- Item: Rows(6).
- VBA construct: Worksheets.Rows property.
- Description: Returns a Range object representing row 6 of the worksheet returned by item #1 above.
- Item: Insert.
- VBA construct: Range.Insert method.
- Description: Inserts a new row above the row returned by item #2 above.
- Item: Shift:=xlShiftDown.
- VBA construct: Shift parameter of Range.Insert method.
- Description:
- Shifts rows down (xlShiftDown) to make space for the row inserted by item #3 above.
- You can usually omit this parameter. By default, VBA decides how to shift the cells based on the range’s shape. When inserting a row, this usually results in Excel shifting the cells down.
Effects of Executing the Macro
The following GIF illustrates the results of executing this macro. As expected, VBA inserts a row below row 5 of the worksheet.
Example #2: Excel VBA Insert Multiple Rows
VBA Code to Insert Multiple Rows
The following macro inserts 5 rows below row 10 of the worksheet named “Insert row”.
Sub insertMultipleRows()
    'Source: powerspreadsheets.com/
    'For further information: https://powerspreadsheets.com/excel-vba-insert-row/
    Worksheets("Insert row").Rows("11:15").Insert Shift:=xlShiftDown
End Sub
Process Followed by Macro
VBA Statement Explanation
Worksheets(“Insert row”).Rows(“11:15”).Insert Shift:=xlShiftDown
- Item: Worksheets(“Insert row”).
- VBA construct: Workbook.Worksheets property.
- Description: Returns a Worksheet object representing the “Insert row” worksheet.
- Item: Rows(“11:15”).
- VBA construct: Worksheet.Rows property.
- Description: Returns a Range object representing rows 11 to 15 of the worksheet returned by item #1 above.
- Item: Insert.
- VBA construct: Range.Insert method.
- Description:
- Inserts new rows above the rows returned by item #2 above.
- The number of inserted rows is equal to the number of rows returned by item #2 above. This is calculated as follows:
lastRow# - firstRow# + 1
In this example:
15 - 11 + 1 = 5
- Item: Shift:=xlShiftDown.
- VBA construct: Shift parameter of Range.Insert method.
- Description:
- Shifts rows down (xlShiftDown) to make space for the rows inserted by item #3 above.
- You can usually omit this parameter. By default, VBA decides how to shift the cells based on the range’s shape. When inserting a row, this usually results in Excel shifting the cells down.
Effects of Executing the Macro
The following GIF illustrates the results of executing this macro. As expected, VBA inserts 5 rows below row 10 of the worksheet.
Example #3: Excel VBA Insert Row with Same Format as Row Above
VBA Code to Insert Row with Same Format as Row Above
The following macro (i) inserts a row below row 20, and (ii) applies the formatting of row 20 to the newly-inserted row.
Sub insertRowFormatFromAbove()
    'Source: powerspreadsheets.com/
    'For further information: https://powerspreadsheets.com/excel-vba-insert-row/
    Worksheets("Insert row").Rows(21).Insert Shift:=xlShiftDown, CopyOrigin:=xlFormatFromLeftOrAbove
End Sub
Process Followed by Macro
VBA Statement Explanation
Worksheets(“Insert row”).Rows(21).Insert Shift:=xlShiftDown, CopyOrigin:=xlFormatFromLeftOrAbove
- Item: Worksheets(“Insert row”).
- VBA construct: Workbook.Worksheets property.
- Description: Returns a Worksheet object representing the “Insert row” worksheet.
- Item: Rows(21).
- VBA construct: Worksheet.Rows property.
- Description: Returns a Range object representing row 21 of the worksheet returned by item #1 above.
- Item: Insert.
- VBA construct: Range.Insert method.
- Description: Inserts a new row above the row returned by item #2 above.
- Item: Shift:=xlShiftDown.
- VBA construct: Shift parameter of Range.Insert method.
- Description:
- Shifts rows down (xlShiftDown) to make space for the row inserted by item #3 above.
- You can usually omit this parameter. By default, VBA decides how to shift the cells based on the range’s shape. When inserting a row, this usually results in Excel shifting the cells down.
- Item: CopyOrigin:=xlFormatFromLeftOrAbove.
- VBA construct: CopyOrigin parameter of Range.Insert method.
- Description:
- Sets formatting of row inserted by item #3 above to be equal to that of row above (xlFormatFromLeftOrAbove).
- You can usually omit this parameter. xlFormatFromLeftOrAbove (or 0) is the default value of CopyOrigin.
Effects of Executing the Macro
The following GIF illustrates the results of executing this macro. As expected, VBA (i) inserts a row below row 20, and (ii) applies the formatting of row 20 to the newly-inserted row.
Example #4: Excel VBA Insert Row with Same Format as Row Below
VBA Code to Insert Row with Same Format as Row Below
The following macro (i) inserts a row below row 25, and (ii) applies the formatting of the row below to the newly-inserted row.
Sub insertRowFormatFromBelow()
    'Source: powerspreadsheets.com/
    'For further information: https://powerspreadsheets.com/excel-vba-insert-row/
    Worksheets("Insert row").Rows(26).Insert Shift:=xlShiftDown, CopyOrigin:=xlFormatFromRightOrBelow
End Sub
Process Followed by Macro
VBA Statement Explanation
Worksheets(“Insert row”).Rows(26).Insert Shift:=xlShiftDown, CopyOrigin:=xlFormatFromRightOrBelow
- Item: Worksheets(“Insert row”).
- VBA construct: Workbook.Worksheets property.
- Description: Returns a Worksheet object representing the “Insert row” worksheet.
- Item: Rows(26).
- VBA construct: Worksheet.Rows property.
- Description: Returns a Range object representing row 26 of the worksheet returned by item #1 above.
- Item: Insert.
- VBA construct: Range.Insert method.
- Description: Inserts a new row above the row returned by item #2 above.
- Item: Shift:=xlShiftDown.
- VBA construct: Shift parameter of Range.Insert method.
- Description:
- Shifts rows down (xlShiftDown) to make space for the row inserted by item #3 above.
- You can usually omit this parameter. By default, VBA decides how to shift the cells based on the range’s shape. When inserting a row, this usually results in Excel shifting the cells down.
- Item: CopyOrigin:=xlFormatFromRightOrBelow.
- VBA construct: CopyOrigin parameter of Range.Insert method.
- Description: Sets formatting of row inserted by item #3 above to be equal to that of row below (xlFormatFromRightOrBelow).
Effects of Executing the Macro
The following GIF illustrates the results of executing this macro. As expected, VBA (i) inserts a row below row 25, and (ii) applies the formatting of the row below to the newly-inserted row.
Example #5: Excel VBA Insert Row without Formatting
VBA Code to Insert Row without Formatting
The following macro inserts a row below row 30 without applying the formatting from the rows above or below the newly- inserted row.
Sub insertRowWithoutFormat()
    'Source: powerspreadsheets.com/
    'For further information: https://powerspreadsheets.com/excel-vba-insert-row/
    Dim myNewRowNumber As Long
    myNewRowNumber = 31
    With Worksheets("Insert row")
        .Rows(myNewRowNumber).Insert Shift:=xlShiftDown
        .Rows(myNewRowNumber).ClearFormats
    End With
End Sub
Process Followed by Macro
VBA Statement Explanation
Lines #4 and #5: Dim myNewRowNumber As Long | myNewRowNumber = 31
- Item: Dim myNewRowNumber As Long.
- VBA construct: Dim statement.
- Description:
- Declares a new variable (myNewRowNumber) as of the Long data type.
- myNewRowNumber represents the number of the newly inserted row.
- Item: myNewRowNumber = 31.
- VBA construct: Assignment statement.
- Description: Assigns the value 31 to myNewRowNumber
Lines #6 and #9: With Worksheets(“Insert row”) | End With
- Item: With | End With.
- VBA construct: With… End With statement.
- Description: Statements within the With… End With statement (lines #7 and #8 below) are executed on the worksheet returned by item #2 below.
- Item: Worksheets(“Insert row”).
- VBA construct: Workbook.Worksheets property.
- Description: Returns a Worksheet object representing the “Insert row” worksheet.
Line #7: .Rows(myNewRowNumber).Insert Shift:=xlShiftDown
- Item: Rows(myNewRowNumber).
- VBA construct: Worksheet.Rows property.
- Description:
- Returns a Range object representing a row (whose number is represented by myNewRowNumber) of the worksheet in the opening statement of the With… End With statement (line #6 above).
- In this example, myNewRowNumber equals 31. Therefore, Worksheet.Rows returns row 31 prior to the insertion of the new row. This is a different row from that returned by Worksheet.Rows in line #8 below.
- This line #7 returns a row prior to the row insertion. This line is that above which the new row is inserted.
- Line #8 below returns a row after the row insertion. This line is the newly-inserted row.
- Item: Insert.
- VBA construct: Range.Insert method.
- Description: Inserts a new row above the row returned by item #1 above.
- Item: Shift:=xlShiftDown.
- VBA construct: Shift parameter of Range.Insert method.
- Description:
- Shifts rows down (xlShiftDown) to make space for the row inserted by item #2 above.
- You can usually omit this parameter. By default, VBA decides how to shift the cells based on the range’s shape. When inserting a row, this usually results in Excel shifting the cells down.
Line #8: .Rows(myNewRowNumber).ClearFormats
- Item: Rows(myNewRowNumber).
- VBA construct: Worksheet.Rows property.
- Description:
- Returns a Range object representing a row (whose number is represented by myNewRowNumber) of the worksheet in the opening statement of the With… End With statement (line #6 above).
- In this example, myNewRowNumber equals 31. Therefore, Worksheet.Rows returns row 31 after the insertion of the new row. This is a different row from that returned by Worksheet.Rows in line #7 above.
- This line #8 returns a row after the row insertion. This line is the newly-inserted row.
- Line #7 above returns a row prior to the row insertion. This line is that below the newly-inserted row.
- Item: ClearFormats.
- VBA construct: Range.ClearFormats method.
- Description: Clears the formatting of the row returned by item #1 above.
Effects of Executing the Macro
The following GIF illustrates the results of executing this macro. As expected, VBA inserts a row below row 30 without applying the formatting from the rows above or below the newly- inserted row.
Example #6: Excel VBA Insert Row Below Active Cell
VBA Code to Insert Row Below Active Cell
The following macro inserts a row below the active cell.
Sub insertRowBelowActiveCell()
    'Source: powerspreadsheets.com/
    'For further information: https://powerspreadsheets.com/excel-vba-insert-row/
    ActiveCell.Offset(1).EntireRow.Insert Shift:=xlShiftDown
End Sub
Process Followed by Macro
VBA Statement Explanation
ActiveCell.Offset(1).EntireRow.Insert Shift:=xlShiftDown
- Item: ActiveCell.
- VBA construct: Application.ActiveCell property.
- Description: Returns a Range object representing the active cell.
- Item: Offset(1).
- VBA construct: Range.Offset property.
- Description:
- Returns a Range object representing the cell range 1 row below the cell returned by item #1 above.
- In this example, Range.Offset returns the cell immediately below the active cell.
- Item: EntireRow:
- VBA construct: Range.EntireRow property.
- Description: Returns a Range object representing the entire row containing the cell range returned by item #2 above.
- Item: Insert.
- VBA construct: Range.Insert method.
- Description: Inserts a new row above the row returned by item #3 above.
- Item: Shift:=xlShiftDown.
- VBA construct: Shift parameter of Range.Insert method.
- Description:
- Shifts rows down (xlShiftDown) to make space for the row inserted by item #4 above.
- You can usually omit this parameter. By default, VBA decides how to shift the cells based on the range’s shape. When inserting a row, this usually results in Excel shifting the cells down.
Effects of Executing the Macro
The following GIF illustrates the results of executing this macro. When I execute the macro, the active cell is B35. As expected, inserts a row below the active cell.
Example #7: Excel VBA Insert Copied Row
VBA Code to Insert Copied Row
The following macro (i) copies row 45, and (ii) inserts the copied row below row 40.
Sub insertCopiedRow()
    'Source: powerspreadsheets.com/
    'For further information: https://powerspreadsheets.com/excel-vba-insert-row/
    With Worksheets("Insert row")
        .Rows(45).Copy
        .Rows(41).Insert Shift:=xlShiftDown
    End With
    Application.CutCopyMode = False
End Sub
Process Followed by Macro
VBA Statement Explanation
Lines #4 and #7: With Worksheets(“Insert row”) | End With
- Item: With | End With.
- VBA construct: With… End With statement.
- Description: Statements within the With… End With statement (lines #5 and #6 below) are executed on the worksheet returned by item #2 below.
- Item: Worksheets(“Insert row”).
- VBA construct: Workbook.Worksheets property.
- Description: Returns a Worksheet object representing the “Insert row” worksheet.
Line #5: .Rows(45).Copy
- Item: Rows(45).
- VBA construct: Worksheet.Rows property.
- Description: Returns a Range object representing row 45 of the worksheet in the opening statement of the With… End With statement (line #4 above).
- Item: Copy.
- VBA construct: Range.Copy method.
- Description: Copies the row returned by item #1 above to the Clipboard.
Line #6: .Rows(41).Insert Shift:=xlShiftDown
- Item: Rows(41).
- VBA construct: Worksheet.Rows property.
- Description: Returns a Range object representing row 41 of the worksheet in the opening statement of the With… End With statement (line #4 above).
- Item: Insert.
- VBA construct: Range.Insert method.
- Description:
- Inserts a new row above the row returned by item #1 above.
- The newly-inserted row isn’t blank. VBA inserts the row copied by line #5 above.
- Item: Shift:=xlShiftDown.
- VBA construct: Shift parameter of Range.Insert method.
- Description:
- Shifts rows down (xlShiftDown) to make space for the row inserted by item #2 above.
- You can usually omit this parameter. By default, VBA decides how to shift the cells based on the range’s shape. When inserting a row, this usually results in Excel shifting the cells down.
Line #8: Application.CutCopyMode = False
- Item: Application.CutCopyMode = False.
- VBA construct: Application.CutCopyMode property.
- Description: Cancels (False) the Cut or Copy mode and removes the moving border that accompanies this mode.
Effects of Executing the Macro
The following GIF illustrates the results of executing this macro. As expected, VBA (i) copies row 45, and (ii) inserts the copied row below row 40.
Example #8: Excel VBA Insert Blank Rows Between Rows in a Data Range
VBA Code to Insert Blank Rows Between Rows in a Data Range
The following macro inserts blank rows within the specified data range. This results in all rows within the data range being separated by a blank row.
Sub insertBlankRowsBetweenRows()
    'Source: powerspreadsheets.com/
    'For further information: https://powerspreadsheets.com/excel-vba-insert-row/
    Dim myFirstRow As Long
    Dim myLastRow As Long
    Dim myWorksheet As Worksheet
    Dim iCounter As Long
    myFirstRow = 5
    Set myWorksheet = Worksheets("Insert blank rows")
    myLastRow = myWorksheet.Cells.Find( _
                                        What:="*", _
                                        LookIn:=xlFormulas, _
                                        LookAt:=xlPart, _
                                        SearchOrder:=xlByRows, _
                                        SearchDirection:=xlPrevious).Row
    For iCounter = myLastRow To (myFirstRow + 1) Step -1
        myWorksheet.Rows(iCounter).Insert Shift:=xlShiftDown
    Next iCounter
End Sub
Process Followed by Macro
VBA Statement Explanation
Lines #4 through #9: Dim myFirstRow As Long | Dim myLastRow As Long | Dim myWorksheet As Worksheet | Dim iCounter As Long | myFirstRow = 5 | Set myWorksheet = Worksheets(“Insert blank rows”)
- Item: Dim myFirstRow As Long.
- VBA construct: Dim statement.
- Description:
- Declares a new variable (myFirstRow) as of the Long data type.
- myFirstRow represents the number of the first row with data in the data range you work with.
- Item: Dim myLastRow As Long.
- VBA construct: Dim statement.
- Description:
- Declares a new variable (myLastRow) as of the Long data type.
- myLastRow represents the number of the last row with data in the data range you work with.
- Item: Dim myWorksheet As Worksheet.
- VBA construct: Dim statement.
- Description:
- Declares a new object variable (myWorksheet) to reference a Worksheet object.
- myWorksheet represents the worksheet you work with.
- Item: Dim iCounter As Long.
- VBA construct: Dim statement.
- Description:
- Declares a new variable (iCounter) as of the Long data type.
- iCounter represents a loop counter.
- Item: myFirstRow = 5.
- VBA construct: Assignment statement.
- Description: Assigns the value 5 to myFirstRow.
- Item: Set myWorksheet = Worksheets(“Insert blank rows”).
- VBA constructs:
- Set statement.
- Workbooks.Worksheets property.
- Description: Assigns the Worksheet object representing the “Insert blank rows” worksheet to myWorksheet.
- VBA constructs:
Lines #10 through #15: myLastRow = myWorksheet.Cells.Find( What:=”*”, LookIn:=xlFormulas, LookAt:=xlPart, SearchOrder:=xlByRows, SearchDirection:=xlPrevious).Row
- Item: myLastRow =.
- VBA construct: Assignment statement.
- Description: Assigns the value returned by items #2 through #9 below to myLastRow.
- Item: myWorksheet.Cells.
- VBA construct: Worksheet.Cells property.
- Description: Returns a Range object representing all cells on myWorksheet.
- Item: Find.
- VBA construct: Range.Find method.
- Description:
- Finds information in the cell range returned by item #2 above and returns a Range object representing the first cell where the information is found.
- In this example, the Range object Range.Find returns represents the last cell with data in last row with data in myWorksheet.
- Item: What:=”*”.
- VBA construct: What parameter of Range.Find method.
- Description: Specifies the data Range.Find searches for. The asterisk (*) is a wildcard and, therefore, Range.Find searches for any character sequence.
- Item: LookIn:=xlFormulas.
- VBA construct: LookIn parameter of Range.Find method.
- Description: Specifies that Range.Find looks in formulas (xlFormulas).
- Item: LookAt:=xlPart.
- VBA construct: LookAt parameter of Range.Find method.
- Description: Specifies that Range.Find looks at (and matches) a part (xlPart) of the search data.
- Item: SearchOrder:=xlByRows.
- VBA construct: SearchOrder parameter of Range.Find method.
- Description: Specifies that Range.Find searches by rows (xlByRows).
- Item: SearchDirection:=xlPrevious.
- VBA construct: SearchDirection parameter of Range.Find method.
- Description: Specifies that Range.Find searches for the previous match (xlPrevious).
- Item: Row.
- VBA construct: Range.Row property.
- Description:
- Returns the row number of the Range object returned by item #3 above.
- In this example, the number returned by Range.Row corresponds to the last row with data in myWorksheet.
Lines #16 and #18: For iCounter = myLastRow To (myFirstRow + 1) Step -1 | Next iCounter
- Item: For | Next iCounter.
- VBA construct: For… Next statement.
- Description:
- Repeats the statement inside the For… Next loop (line #17 below) a specific number of times.
- In this example:
- The macro starts on the last row of the data range as specified by item #2 below.
- Every iteration, the loop counter decreases by 1, as specified by item #4 below. Therefore, the macro moves to the previous row.
- The macro exits the loop after working with the second row in the data range (myFirstRow + 1), as specified by item #3 below.
- Item: iCounter = myLastRow.
- VBA construct: Counter and Start of For… Next statement.
- Description: Specifies myLastRow as the initial value of the loop counter (iCounter).
- Item: To (myFirstRow + 1).
- VBA construct: End of For… Next statement.
- Description: Specifies the value represented by myFirstRow plus 1 (myFirstRow + 1) as the final value of the loop counter.
- Item: Step -1.
- VBA construct: Step of For… Next statement.
- Description: Specifies that the loop counter (iCounter) decreases by 1 (-1) every loop iteration.
Line #17: myWorksheet.Rows(iCounter).Insert Shift:=xlShiftDown
- Item: myWorksheet.Rows(iCounter).
- VBA construct: Worksheet.Rows property.
- Description:
- Returns a Range object representing the row (whose number is represented by iCounter) of myWorksheet.
- Worksheet.Rows returns the row through which the macro is currently looping.
- Item: Insert.
- VBA construct: Range.Insert method.
- Description:
- Inserts a new row above the row returned by item #1 above.
- The macro loops through each line in the data range (excluding the first) as specified by lines #16 and #18 above. Therefore, Range.Insert inserts a row between all rows with data.
- Item: Shift:=xlShiftDown.
- VBA construct: Shift parameter of Range.Insert method.
- Description:
- Shifts rows down (xlShiftDown) to make space for the row inserted by item #2 above.
- You can usually omit this parameter. By default, VBA decides how to shift the cells based on the range’s shape. When inserting a row, this usually results in Excel shifting the cells down.
Effects of Executing the Macro
The following GIF illustrates the results of executing this macro. As expected, VBA inserts blank rows within the specified data range. This results in all rows within the data range being separated by a blank row.
Example #9: Excel VBA Insert a Number of Rows Every Number of Rows in a Data Range
VBA Code to Insert a Number of Rows Every Number of Rows in a Data Range
The following macro inserts 2 rows every 3 rows within the specified data range.
Sub insertMRowsEveryNRows()
    'Source: powerspreadsheets.com/
    'For further information: https://powerspreadsheets.com/excel-vba-insert-row/
    Dim myFirstRow As Long
    Dim myLastRow As Long
    Dim myNRows As Long
    Dim myRowsToInsert As Long
    Dim myWorksheet As Worksheet
    Dim iCounter As Long
    myFirstRow = 5
    myNRows = 3
    myRowsToInsert = 2
    Set myWorksheet = Worksheets("Insert M rows every N rows")
    myLastRow = myWorksheet.Cells.Find( _
                                        What:="*", _
                                        LookIn:=xlFormulas, _
                                        LookAt:=xlPart, _
                                        SearchOrder:=xlByRows, _
                                        SearchDirection:=xlPrevious).Row
    For iCounter = myLastRow To (myFirstRow + myNRows) Step -1
        If (iCounter - myFirstRow) Mod myNRows = 0 Then myWorksheet.Rows(iCounter & ":" & iCounter + myRowsToInsert - 1).Insert Shift:=xlShiftDown
    Next iCounter
End Sub
Process Followed by Macro
VBA Statement Explanation
Lines #4 through 13: Dim myFirstRow As Long | Dim myLastRow As Long | Dim myNRows As Long | Dim myRowsToInsert As Long | Dim myWorksheet As Worksheet | Dim iCounter As Long | myFirstRow = 5 | myNRows = 3 | myRowsToInsert = 2 | Set myWorksheet = Worksheets(“Insert M rows every N rows”)
- Item: Dim myFirstRow As Long.
- VBA construct: Dim statement.
- Description:
- Declares a new variable (myFirstRow) as of the Long data type.
- myFirstRow represents the number of the first row with data in the data range you work with.
- Item: Dim myLastRow As Long.
- VBA construct: Dim statement.
- Description:
- Declares a new variable (myLastRow) as of the Long data type.
- myLastRow represents the number of the last row with data in the data range you work with.
- Item: Dim myNRows As Long.
- VBA construct: Dim statement.
- Description:
- Declares a new variable (myNRows) as of the Long data type.
- myNRows represents the number of rows per block. The macro doesn’t insert rows between these rows.
- Item: Dim myRowsToInsert As Long.
- VBA construct: Dim statement.
- Description:
- Declares a new variable (myRowsToInsert) as of the Long data type.
- myRowsToInsert represents the number of rows to insert.
- Item: Dim myWorksheet As Worksheet.
- VBA construct: Dim statement.
- Description:
- Declares a new object variable (myWorksheet) to reference a Worksheet object.
- myWorksheet represents the worksheet you work with.
- Item: Dim iCounter As Long.
- VBA construct: Dim statement.
- Description:
- Declares a new variable (iCounter) as of the Long data type.
- iCounter represents a loop counter.
- Item: myFirstRow = 5.
- VBA construct: Assignment statement.
- Description: Assigns the value 5 to myFirstRow.
- Item: myNRows = 3.
- VBA construct: Assignment statement.
- Description: Assigns the value 3 to myNRows.
- Item: myRowsToInsert = 2.
- VBA construct: Assignment statement.
- Description: Assigns the value 2 to myRowsToInsert.
- Item: Set myWorksheet = Worksheets(“Insert M rows every N rows”).
- VBA constructs:
- Set statement.
- Workbooks.Worksheets property.
- Description: Assigns the Worksheet object representing the “Insert M rows every N rows” worksheet to myWorksheet.
- VBA constructs:
Lines #14 through #19: myLastRow = myWorksheet.Cells.Find( What:=”*”, LookIn:=xlFormulas, LookAt:=xlPart, SearchOrder:=xlByRows, SearchDirection:=xlPrevious).Row
- Item: myLastRow =.
- VBA construct: Assignment statement.
- Description: Assigns the value returned by items #2 through #9 below to myLastRow.
- Item: myWorksheet.Cells.
- VBA construct: Worksheet.Cells property.
- Description: Returns a Range object representing all cells on myWorksheet.
- Item: Find.
- VBA construct: Range.Find method.
- Description:
- Finds information in the cell range returned by item #2 above and returns a Range object representing the first cell where the information is found.
- In this example, the Range object Range.Find returns represents the last cell with data in last row with data in myWorksheet.
- Item: What:=”*”.
- VBA construct: What parameter of Range.Find method.
- Description: Specifies the data Range.Find searches for. The asterisk (*) is a wildcard and, therefore, Range.Find searches for any character sequence.
- Item: LookIn:=xlFormulas.
- VBA construct: LookIn parameter of Range.Find method.
- Description: Specifies that Range.Find looks in formulas (xlFormulas).
- Item: LookAt:=xlPart.
- VBA construct: LookAt parameter of Range.Find method.
- Description: Specifies that Range.Find looks at (and matches) a part (xlPart) of the search data.
- Item: SearchOrder:=xlByRows.
- VBA construct: SearchOrder parameter of Range.Find method.
- Description: Specifies that Range.Find searches by rows (xlByRows).
- Item: SearchDirection:=xlPrevious.
- VBA construct: SearchDirection parameter of Range.Find method.
- Description: Specifies that Range.Find searches for the previous match (xlPrevious).
- Item: Row.
- VBA construct: Range.Row property.
- Description:
- Returns the row number of the Range object returned by item #3 above.
- In this example, the number returned by Range.Row corresponds to the last row with data in myWorksheet.
Lines #20 and #22: For iCounter = myLastRow To (myFirstRow + myNRows) Step -1 | Next iCounter
- Item: For | Next iCounter.
- VBA construct: For… Next statement.
- Description:
- Repeats the statement inside the For… Next loop (line #21 below) a specific number of times.
- In this example:
- The macro starts on the last row of the data range as specified by item #2 below.
- Every iteration, the loop counter decreases by 1, as specified by item #4 below. Therefore, the macro moves to the previous row.
- The macro exits the loop after working with the row below the first block of rows you want to keep, as specified by item #3 below. Each block of rows has a number of rows equal to myNRows.
- In this example, myNRows equals 3. Therefore, the macro exits the loop after working with the fourth row in the data range.
- Item: iCounter = myLastRow.
- VBA constructs: Counter and Start of For… Next statement.
- Description: Specifies myLastRow as the initial value of the loop counter (iCounter).
- Item: To (myFirstRow + myNRows).
- VBA construct: End of For… Next statement.
- Description: Specifies the value represented by myFirstRow plus myNRows (myFirstRow + myNRows) as the final value of the loop counter.
- Item: Step -1.
- VBA construct: Step of For… Next statement.
- Description: Specifies that the loop counter (iCounter) decreases by 1 (-1) every loop iteration.
Line #21: If (iCounter – myFirstRow) Mod myNRows = 0 Then myWorksheet.Rows(iCounter & “:” & iCounter + myRowsToInsert – 1).Insert Shift:=xlShiftDown
- Item: If | Then.
- VBA construct: If… Then… Else statement.
- Description: Conditionally executes the statement specified by items #3 and #4 below, subject to condition specified by item #2 below being met.
- Item: (iCounter – myFirstRow) Mod myNRows = 0.
- VBA constructs:
- Condition of If… Then… Else statement.
- Numeric expression with Mod operator.
- Description:
- The Mod operator (Mod) (i) divides one number (iCounter – myFirstRow) by a second number (myNRows), and (ii) returns the remainder of the division.
- The condition ((iCounter – myFirstRow) Mod myNRows = 0) is met (returns True) if the remainder returned by Mod is 0.
- The condition is met (returns True) every time the macro loops through a row above which blank rows should be added.
- iCounter represents the number of the row through which the macro is currently looping.
- (iCounter – myFirstRow) is the number of rows (in the data range) above the row through which the macro is currently looping.
- ((iCounter – myFirstRow) Mod myNRows) equals 0 when the number of rows returned by (iCounter – myFirstRow) is a multiple of myNRows. This ensures that the number of rows left above the row through which the macro is currently looping can be appropriately separated into blocks of myNRows. In this example, myNRows equals 3. Therefore, the condition is met every 3 rows.
- VBA constructs:
- Item: myWorksheet.Rows(iCounter & “:” & iCounter + myRowsToInsert – 1).
- VBA constructs:
- Statements executed if the condition specified by item #2 above is met.
- Worksheet.Rows property.
- Description:
- Returns an object representing several rows of myWorksheet. The first row is represented by iCounter. The last row is represented by (iCounter + myRowsToInsert – 1).
- The number of rows Worksheet.Rows returns equals the number of rows to insert (myRowsToInsert).
- iCounter represents the number of the row through which the macro is currently looping.
- (iCounter + myRowsToInsert – 1) returns a row located a number of rows (myRowsToInsert – 1) below the row through which the macro is currently looping. In this example, myRowsToInsert equals 2. Therefore, (iCounter + myRowsToInsert – 1) returns a row located 1 (2 – 1) rows below the row through which the macro is currently looping.
- VBA constructs:
- Item: Insert.
- VBA construct: Range.Insert method.
- Description:
- Inserts new rows above the rows returned by item #3 above.
- The number of inserted rows is equal to the value of myRowsToInsert. This is calculated as follows:
lastRow# - firstRow# + 1
(iCounter + myRowsToInsert - 1) - iCounter + 1 = myRowsToInsert
In this example, if the current value of iCounter is 8:
(8 + 2 - 1) - 8 + 1
9 - 8 + 1 = 2
- Item: Shift:=xlShiftDown.
- VBA construct: Shift parameter of Range.Insert method.
- Description:
- Shifts rows down (xlShiftDown) to make space for the rows inserted by item #4 above.
- You can usually omit this parameter. By default, VBA decides how to shift the cells based on the range’s shape. When inserting a row, this usually results in Excel shifting the cells down.
Effects of Executing the Macro
The following GIF illustrates the results of executing this macro. As expected, VBA inserts 2 rows every 3 rows within the specified data range.
VBA Add row to Table in Excel. We can add a single row or multiple rows and data to table. Default new rows added at the end of the table. In this tutorial we have explained multiple examples with explanation. We also shown example output screenshots. We have specified three examples in the following tutorial. You can change table and sheet name as per your requirement. We also specified step by step instructions how to run VBA macro code at the end of the session.
Table of Formats:
- Objective
- Syntax to Add Row to Table using VBA in Excel
- Example to Add New Row to Table on the Worksheet in Excel
- Add Multiple Rows to Table in Excel using VBA
- Add Row & Data to Table on the Worksheet in Excel
- Instructions to Run VBA Macro Code
- Other Useful Resources
Syntax to Add Row to Table using VBA in Excel
Here is the syntax to add new row to table on the worksheet using VBA in Excel.
expression.Add(Position, AlwaysInsert)
Where expression represents the ListRows.
Position is an optional parameter. It represents the relative position of the new row. Accepts the Integer value.
AlwaysInsert is an optional parameter. It represents the cells to be shifted to down or not, based on Boolean value. Accepts the Boolean value either True or False.
Note: If position is not specified, default adds new row at the end of the table.
Example to Add New Row to Table on the Worksheet
Let us see the example to add new row to table on the worksheet. The sheet name defined as ‘Table‘. And we use table name as ‘MyDynamicTable‘. You can change these two as per your requirement. We Add method of the ListObject object.
 'VBA Add New Row to Table
Sub VBAF1_Add_Row_to_Table()

    'Declare Variables
    Dim oSheetName As Worksheet
    Dim sTableName As String
    Dim loTable As ListObject

    'Define Variable
    sTableName = "MyDynamicTable"

    'Define WorkSheet object
    Set oSheetName = Sheets("Table")

    'Define Table Object
    Set loTable = oSheetName.ListObjects(sTableName)

    'Add New row to the table
    loTable.ListRows.Add

End Sub
Output: Here is the following output screenshot of above example macro VBA code.
Add Multiple Rows to Table in Excel using VBA
Here is another example to add multiple rows to table. In this example we add five(5) rows to the table. You can specify the number of rows count in the for loop.
'VBA Add Multiple Rows to Table
Sub VBAF1_Add_Multiple_Rows_to_Table()

    'Declare Variables
    Dim oSheetName As Worksheet
    Dim sTableName As String
    Dim loTable As ListObject
    Dim iCnt As Integer

    'Define Variable
    sTableName = "MyDynamicTable"

    'Define WorkSheet object
    Set oSheetName = Sheets("Table")

    'Define Table Object
    Set loTable = oSheetName.ListObjects(sTableName)

    For iCnt = 1 To 5 'You can change based on your requirement
        'Add multiple rows to the table
        loTable.ListRows.Add
    Next

End Sub
Output: Let us see the following output screenshot of above example macro VBA code.
Add Row & Data to Table on the Worksheet in Excel
Let us see how to add new row and data to the table using VBA in Excel. In the below example we add new row and data of 5 columns.
 'VBA Add Row and Data to Table
Sub VBAF1_Add_Row_And_Data_to_Table()

    'Declare Variables
    Dim oSheetName As Worksheet
    Dim sTableName As String
    Dim loTable As ListObject
    Dim lrRow As ListRow

    'Define Variable
    sTableName = "MyDynamicTable"

    'Define WorkSheet object
    Set oSheetName = Sheets("Table")

    'Define Table Object
    Set loTable = oSheetName.ListObjects(sTableName)

    'Add New row to the table
    Set lrRow = loTable.ListRows.Add

    'Add Data to recently added row
    With lrRow
        .Range(1) = 20
        .Range(2) = 30
        .Range(3) = 40
        .Range(4) = 50
        .Range(5) = 60
    End With

End Sub
Output: Here is the following output screenshot of above example VBA macro code.
Instructions to Run VBA Macro Code or Procedure:
You can refer the following link for the step by step instructions.
Instructions to run VBA Macro Code
Other Useful Resources:
Click on the following links of the useful resources. These helps to learn and gain more knowledge.
VBA Tutorial VBA Functions List VBA Arrays in Excel VBA Tables and ListObjects
VBA Editor Keyboard Shortcut Keys List VBA Interview Questions & Answers Blog
I have an excel which serves to record the food you ingest for a specific day and meal. I hav a grid in which each line represent a food you ate, how much sugar it has, etc.
Then i’ve added an save button to save all the data to a table in another sheet.
This is what i have tried
    Public Sub addDataToTable(ByVal strTableName As String, ByRef arrData As Variant)
    Dim lLastRow As Long
    Dim iHeader As Integer
    Dim iCount As Integer

    With Worksheets(4).ListObjects(strTableName)
        'find the last row of the list
        lLastRow = Worksheets(4).ListObjects(strTableName).ListRows.Count

        'shift from an extra row if list has header
        If .Sort.Header = xlYes Then
            iHeader = 1
        Else
            iHeader = 0
        End If
    End With

    'Cycle the array to add each value
    For iCount = LBound(arrData) To UBound(arrData)
        **Worksheets(4).Cells(lLastRow + 1, iCount).Value = arrData(iCount)**
    Next iCount
End Sub
but i keep getting the same error on the highlighted line:
Application-defined or object-defined error
What i am doing wrong?
Thanks in advance!
asked Sep 6, 2012 at 10:11
Miguel TeixeiraMiguel Teixeira
7731 gold badge10 silver badges29 bronze badges
You don’t say which version of Excel you are using. This is written for 2007/2010 (a different apprach is required for Excel 2003 )
You also don’t say how you are calling addDataToTable and what you are passing into arrData.
I’m guessing you are passing a 0 based array. If this is the case (and the Table starts in Column A) then iCount will count from 0 and .Cells(lLastRow + 1, iCount) will try to reference column 0 which is invalid.
You are also not taking advantage of the ListObject. Your code assumes the ListObject1 is located starting at row 1. If this is not the case your code will place the data in the wrong row.
Here’s an alternative that utilised the ListObject
Sub MyAdd(ByVal strTableName As String, ByRef arrData As Variant)
    Dim Tbl As ListObject
    Dim NewRow As ListRow

    ' Based on OP
    ' Set Tbl = Worksheets(4).ListObjects(strTableName)
    ' Or better, get list on any sheet in workbook
    Set Tbl = Range(strTableName).ListObject
    Set NewRow = Tbl.ListRows.Add(AlwaysInsert:=True)

    ' Handle Arrays and Ranges
    If TypeName(arrData) = "Range" Then
        NewRow.Range = arrData.Value
    Else
        NewRow.Range = arrData
    End If
End Sub
Can be called in a variety of ways:
Sub zx()
    ' Pass a variant array copied from a range
    MyAdd "MyTable", [G1:J1].Value
    ' Pass a range
    MyAdd "MyTable", [G1:J1]
    ' Pass an array
    MyAdd "MyTable", Array(1, 2, 3, 4)
End Sub
answered Sep 6, 2012 at 11:06
chris neilsenchris neilsen
52.2k10 gold badges84 silver badges122 bronze badges
6
Tbl.ListRows.Add doesn’t work for me and I believe lot others are facing the same problem. I use the following workaround:
    'First check if the last row is empty; if not, add a row
    If table.ListRows.count > 0 Then
        Set lastRow = table.ListRows(table.ListRows.count).Range
        For col = 1 To lastRow.Columns.count
            If Trim(CStr(lastRow.Cells(1, col).Value)) <> "" Then
                lastRow.Cells(1, col).EntireRow.Insert
                'Cut last row and paste to second last
                lastRow.Cut Destination:=table.ListRows(table.ListRows.count - 1).Range
                Exit For
            End If
        Next col
    End If

    'Populate last row with the form data
    Set lastRow = table.ListRows(table.ListRows.count).Range
    Range("E7:E10").Copy
    lastRow.PasteSpecial Transpose:=True
    Range("E7").Select
    Application.CutCopyMode = False
Hope it helps someone out there.
answered Mar 25, 2013 at 10:22
1
I had the same error message and after lots of trial and error found out that it was caused by an advanced filter which was set on the ListObject.
After clearing the advanced filter .listrows.add worked fine again.
To clear the filter I use this — no idea how one could clear the filter only for the specific listobject instead of the complete worksheet.
Worksheets("mysheet").ShowAllData
answered Dec 4, 2014 at 17:18
1
I actually just found that if you want to add multiple rows below the selection in your table
Selection.ListObject.ListRows.Add AlwaysInsert:=True works really well. I just duplicated the code five times to add five rows to my table
answered Sep 28, 2015 at 20:16
I had the same problem before and i fixed it by creating the same table in a new sheet and deleting all the name ranges associated to the table, i believe whene you’re using listobjects you’re not alowed to have name ranges contained within your table hope that helps thanks
answered Jun 25, 2017 at 20:13
0
Ran into this issue today (Excel crashes on adding rows using .ListRows.Add).
After reading this post and checking my table, I realized the calculations of the formula’s in some of the cells in the row depend on a value in other cells.
In my case of cells in a higher column AND even cells with a formula!
The solution was to fill the new added row from back to front, so calculations would not go wrong.
Excel normally can deal with formula’s in different cells, but it seems adding a row in a table kicks of a recalculation in order of the columns (A,B,C,etc..).
Hope this helps clearing issues with .ListRows.Add
answered Sep 4, 2018 at 12:35
As using ListRow.Add can be a huge bottle neck, we should only use it if it can’t be avoided.
If performance is important to you, use this function here to resize the table, which is quite faster than adding rows the recommended way.
Be aware that this will overwrite data below your table if there is any!
This function is based on the accepted answer of Chris Neilsen
Public Sub AddRowToTable(ByRef tableName As String, ByRef data As Variant)
    Dim tableLO As ListObject
    Dim tableRange As Range
    Dim newRow As Range

    Set tableLO = Range(tableName).ListObject
    tableLO.AutoFilter.ShowAllData

    If (tableLO.ListRows.Count = 0) Then
        Set newRow = tableLO.ListRows.Add(AlwaysInsert:=True).Range
    Else
        Set tableRange = tableLO.Range
        tableLO.Resize tableRange.Resize(tableRange.Rows.Count + 1, tableRange.Columns.Count)
        Set newRow = tableLO.ListRows(tableLO.ListRows.Count).Range
    End If

    If TypeName(data) = "Range" Then
        newRow = data.Value
    Else
        newRow = data
    End If
End Sub
answered Apr 25, 2017 at 23:41
Jonas_HessJonas_Hess
1,8241 gold badge20 silver badges32 bronze badges
1
Just delete the table and create a new table with a different name. Also Don’t delete entire row for that table. It seems when entire row containing table row is delete it damages the DataBodyRange is damaged
answered Jun 11, 2016 at 13:19
Bhanu SinhaBhanu Sinha
1,51612 silver badges10 bronze badges
- Excel VBA Вставить строку
Excel VBA Вставить строку
Поскольку в этом слове есть две вещи, одна — VBA, а другая — Insert Row. В этом я объясню, как вставить строку в Excel, используя VBA (Visual Basic для приложений).
VBA — это язык программирования для тех, кто работает в Excel и других программах Office, поэтому можно автоматизировать задачи в Excel, написав так называемые макросы. Используя кодирование VBA, мы можем выполнять практически все задачи, которые мы выполняем в Excel, так как мы можем копировать, вставлять, удалять и т. Д.
Вставить строку — используется для вставки строки в Excel между другой строкой с помощью автоматизации, т.е. одним щелчком мыши.
Предположим, что мы вводим данные сотрудника в Excel, и мы пропустили некоторых сотрудников и хотим вставить данные недостающих между ними, поэтому нам нужно создать пробел и вставить строку для ввода их данных. Вместо вставки строки одна за другой мы можем автоматизировать задачу вставки строк с использованием VBA и создания макросов.
Есть много способов, с помощью которых мы можем вставить строки, используя кодирование VBA. Функция, используемая для вставки строки в VBA:
Диапазон (). Ряд (). EntireRow.Insert
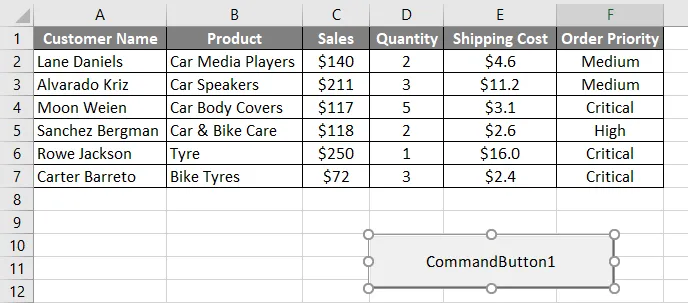
Давайте рассмотрим, у нас есть набор данных, который состоит из столбцов, таких как Имя клиента , Продукт, Продажи, Количество, Стоимость доставки, Приоритет заказа.
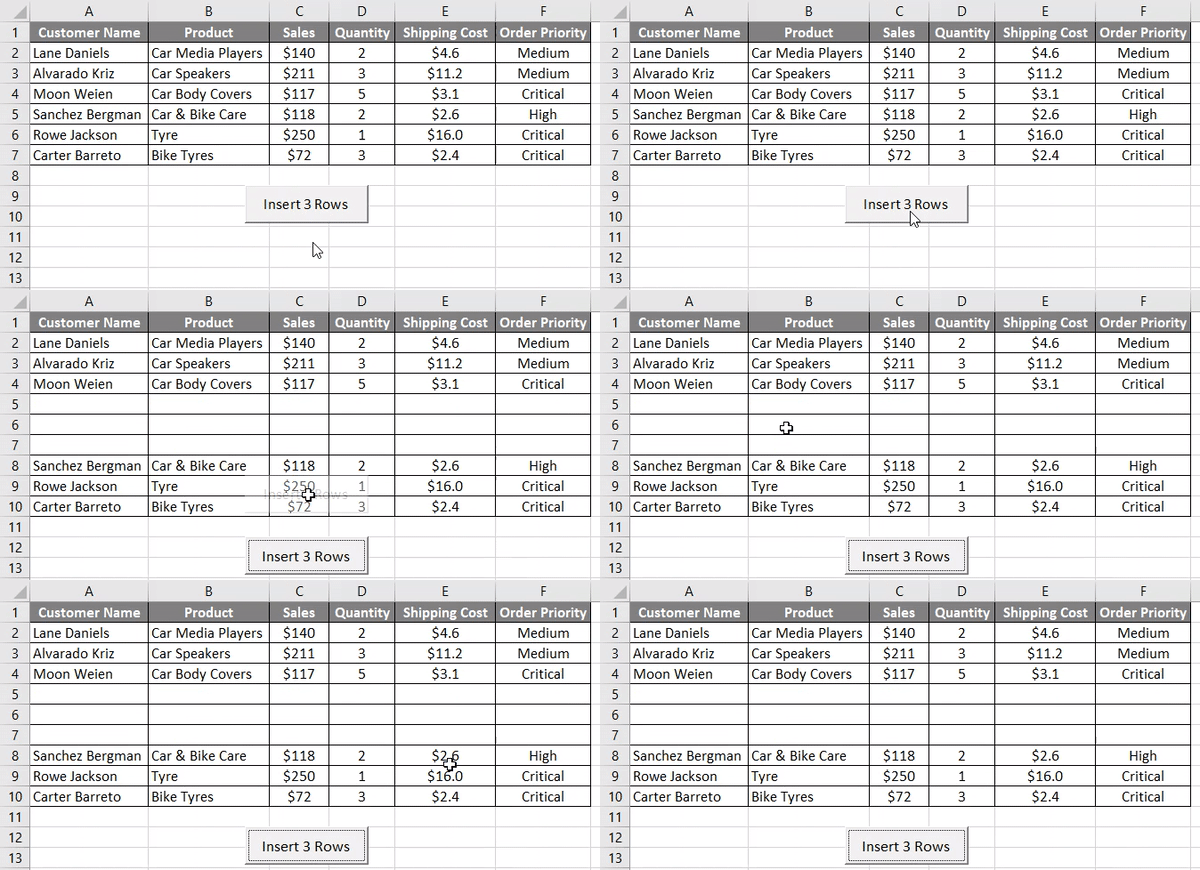
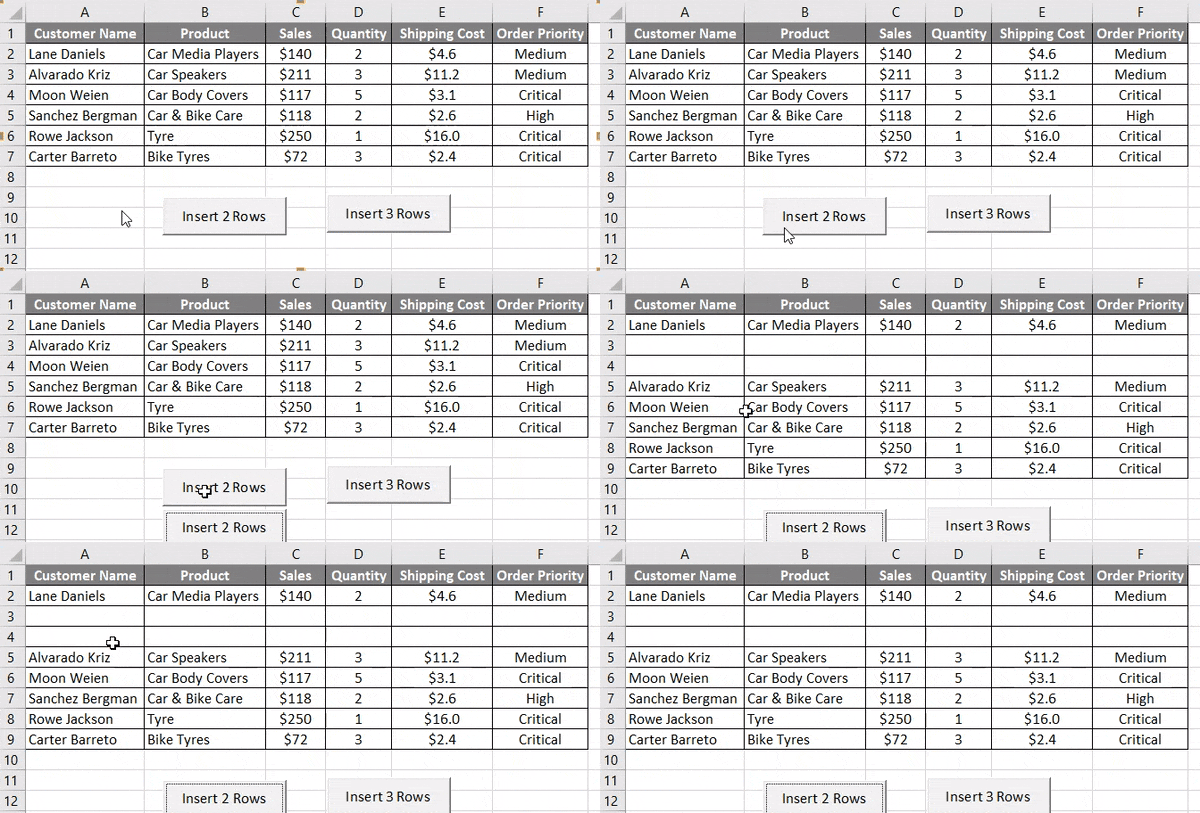
Предположим, что нам нужно сместить столбцы вниз, чтобы вставить 3 новые строки между 3 и 4, чтобы вставить новую отсутствующую запись. Вместо того, чтобы вставлять строку один за другим, мы автоматизируем это, чтобы вставить все 3 строки одним щелчком мыши.
Как вставить строки в Excel VBA?
Ниже приведены различные примеры вставки строк в Excel с использованием кода VBA.
Вы можете скачать этот шаблон Excel для вставки строк VBA здесь — Шаблон Excel для вставки строк VBA
Пример № 1 — Использование всей строки
Выполните следующие шаги, чтобы вставить строки в Excel, используя код VBA.
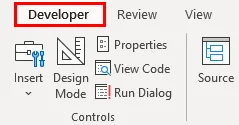
Шаг 1: Для создания макроса нам нужно выбрать вкладку «Разработчик».
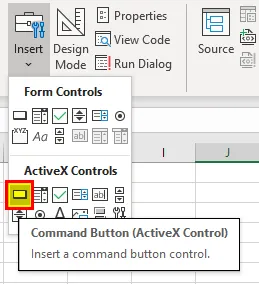
Шаг 2. После открытия вкладки «Разработчик» вставьте кнопку из группы «Элементы управления». Нажмите « Вставить» и выберите первый вариант из элементов управления ActiveX. Как вы можете видеть эту командную кнопку .
Шаг 3: Перетащите стрелку в любую ячейку, чтобы создать командную кнопку.
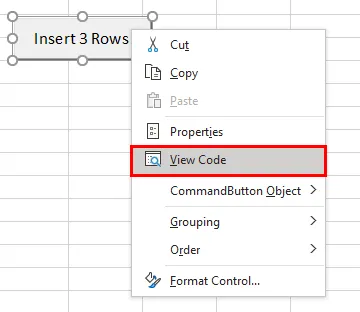
Шаг 4: Чтобы войти в функцию «Вставка», щелкните правой кнопкой мыши на кнопке «Командный», т. Е. Вставьте 3 строки и нажмите « Просмотреть код»
Шаг 5: Когда вы нажимаете на Просмотр кода, появляется следующий код.
Код:
Частный Sub CommandButton1_Click () End Sub
Шаг 6: Мы должны написать наш код INSERT ROW. Как упоминалось ранее, мы должны использовать функцию Rows.EntireRow с RANGE в VBA. В этом коде мы должны вставить 3 между 3- м и 4- м .
Код:
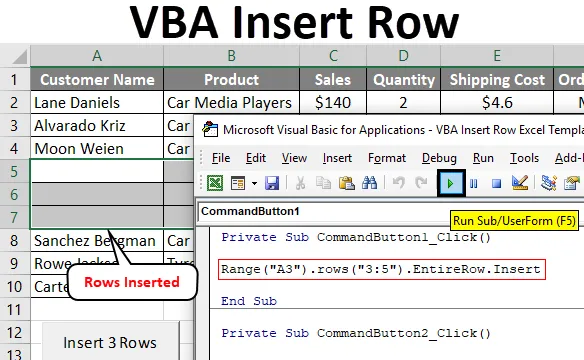
Private Sub CommandButton1_Click () Диапазон ("A3"). Строки ("3: 5"). CompleteRow.Insert End Sub
В приведенной выше строке кода A3 — это столбец, в который мы должны вставить строку, а строки (3: 5) — то, что мы должны вставить 3 новые строки.
Шаг 7: Запустите код, нажав на кнопку « Вставить 3 строки» .
Пример № 2 — Использование номеров строк
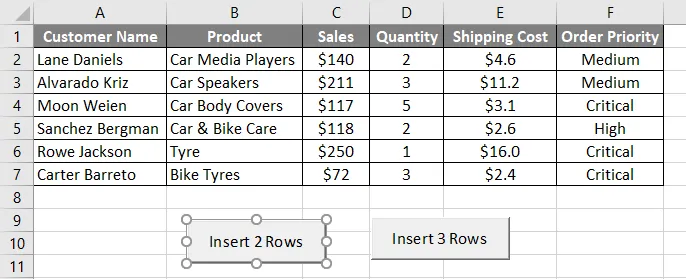
Точно так же мы напишем код для вставки 2 строк одним нажатием кнопки.
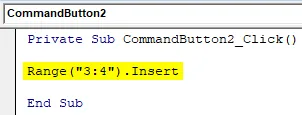
В этом, мы должны упомянуть строку от начального ряда до конечного номера строки, используя RANGE, за которым следует INSERT, который вставит строки.
Код:
Частный саб Диапазон CommandButton2_Click () ("3: 4"). Вставить конечный саб
Когда мы нажимаем кнопку «Вставить 2 строки», мы видим, что 2 строки были вставлены между 3- й и 4- й строкой.
Точно так же мы можем настроить нашу функцию, чтобы вставить столько строк, сколько сможем.
Пример № 3 — Использование активной ячейки
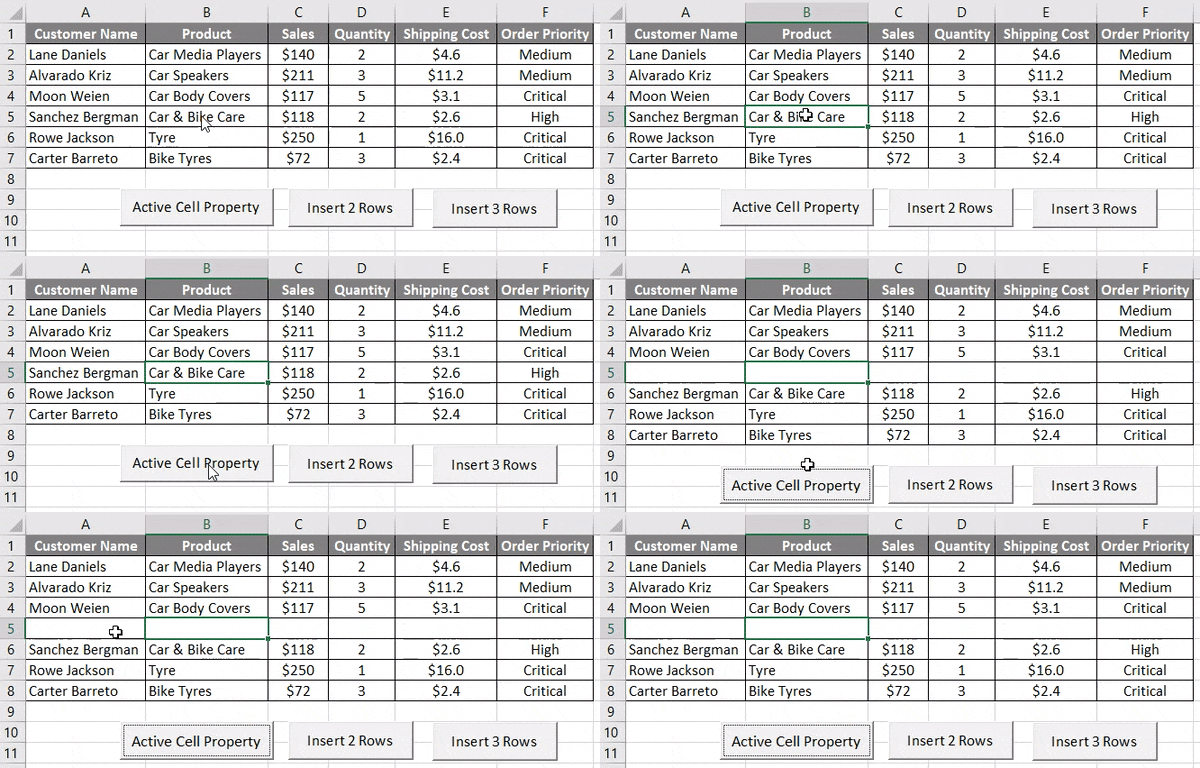
Активная ячейка означает ячейку, которая выбрана в данный момент. Мы будем использовать активную ячейку для вставки строк. Предположим, что мы находимся в ячейке B3 и хотим вставить ячейку над ней, поэтому мы будем использовать свойство active cell. Мы будем использовать следующий код для активной ячейки.
Код:
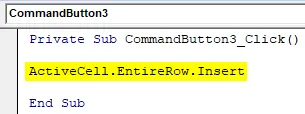
Закрытая подпрограмма CommandButton3_Click () ActiveCell.EntireRow.Insert End Sub
Когда мы нажимаем кнопку «Активное свойство ячейки», мы видим, что одна ячейка вставляется над выбранной ячейкой. Выше мы выбрали B5, а ниже мы видим, что над ним вставлена одна строка.
Пример № 4 — Использование активной ячейки со смещением
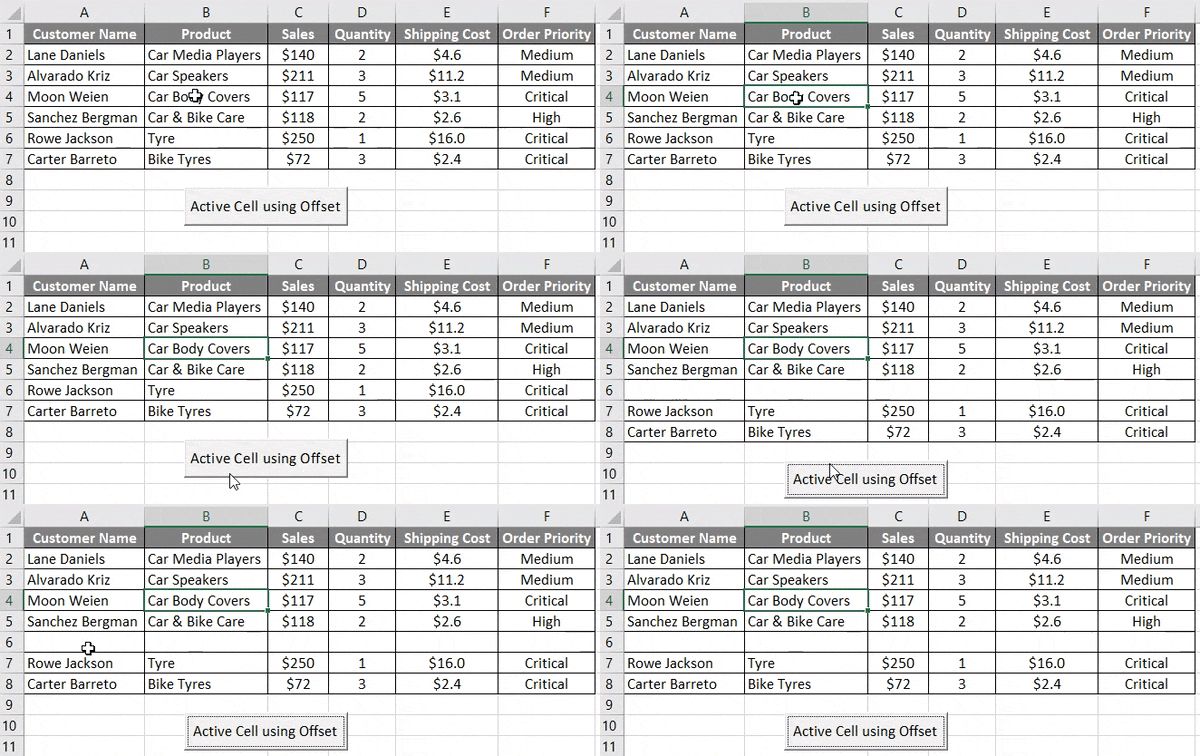
Предположим, мы хотим вставить строку после 3 строк активной ячейки, для этого мы будем использовать функцию OFFSET. Предположим, мы находимся в ячейке B4 и должны вставить строку после 2 строк, мы будем использовать этот код.
Код:
Закрытая подпрограмма CommandButton4_Click () ActiveCell.Offset (2, 0) .EntireRow.Insert End Sub
Когда мы нажимаем кнопку «Активная ячейка с использованием смещения», в B6 вставляется одна строка .
То, что нужно запомнить
- Он используется для вставки строк в Excel, автоматизируя его.
- Вставка строки VBA используется с объектом RANGE в VBA.
- Перед началом работы включите «Включить все макросы» в настройках макроса.
Рекомендуемые статьи
Это руководство по VBA Insert Row. Здесь мы обсудим, как вставить строку в Excel, используя код VBA, а также с практическими примерами и загружаемым шаблоном Excel. Вы также можете посмотреть следующие статьи, чтобы узнать больше —
- Примеры функции VBA GetObject
- Excel Вставка нескольких строк (шаблон Excel)
- Как использовать функцию VBA StrConv?
- Руководство по Excel Вставить ярлык строки
Вставка строки в VBA несколько отличается от вставки столбца в VBA, в столбцах мы использовали метод всего столбца, но для вставки строк мы используем метод рабочего листа с командой вставки для вставки строки, мы также предоставляем ссылку на строку, в которую мы хотим вставить еще один ряд, аналогичный столбцам.
Вставить строку с помощью VBA Excel
Мы можем выполнять почти все действия, которые мы делаем в Excel, с помощью кодирования VBA. Мы можем копировать, мы можем вставлять, мы можем удалять, и мы можем делать многие другие вещи через язык VBA. «Вставка строки» — один из таких методов, который мы часто используем в Excel. В этой статье мы покажем вам, как выполнить метод вставки строки в VBA.
Как вставить строку в Excel VBA?
Ниже приведены различные методы использования VBA для вставки строки в Excel.
Метод №1 — Использование метода вставки
В VBA для вставки строки нам нужно использовать аналогичный метод, который мы использовали на листе Excel. В VBA нам нужно использовать объект диапазона для вставки строки.
Например, посмотрите на приведенный ниже код.
Код:
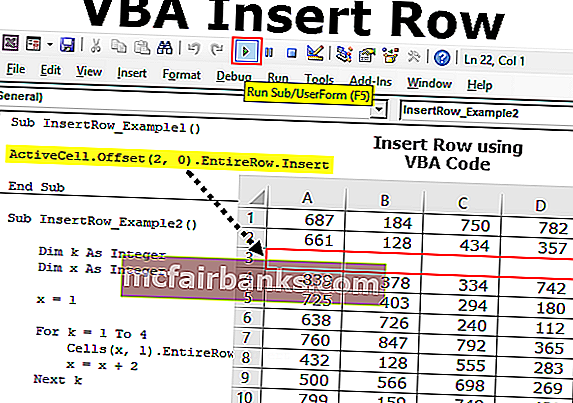
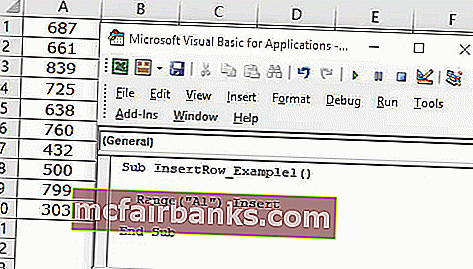
Подложка InsertRow_Example1 () Диапазон ("A1"). Вставить конечную подпрограмму
Этот код переместит ячейку A1 в ячейку B1 и вставит единственную ячейку.
Это вызовет множество проблем с обработкой данных. Это просто переместит указанную ячейку вниз, а все остальные связанные столбцы останутся прежними.
Метод № 2 — Использование свойства всей строки
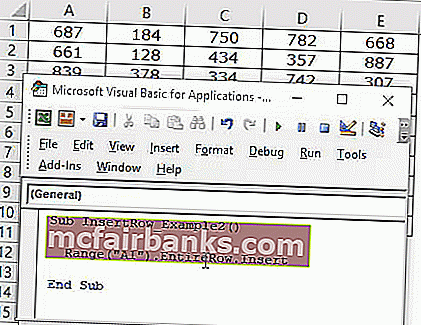
Верхняя строка вставки, мы можем использовать несколько методов. Приведенный ниже метод вставит всю строку над выбранной ячейкой.
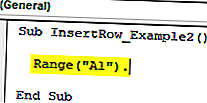
Шаг 1. Сначала укажите адрес ячейки .
Код:
Sub InsertRow_Example2 () Диапазон ("A1"). Конец подписки
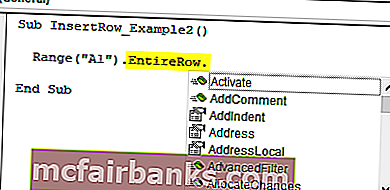
Шаг 2: Вместо использования просто выберите свойство « Вся строка ».
Код:
Sub InsertRow_Example2 () Диапазон ("A1"). Целая строка. Конец подписки
Шаг 3: После доступа к свойству всей строки используйте метод вставки .
Код:
Подложка InsertRow_Example2 () Диапазон ("A1"). Целая строка. Вставить конец Подложки
Это вставит строку над ячейкой A1. Поскольку A1 — первая строка, она переместится вниз по ячейке A1 в B1.
Как вы можете видеть на изображении выше, он должен вставить всю строку, а не одну ячейку.
Метод №3 — Использование номеров строк
В приведенном выше примере мы только что использовали адрес одной ячейки и вставили строку. Однако мы также можем вставить их, используя номера строк.
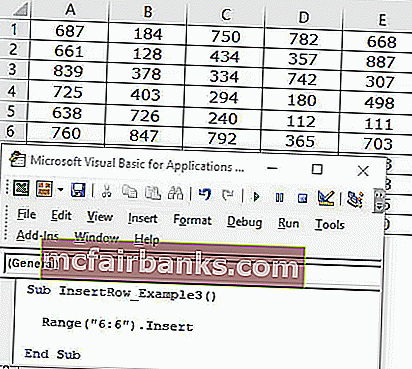
Предположим, вы хотите вставить строку ниже 5-й строки, сначала нам нужно указать номера строк, используя объект RANGE.
Код:
Sub InsertRow_Example3 () Диапазон ("6: 6"). Конец подписки
Поскольку мы упомянули всю строку как 6: 6, нам нужно использовать здесь свойство «Вся строка», мы можем напрямую использовать метод «INSERT».
Код:
Sub InsertRow_Example3 () Диапазон ("6: 6"). Вставить конец Sub
Это также вставит всю строку, а не одну ячейку.
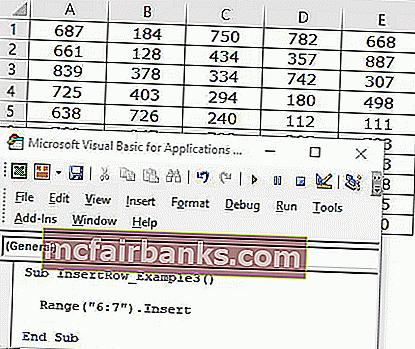
В случае, если вы хотите вставить две строки ниже 5-й строки, нам нужно сначала выбрать 2 строки, а затем использовать метод INSERT.
Sub InsertRow_Example3 () Диапазон ("6: 7"). Вставить конец Sub
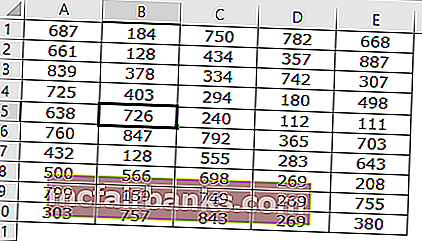
Это вставит две строки ниже 5-й строки.
Таким образом мы можем вставить на лист как можно больше строк.
Метод №4 — Использование свойства активной ячейки
Мы можем использовать свойство Active Cell VBA для вставки строк. Активная ячейка — это не что иное, как выбранная в данный момент ячейка.
Предположим, вы находитесь в ячейке B5 и хотите вставить строку выше, вы можете использовать свойство активной ячейки.
Sub InsertRow_Example4() ActiveCell.EntireRow.Insert End Sub
This will insert the row above the active cell.
Method #5 – Using Active Cell Property with Offset Function
Assume you want to insert a row after 2 rows of the active cell, we need to use Offset function to offset the number of rows.
Assume you are in the B5 cell.
If you want to insert the row after the 2nd row from the active cell then we can use the below code.
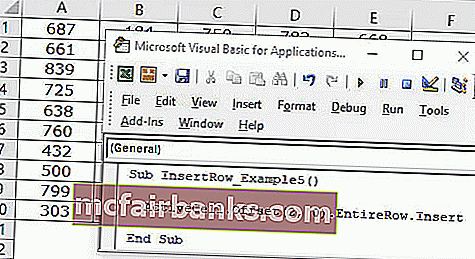
Code:
Sub InsertRow_Example5() ActiveCell.Offset(2, 0).EntireRow.Insert End Sub
This will insert row after the 6th row.
Insert Alternative Rows
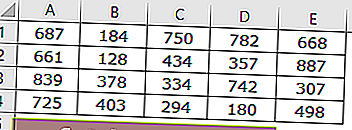
Inserting alternative rows is often I have come across many times. For the look at the below data image.
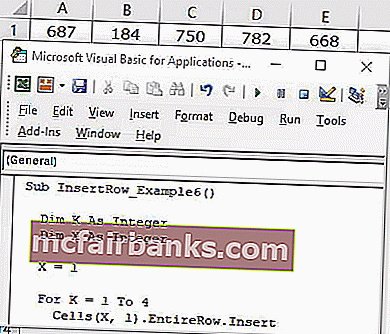
Now we need to insert alternative rows. We need to use loops to insert every alternate row.
Code:
Sub InsertRow_Example6() Dim K As Integer Dim X As Integer X = 1 For K = 1 To 4 Cells(X, 1).EntireRow.Insert X = X + 2 Next K End Sub
This will insert rows like this.
You can download this VBA Insert Row Excel here. VBA Insert Row Excel Template
|
manah1 Пользователь Сообщений: 99 |
Здравствуйте!!! Наткнулся на Ваш форум и решил попросить помощи у гуру VBA. Помогите пожалуйста с макросом вставки строк в таблицу с последующим их заполнением данными с другого листа книги. Более подробно в файле. Очень надеюсь на вашу помощь.Спасибо. Прикрепленные файлы
|
|
А что такое «каталожный номер»? в «Реестре» его нет. |
|
|
manah1 Пользователь Сообщений: 99 |
Столбца каталожный номер в таблице на листе «Реестр» нет так и должно быть. |
|
так? Прикрепленные файлы
|
|
|
manah1 Пользователь Сообщений: 99 |
МатросНаЗебре, нет не так должна заполняться таблица на листе «реестр». Другими словами если нажмем на первый «+», то в таблицу на листе «реестр» добавится новая строка (не важно сверху или снизу). |
|
так? Прикрепленные файлы
|
|
|
manah1 Пользователь Сообщений: 99 |
МатросНаЗебре, да точно так. Огромное спасибо!!! |
|
V Пользователь Сообщений: 5018 |
#8 02.10.2014 11:30:49 я таким методом пошел
используйте эту строчку — меняя букву «А» на нужную и адрес «Н10» на нужный.
Изменено: V — 02.10.2014 11:35:38 |
|||||
|
manah1 Пользователь Сообщений: 99 |
V, спасибо тоже очень хорошо, особенно с перекрашиванием нравится. И еще вопрос, почему только после повторного нажатия на кнопку она меняет цвет? Изменено: manah1 — 02.10.2014 11:49:24 |
|
V Пользователь Сообщений: 5018 |
#10 02.10.2014 12:25:17
добавьте в конце кода
первое нажатие — перекрашивание фигуры и копирование данных. Изменено: V — 02.10.2014 12:29:59 |
||||
|
Юрий М Модератор Сообщений: 60586 Контакты см. в профиле |
#11 02.10.2014 12:51:06 Немного укоротим:
|
||
|
manah1 Пользователь Сообщений: 99 |
#12 02.10.2014 12:56:59 V,Юрий М, огромное спасибо все работает как надо!!! |
Содержание
- Вставить одну строку или столбец
- Вставить несколько строк или столбцов
- Вставить — Shift и CopyOrigin
- Другие примеры вставок
В этом руководстве будет показано, как использовать VBA для вставки строк и столбцов в Excel.
Чтобы вставить строки или столбцы, мы будем использовать Вставить метод.
Вставить одну строку или столбец
Вставить новую строку
Чтобы вставить одну строку, вы можете использовать объект Rows:
Или вы можете использовать Range Object вместе с CompleteRow:
| 1 | Диапазон («b4»). Целый ряд. Вставить |
Вставить новый столбец
Подобно вставке строк, мы можем использовать объект Columns для вставки столбца:
Или объект Range вместе с CompleteColumn:
| 1 | Диапазон («b4»). Весь столбец. Вставить |
Вставить несколько строк или столбцов
Вставить несколько строк
При вставке нескольких строк с помощью объекта Rows необходимо вводить строки в кавычках:
| 1 | Ряды («4: 6»). Вставить |
Вставка нескольких строк с помощью объекта Range работает так же, как и с одной строкой:
| 1 | Диапазон («b4: b6»). Целый ряд. Вставить |
Вставить несколько столбцов
При вставке нескольких столбцов с помощью объекта Columns введите столбец письма в цитатах:
| 1 | Столбцы («B: D»). Вставить |
Вставка нескольких столбцов с помощью объекта диапазона работает так же, как и с одним столбцом:
| 1 | Диапазон («b4: d4»). Весь столбец. Вставить |
Вставить — Shift и CopyOrigin
В Вставить метод имеет два необязательных аргумента:
- Сдвиг — В каком направлении сместить клетки
- CopyOrigin — Какое форматирование ячеек копировать (вверху, внизу, слева или справа)
Аргумент Shift не имеет значения при вставке целых строк или столбцов.. Это только позволяет указать, что нужно сдвигать вниз или вправо:
- xlShiftDown — Сдвинуть ячейки вниз
- xlShiftToRight — Сдвинуть ячейки вправо
Как видите, вы не можете сдвинуть вверх или вправо.
В CopyOrigin аргумент имеет два потенциальных входа:
- xlFormatFromLeftorAbove — (0) Новые вставленные ячейки принимают форматирование от ячеек выше или слева
- xlFormatFromRightorBelow (1) Новые вставленные ячейки принимают форматирование от ячеек ниже или справа.
Давайте посмотрим на несколько примеров CopyOrigin аргумент. Вот наши исходные данные:
В этом примере будет вставлена строка с форматированием из указанной выше строки.
| 1 | Строки (5) .Insert, xlFormatFromLeftOrAbove |
В этом примере будет вставлена строка с форматированием из следующей строки.
| 1 | Строки (5) .Insert, xlFormatFromRightOrBelow |
Другие примеры вставок
Вставить скопированные строки или столбцы
Если вы хотите вставить скопированную строку, используйте следующий код:
| 12 | Диапазон («1: 1»). КопироватьДиапазон («5: 5»). Вставить |
Здесь мы копируем строку 1 и вставляем ее в строку 5.
Вставить строки на основе значения ячейки
Это будет проходить через диапазон, вставляя строки на основе значений ячеек:
| 1234567891011 | Sub InsertRowswithSpecificValue ()Тусклая ячейка как диапазонДля каждой ячейки в диапазоне («b2: b20»)Если cell.Value = «insert» Тогдаcell.EntireRow.InsertКонец, еслиСледующая ячейкаКонец подписки |
Удалить строки или столбцы
Чтобы удалить строки или столбцы, просто используйте Удалить метод.
| 1234567 | Ряды (1) .Удалить.Диапазон («a1»). Целая строка.УдалитьСтолбцы (1) .УдалитьДиапазон («a1»). ВесьСтолбец.Удалить |


