
|
Mitya041  Пользователь Сообщений: 20 |
Доброго времени суток, уважаемые форумчане. Помогите разрешить задачу: При появлении «1» в ячейке A1 на номера (если нельзя на несколько, то на один) отправляется смс (это минимальная цель). В следующем этапе было бы хорошо сделать, что бы смс отправлялось с текстом с других ячеек. Какие образом добиться первой цели? Спасибо. |
|
Hugo Пользователь Сообщений: 23252 |
Делал за деньги отпраку СМС, но это было давно, может теперь того сервиса уже и нет, и может вообще страна не та |
|
Mitya041 Пользователь Сообщений: 20 |
есть столбцы в которых обновляются значения, далее через обычную формулу разницы между большим и меньшим получаем значение, далее если это значение больше константы, то «1», если меньше то «0». Вот когда появляется «1» я хочу получить смс. |
|
Hugo Пользователь Сообщений: 23252 |
Что-то не найду того макроса… http://smspilot.ru — почитайте там у них условия. Кстати там и уже готовые программы есть, естественно не бесплатно. Изменено: Hugo — 19.10.2016 23:02:13 |
|
Mitya041 Пользователь Сообщений: 20 |
Что подразумевается под сервисом? Это программа или сайт должен быть? Изменено: Mitya041 — 19.10.2016 23:03:29 |
|
Hugo Пользователь Сообщений: 23252 |
Сервис — это тот, кто отсылает эти СМС. Ссылка выше. |
|
Игорь Пользователь Сообщений: 3631 |
у меня есть БЕСПЛАТНАЯ (капс — для модераторов) программа для рассылки СМС http://excelvba.ru/programmes/SMS4Office Платите только за отправленные СМС (совсем бесплатно отправлять СМС — это никак) чтобы рассылало не по всем строкам, а только по нужным, |
|
Hugo Пользователь Сообщений: 23252 |
Игорь — я кстати сперва поискал у Вас на сайте по «sms» и «смс» — ничего не нашлось |
|
Mitya041 Пользователь Сообщений: 20 |
|
|
Taleos  Пользователь Сообщений: 2 |
Всем добрый вечер! Подскажите, а нет ничего подобного для отправки сообщений в WhatApp из Excel? Что-то в сети появляется информация о связи Excel с мессенджерами через API, но ничего конкретного не нашел. |
|
Taleos Пользователь Сообщений: 2 |
#12 04.09.2019 18:39:37 БМВ, спасибо, возвращаюсь к СМС |
In this post we are going to learn how to send SMS text messages from Excel… because why not?
Yep, Excel can do pretty much everything, and that now includes sending texts.
But here’s the deal.
This is going to cost a little bit of money unless you just want to send texts to yourself, in which case you can use a trial account. But it’s actually probably cheaper than most pay as you go phone plans for texting.
The whole setup is going to use Microsoft’s Flow Excel add-in and Twilio.
We’ll also need to have an Office 365 Business account in order to save Excel workbooks to OneDrive for Business.
Install the Microsoft Flow Excel Add
The first thing we’ll need to do is install the Microsoft Flow Excel add-in.
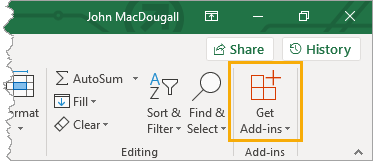
This is done from the Home tab of the ribbon and clicking on the Get Add-ins command. Click on the top part of the button as the lower part will only show recommended add-ins.
- Go to the Microsoft Store.
- Search for Microsoft Flow.
- Press the Add button for the Microsoft Flow for Excel add-in.
Warning, this add-in is in preview as of now, so it can be a little laggy and buggy. It was for me.
After adding the add-in, it will appear in the Data tab.
Get Your Microsoft Flow Account Set Up
The next thing we’re going to need is a Microsoft Flow account.
If we head over to https://flow.microsoft.com, we can sign up for an account. Check out my post on sending emails from Excel with Microsoft Flow for more details on this.
Get Your Twilio Account Set Up
The last piece of the puzzle is getting our Twilio account.
We can go to https://www.twilio.com/ and sign up for an account and fill in the usual details to complete the process.
Once we create an account, we can go to the console to set up our phone number and upgrade our account.
Whether we are just trying out the trial account or upgrading, we will also need a Twilio phone number to send texts from.
- Go to the # section in the console.
- Click on Getting Started and then choose Get Started.
- Then click on the big button that says Get your first Twilio phone number.
Now we have our phone number which can send and receive SMS text messages!
Upgrade Your Twilio Account
Now, this is an optional step… But if we don’t upgrade, then we will only be able to send texts to verified phone numbers.
Verify any phone numbers in the console.
- Go to the # section in the console.
- Go to Verified Caller IDs.
- Click on the Plus Sign icon.
We can fill in the details and Twilio will either call or text a code we can use to verify the phone number.
If we want to use the full capabilities and be able to text any number, then we’re going to have to pay at least $20 to upgrade the account. This $20 dollars is used for pay as you go credit towards messages sent. Currently the rate is $0.0075 to send or receive a message.
Get Your Twilio Account SID and Authorization Token
Now that everything is set up in Twilio, we will need to take note of the account SID and the authorization token (auth token).
- Go to the Home section of the console and click on the Dashboard heading.
- Take note of the ACCOUNT SID.
- Take note of the AUTH TOKEN.
These are the credentials we will need so that Microsoft Flow can connect to and use our Twilio account to send and receive texts.
Open The Flow Add-In From Excel And Sign In
Now we’re ready to head back into Excel! We need to make sure our workbook is saved in OneDrive for Business as we can only create flows for workbooks saved to either SharePoint or OneDrive for Business.
Go back to the Data tab and click on the Flow add-in to open up the Flow window pane. Then we can sign into our flow account.
Create A New Blank Flow
Now scroll down the Flow window and click on Create a flow from blank.
The only trigger event available in the flow add-in will be For a selected row, complete a custom action. Press the Continue button to proceed.
In the workbook we have a table named Texts which contains contact details including names and numbers.
In the trigger step, we need to add the location of our file and the table which has our contact details. This is the table which we will be using to send text messages from.
Now we can add a New Step after the trigger.
We can add our action to perform after the trigger event is detected. Search for Twilio and select the Send Text Message (SMS) action.
We can add our Twilio account credentials. Pick any name as the Connection Name, then add the ACCOUNT SID and AUTH TOKEN.
We will now be able to set up our Twilio SMS text message action.
- Select our Twilio phone number to send text messages from.
- Select the To Phone Number. This is the phone number to send a text to. In our case, we will use the phone number from our contacts table and reference it by the parameter from the selected row step of the flow.
- Create the Text to send as a message. In our case, the message will be dynamic and will reference the name parameter from our contacts table in the selected row step of the flow.
- Give our flow a name.
- Press the Save button.
With this flow in place, we will be able to select rows in our contact table and send those contacts SMS texts. Fun stuff!
Another option, would be to create a message column in our table. Then we can create the message in Excel and reference it with a parameter in the Text field just like we did with the name field.
Using The Flow And Sending Texts
Now that we’ve got everything set up, we can start sending texts.
Select the rows in the table to which you want to send a text. Then head over to the flow window pane and press the play button on your newly created flow.
The first time we run it, Flow will tell us it will connect to Excel Online and Twilio and we can press the Continue button to confirm this is ok and run the flow.
It seems to take a while for created flows to propagate into the Excel desktop Flow add-in. But they are almost instantly available if we use Excel online instead.
Once the flow runs, the recipients will get their messages nearly instantly.
Conclusions
We were able to set up texting from Excel pretty easily using the flow add-in and Twilio.
The flow we created was very basic and only had a trigger and one action. With a little imagination and combining other triggers and actions, the possibilities are endless!
Just remember, no spamming people. But maybe a few prank texts to your friends is ok 🙂
About the Author
John is a Microsoft MVP and qualified actuary with over 15 years of experience. He has worked in a variety of industries, including insurance, ad tech, and most recently Power Platform consulting. He is a keen problem solver and has a passion for using technology to make businesses more efficient.

Надстройка предназначена для автоматизации рассылки SMS сообщений из Excel.
Исходными данными для рассылки является список номеров телефонов в таблице Excel.
Возможно создание «персональных» СМС, — в тексте шаблона сообщения можно использовать ссылки на столбцы исходной таблицы,
где хранятся имена получателей, и прочий добавляемый в сообщение текст.
Для использования надстройки, необходима регистрация на сайте INTIS telecom (и пополнение счёта, для возможности отправки СМС)
После регистрации, вы получаете API-ключ, который вводите в форме настроек программы, — и после этого вам доступен весь функционал программы.
Отправка запросов на сервер реализована в многопоточном режиме (количество потоков задается в настройках, — от 10 до 150)
Это позволяет многократно ускорить отправку SMS (до 10 тыс сообщений в минуту)
Эта надстройка, в отличие от других моих универсальных надстроек, не продаётся (она распространяется бесплатно)
Выложена она на сайте в целях демонстрации возможностей Excel по отправке СМС в многопоточном режиме.
Техподдержка мной не осуществляется. По всем вопросам, связанным и использованием программы, рассылкой сообщений, и т.п., — обращайтесь по email, указанному в форме О ПРОГРАММЕ
Всем привет.
Заинтересовал заголовок темы. Думаю, что задача, пусть и неординарна, но решаема. Предлагаю следующий код для Outlook (не Excel).
Отправка сообщения потребует особой настройки записи Outlook, которой у меня пока нет. Поэтому протестировать саму отправку не могу. У меня код только выводит заготовку для отправки. Если задача решаема для Outlook — то для Excel переделать уже будет не проблема.
Подробно о настройках Outlook можно узнать ЗДЕСЬ.
[vba]
Код
Sub Rio_SMS_Test_for_Outlook()
‘ Создаём переменную для обращения к приложению
Dim olk_App As Outlook.Application
‘ Создаём переменную для обращения к сообщению SMS
Dim mi_SMS As Outlook.MobileItem
‘ Задаём обращение к текущей сессии Outlook
Set olk_App = ThisOutlookSession
‘ Создаём объект Outlook SMS
Set mi_SMS = olk_App.CreateItem(olMobileItemSMS)
‘ Прописываем тему сообщения, необязательно
mi_SMS.Subject = «Test SMS»
‘ Прописываем текст сообщения
mi_SMS.Body = «Rioran SMS test example.»
‘ Задаём номер получателя
mi_SMS.To = «8903XXXXXXX»
‘ Отобразить форму сообщения в Outlook
mi_SMS.Display
‘ Следующая строка должна отправлять сообщение
‘ mi_SMS.Send (True)
‘ Освобождаем заданные объекты
Set mi_SMS = Nothing
Set olk_App = Nothing
End Sub
[/vba]

MS ExcelПрограмма SMS-OFFICE устанавливается на Ваш компьютер, работающий под операционной системой Windows, с предустановленным Microsoft Office 2007 и выше.
После установки, у Вас в программе Microsoft Excel появится возможность отправлять смс сообщения.
Программа постоянно совершенствуется. Следите за выходом новых версий.
Свои замечания и пожелания связанные с работой программы Вы можете отправлять непосредственно из Excel или на электронный адрес support@websms.ru
Программа SMS-OFFICE v2.3.1 от 23 ноября 2015
- для Microsoft Office 2007 и выше скачать
- для Microsoft Office 2003 скачать
Инструкция по установке:
- Скачайте и запустите программу
- Следуйте инструкциям установщика программы
После завершения установки вы можете начать работу зарегистрировав новый или использовать уже существующий аккаунт, прямо в Microsoft Excel!
скриншот установленной программы SMS-OFFICE
Для создания рассылки выделите на листе область с телефонными номерами и кликните правой кнопки мыши. В выпадающем меню выберите «Рассылка СМС».
Так же доступны опции «Состояние рассылки», «Отчет», «Настройки», «Регистрация», «Оплата», «Отправить ошибку», «О компании»
!
Для полноценной работы с сервисами необходимо зарегистрироваться и заключить договор.
Без договора доступно бесплатное тестирование.