
Обычными средствами не получается добавить изображение в конец файла.
Код
old_image = open('Pupils.png', 'r').read()
new_image = open('new_pro.docx', 'a')
new_image.write(old_image)
new_image.close()
Какие есть способы решить эту задачу?
задан 17 апр 2017 в 11:50
![]()
Руслан ВергуновРуслан Вергунов
2911 золотой знак3 серебряных знака11 бронзовых знаков
1
Python хорош тем что на каждый случай есть библиотека. В данном случае это либа docx. Сначала установим её (на Linux нужны права root)
pip install python-docx
А затем просто добавим изображение.
from docx import Document

document = Document("./foo.docx")

document.add_picture('./image-filename.png')
document.save("./foo.docx")
ответ дан 17 апр 2017 в 12:25
![]()
nick_gabpenick_gabpe
3,8334 золотых знака20 серебряных знаков37 бронзовых знаков
1
К библиотеке python-docx предлагаю добавить docxtpl. Работает очень просто. Нужно сделать шаблон и в нем разметить место куда чего вставлять. На гите можно посмотреть примеры разметки. Примеры
ответ дан 17 апр 2017 в 21:40
![]()
*.docx — это Zip-архив со служебными файлами, описывающими документ. Служебные файлы в формате XML, поэтому вы не можете добавить в документ изображение приведенным способом (просто дописав байты в архив). Для решения вам необходимо использовать специальные библиотеки, которые берут парсинг XML на себя и гарантируют корректность получившегося документа согласно стандарту. Пример такой библиотеки: python-docx (pip install python-docx). Пример из официальной документации:
from docx import Document

doc = Document("<PATH_TO_DOCX>")
doc.add_picture('image-filename.png')
Вместо полного пути к изображению вы можете использовать file-like объект (например, BytesIO):
with open("yo.png", "rb") as img:
    doc.add_picture(img)
При необходимости вы можете изменять размер изображения. В этом деле главное помнить, что в документе все размеры — это сантиметры, дюймы и производные, а не пиксели.
ответ дан 17 апр 2017 в 12:32
![]()
m9_psym9_psy
6,2944 золотых знака32 серебряных знака56 бронзовых знаков
Время на прочтение
4 мин
Количество просмотров 11K
Рассмотрим пример простой программы на Python с помощью библотекы docx для автоматизации рабочего процесса, а именно автоматической вставки файлов (в данном случае изображений) и их подпись в документах Word (docx).
Данная статья будет интересна для начинающих изучающих Python, а также полезна для тех кто работает с большими объемами изображений, графиков, осциллограмм и тому подобное. В ней мы рассмотрим простой и удобный способ вставки изображений в Word и их подписью с помощью Python.
Я опишу свой максимально дубовый и непрофессиональный но простой код который Вы сможете повторить в своих проектах. (Полный код в низу статьи).
Цель
В жизни каждого инженера или аналитика или другого специалиста, наступает момент, когда нужно оформлять отчет. Часто это осциллограммы, графики, ВАХ или другие графические изображения. Отчет нужно оформить в вордовском файле, с приведением изображений и их подписью. Делать вручную это очень увлекательно и интересно долго, неэффективно, скучно и другие синонимы к етим словам.
Рассмотрим простой способ вставки изображений и их подписью в файл docx с помощью Python.
Начало написания программы
Сначала нам нужно добавить библиотеку docx для работы с файлами Word.
import docxДавайте создадим блок в коде в котором укажем название docx файла и путь к нему, а также путь к папке с изображениями. Чтобы в дальнейшем для удобства было достаточно внести изменения путь к файлам только в верху кода.
folder_doc = r'D:PITONProject'       # Папка в которой docx файл
name_doc = 'Report.docx'              # Название doc файла
folder_png = 'D:PITONProjectPng'    # Папка в которой находятся графики
Далее добавим объект doc из библиотеки и укажем путь к файлу с названием документа.
doc = docx.Document(folder_doc + name_doc)
# Указываем параметры которые задавали в коде раньше (путь и имя)
Формируем последовательность вставки файлов
Исходя из названия файлов (изображений) нам нужно определить в какой последовательности мы будем вставлять изображения в Word.
В моем случае ето: Test_number1_Outside_humidity_10_Outside_temperature_25. Отличие в названии файлов есть в числах возле названия параметра (их мы и будем менять в коде для автоматического заполнения файла).
Создаем массивы с значениями этих чисел:
test_number = [1, 2, 3, 4, 5]                           # Указываем номер теста
outside_humidity = [10, 20, 30, 40, 50, 60, 70, 80, 90] # Указываем влажность
outside_temperature = [25, 50, 75, 100]                 # Указываем температуру
Основная часть программы
После того как мы разобрались с тем, как мы будем идентифицировать изображение для последующей вставки, нам необходимо определиться в порядке в котором будут идти изображения. У меня все картинки будут идти в таком порядке: test_number, outside_humidity, outside_temperature. Вы же можете сделать произвольный порядок.
Для этой реализации используем цикл for, который будет перебирать все значение из массива по очереди.
for r in range(len(test_number)):
    for d in range(len(outside_humidity)):
        for i in range(len(outside_temperature)):
Далее стандартными средствами библиотеки добавляем картинки в файл и создаем подписи.doc.add_picture — добавляет изображения в файл Wordfolder_png — это путь к папке которую мы указывали вверху кода
После этого мы указываем точное название файлов в папке, но вместо значений которые меняются вставляем в фигурные скобки.
В функции .format указываем те значения переменных которые меняются в каждом файле и которые мы внесли в цикле for. Эти значения будут применяться к каждому файлу, где мы указывали фигурные скобки (в той же последовательности).
Для подписи файла используем такой же алгоритм.doc.add_paragraph — используем для записи параграфуdoc.add_paragraph(" ") — делаем отступ
doc.add_picture(folder_png + '/Test_number{}_Outside_humidity_{}_Outside_temperature_{}.png'
		.format(test_number[r],outside_humidity[d], outside_temperature[i]))

doc.add_paragraph("Figure {}, Test number {}, Outside humidity = {} %, Outside temperature = {} C;"
		.format(i + 1, test_number[r], outside_humidity[d], outside_temperature[i]))

doc.add_paragraph(" ")
Сохраняем файл
doc.save(folder_doc + name_doc)Меняем параметры изображения
Изображение будем вставлять размером 13.33 х 10 см, для этого воспользуемся дополнительными возможностями библиотеки docx.
Сначала напишем функцию которая будет конвертировать размер с inch в см.
def inch_to_cm(value):
    return value / 2.54
Теперь добавим данные параметры к основному коду:
doc.add_picture(folder_png + '/Test_number{}_Outside_humidity_{}_Outside_temperature_{}.png'
	.format(test_number[r],outside_humidity[d], outside_temperature[i]),
			width=docx.shared.Inches(inch_to_cm(13.330)),
				height=docx.shared.Inches(inch_to_cm(9)))
Результат
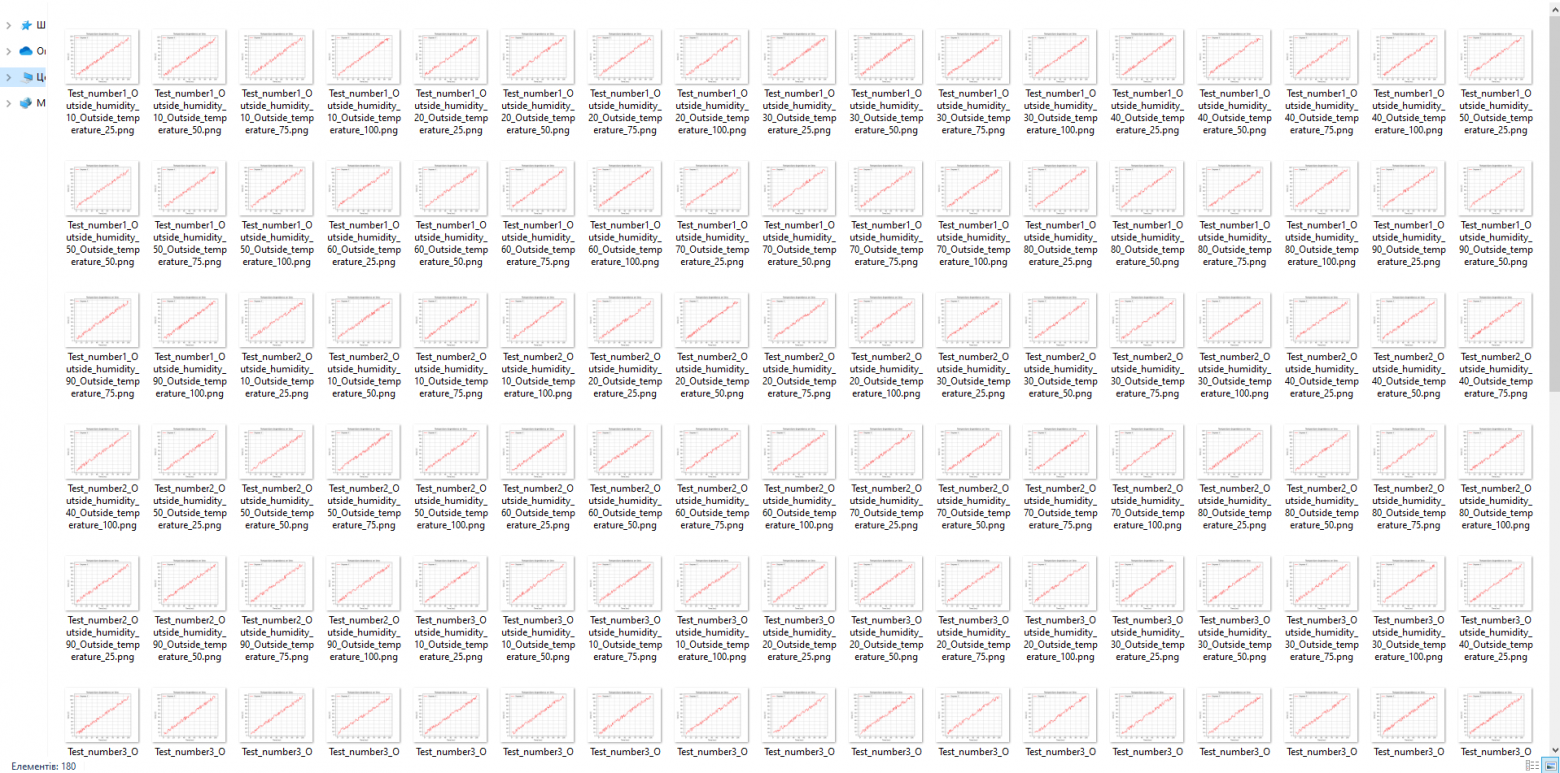
В данной папке находится 180 изображений:
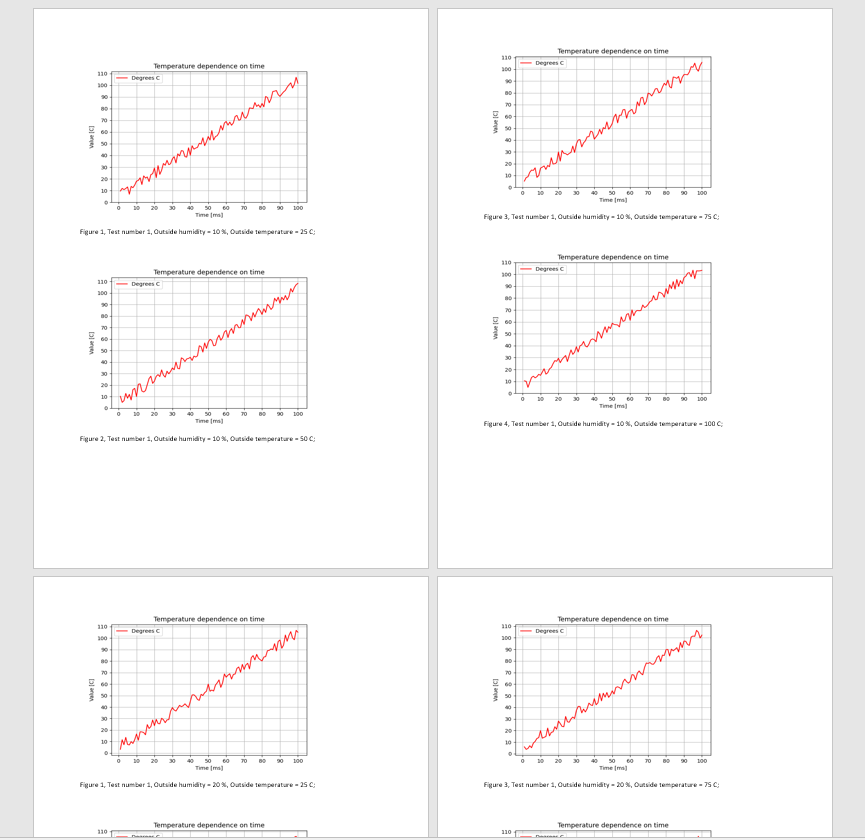
После запуска кода с помощью Python, в течение 5 секунд мы получаем следующий результат:
Вывод
Имея структурированные данные на базе данного кода с помощью Python и библиотеки docx можно в течение 10 минут написать свой код, который в течение нескольких секунд сделает всю грязную работу за Вас.
Разве не для этого придумывали компьютер?
Полный код программы
import docx

folder_doc = r'D:PITONProject'       # Папка в которой docx файл
name_doc = 'Report.docx'              # Название doc файла
folder_png = 'D:PITONProjectPng'    # Папка в которой находятся графики

doc = docx.Document(folder_doc + name_doc) # Указываем параметры которые задавали в коде раньше (путь и имя файла)

test_number = [1, 2, 3, 4, 5]                           # Указываем номер теста
outside_humidity = [10, 20, 30, 40, 50, 60, 70, 80, 90] # Указываем влажность
outside_temperature = [25, 50, 75, 100]                 # Указываем температуру

def inch_to_cm(value):
    return value / 2.54 # Конвертируем в см

for r in range(len(test_number)):
    for d in range(len(outside_humidity)):
        for i in range(len(outside_temperature)):

            # Test_number1_Outside_humidity_10_Outside_temperature_25
            doc.add_picture(folder_png + '/Test_number{}_Outside_humidity_{}_Outside_temperature_{}.png'.format(test_number[r],outside_humidity[d], outside_temperature[i]), width=docx.shared.Inches(inch_to_cm(13.330)), height=docx.shared.Inches(inch_to_cm(9)))
            doc.add_paragraph("Figure {}, Test number {}, Outside humidity = {} %, Outside temperature = {} C;" .format(i + 1, test_number[r], outside_humidity[d], outside_temperature[i]))
            doc.add_paragraph(" ")

doc.save(folder_doc + name_doc)Добавление/извлечение изображений из документа docx.
По сути, документы Word состоят из двух слоев: текстового и слой с картинками. В текстовом слое, текстовые объекты перемещаются слева направо и сверху вниз, начиная новую страницу после заполнения предыдущей. В слое изображений, объекты рисунка, называемые фигурами, размещаются в произвольных местах. Иногда их называют плавающими фигурами.
Изображение — это фигура, которая может вставляться либо в текстовый, либо в графический слой. Если она добавлена в текстовой слой, то она называется встроенной формой или, более конкретно, встроенным изображением.
Содержание:
- Добавление встроенного изображения в DOCX.
- Добавление плавающего изображения в DOCX.
- Извлечение картинок из документа DOCX.
Добавление встроенного изображения в DOCX.
Пока модуль python-docx поддерживает добавление ТОЛЬКО встроенных изображений. Добавить указанное изображение отдельным абзацем в конец документа можно методом Document.add_picture(). Метод возвращает не объект абзаца, а объект вставленной картинки Document.inline_shapes.
По умолчанию, изображение добавляется с исходными размерами, что часто не устраивает пользователя. Собственный размер рассчитывается как px/dpi. Таким образом, изображение размером 300×300 пикселей с разрешением 300 точек на дюйм появляется в квадрате размером один дюйм. Проблема в том, что большинство изображений не содержат свойства dpi, и по умолчанию оно приравнивается к 72 dpi. Следовательно, то же изображение будет иметь одну сторону, размером 4,167 дюйма, что означает половину страницы.
Чтобы получить изображение нужного размера, необходимо указывать его ширину или высоту в удобных единицах измерения, например, в миллиметрах или сантиметрах:
from docx import Document
from docx.shared import Mm

# создаем документ
doc = Document()
# Добавляем картинку как отдельный абзац
img = doc.add_picture('/path/to/image.jpg', width=Mm(25))
# возвращает объект `Document.inline_shapes`
print(img.type, img.width.mm, img.height.mm)
doc.save('test.docx')
Картинку можно еще добавить как отдельный прогон Run.add_picture() Встроенные таким образом изображения, обрабатываются как большой текстовый символ (глиф символа). Высота строки увеличивается на высоту изображения, при этом изображение уменьшится по ширине, что бы уместиться точно так же, как текст. Вставка текста перед ним приведет к его перемещению вправо. Часто изображение помещается в абзац отдельно, но это не обязательно. До и после него в абзаце, в котором он размещен, может быть текст.
Пример:
from docx import Document
from docx.shared import Mm
from docx.enum.text import WD_ALIGN_PARAGRAPH

# создаем документ
doc = Document()
# Добавляем пустой абзац
p = doc.add_paragraph()
# Добавляем пустой прогон
run = p.add_run()
# теперь в прогон вставляем картинку
run.add_picture('/path/to/image.jpg', width=Mm(25))
# выравниваем картинку посередине страницы
p.alignment =  WD_ALIGN_PARAGRAPH.CENTER

# на второй странице расположим
# текст до и после картинки
doc.add_page_break()
p = doc.add_paragraph()
run = p.add_run('Текст до картинки')
run.add_picture('/path/to/image.jpg', width=Mm(25))
run.add_text('текст после картинки')
doc.save('test.docx')
Добавление плавающего изображения в DOCX.
Вставка в документ DOCX плавающего изображения еще не поддерживается модулем python-docx. Но, основываясь на реализации создания встроенной картинки, можно создать обходной путь.
Если посмотреть на структуру XML, созданную DOCX, то можно увидеть различия между встроенной и плавающей картинкой:
- встроенное изображение — это узел
<wp:inline>под<w:drawing>; - плавающее изображение — это узел
<wp:anchor>под<w:drawing>; - помимо всех подузлов встроенного изображения, плавающее изображение содержит также
<wp:positionH>и<wp:positionV>для определения фиксированной позиции.
Идея состоит в том, чтобы вместо узла <wp:inline> добавлять узел <wp:anchor>, а затем дополнительно к уже имеющимся методам inline (встроенной) картинки добавить подузлы <wp:positionH> и <wp:positionV>.
Смотрим:
from docx.oxml import parse_xml, register_element_cls
from docx.oxml.ns import nsdecls
from docx.oxml.shape import CT_Picture
from docx.oxml.xmlchemy import BaseOxmlElement, OneAndOnlyOne

# смотрите: docx.oxml.shape.CT_Inline
class CT_Anchor(BaseOxmlElement):
    """
    Элемент `<w:anchor>`, контейнер для плавающего изображения.
    """
    extent = OneAndOnlyOne('wp:extent')
    docPr = OneAndOnlyOne('wp:docPr')
    graphic = OneAndOnlyOne('a:graphic')

    @classmethod
    def _anchor_xml(cls, pos_x, pos_y):
        """
        Стиль переноса текста: `<wp:anchor behindDoc="0">`;
        Положение изображения: `<wp:positionH relativeFrom="page">`;
        Обтекание текста: `<wp:wrapSquare wrapText="largest"/>`.
        """
        return (
            '<wp:anchor behindDoc="0" distT="0" distB="0" distL="0" distR="0"'
            ' simplePos="0" layoutInCell="1" allowOverlap="1" relativeHeight="2"'
            f' {nsdecls("wp", "a", "pic", "r")}>'
            '  <wp:simplePos x="0" y="0"/>'
            '  <wp:positionH relativeFrom="page">'
            f'    <wp:posOffset>{int(pos_x)}</wp:posOffset>'
            '  </wp:positionH>'
            '  <wp:positionV relativeFrom="page">'
            f'    <wp:posOffset>{int(pos_y)}</wp:posOffset>'
            '  </wp:positionV>'
            '  <wp:extent />'
            '  <wp:wrapSquare wrapText="largest"/>'
            '  <wp:docPr />'
            '  <wp:cNvGraphicFramePr>'
            '    <a:graphicFrameLocks noChangeAspect="1"/>'
            '  </wp:cNvGraphicFramePr>'
            '  <a:graphic>'
            '    <a:graphicData>'
            '    </a:graphicData>'
            '  </a:graphic>'
            '</wp:anchor>'
        )

    @classmethod
    def new(cls, cx, cy, shape_id, pic, pos_x, pos_y):
        """
        Возвращает новый элемент `<wp:anchor>`, заполненный
        переданными значениями в качестве параметров.
        """
        anchor = parse_xml(cls._anchor_xml(pos_x, pos_y))
        anchor.extent.cx = cx
        anchor.extent.cy = cy
        anchor.docPr.id = shape_id
        anchor.docPr.name = f'Picture {shape_id}'
        anchor.graphic.graphicData.uri = (
                'http://schemas.openxmlformats.org/drawingml/2006/picture')
        anchor.graphic.graphicData._insert_pic(pic)
        return anchor

    @classmethod
    def new_pic_anchor(cls, shape_id, rId, filename, cx, cy, pos_x, pos_y):
        """
        Возвращает новый элемент `wp:anchor`, содержащий элемент
        `pic:pic` задается значениями аргументов.
        """
        pic_id = 0  # Word, похоже, не использует это, но и не опускает его
        pic = CT_Picture.new(pic_id, filename, rId, cx, cy)
        anchor = cls.new(cx, cy, shape_id, pic, pos_x, pos_y)
        anchor.graphic.graphicData._insert_pic(pic)
        return anchor


# смотрите: docx.parts.story.BaseStoryPart.new_pic_inline
def new_pic_anchor(part, image_descriptor, width, height, pos_x, pos_y):
    """
    Возвращает вновь созданный элемент `w:anchor`.
    Элемент содержит изображение, указанное в *image_descriptor*,
    и масштабируется на основе значений *width* и *height*.
    """
    rId, image = part.get_or_add_image(image_descriptor)
    cx, cy = image.scaled_dimensions(width, height)
    shape_id, filename = part.next_id, image.filename
    return CT_Anchor.new_pic_anchor(shape_id, rId, filename, cx, cy, pos_x, pos_y)

# смотрите: docx.text.run.add_picture
def add_float_picture(p, image_path_or_stream, width=None, height=None, pos_x=0, pos_y=0):
    """
    Добавляет плавающее изображение в фиксированном
    положении "pos_x" и "pos_y", отсчет - левый верхний угол.
    """
    run = p.add_run()
    anchor = new_pic_anchor(run.part, image_path_or_stream, width, height, pos_x, pos_y)
    run._r.add_drawing(anchor)

# смотрите: docx.oxml.shape.__init__.py
register_element_cls('wp:anchor', CT_Anchor)


if __name__ == '__main__':

    from docx import Document
    from docx.shared import Mm

    doc = Document()
    # добавим плавающее изображение
    p = doc.add_paragraph()
    add_float_picture(p, '/path/to/image.jpg', width=Mm(25), pos_x=Mm(30), pos_y=Mm(30))
    # добавим текст
    p.add_run('текст документа. ' * 50)
    doc.save('test.docx')
Извлечение картинок из документа DOCX.
Так как файл документа MS Word с расширением .docx представляет собой простой zip-архив, то извлечение картинок сводится к распоковки zip-архива, поиска картинок и извлечение их в определенную папку.
Во время извлечения картинок, их можно дополнительно фильтровать по имени ZipInfo.filename, расширению, размеру ZipInfo.file_size и т.д.
import zipfile, pathlib

# укажите файл
docx = 'test.docx'
# директория для извлечения
ex_dir = pathlib.Path(f'pic_{docx}')
if not ex_dir.is_dir():
    ex_dir.mkdir()

with zipfile.ZipFile(docx) as zf:
    for name in zf.infolist():
        if name.filename.startswith('word/media/'):
            # здесь можно задать другие параметры фильтрации,
            # например отобрать картинки с определенном именем,
            # расширением, размером `name.file_size` и т.д.
            zf.extract(name, ex_dir)
Improve Article
Save Article
Like Article
Improve Article
Save Article
Like Article
Prerequisites: docx
Word documents contain formatted text wrapped within three object levels. Lowest level- run objects, middle level- paragraph objects and highest level- document object. So, we cannot work with these documents using normal text editors. But, we can manipulate these word documents in python using the python-docx module.
Python docx module allows user to manipulate docs by either manipulating the existing one or creating a new empty document and manipulating it. It is a powerful tool as it helps you to manipulate the document to a very large extend. To add an image in a word document we use add_picture() method. This method is used to add an image in your Word document whenever called.
Syntax: doc.add_picture(image_path, width=None, height=None)
Parameters:
- image_path: It is a string containing the path of the image to be added.
- width: It sets the width of the image to be added in the document.
- height: It sets the height of the image to be added in the document.
In the function given above, height and width are not specified then the image appears in its native size.
Installation
Pip command to install this module is:
pip install python-docx
Approach
- Import module
- Create docx object
- Declare add_picture() method wherever image is required to be inserted, along with the path to that image and dimensions(optional).
- Save document.
Example 1: Adding an image in native size in a word document.
Python3
import docx
doc = docx.Document()
doc.add_heading('GeeksForGeeks', 0)
doc.add_heading('Image in Native Size:', 3)
doc.add_picture('logo.png')
doc.save('gfg.docx')
Output:

gfg.docx
Example 2: Adding an image in a defined size in a word document.
Python3
import docx
from docx.shared import Inches
doc = docx.Document()
doc.add_heading('GeeksForGeeks', 0)
doc.add_heading('Image with Defined Size:', 3)
doc.add_picture('logo.png', width=Inches(2), height=Inches(2))
doc.save('gfg.docx')
Output:

gfg.docx
Like Article
Save Article
Getting started with |docx| is easy. Let’s walk through the basics.
Opening a document
First thing you’ll need is a document to work on. The easiest way is this:
from docx import Document

document = Document()
This opens up a blank document based on the default «template», pretty much
what you get when you start a new document in Word using the built-in
defaults. You can open and work on an existing Word document using |docx|,
but we’ll keep things simple for the moment.
Adding a paragraph
Paragraphs are fundamental in Word. They’re used for body text, but also for
headings and list items like bullets.
Here’s the simplest way to add one:
paragraph = document.add_paragraph('Lorem ipsum dolor sit amet.')
This method returns a reference to a paragraph, newly added paragraph at the
end of the document. The new paragraph reference is assigned to paragraph
in this case, but I’ll be leaving that out in the following examples unless
I have a need for it. In your code, often times you won’t be doing anything
with the item after you’ve added it, so there’s not a lot of sense in keep
a reference to it hanging around.
It’s also possible to use one paragraph as a «cursor» and insert a new
paragraph directly above it:
prior_paragraph = paragraph.insert_paragraph_before('Lorem ipsum')
This allows a paragraph to be inserted in the middle of a document, something
that’s often important when modifying an existing document rather than
generating one from scratch.
Adding a heading
In anything but the shortest document, body text is divided into sections, each
of which starts with a heading. Here’s how to add one:
document.add_heading('The REAL meaning of the universe')
By default, this adds a top-level heading, what appears in Word as ‘Heading 1’.
When you want a heading for a sub-section, just specify the level you want as
an integer between 1 and 9:
document.add_heading('The role of dolphins', level=2)
If you specify a level of 0, a «Title» paragraph is added. This can be handy to
start a relatively short document that doesn’t have a separate title page.
Adding a page break
Every once in a while you want the text that comes next to go on a separate
page, even if the one you’re on isn’t full. A «hard» page break gets this
done:
document.add_page_break()
If you find yourself using this very often, it’s probably a sign you could
benefit by better understanding paragraph styles. One paragraph style property
you can set is to break a page immediately before each paragraph having that
style. So you might set your headings of a certain level to always start a new
page. More on styles later. They turn out to be critically important for really
getting the most out of Word.
Adding a table
One frequently encounters content that lends itself to tabular presentation,
lined up in neat rows and columns. Word does a pretty good job at this. Here’s
how to add a table:
table = document.add_table(rows=2, cols=2)
Tables have several properties and methods you’ll need in order to populate
them. Accessing individual cells is probably a good place to start. As
a baseline, you can always access a cell by its row and column indicies:
cell = table.cell(0, 1)
This gives you the right-hand cell in the top row of the table we just created.
Note that row and column indicies are zero-based, just like in list access.
Once you have a cell, you can put something in it:
cell.text = 'parrot, possibly dead'
Frequently it’s easier to access a row of cells at a time, for example when
populating a table of variable length from a data source. The .rows
property of a table provides access to individual rows, each of which has a
.cells property. The .cells property on both Row and Column
supports indexed access, like a list:
row = table.rows[1]
row.cells[0].text = 'Foo bar to you.'
row.cells[1].text = 'And a hearty foo bar to you too sir!'
The .rows and .columns collections on a table are iterable, so you
can use them directly in a for loop. Same with the .cells sequences
on a row or column:
for row in table.rows:
    for cell in row.cells:
        print(cell.text)
If you want a count of the rows or columns in the table, just use len() on
the sequence:
row_count = len(table.rows)
col_count = len(table.columns)
You can also add rows to a table incrementally like so:
row = table.add_row()
This can be very handy for the variable length table scenario we mentioned
above:
# get table data -------------
items = (
    (7, '1024', 'Plush kittens'),
    (3, '2042', 'Furbees'),
    (1, '1288', 'French Poodle Collars, Deluxe'),
)

# add table ------------------
table = document.add_table(1, 3)

# populate header row --------
heading_cells = table.rows[0].cells
heading_cells[0].text = 'Qty'
heading_cells[1].text = 'SKU'
heading_cells[2].text = 'Description'

# add a data row for each item
for item in items:
    cells = table.add_row().cells
    cells[0].text = str(item.qty)
    cells[1].text = item.sku
    cells[2].text = item.desc
The same works for columns, although I’ve yet to see a use case for it.
Word has a set of pre-formatted table styles you can pick from its table style
gallery. You can apply one of those to the table like this:
table.style = 'LightShading-Accent1'
The style name is formed by removing all the spaces from the table style name.
You can find the table style name by hovering your mouse over its thumbnail in
Word’s table style gallery.
Adding a picture
Word lets you place an image in a document using the Insert > Photo > Picture menu item. Here’s how to do it in |docx|:
from file...
document.add_picture('image-filename.png')
This example uses a path, which loads the image file from the local filesystem.
You can also use a file-like object, essentially any object that acts like an
open file. This might be handy if you’re retrieving your image from a database
or over a network and don’t want to get the filesystem involved.
Image size
By default, the added image appears at native size. This is often bigger than
you want. Native size is calculated as pixels / dpi. So a 300×300 pixel
image having 300 dpi resolution appears in a one inch square. The problem is
most images don’t contain a dpi property and it defaults to 72 dpi. This would
make the same image appear 4.167 inches on a side, somewhere around half the
page.
To get the image the size you want, you can specify either its width or height
in convenient units, like inches or centimeters:
from docx.shared import Inches

document.add_picture('image-filename.png', width=Inches(1.0))
You’re free to specify both width and height, but usually you wouldn’t want to.
If you specify only one, |docx| uses it to calculate the properly scaled value
of the other. This way the aspect ratio is preserved and your picture doesn’t
look stretched.
The Inches and Cm classes are provided to let you specify measurements
in handy units. Internally, |docx| uses English Metric Units, 914400 to the
inch. So if you forget and just put something like width=2 you’ll get an
extremely small image :). You’ll need to import them from the docx.shared
sub-package. You can use them in arithmetic just like they were an integer,
which in fact they are. So an expression like width = Inches(3) works just fine.
/ thing_count
Applying a paragraph style
If you don’t know what a Word paragraph style is you should definitely check it
out. Basically it allows you to apply a whole set of formatting options to
a paragraph at once. It’s a lot like CSS styles if you know what those are.
You can apply a paragraph style right when you create a paragraph:
document.add_paragraph('Lorem ipsum dolor sit amet.', style='ListBullet')
This particular style causes the paragraph to appear as a bullet, a very handy
thing. You can also apply a style afterward. These two lines are equivalent to
the one above:
paragraph = document.add_paragraph('Lorem ipsum dolor sit amet.')
paragraph.style = 'List Bullet'
The style is specified using its style name, ‘List Bullet’ in this example.
Generally, the style name is exactly as it appears in the Word user interface
(UI).
Applying bold and italic
In order to understand how bold and italic work, you need to understand
a little about what goes on inside a paragraph. The short version is this:
- A paragraph holds all the block-level formatting, like indentation, line
height, tabs, and so forth. - Character-level formatting, such as bold and italic, are applied at the
run level. All content within a paragraph must be within a run, but there
can be more than one. So a paragraph with a bold word in the middle would
need three runs, a normal one, a bold one containing the word, and another
normal one for the text after.
When you add a paragraph by providing text to the .add_paragraph() method,
it gets put into a single run. You can add more using the .add_run() method
on the paragraph:
paragraph = document.add_paragraph('Lorem ipsum ')
paragraph.add_run('dolor sit amet.')
This produces a paragraph that looks just like one created from a single
string. It’s not apparent where paragraph text is broken into runs unless you
look at the XML. Note the trailing space at the end of the first string. You
need to be explicit about where spaces appear at the beginning and end of
a run. They’re not automatically inserted between runs. Expect to be caught by
that one a few times :).
|Run| objects have both a .bold and .italic property that allows you to
set their value for a run:
paragraph = document.add_paragraph('Lorem ipsum ')
run = paragraph.add_run('dolor')
run.bold = True
paragraph.add_run(' sit amet.')
which produces text that looks like this: ‘Lorem ipsum dolor sit amet.’
Note that you can set bold or italic right on the result of .add_run() if
you don’t need it for anything else:
paragraph.add_run('dolor').bold = True

# is equivalent to:

run = paragraph.add_run('dolor')
run.bold = True

# except you don't have a reference to `run` afterward
It’s not necessary to provide text to the .add_paragraph() method. This can
make your code simpler if you’re building the paragraph up from runs anyway:
paragraph = document.add_paragraph()
paragraph.add_run('Lorem ipsum ')
paragraph.add_run('dolor').bold = True
paragraph.add_run(' sit amet.')
Applying a character style
In addition to paragraph styles, which specify a group of paragraph-level
settings, Word has character styles which specify a group of run-level
settings. In general you can think of a character style as specifying a font,
including its typeface, size, color, bold, italic, etc.
Like paragraph styles, a character style must already be defined in the
document you open with the Document() call (see
:ref:`understanding_styles`).
A character style can be specified when adding a new run:
paragraph = document.add_paragraph('Normal text, ')
paragraph.add_run('text with emphasis.', 'Emphasis')
You can also apply a style to a run after it is created. This code produces
the same result as the lines above:
paragraph = document.add_paragraph('Normal text, ')
run = paragraph.add_run('text with emphasis.')
run.style = 'Emphasis'
As with a paragraph style, the style name is as it appears in the Word UI.
С помощью модуля python-docx можно создавать и изменять документы MS Word с расширением .docx. Чтобы установить этот модуль, выполняем команду
> pip install python-docx
При установке модуля надо вводить python-docx, а не docx (это другой модуль). В то же время при импортировании модуля python-docx следует использовать import docx, а не import python-docx.
Чтение документов MS Word
Файлы с расширением .docx обладают развитой внутренней структурой. В модуле python-docx эта структура представлена тремя различными типами данных. На самом верхнем уровне объект Document представляет собой весь документ. Объект Document содержит список объектов Paragraph, которые представляют собой абзацы документа. Каждый из абзацев содержит список, состоящий из одного или нескольких объектов Run, представляющих собой фрагменты текста с различными стилями форматирования.

import docx

doc = docx.Document('example.docx')

# количество абзацев в документе
print(len(doc.paragraphs))

# текст первого абзаца в документе
print(doc.paragraphs[0].text)

# текст второго абзаца в документе
print(doc.paragraphs[1].text)

# текст первого Run второго абзаца
print(doc.paragraphs[1].runs[0].text)
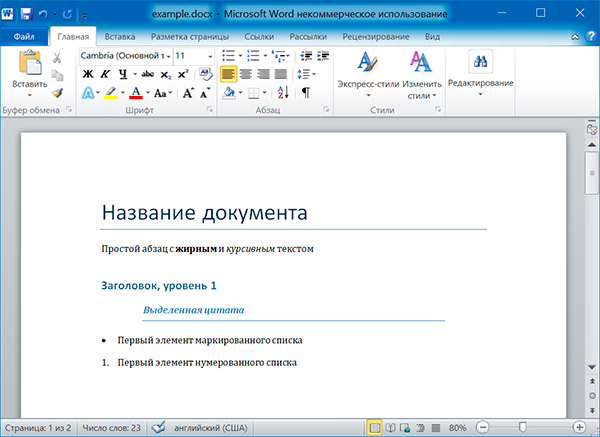
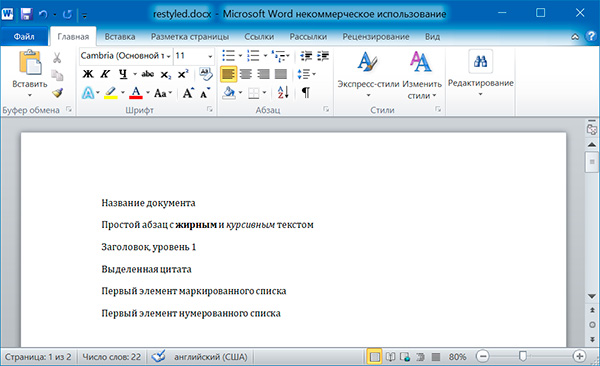
6
Название документа
Простой абзац с жирным и курсивным текстом
Простой абзац с
Получаем весь текст из документа:
text = []
for paragraph in doc.paragraphs:
    text.append(paragraph.text)
print('n'.join(text))
Название документа
Простой абзац с жирным и курсивным текстом
Заголовок, уровень 1
Выделенная цитата
Первый элемент маркированного списка
Первый элемент нумерованного списка
Стилевое оформление
В документах MS Word применяются два типа стилей: стили абзацев, которые могут применяться к объектам Paragraph, стили символов, которые могут применяться к объектам Run. Как объектам Paragraph, так и объектам Run можно назначать стили, присваивая их атрибутам style значение в виде строки. Этой строкой должно быть имя стиля. Если для стиля задано значение None, то у объекта Paragraph или Run не будет связанного с ним стиля.
Стили абзацев
NormalBody TextBody Text 2Body Text 3CaptionHeading 1Heading 2Heading 3Heading 4Heading 5Heading 6Heading 7Heading 8Heading 9Intense QuoteListList 2List 3List BulletList Bullet 2List Bullet 3List ContinueList Continue 2List Continue 3List NumberList Number 2List Number 3List ParagraphMacro TextNo SpacingQuoteSubtitleTOCHeadingTitle
Стили символов
EmphasisStrongBook TitleDefault Paragraph FontIntense EmphasisSubtle EmphasisIntense ReferenceSubtle Reference
paragraph.style = 'Quote'
run.style = 'Book Title'
Атрибуты объекта Run
Отдельные фрагменты текста, представленные объектами Run, могут подвергаться дополнительному форматированию с помощью атрибутов. Для каждого из этих атрибутов может быть задано одно из трех значений: True (атрибут активизирован), False (атрибут отключен) и None (применяется стиль, установленный для данного объекта Run).
bold— Полужирное начертаниеunderline— Подчеркнутый текстitalic— Курсивное начертаниеstrike— Зачеркнутый текст
Изменим стили для всех параграфов нашего документа:
import docx

doc = docx.Document('example.docx')

# изменяем стили для всех параграфов
for paragraph in doc.paragraphs:
    paragraph.style = 'Normal'

doc.save('restyled.docx')
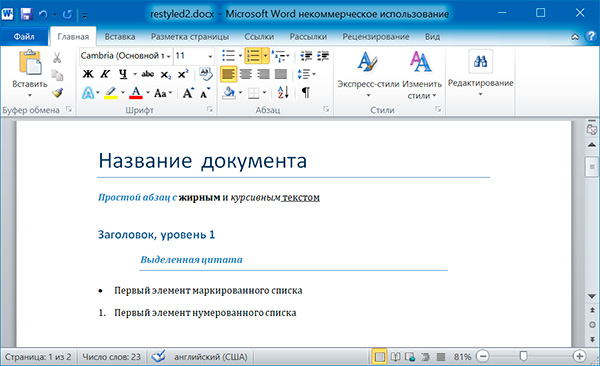
А теперь восстановим все как было:
import docx

os.chdir('C:\example')

doc1 = docx.Document('example.docx')
doc2 = docx.Document('restyled.docx')

# получаем из первого документа стили всех абзацев
styles = []
for paragraph in doc1.paragraphs:
    styles.append(paragraph.style)

# применяем стили ко всем абзацам второго документа
for i in range(len(doc2.paragraphs)):
    doc2.paragraphs[i].style = styles[i]

doc2.save('restored.docx')

Изменим форматирвание объектов Run второго абзаца:
import docx

doc = docx.Document('example.docx')

# добавляем стиль символов для runs[0]
doc.paragraphs[1].runs[0].style = 'Intense Emphasis'
# добавляем подчеркивание для runs[4]
doc.paragraphs[1].runs[4].underline = True

doc.save('restyled2.docx')
Запись докуменов MS Word
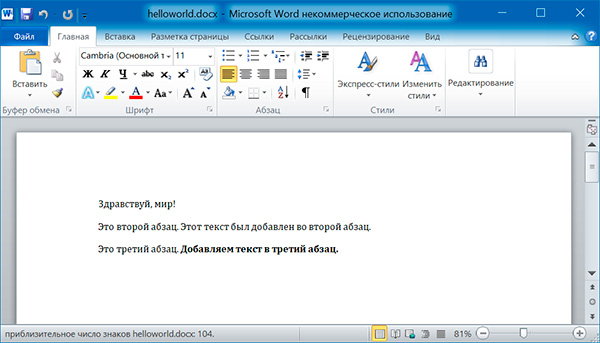
Добавление абзацев осуществляется вызовом метода add_paragraph() объекта Document. Для добавления текста в конец существующего абзаца, надо вызвать метод add_run() объекта Paragraph:
import docx

doc = docx.Document()

# добавляем первый параграф
doc.add_paragraph('Здравствуй, мир!')

# добавляем еще два параграфа
par1 = doc.add_paragraph('Это второй абзац.')
par2 = doc.add_paragraph('Это третий абзац.')

# добавляем текст во второй параграф
par1.add_run(' Этот текст был добавлен во второй абзац.')

# добавляем текст в третий параграф
par2.add_run(' Добавляем текст в третий абзац.').bold = True

doc.save('helloworld.docx')
Оба метода, add_paragraph() и add_run() принимают необязательный второй аргумент, содержащий строку стиля, например:
doc.add_paragraph('Здравствуй, мир!', 'Title')
Добавление заголовков
Вызов метода add_heading() приводит к добавлению абзаца, отформатированного в соответствии с одним из возможных стилей заголовков:
doc.add_heading('Заголовок 0', 0)
doc.add_heading('Заголовок 1', 1)
doc.add_heading('Заголовок 2', 2)
doc.add_heading('Заголовок 3', 3)
doc.add_heading('Заголовок 4', 4)
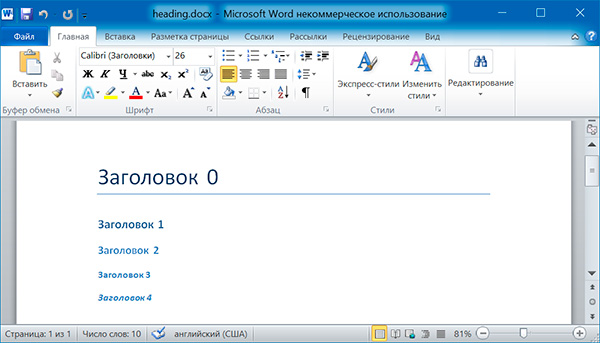
Аргументами метода add_heading() являются строка текста и целое число от 0 до 4. Значению 0 соответствует стиль заголовка Title.
Добавление разрывов строк и страниц
Чтобы добавить разрыв строки (а не добавлять новый абзац), нужно вызвать метод add_break() объекта Run. Если же требуется добавить разрыв страницы, то методу add_break() надо передать значение docx.enum.text.WD_BREAK.PAGE в качестве единственного аргумента:
import docx

doc = docx.Document()

doc.add_paragraph('Это первая страница')
doc.paragraphs[0].runs[0].add_break(docx.enum.text.WD_BREAK.PAGE)
doc.add_paragraph('Это вторая страница')

doc.save('pages.docx')
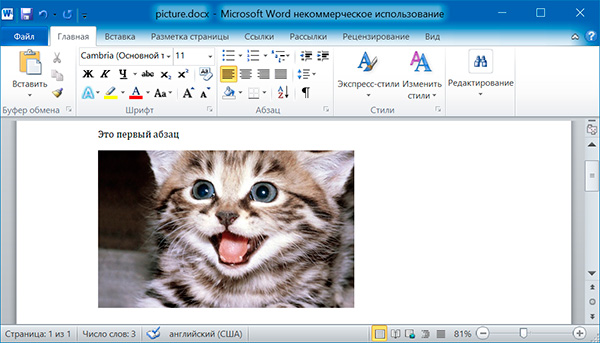
Добавление изображений
Метод add_picture() объекта Document позволяет добавлять изображения в конце документа. Например, добавим в конец документа изображение kitten.jpg шириной 10 сантиметров:
import docx

doc = docx.Document()

doc.add_paragraph('Это первый абзац')
doc.add_picture('kitten.jpg', width = docx.shared.Cm(10))

doc.save('picture.docx')
Именованные аргументы width и height задают ширину и высоту изображения. Если их опустить, то значения этих аргументов будут определяться размерами самого изображения.
Добавление таблицы
import docx

doc = docx.Document()

# добавляем таблицу 3x3
table = doc.add_table(rows = 3, cols = 3)
# применяем стиль для таблицы
table.style = 'Table Grid'

# заполняем таблицу данными
for row in range(3):
    for col in range(3):
        # получаем ячейку таблицы
        cell = table.cell(row, col)
        # записываем в ячейку данные
        cell.text = str(row + 1) + str(col + 1)

doc.save('table.docx')
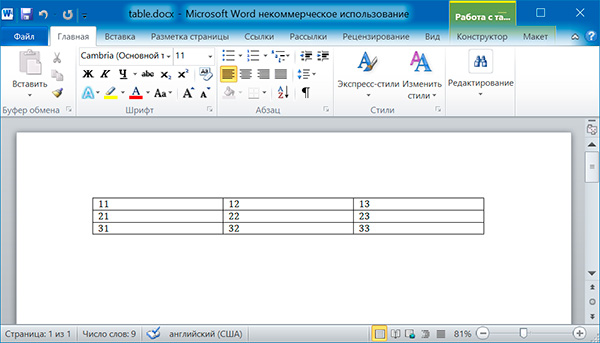
import docx

doc = docx.Document('table.docx')

# получаем первую таблицу в документе
table = doc.tables[0]

# читаем данные из таблицы
for row in table.rows:
    string = ''
    for cell in row.cells:
        string = string + cell.text + ' '
    print(string)
11 12 13
21 22 23
31 32 33
Дополнительно
- Документация python-docx
Поиск:
MS • Python • Web-разработка • Word • Модуль
Каталог оборудования
Lorem ipsum dolor sit amet, consectetur adipiscing elit, sed do eiusmod tempor incididunt ut labore et dolore magna aliqua.
Производители
Lorem ipsum dolor sit amet, consectetur adipiscing elit, sed do eiusmod tempor incididunt ut labore et dolore magna aliqua.
Функциональные группы
Lorem ipsum dolor sit amet, consectetur adipiscing elit, sed do eiusmod tempor incididunt ut labore et dolore magna aliqua.