
![]()
You can use the Go To feature in Microsoft Word to navigate long documents easily. Go to a page, section, line, or object in a snap.
When you have a lengthy Word document, navigating it can be a challenge. You might include a table of contents for your reader to jump to the section they want. However, for writers and editors, the table of contents isn’t the best way to move around a document.
There’s another option—using the Go To feature in Microsoft Word; you can pop right to the spot you want. You can quickly go to a page, line, or section, but you can also jump to a table, comment, or object.
Here’s what you’ll need to do to use this feature in Microsoft Word.
Open the Go To Tool in Microsoft Word
You can open the Go To tool using the menu or a keyboard shortcut in Word on Windows and Mac.
On Windows, go to the Home tab, click the drop-down arrow next to Find, and select Go To. Alternatively, press Ctrl + G.

On Mac, click Edit > Find > Go To from the menu bar or press Option + Command + G.

Go to the Next or Previous Item in Word
Once you open the Go To tool, you should be on the Go To tab. If not, select it at the top.
On the left, choose where you’d like to go from the list. You can pick a page, section, line, bookmark, comment, and more.

If you want to move to the next item in your document, you can click Next.
For example, if you choose Page and click Next, you’ll go to the following page. If you continue to click Next, you’ll go to each subsequent page with every click.

And if you want to go back, click Previous. As with Next, each click of the Previous button takes you back to each item, one by one.
Go to an Item Number or Name
If you want to go to a particular spot in your document, then you can use the box on the right to enter a number or choose a name for the item. Here are a couple of examples.
To jump to a particular page, section, line, footnote or endnote, table, graphic, equation, or heading, enter the number in the box. For instance, you may want to jump to line 25 in your document. So you would select Line from the list, enter “25” in the box, and click Go To.

Select a name from the drop-down box for a specific bookmark, comment, field, or object.
For example, if you want to go to a comment you added, choose Comment, select your name in the drop-down box, and click Next.

If you want to go to an Excel chart you inserted, select Object, choose Microsoft Excel Chart in the drop-down box and click Next.

Move Relative to Your Current Spot
Another handy way to use the Go To tool is to jump ahead or behind your current location in the document. Here are a couple of examples.
Maybe you want to jump ten pages forward from the current page. Select Page, enter “+10” in the box, and then click Go To. You will then move ahead by ten pages.

You can also go back from your current spot. Say you want to move back five sections—select section, enter “-5” in the box, and then click Go To to do this.

Remember to use a plus sign (+) to go forward and a minus sign (-) to go backward. These symbols only work for those items that allow for a number to be entered in the box, as described earlier.
Navigating is Easy Using Go To in Microsoft Word
If you have a long Word document containing many sections, tables, or lines, the Go To tool allows you to move around quickly. You can use this tool to find specific sections, make changes, or review your work in a non-linear fashion.
For more, take a look at how to find and replace text in Word or how to find and replace formatting in both Word and Excel.
![]()
 Please Note:
This article is written for users of the following Microsoft Word versions: 2007, 2010, 2013, 2016, 2019, and Word in Microsoft 365. If you are using an earlier version (Word 2003 or earlier), this tip may not work for you. For a version of this tip written specifically for earlier versions of Word, click here: Jumping to a Line Number.
![]()
Written by Allen Wyatt (last updated June 27, 2020)
This tip applies to Word 2007, 2010, 2013, 2016, 2019, and Word in Microsoft 365
Word allows you to move the insertion point to any line number in your document by using the Go To command. This can be very helpful, particularly if you have line numbers turned on in your document. To take advantage of this ability to jump to a specific line number, follow these steps:
- Press F5. Word displays the Go To tab of the Find and Replace dialog box. (See Figure 1.)
- On the left side of the dialog box, make sure that you indicate you want to go to a line.
- Enter the line number to which you want to move.
- Click on Next (Word 2007 and Word 2010) or Go To (Word 2013 and later versions) or press Enter.
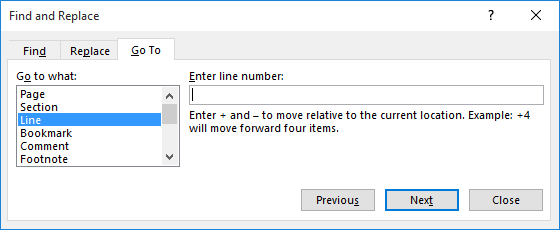
Figure 1. The Go To tab of the Find and Replace dialog box.
WordTips is your source for cost-effective Microsoft Word training.
(Microsoft Word is the most popular word processing software in the world.)
This tip (8957) applies to Microsoft Word 2007, 2010, 2013, 2016, 2019, and Word in Microsoft 365. You can find a version of this tip for the older menu interface of Word here: Jumping to a Line Number.
Author Bio
With more than 50 non-fiction books and numerous magazine articles to his credit, Allen Wyatt is an internationally recognized author. He is president of Sharon Parq Associates, a computer and publishing services company. Learn more about Allen…
MORE FROM ALLEN
Determining How Many Windows are Open
Does your macro need to know how many windows Excel has open? You can determine it by using the Count property of the …
Discover More
Taking a Picture
Excel allows you to capture portions of your worksheet as a picture that you can then use in a variety of other ways. …
Discover More
Showing RGB Colors in a Cell
Excel allows you to specify the RGB (red, green, and blue) value for any color used in a cell. Here’s a quick way to see …
Discover More
The First and Last Word on Word! Bestselling For Dummies author Dan Gookin puts his usual fun and friendly candor back to work to show you how to navigate Word 2013. Spend more time working and less time trying to figure it all out! Check out Word 2013 For Dummies today!
More WordTips (ribbon)
Selecting Tabs in Dialog Boxes
Dialog boxes normally present information in a series of tabs. If you want to move from tab to tab without taking your …
Discover More
Displaying the Full Ribbon
The ribbon, displayed at the top of the Word window, is very handy with all the tools it allows you to access, but it can …
Discover More
Arranging Document Windows
When you have multiple documents open at the same time, you need a way to control how those document windows appear on …
Discover More
Subscribe
FREE SERVICE: Get tips like this every week in WordTips, a free productivity newsletter. Enter your address and click «Subscribe.»
View most recent newsletter.
Videos
Links and Sharing
I see there’s a lot of good answers already, but this should provide the closest to native OSX functionality as possible in more than just your shell. I verified that this works in ZSH, Bash, node, python -i, iex and irb/pry sessions (using rb-readline gem for readline, but should work for all).
Open the iTerm preferences ⌘+, and navigate to the Profiles tab (the Keys tab can be used, but adding keybinding to your profile allows you to save your profile and sync it to multiple computers) and keys sub-tab and enter the following:
Delete all characters left of the cursor
⌘+←Delete Send Hex Codes:
0x15More compatible, but functionality sometimes is to delete the entire line rather than just the characters to the left of the curser. I personally use this and then overwrite my zsh bindkey for^Uto delete only stuff to the left of the cursor (see below).or
0x18 0x7fLess compatible, doesn’t work in node and won’t work in zsh by default, see below to fix zsh (bash/irb/pry should be fine), performs desired functionality when it does work.
Delete all characters right of the cursor
⌘+fn+←Delete or ⌘+Delete→ Send Hex Codes:
0x0b
Delete one word to left of cursor
⌥+←Delete Send Hex Codes:
0x1b 0x08Breaks in Elixir’s IEX, seems to work fine everywhere elseor
0x17Works everywhere, but doesn’t stop at normal word breaks in IRB and will instead delete until it sees a literal space.
Delete one word to right of cursor
⌥+fn←Delete or ⌥+Delete→ Send Hex Codes:
0x1b 0x64
Move cursor to the front of line
⌘+← Send Hex Codes:
0x01
Move cursor to the end of line
⌘+→ Send Hex Codes:
0x05
Move cursor one word left
⌥+← Send Hex Codes:
0x1b 0x62
Move cursor one word right
⌥+→ Send Hex Codes:
0x1b 0x66
Undo
⌘+z Send Hex Codes:
0x1f
Redo typically not bound in bash, zsh or readline, so we can set it to a unused hexcode which we can then fix in zsh
⇧+⌘+Z or ⌘+y Send Hex Codes:
0x18 0x1f
Now how to fix any that don’t work
For zsh, you can setup binding for the not yet functional
⌘+←Delete and ⇧+⌘+Z/⌘+y by running:
# changes hex 0x15 to delete everything to the left of the cursor,
# rather than the whole line
$ echo 'bindkey "^U" backward-kill-line' >> ~/.zshrc

# binds hex 0x18 0x7f with deleting everything to the left of the cursor
$ echo 'bindkey "^X\x7f" backward-kill-line' >> ~/.zshrc

# adds redo
$ echo 'bindkey "^X^_" redo' >> ~/.zshrc

# reload your .zshrc for changes to take effect
$ source ~/.zshrc
I’m unable to find a solution for adding redo in bash or readline, so if anyone know a solution for either of those, please comment below and I’ll try to add them in.
For anyone looking for the lookup table on how to convert key sequences to hex, I find this table very helpful.
Jump to: Word Shortcuts to Navigate Documents, Word Shortcuts to select Words and Paragraphs, Word Shortcuts to Format Text and Align Text, Word Shortcuts to Align Text, Headings, and Paragraph Spacing, Undo, Redo, Cut, Copy and Paste Word Shortcuts, Word Shortcuts for Special Characters, Word Shortcuts for Find and Replace, …Word Shortcuts to Open, Close, Manage, and Print Documents, Word Shortcuts to Manage Views, Split Screen and Multiple Documents, Word Shortcuts for Date, Time, and other Fields, Word Shortcuts for Outline View, Word Shortcuts for Tables
|
Arrow Keys |
Move one character to left/right or one line up/down |
|
Ctrl+Arrow Left/Arrow Right |
Move one word to the left/ to the right |
|
Home/End |
Jump to beginning/ to end of the line |
|
Ctrl+Arrow Down/Arrow Up |
Jump to next/ to previous paragraph |
|
Page Down/Page Up |
Jump up one screen/ down one screen |
|
Ctrl+Alt+Page Up/Page Down |
Jump to beginning/ end of the screen |
|
Ctrl+Home/End |
Jump to beginning/ to end of document |
|
Ctrl+G or F5 |
Go to a page, bookmark, footnote, table, comment, graphic, or other location |
|
Alt+Ctrl+Z |
Go back to previously edited location in document (up to 4 places) |
|
Shift+F5 |
Go to the last change or revision. Also works after opening document. |
|
Ctrl+Shift+F5 |
Set, go to and edit bookmarks |
|
Shift+Arrow Keys |
Select/ extend selection by one character left/ right or one line up/ down |
|
Ctrl+Shift+Arrow Left/Arrow Right |
Select/ extend selection by one word |
|
Shift+Home/End |
Select/ extend selection to beginning/ to end of the line |
|
Ctrl+Shift+Arrow Up/Arrow Down |
Select/ extend selection by one paragraph up/ down |
|
Shift+Page Up/Page Down |
Select/ extend selection up one screen/ down one screen |
|
Shift+Ctrl+Alt+Page Up/Page Down |
Jump to beginning/ end of the screen |
|
Ctrl+A |
Select All |
|
Click left of line |
Select line |
|
Double-click left of line |
Select paragraph |
|
Triple-click left of line |
Select document |
|
Double-click on word |
Select word |
|
Triple-click on word |
Select paragraph |
|
F8 |
Set extended selection mode; use arrow keys |
|
2x F8 |
Select word, then press Escape to exit selection mode. |
|
3x F8 |
Select sentence , then press Escape to exit selection mode |
|
4x F8 |
Select paragraph, then press Escape to exit selection mode |
|
5x F8 |
Select document, then press Escape to exit selection mode |
|
Shift+F8 |
Go backwards in extending selection |
|
Esc |
Exit selection mode |
|
Press and hold Alt+left-drag mouse |
Select vertically |
|
Ctrl+Shift+F8, then arrow keys |
Select vertically |
|
Delete |
Delete character to the right of cursor |
|
Ctrl+Delete |
Delete word to the right of cursor |
|
Backspace |
Delete character to the left of cursor |
|
Ctrl+Backspace |
Delete word to the left of cursor |
|
Alt+Shift+F or Ctrl+D |
Open the Font dialog box (or Font Dialog box if you prefer to memorize D) |
|
Ctrl+Space |
Clear most formatting from selection (bold, underline, italic, color, etc) |
|
Ctrl+Shift+N |
Apply Normal style |
|
Ctrl+Shift+8 |
Toggle display of hidden formatting symbols |
|
Ctrl+B |
Apply/remove Bold |
|
Ctrl+I |
Apply/remove Italic |
|
Ctrl+U |
Apply/remove Underline |
|
Ctrl+Shift+D |
Apply/remove Double-underline |
|
Ctrl+Shift+W |
Apply/remove Words underline (only words, no spaces) |
|
Shift+F3 |
Change text between all upper-, first letter upper- and all lower-case |
|
Ctrl+Shift+A |
Apply/remove Capitalization format |
|
Ctrl+Shift+K |
Apply/remove Small Caps format |
|
Ctrl+= |
Apply/remove subscript |
|
Ctrl+Shift+= |
Apply/remove superscript |
|
Ctrl+[/] |
Decrease / Increase font size one point |
|
Ctrl+Shift+</> |
Decrease / Increase font size one value as defined in font style |
|
Shift+F1 |
Reveal Formatting (show all formats of selection) |
|
Ctrl+Alt+H |
Apply/remove text Highlight to selection |
|
Ctrl+Shift+H |
Hide selected text; e.g. for sharing and letting others focus on specific sections in a document only. Not a security feature. |
|
Ctrl+A, then Ctrl+D, then 2x Alt+H |
Show all hidden text via Select All, Font Dialog, remove Hidden text format |
|
H, FF |
Change Font Face, then start typing for autocomplete, or Alt+Arrow Down to open drop down |
|
H, FS |
Change Font Size, type number and hit Enter |
|
H, FC |
Change Font Color. Press Escape, then Enter to apply current color |
|
Alt+H+4 |
Apply strikethrough formatting |
|
Ctrl+R |
Right-align selected text |
|
Ctrl+L |
Left-align selected text |
|
Ctrl+J |
Justify-align selected text (straight edges on both sides) |
|
Ctrl+E |
Center-align selected text |
|
Ctrl+M |
Indent Text (Move text to the right) |
|
Ctrl+Shift+M |
Outdent Text |
|
Ctrl+T |
Create/ increase hanging indent |
|
Ctrl+Shift+T |
Remove/ decrease hanging indent |
|
Ctrl+0 |
Toggle spacing before paragraph |
|
Ctrl+1 |
Single line spacing |
|
Ctrl+2 |
Double line spacing |
|
Ctrl+5 |
Apply line spacing of 1.5 |
|
Alt+Ctrl+1 |
Apply Heading 1 style |
|
Alt+Ctrl+2 |
Apply Heading 2 style |
|
Alt+Ctrl+3 |
Apply Heading 3 style |
|
Alt+Shift+Arrow Right/Arrow Left |
Promote / demote Headings |
|
Ctrl+Shift+S |
Open Apply Styles task pane (will not close with pressing it a second time) |
|
Ctrl+Z |
Undo previous action (up to 100 by default; limit can be changed) |
|
Ctrl+Y |
Redo undone action |
|
F4 |
Repeat action |
|
Ctrl+C |
Copy selected content to clipboard |
|
Ctrl+X |
Cut selected content to clipboard |
|
Ctrl+V |
Paste clipboard content into document |
|
Alt+H, VT |
Paste text only via Home Ribbon, Paste (V), Text only |
|
Ctrl+Shift+C |
Copy format of selection into Format Clipboard |
|
Ctrl+Shift+V |
Paste format to selection from Format Clipboard |
|
Ctrl+F3 |
Cut text into to Spike (additive clipboard). Add as many non-adjacent areas as desired |
|
Ctrl+Shift+F3 |
Paste text from Spike and reset Spike |
|
Shift+Alt+Arrow Up/Arrow Down |
Move current paragraph or (if selected) multiple paragraphs in text. Cannot move part of paragraph with this |
|
Ctrl+Drag |
Move selected text |
|
F2, move cursor to new location, then enter |
Moves selected text to new location |
|
Shift+F2, move cursor to new location, then enter |
Copies selected text to new location |
|
Alt+Ctrl+C |
Insert Copyright symbol |
|
Alt+Ctrl+T |
Insert Ttrademark symbol |
|
Alt+Ctrl+R |
Insert Registered Trademark symbol |
|
Alt+Ctrl+E |
Insert Euro Currency symbol |
|
Alt+Ctrl+. |
Insert horizontal ellipsis (…) |
|
Alt, then n,u |
Insert Symbol (insert menu) |
|
Ctrl+Shift+Space |
Insert nonbreaking space |
|
Ctrl+Shift+— (Hyphen) |
Insert nonbreaking hyphen |
|
Ctrl+— |
Insert optional hyphen |
|
Type character code and press Alt+X |
Insert Unicode character, e.g. 20ac |
|
Alt+character code on numeric keyboard |
Insert ANSI character |
|
Ctrl+K |
Insert a hyperlink |
|
Ctrl+H |
Open classic find and replace window |
|
Ctrl+H, then Alt+D |
Open classic find window |
|
Alt+F |
Find next |
|
Shift+F4 |
Repeat last find after closing find window |
|
Ctrl+Tab |
Jump between find menu and document |
|
Alt+Space, Arrow keys and Enter |
Move find menu window |
|
Esc |
Close traditional search window if active |
|
Ctrl+F |
Open (new) search menu in navigation task pane |
|
Alt,W,K |
Open and close Navigation pane (View, Navigation) |
|
Ctrl+N |
Create new document |
|
Ctrl+O |
Open document |
|
Ctrl+W |
Close document (Close Window) |
|
Ctrl+S |
Save document |
|
F12 |
Save document as |
|
Alt, then F, R |
Open Recent (File, Recent) |
|
Ctrl+P |
Go to Print document/ print preview |
|
Ctrl+P, then Enter |
Print document |
|
Ctrl+mouse wheel |
Zoom in/ zoom out in preview |
|
Page Up/Page Down |
Up a page/ down a page in preview |
|
Ctrl+Home/Ctrl+End |
Jump to beginning/ end of document in preview |
|
Esc |
Exit print preview and return to document |
|
Alt+Ctrl+S |
Toggle Split of document window |
|
Ctrl+scroll mouse up/down |
Zoom in/ out |
|
Alt then w, q |
Open Zoom Menu (no native shortcut exists for zoom in/ zoom out) |
|
Alt+Ctrl+O |
Switch to Outline view |
|
Alt+Ctrl+P |
Switch to Print Layout view |
|
Alt+Ctrl+N |
Switch to Draft view (used to be normal view) |
|
Ctrl+F6 |
Switch forward to next open Word documents (easier than Alt+Tab as only word documents are iterated) |
|
Ctrl+Shift+F6 |
Switch backwards to previous open Word documents (easier than Alt+Tab as only word documents are iterated) |
|
Alt+Shift+D |
Insert current Date field |
|
Alt+Shift+T |
Insert current Tate field |
|
Alt+Shift+P |
Insert Page number field |
|
Alt+Shift+O |
Insert Table of Content field |
|
Alt+Shift+X |
Insert Index field |
|
Alt+Shift+L |
Insert LISTNUM field |
|
Alt+F9 |
Toggle show/ hide fields |
|
F9 |
Update all fields |
|
F11/Shift+F11 |
Go to next/ go to previous field |
|
Ctrl+F11 |
Lock field |
|
Ctrl+Shift+F11 |
Unlock field |
|
Ctrl+Shift+O |
Switch to Outline View |
|
Tab/Shift+Tab |
Promote / Demote a paragraph (or Alt+Shift+Arrow Left/Arrow Right) |
|
Alt+Shift+Arrow Up/Arrow Down |
Move selected paragraphs up / down |
|
Ctrl+Shift+N |
Demote to body text (set style to normal) |
|
Alt+Shift+plus /— |
Expand / Collapse text under a heading |
|
Alt+Shift+A |
Expand or collapse all text or headings |
|
/ key on the numeric keypad |
Hide or display character formatting |
|
Alt+Shift+L |
Show the first line of body text or all body text |
|
Alt+Shift+1 |
Show all headings with the Heading 1 style |
|
Alt+Shift+N |
Show all headings up to Heading n |
|
Ctrl+Tab |
Insert a tab character |
|
Arrow Down/Arrow Up |
Jump one row down / one row up |
|
Tab/Shift+Tab |
Jump to (and select) next / previous table cell |
|
Alt+Home/Alt+End |
Jump to first column/ jump to last column |
|
Alt+Page Up/Alt+Page Down |
Jump to first row / jump to last row |
|
Ctrl+Arrow Left/Ctrl+Arrow Right |
One cell to the left / to the right |
|
Shift+End |
Select current table cell |
|
end, then shift+Home |
Select content of current table cell |
|
Press and hold shift and press arrow keys repeatedly |
Extend selection to adjacent cells |
|
Ctrl+Shift+f8, then press |
Extend selection or block |
|
Alt+5 on numeric keypad (with numLock off) |
Select an entire table |
|
Alt+Shift+Arrow Up/Alt+Shift+Arrow Down |
Move current row up or down |
|
In first column, press shift+End |
Select row* |
|
In first row press Alt+Shift+Page Down |
Select column |
|
Shift+Delete |
Delete columns with columns selected |
Created by rank17 on 3/4/2017. Last updated by max on 1/14/2021
![]()
Microsoft Word Shortcuts
Advertising for Consideration:
Related:
jump the line
Primarily heard in US, Canada.
1. To move in front of people who have been waiting in a line for something (rather than standing behind the last person, as is customary). Hey, don’t jump the line! Get behind the rest of us! I wanted to shout at the man for jumping the line, but I was too embarrassed about making a scene.
2. To do something before it is one’s turn. There has been public outrage after it came to light that some people had been jumping the queue for surgery appointments because they had a friend or relative working at the hospital.
Farlex Dictionary of Idioms. © 2022 Farlex, Inc, all rights reserved.
- on line
- step out of line
- get a line on
- get a line on (someone or something)
- get a line on someone
- get in(to) line
- come in(to) line
- come into line
- be out of line
- in line