
If you have content in a JSON format that you would like to export to an Excel spreadsheet. You may use Power Query to transfer it into Excel. Today, this article will describe how to convert JSON to Excel.
What is JSON?
The acronym JSON stands for JavaScript Object Notation. It is a text-based open standard file format for storing and transmitting data. You can send information from the server to a website with the help of this. For instance, you might send data from the server to the browser so that everyone can view the information on a web page.
JSON is a plain-text data transmission format. If you want to input data from a JSON file into an Excel spreadsheet. Then you’ll need to use the JSON to Excel converter. So, using Excel’s Get and Transform function, you can simply achieve that. Importing content from a local hard disk or a web API does not necessitate writing any VBA code.
Let’s have a look at how to import/convert a JSON file to an Excel workbook.
How to Insert a JSON File into an Excel Spreadsheet
JSON is a global data structure that is logical and easily understood. It consists of just two forms of data: objects and arrays, or a mix of the two. Objects are key-value combinations separated by dots. Arrays, on the other hand, are just collections of items split by a colon.
When working with JSON data, Excel’s “Get & Transform” function can quickly turn JSON data into Excel data. Data Explorer was the original name before it got its new and updated name ‘Power Query.’
Excel 2010 and 2013 are the only variants that include Power Query. The ‘Get & Transform’ function on the Data tab was updated in Microsoft Excel 2016, 2019, and 365.
Let’s explore how to make an Excel sheet from a JSON file.
JSON Data
This allows to express JSON data using Name/value pairs.. Field names (in double quotes), followed by a semicolon and a value form a name(key)/value pair.
JSON Objects
A JSON document can contain numerous name/value combinations. Around the term they are, they use curly brackets to emphasise their point.
JSON Arrays
A JSON array is a set of objects enclosed in braces ([]).
Accessing Data from a JSON File in Excel
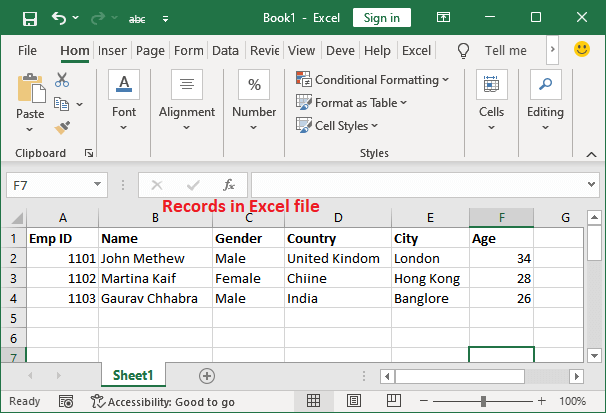
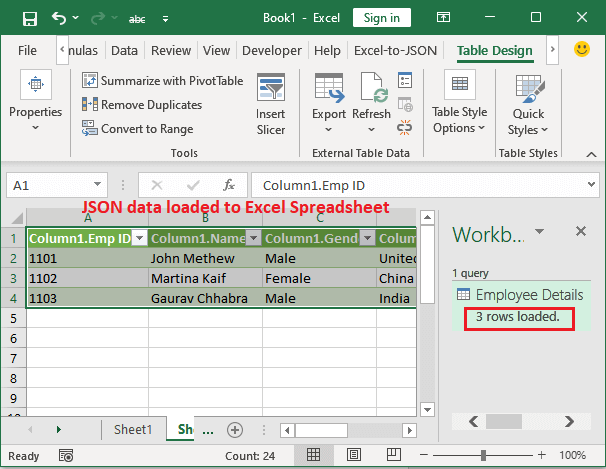
The JSON array has a large number of items. In addition, every item is documentation of a worker like first and last name, date of birth, address, etc. This lesson will be implementing ‘Excel 2016’ to illustrate data migration.
- To begin, launch Microsoft Excel and navigate to the ‘Data’ menu.
- Then, in the ‘Get and Transform Data’ category in the lower-left corner of the menu, press the ‘Get Data’ button.
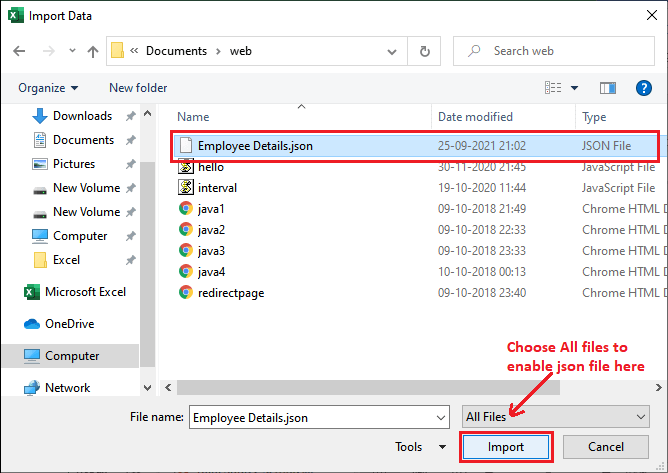
- Click the ‘From File’ drop-down and pick the ‘From JSON’ choice.
- Once you select ‘From JSON’, a file explorer will open. Select ‘Import’ to add a JSON file from your computer.
- If you wish to integrate data from a web API, you may choose to import the data from the internet straight.
- Rather than selecting ‘From JSON’, go to Data > Get Data > From Other Source > ‘From Site’ and input the web address.
- To transfer a file, simply click the “Import” tab on the toolbar.
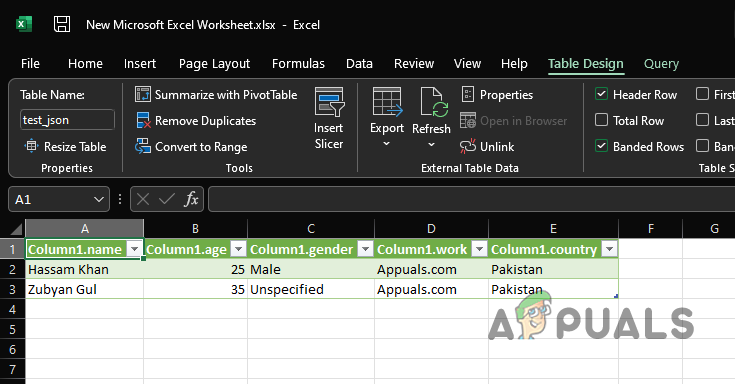
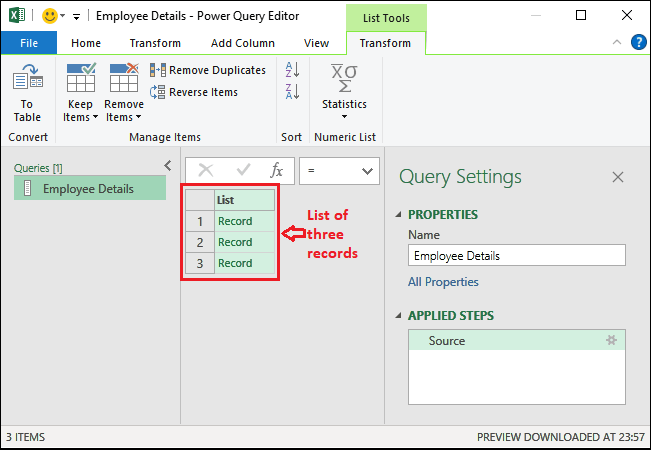
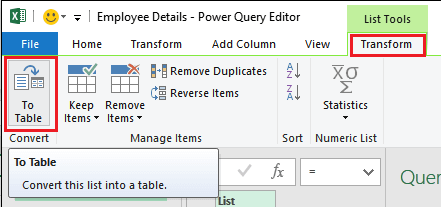
- You’ll see that the records in that list have been divided into rows. However, we are unable to view the real data. To make a table out of this list, select ‘To Table’ from the list’s drop-down menu.
- You’ll see a new dialogue box called To Table. Keep the default settings in the window and click ‘OK’ to proceed.
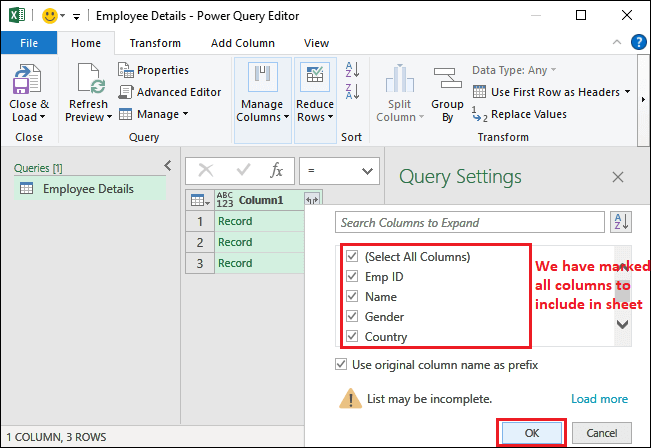
- The content is now in a tabular format, but the record details are still hidden. Choose the ‘Expand Column’ option to make more room for your data.
- The columns that are mentioned in the documents will be visible to you. Click ‘OK’ after selecting the columns you want to include in the table. Pick the columns you want to omit and uncheck them.
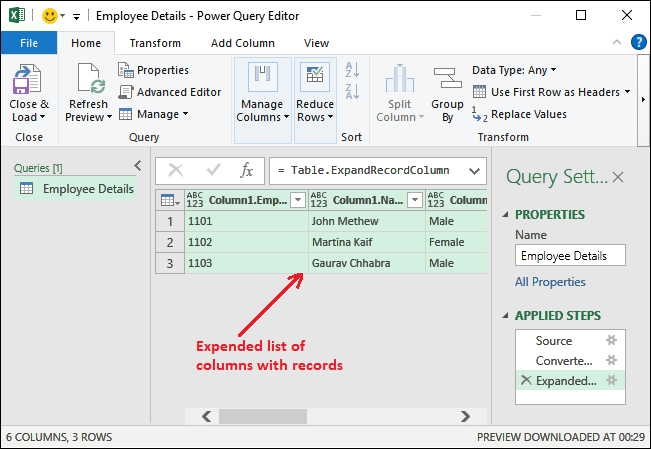
- After then, the information will be separated into several columns.
- You may also re-arrange the columns to suit your needs. To change a column header, just right-click on it, pick ‘Move’, and then tap the new location.
- Once you’re happy with the design, move on to the next phase. To transfer data into Excel as a Spreadsheet, select the ‘Home’ tab and then the ‘Close and Load’ option.
Yes, you can use Python to convert JSON to Excel offline. One popular library for working with JSON and Excel in Python is pandas. Here is an example of how you can use pandas to convert a JSON file to an Excel file:
import pandas as pd
# read json file
df = pd.read_json(“yourfile.json”)
# write dataframe to excel file
df.to_excel(“yourfile.xlsx”)
In this example, “yourfile.json” is the name of the JSON file you want to convert and “yourfile.xlsx” is the name of the Excel file you want to create. The pd.read_json() function is used to read the JSON file and store it as a pandas DataFrame. The to_excel() function is then used to write the DataFrame to an Excel file.
Online Conversion of JSON to Excel
If you need to convert JSON data to Excel files fast (.xslx). You might utilize one of the numerous third-party websites that are available on the internet. They have the capacity to switch your data in a couple of moments. But they are sometimes not accurate.
Try searching for “convert JSON to Excel” in a search query and you’ll find a plethora of websites to choose from.
json-csv.com is among the services that can help you export JSON to XSLX. To submit the JSON from your local drive, go to the website and hit the ‘Upload JSON file’ icon. Select ‘Open’ after finding the JSON file on your hard drive.
You’ll see a sample of your spreadsheet when you’ve uploaded the data. Next, to get your transformed Excel file, press the ‘Excel File (XLSX)’ option.
Using Feature Manipulation Engine
Websites and online apps provide a great deal of information that may be analyzed using spreadsheet software such as Microsoft Excel. APIs that produce JSON data are common in web applications.
FME can simply read and convert this JSON data for usage in Excel. FME (also known as the Feature Manipulation Engine) has compatibility for dozens of file types and programs, as well as transformation functions.
FME’s goal is to help you be more productive, so you can focus your energy using your data instead of battling with it. Once the straightforward graphical user interface has been set up, it’s easy to operate.
JSON to Excel processes may be automated and performed in the background with FME Server. The FME GUI is user-friendly and straightforward to operate. There’s no need to learn any programming languages.
Содержание
- json-excel-converter 1.3.0
- Навигация
- Ссылки проекта
- Статистика
- Метаданные
- Классификаторы
- Описание проекта
- JSON to excel converter
- Sample output
- Simple json
- Nested json
- json with array property
- Installation
- Usage
- Simple usage
- Streaming usage with restarts
- Arrays
- XLSX Formatting
- Cell format
- Column widths
- Row heights
- Как преобразовать JSON в Excel?
- Конвертировать JSON в Excel
- Конвертируйте файл JSON с помощью онлайн-инструмента
- JSON to Excel
- JSON file
- Excel file
- JSON vs Excel
- JSON data representation
- Excel data representation
- What to do?
- Examples
- Method 1: Transfer data from JSON to Excel offline
- Note: It is a new feature of Excel. So, it might be possible you do not find this option in your Microsoft Excel.
- Tip: You can include and exclude the records with their heading in your Excel table while transforming them from JSON files.
- Method 2: Convert the Web API JSON data into Excel
- Convert the JSON data into Excel online
json-excel-converter 1.3.0
pip install json-excel-converter Скопировать инструкции PIP
Выпущен: 26 апр. 2020 г.
JSON to excel convertor
Навигация
Ссылки проекта
Статистика
Метаданные
Метки json, excel, csv, xlsxwriter
Требует: Python >=3.6, mesemus
Классификаторы
- Development Status
- 4 — Beta
- Programming Language
- Python :: 3
- Python :: 3.6
- Python :: 3.7
- Python :: 3.8
- Topic
- Software Development :: Libraries :: Python Modules
Описание проекта
JSON to excel converter
A package that converts json to CSV, excel or other table formats
Sample output
Simple json
the generated CSV/excel is:
Nested json
the generated CSV/excel is (in excel, col2 spans two cells horizontally):
json with array property
the generated CSV/excel is (in excel, col2 spans two cells horizontally):
Installation
- xlsxwriter to use the xlsxwriter
Usage
Simple usage
Streaming usage with restarts
Arrays
When the first row is processed, the library guesses the columns layout. In case of arrays, a column (or more columns if the array contains json objects) is created for each of the items in the array, as shown in the example above.
On subsequent rows the array might contain more items. The library reacts by adjusting the number of columns in the layout and raising LinearizationError as previous rows might be already output.
Converter.convert_streaming just raises this exception — it is the responsibility of caller to take the right action.
Converter.convert captures this error and restarts the processing. In case of CSV this means truncating the output file to 0 bytes and processing the data again. XLSX writer caches all the data before writing them to excel so the restart just means discarding the cache.
If you know the size of the array in advance, you should pass it in options. Then no processing restarts are required and LinearizationError is not raised.
XLSX Formatting
Cell format
XLSX writer enables you to format the header and data by passing an array of header_formatters or data_formatters. Take these from json_excel_converter.xlsx.formats package or create your own.
Column widths
Pass the required column widths to writer:
Width of nested data can be specified as well:
To set the default column width, pass it as DEFAULT_COLUMN_WIDTH property:
Row heights
Row heights can be specified via the row_heights writer option:
To render url, pass a function that gets data of a row and returns url to options
Note: this will only be rendered in XLSX output, CSV output will silently ignore the link.
Источник
Как преобразовать JSON в Excel?
Файлы нотации объектов JSON или Javascript широко используются для хранения различных типов данных. Помимо хранения, они также используются для передачи данных между двумя серверами, и вы часто обнаружите это при общении с веб-сервером через API или что-то еще. Файлы JSON имеют довольно простую структуру, т. е. содержат массивы и объекты. В типичном файле JSON вы найдете пары ключ-значение, которые хранят данные внутри различных объектов, хранящихся в массиве. Доступ к данным можно получить, указав индекс вместе с ключом значения.
 Преобразование JSON в Excel
Нужны деньги на новую видеокарту, хотите купить новый смартфон? Берем кредитную карту от Альфы и не думаем о процентах целый год. А ещё она бесплатная. Оформить карту можно на сайте банка — на это уйдёт всего пара минут, а доставят её в удобное время и место.
Программы для Windows, мобильные приложения, игры — ВСЁ БЕСПЛАТНО, в нашем закрытом телеграмм канале — Подписывайтесь:)
Как оказалось, структура файла JSON, хотя и является базовой для программиста или разработчика, обычному пользователю может быть утомительной для чтения. К счастью, в таком сценарии вы можете легко преобразовать файл JSON в лист Microsoft Excel, по которому может легко перемещаться и обычный пользователь. Это связано с тем, что листы Excel обеспечивают лучшую читаемость, а если у вас есть большой файл JSON, преобразование его в лист Excel может быть подходящим способом, если вы хотите быстрее переварить данные внутри.
Чтобы преобразовать файл JSON в лист Excel, вы можете использовать функцию «Получить и преобразовать» Microsoft Excel. В более старых версиях Microsoft Excel это может называться Power Query. Как оказалось, помимо ручного преобразования файла JSON в Excel, вы также можете использовать онлайн-инструмент, который сделает эту работу за вас. С учетом сказанного давайте начнем и покажем вам, как довольно легко преобразовать JSON в Excel.
Конвертировать JSON в Excel
Преобразование файла JSON в рабочий лист Excel довольно просто, и процесс довольно прост. Вы начинаете с импорта нужного файла JSON в Microsoft Excel. После импорта файла различные функции приложения Excel используются для преобразования данных внутри файла JSON в таблицу. Как оказалось, Excel поставляется с множеством различных функций, которые позволяют вам манипулировать данными, которые у вас есть внутри файла Excel. Кроме того, вы можете защитить свои данные, защитив файлы Excel паролем.
После преобразования данных в формат таблицы вы можете выбрать, какие данные вас интересуют. Это позволит вам фильтровать данные внутри файла JSON и перечислять только те значения в столбцах, которые необходимы. Все это делается в окне редактора Power Query. Следуйте инструкциям, приведенным ниже, чтобы сделать все это:
- Прежде всего, откройте файл Excel на своем компьютере.
- Открыв файл Excel, щелкните параметр «Данные» на ленте меню.
 Опция данных в ленте меню
 - После этого под лентой меню щелкните раскрывающееся меню «Получить данные», расположенное в самом левом углу.Параметр получения данных Excel
- В раскрывающемся меню выберите параметр «Из файла» > «Из JSON».Загрузка файла JSON в Excel
- В появившемся окне «Импорт данных» перейдите туда, где хранится файл JSON, и откройте его. Это позволит импортировать файл JSON на лист Microsoft Excel.
- После импорта файла JSON откроется окно редактора Power Query.Редактор Power Query
- В левом верхнем углу нажмите на предоставленную опцию «К таблице».К столу
- В следующем диалоговом окне оставьте параметры по умолчанию и нажмите кнопку ОК.Преобразование в формат таблицы
- После этого данные были преобразованы в таблицу. Тем не менее, вы по-прежнему не можете видеть данные.
- Чтобы увидеть данные, вам придется развернуть значки. Для этого щелкните предоставленный значок «Развернуть столбец» (с двойными стрелками, направленными друг от друга). Щелчок по значку расширения столбца
- В появившемся диалоговом окне выберите столбцы, которые вы хотите видеть, и снимите флажки с тех, которые вы хотите исключить. Сделав это, нажмите кнопку ОК.Выбор столбцов для отображения
- Наконец, вы должны увидеть данные, перечисленные в отдельных столбцах.
- Для вашего удобства вы можете перемещать различные столбцы на листе. Для этого щелкните правой кнопкой мыши заголовок столбца и в раскрывающемся меню выберите параметр «Переместить».Перемещение столбца
- Оттуда вы можете переместить столбец влево, вправо, в начало или в конец.
- Когда вы будете удовлетворены компоновкой листа Excel, щелкните предоставленную опцию «Закрыть и загрузить».Закрыть и загрузить вариант
- Когда вы это сделаете, данные будут импортированы на ваш лист Excel из редактора Power Query, и вы сможете просмотреть таблицу.Преобразование JSON в Excel
- Сделав это, вы успешно преобразовали файл JSON в рабочий лист Excel.
 Опция данных в ленте меню
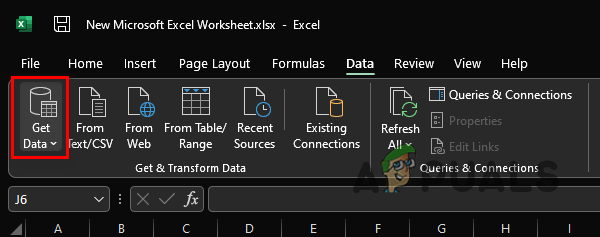 Параметр получения данных Excel
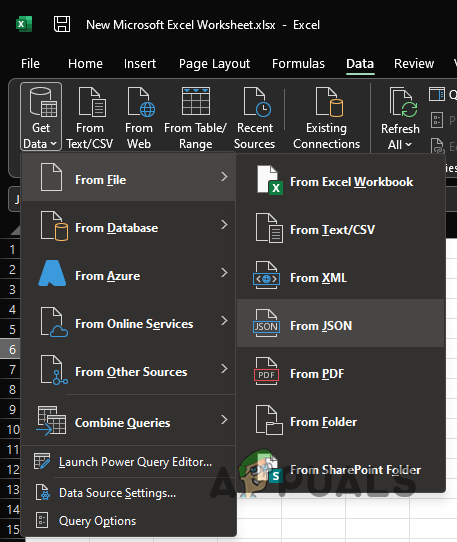 Загрузка файла JSON в Excel
 Редактор Power Query
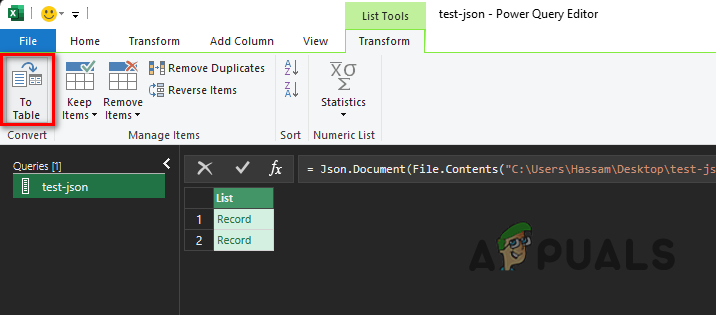 К столу
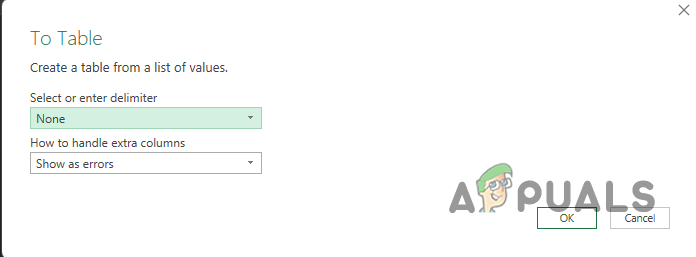 Преобразование в формат таблицы
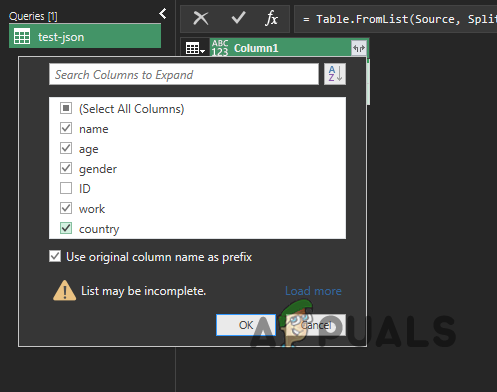 Выбор столбцов для отображения
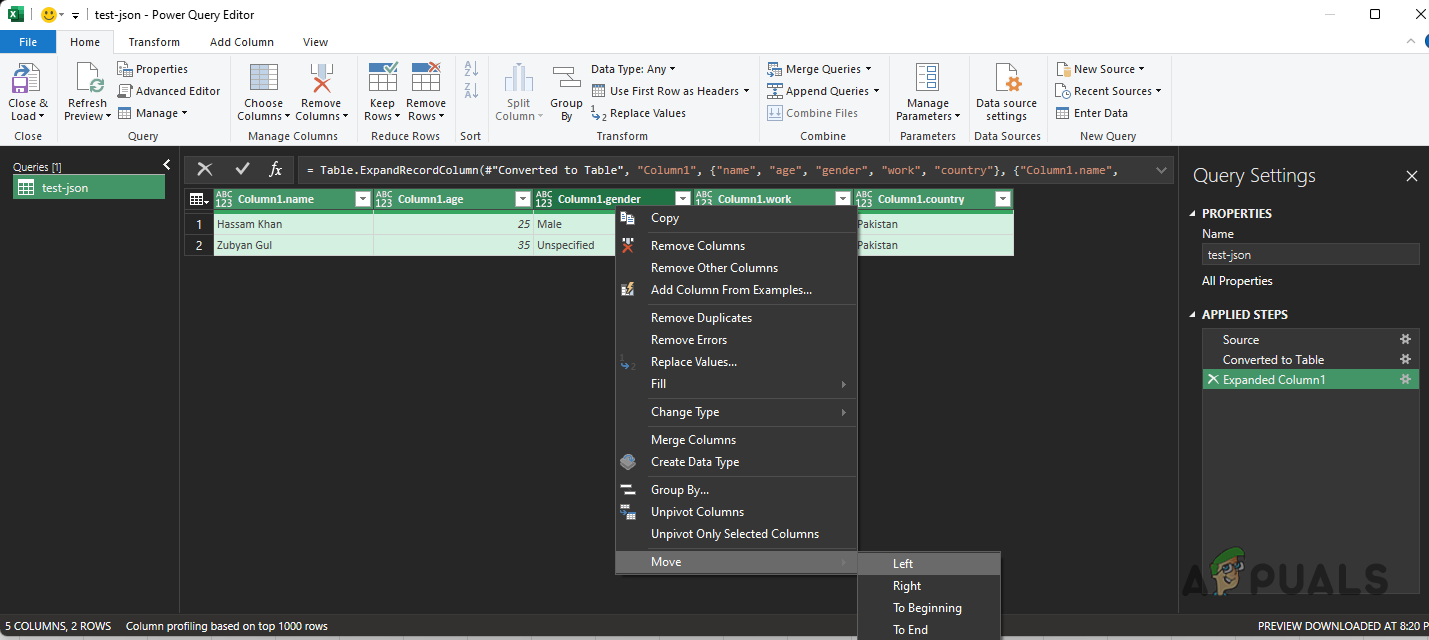 Перемещение столбца
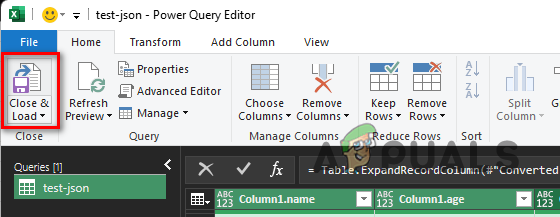 Закрыть и загрузить вариант
Конвертируйте файл JSON с помощью онлайн-инструмента
Наконец, как оказалось, в дополнение к руководству, о котором мы упоминали выше, вы также можете избавить себя от всех проблем с преобразованием файла JSON вручную и вместо этого выбрать онлайн-инструмент. Использование онлайн-инструмента может быть намного проще и быстрее, так как вам нужно всего лишь загрузить файл JSON, который вы хотите преобразовать в рабочий лист Excel. Есть несколько веб-сайтов, которые предлагают эту функцию, и вы можете легко найти их с помощью одного веб-поиска. Итак, если вам не хочется решать все проблемы с преобразованием файла JSON вручную, у вас всегда есть возможность воспользоваться онлайн-инструментом, который сделает работу за вас намного быстрее.
Источник
JSON to Excel
Sometimes, you have data stored in JSON files, but you want it to be in Excel sheet. It is unnecessary to write the entire data one by one from JSON file to Excel when you have several resources to convert the JSON data to Excel file. There are several methods and online softwares available on the internet using which you can easily transfer or convert the JSON data to Excel.
In this chapter, we will try to cover all the easy methods to convert the JSON file data to Excel. We will also provide you the reference of online JSON to Excel conversion tools for free. You can use these tools for free, but if you do not have an internet connection available all the time, you can go for our other offline methods.
JSON file
JSON refers to JavaScript Object Notation, a light weighted format for storing and exchanging data between browser and server. It is a very light weighted file structure that stores data in text format. JSON is a simple text format, but it is not easy to analyse the large/complete data at once. This is the main issue when user needs Excel file.
Excel file
Excel file is a table format structure that is used for storing the data in rows and columns. It stores the data in a completely different manner than the JSON file. It is a much understandable and readable format to analyse the large data at once. While in JSON file, it is not possible to read out large data at once.
JSON vs Excel
JSON and Excel both are great ways for storing data and are extensively used, but they are completely different in structure. It means they store data in different manners to each other.
JSON is a simple text file whose text is structured as a tree. Whereas Excel is a combination of rows and columns that stores the data in table format. Look at the JSON and Excel file to see how they keep the data.
Most of the time, when you get the data from any external source through API, you get the data in JSON format.
JSON data representation
Following is the simple text file containing data in JSON format.
This JSON structure is containing three records currently. Now, look for the same records/data in MS Excel file that contains data in table format.
Excel data representation
Following is the Excel file containing data in table (rows and columns).
This is the same data as used in JSON file format. You can see that there is a big difference between both files data structure and way of storing data.
What to do?
If you have data in a JSON file that you would like to transfer in an Excel sheet, you can easily do it by using Power Query. Basically, JSON is a data transform format that stores data in simple plain text.
Besides this, you can also use Get and Transform feature of Excel to transfer the JSON data to an Excel spreadsheet. In this method, you do not even need to write the VBA code script. Just in few clicks, you can easily import the JSON data to an Excel file.
Examples
We will elaborate the steps to convert the JSON data in an Excel file using Excel built-in Get & Transform feature. It is a very helpful and easy method to convert the data from JSON to Excel.
Method 1: Transfer data from JSON to Excel offline
If you have a JSON file stored on your computer system, you can follow the below steps to transfer the data from JSON file to Excel. It does not require an internet connection. Simply follow the below steps-
Step 1: We have the employee details data stored in JSON format, which is a simple text file currently opened in notepad.
Currently, this file contains three records.

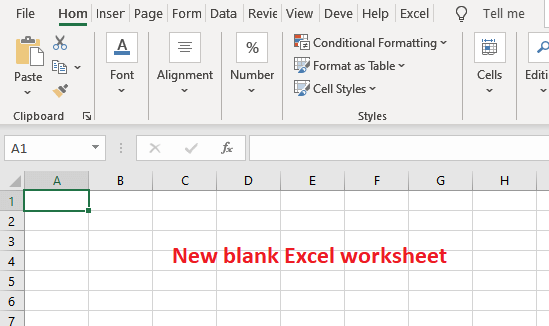
Step 2: Now, open the Excel file where you want to keep the converted JSON data. We have taken a blank Excel file.
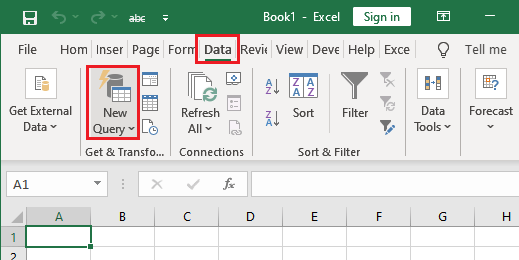
Step 3: Go to the Data tab and click the Get Query button present at the leftmost corner inside the Get & Transform group.
Step 4: From the dropdown list, choose the From File option and then click the From JSON here.
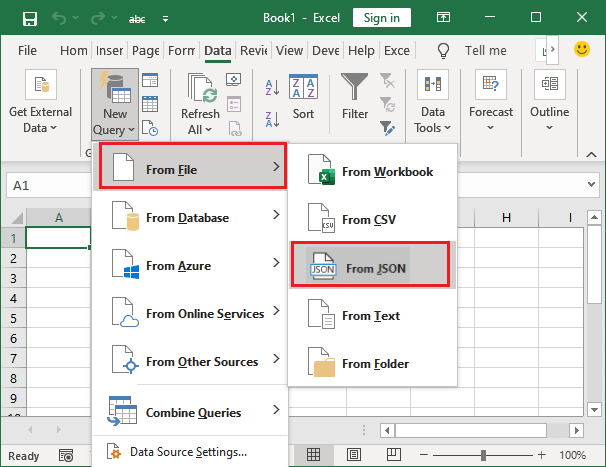
Note: It is a new feature of Excel. So, it might be possible you do not find this option in your Microsoft Excel.
If the From JSON option is not available inside FROM FILE dropdown sub-list, you can choose From Text option. It will work the same for your version of MS Excel.
Step 5: A panel will open where to select your JSON file, which you want to transfer in the Excel table. Here, select the JSON file and click the Import button.
Step 6: When you click the import button in the above step, it will take you to the Excel Power Query Editor.
Here you will see that three records are listed here in Excel Power Query Editor, but cannot see the actual data yet.
Step 7: To make the actual data visible, click the To Table button inside the Transform tab in the power query editor. (This transform tab is automatically opened.)
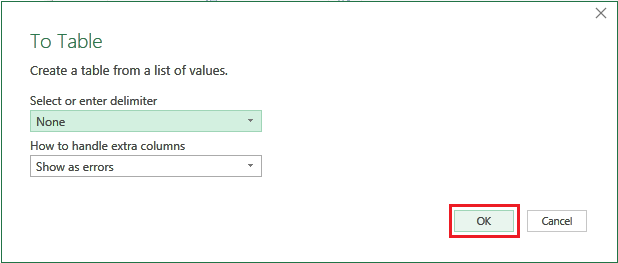
Step 8: A dialog box will open where keep the default setting and just click OK.

Step 9: Now your data is in Excel table format, but you still cannot see the record details. To expand the column, click the Expand Column button.
Step 10: It has opened a panel containing the record headings. Mark the respective record heading which you want to include in the Excel table and click OK.
Tip: You can include and exclude the records with their heading in your Excel table while transforming them from JSON files.
Step 11: Now, the data is broken out into Excel columns along with the records in separate columns and data is actually imported to Excel table and visible too.
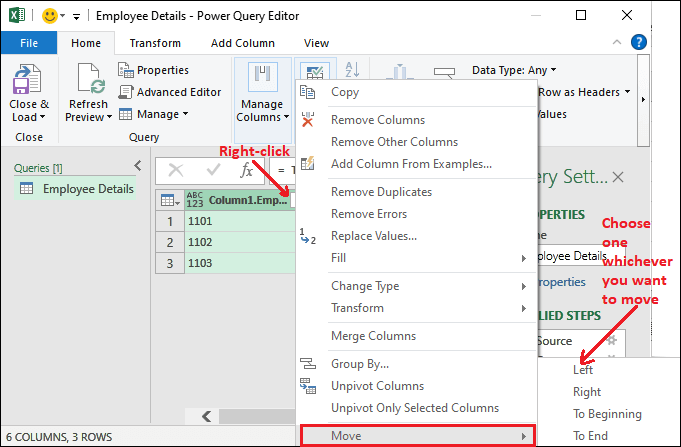
«You can also move the columns and switch from each other where it fits better.»
Step 12: To move the column around, just right-click the column header and select the Move button from the list, then choose the direction wherever you want to move it. (left, right, beginning, ending)
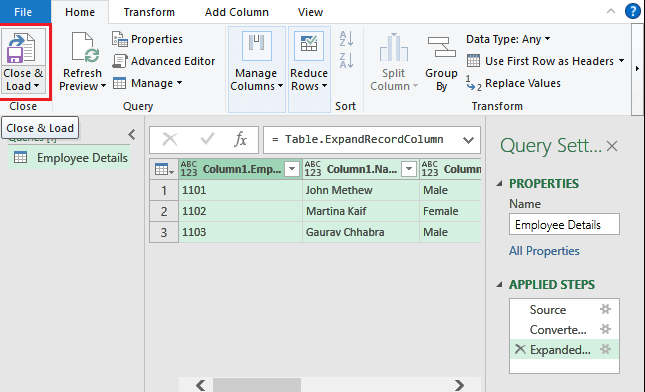
Step 13: Once your selected columns get the location where you want to fix it, navigate to the Home tab and click the Close & Load button to load the data into Excel data.
It will load the converted JSON data from Power Query Editor to Excel sheet.
Step 14: You can see that your JSON data has been imported to the Excel file and it is ready to use and perform any type of Excel operation.

In this way, you can save your time and effort to manually write the large set of data stored in JSON files. Besides the JSON to Excel, you can also import the other file to Excel, such as text, CSV, XML, and more.
Method 2: Convert the Web API JSON data into Excel
Sometimes, you do not have JSON file stored in your computer system. You directly want to import it to an Excel spreadsheet from the Web API. Web API is a Web Application Programming Interface.
In that scenario, instead of From File > From JSON as in the above step (Step 4), choose From Other Source and then From Web.
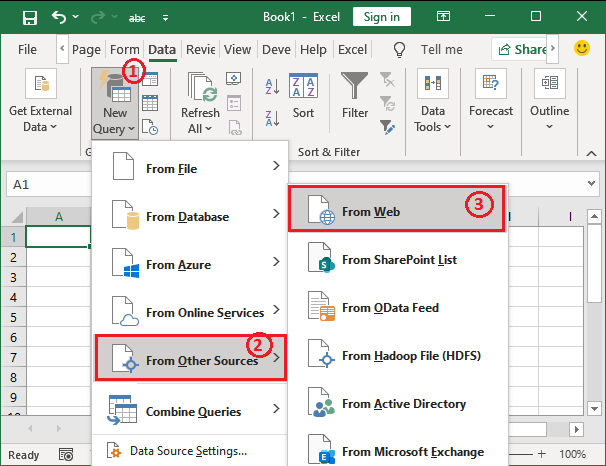
A panel will open where enter the web URL of a JSON file you want to import in Excel.
Convert the JSON data into Excel online
The method that we have used above for converting the JSON data to Excel was the built-in feature of Excel. We did not install any third-party software or used online JSON to Excel converter software.
It allows the users to import the JSON file data to an Excel spreadsheet within MS Excel. If you are in hurry and do not want to put a bit of effort, you can use online softwares to convert the JSON file to Excel. Several websites offer converters for free with some trials.
The user only requires internet connectivity to upload JSON file and download the converted file.
Software for JSON to Excel conversion
Following are some references of online JSON to Excel converter —
Safe Software — Safe software is a JSON to Excel converter that comes with 30 days free trial. You can install and use it to convert your JSON file to Excel. The main drawback of this software is that — you can use it for free only 30 days after that you have to purchase the subscription to use it.
Conversion Tool — This is an online JSON to Excel conversion that allows the users to convert the JSON data to Excel table format. It offers 10 conversions per day, but you have to pay for it if you need more conversions.
TextCompare.org — It is another tool to convert the JSON data and load it to an Excel format file. This software allows the users to see the preview before downloading the file in Excel format.
Code Beauty — Code Beauty is an online JSON to Excel conversion tool. It is used to convert the JSON data to table format. You have to upload your JSON formatted data/JSON file URL or JSON file here. It will take a few minutes to convert the file and then you can download the converted file.
If you want to convert the file quickly, you can go for online methods. All these websites provide some free conversion. Besides this, you may find several other free tools for online JSON to Excel conversions.
Источник
Sometimes, you have data stored in JSON files, but you want it to be in Excel sheet. It is unnecessary to write the entire data one by one from JSON file to Excel when you have several resources to convert the JSON data to Excel file. There are several methods and online softwares available on the internet using which you can easily transfer or convert the JSON data to Excel.
In this chapter, we will try to cover all the easy methods to convert the JSON file data to Excel. We will also provide you the reference of online JSON to Excel conversion tools for free. You can use these tools for free, but if you do not have an internet connection available all the time, you can go for our other offline methods.
JSON file
JSON refers to JavaScript Object Notation, a light weighted format for storing and exchanging data between browser and server. It is a very light weighted file structure that stores data in text format. JSON is a simple text format, but it is not easy to analyse the large/complete data at once. This is the main issue when user needs Excel file.
Excel file
Excel file is a table format structure that is used for storing the data in rows and columns. It stores the data in a completely different manner than the JSON file. It is a much understandable and readable format to analyse the large data at once. While in JSON file, it is not possible to read out large data at once.
JSON vs Excel
JSON and Excel both are great ways for storing data and are extensively used, but they are completely different in structure. It means they store data in different manners to each other.
JSON is a simple text file whose text is structured as a tree. Whereas Excel is a combination of rows and columns that stores the data in table format. Look at the JSON and Excel file to see how they keep the data.
Most of the time, when you get the data from any external source through API, you get the data in JSON format.
JSON data representation
Following is the simple text file containing data in JSON format.
This JSON structure is containing three records currently. Now, look for the same records/data in MS Excel file that contains data in table format.
Excel data representation
Following is the Excel file containing data in table (rows and columns).
This is the same data as used in JSON file format. You can see that there is a big difference between both files data structure and way of storing data.
What to do?
If you have data in a JSON file that you would like to transfer in an Excel sheet, you can easily do it by using Power Query. Basically, JSON is a data transform format that stores data in simple plain text.
Besides this, you can also use Get and Transform feature of Excel to transfer the JSON data to an Excel spreadsheet. In this method, you do not even need to write the VBA code script. Just in few clicks, you can easily import the JSON data to an Excel file.
Examples
We will elaborate the steps to convert the JSON data in an Excel file using Excel built-in Get & Transform feature. It is a very helpful and easy method to convert the data from JSON to Excel.
Method 1: Transfer data from JSON to Excel offline
If you have a JSON file stored on your computer system, you can follow the below steps to transfer the data from JSON file to Excel. It does not require an internet connection. Simply follow the below steps-
Step 1: We have the employee details data stored in JSON format, which is a simple text file currently opened in notepad.
Currently, this file contains three records.
Step 2: Now, open the Excel file where you want to keep the converted JSON data. We have taken a blank Excel file.
Step 3: Go to the Data tab and click the Get Query button present at the leftmost corner inside the Get & Transform group.
Step 4: From the dropdown list, choose the From File option and then click the From JSON here.
Note: It is a new feature of Excel. So, it might be possible you do not find this option in your Microsoft Excel.
If the From JSON option is not available inside FROM FILE dropdown sub-list, you can choose From Text option. It will work the same for your version of MS Excel.
Step 5: A panel will open where to select your JSON file, which you want to transfer in the Excel table. Here, select the JSON file and click the Import button.
Step 6: When you click the import button in the above step, it will take you to the Excel Power Query Editor.
Here you will see that three records are listed here in Excel Power Query Editor, but cannot see the actual data yet.
Step 7: To make the actual data visible, click the To Table button inside the Transform tab in the power query editor. (This transform tab is automatically opened.)
Step 8: A dialog box will open where keep the default setting and just click OK.
Step 9: Now your data is in Excel table format, but you still cannot see the record details. To expand the column, click the Expand Column button.
Step 10: It has opened a panel containing the record headings. Mark the respective record heading which you want to include in the Excel table and click OK.
Tip: You can include and exclude the records with their heading in your Excel table while transforming them from JSON files.
Step 11: Now, the data is broken out into Excel columns along with the records in separate columns and data is actually imported to Excel table and visible too.
«You can also move the columns and switch from each other where it fits better.»
Step 12: To move the column around, just right-click the column header and select the Move button from the list, then choose the direction wherever you want to move it. (left, right, beginning, ending)
Step 13: Once your selected columns get the location where you want to fix it, navigate to the Home tab and click the Close & Load button to load the data into Excel data.
It will load the converted JSON data from Power Query Editor to Excel sheet.
Step 14: You can see that your JSON data has been imported to the Excel file and it is ready to use and perform any type of Excel operation.
In this way, you can save your time and effort to manually write the large set of data stored in JSON files. Besides the JSON to Excel, you can also import the other file to Excel, such as text, CSV, XML, and more.
Method 2: Convert the Web API JSON data into Excel
Sometimes, you do not have JSON file stored in your computer system. You directly want to import it to an Excel spreadsheet from the Web API. Web API is a Web Application Programming Interface.
In that scenario, instead of From File > From JSON as in the above step (Step 4), choose From Other Source and then From Web.
A panel will open where enter the web URL of a JSON file you want to import in Excel.
Convert the JSON data into Excel online
The method that we have used above for converting the JSON data to Excel was the built-in feature of Excel. We did not install any third-party software or used online JSON to Excel converter software.
It allows the users to import the JSON file data to an Excel spreadsheet within MS Excel. If you are in hurry and do not want to put a bit of effort, you can use online softwares to convert the JSON file to Excel. Several websites offer converters for free with some trials.
The user only requires internet connectivity to upload JSON file and download the converted file.
Software for JSON to Excel conversion
Following are some references of online JSON to Excel converter —
Safe Software — Safe software is a JSON to Excel converter that comes with 30 days free trial. You can install and use it to convert your JSON file to Excel. The main drawback of this software is that — you can use it for free only 30 days after that you have to purchase the subscription to use it.
Conversion Tool — This is an online JSON to Excel conversion that allows the users to convert the JSON data to Excel table format. It offers 10 conversions per day, but you have to pay for it if you need more conversions.
TextCompare.org — It is another tool to convert the JSON data and load it to an Excel format file. This software allows the users to see the preview before downloading the file in Excel format.
Code Beauty — Code Beauty is an online JSON to Excel conversion tool. It is used to convert the JSON data to table format. You have to upload your JSON formatted data/JSON file URL or JSON file here. It will take a few minutes to convert the file and then you can download the converted file.
If you want to convert the file quickly, you can go for online methods. All these websites provide some free conversion. Besides this, you may find several other free tools for online JSON to Excel conversions.
Let’s say you have a file named input.json which contains an array of objects defined in standard JSON format. Something like:
[
    {"name": "notebook", "price": 500.00, "rate": 4.2},
    {"name": "sd-card", "price": 60.49, "rate": 3.5}
]
How can I import it as a table in Microsoft Excel without VBA or scripting?
asked Apr 10, 2020 at 1:23
![]()
Mostafa AghajaniMostafa Aghajani
1,6662 gold badges13 silver badges18 bronze badges
0
If you have PowerQuery in Excel (I think 2010+) then it’s very simple and straightforward. Similar scenarios can be used to cover more complicated cases too. Just follow these steps:
- On the ribbon bar, choose:
Data => Get Data => From File => From Json - Select your Json file (input.json in this example)
- In the opened
Power Query Editorwindow and on the ribbon bar, choose:View => Advanced Editorand input:
let
    Source = Json.Document(File.Contents("input.json"))
in
    Table.FromList(Source, Record.FieldValues, {"name","price","rate"})
or if you want auto-import without specifying column names, use the following block instead:
let
    Source = Json.Document(File.Contents("input.json"))
in
    Table.FromList(Source, Record.FieldValues)
Now on the ribbon bar choose:
Home => Close & Load
and you will see a beautiful imported table with all Excel functionality you like.
answered Apr 10, 2020 at 1:23
![]()
Mostafa AghajaniMostafa Aghajani
1,6662 gold badges13 silver badges18 bronze badges
4
Another method is using «Table.FromRecords» as this will populate the column headings for you.
let
    Source = Json.Document(File.Contents("C:someJsonFileHere.json"))
in
    Table.FromRecords(Source)
answered Mar 9 at 12:53
![]()
File GSTR 1 return by using offline excel tool. This xls format enables you to fill outward supply data easily. You can prepare GSTR 1 return in offline mode and generate JSON file. Later, the JSON file needs to be uploaded on GST portal to file the return. Click below to Download GSTR 1 format in excel to prepare GSTR 1. Also, now you can convert your JSON of GSTR 1 into the Excel file.
Read how to Install GSTR 1 offline tool on your computer. Similarly, learn how to prepare and file GSTR 1 in offline mode. GSTR 1 offline format will save your lot of time and internet usage than that actual online filing on GST portal. Thus GSTR 1 format in excel plays a very important role for filing return under Goods and service tax in India.
Download GSTR 1 Format in pdf
You may download GSTR 1 format in pdf format for offline use. This GSTR 1 form in pdf format is as per GST rules. Click on below link to download GSTR 1 in pdf format.
GSTR 1 Format Filing Instructions
Here are the GSTR 1 filing instructions as per CGST rules. However, the actual filing steps may vary for GSTR 1 offline filing and GSTR 1 online filing process. You will find GSTR 1 filing instructions in above GSTR 1 format in excel once you download it.
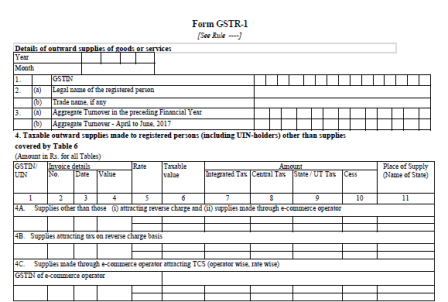
| Sr.no. | Details |
| 1. | Terms used: a. GSTIN: Goods and Services Tax Identification Number b. UIN: Unique Identity Number c. UQC: Unit Quantity Code d. HSN: Harmonized System of Nomenclature e. POS: Place of Supply (Respective State) f. B to B: From one registered person to another registered person g. B to C: From registered person to unregistered person |
| 2. | The details in GSTR 1 shall be furnished by 10thof the month succeeding the relevant tax period. Check GSTR 1 due date from here. |
| 3. | The Aggregate turnover of the taxpayer for the immediate, preceding financial year and first quarter of the current financial year shall be reported in the preliminary information in Table 3.
This information would be required to be submitted by the taxpayers only in the first year. |
| 4. | Invoice-level information pertaining to the tax period should be reported for all supplies as under:
(i) For all B to B supplies (whether inter-State or intra-State), invoice level details, rate-wise, should be uploaded in Table 4, including supplies attracting the reverse charge and those effected through e-commerce operator. Outwards supply information in these categories are to be furnished separately in the Table. (ii) For all inter-State B to C supplies, where invoice value is more than Rs. 2,50,000/- (B to C Large) invoice level details, rate-wise, should be uploaded in Table 5; and (iii) For all B to C supplies (whether inter-State or intra-State) where invoice value is up to Rs. 2,50,000/ – State-wise summary of supplies, rate-wise, should be uploaded in Table 7. |
| 5. | Table 4 capturing information relating to B to B supplies should: (i) be captured in: a. Table 4A for supplies relating to other than reverse charge/ made b. Table 4B for supplies attracting the reverse charge, rate-wise; and c. Table 4C relating to supplies effected through e-commerce operator attracting the collection of tax at source under section 52 of the Act, (ii) Capture Place of Supply (PoS) only if the same is different from the location of the |
| 6. | Table 5 to capture information of B to C Large invoices and other information shall be similar to Table 4. The Place of Supply (PoS) column is mandatory in this table. |
| 7. | Table 6 to capture information related to: (i) Exports out of India (ii) Supplies to SEZ unit/ and SEZ developer (iii) Deemed Exports |
| 8. | Table 6 needs to capture information about the shipping bill and its date. However, if the shipping bill details are not available, Table 6 will still accept the information.
However, the same can be updated through the submission of information in Further, the detail of Shipping Bill shall be furnished in 13 digits capturing port code (six digits) followed by the number of shipping bill. |
| 9. | Any supply made by SEZ to DTA, without the cover of a bill of entry is required to be reported by the SEZ unit in GSTR -1. Also, the supplies made by SEZ on the cover of a bill of entry shall be reported by DTA unit in its GSTR-2 as imports in GSTR-2. Similarly, the liability for payment of IGST in respect of the supply of services would Besides be created from this Table. |
| 10. | In case of export transactions, GSTIN of the recipient will not be there. Hence it will remain blank. |
| 11. | Export transactions effected without payment of IGST (under Bond/ Letter of Undertaking (LUT)) needs to be reported under ―0‖ tax amount heading in Table 6A and 6B. |
| 12. | Table 7 to capture information in respect of the taxable supply of: (i)B to C supplies (whether inter-State or intra-State)with invoice value uptoRs 2,50,000; (ii)Taxable value net of debit/credit note raised in a particular tax period and information pertaining to previous tax periods which was not reported earlier, shall be reported in Table 10. The Negative value can be mentioned in this table, if required; (iii)Transactions effected through e-commerce operator attracting the collection of tax at source under section 52 of the Act to be provided operator wise and rate wise; (iv)Table 7A (1) to capture gross intra-State supplies, rate-wise, including supplies made through e-commerce operator attracting the collection of tax at source and Table 7A (2) to capture supplies made through e-commerce operator attracting the collection of tax at source out of gross supplies reported in Table 7A (1); (v)Table 7B (1) to capture gross inter-State supplies including supplies made through e-commerce operator attracting the collection of tax at source and Table 7B (2) to capture supplies made through e-commerce operator attracting the collection of tax at source out of gross supplies reported in Table 7B (1); and (vi)Table 7B to capture information State wise and rate wise. |
| 13. | Table 9 to capture information of:(i)Amendments of B to B supplies reported in Table 4, B to C Large supplies reported in Table 5 and Supplies involving exports/ SEZ unit or SEZ developer/ deemed exports reported in Table 6;
(ii)Information to be captured rate-wise; (iii)It also captures original information of debit/credit note issued and amendment to it reported in earlier tax periods; While furnishing information the original debit note/credit note, the details of invoice shall be mentioned in the first three columns, While furnishing revision of a debit note/credit note, the details of original debit note/credit note shall be mentioned in the first three columns of this Table, (iv)Place of Supply (PoS) only if the same is different from the location of the recipient; (v)Any debit/ credit note pertaining to invoices issued before the appointed day under the existing law also to be reported in this table; and Shipping bill to be provided only in case of exports transactions amendment. |
| 14. | Table 10 is similar to Table 9 but captures amendment information related to B to C supplies and reported in Table 7. |
| 15. | Table 11A captures information related to advances received, rate-wise, in the tax period and tax to be paid thereon along with the respective PoS. It also includes information in Table 11B for adjustment of tax paid on advance received and reported in earlier tax periods against invoices issued in the current tax period. The details of information relating to advances would be submitted only if the invoice has not been issued in the same tax period in which the advance was received. |
| 16. | Summary of supplies effected against a particular HSN code to be reported only in summary table. It will be optional for taxpayers having annual turnover uptoRs. 1.50 Cr but they need to provide information about the description of goods. |
| 17. | It will be mandatory to report HSN code at two digits level for taxpayers having the annual turnover in the preceding year above Rs. 1.50 Cr but uptoRs. 5.00 Cr and at four digits level for taxpayers having the annual turnover above Rs. 5.00 Cr *Note: Beside this you will find actual instructions of filing in GSTR 1 format in excel. Please download the format from above link. |
GSTR 1 JSON to Excel Converter
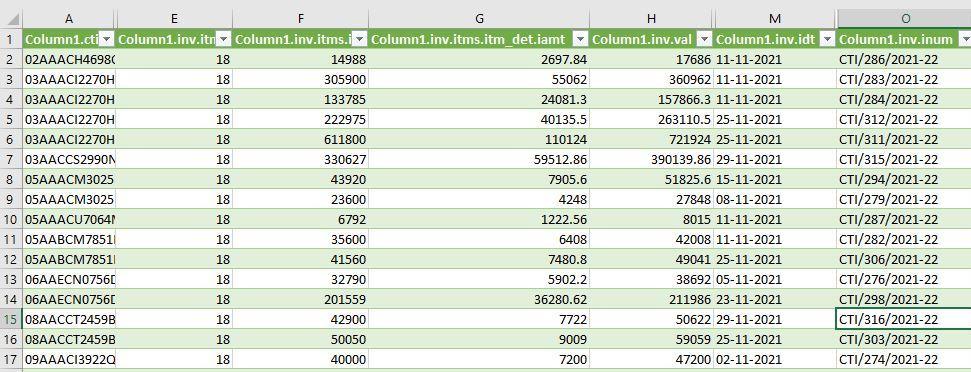
You may want to convert the downloaded GSTR 1 .json file from the GST portal into the excel sheet. There may be a number of online tools available which may convert your JSON file to excel. However, these may not give you the exact data the way you want. Also, sometimes you may not want to upload your JSON file on the third-party website containing the important data. You can extract the JSON file data as shown in the below image by using MS Excel.
Here we are going to discuss how you can import or convert your GSTR 1 JSON file into a Microsoft Excel file. Here is the step-by-step guide.
Time needed: 5 minutes.
- Open the Microsoft Excel
- Click on the “Data” tab
- Click on “New Query”
(Do not click on Get External Data” option
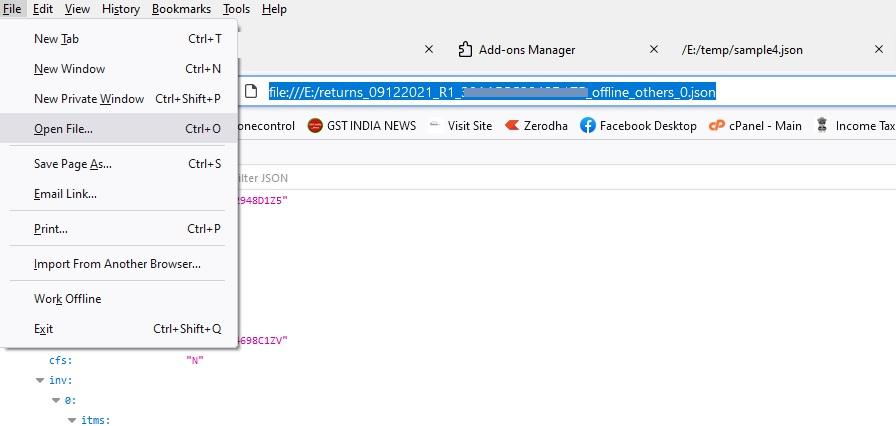
- Select the option “From Web” or “From JSON or “From other sources >> From Web”
If you are using office 365, you will see the option from JSON. You can also open the “Launch power query editor”
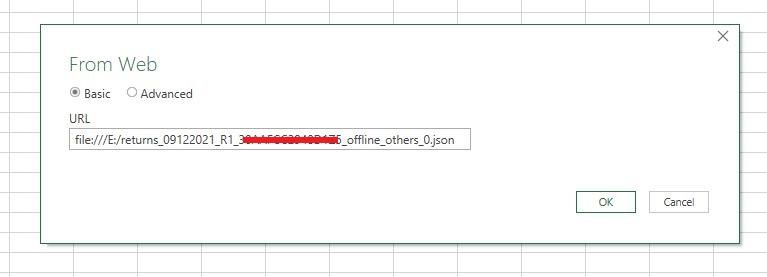
- Copy the JSON file link > OK
Copy the file path of the downloaded JSON file, from the GST portal. In the below path, I have saved my file in e: drive
How to copy the path?
Open the JSON file in the browser >> Right-click on the path and click copy
- Paste the JSON file path into the excel file >> Press the Ok button

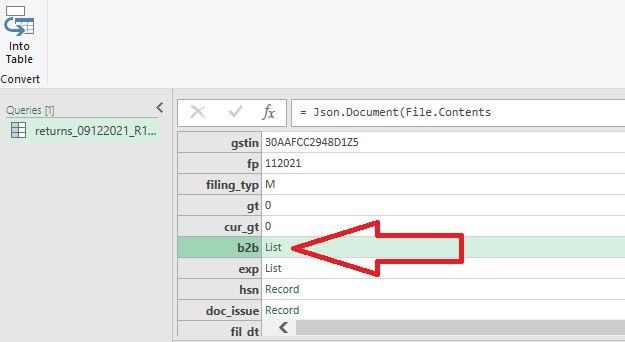
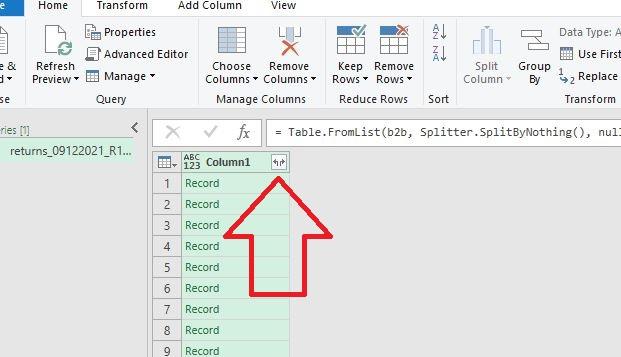
- Now click on on the list as shown below
This will get the b2b entries in the excel sheet. if you want b2c data you may click on b2c.

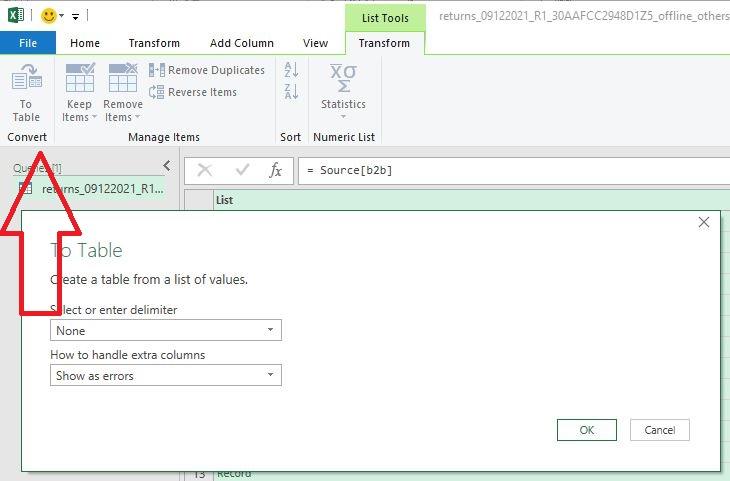
- Now click on “To table”. On the next window, click ok.
Clicking on this option will convert your data into the table format

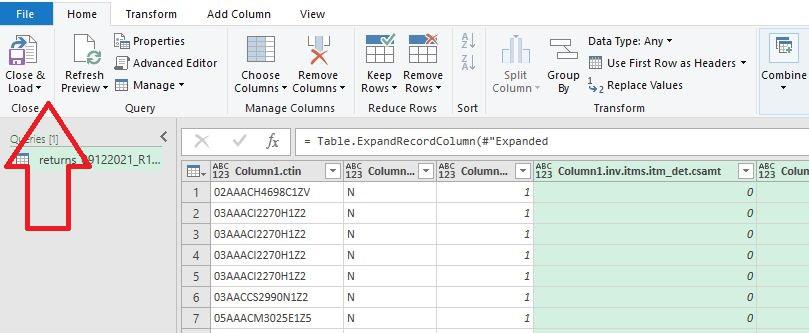
- Finally, click on the “Close and load” Option from the left-hand side.
This step will load the data in the excel file. The loaded data can now be used in many ways like vlookup, sort, pivot table, etc.

- Expand the data columns >> Expand new rows >> Ok.
In order to see the complete data click on the expand sign as shown below. you can keep on expanding the columns till you see the below sign so that the JSON file can fetch all the existing data in the JSON file of the selected sheet. No need to choose any options after clicking on the expand sign, simply hit ok.

By using the above steps you can easily convert not only GSTR 1 JSON file but any other GST-related JSON file in excel. Similarly, these steps are useful beyond the GST JSON file. Thus, the process can be used for another JSON file that contains this type of huge data.
FAQ on GSTR 1
Question 1: In which table Supplies to SEZ to be shown of GSTR 1 Return
Answer1: Supplies to SEZ should be shown in Table 6B of GSTR 1 Return.
Question 2: What happens where the details of inward supplies furnished by the recipient do not match with the outward supply details furnished by the supplier in his valid return?
Answer 2: In case of a mismatch, communication would be made to both parties. If the mismatch is not rectified, then the amount will be added to the output liability of the recipient in the return for the month succeeding the month in which the discrepancy is communicated.
Question 3: What is Table 6A of GSTR 1 Return?
Answer 3: Table 6A of GSTR 1 is meant for providing details of Export supplies made by the taxpayer during the given period. The taxpayer should furnish these details in Table 6A if he intends to claim a refund of ITC (Input Tax credit) of tax paid on Export supplies. These details of export invoices have been entered in this table.
Related: How to resolve https //127.0.0.1:1585 error?
Who should file Table 6A of form GSTR 1, and why?
Any Registered taxable person, other then Input Service Distributor (ISD), Compounding Tax payer, TDS Deductor, TCS Collector and who wants to claim Refund on taxes paid on Exports made should file Table 6A of Form GSTR 1 electronically on GST Portal.
General Questions
How do I download GSTR 1 in Excel?
1. Go to GST portal
2. Click on Downloads >> Offline tools
3. Click on “Returns Offline Tool“
4. Click on Download
How do I use GSTR 1 in Excel?
1. Unzip the downloaded file
2. Run the GST Offline Tool.exe from the extracted folder.
3. Complete the installation.
4. Open the GSTR1_Excel_Workbook_Template_V1.5.xlsx
5. Fill the data in above excel file.
How do I upload gstr1?
1. Open the installed GST offline Tool (Icon on Desktop)
2. Import the excel data file in the above offline tool.
3. Generate the JSON file.
4. Login to GST portal.
5. Upload the JSON file by choosing “Prepare Offline” option.
How do I file the GSTR 1 Return?
1. Choose “Prepare Online” Option
2. Verify the details and click on submit.
3. Click on “File Return” to file the return.
How to show 6% IGST OR 3% CGST in GSTR 1?
A new concessional GST tax rate of 6% IGST or 3% CGST+ 3% SGST has been implemented for certain goods vide Notification No. 02/2022 dated 31st March 2022.
Thus, the changes are being made to the GST portal to include this rate in GSTR-1. Hence as a temporary measure, taxpayers who have to report goods at this rate may do so by reporting the entries in the 5% heading and then manually increasing the system computed tax amount to 6%.
The taxpayer can do this by entering the value in the ‘Taxable value’ column next to the 5% tax rate. Later the taxpayer has to increase the system computed tax-amount to 6% IGST or 3% CGST + 3% SGST in the ‘Amount of Tax’ column. This has to update under the relevant Table, namely B2B, B2C or Export, as applicable.
This process will ensure that the correct tax amount is reported in GSTR-1. The GSTN team will update this rate change provision shortly on the GST portal.
Read: How to File Returns under QRMP Scheme?
Important Links:
- Know the GSTR 1 Due date
- Late fees of GSTR 1
- Online and offline GSTR 1 Filing Process
- GST Late fees,Interest, penalty Calculator | Waive off Notification
- Table 9 of GSTR 1 Amendment for Claiming Input tax credit refund