The reason the solution you found on the internet is no working is because of the line that starts var colCount. The variable mytable only has two elements being <thead> and <tbody>. The var colCount line is looking for all the elements within mytable that are <tr>. The best thing you can do is give an id to your <thead> and <tbody> and then grab all the values based on that. Say you had <thead id='headers'> :
function write_headers_to_excel()
{
  str="";

  var myTableHead = document.getElementById('headers');
  var rowCount = myTableHead.rows.length;
  var colCount = myTableHead.getElementsByTagName("tr")[0].getElementsByTagName("th").length;

var ExcelApp = new ActiveXObject("Excel.Application");
var ExcelSheet = new ActiveXObject("Excel.Sheet");
ExcelSheet.Application.Visible = true;

for(var i=0; i<rowCount; i++)
{
    for(var j=0; j<colCount; j++)
    {
        str= myTableHead.getElementsByTagName("tr")[i].getElementsByTagName("th")[j].innerHTML;
        ExcelSheet.ActiveSheet.Cells(i+1,j+1).Value = str;
    }
}

}
and then do the same thing for the <tbody> tag.
EDIT: I would also highly recommend using jQuery. It would shorten this up to:
function write_to_excel()
{
 var ExcelApp = new ActiveXObject("Excel.Application");
 var ExcelSheet = new ActiveXObject("Excel.Sheet");
 ExcelSheet.Application.Visible = true;

  $('th, td').each(function(i){
    ExcelSheet.ActiveSheet.Cells(i+1,i+1).Value = this.innerHTML;
  });
}
Now, of course, this is going to give you some formatting issues but you can work out how you want it formatted in Excel.
EDIT: To answer your question about how to do this for n number of tables, the jQuery will do this already. To do it in raw Javascript, grab all the tables and then alter the function to be able to pass in the table as a parameter. For instance:
var tables = document.getElementsByTagName('table');
for(var i = 0; i < tables.length; i++)
{
  write_headers_to_excel(tables[i]);
  write_bodies_to_excel(tables[i]);
}
Then change the function write_headers_to_excel() to function write_headers_to_excel(table). Then change var myTableHead = document.getElementById('headers'); to var myTableHead = table.getElementsByTagName('thead')[0];. Same with your write_bodies_to_excel() or however you want to set that up.
Время на прочтение
2 мин
Количество просмотров 58K
Введение
Всем привет! Сегодня я опишу довольно тривиальную, но нигде не освещенную тему экспорта из страницы данных в Excel. На мое удивление сам процесс не описан нигде в полной мере. Итак, приступим.
Все написано до нас
Подумал я и начал искать, нашел очень быстро SheetJS , но, боже мой, как там запущено все! Если с форматированием еще можно справиться, то стили — это головная боль.
Все написано до нас. Подход 2
В старом-старом SharePoint 2007 есть такая возможность экспортировать эксель файл, на удивление это работает до сих пор и хорошо поддается описанию.
Что нужно:
- Современный браузер (проверьте в старых)
- Отформатированная таблица
- Colspan, rowspan, border — знание табличной верстки
var tableToExcel = (function() {
		var uri = 'data:application/vnd.ms-excel;base64,'
		, template = '<html xmlns:o="urn:schemas-microsoft-com:office:office" xmlns:x="urn:schemas-microsoft-com:office:excel" xmlns="http://www.w3.org/TR/REC-html40"><head><!--[if gte mso 9]><xml><x:ExcelWorkbook><x:ExcelWorksheets><x:ExcelWorksheet><x:Name>{worksheet}</x:Name><x:WorksheetOptions><x:DisplayGridlines/></x:WorksheetOptions></x:ExcelWorksheet></x:ExcelWorksheets></x:ExcelWorkbook></xml><![endif]--><meta http-equiv="content-type" content="text/plain; charset=UTF-8"/></head><body><table>{table}</table></body></html>'
		, base64 = function(s) { return window.btoa(unescape(encodeURIComponent(s))) }
		, format = function(s, c) {
			return s.replace(/{(w+)}/g, function(m, p) { return c[p]; })
		}
		, downloadURI = function(uri, name) {
		    var link = document.createElement("a");
		    link.download = name;
		    link.href = uri;
		    link.click();
		}

		return function(table, name, fileName) {
			if (!table.nodeType) table = document.getElementById(table)
				var ctx = {worksheet: name || 'Worksheet', table: table.innerHTML}
			var resuri = uri + base64(format(template, ctx))
			downloadURI(resuri, fileName);
		}
	})();
    // params: element id, sheet name, file name
    tableToExcel('resultTable','Смета', 'Ремрайон_смета.xls');
Форматирование
Оформите саму сетку в таблице с помощью атрибутов colspan, rowspan, добавьте стили и после этого вызывайте генерацию файла.
В заключение
Могу ответить в комментах на ваши вопросы.
Table to Excel 2

Export HTML table to valid excel file effortlessly.
This library uses exceljs/exceljs under the hood to create the excel.
(Initial version of this library was using protobi/js-xlsx, it can be found here)
Installation
Browser
Just add a script tag:
<script type="text/javascript" src="../dist/tableToExcel.js"></script>
Node
npm install @linways/table-to-excel --save
import TableToExcel from "@linways/table-to-excel";
Usage
Create your HTML table as normal.
To export content of table #table1 run:
TableToExcel.convert(document.getElementById("table1"));
or
TableToExcel.convert(document.getElementById("table1"), {
  name: "table1.xlsx",
  sheet: {
    name: "Sheet 1"
  }
});
Check this pen for working example.
Cell Types
Cell types can be set using the following data attributes:
| Attribute | Description | Possible Values |
|---|---|---|
data-t |
To specify the data type of a cell | s : String (Default)n : Number b : Boolean d : Date |
data-hyperlink |
To add hyper link to cell | External URL or hyperlink to another sheet |
data-error |
To add value of a cell as error |
Example:
<!-- for setting a cell type as number -->
<td data-t="n">2500</td>
<!-- for setting a cell type as date -->
<td data-t="d">05-23-2018</td>
<!-- for setting a cell type as boolean. String "true/false" will be accepted as Boolean-->
<td data-t="b">true</td>
<!-- for setting a cell type as boolean using integer. 0 will be false and any non zero value will be true -->
<td data-t="b">0</td>
<!-- For adding hyperlink -->
<td data-hyperlink="https://google.com">Google</td>
Cell Styling
All styles are set using data attributes on td tags.
There are 5 types of attributes: data-f-*, data-a-*, data-b-*, data-fill-* and data-num-fmt which corresponds to five top-level attributes font, alignment, border, fill and numFmt.
| Category | Attribute | Description | Values |
|---|---|---|---|
| font | data-f-name |
Font name | «Calibri» ,»Arial» etc. |
data-f-sz |
Font size | «11» // font size in points | |
data-f-color |
Font color | A hex ARGB value. Eg: FFFFOOOO for opaque red. | |
data-f-bold |
Bold | true or false |
|
data-f-italic |
Italic | true or false |
|
data-underline |
Underline | true or false |
|
data-f-strike |
Strike | true or false |
|
| Alignment | data-a-h |
Horizontal alignment | left, center, right, fill, justify, centerContinuous, distributed |
data-a-v |
Vertical alignment | bottom, middle, top, distributed, justify |
|
data-a-wrap |
Wrap text | true or false |
|
data-a-indent |
Indent | Integer | |
data-a-rtl |
Text direction: Right to Left | true or false |
|
data-a-text-rotation |
Text rotation | 0 to 90 | |
| -1 to -90 | |||
| vertical | |||
| Border | data-b-a-s |
Border style (all borders) | Refer BORDER_STYLES |
data-b-t-s |
Border top style | Refer BORDER_STYLES |
|
data-b-b-s |
Border bottom style | Refer BORDER_STYLES |
|
data-b-l-s |
Border left style | Refer BORDER_STYLES |
|
data-b-r-s |
Border right style | Refer BORDER_STYLES |
|
data-b-a-c |
Border color (all borders) | A hex ARGB value. Eg: FFFFOOOO for opaque red. | |
data-b-t-c |
Border top color | A hex ARGB value. | |
data-b-b-c |
Border bottom color | A hex ARGB value. | |
data-b-l-c |
Border left color | A hex ARGB value. | |
data-b-r-c |
Border right color | A hex ARGB value. | |
| Fill | data-fill-color |
Cell background color | A hex ARGB value. |
| numFmt | data-num-fmt |
Number Format | «0» |
| «0.00%» | |||
| «0.0%» // string specifying a custom format | |||
| «0.00%;(0.00%);-;@» // string specifying a custom format, escaping special characters |
BORDER_STYLES: thin, dotted, dashDot, hair, dashDotDot, slantDashDot, mediumDashed, mediumDashDotDot, mediumDashDot, medium, double, thick
Exclude Cells and rows
To exclude a cell or a row from the exported excel add data-exclude="true" to the corresponding td or tr.
Example:
<!-- Exclude entire row -->
<tr data-exclude="true">
  <td>Excluded row</td>
  <td>Something</td>
</tr>

<!-- Exclude a single cell -->
<tr>
  <td>Included Cell</td>
  <td data-exclude="true">Excluded Cell</td>
  <td>Included Cell</td>
</tr>
Column Width
Column width’s can be set by specifying data-cols-width in the <table> tag.
data-cols-width accepts comma separated column widths specified in character count .
data-cols-width="10,20" will set width of first coulmn as width of 10 charaters and second column as 20 characters wide.
Example:
<table data-cols-width="10,20,30">
  ...
</table>
Row Height
Row Height can be set by specifying data-height in the <tr> tag.
Example:
<tr data-height="42.5">
  <td>Cell 1</td>
  <td>Cell 2</td>
</tr>
Release Changelog
1.0.0
Migration Guide for migrating from V0.2.1 to V1.0.0
- Changed the backend to Exceexceljs/exceljslJS
- Added border color
- Option to set style and color for all borders
- Exclude row
- Added text underline
- Added support for hyperlinks
- Text intent
- RTL support
- Extra alignment options
- String «true/false» will be accepted as Boolean
- Changed border style values
- Text rotation values changed
1.0.2
- Fixed bug in handling multiple columns merges in a sheet
1.0.3
- Option to specify row height
![]()
tato
Posted on Apr 16, 2022
![]()
![]()
![]()
![]()
![]()
Spreadsheets are one of the most important format that stores and calculates data, and are also key components of products that focus on online document.
In this blog, we will see how to create a rich-featured javascript spreadsheet in just 10 minutes.
This is what it will look like when you finish:

Setup
Let’s start by creating an empty project with create-react-app
If you already have a react project, you can skip this step.
npx create-react-app my-spreadsheet
Enter fullscreen mode
Exit fullscreen mode
or if you are using yarn
yarn create react-app my-spreadsheet
Enter fullscreen mode
Exit fullscreen mode
Then, go into my-spreadsheet folder, install our spreadsheet library
# using npm
npm install @fortune-sheet/react
# or using yarn
yarn add @fortune-sheet/react
Enter fullscreen mode
Exit fullscreen mode
Using the library
Replace src/App.js with the following content
import { Workbook } from "@fortune-sheet/react";
import "@fortune-sheet/react/dist/index.css"


function App() {
  return <Workbook data={[{ name: "Sheet1" }]} />
}

export default App;
Enter fullscreen mode
Exit fullscreen mode
Add the following lines into src/index.css
html, body, #root {
  height: 100%;
}
Enter fullscreen mode
Exit fullscreen mode
Great, all things are set up!
Now, start the project by running
# using npm
npm start
# or using yarn
yarn start
Enter fullscreen mode
Exit fullscreen mode
and there you go!
You can play around it and try the features.
Next
In the next blog we will show you how to persist sheet data and make it collabrative, which will end up like this:

The spreadsheet library is completely opensource, for more information, check out
https://github.com/ruilisi/fortune-sheet
It is under active development, feedbacks are appreciated!
In this post we’ll look at how to create XLSX documents in JavaScript with more advanced features such as custom styling and formulas using the xlsx & js-xlsx packages. This works in both NodeJS and React.
- What we are Making
- Installing Requirements
- Data Types
- String
- Date
- Number
- Styling
- Font
- Alignment
- Fill
- Formulas
- How do I Make it Work?
- Formula Example
What we are Making
- If you only need to write text to your XLSX document and don’t require any styling, then the basic version of this guide may be quicker and more suitable.
Installing Requirements
Install the xlsx & js-xlsx packages using the following command:
Data Types
Each sheet in the document will be represented by an Object. The keys of this Object will be the name of the cells (A1, A2, B2, etc).
Each cell in our output document will be represented by another Object. This object will contain information such as the value of the cell, styling, and the output format (number, date, percentage, etc).
More information about supported data types can be found on the XLSX package documentation page here.
Time for examples!
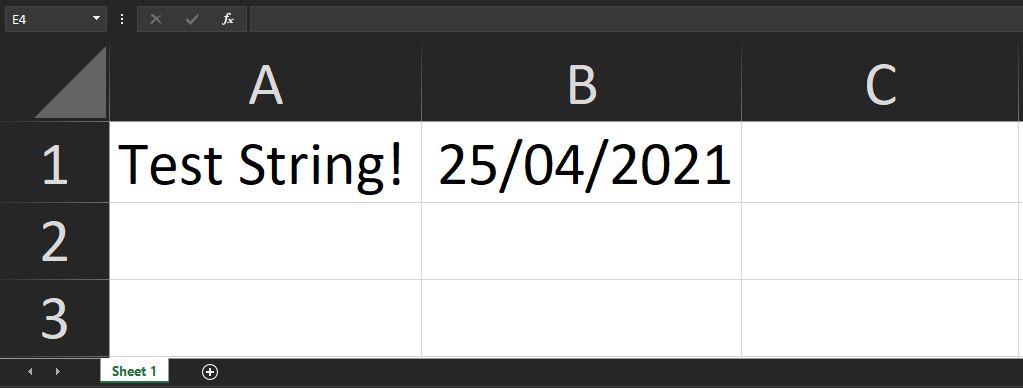
String
1 2 3 4 5 6 7 8 9 10 11 12 13 14 15 16 17 18 19 20 21 |
// import XLSX from 'xlsx'; // Use this for React const XLSX = require('xlsx'); const JS_XLSX = require('js-xlsx'); // Create a new blank XLSX Document let workbook = XLSX.utils.book_new(); // The data that will be added to the sheet let worksheetData = { '!ref': 'A1:A1', // Sheet Range (Which cells will be included in the output) 'A1': { t: 's', // Type v: 'Test String!', // Value }, }; // Add the sheet to the workbook XLSX.utils.book_append_sheet(workbook, worksheetData, 'Sheet 1'); // Save the XLSX File JS_XLSX.writeFile(workbook, 'FILE_NAME.xlsx'); |

- The
!refmust contain the output range of the sheet. Cells that are not in this range will not be rendered. - The
tkey in theA1Object stands forType. The value of's'stands forString/Text. - The
vkey in theA1Object stands forValue. The value here is the text we want in the cell.
Date
To insert a Date, we use the a value of 'd' in the Type field:
1 2 3 4 5 6 7 8 |
let worksheetData = { '!ref': 'A1:B1', 'A1': { t: 's', v: 'Test String!' }, 'B1': { t: 'd', // Type v: (new Date()) // Value } }; |
Number
When working with numbers we need to specify the number format. We do this by adding another key s which stands for Style/Theme. An Object must be provided as the value and contain a key called numFmt which specifies the number format (Integer, Float, Percentage, Fraction, etc).
1 2 3 4 5 6 7 8 9 10 11 12 13 14 15 16 17 18 19 20 21 22 23 24 25 26 27 28 29 30 31 32 33 |
let worksheetData = { '!ref': 'A1:C2', 'A1': { t:'n', // Type v: 256, // Value s: { numFmt: 1 } // Style }, 'B1': { t:'n', v: 3.14159, s: { numFmt: 2 } }, 'C1': { t:'n', v: 0.47836, s: { numFmt: 10 } }, 'A2': { t:'n', v: 0.47836, s: { numFmt: 11 } }, 'B2': { t:'n', v: 0.47836, s: { numFmt: 12 } }, 'C2': { t:'n', v: 21567.489, s: { numFmt: '_-"$"* #,##0.00_-;\-"$"* #,##0.00_-;_-"$"* "-"??_-;[email protected]_-' }, }, }; |
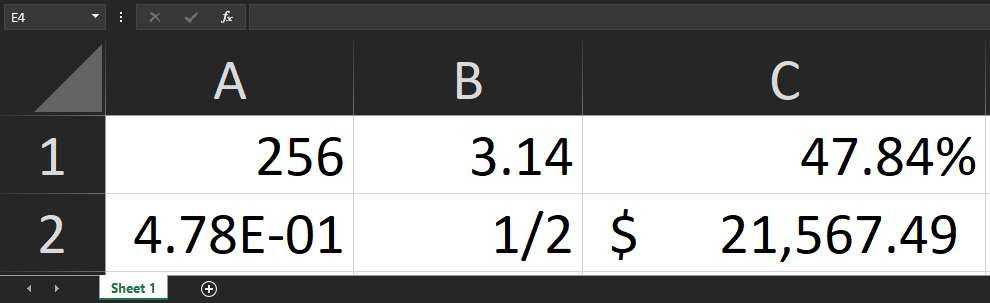
numFmt: 1means Integer (1, 2, 3 , etc).numFmt: 2means Float (0.523, 11.25, etc).numFmt: 10means Percentage (0.85%, 59.23%, etc).numFmt: 11means Scientific Notation (3.94E+03, 6.85E-01, etc).numFmt: 12means Single Digit Fraction (1/3, 6/7, etc).numFmt: '_-"$"* #,##0.00_-;\-"$"* #,##0.00_-;_-"$"* "-"??_-;[email protected]_-'mean Accounting mode ($23,582.64, $0.32, etc).- A more complete list of these codes can be found here.
Styling
We can modify the styling by supplying additional parameters to the Object in the s field.
Documentation with additional options can be found here.
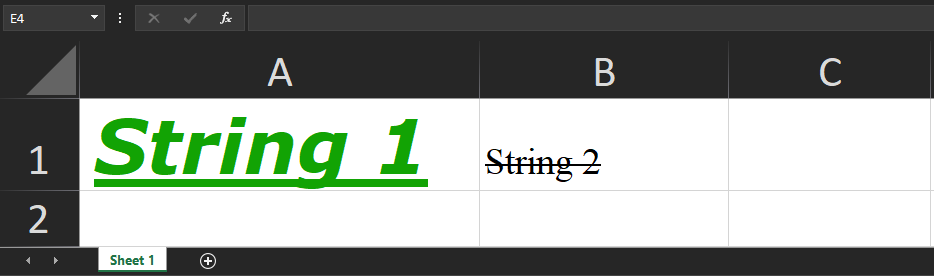
Font
1 2 3 4 5 6 7 8 9 10 11 12 13 14 15 16 17 18 19 20 21 22 23 24 25 26 27 28 |
let worksheetData = { '!ref': 'A1:B1', 'A1': { t: 's', v: 'String 1', s: { font: { name: 'Verdana', sz: 20, bold: true, underline: true, italic: true, color: { rgb: 'FF12A304' }, // Hex Value: ARGB } } }, 'B1': { t: 's', v: 'String 2', s: { font: { name: 'Times New Roman', sz: 10, strike: true, } } }, }; |
Alignment
1 2 3 4 5 6 7 8 9 10 11 12 13 14 15 16 17 18 19 20 21 22 23 24 25 26 27 28 29 |
let worksheetData = { '!ref': 'A1:B1', 'A1': { t: 's', v: 'String 1', s: { font: { name: 'Verdana', }, alignment: { horizontal: 'left', vertical: 'bottom', } } }, 'B1': { t: 's', v: 'String 2', s: { font: { name: 'Arial', }, alignment: { horizontal: 'right', vertical: 'top', } } }, }; |

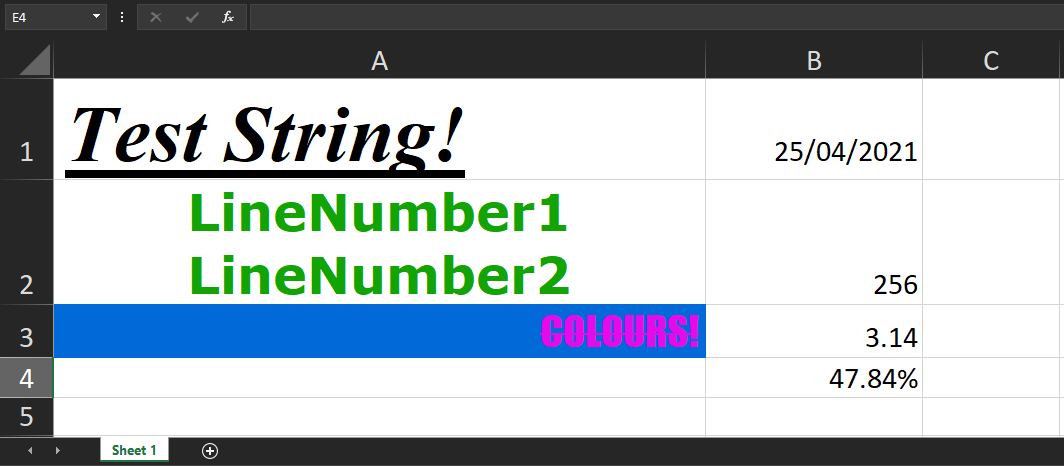
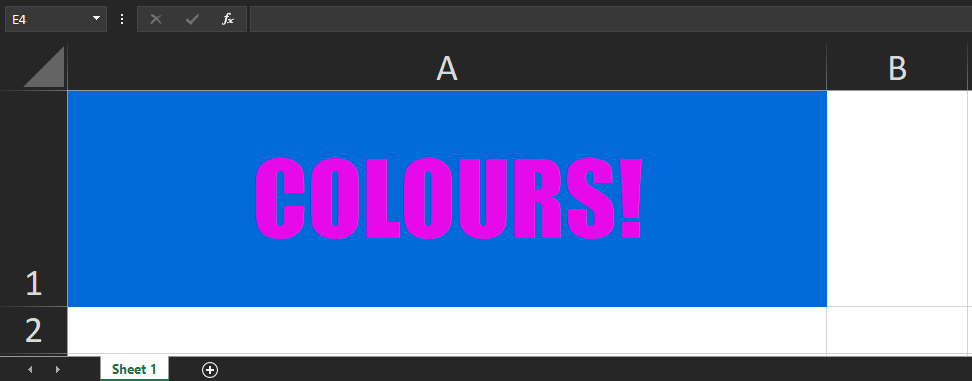
Fill
1 2 3 4 5 6 7 8 9 10 11 12 13 14 15 16 17 18 19 20 21 |
let worksheetData = { '!ref': 'A1:B1', 'A1': { t:'s', v: 'COLOURS!', s: { font: { name: 'IMPACT', sz: 32, color: { rgb: 'FFE609EA' }, // ARGB Hex Value }, fill: { fgColor: { rgb: 'FF0269D8' }, // ARGB Hex Value }, alignment: { horizontal: 'center', vertical: 'center', } } }, }; |
Formulas
At the time of writing the js-xlsx module doesn’t yet support formulas. This is inconvenient because the xlsx module does support formulas, but it doesn’t support styling. We don’t want to choose between styling and formulas, we want both.
Luckily, there are smart people who’ve had the same issue and made a fix!
How do I Make it Work?
For reference the package versions being used in this guide are:
js-xlsx: 0.8.22xlsx: 0.16.9
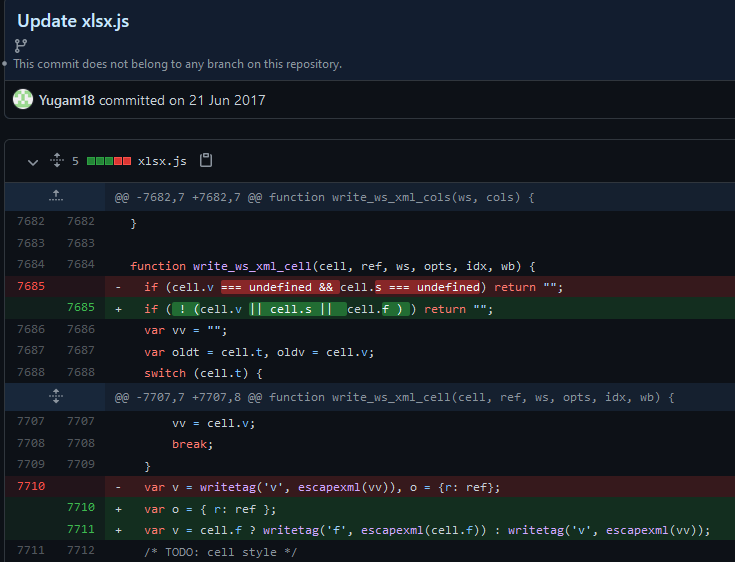
From the above screenshot we can add formula support into js-xlsx with 2 small code changes:
- Open the file
node_modules/js-xlsx/xlsx.js. - Replace line
7685with the following line:1
if ( ! (cell.v || cell.s || cell.f ) ) return "";
- Replace line
7710with the following 2 lines:1 2
var o = { r: ref }; var v = cell.f ? writetag('f', escapexml(cell.f)) : writetag('v', escapexml(vv));
- Done!!!
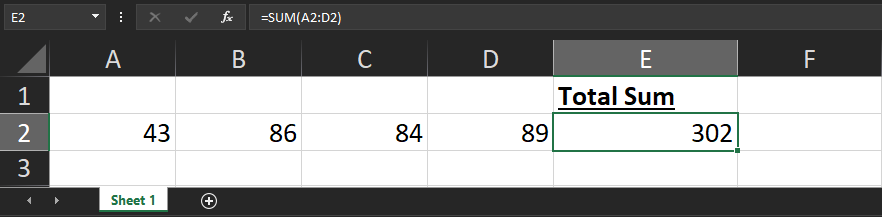
Formula Example
To add a formula we need to create an f key in our cell Object and store our formula there:
1 2 3 4 5 6 7 8 9 10 11 12 13 14 15 16 17 18 |
let worksheetData = { '!ref': 'A1:E2', // Generate some random values in the second row 'A2': { t: 'n', v: Math.round(Math.random()*100), s: { numFmt: 1 } }, 'B2': { t: 'n', v: Math.round(Math.random()*100), s: { numFmt: 1 } }, 'C2': { t: 'n', v: Math.round(Math.random()*100), s: { numFmt: 1 } }, 'D2': { t: 'n', v: Math.round(Math.random()*100), s: { numFmt: 1 } }, // Add a header 'E1': { t: 's', v: 'Total Sum', s: { font: { bold: true, underline: true } } }, // Add formula 'E2': { t: 'n', f: 'SUM(A2:D2)' }, }; |