
![]()

ExcellentExport.js
-
❤️ Sponsor ExcellentExport.js project❤️
-
JavaScript export to Excel or CSV.
-
A quick JavaScript library to create export to Excel/CSV from HTML tables in the browser. No server required.
-
As part of the new version 3.0.0+, there is support for XLSX. The drawback is that the library is 200+ KB.
-
Check My Blog Page for Testing :
JavaScript export to ExcelExcellentExport.js update: JavaScript export to Excel and CSV
Revision history:
3.9.3
- Fix TypeScript exported types
3.9.0
- Cell types and formats!!! Now you can define the cell type and format. For example, you can define a cell as a date or a number. You can also define the format of the cell. For example, you can define a cell as a date with the format «dd/mm/yyyy» or a number with the format «#,##0.00».
3.8.1
- Activate XLSX compression by default. The example of index.bigtable.html went from 18Mb to 3Mb.
- Update npm dependencies to fix vulnerabilities
- Update to latest version of TypeScript
- Reduced size of the library from 912 KB to 277 KB!!!
3.8.0
- Allow RTL options on the whole file or sheet.
- Update npm dependencies to fix vulnerabilities
3.7.3
- Fix (#591) remove columns parameter. Now it is not affected by repeated column numbers nor its order.
3.7.2
- Update npm dependencies to fix vulnerabilities
3.7.1
- Update npm dependencies to fix vulnerabilities
- Start using Dependabot and get rid of Dependabot-preview
3.7.0
- Added option
openAsDownload: boolean. Use this option to download as a file without using an anchor tag. So download can be triggered from a button. - Update npm dependencies to fix vulnerabilities
3.6.0
- Added sponsor link to the project ❤️ Sponsor ExcellentExport.js project❤️
- Transform the project from JavaScript to TypeScript
- Configure Jest as test runner
- Update npm dependencies to fix vulnerabilities
3.5.0
- Add fixValue and fixArray functions to configuration: these configuration functions can be used to manipulate the values of the cells.
- Update npm dependencies to fix vulnerabilities
3.4.3
- Update npm dependencies to fix vulnerabilities
3.4.2
- Remove ES6 function syntax to support IE11
- Update npm dependencies to fix vulnerabilities
3.4.0
- Configure TravisCI on GitHub
- Update npm dependencies to fix vulnerabilities
3.3.0
- Remove columns by index
- Filter rows by value
- Updated build to Webpack 4.x.x
3.2.1
- Update npm dependencies to fix vulnerabilities
3.2.0
- Update npm dependencies to fix vulnerabilities
3.1.0
- Fix old API for base64 and escaping problem.
3.0.0
- XLSX support. This bumps the build size to 640 KB.
- New API : ExcellentExport.convert(…)
- Autogenerate download filename.
- Data input from arrays or HTML Tables.
- Multiple sheets for XLS or XLSX formats.
2.1.0
- Add Webpack build.
- Create UMD JavaScript module. Library can be loaded as a module (import, RequireJS, AMD, etc…) or standalone as window.ExcelentExport.
2.0.3
- Fix export as a module.
- Changed minifier to UglifyJS.
2.0.2
- Fix CSV Chinese characters and other special characters display error in Windows Excel.
- Fix URL.createObjectURL(…) on Firefox.
2.0.0
- Now it can export to big files +2MB.
- Minimum IE 11.
- Links open with URL.createObjectURL(…).
- NPM package available.
- Using Semantic versioning (2.0.0 instead of 2.0).
- Module can be loaded standalone or with RequireJS.
- Change license to MIT.
1.5
- Possibility to select a CSV delimiter.
- Bower package available.
- Compose package available.
1.4
- Add LICENSE.txt with GPL v3
- UTF-8 characters fixed.
1.3
- Added minified version
1.1
- Added CSV data export
1.0
- Added Excel data export
Compatibility
- Firefox
- Chrome
- Internet Explorer 11+
Install
npm
npm install excellentexport --save
yarn
bower
bower install excellentexport
Load
Include script in your HTML:
<script type="text/javascript" src="dist/excellentexport.js"></script>
Include script in your HTML using CDN:
<script type="text/javascript" src="https://cdn.jsdelivr.net/npm/excellentexport@3.4.3/dist/excellentexport.min.js"></script>
Require.js
<script src="http://requirejs.org/docs/release/2.3.6/minified/require.js"></script>
<script>
    require(['dist/excellentexport'], function(ee) {
        window.ExcellentExport = ee;
    });
</script>
ES6 import
import ExcellentExport from 'excellentexport';
Usage
<table id="datatable">
    <tr>
        <td>100</td> <td>200</td> <td>300</td>
    </tr>
    <tr>
        <td>400</td> <td>500</td> <td>600</td>
    </tr>
</table>

<a download="somedata.xls" href="#" onclick="return ExcellentExport.excel(this, 'datatable', 'Sheet Name Here');">Export to Excel</a>
<a download="somedata.csv" href="#" onclick="return ExcellentExport.csv(this, 'datatable');">Export to CSV</a>
<!-- new API, xlsx -->
<a download="somedata.xlsx" href="#" onclick="return ExcellentExport.convert({ anchor: this, filename: 'data_123.array', format: 'xlsx'},[{name: 'Sheet Name Here 1', from: {table: 'datatable'}}]);">Export to CSV</a>
API
 ExcellentExport.convert(options, sheets);

 Options:
 {
    anchor: String or HTML Element,
    format: 'xlsx' or 'xls' or 'csv',
    filename: String,
    rtl: Use Right-to-left characters, boolean (optional)
 }

 Sheets must be an array of sheet configuration objects. Sheet description:
 [
    {
        name: 'Sheet 1', // Sheet name
        from: {
            table: String/Element, // Table ID or table element
            array: [...] // Array with the data. Array where each element is a row. Every row is an array of the cells.
        },
        removeColumns: [...], // Array of column indexes (from 0)
        filterRowFn: function(row) {return true}, // Function to decide which rows are returned
        fixValue: function(value, row, column) {return fixedValue} // Function to fix values, receiving value, row num, column num
        fixArray: function(array) {return array} // Function to manipulate the whole data array
        rtl: Use Right-to-left characters, boolean (optional)
        formats: [...] // Array of formats for each column. See formats below.
        ...
    },
    {
        ...
    }, ...
]
fixValue example
This is an example for the fixValue function to handle HTML tags inside a table cell.
It transforms BR to line breaks and then strips all the HTML tags.
            fixValue: (value, row, col) => {
                let v = value.replace(/<br>/gi, "n");
                let strippedString = v.replace(/(<([^>]+)>)/gi, "");
                return strippedString;
            }
Formats
You can specify an array with the formats for a specific cell range (i.e. A1:A100, A1:D100, A1:H1, etc).
Each element in the format array consists on:
{
    "range": "A1:A100", // Range of cells to apply the format, mandatory
    "format": {
        "type": "<cell_type>", // Type of format, mandatory
        "pattern": "<pattern>" // Pattern, optional
    }
}
Example:
          formats: [
            {
              range: "C2:C20",
              format: {
                type: "n",
                pattern: "0.00",
              },
            },
            {
              range: "C2:C20",
              format: ExcellentExport.formats.NUMBER,
            }
          ],
format can be used from one of the predefined types if you use TypeScript
cell_type can be one of the followint:
's': String
'n': Number
'd': Date
'b': Boolean
pattern is a string with the format pattern used in Excel. For example:
'0' // Integer
'0.00' // 2 decimals
'dd/mm/yyyy' // Date
'dd/mm/yyyy hh:mm:ss' // Date and time
'0.00%' // Percentage
'0.00e+00' // Scientific notation
'@' // Text
Notes
- IE8 or lower do not support data: url schema.
- IE9 does not support data: url schema on links.
- IE10 and above and Edge are supported via the Microsoft-specific
msOpenOrSaveBlobmethod.
Test
python 2.x:
    python -m SimpleHTTPServer 8000

python 3.x:
    python -m http.server 8000
Build
Install dependencies:
Build development version dist/excellentexport.js
Build publish version of dist/excellentexport.js
Publish
Время на прочтение
2 мин
Количество просмотров 58K
Введение
Всем привет! Сегодня я опишу довольно тривиальную, но нигде не освещенную тему экспорта из страницы данных в Excel. На мое удивление сам процесс не описан нигде в полной мере. Итак, приступим.
Все написано до нас
Подумал я и начал искать, нашел очень быстро SheetJS , но, боже мой, как там запущено все! Если с форматированием еще можно справиться, то стили — это головная боль.
Все написано до нас. Подход 2
В старом-старом SharePoint 2007 есть такая возможность экспортировать эксель файл, на удивление это работает до сих пор и хорошо поддается описанию.
Что нужно:
- Современный браузер (проверьте в старых)
- Отформатированная таблица
- Colspan, rowspan, border — знание табличной верстки
var tableToExcel = (function() {
		var uri = 'data:application/vnd.ms-excel;base64,'
		, template = '<html xmlns:o="urn:schemas-microsoft-com:office:office" xmlns:x="urn:schemas-microsoft-com:office:excel" xmlns="http://www.w3.org/TR/REC-html40"><head><!--[if gte mso 9]><xml><x:ExcelWorkbook><x:ExcelWorksheets><x:ExcelWorksheet><x:Name>{worksheet}</x:Name><x:WorksheetOptions><x:DisplayGridlines/></x:WorksheetOptions></x:ExcelWorksheet></x:ExcelWorksheets></x:ExcelWorkbook></xml><![endif]--><meta http-equiv="content-type" content="text/plain; charset=UTF-8"/></head><body><table>{table}</table></body></html>'
		, base64 = function(s) { return window.btoa(unescape(encodeURIComponent(s))) }
		, format = function(s, c) {
			return s.replace(/{(w+)}/g, function(m, p) { return c[p]; })
		}
		, downloadURI = function(uri, name) {
		    var link = document.createElement("a");
		    link.download = name;
		    link.href = uri;
		    link.click();
		}

		return function(table, name, fileName) {
			if (!table.nodeType) table = document.getElementById(table)
				var ctx = {worksheet: name || 'Worksheet', table: table.innerHTML}
			var resuri = uri + base64(format(template, ctx))
			downloadURI(resuri, fileName);
		}
	})();
    // params: element id, sheet name, file name
    tableToExcel('resultTable','Смета', 'Ремрайон_смета.xls');
Форматирование
Оформите саму сетку в таблице с помощью атрибутов colspan, rowspan, добавьте стили и после этого вызывайте генерацию файла.
В заключение
Могу ответить в комментах на ваши вопросы.
The reason the solution you found on the internet is no working is because of the line that starts var colCount. The variable mytable only has two elements being <thead> and <tbody>. The var colCount line is looking for all the elements within mytable that are <tr>. The best thing you can do is give an id to your <thead> and <tbody> and then grab all the values based on that. Say you had <thead id='headers'> :
function write_headers_to_excel()
{
  str="";

  var myTableHead = document.getElementById('headers');
  var rowCount = myTableHead.rows.length;
  var colCount = myTableHead.getElementsByTagName("tr")[0].getElementsByTagName("th").length;

var ExcelApp = new ActiveXObject("Excel.Application");
var ExcelSheet = new ActiveXObject("Excel.Sheet");
ExcelSheet.Application.Visible = true;

for(var i=0; i<rowCount; i++)
{
    for(var j=0; j<colCount; j++)
    {
        str= myTableHead.getElementsByTagName("tr")[i].getElementsByTagName("th")[j].innerHTML;
        ExcelSheet.ActiveSheet.Cells(i+1,j+1).Value = str;
    }
}

}
and then do the same thing for the <tbody> tag.
EDIT: I would also highly recommend using jQuery. It would shorten this up to:
function write_to_excel()
{
 var ExcelApp = new ActiveXObject("Excel.Application");
 var ExcelSheet = new ActiveXObject("Excel.Sheet");
 ExcelSheet.Application.Visible = true;

  $('th, td').each(function(i){
    ExcelSheet.ActiveSheet.Cells(i+1,i+1).Value = this.innerHTML;
  });
}
Now, of course, this is going to give you some formatting issues but you can work out how you want it formatted in Excel.
EDIT: To answer your question about how to do this for n number of tables, the jQuery will do this already. To do it in raw Javascript, grab all the tables and then alter the function to be able to pass in the table as a parameter. For instance:
var tables = document.getElementsByTagName('table');
for(var i = 0; i < tables.length; i++)
{
  write_headers_to_excel(tables[i]);
  write_bodies_to_excel(tables[i]);
}
Then change the function write_headers_to_excel() to function write_headers_to_excel(table). Then change var myTableHead = document.getElementById('headers'); to var myTableHead = table.getElementsByTagName('thead')[0];. Same with your write_bodies_to_excel() or however you want to set that up.
JavaScript is a versatile platform that allows easy customization of client-side scripting tools. In some applications, it’s helpful to have some sort of spreadsheet interface that is easy to code and maintain. The SpreadJS client-side JavaScript spreadsheet component is perfect for this.
Add complete JavaScript spreadsheets into your enterprise web apps. Download SpreadJS Now!
In this blog, we will cover how to import/export to Excel in JavaScript following these steps:
- Set Up the JavaScript Spreadsheet Project
- Add Excel Import Code
- Add Data to the Imported Excel File
- Add a Sparkline
- Add Excel Export Code
Set Up the JavaScript Spreadsheet Project
To start, we can use the SpreadJS files hosted on NPM. To do this, we can install using a command line argument. Open a command prompt and navigate to the location of your application. There, you can install the required files with one command.
In this case, we need the base Spread-Sheets library, Spread-ExcelIO, and jQuery:
npm i @grapecity/spread-sheets @grapecity/spread-excelio jquery
SpreadJS isn’t dependent on jQuery, but in this case, we use it for the easy cross-origin-request support, which we will review later.
Once those are installed, we can add references to those script and CSS files in our code:
<!DOCTYPE html>
<html>
<head>
    <title>SpreadJS ExcelIO</title>
    <script src="./node_modules/jquery/dist/jquery.min.js" type="text/javascript"></script>
    <script src="https://cdnjs.cloudflare.com/ajax/libs/FileSaver.js/2014-11-29/FileSaver.min.js"></script>

    <link href="./node_modules/@grapecity/spread-sheets/styles/gc.spread.sheets.excel2013white.css" rel="stylesheet" type="text/css" />
    <script type="text/javascript" src="./node_modules/@grapecity/spread-sheets/dist/gc.spread.sheets.all.min.js"></script>
    <script type="text/javascript" src="./node_modules/@grapecity/spread-excelio/dist/gc.spread.excelio.min.js"></script>

</head>
<body>
    <div id="ss" style="height:600px; width :100%; "></div>
</body>
</html>
We will also need the FileSaver library, which we have imported in addition to the SpreadJS and jQuery files.
Then we can add a script to the page that initializes the Spread.Sheets component and a div element to contain it (since the SpreadJS spreadsheet component utilizes a canvas, this is necessary to initialize the component):
    <script type="text/javascript">
        $(document).ready(function () {
            var workbook = new GC.Spread.Sheets.Workbook(document.getElementById("ss"));
        });
    </script>
</head>
<body>
    <div id="ss" style="height:600px ; width :100%; "></div>
</body>
Add Excel Import Code
We need to create an instance of the client-side ExcelIO component that we can use to open the file:
var excelIO = new GC.Spread.Excel.IO(); Then we need to add a function to import a file. In this example, we import a local file, but you can do the same thing with a file on a server. You need to reference the location if importing a file from a server. The following is an example of an input element where the user can enter the location of the file:
<input type="text" id="importUrl" value="http://www.testwebsite.com/files/TestExcel.xlsx" style="width:300px" />Once you have that, you can directly access that value in script code:
var excelUrl = $("#importUrl").val(); The following code for the import function uses a local file for the «excelUrl» variable:
function ImportFile() {
    var excelUrl = "./test.xlsx";

    var oReq = new XMLHttpRequest();
    oReq.open('get', excelUrl, true);
    oReq.responseType = 'blob';
    oReq.onload = function () {
        var blob = oReq.response;
        excelIO.open(blob, LoadSpread, function (message) {
            console.log(message);
        });
    };
    oReq.send(null);
}
function LoadSpread(json) {
    jsonData = json;
    workbook.fromJSON(json);

    workbook.setActiveSheet("Revenues (Sales)");
}
Whether you’re referencing a file on a server or locally, you’ll need to add the following to your script inside the $(document).ready function:
$(document).ready(function () {
    $.support.cors = true;
    workbook = new GC.Spread.Sheets.Workbook(document.getElementById("ss"));
    //...
});
In this case, we need to enable Cross-Origin-Request-Support because we are potentially loading a file from a URL. Hence the $.support.cors = true; line, or else attempting to load it will result in a CORS error.
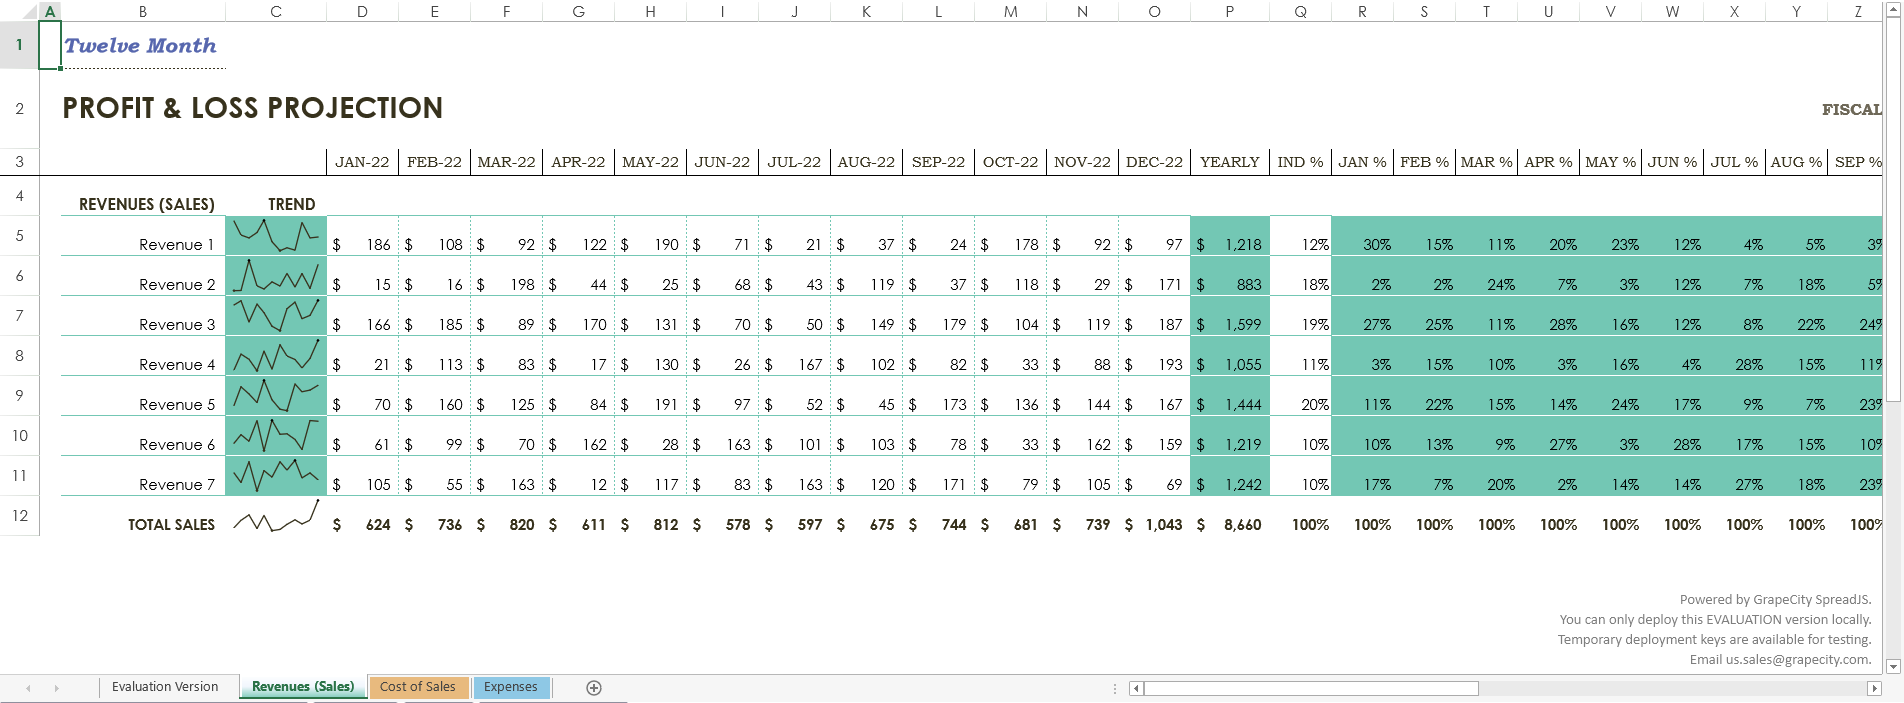
Add Data to the Imported Excel File
We import a local file using the “Profit loss statement” Excel template for this tutorial.

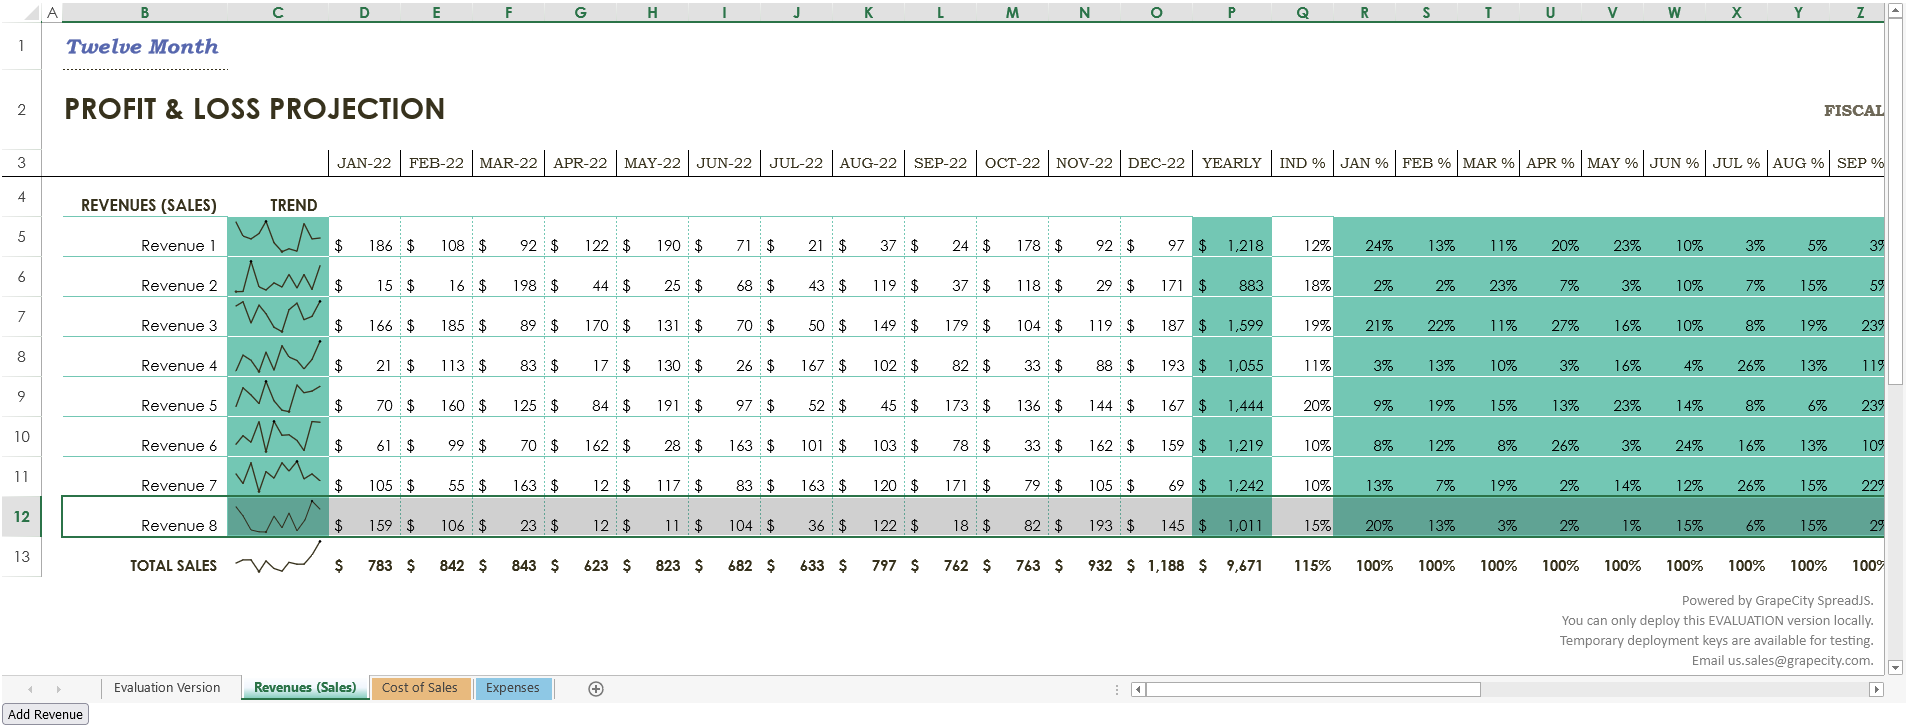
Now we can use Spread.Sheets script to add another revenue line into this file. Let’s add a button to the page that will do just that:
<button id="addRevenue">Add Revenue</button> We can write a function for the click event handler for that button to add a row and copy the style from the previous row in preparation for adding some data. To copy the style, we will need to use the copyTo function and pass in:
- the origin and destination row and column indices
- row and column count
- the CopyToOptions value for style
document.getElementById("addRevenue").onclick = function () {
    var sheet = workbook.getActiveSheet();
    sheet.addRows(newRowIndex, 1);
    sheet.copyTo(10, 1, newRowIndex, 1, 1, 29, GC.Spread.Sheets.CopyToOptions.style);
}
The following script code for adding data and a Sparkline will be contained within this button click event handler. For most of the data, we can use the setValue function. This allows us to set a value in a sheet in Spread by passing in a row index, column index, and value:
sheet.setValue(newRowIndex, 1, "Revenue 8");

for (var c = 3; c < 15; c++) {
    sheet.setValue(newRowIndex, c, Math.floor(Math.random() * 200) + 10);
}
Set a SUM formula in column P to match the other rows and set a percentage for column Q:
sheet.setFormula(newRowIndex, 15, "=SUM([@[Jan]:[Dec]])")
sheet.setValue(newRowIndex, 16, 0.15);
Lastly, we can copy the formulas from the previous rows to the new row for columns R through AD using the copyTo function again, this time using CopyToOptions.formula:
sheet.copyTo(10, 17, newRowIndex, 17, 1, 13, GC.Spread.Sheets.CopyToOptions.formula); Add a Sparkline
Now we can add a sparkline to match the other rows of data. To do this, we need to provide a range of cells to get the data from and some settings for the sparkline. In this case, we can specify:
- the range of cells, we just added data to
- settings to make the sparkline look like the other sparklines in the same column
var data = new GC.Spread.Sheets.Range(11, 3, 1, 12);
var setting = new GC.Spread.Sheets.Sparklines.SparklineSetting();
setting.options.seriesColor = "Text 2";
setting.options.lineWeight = 1;
setting.options.showLow = true;
setting.options.showHigh = true;
setting.options.lowMarkerColor = "Text 2";
setting.options.highMarkerColor = "Text 1";
After that, we call the setSparkline method and specify:
- a location for the sparkline
- the location of the data
- the orientation of the sparkline
- the type of sparkline
- the settings we created
sheet.setSparkline(11, 2, data, GC.Spread.Sheets.Sparklines.DataOrientation.horizontal, GC.Spread.Sheets.Sparklines.SparklineType.line, setting); If you were to try running the code now, it might seem a little slow because the workbook is repainting every time data is changed and styles are added. To drastically speed it up and increase performance, Spread.Sheets provide the ability to suspend painting and the calculation service. Let’s add the code to suspend both before adding a row and its data and then resume both after:
workbook.suspendPaint();
workbook.suspendCalcService();
//...
workbook.resumeCalcService();
workbook.resumePaint();
Once we add that code, we can open the page in a web browser and see the Excel file load into Spread.Sheets with an added revenue row. Important: Keep in mind that Chrome doesn’t allow you to open local files for security purposes, so you need to use a web browser like Firefox to run this code successfully. Alternatively, loading a file from a website URL should open fine in any browser.
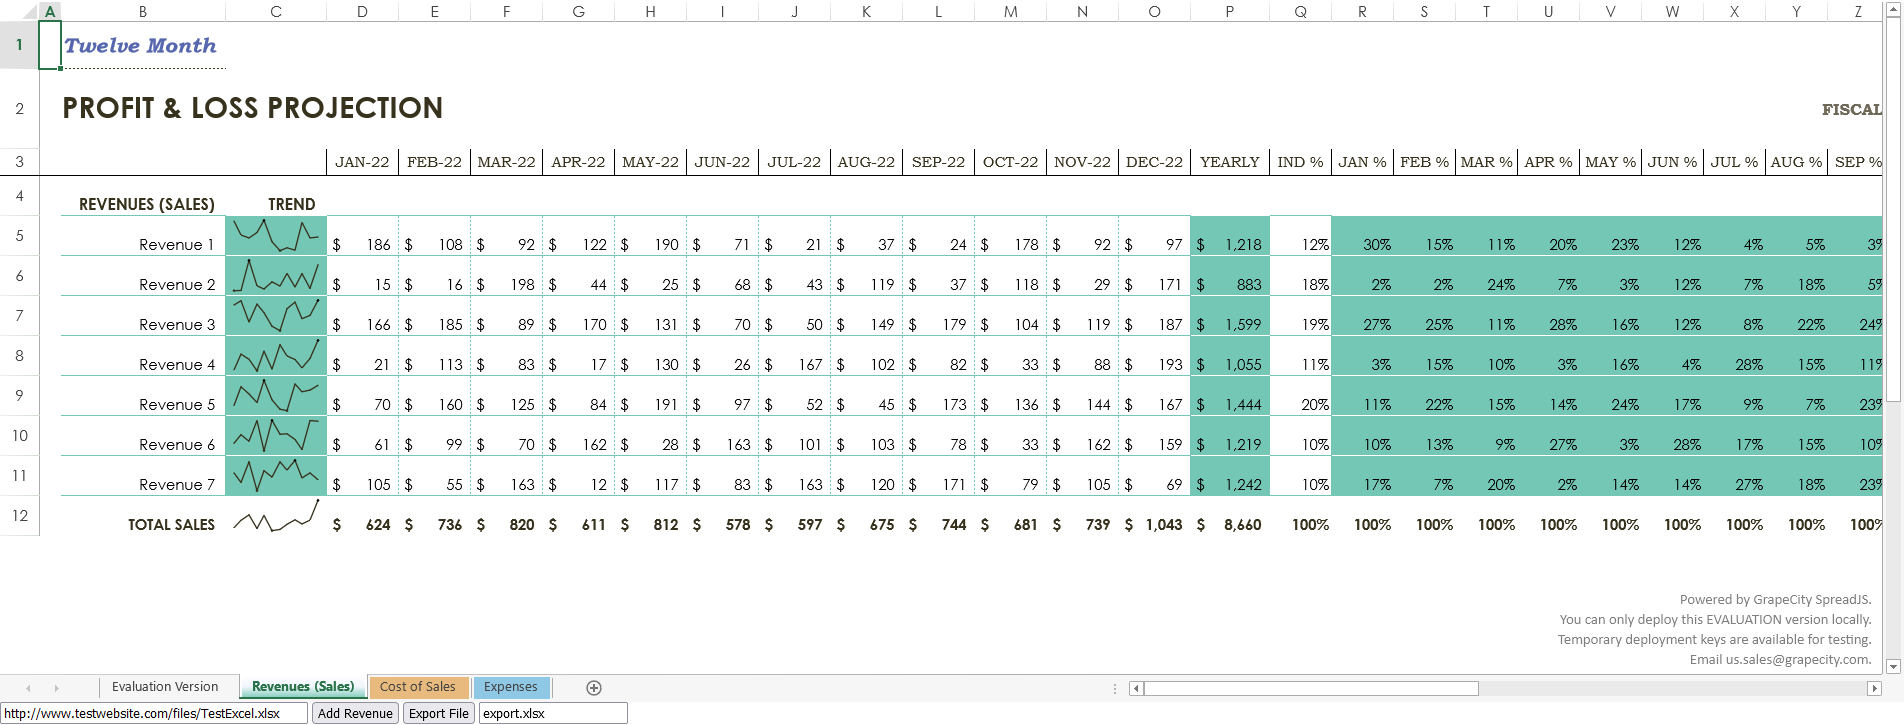
Add Excel Export Code
Finally, we can add a button to export the file with the added row. To do this, we can use the client-side ExcelIO code built into Spread.Sheets:
function ExportFile() {
    var fileName = $("#exportFileName").val();
    if (fileName.substr(-5, 5) !== '.xlsx') {
        fileName += '.xlsx';
    }
    var json = JSON.stringify(workbook.toJSON());

    excelIO.save(json, function (blob) {
        saveAs(blob, fileName);
    }, function (e) {
        if (e.errorCode === 1) {
            alert(e.errorMessage);
        }
    });
}
That code gets the export file name from an exportFileName input element. We can define it and let users name the file like so:
<input type="text" id="exportFileName" placeholder="Export file name" value="export.xlsx" /> Then we can add a button that calls this function:
<button id="export">Export File</button> document.getElementById("export").onclick = function () {
ExportFile();
} 
Once you add a revenue row, you can export the file using the Export File button. Make sure to add the FileSaver external library to allow users to save the file where they want:
<script src="https://cdnjs.cloudflare.com/ajax/libs/FileSaver.js/2014-11-29/FileSaver.min.js"></script> When the file is successfully exported, you can open it in Excel and see that the file looks like it did when it was imported, except there is now an extra revenue line that we added.
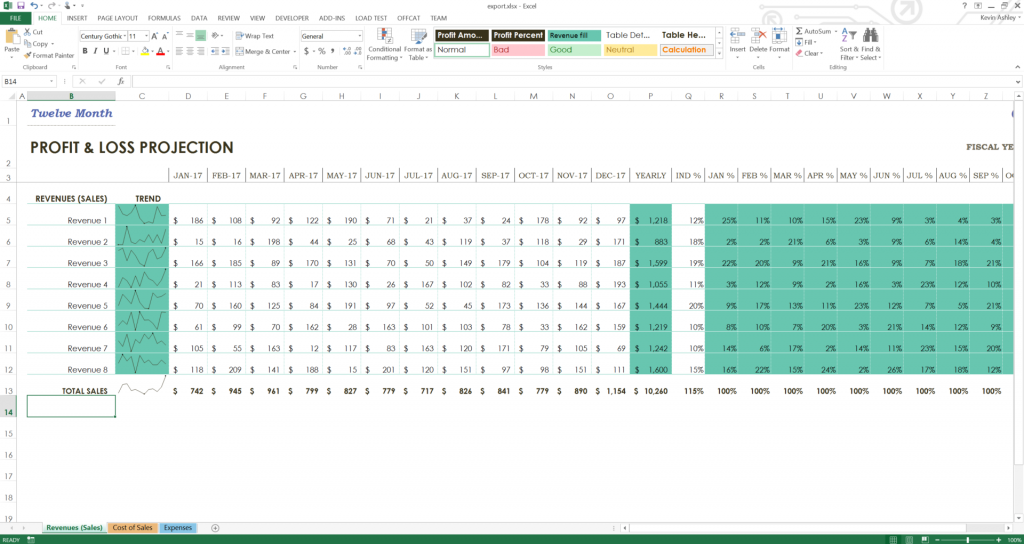
This is just one example of how you can use SpreadJS JavaScript spreadsheets to add data to your Excel files and then export them back to Excel with simple JavaScript code.
Download the sample here.
In another article series, we demonstrate how to import/export Excel spreadsheets in other Javascript frameworks:
- React
- Vue
- Angular
Add complete JavaScript spreadsheets into your enterprise web apps. Download SpreadJS Now!
In this tutorial you can find the solution of How to Export or Download the HTML Table Data in Excel Sheet by using JavaScript. Exporting Data to Excel is required feature in our web application. Because by export data functionality will helps to download data from web application to different file format for offline use of data and for this excel format is an ideal for exporting data in file for offline use. There many tutorial we have published for export data to excel at server side scripting using PHP. But if we can perform at client-side for export data into Excel sheet, so it will reduce load on server. So for this for export data to excel , here we will use JavaScript for perform client-side export data to excel sheet.
The client-side export feature will makes our web application more user-friendly. So with the help of JavaScript, we can export HTML table data to Excel format without refresh of web page. Under this tutorial, you can learn How to export HTML table data to excel using JavaScript. In this tutorial, we will use SheetJS JavaScript Library for export HTML table data to Excel.

- HTML Table Data:
- JavaScript Code:
1. HTML Table Data
For Export HTML data to Excel, here first we have to load some data in HTML table. So here we have make fetch employee table data and load in HTML table with table column like name, address, gender, designation and age. Here we have create HTML table with id employee_data. So this id we will use for fetch this HTML table data in JavaScript code. Under this HTML code we have make one button tag with id export_button, so when use has click on this button, then HTML table data will be download in Excel file format without refresh of web page using JavaScript.
<?php

$connect = new PDO("mysql:host=localhost;dbname=testing", "root", "");

$query = "SELECT * FROM tbl_employee ORDER BY name ASC";

$result = $connect->query($query);

?>

<!DOCTYPE HTML>
<html>
<head>
	<meta charset="utf-8" />
	<title>Export HTML table data to excel using JavaScript</title>
	<meta name="viewport" content="width=device-width, initial-scale=1" />
    <link rel="stylesheet" href="https://maxcdn.bootstrapcdn.com/bootstrap/4.0.0/css/bootstrap.min.css" integrity="sha384-Gn5384xqQ1aoWXA+058RXPxPg6fy4IWvTNh0E263XmFcJlSAwiGgFAW/dAiS6JXm" crossorigin="anonymous">

    <script type="text/javascript" src="https://unpkg.com/xlsx@0.15.1/dist/xlsx.full.min.js"></script>
</head>
<body>
    <div class="container">
    	<h2 class="text-center mt-4 mb-4">Export HTML table data to excel using JavaScript</h2>
    	<div class="card">
    		<div class="card-header">
    			<div class="row">
    				<div class="col col-md-6">Sample Data</div>
    				<div class="col col-md-6 text-right">
    					<button type="button" id="export_button" class="btn btn-success btn-sm">Export</button>
    				</div>
    			</div>
    		</div>
    		<div class="card-body">
    			<table id="employee_data" class="table table-striped table-bordered">
                    <tr>
                        <th>Name</th>
                        <th>Address</th>
                        <th>Gender</th>
                        <th>Designation</th>
                        <th>Age</th>
                    </tr>
                    <?php
                    foreach($result as $row)
                    {
                        echo '
                        <tr>
                            <td>'.$row["name"].'</td>
                            <td>'.$row["address"].'</td>
                            <td>'.$row["gender"].'</td>
                            <td>'.$row["designation"].'</td>
                            <td>'.$row["age"].'</td>
                        </tr>
                        ';
                    }
                    ?>
                </table>
    		</div>
    	</div>
    </div>
</body>
</html>
2. JavaScript Code
In this tutorial, we have use SheetJS JavaScript Library for export HTML table data to Excel using JavaScript. So first we have to include following SheetJS library link at header of this HTML web page.
<script type="text/javascript" src="https://unpkg.com/xlsx@0.15.1/dist/xlsx.full.min.js"></script>
In JavaScript code part, first we have make html_table_to_excel(type) function. This function has use SheetJS Library function and convert or Write HTML table data to Excel format and download in browser without refresh of web page.
Once function is ready then we have to called html_table_to_excel(type) function on button click event, so for trigger button click event, we have use addEventListener method. So when user has click on button then html_table_to_excel(type) function has been called with xlsx file type. So it will download HTML table data in .xlsx format Excel file in browser without refresh of web page at client-side.
function html_table_to_excel(type)
    {
        var data = document.getElementById('employee_data');

        var file = XLSX.utils.table_to_book(data, {sheet: "sheet1"});

        XLSX.write(file, { bookType: type, bookSST: true, type: 'base64' });

        XLSX.writeFile(file, 'file.' + type);
    }

    const export_button = document.getElementById('export_button');

    export_button.addEventListener('click', () =>  {
        html_table_to_excel('xlsx');
    });
Conclusion
This tutorial will helps you to add export feature of download HTML table data in Excel sheet without using third-party jQuery plugin or any server-side script. By follow this tutorial you can easily export HTML table data to Excel using minimal JavaScript code.
If you want to get complete source with .sql file, so please write your email address in comment box. We will send you complete source code file at your define email address.