
В прошлых двух статьях мы познакомились с библиотекой Apache POI, а также разобрались со считыванием данных из Excel документов в форматах .xls и .xlsx. Сегодня мы продолжим изучение возможностей этой библиотеки и попробуем создать новый Excel файл с формулами и стилями. Скачать проект Вы сможете в конце статьи.
Если Вы еще не знакомы с Apache POI, то рекомендую вкратце ознакомится с ее возможностями и способами ее подключения в проект по этой ссылке.
Внимание, код не очень красив и оптимизирован. Я хотел просто продемонстрировать возможности этой удобной библиотеки.
Для начала давайте создадим простой xls файл и запишем в него какие-то данные. А далее будем применять к нему стили и добавлять формулы.
Для удобной работы с данными нам потребуется дополнительный класс, который будет представлять собой модель данных, которую мы будем записывать в файл:
|
1 2 3 4 5 6 7 8 9 10 11 12 13 14 15 16 17 18 19 20 21 22 23 24 25 26 27 28 29 30 31 32 33 34 35 36 37 38 39 40 41 42 43 44 45 46 47 48 49 50 51 |
package ua.com.prologistic.model; public class DataModel { private String name; private String surname; private String city; private Double salary; public DataModel() { } public DataModel(String name, String surname, String city, Double salary) { this.name = name; this.surname = surname; this.city = city; this.salary = salary; } public String getName() { return name; } public void setName(String name) { this.name = name; } public String getSurname() { return surname; } public void setSurname(String surname) { this.surname = surname; } public String getCity() { return city; } public void setCity(String city) { this.city = city; } public Double getSalary() { return salary; } public void setSalary(Double salary) { this.salary = salary; } } |
Как видим, это простой класс с полями для имени, фамилии, города и зарплаты какого-то человека.
Ниже представлен листинг класса, в котором создается сам Excel файл:
|
1 2 3 4 5 6 7 8 9 10 11 12 13 14 15 16 17 18 19 20 21 22 23 24 25 26 27 28 29 30 31 32 33 34 35 36 37 38 39 40 41 42 43 44 45 46 47 48 49 50 51 52 53 54 55 56 57 58 59 60 61 62 63 64 65 66 67 68 69 70 71 |
package ua.com.prologistic.excel; import org.apache.poi.hssf.usermodel.HSSFSheet; import org.apache.poi.hssf.usermodel.HSSFWorkbook; import org.apache.poi.ss.usermodel.Row; import ua.com.prologistic.model.DataModel; import java.io.File; import java.io.FileOutputStream; import java.io.IOException; import java.text.ParseException; import java.util.ArrayList; import java.util.List; public class ExcelWorker { public static void main(String[] args) throws ParseException { // создание самого excel файла в памяти HSSFWorkbook workbook = new HSSFWorkbook(); // создание листа с названием «Просто лист» HSSFSheet sheet = workbook.createSheet(«Просто лист»); // заполняем список какими-то данными List<DataModel> dataList = fillData(); // счетчик для строк int rowNum = 0; // создаем подписи к столбцам (это будет первая строчка в листе Excel файла) Row row = sheet.createRow(rowNum); row.createCell(0).setCellValue(«Имя»); row.createCell(1).setCellValue(«Фамилия»); row.createCell(2).setCellValue(«Город»); row.createCell(3).setCellValue(«Зарплата»); // заполняем лист данными for (DataModel dataModel : dataList) { createSheetHeader(sheet, ++rowNum, dataModel); } // записываем созданный в памяти Excel документ в файл try (FileOutputStream out = new FileOutputStream(new File(«F:\Apache POI Excel File.xls»))) { workbook.write(out); } catch (IOException e) { e.printStackTrace(); } System.out.println(«Excel файл успешно создан!»); } // заполнение строки (rowNum) определенного листа (sheet) // данными из dataModel созданного в памяти Excel файла private static void createSheetHeader(HSSFSheet sheet, int rowNum, DataModel dataModel) { Row row = sheet.createRow(rowNum); row.createCell(0).setCellValue(dataModel.getName()); row.createCell(1).setCellValue(dataModel.getSurname()); row.createCell(2).setCellValue(dataModel.getCity()); row.createCell(3).setCellValue(dataModel.getSalary()); } // заполняем список рандомными данными // в реальных приложениях данные будут из БД или интернета private static List<DataModel> fillData() { List<DataModel> dataModels = new ArrayList<>(); dataModels.add(new DataModel(«Howard», «Wolowitz», «Massachusetts», 90000.0)); dataModels.add(new DataModel(«Leonard», «Hofstadter», «Massachusetts», 95000.0)); dataModels.add(new DataModel(«Sheldon», «Cooper», «Massachusetts», 120000.0)); return dataModels; } } |
Обратите внимание, что мы использовали try with resources — одну из особенностей Java 7. А это значит, что нам не нужно беспокоится о закрытии файла вручную. В Java 7 конструкцию try-catch-finally можно не использовать, так как ей на смену пришла try with resources, которая сама закрывает открытые файлы или потоки без вашего вмешательства.
После запуска приведенной выше программы, в корне проекта создастся файл с названием Apache POI Excel File.xls. Давайте посмотрим на его содержимое:
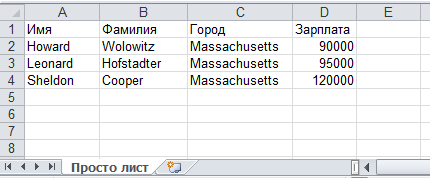
Лист Excel файла называется «Просто лист», как мы и называли, а данные расположены правильно.
Добавление стилей в Excel документ на Java
Теперь давайте поупражняемся с обновлением файла, а именно добавлением стилей. Например, выделим имя столбцов из первой строки жирным.
Для этого нам понадобится еще один метод setBoldStyle():
|
1 2 3 4 5 6 7 8 9 10 11 12 13 14 15 16 17 18 19 20 21 22 23 24 25 26 27 28 29 30 31 32 33 |
private static void setBoldStyle() throws IOException { // получаем файл с диска FileInputStream file = new FileInputStream(new File(«F:\Apache POI Excel File.xls»)); // считываем его в память HSSFWorkbook workbook = new HSSFWorkbook(file); // говорим, что хотим работать с первым листом HSSFSheet sheet = workbook.getSheetAt(0); // создаем шрифт HSSFFont font = workbook.createFont(); // указываем, что хотим его видеть жирным font.setBoldweight(HSSFFont.BOLDWEIGHT_BOLD); // создаем стиль для ячейки HSSFCellStyle style = workbook.createCellStyle(); // и применяем к этому стилю жирный шрифт style.setFont(font); // получаем первую строку листа excel файла Row row = sheet.getRow(0); // проходим по всем ячейкам этой строки for (int i = 0; i < row.getPhysicalNumberOfCells(); i++) { // применяем созданный выше стиль к каждой ячейке row.getCell(i).setCellStyle(style); } // получаем доступ к excel файлу и обновляем его try (FileOutputStream out = new FileOutputStream(new File(«F:\Apache POI Excel File.xls»))) { workbook.write(out); } catch (IOException e) { e.printStackTrace(); } System.out.println(«Excel файл успешно обновлен!»); } |
Как видите, мы просто обходим все ячейки первой строки и применяем к ней стиль BOLD.
Результат выполнения этого кода представлен ниже:

С помощью Apache POI это делается быстро и удобно.
Добавление формул в Excel документ на Java
Теперь попробуем разобраться с добавлением формул с помощью Apache POI.
Apache POI не позволяет устанавливать в ячейки значения из знаком равно: «=».
Пример:
Можно делать так:
|
cell.setCellFormula(«D2+D3+D4»); |
и вот так:
|
cell.setCellFormula(«SUM(D2:D4)»); |
Но если Вы попробуете написать так:
|
cell.setCellFormula(«=D2*D3*D4»); |
то вылетит exception с сообщением о недопустимой операции. Apache POI не позволяет работать с формулами таким образом.
И так, в теории мы подкованы, теперь добавим простую формулу. Для этого напишем еще один метод setFormula():
|
1 2 3 4 5 6 7 8 9 10 11 12 13 14 15 16 17 18 19 20 21 22 23 24 25 26 27 28 29 30 31 32 33 34 |
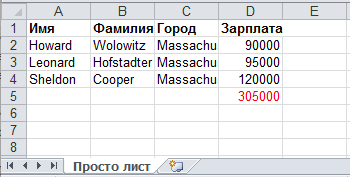
private static void setFormula() throws IOException { // получаем файл с диска FileInputStream file = new FileInputStream(new File(«F:\Apache POI Excel File.xls»)); // считываем его в память HSSFWorkbook workbook = new HSSFWorkbook(file); // говорим, что хотим работать с первым листом HSSFSheet sheet = workbook.getSheetAt(0); // создаем 5ю строку листа excel файла // (сейчас она null, так как в ней нет никаких данных) Row row = sheet.createRow(4); // идем в 4ю ячейку строки и устанавливаем // формулу подсчета зарплат (столбец D) Cell sum = row.createCell(3); sum.setCellFormula(«D2+D3+D4»); // создаем шрифт HSSFFont font = workbook.createFont(); // указываем, что хотим его видеть красным font.setColor(Font.COLOR_RED); // создаем стиль для ячейки HSSFCellStyle style = workbook.createCellStyle(); // и применяем к этому стилю жирный шрифт style.setFont(font); sum.setCellStyle(style); // получаем доступ к excel файлу и обновляем его try (FileOutputStream out = new FileOutputStream(new File(«F:\Apache POI Excel File.xls»))) { workbook.write(out); } catch (IOException e) { e.printStackTrace(); } System.out.println(«Excel файл успешно обновлен!»); } |
В нем мы открываем файл, добавляем к нему еще одну строку с ячейкой для подсчета суммы зарплаты физиков. И да, выделяем ее красным цветом.
Результат выполнения представленного выше метода:
Урок по созданию нового Excel файла в Java с помощью Apache POI подошел к концу. Скачать рабочий проект можно по этой ссылке.
Подробнее о считывании Excel файлов Вы найдете здесь.
Подписывайтесь на обновления и получайте новые уроки по Java и Android сразу на почту!
I’ve created the API «generator-excel» to create an Excel file, below the dependecy:
<dependency>
  <groupId>com.github.bld-commons.excel</groupId>
  <artifactId>generator-excel</artifactId>
  <version>3.1.0</version>
</dependency>
This library can to configure the styles, the functions, the charts, the pivot table and etc. through a series of annotations.
You can write rows by getting data from a datasource trough a query with or without parameters.
Below an example to develop
- I created 2 classes that represents the row of the table.
- I created 2 class that represents the sheets.
- Class test, in the test function there are antoher sheets
- Application yaml
package bld.generator.report.junit.entity;

    import java.util.Date;

    import org.apache.poi.ss.usermodel.HorizontalAlignment;

    import bld.generator.report.excel.RowSheet;
    import bld.generator.report.excel.annotation.ExcelCellLayout;
    import bld.generator.report.excel.annotation.ExcelColumn;
    import bld.generator.report.excel.annotation.ExcelDate;
    import bld.generator.report.excel.annotation.ExcelImage;
    import bld.generator.report.excel.annotation.ExcelRowHeight;

    @ExcelRowHeight(height = 3)
    public class UtenteRow implements RowSheet {

        @ExcelColumn(columnName = "Id", indexColumn = 0)
        @ExcelCellLayout(horizontalAlignment = HorizontalAlignment.RIGHT)
        private Integer idUtente;
        @ExcelColumn(columnName = "Nome", indexColumn = 2)
        @ExcelCellLayout
        private String nome;
        @ExcelColumn(columnName = "Cognome", indexColumn = 1)
        @ExcelCellLayout
        private String cognome;
        @ExcelColumn(columnName = "Data di nascita", indexColumn = 3)
        @ExcelCellLayout(horizontalAlignment = HorizontalAlignment.CENTER)
        @ExcelDate
        private Date dataNascita;
        @ExcelColumn(columnName = "Immagine", indexColumn = 4)
        @ExcelCellLayout
        @ExcelImage(resizeHeight = 0.7, resizeWidth = 0.6)
        private byte[] image;

        @ExcelColumn(columnName = "Path", indexColumn = 5)
        @ExcelCellLayout
        @ExcelImage(resizeHeight = 0.7, resizeWidth = 0.6)
        private String path;


        public UtenteRow() {
        }


        public UtenteRow(Integer idUtente, String nome, String cognome, Date dataNascita) {
            super();
            this.idUtente = idUtente;
            this.nome = nome;
            this.cognome = cognome;
            this.dataNascita = dataNascita;
        }


        public Integer getIdUtente() {
            return idUtente;
        }


        public void setIdUtente(Integer idUtente) {
            this.idUtente = idUtente;
        }


        public String getNome() {
            return nome;
        }


        public void setNome(String nome) {
            this.nome = nome;
        }


        public String getCognome() {
            return cognome;
        }


        public void setCognome(String cognome) {
            this.cognome = cognome;
        }


        public Date getDataNascita() {
            return dataNascita;
        }


        public void setDataNascita(Date dataNascita) {
            this.dataNascita = dataNascita;
        }


        public byte[] getImage() {
            return image;
        }


        public String getPath() {
            return path;
        }


        public void setImage(byte[] image) {
            this.image = image;
        }


        public void setPath(String path) {
            this.path = path;
        }

    }
package bld.generator.report.junit.entity;

import org.apache.poi.ss.usermodel.DataConsolidateFunction;
import org.apache.poi.ss.usermodel.HorizontalAlignment;

import bld.generator.report.excel.RowSheet;
import bld.generator.report.excel.annotation.ExcelCellLayout;
import bld.generator.report.excel.annotation.ExcelColumn;
import bld.generator.report.excel.annotation.ExcelFont;
import bld.generator.report.excel.annotation.ExcelSubtotal;
import bld.generator.report.excel.annotation.ExcelSubtotals;

@ExcelSubtotals(labelTotalGroup = "Total",endLabel = "total")
public class SalaryRow implements RowSheet {

    @ExcelColumn(columnName = "Name", indexColumn = 0)
    @ExcelCellLayout
    private String name;
    @ExcelColumn(columnName = "Amount", indexColumn = 1)
    @ExcelCellLayout(horizontalAlignment = HorizontalAlignment.RIGHT)
    @ExcelSubtotal(dataConsolidateFunction = DataConsolidateFunction.SUM,excelCellLayout = @ExcelCellLayout(horizontalAlignment = HorizontalAlignment.RIGHT,font=@ExcelFont(bold = true)))
    private Double amount;

    public SalaryRow() {
        super();
    }
    public SalaryRow(String name, Double amount) {
        super();
        this.name = name;
        this.amount = amount;
    }
    public String getName() {
        return name;
    }
    public void setName(String name) {
        this.name = name;
    }
    public Double getAmount() {
        return amount;
    }
    public void setAmount(Double amount) {
        this.amount = amount;
    }

}
package bld.generator.report.junit.entity;

import javax.validation.constraints.Size;

import bld.generator.report.excel.QuerySheetData;
import bld.generator.report.excel.annotation.ExcelHeaderLayout;
import bld.generator.report.excel.annotation.ExcelMarginSheet;
import bld.generator.report.excel.annotation.ExcelQuery;
import bld.generator.report.excel.annotation.ExcelSheetLayout;

@ExcelSheetLayout
@ExcelHeaderLayout
@ExcelMarginSheet(bottom = 1.5, left = 1.5, right = 1.5, top = 1.5)
@ExcelQuery(select = "SELECT id_utente, nome, cognome, data_nascita,image,path "
        + "FROM utente "
        + "WHERE cognome=:cognome "
        + "order by cognome,nome")
public class UtenteSheet extends QuerySheetData<UtenteRow> {


    public UtenteSheet(@Size(max = 31) String sheetName) {
        super(sheetName);
    }


}
package bld.generator.report.junit.entity;

import javax.validation.constraints.Size;

import bld.generator.report.excel.SheetData;
import bld.generator.report.excel.annotation.ExcelHeaderLayout;
import bld.generator.report.excel.annotation.ExcelMarginSheet;
import bld.generator.report.excel.annotation.ExcelSheetLayout;
@ExcelSheetLayout
@ExcelHeaderLayout
@ExcelMarginSheet(bottom = 1.5,left = 1.5,right = 1.5,top = 1.5)
public class SalarySheet extends SheetData<SalaryRow> {

    public SalarySheet(@Size(max = 31) String sheetName) {
        super(sheetName);
    }

}
package bld.generator.report.junit;

import java.util.ArrayList;
import java.util.Calendar;
import java.util.GregorianCalendar;
import java.util.List;

import org.junit.Before;
import org.junit.Test;
import org.junit.runner.RunWith;
import org.springframework.beans.factory.annotation.Autowired;
import org.springframework.boot.context.properties.ConfigurationProperties;
import org.springframework.boot.test.context.SpringBootTest;
import org.springframework.context.annotation.ComponentScan;
import org.springframework.test.context.junit4.SpringRunner;
import org.springframework.transaction.annotation.EnableTransactionManagement;

import bld.generator.report.excel.BaseSheet;
import bld.generator.report.excel.GenerateExcel;
import bld.generator.report.excel.data.ReportExcel;
import bld.generator.report.junit.entity.AutoreLibriSheet;
import bld.generator.report.junit.entity.CasaEditrice;
import bld.generator.report.junit.entity.GenereSheet;
import bld.generator.report.junit.entity.SalaryRow;
import bld.generator.report.junit.entity.SalarySheet;
import bld.generator.report.junit.entity.TotaleAutoreLibriRow;
import bld.generator.report.junit.entity.TotaleAutoreLibriSheet;
import bld.generator.report.junit.entity.UtenteSheet;
import bld.generator.report.utils.ExcelUtils;

/**
 * The Class ReportTest.
 */
@RunWith(SpringRunner.class)
@SpringBootTest
@ConfigurationProperties
@ComponentScan(basePackages = {"bld.generator","bld.read"})
@EnableTransactionManagement
public class ReportTestJpa {

    /** The Constant PATH_FILE. */
    private static final String PATH_FILE = "/mnt/report/";

    /** The generate excel. */
    @Autowired
    private GenerateExcel generateExcel;

    /**
     * Sets the up.
     *
     * @throws Exception the exception
     */
    @Before
    public void setUp() throws Exception {
    }

    /**
     * Test.
     *
     * @throws Exception the exception
     */
    @Test
    public void test() throws Exception {
        List<BaseSheet> listBaseSheet = new ArrayList<>();

        UtenteSheet utenteSheet=new UtenteSheet("Utente");
        utenteSheet.getMapParameters().put("cognome", "Rossi");
        listBaseSheet.add(utenteSheet);

        CasaEditrice casaEditrice = new CasaEditrice("Casa Editrice","Mondadori", new GregorianCalendar(1955, Calendar.MAY, 10), "Roma", "/home/francesco/Documents/git-project/dev-excel/linux.jpg","Drammatico");
        listBaseSheet.add(casaEditrice);


        AutoreLibriSheet autoreLibriSheet = new AutoreLibriSheet("Libri d'autore","Test label");
        TotaleAutoreLibriSheet totaleAutoreLibriSheet=new TotaleAutoreLibriSheet();
        totaleAutoreLibriSheet.getListRowSheet().add(new TotaleAutoreLibriRow("Totale"));
        autoreLibriSheet.setSheetFunctionsTotal(totaleAutoreLibriSheet);
        listBaseSheet.add(autoreLibriSheet);
        GenereSheet genereSheet=new GenereSheet("Genere");
        listBaseSheet.add(genereSheet);
        SalarySheet salarySheet=new SalarySheet("salary");
        salarySheet.getListRowSheet().add(new SalaryRow("a",2.0));
        salarySheet.getListRowSheet().add(new SalaryRow("a",2.0));
        salarySheet.getListRowSheet().add(new SalaryRow("a",2.0));
        salarySheet.getListRowSheet().add(new SalaryRow("a",2.0));
        salarySheet.getListRowSheet().add(new SalaryRow("c",1.0));
        salarySheet.getListRowSheet().add(new SalaryRow("c",1.0));
        salarySheet.getListRowSheet().add(new SalaryRow("c",1.0));
        salarySheet.getListRowSheet().add(new SalaryRow("c",1.0));
        listBaseSheet.add(salarySheet);
        ReportExcel excel = new ReportExcel("Mondadori JPA", listBaseSheet);

        byte[] byteReport = this.generateExcel.createFileXlsx(excel);

        ExcelUtils.writeToFile(PATH_FILE,excel.getTitle(), ".xlsx", byteReport);

    }


}
logging:
  level:
    root: WARN
    org:
      springframework:
        web: DEBUG
      hibernate: ERROR


spring:
  datasource:
    url: jdbc:postgresql://localhost:5432/excel_db
    username: ${EXCEL_USER_DB}
    password: ${EXCEL_PASSWORD_DB}
  jpa:
    show-sql: true
    properties:
      hibernate:
        default_schema: public
        jdbc:
          lob:
            non_contextual_creation: true
        format_sql: true
        ddl-auto: auto
    database-platform: org.hibernate.dialect.PostgreSQLDialect
    generate-ddl: true
below the link of the project on github:
- https://github.com/bld-commons/dev-excel
Афоризм
У тебя ноги уже кончились, а платье еще не началось!
Лариса Гузеева
Поддержка проекта
Если Вам сайт понравился и помог, то будем признательны за Ваш «посильный» вклад в его поддержку и развитие
• Yandex.Деньги
410013796724260
• Webmoney
R335386147728
Z369087728698
Свойства и методы взаимодействия Java приложений с файлами Excel представлены на странице
библиотеки Apache POI. Здесь рассматриваются примеры использования
Apache POI для создания файлов Excel 2007 или более поздней версии. Если необходимо создать
Excel 1997-2003, то следует использовать классы, наименования которых начинаются с символа ‘H’.
Использование библиотеки Apache POI для чтения файлов Excel с примером рассмотрен
здесь.
Создание книги Excel
// Создание книги Excel
XSSFWorkbook book = new XSSFWorkbook();
FileOutputStream fileOut = new FileOutputStream("workbook.xlsx");

// создания страниц
// создание строк
// создание и форматирование ячеек
// запись информации в ячейки

// Закрытие
book.write(fileOut);
fileOut.close();
Создание страницы
XSSFSheet sheet2 = book.createSheet("Sheet 1");
XSSFSheet sheet3 = book.createSheet("Страница 2");
Наименование страницы не должно превышать 31 символ. Следующие символы недопустимы в
наименовании страницы :
0x0 — нулевое значение;
‘:’ — двоеточие;
» — обратный слэш;
‘/’ — прямой слэш;
‘*’ — «звездочка»;
‘?’ — вопросительный знак;
‘[‘ — открывающаяся квадратная скобка;
‘]’ — закрывающаяся квадратная скобка.
Можно использовать утилиту WorkbookUtil для получения наименования страницы книги. Метод
createSafeSheetName данной утилиты заменит «неправильные» символы на пробелы (‘ ‘).
import org.apache.poi.ss.util.WorkbookUtil;

String caption  = "[O'Brien's sales*?]";
String safeName = WorkbookUtil.createSafeSheetName(caption);

// safeName = " O'Brien's sales   ";
XSSFSheet sheet3 = book.createSheet(safeName);
Определение размера колонки
При определении размера колонки необходимо учитывать максимальное количество символов в колонке,
коэффициент размера символа для заданного шрифта (для «Sans Sherif» равен 1.14388) и коэффициент
EXCEL_COLUMN_WIDTH_FACTOR, равный 256. Метод autoSizeColumn(idx_column) позволяет автоматически
установить размер колонки по максимальному значению.
// Определение размера колонки
int width = (int) (6 * 1.14388) * 256; // 1757;
sheet.setColumnWidth(0, width);

// Автоматическая настройка размера колонки
sheet.autoSizeColumn(1);
Метод setColumnWidth(column, width) в качестве параметров принимает номер колонки (отсчет от 0) и
размер колонки. Методу autoSizeColumn(column) необходимо передать только номер колонки.
Создание строки
При создании строки в метод createRow в качестве параметра необходимо передать номер строки
(отсчет от 0). Для определения размера строки можно использовать методы setHeight (short) и
setHeightInPoints (float). При использовании метода setHeight также, как и с определением размера колонки,
необходимо учитывать коэффициенты. Поэтому метод setHeightInPoints оказывается более предпочтительным.
XSSFRow row = sheet.createRow((short)0);
row.setHeightInPoints(80.0f);
Создание ячейки, определение типа значения
В следующем примере создаются ячейки, устанавливается их тип и записываются значения.
XSSFCell cell = row.createCell(0);
cell.setCellType(CellType.NUMERIC);
cell.setCellValue(1.2);

cell = row.createCell(1);
cell.setCellType(CellType.STRING);
cell.setCellValue("Строковое представление");

cell = row.createCell(2);
cell.setCellType(CellType.FORMULA);
cell.setCellValue("SUM(B3:B5)");
Класс CellType включает свойства [_NONE, BLANK, BOOLEAN, ERROR, FORMULA, NUMERIC, STRING],
которые можно использовать для определения типа значения ячейки.
Определение формата даты ячейки
В следующем примере создаются две ячейки с записью текущей даты. Вторая ячейка форматируется.
CreationHelper createHelper = book.getCreationHelper();

XSSFCellStyle cellStyle = book.createCellStyle();
cellStyle.setDataFormat(createHelper
                       .createDataFormat()
                       .getFormat("m/d/yy h:mm"));
XSSFCell cell = row.createCell(0);
cell.setCellValue(new Date());

cell = row.createCell(1);
cell.setCellStyle(cellStyle);
cell.setCellValue(new Date());
Слияние ячеек
Для слияния ячеек используется метод addMergedRegion.
// Создание строки
XSSFRow row = sheet.createRow((short) 1);

// Создание ячейки
XSSFCell cell = row.createCell((short) 1);
cell.setCellValue("This is a test of merging");

// Слияние 2-х ячеек в одной строке
sheet.addMergedRegion(
        new CellRangeAddress(1, // первая строка
                             1, // последняя строка
                             1, // первая колонка
                             2) // последняя колонка
);
Определение шрифта
// Создание шрифта
XSSFFont font = book.createFont();

font.setFontHeightInPoints((short)24);
font.setFontName("Courier New");
font.setItalic(true);
font.setStrikeout(true);
// цвет шрифта
font.setColor(new XSSFColor(new java.awt.Color(16,64,255)));

// Создание стиля с определением в нем шрифта
XSSFCellStyle style = book.createCellStyle();
style.setFont(font);

// Создание ячейки с определением ее стиля
XSSFRow row = sheet.createRow(0);
XSSFCell cell = row.createCell(1);
cell.setCellValue("Тестовый шрифт");
cell.setCellStyle(style);
Помните, что максимальное количество создаваемых шрифтов ограничено значением 32767. Необходимо
использовать объекты шрифтов/стилей.
// Неправильно
for (int i = 0; i < 100; i++) {
    XSSFRow row = sheet.createRow(i);
    for (int j = 0; j < 100; j++) {
        XSSFCell cell = row.createCell((short) j);

        XSSFCellStyle style = workbook.createCellStyle();
        XSSFFont font = workbook.createFont();
        font.setBold(true);
        style.setFont(font);
        cell.setCellStyle(style);
    }
}

// Правильно
XSSFFont font = workbook.createFont();
font.setBold(true);

XSSFCellStyle style = workbook.createCellStyle();
style.setFont(font);

for (int i = 0; i < 100; i++) {
    XSSFRow row = sheet.createRow(i);
    for (int j = 0; j < 100; j++) {
        XSSFCell cell = row.createCell((short) 0);
        cell.setCellStyle(style);
    }
}
Определение цвета фона ячейки
Color COLOR_light_gray  = new java.awt.Color(232, 232, 232);

XSSFCellStyle style = book.createCellStyle();

style.setFillPattern(FillPatternType.SOLID_FOREGROUND);

style.setFillForegroundColor(new XSSFColor(COLOR_light_gray));
ПРИМЕЧАНИЕ : для выделения цвета значения настраивайте шрифт (см. выше).
Выравнивание значения
В следующем примере создаются ячейки с различным выравниванием значений по горизонтали и
вертикали.
createCell(wb, row, (short) 0, CellStyle.ALIGN_CENTER,
                               CellStyle.VERTICAL_BOTTOM);
createCell(wb, row, (short) 1, CellStyle.ALIGN_CENTER_SELECTION,
                               CellStyle.VERTICAL_BOTTOM);
createCell(wb, row, (short) 2, CellStyle.ALIGN_FILL,
                               CellStyle.VERTICAL_CENTER);
createCell(wb, row, (short) 3, CellStyle.ALIGN_GENERAL,
                               CellStyle.VERTICAL_CENTER);
createCell(wb, row, (short) 4, CellStyle.ALIGN_JUSTIFY,
                               CellStyle.VERTICAL_JUSTIFY);
createCell(wb, row, (short) 5, CellStyle.ALIGN_LEFT,
                               CellStyle.VERTICAL_TOP);
createCell(wb, row, (short) 6, CellStyle.ALIGN_RIGHT,
                               CellStyle.VERTICAL_TOP);

/**
 * Creates a cell and aligns it a certain way.
 *
 * @param book   книга Excel
 * @param row    строка
 * @param column колонка
 * @param halign горизонтальное выравнивание
 * @param valign вертикальное выравнивание
 */
private void createCell(Workbook book,
                        Row row, short column,
                        short halign, short valign)
{
    XSSFCell cell = row.createCell(column);
    cell.setCellValue("Значение");
    // Определение стиля
    XSSFCellStyle cellStyle = book.createCellStyle();
    // Настройка выравнивания стиля
    cellStyle.setAlignment(halign);
    cellStyle.setVerticalAlignment(valign);
    // Стиль ячейки
    cell.setCellStyle(cellStyle);
}
Границы ячейки, Border
// Создание строки
XSSFRow row = sheet.createRow(1);
// Создание ячейки
XSSFCell cell = row.createCell(1);
cell.setCellValue("Значение");

// Создание стиля
XSSFCellStyle style = book.createCellStyle();

// Определение граничных значений стиля
style.setBorderTop   (CellStyle.BORDER_MEDIUM_DASHED);
style.setBorderRight (CellStyle.BORDER_THIN         );
style.setBorderBottom(CellStyle.BORDER_THIN         );
style.setBorderLeft  (CellStyle.BORDER_THIN         );
// Определение цвета граничных значений стиля
style.setTopBorderColor   (IndexedColors.BLACK.getIndex());
style.setRightBorderColor (IndexedColors.BLUE.getIndex ());
style.setBottomBorderColor(IndexedColors.BLACK.getIndex());
style.setLeftBorderColor  (IndexedColors.GREEN.getIndex());

// Определение стиля ячейки
cell.setCellStyle(style);
Многострочные ячейки
Для фиксированного разделения/переноса текста в ячейке необходимо в стиле определить
свойство WrapText=true, и в тексте установить разделители ‘n’.
String text = "Фиксированное n разделение n текста";

XSSFCellStyle style = book.createCellStyle();
style.setWrapText(true);

XSSFRow row = sheet.createRow(2);
XSSFCell cell = row.createCell(2);
cell.setCellValue(text);
cell.setCellStyle(style);
Использование формулы
Создадим две ячейки. В первую ячейку cell1 запишем сумму значений колонки, а во второй ячейке
cell2 разместим формулу «СУММА()». Для вычисления значения первой ячейки дополнительно используются
методы getColsSummary и getCellValue.
int row = 5;
int summa = getColsSummary (1, 2, row);
XSSFCell cell1 = row.createCell(2);
if (summa > 0)
    cell1.setCellValue(summa);

XSSFCell cell2 = row.createCell(2);
String formula = String.format("SUM(B3:B%d)", row);
cell2.setCellFormula(formula);
//-------------------------------------------------------
private int getCellValue (final int cl, final int rw)
{
    XSSFRow  row  = sheet.getRow(rw);
    XSSFCell cell = row.getCell(cl);

    return (int)cell.getNumericCellValue();
}
//-------------------------------------------------------
private int getColsSummary (int col, int row1, int row2)
{
    int summary = 0;
    for (int i = row1; i < row2; i++)
        summary += getCellValue (col, i);
    return summary;
}
In this Java Apache POI tutorial we learn step by step to implement a Java program to export data from Java objects to an Excel file using the Apache POI library.
Table of contents
- Add Apache POI dependencies to Java project
- Create New Entity Class
- Implement Excel File Exporter Class
- How to use ExcelFileExporter class to export Excel file
Add Apache POI dependencies to Java project
First step, we add the Apache POI dependencies to the Java project.
If you use Gradle build project, add the following dependencies to the build.gradle file.
implementation group: 'org.apache.poi', name: 'poi', version: '5.2.2'
implementation group: 'org.apache.poi', name: 'poi-ooxml', version: '5.2.2'
If you use Maven build project, add the following dependencies to the pom.xml file.
<dependency>
    <groupId>org.apache.poi</groupId>
    <artifactId>poi</artifactId>
    <version>5.2.2</version>
</dependency>
<dependency>
    <groupId>org.apache.poi</groupId>
    <artifactId>poi-ooxml</artifactId>
    <version>5.2.2</version>
</dependency>
Create New Entity Class
For example, we want to implement a Java application to export a list of contacts data to an Excel file. At this step we implement a new Java class named Contact to represent the contact information which needs to be exported.
Contact.java
public class Contact {
    private String firstName;
    private String lastName;
    private String email;

    public Contact(String firstName, String lastName, String email) {
        this.firstName = firstName;
        this.lastName = lastName;
        this.email = email;
    }

    public String getFirstName() {
        return firstName;
    }

    public void setFirstName(String firstName) {
        this.firstName = firstName;
    }

    public String getLastName() {
        return lastName;
    }

    public void setLastName(String lastName) {
        this.lastName = lastName;
    }

    public String getEmail() {
        return email;
    }

    public void setEmail(String email) {
        this.email = email;
    }
}
Implement Excel File Exporter Class
At this step we implement a new Java class named ExcelFileExporter with the following steps to export an Excel file from given data.
- Create a new Workbook object which represent an Excel workbook.
- Create a new Sheet object which represent an Excel worksheet.
- Create a new header Row from given header texts. At this step we use CellStyle class to define header foreground color and border.
- Create new data rows from given list of Contact objects. At this step we use CellStyle class to define cell border for data rows.
- Using Sheet.autoSizeColumn(int column) method to adjusts column width to fit the contents for three first columns.
- Using the Workbook.write(OutputStream stream) method to write Excel file with given name.
ExcelFileExporter.java
import org.apache.poi.ss.usermodel.BorderStyle;
import org.apache.poi.ss.usermodel.Cell;
import org.apache.poi.ss.usermodel.CellStyle;
import org.apache.poi.ss.usermodel.FillPatternType;
import org.apache.poi.ss.usermodel.IndexedColors;
import org.apache.poi.ss.usermodel.Row;
import org.apache.poi.ss.usermodel.Sheet;
import org.apache.poi.ss.usermodel.Workbook;
import org.apache.poi.xssf.usermodel.XSSFWorkbook;

import java.io.FileNotFoundException;
import java.io.FileOutputStream;
import java.io.IOException;
import java.io.OutputStream;
import java.util.List;

/**
 * Excel File Exporter
 */
public class ExcelFileExporter {

    public void exportExcelFile(List<Contact> contacts, String[] headers, String fileName) {
        // create a new Workbook
        Workbook workbook = new XSSFWorkbook();

        // Create a new Sheet named "Contacts"
        Sheet sheet = workbook.createSheet("Contacts");

        // Create header row
        createHeaderRow(workbook, sheet, headers);

        // Create rows
        for(int i = 0; i < contacts.size(); i++) {
            // row index equals i + 1 because the first row of Excel file is the header row.
            int rowIndex = i + 1;
            createNewRow(workbook, sheet, rowIndex, contacts.get(i));
        }

        // Adjusts 3 columns to set the width to fit the contents.
        sheet.autoSizeColumn(0);
        sheet.autoSizeColumn(1);
        sheet.autoSizeColumn(2);

        // Write to file
        try (OutputStream outputStream = new FileOutputStream(fileName)) {
            workbook.write(outputStream);
        } catch (FileNotFoundException e) {
            e.printStackTrace();
        } catch (IOException e) {
            e.printStackTrace();
        }
    }

    /**
     * Create header row
     * @param workbook the Workbook object
     * @param sheet the Sheet object
     * @param headers the headers text
     */
    private void createHeaderRow(Workbook workbook, Sheet sheet, String[] headers) {
        Row headerRow = sheet.createRow(0);
        CellStyle headerCellStyle = workbook.createCellStyle();
        headerCellStyle.setFillForegroundColor(IndexedColors.LIGHT_YELLOW.index);
        headerCellStyle.setFillPattern(FillPatternType.SOLID_FOREGROUND);
        headerCellStyle.setBorderTop(BorderStyle.THIN);
        headerCellStyle.setTopBorderColor(IndexedColors.BLACK.index);
        headerCellStyle.setBorderRight(BorderStyle.THIN);
        headerCellStyle.setRightBorderColor(IndexedColors.BLACK.index);
        headerCellStyle.setBorderBottom(BorderStyle.THIN);
        headerCellStyle.setBottomBorderColor(IndexedColors.BLACK.index);
        headerCellStyle.setBorderLeft(BorderStyle.THIN);
        headerCellStyle.setLeftBorderColor(IndexedColors.BLACK.index);

        for(int i = 0; i < headers.length; i++) {
            Cell cell = headerRow.createCell(i);
            cell.setCellValue(headers[i]);
            cell.setCellStyle(headerCellStyle);
        }
    }

    /**
     * Create a new row
     * @param workbook the Workbook object
     * @param sheet the Sheet object
     * @param rowIndex the index of row to create
     * @param contact the Contact object which represent information to write to row.
     */
    private void createNewRow(Workbook workbook, Sheet sheet, int rowIndex, Contact contact) {
        Row row = sheet.createRow(rowIndex);
        CellStyle cellStyle = workbook.createCellStyle();
        cellStyle.setBorderTop(BorderStyle.THIN);
        cellStyle.setTopBorderColor(IndexedColors.BLACK.index);
        cellStyle.setBorderRight(BorderStyle.THIN);
        cellStyle.setRightBorderColor(IndexedColors.BLACK.index);
        cellStyle.setBorderBottom(BorderStyle.THIN);
        cellStyle.setBottomBorderColor(IndexedColors.BLACK.index);
        cellStyle.setBorderLeft(BorderStyle.THIN);
        cellStyle.setLeftBorderColor(IndexedColors.BLACK.index);

        Cell cell = row.createCell(0);
        cell.setCellValue(contact.getFirstName());
        cell.setCellStyle(cellStyle);

        cell = row.createCell(1);
        cell.setCellValue(contact.getLastName());
        cell.setCellStyle(cellStyle);

        cell = row.createCell(2);
        cell.setCellValue(contact.getEmail());
        cell.setCellStyle(cellStyle);
    }

}
How to use ExcelFileExporter class to export Excel file
At this final step we implement a Main class and use the ExcelFileExporter above to export Excel file named contacts.xlsx as the following Java code.
Main.java
import java.util.ArrayList;
import java.util.List;

public class Main {
    public static void main(String... args) {
        // List of contacts to export to Excel file.
        List<Contact> contacts = new ArrayList<>();
        contacts.add(new Contact("Rayhan", "Harmon", "rayhan@simplesolution.dev"));
        contacts.add(new Contact("Paddy", "Sheridan", "paddy@simplesolution.dev"));
        contacts.add(new Contact("Clara", "Callaghan", "clara@simplesolution.dev"));
        contacts.add(new Contact("Josephine", "Amos", "josephine@simplesolution.dev"));
        contacts.add(new Contact("Sheikh", "Tucker", "sheikh@simplesolution.dev"));

        // Header text
        String[] headers = new String[] {"First Name", "Last Name", "Email"};

        // File name
        String fileName = "contacts.xlsx";

        // Export Excel file
        ExcelFileExporter excelFileExporter = new ExcelFileExporter();
        excelFileExporter.exportExcelFile(contacts, headers, fileName);
    }
}
Execute the the above Java application we have the output contacts.xlsx file as below.
Happy Coding 😊
Related Articles
Java Apache POI Tutorial
Spring Boot Download Excel File Export from MySQL Database
Spring Boot Web Application Download Excel File
Java Read Excel File using Apache POI
Java Read Excel Workbook from File using Apache POI
Java Read Excel Workbook from InputStream using Apache POI
Java Read Password Protected Excel File using Apache POI
Java How to Iterate over Sheets Rows and Cells of Excel file using Apache POI
Java Add Rows to Existing Excel File using Apache POI
Java Add Sheet to Existing Excel File using Apache POI
Java Remove Sheet from Existing Excel File using Apache POI
Java Create Formula Excel Cells using Apache POI
In Java, read excel file and write excel file is a bit tricky because excel worksheet has cells to store data. Java does not provide direct API to read or write Microsoft Excel or Word documents. We have to rely on the third-party library that is Apache POI. In this section, we will learn how to create an excel file in Java and how to write or insert data in the excel file using the Apache POI Java library.
Java Apache POI Library
Apache POI (Poor Obfuscation Implementation) is a Java API for reading and writing Microsoft Documents. It contains classes and interfaces. The Apache POI library provides two implementations for reading or writing excel files:
- HSSF (Horrible SpreadSheet Format) Implementation:It denotes an API that is working with Excel 2003 or earlier versions.
- XSSF (XML SpreadSheet Format) Implementation:It denotes an API that is working with Excel 2007 or later versions.
Throughout this section, we have used HSSF implementation.
Create Excel File in Java
Follow the steps given below to create an excel file in Java.
Step 1: Create a Java project in eclipse. We have created a Java project with the name CreateExcelEile.
Step 2: Create a class with the name CreateExcelFileExample1 and write the code that we have written in CreateExcelFileExample1.java file.
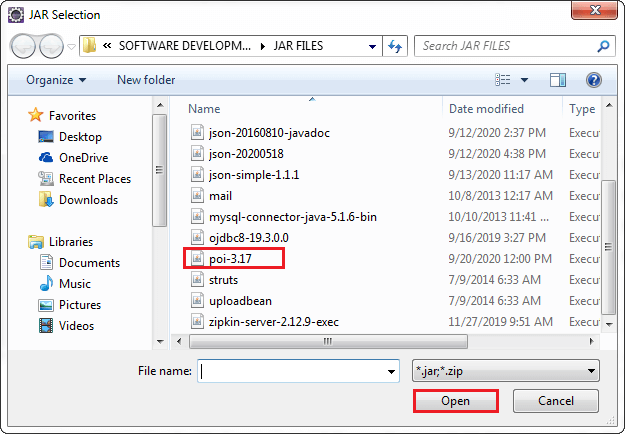
Step 3: Download the Apache POI library (poi-3.17.jar).
Step 4: Add the Apache POI to the project. Right-click on the project -> Build Path -> Configure Build Path. It opens the Properties window for the current project.
Step 5: In the Properties window, click on the Add External JARs button.
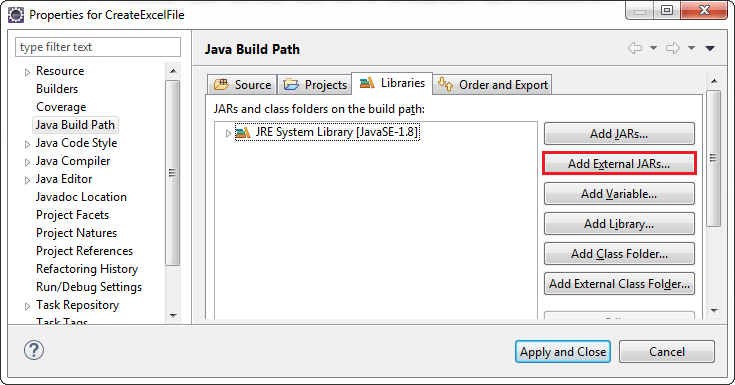
Step 6: Go to the path where the poi-3.17.jar file is located. Select the JAR file and click on the Open button. It adds the JAR file to the project. After that, click on the Apply and Close button to apply the changes.
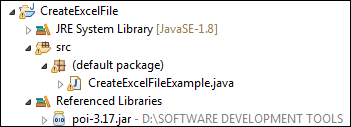
When we have done with all the above steps, the project structure looks like the following:
Let’s understand the following code.
In the following program, we have used the Apache POI library to create an excel file. The library provides the class named HSSFWorkbook defined in the org.apache.poi.hssf.usermodel package.
CreateExcelFileExample1.java
Output:
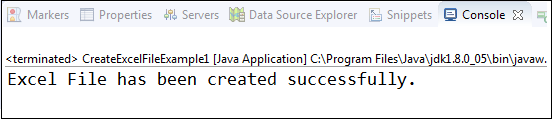
It creates a blank excel file at the specified location.
Let’s create another Java program that creates an excel file.
CreateExcelFileExample2.java
Output:

It creates a blank excel file at the specified location.
Insert Data in the Excel File
Still, we have created a blank excel file. But it is not always necessary that create a blank excel file only. Some times we need to insert some data in the worksheet. Let’s see how to insert data in an excel file through a Java program.
CreateExcelFileExample3.java
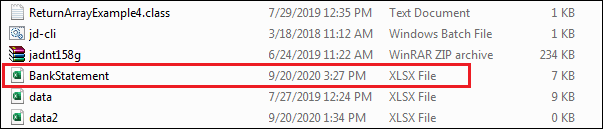
Output:
It creates an excel file at the specified location with the values that we have inserted using the setCellValue() method.
Learn to read excel, write excel, evaluate formula cells and apply custom formatting to the generated excel files using Apache POI library with examples.
If we are building software for the HR or Finance domain, there is usually a requirement for generating excel reports across management levels. Apart from reports, we can also expect some input data for the applications coming in the form of excel sheets and the application is expected to support this requirement.
Apache POI is a well-trusted library among many other open-source libraries to handle such usecases involving excel files. Please note that, in addition, we can read and write MS Word and MS PowerPoint files also using the Apache POI library.
This Apache POI tutorial will discuss some everyday excel operations in real-life applications.
- 1. Maven Dependency
- 2. Important Classes in POI Library
- 3. Writing an Excel File
- 4. Reading an Excel File
- 5. Add and Evaluate Formula Cells
- 6. Formatting the Cells
- 7. Conclusion
1. Maven Dependency
If we are working on a maven project, we can include the Apache POI dependencies in pom.xml file using this:
<dependency>
  <groupId>org.apache.poi</groupId>
  <artifactId>poi</artifactId>
  <version>5.2.2</version>
</dependency>

<dependency>
  <groupId>org.apache.poi</groupId>
  <artifactId>poi-ooxml</artifactId>
  <version>5.2.2</version>
</dependency>
2. Important Classes in POI Library
-
HSSF, XSSF and XSSF classes
Apache POI main classes usually start with either HSSF, XSSF or SXSSF.
- HSSF – is the POI Project’s pure Java implementation of the Excel 97(-2007) file format. e.g., HSSFWorkbook, HSSFSheet.
- XSSF – is the POI Project’s pure Java implementation of the Excel 2007 OOXML (.xlsx) file format. e.g., XSSFWorkbook, XSSFSheet.
- SXSSF (since 3.8-beta3) – is an API-compatible streaming extension of XSSF to be used when huge spreadsheets have to be produced and heap space is limited. e.g., SXSSFWorkbook, SXSSFSheet. SXSSF achieves its low memory footprint by limiting access to the rows within a sliding window, while XSSF gives access to all rows in the document.
-
Row and Cell
Apart from the above classes, Row and Cell interact with a particular row and a particular cell in an excel sheet.
-
Styling Related Classes
A wide range of classes like CellStyle, BuiltinFormats, ComparisonOperator, ConditionalFormattingRule, FontFormatting, IndexedColors, PatternFormatting, SheetConditionalFormatting etc. are used when you have to add formatting to a sheet, primarily based on some rules.
-
FormulaEvaluator
Another helpful class FormulaEvaluator is used to evaluate the formula cells in an excel sheet.
3. Writing an Excel File
I am taking this example first so we can reuse the excel sheet created by this code in further examples.
Writing excel using POI is very simple and involves the following steps:
- Create a workbook
- Create a sheet in workbook
- Create a row in sheet
- Add cells to sheet
- Repeat steps 3 and 4 to write more data
It seems very simple, right? Let’s have a look at the code doing these steps.
Java program to write an excel file using Apache POI library.
package com.howtodoinjava.demo.poi;
//import statements
public class WriteExcelDemo
{
    public static void main(String[] args)
    {
        //Blank workbook
        XSSFWorkbook workbook = new XSSFWorkbook();

        //Create a blank sheet
        XSSFSheet sheet = workbook.createSheet("Employee Data");

        //This data needs to be written (Object[])
        Map<String, Object[]> data = new TreeMap<String, Object[]>();
        data.put("1", new Object[] {"ID", "NAME", "LASTNAME"});
        data.put("2", new Object[] {1, "Amit", "Shukla"});
        data.put("3", new Object[] {2, "Lokesh", "Gupta"});
        data.put("4", new Object[] {3, "John", "Adwards"});
        data.put("5", new Object[] {4, "Brian", "Schultz"});

        //Iterate over data and write to sheet
        Set<String> keyset = data.keySet();
        int rownum = 0;
        for (String key : keyset)
        {
            Row row = sheet.createRow(rownum++);
            Object [] objArr = data.get(key);
            int cellnum = 0;
            for (Object obj : objArr)
            {
               Cell cell = row.createCell(cellnum++);
               if(obj instanceof String)
                    cell.setCellValue((String)obj);
                else if(obj instanceof Integer)
                    cell.setCellValue((Integer)obj);
            }
        }
        try
        {
            //Write the workbook in file system
            FileOutputStream out = new FileOutputStream(new File("howtodoinjava_demo.xlsx"));
            workbook.write(out);
            out.close();
            System.out.println("howtodoinjava_demo.xlsx written successfully on disk.");
        }
        catch (Exception e)
        {
            e.printStackTrace();
        }
    }
}
See Also: Appending Rows to Excel
4. Reading an Excel File
Reading an excel file using POI is also very simple if we divide this into steps.
- Create workbook instance from an excel sheet
- Get to the desired sheet
- Increment row number
- iterate over all cells in a row
- repeat steps 3 and 4 until all data is read
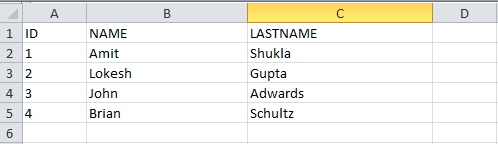
Let’s see all the above steps in code. I am writing the code to read the excel file created in the above example. It will read all the column names and the values in it – cell by cell.
Java program to read an excel file using Apache POI library.
package com.howtodoinjava.demo.poi;
//import statements
public class ReadExcelDemo
{
    public static void main(String[] args)
    {
        try
        {
            FileInputStream file = new FileInputStream(new File("howtodoinjava_demo.xlsx"));

            //Create Workbook instance holding reference to .xlsx file
            XSSFWorkbook workbook = new XSSFWorkbook(file);

            //Get first/desired sheet from the workbook
            XSSFSheet sheet = workbook.getSheetAt(0);

            //Iterate through each rows one by one
            Iterator<Row> rowIterator = sheet.iterator();
            while (rowIterator.hasNext())
            {
                Row row = rowIterator.next();
                //For each row, iterate through all the columns
                Iterator<Cell> cellIterator = row.cellIterator();

                while (cellIterator.hasNext())
                {
                    Cell cell = cellIterator.next();
                    //Check the cell type and format accordingly
                    switch (cell.getCellType())
                    {
                        case Cell.CELL_TYPE_NUMERIC:
                            System.out.print(cell.getNumericCellValue() + "t");
                            break;
                        case Cell.CELL_TYPE_STRING:
                            System.out.print(cell.getStringCellValue() + "t");
                            break;
                    }
                }
                System.out.println("");
            }
            file.close();
        }
        catch (Exception e)
        {
            e.printStackTrace();
        }
    }
}
Program Output:
ID      NAME        LASTNAME
1.0     Amit        Shukla
2.0     Lokesh      Gupta
3.0     John        Adwards
4.0     Brian       Schultz
See Also: Apache POI – Read an Excel File using SAX Parser
5. Add and Evaluate Formula Cells
When working on complex excel sheets, we encounter many cells with formulas to calculate their values. These are formula cells. Apache POI also has excellent support for adding formula cells and evaluating already present formula cells.
Let’s see one example of how to add formula cells in excel?
The sheet has four cells in a row and the fourth one in the multiplication of all the previous 3 rows. So the formula will be: A2*B2*C2 (in the second row)
Java program to add formula in an excel file using Apache POI library.
public static void main(String[] args)
{
    XSSFWorkbook workbook = new XSSFWorkbook();
    XSSFSheet sheet = workbook.createSheet("Calculate Simple Interest");

    Row header = sheet.createRow(0);
    header.createCell(0).setCellValue("Pricipal");
    header.createCell(1).setCellValue("RoI");
    header.createCell(2).setCellValue("T");
    header.createCell(3).setCellValue("Interest (P r t)");

    Row dataRow = sheet.createRow(1);
    dataRow.createCell(0).setCellValue(14500d);
    dataRow.createCell(1).setCellValue(9.25);
    dataRow.createCell(2).setCellValue(3d);
    dataRow.createCell(3).setCellFormula("A2*B2*C2");

    try {
        FileOutputStream out =  new FileOutputStream(new File("formulaDemo.xlsx"));
        workbook.write(out);
        out.close();
        System.out.println("Excel with foumula cells written successfully");

    } catch (FileNotFoundException e) {
        e.printStackTrace();
    } catch (IOException e) {
        e.printStackTrace();
    }
}
Similarly, we want to read a file with formula cells and use the following logic to evaluate formula cells.
Java program to evaluate formula in an excel file using Apache POI library.
public static void readSheetWithFormula()
{
    try
    {
        FileInputStream file = new FileInputStream(new File("formulaDemo.xlsx"));

        //Create Workbook instance holding reference to .xlsx file
        XSSFWorkbook workbook = new XSSFWorkbook(file);

        FormulaEvaluator evaluator = workbook.getCreationHelper().createFormulaEvaluator();

        //Get first/desired sheet from the workbook
        XSSFSheet sheet = workbook.getSheetAt(0);

        //Iterate through each rows one by one
        Iterator<Row> rowIterator = sheet.iterator();
        while (rowIterator.hasNext())
        {
            Row row = rowIterator.next();
            //For each row, iterate through all the columns
            Iterator<Cell> cellIterator = row.cellIterator();

            while (cellIterator.hasNext())
            {
                Cell cell = cellIterator.next();
                //Check the cell type after eveluating formulae
                //If it is formula cell, it will be evaluated otherwise no change will happen
                switch (evaluator.evaluateInCell(cell).getCellType())
                {
                    case Cell.CELL_TYPE_NUMERIC:
                        System.out.print(cell.getNumericCellValue() + "tt");
                        break;
                    case Cell.CELL_TYPE_STRING:
                        System.out.print(cell.getStringCellValue() + "tt");
                        break;
                    case Cell.CELL_TYPE_FORMULA:
                        //Not again
                        break;
                }
            }
            System.out.println("");
        }
        file.close();
    }
    catch (Exception e)
    {
        e.printStackTrace();
    }
}
Program Output:
Pricipal        RoI         T       Interest (P r t)
14500.0 9.25 3.0 402375.0 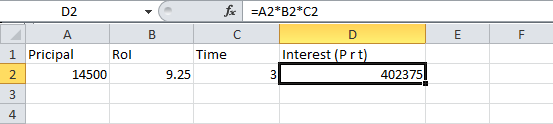
6. Formatting the Cells
So far we have seen examples of reading/writing and excel files using Apache POI. But, when creating a report in an excel file, it is essential to add formatting on cells that fit into any pre-determined criteria.
This formatting can be a different coloring based on a specific value range, expiry date limit etc.
In the below examples, we are taking a couple of such cell formatting examples for various purposes.
6.1. Cell value in a specific range
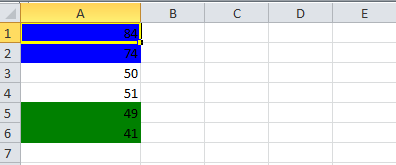
This code will color any cell in a range whose value is between a configured range. [e.g., between 50 and 70]
static void basedOnValue(Sheet sheet)
{
    //Creating some random values
    sheet.createRow(0).createCell(0).setCellValue(84);
    sheet.createRow(1).createCell(0).setCellValue(74);
    sheet.createRow(2).createCell(0).setCellValue(50);
    sheet.createRow(3).createCell(0).setCellValue(51);
    sheet.createRow(4).createCell(0).setCellValue(49);
    sheet.createRow(5).createCell(0).setCellValue(41);

    SheetConditionalFormatting sheetCF = sheet.getSheetConditionalFormatting();

    //Condition 1: Cell Value Is   greater than  70   (Blue Fill)
    ConditionalFormattingRule rule1 = sheetCF.createConditionalFormattingRule(ComparisonOperator.GT, "70");
    PatternFormatting fill1 = rule1.createPatternFormatting();
    fill1.setFillBackgroundColor(IndexedColors.BLUE.index);
    fill1.setFillPattern(PatternFormatting.SOLID_FOREGROUND);

    //Condition 2: Cell Value Is  less than      50   (Green Fill)
    ConditionalFormattingRule rule2 = sheetCF.createConditionalFormattingRule(ComparisonOperator.LT, "50");
    PatternFormatting fill2 = rule2.createPatternFormatting();
    fill2.setFillBackgroundColor(IndexedColors.GREEN.index);
    fill2.setFillPattern(PatternFormatting.SOLID_FOREGROUND);

    CellRangeAddress[] regions = {
            CellRangeAddress.valueOf("A1:A6")
    };

    sheetCF.addConditionalFormatting(regions, rule1, rule2);
}
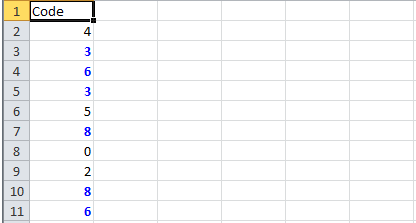
6.2. Highlight Duplicate Values
Highlight all cells which have duplicate values in observed cells.
static void formatDuplicates(Sheet sheet) {
    sheet.createRow(0).createCell(0).setCellValue("Code");
    sheet.createRow(1).createCell(0).setCellValue(4);
    sheet.createRow(2).createCell(0).setCellValue(3);
    sheet.createRow(3).createCell(0).setCellValue(6);
    sheet.createRow(4).createCell(0).setCellValue(3);
    sheet.createRow(5).createCell(0).setCellValue(5);
    sheet.createRow(6).createCell(0).setCellValue(8);
    sheet.createRow(7).createCell(0).setCellValue(0);
    sheet.createRow(8).createCell(0).setCellValue(2);
    sheet.createRow(9).createCell(0).setCellValue(8);
    sheet.createRow(10).createCell(0).setCellValue(6);

    SheetConditionalFormatting sheetCF = sheet.getSheetConditionalFormatting();

    // Condition 1: Formula Is   =A2=A1   (White Font)
    ConditionalFormattingRule rule1 = sheetCF.createConditionalFormattingRule("COUNTIF($A$2:$A$11,A2)>1");
    FontFormatting font = rule1.createFontFormatting();
    font.setFontStyle(false, true);
    font.setFontColorIndex(IndexedColors.BLUE.index);

    CellRangeAddress[] regions = {
            CellRangeAddress.valueOf("A2:A11")
    };

    sheetCF.addConditionalFormatting(regions, rule1);

    sheet.getRow(2).createCell(1).setCellValue("<== Duplicates numbers in the column are highlighted.  " +
            "Condition: Formula Is =COUNTIF($A$2:$A$11,A2)>1   (Blue Font)");
}
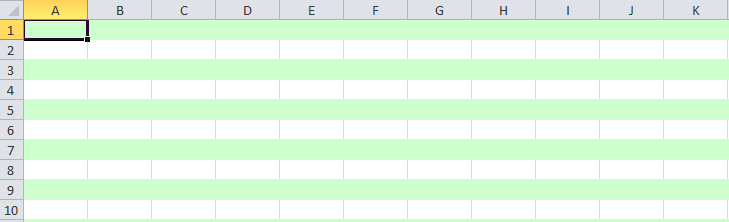
6.3. Alternate Color Rows in Different Colors
A simple code to color each alternate row in a different color.
static void shadeAlt(Sheet sheet) {
    SheetConditionalFormatting sheetCF = sheet.getSheetConditionalFormatting();

    // Condition 1: Formula Is   =A2=A1   (White Font)
    ConditionalFormattingRule rule1 = sheetCF.createConditionalFormattingRule("MOD(ROW(),2)");
    PatternFormatting fill1 = rule1.createPatternFormatting();
    fill1.setFillBackgroundColor(IndexedColors.LIGHT_GREEN.index);
    fill1.setFillPattern(PatternFormatting.SOLID_FOREGROUND);

    CellRangeAddress[] regions = {
            CellRangeAddress.valueOf("A1:Z100")
    };

    sheetCF.addConditionalFormatting(regions, rule1);

    sheet.createRow(0).createCell(1).setCellValue("Shade Alternating Rows");
    sheet.createRow(1).createCell(1).setCellValue("Condition: Formula Is  =MOD(ROW(),2)   (Light Green Fill)");
}
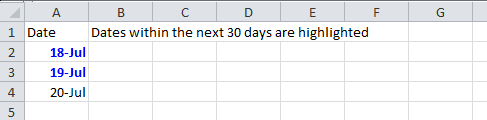
6.4. Color amounts that are going to expire in the next 30 days
A handy code for financial projects which keeps track of deadlines.
static void expiryInNext30Days(Sheet sheet)
{
    CellStyle style = sheet.getWorkbook().createCellStyle();
    style.setDataFormat((short)BuiltinFormats.getBuiltinFormat("d-mmm"));

    sheet.createRow(0).createCell(0).setCellValue("Date");
    sheet.createRow(1).createCell(0).setCellFormula("TODAY()+29");
    sheet.createRow(2).createCell(0).setCellFormula("A2+1");
    sheet.createRow(3).createCell(0).setCellFormula("A3+1");

    for(int rownum = 1; rownum <= 3; rownum++) sheet.getRow(rownum).getCell(0).setCellStyle(style);

    SheetConditionalFormatting sheetCF = sheet.getSheetConditionalFormatting();

    // Condition 1: Formula Is   =A2=A1   (White Font)
    ConditionalFormattingRule rule1 = sheetCF.createConditionalFormattingRule("AND(A2-TODAY()>=0,A2-TODAY()<=30)");
    FontFormatting font = rule1.createFontFormatting();
    font.setFontStyle(false, true);
    font.setFontColorIndex(IndexedColors.BLUE.index);

    CellRangeAddress[] regions = {
            CellRangeAddress.valueOf("A2:A4")
    };

    sheetCF.addConditionalFormatting(regions, rule1);

    sheet.getRow(0).createCell(1).setCellValue("Dates within the next 30 days are highlighted");
}
I am ending this apache poi tutorial here to keep the post within a limit.
7. Conclusion
In this tutorial, we learned to read excel, write excel, set and evaluate formula cells, and format the cells with color codings using the Apache POI library.
Happy Learning !!
Source Code on Github
- Details
- Written by
- Last Updated on 30 May 2019 | Print Email
In this tutorial, I’d love to share with you guys some examples of writing data to Excel files using the Apache POI library. If today is the first day you get to know Apache POI and you haven’t written any code snippet to read/write Excel files yet, I recommend you to read the sections 1 and 2 in the tutorial How to Read Excel Files in Java using Apache POI to understand the fundamentals of Apache POI.
Or if you are a kind of person who likes getting your hands-dirty first, let jump directly into the following examples.
1. Apache POI API Basics for Writing Excel Files
The fundamental interfaces include Workbook, Sheet, Row and Cell. For basic formatting, use the CellStyle and Font interfaces. Concrete implementing classes include:
- Excel 2003: HSSFWorkbook, HSSFSheet, HSSFRow, HSSFCell, etc.
- Excel 2007: XSSFWorkbook, XSSFSheet, XSSFRow, XSSFCell, etc.
But I recommend using the common interfaces for greater flexibility with both Excel formats 2003 (XLS) and 2007(XLSX).
Here are the basic steps for writing an Excel file:
- Create a Workbook.
- Create a Sheet.
- Repeat the following steps until all data is processed:
- Create a Row.
- Create Cellsin a Row. Apply formatting using CellStyle.
- Write to an OutputStream.
- Close the output stream.
Now, let’s see some examples that demonstrate writing a list of books to an Excel file.
2. A Simple Example to create an Excel file in Java
The following code snippet is a very simple program that demonstrates writing a list of books to an Excel file in the simplest and dirty form:
package net.codejava.excel;
import java.io.FileOutputStream;
import java.io.IOException;
import org.apache.poi.ss.usermodel.Cell;
import org.apache.poi.ss.usermodel.Row;
import org.apache.poi.xssf.usermodel.XSSFSheet;
import org.apache.poi.xssf.usermodel.XSSFWorkbook;
/**
* A very simple program that writes some data to an Excel file
* using the Apache POI library.
* @author www.codejava.net
*
*/
public class SimpleExcelWriterExample {
public static void main(String[] args) throws IOException {
XSSFWorkbook workbook = new XSSFWorkbook();
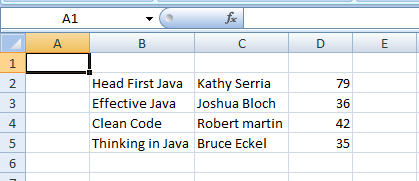
XSSFSheet sheet = workbook.createSheet("Java Books");
Object[][] bookData = {
{"Head First Java", "Kathy Serria", 79},
{"Effective Java", "Joshua Bloch", 36},
{"Clean Code", "Robert martin", 42},
{"Thinking in Java", "Bruce Eckel", 35},
};
int rowCount = 0;
for (Object[] aBook : bookData) {
Row row = sheet.createRow(++rowCount);
int columnCount = 0;
for (Object field : aBook) {
Cell cell = row.createCell(++columnCount);
if (field instanceof String) {
cell.setCellValue((String) field);
} else if (field instanceof Integer) {
cell.setCellValue((Integer) field);
}
}
}
try (FileOutputStream outputStream = new FileOutputStream("JavaBooks.xlsx")) {
workbook.write(outputStream);
}
}
}
This program creates an Excel 2007 document which looks like the following screenshot (File: JavaBooks.xlsx):
3. A More Object-Oriented Example to create an Excel file in Java
The following code snippets demonstrate a nicer program that focuses on OOP approach. That makes the program more flexible and easy to extend or upgrade in the future.
- Create the model class (Book.java):
package net.codejava.excel; public class Book { private String title; private String author; private float price; public Book() { } public Book(String title, String author, double price) { this.title = title; this.author = author; this.price = price; } // getters and setters } - The method that writes a list of books to an Excel file (in 2003 format):
public void writeExcel(List<Book> listBook, String excelFilePath) throws IOException { Workbook workbook = new HSSFWorkbook(); Sheet sheet = workbook.createSheet(); int rowCount = 0; for (Book aBook : listBook) { Row row = sheet.createRow(++rowCount); writeBook(aBook, row); } try (FileOutputStream outputStream = new FileOutputStream(excelFilePath)) { workbook.write(outputStream); } } - The method that writes information of a book to cells:
private void writeBook(Book aBook, Row row) { Cell cell = row.createCell(1); cell.setCellValue(aBook.getTitle()); cell = row.createCell(2); cell.setCellValue(aBook.getAuthor()); cell = row.createCell(3); cell.setCellValue(aBook.getPrice()); } - The following method creates some dummy data (a list of books):
private List<Book> getListBook() { Book book1 = new Book("Head First Java", "Kathy Serria", 79); Book book2 = new Book("Effective Java", "Joshua Bloch", 36); Book book3 = new Book("Clean Code", "Robert Martin", 42); Book book4 = new Book("Thinking in Java", "Bruce Eckel", 35); List<Book> listBook = Arrays.asList(book1, book2, book3, book4); return listBook; } - And the following code snippet is for testing:
NiceExcelWriterExample excelWriter = new NiceExcelWriterExample();

List<Book> listBook = excelWriter.getListBook();
String excelFilePath = "NiceJavaBooks.xls";

excelWriter.writeExcel(listBook, excelFilePath);
4. Formatting Cells of the Excel file
Of course you may need to format the Excel file to make it looks nicely and professionally. Formatting is diversity and quite complex so in this introductory tutorial, I just show you how to format the basics like setting font style. Here are the steps:
- Create a CellStyle object what holds formatting information:
CellStyle cellStyle = sheet.getWorkbook().createCellStyle();
- Invoke the appropriate setters to apply the formatting you want. For example:
cellStyle.setAlignment(CellStyle.ALIGN_CENTER);
cellStyle.setFont(font);
cellStyle.setWrapText(true);
For example, the following method writes a header row for the document with font style bold and size is 16:
private void createHeaderRow(Sheet sheet) {

	CellStyle cellStyle = sheet.getWorkbook().createCellStyle();
	Font font = sheet.getWorkbook().createFont();
	font.setBold(true);
	font.setFontHeightInPoints((short) 16);
	cellStyle.setFont(font);

	Row row = sheet.createRow(0);
	Cell cellTitle = row.createCell(1);

	cellTitle.setCellStyle(cellStyle);
	cellTitle.setCellValue("Title");

	Cell cellAuthor = row.createCell(2);
	cellAuthor.setCellStyle(cellStyle);
	cellAuthor.setCellValue("Author");

	Cell cellPrice = row.createCell(3);
	cellPrice.setCellStyle(cellStyle);
	cellPrice.setCellValue("Price");
}
You can see the complete program (FormattedExcelWriterExample.java) which can be found in the source code attached to this article.
5. Writing both Excel 2003 and Excel 2007 formats in Java
For better flexibility (supporting both common Excel formats), I recommend writing a factory method that either returns a HSSFWorkbook or XSSFWorkbook, depending on the extension of the file (.xls or .xlsx). Here’s the method:
private Workbook getWorkbook(String excelFilePath)
		throws IOException {
	Workbook workbook = null;

	if (excelFilePath.endsWith("xlsx")) {
		workbook = new XSSFWorkbook();
	} else if (excelFilePath.endsWith("xls")) {
		workbook = new HSSFWorkbook();
	} else {
		throw new IllegalArgumentException("The specified file is not Excel file");
	}

	return workbook;
}
You can see the complete program (FlexibleExcelWriterExample.java) which can be found in the source code attached to this article.
That’s how to read Excel files in Java programmatically. To learn more in-depth about Java programming, this Java software developers course would be good choice.
Related Java Excel Tutorials:
- How to Read Excel Files in Java using Apache POI
- Java Example to Read Password-protected Excel Files Using Apache POI
- Java Example to Update Existing Excel Files Using Apache POI
- Working with Formula Cells in Excel using Apache POI
References
- Apache POI — the Java API for Microsoft Documents
- POI API Documentation (Javadocs)
- Apache POI Quick Guide
- Apache POI HOWTO
About the Author:
 Nam Ha Minh is certified Java programmer (SCJP and SCWCD). He started programming with Java in the time of Java 1.4 and has been falling in love with Java since then. Make friend with him on Facebook and watch his Java videos you YouTube.