
Access, Excel, PowerPoint and Word
- Open Microsoft Access, Excel, PowerPoint or Word and click the “Home” tab on the command ribbon.
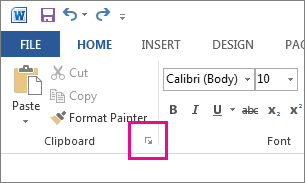
- Click the “Dialog Box Launcher” button in the Clipboard group to open the Clipboard pane.
Contents
- 1 How do I view the Clipboard in Word?
- 2 How do I open Clipboard items?
- 3 Where is the Clipboard on Word 2020?
- 4 How do I open clipboard in Windows 10?
- 5 How do I access the clipboard in Windows 10?
- 6 Why clipboard is not working?
- 7 How do you snip on Windows?
- 8 How do I copy from clipboard in Windows 10?
- 9 Where do I find items saved to Clipboard?
- 10 How do I open the Clipboard in Word 2010?
- 11 What is Window clipboard?
- 12 What is the shortcut for clipboard?
- 13 Where is Microsoft clipboard?
- 14 How do I copy to clipboard in Windows?
- 15 Why can’t I copy and paste on Microsoft Word?
- 16 How do I enable copy and paste in Word?
- 17 How do I take a screenshot on Microsoft?
- 18 How do you take a screenshot of a specific area on a PC?
- 19 How do you move things from your clipboard?
- 20 How do I recover clipboard history?
How do I view the Clipboard in Word?
Click the Home tab. In the Clipboard group, click the dialog box launcher. You see the Clipboard task pane, along with all text cut or copied since you’ve started the Word program, similar to what’s shown here.
How do I open Clipboard items?
To get to your clipboard history at any time, press Windows logo key + V. You can also paste and pin frequently used items by choosing an individual item from your clipboard menu.
Where is the Clipboard on Word 2020?
The summary is simple. From the Home tab, click the launcher in the lower-right corner of the Clipboard group. Now you can save up to 24 different items to your clipboard with a list of them on the left side of Word documents.
How do I open clipboard in Windows 10?
How to turn on and use clipboard history on a Windows 10 computer
- The clipboard history is a feature in Windows 10 that holds the most recent 25 items you’ve copied or cut.
- Press Windows + V to open the clipboard history, then click any item to paste it into the current program.
How do I access the clipboard in Windows 10?
Open Windows 10 Clipboard
Press Win key+V. The Clipboard history panel appears with each item you cut or copied, starting with the last one.
Why clipboard is not working?
1] Make sure Clipboard History is Enabled
The first thing you should try to fix this issue is to check if the Clipboard History is enabled in the Settings. Simply enable the Clipboard History from the Settings app and then check if the clipboard history shows up on clicking Windows + V hotkey.
How do you snip on Windows?
Capture a snip of a menu
Press Ctrl + PrtScn keys. The entire screen changes to gray including the open menu. Select Mode, or in earlier versions of Windows, select the arrow next to the New button. Select the kind of snip you want, and then select the area of the screen capture that you want to capture.
How do I copy from clipboard in Windows 10?
Press the Windows key + V and click Turn on. Select the text or image you want to copy, then bring up the Clipboard using the shortcut. Click on the text you want to copy from the Clipboard, then paste it to your destination file or program. Select what you want to copy and press Ctrl + C on your keyboard.
Where do I find items saved to Clipboard?
Look for a clipboard icon in the top toolbar. This will open the clipboard, and you’ll see the recently copied item at the front of the list. Simply tap any of the options in the clipboard to paste it into the text field. Android does not save items to the clipboard forever.
How do I open the Clipboard in Word 2010?
1Click the dialog box launcher in the lower-right corner of the Clipboard group on the Home tab, right next to the word Clipboard. The Clipboard pane then appears in the writing area of the Word window.
What is Window clipboard?
The Windows clipboard is a storage area for items the have been cut or copied. Whenever you cut or copy something, it is automatically placed in the clipboard for you.There are three clipboard functions that can be performed in virtually all Windows applications: cut, copy and paste.
What is the shortcut for clipboard?
Press “Ctrl-C” twice to display the Clipboard pane.
Where is Microsoft clipboard?
To open the Office clipboard and access the items you copied or cut, make sure the Home tab is active, and then click the “Clipboard” button in the lower-right corner of the Clipboard section. By default, the Clipboard pane is anchored to the left side of the Office program window.
How do I copy to clipboard in Windows?
Copy to clipboard: Highlight the text or image and press Ctrl+C or right-click the text or image and select Copy in the pop-up menu. Paste from clipboard: Press Ctrl+V to paste the last copied item.
Why can’t I copy and paste on Microsoft Word?
Go to File > Options > Advanced. Under Cut, copy and paste, ensure the Show Paste Options button when content is pasted option is checked.
How do I enable copy and paste in Word?
Follow these steps to turn it on.
- Go to File > Options > Advanced.
- In the Cut, copy, and paste section, select Show Paste Options button when content is pasted.
- Select OK.
How do I take a screenshot on Microsoft?
Screenshots on an Android phone
There are two ways to take a screenshot of your Android screen (assuming you have Android 9 or 10): Press and hold your power button. You’ll get a pop-out window on the right side of your screen with icons that let you power off, restart, call an emergency number, or take a screenshot.
How do you take a screenshot of a specific area on a PC?
Press “Windows + Shift + S”. Your screen will appear grayed out and your mouse cursor will change. Click and drag on your screen to select the part of your screen you want to capture. A screenshot of the screen region you selected will be copied to your clipboard.
How do you move things from your clipboard?
How to Retrieve Items on Your Clipboard for Android
- Launch the target application that you want to transfer the contents of the clipboard to. Select the appropriate text field.
- Press and hold down the text area until a dialog box appears.
- Press “Paste” to retieve the data from your clipboard.
How do I recover clipboard history?
1. Using Google Keyboard (Gboard)
- Step 1: While typing with Gboard, tap the clipboard icon next to the Google logo.
- Step 2: To recover a particular text/clip from the clipboard, simply tap on it to paste in the text box.
- Caveat: By default, clips/texts in the Gboard clipboard manager are deleted after an hour.
Word for Microsoft 365 Word 2021 Word 2019 Word 2016 Word 2013 More…Less
The Office Clipboard stores text and graphics that you copy or cut from anywhere, and it lets you paste the stored items into any other Office file. Here’s how it works in Word 2013 or 2016.
Cut and paste items from the Clipboard
-
If you’re not already there, click Home, then click the launcher in the lower-right corner of the Clipboard group.

-
Select the text or graphics you want to copy, and press Ctrl+C.
Each selection appears in the Clipboard, with the latest at the top.
-
Optionally, repeat step 2 until you’ve copied all the items you want to use.
Tip: After you open the Clipboard, it stores content that you copy or cut from anywhere. The same thing happens when you set the Clipboard to store content but remain closed, as long as you have an Office program running. For more about that, see Set options for the Clipboard below.
-
In your document, click where you want to paste the item.
-
Do one of the following in the Clipboard:
-
Click the down arrow next to the item you want to paste, and click Paste.
-
To paste everything in the Clipboard to the selected area in your document, click Paste All.
-
Other things you can do with the Clipboard
-
Delete items from the Clipboard
-
Close the Clipboard
-
Set options for the Clipboard
Delete items from the Clipboard
Do any of the following:
-
Click the arrow on the right side of the item, and click Delete.
-
Right-click the item you want to delete, and click Delete.
-
Click Clear All to clear everything out of the Clipboard.
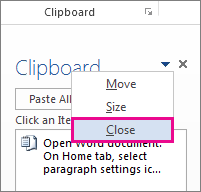
Close the Clipboard
Click the X in the upper-right corner of the Clipboard pane.
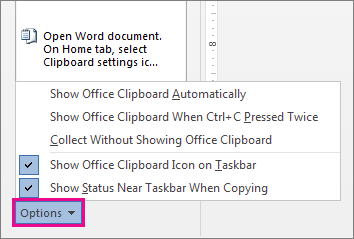
Set options for the Clipboard
The options control a variety of Clipboard functions, such as when the Clipboard appears.
With the Clipboard open, click Options at the bottom of the pane.
Here’s what each option does:
|
Option |
Description |
|---|---|
|
Show Office Clipboard Automatically |
Displays the Office Clipboard when you copy more than one item. |
|
Show Office Clipboard When CTRL+C Pressed Twice |
Displays the Office Clipboard when you press Ctrl+C twice. |
|
Collect Without Showing Office Clipboard |
Automatically copies items to the Office Clipboard without displaying the Clipboard task pane. When you select this option, the Clipboard will store content copied or cut from anywhere. |
|
Show Office Clipboard Icon on Taskbar |
Displays the Clipboard icon in the notification area of your Windows taskbar when the Clipboard is active. This option is on by default. |
|
Show Status Near Taskbar When Copying |
Shows the number of items you’ve collected in the bottom-right corner of the Word window. This option is on by default. |
Need more help?
Updated: 12/31/2022 by

The clipboard, also known as pasteboard, is a location on a computer, phone, or tablet memory that temporarily stores cut or copied text or other data. Once something is stored in the clipboard, it can be pasted to a new location as much as needed. The clipboard holds its information until you cut or copy something else or log out of the computer.
For example, a user may copy information from a word processor and paste it into an e-mail message. If the user pastes from the clipboard multiple times, the same information is pasted repeatedly. If the user copies something else, that new information replaces the old information in the clipboard.
Tip
If you ever need to type something more than once, type the text once, copy that text, and then paste it as much as needed.
How to copy or move information to the clipboard
On a computer
Use the copy feature to copy information from a program to the clipboard. For example, you could highlight the text, image, or another object you want to copy, and once highlighted, right-click it and choose the option to copy. Alternatively, you could use the copy keyboard shortcut Ctrl+C on the PC and Chromebook or Command+C on a Mac.
Use the cut feature to move text or another object from a program to the clipboard. For example, you could highlight the text, image, or another object you want to cut, and once highlighted, right-click it and choose the option to cut. Alternatively, you could use the cut keyboard shortcut Ctrl+X on the PC and Chromebook or Command+X on a Mac.
On a mobile device
To copy text or a picture, use the copy feature. Highlight the text or picture, tap the highlighted text or picture with your finger, and select the Copy option that appears.
To move text or a picture, use the cut feature. Highlight the text or picture, tap the highlighted text or picture with your finger, and select the Cut option that appears.
Copying information from the clipboard to another program
On a computer
After completing the steps above to copy or move information to the clipboard, you can place it in any program using paste. For example, you could move to where you want to paste text, picture, or another object, right-click a blank area, and select the option to paste. Alternatively, you could use the paste keyboard shortcut Ctrl+V on a PC and Chromebook or Command+V on a Mac.
- How to copy and paste text to a document or another program.
On a mobile device
Android and Apple iOS devices, including the iPhone and Samsung Galaxy devices, allow users to copy information from the clipboard to any program using the paste feature. After copying the information to the clipboard, tap in the program where you want to paste the content. Tap again at that same location and select the Paste option that appears.
- How to copy and paste text to a document or another program.
How do I open the clipboard?
Many operating systems include «clipboard viewers» that display the information stored in the clipboard. These utilities can often configure the clipboard with permissions or view its history. Below are the steps to view the clipboard in Windows, macOS, mobile devices, and a Chromebook.
- Windows 11
- Windows 10
- Windows Vista, 7, and 8
- Windows 2000 and XP
- Windows 9x, ME, and NT
- Windows command line
- Windows PowerShell
- Apple macOS
- iPad and iPhone
- Android device
- Chromebook
Windows 11
- Click Start, then click the Settings
 icon.
icon. - On the right side of the Settings window, scroll down and click the Clipboard option.
- For the Clipboard history option, click the toggle switch to the
 position.
Once enabled, you can view the clipboard history by pressing the Windows key+V keyboard shortcut.
Windows 10
In the October 2018 update for Windows 10, Microsoft introduced a new clipboard to view the history of content copied. However, the clipboard history is only available for copied text and images up to 4 MB in size.
To enable the clipboard history feature, follow the steps below.
- Click Start, then click the Settings icon.
- On the Settings window, click the System option.
- In the left navigation pane, click the Clipboard option.
- Under Clipboard history, click the toggle switch to the
 position.
Once enabled, you can view the clipboard history by pressing the Windows key+V keyboard shortcut.
Windows Vista, 7, and 8
Unfortunately, Microsoft decided not to include a clipboard viewer in Windows Vista, 7, and 8. You need to download and use a third-party utility or program to view the clipboard contents.
Note
The command-line clip command still works. See the command line section for further information.
Windows 2000 and XP
Microsoft Windows 2000 and XP users may find it difficult to locate the clipboard because it was renamed to the Clipbook viewer. It is accessible by opening Windows Explorer, then the «Winnt» or «Windows» folder, then the «System32» folder. Find and double-click the clipbrd.exe file.
Users can also click Start, Run, type clipbrd, and press Enter to execute this program.
Windows 9x, ME, and NT
Microsoft Windows 95, 98, NT 4.0, and ME come installed with a clipboard viewer accessible by clicking Start, Programs, System Tools, and Clipboard Viewer. The clipboard viewer is also executable through the clipbrd.exe file in the Windows directory.
Windows command line
There are no commands in the standard Windows command line that allow you to paste or view the clipboard’s contents. However, you can copy text to the clipboard with the clip command.
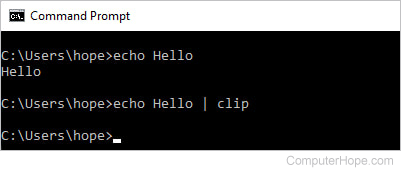
Then you can paste the text to another program, such as Notepad.

See the clip command page for further information and examples.
Windows PowerShell
Using PowerShell, you can paste the clipboard with the Get-Clipboard command or its alias gcb.
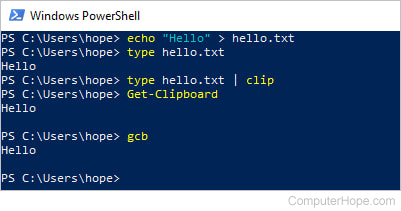
To use PowerShell, open the Start menu and click Windows PowerShell > Windows PowerShell.
Apple macOS
You can view the clipboard using the steps below on a Mac computer.
- Open the Finder application.
- In the menu bar at the top of the Finder window, click Edit and select Show Clipboard.
Only the last copied item is displayed in the clipboard. You need to install a third-party clipboard manager application, like Paste, to view more clipboard history.
iPad and iPhone
Unfortunately, Apple does not include a clipboard viewer on iPads and iPhones. You need to download and use a third-party app to view the clipboard contents, like Paste or Clip+.
Android device
Google does not include a clipboard viewer for the stock Android operating system on phones or tablets. Some versions of Android, such as Samsung One UI, include a clipboard icon on the default keyboard. Open the keyboard and press the clipboard icon above the keys to access it. This icon could be hidden behind a meatballs menu, as seen in the image.
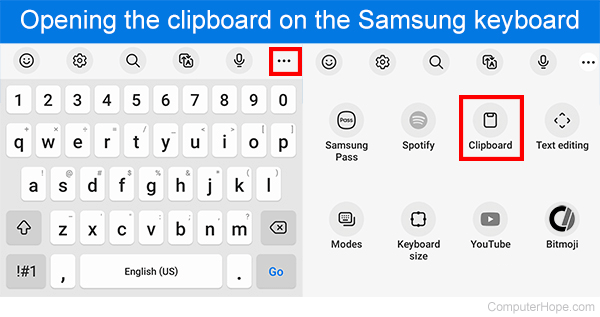
If your keyboard doesn’t have a clipboard icon, you can download and use a third-party app like Gboard to view the clipboard contents.
Chromebook
To open and view the clipboard manager on a Chromebook, press the Search key+V keyboard shortcut. The clipboard manager opens in the middle of the screen, showing you the current contents and what you can paste.
How many things can be stored in the clipboard?
The clipboard can store one thing at a time. For example, selecting and copying a paragraph of text or an image, is considered one thing. If one thing is currently stored in the clipboard and you copy another thing, it overwrites what’s stored in the clipboard.
How much data can the clipboard store?
The amount of data the clipboard can store depends on how much physical memory (RAM) and configured virtual memory (paging file) is in the computer. The more memory a computer has, the more data you can copy to the clipboard.
- How to install computer memory (RAM).
- View and increase Windows virtual memory (page file) settings.
Only copied text and images are stored in the clipboard. If you copy a file, only information about the file is stored, not the file itself. For this reason, it’s uncommon that you need to increase the amount of data the clipboard can store. However, if you are working with large or raw images, you might encounter a case where more memory is needed to allow the clipboard to store the image data.
Copy, Cut, Ditto clipboard, Office Clipboard, Operating system terms, Paste, Snipping Tool, Word processor terms
From Wikipedia, the free encyclopedia
The clipboard is a buffer that some operating systems provide for short-term storage and transfer within and between application programs. The clipboard is usually temporary and unnamed, and its contents reside in the computer’s RAM.[1]
The clipboard provides an application programming interface by which programs can specify cut, copy and paste operations. It is left to the program to define methods for the user to command these operations, which may include keybindings and menu selections. When an element is copied or cut, the clipboard must store enough information to enable a sensible result no matter where the element is pasted. Application programs may extend the clipboard functions that the operating system provides. A clipboard manager may give the user additional control over the clipboard. Specific clipboard semantics vary among operating systems, can also vary between versions of the same system, and can sometimes be changed by programs and by user preferences.
Windows, Linux and macOS support a single clipboard transaction.[2][3]
History[edit]
Clipboards as buffers for small text snippets were first used by Pentti Kanerva when he used it to store deleted texts in order to restore them.[4] Since one could delete a text in one place and restore it in another, the term «delete» wasn’t what one would expect in this case. Larry Tesler renamed this in 1973 as cut, copy, and paste and coined the term «clipboard» for this buffer, since these techniques need a clipboard for temporary saving the copied or cut data.[5]
Data formats[edit]
Applications communicate through the clipboard by providing either serialized representations of an object, or a promise (for larger objects).[6] In some circumstances, the transfer of certain common data formats may be achieved opaquely through the use of an abstract factory; for example, Mac OS X uses a class called NSImage to provide access to image data stored on the clipboard, though the actual format of the image data backing the object is hidden. The sending and receiving application negotiate the formats which can be transferred in between them, oftentimes with the active GUI widget responsible for providing acceptable type transformations. The pasteboard allows for transfer of common items such as URLs, colors, images, strings, attributed strings (Rich text), and sounds. The operating system and GUI toolkit may provide some common conversions, for example converting from rich text to plain text and vice versa. Various type identifiers for data transfer are supported by modern operating systems, which may automatically provide acceptable mappings between type systems, such as between MIME and Uniform Type Identifier.[7][8]
Computer security[edit]
Clipboard hijacking is an exploit in which a person’s clipboard’s content is replaced by malicious data, such as a link to a malicious web site.[9] While some security-holes were patched, JavaScript can still be used to modify clipboard content via an attack dubbed ‘pastejacking’.[10][11] Dylan Ayrey who developed the attack set up a website that demonstrates how this exploit can be used to trick a user into running commands they didn’t want to run.[12]
There have been exploits where web pages grab clipboard data. In early 2013 researchers exposed risks stemming from Android-based password managers and documented how passwords in 21 of the most popular of these apps could be accessed by any other app on an Android device including those with extremely low-level privileges.[13] Joe Siegrist notes that this is an «OS-level issue that impacts everything running on Android».[14][1]
Clipboard management and extensions[edit]

Glipper, an example of a clipboard management program
Clipboard manager extensions add functionality to the integrated clipboard functions of an operating system. They are applications that enable the user to manipulate the clipboard. On platforms such as Linux that use multiple incompatible GUI toolkits, clipboard managers are often used to transfer data between applications using different such frameworks.
When a clipboard manager provides multiple cut and paste transactions, the clipboard is treated as a stack or scrap book, with new cuts and copies being placed on a list of recent transactions. The standard paste operation copies the most recent transaction, while specialized pastes provide access to the other stored transactions. These managers generally also provide a window that displays the transaction history and allows the user to select earlier copies, edit them, change their format and even search amongst them.
Since most operating systems (e.g. Windows, macOS, Linux, X11, Android, iOS) do not save the clipboard contents to any persistent storage – when a user logs out or reboots the system the clipboard contents are deleted – an added functionality is to save the clipboard persistently. Another example is making the local clipboard work with online applications by saving the clipboard data to the online location upon a copy or cut event, making this data available to online applications for pasting. Clipboard managers can also serve as tools to overcome the limitation of software not supporting copying and pasting (for example, while logging into remote Windows server, one cannot copy and paste their user name and password).
Operating system-specific clipboards[edit]
Microsoft Windows and ReactOS[edit]

The ReactOS |
|
| Developer(s) | Microsoft, ReactOS Contributors |
|---|---|
| Operating system | Windows, ReactOS |
| Type | Command |
| License | Windows: Proprietary commercial software ReactOS: GNU General Public License |
| Website | docs.microsoft.com/en-us/windows-server/administration/windows-commands/clip |
The clipboard in Microsoft Windows and ReactOS holds one item in multiple available formats.
Every item has at least one clipboard format, but can have different types of format of the same data. The three different types of possible formats are:[15]
- standard formats[16] (e.g. CF_BITMAP, or CF_UNICODETEXT),
- registered formats[17] (e.g. CF_HTML)
- private formats for internal use
Up to and including Windows XP the clipboard could be accessed via the ClipBook Viewer application.[18] In newer versions of Windows the content can be accessed via clipboard managers.
Data can be stored to the Windows[19] and ReactOS[20] clipboard via command line using the clip command:[21]
$ # to paste the content of a folder to the clipboard:
$ dir | clip
The clipboard can also be accessed via PowerShell:[22][23]
# to paste the content of a directory to the clipboard
Set-Clipboard -Path "C:directory"
# to get the content of the clipboard
Get-Clipboard
Apple macOS[edit]
The clipboard in Apple macOS holds one item in multiple available formats.
The contents of the clipboard can be viewed by selecting the Show Clipboard menu item from the Finder’s Edit menu. The raw data and the stored formats can be seen using the ClipboardViewer.[24]
Using the following commands the clipboard can be accessed from the command line:[25][26]
$ # to copy data into the clipboard:
$ echo 'hello world' | pbcopy
$ # to paste from the clipboard:
$ pbpaste
hello world
X Window System[edit]
The X Window System commonly used on Unix and Linux systems provides three clipboards, which are named «PRIMARY», «SECONDARY» and «CLIPBOARD».[27]
The usage and handling of various selections is not standardized. However, most modern toolkits and desktop environments, such as GNOME or KDE, follow a widely accepted convention, outlined in the freedesktop.org specification.[28] One selection, CLIPBOARD, is used for traditional clipboard semantics, with shortcuts identical to Windows. Another selection, PRIMARY, is an X11-specific mechanism. Data is «copied» immediately upon highlighting and pasted with the third (middle) mouse button.[29] This copied data is usually separated from the CLIPBOARD selection and does not change its contents.[30] SECONDARY was planned as an alternative to PRIMARY but is only used inconsistently.[27]
There are two command line tools (xsel and xclip) which can access the clipboard:[31]
$ # to paste standard output to the clipboard using xclip
$ echo text | xclip -in -selection clipboard
$ # to paste standard output to the clipboard using xsel
$ echo text | xsel --clipboard
The main difference to OS X and Windows is that no data is actually stored in the CLIPBOARD-clipboard but only the reference to the copied or cut data. The application claims the ownership of the CLIPBOARD selection and communicates its ownership to the X Server.[29] When pasting this data, the data and its available formats are requested from the application that owns the CLIPBOARD selection.[32]
AmigaOS[edit]
The Amiga operating system uses 256 units, so one has multiple clipboards at the same time.[33]
Android[edit]
Android provides a clipboard that can hold up to one clip object and is accessible system-wide. Simple text is stored directly in the clipboard; complex data are stored by reference. The clip object has one of three formats: text string, URI object, or intent.[34]
To interact with the clipboard, an app uses the class ClipboardManager[35] and system calls to cut, copy, and paste objects.
In Android 8.0, the clipboard first appears in the user interface: In a situation where the user prepares to paste from the clipboard, a «Clipboard» option appears that gives the user access to many objects copied or cut to the clipboard in the past. Apart from that, and in earlier versions, the user has no access to the clipboard except in apps that make it available to the user.
Apple iOS[edit]
The clipboard is called «pasteboard» in iOS similar to OS X. Apps on this operating system can create additional pasteboards, called instances of the UIPasteboard class, which can be public or private. One instance can hold a single item or multiple items in different formats.[36]
The formats are identified by Uniform Type Identifiers (UTI).[37]
The data contained in the pasteboard cannot be accessed via the GUI but only from the system and applications.
APIs[edit]
Applications can access the clipboard or its data via APIs.
JavaScript[edit]
In JavaScript a class which detects changes in the users clipboard data (ClipboardEvent)[38] and functions to alter the content of a clipboard or read from it (clipboardData.getData(), clipboardData.setData())[39] exist, but aren’t supported by every browser since altering the clipboard of a user can represent a security issue.
Qt[edit]
In Qt a wrapper for every supported platform[40] exists. It provides access to window system clipboards with the use of the class QClipboard. This class facilitates access to common data types by functions.[41] The data type of the element stored in the clipboard is indicated via MIME and MIME data can also be put in the clipboard with help of functions from this class.
See also[edit]
- Clipboard manager
- Cut, copy, and paste
References[edit]
- ^ a b «What is a Clipboard in Computing? — Definition from Techopedia». Techopedia.com. Archived from the original on 2018-02-02. Retrieved 2018-02-01.
- ^ Kimmatkar, Sarang B. (2014). «Extending functionalities of default clipboard». (IJCSIT) International Journal of Computer Science and Information Technologies 5. 6.
- ^ Stephens, Rod (2010). Visual Basic 2010 : programmer’s reference. Library Genesis. Indianapolis, IN : Wiley Pub., Inc. ISBN 978-0-470-49983-2.
- ^ Moggridge, Bill (2007). Designing interactions. Cambridge, Massachusetts: MIT Press. p. 65ff. ISBN 9780262134743.
- ^ Larry Tesler. «A User Experience Retrospective». Archived from the original on 2018-02-02. Retrieved 23 January 2018.
- ^ «Dragging Files». developer.apple.com. Retrieved 9 December 2018.
- ^ «NSPasteboard — AppKit | Apple Developer Documentation». developer.apple.com. Archived from the original on 2018-05-26. Retrieved 9 December 2018.
- ^ «Adopting Uniform Type Identifiers». developer.apple.com. Archived from the original on 2018-07-21. Retrieved 9 December 2018.
- ^ «What is clipboard hijack attack? — Definition from WhatIs.com». WhatIs.com. Archived from the original on 2017-01-05. Retrieved 4 January 2017.
- ^ Chirgwin, Richard. «Pastejack attack turns your clipboard into a threat». The Register. Archived from the original on 2017-01-04. Retrieved 4 January 2017.
- ^ «Researcher warns of ‘pastejacking’ hack attacks targeting users’ clipboards». Graham Cluley. 26 May 2016. Archived from the original on 2017-01-05. Retrieved 4 January 2017.
- ^ «dxa4481/Pastejacking». GitHub. Archived from the original on 2017-01-04. Retrieved 4 January 2017.
- ^ Fahl, Sascha; Harbach, Marian; Oltrogge, Marten; Muders, Thomas; Smith, Matthew (2013). «Hey, You, Get Off of My Clipboard» (PDF). Financial Cryptography and Data Security. Lecture Notes in Computer Science. Vol. 7859. pp. 144–161. doi:10.1007/978-3-642-39884-1_12. ISBN 978-3-642-39883-4. Archived (PDF) from the original on 2017-09-19. Retrieved 4 January 2017.
- ^ «Using a password manager on Android? It may be wide open to sniffing attacks». Ars Technica. 21 November 2014. Archived from the original on 2017-01-04. Retrieved 4 January 2017.
- ^ «Clipboard Formats (Windows)». msdn.microsoft.com. Archived from the original on 2018-02-07. Retrieved 2018-02-03.
- ^ «Standard Clipboard Formats (Windows)». msdn.microsoft.com. Archived from the original on 2018-02-07. Retrieved 2018-02-03.
- ^ «HTML Clipboard Format (Internet Explorer)». msdn.microsoft.com. Archived from the original on 2018-02-07. Retrieved 2018-02-03.
- ^ «View & Manage Clipboard In Windows 10/8/7». The Windows Club. 2013-04-12. Archived from the original on 2018-02-12. Retrieved 2018-02-06.
- ^ «clip | Microsoft Docs». Docs.microsoft.com. 2017-10-16. Retrieved 2019-09-26.
- ^ «reactos/base/applications/cmdutils/clip at master · reactos/reactos · GitHub». Github.com. Retrieved 2019-09-26.
- ^ «How to Copy Command Line Output to the Windows Clipboard». www.labnol.org. Archived from the original on 2018-02-07. Retrieved 2018-02-06.
- ^ sdwheeler. «Get-Clipboard (Microsoft.PowerShell.Management)». docs.microsoft.com. Archived from the original on 2018-01-26. Retrieved 2018-02-06.
- ^ sdwheeler. «Set-Clipboard (Microsoft.PowerShell.Management)». docs.microsoft.com. Archived from the original on 2018-02-07. Retrieved 2018-02-06.
- ^ «ClipboardViewer». developer.apple.com. Archived from the original on 2018-02-07. Retrieved 2018-02-06.
- ^ «Copy to clipboard from terminal in OS X». rogeriopvl.com. Archived from the original on 2013-08-15. Retrieved 2013-07-02.
- ^ «pbcopy(1) Mac OS X Manual Page». apple.com. Archived from the original on 2014-03-28. Retrieved 2013-07-02.
- ^ a b «Clipboard — ArchWiki». wiki.archlinux.org. Archived from the original on 2018-02-17. Retrieved 2018-02-16.
- ^ «clipboards-spec». freedesktop.org. Archived from the original on 2014-12-24. Retrieved 2014-08-16.
- ^ a b «Copy & Paste, Drag & Drop [MI Wiki]». wiki.mi.ur.de (in German). Archived from the original on 2018-02-16. Retrieved 2018-02-16.
- ^ «gnu.org». www.gnu.org. Archived from the original on 2017-12-24. Retrieved 2018-02-16.
- ^ «Copying and Pasting To and From the System Clipboard On The Command Line — Fernando Basso». fernandobasso.github.io. Archived from the original on 2018-02-07. Retrieved 2018-02-06.
- ^ «X Selections, X Cut Buffers, and Emacs Kill Rings». www.jwz.org. Archived from the original on 2018-03-04. Retrieved 2018-02-02.
- ^ «Clipboard Device — AmigaOS Documentation Wiki». wiki.amigaos.net. Archived from the original on 2018-02-05. Retrieved 2018-02-03.
- ^ «Copy and Paste | Android Developers». developer.android.com. Archived from the original on 2018-02-07. Retrieved 2018-02-06.
- ^ «ClipboardManager | Android Developers». developer.android.com. Archived from the original on 2018-02-07. Retrieved 2018-02-02.
- ^ «Pasteboard». developer.apple.com. Archived from the original on 2018-02-07. Retrieved 2018-02-01.
- ^ «Uniform Type Identifier». developer.apple.com. Archived from the original on 2018-02-07. Retrieved 2018-02-06.
- ^ «Clipboard API and events – ClipboardEvent». www.w3.org. Archived from the original on 2018-01-28. Retrieved 2018-02-08.
- ^ «Clipboard API and events – Synchronous Clipboard API». www.w3.org. Archived from the original on 2018-01-28. Retrieved 2018-02-08.
- ^ «platformspluginssrc — qt/qtbase.git — Qt Base (Core, Gui, Widgets, Network, …)». code.qt.io. Archived from the original on 2018-02-09. Retrieved 2018-02-02.
- ^ «QClipboard Class | Qt GUI 5.10». doc.qt.io. Archived from the original on 2018-02-02. Retrieved 2018-02-02.
Further reading[edit]
- Stanek, William R. (2008). Windows Command-Line Administrator’s Pocket Consultant, 2nd Edition. Microsoft Press. ISBN 978-0735622623.
- McElhearn, Kirk (2006). The Mac OS X Command Line: Unix Under the Hood. John Wiley & Sons. ISBN 978-0470113851.
External links[edit]
- clip | Microsoft Docs
- 2. Peer-to-Peer Communication by Means of Selections in the ICCCM
- Windows Dev Center: Transferring Shell Objects with Drag-and-Drop and the Clipboard
- Microsoft Developer Network: How the Clipboard Works, Part 1
- Microsoft Developer Network: How the Clipboard Works, Part 2
- Microsoft Developer Network: Delayed Rendering of Clipboard Data
Буфер обмена
На уроке 15 мы говорили о причине появления лишних стилей. И одна из причин появления лишних стилей – это неумение правильно пользоваться таким явлением, как буфер обмена и, в частности, такой возможностью, как специальная вставка из буфера обмена.
По окончании урока вы сможете:
- Рассказать, что такое буфер обмена
- Применить специальную вставку из буфера обмена
Буфер обмена – это часть памяти компьютера, в которой можно сохранить информацию, которую вы скопировали. По мере необходимости скопированную информацию можно извлекать из буфера обмена и вставлять в выбранное нами место.
1. Буфер обмена. Возможности буфера обмена
Скачайте документ тут. Откройте документ.
- Выделяем текст (см. Урок 2. Выделяем текстовую информацию в документе)

- Копируем текст в буфер обмена. Выбирайте, каким способом вы это сделаете:

- Разыскать место, куда вы будете вставлять скопированный текст. Это может быть другое место в документе или новый документ, в который вы собираете информацию из разных источников.
- Вставить текстовую информацию из буфера обмена. Выбирайте, каким способом вы это сделаете:
| Запомните! | Использование клавиатурных сочетаний значительно увеличивает производительность труда |
Скопированную информацию можно вставлять много раз.
Буфер обмена един для всех программ, установленных на компьютере. Вы можете скопированный текст вставить в графический редактор Visio или CorelDraw. Скопированная информация храниться в буфере обмена, до тех пор, пока вы не скопируете что-нибудь новое. Новое затирает старое.
Но у офисных программ есть замечательная особенность: сохранение в буфере обмена до 24 (!) фрагментов. Причём, не важно каких: размер, вид, объём – всё это не важно. Одно копирование – один фрагмент. Воспользуемся этой особенностью.
- Лента Главная → группа команд Буфер обмена → кнопка группы.
 Откроется окно Буфера обмена.
 - Выберите команду Параметры → Установите галочки:


- Собирать данные без отображения буфера обмена Office
Данные в количестве до 24 фрагментов будут собираться в буфере обмена вне зависимости открыто окно Буфера обмена или нет. Если вы скопировали больше 24 раз, то информация, скопированная первой, исчезнет, и так по кругу.
Интересная особенность: если вы копируете информацию в другой неофисной программе (например, вы работаете в графическом редакторе), то эта информация в количестве до 24 фрагментов будут собираться в буфере обмена Office. Тогда как в программе, в которой вы работаете в настоящий момент, будет доступен только последний скопированный фрагмент.
Если бы вы знали, как часто меня выручала информация, собранная в буфере обмена Office!

- Показать значок буфера обмена Office на панели задач
 Ваша картинка может отличаться от моей (операционная система другой версии, другие цвета)
Буфер обмена настраивается один раз. Если вы закроете окно Буфера обмена, то настройки сохраняться. Закрывается Буфер обмена повторным щелчком ЛМ по кнопке группы (Лента Главная → группа команд Буфер обмена → кнопка группы): Если вам необходимо вставить фрагмент, скопированный ранее, то откройте окно Буфера обмена (вы уже знаете, как это делается). Далее из списка скопированный фрагментов выберите нужный вам фрагмент и щёлкните на нём ЛМ – фрагмент вставиться из буфера обмена.
Обратите внимание: на выбранном вами фрагменте появляется кнопка выпадающего меню. Щёлкните ЛМ по кнопке выпадающего меню и вы увидите две команды на выбор: Вставить и Удалить. Командой Удалить вы удаляете этот фрагмент из буфера обмена:
| Запомните! | Скопированная информация хранится в буфере обмена до тех пор, пока вы не перезагрузите или выключите компьютер. |
2. Буфер обмена. Специальная вставка
Очень часто нам бывает нужна операция «Скопировать из документа – вставить в новый документ». Даже очень часто. Но эта операция является причиной появления лишних стилей в документе (см. Урок 15. Лишние стили текста). Ведь вместе с текстом мы копируем символ конца абзаца, а именно он заключает в себе всю характеристику абзаца (Стиль абзаца).
Если нам нужно вставить один абзац, то можно, перетаскивая мышку, выделить текст без символа конца абзаца, скопировать и вставить в новый документ, что мы и делали на Уроке 15. А если нам нужно скопировать несколько абзацев? Ведь в этом случае мы поневоле копируем символы конца абзаца, а с ними тащим в наш новенький чистенький документ кучу ненужных нам стилей, в чём мы уже с вами убедились на прошлом уроке. В этом случае нас выручит специальная вставка буфера обмена.
Скачайте документ тут
Вы открыли Учебный файл_Специальная вставка?
- Выделите весь текст (см. Урок 2. Я предпочитаю тройной щелчок ЛМ по полосе выделения)
- Скопируйте весь текст любым известным вам способом (я предпочитаю сочетание клавиш Ctrl+C).
- Создайте новый документ (я уже не напоминаю, что режим «Непечатаемые символы» и рабочее окно Стили должны быть заданы всегда).
- Лента Главная → группа команд Буфер обмена → кнопка Вставить → чёрный треугольник выпадающего меню.
Раскроется меню Параметры вставки:

Пройдитесь курсором по четырём кнопкам в раскрывшемся окне параметры вставки.
Первая кнопка ![]()
В этом случае мы притащим в новый документ все стили текста, которые только есть в старом документе. Оно нам надо?
Вторая кнопка ![]() даёт такую картину:
даёт такую картину: Третья кнопка
 ![]() даёт такую картину:
даёт такую картину:
Как видите, есть риск получить в список стилей Встроенный стиль.
Четвёртая кнопка ![]() даёт такую картину:
даёт такую картину:
Как видите:
- Новые стили в области задач Стили не появились,
- Автоматическая нумерация списков превратилась в обычный текст.
Выбирайте, какой кнопкой специальной вставки Буфера обмена вы будете пользоваться.
Я предпочитаю кнопку ![]()
На мой взгляд, она самая безопасная в смысле «недопущения» в новый документ ненужных мне стилей.
Вы можете возразить: А как же превращённая в текст автоматическая нумерация? С этим явлением мне помогает справиться моя любимая команда Заменить. Возможности этой команды очень велики и, честно, до конца мной не изучены. Я сомневаюсь, что за один урок расскажу вам о возможностях команды Заменить.
Теперь вы сможете:
- Рассказать, что такое буфер обмена
- Применить специальную вставку из буфера обмена
В операционных системах Windows, Mac OS или Андроид пользователям компьютера и Интернета была предоставлена возможность работать одновременно в нескольких окнах с несколькими программами.

У пользователей сразу же возник соблазн передачи данных из одних программ (из одних окон) в другие программы (в другие окна).
Содержание (кликабельно):
1) Что такое Буфер обмена
2) Операции буфера обмена «Копировать» и «Вставить»
3) Буфер обмена или буфер обмана на примере Excel
4) О буфере обмена Microsoft Office, в том числе, 2010, 2013, 2016
5) Буфер обмена в Word
6) Вставить данные можно напрямую, без буфера обмена
7) Что значит «Буфер обмена содержит большой фрагмент»?
Действительно, имеешь, например, подходящий текст в формате Блокнота (скажем, с расширением .txt), и это текст вполне пригоден, чтобы его вставить в подготавливаемую презентацию (скажем, в формате PowerPoint). Не перепечатывать же его заново?! Текст уже есть, но в другом формате и в другом окне, в другой программе. Так и хочется его каким-то образом автоматически перенести в другое окно, в другую программу.
Или, например, пользователь ПК сделал фотографию и сохранил ее в формате (например, с расширением .jpeg). И теперь надо эту фотку вставить в виде рисунка, например, в текст Word, чтобы «украсить» текст, сделать «книжку с картинками». Подобных примеров, когда есть желание перенести данные из одной программы (из одного окна) в другую программу (в другое окно) можно привести множество. А если есть желания, то должны быть и соответствующие возможности.
Как сделать так, чтобы можно было из одной программы в другую переносить совершенно любые данные: тексты, картинки, графику, чертежи, схемы и даже видео или аудио и пр.?
Что такое Буфер обмена
Разработчики операционных систем придумали довольно оригинальный способ, который может считаться универсальным, пригодным для передачи практически любых данных.
Достаточно в одной программе выделить данные, подлежащие переносу в другую программу, и скопировать их в некую специальную область. Затем в другой программе, куда должны быть перенесены данные, нужно установить курсор в то место, куда данные должны быть помещены, и после этого выполнить процедуру вставки данных из этой специальной области, которые ранее были туда скопированы.
Кстати, процедура копи-паст работает также в пределах одного окна, одной программы, если данные нужно копировать из одного места и вставить в другое место текста, презентации и т.п.
Благодаря внешней простоте подобной процедуры переноса данных из одного окна в другое, эта процедура получила жаргонное наименование «копи-паст». Слово «копипаст» произошло от двух английских слов «copy-paste», что в переводе означает «копировать-вставить».
Специальная область, в которую данные сначала копируются, а потом оттуда восстанавливаются (вставляются), получила название «буфер обмена» (по-английски «clipboard», переводится так же – «буфер обмена»).
Здорово придумано: пользователю даже не надо задумываться, что такое буфер обмена, каким образом выделенные данные туда попадают, и потом каким образом эти данные восстанавливаются из буфера обмена в окне другой программы или в другом месте той же программы.
Операции «Копировать» или «Вырезать», а потом «Вставить» и связанный с этими операциями буфер обмена являются стандартными функциями операционных систем Windows, Mac OS или Андроид.
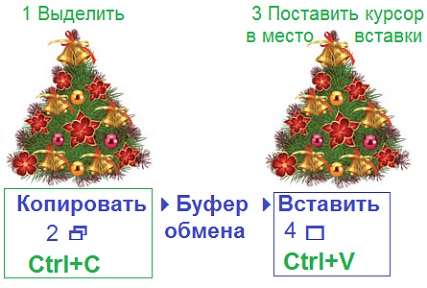
Схема работы буфера обмена в Windows, Mac, Android
Как правило, в буфер обмена информация попадает, когда пользователь использует одну из двух операций:
- «Копировать» (горячие клавиши Ctrl+C) или
- «Вырезать» (Ctrl+X).
А из буфера обмена пользователь извлекает информацию с помощью операции «Вставить» (Ctrl+V).
Таким образом, буфер обмена является промежуточным хранилищем информации, которое занимает некоторую часть оперативной памяти компьютера. Оперативная память предназначена для временного хранения информации.
Стандартный буфер обмена как часть оперативной памяти способен сам себя очищать, например, при выключении компьютера или при помещении туда новой информации.
Скриншот экрана, если в Windows его делать с помощью кнопки PrtScr (сокращение от Print Screen), то он также попадает в буфер обмена. И извлечь скриншот из буфера обмена можно с помощью операции «Вставить».
Операции буфера обмена «Копировать» и «Вставить»
Многие программы имеют в своем арсенале возможностей пункты меню и кнопки «Копировать» («Copy»), а также пункты меню и кнопки «Вставить» («Paste»).
Как правило, из-за частого применения этих пунктов, данные пункты меню находятся чаще всего в самом главном меню программ, а кнопки «Копировать» («Copy») и «Вставить» («Paste») могут иметь довольно большой размер и могут быть хорошо заметными (рис. 1).
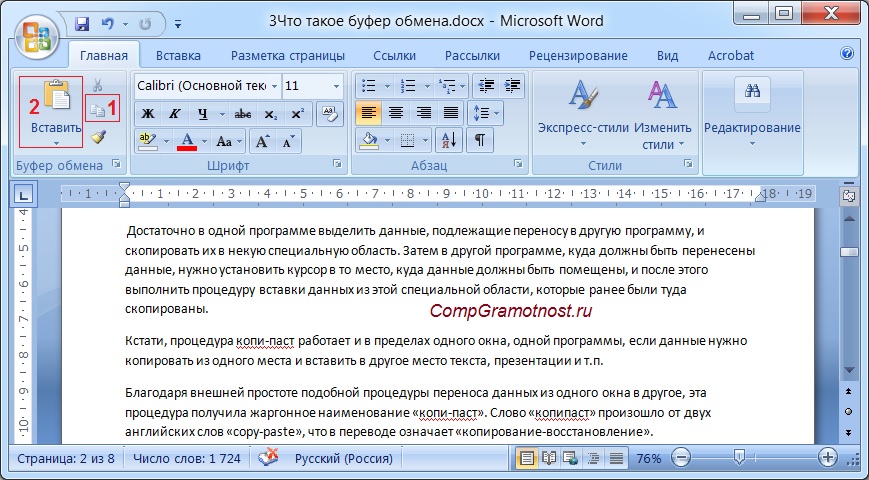
Рис. 1. Кнопки «Вставить» и «Копировать» в программе Microsoft Word
1 на рис. 1 – кнопка «Копировать» в программе Word, которая будет активна только в том случае, когда выделен текст (или картинка), и, следовательно, есть объект для копирования и помещения его в буфер обмена,
2 на рис. 1 – кнопка «Вставить».
Многие контекстные меню, которые появляются при щелчке правой кнопкой мыши (ПКМ) по выделенному фрагменту документа (текст, рисунок и т.п.) имеют опции «Копировать» и «Вставить», поскольку это часто применяемые действия пользователей ПК при работе с программами (рис. 2).
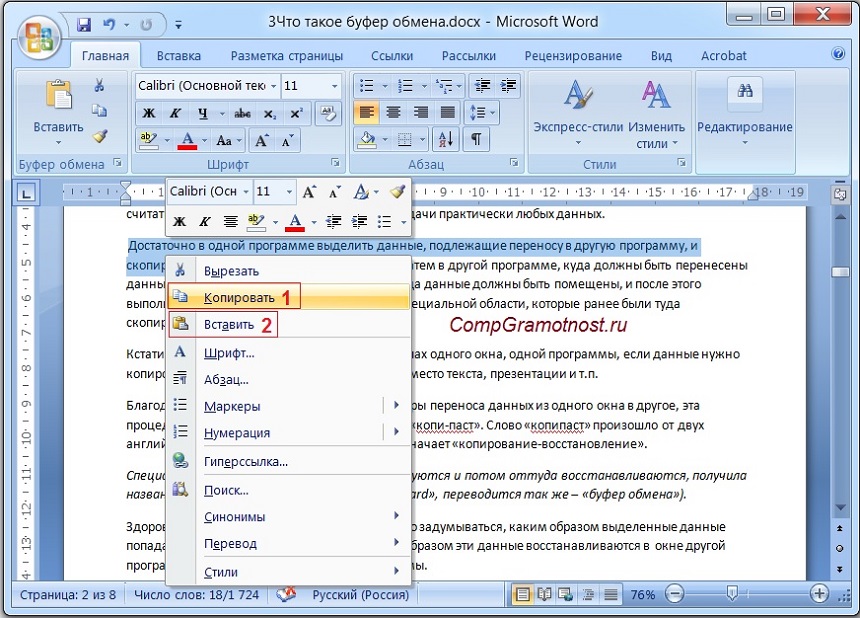
Рис. 2. Пункты контекстного меню «Копировать» и «Параметры вставки» в программе Microsoft Word
Заменой кнопок «Копировать» и «Вставить» (1 и 2 на рис. 1) являются пункты контекстного меню точно с такими же названиями (1 и 2 на рис. 2).
Все ли так просто?
Чаще всего пользователь применяет копирование и вставку для переноса данных из одного места программы в другое место или из одной программы в другую, даже не задумываясь, как это делается. И почти в 100% случаев получается адекватный результат: данные из одной программы переносятся без искажений в другую программу или из одного места они переходят в другое в пределах одной программы.
Но могут быть и исключения. И тогда применение буфера обмена может привести к искажению данных, если неправильно пользоваться предоставленными возможностями. Это случается редко, но все-таки может случиться. Разберем примеры «искажения» данных, а точнее, примеры неправильной работы с буфером обмена.
Буфер обмена или буфер обмана на примере Excel
Пользователи электронных таблиц Excel знают, что в ячейках программы Excel могут храниться не только цифры, но и формулы для их вычисления. А в самих ячейках высвечиваются данные, полученные в результате вычислений по этим формулам. Теперь представьте себе, что мы ставим курсор в такую ячейку с формулой, жмем «Копировать» и данные помещаем в буфер обмена.
Затем ставим курсор в другую свободную ячейку и жмем «Вставить». Что должно попасть в эту свободную ячейку? Формула, которая стояла в прежней ячейке, из которой мы копировали данные в буфер обмена? Или число, которое стояло в прежней ячейке? Если формула, то результат вставки будет один (вставленная формула сработает, и в ячейке появится число, являющееся результатом вычисления по этой формуле). Если же вставится число, то результат вставки – это число, полностью равное тому, которое стояло в ячейке, из которой производилось копирование.
Понятно, что в итоге в новой ячейке мы можем увидеть либо одно число (если вставилась формула), либо другое (если вставилось число). Значит, мы можем получить как «правильный», так и «неправильный» результат. То есть мы или получим точный ответ из буфера обмена, или получим неточный ответ уже из «буфера обмана»!
Как не ошибиться? Надо знать, ЧТО по умолчанию вставляется из буфера обмена в той или иной программе. Именно знать. Для этого надо про это где-то прочитать (в справке к программе, например), или поэкспериментировать самостоятельно. Если не знать, то можно получить неверные данные, опираясь на возможности уже не буфера обмена, а «буфера обмана»!
В приведенном примере с программой Excel опытные пользователи этой программы знают, что по умолчанию в ячейку вставляется формула, а не значение. Если же нужно из буфера обмена вставить все-таки значение, а не формулу, то надо пользоваться дополнительным меню вставки, и выбирать из него «Вставить значение» (цифра 1 на рис. 3) или воспользоваться «Специальной вставкой» (цифра 2 на рис. 3 и рис. 4):
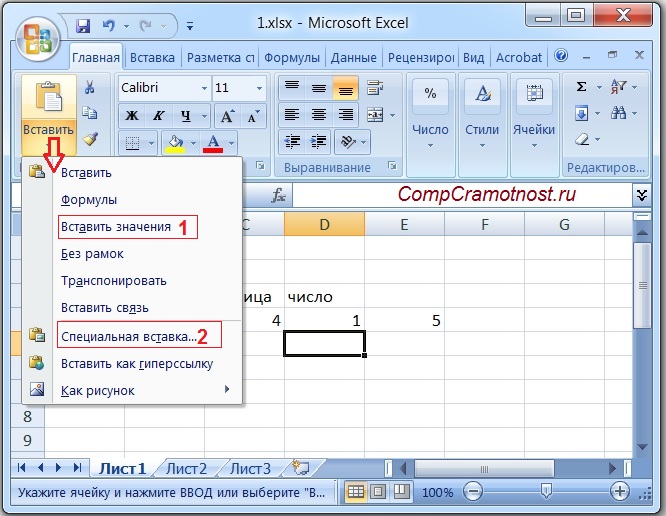
Рис. 3. Вставка значения в новую ячейку (вместо формулы) (цифра 1) или использование «Специальной вставки» (цифра 2)
Если кликнуть по опции «Специальная вставка» (2 на рис. 3), то в открывшемся окне с таким же названием получим много вариантов вставки:
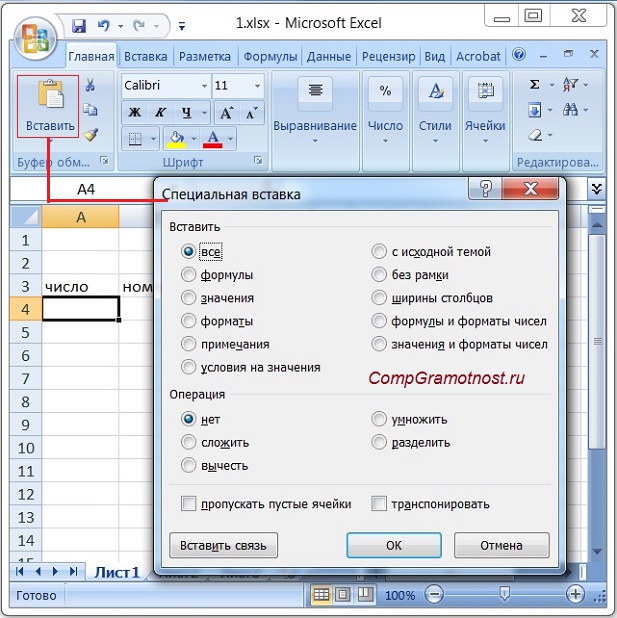
Рис. 4. Окно «Специальная вставка» программы Excel для выбора вариантов вставки скопированных данных из буфера обмена в новую ячейку.
Как видим на рис. 4 в новую ячейку можно вставить не только значения или формулы, но и форматы данных, формулы и значения вместе с форматами и пр., а также примечания к ячейкам, условия на значения, и в том числе добавить дополнительные операции для обработки данных.
Вот так можно с одной стороны окончательно запутаться с вроде бы простым буфером обмена, с которым обычные пользователи чаще всего делают две операции «Копировать» и «Вставить». С другой стороны, можно получить множество дополнительных возможностей, если эти возможности предусмотрены в программе, пользующейся буфером обмена.
О буфере обмена Microsoft Office, в том числе, 2010, 2013, 2016
Развернутые, расширенные функции по управлению буфером обмена предлагаются в пакете Microsoft (сокращенно MS) Office. Это позволяет делать программа «Буфер обмена», встроенная в пакет MS Office. (В этот пакет входит набор программ: текстовый редактор Word, электронные таблицы Excel, презентации PowerPoint, базы данных Access и другие).
С помощью буфера обмена в MS Office можно осуществлять копирование и вставку не один раз и не раз за разом, а многократно.
В буфере обмена может храниться до 24 копий текстовых и графических элементов, которые в свою очередь затем можно вставлять все сразу, либо по одному, либо иным способом.
Обращение к возможностям буфера обмена, которое осуществляется из любой программы пакета MS Office, показано ниже на рис. 5 на примере Excel.
Из одного буфера обмена можно вставлять данные в разные программы офиса: Word, Excel, PowerPoint и др. Проще говоря, можно картинку скопировать один раз, после чего она будет помещена в программу «Буфер обмена» MS Office. Затем эту картинку можно поместить из буфера обмена и в редактор Word, и в таблицу Excel, и в презентацию PowerPoint.
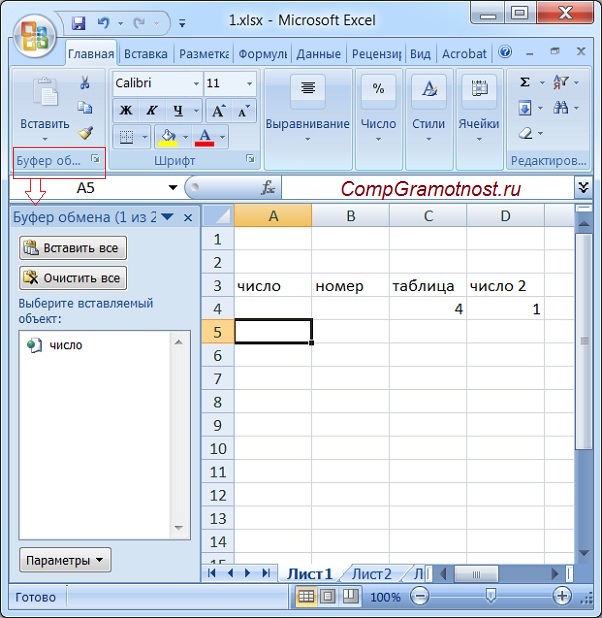
Рис. 5. Буфер обмена в Excel
Подробнее про буфер обмена для офиса 2010, в частности, про его включение и отключение, про настройку его видимости, информация с официального сайта на русском языке:
Копирование и вставка нескольких элементов с использованием буфера обмена Office 2010
Официальный сайт Microsoft на русском языке о буфере обмена для Office 2013 и 2016:
Использование буфера обмена Office 2013, 2016
Программа «Буфер обмена» в MS Office иначе еще называют менеджером буфера обмена. Есть и другие специальные программы для операционных систем, называемые менеджерами буфера обмена, которые предназначены для расширения возможностей стандартного буфера обмена.
Возвращаясь к стандартным возможностям обычного буфера обмена, который есть в Windows, Mac OS или Андроид, отметим, что в нем сохраняются последние данные, которые туда были скопированы.
Если копировать в буфер обмена несколько раз подряд, то вставить можно будет только данные, которые туда были скопированы последний раз, а все предыдущие копии автоматически стираются из стандартного буфера обмена.
Таким образом, при необходимости многократного использования стандартного буфера обмена нужно после каждой операции «Копировать» сразу же использовать операцию «Вставить». Многократно подряд скопировать, и потом многократно подряд вставить (даже если это кажется более удобным вариантом работы), пользуясь стандартными возможностями буфера обмена, нельзя.
Буфер обмена в Word
Специальные вставки есть не только в довольно сложной и многофункциональной программе Excel, но и в том же Ворде (рис. 6), а также во многих других программах. И об этом надо помнить, если активно пользоваться буфером обмена, чтобы он не превратился в итоге в «буфер обмана».
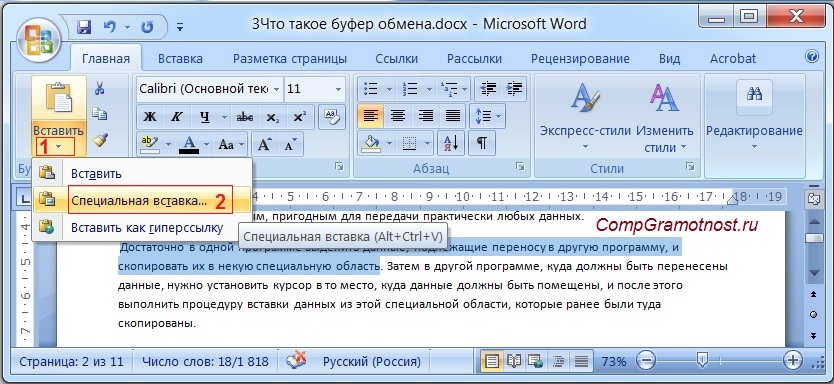
Рис. 6.1. Меню «Вставить» в Word
Если в Ворде открыть меню «Вставить» (1 на рис. 6.1), а затем кликнуть по опции «Специальная вставка» (2 на рис. 6.1), то можно увидеть предлагаемые возможности вставки из буфера обмена:
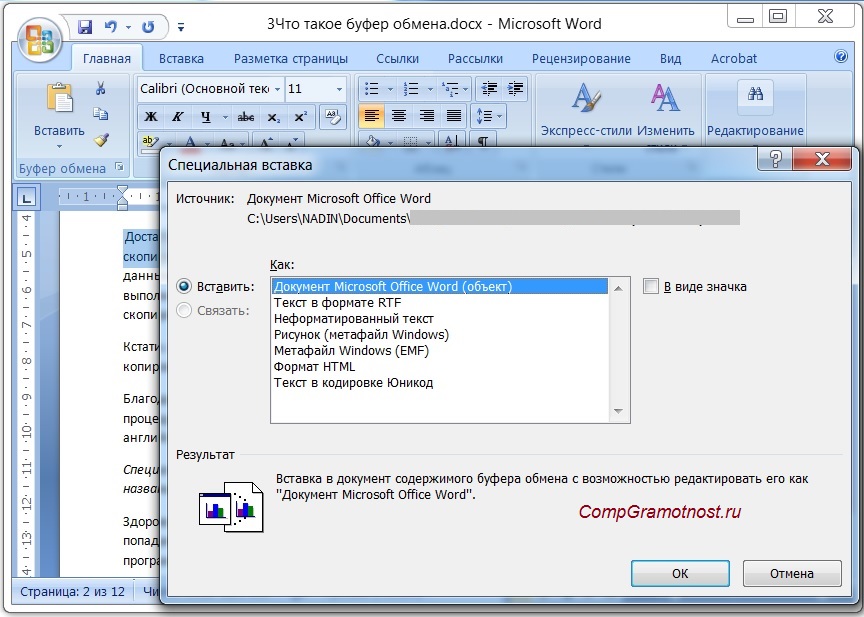
Рис. 6.2. Специальная вставка из буфера обмена в программе Microsoft Word
Вставить данные можно напрямую, без буфера обмена
И еще хотелось бы отметить следующее. Вставлять данные в программы можно не только из буфера обмена. Картинки можно вставлять из файлов, тексты можно тоже вставлять из файлов, в таблицы можно вставлять графики и диаграммы и многое-многое другое. Здесь уже буфер обмена не при чем! И меню «Вставка» в том же Ворде (рис. 7) тоже не имеет не малейшего отношения к вставке данных из буфера обмена, хоть это меню записывается одинаково с наименованием кнопки «Вставить», предназначенной для вставки из буфера обмена.
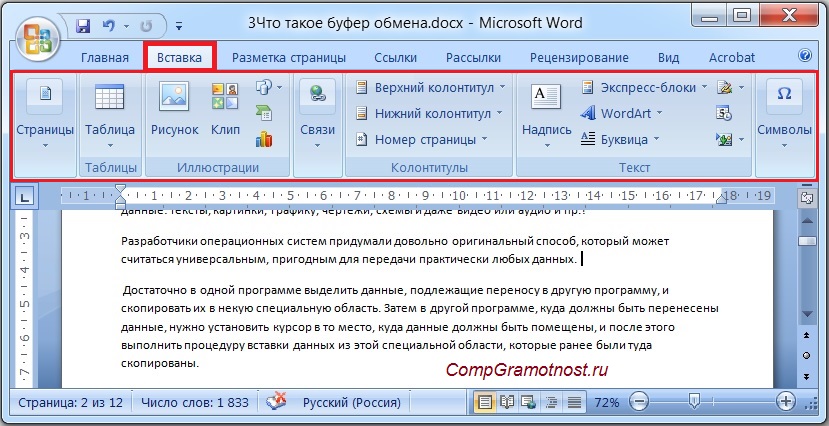
Рис. 7. Меню «Вставка» программы Microsoft Word, НЕ имеющее отношения к вставке из буфера обмена
На рис. 7 видно, что в Word в меню «Вставка», которое НЕ связано с буфером обмена, входят:
- страницы,
- таблицы,
- рисунок,
- клип,
- диаграммы,
- колонтитулы,
- надписи,
- символы
- и т.д.
Таким образом, пользуясь буфером обмена, пользователь ПК может вставлять данные, ранее скопированные туда из другого места той же программы или из другой программы. И это никак не связано с другими возможностями вставки других данных, которых, как видим, тоже немало.
Что значит «Буфер обмена содержит большой фрагмент»?
После завершения работы с программами в буфере обмена остаются последние скопированные данные. Даже после закрытия программы, из которой данные были скопированы, эти данные останутся в буфере обмена, и их можно использовать для вставки в другие программы (в другие окна).
Если эти данные в буфере обмена занимают много места (например, скопирован большой текст, объемная картинка и др.), то при выходе из программы может быть выдано предупреждение о том, что в буфере обмена остался большой объем информации (рис. 8).
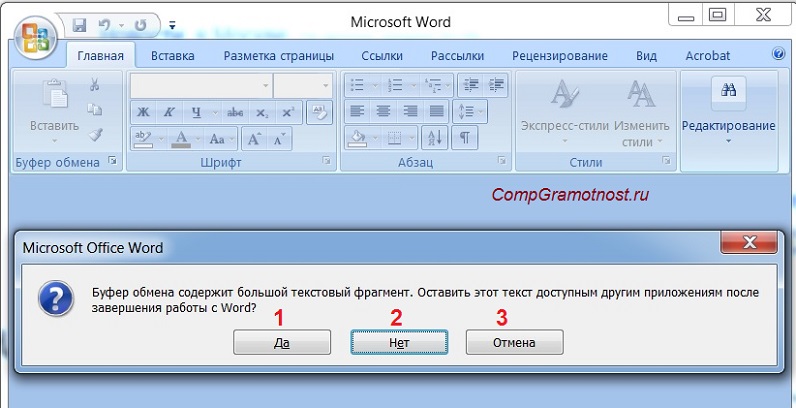
Рис. 8. Предупреждение, что в буфере обмена остался большой объем информации.
В этом случае пользователь должен принять решение, оставлять ли эти данные или буфер обмена нужно «почистить» одновременно с закрытием программы, из которой эти данные были скопированы.
1 на рис. 8 – если нажать «Да», тогда данные останутся в буфере обмена, программа Word будет закрыта.
2 на рис. 8 – клик по «Нет», данные будут удалены из буфера обмена, Word будет закрыт.
3 на рис. 8 – если щелкнуть «Отмена», тогда ничего не изменится, ибо пользователь передумал очищать буфер обмена и закрывать Word.
Решение, какую из трех кнопок выбрать, остается за пользователем.
Если данные из буфера обмена удалить, то их уже нельзя будет вставить в другие программы. А если оставить, то вставить их будет возможно. Но при этом на хранение большого объема данных в буфере обмена потребуется много ресурсов ПК. Тут уж пользователь должен определиться, что он хочет: сохранить данные в буфере обмена или сохранить ресурсы оперативной памяти на своем устройстве для дальнейшей работы.
Не забывайте!
Копировать тексты, картинки и прочую информацию из Интернета без указания ссылки на источник можно только для личного использования.
Если же скопированная информация повторно выкладывается в Интернет БЕЗ указания ссылки на источник информации, то это является нарушением авторских прав и может повлечь неприятные последствия.
Также по теме:
1) Как выделить и копировать текст на Андроиде, а также вставить и вырезать
2) Как объем памяти влияет на работу мобильного телефона
3) О сходстве и различии файлов doc и docx
4) Как сделать непрерывную горизонтальную линию в Word: 4 способа
5) Всплывающие подсказки в Word: показывать обычные или улучшенные, либо совсем не показывать
Получайте новые статьи по компьютерной грамотности на ваш почтовый ящик:
Необходимо подтвердить подписку в своей почте. Спасибо!
 We recently covered the basics of cutting, copying, and pasting in Microsoft Word. Today, we’re going to expand on that topic by looking at how to use the Clipboard in Microsoft Word.
Specifically, we will copy, paste, and delete content in the Clipboard. Plus, we will customize the options and turn off the Clipboard.
Quick Links:
- How to Copy Content into the Clipboard
- How to Paste Content from the Clipboard
- How to Delete Content in the Clipboard
- How to Customize the Clipboard Options
- How to Turn Off the Clipboard
First, let’s answer an important question…
What Is the Difference between Basic Copying and Pasting and Using the Clipboard?
Your PC has two clipboards: the Windows Clipboard and the Office Clipboard.
The basic copy and paste methods use the Windows Clipboard, which lets you copy one piece of content at a time—as soon as you copy a new piece of content, the old piece is deleted.
In contrast, the Office Clipboard in Microsoft Word is divided into slots where you can copy up to twenty-four different pieces of content and then paste them individually or all at once.
It’s important to note that the content in the top slot in the Office Clipboard is the same as the content in the Windows Clipboard.

For simplicity, all references to the “Clipboard” in the steps below refer to the Office Clipboard, not the Windows Clipboard.
Pro Tip: The Office Clipboard is accessible to all your Office apps. So, if you copy content to the Clipboard in Word and then open the Clipboard in PowerPoint, you will have access to the same copied content in each of the twenty-four slots.
This tutorial is also available as a YouTube video showing all the steps in real time.
Watch more than 100 other writing-related software tutorials on my YouTube channel.
The images below are from Word for Microsoft 365. These steps also apply to Word 2019, Word 2016, and Word 2013. These steps don’t apply to Word for Mac or Word for the Web.
How to Copy Content into the Clipboard
- Select the Home tab in the ribbon.

- Select the dialog box launcher in the Clipboard group.

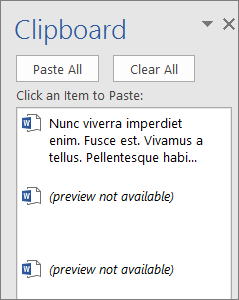
The Clipboard pane will open on the left side of your screen.

- Select the content you want to copy and then use the Copy button in the ribbon or press Ctrl + C on your keyboard. You can copy text, images, tables, figures, or even embedded videos.

The content you copied will appear in the Clipboard.

- Continue to copy content as necessary. Each time you copy new content, it will be placed in the top slot in the Clipboard.

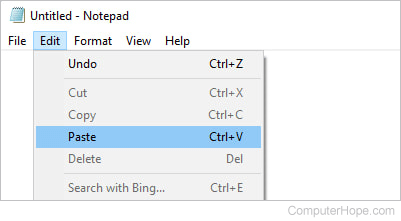
How to Paste Content from the Clipboard
- Place your cursor where you want to paste the content.
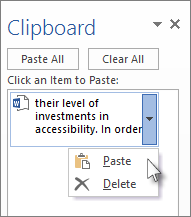
- Select an individual item in the Clipboard. Alternatively, hover over it to select the menu arrow and then select Paste from the drop-down menu.

- (Alternative Step) Select the Paste All button to paste all the content. The content will be inserted in the order you copied it, so the top item in the Clipboard will be the last item pasted into your document.

- (Optional) Select the Paste Options button that appears after you paste your content.

- Select an option from the shortcut menu. These options primarily apply to text rather than images or other visuals.
A. Keep Source Formatting maintains the formatting (e.g., font, size, color, etc.) of the pasted text.
B. Merge Formatting changes the formatting of the pasted text to match the formatting of the new location without removing existing emphasis formatting (i.e., boldness, italics, or underlining) from the pasted text.
C. Use Destination Style maintains the current style type but matches it to the equivalent style type in the new location. So, if you copy text with a default Heading 3 style and then paste it into document with a custom Heading 3 style, the pasted text will still be a Heading 3, but will take on the new custom style.
You may notice that when the Clipboard is turned off, Paste as Picture appears instead of Use Destination Style in the Paste Options menu in Word for Microsoft 365.
D. Keep Text Only removes the formatting of the pasted text and adds the formatting of the new location.
Please see “What Is the Difference between Merge Formatting and Keep Text Only?” for more information about these options.

Your pasted text should change formatting according to your selection.
Important Note: You must use the Paste Options button immediately after pasting your text because it will disappear when you perform another action such as typing or pressing the Enter key.
How to Delete Content in the Clipboard
- To delete all the content from the clipboard, select the Clear All button.

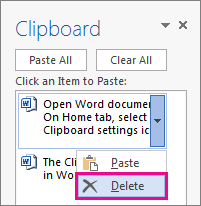
- To delete individual items, hover your cursor over the content, select the menu arrow, and then select Delete from the drop-down menu.

How to Customize the Clipboard Options
- Select the Options button at the bottom of the Clipboard.

- Check or uncheck options in the menu:
-
- Show Office Clipboard Automatically opens the Clipboard every time you copy content.
- Show Office Clipboard When Ctrl + C Pressed Twice opens the Clipboard when you press Ctrl + C on your keyboard twice.
- Collect Without Showing Office Clipboard lets you copy content into the Clipboard without opening it. (However, you can still open it by pressing the dialog box launcher in the Clipboard group, as shown in figure 3.)
- Show Office Clipboard Icon on Taskbar places the Clipboard icon (a tiny clipboard) in the Taskbar at the bottom of your screen. The icon may be placed in the Hidden Icons menu accessible through the up arrow near the Wi-Fi, sound, and battery icons.
- Show Status Near Taskbar When Copying reveals a small message in the bottom right-hand corner of your screen when you copy new content. The message will tell you the number of slots that have been filled (e.g., 3 of 24).

How to Turn Off the Clipboard
The Clipboard will turn off when you close all your Office apps (e.g., Word, Excel, PowerPoint).
However, you may want to turn it off before closing your apps. Unfortunately, the close button (X) doesn’t turn off the Clipboard; it just closes the Clipboard pane. The Clipboard will continue to collect copied content even when the pane is closed.
To turn off the Clipboard and return to the basic copying and pasting method, use the icon in the Taskbar.
- Right-click the Clipboard icon in the Taskbar. (Friendly reminder: it may be stored in the Hidden Icons menu behind the up arrow.)
![]()
- Select Stop Collecting from the menu.
![]()
The Clipboard icon should be removed from your Taskbar after a few moments.
Related Resources
How to Cut, Copy, and Paste in Word for Mac
Three Ways to Insert Tables in Microsoft Word
How to Create and Customize Charts in Microsoft Word
Lets say my Cliboard variable is currently in this state:
Clipboard:= "-Classes Essay on Hobbes
I want to perform If conditions depending on the first block/word in the clipboard, in this case -Classes . Essentially doing something like below using FileAppend:
if "-diary"{
    ;Create file in /Diary/Entry 27.MD
}

Else if  "-Classes"{
    ;Create file in /Classes/Essay on Hobbes.MD
}
I was able to find this page in the docs If Var in/contains MatchList — Syntax & Usage | AutoHotkey but its not positional, which means if the block -Classes is also present as part of the file name for some reason, my logic breaks.
I have taken the liberty to crosspost this question on other forums as well.
Any help would be greatly appreciated!
asked May 14, 2022 at 12:02
![]()
0
Or.. you can just:
Clipboard:= "-Classes Essay on Hobbes"
Gosub % subroutine := SubStr( Clipboard, 1, InStr( Clipboard, " " )-1 )

Clipboard:= "-diary diary example"
Gosub % subroutine := SubStr( Clipboard, 1, InStr( Clipboard, " " )-1 )
Return

-diary:
    MsgBox % "Diary:`n"  StrReplace( clipboard, subroutine " " )
    ;Create file in /Diary/Entry 27.MD
Return

-Classes:
    MsgBox % "Classes:`n"  StrReplace( clipboard, subroutine " " )
    ;Create file in /Classes/Essay on Hobbes.MD
Return
answered May 15, 2022 at 11:25
![]()
You might try StrSplit()
; Array := StrSplit(String , Delimiters, OmitChars, MaxParts)
clip_array := StrSplit(Clipboard, A_Space, , 1)

if clip_array[1] = "-diary"{
    ;Create file in /Diary/Entry 27.MD
}

Else if clip_array[1] = "-Classes"{
    ;Create file in /Classes/Essay on Hobbes.MD
}

Else {
    MsgBox % "No match for " clip_array[1]
}
Described here https://www.autohotkey.com/docs/commands/StrSplit.htm and note the param for MaxParts which addresses how many «tokens» to look in to (keeping the rest in the last) if the clipboard is sufficiently large to matter (in which case I’m not sure any of the other answers address any better).
answered May 14, 2022 at 20:33
![]()
PGilmPGilm
2,2321 gold badge14 silver badges26 bronze badges
1
If the amount of text on the clipboard is enormous, that could cause lagging with the script loading all of that text into the script memory, just to check the first value. I’d recommend regexMatch since that can return a position and capture the word as well without parsing everything.
; for reference of regexMatch function
; regexMatch(Haystack, Needle, outputVar, startPos)

Fnd := regexMatch(Clipboard, "U)(-[w]+))", capSubStr, inStr(Clipboard, "-"))
if (Fnd==0) {
    Msgbox, Didn't find a word on the Clipboard.
    Return
}
checkVal := capSubStr1
if (checkVal=="-diary") {
    ;Create file in /Diary/Entry 27.MD
} Else if (checkVal=="-Classes") {
    ;Create file in /Classes/Essay on Hobbes.MD
}
Here is the basic reference for using regular expressions with AHK: https://www.autohotkey.com/docs/misc/RegEx-QuickRef.htm
That will give an idea as to what the above expression is actually looking for, if you are not already familiar with regex.
answered May 15, 2022 at 7:27
![]()
T_LubeT_Lube
1666 bronze badges
2
В статье «Что такое буфер обмена?» я рассказал что такое буфер обмена и для чего он применяется. В данной статье я покажу как им пользоваться.
Итак, еще раз – буфер обмена – это объем компьютерной
памяти, куда вы копируете информацию и, по мере необходимости, вставляете ее в
нужные места в документе.
Возможности буфера
обмена
Для того, чтобы понять, как работает буфер обмена нужно
открыть текстовый документ и скопировать в буфер обмена часть текста.
Кстати, сделать это вы можете несколькими способами: как копировать в Word.
Скопированную информацию вы можете вставлять много раз.
Буфер обмена, который вы используйте един для практически
всех программ на вашем компьютере, то есть скопированный текст вы можете без
проблем вставить в любой другой программный продукт Microsoft (Exel, Visio) или в другие программы, которые не относятся к Microsoft Office (например, в Paint).
Буфер обмена может вмещать в себя 24 фрагмента, то есть тут
не важен вид информации и ее объем – сохранить в буфере обмена вы можете до 24 фрагментов:
одно копирование – один фрагмент.
Давайте воспользуемся этим.
- Перейдите во вкладку «Главная» — «Буфер обмена» — кнопка группы «Буфер обмена».

Откроется
диалоговое окно Буфера обмена.
- Выберите команду «Параметры» и установите галочки согласно иллюстрации:

«Собирать данные без отображения буфера обмена Office»
Теперь данные в
количестве 24 фрагмента будут собираться в буфере обмена вне зависимости от
того, открыто ли окно Буфера обмена или нет.
В случае, если
вы скопируете больше, чем 24 элемента, то перезаписываться на новые будут
первые элементы, которые вы копировали.

Кстати, если вы
будете копировать информацию в других неофисных программах, то все равно эта
информация будет попадать в данный буфер обмена до 24 элементов, тогда как в
программе, в которой вы работаете в настоящий момент был бы доступен только
последний скопированный элемент.
После того, как
вы включите функцию «Собирать данные без отображения буфера обмена Office» на панели задач Windows появится
значок буфера обмена.

При копировании
очередного элемента на панели задач будет всплывать диалоговое окно:

Иногда
случается, что объект невозможно поместить в буфер обмена и тогда появляется
следующее окно:

Итак, если вы
настроили буфер обмена на размещение 24 элементов, то при закрытии программы
заново вам его настраивать не нужно, так как программа сохранит ваши настройки.
Вставка элементов из буфера обмена
Итак, вы
работаете с текстом, несколько раз копировали различные элементы и вставляли их
и вам понадобилось вставить один из элементов, который вы достаточно давно
отправляли в буфер обмена. Что делать?
Нужно зайти в
окно буфера обмена и выбрать нужный вам элемент из списка.

Обратите
внимание: в выпадающем окне появляется две операции – вставить и удалить, то
есть вы можете не только вставить элемент, но и удалить его из памяти Буфера
обмена, если он вам больше не понадобится.
Информация, которую вы скопировали хранится в памяти Буфера обмена до тех пор, пока вы не перезагрузите или выключите компьютер.
Специальная вставка Буфера обмена
Когда вы
копируете информацию из одного документа в другой появляется проблема –
появление новых стилей или изменение старых, заданных в конечном документе, так
как вместе с текстом мы копируем не только содержание, но и характеристики
абзаца первого документа.
Чтобы такого не
происходило нам помогает Специальная
вставка буфера обмена.
Чтобы понять для чего нужна каждая из вставок скопируйте любую часть текста из одного документа и в другом документе кликните, куда хотите вставить текст, перейдите в «Главная» — «Буфер обмена» — «Вставить» и увидите различные «Параметры вставки».

У вас появляется
четыре кнопки в параметрах вставки. Разберем каждую из них.
- «Использовать конечную тему (И)» — в данном случае вы вставите текст со всеми стилями первого документа – этого делать не стоит.
- «Сохранить исходное форматирование (И)» — сохраняет оформление скопированного текста, но не добавляет новых стилей в набор стилей в ваш новый документ.
- «Объединить форматирование (О)» — объединяет стили первого и второго документа, что может не очень хорошо сказаться на оформлении документа целиком. Тут есть риск получить в список стилей Встроенный стиль.
- «Сохранить только текст (С)» — позволяет вставить в документ только текст, однако, если у вас в скопированной информации были какие-то нумерованные списки, то такая вставка превратит их в обычный текст.
Я бы отдал
предпочтение последнему варианту вставки, так как в данном случае не появляются
новые стили и оформление документа не страдает.
Что же касается превращения в текст нумерованных стилей, то их всегда можно поправить различными командами, например командой «Заменить».