
This issue was discovered while working on making phetioIDs consistent, but I would consider it nearly as important to have a consistent API for our sim development (to avoid case-related undefined bugs).
It seems odd because Java has java.awt.Checkbox but javax.swing.JCheckBox. Why did they make this change?
Iterating through top hits in google search for «checkbox API»:
- Android has
android.widget.CheckBox - Angular (also from Google) uses
Angular Material checkbox - Ionic uses «checkbox» https://ionicframework.com/docs/api/components/checkbox/Checkbox/
- Drupal uses Checkbox
- .NET uses CheckBox
- Facebook uses Checkbox
I’m still leaning toward the one-word solution. I’ll add a lint rule and start converting usages.
Updated: 11/30/2020 by

A check box, selection box, or tick box is a small interactive box that can be toggled by the user to indicate an affirmative or negative choice. It is frequently found in HTML input forms, dialog boxes, and in the GUIs of applications and operating systems.
When clicked, a check mark (✓) appears inside the box, to indicate an affirmative choice (yes). When clicked again, the check mark disappears, indicating a negative choice (no).
Check boxes are used when more than one option may need to be checked or as an easy way to enable or disable a setting in a software program. Checking the box enables that setting, and unchecking disables it.
Check box example
Below is an interactive example of multiple check boxs. To select a check box or place a check in the check box with a computer mouse, click the check box with left mouse button. To check a check box with a touch screen, tap your finger on the check box. If a box is checked, it can be unchecked by clicking or tapping the box again.
Tip
If you’re using a smartphone or tablet, the small size of the screen can make it difficult to tap a check box. On these devices, you can zoom in on the screen to enlarge the check box, making it easier to tap. To zoom in, pinch with your fingers, using an outward motion.
Note
Depending on your browser and device, the check box mark may be a check mark, X, or a solid box to indicate it’s selected.
How to place a check in a check box using a keyboard?
To check a check box with the keyboard, press Tab until the check box is highlighted, and then press the spacebar to check or uncheck the box. You can try this now in the check boxes below.
Note
If pressing Tab does not immediately select the boxes above in your browser, you need to keep pressing Tab until they’re selected. Alternatively, you could first click the box with your mouse and then press the spacebar to uncheck and check the box.
How to create a check box on my HTML web page
To create a check box on a web page, use the <input> tag as shown below. The code below is from the example above that created the check box followed by the «Check box 1» text.
<input type="checkbox" name="Example-1" value="on" id="Example-1"> Check box 1
To perform an action based on the checked boxes, it must be included in a <form> tag that’s submitted as part of the form. When submitted, it’s sent to a Perl, PHP, Python, or another script language that grabs what check box was checked and performs the necessary action.
Difference between check box and a radio button
A check box is always a square box and allows for one or more items to be selected. A radio button is a circle that only allows for one option to be selected. If you’re creating a list that needs multiple options selected, use check boxes. If you want only one option to be selected and prevent multiple options from being selected, use a radio button.
Should I use «checkbox» or «check box» in my writing?
Both forms are correct, and its usage depends on the style guide you’re following. When describing a selectable box or object, we follow the Microsoft Manual of Style and write «check box» as two words in all our writing. When describing an attribute value, such as the «checkbox» value in an HTML input tag, it should be one word.
Tip
According to Google Trends, «checkbox» is used more than «check box.»
Check, Internet terms, List box, Push button, Radio button, Software terms

First, you need to customize Word’s ribbon and enable the “Developer” tab to show the option to add check boxes. Then, select “Developer” and click the “Check Box Content Control” button to insert a check box into your document. You can also transform Word’s bullets into checkboxes.
When you create surveys or forms with Microsoft Word, check boxes make the options easier to read and answer. We’re covering two good options for doing just that. The first is ideal for documents that you want people to fill out digitally within the Word document itself. The second option is easier if you’re planning to print documents like to-do lists.
Option 1: Use Word’s Developer Tools to Add the Check Box Option for Forms
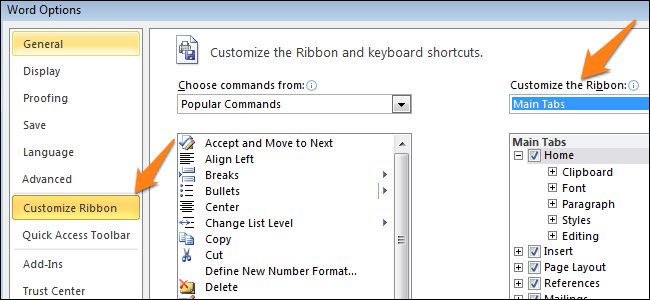
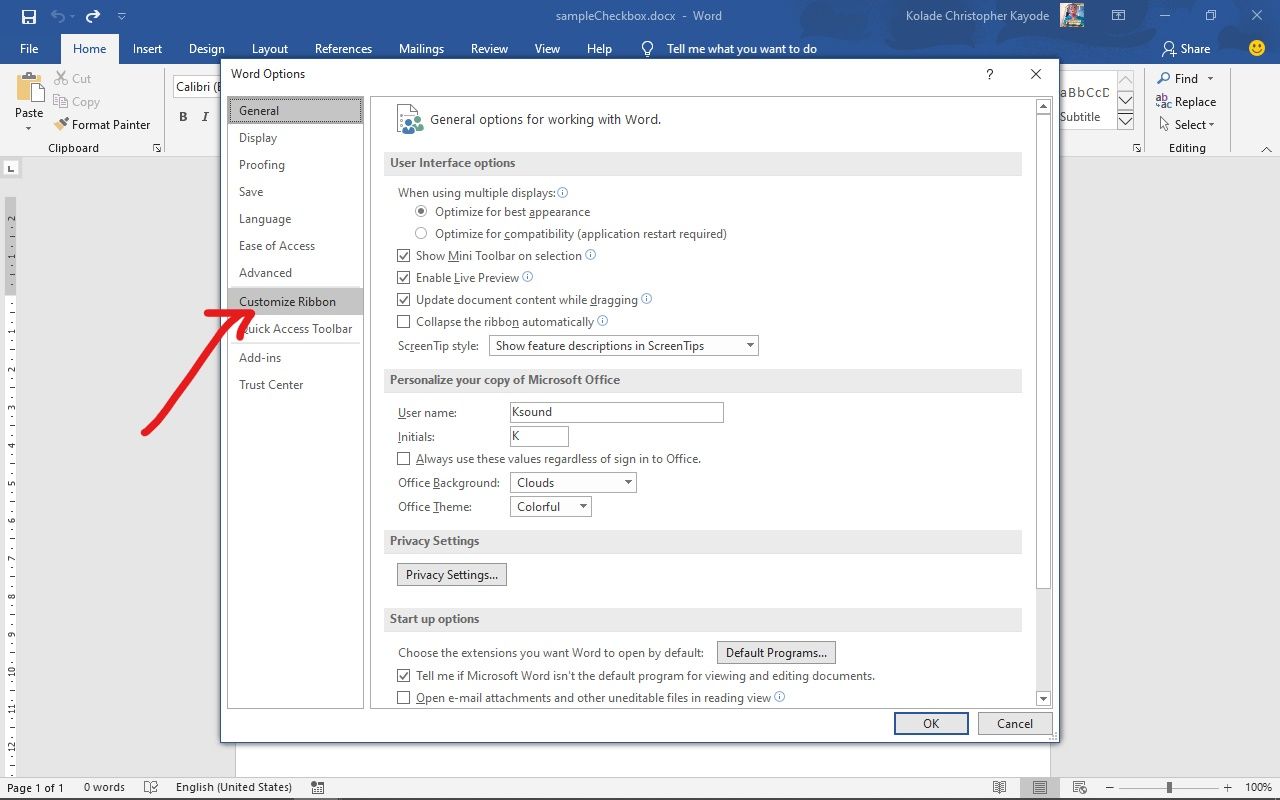
In order to create fillable forms that include checkboxes, you first need to enable the “Developer” tab on the Ribbon. With a Word document open, click the “File” drop-down menu and then choose the “Options” command. In the “Word Options” window, switch to the “Customize Ribbon” tab. On the right-hand “Customize the Ribbon” list, select “Main Tabs” on the dropdown menu.

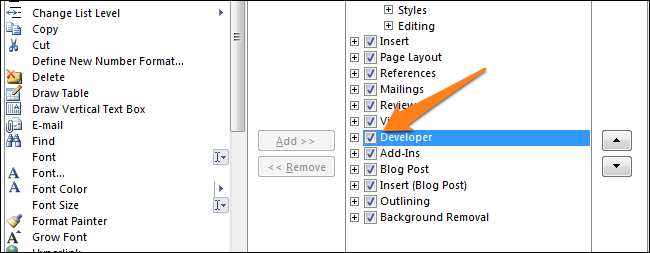
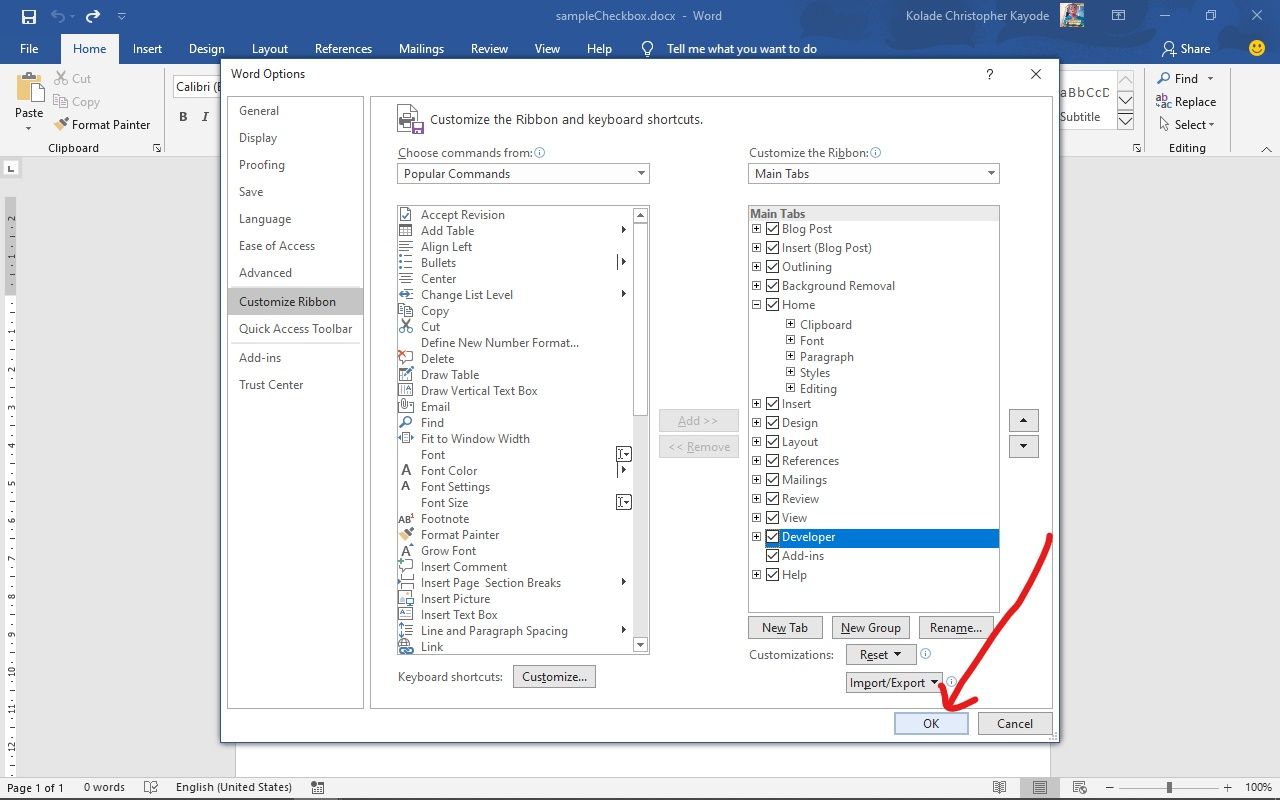
On the list of available main tabs, select the “Developer” check box, and then click the “OK” button
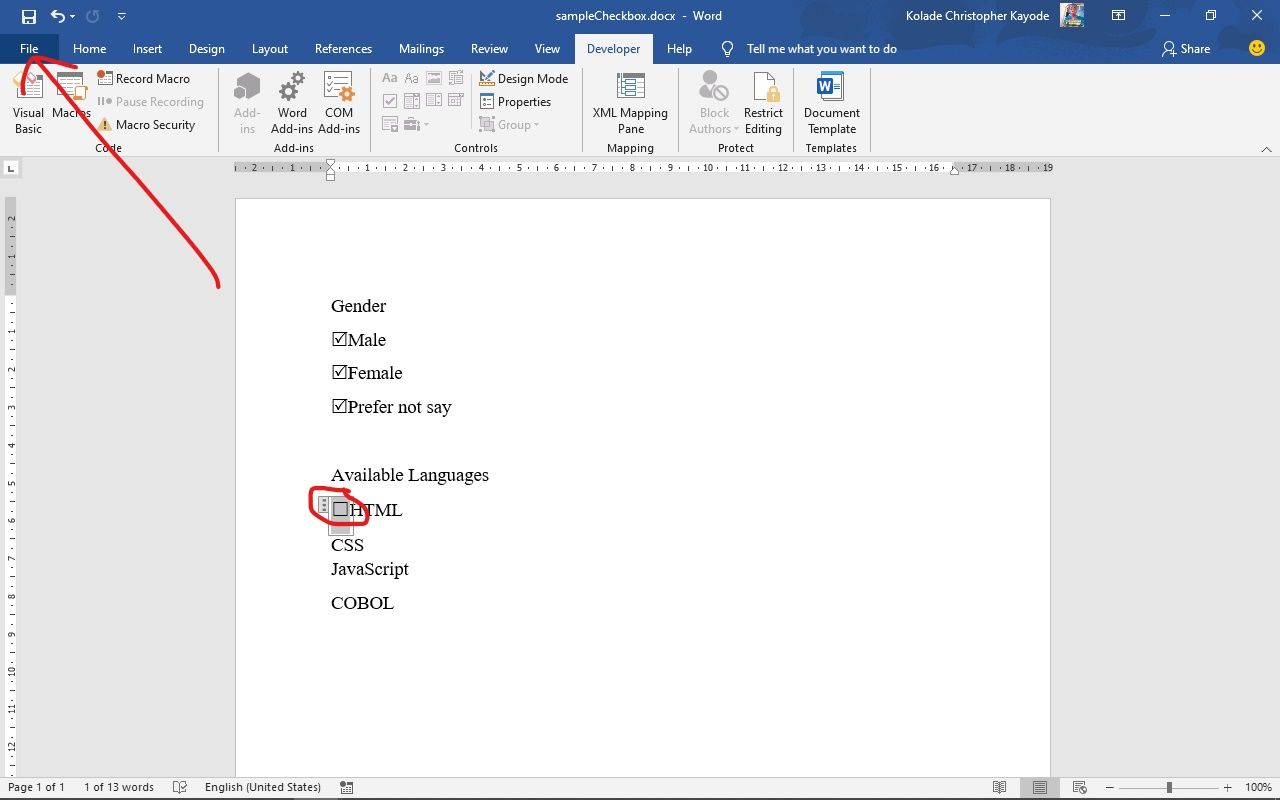
Notice that the “Developer” tab is added to your Ribbon. Just position your cursor in the document where you want a check box, switch to the “Developer” tab, and then click the “Check Box Content Control” button.
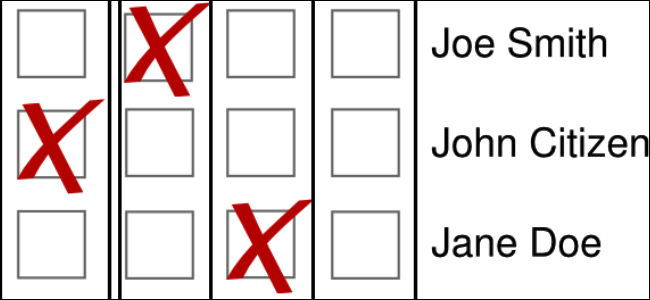
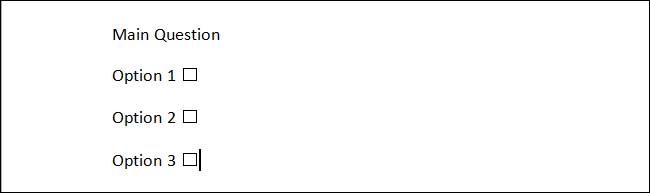
You should see a check box appear wherever you placed your cursor. Here, we’ve gone ahead and placed a check box next to each answer and, as you can see, those check boxes are interactive. Click a box to mark it with an “X” (as we’ve done for answers 2, 3, and 4) or select the whole form box (as we’ve done for answer 4) to move the check box around, format it, and so on.
RELATED: How to Create a Fillable Form With Microsoft Word
Option 2: Change Bullets to Check Boxes for Printed Documents
If you’re creating a document to print out—like a to-do list or printed survey—and just want check boxes on it, you don’t have to mess around with adding Ribbon tabs and using forms. Instead, you can create a simple bullet list and then change the bullets from the default symbol to check boxes.
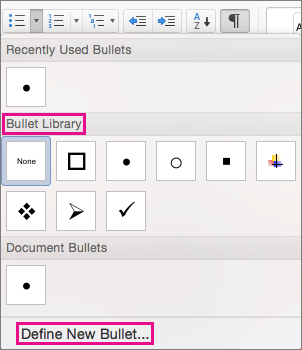
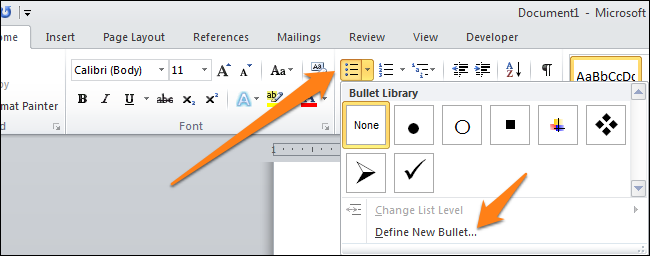
In your Word document, on the “Home” tab, click the small arrow to the right of the “Bullet List” button. On the dropdown menu, select the “Define new bullet” command.
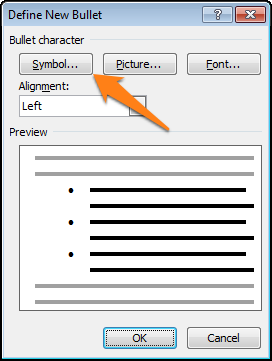
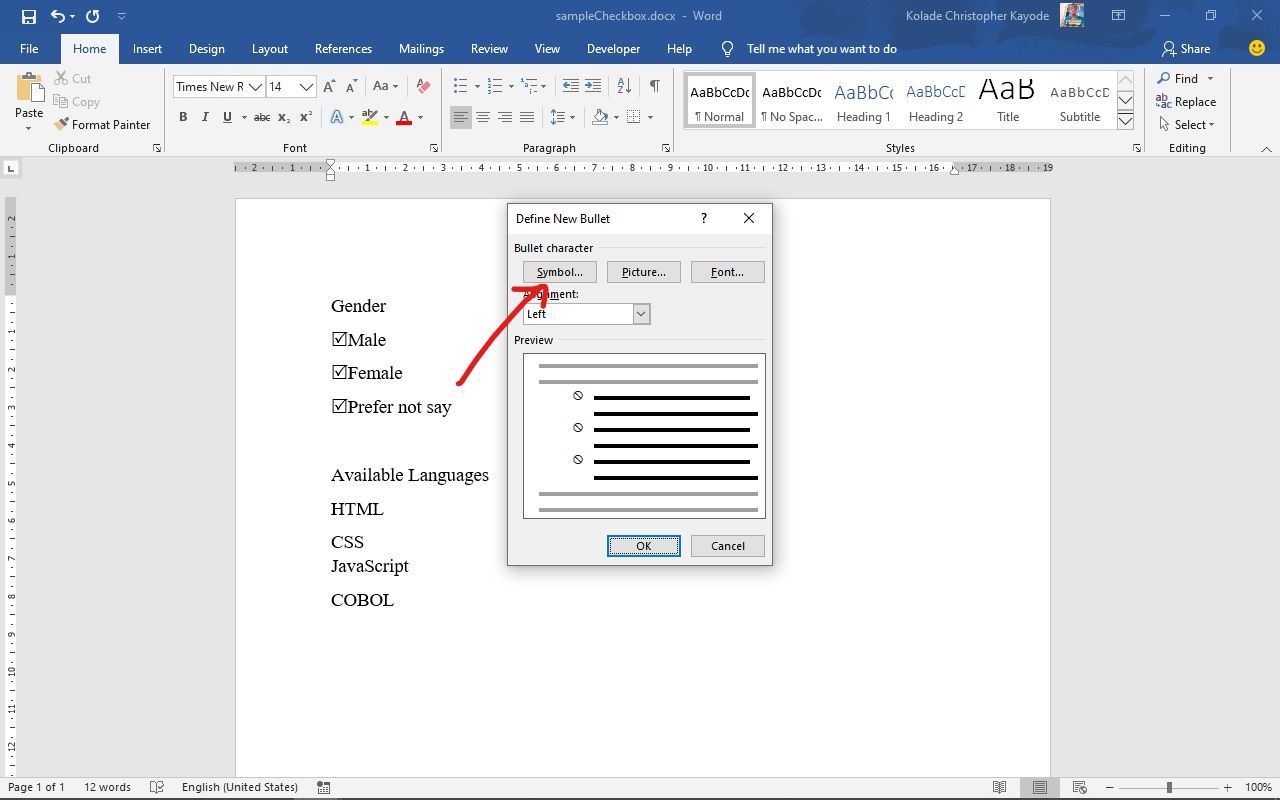
In the “Define New Bullet” window, click the “Symbol” button.
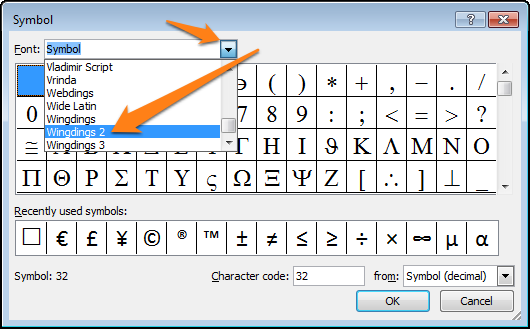
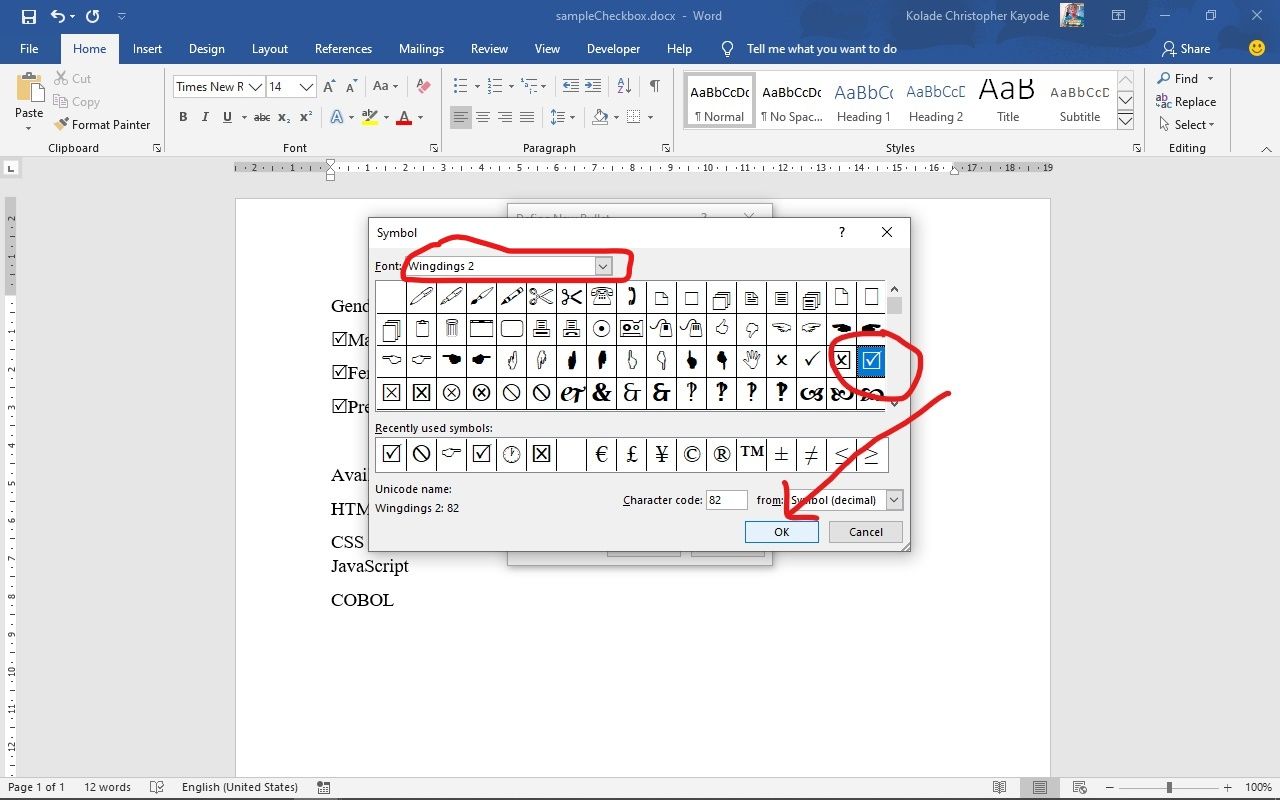
In the “Symbol” window, click the “Font” dropdown and choose the “Wingdings 2” option.
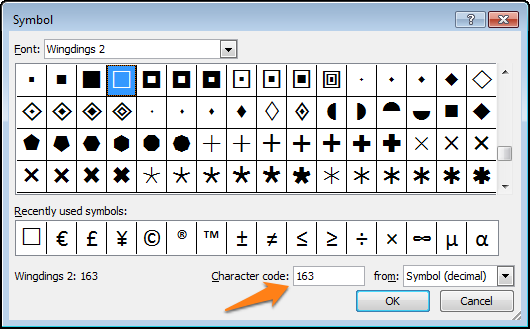
You can scroll through the symbols to find the empty square symbol that looks like a check box, or you just type the number “163” into the “Character Code” box to automatically select it. Of course, if you see a symbol you like better—like the open circle (symbol 153)—feel free to choose that instead.
When you’ve selected your symbol, click the “OK” button to close the “Symbol” window, and then click the “OK” button to close the “Define New Bullet” window, too.
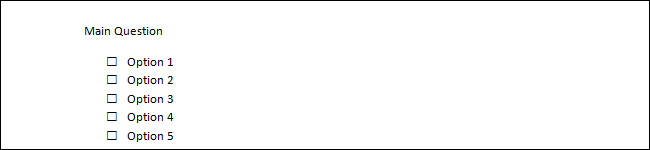
Back in your Word document, you can now type your bullet list. The check boxes appear instead of the regular bullet symbol.
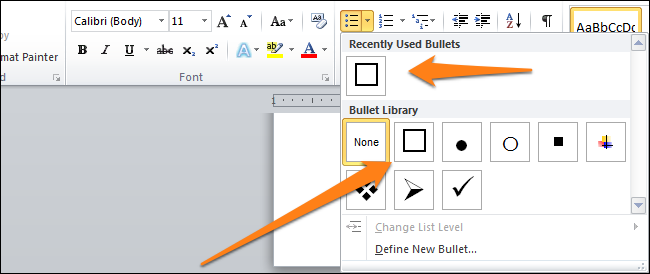
And the next time you need the check box symbol, you don’t have to navigate through that whole set of windows. Just click that small arrow to the right of the “Bullet List” button again, and you’ll see the checkbox listed under the “Recently Used Bullets” section.
Again, this method is really only useful for documents you want to print out. The check box symbols are not interactive, so you can’t check them off inside a Word document.
If you’re also creating spreadsheets and presentations, you may want to learn how to insert checkboxes in Excel and add checkboxes to PowerPoint too.
RELATED: How to Add a Check Mark or Tick Mark in Word
READ NEXT
- › How to Add a Drop-Down List to a Word Document
- › How to Add a Check Mark or Tick Mark in Word
- › How to Create a Fillable Form With Microsoft Word
- › How to Count Checkboxes in Microsoft Excel
- › How to Create a Basic Survey in Microsoft Word
- › HoloLens Now Has Windows 11 and Incredible 3D Ink Features
- › How to Adjust and Change Discord Fonts
- › BLUETTI Slashed Hundreds off Its Best Power Stations for Easter Sale
Когда необходимо создать анкету для опросов в Word, то для удобства можно добавить флажки или чек-боксы, чтобы было проще выбрать и отметить один из вариантов ответа. Для этого есть два основных способа.
Способ 1
Чтобы сделать заполняемую анкету с флажками или чек-боксами, нужно активировать вкладку «Разработчик». Для этого откройте в ленте вкладку «Файл» и нажмите на иконку «Параметры». Перед Вами появится окно «Параметры Word». Перейдите в меню «Настроить ленту» и выберите из списка «Настроить ленту» вариант «Основные вкладки»:

Поставьте галочку в строке «Разработчик» и после нажмите на кнопку «ОК»:

В ленте появилась новая вкладка «Разработчик» с инструментами для разработчиков:

Теперь Вы можете добавить в документ – «Чек-бокс или Флажок». Запишите любой вопрос и варианты ответа для него, потом откройте вкладку «Разработчик» и кликните значок «Чек-бокса или флажка»:

Теперь повторите тоже самое для всех вариантов ответа. Как видно ниже, рядом с каждым ответом появится чек-бокс или флажок:

Способ 2
Откройте в ленте вкладку «Главная», и Вы увидите кнопку для вставки маркеров в разделе инструментов «Абзац».
Нажмите на маленькую стрелку рядом с этой кнопкой и выберите пункт «Определить новый маркер»:

Чтобы сделать новый маркер, в окне «Определение нового маркера» нажмите на кнопку «Символ…»:

Когда откроется окно, можно увидеть множество различных вариантов символов. В верхней части окна есть выпадающий список. Нажмите на него и выберите пункт «Wingdings 2»:

Теперь в нижней части окна есть поле «Код знака», введите код «163», чтобы автоматически перейти к варианту чек-бокса или флажка в Word:

Запишите варианты ответов маркированным списком:

В следующий раз, когда понадобится вставить такой символ, просто нужно нажать на маленькую стрелку рядом с кнопкой выбора маркеров, и Вы увидите его в одном ряду с символами по умолчанию:

HTML CSS JS
Checkbox Checked — Проверка Состояния Чекбокса ✔️
Дата размещения статьи 22/12/2019 👁48083
Checkbox Checked — Проверка Состояния Чекбокса ✔️
В данной статье мы разберём различные способы проверки состояния чекбоксов. Это необходимо для эффективной работы с элементами форм.
Содержание:
- метод .is();
- метод .prop();
- отметить/снять (checked);
- деактивация чекбокса (disabled);
- метод .trigger();
- селектор :checked;
- свойство .length;
- атрибут «disabled»;
- массив значений выбранных чекбоксов;
- свойство .checked — проверка checkbox на checked на чистом JavaScript.
1. Проверка checkbox на checked — метод .is()
Сначала научимся определять при клике состояние текущего checkbox (checked / unchecked).
HTML:
<input type="checkbox" class="checkbox">Мы будем использовать jQuery.
$(".checkbox").on("click", function () {
    if ($(this).is(":checked")) {
        // checkbox checked
    } else {
        // checkbox unchecked
    }
})
Нажми меня
Чекбокс не выбран
Т.о. при клике на чекбокс, мы отлавливаем событие click у текущего checkbox $(this) и с помощью метода .is() мы проверяем наличие псевдокласса :checked.
2. Проверка checkbox/radio на состояние (выбран/не выбран) — метод .prop()
Воспользуемся методом .prop() для проверки состояния checkbox или radio input.
$(".checkbox").on("click", function () {
    let checkboxStatus = $(this).prop("checked");

    console.log(checkboxStatus);
})
Данный код возвращает true или false при нажатии на чекбокс или радио input.
Нажми меня
Состояние чекбокса: _
Чтобы сразу выполнять необходимые действия, добавим оператор if:
$(".checkbox").on("click", function () {
    if ($(this).prop("checked") === true) {
        // ваш код
    }
})
2.1 Отметить / снять checked
Также при помощи метода .prop() можно отметить (или снять состояние checked).
// добавим checked
$(".checkbox").prop("checked", true)

// удалим состояние checked
$(".checkbox").prop("checked", false)

// добавим состояние checked для всех чекбоксов
$("input:checkbox").prop("checked", true);

// удалим checked для всех чекбоксов
$("input:checkbox").prop("checked", false);
2.2 Деактивация чекбокса
Чтобы деактивировать/активировать чекбокс, воспользуйтесь следующим кодом:
// отключаем чекбокс
$(".checkbox").prop("disabled", true)

// включаем чекбокс
$(".checkbox").prop("disabled", false)
3. Имитация клика по чекбоксу
Чтобы имитировать клик по чекбоксу, воспользуйтесь следующим кодом:
$(".checkbox").trigger("click");4. Найти все выбранные checkbox / radio — селектор :checked
При помощи селектора :checked найдём все выбранные checkbox / radio.
Пример с radio input.
<label>
    <input type="radio" value="HTML" name="radio input">
    HTML
</label>
<label>
    <input type="radio" value="CSS" name="radio input">
    CSS
</label>
<label>
    <input type="radio" value="JavaScript" name="radio input">
    JavaScript
</label>

<div id="output_field"></div>
$("input").on("click", function () {
$("#output_field").text("Вы выбрали " + $("input:checked").val());
});Вы выбрали _
Теперь рассмотрим пример с input type=»checkbox», это также отлично работает и с radio input.
$("input").on("click", function () {
    $(container).html("");

    $("input:checked").each(function () {
        $(container).append($(this).val() + " ");
    });
});
Нативный JavaScript:
const inputs = document.querySelectorAll("input");
const container = document.querySelector(".container");

inputs.forEach(el => {
    el.addEventListener("click", () => {
        container.textContent = "";
        let input_checks = document.querySelectorAll("input:checked");

        input_checks.forEach(el_checked => {
            container.insertAdjacentHTML("beforeend", el_checked.value);
        });
    });
});
Вы выбрали _
5. Подсчёт количества выбранных чекбоксов
<input type="checkbox" value="1" name="name" class="count-checked">
<input type="checkbox" value="2" name="name" class="count-checked">
<input type="checkbox" value="3" name="name" class="count-checked">
<input type="checkbox" value="4" name="name" class="count-checked">

<div id="output_field"></div>
Чтобы узнать количество выбранных checkbox, будем использовать свойство .length:
const myCount = function () {
    $("#output_field").html($(".count-checked:checked").length + " чекбоксов выбрано вами.");
};
myCount();

$("input").on("click", myCount);
Вы выбрали _ checkbox
6. Запрет отправки формы без выбора чекбокса
Создадим форму, отправить данные которой пользователь сможет только после выбора checkbox.
Структура.
<form>
    <input type="text">
    <input type="email">
    <input type="checkbox" id="checked">
    <button class="form__submit" type="submit" disabled>Нажать</button>
</form>
Работа с JavaScript. Проверка checkbox на checked:
$("#checked").on("change", function () {
    if ($("#checked").prop("checked")) {
        $(".form__submit").attr("disabled", false);
    } else {
        $(".form__submit").attr("disabled", true);
    }
});
Как вы помните из 2 примера, .prop(«checked») возвращает true или false — то что нам и нужно.
Нативный JavaScript:
const checkbox = document.getElementById("checked");
const btn_submit = document.querySelector(".form__submit");

checkbox.addEventListener("change", () => {
    if (checkbox.checked) {
        btn_submit.removeAttribute("disabled");
    } else {
        btn_submit.setAttribute("disabled", true);
    }
});
Результат:
7. Массив значений выбранных чекбоксов
HTML:
<input type="checkbox" name="technology" value="PHP" class="array-checked">
<input type="checkbox" name="technology" value="JS" class="array-checked">
<input type="checkbox" name="technology" value="CSS" class="array-checked">
Получим массив значений из выбранных чекбоксов.
$(".array-checked").on("change", function () {
    const arrayChecked = [];

    $(".array-checked:checked").each(function () {
        arrayChecked.push($(this).val());
    });

    console.log(arrayChecked);
});
Возможно вам так же будет интересна статья про стилизацию чекбоксов.
8. Проверка checkbox на checked на чистом JavaScript
Используя чистый JavaScript определим состоние чекбокса.
HTML:
<input type="checkbox" class="checkbox">JavaScript:
const checkbox = document.querySelector(".checkbox");

checkbox.addEventListener("change", function () {
    if (this.checked) {
        console.log("checked");
    } else {
        console.log("unchecked");
    }
})Git SSH Windows — пошаговое руководство События Формы
Надеюсь, вам понравилась данная информация. Если вам интересна тема web-разработки,
то можете следить за выходом новых статей в Telegram.
- JavaScript: Работа с Массивами
- Наличие Динамически Добавленного Элемента
- Стилизация Input File
- Предзагрузка Картинок — Предварительная Загрузка Изображений на JavaScript
- Стилизация Скролла
- События Формы
Show the Developer tab
If the developer tab isn’t already visible, see Show the Developer tab.
Make your list
-
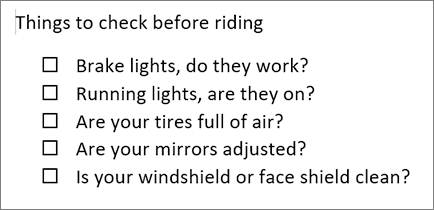
Type the list.
-
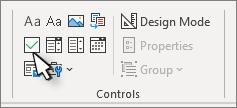
Go to Developer and select the Check Box Content Control at the beginning of the first line.

-
To change the default X to something else, see Make changes to checkboxes.
-
Copy and paste the check box control at the beginning of each line.
-
Select a checkbox to put an X (or other character) in the check box.
Add hanging indentation
If some list items are more than one line long, use hanging indents to align them.
-
Select the list. Bullets or numbers won’t look selected.
-
Go to Home and select the Paragraph dialog box launcher
. -
Under Indentation, in the Left box, type 0.25.
-
Under Special, choose Hanging.
-
For By, Word sets a default value of 0.5 inches. Change this if you want your additional lines indented differently.
-
Select OK when finished.
 .
.Lock the text and controls to prevent changes
-
Select the list and checkboxes.
-
Go to Developer >Group > Group.
To unlock the list, select the list and choose Group > Ungroup.
Create a print only list
-
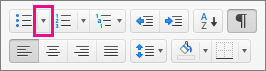
Go to Home and select the down arrow next to the Bullets button.
-
In the drop down menu, select Define New Bullet.
-
Select Symbol and find a box character. If you don’t initially see one, change Font to Wingdings or Segoe UI Symbol.
-
Select OK twice, and create your list.

Make a checklist you can check off in Word
To create a list that you can check off in Word, add content controls for checkboxes to your document.
Show the Developer tab
For more info if the developer tab isn’t already visible in Word, see Show the Developer tab.
Make your list
-
Create your list.
-
Place you cursor at the start of the first line.
-
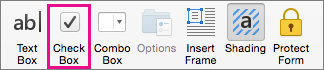
Go to the Developer tab, and then click Check Box.
-
If you want a space after the check box, press Tab or Spacebar.
Use a Tab character if you want to format the list item with hanging indentation, like Word applies to bulleted lists.
-
Select and copy (⌘ + C) the check box and any tabs or spaces.
-
Place the cursor at the start of the each list item, and paste (⌘ + V ) the copied check box and characters.
-
Paste the checkbox at the start of each line in your list.
Add hanging indentation
If some of the list items are longer than one line, use hanging indentation to align them.
-
Select the list.
-
Go to Format and select Paragraph.
-
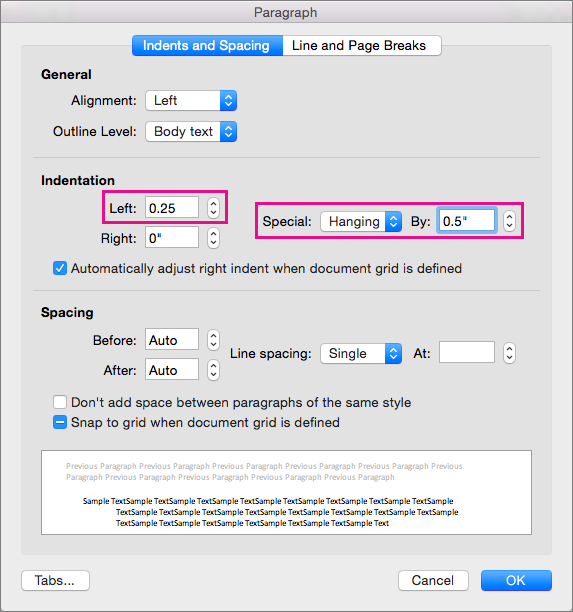
Under Indentation, type 0.25 in the Left box.
-
In the Special list, choose Hanging.
For By, Word sets a default value of 0.5 inches. Change this if you want your additional lines indented differently.
Make a print only check list
You can replace the bullets or numbers in a list with another symbol, such as a box can be checked on a printed version of your document.
-
Select the entire list.
-
Select Home and select the arrow next to Bullets.
-
Select Define New Bullet.
-
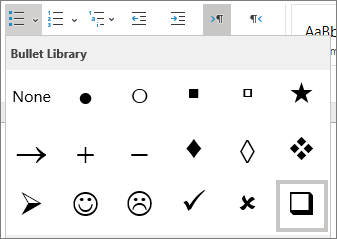
Select Bullet, and choose a symbol from the table of symbols.
For more choices, in the Font box choose a symbol font, such as Wingdings.
-
Select a symbol to use, such as an open box (
) or a three-dimensional box (). -
Select OK, and then select OK again.
 ) or a three-dimensional box (
 ).
).Word for the web supports only the on-paper form of checklist.
-
Write your list, and then select it.
-
On the Home tab, choose the down-arrow next to the Bullets list to open the bullet library, and then choose the checkbox symbol.
В документ Word иногда требуется добавить элементы формы – чекбоксы, возможность выбора из списка и т.п. Лично я не рекомендую использовать Word для интеграции с внешними системами, т.к. кроме головной боли мало что получите. Решение скорей всего будет сделано быстро, но решения, сделанные на коленке, обычно трудно в дальнейшем поддерживать и расширять.
Чекбокс – это элемент управления, который имеет 2 состояния – выбран и не выбран. Иногда его называют «крыжик» или «флажок».
Word является текстовым редактором, потому как правило файлы в Word делают для создания бумажных версий документов, например, бланков голосования, опросов и т.п. Одной из наиболее распространённой задачей является добавить чекбокс («крыжик»). Предложу 3 варианта добавления поля для галочки.
1. Только для печати – символ белого квадрата
Если «крыжик» будут ставить только на бумаге, то можно обойтись вставкой символа «Белый квадрат» (White square).

Рис.1. Вставка символа
Окно «Символ» можно вызвать из закладки «Вставка», нажав на кнопку «Символ»

Рис.2. Кнопка добавления символа в Word
2. Картинка с крыжиком
Второй способ также относится к серии «Только для печати» — добавить картинку с «крыжиком». В любом поисковике можно найти подобную картинку и вставить. Плюс такого решения – можно найти «крыжик» не только официально-протокольный, но и соответствующий стилю бланка.
3. Интерактивный чекбокс
Если подготавливаемый документ Word может быть заполнен в электронном виде, то лучше всего вставить соответствующий элемент управления в документ.
Чтобы иметь возможность вставлять в документы Word элементы управления, нужно включить панель «Разработчик». По умолчанию она скрыта. Для этого в редакторе Word зайдите в меню «Файл» / «Параметры», в открывшемся окне перейдите в меню «Настроить ленту», где установите галочку на пункте «Разработчик» (Рис.3).

Рис.3. Включение панели «Разработчик» в Word
После этого в Word появится еще одна закладка «Разработчик». Чтобы добавить чекбокс в тело документа, установите курсор в документе туда, куда требуется вставить чекбокс, перейдите в панель «Разработчик» и нажмите левой кнопкой мыши на элемент «флажок».

Рис.4. Добавление чекбокса в документ Word
Если нажать на добавленный в текст чекбокс, то он станет отмеченным, если нажать еще раз – неотмеченным.
На чтение 3 мин Опубликовано 24.07.2015
Когда Вы создаёте опросы или формы в Microsoft Word, то для удобства можно добавить флажки (чек-боксы), чтобы было проще выбрать и отметить один из вариантов ответа. Для этого есть два основных способа. Первый отлично подходит для документов, которые нужно заполнять в электронном виде, второй удобен для печатных документов (таких как списки дел).
- Способ 1 – Элементы управления для электронных документов
- Способ 2 – Флажки для печатных документов
Способ 1 – Элементы управления для электронных документов
Чтобы создавать заполняемые формы с флажками (чек-боксами), сперва нужно активировать вкладку Developer (Разработчик). Для этого откройте меню File (Файл) и нажмите кнопку Options (Параметры). Перейдите на вкладку Customize Ribbon (Настроить ленту) и выберите из выпадающего списка Customize the Ribbon (Настроить ленту) вариант Main Tabs (Основные вкладки).
Поставьте галочку в строке Developer (Разработчик) и нажмите ОК.
На Ленте появилась новая вкладка с инструментами для разработчиков.

Теперь Вы можете добавить в документ элемент управления — Check Box (Флажок). Это просто: запишите вопрос и варианты ответа на него, откройте вкладку Developer (Разработчик) и кликните значок Check Box Content Control (Элемент управления содержимым «флажок”) .

Теперь повторите тот же приём для всех вариантов ответа. Как видно на рисунке ниже, рядом с каждым ответом появится чек-бокс.
Способ 2 – Флажки для печатных документов
Второй способ подходит для создания документов, которые нужно распечатать на бумаге. Он потребует вставки маркеров. Откройте вкладку Home (Главная), и Вы увидите кнопку для вставки маркеров в разделе Paragraph (Абзац).
Просто нажмите маленькую стрелку рядом с этой кнопкой и выберите команду Define New Bullet (Определить новый маркер). Обратите внимание, что там уже есть несколько вариантов на выбор, но среди них нет нужного значка.
Чтобы определить новый маркер, в открывшемся диалоговом окне выберите вариант Symbol (Символ).
Когда откроется окно выбора символов, Вы увидите множество различных вариантов. В верхней части окна находится выпадающий список. Кликните по нему и выберите Wingdings 2.
Теперь введите в поле Character Code (Код знака) код 163, чтобы автоматически перейти к лучшему варианту чек-бокса в Word.
Запишите варианты ответов маркированным списком:
В следующий раз, когда Вам понадобится вставить такой символ, просто кликните по маленькой стрелке рядом с кнопкой выбора маркеров, и Вы увидите его в одном ряду с символами по умолчанию.
Попробуйте сами поэкспериментировать с настройкой маркеров, используя символы. Возможно Вы найдёте варианты лучше, чем привычный чек-бокс. Наслаждайтесь, создавая опросы и документы с использованием флажков.
Оцените качество статьи. Нам важно ваше мнение:

In Microsoft Word, you can create digital forms, surveys, to-do lists, and printable forms. And you might need to add a checkbox in these forms so your respondents can select certain options.
In this tutorial, I will show you how to insert an interactive checkbox in Microsoft Word for softcopy documents, and a non-interactive checkbox for hardcopy (printed) documents. Then you can start using them in your forms, surveys, and lists.
I will be using the Microsoft Word 2016 desktop app in this guide because it’s my personal preference. If you are using a different version, things may not be entirely the same, but you can still follow along.
How to Insert a Checkbox in Softcopy Documents like Digital Forms and Surveys
To insert a checkbox in a softcopy document (like forms and surveys that you want respondents to fill out digitally within the Word document), you’ll use the Developer tab in the menu bar.
Unlike other tabs such as File, Home, Insert, Design, and so on, the Developer tab doesn’t appear in the menu bar by default. So I will start this guide by walking you through how to show the Developer tab in the menu bar.
How to Show the Developer Tab
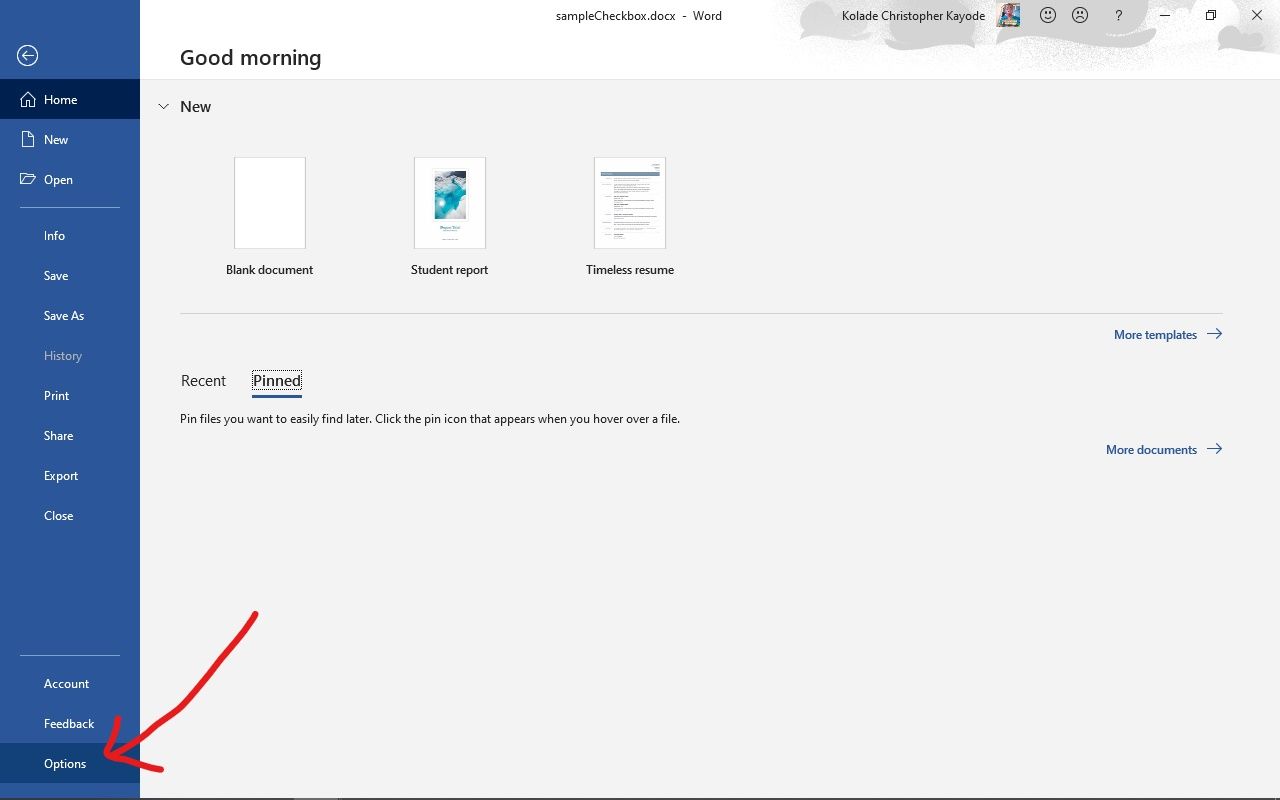
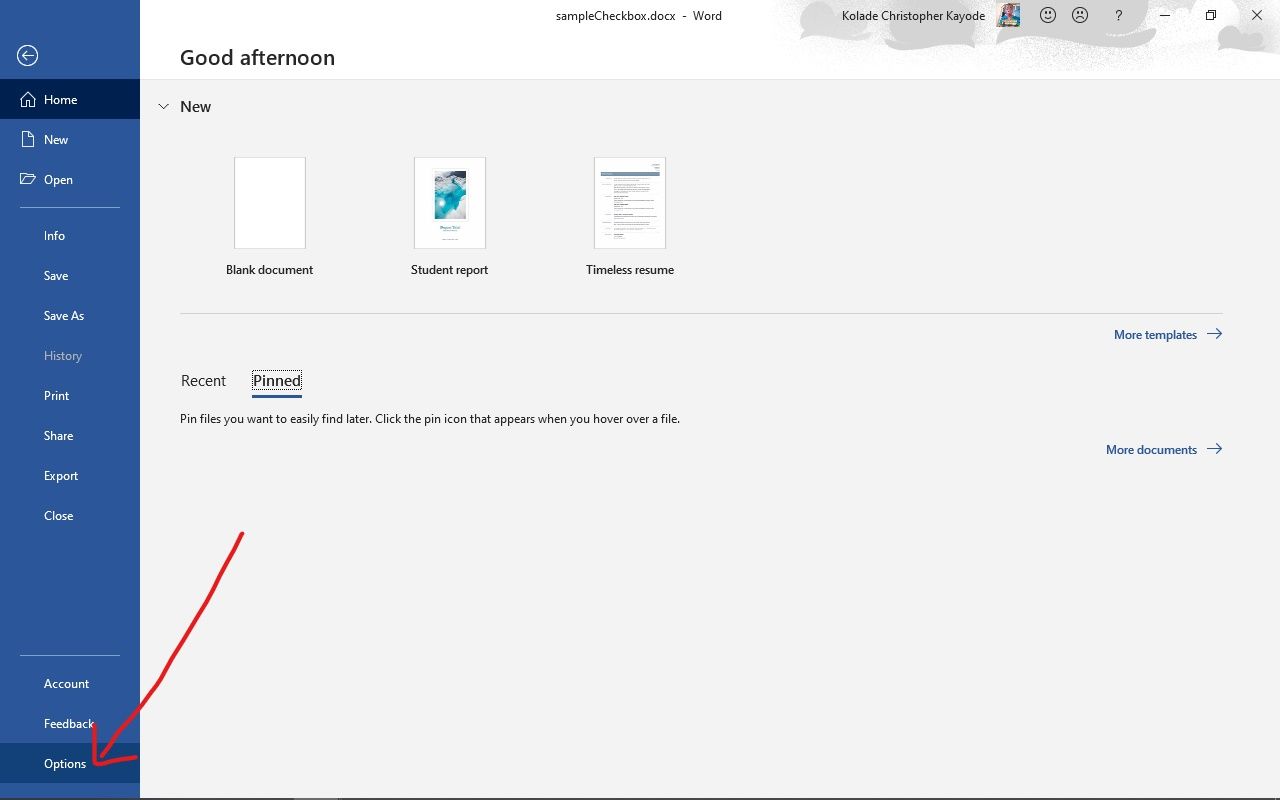
To show the Developer tab in the menu bar, first click on “File”:

Next, click “Options”:
Then select “Customize Ribbon” in the pop up that shows up:
Under “Main Tabs”, check the “Developer” option:

Finally, click “Ok”:
How to Insert the Checkbox in your Word Document
First, place the cursor where you want to insert the checkbox.
Next, click on the Developer tab in the menu bar. You will see options such as Add-ins, XML Mapping Pane, and some others (you will not see their names until you hover on them).
Hover on the one that has a checkmark and select it.
This will insert your checkbox.
How to Change the Icon of the Checked State of the Checkbox
The checkbox becomes interactive immediately after you insert it. The only problem is that an «X» appears by default in the checked state, and you might want a checkmark instead of this.
So now I’m going to show you how to change the X to a checkmark.
Step 1: Select the checkbox, or place the cursor right next to it:

Step 2: Click on the Developer tab and select “Properties”:

Step 3: You will see the default symbols for checked and unchecked symbols. Right next to the “Checked Symbol”, click “change”.
Step 4: In the popup that shows up, look for “winding2” under font and select it. You will see the common checkmark icons used for the checked state of checkboxes. Just select one of them and click “Ok”, then “Ok” again.
Below is a gif demonstrating how to change the checked icon:

You can follow the same process to change the unchecked state, as I’ve shown below:

How to Remove the Bounding Box of the Checkmark
Another way you can make the checkbox look better and make it user-friendly is to remove the bounding box that appears when it is checked or unchecked, and when the cursor is placed on it.
Step 1: Place the cursor on the checkbox.
Step 2: Select the Developer tab in the menu bar and click on “Properties”.
Step 3: Right next to “Show as”, click the dropdown and select “None”.
Thee 3 steps above are demonstrated in the animated gif below:
How to Insert a Checkbox in Hardcopy (Printed) Documents
If you are dealing with printed documents, you don’t need to dabble around with the Developer tab to insert a checkbox. Instead, you can define a custom bullet point for the purpose.
Step 1: Make sure you are on the Home tab of the menu bar.
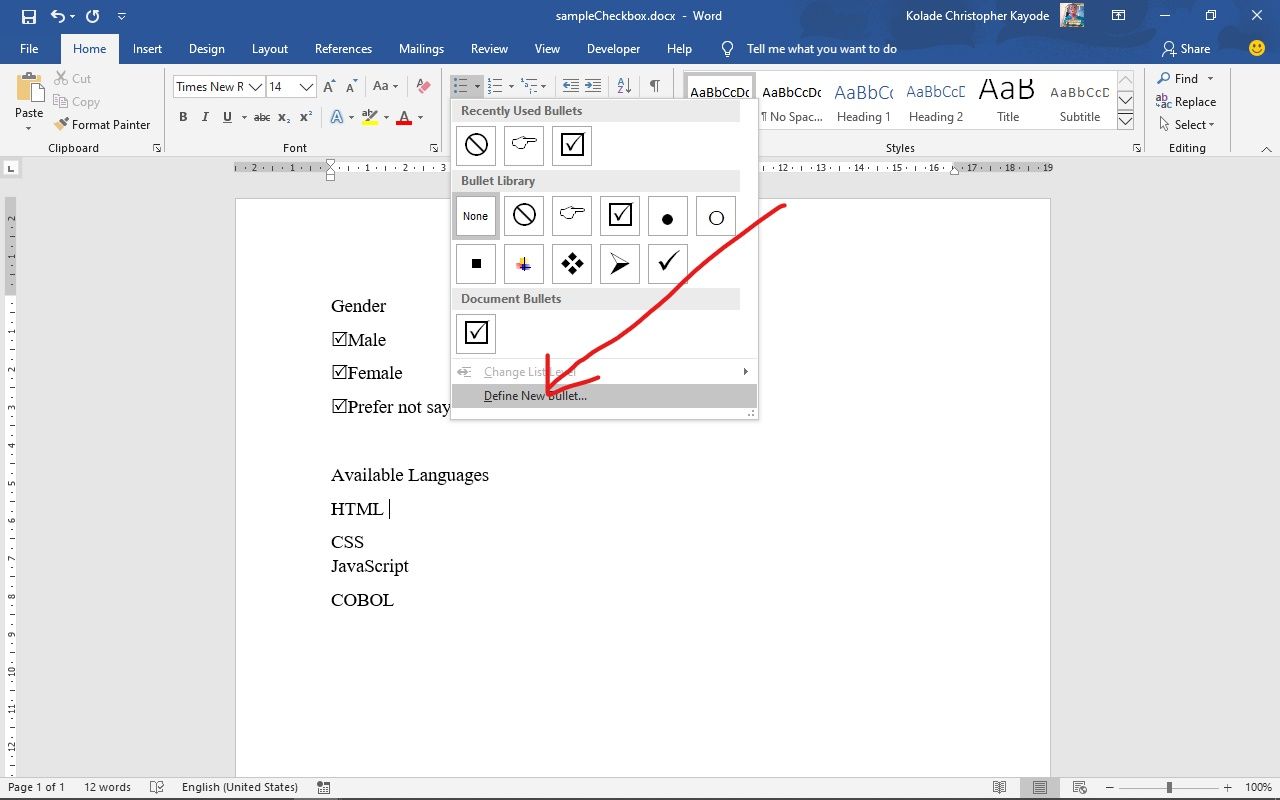
Step 2: Click the Bullets dropdown icon:

Step 3: Click “Define new bullet”:
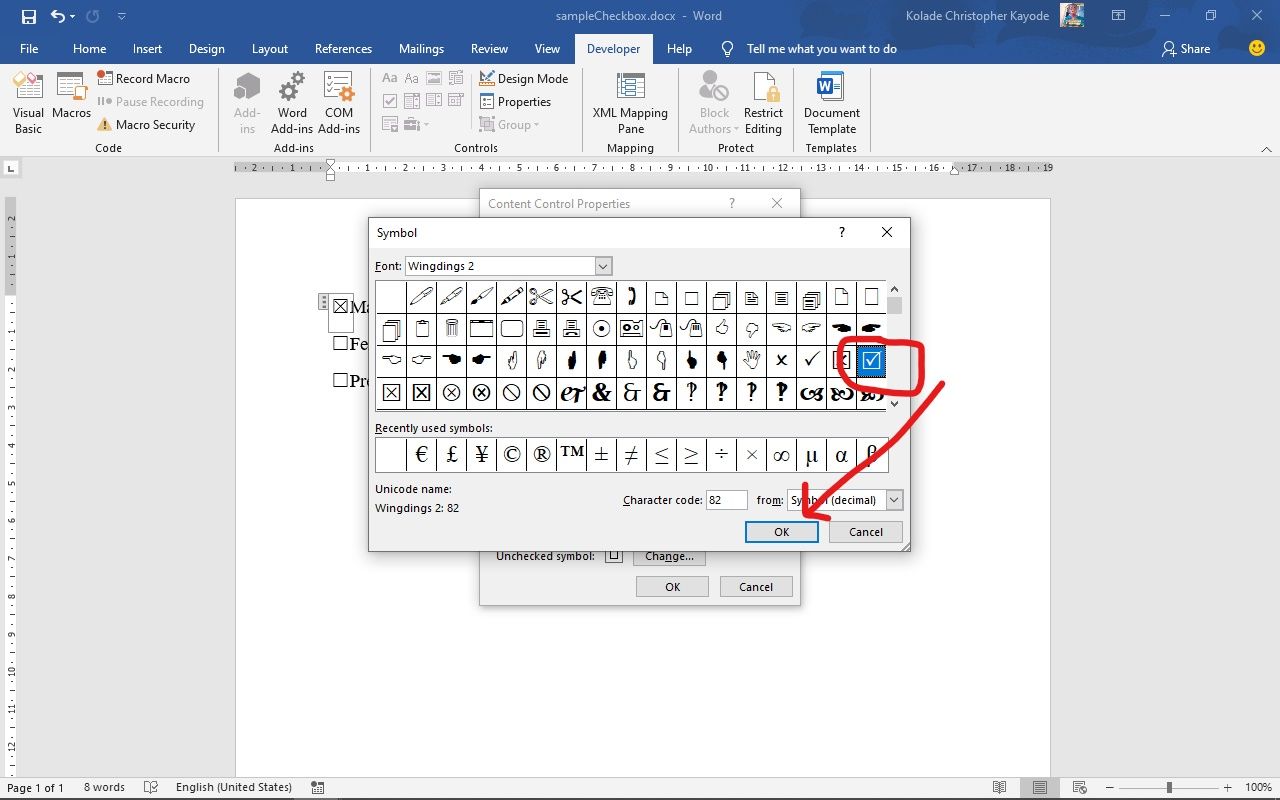
Step 4: Select «Symbol» in the popup that shows up:
Step 5: Select «Winding2» as the font.
Step 6: Choose the checkmark Icon and click “Ok”, then “Ok” again:
This is how its all done:
How to Create a Shortcut to Add an Interactive Checkbox in Word
If you want to continue inserting more interactive checkboxes, you don’t need to waste time by doing it from the Developer tab all the time. You can create a shortcut with the steps below.
Step 1: Make sure the checkbox is being shown as a bounding box.
Refer to the steps under the «Remove the Bounding Box” part of this tutorial to get a refresh on how to do this.
Step 2: Highlight the checkbox and click on the File tab of the menu bar:
Step 3: Click on “Options”:
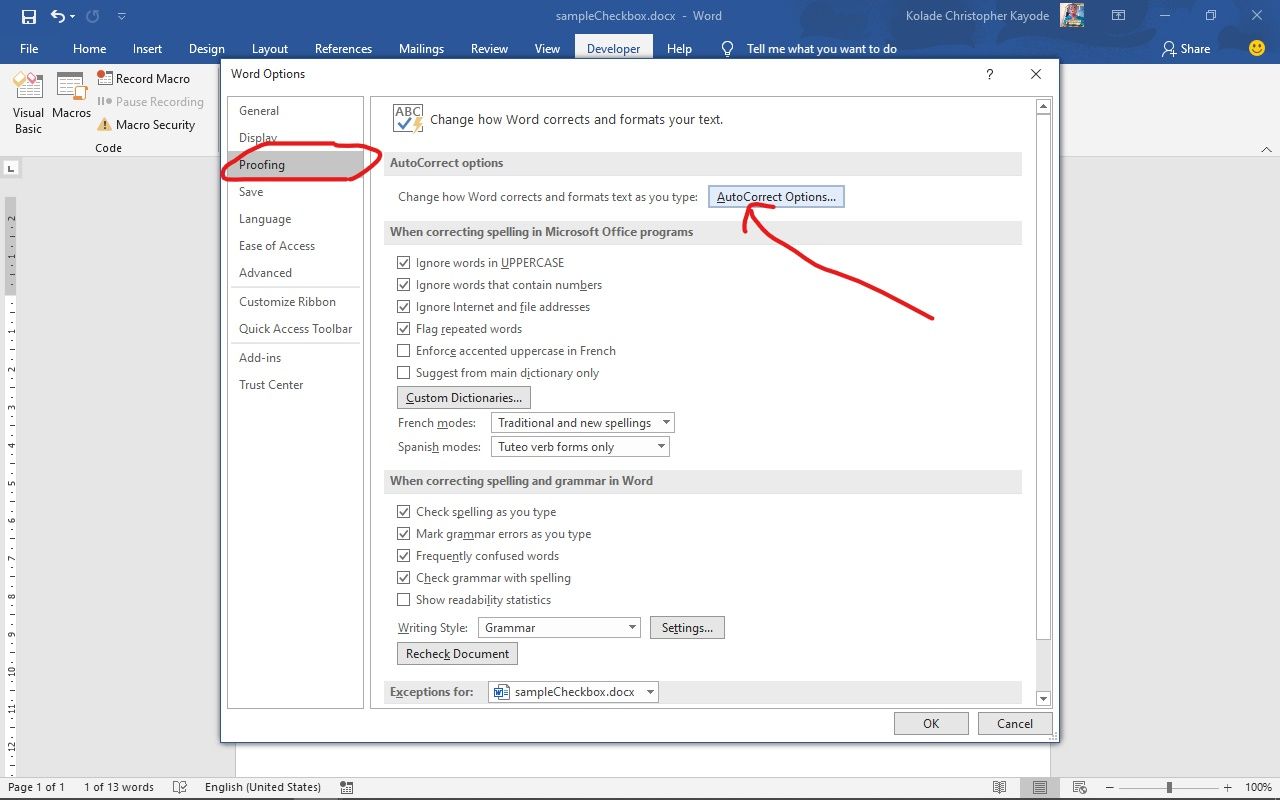
Step 4: Select “Proofing” in the popup that comes up and click on “Autocorrect Options”:
Step 5: You should see several options checked. Make sure “Replace text as you type” is checked too.
Step 6: In the editor under “Replace”, type in the shortcut you would like to use to insert checkboxes and click “Add”. Click “Ok” and “Ok” again.
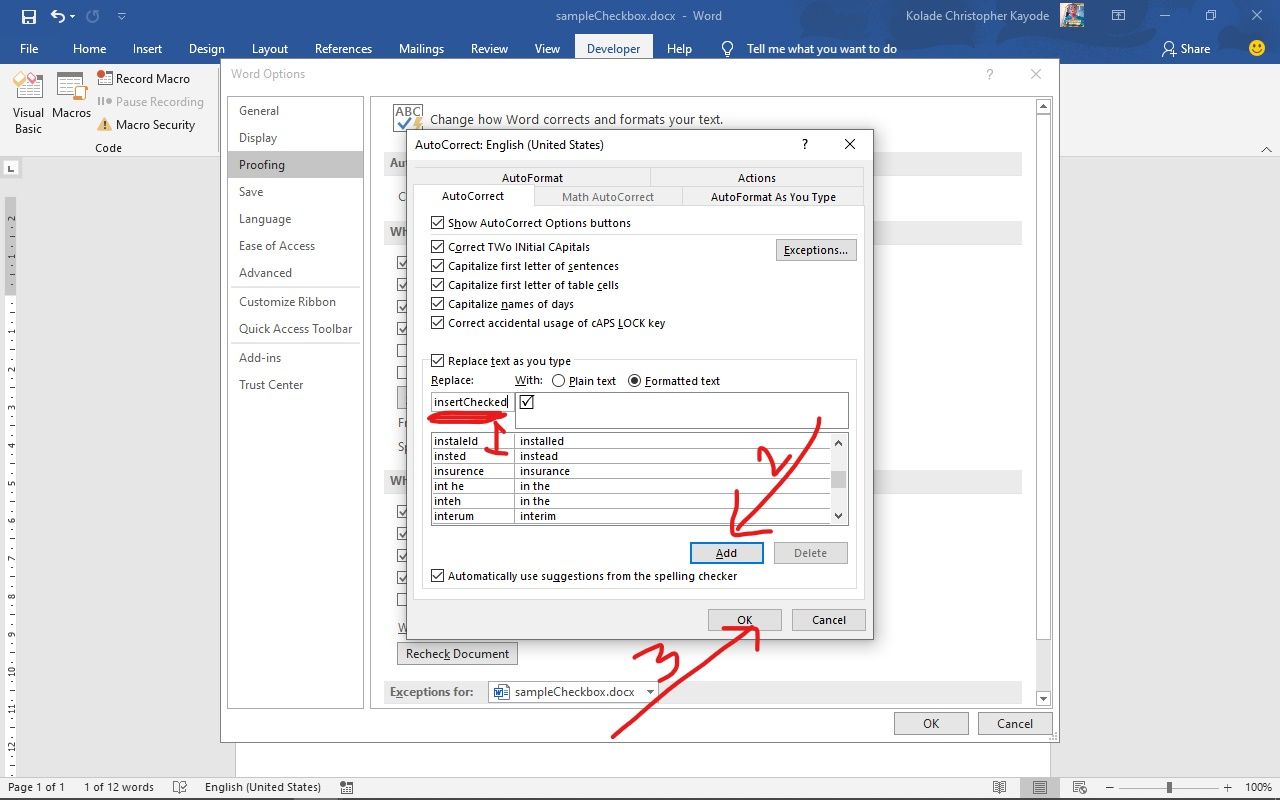
Now, to insert a checkbox, you can simply type the word you entered in step 6 and hit the space bar.
Conclusion
Checkboxes often play a crucial role in data collection using softcopy and printed documents. I hope this tutorial helped you understand how they work.
In this guide, you learned how to insert an interactive checkbox for fillable digital documents such as forms and surveys, and insert a non-interactive checkbox in printed documents.
Thank you for reading, and have a nice time.
Learn to code for free. freeCodeCamp’s open source curriculum has helped more than 40,000 people get jobs as developers. Get started