
Downloadable Word Invoice Templates
Here’s our collection of Word invoice templates. For more templates, refer to our main invoice templates page here. Generally, we recommend that you use our Excel invoice templates or Google Sheets templates instead of Word since they are more flexible.
Simply select the template that you like, and it will start downloading. You can also try out our online invoice generator. It’s an easy way to create an invoice for your projects that will look fantastic.
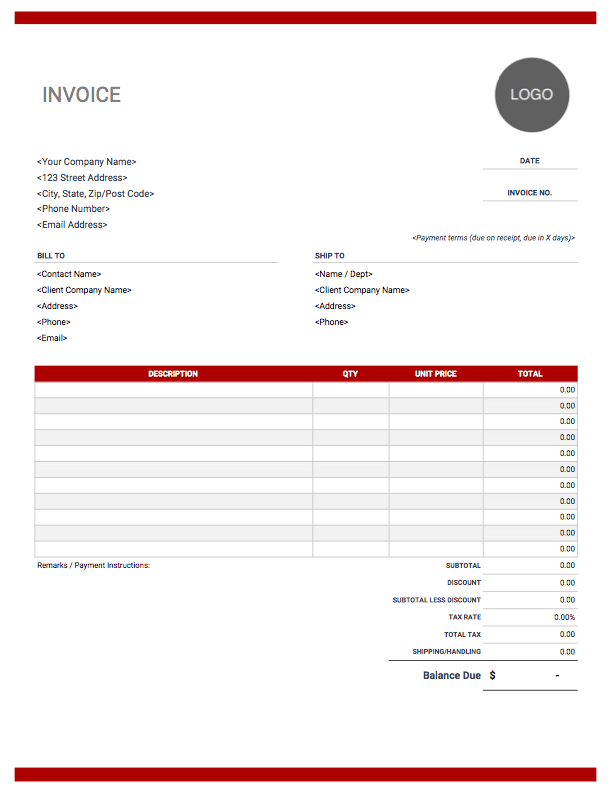
Modern Template
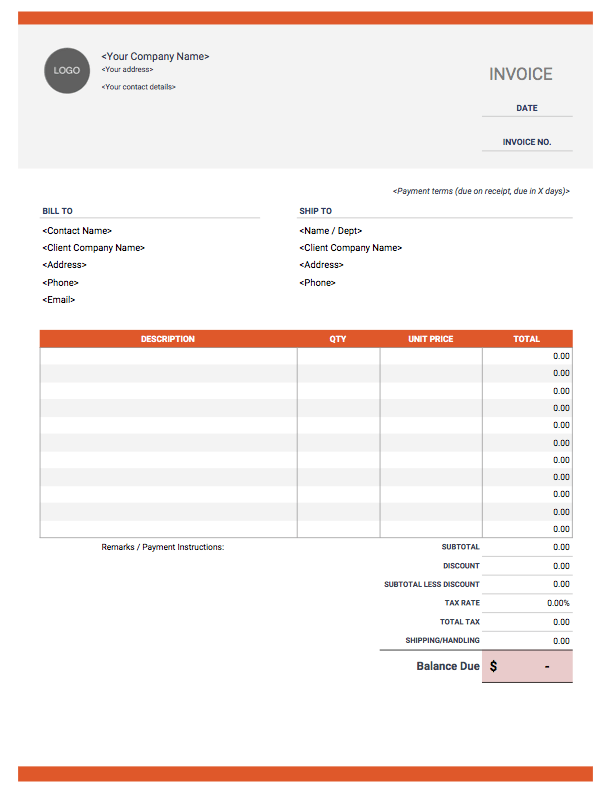
Letterhead Style Template
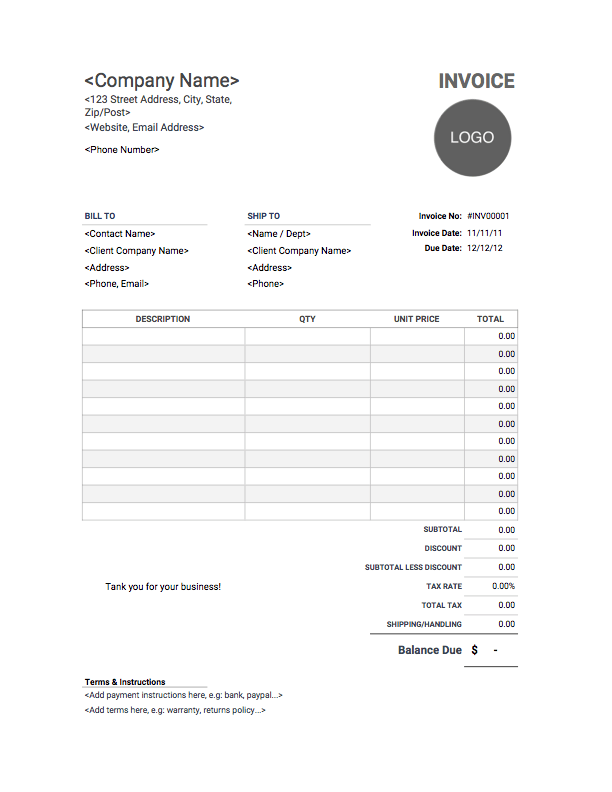
Classic
Printer Friendly
Wide Margin Template
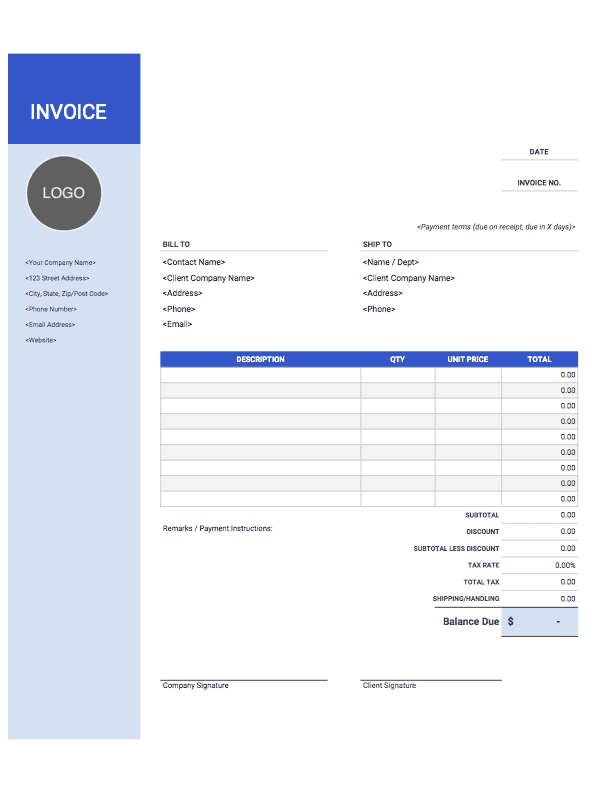
Modern II
Create your first invoice free with our Online Invoice Generator.
Try It
Highlights of Word Invoice Templates
![]()
Blank Word invoice templates that are ready to send to clients.
![]()
Fully customizable templates to fit the needs of your unique business.
![]()
Professionally formatted with all the essential invoice elements included.
![]()
Printable invoice templates make hand-delivering invoices a breeze.
FAQ
Microsoft Word is designed for general documents such as letters and reports. You can usually make good-looking documents in Word. However, it can be quite a pain to add line items and totals and to calculate taxes.
Some recommend using Excel instead because of its automatic formulas. Excel makes it quite easy to add up your totals and measure taxes. You can set up a table with items and quantities with little effort.
However, Excel falls short on the visuals. It’s very hard to make the invoice look professional, even when using professionally designed invoice templates.
The best option is to use tools or software designed for making invoices. You can use these tools to gain the best of both worlds! Great convenience as well as amazing style.
That’s where we come in. We’ve built our online invoice generator to be a great alternative to Word and Excel. Here are some of the added benefits of using Invoice Simple:
- Professional layout
- Fully customizable
- Clients and items saved automatically
- Simple bookkeeping for tax season
- Online and in-person credit card processing
If you’re invoicing more than once or twice a year, it makes a lot of sense to switch to an invoicing software.
Our free Word invoice templates are a simple and easy way to send professional-looking invoices to clients. Simply download the file you want and fill out the customizable fields. Then you’re ready to email or print and mail the customized Word invoice template.
These printable Word invoice templates work perfectly for standard 8.5″ x 11″ printer paper.
Microsoft Word also offers a few free templates. You can find them from File > New and then search/select from the available invoice templates.
Not finding what you’re looking for? Head over to Support
Build a Custom Invoice
Create the perfect invoice for your business with our Online Invoice Generator.
Try It
Creating an invoice in Microsoft Word is fairly simple.
There are generally two ways you can go about creating an invoice in Word.
The most common way is by choosing an invoice template from their template gallery.
The other way is by using Word to create the invoice layout and template from scratch. Which of course is a lot more time-consuming.
In this guide, we will explain how to use both of these methods to make an invoice in Word, along with its advantages and disadvantages.
Read on to learn about:
- How to Make an Invoice from a Word Template
- How to Create an Invoice in Word from Scratch
- What Are the Advantages and Disadvantages of Creating an Invoice in Word
- Blank Word Invoice Templates for Business
- Creating an Invoice with Invoicing Software
How to Make an Invoice from a Word Template
The easiest way to create any type of invoice in Word is through their premade invoice template gallery. These invoice templates save you the trouble of having to manually create the format from scratch, and can also be personalized to fit your business needs.
Here’s the step-by-step guide on how to make an invoice from a Word template:
Step 1: Pick Your Invoice Template
When opening Microsoft Word, the software usually redirects you to the word document gallery automatically.
If that doesn’t happen and Word opens a blank document instead, you can find the template gallery by clicking on File at the top navbar and then clicking on New From Template.
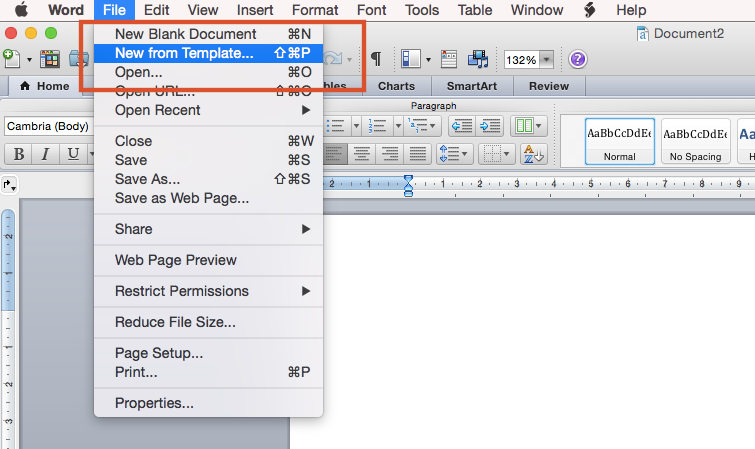
The Word document gallery should pop up.
Now that you’re at the document gallery, locate the search bar (which is typically on the top right of the page) and type the word invoice. A list of invoice templates will appear. There you can scroll through the options until you find a template that you want to use.
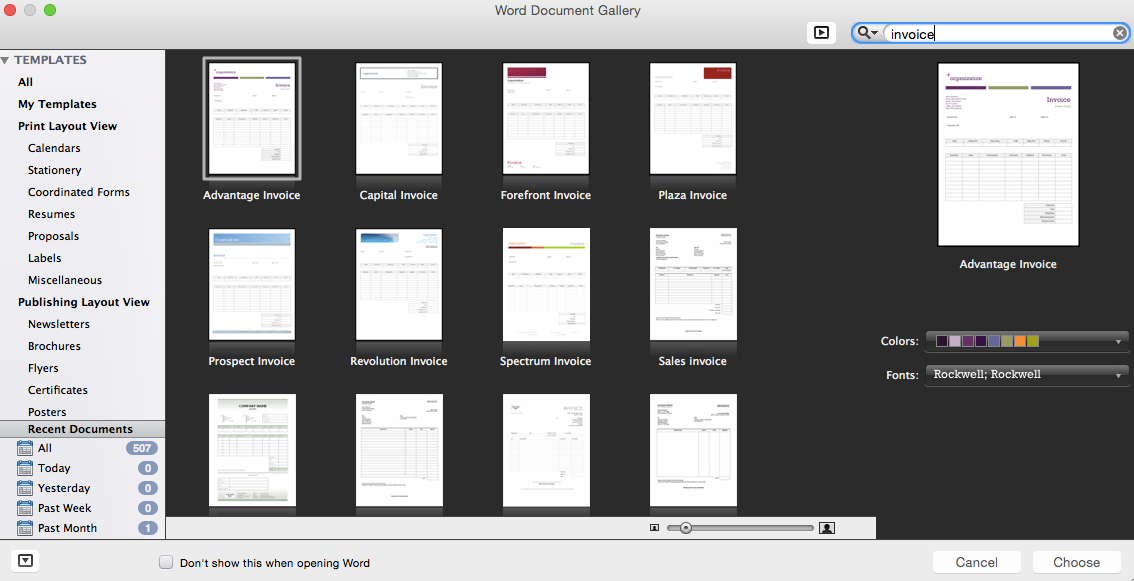
Once you’ve decided on a template, press on it and then click the Choose button at the bottom right of the page to select it.
Step 2: Customize the Invoice Template
Once you’ve chosen an invoice template, you should decide on the elements you’ll want to include.
Usually, Word invoice templates have pre-existing placeholder text that guides you through what information you have to add to each section, as shown below.
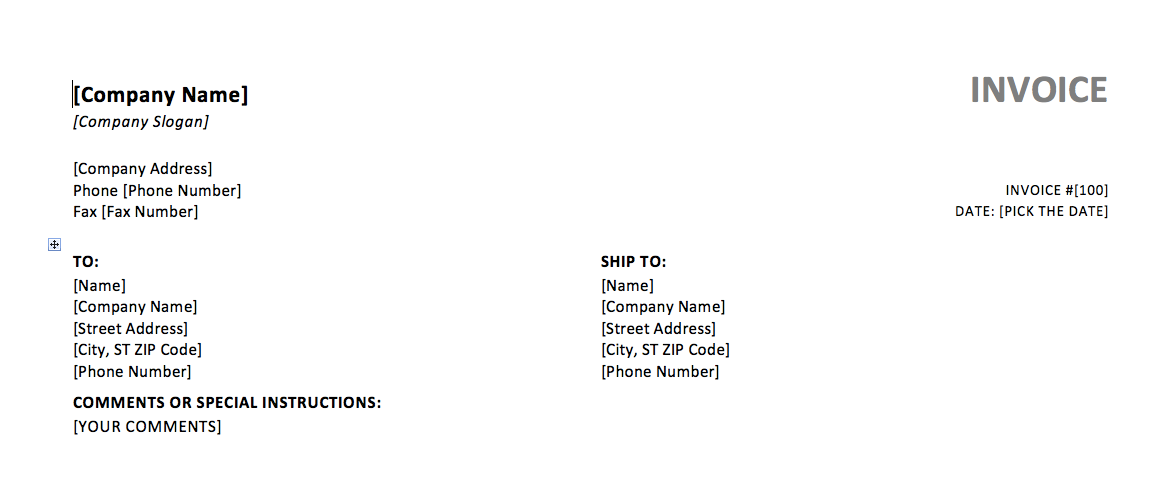
However, before you start editing, make sure that the template matches all of the necessary information of an invoice.
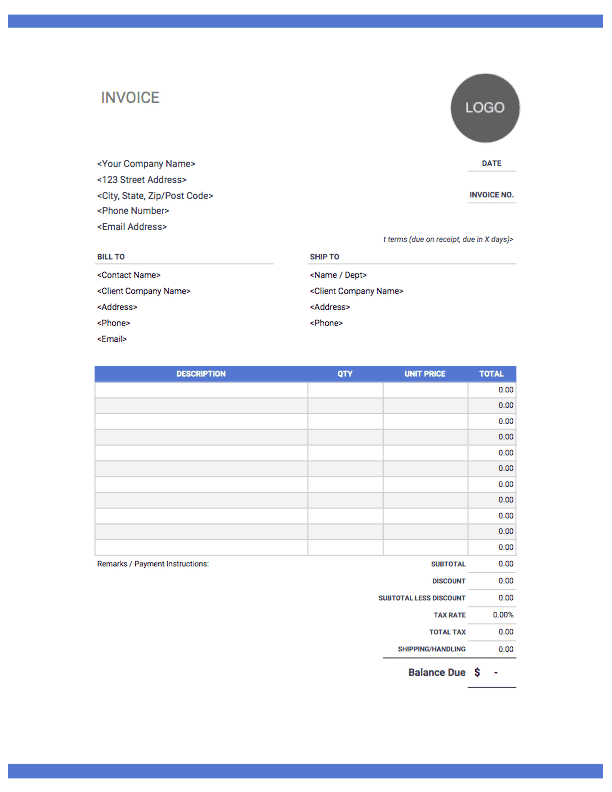
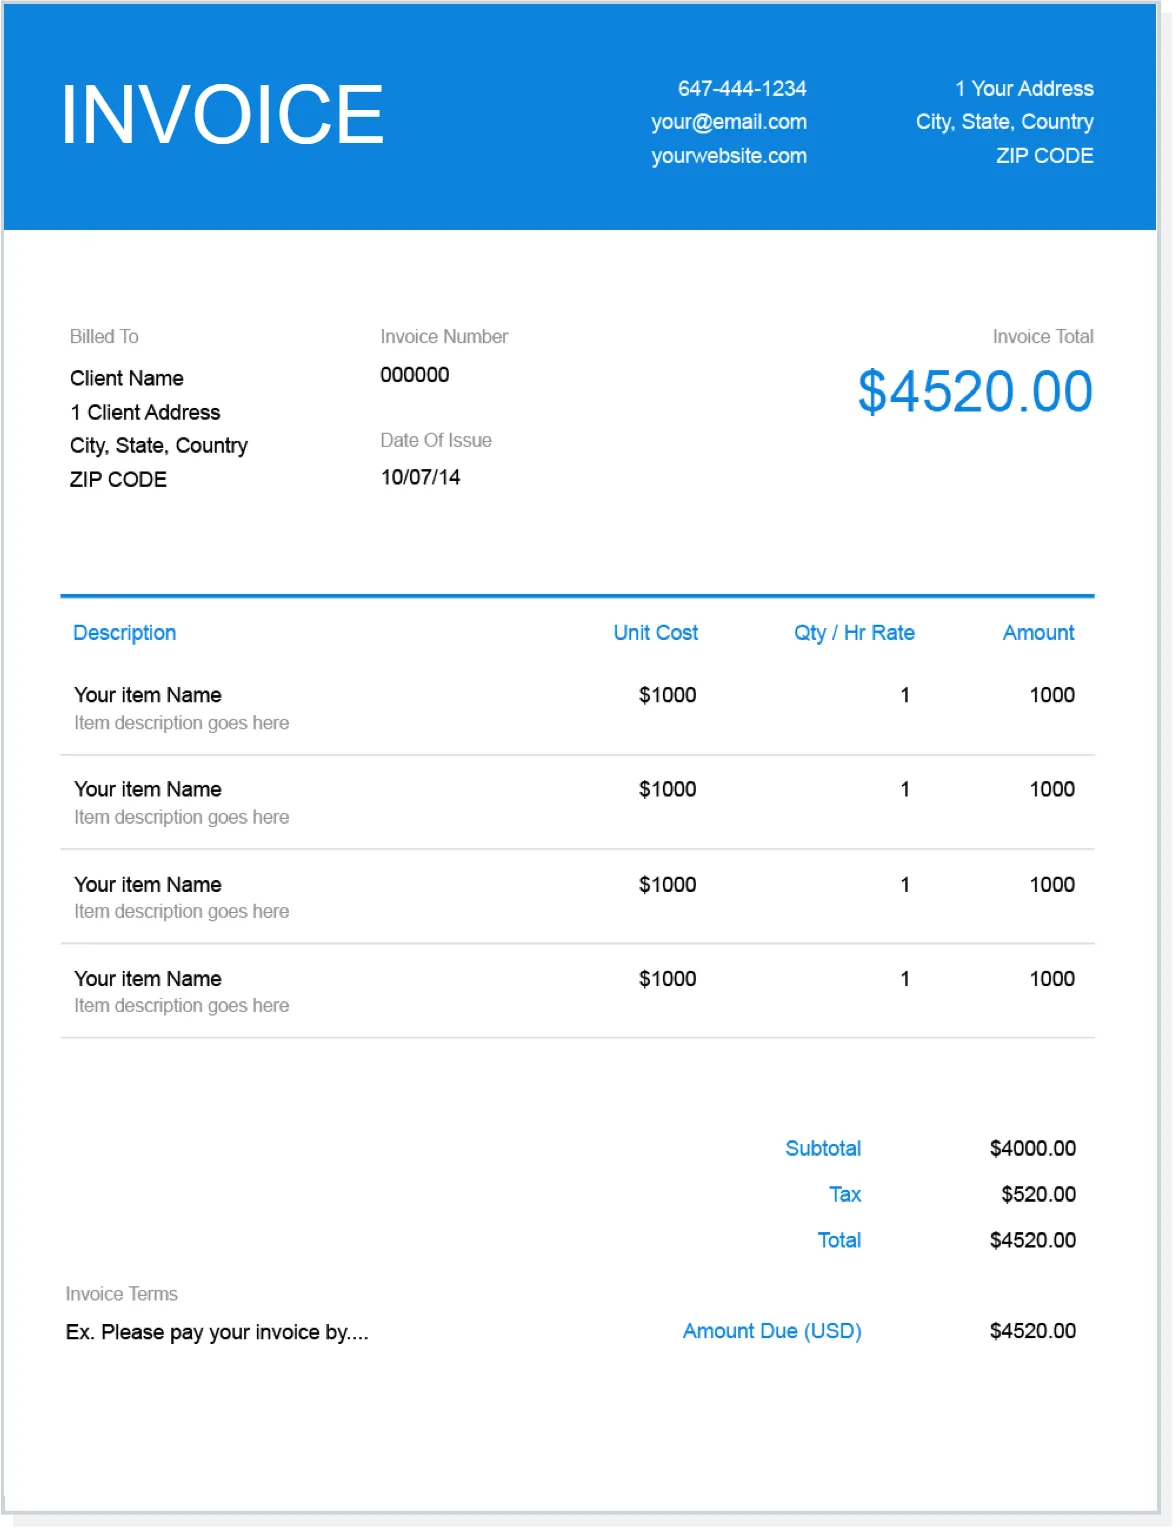
Typically, the essential elements of an invoice include:
- The word “invoice” in the header
- Company name and contact details
- Client contact information
- Payment due date and billing date
- Unique invoice number
- Itemized list of products and services with a brief description
- Subtotal for every product or service
- Payment terms
- Taxes and discounts
- The total amount of the invoice
Now, these elements may vary from your industry, clients, and products or services you’re billing, so you might need to include more details than the above.
Head over to our guide on invoice types for more information on the different elements every invoice type includes.
It’s finally time to start customizing and editing your invoice. Fill in all of the invoice details on the appropriate sections, and change the font and document colors to your preference. If there’s anything that doesn’t work for your business, Word allows you to easily remove, resize, or adjust the size of elements.
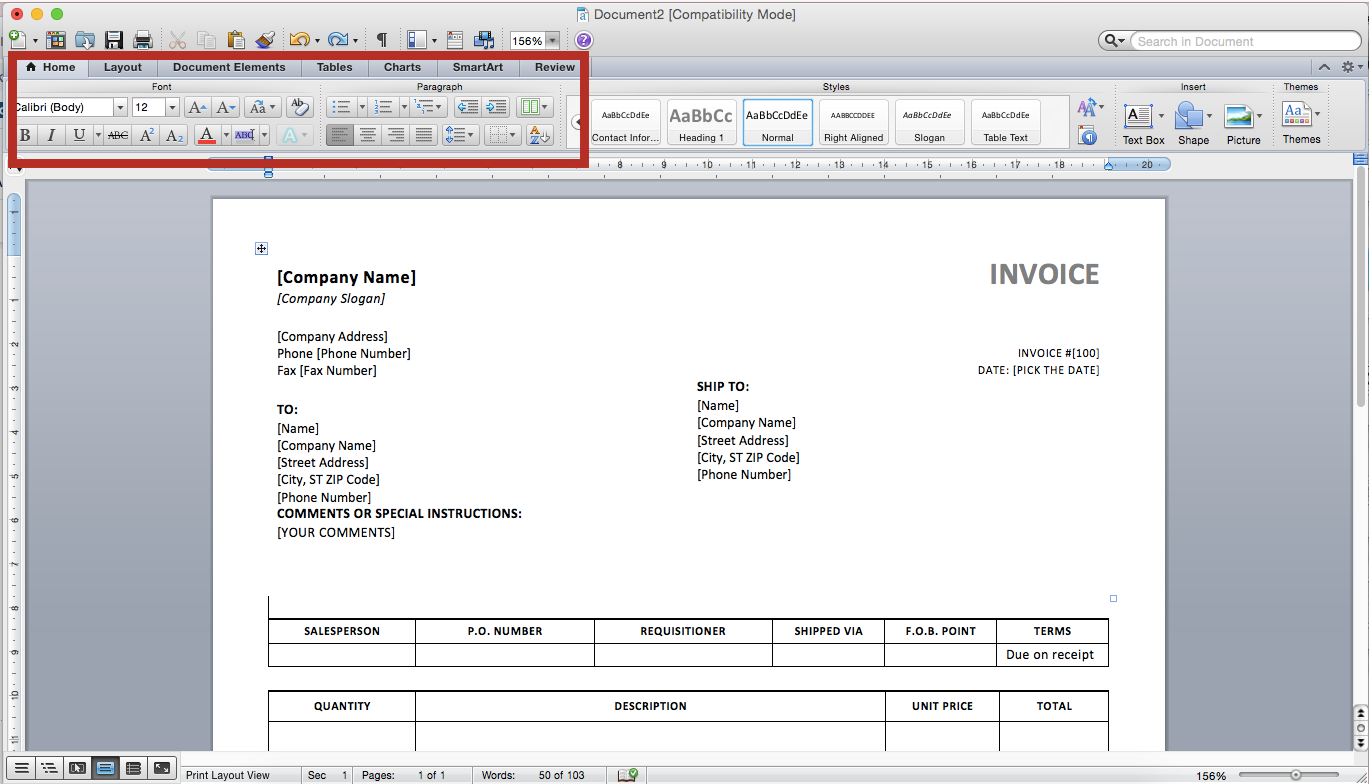
If you want to add more style to the template, consider attaching the business logo on the header, next to the company name. Do this by either directly sliding the logo picture onto the document or by choosing the photo from the Insert menu as shown below.
![]()
And you’re done! All that’s left to do now is save, download, send the invoice, and get paid!
Pro-Tip
Are you tired of manually editing templates in Word? Or maybe you’re looking for a more professional tool to create your invoices with?
If that’s the case, give invoicing software a try.
Invoicing software offers hundreds of pre-made professional templates, which can be created and customized in a matter of seconds. All you have to do is fill in the built-in forms the system provides with your invoice details, press Send, and you’re done!
Step 3: Save your Completed Invoice
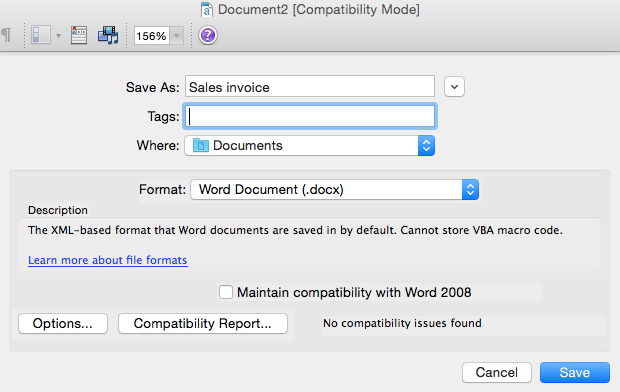
To save your finished invoice, click on File and then Save As.
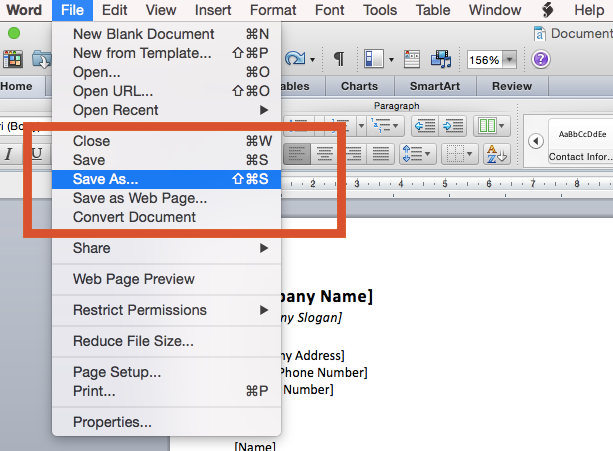
A save pop-up menu should appear, that allows you to name the template and save it to your preferred format, and folder. You can save it as an editable .docx or as a PDF file. The best format to go for is PDF, so that the invoice format doesn’t get scrambled along the way.
Once you’re done with all of the above, press Save at the bottom right of the save pop-up menu to finish.
Step 4: Send the Invoice
Send the invoice with whatever method is most convenient to your business, either by fax, email, or invoicing software.
If you want to learn the easiest way to send an invoice and get paid on time, check out our guide on how to send an invoice.
How to Create an Invoice in Word from Scratch
If you don’t like any of the available Word invoice templates and want to create your own from scratch, here’s the step-by-step guide on how to do it:
Step 1: Open a New Blank Document
To open a new empty document on Word, click on File and then New Blank Document.
![]()
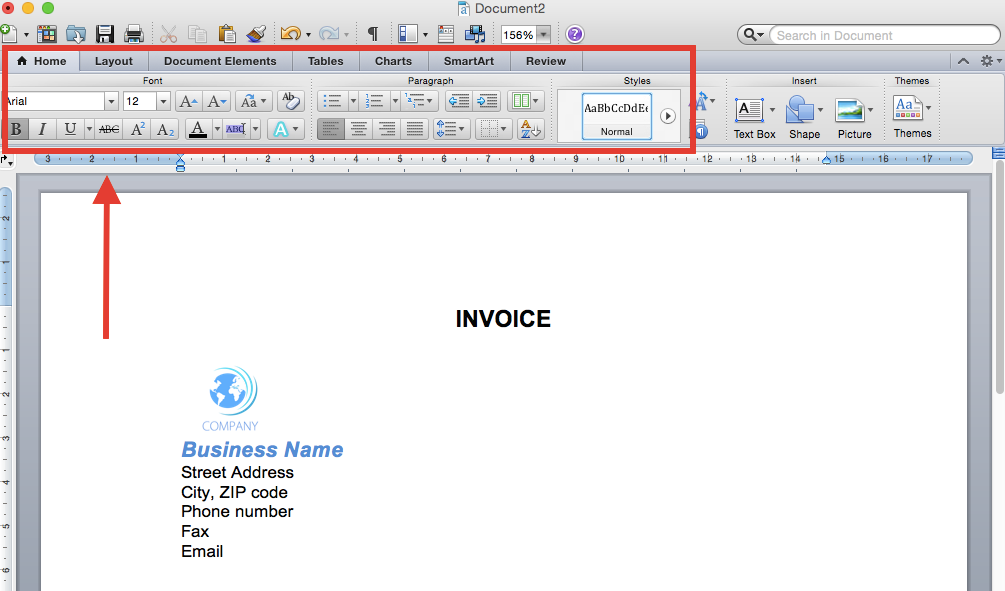
Step 2: Create a Header
An invoice header needs to include:
- The word “invoice”
- Business name
- Business contact information, such as the street address, city, phone number, fax, and email.
- Your business logo (optional)
Design and stylize this information with the colors, font, and sizes that fit your business best. Remember to keep the design simple and professional, though.
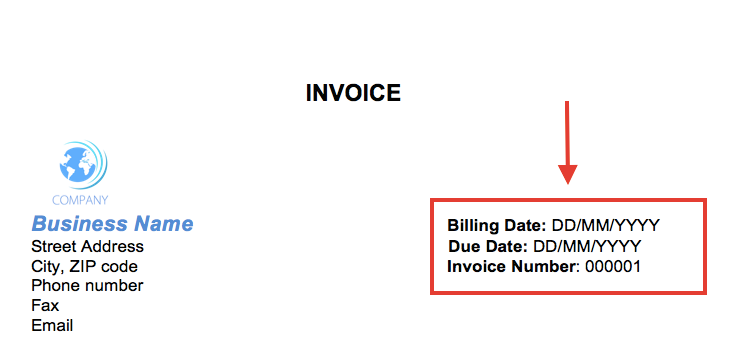
Step 3: Add Invoice Payment Due Date & Invoice Number
On the right side of the business information, insert the billing date, payment due date, and a unique invoice number.
The billing date is the date when the invoice gets issued in, while the due date refers to the deadline for paying the invoice. As for the invoice number, it serves as an identifier, and it’s unique for every invoice.
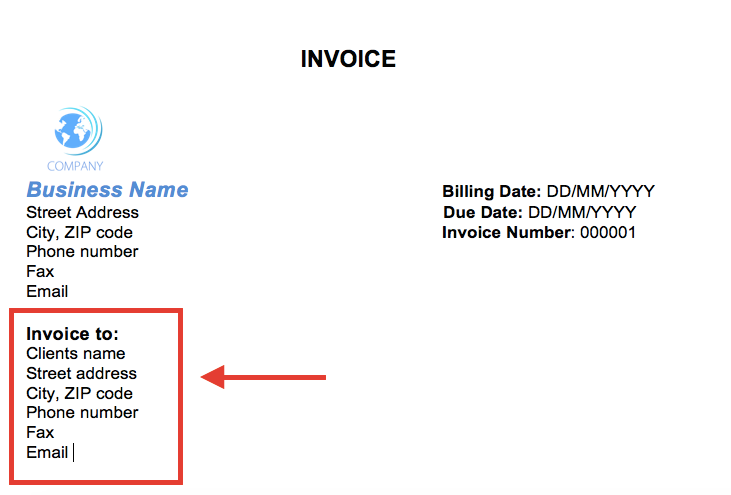
Step 4: Enter the Client’s Contact Information
Client contact information includes their name, street address, city, phone number, fax, and email. Preface this section with the word “to”, to make it clear who is being charged. For example, “invoice to” or “bill to”.
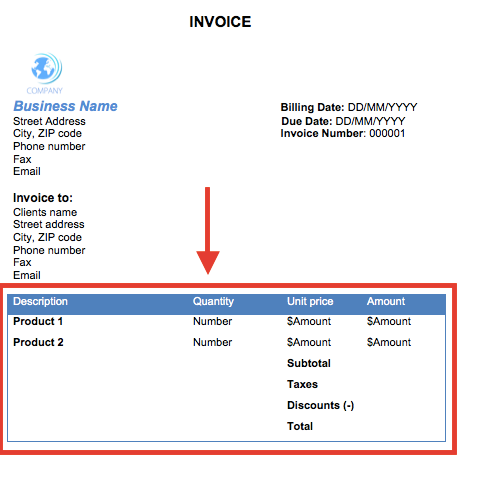
Step 5: Create an Itemized List of Services and Products
The easiest way to add an itemized list of services and products in Word is by creating a table with several rows and columns.
Usually, you’ll need to create four columns for:
- The name and description of the products or services. On the table, label this row as “Description” or “Product Description”.
- Quantity of products. For short, name the row “Quantity” or “QTY”.
- Unit price
- The price for each product, that is usually referred to as “Amount”.
Then, below the headers row, you have to make a separate row for every line of product or service you’ve provided to the client.
Once you’ve filled in all of these invoice details, add three new rows for:
- Subtotal — the sum of all of the totals of the Amount column.
- Any taxes or discounts
- The total — the final amount the customer has to pay, after applying taxes and discounts to the subtotal.
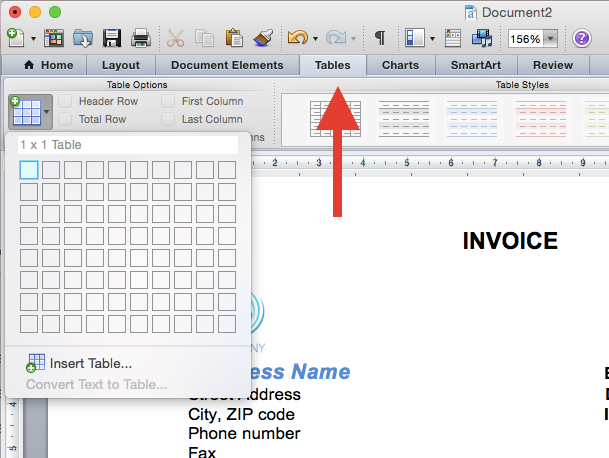
Now, to create a table in Word, you have to go to the Table menu. There you can access the diagram that allows you to select the number of rows and columns you want for your table. You can also pick a table style that best fits your business brand.
After choosing the table design, fill it in with all of the appropriate information along with any taxes or discounts applicable to the purchase, as we previously explained.
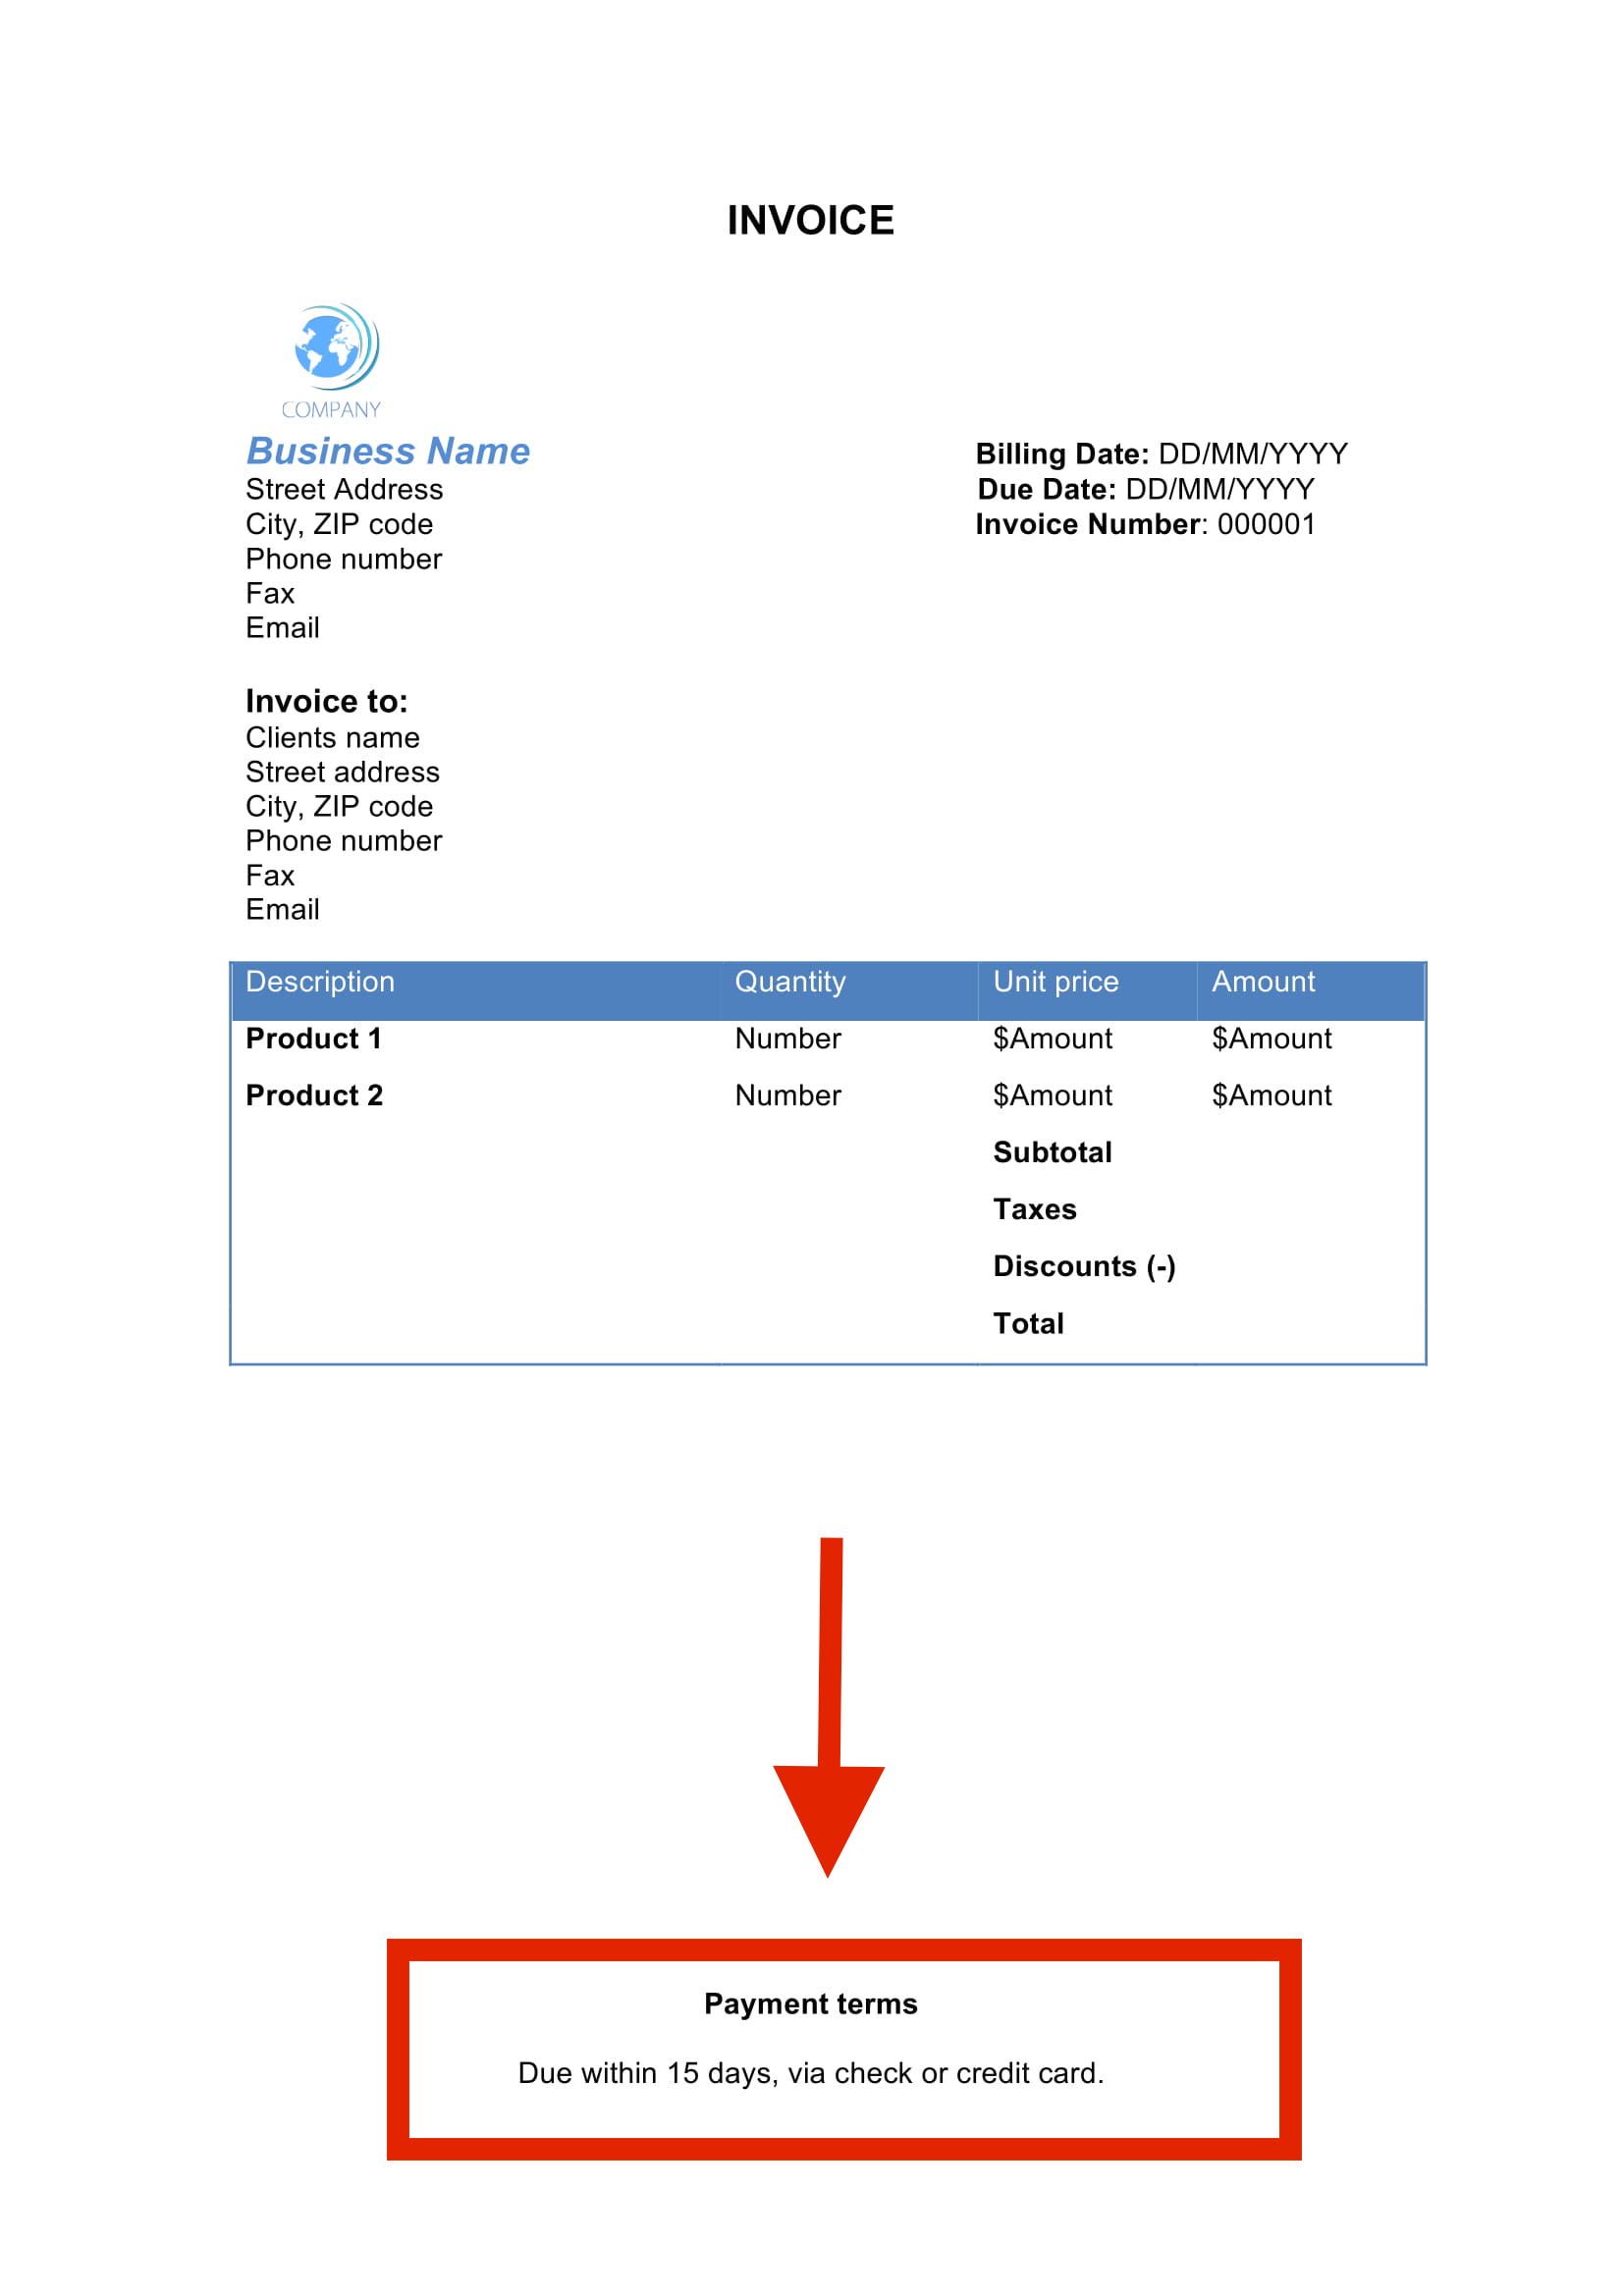
In the end, your itemized list of products and services should look like this:
Step 6: Include Additional Payment Terms or Notes
At the very bottom of the invoice add the payment terms, such as “payment due in 30 days via credit card”, as well as any additional notes you might have regarding the invoice.
Step 7: Save and Send Your Finished Invoice
All that’s left to do now is save the finished invoice as a PDF and send it out to your customer. This step is the same as we explained in the previous section.
And you’re done! That’s how you create an invoice template in Word from beginning to end.
What Are the Advantages and Disadvantages of Creating an Invoice in Word
So far we’ve discussed how to create an invoice in Word, but how convenient is this method for your small business accounting?
Let’s find out by going through the main advantages and disadvantages of Word invoicing.
Advantages of Using a Word Invoice
Advantages of using a Word invoice include:
- Easily accessible templates
- Free of charge
- A variety of invoice templates to choose from
- Flexibility in making custom changes in design like color, font, business logo, etc.
Disadvantages of Using a Word Invoice
Microsoft Word might be a budget-friendly program to create invoices with, but its disadvantages actually outweigh the benefits.
First, using the same templates as thousands of other companies may make your business appear cheap and unprofessional to the client.
But even if you create a unique template from scratch, the manual process requires a lot of effort and accounting knowledge, which becomes time-consuming and tedious very fast.
And whenever you need to make changes to a Word invoice, its format gets easily scrambled, making it hard to work with.
At the same time, you can’t insert any formulas to calculate the sum total of the purchase, applicable taxes, or discounts. Everything has to be determined manually, which leaves plenty of room for accounting errors.
These errors take time to fix and may cost your business extra fees, delayed payments, and leave customers unsatisfied.
That’s why it’s important that your business has an automated invoice management system put in place, that streamlines the entire invoicing process, and eliminates any errors.
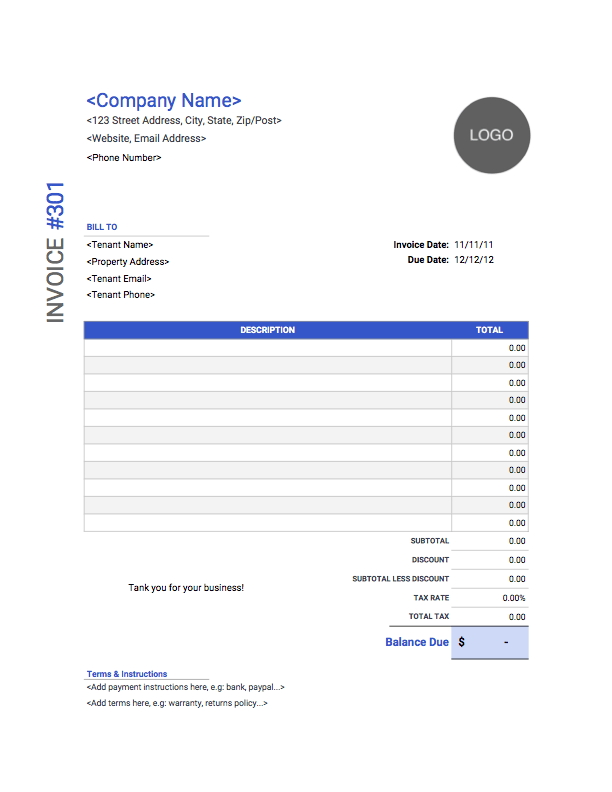
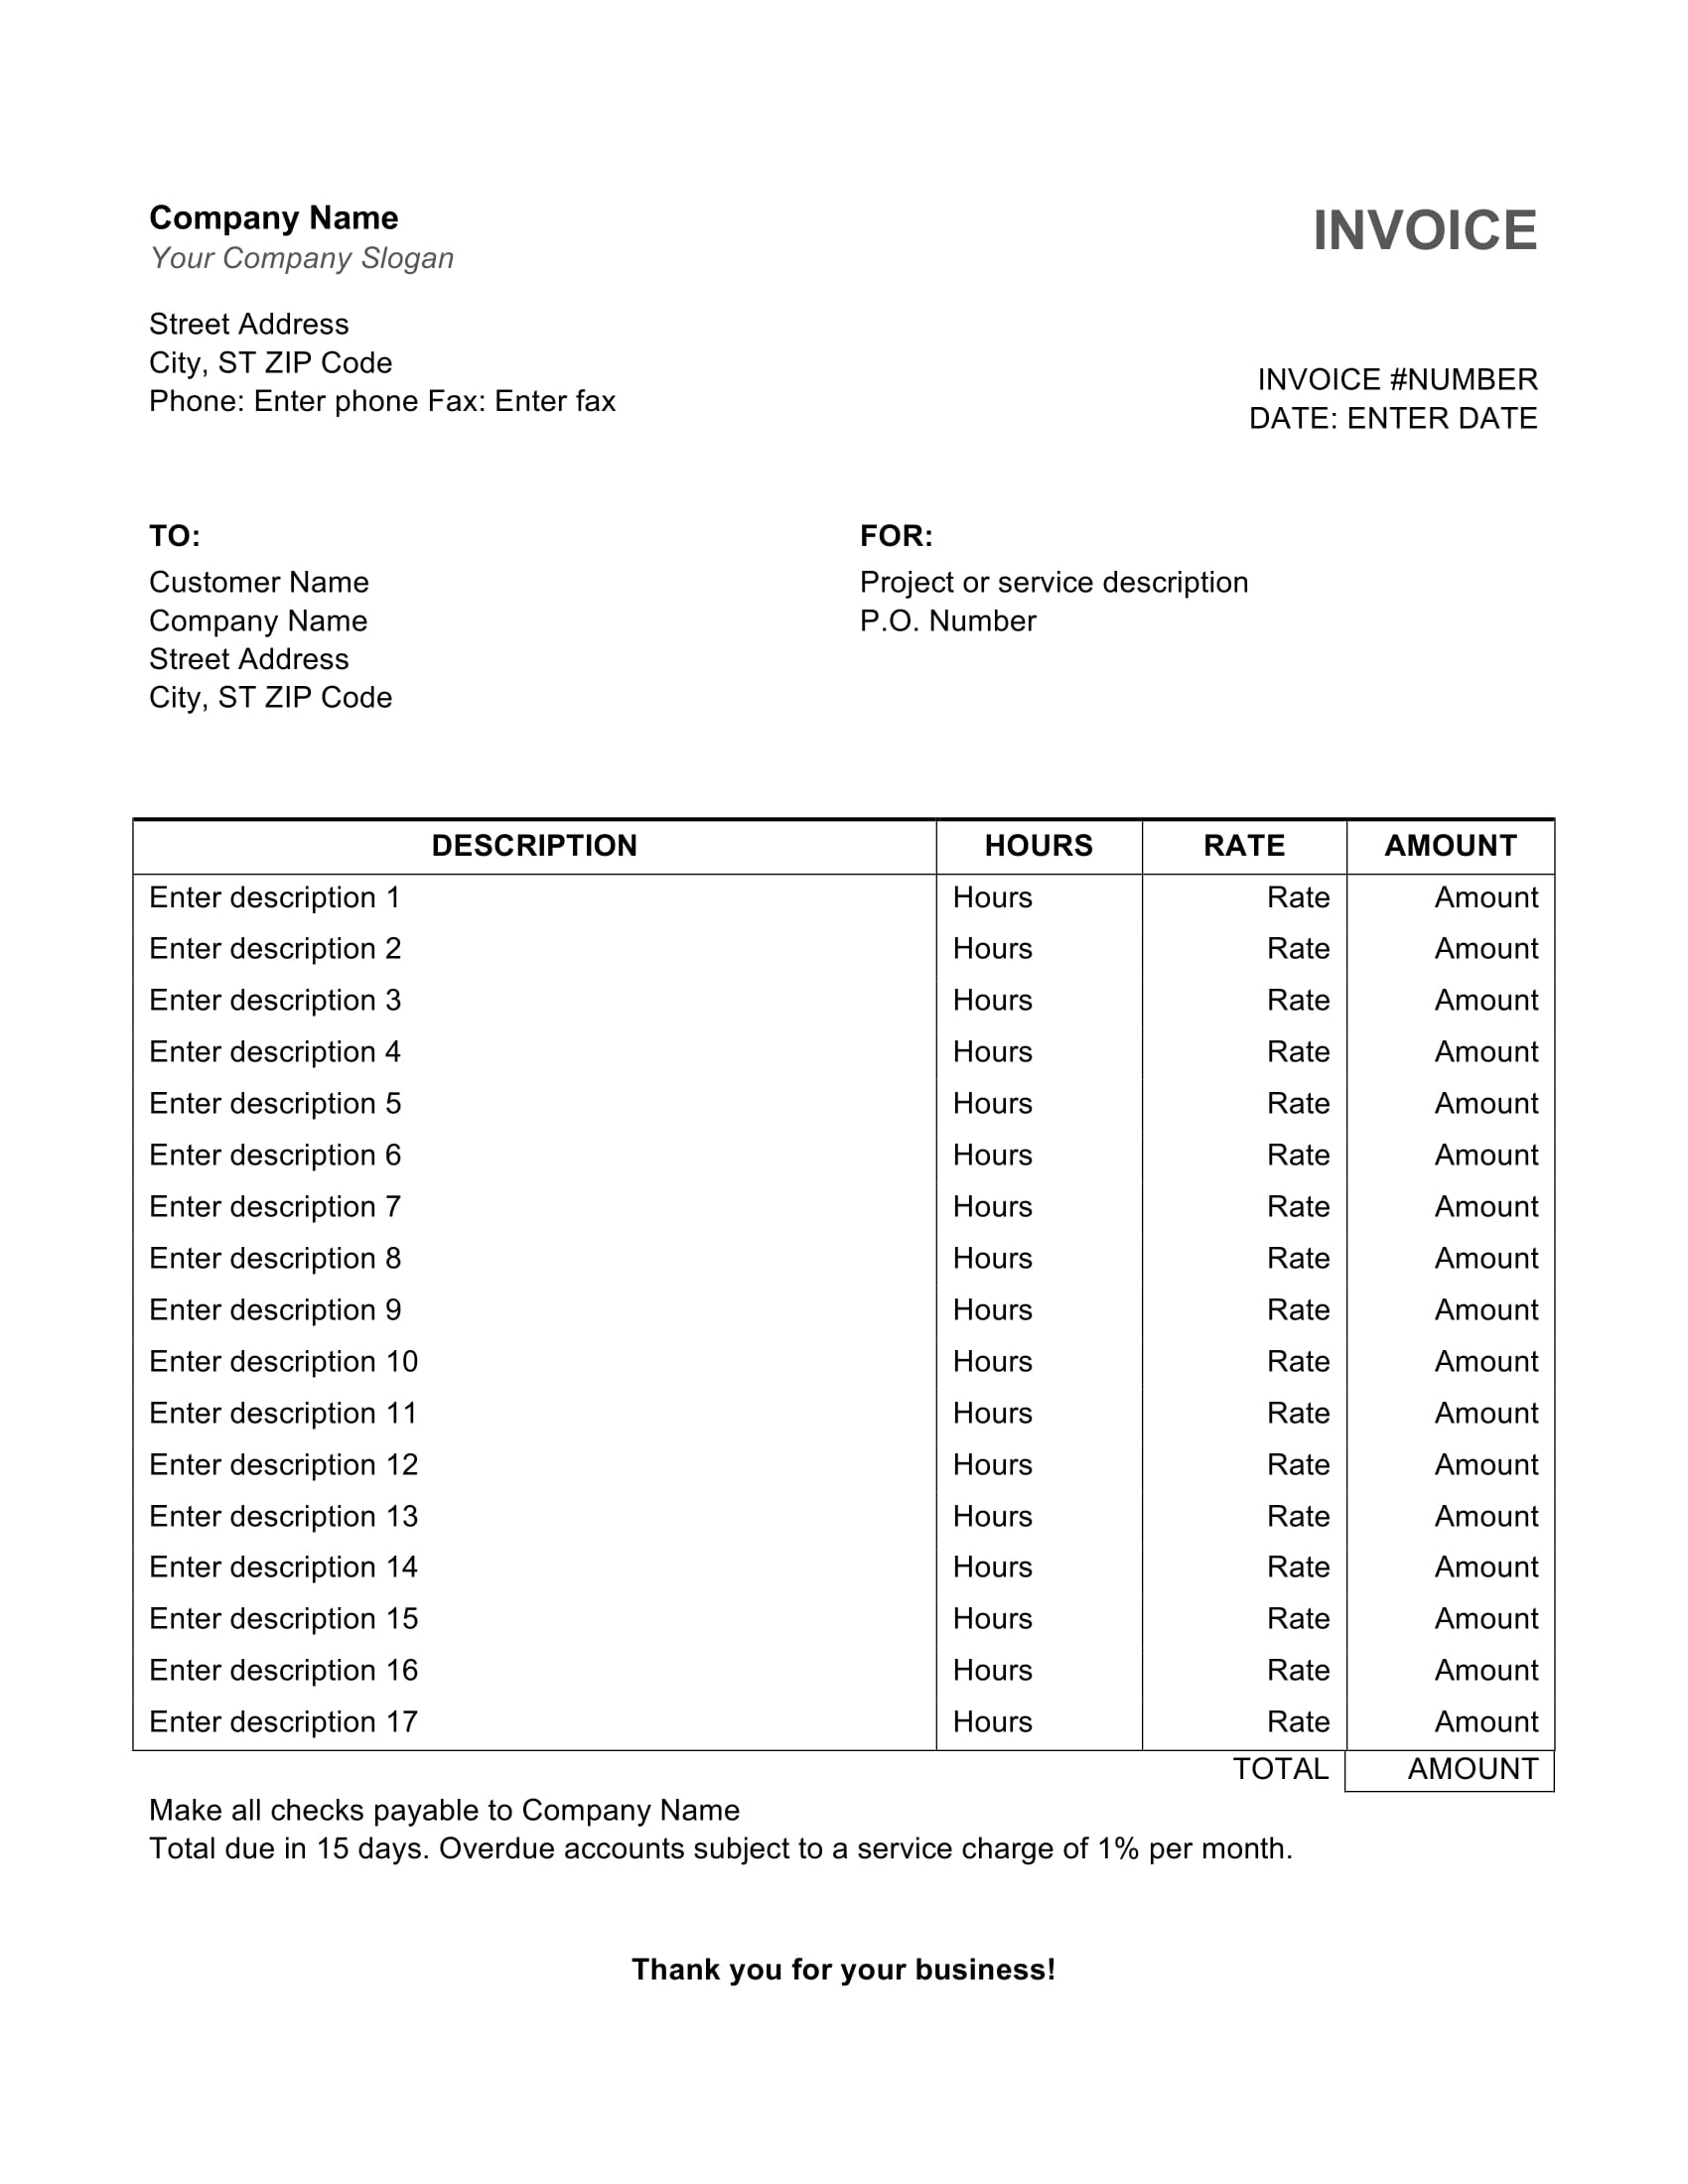
Blank Word Invoice Templates for Business
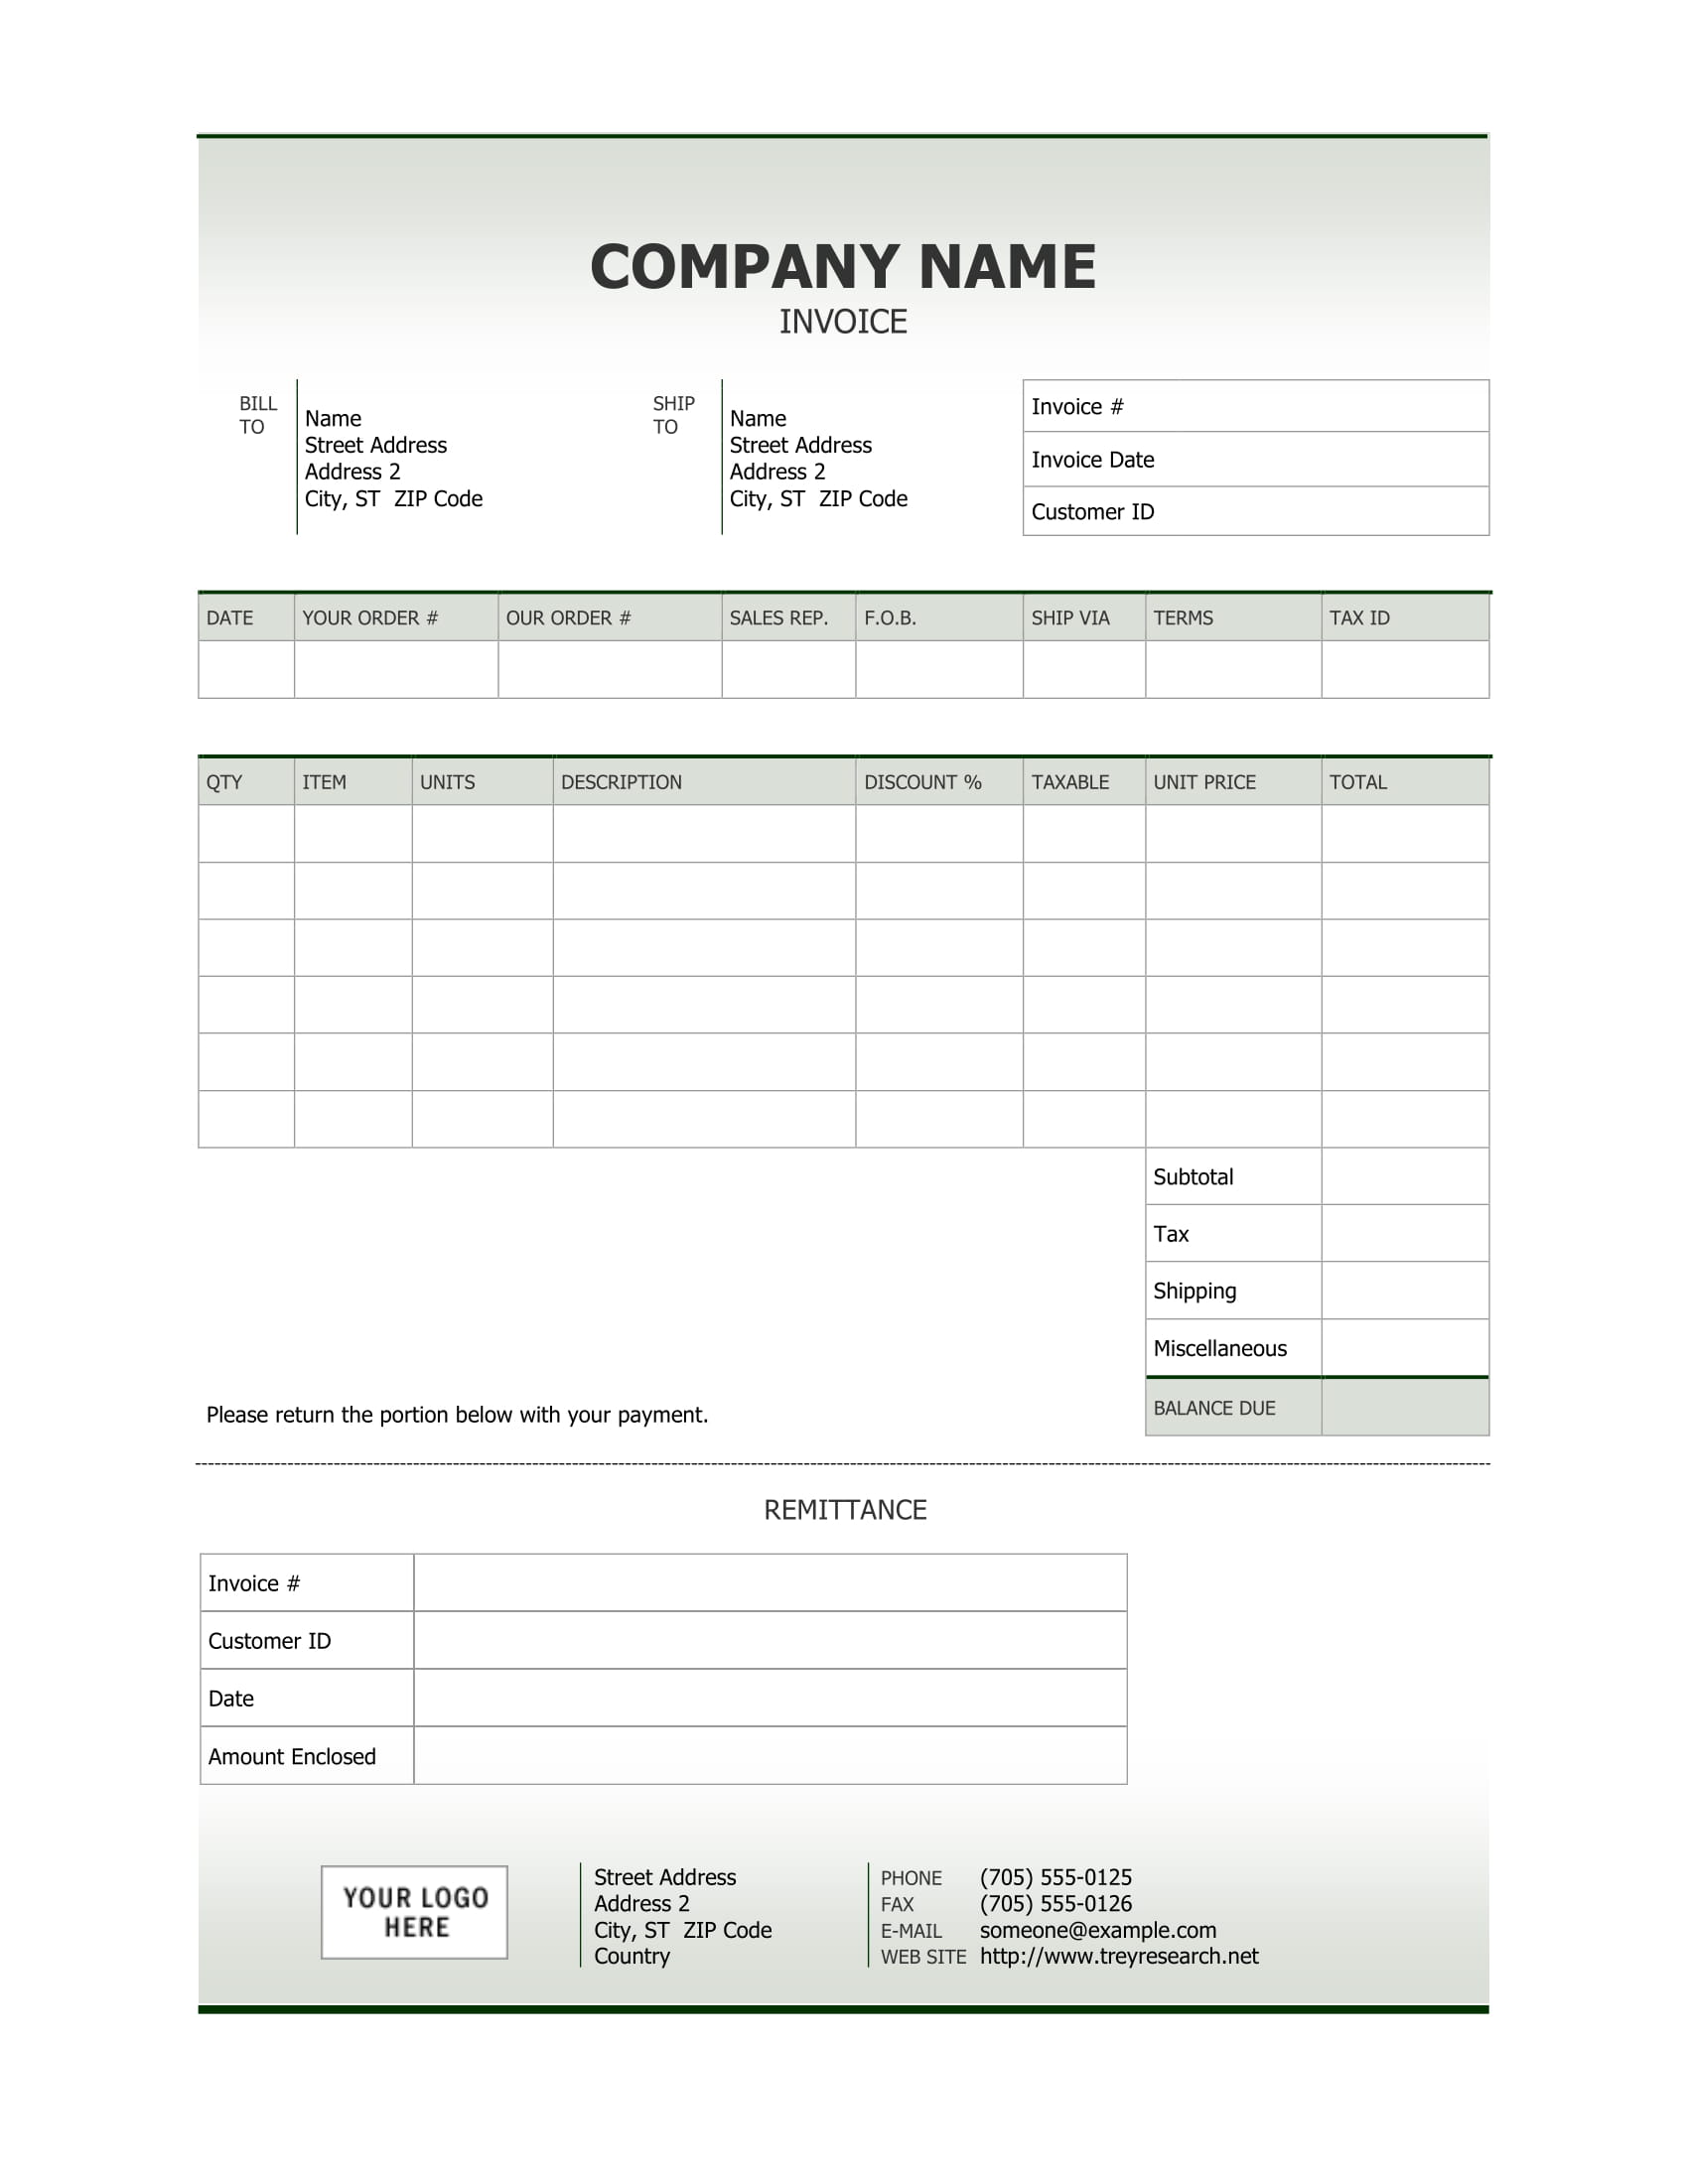
Clean Sales Invoice Template
This simple and professional Word sales invoice template features all of the appropriate elements of an invoice, along with an extra remittance section for returning a payment.
Where to find it: Microsoft Templates Gallery
Simple Service Invoice Template
If your business bills customers by the hour, this Word service invoice template is the right choice for you. It allows you to easily include the service description, the rate you charge, and the total hours worked, just by filling in the premade itemized table.
Where to find it: Microsoft Templates Gallery
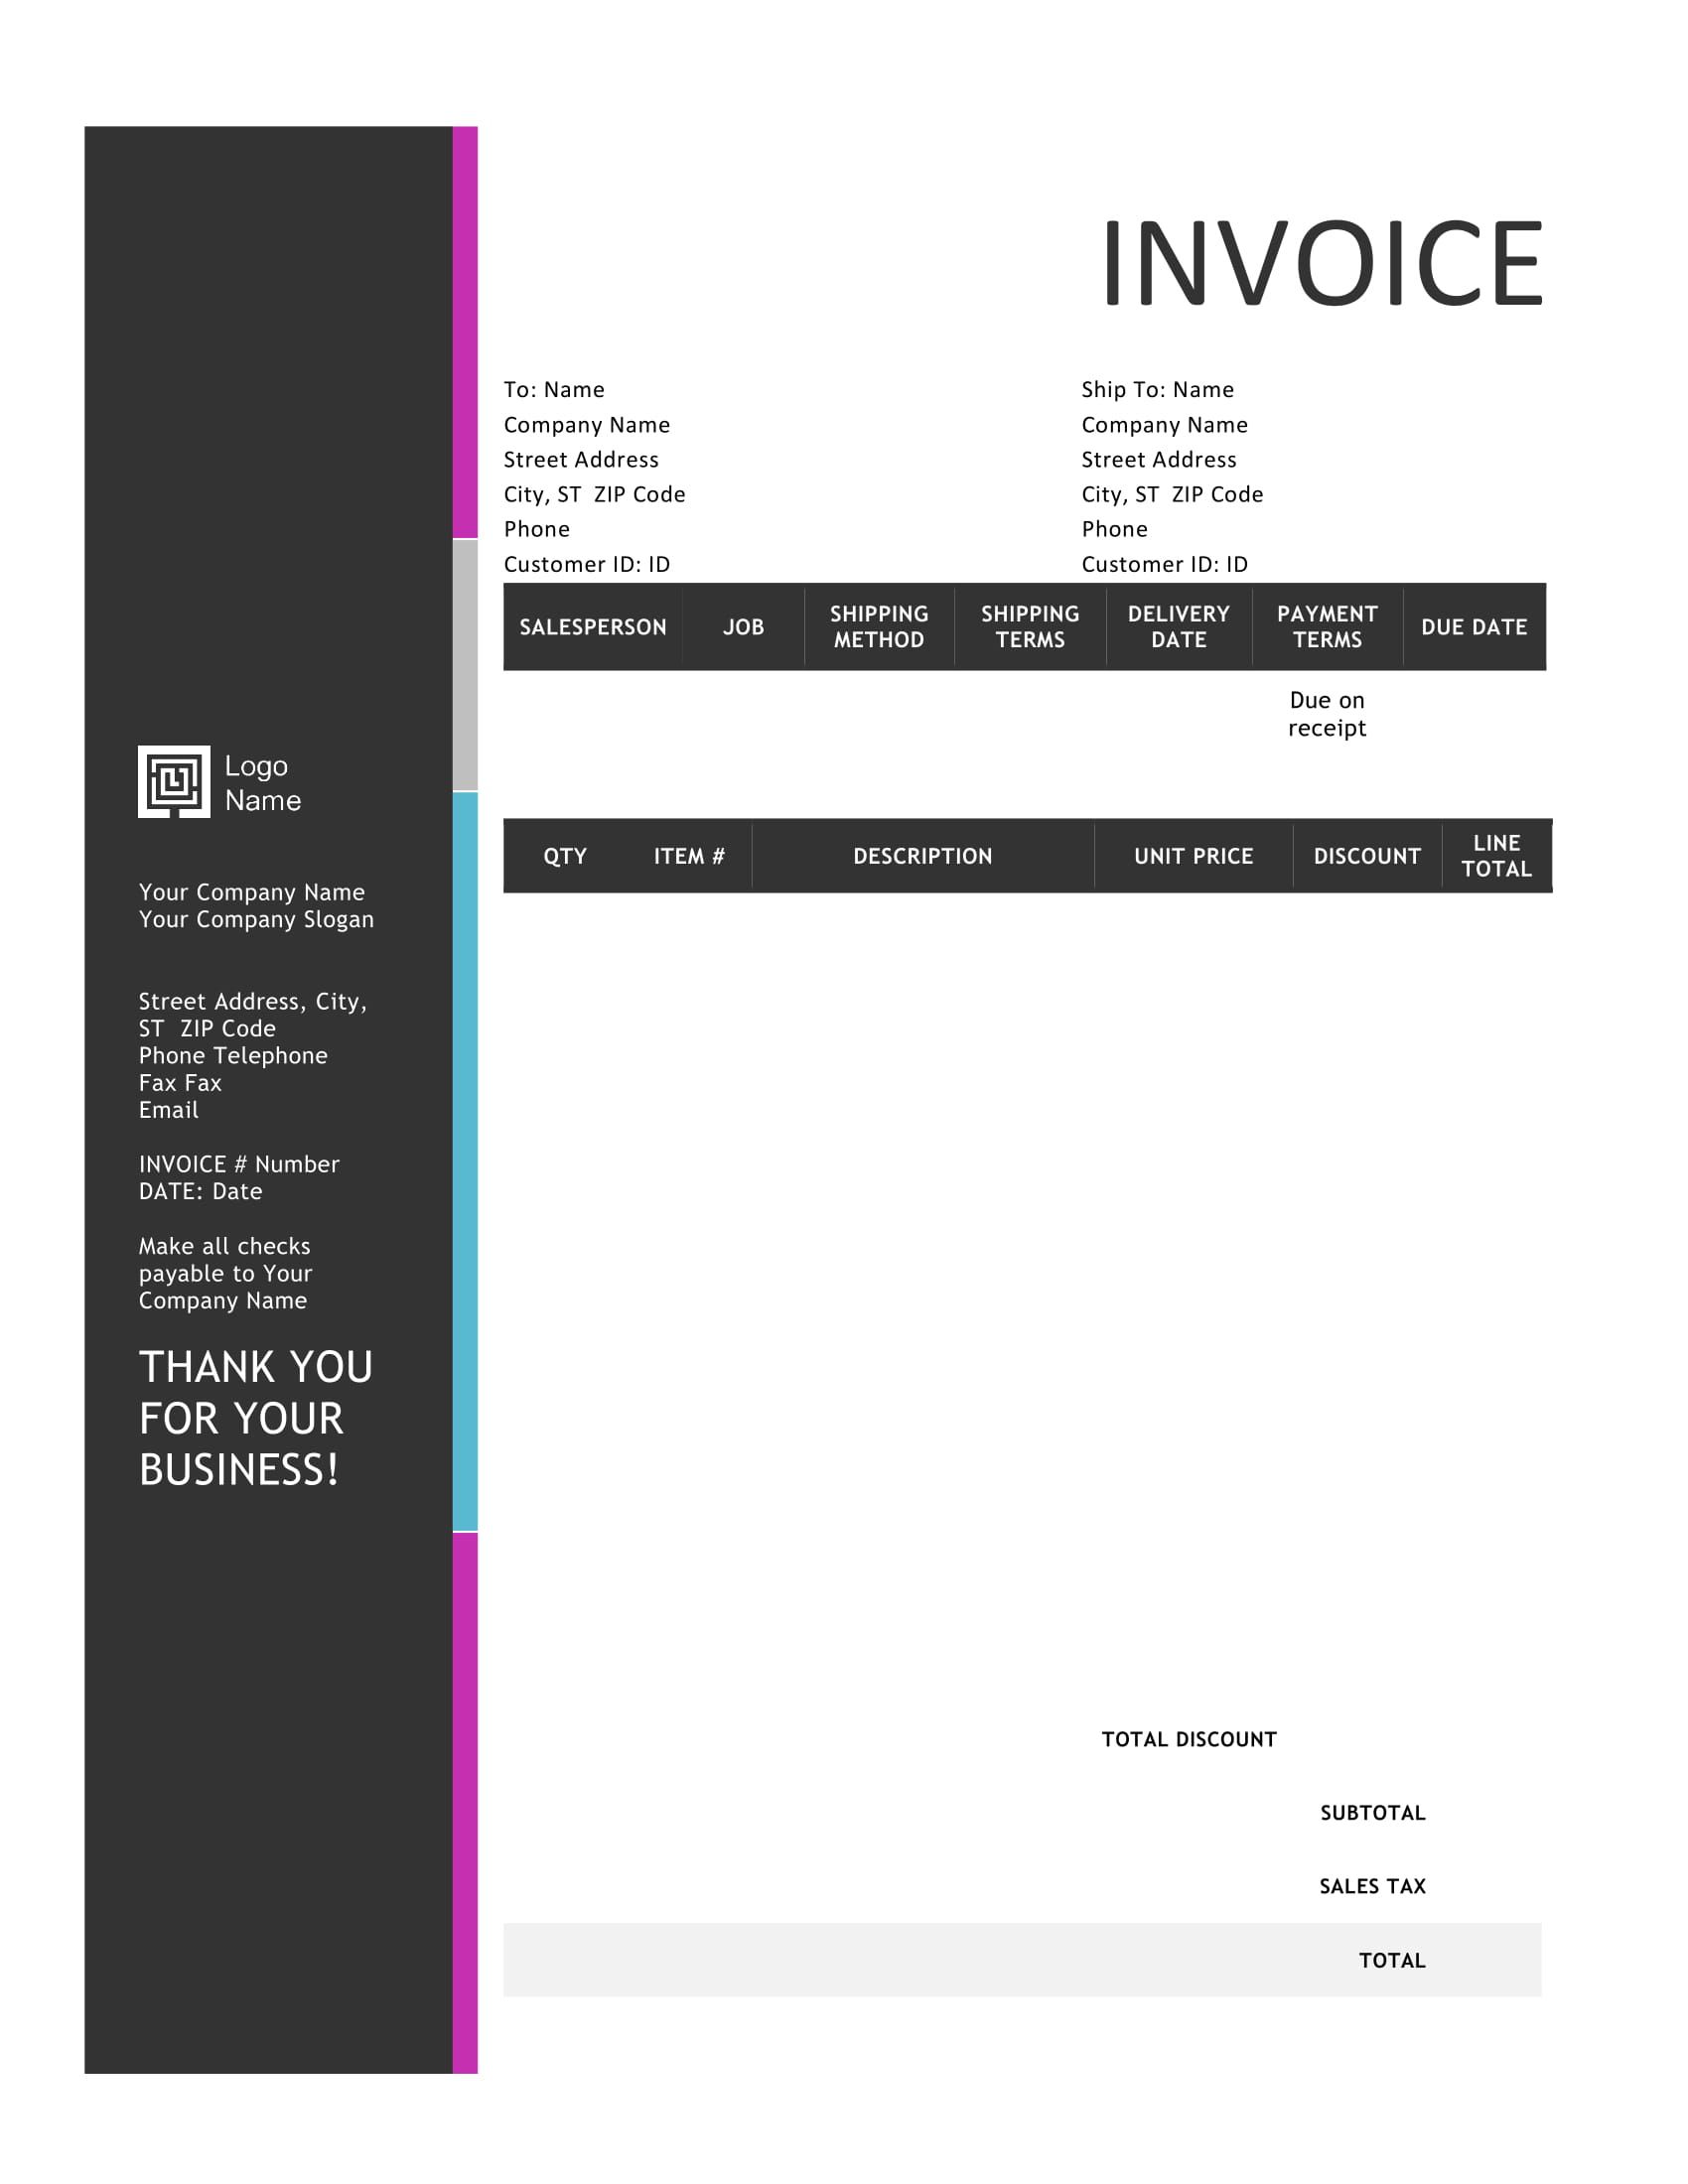
Bold Stylish Sales Word Invoice
Is your business part of a creative industry, such as design, publishing, or architecture?
Do you want to add a bit more color and style to the invoices you issue?
Then consider this bold, modern Word invoice template as an alternative. The template switches up the traditional format of an invoice by highlighting your business information in a big bright sidebar on the left of the page.
Where to find it: Microsoft Templates Gallery
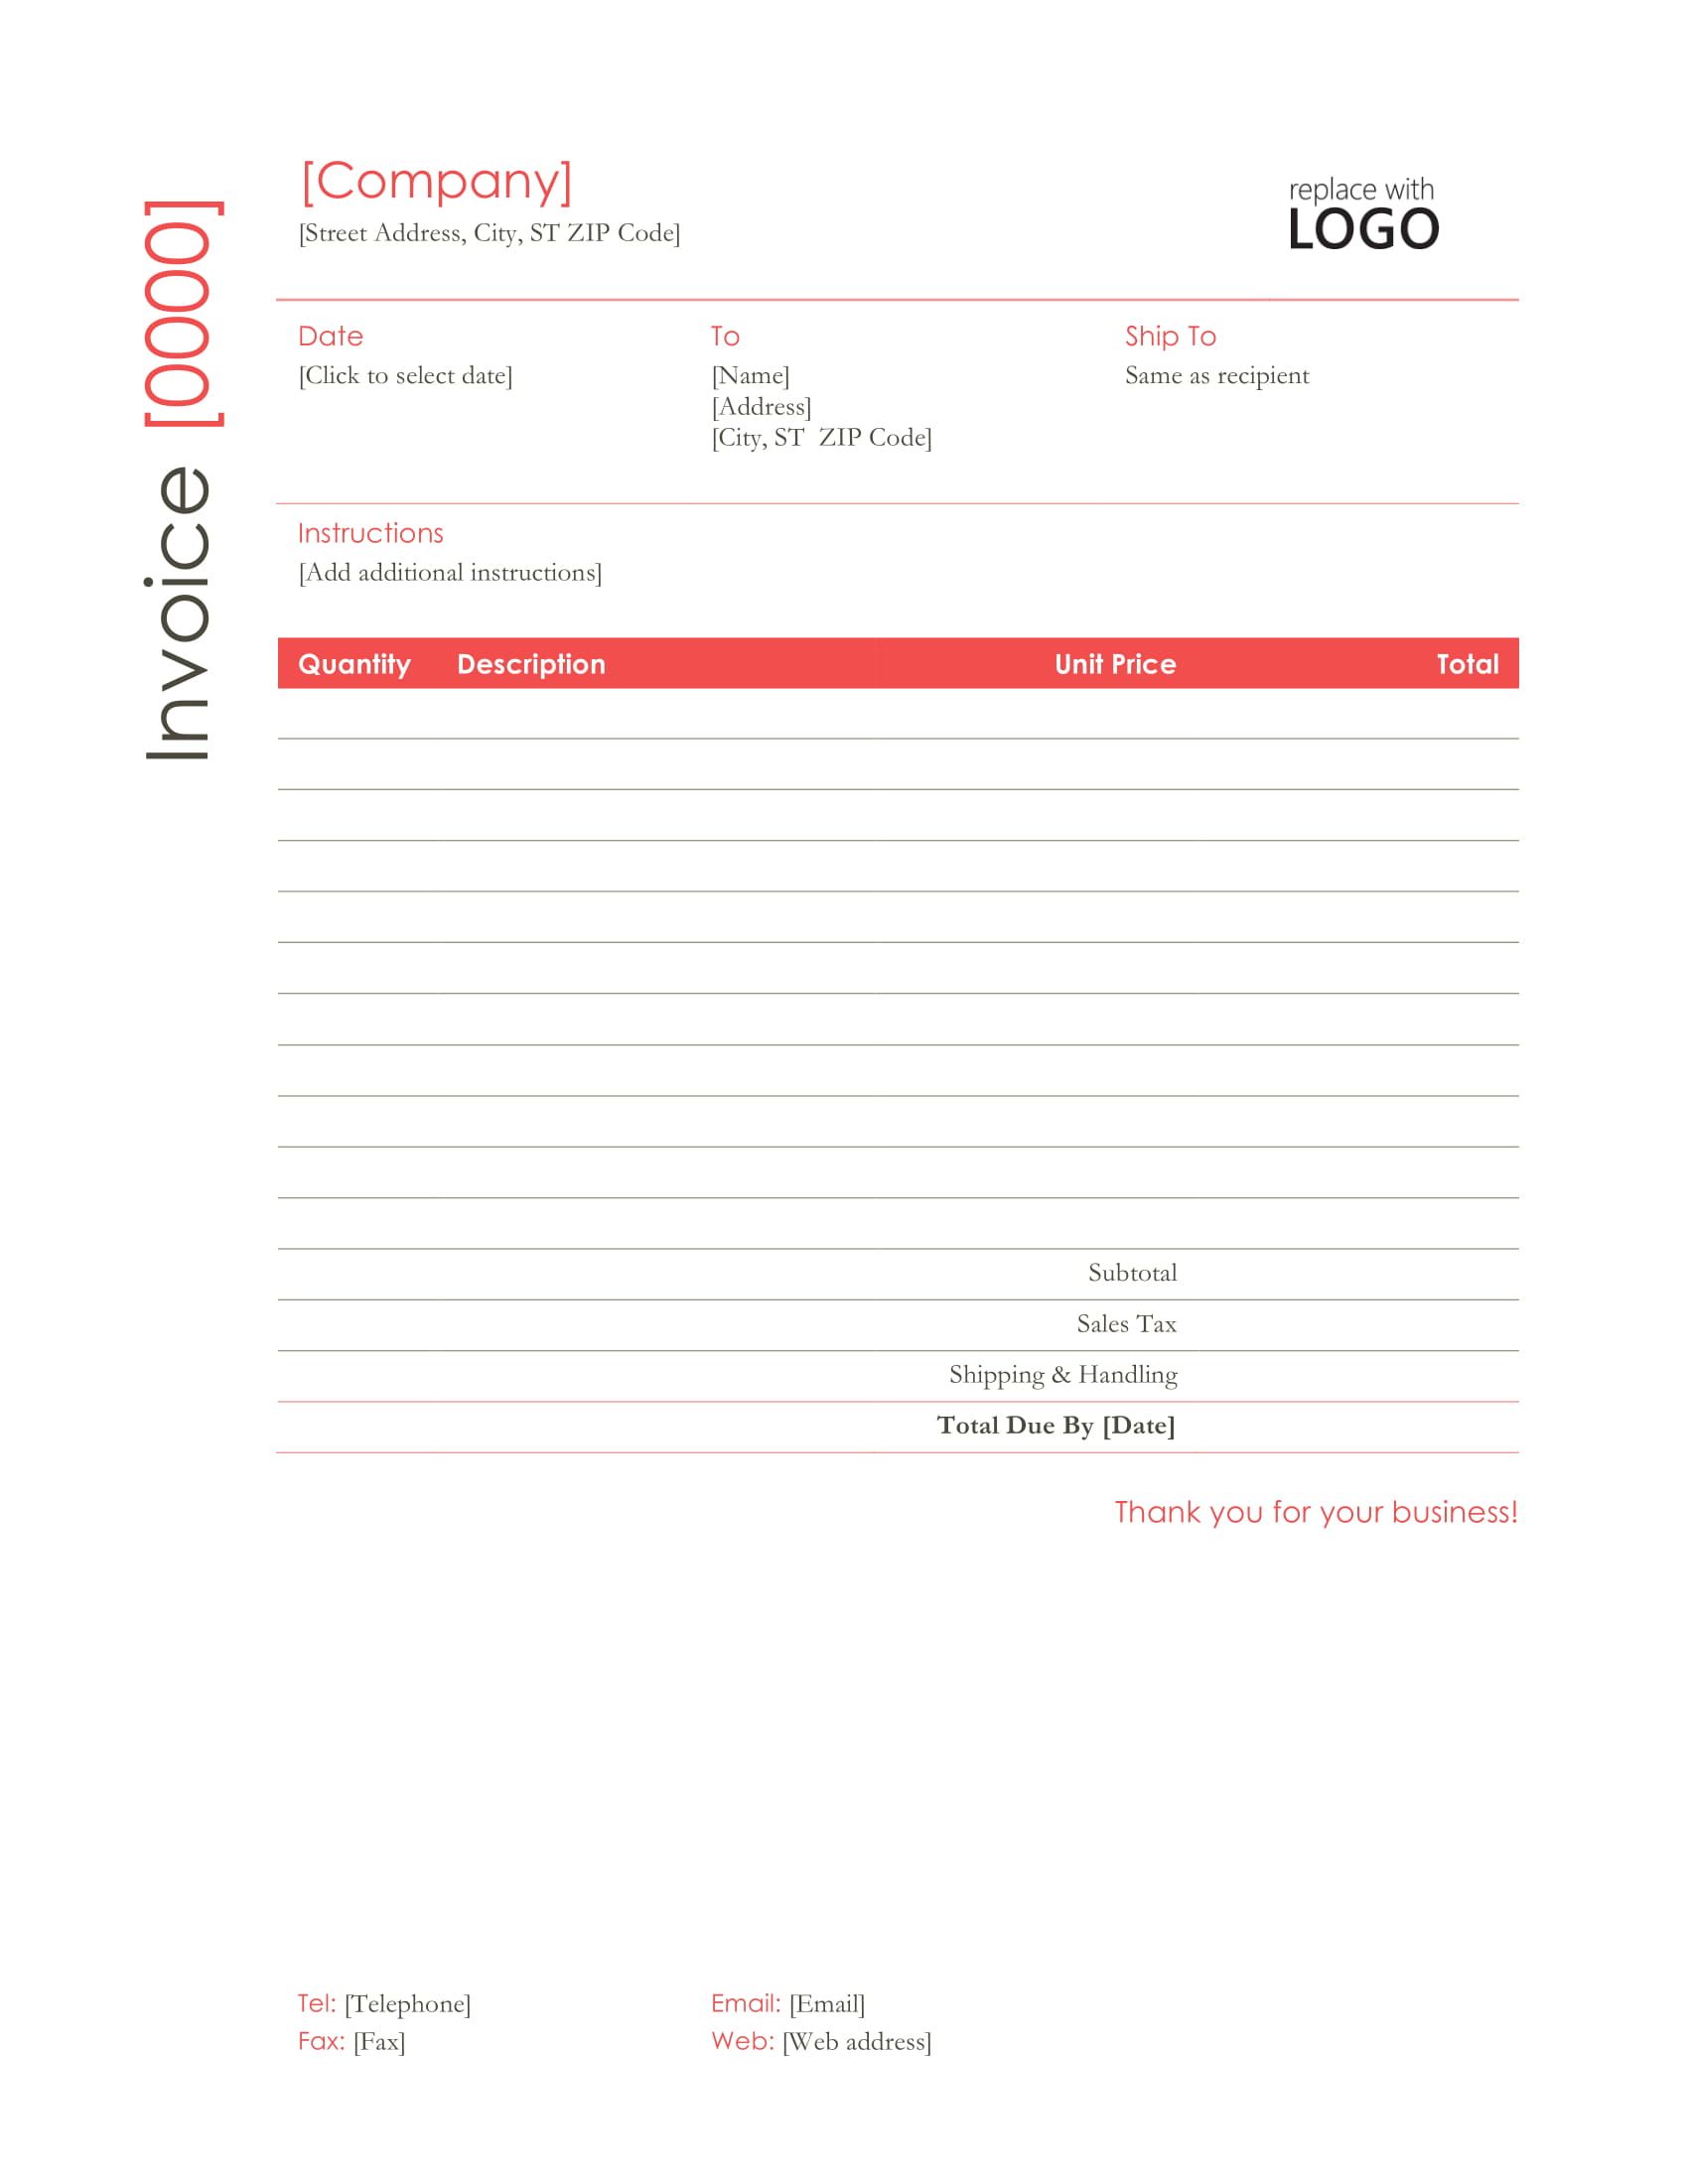
Red Professional Invoice Template
If you’re looking for a modest invoice with a sparkle of color, give this red invoice template a try.
The format is polished and professional, but the bright highlighted headers make it stand out.
If red doesn’t suit your business’ brand, you can always edit and personalize the colors in Word.
Where to find it: Microsoft Templates Gallery
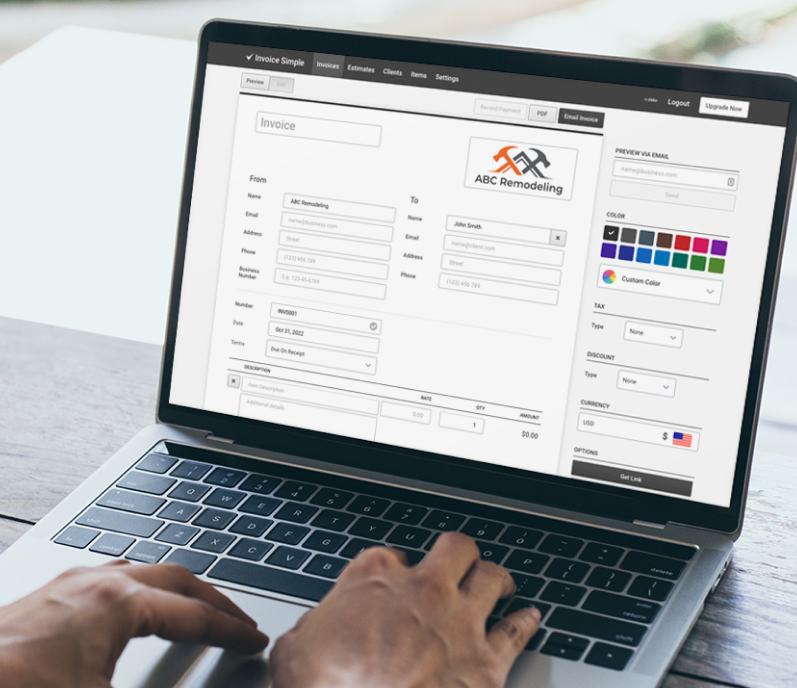
Creating an Invoice with Invoicing Software
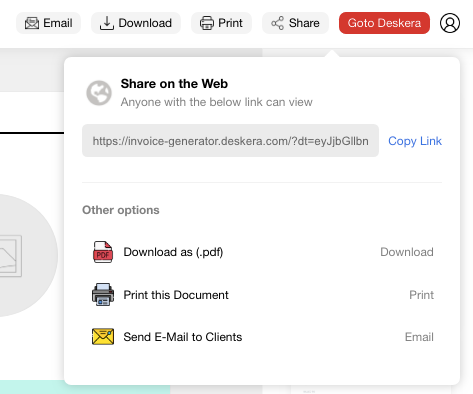
With invoicing software like Deskera, you can create professional invoices within seconds.
Deskera offers over 100+ free premade templates, you can tailor to your business brand with your preferred colors, font, business logo, signature, and so much more.
All you have to do is head over to the Deskera invoice generator, choose your favorite template, and customize it by filling in the appropriate details at the sidebar on the left of the page.
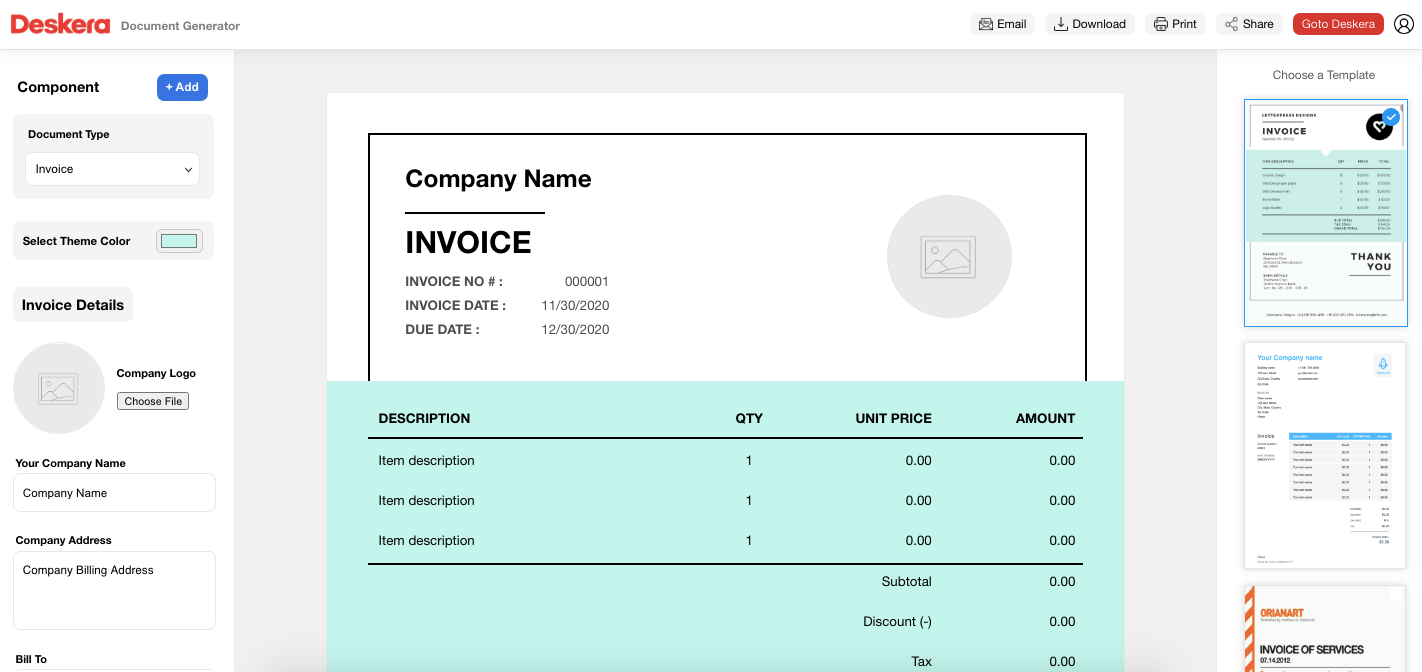
Once you’ve finished with personalizing the design and adding all your invoice elements, just press Share at the top right of the page, to download, print, or email the invoice to your client.
And just like that, you’ve automated invoice creation with Deskera!
That’s not the end of it, though.
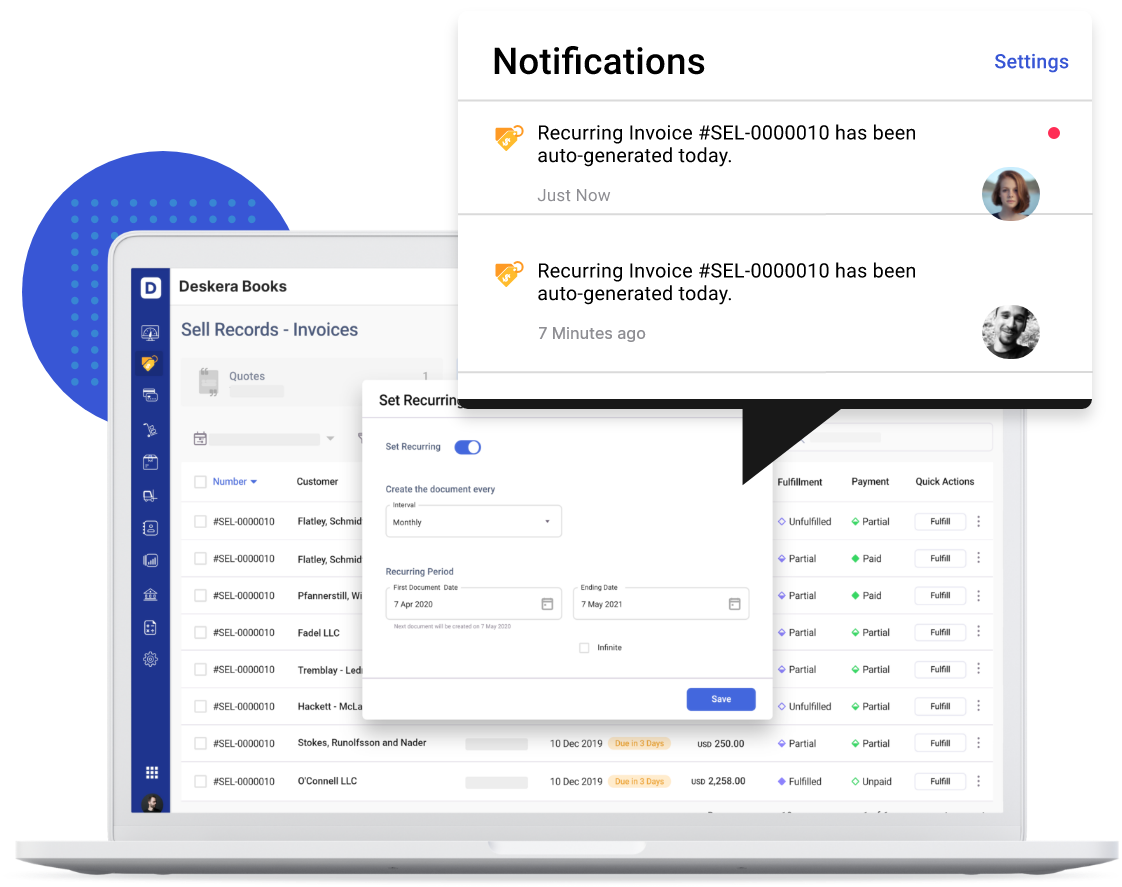
With Deskera you can automate almost every part of your invoicing process, with features such as recurring payments, reminders for outstanding invoices, automatic tax compliance, and so much more.
The best part: you can access the software anytime, anywhere, from your mobile phone, tablet, or desktop, for just $9 per month.

You can even try it out right away, with our completely free trial! No credit card details required.
Key Takeaways
And that’s a wrap! We hope you found our guide on how to create an invoice in word helpful.
To recap, here are some of the main points we’ve covered:
- To make an invoice from a Word Invoice template you have to:
- Select your invoice template from the Word document gallery
- Customize the template with your brand colors, logo, and preferred font.
- Save your completed invoice in PDF
- Send the invoice via fax, email, or an invoicing software
- The steps to making an invoice from scratch include:
- Open a blank Word document
- Create a header with the business information
- Add the invoice billing date, due date, and invoice number
- Enter the client contact information
- Include an itemized list of products and services with their totals
- Finish with payment terms and additional notes
- Save and send the document
- Save time and money with Deskera, by automating your entire invoicing process.
Related Articles
Accounting For Startups — The Entrepreneur’s Guide
Establishing a startup can be overwhelming work. And as a founder, you probablydon’t have time to worry about sending invoices [/blog/send-an-invoice/] orbalancing the books. However, it’s still crucial to have some general knowledge of the fundamentalsof accounting. After all, no matter how gr…
![]() Deskera BlogSaurabh
Deskera BlogSaurabh

Accounting Cycle — Definition & Examples for Business
If you’re managing a small business, you probably don’t have a lot of spare timeto deal with accounting. And as a result, accounting becomes more of anafterthought, rather than an essential business activity. However, keeping track of your business’ finances and accounting is extremelyimportant.…
![]() Deskera BlogSaurabh
Deskera BlogSaurabh

What is Accounts Receivable(AR)? Definition, Journal Entries, Examples
Accounts receivable is money that your customers owe you for buying goods and services on credit. Your accounts receivable consist of all the unpaid invoices or money owed by your customers. Accounts receivable are recorded as an asset on your company’s balance sheet.
![]() Deskera BlogNidhi Mahana
Deskera BlogNidhi Mahana

12 Min. Read
March 14, 2023
Small businesses need simple, effective invoicing solutions to get paid for their services. You can make an invoice in Microsoft Word by creating your own design from scratch or by using a customizable Microsoft Word invoice template. Invoice templates are easy to use and can save you time, freeing you up to focus on more involved aspects of running your business.
FreshBooks offers cloud-based accounting software so that you can streamline your accounting needs. With tailored industry options and fully customizable templates, you can quickly create a professional-looking invoice, automatically generate and send them to your clients, and start getting all your invoices paid faster today. Click here to try FreshBooks for free.

These invoicing topics will show you how to make an invoice in Word:
How to Create an Invoice in Word
How to Make an Invoice from a Word Template
Advantages & Disadvantages of Using Word Invoices
Free Microsoft Word Invoice Templates
Conclusion
Frequently Asked Questions
How to Create an Invoice in Word
Ready to create your first Word invoice? If you’re looking to create professional invoices without invoice templates, you’ll need to follow a few key practices, especially regarding invoicing elements. Here’s everything you need to know about creating a Microsoft Word invoice from scratch:
1. Open a New Blank Document
To start making your own professional-looking invoice from scratch, open Word, click ‘File’ and then choose ‘New Document’ from the menu. A new blank document will open.
Remember that this option won’t give you the same preformatted layout that a Microsoft Word template would offer, and you will have to create your entry fields yourself. Doing this can be a more labor-intensive process than selecting an invoice template. However, you’ll have more flexibility over the look and function of your invoice, making this a good trade-off for businesses with a unique invoicing process.
2. Create an Invoice Header
Create a header in the document. The invoice header should include your business logo, business name, and contact details. It should also clearly identify the document as an invoice.
3. Add the Invoice Date
Next, add the invoice date to the document. Typically, you should place this near the top-right corner of your Word document. List the current date directly below your invoice header. You can also place your payment due date underneath the invoice date.
4. Include a Unique Invoice Number
Add a unique invoice number to the top portion of the document. Invoice numbers are used for reference purposes when discussing an invoice with a client and when filing them for your business records. You should decide early on the numbering system you’ll use in your invoicing process and stick to it. The easiest way to number invoices is to do it numerically, starting with Invoice # 001, then Invoice #002, and so on.
If you are having trouble keeping your invoices in order, using an invoice generator and organization software is a good idea. FreshBooks has a range of invoicing software options that can automate this process and keep your payments organized, as well as a few free invoice templates that we’ll look at later.
5. Include Your Client’s Contact Details
Include your client’s business details, including their business name, company logo, contact name, address, phone number, email address, and possibly the client’s purchase order number. Make sure you have the correct contact name on your invoice—if your client’s company has a billing or accounts receivable department, you might need to list someone there instead of your day-to-day contact person.

6. Create an Itemized List of Products or Services
Next, create an itemized list of the products or services you provided for the business or client. You should include a brief description of each service, the hours worked or quantity supplied, and the rate charged. Add a subtotal for each service. It’s often easiest to create a table in your Word invoice to clearly display your products/services.
7. Display the Total Amount Due
Add up all the charges and list any applicable taxes. Then, add the total amount due on the invoice and clearly display the information at the document’s bottom. Label it as ‘total’ or ‘grand total’ to make it as straightforward as possible.
8. Add the Deadline for Payment
Add a payment due date to the invoice to avoid overdue payments. Be as clear as possible when listing the payment due date. Instead of writing “Payment Due in 30 Days,” include the specific date, for example, “Payment Due December 31, 2018.”
9. Include Your Payment Terms
Add your payment terms to the bottom of the document. Include the payment methods you accept and outline any late fees you’ll charge for past due payments—provided that your client already agreed to your payment policy when engaging your services.
How to Make an Invoice from a Word Template
Microsoft Word is an accessible and familiar program for many users, making it a popular choice for busy freelancers and industry workers. With a range of free Word invoice templates to suit any occasion or industry, you can rest easy knowing FreshBooks will help make your payment process as easy as possible and help you get paid faster.
Freshbooks offers several free, professional-looking invoice templates, including a functional yet flexible invoice template for Microsoft Word. Click here to try FreshBooks for free.
Sometimes, a basic blank invoice template won’t be up to par. If you’re having trouble finding the right option from the range of blank invoice templates available online, look at the template gallery on FreshBooks. Once you’ve found the right template to suit your industry, you can edit your invoice in a matter of minutes. Our invoice management software will show you how to keep track of invoices and payments.
Here’s a detailed step-by-step guide to making an invoice in Word using our free invoicing template.
1. Download Your Favorite Template from FreshBooks
To make an invoice in Word using our pre-existing word invoice template, head to our free invoice template page and download your favorite template. Download one of our free Word templates (it will be a doc or docx file, not a PDF file) to your computer.
2. Open the Template in Microsoft Word
To use our Word template to create a new invoice, open the downloaded template of your choice in Microsoft Word. From here, all the blank fields should be easy to edit and customize to include all necessary invoice details.
3. Customize Your Invoice Template
Next, customize the invoice template to reflect all the relevant details of your completed project. Our free invoice template options are formatted to show all the most important business details, helping you keep your invoice accurate. Filling in the correct fields is an important step since including the wrong information by mistake could cause your payment to be delayed. Be sure to include the following information:
- Your business logo, if you have one
- Your company contact details, including your name, address, phone number, and email address
- Your client’s contact and business details
- A unique invoice number, for reference purposes
- The invoicing date
- An itemized list of the products or services you provided the client, with the quantity or number of hours worked, and the rate included
- A subtotal for each of your products/services
- Your payment terms, including the payment methods you accept and any late fee terms
- The payment due date
- The total amount owing for the invoice, including any applicable taxes
4. Save Your Invoice
When you’re happy with the completed invoice, save it to your computer. You can save it as an editable .docx document for future use for invoicing this client. You’ll also want to save it as a PDF file, so no one can edit the final version you send to clients. It’s always a good idea to back up these files to the cloud or, better yet, use a cloud-based accounting software to take care of this step for you.
If you think you need to add more details later, it’s OK to save your invoice as a word doc. Doing this allows you to add more products or services later or adjust your hours or material costs. However, you will want to have it saved in a final PDF format. Keep this in mind before emailing invoices to clients—you only want to send PDFs to clients.
5. Send Your Invoice
Send your invoice to the client in the method that’s most convenient to you, whether by mail or email. Include a short cover note that outlines the most important details, including the balance owed and the payment due date.
Advantages & Disadvantages of Using Word Invoices
Microsoft Word is a powerful tool for businesses the world over. But is it the right choice for your invoicing process? This invoicing method has its advantages and downsides, and it’s up to each business to determine if it’s the right option for them.
The main disadvantage of a Word invoice is the labor that can go into making one. Because these are simply templates, it’s up to you or your billing department to manually edit the template for every bill you send. Doing this is much faster than creating invoices from scratch every time, but the time can add up. And with so much manual editing by multiple users, the risk of a clerical error increases, leading to delays, missing payments, or even a strain on your professional relationships.
However, an invoice template can also have distinct advantages over other options in specific scenarios. A Word invoice template often offers greater customization, making it easier to adapt an existing template to meet the particular needs of your unique invoicing process. Furthermore, many sources online for professional-looking invoice templates are completely free, including the several options offered by FreshBooks.
Free Microsoft Word Invoice Templates
There are a variety of free Word invoice templates that can be found online and downloaded to your computer. FreshBooks offers a range of invoice templates available in Word, Excel, and PDF formats customized to different industries. Click here to try FreshBooks for free.

If you are just starting and are after a simple, free, blank invoice template, you can rest easy knowing that FreshBooks can help you find the right one to suit your needs.
If you already have access to the Microsoft Office Suite, select a template you can edit in Word or Excel. If you prefer the Google range, choose the Google Doc or Google Sheets templates to get started. You will still have the option to save all of these as a PDF file once you have finished editing.
Choose the invoice tracker template that best suits your business, whether you’re a freelancer, entrepreneur, or small business, and keep track of invoices.
Conclusion
Microsoft Word is an indispensable tool for many businesses—not only as a word processor but as a key invoicing apparatus. Although there are downsides to using Microsoft Word templates for invoicing, such as increased time spent creating them and a slightly higher risk of errors, the customizable functionality outweighs the disadvantages for many.
If you choose to use Microsoft Word for your invoices, it’s best to work off of one of the many available invoice templates online. Choosing these ensures no crucial invoice details are missed and will help you get paid faster.
FAQs on How To Make An Invoice In Word
More questions about Word invoices, invoicing templates, payment tracking software, or anything else? Let’s break down some common questions about creating invoices in Microsoft Word.
How do I make my own invoice?
Though it’s not too difficult to create your own invoice from scratch in a word processor like Microsoft Word or Google Docs, it’s infinitely easier to work off of an existing invoice template. If you create an invoice from scratch, follow the standard best practices of invoicing. You will see all the income you earn ends up in your bank account, and you will be able to track it accordingly.
How do I make an invoice for a small business?
If your invoicing method is still manageable without the need for professional accounting software programs or a billing department, invoicing can be a simple process. Browse available invoice templates online to find one that suits your business needs, and customize it as necessary. From here, simply fill in the relevant details for every invoice you send.
Is there a free invoice maker?
Yes! Sites like FreshBooks offer several free, specialized invoice templates that you can fill to suit specific needs and help your invoice management, like keeping track of paid and unpaid invoices. And if filling in templates sounds like too much work to do ongoingly, consider an all-inclusive accounting software to handle the task for you, which may include things like profit and loss reports and multiple user accounts.
What are the three types of invoices?
There are three main kinds of invoices. These are pro forma invoices (not a formal demand for payment, but rather an advanced estimate to give clients a sense of price and scope ahead of time), interim invoices (used to break down a large project or order into payable milestones, maintaining cash flow), and final invoices (sent after all work is completed and delivered).
Keep in mind that not every business will use every kind of invoice to track payments. Different industries have different invoicing standards that they will often use to create invoices and payments.

Jason Ding, CPA
About the author
Jason Ding is a seasoned accountant with over 15 years of progressive experience in senior finance and accounting across multiple industries. Jason holds a BBA from Simon Fraser University and is a designated CPA. Jason’s firm, Notion CPA, is an accounting firm with a business-first focus. The firm specializes in preparing personal and corporate taxation while providing fractional CFO work and leading the accounting and finance function for several small-to-medium-sized businesses. In his free time, you’ll find Jason on the basketball court, travelling, and spending quality time with family.
RELATED ARTICLES
![]()
Загрузить PDF
![]()
Загрузить PDF
Инвойс – документ, содержащий перечень товаров, их количество и цену, а также другую важную информацию (особенности товара, условия поставки и т.п.). Вы можете создать инвойс в Microsoft Word с помощью готовых шаблонов или по вашему собственному образцу. Эта статья рассматривает создание инвойса в Word 2003, Word 2007 и Word 2010.
-

1
Создайте новый документ. Хотя готовый шаблон – это не новый документ, вы начинаете так, как будто создаете новый документ.
- В Word 2003 нажмите File – New.
- В Word 2007 нажмите кнопку Office (в левом верхнем углу), а затем нажмите File – New.
- В Word 2010 откройте вкладку File и нажмите New (слева).
- Не нажимайте на кнопку New на панели инструментов в Word 2003 или на кнопку New на панели быстрого доступа в Word 2007 или 2010 года. Нажатие на эти кнопки приведет к созданию нового документа с шаблонами по умолчанию Normal.dot или Normal.dotx (вы можете нажать эти кнопки при создании инвойса без помощи шаблонов).
-
2
Откройте нужный шаблон.
- В Word 2003 и 2007 в левой панели окна New Document в разделе Available Office Templates выберите Invoices. Выберите тип шаблона из списка в центральном окне; затем выберите один из предложенных типов инвойсов.
- В Word 2010 в разделе Available Office Templates — Office.com Templates выберите Invoices. Откройте папку нужного вам шаблона; затем выберите один из предложенных типов инвойсов.
-
3
-
4
Метод второй: создание инвойса без помощи шаблонов.
-
5
Создайте заголовок инвойса. Заголовок должен включать название компании и слово «Инвойс» или описание инвойса, например, «Предлагаемые цены» (если вы только предлагаете цены на товар/услуги, а не выставляете счет за купленный товар/услуги).
- Вы можете разместить заголовок либо в верхней части страницы, либо в колонтитуле Word. Если вы поместите заголовок в колонтитуле, то заголовок будет перенесен и на следующие страницы (если инвойс состоит из нескольких страниц), причем на первой страницы вы можете дать развернутый заголовок инвойса, а на последующих страницах – краткий заголовок.
- Название компании должно отображаться тем же шрифтом, какой присутствует в других документах этой компании.
- Шрифт заголовка инвойса должен быть достаточно большим, чтобы ваши клиенты могли идентифицировать документ именно как инвойс.
-
6
Отображение даты инвойса. Дата инвойса проставляется в верхней части документа (под заголовком справа).
- Word имеет функцию Automatic Date, которая автоматически проставляет дату. Эта функция полезна, если вы распечатываете и отправляете инвойсы; однако не используйте эту функцию для инвойсов, отправляемых в электронном виде, так как будет проставлена текущая дата (это может привести к путанице со сроками погашения кредиторской задолженности).
-
7
Отображение номера инвойса. Он также проставляется в верхней части инвойса. Нумерация инвойсов дает вам возможность отслеживать те из них, которые не оплачены. Вы можете проставить номер инвойса одним из двух способов:
- Глобальная нумерация, то есть номер проставляется по порядку вне зависимости от клиента (таким образом, все инвойсы хранятся в одной папке).
- Индивидуальная нумерации, когда инвойсы для каждого клиента имеют свою нумерацию (таким образом, инвойсы хранятся в разных папках для разных клиентов). Вы можете включить имя (или часть имени) клиента в номер инвойса.
-
8
Отображение контактной информации отправителя и получателя. В инвойсе проставьте вашу контактную информацию и контактную информацию получателя.
- Ваша контактная информация должна включать ваше имя, адрес вашей компании, телефон, факс (если есть) и адрес электронной почты.
- Контактная информацию вашего клиента (получателя инвойса) должна включать название компании, имя получателя, его адрес и, при необходимости, телефон, факс и адрес электронной почты.
-
9
Отображение платежной информации. Для этого вставьте в документ таблицу и в ее строках и столбцах расположите информацию о платеже, например, количество товара, его описание, цену за единицу товара и т.п.
- В таблице вы можете автоматически вычислить сумму значений, например, общее количество проданного товара или общую сумму платежей.
-
10
Отображение общей суммы инвойса. Она проставляется справа под таблицей с платежной информацией. Вы можете выделить сумму полужирным шрифтом.
- Если вы включаете налог с продаж, сначала укажите промежуточную сумму за проданный товар, затем укажите налог, и только потом укажите общую сумму инвойса.
-
11
Включите условия оплаты. Вы можете отобразить их над или под таблицей с платежной информацией. Примеры условия оплаты: немедленно при получении, в течение 14 дней, в течение 30 дней.
- В конце документа вы можете включить информацию о методах оплаты, или информацию общего содержания, или просто слова благодарности клиенту.
-
12
Сохраните счет. Назовите инвойс в соответствии с его назначением, например, включите в название инвойса название вашей компании, номер инвойса и имя клиента.
Реклама


Советы
- Таблицу с платежной информацией лучше всего создать в Microsoft Excel, а затем вставить ссылку на эту таблицу в документ Word. При обновлении значений в таблице Excel щелкните правой кнопкой мыши по встроенной в Word таблице и в меню выберите Update Link.
- После сохранения созданного инвойса вы можете использовать его в качестве шаблона для создания других инвойсов с помощью опции New from existing. Вы также можете сохранить созданный инвойс в формате DOT или DOTX, чтобы использовать его как шаблон.
Реклама
Об этой статье
Эту страницу просматривали 9317 раз.
Была ли эта статья полезной?
Word document is the easiest and most efficient source for writing documents. But it is not limited to that, it is the easiest and great medium for creating invoices as well. Yes, creating an invoice in a word is very simple. Let’s find out how.
There are two ways to create invoices in word; one is from scratch and the other is by using templates. In this blog, we will explain both methods of how to make an invoice in a word by using a word template and from scratch.
Let’s first start with how to create an invoice in word by using a word template.
Steps on How to Create an Invoice from the Word Template
Step 1: Open the File
To create an invoice from a word template, first, you need to open Microsoft word. Click on the right-side button ‘File’ and then navigate it to the new template. Next, go to the top right of the page; click on the ‘Search bar’.
In the search bar, type the word ‘invoice’.There you will get several options of invoices; select the one which is suitable for your business. Choose your industry style and type of services.
Step 2: Choose Your Template
After you found an appropriate and suitable invoice template, you need to double click on your chosen template. After the click, a new word document of the invoice template will be opened.
You can send the chosen template through email or any third-party integration. Moreover, you have the option of choosing a customizable range of invoices. Invoice reflects the professionalism of your business; thus, select your invoice template wisely.
Step 3: Personalize it
After selecting your template, it is time to add your business’s relevant information. You can customize and make the word invoice template into your personalized template. As we mentioned earlier, it is essential to put necessary and important details in your company.
Usually, it takes hours to fill in the information but the word template makes it easier for you. Even invoice software is helpful to create invoices within a few clicks and save all your information; so you don’t have to waste time.
Here is the list which should be included in your invoice, no matter what industry you are from:
- Company’s contact details such as name, contact number, email, and address
- Company’s logo
- Invoice date
- Itemized list
- Payment terms
- Payment due date
- Unique invoice number
- Total amount
Step 4: Save and Send your Invoice
Now, you have filled in all the details and selected formation and color, thus you are ready with your invoice template created from a word document. Once you are done, select the top-left button, click on File and select Save as.
After clicking that, a save pop-up menu will appear. It will ask you to name the template, once you enter the name and select file format, you can save it to whichever file you want. You can save your template in the document (.docx) or as a PDF file (.pdf)
If there are any changes, you can also edit the invoice after being saved.
And your invoice is ready by using a word document template. Send it to your client and improve your business value. Now, let’s jump to creating an invoice from the scratch in word.
Creating an Invoice in a Word from the Scratch
Let’s learn how to create an invoice from scratch in the word documents by following these steps:
Step 1: Open a Blank Document
The first step of creating an invoice in word from scratch is to open a new blank document. If you are unable to see it, click on the top-left button name ‘File’. Select it and choose a new document from the menu.
You will get a new blank document and in that document, you need to make an invoice. It is an easy process, just follow the steps and you will create an efficient one.
Step 2: Make a Header
After creating a blank document, the first thing you should make is a header; An invoice header includes your company’s name, logo, and contact details like email address, phone number, and office address. It should be clear as it represents your company’s identity.
Step 3: Include the Date
Another essential element that you should not forget is the date. Add invoice date on the left side of the invoice. The invoice date is important because it shows when your invoice was issued.
Step 4: Add a Unique invoice Number
Write unique invoice numbers after writing the invoicing date and it should be on top of your invoice document. The invoice number is a must part that you should include in your invoice document.
As it is referred for reference purposes to the clients or for your business records. It helps to differentiate invoices among multiple records of the invoice document. For instance, if you are starting an invoice for the first time, number it as #001.
Step 5: Make an Itemized List of Services
Another important step is to form an itemized list of services. Itemized list will signify a brief description of every service, the amount of quantity, and hours spent on it. You should also include the charges or rate of the project.
Step 6: Clear Payment
One a mistake in writing payment then your balance sheet is messed up. Thus, it is crucial to write it properly. First, add a subtotal of each service and later sum up all the charges including applicable taxes.
You also have to add the deadline of the payment. You need to include the due date of the invoice, so there would be no mistakes further. Be specific about it, for example, payment due in 15 days or payment due November 30, 2021.
Step 7: Payment Term and Save
And the last step is to add the payment terms at the bottom of your invoice document. Now, you are done with all steps and all that’s left is to save your invoice. You can save it in the format of PDF or document (.docx).
And that’s a wrap from our side, hope you have understood how effortless it is to create an invoice in a word document and why an invoice template is important.