Tables organize information visually and help you show relationships between things. Learn how to set up tables so they can be read out loud to people who use a screen reader.
To add a header row to a table
-
Choose Insert > Table to insert a table.
-
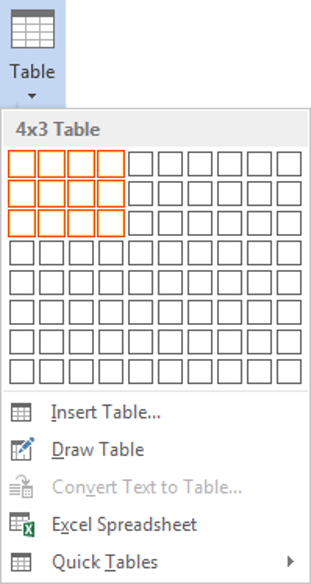
Choose the number of boxes you want across to create columns, and then choose the number of boxes you want down to create rows for your table.
Note: When you add a table to your document, two new tabs to appear in the ribbon: Design and Layout. These are the Table Tools.
-
On the Design tab, choose the Table Styles Options group, and then choose Header row. Other options include Banded Rows or Total Row.
Your table now has a header row. This means that, behind the scenes, Word and any assistive technologies can communicate intelligently about the table.
Add column headings
-
Place your cursor in the first cell on the top row of your new table.
-
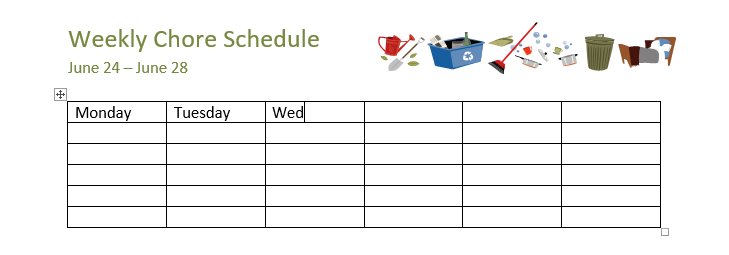
Type the name for this column and then press Tab to move from one column to the next. Add additional column names as needed.
Your table now has column names, which makes it easier to understand the information that the table contains. Some screen readers can be set up to read column names at any time, which can help when working with a large table.
Want more?
Accessibility in Microsoft 365
Tables that include nested tables, split cells, or merged cells can trip up even the best screen-reading programs.
Here are a few ways to check the accessibility of your tables.
First, try navigating all the way through your table using only the Tab key.
If you can Tab smoothly through the table, cell by cell and row by row, a screen reader should have no trouble with it.
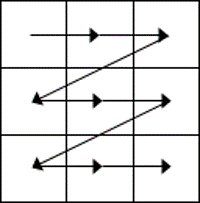
In English-language tables, the Tab key should move from left to right, starting in the top left cell and ending in the bottom right.
Next, consider the use of a designated header row for your table.
Designated header rows make it easier for a screen reader to navigate your table, and some screen readers will call out the name of a row or column before reading the data.
To designate a row as a header, select it, then right-click and select Table Properties.
Select the Row tab, and check Repeat as header row at the top of each page.
Also, be sure Allow row to break across pages is unchecked.
While you’ve got the Table Properties window open, it’s a good time to check your table’s alt text.
Select the Alt Text tab, and make sure the alt text is clear, descriptive, and concise.
Once your header row and alt text are ready, choose OK.
A common stumbling block for accessible tables are split cells, where two cells occupy the space of a single cell.
In this column, we’ve got a split cell that might cause problems for a screen reader.
To merge these split cells into a single cell, we’ll select them, right-click, and choose Merge Cells.
For more about creating accessible documents, go to aka.ms/accessible.
Lesson 23: Tables
/en/word/aligning-ordering-and-grouping-objects/content/
Introduction
A table is a grid of cells arranged in rows and columns. Tables can be used to organize any type of content, whether you’re working with text or numerical data. In Word, you can quickly insert a blank table or convert existing text to a table. You can also customize your table using different styles and layouts.
Optional: Download our practice document.
Watch the video below to learn more about creating tables.
To insert a blank table:
- Place the insertion point where you want the table to appear.
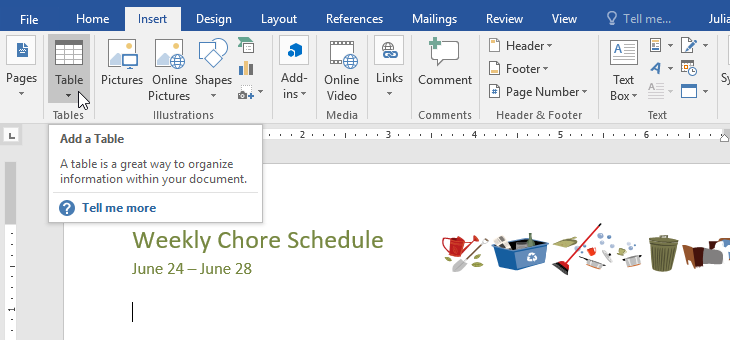
- Navigate to the Insert tab, then click the Table command.
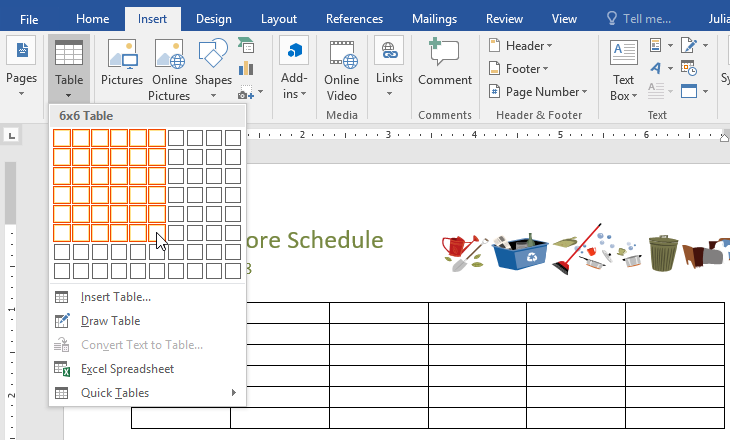
- This will open a drop-down menu that contains a grid. Hover over the grid to select the number of columns and rows you want.
- Click the grid to confirm your selection, and a table will appear.
- To enter text, place the insertion point in any cell, then begin typing.
To navigate between cells, use the Tab key or arrow keys on your keyboard. If the insertion point is in the last cell, pressing the Tab key will automatically create a new row.
To convert existing text to a table:
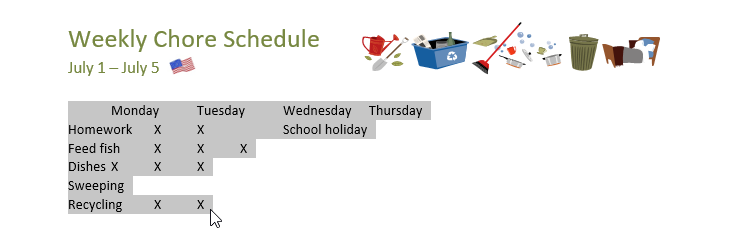
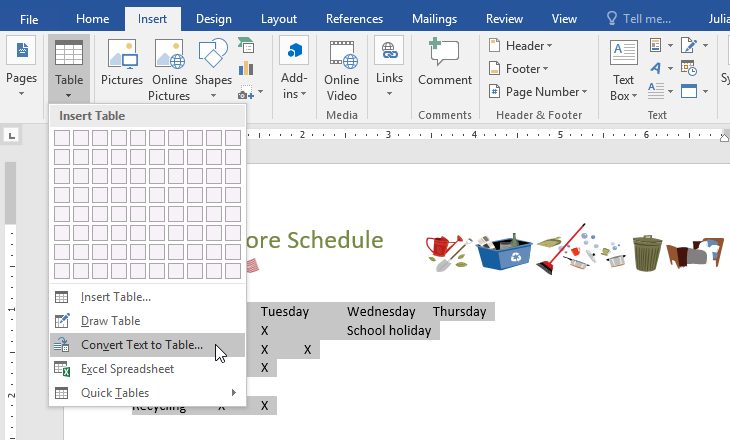
In the example below, each line of text contains part of a checklist, including chores and days of the week. The items are separated by tabs. Word can convert this information into a table, using the tabs to separate the data into columns.
- Select the text you want to convert to a table. If you’re using our practice file, you can find this text on page 2 of the document.
- Go to the Insert tab, then click the Table command.
- Select Convert Text to Table from the drop-down menu.
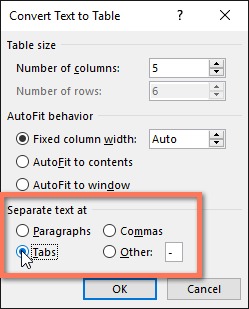
- A dialog box will appear. Choose one of the options under Separate text at. This is how Word knows what to put into each column.
- Click OK. The text will appear in a table.
Modifying tables
You can easily change the appearance of your table once you’ve added one to your document. There are several options for customization, including adding rows or columns and changing the table style.
To add a row or column:
- Hover outside the table where you want to add a row or column. Click the plus sign that appears.
- A new row or column will be added to the table.
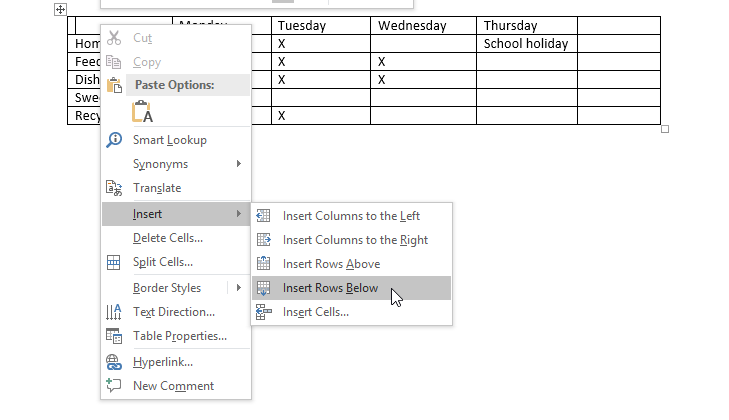
You can also right-click the table, then hover over Insert to see various row and column options.
To delete a row or column:
- Place the insertion point in the row or column you want to delete.
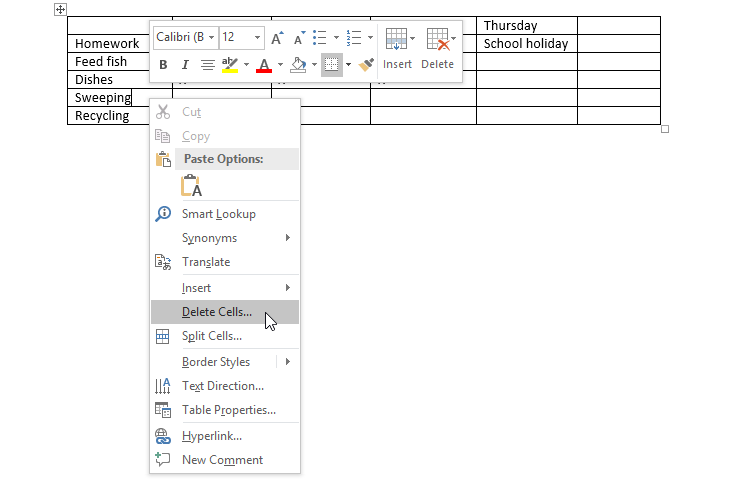
- Right-click, then select Delete Cells from the menu.
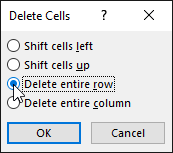
- A dialog box will appear. Choose Delete entire row or Delete entire column, then click OK.
- The row or column will be deleted.
To apply a table style:
Table styles let you change the look and feel of your table instantly. They control several design elements, including color, borders, and fonts.
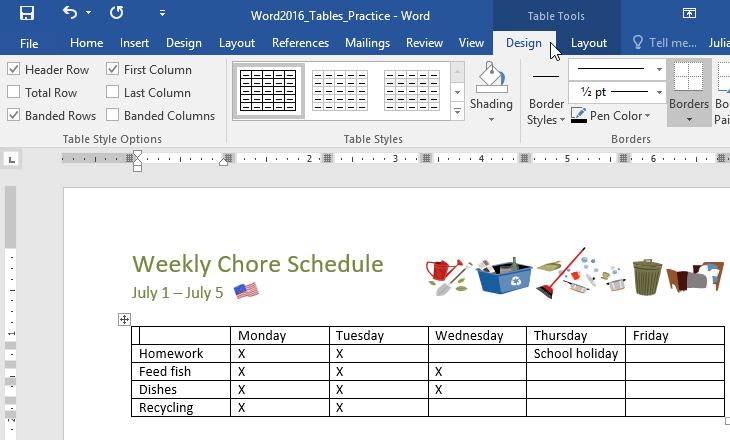
- Click anywhere in your table to select it, then click the Design tab on the far right of the Ribbon.
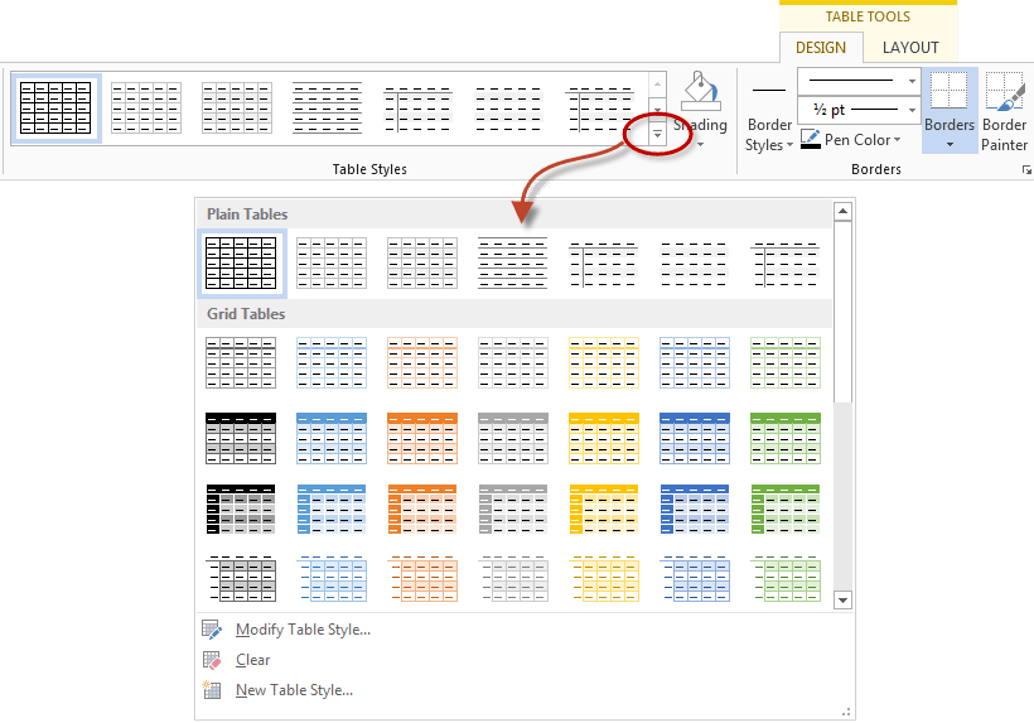
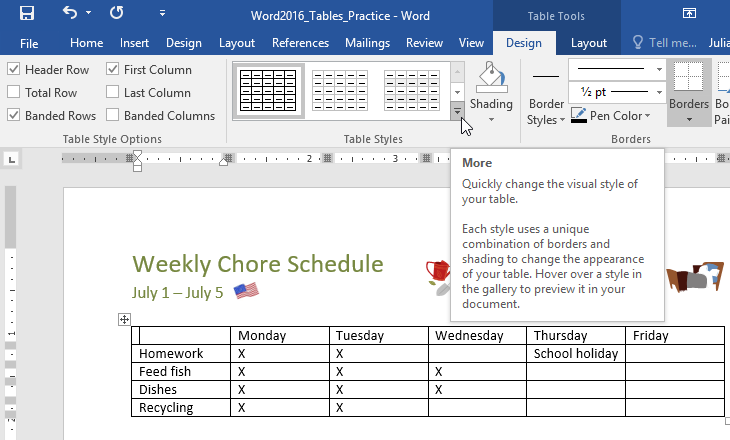
- Locate the Table Styles group, then click the More drop-down arrow to see the full list of styles.
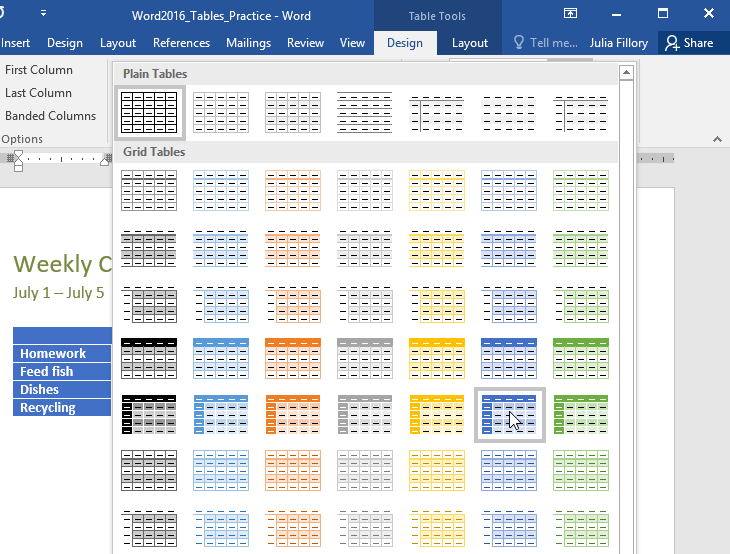
- Select the table style you want.
- The table style will appear.
To modify table style options:
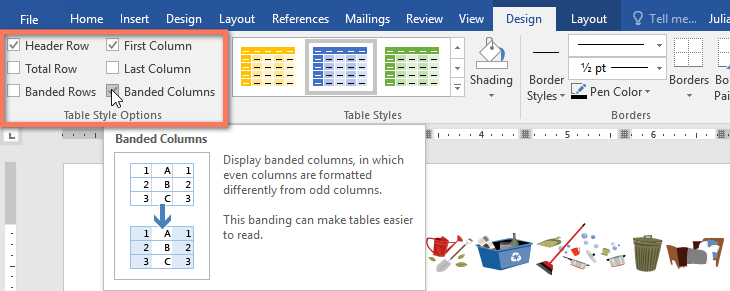
Once you’ve chosen a table style, you can turn various options on or off to change its appearance. There are six options: Header Row, Total Row, Banded Rows, First Column, Last Column, and Banded Columns.
- Click anywhere in your table, then navigate to the Design tab.
- Locate the Table Style Options group, then check or uncheck the desired options.
- The table style will be modified.
Depending on the Table Style you’ve chosen, certain Table Style Options may have a different effect. You might need to experiment to get the look you want.
To apply borders to a table:
- Select the cells you want to apply a border to.
- Use the commands on the Design tab to choose the desired Line Style, Line Weight, and Pen Color.
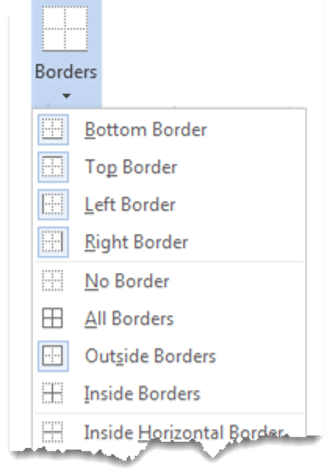
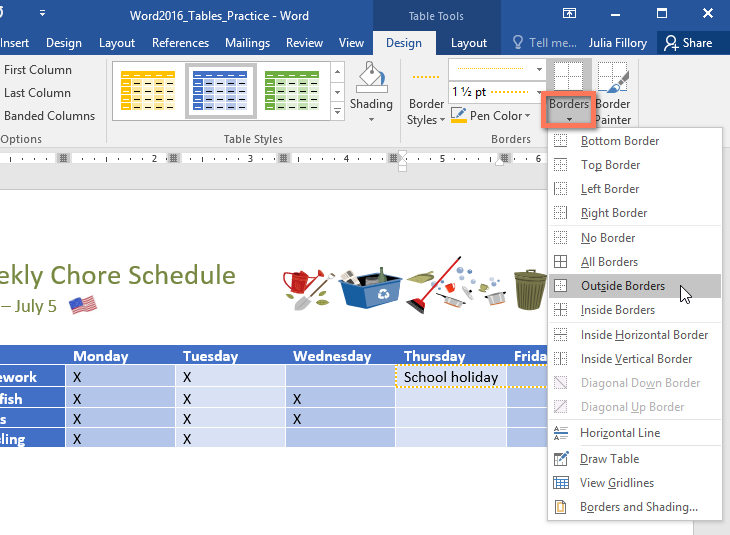
- Click the drop-down arrow below the Borders command.
- Choose a border type from the menu.
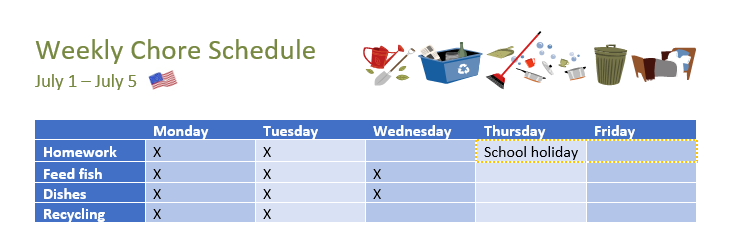
- The border will be applied to the selected cells.
Modifying a table using the Layout tab
In Word, the Layout tab appears whenever you select your table. You can use the options on this tab to make a variety of modifications.
Click the buttons in the interactive below to learn more about Word’s table layout controls.
Challenge!
- Open our practice document.
- Scroll to page 3 and select all of the text below the dates July 8 — July 12.
- Use the Convert Text to Table to insert the text into a 6-column table. Make sure to Separate text at Tabs.
- Delete the Saturday column.
- Insert a column to the left of the Friday column and type Thursday in the top cell.
- Change the table style to any style that begins with Grid Table 5. Hint: Style names appear when you hover over them.
- In the Table Style Options menu, uncheck Banded Rows and check Banded Columns.
- Select the entire table. In the Borders drop-down menu, choose All Borders.
- With the table still selected, increase the table row height to 0.3″ (0.8 cm).
- Select the first row and change the cell alignment to Align Center.
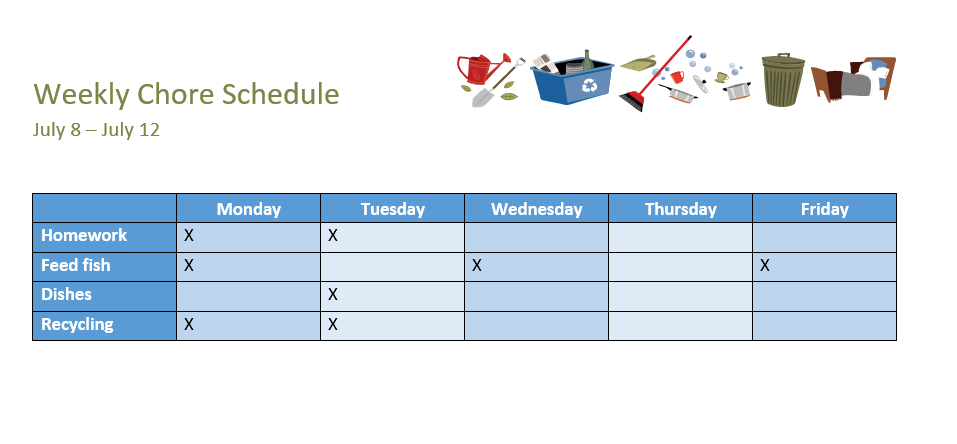
- When you’re finished, your table should look something like this:
/en/word/charts/content/
Many documents present some data in the form of figures or tables. Creating tables is often more efficient than describing the data in the paragraph text, especially when the data is numerical or large. The tabular data presentation makes it easier to read and understand.
A table is a collection of information or data, usually represented by horizontal rows and vertical columns. Each column and each row can have a header. Some tables have only column headings or only row headings. The box at the junction of each column and row is a cell that contains data such as text, numeric information, or images. Some cells can be merged or split (see more about formatting tables). E.g.:

Microsoft Word has many features that make working with tables simple and convenient.
Create a table
There are several ways how to insert or create a table:
- Create a blank table of up to 10 columns and 8 rows,
- Create a blank table with more than 10 columns or more than 8 rows,
- Create a blank table manually (Draw a table),
- Create a table using predefined templates (Quick Tables),
- Create a table from the existing data (Convert Text to Table),
- Insert a Microsoft Excel spreadsheet.
To create a blank table in a Word document, do the following:
1. Place your cursor where you want to insert the table.
2. On the Insert tab, in the Tables group, click the Table button:

3. Do one of the following:
Create a blank table of up to 10 columns and 8 rows
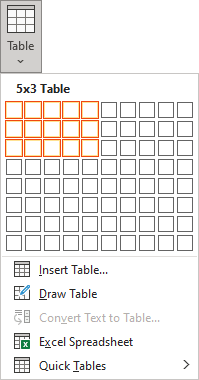
- To create a table of up to 10 columns and 8 rows, move the cursor right (to select columns) and down (to select rows) the grid to select as many cells as you need. E.g., the table of 5 columns and 3 rows (selected cells will turn orange):
Click on a cell in the grid with the expected number of rows and columns (or press Enter) to insert an empty table to fit the width of the text (paragraph).
The table has the specified number of single-line text rows in the current paragraph and equal-width columns. E.g., the table of 3 rows and 5 columns:
Create a blank table with more than 10 columns or more than 8 rows
- To create a table with more than 10 columns or more than 8 rows, do one of the following:
- Create a table with exactly 10 columns or 8 rows, then add as many columns or rows as you need (see below how to customize table).
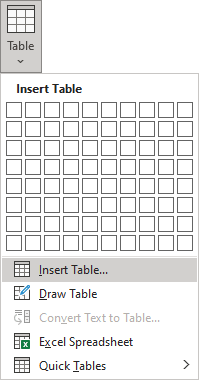
- Click the Insert Table… option:
In the Insert Table dialog box:
- In the Table size group, specify the number of columns and rows,
- In the AutoFit behavior group, specify the width of the table and its columns:
- Select the Fixed column width option to customize width in the appropriate field: select Auto (used by default) or specify width. E.g., 0.75″:
- Select the AutoFit contents option to adjust cell sizes to the document content. E.g.:
- Select the AutoFit to window option to adjust the table’s width to the document content width. E.g.:
- Select the Remember dimension for new tables check box if you want to create tables with the same options later. Word will remember your customization.
Create a blank table manually
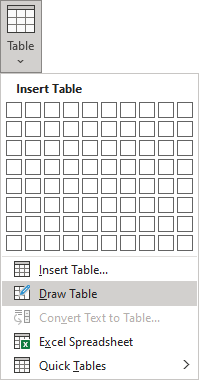
- To manually create an empty table, click the Draw Table option:
After clicking that option, the cursor changes to the pencil
that allows drawing cells directly in the Word document to create a table:
Click anywhere in a document but the table itself by the pencil to stop drawing a table.
Notes:
- To draw additional lines, select a table, then on the Table Layout tab, in the Draw group, click the Draw Table button:
- If you draw a line in the wrong position, click the Eraser button in the Draw group of the Table Layout tab:
- We recommend displaying the rulers or gridlines to help you place the lines correctly.
- To draw additional lines, select a table, then on the Table Layout tab, in the Draw group, click the Draw Table button:
Create a table using predefined templates
To create a table using predefined Word templates of tables and calendars, do the following:
1. Place your cursor where you want to insert the table.
2. On the Insert tab, in the Tables group, click the Table dropdown list, then select Quick Tables list:
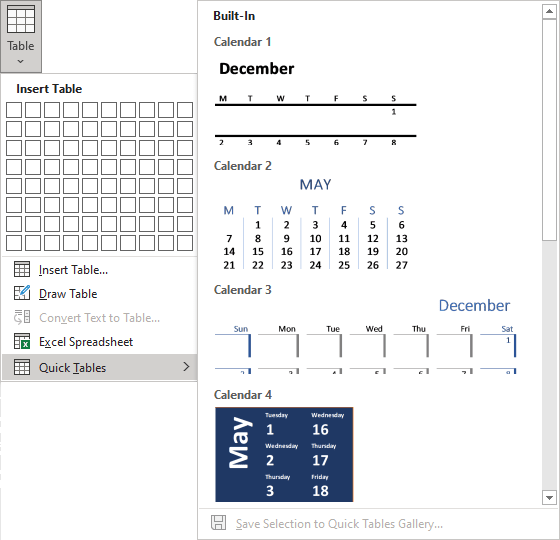
3. From the Quick Tables gallery, select the template you prefer.
For example:

Create a table from the existing data
To create a table from the existing data in a document data (either as regular text or as a tabbed list), do the following:
1. Select the document data you want to shape into a new table.
2. On the Insert tab, in the Tables group, click the Table dropdown list, then select Convert Text to Table…:
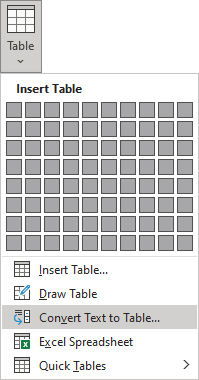
3. In the Convert Text to Table dialog box:

- In the Table size group, specify the number of columns,
- In the AutoFit behavior group, specify whether the width of the columns should be fixed (see details above),
- In the Separate text at group, select the character that separates text into columns in the selected text: paragraph marks, commas, tabs, or some other character.
E.g.:

Insert a Microsoft Excel spreadsheet
Note: It is possible to insert a Microsoft Excel spreadsheet in a document. To do so, on the Insert tab, in the Tables group, click the Table dropdown list, then select Excel Spreadsheet:
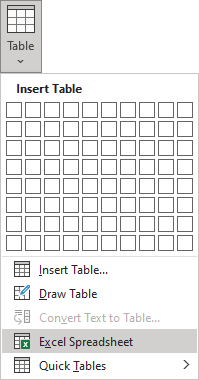
Word opens the Excel spreadsheet where you can enter the data. You can use Excel features such as functions and formulas to create or manipulate the data. Note that it is not a Word table.
Add rows and columns
To add a row and a column to a table, do the following:
1. Position the cursor:
- to a cell in a row above or below which you need to insert a row,
- to a cell in a column left or right which you need to insert a column.
2. Do one of the following:
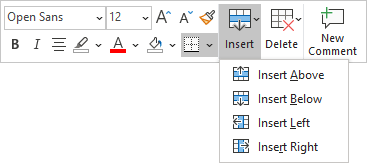
- Click the Insert dropdown list in the Mini toolbar:
- On the Table Layout tab, in the Rows & Columns group:
- Click the Insert Above button to insert a row above the row with the cursor,
- Click the Insert Below button to insert a row below the row with the cursor,
- Click the Insert Left button to insert a column left to the column with the cursor,
- Click the Insert Right button to insert a column right to the column with the cursor.
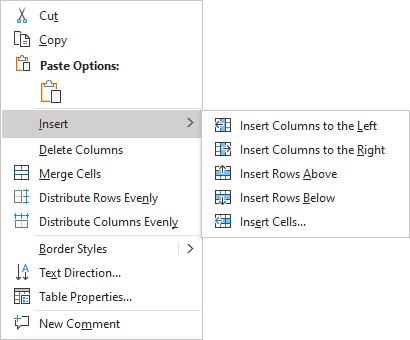
- Right-click and select the Insert list:
Notes:
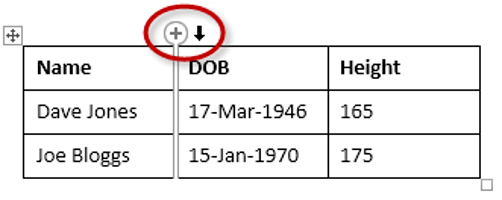
- To insert rows or columns, move the mouse over the table or left of the table until you see the Insertion indicator, then click the icon:
and
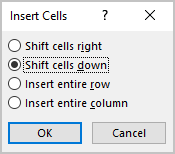
- You can choose the option Insert -> Insert Cells… from the popup menu; Word opens the Insert Cells dialog box:
After selecting the option and clicking the OK button, Word adds an entire row or column, not a cell. Word just moves cells according to the selection.
Delete a table element
To delete a table element, do the following:
1. Select the cell, multiple cells, the entire column or multiple columns, the entire row, or multiple rows.
2. Do one of the following:
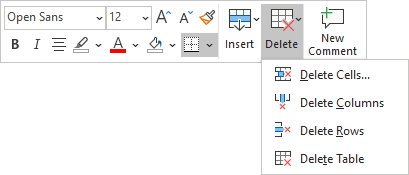
- Click the Delete dropdown list in the Mini toolbar:
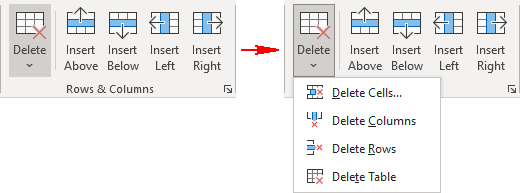
- On the Table Layout tab, in the Rows & Columns group, click the Delete dropdown list, then select one of the options:
3. Select one of the proposed options:
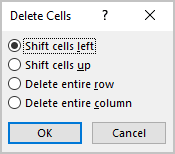
- Delete Cells… opens the Delete Cells dialog box, in which select the option you need:
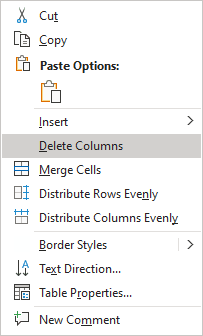
- Delete Columns
- Delete Rows
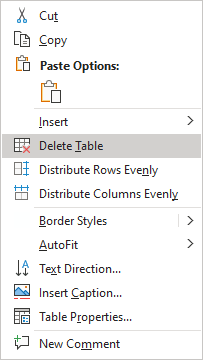
- Delete Table
Note: You can select the element you want to delete, right-click on the selection and select the appropriate item in the popup menu. For example, if the entire table is selected or the column is selected:
Convert a table into text
To convert a table into text in Word, follow the next steps:
1. Click anywhere in the table.
2. On the Layout tab, in the Format group, click the Convert to Text button:

3. In the Convert Table to Text dialog box, select the charter to separate cells data in the text:

4. Click OK.
Tables in Word are useful in so many situations. In this post you’ll discover how to create tables, then manipulate and design them in the quickest and easiest way to provide that visual punch.
Clickable Table of Contents
Enhance your Word tables with these advanced features
1. What are tables in Word good for?
Tables are useful for 2 distinct reasons.
- To show an actual table of data, or
- To organise and postion text, images and other elements on the page.
Many years ago, typewriters ruled the world. And a feature of a good typewriter was the tab stop, which was a device that essentially let you control indentation.
Over the years many people have continued to use tabs to indent text, because of its convenience, but they are hard work to set up properly.
Tables provide a much easier way to organise content on a page.
1. Select the Insert tab.
2. Click the Tables icon in the Tables group.
3. Move your mouse pointer into the table grid until the required number of rows and columns are highlighted orange, then left-click.
An empty table is inserted into the document.
Two new tabs, Design and Layout are also added to the ribbon area, under the banner of Table Tools.
3. MOVING AROUND A Word TABLE
- While the table is empty, you can use the cursor keys to move around the cells. However, when the cells contain information, using the cursor keys will move through the cell content first before moving to the next cell
- You can left-click in any cell to position the cursor.
- Press Tab to move to the next cell. The cursor will move across and then down the table.
- Press Shift + Tab to move to the previous cell.
NB. Using Tab is better than using the cursors as it will move to the next/previous cell regardless of whether there is information in the cells.
NB2. If you press Tab while you are in the last cell, a new row will be added to the bottom of your table
4. SELECTING A CELL, ROW, COLUMN OR THE ENTIRE TABLE
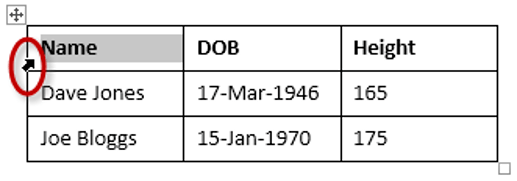
To select a cell:
1. Position the mouse pointer inside the cell on the bottom-left corner of the cell.
The pointer will change shape to a solid black arrow that points up and right.
2. Left-click.
To select a row of a table:
1. Position the mouse pointer in the left margin in line with the row you want to select.
The mouse pointer will change to a white arrow that points up and right.
2. Left-click.
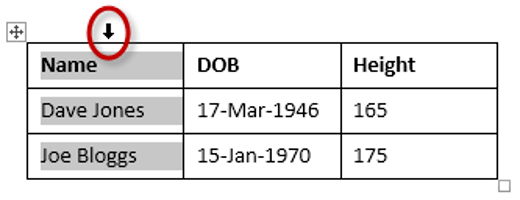
To select a column
1. Position the mouse pointer so that it rests on the top border of the table, above the column you want to select.
The mouse pointer will change to a solid black arrow pointing down.
2. Left-click.
To select the entire table:
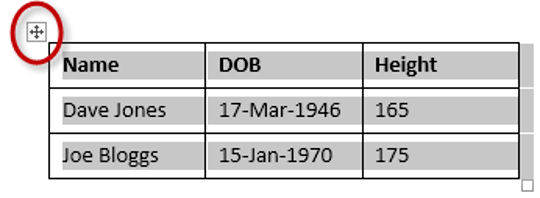
1. Position your mouse pointer over the 4-headed arrow icon situated at the top-left of the table.
2. Left-click.
5. INSERTING AN EXTRA ROW OR COLUMN
To insert an extra row:
1. Position the cursor in a cell.
2. Select the Layout tab, under the Table Tools banner.
3. Click Insert Above or Insert Below in the Rows and Columns group
Here is a quick way to insert new rows:
1. Position the cursor to the left of the table, but in close proximity.
2. A plus symbol will appear above or below the mouse pointer indicating where the new row will be added.
3. Nudge the mouse pointer up or down to move the plus sign above or below.
4. Left-click to insert the new row,
To insert an extra column:
1. Position the cursor in a cell.
2. Select the Layout tab, under the Table Tools banner.
3. Click Insert Left or Insert Right in the Rows and Columns group
Here is a quick way to insert a new column:
1. Position the cursor above a column, but in close proximity to the table.
2. A plus symbol will appear to the left or right of the mouse pointer indicating where the new column will be added.
3. Nudge the mouse pointer left or right to move the plus sign to the left or the right of the column.
4. Left-click to insert the new column,
6. DELETING A ROW OR COLUMN
To delete the current row or column:
1. Position the cursor in any cell of the row you want to delete.
2. Select the Layout tab, under the Table Tools banner.
3. Click the Delete icon in the Rows and Columns group.
4. Choose Delete Row or Delete Column from the drop-down menu.
7. Quickly fORMATTING tables in Word
Word provides you with a number of pre-set table designs. This means that it formats the headings and the data, applies a variety of borders and colours the cells in a way that makes it look like a professionally produced table. As a beginner this simple technique will give you a good-looking table.
1. Position the cursor in any cell in the table.
2. Select the Design tab under the Table Tools banner.
The Table Styles group lists a number of table designs. To get the full list, click the More button beneath the table styles scroll bar
The default table style is Table Grid in the Plain Tables category which adds simple gridlines but no shading to your table.
Live Preview allows you to hover over a design and see it applied to your table. If you like what you see, click to select the table design.
In the Table Style Options group of the Design tab, tick the components that you have in your table. For example, if your table has column headings, tick Header Row. In doing this, the various parts of your table are formatted accordingly
Header Row
This will emphasise the header row by making the text bold or applying a different cell colour (depending on the table style selected.
Total Row
This will emphasise the bottom table row by making the text bold or applying a different cell colour (depending on the table style selected.
First Column
This will emphasise the first column (for labels etc.) by making the text bold or applying a different cell colour (depending on the table style selected.
Last Column
This will emphasise the last column (for row totals etc.) by making the text bold or applying a different cell colour (depending on the table style selected.
Banded Rows
This will make odd rows one colour and even rows a different colour. This helps readability.
Banded Columns
This will make odd columns one colour and even columns a different colour. This helps readability.
8. SETTING THE BORDERS AND SHADING
The Table Styles Gallery allows you to completely format a table with one click. Whereas you used to need some nous, anybody can now create a professional looking design.
However, you will often still need to apply your own border and shading, and manually change a table design. With a little effort can add a lot of flavour to your page and dramatically enhance the overall appearance of the document.
To set the borders for tables in Word:
1. Select the portion of the table that you wish to set the borders for. This may be the entire table, a row or rows, a column or columns or a selection of cells.
2. Select the Design tab under the Table Tools banner.
3. Select the Borders icon. A drop-down list appears. This list shows every combination of border that can be turned on or off. The icons with a shaded background are currently switched on. The rest are switched off.
4. Click any icon to switch the border on or off. The border style that is applied is the default style (½ pt solid black line ) or the last style that was used.
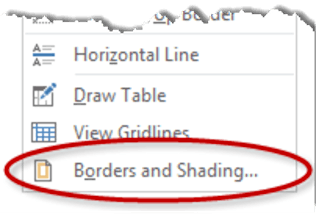
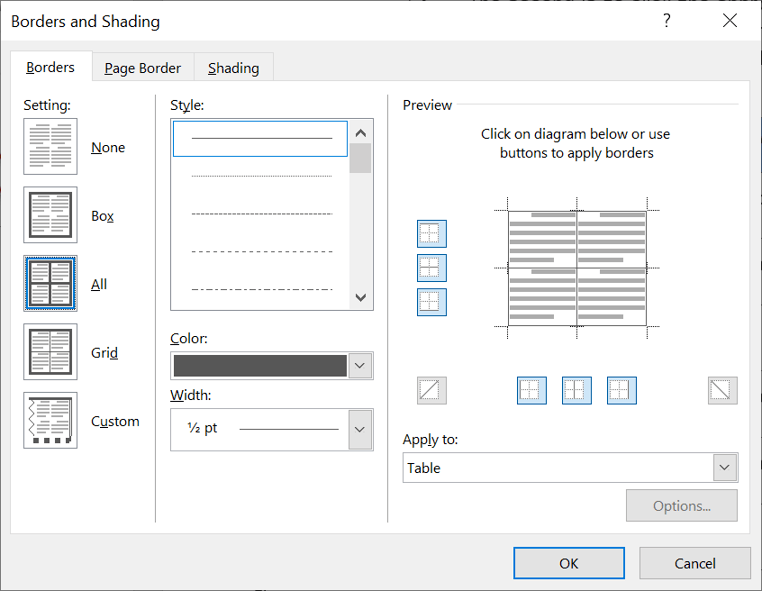
5. To apply customised borders, with different colours, styles and widths, click the Borders & Shading option at the bottom of the list to display the Borders and Shading dialog box.
Your selection will always have an outer border, and if you selected more than one cell, you will have some inside borders as well. The easiest way to use the dialog box is to start on the bottom-middle and work your way up and right.
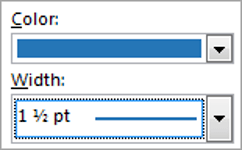
1. Select the colour and width (thickness) that you would like for your border.
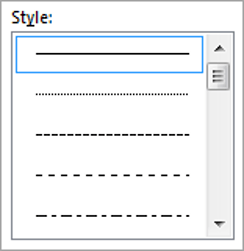
2. Choose a style (e.g. dotted, dashed, double, solid etc.)
3. Paint your borders. There are two ways to do this.
- The first way is to click directly on a border in the Preview itself.
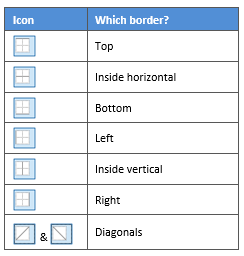
- The second way is to click the appropriate icon around the edge of the Preview section that represents each border. Depending on which cells you selected in your table, some of these icons may not be available.
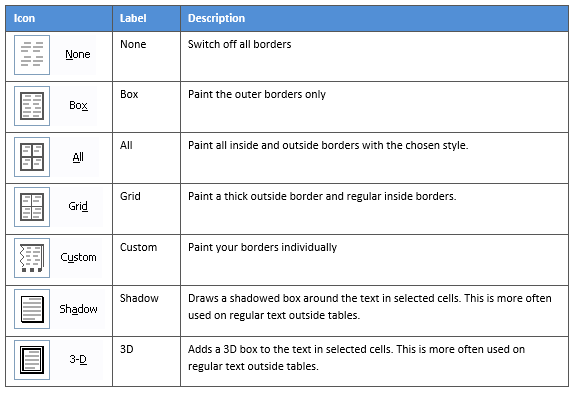
On the left-hand side of the dialog box, there are some pre-defined border combinations which you can use to save yourself some time. Depending on your selection of cells, the pre-defined options may differ. Here’s a run-down:
To shade the cells of tables in Word:
1. Select the portion of the table that you wish to shade. This may be the entire table, a row or rows, a column or columns or a selection of cells.
2. Select the Design tab under the Table Tools banner.
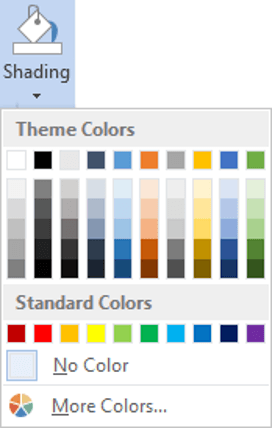
3. Click the Shading icon.
The colours that you see displayed match the current them of the document. Themes were discussed earlier in the course.
4. Click a colour in the palette.
While you can pick any colour, it is recommended to stick with the light colour shades, otherwise your tables will appear very loud and ugly, like they’re shouting in your face. Subtle is the order of the day. The exception to this is column headings or other cells that you wish to differentiate. Under these circumstances, you can use a dark colour, but use a light font with it.
If you cannot find the exact colour you need,
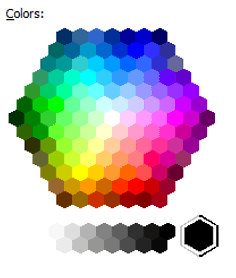
- Click the More Colours link underneath the palette. This displays a larger, more accurate colour palette.
- And if that’s not enough, click the Custom tab and you’ll get a really fine selection of colours (you can even enter your own RGB settings if you know them)
9. REPEATING table HEADINGS ON EVERY PAGE WHEN PRINTING
When you have large tables that occupy two or more pages, many people insert manual page breaks, then copy and paste their table header rows at the top of each page.
When rows are added or removed from tables in Word, the table headers end up half way down the page.
There is a simple tool that will eliminate this problem
1. Ensure that the table is a single table, with no manual page breaks in the middle, and one header at the top. The table header may occupy more than one row, it doesn’t affect the way this feature works.
2. Position the cursor somewhere in the top row of the table.
3. Select the Layout tab under the Table Tools banner.
4. Click the Repeat Header Rows icon ion the Data group.
Now, it doesn’t matter how many rows tables in Word contain, if the table ever spills across into another page, the header row (which normally displays the column headings) will always appear at the top of the table.
10. All the key points again
- Tables in Word serve 2 distinct purpose: to display a table of data and to organise and position items on the page
- To create table, select 2 tabs — Design and Layout under the Table Tools banner.
- There are 2 tabs — Design and Layout under the Table Tools banner.
- You can press the TAB key to move direct to the next cell and SHIFT and TAB together to move backwards through a table.
- The four elements of a table are cells, rows, columns and the whole table. Each can be selected.
- Rows can be inserted by selecting the Layout tab under Table Tools, then clicking the Insert Above or Insert Below icons. Alternatively, hover to the left of a row and click the plus symbol that appears above or below the mouse pointer.
- Columns can be inserted by selecting the Layout tab under Table Tools, then clicking the Insert
Left or Insert Right icons. Alternatively, hover above a table column and click the plus symbol that appears to the left or right of the mouse pointer. - Columns and rows and be removed from the table, by positioning the cursor in the row or column to be removed, then clicking the Delete icon on the Layout tab of Table Tools and choosing Delete
Row or Delete Column. - Tables can be formatted using the Table Style gallery or by manually setting the shading and borders manually. Both sets of tools are found on the Design ribbon of the Table Tools.
- When using the Microsoft Table Styles, you can control the behaviour of the formatting by setting the Table Style options – 6 tick boxes that define the structure of your table.
- For long tables that spill across onto subsequent pages, the top row, which normally contains the column headings can be set to repeat automatically. So there is no excuse for cutting and pasting headings midway through your table or taping pages together to make sense of the table!
I hope you found plenty of value in this post. I’d love to hear your biggest takeaway in the comments below together with any questions you may have.
Have a fantastic day.
About the author
Jason Morrell
Jason loves to simplify the hard stuff, cut the fluff and share what actually works. Things that make a difference. Things that slash hours from your daily work tasks. He runs a software training business in Queensland, Australia, lives on the Gold Coast with his wife and 4 kids and often talks about himself in the third person!
SHARE
If you writing a really long document like your thesis or a portfolio an easy way to find everything quickly is by adding internal hyperlinks to your Table of Contents. I’ve run through before how to generate your Table of Contents automatically and if you do that it will save you a lot of time adding the hyperlinks.
If you are sending it for correction then you want to make sure it is easily accessible for the examiner to correct and an interactive TOC will help. By adding the hyperlinks in the word file and then saving (or printing) the file as a PDF they will remain in-bedded in the file.
Note if you haven’t use your Headings 1,2,3 throughout your document do that first or else you will have to manually add all the bookmarks which will take a bit of time.
So here are the steps and its also covered in the video below
- highlight the text in the table of contents that you want to add a link to
- Go to insert > Hyperlink
- Select Document and under the anchor heading select locate
- This will bring up the display box as shown below giving you a drop down menu of headings and bookmarks
- Select the corresponding heading from the drop down menu
- Job Gone
For some reason the hyperlinks do not stay in bedded in the PDF when using Office for Mac 2011 but seems to work on all other versions. If using Office 2011 and you need the PDF the only option I’ve found is export your PDF from a windows version (bit of a pain but I’m sure there is a work around somewhere).
Still unsure….have a look at the video below












 and
and 
