
Insert a table

For a basic table, click Insert > Table and move the cursor over the grid until you highlight the number of columns and rows you want.
For a larger table, or to customize a table, select Insert > Table > Insert Table.
Tips:
-
If you already have text separated by tabs, you can quickly convert it to a table. Select Insert > Table, and then select Convert Text to Table.
-
To draw your own table, select Insert > Table > Draw Table.
Need more help?
Want more options?
Explore subscription benefits, browse training courses, learn how to secure your device, and more.
Communities help you ask and answer questions, give feedback, and hear from experts with rich knowledge.
Many documents present some data in the form of figures or tables. Creating tables is often more efficient than describing the data in the paragraph text, especially when the data is numerical or large. The tabular data presentation makes it easier to read and understand.
A table is a collection of information or data, usually represented by horizontal rows and vertical columns. Each column and each row can have a header. Some tables have only column headings or only row headings. The box at the junction of each column and row is a cell that contains data such as text, numeric information, or images. Some cells can be merged or split (see more about formatting tables). E.g.:

Microsoft Word has many features that make working with tables simple and convenient.
Create a table
There are several ways how to insert or create a table:
- Create a blank table of up to 10 columns and 8 rows,
- Create a blank table with more than 10 columns or more than 8 rows,
- Create a blank table manually (Draw a table),
- Create a table using predefined templates (Quick Tables),
- Create a table from the existing data (Convert Text to Table),
- Insert a Microsoft Excel spreadsheet.
To create a blank table in a Word document, do the following:
1. Place your cursor where you want to insert the table.
2. On the Insert tab, in the Tables group, click the Table button:

3. Do one of the following:
Create a blank table of up to 10 columns and 8 rows
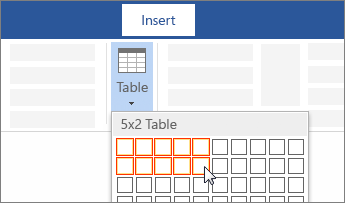
- To create a table of up to 10 columns and 8 rows, move the cursor right (to select columns) and down (to select rows) the grid to select as many cells as you need. E.g., the table of 5 columns and 3 rows (selected cells will turn orange):

Click on a cell in the grid with the expected number of rows and columns (or press Enter) to insert an empty table to fit the width of the text (paragraph).
The table has the specified number of single-line text rows in the current paragraph and equal-width columns. E.g., the table of 3 rows and 5 columns:


Create a blank table with more than 10 columns or more than 8 rows
- To create a table with more than 10 columns or more than 8 rows, do one of the following:
- Create a table with exactly 10 columns or 8 rows, then add as many columns or rows as you need (see below how to customize table).
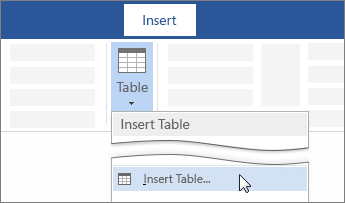
- Click the Insert Table… option:
In the Insert Table dialog box:

- In the Table size group, specify the number of columns and rows,
- In the AutoFit behavior group, specify the width of the table and its columns:
- Select the Fixed column width option to customize width in the appropriate field: select Auto (used by default) or specify width. E.g., 0.75″:

- Select the AutoFit contents option to adjust cell sizes to the document content. E.g.:

- Select the AutoFit to window option to adjust the table’s width to the document content width. E.g.:

- Select the Remember dimension for new tables check box if you want to create tables with the same options later. Word will remember your customization.


Create a blank table manually
- To manually create an empty table, click the Draw Table option:
After clicking that option, the cursor changes to the pencil
 that allows drawing cells directly in the Word document to create a table:
Click anywhere in a document but the table itself by the pencil to stop drawing a table.
Notes:
- To draw additional lines, select a table, then on the Table Layout tab, in the Draw group, click the Draw Table button:

- If you draw a line in the wrong position, click the Eraser button in the Draw group of the Table Layout tab:
- We recommend displaying the rulers or gridlines to help you place the lines correctly.
- To draw additional lines, select a table, then on the Table Layout tab, in the Draw group, click the Draw Table button:


Create a table using predefined templates
To create a table using predefined Word templates of tables and calendars, do the following:
1. Place your cursor where you want to insert the table.
2. On the Insert tab, in the Tables group, click the Table dropdown list, then select Quick Tables list:

3. From the Quick Tables gallery, select the template you prefer.
For example:

Create a table from the existing data
To create a table from the existing data in a document data (either as regular text or as a tabbed list), do the following:
1. Select the document data you want to shape into a new table.
2. On the Insert tab, in the Tables group, click the Table dropdown list, then select Convert Text to Table…:

3. In the Convert Text to Table dialog box:

- In the Table size group, specify the number of columns,
- In the AutoFit behavior group, specify whether the width of the columns should be fixed (see details above),
- In the Separate text at group, select the character that separates text into columns in the selected text: paragraph marks, commas, tabs, or some other character.
E.g.:

Insert a Microsoft Excel spreadsheet
Note: It is possible to insert a Microsoft Excel spreadsheet in a document. To do so, on the Insert tab, in the Tables group, click the Table dropdown list, then select Excel Spreadsheet:

Word opens the Excel spreadsheet where you can enter the data. You can use Excel features such as functions and formulas to create or manipulate the data. Note that it is not a Word table.
Add rows and columns
To add a row and a column to a table, do the following:
1. Position the cursor:
- to a cell in a row above or below which you need to insert a row,
- to a cell in a column left or right which you need to insert a column.
2. Do one of the following:
- Click the Insert dropdown list in the Mini toolbar:

- On the Table Layout tab, in the Rows & Columns group:

- Click the Insert Above button to insert a row above the row with the cursor,
- Click the Insert Below button to insert a row below the row with the cursor,
- Click the Insert Left button to insert a column left to the column with the cursor,
- Click the Insert Right button to insert a column right to the column with the cursor.
- Right-click and select the Insert list:


Notes:
- To insert rows or columns, move the mouse over the table or left of the table until you see the Insertion indicator, then click the icon:
 and
and
- You can choose the option Insert -> Insert Cells… from the popup menu; Word opens the Insert Cells dialog box:

After selecting the option and clicking the OK button, Word adds an entire row or column, not a cell. Word just moves cells according to the selection.
 and
and 

Delete a table element
To delete a table element, do the following:
1. Select the cell, multiple cells, the entire column or multiple columns, the entire row, or multiple rows.
2. Do one of the following:
- Click the Delete dropdown list in the Mini toolbar:

- On the Table Layout tab, in the Rows & Columns group, click the Delete dropdown list, then select one of the options:


3. Select one of the proposed options:
- Delete Cells… opens the Delete Cells dialog box, in which select the option you need:
- Delete Columns
- Delete Rows
- Delete Table

Note: You can select the element you want to delete, right-click on the selection and select the appropriate item in the popup menu. For example, if the entire table is selected or the column is selected:
 and
and

Convert a table into text
To convert a table into text in Word, follow the next steps:
1. Click anywhere in the table.
2. On the Layout tab, in the Format group, click the Convert to Text button:

3. In the Convert Table to Text dialog box, select the charter to separate cells data in the text:

4. Click OK.
Updated: 04/30/2020 by
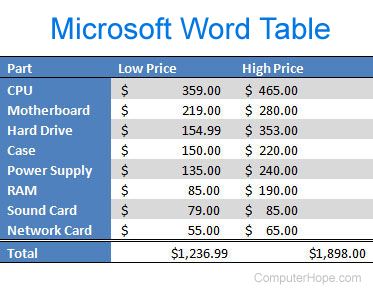
You can insert a table in a Microsoft Word document to display data in a tabular format. A table is a great way to represent multiple fields of associated data. For example, a list of prices is easier to read when displayed in a table.
Adding a table in Word
- In Word, place the mouse cursor where you want to add the table.
- Click the Insert tab in the Ribbon.
- Click the Table button and select how many cells, rows, and columns you want the table to display. You can also click Insert Table and enter the number of columns and rows for the inserted table.
Inserting or deleting a row or column
In a Microsoft Word table, you can add or remove a row or column at any time.
- Insert a row.
- Insert a column.
- Delete a row.
- Delete a column.
Insert a row
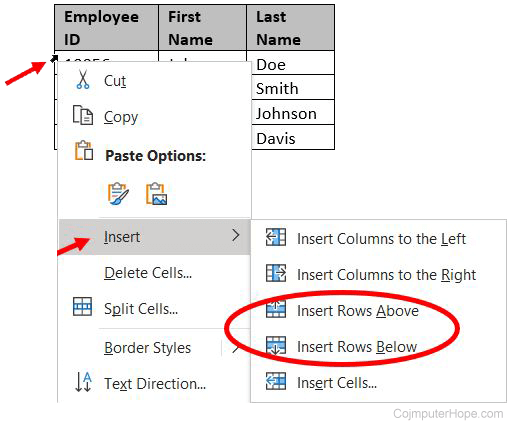
- Move the mouse cursor inside the left edge of a cell in the row where you want to insert a new row. The cursor changes to a small black arrow pointing to the top-right.
- Using your mouse, right-click to open the pop-up menu, select Insert, then select Insert Rows Above or Insert Rows Below, depending where you want to insert the row.
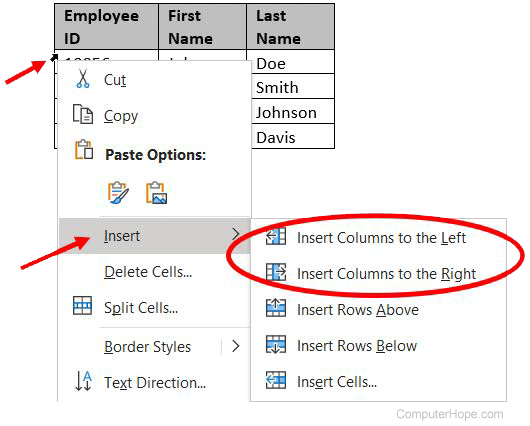
Insert a column
- Move the mouse cursor inside the left edge of a cell in the column where you want to insert a new column. The cursor changes to a small black arrow pointing to the top-right.
- Using your mouse, right-click to open the pop-up menu, select Insert, then select Insert Columns to the Left or Insert Columns to the Right, depending where you want the row inserted.
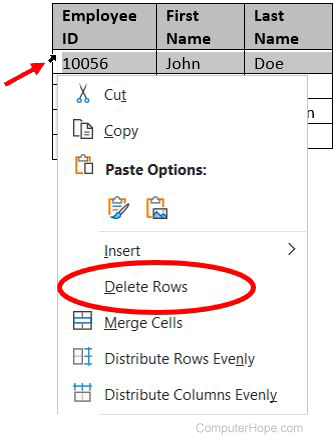
Delete a row
- Move the mouse cursor inside the left edge of a cell in the row you want to delete. The cursor changes to a small black arrow pointing to the top-right.
- Using your mouse, double-click to select the entire row in the table.
- Right-click with the mouse to open the pop-up menu, and select Delete Rows.
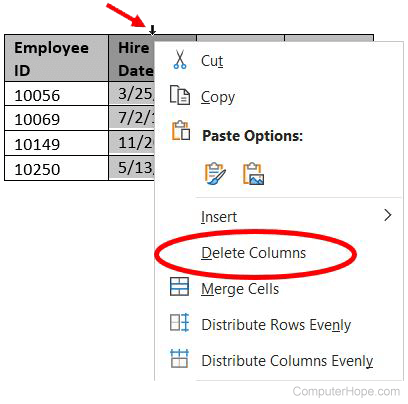
Delete a column
- Move the mouse cursor inside the top edge of the top-most cell in the column you want to delete. The cursor changes to a small black arrow pointing downward.
- Using your mouse, click once to select the entire column in the table.
- Right-click with the mouse to open the pop-up menu, and select Delete Columns.
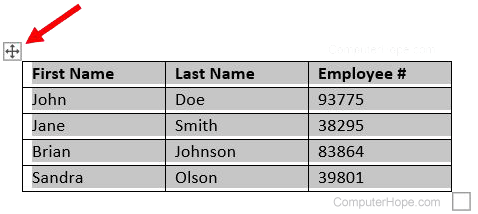
Moving the table
After the table is added to the document, you can move it anywhere else in the document. To move the table, hover your mouse cursor over the table, then click-and-drag the arrows in the top-left corner of the table.
Resizing the table
Once the table is inserted, you can adjust the table’s size by moving the mouse to the bottom-right corner of the table until you get a double-headed arrow. Once this arrow is visible, click-and-drag the table in the direction you want the table to expand.
Changing the look of the table
After the table is added to the document, move your cursor to a cell in the table, and click the Design tab. In the Design tab, you can adjust the Header Row, Total Row, and how the rows appear. You can also adjust the overall look of the table by clicking one of the table styles.
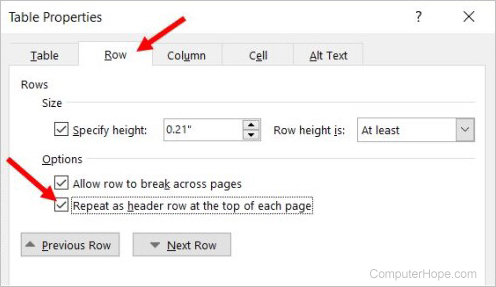
Repeat header row of the table on each page
If the table spans more than one page, you may want to have the header row displayed on each additional page the table spans across. You can make the header row visible on each page by following the steps below.
- Right-click the header row of the table and select Properties in the pop-up menu.
- In the Table Properties window, click the Row tab.
- Check the box for the Repeat as header row at the top of each page option, and click OK.
Deleting a table
If you want to delete a table from a Word document, follow the steps below.
- Move your mouse cursor over the table you want to delete.
- At the upper-left corner of the table, a small square with the move icon
 inside it should be seen. Move your mouse cursor over that icon and click it to select the entire table.
- Right-click anywhere in the table and select Delete Table in the pop-up menu.
![]()
Download Article
![]()
Download Article
A good table in your document can help make your data stand out to your readers, and adding a table in Word is a snap. You have a variety of options for customizing your table’s look at functionality, and you can even choose from existing templates to make inserting tables completely painless. Follow this guide to learn how.
Steps
-

1
Open Word or the document where you wish to put a table. You can insert tables into any version of Word.
-
2
Position the cursor on the area where you want the table to be inserted. Click the “Table” button that is located under the “Insert” tab. In Word 2003, click the “Insert” menu and then select “Table”.
- For best formatting results, place the table between paragraphs or on its own line.
Advertisement
-
3
Choose your method of inserting your table. In Word 2007, 2010, and 2013, you have a few different choices when it comes to inserting a table into your document. A dialog box appears when you click the “Insert” button which allows you select from the following methods:
- Use the Grid to make a table. You may insert the table by using the grid where the squares represent the number of rows or columns you can have on your table. Simply drag your mouse over the grid and click after highlighting the number of squares needed.
- Open the “Insert Table” menu. This menu allows you to specify the number of rows and columns that you want your table to have, as well as the width of the columns. You can set the width to AutoFit to your cell’s contents or have a fixed width. Click “OK” to insert the table.
- Insert an Excel spreadsheet. Click on Excel Spreadsheet if you want to insert a table which allows you to manipulate data like Excel (for example: formulas and filters). Click outside the table if you want to work on the document itself.
- Use prebuilt table templates. On newer versions of Word you can click “Quick Table” if you want to use built-in table templates. Simply replace the sample data with your own.


Advertisement
Add New Question
-
Question
Why do I need bullets and numbering?

To simplify points and paragraphs, bullets are used. If you are writing a long passage, numbering comes in handy. They are also used to make a document look neat.
-
Question
What is the use of table?
Mainly to display data in a neat, organized way. You may or may not have any personal use for a table, but they are often used in scientific papers or business documents to list a set of data.
-
Question
How do I change the size of the columns?
Hover your mouse over the bars separating columns, and your mouse cursor should change into a double arrow symbol (↔) or similar. Click on the bar, and drag it to the left or right. You can also right-click on the same, and select «Table Properties» from the menu that comes up. You should be able to change the size of the columns in the new window that comes up.
See more answers
Ask a Question
200 characters left
Include your email address to get a message when this question is answered.
Submit
Advertisement
Video
-
Additionally, you may draw a table by clicking “Table” on the “Insert” tab and then selecting the “Draw Table” command.
Thanks for submitting a tip for review!
Advertisement
About This Article
Thanks to all authors for creating a page that has been read 270,137 times.
Is this article up to date?
This tutorial shows three ways to insert tables in Microsoft Word so you can choose the method that is most appropriate for your content:
- Create a table from the Table menu (best for general use)
- Create a table from the Table dialog box (offers the most sizing options)
- Insert a Quick Table (fastest setup)
Note that you can also draw a custom table and create a table by importing a spreadsheet from Excel. We will cover those advanced topics in separate tutorials.
Don’t miss the five tips for working with tables at the bottom of this tutorial:
- How to delete a table
- How to resize an entire table
- How to resize individual rows and columns
- How to add rows and columns
- How to add color to a table
This tutorial is also available as a YouTube video showing all the steps in real time.
Watch more than 200 other writing-related software tutorials on my YouTube channel.
The images below are from Word for Microsoft 365.The steps are the same in Word 2021, Word 2019, and Word 2016 and similar for Word 2013 and Word 2010. However, your interface may look slightly different in those older versions of the software.
This method is appropriate for most users who want to create a basic table for general use.
- Place your cursor where you want to insert the table.
- Select the Insert tab in the ribbon.

- Select the Table button in the Tables group.

- Move your pointer across and down the grid to select the number of cells (organized as rows and columns) needed in your table.
The selected cells will turn orange.

- Click the selected (orange) part of the grid or press Enter on your keyboard to insert the table.
Method 2: Create a Table from the Table Dialog Box
This method provides advanced sizing options.
- Place your cursor where you want to insert the table.
- Select the Insert tab in the ribbon (see figure 1).
- Select the Table button in the Tables group (see figure 2).
- Select Insert Table from the drop-down menu.

- Enter the number of rows and columns in the Insert Table dialog box.

- Select an AutoFit behavior:
-
- Fixed column width can be set to Auto or a specific width between 1/100 inch and twenty-two inches using the increment arrows.
- AutoFit to contents adjusts cell sizes to the content.
- AutoFit to Window adjusts the width of the table to the viewer’s Word window or browser window.

- (Optional Step) Check Remember dimensions for new tables if you want to create the same size table in the future.

- Select the OK button to close the Insert Table dialog box and insert your new table.

Method 3: Insert a Quick Table
Quick Tables are prebuilt tables and calendars you can modify for your own use.
- Place your cursor where you want to insert the table.
- Select the Insert tab in the ribbon (see figure 1).
- Select the Table button in the Tables group (see figure 2).
- Select Quick Tables from the drop-down menu.

- Select a table from the gallery.

- Add your own content by typing over or deleting the table’s example text.
Now let’s look at some tips for working with tables.
Five Tips for Working with Tables in Word
The following tips cover the basics of working with tables. We will dive into this topic in much greater detail in a separate tutorial.
Tip 1: How to Delete a Table
- Select the table selector, which looks like crossed arrows, to select the entire table. You may have to hover your pointer over the table to reveal the table selector.

- Right-click the table.
- Select Delete Table from the shortcut menu.

Tip 2: How to Resize an Entire Table
- Click and hold the resizing handle in the bottom right of the table. You may need to hover your pointer over the table to reveal the handle.

- Drag the table to the size you want and then release the handle.
Tip 3: How to Resize Individual Rows and Columns
- Hover your pointer over a row or column border until your pointer becomes two lines with two arrows.
Note that the pointer in figure 14 is enlarged to make it easier to see. Your pointer will be smaller.

- Click and hold as you drag the border to resize the row or column.
Tip 4: How to Add Rows and Columns
- Right-click inside a cell.
- Select Insert from the shortcut menu.

- Select the location of your new row or column:
-
- Insert Columns to the Left
- Insert Columns to the Right
- Insert Rows Above
- Insert Rows Below
- Insert Cells

If you select Insert Cells, a dialog box will appear asking where you want to insert your new cells. Note that regardless of your answer, you will be inserting an entire row or column, not an individual cell.

Tip 5: How to Add Color to a Table
- Select the table selector, which looks like crossed arrows, to select the entire table (see figure 11). You may need to hover your pointer over the table to reveal the table selector.
- Select the Table Design tab in the ribbon. (Note that this tab only appears in the ribbon when a table is selected.)

- Select the down arrow in the Table Styles group.

- Select one of the styles from the gallery.

Alternatively, you can use the shading menu to add custom colors to individual rows and columns.

Pro Tip: For even more customization, add a background image to your table. Then, save your customized table as a template for reuse in future documents, as shown in “How to Save Tables as Templates in Microsoft Word.”
Related Resources
How to Create and Customize Charts in Microsoft Word
How to Save Tables and Figures as Images in Microsoft Word (PC & Mac)
How to Insert Figure Captions and Table Titles in Microsoft Word
How to Change the Style of Table Titles and Figure Captions in Microsoft Word
How to Update Table and Figure Numbers in Microsoft Word
How to Create and Update a List of Tables or Figures in Microsoft Word
How to Export PDF Tables from Adobe Acrobat to Excel (PC & Mac)
How to Write Table Titles
How to Write Figure Captions for Graphs, Charts, Photos, Drawings, and Maps
How to Reference Tables and Figures in Text
Updated February 27, 2023