
For anyone coming here looking for how to do this in C#, I have tried the following method and had success in dotnet core 2.0.3 and entity framework core 2.0.3
First create your model class.
public class User
{
    public string Name { get; set; }
    public int Address { get; set; }
    public int ZIP { get; set; }
    public string Gender { get; set; }
}
Then install EPPlus Nuget package. (I used version 4.0.5, probably will work for other versions as well.)
Install-Package EPPlus -Version 4.0.5
The create ExcelExportHelper class, which will contain the logic to convert dataset to Excel rows. This class do not have dependencies with your model class or dataset.
public class ExcelExportHelper
    {
        public static string ExcelContentType
        {
            get
            { return "application/vnd.openxmlformats-officedocument.spreadsheetml.sheet"; }
        }

        public static DataTable ListToDataTable<T>(List<T> data)
        {
            PropertyDescriptorCollection properties = TypeDescriptor.GetProperties(typeof(T));
            DataTable dataTable = new DataTable();

            for (int i = 0; i < properties.Count; i++)
            {
                PropertyDescriptor property = properties[i];
                dataTable.Columns.Add(property.Name, Nullable.GetUnderlyingType(property.PropertyType) ?? property.PropertyType);
            }

            object[] values = new object[properties.Count];
            foreach (T item in data)
            {
                for (int i = 0; i < values.Length; i++)
                {
                    values[i] = properties[i].GetValue(item);
                }

                dataTable.Rows.Add(values);
            }
            return dataTable;
        }

        public static byte[] ExportExcel(DataTable dataTable, string heading = "", bool showSrNo = false, params string[] columnsToTake)
        {

            byte[] result = null;
            using (ExcelPackage package = new ExcelPackage())
            {
                ExcelWorksheet workSheet = package.Workbook.Worksheets.Add(String.Format("{0} Data", heading));
                int startRowFrom = String.IsNullOrEmpty(heading) ? 1 : 3;

                if (showSrNo)
                {
                    DataColumn dataColumn = dataTable.Columns.Add("#", typeof(int));
                    dataColumn.SetOrdinal(0);
                    int index = 1;
                    foreach (DataRow item in dataTable.Rows)
                    {
                        item[0] = index;
                        index++;
                    }
                }


                // add the content into the Excel file
                workSheet.Cells["A" + startRowFrom].LoadFromDataTable(dataTable, true);

                // autofit width of cells with small content
                int columnIndex = 1;
                foreach (DataColumn column in dataTable.Columns)
                {
                    int maxLength;
                    ExcelRange columnCells = workSheet.Cells[workSheet.Dimension.Start.Row, columnIndex, workSheet.Dimension.End.Row, columnIndex];
                    try
                    {
                        maxLength = columnCells.Max(cell => cell.Value.ToString().Count());
                    }
                    catch (Exception) //nishanc
                    {
                        maxLength = columnCells.Max(cell => (cell.Value +"").ToString().Length);
                    }

                    //workSheet.Column(columnIndex).AutoFit();
                    if (maxLength < 150)
                    {
                        //workSheet.Column(columnIndex).AutoFit();
                    }


                    columnIndex++;
                }

                // format header - bold, yellow on black
                using (ExcelRange r = workSheet.Cells[startRowFrom, 1, startRowFrom, dataTable.Columns.Count])
                {
                    r.Style.Font.Color.SetColor(System.Drawing.Color.White);
                    r.Style.Font.Bold = true;
                    r.Style.Fill.PatternType = OfficeOpenXml.Style.ExcelFillStyle.Solid;
                    r.Style.Fill.BackgroundColor.SetColor(Color.Brown);
                }

                // format cells - add borders
                using (ExcelRange r = workSheet.Cells[startRowFrom + 1, 1, startRowFrom + dataTable.Rows.Count, dataTable.Columns.Count])
                {
                    r.Style.Border.Top.Style = ExcelBorderStyle.Thin;
                    r.Style.Border.Bottom.Style = ExcelBorderStyle.Thin;
                    r.Style.Border.Left.Style = ExcelBorderStyle.Thin;
                    r.Style.Border.Right.Style = ExcelBorderStyle.Thin;

                    r.Style.Border.Top.Color.SetColor(System.Drawing.Color.Black);
                    r.Style.Border.Bottom.Color.SetColor(System.Drawing.Color.Black);
                    r.Style.Border.Left.Color.SetColor(System.Drawing.Color.Black);
                    r.Style.Border.Right.Color.SetColor(System.Drawing.Color.Black);
                }

                // removed ignored columns
                for (int i = dataTable.Columns.Count - 1; i >= 0; i--)
                {
                    if (i == 0 && showSrNo)
                    {
                        continue;
                    }
                    if (!columnsToTake.Contains(dataTable.Columns[i].ColumnName))
                    {
                        workSheet.DeleteColumn(i + 1);
                    }
                }

                if (!String.IsNullOrEmpty(heading))
                {
                    workSheet.Cells["A1"].Value = heading;
                   // workSheet.Cells["A1"].Style.Font.Size = 20;

                    workSheet.InsertColumn(1, 1);
                    workSheet.InsertRow(1, 1);
                    workSheet.Column(1).Width = 10;
                }

                result = package.GetAsByteArray();
            }

            return result;
        }

        public static byte[] ExportExcel<T>(List<T> data, string Heading = "", bool showSlno = false, params string[] ColumnsToTake)
        {
            return ExportExcel(ListToDataTable<T>(data), Heading, showSlno, ColumnsToTake);
        }
    }
Now add this method where you want to generate the excel file, probably for a method in the controller. You can pass parameters for your stored procedure as well. Note that the return type of the method is FileContentResult. Whatever query you execute, important thing is you must have the results in a List.
[HttpPost]
public async Task<FileContentResult> Create([Bind("Id,StartDate,EndDate")] GetReport getReport)
{
    DateTime startDate = getReport.StartDate;
    DateTime endDate = getReport.EndDate;

    // call the stored procedure and store dataset in a List.
    List<User> users = _context.Reports.FromSql("exec dbo.SP_GetEmpReport @start={0}, @end={1}", startDate, endDate).ToList();
    //set custome column names
    string[] columns = { "Name", "Address", "ZIP", "Gender"};
    byte[] filecontent = ExcelExportHelper.ExportExcel(users, "Users", true, columns);
    // set file name.
    return File(filecontent, ExcelExportHelper.ExcelContentType, "Report.xlsx");
}
More details can be found here
Содержание
- Импорт данных SQL в Excel
- Импорт данных SQL в Excel
- Небольшой экскурс в MS SQL
- Создаём базу данных
- Создаём таблицу
- Импорт данных SQL в Excel
- How to Import and Export SQL Server data to an Excel file
- Export SQL Server data to an Excel file using the SQL Server Import and Export Wizard
- Export SQL Server data to an Excel file using T-SQL code
- Import SQL Server data into Excel using the Data Connection Wizard dialog
- Export SQL Server data to an Excel file using Export to Excel from ApexSQL Complete
Импорт данных SQL в Excel
Импорт данных SQL в Excel
Небольшой экскурс в MS SQL
Добрый день, уважаемые читатели и подписчики блога. Как вы уже догадались из названия статьи, речь сегодня пойдёт об импорте данных SQL в таблицу Excel.
Небольшое предисловие. Имеется база данных MS SQL, в которой содержится определённая таблица, её нужно загрузить в Excel.
Зачем использовать такую модель? Базы данных SQL могут быть объёмом гораздо больше чем файлы Excel и работают гораздо быстрее, а Excel используется как инструмент тонкой настройки загруженной таблицы.
Задача проста, но есть несколько моментов: необходимо знать, как называется инстанс (экземпляр) где находится база данных, естественно, нужно знать учётные данные, нужно знать название таблицы. Что ж, приступим.
Я предпочитаю в таких случаях использовать Microsoft Management Studio, для поиска основных данных. Найти ярлык можно в меню Пуск.

В консоли MS SQL есть несколько полей:
Server Type — можно выбрать тип подключения (в этом случаем остаётся Database Engine);
- Analysis Services — сервисы аналитики;
- Reporting Services — сервисы отчётов;
- Integration Services — сервисы интеграции (встраивания).
Далее следует имя сервера (его можно задать на этапе установки).
Тип аутентификации — WIndows Authentication или SQL Server Authentication, эти пункты позволяют выбрать тип проверки пользователя. Windows — можно войти под логином и паролем для операционной системы, SQL Server — под специальной учётной записью sa и заданным для неё паролем.
Оставим первый вариант — он проще (но запомните — только для тестов!). Хорошим тоном считается смешанная аутентификация и смена пароля для учётки sa на случай непредвиденных ситуаций.
Видно, что имя сервера — BLACKPRINCE, логин axiro. Пароль не скажу:) Осталось нажать кнопку «Connect» и зайти в базу данных.

Поди цифрой 1 — список баз данных, под 2 — тестовая база с именем Test, под 3 — запущенный SQL Server Agent — он должен быть запущен иначе база данных может быть не видна для других программ, если на нем стоит крест — щёлкнуть правой кнопкой мышки и выбрать «Start».
Исходные данные есть, теперь необходимо создать таблицу с данными. Это можно сделать через графический интерфейс, но лучше воспользоваться запросом — «New Query».

Откроется окно запроса.

Все запросы будут производиться на языке Transact SQL. У него очень много общего с синтаксисом SQL, но есть и много отличий.
Создаём базу данных
Если необходимо создать новую базу данных, например, магазины (SHOPS), синтаксис будет следующий:
CREATE DATABASE SHOPS
Обязательно после написания запроса нажать «Execute» или F5! В противном случае запрос не будет выполнен.

Под цифрой 1 — «Execute», под 2 — текст запроса, под 3 — результат выполнения. Если в процессе выполнения будут выявлены ошибки, они незамедлительно будут показаны. Пока всё идёт по плану.
Создаём таблицу
Если необходимо выполнить запрос к определённой базе данных — щёлкаем правой кнопкой на неё и выбираем «New query».

В окне запроса введём текст запроса. Цель — создать таблицу с четырьмя столбцами: номер магазина, название магазина, выручка магазина, менеджер. Лучше все столбцы называть по английски (хотя бы на первоначальном этапе).
CREATE TABLE dbo.Shops
(ShopID int PRIMARY KEY NOT NULL,
ShopName varchar(25) NOT NULL,
Revenue money NULL,
Manager text NULL)
GO

Нажать «Execute». Таблица создалась. Проверить можно раскрыв дерево базы данных и раскрыть группу «Tables».

Цель достигнута. В запросе также были упомянуты типы данных (varchar(25), money, text, PRIMARY KEY). Соответственно — varchar это длина текста, в скобках указано, что длина названия магазина может быть до 25 символов включительно, money — тип данных, представляющий денежные (валютные) значения, text — обычный текст, PRIMARY KEY — ограничение, позволяющее однозначно идентифицировать каждую запись в таблице SQL. Также есть атрибут NULL и NOT NULL — позволяет значениям принимать нулевое значение или не принимать (может в поле стоять ноль или не может).
Добавим в таблицу одну строчку (пока). Открываем окно нового запроса базе данных и добавляем запрос.
INSERT INTO dbo.Shops VALUES ( ‘1’, ‘Ручеёк’, ‘120000’, ‘Петров В.И.’)

Добавилась одна строка.
Импорт данных SQL в Excel
Со стороны Excel действий будет гораздо меньше. Переходим на вкладку «Данные», нажимаем кнопку «Получение внешних данных», «Из других источников», «С сервера SQL Server».

Как было написано выше, нужно указать имя сервера SQL — BLACKPRINCE, и выбрать проверку подлинности — Windows. Нажать «Далее».

В следующем окне выберем базу данных SHOPS и отметим галкой таблицу Shops. Если нужно выбрать несколько таблиц — отметить галкой соответствующую настройку. Нажать «Далее».

В следующем окне Excel предложит сохранить файл для подключения к базе данных с настройками. Нажать «Готово».

Теперь можно выбрать расположение загруженной таблицы и указать необходимые настройки. Я пока указывать их не буду, просто нажму «ОК». Таблица будет размещена в ячейку A1.

Цель достигнута! Таблица из базы данных перекочевала в Excel и теперь над ней можно совершать привычные действия.
В следующих уроках мы поговорим о более сложных манипуляциях с запросами к базам данных .
Источник
How to Import and Export SQL Server data to an Excel file
There are several ways to Export/Import SQL Server data to an Excel file. In this article, a couple of ways to import and export SQL Server data to an Excel file will be explained:
- Export SQL Server data to an Excel file using
- the SQL Server Import and Export Wizard
- T-SQL code
- Export to Excel from ApexSQL Complete
- Import SQL Server data into Excel using the Data Connection Wizard
Export SQL Server data to an Excel file using the SQL Server Import and Export Wizard
In SQL Server Management Studio (SSMS), there is a feature that provides for exporting data from one data source to another data source; in this case, data from SQL Server will be copied to an Excel file trough Export Wizard.
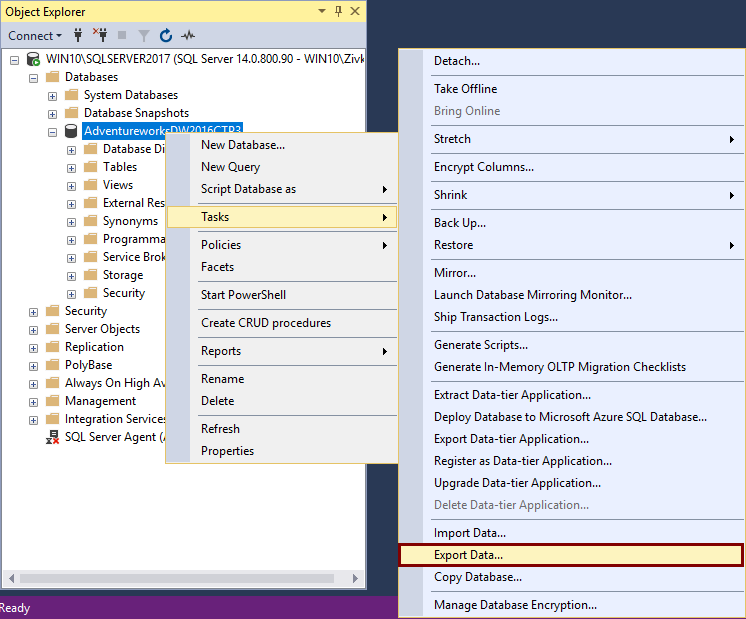
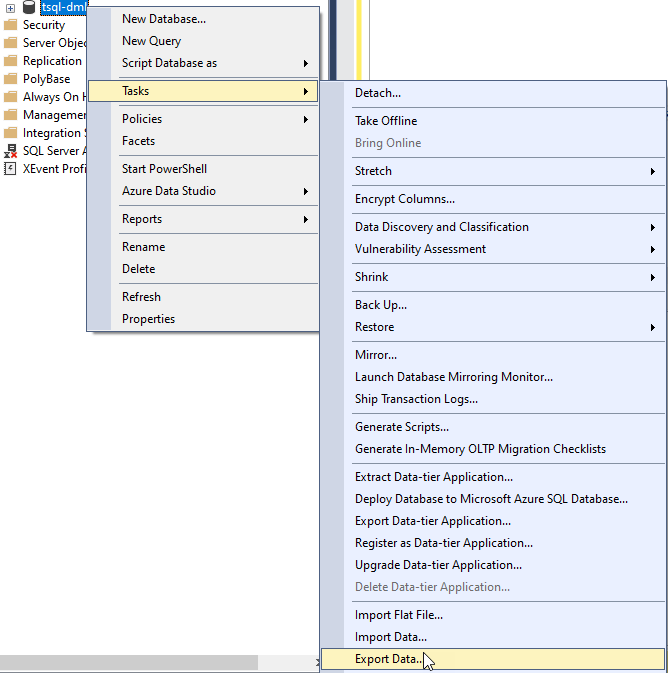
To start to use this feature, go to Object Explorer, right click on any database (e.g. AdventureworksDW2016CTP3), under the Tasks, choose Export Data command:
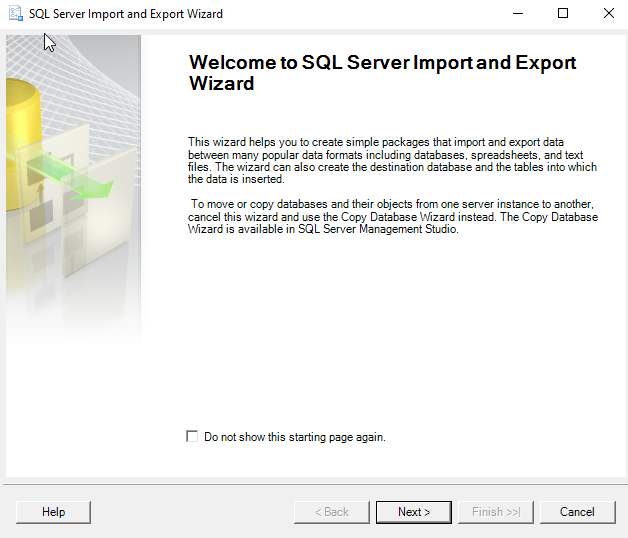
This will open the SQL Server Import and Export Wizard window:
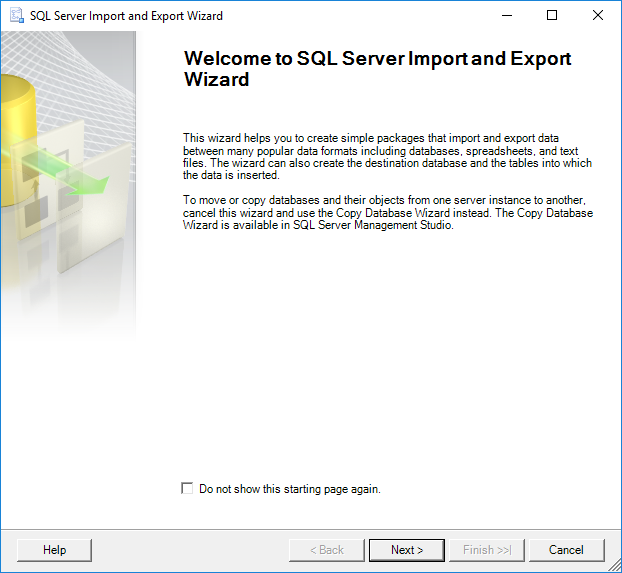
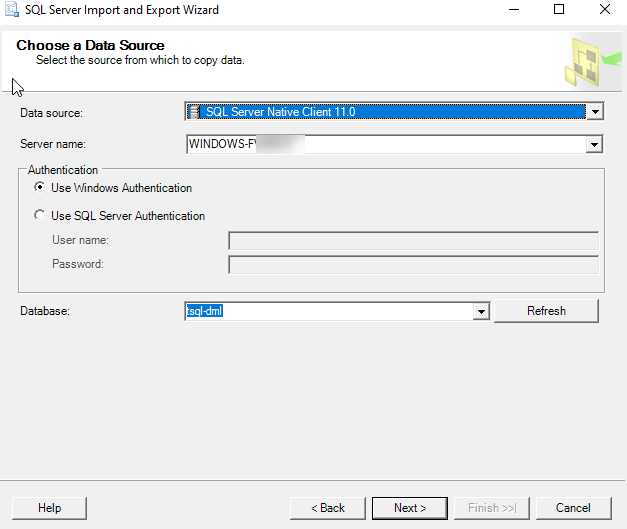
To proceed with exporting SQL Server data to an Excel file, click the Next button. This will open the Choose a Data Source window. On this window, a source from which you want to copy data can be chosen:
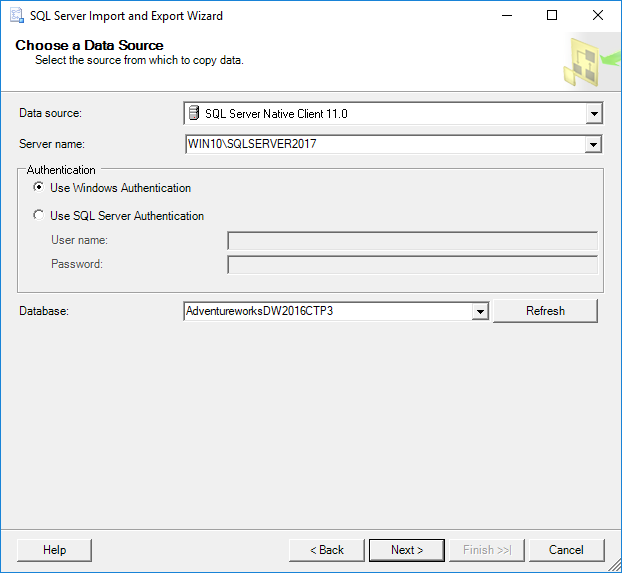
From the Data source drop down box, choose the SQL Server Native Client 11.0 item. Under the Server name drop down box, choose the SQL Server instance from which data need to be copied. In the Authentication section, choose the authentication mode for the data source connection and under the Database drop down box, choose the database from which the data will be copied. After all these options are set, click the Next button to proceed.
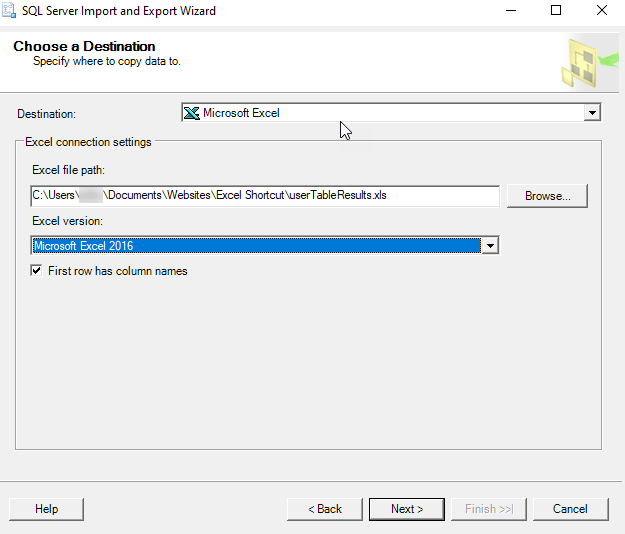
This will open the Choose a Destination window in which can be specified where to copy data from the data source:

In the Destination drop down box, choose the Microsoft Excel item. Under the Excel file path, choose the destination for copied data from SQL Server data source (SQL Data.xlsx). In the Excel version drop down box, choose the version of the Microsoft Excel worksheet. After these are all set, press the Next button to continue. But after pressing the Next button, the following warning message may appear:
The operation could not be completed.
ADDITIONAL INFORMATION:
The ‘Microsoft.ACE.OLEDB.12.0’ provider is not registered on the local machine. (System.Data)
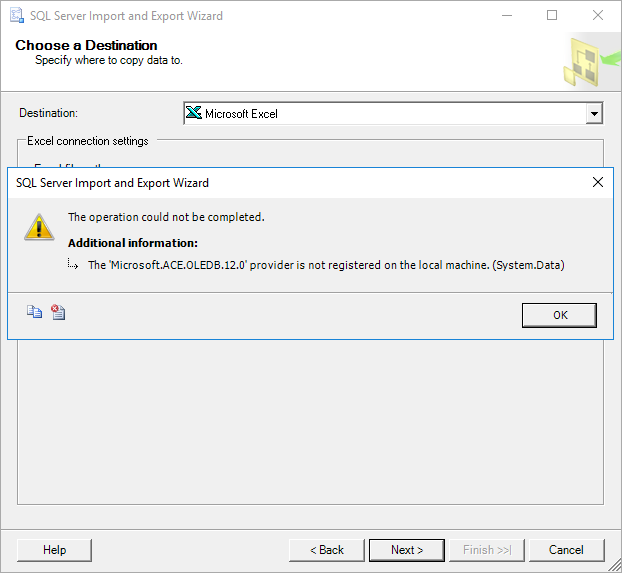
This happens because SSMS is a 32-bit application and when you launch the Export Wizard via SSMS, it launches a 32-bit version of Export Wizard. On the other hand, the machine (Operating system) on which SSMS is installed is a 64-bit version and the installed SQL Server is a 64-bit version.
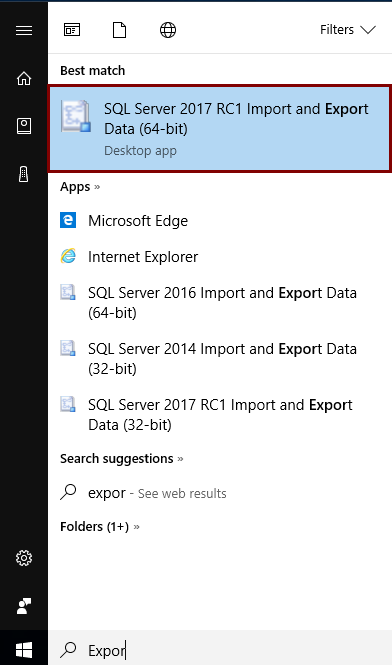
To solve this problem, close SSMS, go to the Start menu and find the 64-bit version of SQL Server Import and Export Data:
After launching this SQL Server Import and Export Wizard, it will be prompted with the same window that is used via SSMS. After setting all previous options, click the Next button. The Specify Table Copy or Query window will appear:
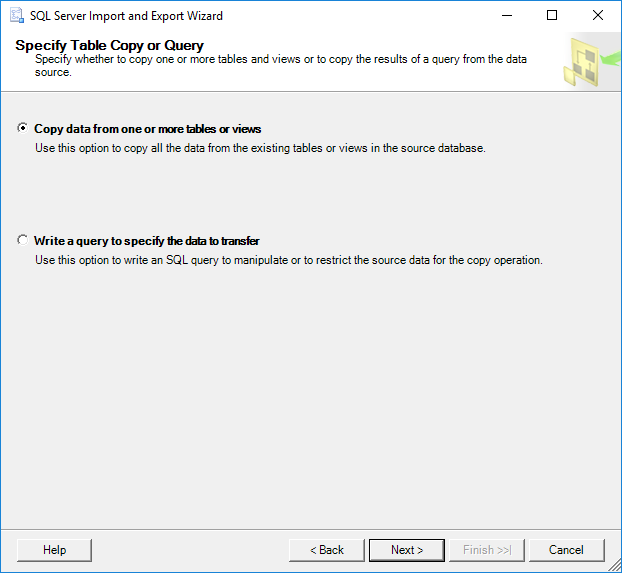
On this window, whether to copy data from one or more tables and views or to copy the results of a query can be specified.
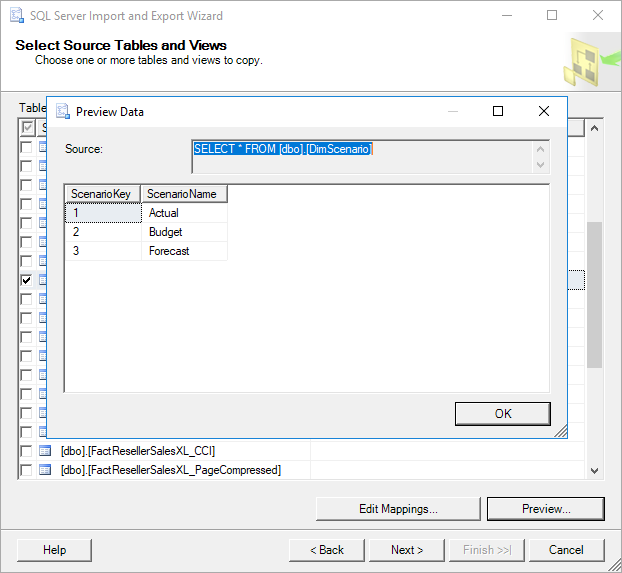
Select the Copy data from one or more tables or views radio button and click the Next button. The Select Source Table and Views window allows choosing one or more tables and views from which you want to export SQL Server data to an Excel file by clicking the check box next to the name of the table/view:
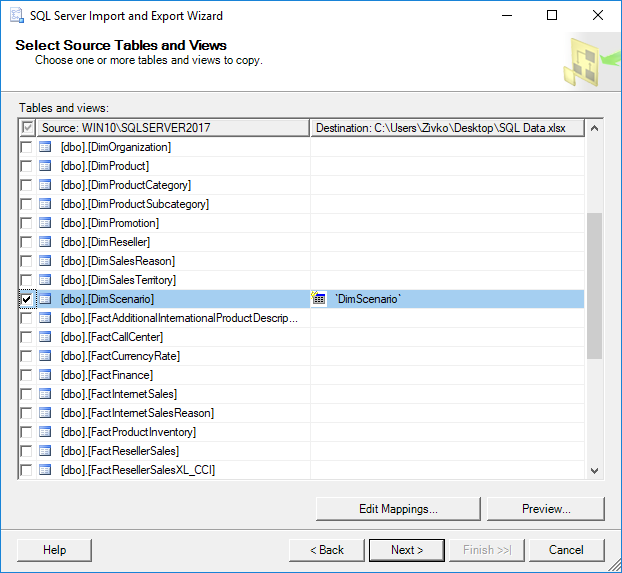
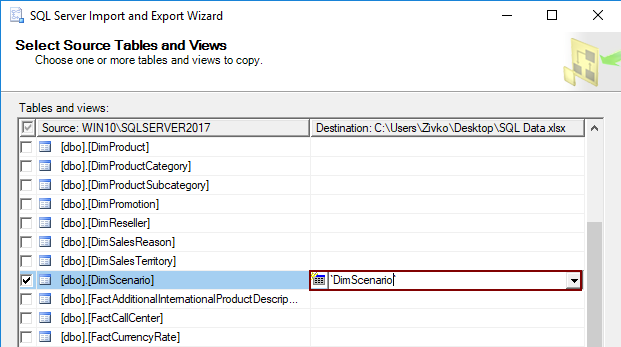
As it may be noticed, as soon as the check box next to a table/view is checked, the name of the table/view will be copied under the Destination column. This name represents the name of the sheet where the data from the table will be put, this name can be changed to whatever you like, but for now, it will be left as it is:
To preview which data will be generated to an Excel file, click the Preview button:
After choosing which tables/views data will be copied to an Excel file, click the Next button:
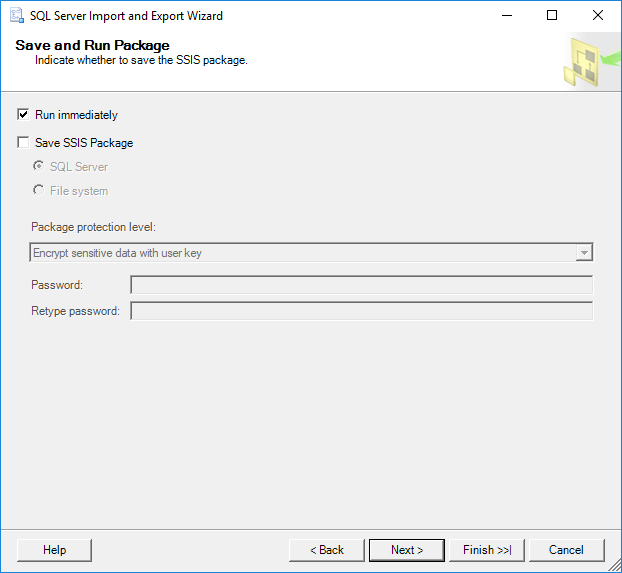
On the Save as Run Package window, check the Run immediately check box and click the Next button:
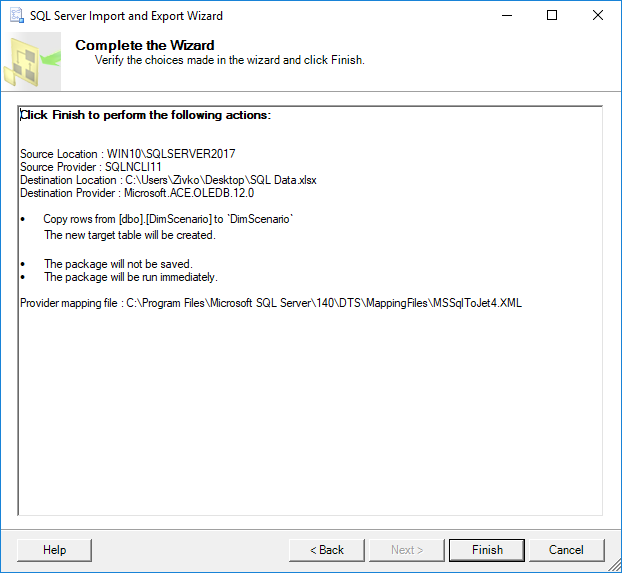
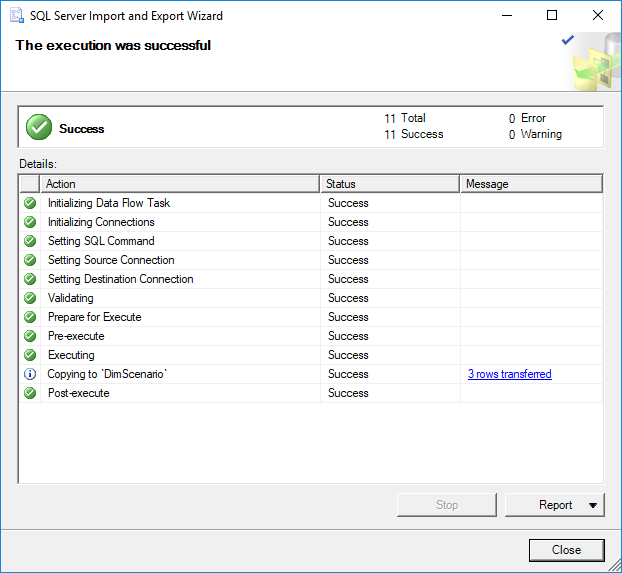
The Complete the Wizard window shows all options that are chosen for exporting operations. To finalize the process of export SQL Server data to an Excel file, click the Finish button. The last SQL Server Import and Export Wizard window shows the state of the data have been successfully exported or some errors occurred during exporting data:
In our case, the data were successfully generated into the SQL Data.xlsx file in the DimScenario sheet:
Export SQL Server data to an Excel file using T-SQL code
The Transact-SQL OPENROWSET can be used to export SQL Server data to an Excel file via SSMS. In a query editor type and execute the following code:
But, when executing the above code, the following error may occur:
Msg 15281, Level 16, State 1, Line 1
SQL Server blocked access to STATEMENT ‘OpenRowset/OpenDatasource’ of component ‘Ad Hoc Distributed Queries’ because this component is turned off as part of the security configuration for this server. A system administrator can enable the use of ‘Ad Hoc Distributed Queries’ by using sp_configure. For more information about enabling ‘Ad Hoc Distributed Queries’, search for ‘Ad Hoc Distributed Queries’ in SQL Server Books Online.
To resolve this error the Ad Hoc Distributed Queries option should be enabled This can be done by using the sp_configure procedure and executing the following SQL code in a query editor:
After executing the above code, the following message will appear that indicate that the show advanced options and Ad Hoc Distributed Queries options are enabled:
Configuration option ‘show advanced options’ changed from 0 to 1. Run the RECONFIGURE statement to install.
Configuration option ‘Ad Hoc Distributed Queries’ changed from 0 to 1. Run the RECONFIGURE statement to install.
Now, when again the code is executed:
The following error may appear:
OLE DB provider “Microsoft.ACE.OLEDB.12.0” for linked server “(null)” returned message “The Microsoft Access database engine cannot open or write to the file ”. It is already opened exclusively by another user, or you need permission to view and write its data.”.
Msg 7303, Level 16, State 1, Line 1
Cannot initialize the data source object of OLE DB provider “Microsoft.ACE.OLEDB.12.0” for linked server “(null)
This usually happens because of inadequate permissions.
More about how to resolving these issues can be found in the How to query Excel data using SQL Server linked servers page.
One way for resolving this issue is to open SSMS as an administrator and execute the code again. But this time, another error may appear:
Msg 213, Level 16, State 1, Line 1
Column name or number of supplied values does not match table definition.
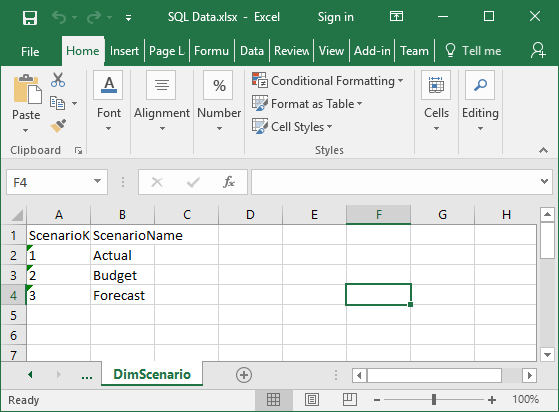
To resolved this, open excel file (e.g. SQL Data.xlsx) for which is planned to store the data from SQL Server table (e.g. dbo.DimScenario) and enter the column names which will represent the column names from the DimScenario table:
Close the SQL Data.xlsx file and once again execute the code:
Now, the following message will appear:
(3 rows affected)
Finally, the data from the SQL Server table are copied into the Excel file:
Import SQL Server data into Excel using the Data Connection Wizard dialog
Another way to copy data from SQL Server table to an Excel file is to use the Data Connection Wizard dialog from Excel.
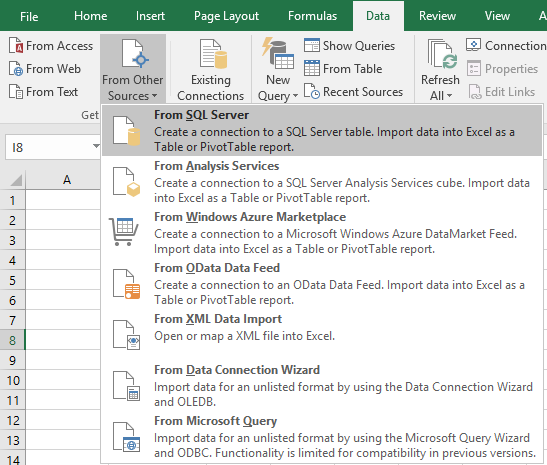
In order to achieve that, open an Excel file (e.g. SQL Data.xlsx) in which you want to import data. In the Data tab, under the From Other Source sub-menu, choose the From SQL Server command:
This will open the Data Connection Wizard dialog. In the Server name, enter a name of the SQL Server instance from which data need to be copied. In the Log on credentials section, choose the authentication mode for the data source connection and click the Next button:

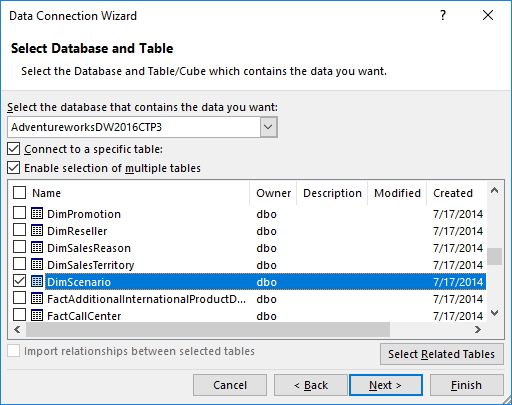
From the Select the database that contains the data you want drop down box, choose the database from which the data will be copied. In the grid, all available tables and views will be listed. Choose a desired table / view (e.g. DimScenario) and click the Next button to proceed.
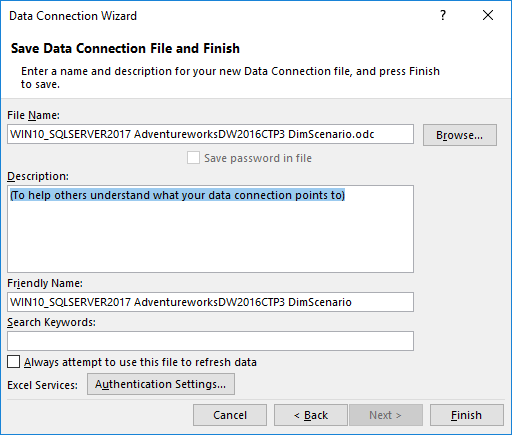
On this window, leave everything as it is and press the Finish button:
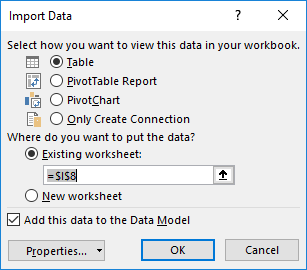
In the Import Data dialog, choose the Table radio button, under the Where do you want to put the data? section, choose the Existing worksheet radio button and press the OK button:
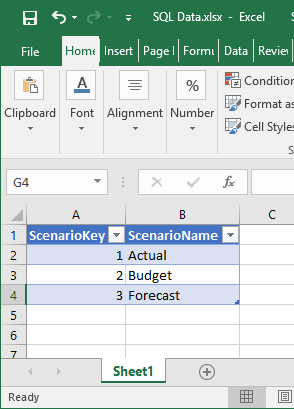
After pressing the OK button, the data from the DimScenario table will be copied to the SQL Data.xslx file:
Export SQL Server data to an Excel file using Export to Excel from ApexSQL Complete
Using the Export to Excel feature from ApexSQL Complete, add-in for SSMS and Visual Studio, exporting data from the SQL Server table to an Excel file can be done by one click.
In a query editor, type and execute the following code:
From the Results grid, select data that you want to export to an Excel file, right click in the Result grid and, from the context menu, choose the Export to Excel option:
This will open a new Excel workbook and the selected data from the Results grid will be copied in the first worksheet:
More about exporting to Excel via ApexSQL Complete can be found on the Export to Excel page.
Источник
There are several ways to Export/Import SQL Server data to an Excel file. In this article, a couple of ways to import and export SQL Server data to an Excel file will be explained:
- Export SQL Server data to an Excel file using
- the SQL Server Import and Export Wizard
- T-SQL code
- Export to Excel from ApexSQL Complete
- Import SQL Server data into Excel using the Data Connection Wizard
In SQL Server Management Studio (SSMS), there is a feature that provides for exporting data from one data source to another data source; in this case, data from SQL Server will be copied to an Excel file trough Export Wizard.
To start to use this feature, go to Object Explorer, right click on any database (e.g. AdventureworksDW2016CTP3), under the Tasks, choose Export Data command:

This will open the SQL Server Import and Export Wizard window:

To proceed with exporting SQL Server data to an Excel file, click the Next button. This will open the Choose a Data Source window. On this window, a source from which you want to copy data can be chosen:

From the Data source drop down box, choose the SQL Server Native Client 11.0 item. Under the Server name drop down box, choose the SQL Server instance from which data need to be copied. In the Authentication section, choose the authentication mode for the data source connection and under the Database drop down box, choose the database from which the data will be copied. After all these options are set, click the Next button to proceed.
This will open the Choose a Destination window in which can be specified where to copy data from the data source:

In the Destination drop down box, choose the Microsoft Excel item. Under the Excel file path, choose the destination for copied data from SQL Server data source (SQL Data.xlsx). In the Excel version drop down box, choose the version of the Microsoft Excel worksheet. After these are all set, press the Next button to continue. But after pressing the Next button, the following warning message may appear:
The operation could not be completed.
ADDITIONAL INFORMATION:
The ‘Microsoft.ACE.OLEDB.12.0’ provider is not registered on the local machine. (System.Data)

This happens because SSMS is a 32-bit application and when you launch the Export Wizard via SSMS, it launches a 32-bit version of Export Wizard. On the other hand, the machine (Operating system) on which SSMS is installed is a 64-bit version and the installed SQL Server is a 64-bit version.
To solve this problem, close SSMS, go to the Start menu and find the 64-bit version of SQL Server Import and Export Data:

After launching this SQL Server Import and Export Wizard, it will be prompted with the same window that is used via SSMS. After setting all previous options, click the Next button. The Specify Table Copy or Query window will appear:

On this window, whether to copy data from one or more tables and views or to copy the results of a query can be specified.
Select the Copy data from one or more tables or views radio button and click the Next button. The Select Source Table and Views window allows choosing one or more tables and views from which you want to export SQL Server data to an Excel file by clicking the check box next to the name of the table/view:

As it may be noticed, as soon as the check box next to a table/view is checked, the name of the table/view will be copied under the Destination column. This name represents the name of the sheet where the data from the table will be put, this name can be changed to whatever you like, but for now, it will be left as it is:

To preview which data will be generated to an Excel file, click the Preview button:

After choosing which tables/views data will be copied to an Excel file, click the Next button:

On the Save as Run Package window, check the Run immediately check box and click the Next button:

The Complete the Wizard window shows all options that are chosen for exporting operations. To finalize the process of export SQL Server data to an Excel file, click the Finish button. The last SQL Server Import and Export Wizard window shows the state of the data have been successfully exported or some errors occurred during exporting data:

In our case, the data were successfully generated into the SQL Data.xlsx file in the DimScenario sheet:

Export SQL Server data to an Excel file using T-SQL code
The Transact-SQL OPENROWSET can be used to export SQL Server data to an Excel file via SSMS. In a query editor type and execute the following code:
INSERT INTO OPENROWSET('Microsoft.ACE.OLEDB.12.0','Excel 12.0;
Database=C:UsersZivkoDesktopSQL Data.xlsx;','SELECT * FROM [Sheet1$]')
SELECT * FROM dbo.DimScenario
But, when executing the above code, the following error may occur:
Msg 15281, Level 16, State 1, Line 1
SQL Server blocked access to STATEMENT ‘OpenRowset/OpenDatasource’ of component ‘Ad Hoc Distributed Queries’ because this component is turned off as part of the security configuration for this server. A system administrator can enable the use of ‘Ad Hoc Distributed Queries’ by using sp_configure. For more information about enabling ‘Ad Hoc Distributed Queries’, search for ‘Ad Hoc Distributed Queries’ in SQL Server Books Online.
To resolve this error the Ad Hoc Distributed Queries option should be enabled This can be done by using the sp_configure procedure and executing the following SQL code in a query editor:
EXEC sp_configure 'show advanced options', 1
RECONFIGURE
EXEC sp_configure 'Ad Hoc Distributed Queries', 1
RECONFIGURE
After executing the above code, the following message will appear that indicate that the show advanced options and Ad Hoc Distributed Queries options are enabled:
Configuration option ‘show advanced options’ changed from 0 to 1. Run the RECONFIGURE statement to install.
Configuration option ‘Ad Hoc Distributed Queries’ changed from 0 to 1. Run the RECONFIGURE statement to install.
Now, when again the code is executed:
INSERT INTO OPENROWSET('Microsoft.ACE.OLEDB.12.0','Excel 12.0;
Database=C:UsersZivkoDesktopSQL Data.xlsx;','SELECT * FROM [Sheet1$]')
SELECT * FROM dbo.DimScenario
The following error may appear:
OLE DB provider “Microsoft.ACE.OLEDB.12.0” for linked server “(null)” returned message “The Microsoft Access database engine cannot open or write to the file ”. It is already opened exclusively by another user, or you need permission to view and write its data.”.
Msg 7303, Level 16, State 1, Line 1
Cannot initialize the data source object of OLE DB provider “Microsoft.ACE.OLEDB.12.0” for linked server “(null)
This usually happens because of inadequate permissions.
More about how to resolving these issues can be found in the How to query Excel data using SQL Server linked servers page.
One way for resolving this issue is to open SSMS as an administrator and execute the code again. But this time, another error may appear:
Msg 213, Level 16, State 1, Line 1
Column name or number of supplied values does not match table definition.
To resolved this, open excel file (e.g. SQL Data.xlsx) for which is planned to store the data from SQL Server table (e.g. dbo.DimScenario) and enter the column names which will represent the column names from the DimScenario table:

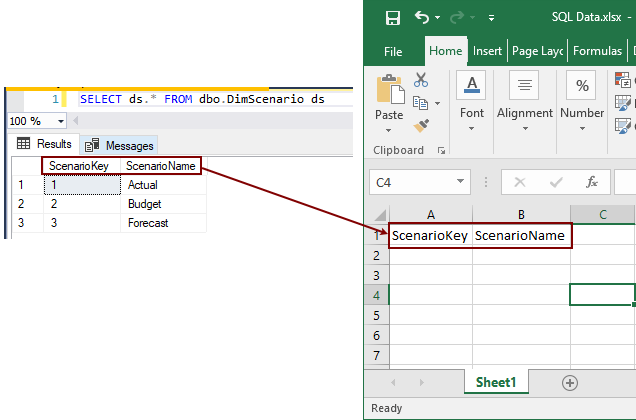
Close the SQL Data.xlsx file and once again execute the code:
Now, the following message will appear:
(3 rows affected)
Finally, the data from the SQL Server table are copied into the Excel file:

Import SQL Server data into Excel using the Data Connection Wizard dialog
Another way to copy data from SQL Server table to an Excel file is to use the Data Connection Wizard dialog from Excel.
In order to achieve that, open an Excel file (e.g. SQL Data.xlsx) in which you want to import data. In the Data tab, under the From Other Source sub-menu, choose the From SQL Server command:

This will open the Data Connection Wizard dialog. In the Server name, enter a name of the SQL Server instance from which data need to be copied. In the Log on credentials section, choose the authentication mode for the data source connection and click the Next button:

From the Select the database that contains the data you want drop down box, choose the database from which the data will be copied. In the grid, all available tables and views will be listed. Choose a desired table / view (e.g. DimScenario) and click the Next button to proceed.

On this window, leave everything as it is and press the Finish button:

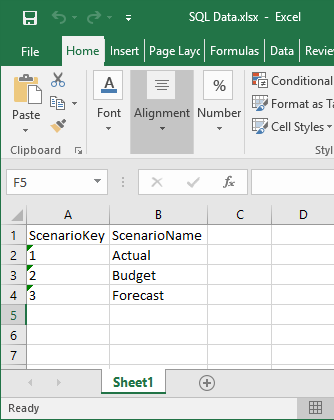
In the Import Data dialog, choose the Table radio button, under the Where do you want to put the data? section, choose the Existing worksheet radio button and press the OK button:

After pressing the OK button, the data from the DimScenario table will be copied to the SQL Data.xslx file:

Export SQL Server data to an Excel file using Export to Excel from ApexSQL Complete
Using the Export to Excel feature from ApexSQL Complete, add-in for SSMS and Visual Studio, exporting data from the SQL Server table to an Excel file can be done by one click.
In a query editor, type and execute the following code:
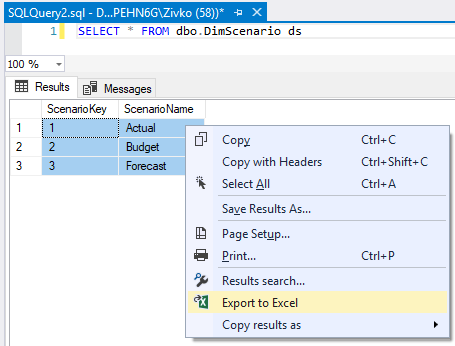
SELECT * FROM dbo.DimScenario ds
From the Results grid, select data that you want to export to an Excel file, right click in the Result grid and, from the context menu, choose the Export to Excel option:

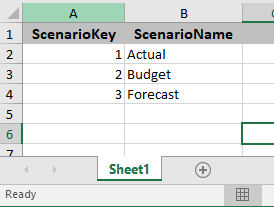
This will open a new Excel workbook and the selected data from the Results grid will be copied in the first worksheet:

More about exporting to Excel via ApexSQL Complete can be found on the Export to Excel page.
See also:
- Tutorial: Import Data into Excel, and Create a Data Model
- Get started with this simple example of the Import and Export Wizard
- How to query Excel data using SQL Server linked servers
- Export to Excel
September 11, 2017
Export SQL Data to Excel from Microsoft SQL Server
Let’s go over three ways to export an SQL Query to an Excel File Using MSSQL
Despite the pushback from Database aficionados, sometimes it makes sense to export data from SQL to an Excel file. It really depends on who is the audience of the information. Not everyone is great with SQL Analysis. Few people require access to the database.
And lots of times the boss just needs to see the information in Excel.
So, if Excel is the Output required this article is here to help you Export SQL Queries to Excel.
Here are three ways to Export a SQL query to Excel format. The last one can be kind of tricky. I’ll provide a condensed version followed by a detailed version with screenshots.
Three quick ways to Export SQL Data to Excel:
Choose the Summarized Version and then scroll to further down to use the SQL Export Version to Excel that works best for you.
Method Number 1 – Copy Grid results and Paste into Excel
Under Query, Make sure results to Grid are selected.
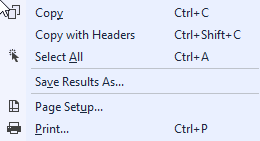
After Running your query, right-click the top right corner of the grid.
Copy With Headers.
Paste into an Excel File
Possible Issues:
I’ve seen formatting issues with this strategy. For Example, there are situations where the spreadsheet drops preceding zeroes after the copy-paste.
I’ve also noticed lengthy fields, (think of a really long free text field) end up running into the next line.
For the reasons above, I prefer this next method for a clean Excel file.
Method Number 2: Export the Query Results as a Task
In the object explorer window, find the database you want to export from.
Right Click the Database, Click Tasks, and Export Data
The Wizard walks you through the rest of the steps but I have included screenshots below.
Method Number 3 – Use Good Old fashioned TSQL to send the data to an excel file
For those who value speed above all use the following script format.
INSERT INTO OPENROWSET(‘Microsoft.ACE.OLEDB.12.0′,’Excel 12.0; Database=C:SQL2019ReportsUsernames.xlsx;’,’SELECT * FROM [Sheet1$]’) SELECT DisplayName FROM dbo.Users Where Reputation > 2000
Possible Issues – Configuring this might not be your type of fun and getting this straight deserves its own article.
Step by Step instructions with screenshots
Method Number 1 – Copy Grid results and paste into Excel
After ensuring results to grid turned on, Execute your query, right-click the top left-hand corner of the results grid.
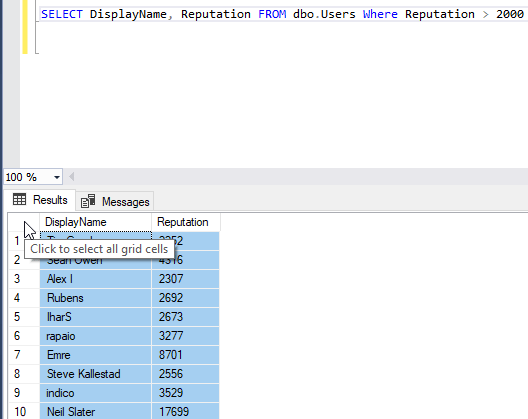
Choose Copy with Headers and then you are ready to paste in Excel with Ctrl + C
Method 2 – Export Via the Export Wizard
Right-click on the database you want to export from. Then Select tasks and “Export Data”.
The SQL Server Wizard will startup. Click Next through the prompts.
Select the appropriate Native client, your server name, and database and choose “Next”.
Next, Select Microsoft Excel and the file path where you want to import the data. The .xls file that you name will be created by this process.
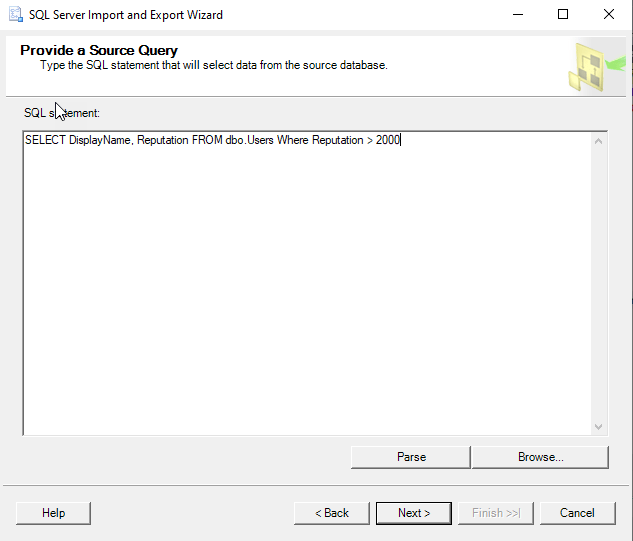
Now you can choose to export a whole table or a query. For the purpose of this exercise, we are creating a query.
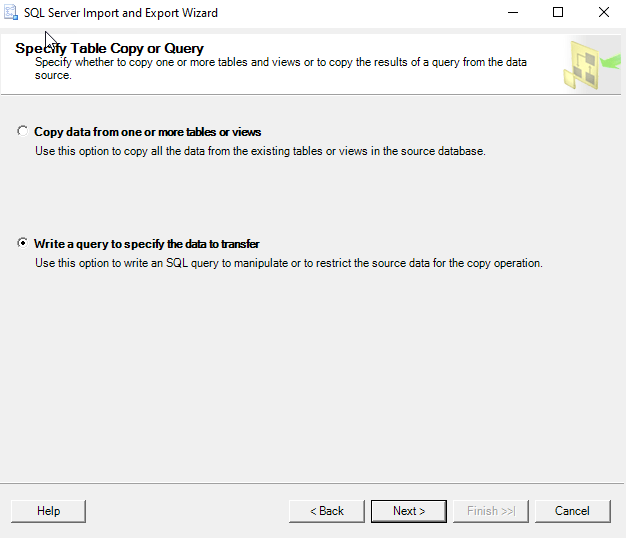
Paste the query into the SQL Statement field. Make sure every output field has a unique name.
Click Next on the “Select Source Tables and Views” screen.

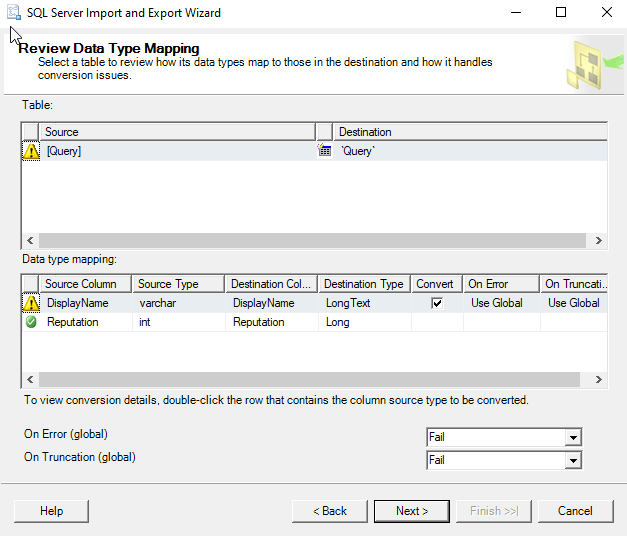
I use the default settings on the “conversion issues and data type mapping screen”
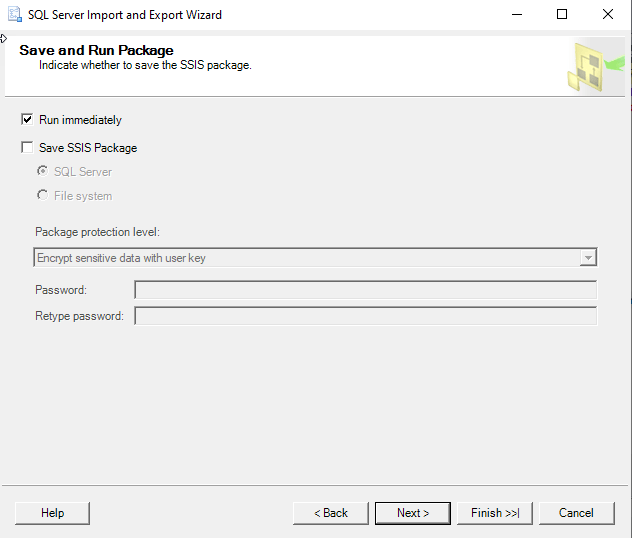
Now you can choose to Run immediately or Save an SSIS Package for later reuse.
Double Check your settings and click finish.
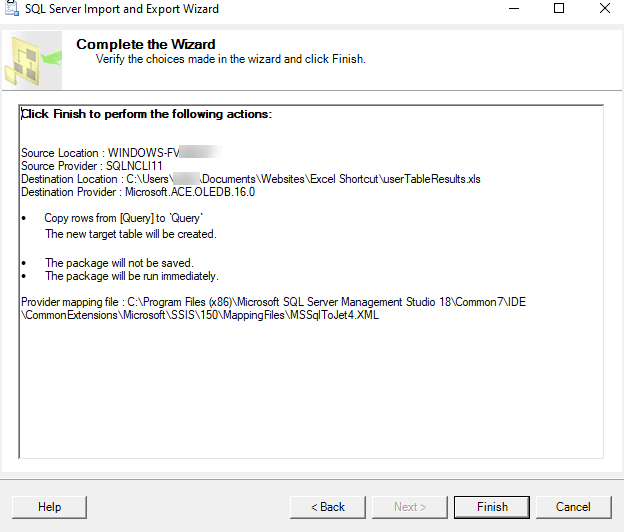
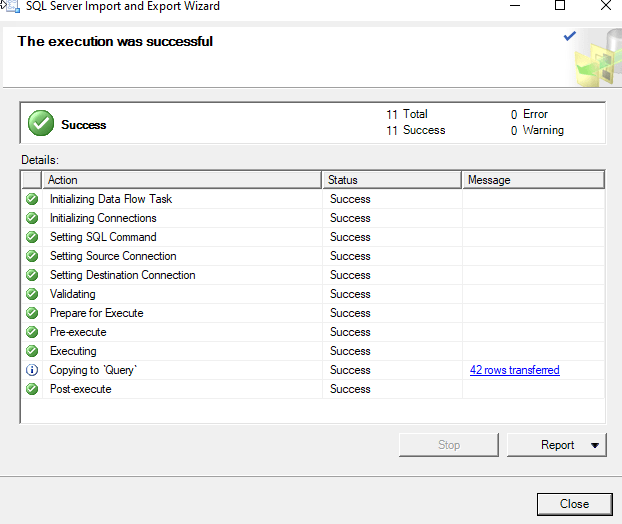
Make sure there were no errors in the Export.
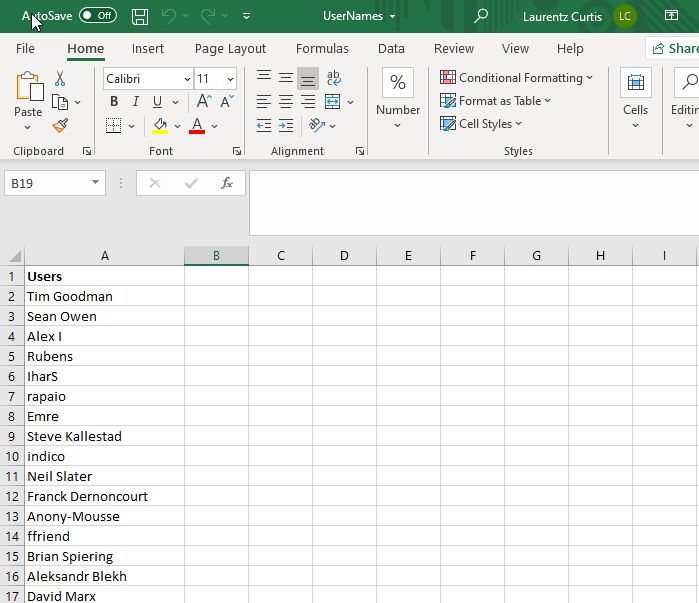
Now Go to the directory you choose earlier and make sure you have a sweet-looking Excel File at that location!
Method Number 3 – Use TSQL to send the data to an excel file
This method is the quickest once you get it set up but the configuration is the tricky part. Permissions can be a limiting factor.
Also with the script below, you have to make sure the file exists before you run the query for it to import properly.
First, create a blank excel file at the directory of your choosing.
C:SQL2019ReportsUsernames.xlsx
Then run this script below.
INSERT INTO OPENROWSET(‘Microsoft.ACE.OLEDB.12.0’,’Excel 12.0;
Database=C:SQL2019ReportsUsernames.xlsx;’,’SELECT * FROM [Sheet1$]’)
SELECT DisplayName FROM dbo.Users Where Reputation > 2000

Configuring this can be tricky and dependent on your level of permissions. Make sure you have the correct Linked Server/Provider installed (‘Microsoft.ACE.OLEDB.12.0’) And check your Database user settings to this server .

Introduction
There are two ways to import SQL Server data into Microsoft Excel using VBA:
- To create a QueryTable connected to a database table using Excel or VBA.
- To insert database data to a range using ADO Recordset or Excel add-ins.
The QueryTable object has a native Excel feature to refresh data.
To refresh data inserted using ADO, just insert the data again.
There are two ways to export Excel data to SQL Server using VBA:
- To use ADO.
- To use Excel add-ins that allow saving data and support VBA integration.
You can download the example and continue reading when you try the code.
Download Example
The attached VBA code example works in Microsoft Excel 2003-2016.
The example works with data in Microsoft Azure SQL Database. So, you can test the solution right after download.
Before to continue
This article was written in June 2011. It contains the tested code that you can use. I have a lot of thanks.
I would like to recommend you to take a look at my e-book «Excel Applications. 10 Steps for VBA Developers.»
You can also download the workbook examples and the SaveToDB add-in used as a free VBA library.
With the SaveToDB add-in, you can create more functional VBA applications with fewer efforts.
For example, you can save data changes from Excel to a database using a single call like GetAddIn().Save.
E-book
E-book Examples
SaveToDB Add-In
Table of Contents
- Introduction
- SQL Server Data Import to Excel using QueryTable
- SQL Server Data Import to Excel using ADO
- SQL Server Data Import to Excel using SaveToDB Add-In
- Excel Data Export to SQL Server using ADO
- Excel Data Export to SQL Server using SaveToDB Add-In
- Connection String Functions
- Conclusion
- See Also
- Download
SQL Server Data Import to Excel using QueryTable
Function ImportSQLtoQueryTable
The function creates a native Excel QueryTable connected to the OLE DB data source specified by the conString parameter.
The result is nearly the same as using the standard Excel connection dialog box.
Function ImportSQLtoQueryTable(conString As String, query As String, target As Range) As Integer

    On Error Resume Next

    Dim ws As Worksheet
    Set ws = target.Worksheet

    Dim address As String
    address = target.Cells(1, 1).address

    ' Procedure recreates ListObject or QueryTable

    If Not target.ListObject Is Nothing Then     ' Created in Excel 2007 or higher
        target.ListObject.Delete
    ElseIf Not target.QueryTable Is Nothing Then ' Created in Excel 2003
        target.QueryTable.ResultRange.Clear
        target.QueryTable.Delete
    End If

    If Application.Version >= "12.0" Then        ' Excel 2007 or higher
        With ws.ListObjects.Add(SourceType:=0, Source:=Array("OLEDB;" & conString), _
            Destination:=Range(address))

            With .QueryTable
                .CommandType = xlCmdSql
                .CommandText = StringToArray(query)
                .BackgroundQuery = True
                .SavePassword = True
                .Refresh BackgroundQuery:=False
            End With
        End With
    Else                                          ' Excel 2003
        With ws.QueryTables.Add(Connection:=Array("OLEDB;" & conString), _
            Destination:=Range(address))

            .CommandType = xlCmdSql
            .CommandText = StringToArray(query)
            .BackgroundQuery = True
            .SavePassword = True
            .Refresh BackgroundQuery:=False
        End With
    End If

    ImportSQLtoQueryTable = 0

End Function

' Source: http://support.microsoft.com/kb/816562

Function StringToArray(Str As String) As Variant

    Const StrLen = 127
    Dim NumElems As Integer
    Dim Temp() As String
    Dim i As Integer

    NumElems = (Len(Str) / StrLen) + 1
    ReDim Temp(1 To NumElems) As String

    For i = 1 To NumElems
       Temp(i) = Mid(Str, ((i - 1) * StrLen) + 1, StrLen)
    Next i

    StringToArray = Temp
End Function
Code comments:
- The query parameter can contain a SELECT or EXECUTE query.
- The resulting data will be inserted starting from the top left cell of the target range.
- If the target range contains a ListObject or QueryTable object, it will be deleted, and a new object will be created instead.
If you need to change the query only, just change the QueryTable.CommandText property. - Pay attention to the .SavePassword = True line.
Microsoft Excel stores passwords without encryption.
If possible, use the trusted connection. However, it is not supported by Microsoft Azure SQL Database yet.
Test Code of SQL Server Data Import to Excel using QueryTable
Sub TestImportUsingQueryTable()

    Dim conString As String
    conString = GetTestConnectionString()

    Dim query As String
    query = GetTestQuery()

    Dim target As Range
    Set target = ThisWorkbook.Sheets(1).Cells(3, 2)

    Select Case ImportSQLtoQueryTable(conString, query, target)
        Case Else
    End Select

End Sub
SQL Server Data Import to Excel using ADO
Function ImportSQLtoRange
The function inserts SQL Server data to the target Excel range using ADO.
Function ImportSQLtoRange(conString As String, query As String, target As Range) As Integer

    On Error Resume Next

    ' Object type and CreateObject function are used instead of ADODB.Connection,
    ' ADODB.Command for late binding without reference to
    ' Microsoft ActiveX Data Objects 2.x Library

    ' ADO API Reference
    ' https://docs.microsoft.com/en-us/sql/ado/reference/ado-api/ado-api-reference?view=sql-server-ver16

    ' Dim con As ADODB.Connection
    Dim con As Object
    Set con = CreateObject("ADODB.Connection")

    con.ConnectionString = conString

    ' Dim cmd As ADODB.Command
    Dim cmd As Object
    Set cmd = CreateObject("ADODB.Command")

    cmd.CommandText = query
    cmd.CommandType = 1         ' adCmdText

    ' The Open method doesn't actually establish a connection to the server
    ' until a Recordset is opened on the Connection object
    con.Open
    cmd.ActiveConnection = con

    ' Dim rst As ADODB.Recordset
    Dim rst As Object
    Set rst = cmd.Execute

    If rst Is Nothing Then
        con.Close
        Set con = Nothing

        ImportSQLtoRange = 1
        Exit Function
    End If

    Dim ws As Worksheet
    Dim col As Integer

    Set ws = target.Worksheet

    ' Column Names
    For col = 0 To rst.Fields.Count - 1
        ws.Cells(target.row, target.Column + col).Value = rst.Fields(col).Name
    Next
    ws.Range(ws.Cells(target.row, target.Column), _
        ws.Cells(target.row, target.Column + rst.Fields.Count)).Font.Bold = True

    ' Data from Recordset
    ws.Cells(target.row + 1, target.Column).CopyFromRecordset rst

    rst.Close
    con.Close

    Set rst = Nothing
    Set cmd = Nothing
    Set con = Nothing

    ImportSQLtoRange = 0

End Function
Code comments:
- The query parameter can contain a SELECT or EXECUTE query.
- The resulting data will be inserted starting from the top left cell of the target range.
- Using Object types and the CreateObject function instead of direct use of ADO types
lets to avoid setting ActiveX Data Objects 2.x Library references on user computers.
This code works in Microsoft Excel 2003-2016. - Always use Set Nothing statements for ADODB.Connection and ADODB.Recordset objects to free resources.
Test Code of SQL Server Data Import to Excel using ADO
Sub TestImportUsingADO()

    Dim conString As String
    conString = GetTestConnectionString()

    Dim query As String
    query = GetTestQuery()

    Dim target As Range
    Set target = ThisWorkbook.Sheets(2).Cells(3, 2)

    target.CurrentRegion.Clear

    Select Case ImportSQLtoRange(conString, query, target)
        Case 1
            MsgBox "Import database data error", vbCritical
        Case Else
    End Select

End Sub
SQL Server Data Import to Excel using SaveToDB Add-In
The SaveToDB add-in allows connecting to databases, to text files, and the web using Data Connection Wizard, and supports OLE DB, ODBC, .NET and internal providers.
You can reload data using the Reload button at the ribbon or in the Context menu, or from VBA macros.
However, the add-in does not support connecting to new data sources from macros.
The add-in can save a lot of developer time when you need to implement changing query parameters.
You can modify the parameters by setting new values to named cells like Range(«Company») = «ABC».
You can learn about this feature in the attached SaveToDB examples for VBA developers.
Procedure TestImportUsingSaveToDB
The procedure reloads active table data.
The table is a native Excel ListObject connected using the Data Connection Wizard.
Sub TestImportUsingSaveToDB()

    Dim addIn As COMAddIn
    Dim addInObj As Object

    Set addIn = Application.COMAddIns("SaveToDB")
    Set addInObj = addIn.Object

    addInObj.Load

End Sub
Code comments:
If the table is an Excel ListObject connected to a database using OLE DB or ODBC, then the action is the same as ListObject.QueryTable.Refresh BackgroundQuery:=False.
In other cases (the web and file connections or databases through .NET providers), the add-in refreshes data using internal procedures. Moreover, the macro remains the same.
Excel Data Export to SQL Server using ADO
Function ExportRangeToSQL
The function exports the sourceRange data to a specified database table.
The optional beforeSQL code is executed before exporting, and the optional afterSQL code is executed after exporting.
The following logic of the export process is used in the example:
- Delete all data from a temporary import table.
- Export Excel data to the empty temporary import table.
- Update desired tables from the temporary import table data.
Specially developed stored procedures are used in the first and third steps.
You can adapt them to your task.
Moreover, a universal code is used to transfer Excel data to a destination table.
Function ExportRangeToSQL(sourceRange As Range, conString As String, table As String, _
    Optional beforeSQL = "", Optional afterSQL As String) As Integer

    On Error Resume Next

    ' Object type and CreateObject function are used instead of ADODB.Connection,
    ' ADODB.Command for late binding without reference to
    ' Microsoft ActiveX Data Objects 2.x Library
    ' ADO API Reference
    ' https://docs.microsoft.com/en-us/sql/ado/reference/ado-api/ado-api-reference?view=sql-server-ver16
    ' Dim con As ADODB.Connection
    Dim con As Object
    Set con = CreateObject("ADODB.Connection")

    con.ConnectionString = conString
    con.Open

    ' Dim cmd As ADODB.Command
    Dim cmd As Object
    Set cmd = CreateObject("ADODB.Command")

    ' BeginTrans, CommitTrans, and RollbackTrans Methods (ADO)
    ' http://msdn.microsoft.com/en-us/library/ms680895(v=vs.85).aspx

    Dim level As Long
    level = con.BeginTrans

    cmd.CommandType = 1             ' adCmdText
    If beforeSQL > "" Then
        cmd.CommandText = beforeSQL
        cmd.ActiveConnection = con
        cmd.Execute
    End If

    ' Dim rst As ADODB.Recordset
    Dim rst As Object
    Set rst = CreateObject("ADODB.Recordset")

    With rst
        Set .ActiveConnection = con
        .Source = "SELECT * FROM " & table
        .CursorLocation = 3         ' adUseClient
        .LockType = 4               ' adLockBatchOptimistic
        .CursorType = 0             ' adOpenForwardOnly
        .Open

        ' Column mappings

        Dim tableFields(100) As Integer
        Dim rangeFields(100) As Integer

        Dim exportFieldsCount As Integer
        exportFieldsCount = 0

        Dim col As Integer
        Dim index As Integer

        For col = 0 To .Fields.Count - 1
            index = 0
            index = Application.Match(.Fields(col).Name, sourceRange.Rows(1), 0)
            If index > 0 Then
                exportFieldsCount = exportFieldsCount + 1
                tableFields(exportFieldsCount) = col
                rangeFields(exportFieldsCount) = index
            End If
        Next

        If exportFieldsCount = 0 Then
            ExportRangeToSQL = 1
            Goto ConnectionEnd
        End If

        ' Fast read of Excel range values to an array
        ' for further fast work with the array

        Dim arr As Variant
        arr = sourceRange.Value

        ' The range data transfer to the Recordset

        Dim row As Long
        Dim rowCount As Long
        rowCount = UBound(arr, 1)

        Dim val As Variant

        For row = 2 To rowCount
            .AddNew
            For col = 1 To exportFieldsCount
                val = arr(row, rangeFields(col))
                If IsEmpty(val) Then
                Else
                    .Fields(tableFields(col)) = val
                End If
            Next
        Next

        .UpdateBatch
    End With

    rst.Close
    Set rst = Nothing

    If afterSQL > "" Then
        cmd.CommandText = afterSQL
        cmd.ActiveConnection = con
        cmd.Execute
    End If

    ExportRangeToSQL = 0

ConnectionEnd:

    con.CommitTrans

    con.Close
    Set cmd = Nothing
    Set con = Nothing

End Function
Code comments:
- The preliminary column mappings are used for fast transferring Excel range column data to a Recordset column.
- Excel data types are not verified.
- Using Object types and the CreateObject function instead of direct use of ADO types
lets to avoid setting ActiveX Data Objects 2.x Library references on user computers.
This code works in Microsoft Excel 2003-2016. - Always use Set Nothing statements for ADODB.Connection and ADODB.Recordset objects to free resources.
Test Code of Excel Data Export to SQL Server
The temporary dbo04.ExcelTestImport table is used for inserting Excel data.
This table is cleared before exporting by the dbo04.uspImportExcel_Before stored procedure.
The dbo04.uspImportExcel_After stored procedure updates the source dbo04.ExcelTest table with values from dbo04.ExcelTestImport.
This technique simplifies the Excel part of an application but requires additional database objects and server side coding.
Sub TestExportUsingADO()

    Dim conString As String
    conString = GetTestConnectionString()

    Dim table As String
    table = "dbo04.ExcelTestImport"

    Dim beforeSQL As String
    Dim afterSQL As String

    beforeSQL = "EXEC dbo04.uspImportExcel_Before"
    afterSQL = "EXEC dbo04.uspImportExcel_After"

    Dim ws As Worksheet
    Set ws = ThisWorkbook.ActiveSheet

    Dim qt As QueryTable
    Set qt = GetTopQueryTable(ws)

    Dim sourceRange As Range

    If Not qt Is Nothing Then
        Set sourceRange = qt.ResultRange
    Else
        Set sourceRange = ws.Cells(3, 2).CurrentRegion
    End If

    Select Case ExportRangeToSQL(sourceRange, conString, table, beforeSQL, afterSQL)
        Case 1
            MsgBox "The source range does not contain required headers", vbCritical
        Case Else
    End Select

    ' Refresh the data
    If Not qt Is Nothing Then
        Call RefreshWorksheetQueryTables(ws)
    ElseIf ws.Name = ws.Parent.Worksheets(1).Name Then
    Else
        Call TestImportUsingADO
    End If

End Sub
The called RefreshWorksheetQueryTables procedure updates all worksheet QueryTables and ListObjects.
Sub RefreshWorksheetQueryTables(ws As Worksheet)

    On Error Resume Next

    Dim qt As QueryTable

    For Each qt In ws.QueryTables
        qt.Refresh BackgroundQuery:=True
    Next

    Dim lo As ListObject

    For Each lo In ws.ListObjects
        lo.QueryTable.Refresh BackgroundQuery:=True
    Next

End Sub
The called GetTopQueryTable function returns the most top QueryTable object connected to a database.
Function GetTopQueryTable(ws As Worksheet) As QueryTable

    On Error Resume Next

    Set GetTopQueryTable = Nothing

    Dim lastRow As Long
    lastRow = 0

    Dim qt As QueryTable
    For Each qt In ws.QueryTables
        If qt.ResultRange.row > lastRow Then
            lastRow = qt.ResultRange.row
            Set GetTopQueryTable = qt
        End If
    Next

    Dim lo As ListObject

    For Each lo In ws.ListObjects
        If lo.SourceType = xlSrcQuery Then
            If lo.QueryTable.ResultRange.row > lastRow Then
                lastRow = lo.QueryTable.ResultRange.row
                Set GetTopQueryTable = lo.QueryTable
            End If
        End If
    Next

End Function
Excel Data Export to SQL Server using SaveToDB Add-In
The SaveToDB add-in allows saving data changes from Excel to databases.
You can save data using the Save button at the ribbon or from VBA macros.
The simplest scenario is saving changes to a single target table. It works without coding.
Moreover, you can load data from tables, views, or stored procedures.
If you need to save the data to multiple normalized tables, you have to use stored procedures
for INSERT, UPDATE, and DELETE operations. It is not so hard.
Procedure TestExportUsingSaveToDB
The macro saves data changes of the active table to a database and reloads the data.
Sub TestExportUsingSaveToDB()

    Dim addIn As COMAddIn
    Dim addInObj As Object

    Set addIn = Application.COMAddIns("SaveToDB")
    Set addInObj = addIn.Object

    addInObj.Save

End Sub
Code comments:
The SaveToDB add-in makes a lot of work behind the scene.
It saves table metadata, a copy of loaded data, and data changes on hidden sheets.
You can even close the workbook. When the Save action is called, it builds and sends
INSERT, UPDATE and DELETE statements (or specified stored procedures) to a database.
You can learn hidden sheets using the SaveToDB, Options, Developer Options tab,
and generated SQL commands using the SaveToDB, Save, View Save Changes SQL menu item.
Connection String Functions
The example contains several useful functions for working with connection strings.
Function OleDbConnectionString
If the Username parameter is empty, the function returns an OLE DB connection string for trusted connection.
Function OleDbConnectionString(Server As String, Database As String, _
    Username As String, Password As String) As String

    If Username = "" Then
        OleDbConnectionString = "Provider=SQLOLEDB.1;Data Source=" & Server _
            & ";Initial Catalog=" & Database _
            & ";Integrated Security=SSPI;Persist Security Info=False;"
    Else
        OleDbConnectionString = "Provider=SQLOLEDB.1;Data Source=" & Server _
            & ";Initial Catalog=" & Database _
            & ";User ID=" & Username & ";Password=" & Password & ";"
    End If

End Function
Function OdbcConnectionString
If the Username parameter is empty, the function returns an ODBC connection string for trusted connection.
Function OdbcConnectionString(Server As String, Database As String, _
    Username As String, Password As String) As String

    If Username = "" Then
        OdbcConnectionString = "Driver={SQL Server};Server=" & Server _
            & ";Trusted_Connection=Yes;Database=" & Database
    Else
        OdbcConnectionString = "Driver={SQL Server};Server=" & Server _
            & ";UID=" & Username & ";PWD=" & Password & ";Database=" & Database
    End If

End Function
Conclusion
You can use the attached example code to import-export data between Microsoft Excel and SQL Server.
The code works fine with Microsoft SQL Server 2005-2016 and Microsoft Azure SQL Database, and in Microsoft Excel 2003-2016.
You can adapt it to another database platforms like MySQL, Oracle, or DB2 as the code uses OLE DB and ODBC connections.
You can also use the SaveToDB add-in as a database layer starting Excel 2007.
SaveToDB allows implementing projects with fewer efforts as it solves database layer tasks from the box.
See Also
- Microsoft Office Development
- ADO API Reference
- How to import data from Microsoft SQL Server into Microsoft Excel
- Using SaveToDB Add-In as VBA Library
Download