
Watch Video – How to Insert Picture into a Cell in Excel
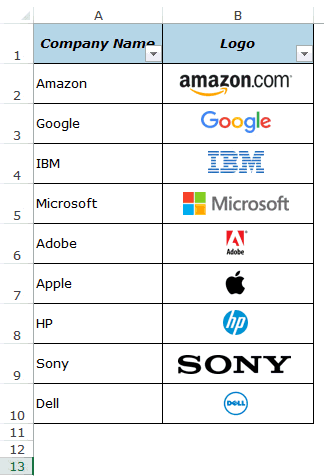
A few days ago, I was working with a data set that included a list of companies in Excel along with their logos.
I wanted to place the logo of each company in the cell adjacent to its name and lock it in such a way that when I resize the cell, the logo should resize as well.
I also wanted the logos to get filtered when I filter the name of the companies.
Wishful Thinking? Not Really.
You can easily insert a picture into a cell in Excel in a way that when you move, resize, and/or filter the cell, the picture also moves/resizes/filters.
Below is an example where the logos of some popular companies are inserted in the adjacent column, and when the cells are filtered, the logos also get filtered with the cells.
This could also be useful if you’re working with products/SKUs and their images.
When you insert an image in Excel, it not linked to the cells and would not move, filter, hide, and resize with cells.
In this tutorial, I will show you how to:
- Insert a Picture Into a Cell in Excel.
- Lock the Picture in the cell so that it moves, resizes, and filters with the cells.
Insert Picture into a Cell in Excel
Here are the steps to insert a picture into a cell in Excel:
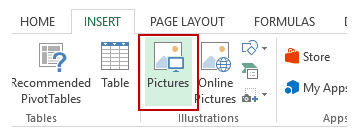
- Go to the Insert tab.
- Click on the Pictures option (it’s in the illustrations group).

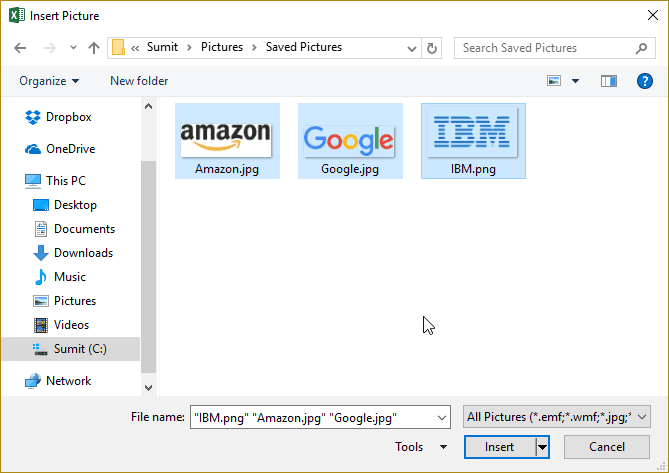
- In the ‘Insert Picture’ dialog box, locate the pictures that you want to insert into a cell in Excel.

- Click on the Insert button.
- Re-size the picture/image so that it can fit perfectly within the cell.

- Place the picture in the cell.
- A cool way to do this is to first press the ALT key and then move the picture with the mouse. It will snap and arrange itself with the border of the cell as soon it comes close to it.

- A cool way to do this is to first press the ALT key and then move the picture with the mouse. It will snap and arrange itself with the border of the cell as soon it comes close to it.


If you have multiple images, you can select and insert all the images at once (as shown in step 4).
You can also resize images by selecting it and dragging the edges. In the case of logos or product images, you may want to keep the aspect ratio of the image intact. To keep the aspect ratio intact, use the corners of an image to resize it.
When you place an image within a cell using the steps above, it will not stick with the cell in case you resize, filter, or hide the cells. If you want the image to stick to the cell, you need to lock the image to the cell it’s placed n.
To do this, you need to follow the additional steps as shown in the section below.
Lock the Picture with the Cell in Excel
Once you have inserted the image into the workbook, resized it ti fit within a cell, and placed it in the cell, you need to lock it to make sure it moves, filters, and hides with the cell.
Here are the steps to lock a picture in a cell:
- Right-click on the picture and select Format Picture.

- In the Format Picture pane, select Size & Properties and with the options in Properties, select ‘Move and size with cells’.


That’s It!
Now you can move cells, filter it, or hide it, and the picture will also move/filter/hide.
Try it yourself.. Download the Example File

This could be a useful trick when you have a list of products with their images, and you want to filter certain categories of products along with their images.
You can also use this trick while creating Excel Dashboards.
You May Also Like the Following Excel Tutorials:
- Insert a Picture in a Comment in Excel.
- Insert Line Break in Excel Formula result.
- Picture Lookup Technique using Named Ranges.
- How to Insert Watermark in Excel Worksheets.
- How to Lock Cells in Excel.
Insert pictures

-
Do one of the following:
-
Select Insert > Pictures > This Device for a picture on your PC.
-
Select Insert > Pictures > Stock Images for high quality images or backgrounds.
-
Select Insert > Pictures > Online Pictures for a picture on the web.
Tip: For a picture from your OneDrive, go to the drop-down list at the top left, and switch from Bing to OneDrive.
-
-
Select the picture you want, and then select Insert.
Resize or move pictures
-
To resize a picture, select the picture and drag a corner handle.
-
To wrap text around a picture, select the picture, and then select a wrapping option.
Tip: Pick something other than In Line with Text, and you can move the picture around the page: select the picture and drag it.
What about EPS?
EPS files can no longer be inserted into Office documents. For details, see Support for EPS images has been turned off in Microsoft 365.
What do you want to do?
-
Click the location in your document where you want to insert a picture.
-
On the Insert tab, click Pictures.
-
Select the option you want to use for inserting pictures.
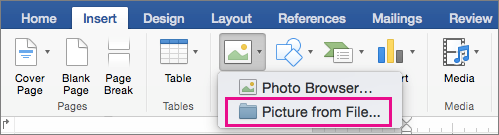
The Photo Browser option helps you browse through existing photo sets on your computer, such as photos in iPhoto or Photo Booth. Picture from File lets you browse through your computer’s file structure to look for photos.
-
When you find the picture you want, drag it from the Photo Browser into your document, or click Insert in the file browser.
Tip: The picture is embedded in your document. If your picture has a large file size and makes your document too large, you can reduce the size of your document by linking to the picture instead of embedding it. In the Choose a Picture dialog box, select the Link to File box.
You can insert a picture or photo into the body of an email message, instead of attaching the file. Inserting a picture requires that your message uses HTML formatting. To set HTML formatting, select Options > HTML.
-
In the body of your message, click where you want to add a picture.
-
On the Message tab, click Pictures.
-
Select the option you want to use for inserting pictures.
The Photo Browser option helps you browse through existing photo sets on your computer, such as photos in iPhoto or Photo Booth. Picture from File lets you browse through your computer’s file structure to look for photos.
-
When you find the picture you want, drag it from the Photo Browser into your document, or click Open in the file browser.
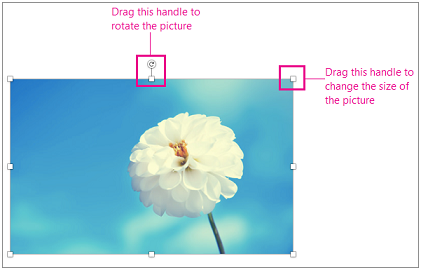
Resize the picture, if necessary, by clicking one of the handles that surround the picture and dragging it. Click the handle at the top of the picture to rotate it.
-
Hold down CONTROL and click the picture, and then click Change Picture.
-
Locate a new picture on your computer, and then click Insert.
See also
Crop a picture
Move, rotate, or group a picture, text box, or other object in Office for Mac
Change the size of a picture, shape, WordArt, or other object in Word 2016 for Mac
Control text wrapping around objects in Word 2016 for Mac
Pictures make documents more engaging and easier to understand.
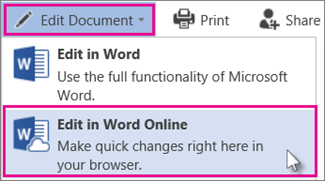
Tip: To add pictures in Word for the web, first switch to Editing View by clicking Edit Document > Edit in Word for the web.
Insert a picture
Do one of the following:
-
Insert a picture from my computer: On the Insert tab, click Picture, browse to, and select the picture you want, and click Open.
-
Insert a picture from the web: On the Insert tab, click Online Pictures, and in the Search Bing box, type a word that describes the picture you’re looking for, such as ‘cat’.

Tip: You can also insert a picture by copying it (Ctrl + C) and pasting it (Ctrl + V) where you want.
Add style and formatting to a picture
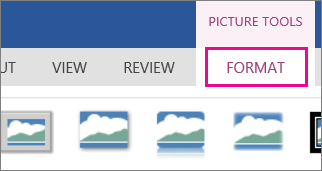
When you insert a picture, Word for the web places the picture in your document and displays the Picture Tools ribbon with the Format tab.
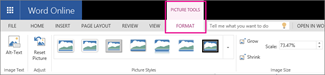
Tip: To open the Picture Tools ribbon anytime you’re in Editing View, select the picture.
-
To change the picture’s size, style, or to add alt text, on the Format tab choose the style options that you want to apply to the picture.
Note: If you have Word 2013 or 2016 for Windows, you can do much more to fine-tune a picture: compress it, crop it, remove the background, apply artistic effects, control its position on the page, put it in front of or behind the text, trim it to a specific size, and control how text wraps around it. Click Open in Word to get started.
Need more help?
Want more options?
Explore subscription benefits, browse training courses, learn how to secure your device, and more.
Communities help you ask and answer questions, give feedback, and hear from experts with rich knowledge.
Содержание
- Особенности вставки картинок
- Вставка изображения на лист
- Редактирование изображения
- Прикрепление картинки
- Способ 1: защита листа
- Способ 2: вставка изображения в примечание
- Способ 3: режим разработчика
- Вопросы и ответы

Некоторые задачи, выполняемые в таблицах, требуют установки в них различных изображений или фото. Программа Excel имеет инструменты, которые позволяют произвести подобную вставку. Давайте разберемся, как это сделать.
Особенности вставки картинок
Для того, чтобы вставить изображение в таблицу Эксель, оно сначала должно быть загружено на жесткий диск компьютера или подключенный к нему съёмный носитель. Очень важной особенностью вставки рисунка является то, что он по умолчанию не привязывается к конкретной ячейке, а просто размещается в выбранной области листа.
Урок: Как вставить картинку в Microsoft Word
Вставка изображения на лист
Сначала выясним, как вставить рисунок на лист, а уже потом разберемся, как прикрепить картинку к конкретной ячейке.
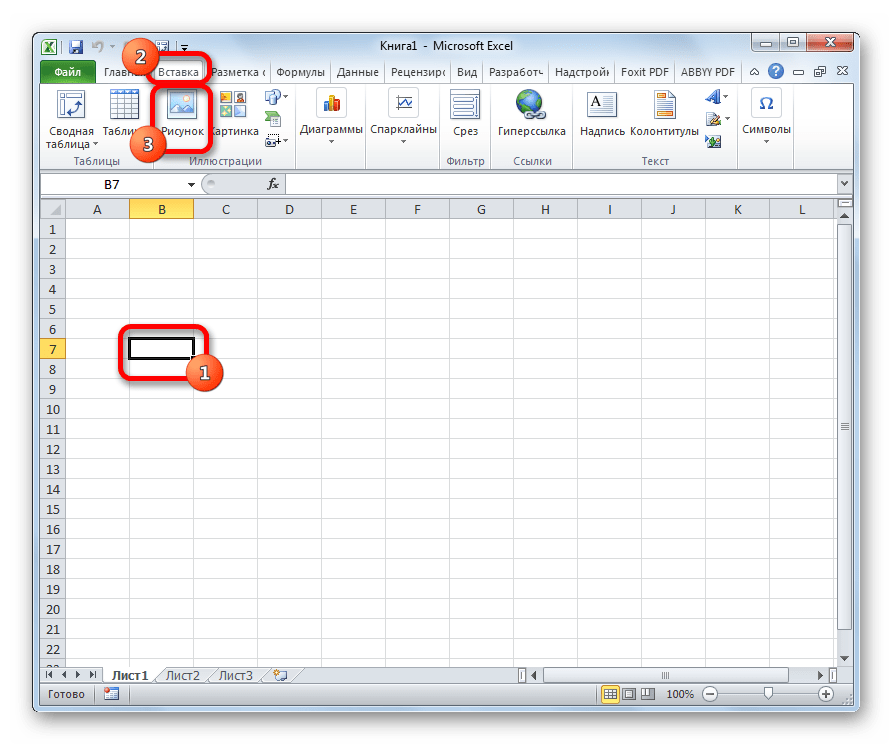
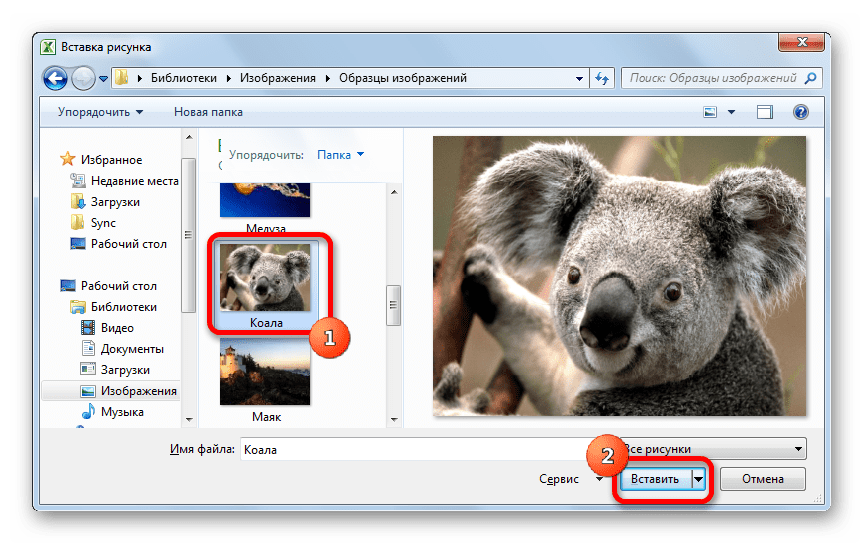
- Выделяем ту ячейку, куда вы хотите вставить изображение. Переходим во вкладку «Вставка». Кликаем по кнопке «Рисунок», которая размещена в блоке настроек «Иллюстрации».
- Открывается окно вставки рисунка. По умолчанию оно всегда открывается в папке «Изображения». Поэтому вы можете предварительно перебросить в неё ту картинку, которую собираетесь вставить. А можно поступить другим путем: через интерфейс этого же окна перейти в любую другую директорию жесткого диска ПК или подключенного к нему носителя. После того, как вы произвели выбор картинки, которую собираетесь добавить в Эксель, жмите на кнопку «Вставить».
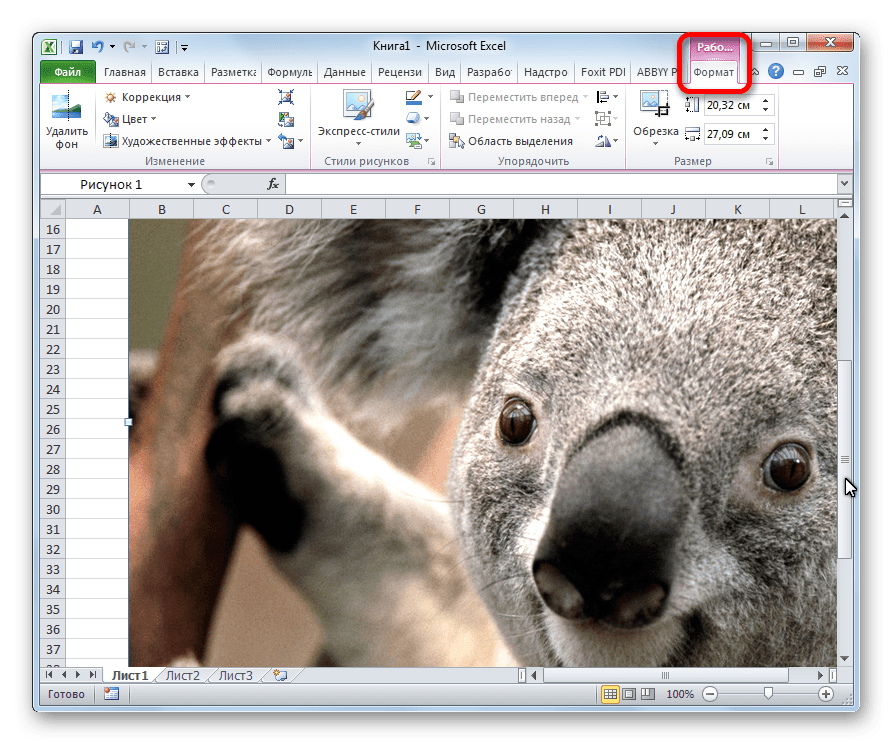
После этого рисунок вставляется на лист. Но, как и говорилось ранее, он просто лежит на листе и фактически ни с одной ячейкой не связан.
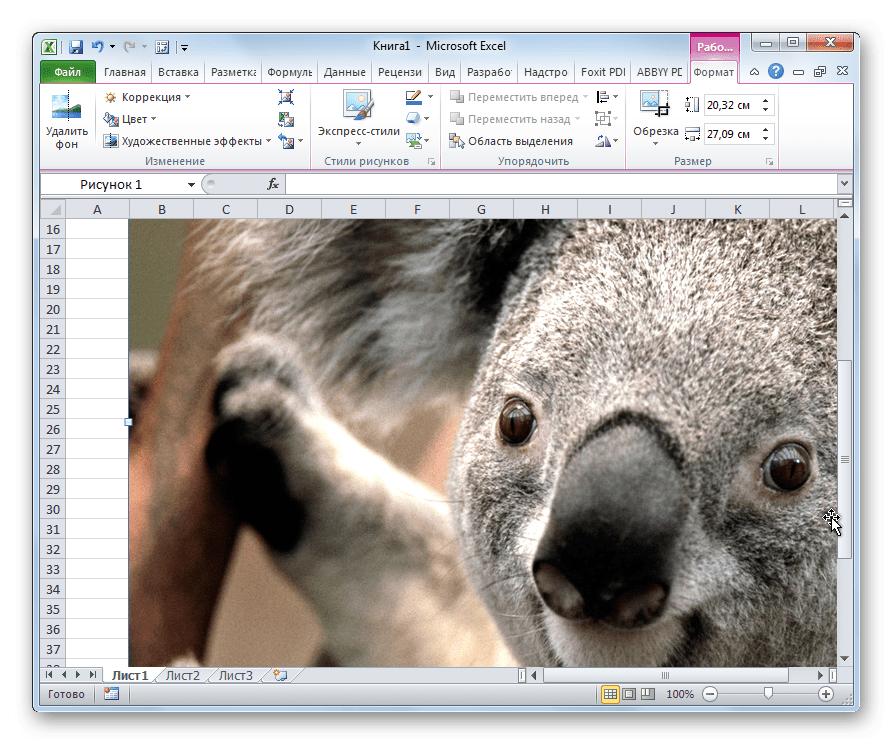
Редактирование изображения
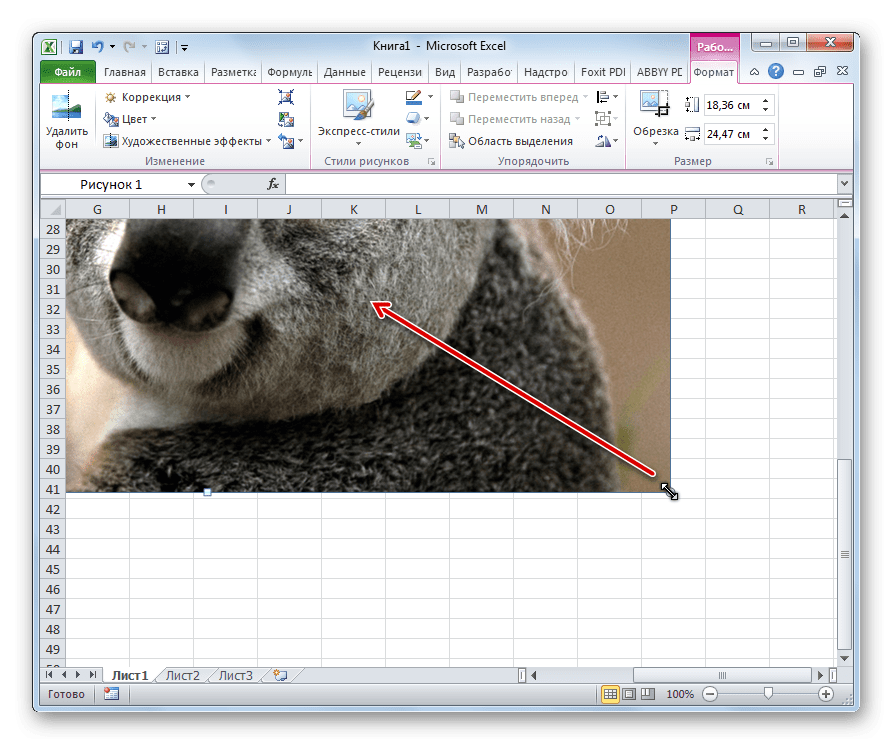
Теперь нужно отредактировать картинку, придать ей соответствующие формы и размер.
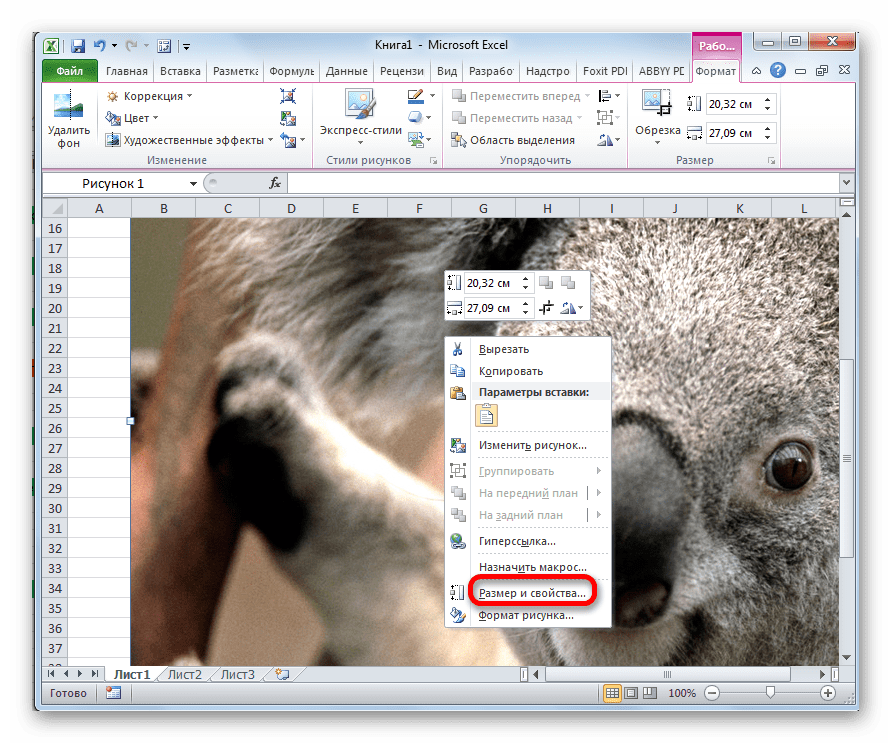
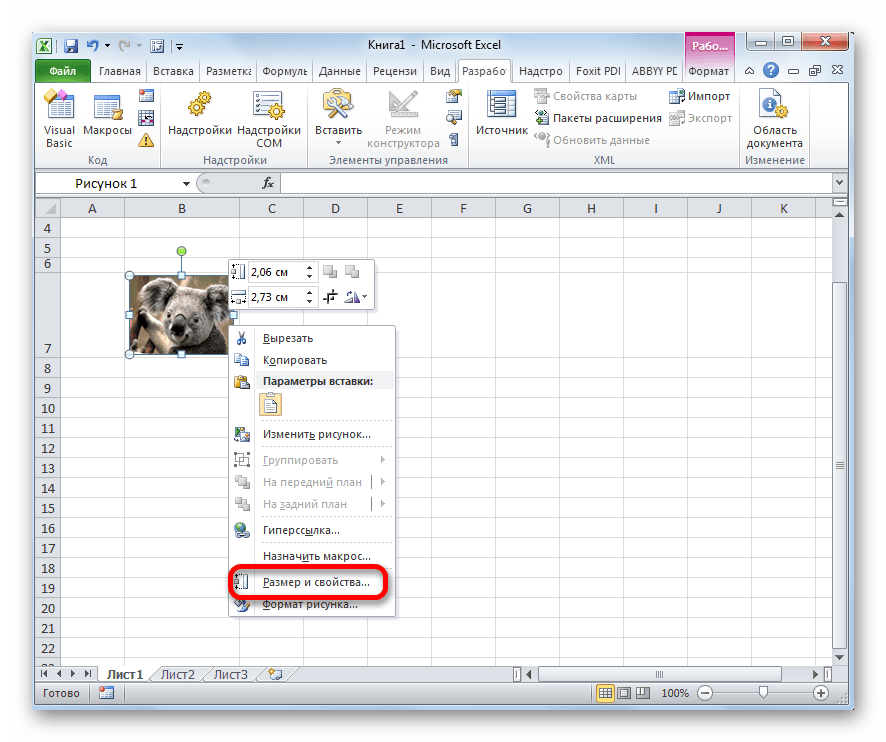
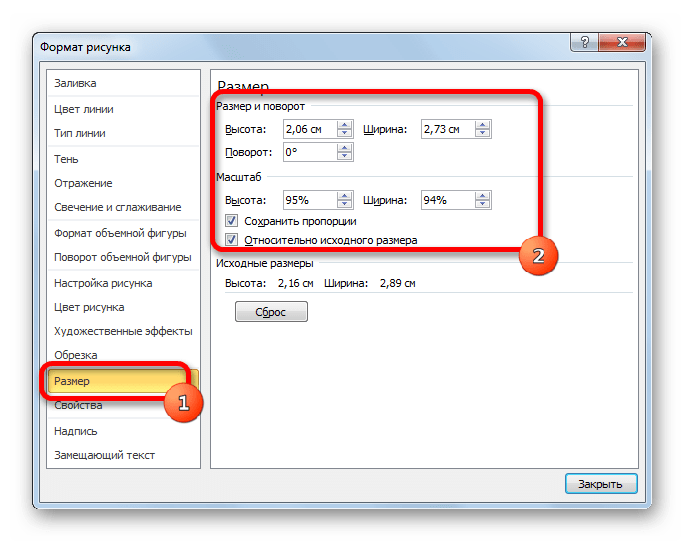
- Кликаем по изображению правой кнопкой мыши. Открываются параметры рисунка в виде контекстного меню. Кликаем по пункту «Размер и свойства».
- Открывается окно, в котором присутствует множество инструментов по изменению свойств картинки. Тут можно изменить её размеры, цветность, произвести обрезку, добавить эффекты и сделать много другого. Всё зависит от конкретного изображения и целей, для которых оно используется.
- Но в большинстве случаев нет необходимости открывать окно «Размеры и свойства», так как вполне хватает инструментов, которые предлагаются на ленте в дополнительном блоке вкладок «Работа с рисунками».
- Если мы хотим вставить изображение в ячейку, то самым важным моментом при редактировании картинки является изменение её размеров, чтобы они не были больше размеров самой ячейки. Изменить размер можно следующими способами:
- через контекстное меню;
- панель на ленте;
- окно «Размеры и свойства»;
- перетащив границы картинки с помощью мышки.
Прикрепление картинки
Но, даже после того, как изображение стало меньше ячейки и было помещено в неё, все равно оно осталось неприкрепленным. То есть, если мы, например, произведем сортировку или другой вид упорядочивания данных, то ячейки поменяются местами, а рисунок останется все на том же месте листа. Но, в Excel все-таки существуют некоторые способы прикрепления картинки. Рассмотрим их далее.

Способ 1: защита листа
Одним из способов прикрепить изображение является применение защиты листа от изменений.
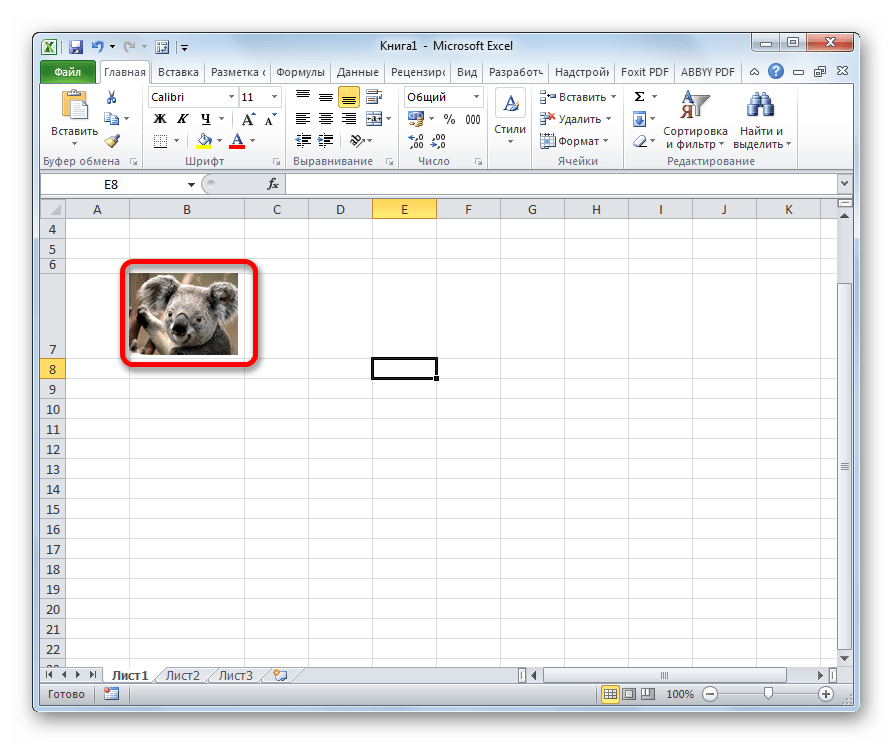
- Подгоняем размер рисунка под размер ячейки и вставляем его туда, как было рассказано выше.
- Кликаем по изображению и в контекстном меню выбираем пункт «Размер и свойства».
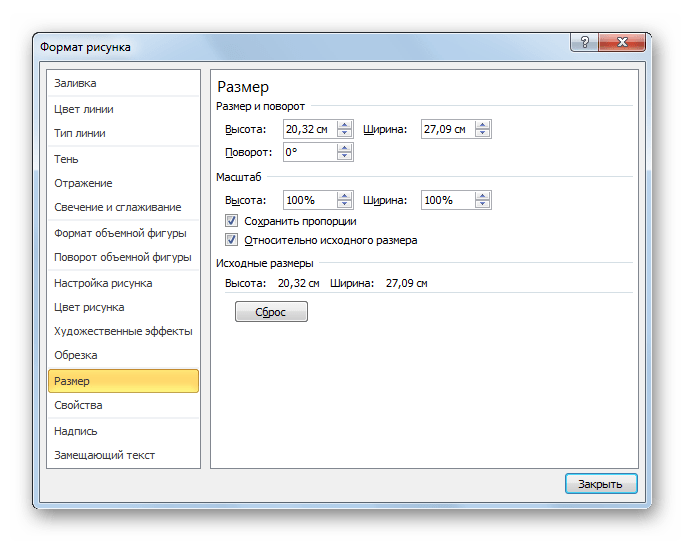
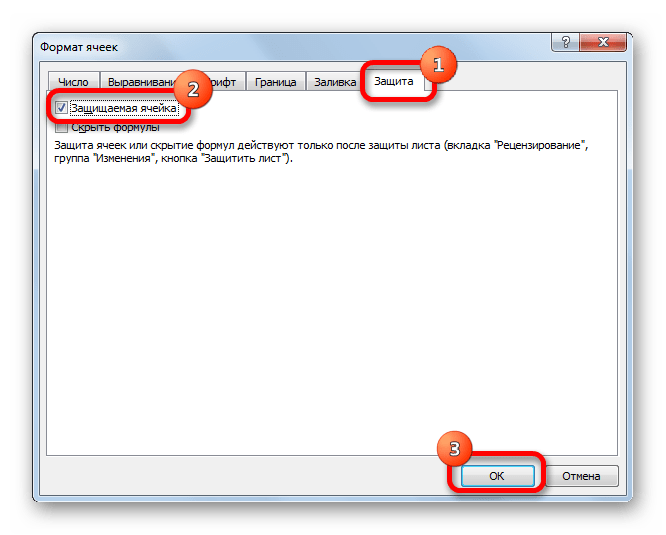
- Открывается окно свойств рисунка. Во вкладке «Размер» удостоверяемся, чтобы величина картинки была не больше размера ячейки. Также проверяем, чтобы напротив показателей «Относительно исходного размера» и «Сохранить пропорции» стояли галочки. Если какой-то параметр не соответствует указанному выше описанию, то изменяем его.
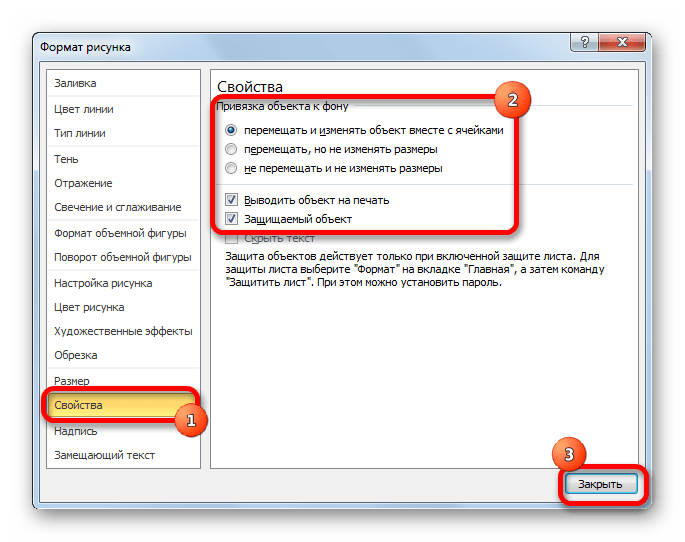
- Переходим во вкладку «Свойства» этого же окна. Устанавливаем галочки напротив параметров «Защищаемый объект» и «Выводить объект на печать», если они не установлены. Ставим переключатель в блоке настроек «Привязка объекта к фону» в позицию «Перемещать и изменять объект вместе с ячейками». Когда все указанные настройки выполнены, жмем на кнопку «Закрыть», расположенную в нижнем правом углу окна.
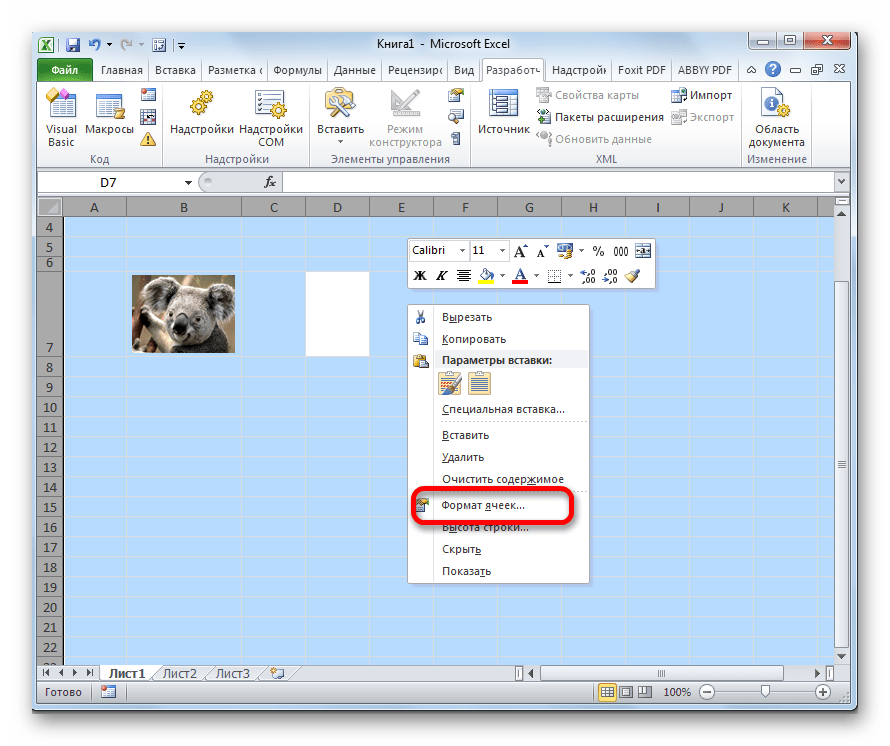
- Выделяем весь лист, нажатием сочетания клавиш Ctrl+A, и переходим через контекстное меню в окно настроек формата ячеек.
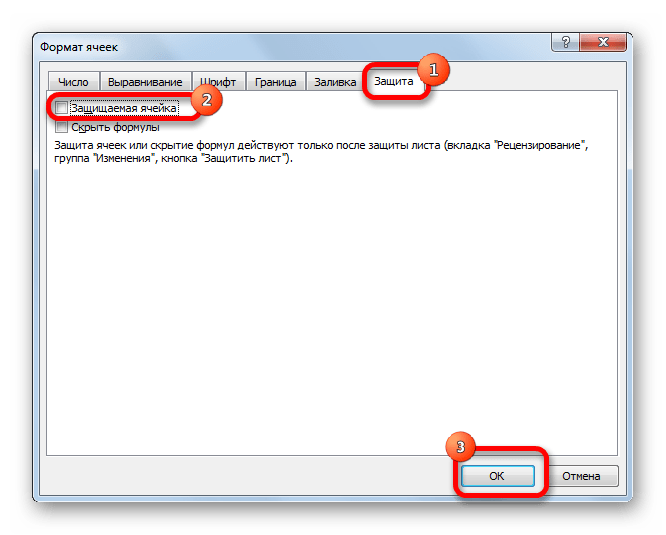
- Во вкладке «Защита» открывшегося окна снимаем галочку с параметра «Защищаемая ячейка» и жмем на кнопку «OK».
- Выделяем ячейку, где находится картинка, которую нужно закрепить. Открываем окно формата и во вкладке «Защита» устанавливаем галочку около значения «Защищаемая ячейка». Кликаем по кнопке «OK».
- Во вкладке «Рецензирование» в блоке инструментов «Изменения» на ленте кликаем по кнопке «Защитить лист».
- Открывается окошко, в котором вводим желаемый пароль для защиты листа. Жмем на кнопку «OK», а в следующем открывшемся окне снова повторяем введенный пароль.

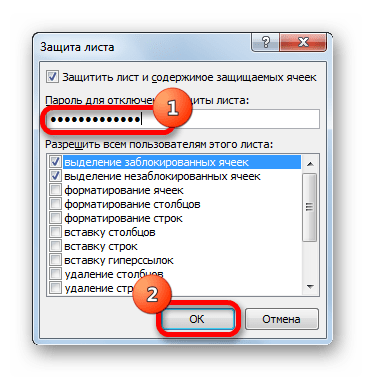
После этих действий диапазоны, в которых находятся изображения, защищены от изменений, то есть, картинки к ним привязаны. В этих ячейках нельзя будет производить никаких изменений до снятия защиты. В других диапазонах листа, как и прежде, можно делать любые изменения и сохранять их. В то же время, теперь даже если вы решите провести сортировку данных, то картинка уже никуда не денется с той ячейки, в которой находится.
Урок: Как защитить ячейку от изменений в Excel
Способ 2: вставка изображения в примечание
Также можно привязать рисунок, вставив его в примечание.
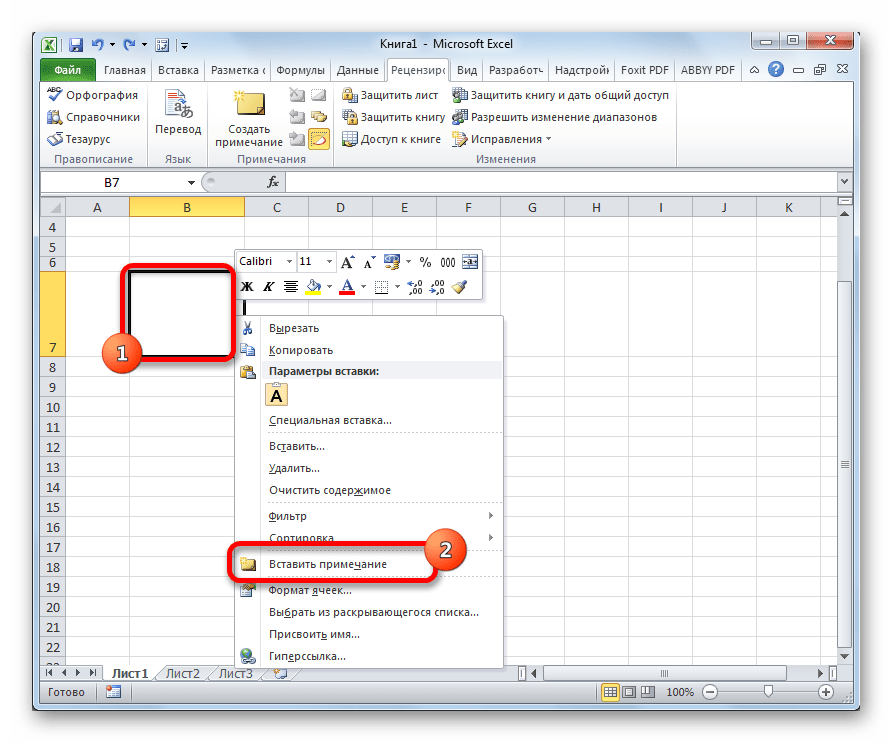
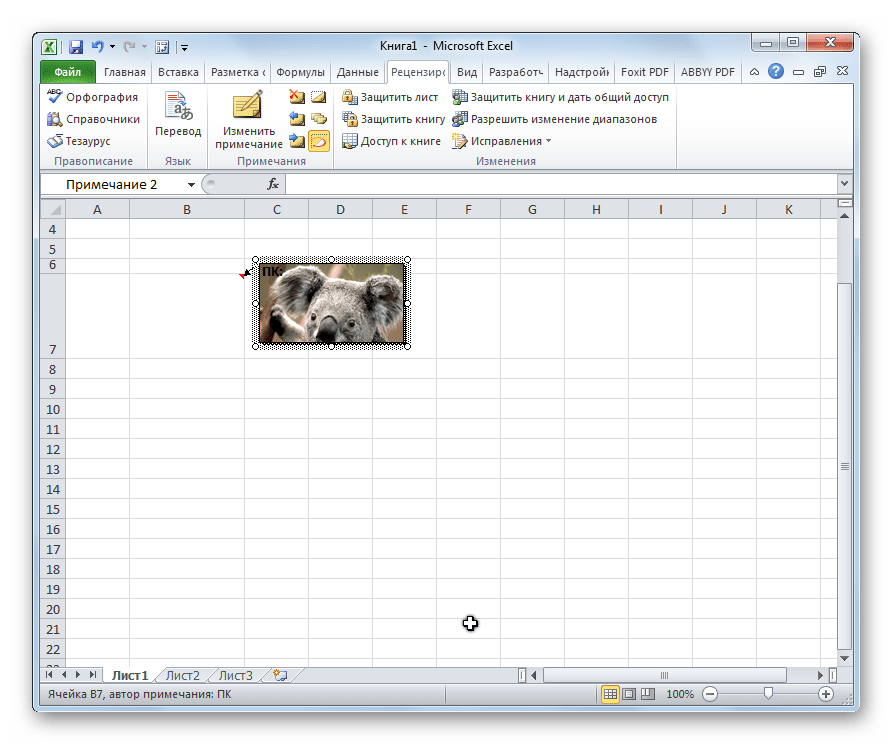
- Кликаем по ячейке, в которую планируем вставить изображение, правой кнопкой мышки. В контекстном меню выбираем пункт «Вставить примечание».
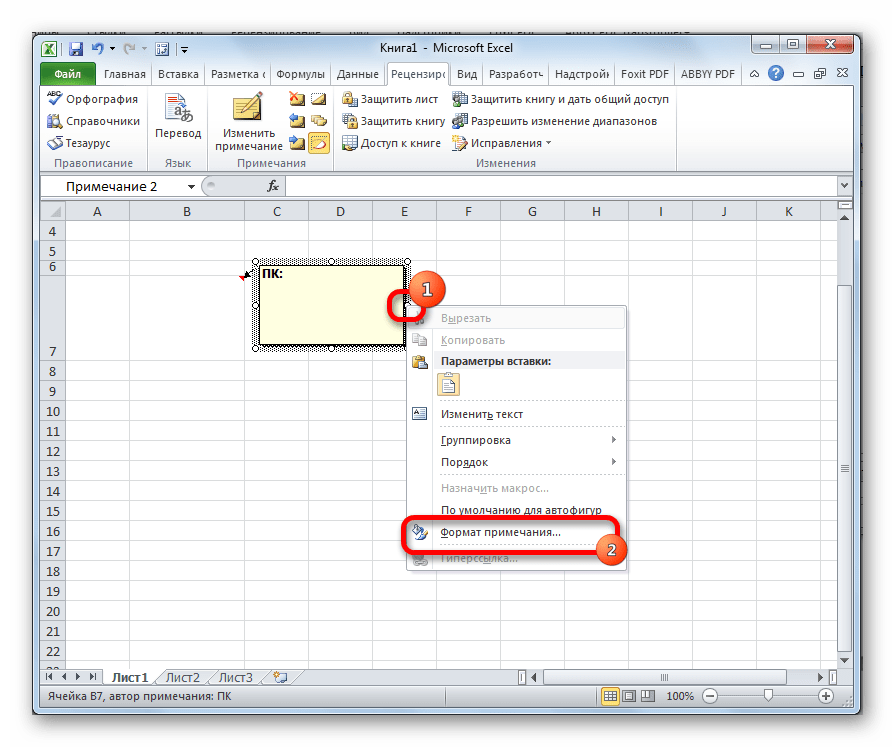
- Открывается небольшое окошко, предназначенное для записи примечания. Переводим курсор на его границу и кликаем по ней. Появляется ещё одно контекстное меню. Выбираем в нём пункт «Формат примечания».
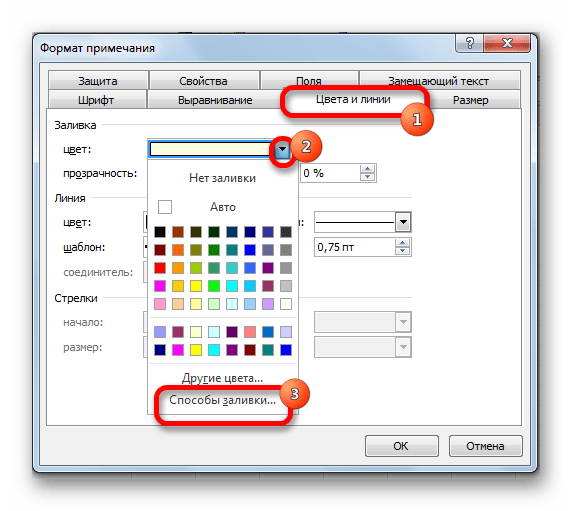
- В открывшемся окне настройки формата примечаний переходим во вкладку «Цвета и линии». В блоке настроек «Заливка» кликаем по полю «Цвет». В открывшемся перечне переходим по записи «Способы заливки…».
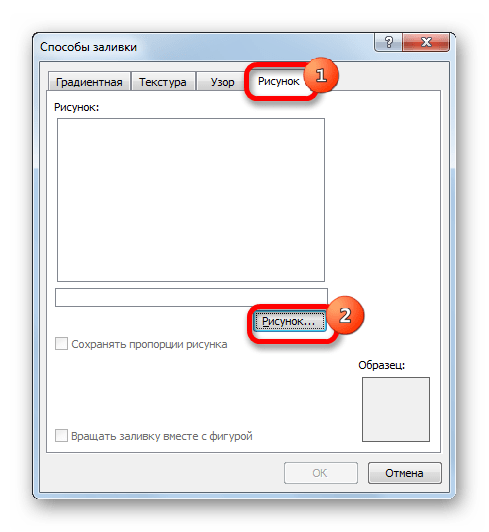
- Открывается окно способов заливки. Переходим во вкладку «Рисунок», а затем жмем на кнопку с одноименным наименованием.
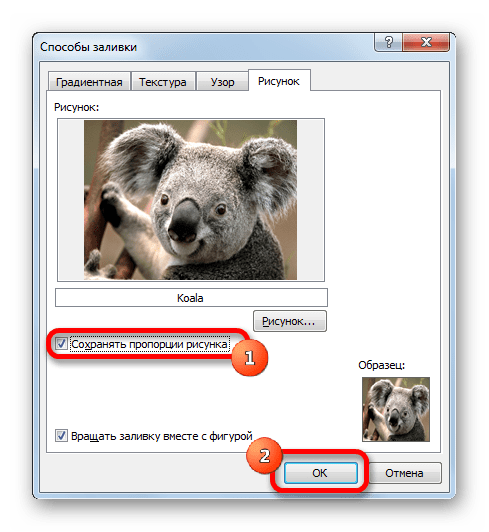
- Открывается окно добавления изображения, точно такое же, как было описано выше. Выбираем рисунок и жмем на кнопку «Вставить».
- Изображение добавилось в окно «Способы заливки». Устанавливаем галочку напротив пункта «Сохранять пропорции рисунка». Жмем на кнопку «OK».
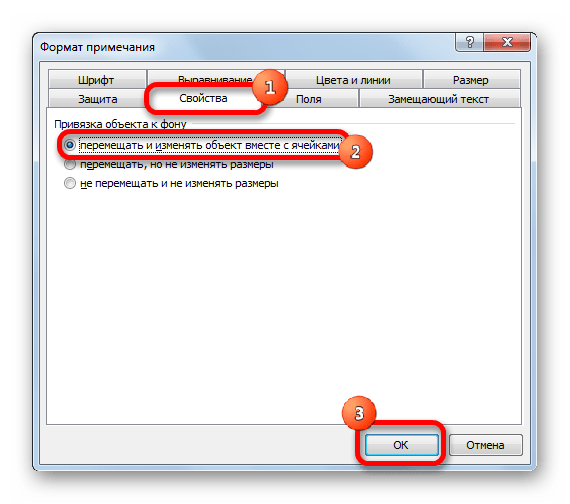
- После этого возвращаемся в окно «Формат примечания». Переходим во вкладку «Защита». Убираем галочку с параметра «Защищаемый объект».
- Переходим во вкладку «Свойства». Устанавливаем переключатель в позицию «Перемещать и изменять объект вместе с ячейками». Вслед за этим жмем на кнопку «OK».

После выполнения всех вышеперечисленных действий, изображение не только будет вставлено в примечание ячейки, но и привязано к ней. Конечно, данный способ подходит не всем, так как вставка в примечание налагает некоторые ограничения.
Способ 3: режим разработчика
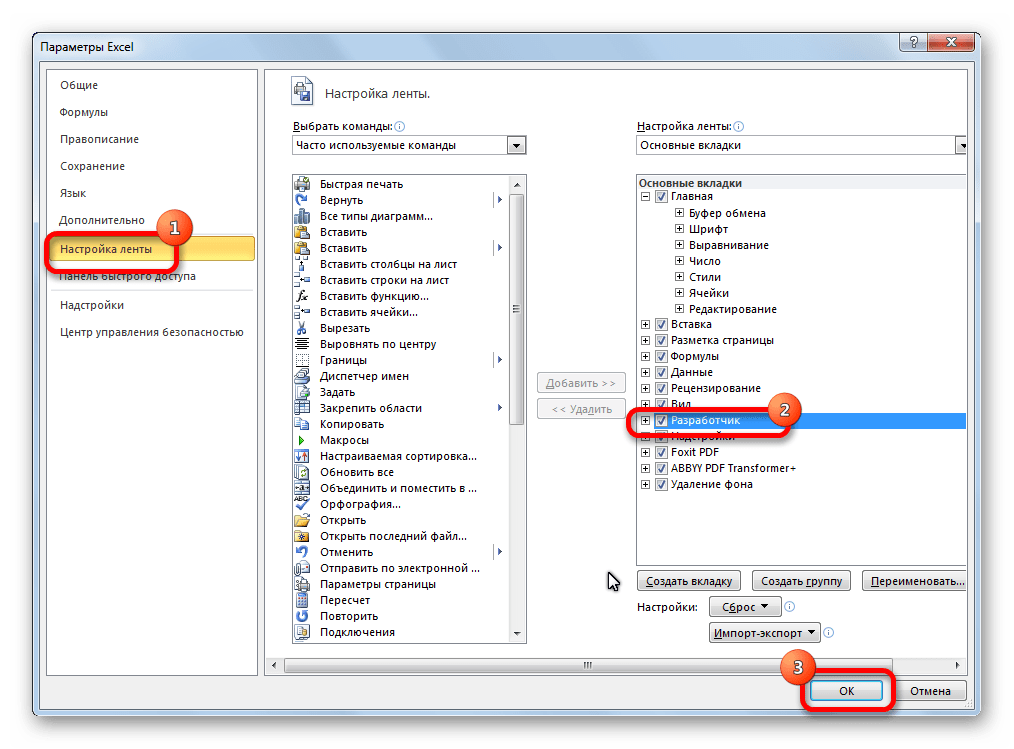
Привязать изображения к ячейке можно также через режим разработчика. Проблема состоит в том, что по умолчанию режим разработчика не активирован. Так что, прежде всего, нам нужно будет включить его.
- Находясь во вкладке «Файл» переходим в раздел «Параметры».
- В окне параметров перемещаемся в подраздел «Настройка ленты». Устанавливаем галочку около пункта «Разработчик» в правой части окна. Жмем на кнопку «OK».
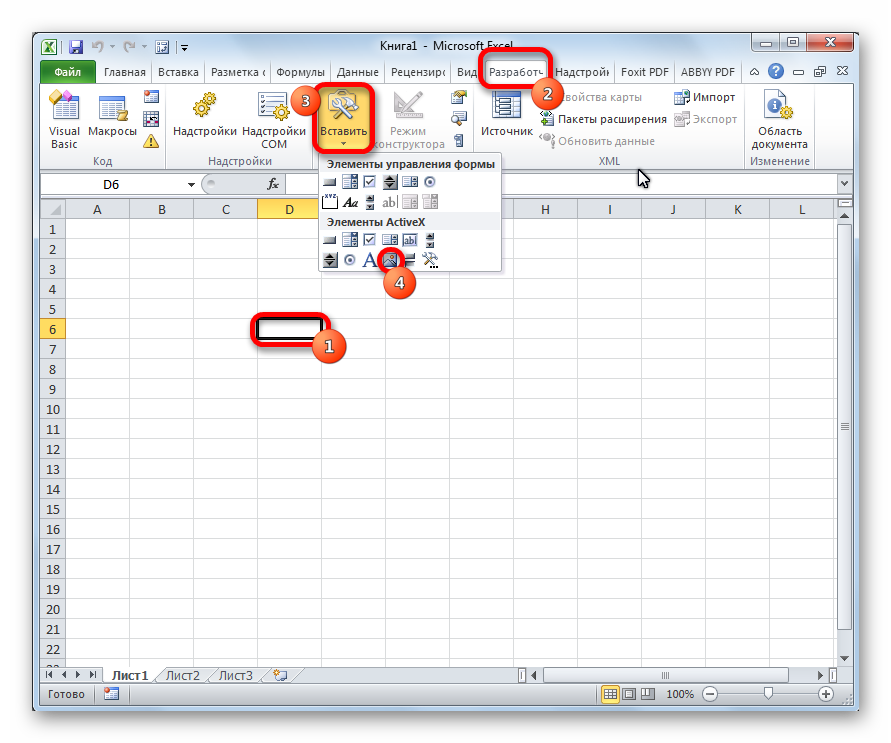
- Выделяем ячейку, в которую планируем вставить картинку. Перемещаемся во вкладку «Разработчик». Она появилась после того, как мы активировали соответствующий режим. Кликаем по кнопке «Вставить». В открывшемся меню в блоке «Элементы ActiveX» выбираем пункт «Изображение».
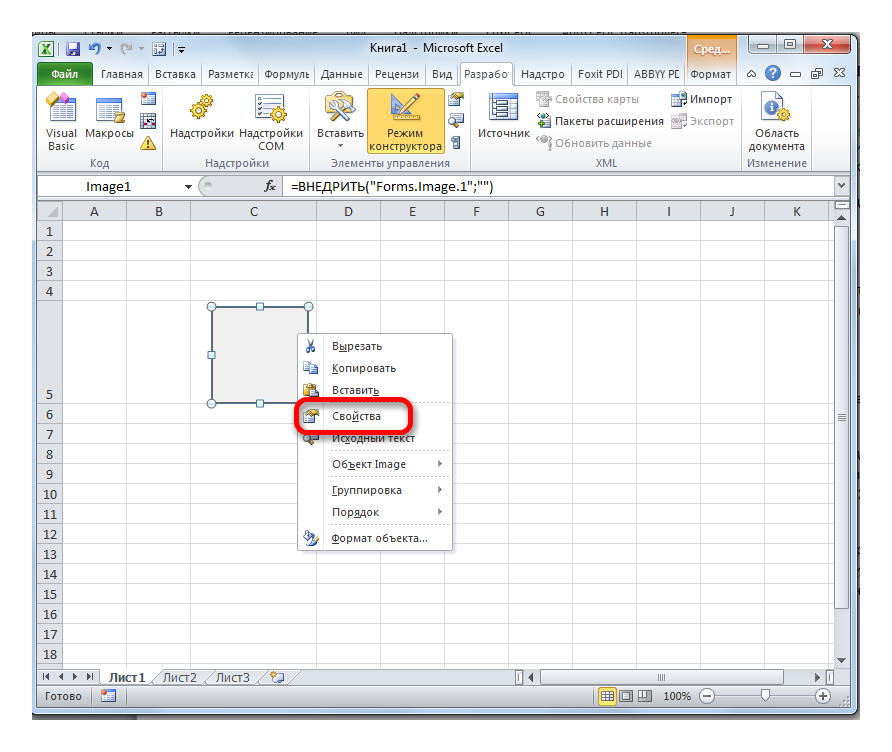
- Появляется элемент ActiveX в виде пустого четырехугольника. Регулируем его размеры перетаскиванием границ и помещаем в ячейку, где планируется разместить изображение. Кликаем правой кнопкой мыши по элементу. В контекстном меню выбираем пункт «Свойства».
- Открывается окно свойств элемента. Напротив параметра «Placement» устанавливаем цифру «1» (по умолчанию «2»). В строке параметра «Picture» жмем на кнопку, на которой изображено многоточие.
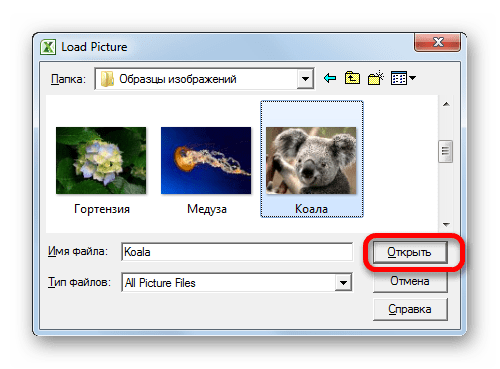
- Открывается окно вставки изображения. Ищем нужную картинку, выделяем её и жмем на кнопку «Открыть».
- После этого можно закрывать окно свойств. Как видим, рисунок уже вставлен. Теперь нам нужно полностью привязать его к ячейке. Выделяем картинку и переходим во вкладку «Разметка страницы». В блоке настроек «Упорядочить» на ленте жмем на кнопку «Выровнять». Из выпадающего меню выбираем пункт «Привязать к сетке». Затем чуть-чуть двигаем за край рисунка.


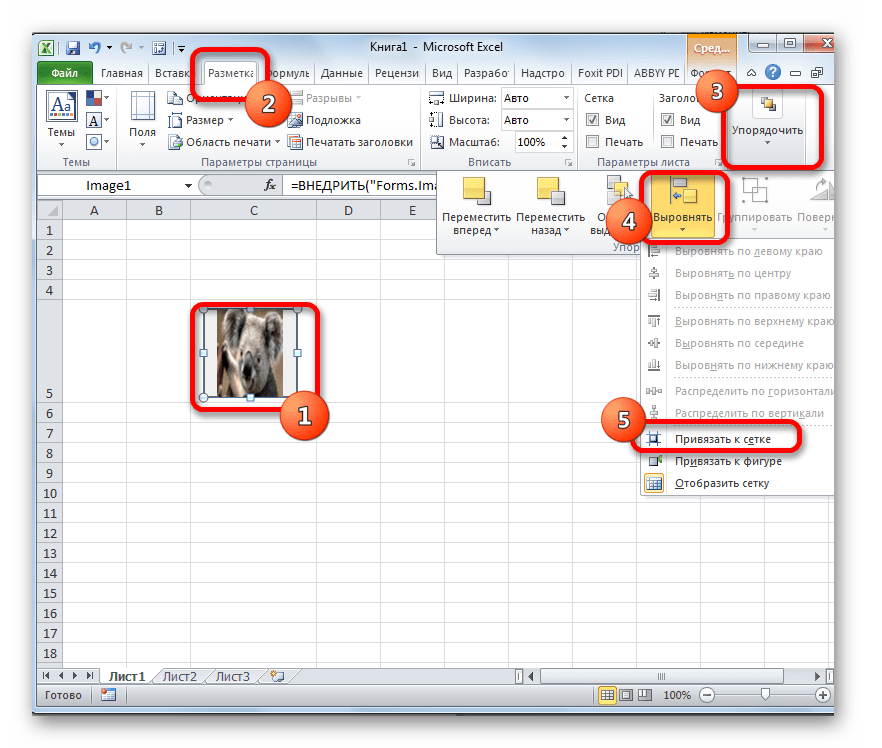
После выполнения вышеперечисленных действий картинка будет привязано к сетке и выбранной ячейке.
Как видим, в программе Эксель имеется несколько способов вставить изображение в ячейку и привязать его к ней. Конечно, способ со вставкой в примечание подойдет далеко не всем пользователям. А вот два остальных варианта довольно универсальны и каждый сам должен определиться, какой из них для него удобнее и максимально соответствует целям вставки.
See all How-To Articles
This tutorial shows how to insert pictures in Excel and Google Sheets.
Insert Single Picture
There are several ways to insert pictures in Excel. To insert a single picture, follow these steps:
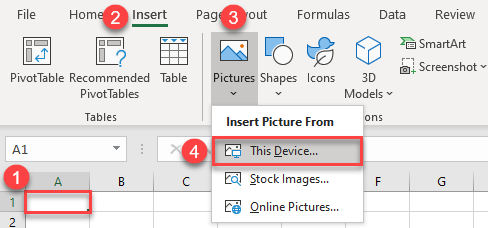
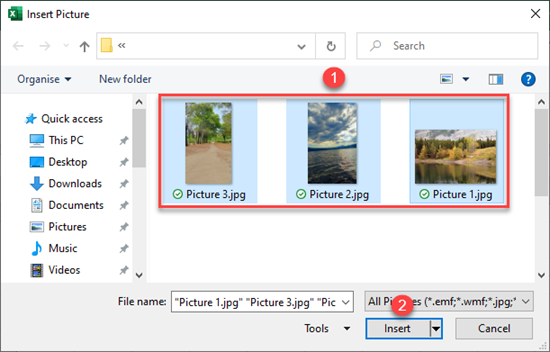
- Select the cell where you want the picture to start and in the Ribbon, go to Insert > Pictures > This Device. If you select cell A1, for example, then the upper left corner of the picture aligns with the upper left corner of A1.
2. In the Insert Picture window, select a picture to insert, and click Insert.
As a result, the selected picture is inserted into the worksheet.
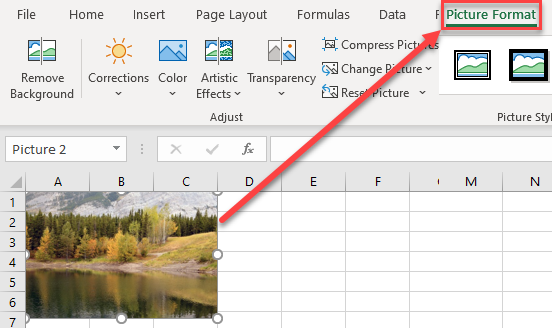
Moving and Editing a Picture
If you click on the picture, a new Picture Format tab appears. There, you can find options for editing pictures, such as resizing, editing colors, inserting borders and effects, cropping, etc.
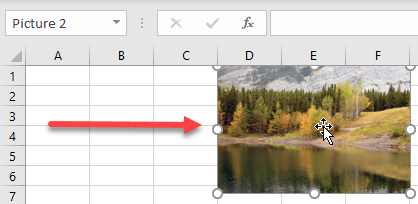
To move the picture to a new position in the worksheet, follow these steps:
- Position the cursor over the picture until it turns into a white pointer with a four-sided black arrow. This cursor is used for selecting or moving pictures.
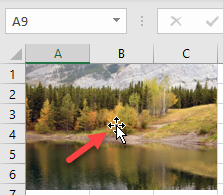
- Drag the picture to the desired position (for example, cell E1) and drop it. This way, you can move pictures inside the worksheet.
Insert Multiple Pictures
You can also insert multiple pictures in a worksheet at once.
- Select the cell where you want your pictures to start (A1) and in the Ribbon, go to Insert > Pictures > This Device.
- In the Insert Picture window, hold CTRL on your keyboard and click on the pictures you want to insert. Then click Insert.
As a result, all three pictures are inserted from the selected cell (A1). When you insert multiple pictures at once, they always overlap.

Use steps from the previous section to reposition the pictures so they are displayed properly.
Insert Picture in Google Sheets
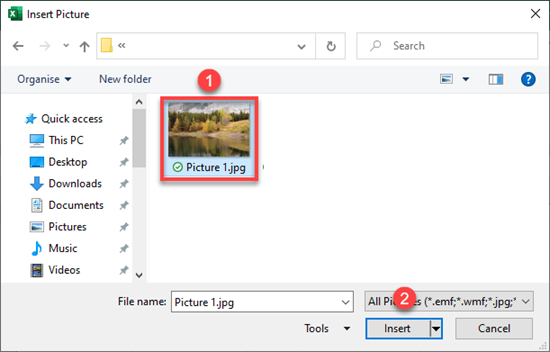
In Google Sheets, you can insert only one picture at a time, so if you want to insert multiple pictures, do it one-by-one. To insert a single picture, follow these steps:
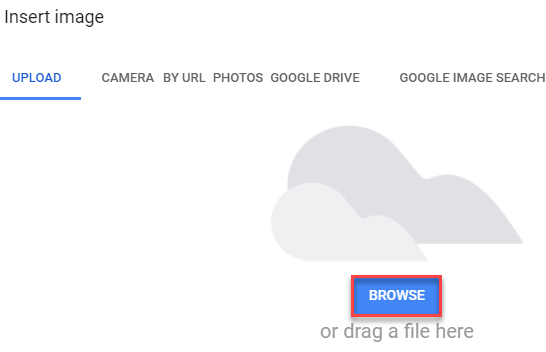
- Select the cell where you want your pictures to start (A1) and in the Menu, go to Insert > Image > Image over cells. If you choose Image in cell, the picture is resized to fit into the selected cell.

- In the Insert image window, click Browse to upload an image from the computer. Here you can also choose to take a picture with the camera, insert a URL, upload from Google Photos or Google Drive, or search for an image on Google.
- In the Open window, select the picture you want to insert (Picture 1.jpg), and click Open.
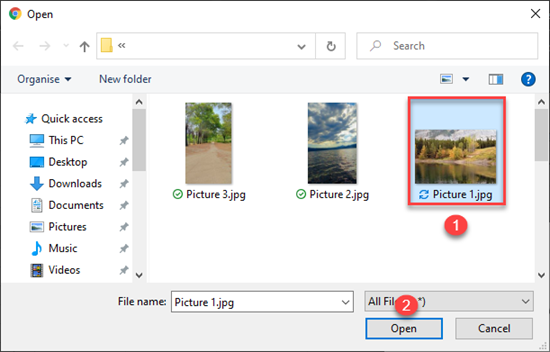
Finally, the selected image is inserted in your Google Sheets worksheet.

Moving a Picture in Google Sheets
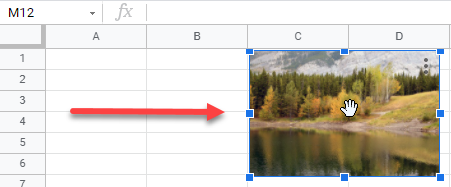
To move a picture in the sheet, follow these steps:
- Select the picture and the cursor turns into a white hand. This cursor is used for moving pictures.
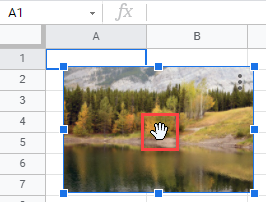
- Drag the picture to the desired position (for example, cell C1) and drop it. In this way, you can move pictures inside the worksheet.
![]()
Download Article
![]()
Download Article
Do you have an image or logo that you want to add to your Excel sheet to make it more visually appealing? While there is no automatic setting that will resize your image inside a cell, you can do it yourself with a few clicks. This wikiHow article will teach you how to insert pictures in Excel and size them to fit into cells.
Steps
-
1
Open your project in Microsoft Excel. You can do this by going to File > Open within Excel or you can right-click the project file and select Open with > Excel.
-
2
Insert an image. You can do this by going to Insert > Pictures > Selecting your picture > Insert.
Advertisement
-
3
Resize it. When you have the image selected, you’ll see a «Size» grouping under «Format» and «Picture Tools.»
- Change the Height and Width to adjust the size of your image. Instead, you can drag and drop the corners of the image to re-adjust the size.
-
4
Lock the image to the cell. By default, the image you added «floats» above your cells and doesn’t change size as your cells do. To fix this, you need to lock the image or the cell.
- Right-click your picture and click Format Picture. Then click the «Size & Properties» tab (a symbol with a green square with arrows around it) and select Move and size with cells.
- You can also use a VBA code after you’ve inserted some pictures. Insert the images and press Alt + F11 to open the VBA window. Click Insert > Module and paste the following code:
- Press F5 to run the code and repeat this process until all the images in your sheet fit into cells.
Public Sub FitPic()
On Error GoTo NOT_SHAPE
Dim PicWtoHRatio As Single
Dim CellWtoHRatio As Single
With Selection
PicWtoHRatio = .Width / .Height
End With
With Selection.TopLeftCell
CellWtoHRatio = .Width / .RowHeight
End With
Select Case PicWtoHRatio / CellWtoHRatio
Case Is > 1
With Selection
.Width = .TopLeftCell.Width
.Height = .Width / PicWtoHRatio
End With
Case Else
With Selection
.Height = .TopLeftCell.RowHeight
.Width = .Height * PicWtoHRatio
End With
End Select
With Selection
.Top = .TopLeftCell.Top
.Left = .TopLeftCell.Left
End With
Exit Sub
NOT_SHAPE:
MsgBox "Select a picture before running this macro."
End Sub


Advertisement
Add New Question
-
Question
When I resize a picture to a smaller cell and then restore it, I lose the detail. How can I avoid this?

When you resize an image to a smaller size and then restore it to its original size, the image may lose some of its detail and sharpness. To avoid this, it is best to start with the original high-resolution image and use good-quality resizing software that includes bicubic interpolation. Bicubic interpolation is a resizing method that helps preserve detail and sharpness in the image. It is also important to avoid resizing the image too much and to save a copy of the original image. By following these tips, you can help ensure that your images retain their detail and quality when resized.

Ask a Question
200 characters left
Include your email address to get a message when this question is answered.
Submit
Advertisement
Thanks for submitting a tip for review!
About This Article
Article SummaryX
1. Open your project in Microsoft Excel.
2. Insert an image.
3. Resize it.
4. Lock the image to the cell.
Did this summary help you?
Thanks to all authors for creating a page that has been read 82,831 times.