
Skip to main content
Support
Support
Sign in
Sign in with Microsoft
Sign in or create an account.
Hello,
Select a different account.
You have multiple accounts
Choose the account you want to sign in with.
Word for Microsoft 365 Word for Microsoft 365 for Mac Word for the web Word 2021 Word 2021 for Mac Word 2019 Word 2019 for Mac Word 2016 Word 2016 for Mac Word 2013 Word 2010 Word for Mac 2011 More…Less
Word automatically adds a break at the end of each page. You can also insert a manual page break anytime you want to start a new page in your document.
WindowsmacOSWeb
-
Put your cursor where you want one page to end and the next to begin.
-
Go to Insert > Page Break.

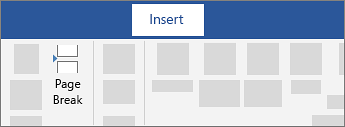
Insert a manual page break
-
Click or tap in the document where you want to insert a page break.
-
Go to Layout > Breaks > Page.
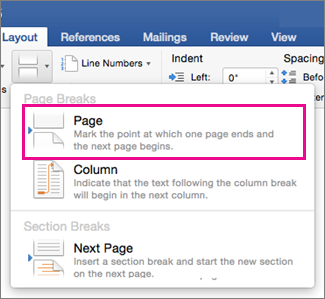
-
Click or tap in the document where you want a page break.
-
Go to Insert > Page Break.
See Also
Insert a section break
Remove a page break from a Word document


Need more help?
Want more options?
Discover
Community
Explore subscription benefits, browse training courses, learn how to secure your device, and more.

Microsoft 365 subscription benefits

Microsoft 365 training

Microsoft security

Accessibility center
Communities help you ask and answer questions, give feedback, and hear from experts with rich knowledge.

Ask the Microsoft Community

Microsoft Tech Community

Windows Insiders
Microsoft 365 Insiders
Was this information helpful?
(The more you tell us the more we can help.)
(The more you tell us the more we can help.)
What affected your experience?
Resolved my issue
Clear instructions
Easy to follow
No jargon
Pictures helped
Other
Didn’t match my screen
Incorrect instructions
Too technical
Not enough information
Not enough pictures
Other
Any additional feedback? (Optional)
Thank you for your feedback!
×
 A page break moves the content after the break to the next page in your document. This tutorial shows three ways to insert page breaks in Microsoft Word. We’ll also look at how to delete page breaks.
Quick Links:
- How to Insert Page Breaks
- How to Delete Page Breaks
Looking for information about section breaks? Please check out my other tutorial “How to Insert Section Breaks in Microsoft Word.”
This tutorial is also available as a YouTube video showing all the steps in real time.
Watch more than 100 other videos about Microsoft Word and Adobe Acrobat on my YouTube channel.
The images below are from Word for Microsoft 365. These steps will also work in Word 2019, Word 2016, Word 2013, and Word for Mac.
There are three ways to insert page breaks in Microsoft Word: (1) the Insert tab, (2) the Layout tab, and (3) the keyboard shortcut.
Recommended First Step: Select the Show/Hide button in the Home tab to show the formatting marks in your document, including page breaks.

Insert a Page Break through the Insert Tab
- Place your cursor where you want to insert the break.

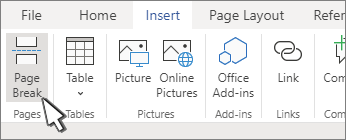
- Select the Insert tab in the ribbon.

- Select Page Break in the Pages group.

The content after the break should move to the next page in your document.
Insert a Page Break through the Layout Tab
- Place your cursor where you want to insert the break (see figure 2).
- Select the Layout tab in the ribbon.

- Select Breaks in the Page Setup group.

- Select Page in the drop-down menu.

The content after the break should move to the next page in your document.
Insert a Page Break with a Keyboard Shortcut
- Place your cursor where you want to insert the break (see figure 2).
- Press the shortcut Ctrl + Enter (PC) or Command + Return (Mac) on your keyboard.
The content after the break should move to the next page in your document.
How to Delete Page Breaks
You can skip to step 2 if your formatting marks are already visible.
- Select the Show/Hide button in the Home tab to reveal the formatting marks (see figure 1).
- Place your cursor at the start of the page break.

- Select the Delete key on your keyboard.
- Reselect the Show/Hide button to hide the formatting marks (see figure 1).
The page break should be deleted.
Related Resources
How to Insert and Delete a Blank Page in Microsoft Word
How to Insert Headers and Footers in Microsoft Word
How to Adjust Page Margins in Microsoft Word
How to Add Page Numbers in Microsoft Word
Updated May 23, 2021
When you’re working on a long document, separating it into different parts makes it much easier to navigate. Microsoft Word eases your workflow by letting you insert document breaks, namely section and page breaks.


As you’ll see in this article by defining section and page breaks you can apply specific formatting elements in different parts of your document. You’ll also have better control over pagination.
Read on to learn how to use section and page breaks in Word to make your document more visually appealing and easier for readers to make their way around. Finally, we’ll show you some great sources for professionally designed Word templates.
How to Add Breaks in MS Word (Quick Start Video)
Are you ready to learn how how to insert breaks in MS Word? The short video below will give you a head start on inserting, viewing, and deleting MS Word section and page breaks:
To learn even more about breaks in Word (including the difference betwen section breaks and page breaks), study the written tutorial below.
Understanding Section and Page Breaks
Section and page breaks are types of breaks or partitions in a Word document. In this section, you’ll learn some basics:
1. Microsoft Word Section Break vs Page Break
A page break is a partition in the text of the document. At a page break, the succeeding text is automatically placed on top of a new page.


But, with a section break for Word the text is partitioned — along with the formatting associated with it:
- page numbers
- margins
- headers and footers
- paper size and/or orientation
Also, a Microsoft Word section break may or may not begin on a new page (more on that below).
2. Why Use Microsoft Section and Page Breaks?
Section and page breaks are useful for partitioning different parts of a document, especially a long one.
In a book, you’d use section breaks to divide it into chapters as well as delineate the front matter from the back matter. The title page, copyright page, table of contents, individual chapters, index, etc., would be separate sections.
For example, you usually want a new chapter of a book (or similar) document to begin on a new page. This is when a page break is most useful.
A section break for MS Word is useful for visually distinguishing parts of a document. An example of where you might use a section break is in a proposal where you want the summary to have a different layout. In this case, the summary section could have its own header, footer, and margins that are different from the rest of the document.
By using section breaks, each chapter can have a different running header, including the chapter title.


Microsoft Word Section breaks also let you use lower case numbers for page numbers on the introduction of the book and Arabic numerals on the rest of the pages.
Similarly, a section break in Microsoft Word lets you use a two-column format in the index section and a single column everywhere else.
You’ll also want to use section and page breaks when you want to control the pagination of your document. For example, the first page of your document may be a cover page. But you don’t want the cover page to be page 1 of your document. By inserting a section break after the cover page, you can make the next page be page 1.
You accomplish these results by inserting different types of section and page breaks in Word.
3. Types of Microsoft Word Section Breaks
There are four types of section breaks in MS Word:
- Next Page. This type of section break forces the text to the right of the cursor to a new section on the following page. All the formatting associated with the text is carried through to the new section as well.
- Continuous. A continuous section break creates a new section but keeps the text on the same page. This means two different sections can have their own formatting yet remain on the same page.
- Odd Page. This kind of section break moves the text to the right of the cursor to the top of the next odd-numbered page. If you’re on page 3, for example, and you insert an Odd Page Section Break, the next section will start on top of page 5 (page 4 will be blank). Book chapters usually begin on the next odd page of the book.
- Even Page. An Even Page section break moves the text to the right of the cursor to the top of the next even-numbered page. So, if you’re on page 6 and you insert an Even Page Section Break, the new section will begin on page 8 (leaving page 7 blank).
4. Types of Page Breaks
As for Microsoft Word page breaks, there are two kinds:


- Simple Page Breaks. A simple page break moves text to the right of the cursor to the top of the next page.
- Column Breaks. If your document is broken up into columns, a column break moves text to the right of the cursor to the top of the next column.
How to View Existing Breaks in an MS Word Doc
By default, section and page breaks are invisible in Word. You can only see their effects. You’ll see changes in formatting and pagination for each section. That’s because these breaks don’t appear when the document is printed.
As you’re editing and formatting your document, you may need to see page and section breaks. To view existing page and section breaks in Word, on the Home tab, then click on the Paragraph button.


How to Insert Section Breaks in Your Word Docs
To insert a page or section break, place the cursor where you want one section/page to end and the next section/page to begin.
Go to Insert > Break, then choose the specific type of page break or section break you want to insert.


Or, click on the Layout tab. Then click on the Breaks button on the ribbon and select the type of page or section break you wish to insert.


How to Remove/Delete Section and Page Breaks in Word
To remove a section or page break in Word, first display all the breaks.
Select the section or page break you want to remove by highlighting it. Click on either the Delete or Backspace key on your keyboard.


When you delete a section break, the text in the section adopts the formatting of the next section.
Tips for Using Section and Page Breaks in MS Word
Are you just getting comfortable with using Microsoft Word section and page breaks? Here are some extra tips to help you use them effectively:
1. Keep Your Section Breaks to a Minimum
Insert a section break in Word only when you have to (see above for when it’s a good idea to do so). Having more sections than necessary makes it more difficult to make global changes to your document, because you’d have to manually make those changes in each section.
2. Pay Attention to Which Section You’re In
If you’ve divided your document into sections, always be aware of what section you’re in when you make formatting changes. That’s because these changes will apply only to the section you’re currently in — that’s the section where your cursor is. If you want to make a formatting change to apply to the whole document, select the entire document first before making your changes.
3. Microsoft Word May Change a Continuous Section Break to the Other Section Break Types
You may be surprised that your continuous section break has been converted into a different type of section break. This happens when you’ve got a continuous section break. Then, in the next section, you try to apply a different header/footer, pagination, margins, or page size and orientation. Those formatting changes require a page break. And so, Word will automatically change the section break type to one that results in a page break.
Streamline Your Microsoft Word Workflow With Templates


There are other ways to streamline your MS Word workflow. One of them is using premium Word templates, like the ones you’ll find at Envato. Premium templates for Microsoft Word are created by professional designers to provide impressive layouts. These templates are customizable with your content, images, and branding. You can also adjust the design and layout as you please.
Envato Elements gives you unlimited downloads of Word templates as well as other inputs you need to complete your projects — fonts, graphics, stock photos, and more — all for one flat monthly subscription fee.


Or, go to GraphicRiver for Microsoft Word templates and other creative elements on a pay-per-use basis. It’s a terrific source for one-off projects.
Make Your Document Easier to Read and Navigate
Now you know how to use section and page breaks in Microsoft Word to better organize your document. Section breaks also let you have more granular control over the formatting of specific parts of your document. These make your document look better as well as easier to read and navigate through.
Use the steps you learned in this article to properly use section and page breaks. Also, use Word templates to make it much easier and faster to create impressive documents. Envato Elements provides unlimited downloads of templates for Word for one monthly subscription. For occasional projects, GraphicRiver is an excellent source of Word templates where you pay for each use.
Editorial Note: This tutorial has been updated to add a video by Andrew Childress.
Working in MS Word is easy as there are lots of tools and features available. MS-Word is a Word Processing application developed by Microsoft corporations Ltd. In this, a user can make documents and projects with ease.
Inserting Page Breaks:
When a user is working in MS Word and gets to the end of the page then MS-Word automatically stars a new page to work on. But sometimes a user needs to control where to end a page and where to begin a new page. So, this is the situation where we need to use page breaks or insert a page break. Now, We will learn that how to insert a page break step by step, by simply following the instructions given below and understand with the help of the images or screen shown.
Inserting Page Breaks at different positions:
There can be different positions where a user can insert page breaks:
1. Inserting a page break at the start
2. Inserting a page break in the middle (mostly used or the main thing you will use)
3. Inserting a page break at the end
Steps to follow for inserting a page break at start:
Step 1: Open MS Word on your PC.
Step 2: Open the file or document you want to make changes to or create a new file or document.

Step 3: Now, choose from where you want to start a new page (or where you want to insert a page break).
Step 4: Here, For e.g. on this page, the user wants to insert a page break at start.
Step 5: So, put the cursor where you want to start a new page. (In this case, put cursor before “Hi”)
Step 6: Now, go to “Insert tab” and click on it. (marked in the image below)

Step 7: Now, go to the pages section and click on “Page Break” (marked in a circle).

Step 8: Page break is inserted successfully and the document looks like the below image,

Now, Steps to follow for inserting a page break in the middle (mostly used or the main thing you will use):
Step 1: Open MS-Word on your PC.
Step 2: Open the file or document you want to make changes to or create a new file or document.

Step 3: Now, choose from where you want to start a new page (or where you want to insert a page break).
Step 4: Here, For e.g. on this page the user wants that “Hi Geeks” on 1 page and the content “This file is created to insert a page breaks” on a new page.
Step 5: So, put the cursor where you want to start a new page. (Here we put the cursor after “Geeks”)
Step 6: Now, go to “Insert tab” and click on it.
Step 7: Now, go to pages section and click on “Page Break” (marked in a circle).
Step 8: Page break is inserted successfully and the document looks like the below image,

Now, Steps to follow for inserting an page break in the end:
Step 1: Open MS Word on your PC.
Step 2: Open the file or document you want to make changes to or create a new file or document.
Step 3: Now, choose from where you want to start a new page (or where you want to insert a page break).
Step 4: Here, For e.g. in this page the user wants to insert a page break at end.
Step 5: So, put the cursor where you want to start a new page. (Here we put the cursor after “#PAGE 3”)
Step 6: Now, go to “Insert tab” and click on it.
Step 7: Now, go to the pages section and click on “Page Break” (marked in a circle).
Step 8: Page break is inserted successfully and the document looks like the below image,

This way a new page is inserted anywhere or you can insert a page break anywhere in the document you desire to add.
Insert or Delete Page Breaks in a Word Document
by Avantix Learning Team | Updated January 10, 2021
Applies to: Microsoft® Word® 2010, 2013, 2016, 2019 or 365 (Windows)
You can add or remove page breaks in Microsoft Word in a number of ways. It’s important to understand that there are both manual page breaks and automatic page breaks in Word. Automatic page breaks are inserted by Word based on settings in the file (such as font size, paragraph spacing, page size and margins). You can delete manual page breaks by selecting them and deleting them. However, if page breaks are automatic, you can’t remove them, you can only adjust where they occur by editing the document (such as changing margins, paragraph spacing and font size).
If you are a keyboard only user, check out our article No Mouse? Using Keyboard Only Navigation in Microsoft Office.
Recommended article: How to Quickly Remove All Page Breaks in a Word Document
Do you want to learn more about Microsoft Word? Check out our virtual classroom or live classroom Word courses >
Viewing page breaks
To view manual page breaks, paragraph marks and other non-printing characters in Microsoft Word:
- Click the Home tab in the Ribbon.
- Click Show/Hide ¶ in the Paragraph group Paragraph marks, tabs, spacing and manual page breaks will display but will not print.
Removing unnecessary blank paragraphs
If a user has pressed Enter multiple times to create a new page (which is not good practice), you should delete the extra blank paragraphs or hard returns. Word will then create automatic page breaks or you can insert a manual page break if necessary.
To delete unnecessary blank paragraphs:
- If necessary, click the Home tab in the Ribbon and then click Show/Hide ¶.
- Select the blank paragraphs (hard returns).
- Press Backspace or Delete to delete blank paragraphs.
Inserting a manual page break
To insert a manual page break using the Ribbon:
- If necessary, click the Home tab in the Ribbon and then click Show/Hide ¶.
- Place the insertion point where you want the manual break to appear.
- Click the Page Layout or Layout tab in the Ribbon.
- In the Page Setup group, click Breaks. A drop-down menu appears.
- Click Page under Page Breaks. A page break will appear with a dotted line and the word Page Break.
Below is the Breaks drop-down menu:

To insert a manual page break using a keyboard:
- If necessary, click the Home tab in the Ribbon and then click Show/Hide ¶.
- Place the insertion point where you want the break to appear.
- Press Ctrl + Enter. A page break will appear with a dotted line and the word Page Break.
Ensuring Track Changes is off
You can’t delete manual page breaks when Track Changes is turned on.
To turn off Track Changes:
- Click the Review tab in the Ribbon.
- Click Track Changes in the Tracking group.
- From the drop-down menu, select Track Changes to turn tracking off.
You can also press Ctrl + Shift + E to turn off Track Changes.
Deleting a manual page break
Manual page breaks are hidden by default. If you want to delete a manual page break easily, turn on Show/Hide ¶.
To delete a break:
- If necessary, click the Home tab and then click Show/Hide ¶.
- Double-click the break to select it or drag over it.
- Press Backspace or Delete to delete the break.
Removing page breaks created with paragraph formatting
Page breaks may have been created by a user where specific paragraph settings have been selected.
If a page break is occurring and you do not see a manual page break with Show/Hide ¶ on, check the paragraph options:
- Select the first paragraph on the page following the page break.
- Click the Home tab in the Ribbon.
- Click the Paragraph dialog box launcher on the bottom right corner in the Paragraph group. A dialog box appears.
- Click the Line and Page Breaks tab.
- Check to see whether one of the following three pagination options is selected:
Page break before – inserts a page break before a paragraph.
Keep with next – prevents a page break between the current and following paragraphs.
Keep lines together – prevents a page break within a paragraph. - Select the desired pagination option.
- Click OK.
Below is the Paragraph dialog box:
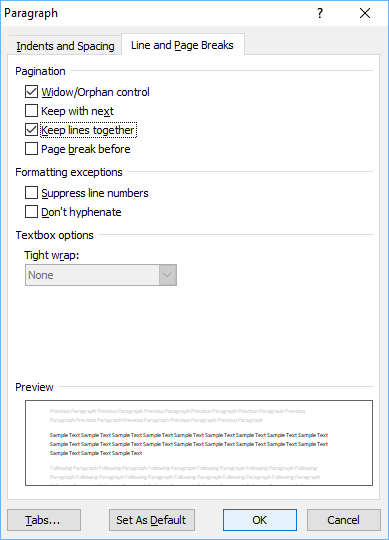
Note: The above paragraph formatting options may have been included in a style such as Heading 1. If that is the case, you will need to edit the style and change the pagination options in the style.
Page breaks can be troublesome and learning how they are created will help in removing them.
Subscribe to get more articles like this one
Did you find this article helpful? If you would like to receive new articles, join our email list.
More resources
How to Create a Table of Contents in Word
3 Strikethrough Shortcuts in Microsoft Word
How to Add Page Numbers in Word (Step by Step)
14+ Word Selection Shortcuts to Quickly Select Text
How to Find and Replace in Word (and Use Wildcards)
Related courses
Microsoft Word: Intermediate / Advanced
Microsoft Word: Designing Dynamic Word Documents Using Fields
Microsoft Word: Long Documents Master Class
Microsoft Word: Accessible Word Documents
Microsoft Excel: Intermediate / Advanced
Microsoft PowerPoint: Intermediate / Advanced
VIEW MORE COURSES >
Our instructor-led courses are delivered in virtual classroom format or at our downtown Toronto location at 18 King Street East, Suite 1400, Toronto, Ontario, Canada (some in-person classroom courses may also be delivered at an alternate downtown Toronto location). Contact us at info@avantixlearning.ca if you’d like to arrange custom instructor-led virtual classroom or onsite training on a date that’s convenient for you.
Copyright 2023 Avantix® Learning
Microsoft, the Microsoft logo, Microsoft Office and related Microsoft applications and logos are registered trademarks of Microsoft Corporation in Canada, US and other countries. All other trademarks are the property of the registered owners.
Avantix Learning |18 King Street East, Suite 1400, Toronto, Ontario, Canada M5C 1C4 | Contact us at info@avantixlearning.ca