
Make calculations and draw up a table more conveniently in Excel if you want to work with numeric data. In fact the program is a table. Word for such work is not quite fit.
But sometimes you have to migrate from an Excel table to Word. Also you may need to convert filled data. Converting from one format to another is unproductive and takes too much time. There should be another way.
How to move a table from Excel to Word?
The first method.
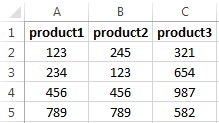
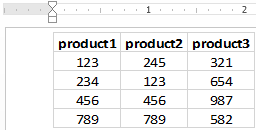
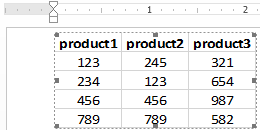
- We have a table with three columns and five rows. The boundaries are set.
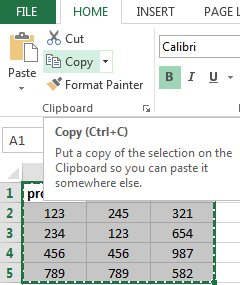
- Select the data range. Click Copy in the main menu. Alternatively use the key combination Ctrl + C. Also you may select table and click the right mouse button. Than choose and click «Copy».
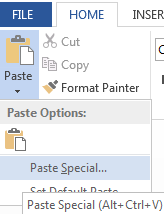
- Open the Word List. In the main menu use «Paste» tool. Select the «Paste Special».
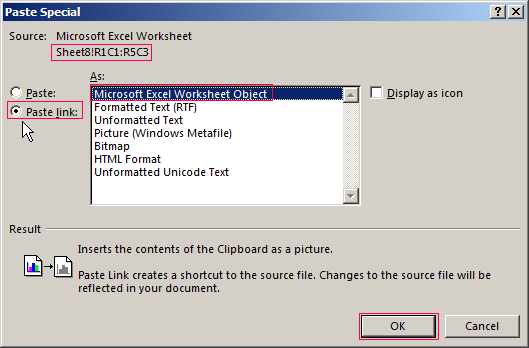
- We set the parameters of a special paste. «Paste Link» — «Microsoft Excel Worksheet Object». Check is the source for insert selected correctly. Click OK.
The result of our work:
This method has some drawbacks:
- table inserted as a graphic object that is it cannot be edited.
- border spreadsheets may extend beyond the sheet.
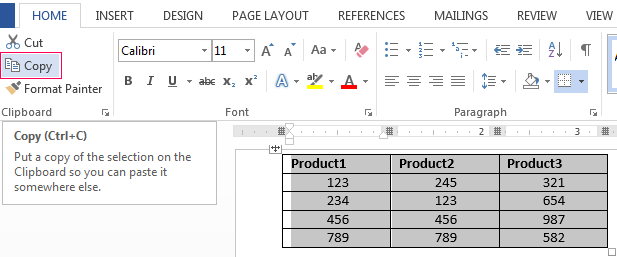
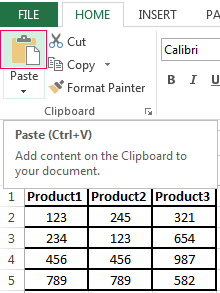
The second method.
- Select a table in MS Excel. Copy it to the clipboard.
- Open MS Word. Click «Paste» or use the key combination CTRL+V (Shift+Ins). The result is next:
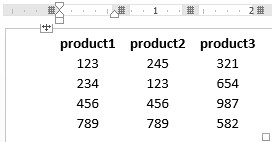
We can edit the data, change borders, font values and format.
This method of insertion has one significant drawback. Table with a large amount of data goes beyond the sheet.
The third method.
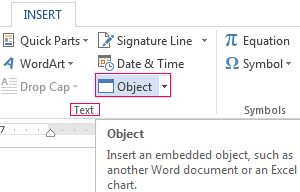
- Go to the tab «INSERT» in In Word sheet. We need the menu «Text» and the tool «Object».
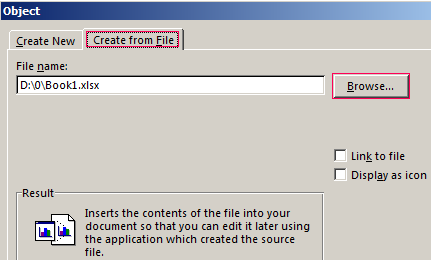
- Select «Create from File» in the dialog box. Click «Browse» to find the text file Prodic1.txt.
- In the «File name:» line will be its data when the desired object will be found. Click OK.
The inserted table is a graphical object. You cannot edit the values in the cells.
You should first remove borders to insert a range of data without boundaries.
In MS Excel:
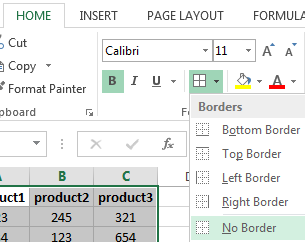
Or use a combination of keys CTRL + SHIFT + (minus).
In MS Word:

If you want to manipulate the boundaries must be inserted with the 1 and 2 method.
How to convert a table from Word to Excel?
We’ll perform a reverse transfer.
Method 1.
- Select a table in MS Word. Click «Copy» CTRL+C.
- Open MS Excel. Put the mouse in the place where the table should appear. Click «Paste» after right click.
We have a «neat» table. Therefore it inserted smoothly and accurately. If the data were filled ugly with a lot of extra characters (non-printable) so the row and column boundaries may shift. There are 2 outputs to escape from this situation:
- Clean the data manually. If there are a lot of recurring characters you can use AutoCorrect Options.
- Save the spreadsheet as text (in txt format). In this case all the extra characters will be deleted. And then insert the data from the txt to Excel.
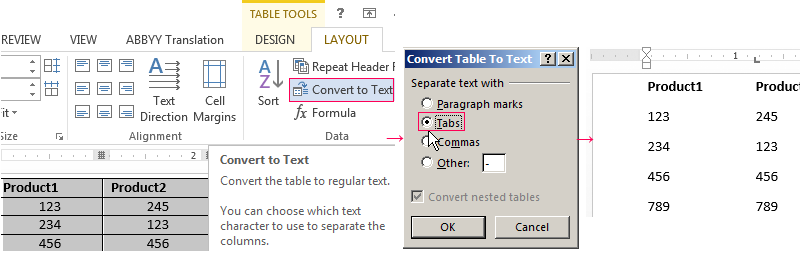
Method 2.
- Select the table in Word. Menu «TABLE TOOL» — «LAYOUT» — the tool «Convert to Text». In the parameters of the transformation choose «Tabs».
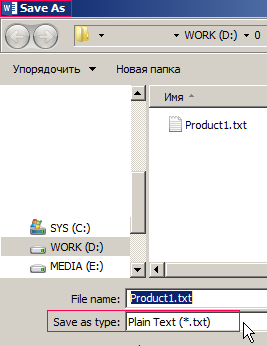
- Go to the main menu – «Save as» — «Save as type». Choose file type «Plain Text (*.txt)».
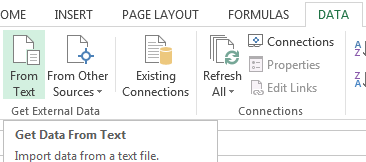
- Open Excel. «DATA» tab. «Get External Data» — «From Text».
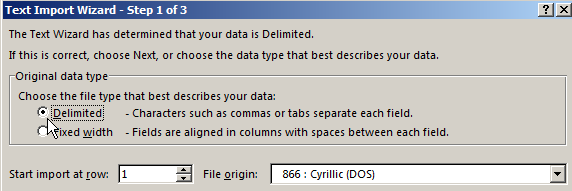
- Now find the saved file. Click «Open». And then the «Text Import Wizard» opens.
- Set the desired conversion settings. Choose data format with delimiters. Separator character is a tab character. Done.
You can edit the data and draw border etc. This method of insertion removes the extra characters and prevents displacement of the cells.
When working with data in Excel, you would often have a need to copy some tables from Excel into an MS Word document.
While there is no built-in option in Excel to convert an entire Excel file to Word, you can easily copy and paste the data from an Excel document to Word.
In this tutorial, I will show you multiple ways to copy data from an Excel Worksheet into a Word document.
Copy Paste Excel Table as Plain Text in MS Word
If all you want is to copy and paste a table from Excel to Word, you can do that with a simple copy paste.
It allows you to get the static table in Word, where you can then format it (and change it if you want).
The downside of this method is that in case there are any formulas in the data, that won’t work. And since this is static table, any changes you make in Excel will not get reflected in the table you copied to Word.
But in most cases, this is exactly what you want.
Let’s see how to do this.
Suppose you have a dataset as shown below and you want to copy this data from Excel and insert it into Word.

Below are the steps to do this:
- Select the data in Excel that you want to copy to Word
- Right-click and then click on Copy (or use the keyboard shortcut Control + C in Windows or Command + C in Mac)

- Open the Word document where you want to insert this data
- Place the cursor where you want this data in the Word document
- Go to the Home tab in Word and click on Paste (or use the keyboard shortcut Control + V)

The above steps would copy the data from Excel and paste it as a static table in the Word document.

Once you have the table in Word, you can format and work with it just like any other table that you insert in Word.
A couple of things to note when using this method:
- If there are any formulas in the table in Excel, they won’t be copied. In my example, I have the formulas in the Total row, but when copied to Word, these are static values. If you make any changes to any data, you will have to manually adjust the formula values as well
- If you don’t want to get copy the formatting from Excel and would rather want to use the formatting of the Word document, you can use the option Use Destination Style option. It shows up when you click on the Paste Options icon after you have pasted the table in Word.
Embed Excel Table into Word (as a Linked Object)
In the above method, we copied the data from Excel and inserted it as a static table into Word.
Another option that you can use is to copy and paste the table into a Word document and keep the two tables linked.
This way, if you make any changes in the Excel table that you copied, you will see that these are reflected in real-time in the table in Word as well.
This is quite useful when there is a possibility that you may have to update the data in Excel and it would also need to be updated in Word. By having the linked table, you only need to make changes in Excel data and these would automatically get reflected in the table you copied to Word.
Let me show you how this works.
Suppose you have a table as shown below and you want to copy it from Excel to MS Word and keep this linked.
Below are the steps to do this:
- Select the data in Excel that you want to copy to Word
- Right-click and then click on Copy (or use the keyboard shortcut Control + C)
- Open the Word document where you want to insert this data
- Place the cursor where you want this data in the Word document
- Go to the Home tab in Word and click on Paste drop-down (click on the small inverted arrow below the Paste Special icon)

- In the options that show up, click on Paste Special

- In the Paste Special dialog box, select the ‘Paste link’ option

- Select Microsoft Excel Worksheet Object from the listed options

- Click OK
The above steps would insert the copied table in Word, where it’s still linked to the original table in Excel.
Now, if you go and make any changes in the table in Excel, you will see that the same is reflected in the table in Word (in real-time).
If for some reason your data doesn’t update in real-time, right-click on the table and click on the ‘Update Link’ option
Here are some things you need to know about this method:
- Since the two files are linked to each other, you will have to keep these together. If you’re sending the Word file to someone, you will also have to send them the Excel file, or the link would be broken and the data in Word would not update.
- Whenever the Word file opens, it will check for any updates in the Excel table. This works even if the Excel file is closed.
This method is best suited for situations where you have a large Excel file that has a lot of calculations/data/dashboards. By using this method, you can only copy a small part of the Excel file, while still being able to update the table when values change in Excel.
Embed Excel Table into Word
This is a really useful feature that MS Word offers. It allows you to embed an Excel document as a part of the Word document.
In the above method, I showed you how to keep the Excel and Word files together and keep them linked.
In this section, I will show you how to embed the Excel file within the Word document, so you won’t have to keep both the files (and only keep the Word file).
In layman terms, it’s as if you can open and work on an Excel worksheet from within the Word Document.
Let me show you what I mean.
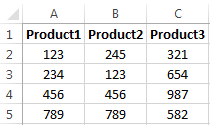
Suppose you have a table in Excel as shown below that you want to copy to Word.
Below are the steps to insert this as an Embedded Excel object in Word:
- Select the data in Excel that you want to copy to Word
- Right-click and then click on Copy (or use the keyboard shortcut Control + C)
- Open the Word document where you want to insert this data
- Place the cursor where you want this data in the Word document
- Go to the Home tab in Word and click on Paste drop-down (click on the small inverted arrow below the Paste Special icon)
- In the options that show up, click on Paste Special
- In the Paste Special dialog box, make sure the ‘Paste’ option is selected

- Select Microsoft Excel Worksheet Object from the listed options

- Click OK
The above steps would insert the copied data from Excel to MS Word.
But what actually happnes in the backend in MS Word is that it creates a new Excel file (which is a part of the Word document itself) and shows you the table from that file.
If you double click on the table, you will notice that it opens the Excel file (from within the Word document). You get to see the familiar Excel interface while still being in the Word document.
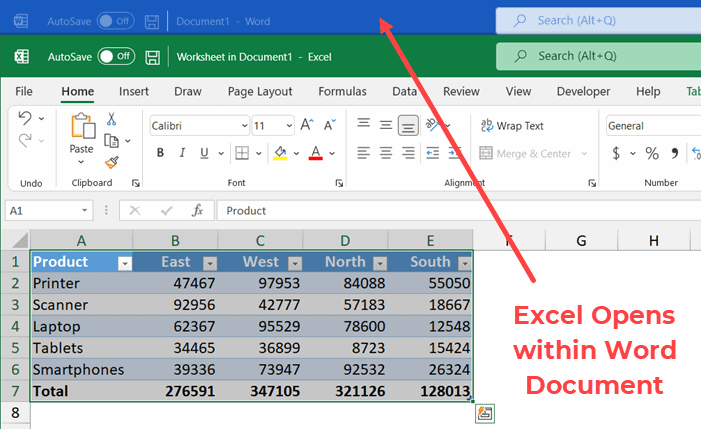
You can make any change and also use functionality such as conditional formatting, and that would be reflected in the table. Also, any formulas you have in place would continue to work.
The biggest benefit of using this method is that you don’t have to worry about two separate files. Unlike the previous method, in this method, the Excel file is a part of the Word document.
So, if you save the Word file or share it with someone else, the Excel file would remain with it and the data would remain intact.
On the downside, if you use multiple such tables or if the data is large, it will lead to a heavy Word document (as it has to also bear the weight of the embedded Excel file).
Copy Excel Table as a Satic Image
If you’re preparing a report and all you want is a really easy way to show some table (without any need to change the data), you can insert that data as an image.
Doing this is really easy and images are also easier to manage in Word (such as placement and resizing).
With copying an images, you also have an option to link the image to the table in Excel. This way, if you make any changes in Excel table, it would be reflected in the table image in Word.
Inserting Copied Table as a Static Image in Word
Suppose you have a table as shown below in Excel:
Below are the steps to copy this table and insert it as an image in MS Word:
- Select the data in Excel that you want to copy to Word
- Right-click and then click on Copy (or use the keyboard shortcut Control + C)
- Open the Word document where you want to insert this data
- Place the cursor where you want this data in the Word document
- Go to the Home tab in Word and click on Paste drop-down (click on the small inverted arrow below the Paste Special icon)
- In the options that show up, click on Paste Special
- In the Paste Special dialog box, make sure the ‘Paste’ option is selected

- Select ‘Picture’ from the listed options

- Click OK
The above steps would insert an image of the table in the Word document.
This is just like any other image and you can resize and format it.
Inserting Copied Table as a Linked Image in Word
If you like the flexibility of managing images in Word, and still want the table to be connected to the original Excel file, you can do that as well.
Suppose you have a table as shown below in Excel:
Below are the steps to copy this table and insert it as a linked image in MS Word:
- Select the table in Excel
- Right-click and then click on Copy (or use the keyboard shortcut Control + C)
- Open the Word document where you want to insert this data
- Place the cursor where you want this data in the Word document
- Go to the Home tab in Word and click on Paste Special
- In the Paste Special dialog box, select the ‘Paste Link’ option

- Select ‘Picture’ from the listed options

- Click OK
The above steps would again give you an image that you can easily resize and format.
But since this is linked to the original table in Excel, if you make any changes in the original table, these would also be reflected in the image.
Also, remember that since this image is linked to the original data, if you plan to share this Word document with someone else, you should also share the Excel File (in case you want the link to remain as is)
In case the excel file is not available or the name is changed, the image would be just like any other regular image.
So these are some of the ways you can use to copy a table for Excel and insert it into Word. In most cases, I prefer copying and pasting Excel tables as images, as these are easier to manage. In some cases, I also prefer the embed method which allows me to open the Excel file from within Word itself.
I hope you found this tutorial useful!
Other Excel tutorials you may also like:
- How to Save Excel Charts as Images (save as PNG, JPG, BMP)
- Microsoft Excel Won’t Open – How to Fix it! (6 Possible Solutions)
- How to Quickly Copy Chart (Graph) Format in Excel
- How to Copy Conditional Formatting to Another Cell in Excel
- How to Copy and Paste Formulas in Excel without Changing Cell References
- Copy and Paste Multiple Cells in Excel (Adjacent & Non-Adjacent)
Excel for Microsoft 365 Word for Microsoft 365 Excel 2021 Word 2021 Excel 2019 Word 2019 Excel 2016 Word 2016 Excel 2013 Word 2013 Excel 2010 Word 2010 Word 2007 More…Less
Insert an Excel chart in a Word document
The simplest way to insert a chart from an Excel spreadsheet into your Word document is to use the copy and paste commands.
You can change the chart, update it, and redesign it without ever leaving Word. If you change the data in Excel, you can automatically refresh the chart in Word.
-
In Excel, select the chart, and then press Ctrl+C or go to Home > Copy.
-
In your Word document, click or tap where you want the chart to appear, and press Ctrl+V or go to Home > Paste.
Note: The chart is linked to the original Excel spreadsheet. If data in the spreadsheet changes, the chart updates automatically.
Update a chart
-
In Word, select the chart.
-
Go to Chart Design or Chart Tools Design > Data > Refresh Data.
You can change the design or data for a chart in Word.
Note: You can’t edit a chart that was inserted as a picture, but you can adjust it. Select the chart, and then on Picture Format or Picture Tools Format, choose an option.
Edit a chart in Word
-
Select the chart.
-
Go to Chart Design or Chart Tools Design > Data > Edit Data and choose one of the following:
-
Choose Edit Data to edit the chart in Word.
-
Choose Edit Data in Excel.
-
Note: For Word 2010 the chart opens in Excel for editing.
You also can modify the chart in Word by using any of the four buttons that appear when you select the chart.

The buttons are:
-
Layout Options
Choose how your object interacts with the text around it. -
Chart Elements
Add, remove, or change chart elements such as the title, legend, gridlines, and data labels. -
Chart Styles
Set a style and color scheme for your chart. -
Chart Filters
Edit what data points and names are visible in your chart.Select any button to view available options.
There are five options for pasting an Excel chart into Word. Two options embed a copy of the whole workbook, another two keep the chart linked to the original workbook instead of embedding it, and one converts the chart into a picture. If none of those options do exactly what you want, you also can select Paste Special.
From Excel
-
In Excel, select the chart you want to paste into Word, and then press Ctrl+C or go to Home > Copy.
In Word
-
In Word, select Home, and in the Paste list, choose one of the five Paste Options.

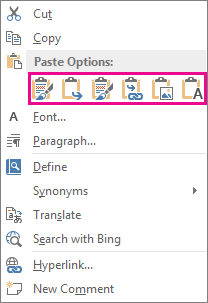
Note: Hover over a button to read a description of the option.
|
Paste option |
Color theme |
Data refresh |
|---|---|---|
|
Use Destination Theme & Embed Workbook |
Matches the Word theme |
Embeds a copy of the Excel workbook with the chart. The chart doesn’t stay linked to the original workbook. To update the chart automatically, change the data in the embedded workbook. |
|
Keep Source Formatting & Embed Workbook |
Keeps the Excel theme |
Embeds a copy of the Excel workbook with the chart. The chart doesn’t stay linked to the original workbook. To update the chart automatically, change the data in the embedded workbook. |
|
Use Destination Theme & Link Data This is the default paste option (Ctrl+V). |
Matches the Word theme |
Keeps the chart linked to the original workbook. To update the chart automatically, change the data in the original workbook. You also can select Chart Tools > Design > Refresh Data. |
|
Keep Source Formatting & Link Data |
Keeps the Excel theme |
Keeps the chart linked to the original workbook. To update the chart automatically, change the data in the original workbook. You also can select Chart Tools> Design > Refresh Data. |
|
Picture |
Becomes a picture |
You can’t update the data or edit the chart, but you can adjust the chart’s appearance. Under Picture Tools, select Format. |
The main differences between linked objects and embedded objects are where the data is stored and how you update the data after it’s inserted in the Word document.
-
Linked object
Information from a object that is linked in Word is stored in the source file and can be updated if the source file is modified. Use linked objects if file size is a consideration. -
Embedded object
Information from an Excel object that you embed in Word doesn’t change if you modify the source Excel file. Once embedded, the object is no longer part of the source file and won’t reflect any changes made.
-
Go to Insert > Text > Object.
-
Go to Create from file > Browse, and locate the file you want to insert in the Word document.
-
Choose one of the following:
-
To add the file as a linked object, select Link to file, and then select OK.
-
To add the file as an embedded object, select Display as icon, and then select OK.
-
Need more help?
Want more options?
Explore subscription benefits, browse training courses, learn how to secure your device, and more.
Communities help you ask and answer questions, give feedback, and hear from experts with rich knowledge.
Link an Excel file to a Word doc so the doc updates when the Excel data changes
Updated on March 11, 2022
What to Know
- Link: Copy cells. Right-click Link & Use Destination Styles or Link & Keep Source Formatting in Word.
- Embed: In Word, go to Insert > Object > Object > Create from File > Browse > choose Excel file > OK.
- Embed a spreadsheet table: In Word, go to Insert > Table > Excel Spreadsheet.
This article explains two ways to display Excel data in Word.
Instructions apply to Word for Microsoft 365, Word 2019, Word 2016, Word 2013, Word 2010, Excel for Microsoft 365, Excel 2019, Excel 2016, Excel 2013, and Excel 2010.
How to Link Excel to Word
To insert any part of an Excel worksheet in a Word document:
Maddy Price / Lifewire
-
Open the Word document where the worksheet will display.
-
Open the Excel worksheet that contains the data you want to link to the Word document.
-
In Excel, select and copy the range of cells to include. If you plan to insert more columns or rows into the worksheet, select the entire worksheet.
To select the entire worksheet, select the cell located in the upper-left corner at the juncture of the row numbers and column letters.
-
In the Word document, position the cursor where you want to insert the linked table.
-
Right-click and select Link & Use Destination Styles or Link & Keep Source Formatting.
Destination Styles uses the default Word table formatting, which usually results in a better-looking table. Keep Source Formatting uses the formatting from the Excel workbook.
-
The Excel data pastes directly into the Word document where the cursor was positioned. If changes are made to the source Excel file, the Word document updates with those changes automatically.
What Happens When You Link Excel to Word
Linking an Excel file to a Word document ensures that the Word document is updated every time the data in the Excel file changes. It works as a one-way link feed that brings the updated Excel data into the linked Word document. Linking an Excel worksheet also keeps your Word file small because the data doesn’t save to the Word document.
Linking an Excel worksheet to a Word document has a few limitations:
- If the Excel file moves, the link to the Word document needs to be re-established.
- If you plan to transport the Word file or use it on another computer, you must transport the Excel file along with it.
- You must do data editing in the Excel worksheet. It isn’t a problem unless you require different spreadsheet formats in the Word document.
How to Embed an Excel Spreadsheet in Word
The process of embedding an Excel worksheet in a Word document is essentially the same as linking to an Excel worksheet. It does require a few extra clicks, but it brings all data from the worksheet into your document, not only the selected range.
There are two ways to embed an Excel worksheet in Word. The first is to embed the worksheet as an object. The second is to insert a table.
When you embed a worksheet, Word uses the formatting from the Excel worksheet. Make sure that the data in the worksheet looks the way you want it to appear in the Word document.
Embed an Excel Worksheet as an Object
To embed an Excel worksheet as an object:
-
Open the Word document.
-
Go to the Insert tab.
-
Select Object > Object. In Word 2010, select Insert > Object.
-
In the Object dialog box, select the Create from File tab.
-
Select Browse, then choose the Excel worksheet that contains the data you want to embed.
-
Select OK.
-
The Excel worksheet is embedded in the Word document.
How to Embed an Excel Spreadsheet Table
An alternative is to insert the Excel worksheet as a table. This method inserts the worksheet the same way as if you embedded it as an object. The difference is that it opens a blank Excel worksheet for you to fill out. Choose this method if you haven’t created the Excel file yet.
To insert an Excel worksheet as a table in Word:
-
Open a Word document.
-
Place the cursor where you want to insert the Excel worksheet.
-
Go to the Insert tab, then select Table.
-
Select Excel Spreadsheet.
-
This menu option opens a blank Excel worksheet that you can fill with data. Either enter new data or paste data from another spreadsheet.
When you insert and fill out a new Excel worksheet, you have an Excel file that you can update at any time. The data in the Word table automatically updates to match the data in the Excel file.
FAQ
-
How do I embed a Microsoft Word document in Excel?
In Excel, select the Insert tab > Text > Object > Create from File. Next, select Browse to find the Word file > Insert > OK.
-
How do I create labels in Microsoft Word from an Excel list?
To create labels in Word from an Excel list, open a blank Word document > select Mailings > Start Mail Merge > Labels > choose the brand and product number for the labels. Then, choose Select Recipients > Use an Existing List > navigate to the Excel address list > OK. Add the merge mail fields to complete the merge.
Thanks for letting us know!
Get the Latest Tech News Delivered Every Day
Subscribe
![]()
Download Article
A simple guide to converting Microsoft Excel projects to Word projects
![]()
Download Article
- Inserting an Excel Chart into Word
- Embedding an Excel Worksheet
- Copying and Pasting Excel Data into Word
- Q&A
- Tips
|
|
|
|
Do you want to export an Excel document into a Microsoft Word document? While Excel can’t directly convert files into Word files, you can insert the Excel file as an Object in Word. You can also copy and paste Excel data into a Word document. After doing so, you can save the Word document. You can also copy and paste an entire Excel chart into Word. This wikiHow will show you how to insert Excel data into a Word document on your Windows or Mac computer.
Things You Should Know
- In Word, click the Insert tab, then Object. Click Create from File, locate your Excel project, then Insert.
- Copy Excel data with CTRL + C (Windows) or CMD + C (Mac). Paste it into a Word document using the Paste icon in the Home tab.
- Right-click an Excel chart, then click Copy. Paste it into a Word document using the Paste icon in the Home tab.
-
1
Open a project in Microsoft Excel. You can use an existing project or create a new one.
- Microsoft Excel is available on Windows and Mac. You can also use the online web version at the Microsoft 365 website.
-
2
Copy the Excel chart. Click the chart you want to copy, then press CTRL + C (Windows) or Command + C.
- You can also right-click the chart and click Copy.
Advertisement
-
3
Open Microsoft Word. You can use the web version of Word or the desktop application.
- You’ll need to open a new or existing project.
-
4
Click Paste. This is the clipboard icon in the Home tab. This will paste the Excel chart into Word.
- You can also move the cursor to the location you’d like your data, and then press CTRL + V (Windows) or Command + V (Mac). The chart will be pasted into Word.[1]
- To select different paste options, click the arrow underneath Paste.
- If you want to link to the original Excel chart so updates are reflected in the destination file, select Use Destination Theme & Link Data.
- If you want to embed the original chart to edit it in Word, select Use Designation Theme & Embed Workbook.
- If you want the chart to act as a picture element, select Picture.
- You can also move the cursor to the location you’d like your data, and then press CTRL + V (Windows) or Command + V (Mac). The chart will be pasted into Word.[1]
-
5
Edit your chart. Click your chart to open the Format Chart Area window on the right panel. You can adjust the Fill and Border.
- You can also click the chart to adjust the Layout Options, Chart Elements, Style, and Values.
-
6
Save your Word document. Click File in the top right corner, then Save As. Choose a name and save location for your document.


Advertisement
-
1
-
2
Place your cursor where you want the Excel data. You can move this around later, but be sure to enter your data in an empty space for easy editing.
-
3
Click Insert tab in the top toolbar. This is located between the Home and Draw tab.
-
4
Click Object. This will be in the Text section of the Insert tab. You can find this next to the Symbols section.
- The Object window will open.
-
5
Click Create from File. This allows you to embed an existing Excel file into your Word document.
- You can also choose Create New then select your Object type. This allows you to embed a new object where you can input data.
-
6
Click Browse. This will open the File Explorer (Windows) or the Finder (Mac). You’ll be able to browse your computer for your file.
-
7
Click your file and click Insert. You may have to search for your file depending on its location.
- The file name and path will be displayed in the File name field.
-
8
Click the box next to Link to file. This will embed the content of the file into your Word document and create a link to the original file. If the original Excel document is updated, the changes will transfer over to the data in your Word document.
- You can check the box next to Display as icon if you only want a quick link to your Excel document from Word. This will override Link to file.
-
9
Save your Word document. Click File in the top right corner, then Save As. Choose a name and save location for your document.
- Your Excel data will be embedded in your Word document. Since the data is linked, you can double-click the Excel chart to open the project in Excel or edit directly in Word.


Advertisement
-
1
-
2
Copy the Excel data. In Excel, click and drag to select the content you’d like to put in the Word document, and then press CTRL + C (Windows) or Command + C.[2]
- On Windows, press CTRL + A to select all the data in a chart, and then press CTRL + C to copy.
- On Mac, press CMD + A to select all the data in a chart, and then press Command +C to copy.
-
3
Open Microsoft Word. You can use the web version of Word or the desktop application.
- You’ll need to open a new or existing project.
-
4
Click Paste. This is the clipboard icon in the Home tab. This will paste the Excel data into Word.
- You can also move the cursor to the location you’d like your data, and then press CTRL + V (Windows) or Command + V (Mac). The table will be pasted into Word.
- To select different paste options, click the arrow underneath Paste. You can choose Keep Original Table Formatting, Merge Table, or Keep Text Only.
- If you don’t see the Paste Options button, you don’t have it enabled. To enable it, go to Word Options and click Advanced. Under Cut, Copy, and Paste, check the Show Paste Options buttons box.[3]
-
5


Advertisement
Our Most Loved Articles & Quizzes
Add New Question
-
Question
Can I do this if I don’t have Word?

Yes. Just search for «free online excel to word converter» and use one of the websites that shows up. You could also download OpenOffice for free, which you can use the same way as Word and where you can save documents in Word format.
-
Question
I copied my Excel cells into Word as a picture. How can I remove the cell border lines in this process?
I assume you are using a screen clipping tool to copy the Excel cells into Word. I would recommend either copying the cells (dragging to select) and pasting as a table into Word, or embedding the spreadsheet into Word. Method one works perfectly for basic Excel content and allows you to further format it to suit the structure and styling of your Word document. Method two allows complicated Excel content such as graphs to appear in Word without making screen clippings. It also can be used to preserve all formulas in the embedded sheet so that you can access them directly in Word. Either of these methods should help your Excel cells appear correctly in your Word document.
Ask a Question
200 characters left
Include your email address to get a message when this question is answered.
Submit
Advertisement
-
Looking for money-saving deals on Microsoft Office products? Check out our coupon site for tons of coupons and promo codes on your next subscription.
Thanks for submitting a tip for review!
Advertisement
About This Article
Article SummaryX
1. Select the data to convert.
2. Press Ctrl + C to copy.
3. Open a document in Word.
4. Click the desired location.
5. Click the Paste menu on the Home tab.
6. Select a paste option.
Did this summary help you?
Thanks to all authors for creating a page that has been read 1,447,753 times.