Link an Excel file to a Word doc so the doc updates when the Excel data changes
Updated on March 11, 2022
What to Know
- Link: Copy cells. Right-click Link & Use Destination Styles or Link & Keep Source Formatting in Word.
- Embed: In Word, go to Insert > Object > Object > Create from File > Browse > choose Excel file > OK.
- Embed a spreadsheet table: In Word, go to Insert > Table > Excel Spreadsheet.
This article explains two ways to display Excel data in Word.
Instructions apply to Word for Microsoft 365, Word 2019, Word 2016, Word 2013, Word 2010, Excel for Microsoft 365, Excel 2019, Excel 2016, Excel 2013, and Excel 2010.
How to Link Excel to Word
To insert any part of an Excel worksheet in a Word document:
Maddy Price / Lifewire
-
Open the Word document where the worksheet will display.
-
Open the Excel worksheet that contains the data you want to link to the Word document.
-
In Excel, select and copy the range of cells to include. If you plan to insert more columns or rows into the worksheet, select the entire worksheet.
To select the entire worksheet, select the cell located in the upper-left corner at the juncture of the row numbers and column letters.
-
In the Word document, position the cursor where you want to insert the linked table.
-
Right-click and select Link & Use Destination Styles or Link & Keep Source Formatting.
Destination Styles uses the default Word table formatting, which usually results in a better-looking table. Keep Source Formatting uses the formatting from the Excel workbook.
-
The Excel data pastes directly into the Word document where the cursor was positioned. If changes are made to the source Excel file, the Word document updates with those changes automatically.
What Happens When You Link Excel to Word
Linking an Excel file to a Word document ensures that the Word document is updated every time the data in the Excel file changes. It works as a one-way link feed that brings the updated Excel data into the linked Word document. Linking an Excel worksheet also keeps your Word file small because the data doesn’t save to the Word document.
Linking an Excel worksheet to a Word document has a few limitations:
- If the Excel file moves, the link to the Word document needs to be re-established.
- If you plan to transport the Word file or use it on another computer, you must transport the Excel file along with it.
- You must do data editing in the Excel worksheet. It isn’t a problem unless you require different spreadsheet formats in the Word document.
How to Embed an Excel Spreadsheet in Word
The process of embedding an Excel worksheet in a Word document is essentially the same as linking to an Excel worksheet. It does require a few extra clicks, but it brings all data from the worksheet into your document, not only the selected range.
There are two ways to embed an Excel worksheet in Word. The first is to embed the worksheet as an object. The second is to insert a table.
When you embed a worksheet, Word uses the formatting from the Excel worksheet. Make sure that the data in the worksheet looks the way you want it to appear in the Word document.
Embed an Excel Worksheet as an Object
To embed an Excel worksheet as an object:
-
Open the Word document.
-
Go to the Insert tab.
-
Select Object > Object. In Word 2010, select Insert > Object.
-
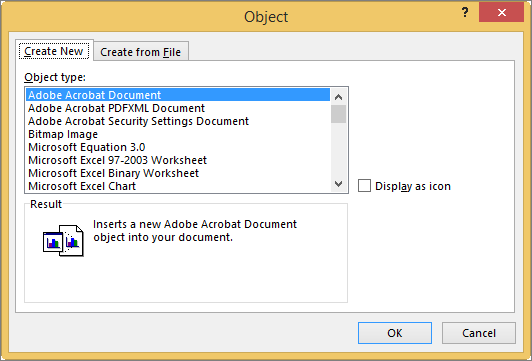
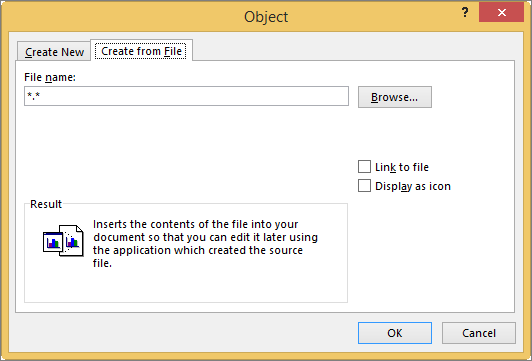
In the Object dialog box, select the Create from File tab.
-
Select Browse, then choose the Excel worksheet that contains the data you want to embed.
-
Select OK.
-
The Excel worksheet is embedded in the Word document.
How to Embed an Excel Spreadsheet Table
An alternative is to insert the Excel worksheet as a table. This method inserts the worksheet the same way as if you embedded it as an object. The difference is that it opens a blank Excel worksheet for you to fill out. Choose this method if you haven’t created the Excel file yet.
To insert an Excel worksheet as a table in Word:
-
Open a Word document.
-
Place the cursor where you want to insert the Excel worksheet.
-
Go to the Insert tab, then select Table.
-
Select Excel Spreadsheet.
-
This menu option opens a blank Excel worksheet that you can fill with data. Either enter new data or paste data from another spreadsheet.
When you insert and fill out a new Excel worksheet, you have an Excel file that you can update at any time. The data in the Word table automatically updates to match the data in the Excel file.
FAQ
-
How do I embed a Microsoft Word document in Excel?
In Excel, select the Insert tab > Text > Object > Create from File. Next, select Browse to find the Word file > Insert > OK.
-
How do I create labels in Microsoft Word from an Excel list?
To create labels in Word from an Excel list, open a blank Word document > select Mailings > Start Mail Merge > Labels > choose the brand and product number for the labels. Then, choose Select Recipients > Use an Existing List > navigate to the Excel address list > OK. Add the merge mail fields to complete the merge.
Thanks for letting us know!
Get the Latest Tech News Delivered Every Day
Subscribe
Download PC Repair Tool to quickly find & fix Windows errors automatically
Sometimes we need to insert an Excel Spreadsheet in Word Document. It can be done is such a way that, whenever you update the Excel Spreadsheet, it automatically needs to be updated in the Word Document, so that we can avoid updating the same in Word. There are a couple of ways of doing it – called Linking to an object and Creating a new Excel inside Word. Normally, most of us will not follow these two methods but will go for the copy-paste method. They simply copy the content from the Excel Spreadsheet and will paste it in the Word. This will not update the Word when you update the Excel Sheet.
In this article, I will let you know the two best ways to insert an Excel spreadsheet into Word. Before that, let me tell you how to update the Excel sheet when you already have the Word with the pasted Excel sheet in it.
1] Copy and Paste Excel Sheet into Word
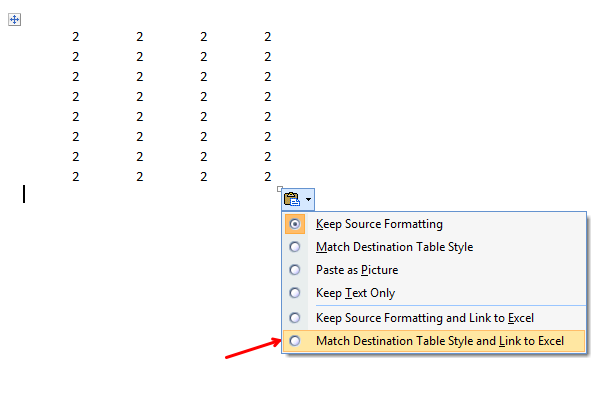
Just copy the content from the Excel Sheet and paste it in the Word Document. Choose the option Keep Source Formatting and Link to Excel or Match Destination Table Style and Link to Excel option from the Pasting Options.
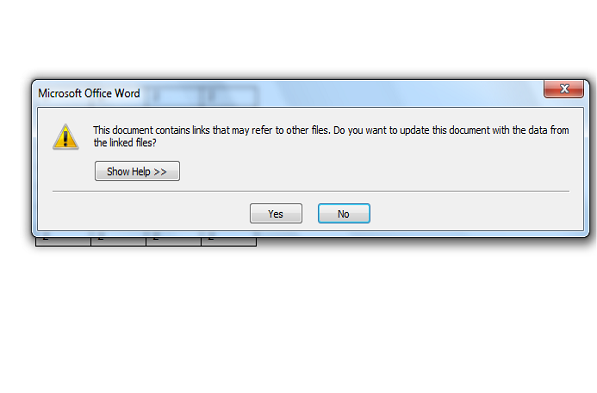
Now, it is just the static Excel data inserted in the Word. If you update the Excel sheet, it will not reflect the changes in the Word. If you update the Excel sheet and open the Word document, it will ask you whether to update the document or not. If you click “Yes” Word gets updated with the latest data.
Even if you update the Word and close, when you reopen it, you will face the same message and the values will be overridden with the previous values.
Recommended: How to add Error Messages in Microsoft Excel.
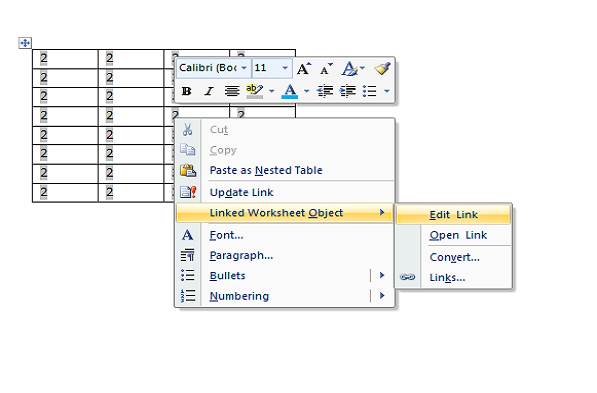
Tip: If you want to update the respective Excel Sheet from this method, simply right-click on the Excel data in Word and click Linked Worksheet Object and click Edit Link. This will open the source Excel Sheet and make changes in them.
This tip comes handy when you have the Word document with you and want to update the original Excel sheet, but you do not know it’s exact location.
2] Inserting an Object
The second method is to link an Excel sheet into Word Document through Insert tab.
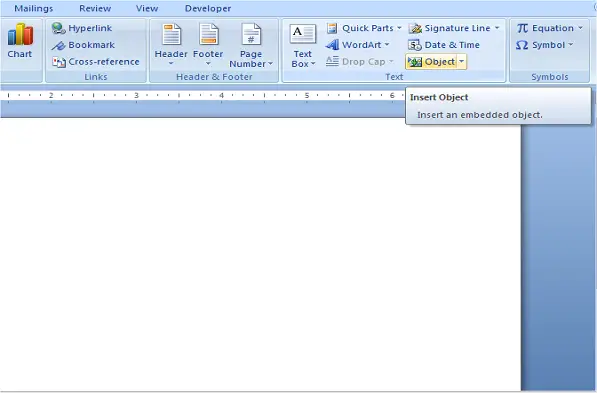
STEP 1: In Word, click on Insert tab and click on Object in Text section.
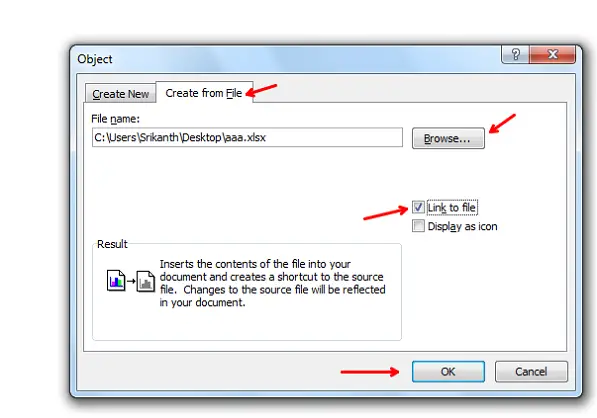
STEP 2: The object dialog box comes up. Click on Create from File tab.
STEP 3: Browse to the Excel Sheet and you will be shown two options on the right side. If you want to link the Excel sheet, then check the option Link to file, else do not check anything and click Ok.
You could see that all the contents of Excel are inserted into Word rather that the portion of Excel sheet.
This method will link the Excel sheet in the Word Document. If you double-click on the Excel data in Word, then it would open the original Excel Sheet, and you can make changes. Here, when the Excel sheet is open and when you update the Excel, you could see that the changes are being reflected in the Word as well.
3] Using Insert Table
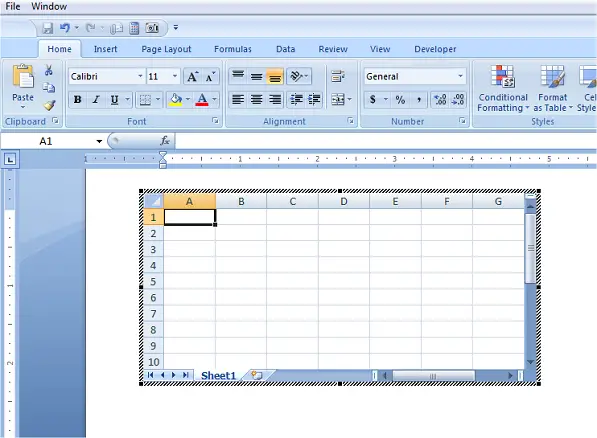
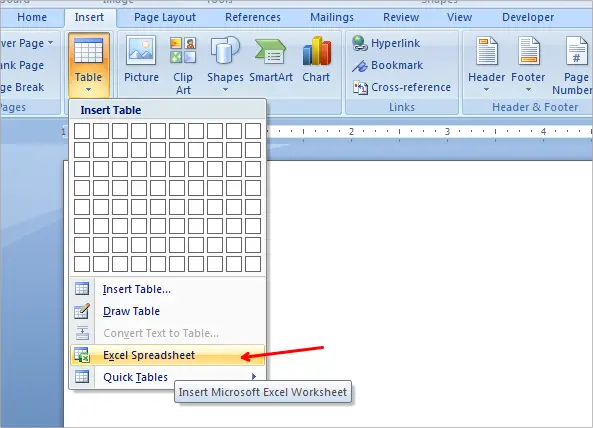
This method is to insert the whole editable Excel sheet into Word. In Word, click on Insert tab and click on Table. Click on the option Excel Spreadsheet.
You could see that the entire Excel sheet with the menu is inserted into Word. Now, we can create formulas; create filters, and more as we normally do in the Excel sheet.
This method would be helpful if you want to work with Excel in Word as editing Word tables is not so easy like Excel.
These are the different ways to insert an Excel Spreadsheet in Word document with or without linking them.
Now read: How to Insert a PDF File in an Excel Sheet.
Sridhar is a Software Engineer who loves to stay updated with developments in the world of technology. He is fond of writing everything related to Internet, Computers and Mobile and Desktop Operating Systems.
Содержание
- Вариант 1: Обычная вставка
- Вариант 2: Вставка со связкой
- Вариант 3: Вставка объекта
- Вариант 4: Вставка в виде ссылки
- Вариант 5: Вставка таблицы
- Вопросы и ответы
Обратите внимание! Первые четыре из рассмотренных далее вариантов вставки книги Excel в текстовый документ Word подразумевают добавление именно файла, а не его содержимого. Если же вам требуется перенести таблицу, переходите к последней части статьи.
Вариант 1: Обычная вставка
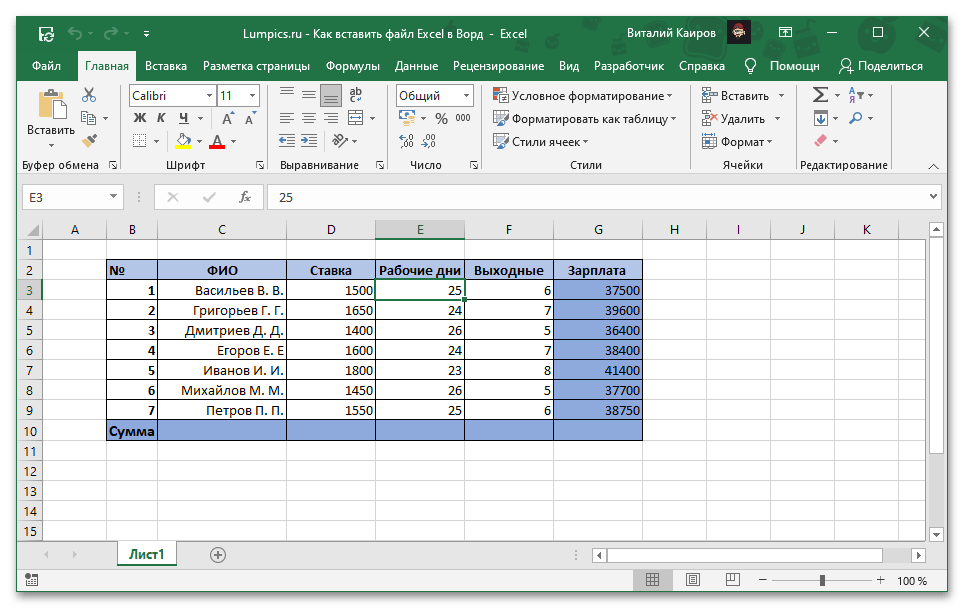
Если вам необходимо добавить в текстовый документ Ворд файл Эксель в его законченном виде, то есть когда в дальнейшем никаких изменений в изначальную книгу вносить не планируется, выполните следующее:
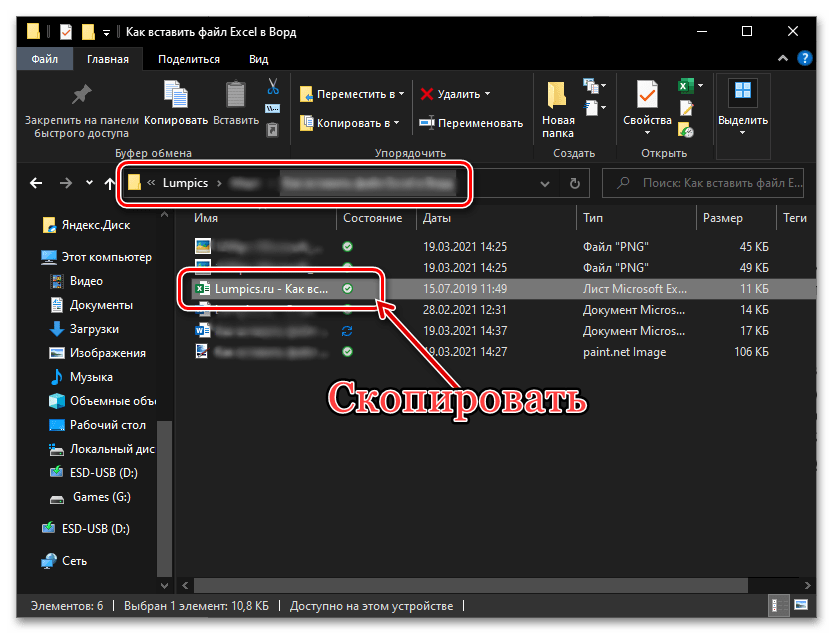
- Перейдите в папку с файлом таблицы, выделите его и скопируйте, воспользовавшись соответствующим пунктом контекстного меню или сочетанием клавиш «Ctrl+C».
Читайте также: Горячие клавиши для удобной работы в Word
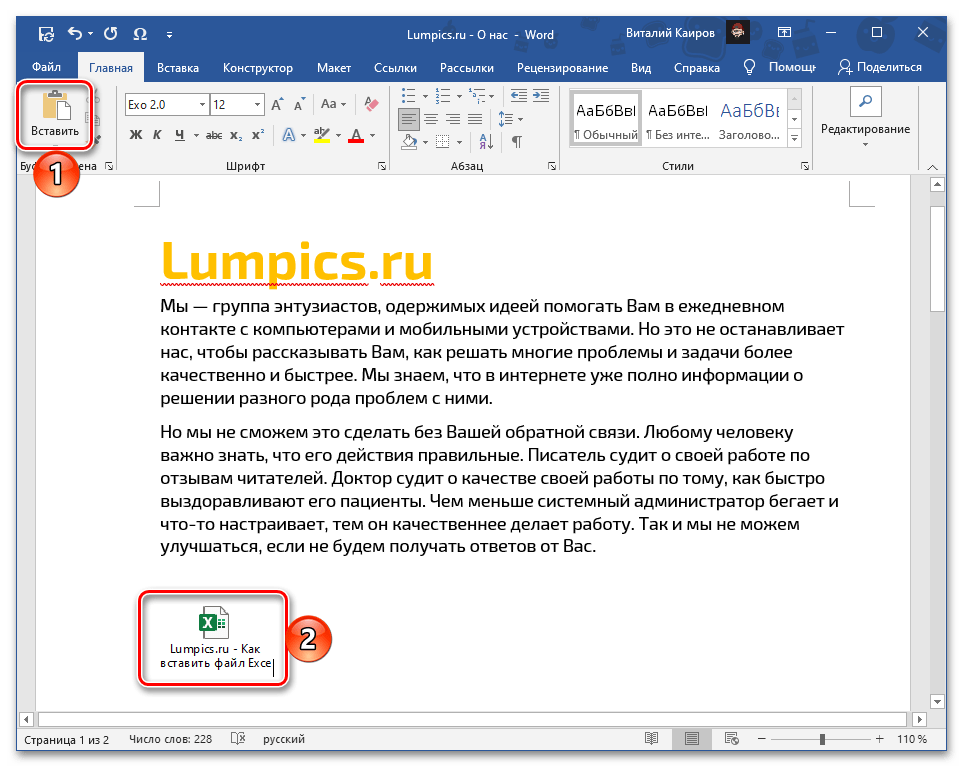
- Откройте документ Ворд и установите указатель курсора в том месте, где должна быть выполнена вставка. Любым удобным способом вставьте скопированную книгу Excel, например, выбрав пункт в контекстном меню или воспользовавшись сочетанием «Ctrl+V».
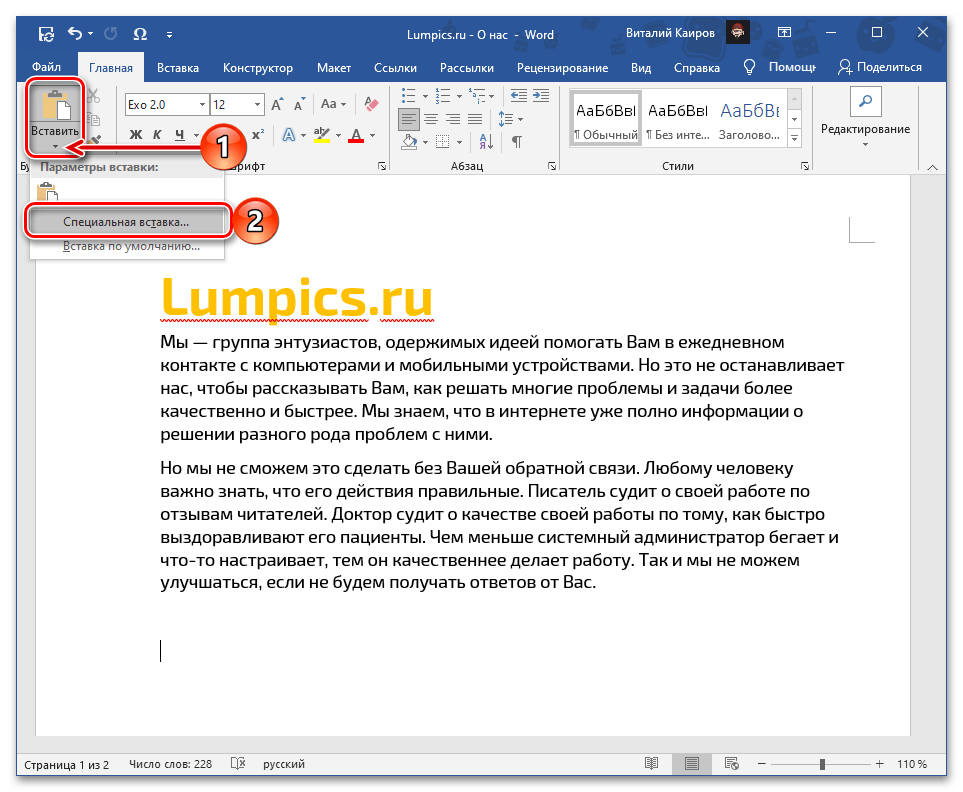
- Отдельно стоит рассмотреть вставку содержимого буфера обмена через соответствующую кнопку на панели инструментов – непосредственное нажатие на нее интегрирует файл электронной таблицы в текстовый документ аналогично использованию клавиш.
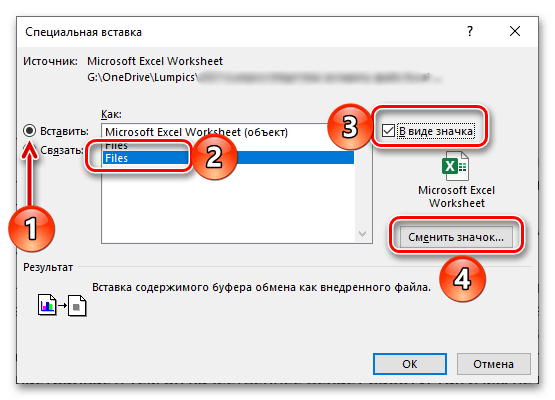
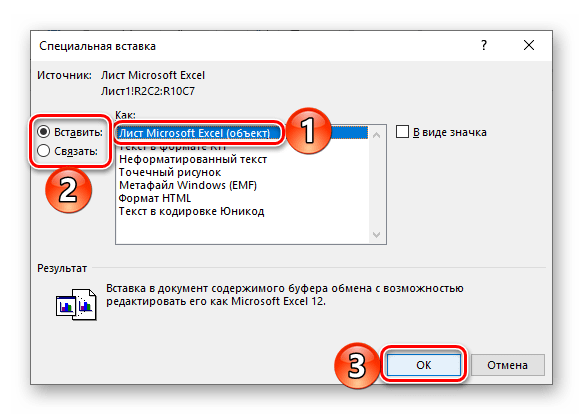
Если же вызвать меню этой кнопки и выбрать пункт «Специальная вставка», появится окно с дополнительными параметрами:
- Установите в нем маркер возле пункта «Вставить»;
- Убедитесь, что в области «Как» отмечено «Files»;
- Правее установите галочку возле пункта «В виде значка»;
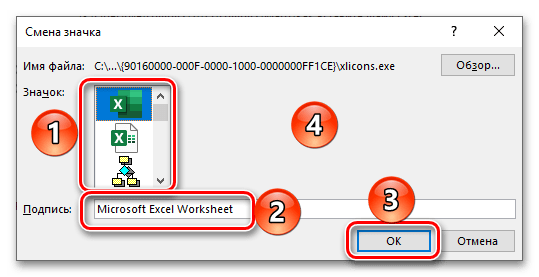
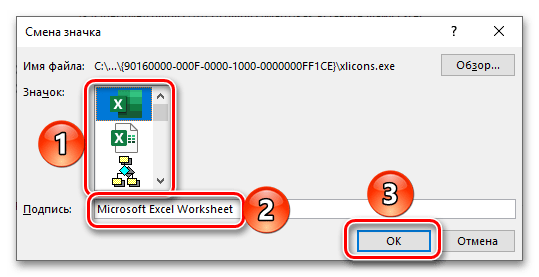
- По необходимости «Смените значок»,
выбрав один из шаблонных вариантов. Измените или оставьте изначальную «Подпись» (название файла);
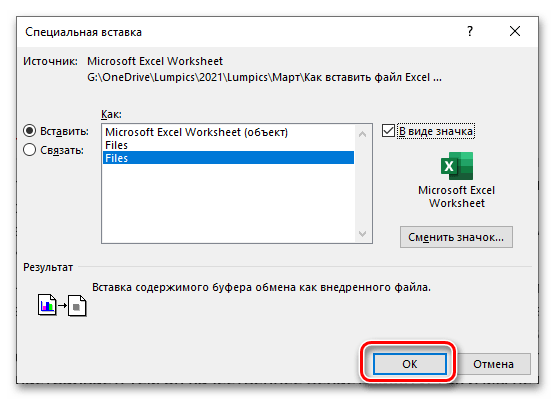
- Нажмите «ОК» в обоих диалоговых окнах для их закрытия.
Читайте также: Как вставить скопированный текст в документ Word
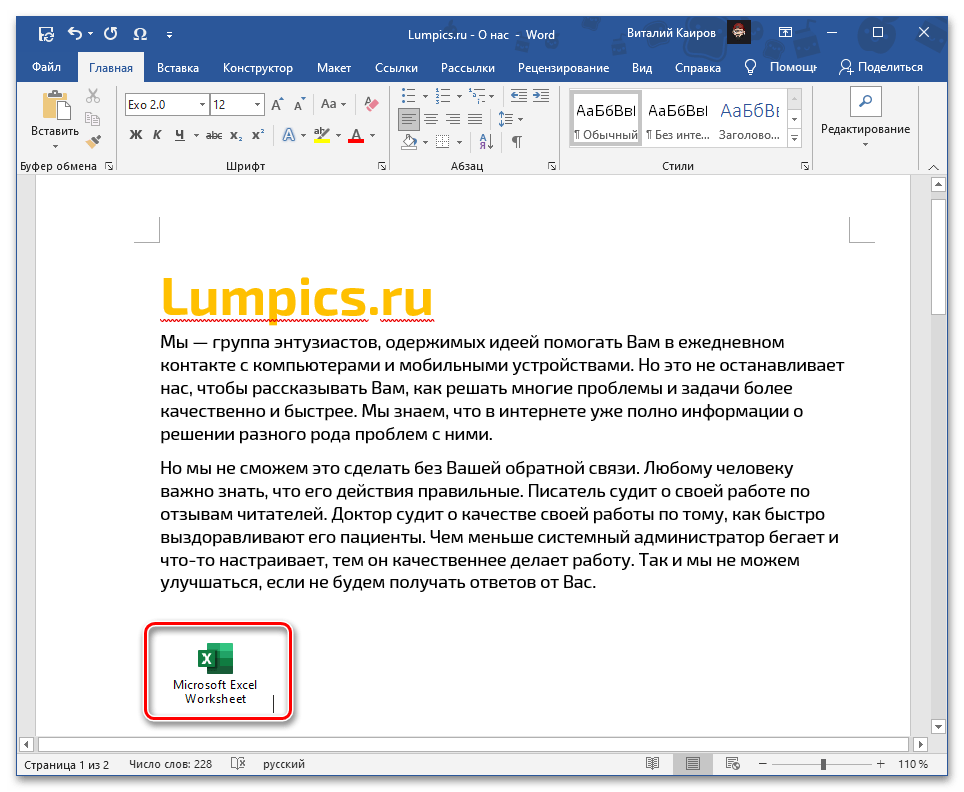
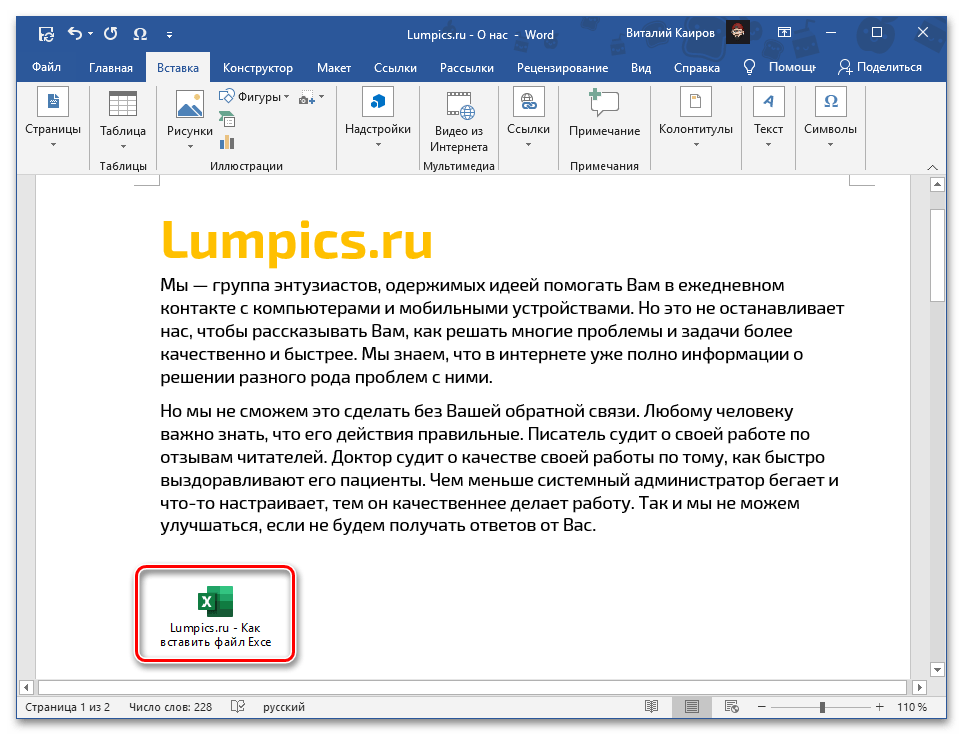
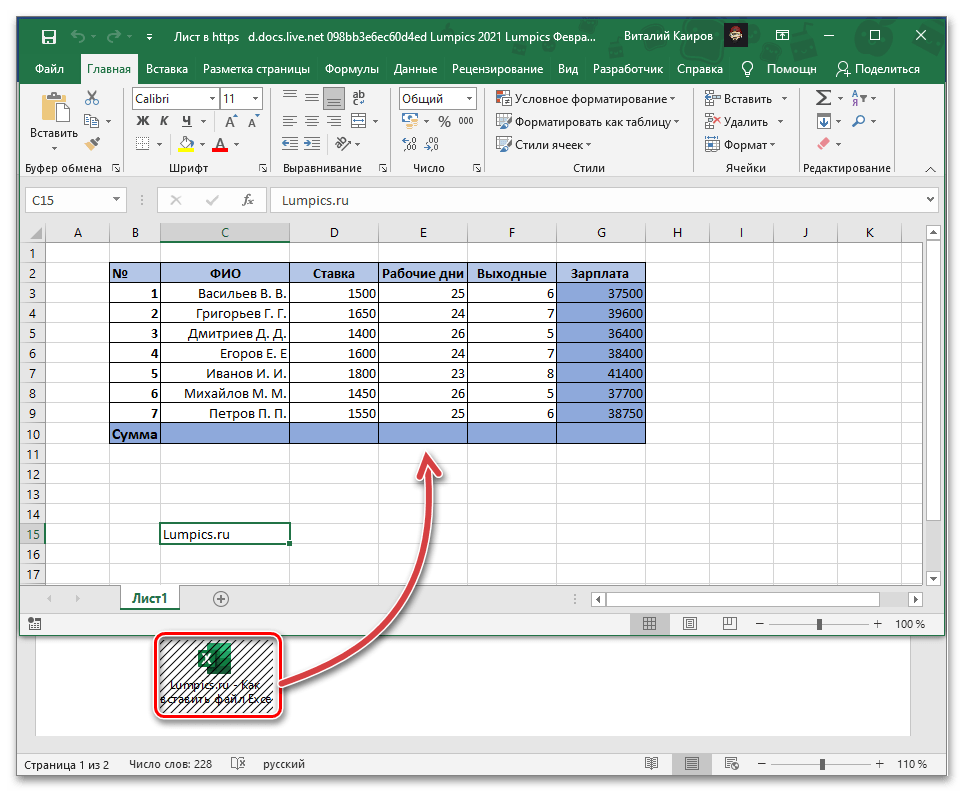
Файл с таблицей будет добавлен в виде активного ярлыка, который можно открыть двойным нажатием левой кнопки мышки (ЛКМ).
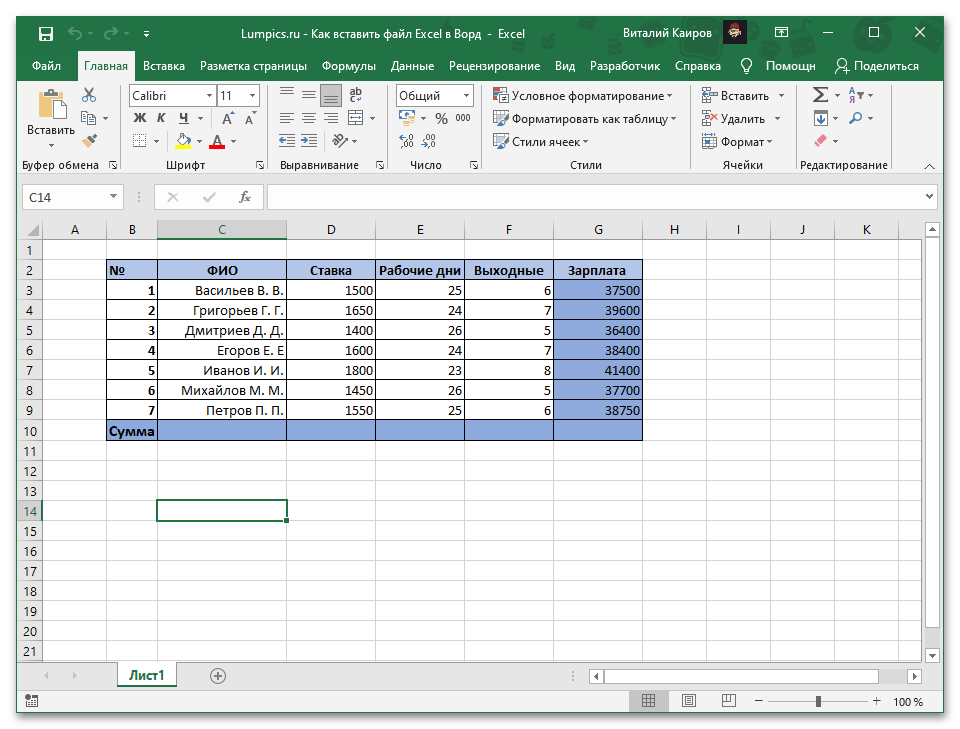
Это действие запустит приложение Эксель с отдельным экземпляром книги, которая, по сути, является независимой копией своей изначальной версии и никак с ней не связана – в нее можно вносить изменения и сохранять их, но это будет отражаться исключительно на внедренном в документ Ворд объекте.
Вариант 2: Вставка со связкой
В том же случае, если требуется сделать так, чтобы вносимые в изначальную книгу Excel изменения отражались на ее копии в документе Word и наоборот, в меню специальной вставки, рассмотренном на последнем шаге инструкции выше, потребуется изменить один из параметров.
- Скопируйте файл таблицы и перейдите к текстовому документу. Установите указатель курсора в нужном месте.
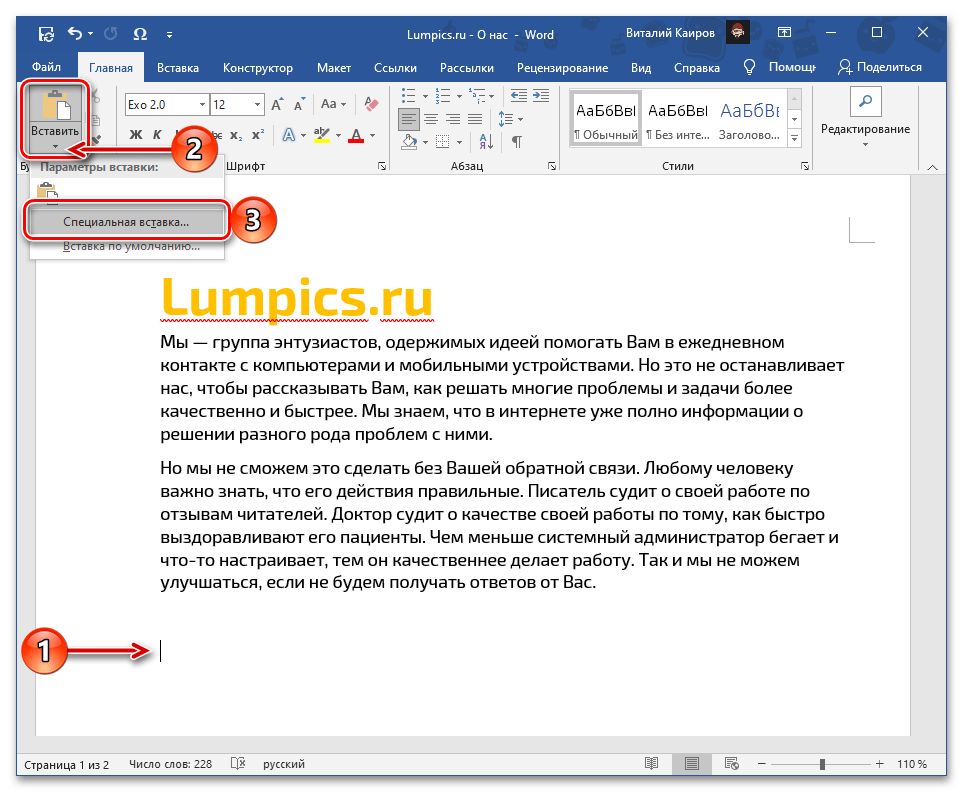
- Разверните меню кнопки «Вставить» на ленте и выберите пункт «Специальная вставка».
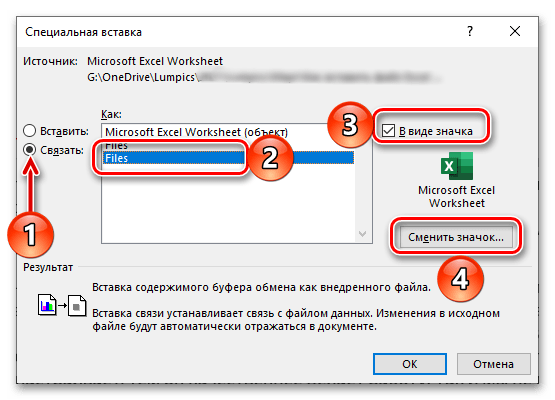
- Установите маркер напротив расположенного слева параметра «Связать», в основной области выберите «Files»,
поставьте галочку в чекбоксе «В виде значка», по необходимости смените его и подпись.
Для подтверждения внесенных изменений нажмите «ОК».
Как и в рассмотренном выше случае, в документ будет добавлена электронная книга Эксель в виде ярлыка. По двойному нажатию ЛКМ на нем будет открыто окно табличного процессора с изначальным файлом, который можно редактировать и сохранять. Даже если вносить изменения напрямую, то есть без запуска этого объекта через текстовый редактор, они все равно будут синхронизированы и применены.
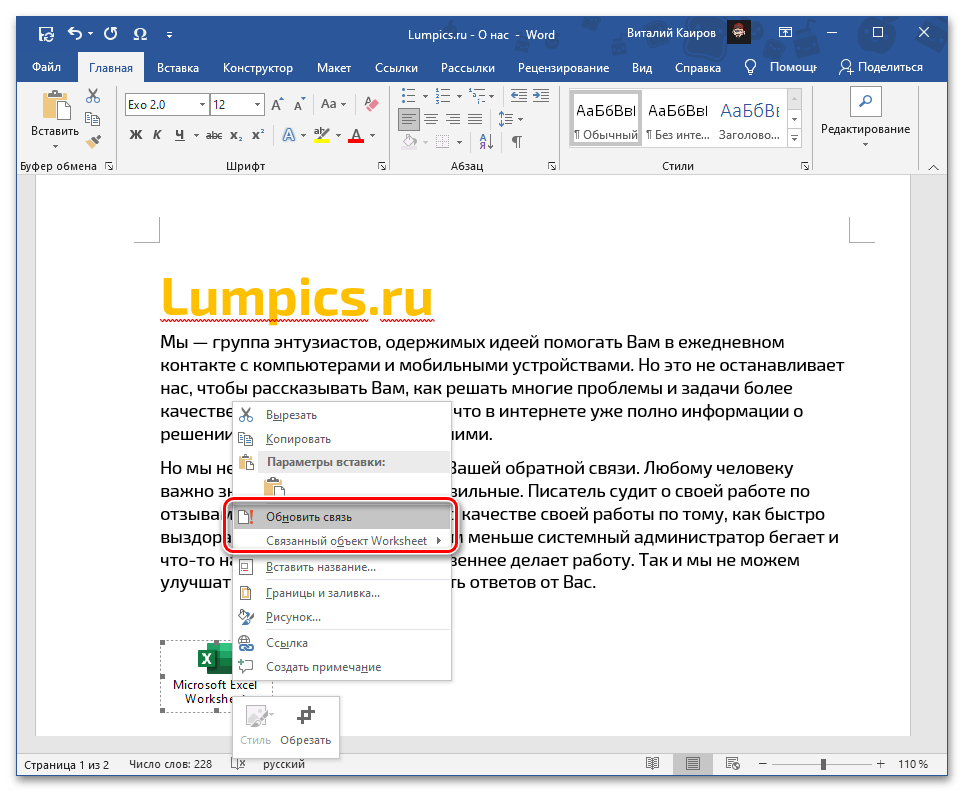
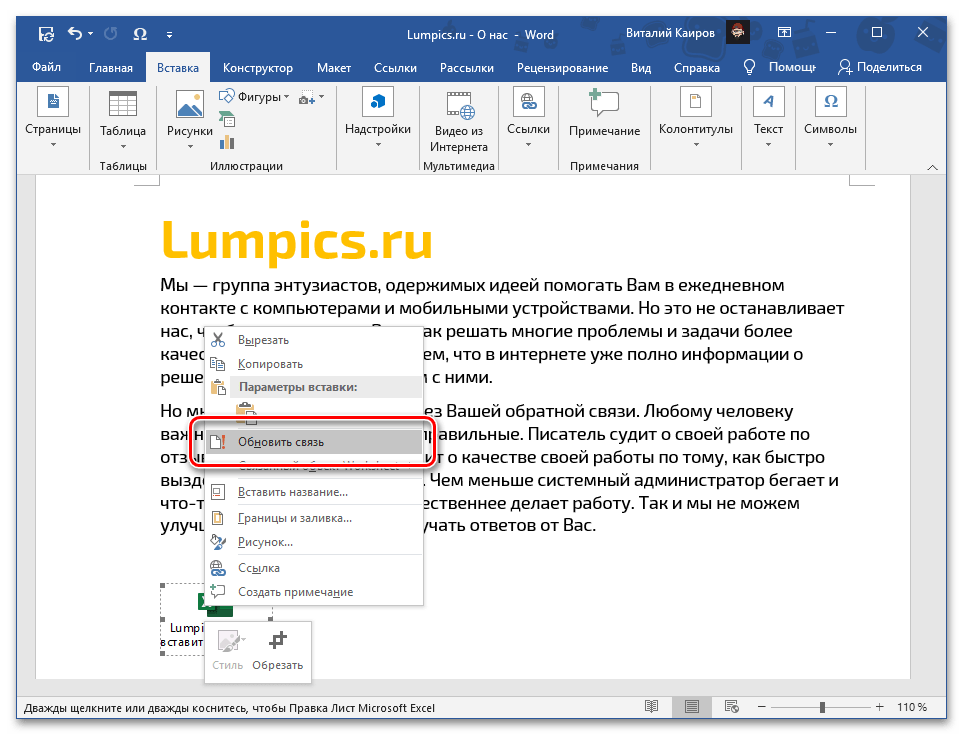
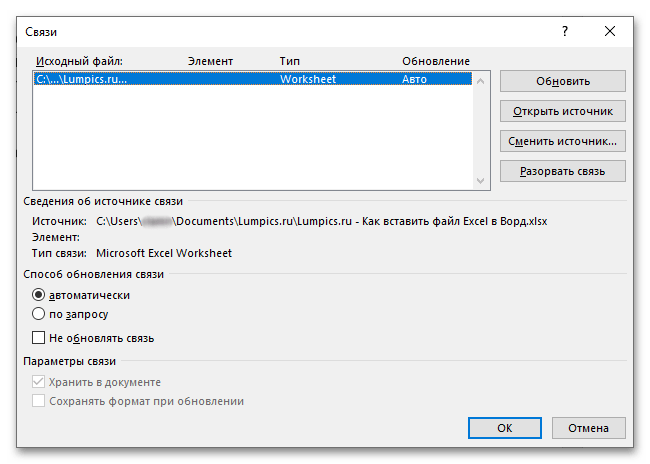
Если этого не произойдет автоматически, «Обновить связь» можно через контекстное меню, там же доступны и дополнительные параметры, которые мы рассмотрим в конце следующей части статьи.
При каждом новом запуске документа также будет предложено обновить связь.

Вариант 3: Вставка объекта
Оба предложенных выше решения работают только с локальными файлами, используемыми на конкретном ПК, то есть если вы передадите документ Word с внедренной в него таким образом таблицей Excel, открыть ее не получится по причине фактического отсутствия самого файла. Для того чтобы такая возможность стала доступной, книгу нужно добавлять в виде объекта. Делается это следующим образом:
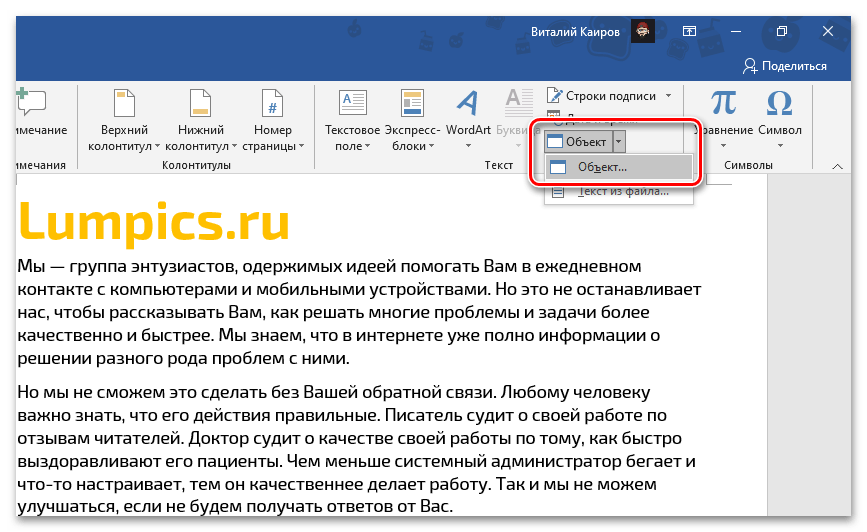
- Установите указатель курсора в том месте документа, куда требуется добавить файл таблицы, и перейдите во вкладку «Вставка».
- Разверните меню кнопки «Объект» и выберите в нем одноименный пункт.
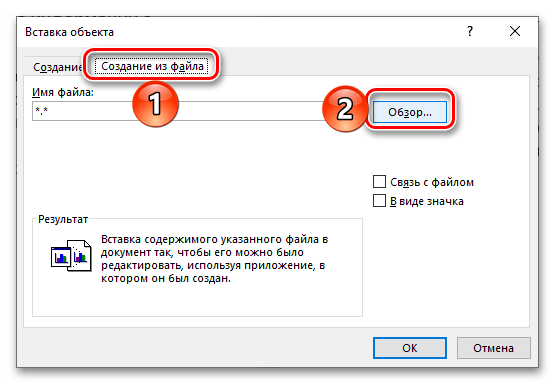
- В открывшемся окне перейдите во вкладку «Создание из файла» и нажмите на кнопку «Обзор».
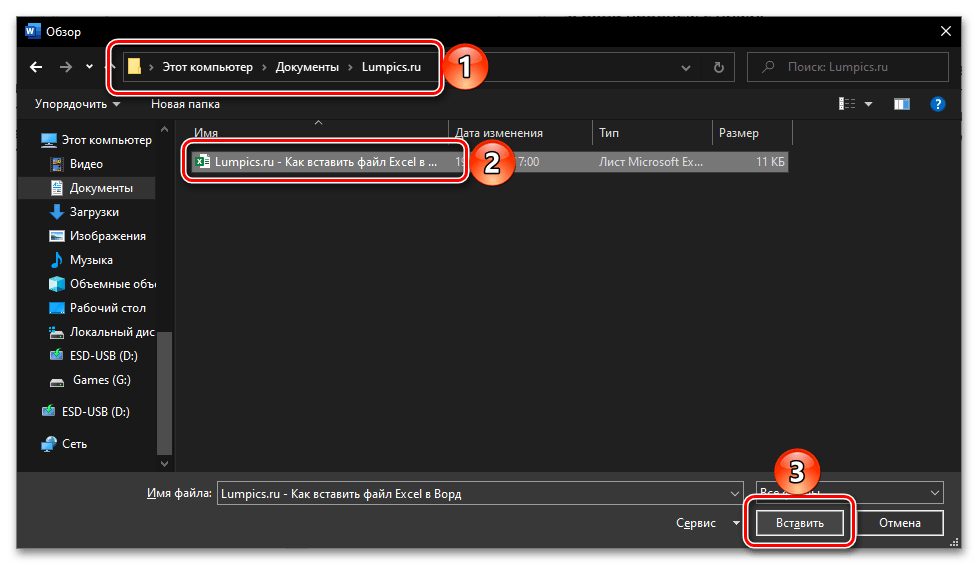
- С помощью системного «Проводника» переместитесь к папке с книгой Эксель, выделите ее и нажмите «Вставить».
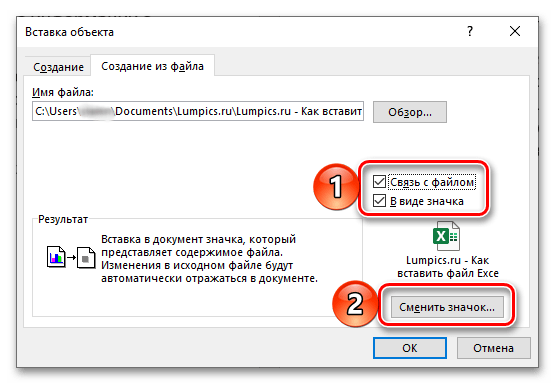
- Установите отметку в чекбоксе «В виде значка». Если хотите сохранить «Связь с файлом» (аналогично решению из части «Вариант 2» настоящей статьи), отметьте соответствующий пункт.
Важно! Сохранение связи вложенного файла с исходным работает только в рамках конкретного компьютера, на котором они создавались и редактировались.
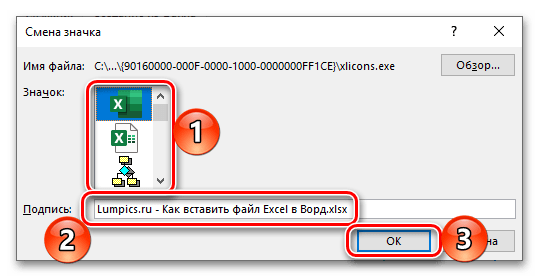
- По желанию «Смените значок» и «Подпись» (название).
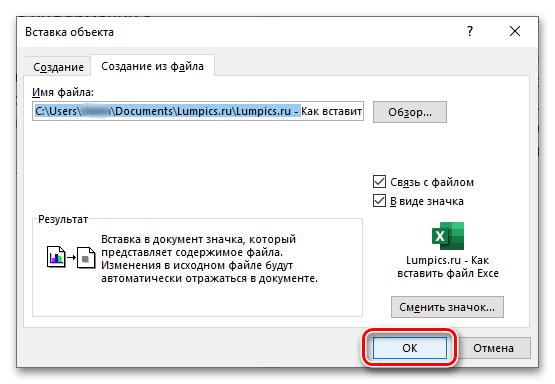
- Нажмите «ОК» для закрытия окон и подтверждения вставки.
Файл с таблицей будет добавлен в текстовый документ и доступен для редактирования.
В зависимости от того, связали вы его с изначальной копией или нет, изменения в обоих объектах будут синхронизироваться или нет.
При наличии связи ее можно принудительно обновить через контекстное меню,
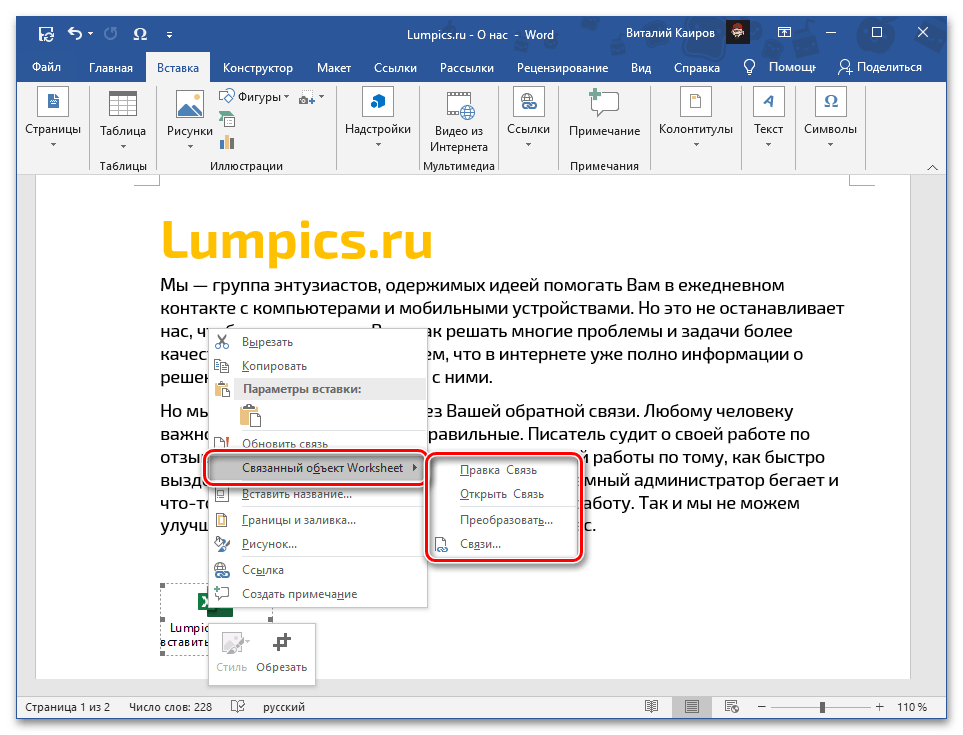
в нем же доступны дополнительные параметры, такие как правка и преобразование,
а также более детальная настройка.

Если вы передадите такой документ Word пользователю или сами захотите открыть его на другом компьютере, содержимое таблицы Excel будет доступно для просмотра и редактирования, так как это уже не просто ярлык, а полноценный файл. Однако при наличии связи его не получится даже открыть.
Вариант 4: Вставка в виде ссылки
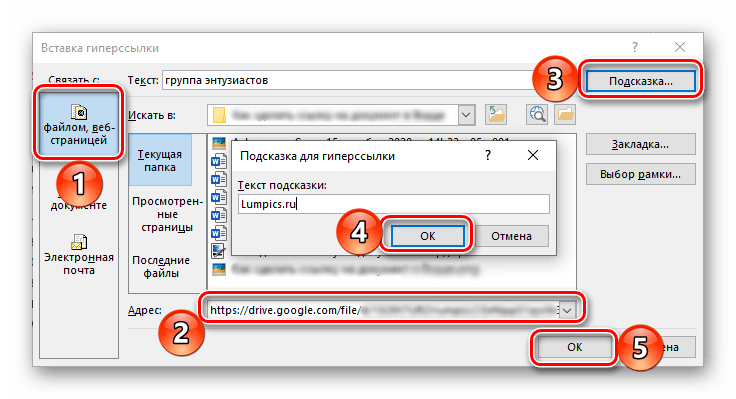
Альтернативой предыдущему методу, причем во многих случаях более универсальной и простой в своей реализации, является добавление файла Эксель в виде предварительной созданной и полученной публичной ссылки на него. Стоит отметить, что такой подход работает как с локальными, так и с удаленными документами (например, сохраненными в облаке) и, в отличие от предложенного выше решения, позволяет сохранить связь между ними с возможностью полноценного редактирования и синхронизацией изменений. Узнать же более детально обо всех его особенностях можно из отдельной инструкции.
Подробнее: Как вставить документ из облака в Ворд
Вариант 5: Вставка таблицы
Если же ваша задача заключается в добавлении не непосредственно файла Эксель, как объекта, а электронной таблицы, действовать нужно несколько иначе, чем в любом из предложенных выше решений. На выбор доступно несколько вариантов, подразумевающих сохранение исходного форматирования, его объединение с текущим или полную очистку, создание связи и некоторые другие, дополнительные параметры. Более детально обо всех нюансах данной процедуры можно узнать из следующей статьи на нашем сайте.
Подробнее: Как вставить таблицу из Excel в Word
Еще статьи по данной теме:
Помогла ли Вам статья?
Word documents are for word processing while Excel files are for data processing. But what if you need to combine the two? What if you need to display a part of your Excel data in, say a sales report that’s in a Word file?
You’re probably aware of the easiest technique that involves copying the table from Excel and pasting it into Word.
This technique, though quick and easy, has certain limitations.
However, there are other techniques to insert an Excel file into your Word document that allow for a lot more flexibility.
In this tutorial we will look at three ways to insert an Excel file into Word:
- By simple copy-pasting
- By Inserting as an embedded object
- By inserting as a linked object
Inserting an Excel File into Word by Simple Copy-Pasting
This first copy-paste method is the easiest. It’s just like copy-pasting data from one sheet in Excel into another.
In fact, you have probably already used this technique plenty of times. The method simply involves the following steps:
- Select the part of the Excel file that you want to insert into your Word file
- Press CTRL+C to copy (or right-click on the selection and then click on Copy)
- Open the Word file where you want to insert this data
- Place your cursor where you want to insert the Excel table
- Press CTRL+V to paste
Once you’ve pasted the data into Word, you get a table with the data that you copied. This works the same way as a regular Word table.
You can press the tab key to navigate through the table, you can edit the contents, you can delete rows and columns, or insert new rows and columns.
However, the changes you make to the pasted table do not get reflected in the original Excel file.
Moreover, any changes you make to the original Excel file will not automatically get reflected in your pasted table, unless you paste it again.
This method, though easy, does not offer much in terms of flexibility. It’s best used when you have a final table/data in Excel and you want it in Word (as a static table).
While this method works as expected in most cases, there are some minor issues you may face when using the simple copy paste to insert Excel data into Word:
- You might lose some of the formatting from your original table structure
- It will not be possible to copy larger tables
- If you have any formulas in the original Excel file, they will get pasted as values. So you cannot use Excel formulas in the table once it is pasted to Word
If you want to take advantage of Excel formulas inside Word, then the next two methods might work better for you.
Also read: Get File Names from a Folder into Excel
Inserting an Excel File into Word as an Embedded Object
An alternative way to insert an Excel file into Word is by inserting it as an embedded object.
An embedded object is an object that is created with one application and then embedded into a document that is created by another application.
For example when you embed an object or file created in Excel into a document created in Microsoft Word.
This is made possible by the Windows OLE technology (Object Linking and Embedding).
Embedding the object, rather than just pasting it, ensures that the object retains its original format.
Moreover, you get to alter the embedded object using the original program. This means that you can open the embedded Excel file from Word itself and make changes in it.
To embed an Excel file into a Word file, follow the steps below:
- Select the part of the Excel file that you want to insert into your Word file
- Press CTRL+C to copy (or right-click on the selection and then click on Copy)
- Open the Word file where you want to insert this data
- Place your cursor where you want to insert the Excel table.
- Under the Home tab, click on the dropdown of the Paste button (in the Clipboard group).
- Select the ‘Paste Special’ option.

- This will open the Paste Special dialog box. From this box, select Microsoft Excel Worksheet Object (in the group of options under ‘As’).

- Click OK
This will insert the copied cells into your Word doc.
The size of the embedded object might not fit correctly to your Word doc’s margins. So you can go ahead and resize it as required.
Note: The inserted table is not a regular Word table. It is, in fact, an Excel table. So you can apply formulas and work on it as a regular excel table.
If you want to edit the table, simply double-click inside the object. It will open the spreadsheet in an Excel interface (felt like pure magic when I first used it).
You can come out of edit mode when you click outside the object window.
It is important to note, however, that any changes you make to the object will not get reflected to the original Excel file. Similarly, any changes you make to the original Excel file will not get reflected in this object.
This is because the object is basically just a copy of the original file. It is not linked to it. If you want even more flexibility, the next method may be helpful for you.
Inserting an Excel File into Word as a Linked Object
You will get the most flexibility if you insert your Excel data into Word as a linked object.
A linked object is different from an embedded object in that the embedded object is like a snapshot or copy of the original file, while a linked object maintains an active connection between both files.
This means that editing the source file will cause the changes to also get reflected in the target file and vice-versa, provided that both documents are open.
So if I use this method and then change anything in the original Excel file, it would be reflected in the Word data as well.
To insert an Excel file into a Word file as a linked object, follow the steps below:
- Select the part of the Excel file that you want to insert into your Word file.
- Press CTRL+C to copy (or right-click on the selection and then click on Copy)
- Open the Word file where you want to insert this data
- Place your cursor where you want to insert the Excel table.
- Under the Home tab, click on the dropdown of the Paste button (in the Clipboard group).
- Select the ‘Paste Special’ option.
- This will open the Paste Special Dialog box. From this box, select Microsoft Excel Worksheet Object (in the group of options under ‘As’).
- Make sure that the ‘Paste link’ radio button (on the left side of the window) is checked.

- Click OK.
- This will insert the copied cells from MS Excel as a linked object into your MS Word document.
- Once again, resize the object in your Word doc as required.

You will notice that other than the addition of step 8, the procedure is more or less the same as inserting an embedded object.
The linked object works more or less like an embedded object, with an important difference.
When you double click the table in Word, the file will open in Excel.
If you make a change to the original file in Excel, the changes get updated to the table in Word, even if you don’t save the changes in the Excel file.
In case the changes are not updating automatically, right click on the table in Word and then click on Update Link.
Also, remember that for this method to work, it’s important that the source Excel file is also open. If you make any changes to the Excel file and close it, and it doesn’t get updated in the Word file, trying to update it by right-clicking and using the Update Link option wouldn’t work.
In this way, the linked object works almost like a live view of the Excel file from Word.
This method is especially useful if you’re trying to create something like a real-time dashboard in Word, displaying important tables from multiple Excel files.
These are three different ways in which you can insert an Excel file into Word.
As you must have noticed, all these methods have their pros and cons. Personally, if like the second method where we embedded Excel as an object into Word. That allows me to be a lot more flexible and use all the functionality of Excel from within the Word document.
Also, the methods covered here can also be used to insert an Excel file into other MS applications such as PowerPoint.
I hope this tutorial was useful and easy to follow.
Other Excel tutorials you may also like:
- How to Move a Chart to a New Sheet in Excel
- How to Start Excel in Safe Mode (3 Easy Ways)
- How to Find out What Version of Excel You Have (Easy Way)
- How to Open Excel File [xls, xlsx] Online (for FREE)
- Why does Excel Open on Startup (and How to Stop It)
- How to Convert a Text File to Excel?
- How to Merge Two Excel Files?
- How to Insert Sheet Name into Header or Footer in Excel?
- How to Convert PDF to Excel without Software?
Word for Microsoft 365 Outlook for Microsoft 365 Word 2021 Outlook 2021 Word 2019 Outlook 2019 Word 2016 Outlook 2016 Word 2013 Outlook 2013 Word 2010 Outlook 2010 More…Less
Depending on the version of Word or Outlook you’re using, you can insert a variety of objects (such as PDF files, Excel charts or worksheets, or PowerPoint presentations) into a Word document or an email message by linking or embedding them. To insert an object, click Object on the Insert tab.
Insert a new object
To create a new file that is inserted into your Word document or email message:
-
In the Object dialog box, click the Create New tab, and then select an option from the Object type list.
The default program for that file type opens, where you can enter any text or data you want. When you close the program, any added content or changes appear in your Word document or email message.
-
If you want the new file to appear as a clickable icon, rather than the first page of your new file, select Display as icon. If this check box is selected, you can choose a different icon by clicking Change Icon.
Tips:
-
The information in the Result section changes based on the selected object type and whether Display as icon is selected. Use this information to help you determine what you want to insert and how you want it to appear.
-
To edit the information in your inserted object, double-click the object.
-
In Outlook, the Display as icon option is only available if you format your email as RTF (Format Text > Format > Message Format > Rich Text).
Link or embed an existing file
To link or embed an object that’s already been created:
-
In the Object dialog box, select the Create from File tab, and then click Browse to find the file you want to insert.
-
To link to the source file, rather than embedding it into your Word document or email message, select Link to file.
-
If you want the inserted file to appear as a clickable icon, rather than the first page of the file, select Display as icon. If this check box is selected, you can choose a different icon by clicking Change Icon.
Tip: The information in the Result section changes based on whether Link to file and Display as icon are selected. Use this information to help you determine what you want to insert and how you want it to appear.
Embedded objects vs. linked objects
Embedded objects become part of the Word file or email message and, after they are inserted, they are no longer connected to any source file.
Linked objects can be updated if the source file is modified. Linked data is stored in the source file. The Word file or email message (the destination file) stores only the location of the source file, and it displays a representation of the linked data. Use linked objects if file size is a consideration.

