
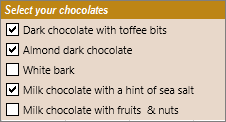
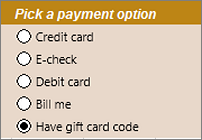
You can insert form controls such as check boxes or option buttons to make data entry easier. Check boxes work well for forms with multiple options. Option buttons are better when your user has just one choice.
To add either a check box or an option button, you’ll need the Developer tab on your Ribbon.
Notes: To enable the Developer tab, follow these instructions:
-
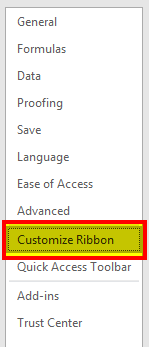
In Excel 2010 and subsequent versions, click File > Options > Customize Ribbon , select the Developer check box, and click OK.
-
In Excel 2007, click the Microsoft Office button
 > Excel Options > Popular > Show Developer tab in the Ribbon.
 > Excel Options > Popular > Show Developer tab in the Ribbon.
-
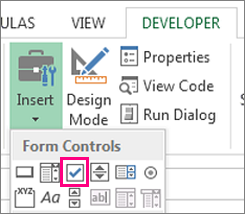
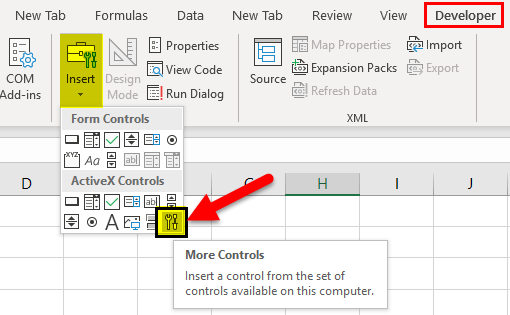
To add a check box, click the Developer tab, click Insert, and under Form Controls, click
.
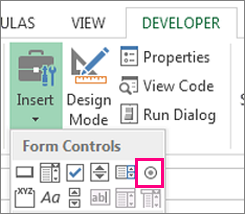
To add an option button, click the Developer tab, click Insert, and under Form Controls, click
.
-
Click in the cell where you want to add the check box or option button control.
Tip: You can only add one checkbox or option button at a time. To speed things up, after you add your first control, right-click it and select Copy > Paste.
-
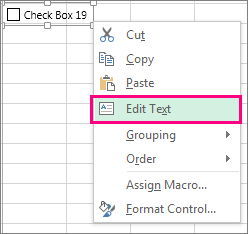
To edit or remove the default text for a control, click the control, and then update the text as needed.
 .
.
 .
.
Tip: If you can’t see all of the text, click and drag one of the control handles until you can read it all. The size of the control and its distance from the text can’t be edited.
Formatting a control
After you insert a check box or option button, you might want to make sure that it works the way you want it to. For example, you might want to customize the appearance or properties.
Note: The size of the option button inside the control and its distance from its associated text cannot be adjusted.
-
To format a control, right-click the control, and then click Format Control.
-
In the Format Control dialog box, on the Control tab, you can modify any of the available options:
-
Checked: Displays an option button that is selected.
-
Unchecked: Displays an option button that is cleared.
-
In the Cell link box, enter a cell reference that contains the current state of the option button.
The linked cell returns the number of the selected option button in the group of options. Use the same linked cell for all options in a group. The first option button returns a 1, the second option button returns a 2, and so on. If you have two or more option groups on the same worksheet, use a different linked cell for each option group.
Use the returned number in a formula to respond to the selected option.
For example, a personnel form, with a Job type group box, contains two option buttons labeled Full-time and Part-time linked to cell C1. After a user selects one of the two options, the following formula in cell D1 evaluates to «Full-time» if the first option button is selected or «Part-time» if the second option button is selected.
=IF(C1=1,»Full-time»,»Part-time»)
If you have three or more options to evaluate in the same group of options, you can use the CHOOSE or LOOKUP functions in a similar manner.
-
-
Click OK.
Deleting a control
-
Right-click the control, and press DELETE.
Currently, you can’t use check box controls in Excel for the web. If you’re working in Excel for the web and you open a workbook that has check boxes or other controls (objects), you won’t be able to edit the workbook without removing these controls.
Important: If you see an «Edit in the browser?» or «Unsupported features» message and choose to edit the workbook in the browser anyway, all objects such as check boxes, combo boxes will be lost immediately. If this happens and you want these objects back, use Previous Versions to restore an earlier version.
If you have the Excel desktop application, click Open in Excel and add check boxes or option buttons.
The buttons in Excel are single-click commands inserted to perform a certain task for us. They are used in macros:
- We can insert it by enabling the “Developer” tab.
- In the “Insert” form controls in excelExcel Form Controls are objects which can be inserted at any place in the worksheet to work with data and handle the data as specified. These controls are compatible with excel and can create a drop-down list in excel, list boxes, spinners, checkboxes, scroll bars.read more we can find button tab to insert.
- Then, we can draw the button on the worksheet.
Normally, the button is in the “Design Mode,” but we can remove it after coding and use it.
While using the “Insert” option, first, we need to insert the “Developer” option in the Excel ribbon.
- How to Insert Button in Excel
- Steps to Insert Developer Option in Excel Ribbon
- How to Make use of Insert Button Option in Excel?
- How to add more Controls in Excel?
- How to Format the Control Function in your Excel Sheet?
- Things to Remember
- Recommended Articles

Steps to Insert Developer Option in Excel Ribbon
- Step #1 – We must first go to the “File” option and click on the “Options” at the bottom of the file option. option:

- Step #2 – When we click on “Options,” it enables one dialog box and goes to “Customize Ribbon in excelRibbons in Excel 2016 are designed to help you easily locate the command you want to use. Ribbons are organized into logical groups called Tabs, each of which has its own set of functions.read more:
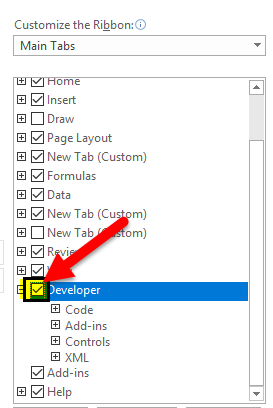
- Step #3 – Now, we will be able to see so many options under the “Customize Ribbon” tab. Click on the checkbox adjacent to the “Developer,” enabling the “Developer” option in the Excel ribbon:
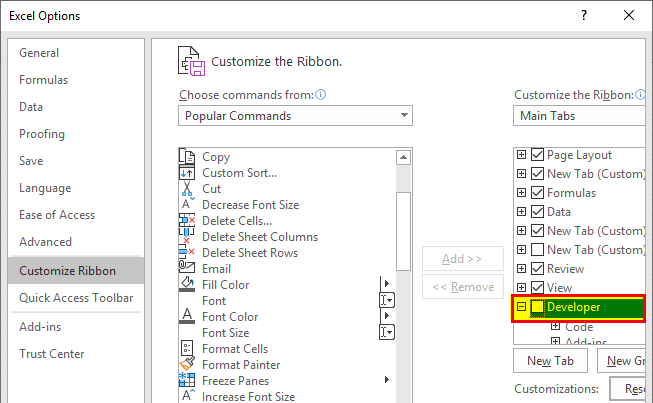
- Step #4 – When we check the developer option, click Ok to confirm the same:
- Step#5 – Now we will be able to see the developer tab in you excel ribbonEnabling the developer tab in excel can help the user perform various functions for VBA, Macros and Add-ins like importing and exporting XML, designing forms, etc. This tab is disabled by default on excel; thus, the user needs to enable it first from the options menu.read more option as shown below:

How to Make use of Insert Button Option in Excel?
Excel “Insert” button is used if we want to add the control in the documents. E.g., checkbox, scroll button, etc.
You can download this Insert Button Excel Template here – Insert Button Excel Template
Below are the steps of using insert button option in excel –
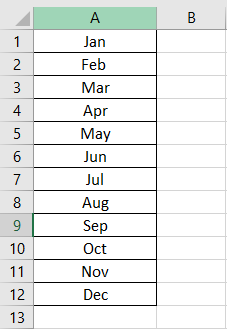
- We must select the data first and organize the data as per the requirement.

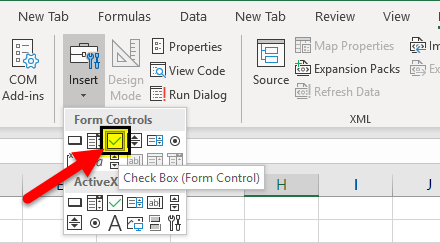
- Then, go to the “Developer” tab and select the “Insert” option under the tab.

- Click on the “Insert” and see what option is required in your data.

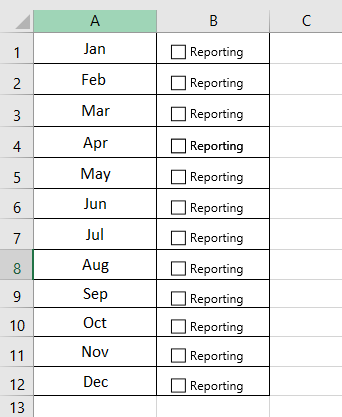
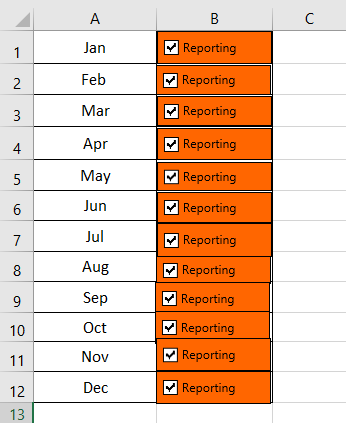
- Now, click on the “Check Box” option. It enables us to create the checkbox in the sheet wherever required

- Next, click on the cell in the data where we want to insert the checkbox. The “CheckBox (Form Control)”will appear nearby only to that place. If we need, we can adjust the box as per the requirement.

- If we want to remove or edit the text on “Check Box 1,” which we created, right-click on the checkbox, select the text, and delete it or edit it as per the requirement. We can do one alternative: right-click on the checkbox and select “Edit.”

- Copy all the columns’ check-in by dragging the “Column B1” checkbox to all the tabs or press “Ctrl+D” to paste the same in cells.

- We can see that the same checkbox is shown in all the cells.

- Now, we can easily use the checkbox by clicking on it, whether we have done the task.

- If we want to delete the checkbox option from the worksheet, press the right-click, choose the cell, and press the “Delete” key.


How to add more Controls in Excel?
- Step#1 – If you want to add more control in the insert tab, click on to more control option:
- Step#2 – When we click on more control, it opens the dialogue box, as shown below:
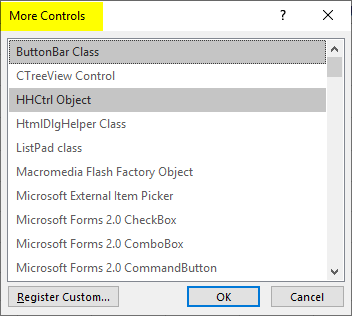
- Step#3 – Click on the control which we want to add and click Ok, It will automatically show in the insert button excel tab.
How to Format the Control Function in your Excel Sheet?
- Step#1 – Select the control option which we have inserted in your excel sheet:

- Step#2 – Click right and go to format controls:

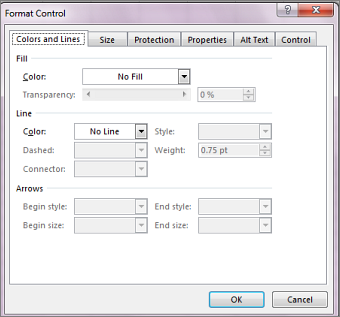
- Step#3 – Once we click on “Format Control,” it opens one dialog box, as shown below.
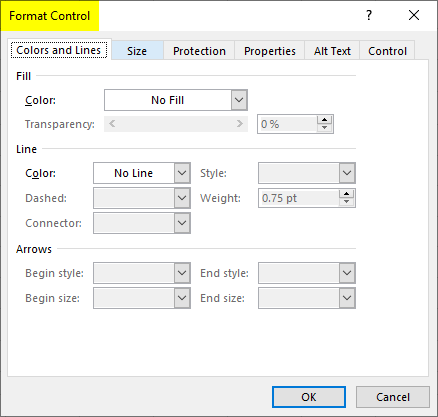
- Step#4 – Go to “Color” and “Line” to choose the color and line of the box.
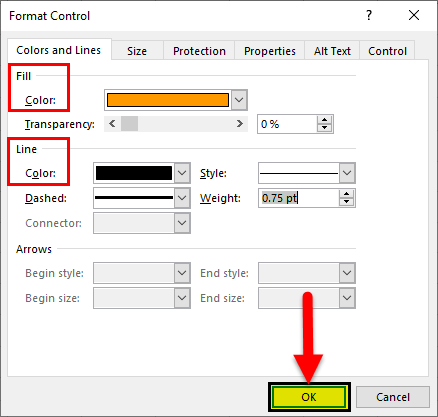
- Step#5 – Click Ok, we will get the color in the control option:
From the “Format” option, we can format the color and lines, size of the control, protection of control (locked or lock the text) so that no one can change the option, object positioning, Alt Text, and control.
Things to Remember
- While inserting a button in Excel, we must always check which option is required in the data.
- Always ensure that the control is of a size that is easily readable while inserting a button in Excel.
- While inserting a button in Excel, we can only add one checkbox or the options button at a time.
- Once we add the first control, click right and select “Copy” and “Paste” the control option to make it faster.
- We must always check to enable the “Developer” tab if it is allowed to insert a button in Excel.
- We cannot adjust the size of the options button inside the control and its separation from its related content.
- Do not oversize the control option while inserting a button in Excel.
- While adding a button, always ensure to text and the button’s size should be almost the same.
- We should not use the thick line for the box because it will not be able to see what is shown on the button.
- While inserting a button in Excel, we must always remember to make the control option feasible so that everyone can understand the same and find the information in the Excel sheet useful.
Recommended Articles
This article is a guide to Insert Button in Excel. Here, we discuss inserting the form control button in Excel, practical examples, and downloadable templates. You may learn more about Excel from the following articles: –
- Creating a Dashboard in Excel
- Remove Watermark in Excel
- Excel Forms
- Watermark in Excel
Reader Interactions
Microsoft Excel lets you add two types of buttons to a worksheet: option buttons and toggle buttons. Option buttons, also referred to as radio buttons, let you choose one item from a list. Toggle buttons are either enabled or disabled, allowing you to switch between two states, such as on and off. Once a button is inserted into your worksheet, you then assign it form or ActiveX controls to make it perform an action when clicked.
Option Button
-
Open Excel and Click on «Developer» Tab
-
Open Excel and click on the «Developer» tab. If it’s not visible, click “File,” “Options” and then “Customize Ribbon.” Click the “Developer” check box within the Main Tabs list and click the «OK» button when you’re finished.
-
Select «Insert»
-
Select “Insert” from the Controls group on the Developer tab.
-
Choose the Type of Button
-
Click the type of option button you’d like to insert. Form Control and ActiveX Control are the two main categories. To insert a Form Control option button, click “Option Button” from the list of Form Controls. The names of the buttons appear when you hover the mouse over them. To insert an ActiveX Control option button, click “Option Button” from the list of ActiveX Controls.
-
Click the Cell on Your Worksheet
-
Click the cell on your worksheet where you want your option button displayed.
-
Format the Button
-
Format or edit your button properties to make it do something when clicked. For example, if you inserted a Form Control option button, right-click it and select “Format Control” from the drop-down menu to edit its properties. If you inserted an ActiveX Control button, right click your button and select “Properties» from the drop-down menu.
Toggle Button
-
Click «Insert» in Controls Group
-
Click “Insert” in the Controls group on the Developer tab in Excel.
-
Select «Toggle Button»
-
Select “Toggle Button” from the list of ActiveX Controls.
-
Click where Button Should Appear
-
Click your cursor in worksheet cell where you’d like the toggle button to appear.
-
Select «Properties»
-
Right-click the button and select “Properties” to assign ActiveX controls to it.
Tip
You can also assign macro controls to option buttons. With an option button inserted into your worksheet, right-click it and select “Assign Macro.” Choose the macro you’d like to use from the pop-up dialog box and then press “OK.”
When we mention buttons in Excel, anyone who is not a consistent user will wonder what that means. Yes, Microsoft Excel does have Macros buttons which are the most advanced level of Excel. These buttons are commands initiated by a single click. It is easy to add buttons to excel. A user can simplify and save the time that they will take to navigate between different cells looking for specific information. In short, the buttons are inserted to perform specific tasks for us. The three different types of buttons you can place in a worksheet include;
- Shapes
- Form Control Buttons
This article shows how to add a button in Excel and how to assign Macros to them. With those buttons, navigating through your spreadsheet won’t be a nightmare anymore.
Method 1: Using shapes to create Macro buttons to open a particular sheet
You can create a macros button by using shapes. You can easily create a rounded rectangle; add a hyperlink to it for your worksheet. Here is what you can do;
1. On the main menu ribbon, click on the Insert tab.

2. Go to Shapes, click the drop-down arrow, and select the Rounded Rectangle icon.

3. Draw a rounded rectangle on your worksheet.

5. Format the shape by typing text into it-Right-click on the form and select edit text. Or double-click the shape.

6. To Hyperlink the shape, right-click on it and select Hyperlink from the menu. Right-clicking will display an Insert Hyperlink dialogue box.
- Under the ‘Link to’ section, select ‘Place in This Document.
- Under the ‘Type the cell reference’ section, type in the destination cell address.
- Under the ‘Or select a place in this document box, click to choose the particular sheet name. Click the OK button when done.
When you click the rounded rectangle, it will skip to the specified cell of a specified sheet.

7. To assign the macro, right-click on the table and select Assign Macro. Under the ‘Macros in’ drop-down arrow, select ‘This Workbook’. Here, select the macro from the list of macros in This Workbook.

8. Press OK. When you point your mouse on this shape, it will turn to the hand pointer cursor, and clicking the form will run the macro. Remember to set your shape not to resize with cell changes by right-clicking on it and selecting ‘Size and Properties.’
Method 2: Using Developers Form Control Buttons to create buttons in Excel
1. On the main ribbon, click on the Developer tab.
2. Go to the Insert button and click the drop-down arrow.

3. Under Form Control, select the first option called button. Draw a button on your worksheet

4. Next, in the Assign Macro dialogue box, type or select a name for the macro.

5. Click OK when done. You can click on this button to run the macro.

Using ActiveX Controls
Since running a macro in Excel can prove tedious, you can assign a macro to a button to run it faster. In this case, you can follow these steps to add a button in Excel using ActiveX controls easily.
1. Right-click anywhere on the Home ribbon and select Customize the Ribbon option from the pop-up menu.
2. Once the Customize the Ribbon window is open, go to the Main Tabs section and select the Developer option.
3. Click OK. However, if you already have the Developer Tab added to your ribbon, then proceed as follows.
4. Go to the Developer Tab and click on Insert.

5. Next, click on your preferred button under the ActiveX Controls.

You can now drag it anywhere in the Excel worksheet to create a button.
6. Right-click on the newly created button and select the View Code option from the drop-down menu.

7. You can now type this code, which sets the value of cell A6 to Hello:
Range(“A6”).Value = “Hello”

8. If you want to test setting the cell value, ensure the Design Mode option is deselected. You can also click on the button, and the Hello text will be displayed on your screen.

You can further use VBA codes to assign a different task for various operations such as double-clicking, single-clicking, right-clicking, and many more. When you right-click on the button, you can also select the Format Control option. However, the only downside is that the size of the buttons changes every time you make changes on the worksheet or share it.
Adding Macros To Quick Access Toolbar
Adding macros to Quick Access Toolbar also allows you to create buttons in Excel and use them on any sheet in your present workbook. To do this, follow these steps:
1. Right-click on the arrow below the ribbon of the Excel workbook.

2. When the Customize Quick Access Toolbar screen opens, navigate and select More Commands at the bottom.

3. Select Macros in the Choose commands from the section. You can click on the down-facing arrow in the Popular Commands box.

4. Select the HighlightMaxValue option and click on the Add button.

5. You can now click on Modify to customize the symbol of the macro.

6. Select your preferred symbol from the provided list and hit the OK button.

7. Finish by clicking OK to add a button to your Excel workbook. If you want to run the HighlightMaxValue macro, simply click on the icon.
Conclusion
When working with adding buttons to Excel, it is best to keep it easy and straightforward. The above methods portray these as the steps are short and easy to follow. They are not only easy to set up, but they also give you different options for formatting.
Home / Excel Basics / How to Add a Button in Excel
In Excel, users can add macro-enabled buttons on the worksheets and can run macros by just clicking on them.
Users can use these macro-enabled buttons to perform several different tasks like filtering data, selecting data, printing a worksheet, running formulas, and calculations just by clicking on the buttons.
Adding buttons and embedding the macros to them is easier. Excel has multiple ways to add the macro-enabled buttons to the worksheet. Below, we have some quick and easy ways mentioned for you to add the macro buttons in Excel.
Add Macro Buttons Using Shapes
Users can create buttons in excel using shapes. Creating buttons using shapes has more formatting options over the buttons created from Control buttons or ActiveX buttons. Users can change the design, color, font, and style of the button created using shapes.
- First, go to the “Insert” tab and then click on the “Illustrations” icon” then click on the “Shapes” option and select any rectangle button.

- After that, with the help of a mouse, draw the rectangular button on the worksheet.

- Now, to enter the text in the button, double-click on the button and insert the text.

- For formatting, go to the “Shape Format” tab and you will get multiple options for the formatting of the button.
- From here, you can format the font style, font color, button color, button effects, and much more.

- To edit the text, add the hyperlink, or add the macro, just right-click on the button and you will get the pop-up menu with multiple options.
- From here, you can edit the text, add the hyperlink, and can add the macro to the button.
- Now, select the “Assign Macro” option to add the macro to the button.

- Once you select the “Assign Macro” option, you will get the “Assign Macro” dialogue box opened.
- From here, select the macro and click OK.

- At this point, the button has become micro enabled, and when you move your cursor on the button, the cursor turns to the hand point cursor.
- To freeze the button movement, right-click on the button and select the “Format Shape” and select the option “Don’t move or size with cells”.


Add Macro Buttons Using Form Controls
- First, go to the “Developer” tab and click on the “Insert” icon under the “Control” group on the ribbon.

- After that, select the first button option from the “Form Controls” menu and draw a button on the worksheet.
- Now, select or type the macro name from the “Assign Macro” dialogue box and click OK.
- If you don’t have any macro created yet, you can click cancel to add the macro at a later stage.

- From here, right-click on the button and select “Assign Macro” to add the macro to the button if did not assign yet.
- To format the button font size, style, color, etc. select the “Format Control” option.

- Once you click on “Format Control”, you will get the “Format Control” window open and then can do the button font formatting.

- To freeze the button movement, select the “Properties” tab and select the option “Don’t move or size with cells” and click OK.


Add Macro Buttons Using ActiveX Controls
- First, go to the “Developer” tab and click on the “Insert” icon under the “Control” group on the ribbon.

- After that, select the first button option from the “ActiveX Controls” menu and draw a button on the worksheet.

- Now, to create and insert the macro to the button, click on the “View Code” icon to launch the VBA editor.

- Now, select the” CommandButton1” on the subprocedure and choose the “Click” option from the drop-down list on the right side of the editor.


