
Word for Microsoft 365 Word 2021 Word 2019 Word 2016 Word 2013 Word 2010 Word 2007 More…Less
An index lists the terms and topics that are discussed in a document, along with the pages that they appear on. To create an index, you mark the index entries by providing the name of the main entry and the cross-reference in your document, and then you build the index.
You can create an index entry for an individual word, phrase, or symbol, for a topic that spans a range of pages, or that refers to another entry, such as «Transportation. See Bicycles.» When you select text and mark it as an index entry, Word adds a special XE (Index Entry) field that includes the marked main entry and any cross-reference information that you choose to include.
After you mark all the index entries, you choose an index design and build the finished index. Word collects the index entries, sorts them alphabetically, references their page numbers, finds and removes duplicate entries from the same page, and displays the index in the document.
Mark the entries
These steps show you how to mark words or phrases for your index, but you can also Mark index entries for text that spans a range of pages.
-
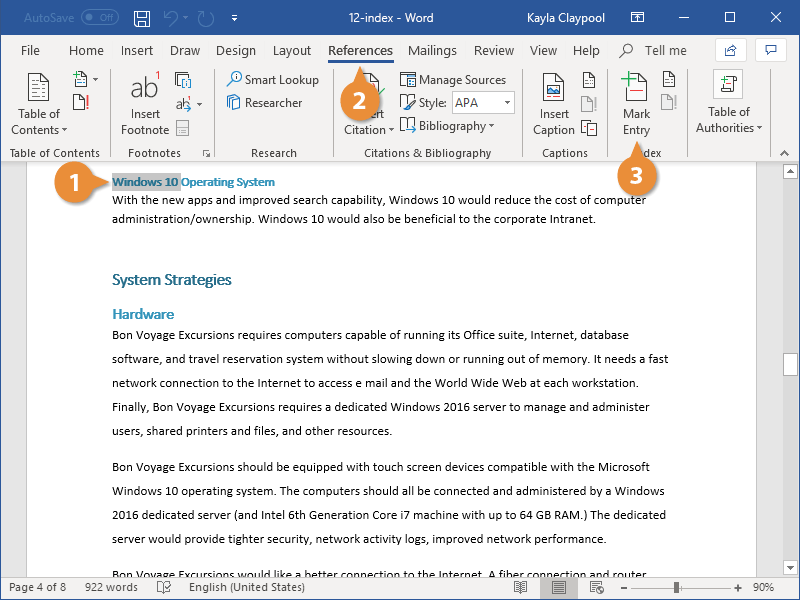
Select the text you’d like to use as an index entry, or just click where you want to insert the entry.
-
On the References tab, in the Index group, click Mark Entry.

-
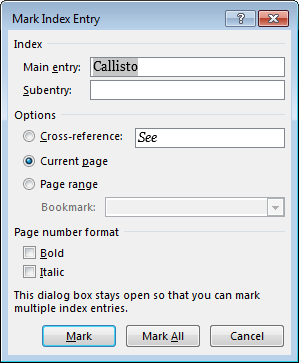
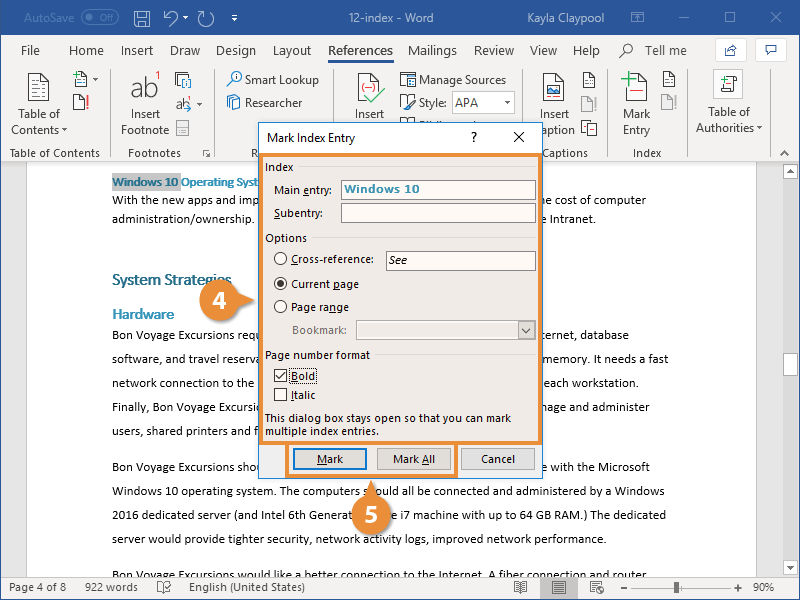
You can edit the text in the Mark Index Entry dialog box.
-
You can add a second-level in the Subentry box. If you need a third level, follow the subentry text with a colon.
-
To create a cross-reference to another entry, click Cross-reference under Options, and then type the text for the other entry in the box.
-
To format the page numbers that will appear in the index, select the Bold check box or Italic check box below Page number format.
-
-
Click Mark to mark the index entry. To mark this text everywhere it shows up in the document, click Mark All.
-
To mark additional index entries, select the text, click in the Mark Index Entry dialog box, and then repeat steps 3 and 4.

Create the index
After you mark the entries, you’re ready to insert the index into your document.
-
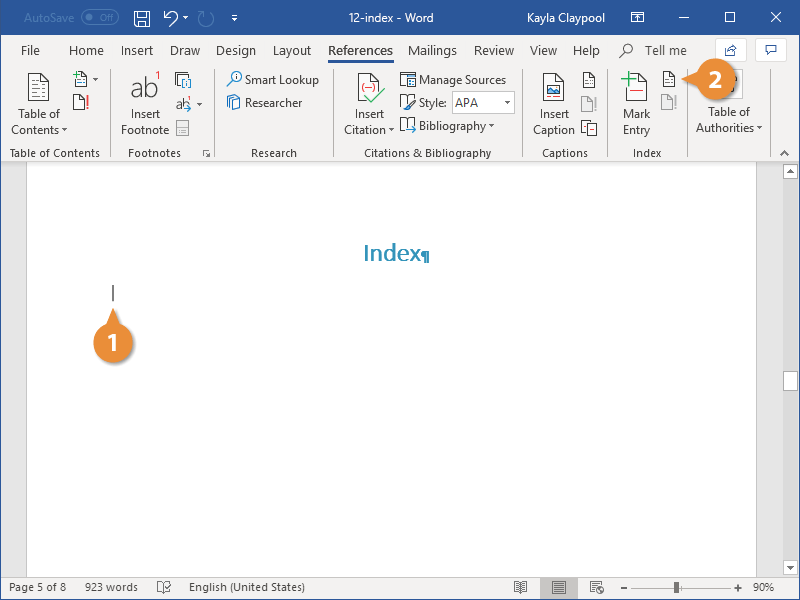
Click where you want to add the index.
-
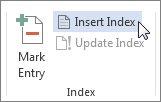
On the References tab, in the Index group, click Insert Index.
-
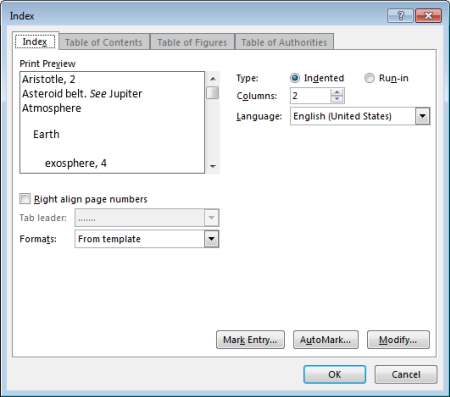
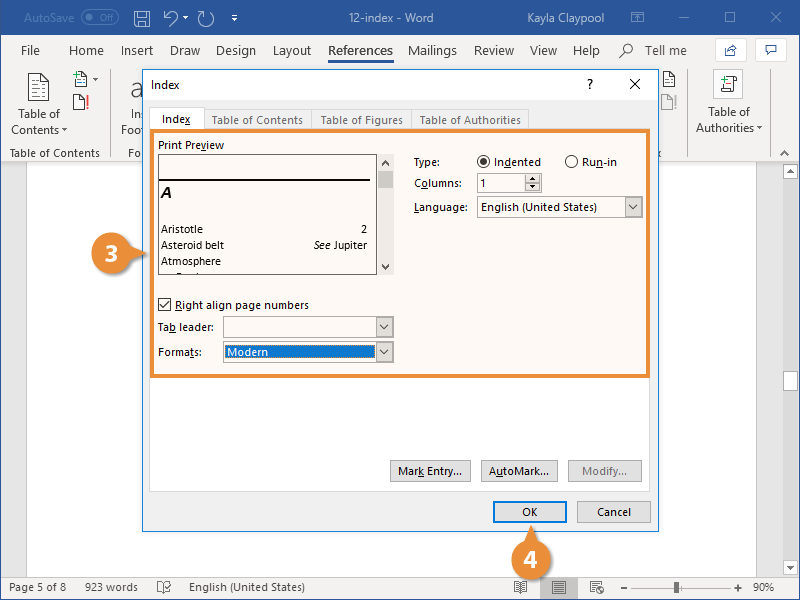
In the Index dialog box, you can choose the format for text entries, page numbers, tabs, and leader characters.
-
You can change the overall look of the index by choosing from the Formats dropdown menu. A preview is displayed in the window to the top left.
-
Click OK.
Edit or format an index entry and update the index
If you mark more entries after creating your index, you’ll need to update the index to see them.
-
If you don’t see the XE fields, click Show/Hide
in the Paragraph group on the Home tab. -
Find the XE field for the entry that you want to change, for example, { XE «Callisto» t «See Moons» }.
-
To edit or format an index entry, change the text inside the quotation marks.
-
To update the index, click the index, and then press F9. Or click Update Index in the Index group on the References tab.
 in the Paragraph group on the Home tab.
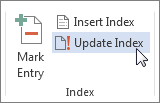
If you find an error in the index, locate the index entry that you want to change, make the change, and then update the index.
Delete an index entry and update the index
-
Select the entire index entry field, including the braces ({}), and then press DELETE.
If you don’t see the XE fields, click Show/Hide
in the Paragraph group on the Home tab. -
To update the index, click the index, and then press F9. Or click Update Index in the Index group on the References tab.
Need more help?
![]()
Download Article
![]()
Download Article
- Marking Your Entries
- Inserting the Index Page
- Editing Index Entries
- Video
- Q&A
- Tips
|
|
|
|
|
This wikiHow teaches you how to build an index page for your Microsoft Word document. Microsoft Word comes with a built-in indexing tool that can automatically create an index based on the entries you choose. All you’ll need to do is use the Mark Entry tool to mark each word or phrase you want to add to the index. Terms in your index can point to specific pages in the document or cross-reference to other indexed entries.
-
1
Open a Microsoft Word document. MS Word lets you add an index to any document regardless of its length, style, or subject matter. Before you can add an index to your document, you’ll need to go through each page to mark the terms you want to appear in the index.
-
2
Select a word or a group of words for your index. You can select a word or phrase by highlighting it with your mouse.
Advertisement
-
3
Click the References tab. It’s on the toolbar at the top of Word.
-
4
Click the Mark Entry button. Depending on your version of word, this icon will usually appear in a panel on the toolbar labeled «Index.» It’s the icon of a sheet of paper with a minus sign and a plus sign.[1]
-
5
Change how the word or phrase appears in the index. You’ll see the word or phrase you selected in the «Main entry» field at the top of the window. As of now, this is how that word or phrase will appear in the index you’ll be creating. If you want to change the wording, capitalization, or other parameters, you can do so by editing the text in the «Main entry» box.
- If you want to adjust the font face, size, style, or color of this entry in your index, you can do so here. Just highlight the word or phrase in «Main entry,» right-click the highlighted area, and then select Font. Make any changes you want to the font and then click OK.
-
6
Add a subentry (optional). Think about main entries as being their own lines in your index. A subentry would appear below its main entry in the index. It might be helpful to go through your document and create main entries first, and then go back and add subentries.
- For example, if you selected the word surnames and plan to index all surnames in your document, you may want to add mark each surname in the document with the «Surnames» main entry, and then list the surname itself as the subentry.
- You could also add a third-level entry, which would appear below a subentry in the index. To do this, just type a colon after the subentry and then type the third-level entry.
-
7
Choose the location referenced in the index entry. When Word builds an index based on your marked entries, it will simply list the page number on the entry you selected by default. For example, if you highlighted the word «Surnames» on page 2, the index will list «page 2» as the location of the Surnames entry. This is because «Current page» is the default selection in the «Options» section.
- If you’d rather the selected entry reference a different entry (think of when you see «See also» in an index), select «Cross-reference,» and then type the name of the other entry next to «See.»
- If you want the entry to point to a range of pages rather than a single page, you’ll need to create a bookmark for that page range. If you have a bookmark, select «Page range,» and then select your bookmark from the drop-down menu.
-
8
Format the page numbers in your index. Under the «Page number format»‘ heading, choose whether to display the page numbers in Bold and/or Italics as needed.
-
9
Click Mark to save your new entry. This button will mark the highlighted term and add it to your index with its corresponding page number, range, or cross-reference.
- After marking an entry in the index, paragraph markers will turn on immediately, and you’ll see the selected word or phrase in your document surrounded in curly braces with special formatting, much like this:
{XE "entry"} - If it’s too confusing for you to see your document in this format, you can switch back to the standard view by clicking the Home tab and then clicking the paragraph symbol ¶ in the toolbar.
- If you want to mark all instances of the same word or phrase throughout your document, you can click the Mark all button at the bottom. This would add the page number for all instances of this word or phrase to its entry in the index.
- After marking an entry in the index, paragraph markers will turn on immediately, and you’ll see the selected word or phrase in your document surrounded in curly braces with special formatting, much like this:
-
10
Continue marking entries. The «Mark Index Entry» window stays open after you mark an entry, which makes it easy to move to the next entry you want to mark. To continue, highlight another term in your document, and then click the «Mark Index Entry» window to add it to the «Main entry» field. After customizing this entry to your liking, click Mark to save it and move to the next.
- After marking your main entries, go through and mark any subentries or third-level entries. It’s kind of awkward to do:
- Highlight the word or phrase you want to list as a subentry. Using our surname example, let’s say you created a main entry for Surnames and want to add the surname «Williams» to the list of surnames in the index. Start by highlighting the first instance of «Williams» in your document.
- Next, click the Mark Index Entry window. This adds «Williams» to the «Main entry» field (for now).
- Type or paste the subentry (Williams, in our example) into the subentry field.
- Replace the text in the «Main entry» field with the name of the main entry (Surnames, in our example).
- Edit any details and click Mark (or Mark all).
- After marking your main entries, go through and mark any subentries or third-level entries. It’s kind of awkward to do:


Advertisement
-
1
Click your mouse cursor where you want to place the index. In most cases, you’ll want to place your index at the end of the document—just scroll down and click the first empty line below your existing content.
-
2
Click the Insert tab. It’s at the top of Word.
-
3
Insert a Page Break so the index is on its own page (optional). You’ll usually want your index to appear on its own page at the end of the document. To ensure that this happens, click the Insert tab and select Page Break on the toolbar to add a new page for your index.
-
4
Click the References tab. It’s at the top of Word.
-
5
Click the Insert Index button. This button is located next to the Mark Entry button on the References toolbar. This opens a window titled «Index.»
-
6
Select your index type. You can select Indented or Run-in at the top-right corner of the window. An indented index will be easier to navigate for readers, whereas a run-in index will take up much less space on the page.
- As you make changes to the index, you’ll always see a preview in the «Print Preview» box at the top-left corner of this window.
-
7
Choose the number of columns. Your index will appear in two columns by default, but you can select a different number by clicking the up or down arrows next to the «Columns» field.
- If you click the down arrow enough times, the value will change to «Auto,» which will automatically adjust the column numbers to best fit the amount of content in the index.
-
8
Select an index design from the «Formats» menu. This drop-down menu is below the Print Preview image. Select any of the designs from the drop-down menu to customize your index’s appearance.
- You can also create your own design by selecting From template and clicking the Modify button at the bottom-right. This lets you customize fonts, spacing, and style for all entries and subentries to create your own design format.
- If you want the page numbers to be aligned on the right instead of right after each entry, check the box next to «Right align page numbers.»
-
9
Click OK to save your index. This creates an index that contains all of the entries you’ve marked throughout your document. You can use this index to look up the pages where important terms and concepts are mentioned throughout your writing.


Advertisement
-
1
Click the Home tab. It’s at the top of Word. If you’ve found an error in the index, such as a misspelling or incorrect term, you can correct the errors by hand and then update the index using the Update Index tool.
-
2
Scroll to the error you want to correct. First, if you’re not in paragraph view, click the Home tab and then click the Paragraph icon ¶ to display them.[2]
Then, scroll to the «XE» entry for the entry you want to correct. Remember, all indexed references start with «XE» and are surrounded by those curly braces you saw earlier. -
3
Make your changes.
- Change the text inside the quotation marks: If the text is incorrect, correct it now by editing what’s inside of the quotes.
- Delete an entry: If you want to completely remove an entry from the index, select the entire index entry field (including the curly brackets) with your mouse, and then press your keyboard’s Delete key.
- You can click the Paragraph icon in the Home tab when you’re finished to turn off paragraph markers.
-
4
Scroll down and click your index. Now that you’ve made changes to the index, you’ll need to update it. Clicking the index selects it for updating.
-
5
Press the F9 key on the keyboard. Depending on your keyboard, you may have to press the Fn key as well to use the F9 key. This updates the index to reflect your changes.
- If that doesn’t work, click the References tab, and then click Update Index on the toolbar.


Advertisement
Add New Question
-
Question
How do I create an index which includes the pages that the words show up on?

Create the index. Click where you want to add the index. On the References tab, in the Index group, click Insert Index. In the Index dialog box, you can choose the format for text entries, page numbers, tabs, and leader characters. You can change the overall look of the index by choosing from the Formats dropdown menu.
-
Question
How many entries can I index?
You can create an index entry for an individual word, phrase, or symbol, for a topic, a special XE (Index Entry) field that includes the marked main entry.
-
Question
How do I set up an index page at the beginning of my document?
Position the insertion pointer where you want the index to appear. If you want the index to start on a new page, create a new page in Word. Click the References tab. In the Index group, click the Insert Index button. Click the OK button to insert the index into your document.
See more answers
Ask a Question
200 characters left
Include your email address to get a message when this question is answered.
Submit
Advertisement
Video
-
If you mark more entries in your document after inserting the index and they don’t appear automatically, click the index and press the F9 key on the keyboard.
-
Marking index entries will automatically turn on the Show all nonprinting characters option. You can turn this off anytime by clicking on the paragraph icon on the Home tab.
Thanks for submitting a tip for review!
Advertisement
About This Article
Article SummaryX
1. Click References.
2. Click Mark Entry.
3. Select a word for the index.
4. Click the «Mark Index Entry» box.
5. Format the page numbers.
6. Format the text.
7. Click Mark.
8. Click Mark All.
Did this summary help you?
Thanks to all authors for creating a page that has been read 424,443 times.
Is this article up to date?
An index can usually be found at the end of a document, listing the key words and phrases in a document, along with the page numbers they appear on. There are two steps involved in creating an index: defining which words you want to appear in the index and then inserting the index.
Insert an Index Entry
- Select the text you want to include in the index.
- Click the References tab.
- Click the Mark Entry in the Index group.

- Adjust the index entry’s settings and choose an index entry option:
- Cross-reference: Adds a reference to another index entry, instead of listing the current page number.
- Current page: Lists the current page number for the selected index entry. This is the default option.
- Page range: Lists the range of pages that are included in the bookmark that you click in the Bookmark list. Before using this option, you’ll need to create a bookmark of the selected range.
- Click the Mark or Mark All button.
- Repeat the process for your other index entries.
- Click Close when you’re done.
The Mark Index Entry dialog box opens, where you can set up how the index entry works. The main entry field is filled with the selected text, and you can also add a subentry that will appear below the main entry.
Clicking Mark will create an index entry for the selected instance of the word. Clicking Mark All will instead create an index entry for every instance of the selected word throughout the document.
Once you mark an entry, formatting marks will be displayed so that you can see the hidden text that marks index entries. The window remains open, so you can continue to mark index entries throughout the document.
Index entries are invisible and will not be printed. However, you can see them when the paragraph marks are turned on.
Insert an Index
Once index entries have been marked, you’re ready to insert the index.
- Click in your document where you want to insert an index.
- Click the Insert Index button on the References tab.
- Customize the appearance and behavior of the index.
- Click OK.
Indexes usually appear at the end of a document and can take up a lot of space, so a blank page at the end is ideal.
The Index dialog box opens, where you can set up how the index will appear.
You can choose whether to right align page numbers and select a tab leader that appears between text and page numbers. You can also select whether to use a document’s formatting theme or select another one.
You can choose whether subentries will be indented below the main entry or shown run-in style in a paragraph below the main entry.
Any changes you make to the index appearance will be shown in the Print Preview.
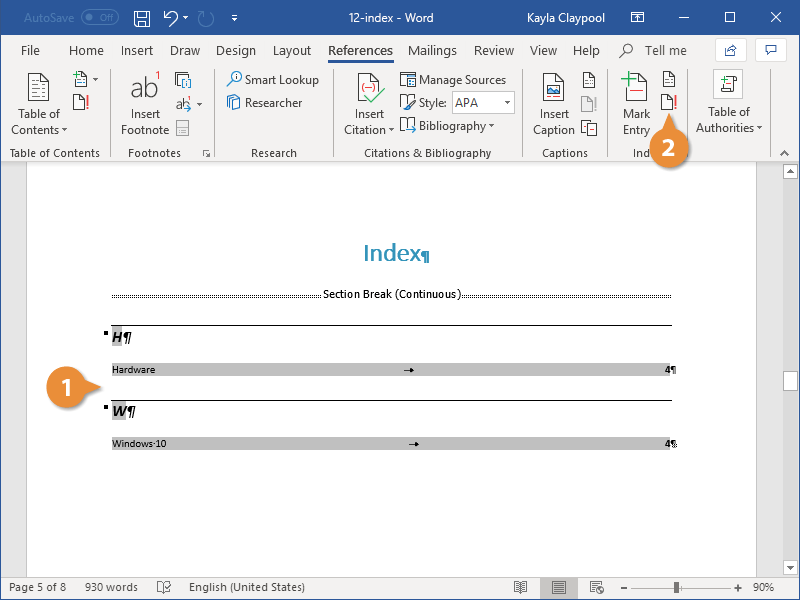
The index is inserted, automatically filling itself out with all the index entries in the document.
Update an Index
When you insert an index, it automatically adds every index entry in the document. If you add or modify index entries after the index is created, you’ll need to update the index.
- Click anywhere in the index.
- Click the Update button.
The index is updated, adding any newly created entries while updating the page numbers for any entries that may have moved.

FREE Quick Reference
Click to Download
Free to distribute with our compliments; we hope you will consider our paid training.
Create the index
- Click where you want to add the index.
- On the References tab, in the Index group, click Insert Index.
- In the Index dialog box, you can choose the format for text entries, page numbers, tabs, and leader characters.
- You can change the overall look of the index by choosing from the Formats dropdown menu.
Contents
- 1 How do you create an index?
- 2 Can Word automatically create an index?
- 3 What is an index example?
- 4 Where do we generally create index?
- 5 How do you insert table of contents in Word?
- 6 How do I create an index in Word 2007?
- 7 How do I link an index to a Word document?
- 8 How do I create an index in Word 2019?
- 9 How do you create a table of contents in Word 2016?
- 10 How do I create an index page?
- 11 What does an index looks like?
- 12 Which command will create an index?
- 13 Which of the following is correct create index command?
- 14 What is the type of index?
- 15 How do you create tables in Word?
- 16 How do I create a multi level Table of Contents in Word?
- 17 How do I create a list of tables in Word?
- 18 Where is the index page of a document found?
- 19 How do I create an index in notebook?
- 20 What is a hyperlink index?
There are four steps for constructing an index: 1) selecting the possible items that represent the variable of interest, 2) examining the empirical relationship between the selected items, 3) providing scores to individual items that are then combined to represent the index, and 4) validating the index.
Can Word automatically create an index?
If you want the index to start on a new page, create a new page in Word. Putting the index at the end of your document is what the reader expects. Click the References tab. In the Index group, click the Insert Index button.
What is an index example?
The definition of an index is a guide, list or sign, or a number used to measure change. An example of an index is a list of employee names, addresses and phone numbers.
Where do we generally create index?
Generally, we create an index at the time of table creation in the database. The following statement creates a table with an index that contains two columns col2 and col3. If we want to add index in table, we will use the CREATE INDEX statement as follows: mysql> CREATE INDEX [index_name] ON [table_name] (column names)
How do you insert table of contents in Word?
On the toolbar ribbon, select References. Near the left end, select Insert Table of Contents. (Or select Table of Contents > Insert Table of Contents. The table of contents is inserted, showing the headings and page numbering in your document.
How do I create an index in Word 2007?
Creating the Index
- Place the insertion point where you want the index to appear.
- From the References command tab, in the Index group, click INSERT INDEX. The Index dialog box appears.
- Click OK. The index appears at the insertion point.
How do I link an index to a Word document?
Add the link
- Select the text or object you want to use as a hyperlink.
- Right-click and then click Hyperlink .
- Under Link to, click Place in This Document.
- In the list, select the heading or bookmark that you want to link to.
How do I create an index in Word 2019?
Create the index
- Click where you want to add the index.
- On the References tab, in the Index group, click Insert Index.
- In the Index dialog box, you can choose the format for text entries, page numbers, tabs, and leader characters.
- You can change the overall look of the index by choosing from the Formats dropdown menu.
How do you create a table of contents in Word 2016?
Click in your document where you want to create the table of contents. If you’d like it to appear on its own page, insert a page break (Ctrl+Enter) before and after inserting the ToC. Click the References tab. In the Table of Contents group, click Table of Contents.
How do I create an index page?
A good index will:
- be arranged in alphabetical order.
- include accurate page references that lead to useful information on a topic.
- avoid listing every use of a word or phrase.
- be consistent across similar topics.
- use sub-categories to break up long blocks of page numbers.
- use italics for publications and Acts.
What does an index looks like?
An index is an alphabetical list of keywords contained in the text of a book or other lengthy writing project. It includes pointers to where those keywords or concepts are mentioned in the book—typically page numbers, but sometimes footnote numbers, chapters, or sections.
Which command will create an index?
The syntax for creating an index is: CREATE INDEX “index_name” ON “table_name” (column_name); Note that an index can only cover one table. We cannot build an index that covers multiple tables.
Which of the following is correct create index command?
Which of the following is correct CREATE INDEX Command? Explanation: The basic syntax of a CREATE INDEX is as follows : CREATE INDEX index_name ON table_name; 4. A ______ index is created based on only one table column.
What is the type of index?
Index architectures are classified as clustered or non-clustered. Clustered indexes are indexes whose order of the rows in the data pages corresponds to the order of the rows in the index. This order is why only one clustered index can exist in any table, whereas, many non-clustered indexes can exist in the table.
How do you create tables in Word?
Answer
- Open a blank Word document.
- In the top ribbon, press Insert.
- Click on the Table button.
- Either use the diagram to select the number of columns and rows you need, or click Insert Table and a dialog box will appear where you can specify the number of columns and rows.
- The blank table will now appear on the page.
How do I create a multi level Table of Contents in Word?
3 Answers
- Click on your top level number/symbol.
- “Define new multi-level list”
- Click “More >>”
- Click on your top level line and click “link level to style”
- Select “heading 1” or your own custom style, I don’t care.
- OK.
- References > Table of contents > Insert table of contents.
- Show levels: 1.
How do I create a list of tables in Word?
To create a combined list of tables and figures
- After the table of contents, click where you want to insert the list.
- In the Insert menu, pull down to Index and Tables.
- Click Table of Figures.
- Check Include label and number, Show page numbers, Right align page numbers.
- Click Options.
- Click OK.
- Click OK.
Where is the index page of a document found?
What Is An Index? An index is an alphabetical and detailed listing of topics in a document, with a corresponding page number displayed alongside (see picture below). An index is typically located at the end of a long document.
How do I create an index in notebook?
Setting up your Index is easy. Simply leave the first couple pages of your notebook blank and give them the topic of “Index.” As you start to use your book, add the topics of your entries and their page numbers to the Index, so you can quickly find your them later.
What is a hyperlink index?
Indices are dictionaries that associate keys (words or phrases) with one or more attributes. Indices maintain these key/attribute bindings over all or part of a document, and are used by browsers to create hyperlinks dynamically. Indices may also include bindings of other indices, in a hierarchical fashion.

If you’re composing a lengthy document or book, we’ll show you how to create an index in Word. This is a handy reference for your readers.
If you’re creating a lengthy document in Microsoft Word, an index is a convenient tool for your readers. Traditionally, we see indexes in the backs of books. These handy tools allow us to look up a word or phrase to find the page referencing that topic.
Similar to a table of contents in Word, you can insert an index and then update it automatically. This takes much of the manual work out of creating these great reference sources. Here, we’ll show you how to mark your index entries, create the index, and update it in Word.
Mark Your Index Entries
Even though Word can build your index automatically, it’s not smart enough to know which items you want in it. So to create your index, you’ll need to mark the entries. This is the bulk of the work you’ll do for the index. But once you start marking entries, you’ll be able to zip through them quickly.
- Open your document in Word and head to the References tab.
- Select your first index entry by dragging your cursor through it. This can be a word or phrase.
- In the ribbon, you’ll see the Index section toward the right side. Click the Mark Entry button.

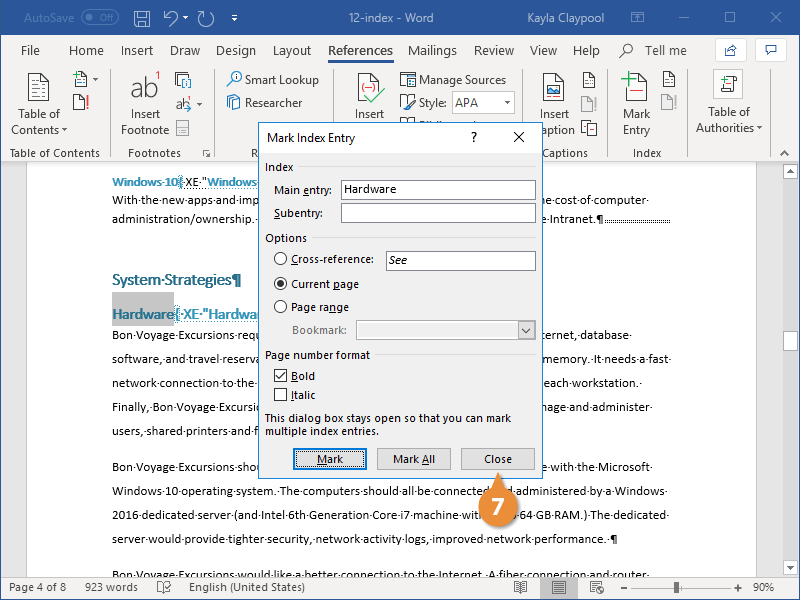
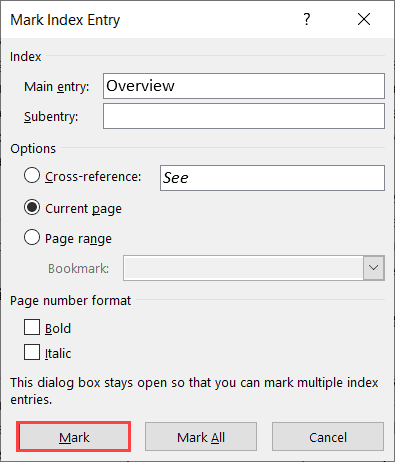
- A small pop-up window appears for you to describe your entry. And this window can remain open while you select your remaining entries.
- Enter the Main entry at the top and optionally a Subentry.
- Choose from Options for a cross-reference, the current page, or a page range.
- Optionally, you can format the page number that displays in bold and/or italic.
- Click Mark for a single entry or Mark All to mark that same text everywhere in your document.
- When you finish with the Mark Index Entry window, click Close.


On your document, index entries are labeled with “XE”. If you add a Subentry or cross-reference, you’ll notice that within the XE tag as well. If you don’t see your XE tags but would like to, go to the Home tab and click the Show/Hide Paragraph button.

Edit or Remove Index Entries
If you need to make a change to an entry, for instance, remove a cross-reference, you’ll do so within that XE field. Make your changes inside the quotation marks. Another option is to remove the marked entry and then remark it.

To remove an index entry, select all text within and including the braces ({ }) and hit Delete. You can then follow the steps above to mark the entry again with the changes you want.
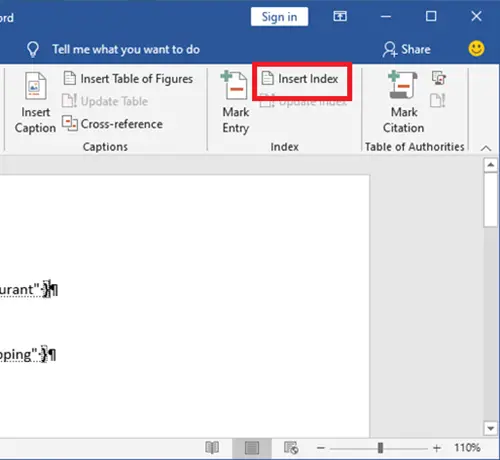
When you’re ready to insert your index, move your cursor to the spot you want it in your document. Then, select the References tab and click Insert Index. Before the index is created, you have a few settings you can adjust if you like.

Print Preview: This gives you a snapshot of what the index will look like and it will adjust if you change the below settings.
Tab Leader: Certain formats (below) offer different tab leaders to choose from such as dotted lines or dashes. These come between the entry and the page number.
Formats: You can pick from different themes for your index such as fancy, modern, or formal for a pleasing appearance.
Type: Choose from Indented or Run-in for the format type. You can spot the difference in the Print Preview box.
Columns: Depending on how many entries your index has you may want to add or remove columns for the structure.

After you make your index adjustments, click OK. Your index will pop into your document with your entries. You’ll see everything nice and neat and in alphabetical order.

Update the Index
You can continue to mark additional entries after you create your index and simply update it. And if you edit or remove entries, you’ll need to update the index as well.
Click inside the index area in your document and click the Update Index button in the ribbon on the References tab. If the button is grayed out, be sure your cursor is within the index.

If you want to remove the index completely, select all of its text and hit your Delete key. You’ll then likely want to delete the index entries (above) if you don’t plan to use an index at all.
Create an Index Automatically in Word
It can take some time to mark all of the entries you want in your Word index. But an index can be a valuable tool for your readers. So consider adding one if your audience can benefit from it for your next Word document, book, or other lengthy material.
For more reference features, check out how to cite sources and create a bibliography in Microsoft Word.
![]()
You have just finished writing a text in Word, would you like to make your document more «professional» by inserting an index inside it but you don’t know how to do it? Don’t panic, you are in the right place. But first you have to choose the type of index you want to create: a table of contents or an index?
In case you don’t know the difference between the two, you should know that a table of contents (or table of contents) is the one in which the chapters and sub-chapters of the document are listed. It is usually placed at the beginning of the text and allows readers to easily locate the pages where new chapters begin and / or certain topics are covered. An index, on the other hand, is a list of key words and phrases in the document (in alphabetical order). It is usually placed at the end of a text and its purpose is to help the reader search for pages where certain places, objects, people, etc. are mentioned.
Now that you know the difference, let’s see together in more detail how to insert Word index in both circumstances. The tutorial was written using the 2022 edition of Word for Windows, but the instructions also apply to macOS and other versions of Office equipped with the Ribbon interface (the tabbed interface introduced starting with Office 2007). I just have to wish you a good reading and, above all, a good job!
Index
- Insert a table of contents in Word
- Microsoft Word
- Word Online
- Word for smartphones and tablets
- Insert an index into Word
- How to insert index figures in Word
Insert a table of contents in Word
If you want to know how to insert a table of contents in word, in the next chapters I will explain how to do this both through the Microsoft Word desktop software for Windows and macOS, and through Word Online and the Word app for smartphones and tablets.
Microsoft Word
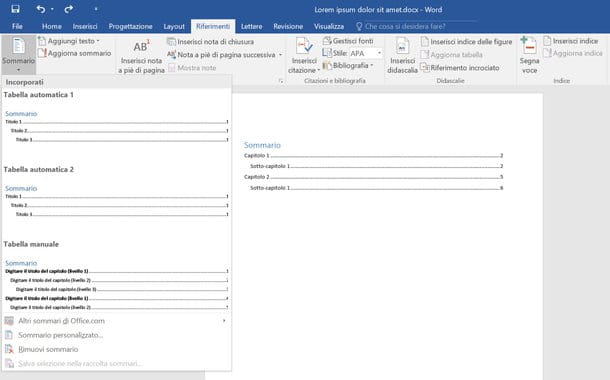
Let’s start with the classic summary, also called Content index. To insert this type of index into your document you must mark the beginning of the various chapters and sub-chapters using the appropriate buttons in Word.
If you have not already done so, then select the title of each chapter and select the item 1 title from the card Home of the program to make it usable in the summary. If the document also contains second and third level chapters (therefore sub-chapters), highlight them too with the mouse and «signals» using the buttons 2 title e 3 title in Word.
When the operation is completed, go to the first page of the document (or in any case to the page where you intend to insert the summary) and add apage break by selecting the appropriate item from the tab Inserisci Word (so that the page where you are going to insert the table of contents does not contain other texts). In newer versions of Office, the page break option is “hidden” behind the button Pages located at the top left.
Now, select the tab References in the Word toolbar, click on the button Contents (top left) and choose the type of table of contents you want to insert in your document by selecting one of the templates automatic table available in the menu that appears. An index will be generated including all the chapter and sub-chapter titles you marked earlier and their page numbers. On Mac you can also get the same result by going to the menu Insert> Index and table of contents (located at the top), by selecting the option Contents from the window that opens and choosing the summary style you prefer.
If you don’t like the structure of the automatic tables, select the item Personalized summary from the menu Contents Word and set the «look» of your table of contents using the drop-down menus filler characters (to choose the lines or dots that must separate the title of a chapter from its page number), Format (to select the graphical aspect of the index) e Show levels up to (to choose how many levels of sub-chapters to include in the summary). Then click on the button OK and the index will be inserted into the document.
In case any changes are applied to the document after the creation of the table of contents, fear not, Word is able to update the table of contents in a completely automatic way. All you have to do to update the page titles and numbers contained in the table of contents is to select the tab References Word and click the button Update summary which is at the top left. Easier than that?
If you prefer, you can also create a summary to be managed in «manual» mode. In this case you have to go to the tab References Word and select the item Manual table from the menu Contents. A table of contents will be created whose titles and page numbers will be freely editable by you with a simple click of the mouse.
Word Online
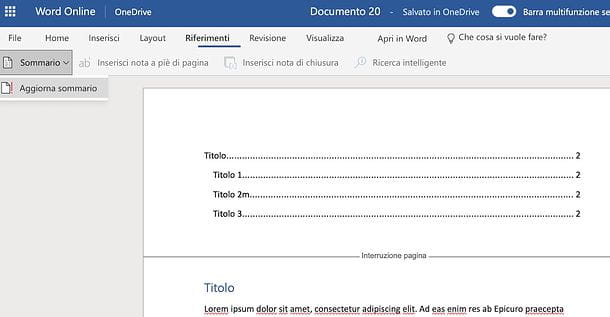
As you may already know, Word is available in an online version that can be used directly from the browser (eg. Chrome, Firefox o Safari) at no cost. The only prerequisite for accessing it is a Microsoft account. Unfortunately it does not offer all the functions of Word for Windows or macOS, in fact it does not allow the creation of summaries, however it allows you to update the summaries of documents that already include them within them.
Therefore, if you want to update the table of contents of an existing document and you are using a computer on which Word is not installed, you can easily remedy the problem by connecting to OneDrive (the Microsoft cloud storage service, which I told you about in a more exhaustive way in this guide of mine), by clicking on the button Go to my OneDrive and dragging the file to edit into the browser window. Once the upload is complete, double-click the name of the file you just uploaded to OneDrive and it will open in Word Online.
At this point, all you have to do is make the desired changes to the document, click anywhere in the summary to be updated, select the tab References Word Online (top left) and click the button first Contents e poi quello Update summary, in order to update the summary.
The changes will be automatically saved to OneDrive. If you want to download the document offline, instead, click on the button Fillet located at the top left, select the item Save with name from the menu that opens, click on the button Download a copy and finally, su Download.
Word for smartphones and tablets
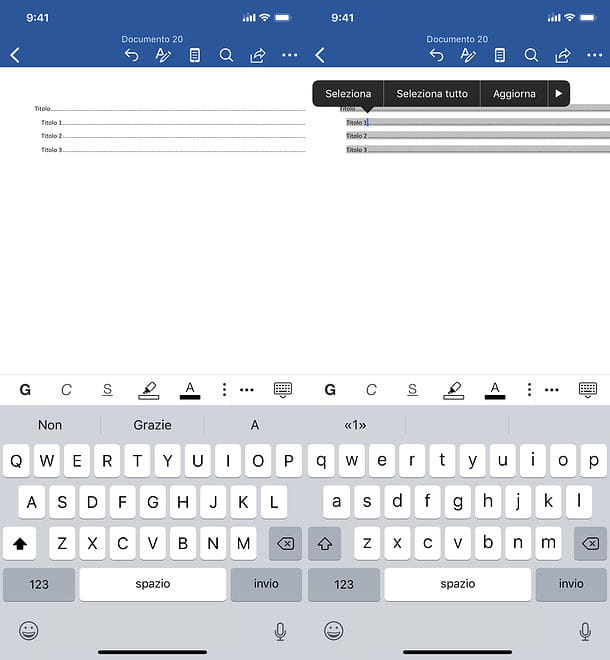
Word is also available as an application for Android (also on alternative stores) and iOS / iPadOS and is free for all devices with a size equal to or less than 10.1 ″ (on larger devices you need to subscribe to the service Microsoft 365, which has prices starting from 7 euros / month). Like Word Online, Word for Android and iOS also offers a limited set of functions (when compared to that offered by Word for Windows and macOS), so it allows you to update existing summaries but not to create new ones.
To update the table of contents of an existing document in Word for Android or Word for iOS, start the application (if you have not yet installed it on your device, proceed via the links I have provided you with just now), perform the login to your Microsoft account (if you don’t have one yet, create it) and go to the section apri to select the document with the table of contents to update. You can select a file hosted on the memory of your smartphone or tablet or stored on one of the cloud storage services supported by the application, such as OneDrive, dropbox o Google Drive.
Once the document is open, make the desired changes to it, then make a long tap anywhere on the summary and select the item Update from the menu that appears on the screen: by doing so, the table of contents will automatically update according to the content of the document. The changes will be saved automatically by clicking on back arrow located at the top left.
Insert an index into Word
Now let’s see how to insert Word index, an analytical index to be precise. As a first step you have to select the phrases and keywords you intend to insert in the index and «mark» them using the appropriate function of the Microsoft software.
So highlight a phrase or a word with the mouse, go to the card References Word and click on the button Mark entry located at the top right. In the window that opens, make sure that in the field Main item the selected phrase or word is set and choose whether to insert only the selected occurrence in the index by clicking on the button Mark, or whether to mark all the pages of the document in which to buy the selected phrase / word, by clicking on the button Mark all. If you want the page numbers to appear in Bold or italic, put the check mark next to the appropriate items and click on OK to save the settings.
After having marked all the phrases and all the words to be included in the index, go to the final page of the document (or in any case to the page where you want to insert the index) and add apage break by selecting the appropriate item from the tab Inserisci in Word.
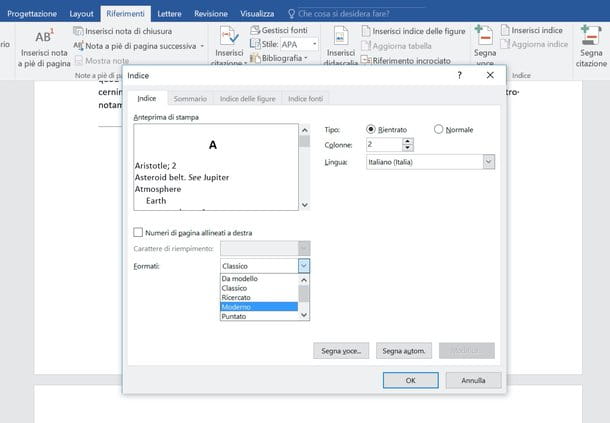
At this point, go back to the tab References and click on the button Insert index which is located at the top right (on Mac you can get the same result by going to the menu Insert> Index and table of contents placed at the top). In the window that opens, expand the drop-down menu to select i filler characters to be used to separate the index entries from the page numbers, the drop-down menu Formats to choose the style of the index and, if you want, put the check mark next to the item Page numbers aligned to the right to align the index numbers to the right.
Finally, choose how many column arrange the index using the appropriate text field (top right), choose whether to create an index returned o normal placing the check mark next to one of the two available items and click on OK to insert the index into the document.
Instead of page numbers, for some index entries you would like to see a cross-reference (ex. «See [cross reference]»)? This can also be done. After calling the function Mark entry Word, remove the check mark from the item Current page and put it on Cross reference, then type in the adjacent text field the name of the secondary item to be displayed in the index and that’s it.
I would like to point out the possibility of limiting the search for occurrences in the index to a specific number of pages (in order to show the number of times that a phrase or a word appears in a certain part of the text rather than in the entire document). To do this you need to create a bookmark.
Then select with the mouse the content of the pages to which you want to limit the search, go to the tabInserisci Word and click the button Bookmark. So give your bookmark a name and click on the button Add but I will complete the operation.
Once the bookmark has been created, mark the items to be included in the index as explained above, put the check mark next to the item Page range on the page that opens and select the bookmark created before in the appropriate drop-down menu.
Like the table of contents, the index also includes an automatic update function that allows all changes applied to the document to be reflected in the index. To update an analytical index, go to the tab References Word and select the item Update index which is located at the top right.
Unfortunately neither Word Online nor Word for smartphones and tablets they offer the functions to create and update indexes, while allowing you to open — and modify — without problems files that include indexes within them.
How to insert index figures in Word
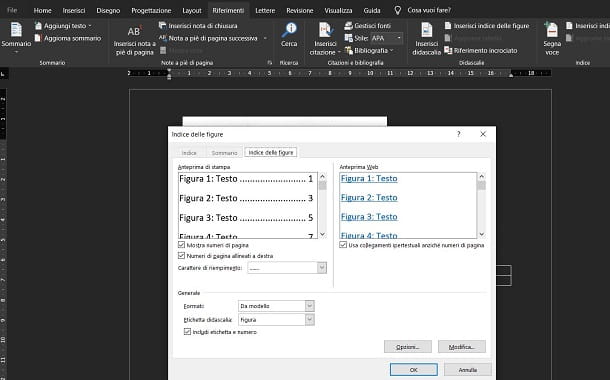
If you are using the Microsoft Word, know that you can also enter a index for the figures (this cannot be done on Word Online and the Word app for smartphones and tablets).
To do this, all you have to do is click in the document in the exact point where you want the index to be inserted and then select the tab References up. At this point, click on the button Insert index of figures, to display a new screen.
Through the latter, you can customize the way in which this index should be displayed within the document. Customize it then using the appropriate options that are shown to you and then press the button OK to confirm the insertion of the index for the figures.
This Index in Word tutorial is suitable for users of Word 2010/2013/2016/2019 and Microsoft 365.
Objective
Mark entries in a long document for inclusion in the index. Create an index in Word from scratch and understand how to edit and update it.
Indexing Explained
An index lists the terms and topics discussed in a document listed in alphabetical order. It is usually located at the end of a document. It allows the reader to quickly jump to pages of interest by clicking on the page number associated with the index entry. To create an index in Word, you must first go through the document and mark points of interest as index entries. Once complete, the index can be inserted.
It is important to remember to update the index if anything in the document changes to ensure that the page numbers still correspond with the topic. Note, an Index page is different from a Contents Page!
Video Tutorial
Marking Index Entries
In this example, I have a document that spans 9 pages. It contains various headings that have been marked with Word heading styles. To create an index in Word, I first need to go through the document and mark each heading that I want to appear in the index.
- Select the heading that you want to mark
- Click the References tab
- From the Index group, click the Mark Entry button or press the Alt+Shift+X keyboard shortcut

- Review the options in the Mark Index Entry dialog box
- Click Mark
Word will automatically turn on Show/Hide, and you will see the field code behind the entry. Do not worry too much about this as it will disappear once Show/Hide is turned off again.

Continue through the document marking entries in the same way.
NOTE: You will need to click Close on the Mark Entry dialog box each time you mark an entry.

Mark Index Subentries
To add structure and hierarchy to the index, you can mark entries as subentries of main entries. These subentries will appear indented underneath the main entry they are linked to in the index.
In this example, ‘House Stark’, ‘House Lannister’, and ‘House Targaryen’ are sub-headings of ‘Cast and Characters’. I can show this hierarchy in the index by marking them as subentries. This means they will be indented in the index.
- Select the subentry text i.e. ‘House Stark’
- Click Mark Entry
- Press Ctrl+C to copy the selected Main Entry text to the Clipboard.
- Position the insertion point in the Subentry text box.
- Press Ctrl+V to paste the text into the Subentry text box.
- Change the information in the Main Entry text box to indicate the main index entry to which this subentry should be subordinate.
- Click on Mark

Continue through the document marking subentries in the same way.
Create an Index
Once you have marked all entries to be included in the index, you can add the index to the bottom of the document.
- Scroll to the last page of the document (preferably a blank page)
- Click the References tab
- From the Index group, click Insert Index
Review the options in the Index dialog box. In this example, I have chosen to right-align page numbers and use a dotted tab leader between the entry and the page number.

- Click OK
Notice that the subentries are indented.

Add an Index Heading
You may want to add a heading for your index. You may also want to include the index heading as an index entry.
- Type a name for your index and apply a heading style if desired
- Select the Index heading
- Click the References tab
- Click Mark Entry
Update an Index
To include the new entry in the index, you will need to update it.
- Click anywhere in the index
- Click the References tab
- Click Update Index

The index heading is now included in the index.

For more information about creating indexes in Word, please check out the following links:
Microsoft – Create and Update an Index
TechRepublic – How to add an index to a Word document using index tags
If you are interested in learning more about Microsoft Word, then take a look at the following free resources:
- How to Create and Print Envelopes in Word
- How to Create a Contents Page in Word
- How to Mail Merge in Word
- How to Print Labels in Word
To learn Word with Simon Sez IT. Take a look at the Word courses we have available.
Deborah Ashby

Deborah Ashby is a TAP Accredited IT Trainer, specializing in the design, delivery, and facilitation of Microsoft courses both online and in the classroom.She has over 11 years of IT Training Experience and 24 years in the IT Industry. To date, she’s trained over 10,000 people in the UK and overseas at companies such as HMRC, the Metropolitan Police, Parliament, SKY, Microsoft, Kew Gardens, Norton Rose Fulbright LLP.She’s a qualified MOS Master for 2010, 2013, and 2016 editions of Microsoft Office and is COLF and TAP Accredited and a member of The British Learning Institute.
As a user, when creating a lengthy document in Microsoft Word, an index is a convenient tool for your potential readers. Normally, we get to see indexes in the backs of books. They allow readers to look up a word or phrase to find the page referencing that topic.
In the same way, in a table of contents in Microsoft Word, users can insert an index and then update it automatically. This takes much of the manual work out of creating these great reference sources. Here, users will be shown how to create the index and also update it in Word.
![]()
Listed below are steps to create an index in word.
- Mark Your Entries.
- Edit or Remove Index Entries.
- Update the Index.
- Create an Index Automatically in Microsoft Word
Now we will have a look at each step as we proceed below-
1] Mark Your Index Entries
Word can build your index automatically, but it’s smart enough to know which items you want in it. So for users to create an index, they will need to mark the entries. This is the bulk of the work you will do for the index. But once you start marking entries, you will be able to zip through them quickly.
Open Microsoft Word document and go to the References tab. Select your first index entry by dragging your cursor through it.
In the ribbon, you will see the Index section toward the right side. Select the Mark Entry button.

A pop-up window will appear for you to describe your entry. This window can remain open while you select your remaining entries. Enter the Main entry at the top and optionally a Subentry.
Then choose from Options for a cross-reference, the current page, or a page range.
Or you can format the page number that displays in bold and/or italic.
Click on Mark for a single entry or Mark All to mark that same text everywhere in your document.
When you are done with the Mark Index Entry window, click on Close.

On the document, index entries are labeled with XE. If you add a Subentry or cross-reference, you will notice that within the XE tag as well.
If you do not see your XE tags but would like to, go to the Home tab and click the Show/Hide Paragraph button.

2] Edit or Remove Index Entries
If users need to make a change to an entry, for instance, remove a cross-reference, they will do so within that XE field. Make the changes inside the quotation marks. Another option is to remove the marked entry and then mark it again.

Also, to remove an index entry, select all text within and including the braces { } and hit Delete. You can then follow the steps above to mark the entry again with the changes you want.
3] Create the Index in Word
When about to insert your index, move the cursor to the spot you want it in the document. Then, select the References tab and click Insert Index.
Before the index is created, you have a few settings you can adjust if you like. These are Print Preview, Tab Leader, Formats Type and Columns.

After you make your index adjustments, click OK. Your index will pop into your document with your entries. You’ll see everything nice and neat and in alphabetical order.
4] Update the Index
Users can continue to mark additional entries after creating the index and simply updating it. And if you edit or remove entries, you will need to update the index as well.
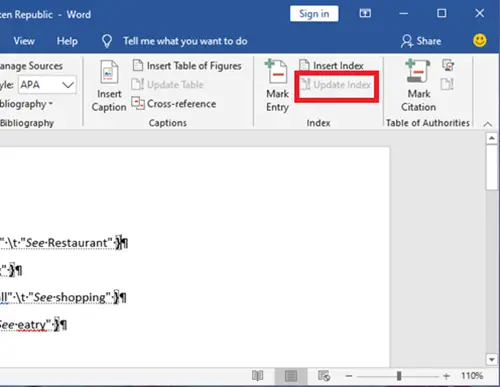
Click inside the index area in your document, the Update Index button in the ribbon on the References tab will come alive. If the button is still grayed out as shown in the image above, make sure your cursor is within the index.
If you want to remove the index completely, select all of its text and tap the Delete key. You will then likely want to delete the index entries (as seen above) if you don’t plan to use an index at all.
5] Create an Index Automatically in Word
It may take some time to mark all the entries you want in your Word index. But an index can be a valuable tool for your readers. So consider adding one if your audience can benefit from it for your next Word document, book, or other lengthy material.
If this was helpful, you might also like – How to use linked text in Microsoft Word.
Содержание
- Написание индекса в Ворде
- Способ 1: Инструменты группы «Шрифт»
- Способ 2: Горячие клавиши
- Удаление индекса
- Заключение
- Вопросы и ответы

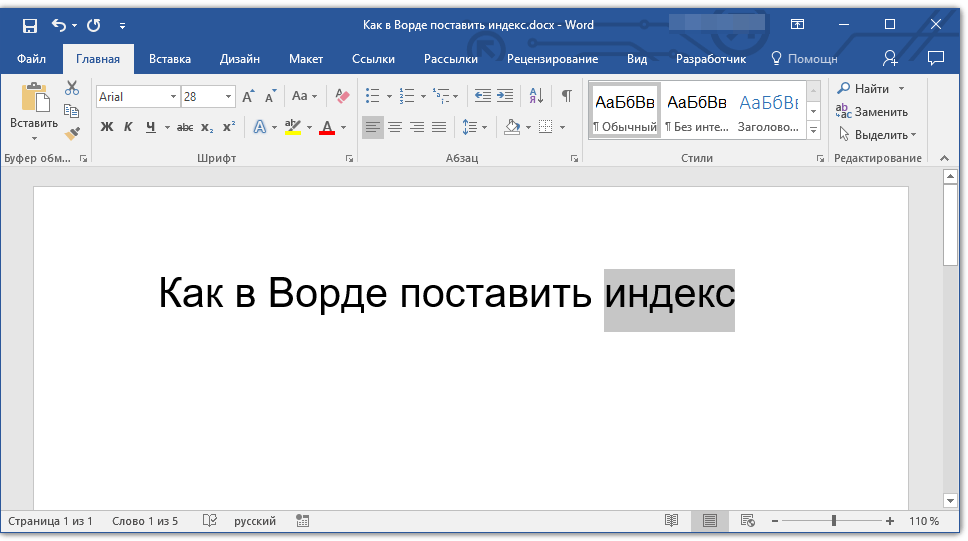
Верхний и нижний или надстрочный и подстрочный индекс в Microsoft Word — это тип символов, которые отображаются выше или ниже стандартной строки (на ее границе) с обычным текстом в документе. Размер этих символов меньше, чем у обычного текста, а используется такой тип написания, в большинстве случаев, в сносках и ссылках, а также при записи математических нотаций и выражений.
Читайте также: Как изменить регистр в Word
Написание индекса в Ворде
Возможности программы Microsoft Word позволяют легко переключаться между надстрочным и подстрочным индексами, используя для этого инструменты группы «Шрифт» или горячие клавиши. В этой статье мы рассмотрим оба варианта, а также то, как отменить подобное написание.
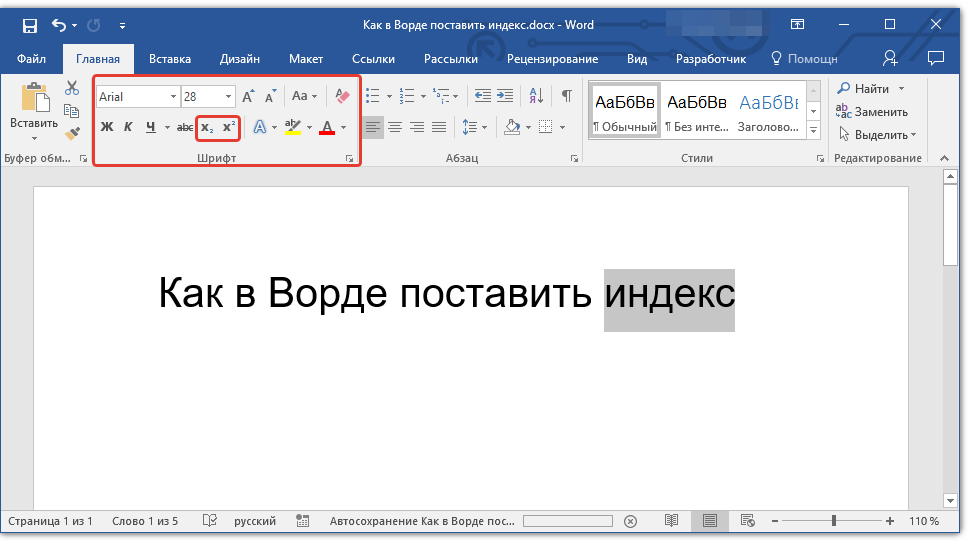
Способ 1: Инструменты группы «Шрифт»
Изменение индекса, в котором написан или только будет писаться текст, осуществляется в той же группе инструментов, где изменяется шрифт в целом, его размер, начертание, цвет и некоторые другие параметры. Для этого в данном блоке вкладки «Главная» предусмотрены отдельные кнопки.
Читайте также: Как в Ворде изменить шрифт
- Выделите фрагмент текста, который необходимо преобразовать в индекс, либо установите указатель курсора в том месте, где только планируете набирать текст в надстрочном или подстрочном индексе.
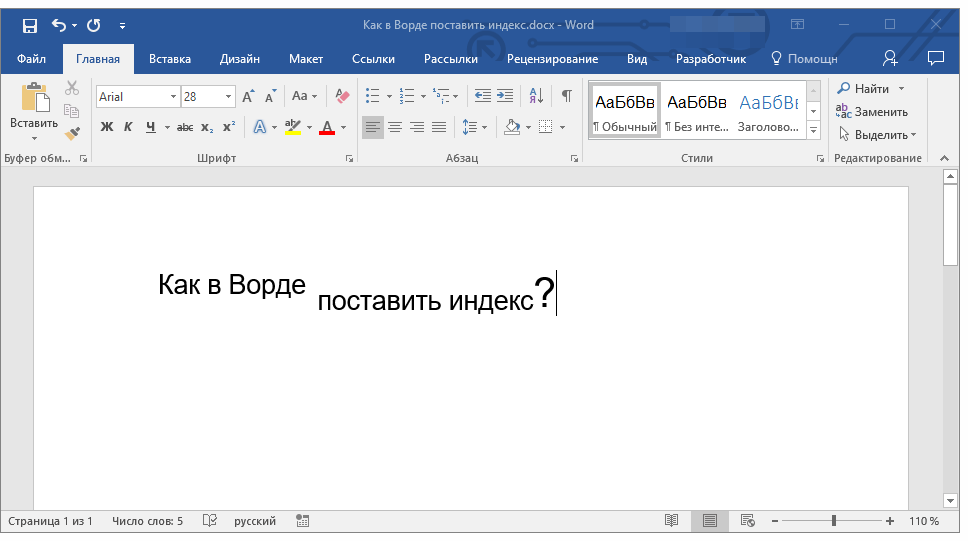
- Во вкладке «Главная» в группе «Шрифт» нажмите кнопку «Подстрочный знак» или «Надстрочный знак», в зависимости от того, какой вариант написания вам нужен — нижний или верхний.
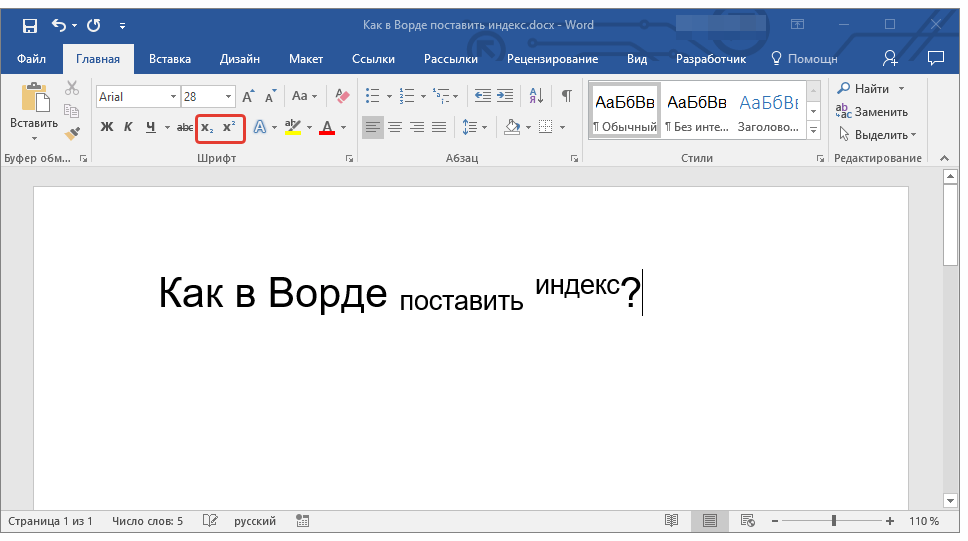
- Выделенный текст будет преобразован в индекс. Если же вы не выделяли его, а только собирались писать, введите то, что должно быть возведено индекс.

Для возвращения к нормальному написанию кликните левой кнопкой мышки в месте за текстом, преобразованным в верхний или нижний индекс. Отключите кнопку «Подстрочный знак» или «Надстрочный знак», чтобы вернуться к «классическому» набору.

Вот так просто с помощью инструментов на ленте текстового редактора от Майкрософт можно записать текст в надстрочном или подстрочном индексе либо преобразовать в него уже имеющуюся запись. Но есть и еще более простое и удобное в своей реализации решение.
Читайте также: Как в Ворде поставить градусы Цельсия
Способ 2: Горячие клавиши
Вполне возможно, что при выполнении предыдущего способа вы заметили, что при наведении указателя курсора на кнопки, отвечающие за изменение индекса, отображается не только их назначение, но и комбинация клавиш, отвечающих за быстрый вызов этих функций. Если выполнять те или иные действия и использовать инструментарий Microsoft Word вам проще посредством горячих клавиш, просто запомните следующие комбинации:
| «CTRL» + «=» | Переключение в подстрочный индекс |
| «CTRL» + «SHIFT» + «+» | Переключение в надстрочный индекс |
Как и в случае с кнопками на панели управления, выделите текст, который необходимо преобразовать в верхний или нижний индекс, и нажмите соответствующую комбинацию клавиш либо же просто воспользуйтесь ею, если только собираетесь записать текст в таком виде.
Читайте также: Как в Word поставить обозначение квадратного и кубического метров
Удаление индекса
Бывает и так, что требуется выполнить действие, обратное тому, что озвучено в заголовке данной статьи, либо же просто продолжить писать текст в обычном режиме. О последнем мы рассказали в конце первого способа, но кроме этого вы всегда можете отменить преобразование в надстрочный или подстрочный текст. Нюанс заключается в том, что использовать для этого нужно не стандартную функцию отмены последнего действия (круговая стрелка в верхнем левом углу ленты Майкрософт Ворд или клавиши «CTRL+Z»), а другую комбинацию.

Читайте также: Как в Ворде отменить последнее действие
Так, для отмены преобразования в индекс необходимо воспользоваться клавишами «CTRL» + «SPACE» (Пробел) — после их нажатия текст примет привычный вид.
Читайте также: Горячие клавиши в MS Word
Заключение
Мы рассмотрели то, как в Microsoft Word можно записать что-либо в верхнем и нижний индексе. Это работает как с текстом, так и с числовыми значениями, на которых применяется значительно чаще, например, для возведения в степень.
Читайте также: Как в Ворде поставить степень
Еще статьи по данной теме: