
Insert text or data from another document without using cut-and-paste
Updated on November 21, 2021
What to Know
- Insert a document within Word by going to Insert > Object > Text from File. Select a file and choose Insert.
- Insert a portion of a document by going to Insert > Object > Text from File and selecting a file. Adjust Range to choose a portion.
A common method to insert text into a Microsoft Word document is to cut and paste it. This works well for short pieces of text. When you want to insert an entire document or a lengthy section of a document, there’s a quicker solution than the cut-and-paste method. Instructions in this article apply to Word for Microsoft 365, Word 2019, Word 2016, Word 2013, and Word 2010.
Add Another Document to a Word Document
Word can add an entire document into your work in a few quick steps.
-
Position the cursor where you want to insert the document.
-
Go to the Insert tab.
-
In the Text group, select the Object drop-down arrow.
-
Select Text from File.
-
In the Insert File dialog box, select a document file.
-
Choose Insert.
-
The document is inserted, beginning at the cursor location.
Add a Portion of a Document to a Word Document
If you don’t want to add the entire contents of the file into your Word document, choose which parts of the document or worksheet that you want to insert.
-
Place the cursor where you want to insert the text.
-
Select Insert > Object > Text from File.
-
In the Insert File dialog box, select a document file.
-
Select Range.
-
In the Set Range dialog box, enter the bookmark name from the Word document, or the range of cells from the Excel worksheet.
-
Select OK.
-
In the Insert File dialog box, select Insert.
-
The portion of the document is inserted, beginning at the cursor location.
Insert a Linked Text in a Document
If the text from the document you’re inserting might change, use linked text that can be updated easily. The linked text option offers a third method to insert a document that updates the document automatically if the original changes.
-
Position the cursor where you want to insert the link to the document.
-
Go to the Insert tab.
-
Select the Object drop-down arrow.
-
Choose Object.
-
In the Object dialog box, go to the Create from File tab, then select Browse.
-
In the Browse dialog box, choose the file to insert, then select Insert.
-
In the Object dialog box, select Display as icon to display the inserted file as a clickable icon, rather than display the first page of the file.
-
Select OK to insert the linked file
How to Update Linked Text
Because linked data is stored in the source file, linked objects can be updated if the source is changed.
If the text changes in the original document, select the linked text object (the entire text of the insert will be selected), then press F9. This checks the original and updates the inserted text with the changes made to the original.
Only linked text can be updated. Because embedded objects become part of the Word file, these objects are not connected to the source file and do not update.
Thanks for letting us know!
Get the Latest Tech News Delivered Every Day
Subscribe
![]()
Download Article
![]()
Download Article
This wikiHow teaches you how to insert the contents of and/or a link to another document into a Microsoft Word document on Windows or Mac.[1]
Steps
-

1
Open a Microsoft Word document. To do so, double-click the blue app that contains or is shaped like a W. Then click File at the top of the screen and Open….
- To create a new document, click New in the file menu.
-
2
Click the place in the document where you want to insert the file.
Advertisement
-
3
Click the Insert tab. It’s at the top of the window.
-
4
Click the
next to Object. It’s in the Text group on the right side of the tool bar at the top of the window.
- On Mac, click Text to expand the group.
-
5
Choose the type of file to insert.
- Click Object… to insert a PDF, image, or another type of non-text file into your Word document. Then click From File… on the left side of the dialog box that opens.
- If you prefer to insert a link to and/or icon of the file, rather than the entire document, click Options on the left side of the dialog box and check Link to File and/or Display as Icon.
- Click Text from File… to insert the text of another Word or text document into the current Word document.
- Click Object… to insert a PDF, image, or another type of non-text file into your Word document. Then click From File… on the left side of the dialog box that opens.
-
6
Select the file to insert.
-
7
Click OK. The file contents, a linked icon, or the text of the file will be inserted into your Word document.


Advertisement
Add New Question
-
Question
I like that I can copy the file and paste to a blank page within another Word file. Is there a way to paste a document that’s more than one page?

Open Microsoft Word. On the top left menu choose Insert. Choose File. Browse through your file system to the file you want. Click on the file name. Choose Insert. For an existing document, place the cursor at the point you want to insert the document, then follow the above instructions. You can also choose a range of pages substituting the final Insert with Range.
-
Question
How do I insert a file into a Word document?
Read and follow the instructions listed in the article above.
-
Question
I need to email a document that is not already in a file. What do I do?
Okay, where is the document? All documents are files. If you don’t like the current format, save it to another format, or copy the material into another file in a standard format. If desperate, take a screenshot by pressing the PrintScreen key and pasting it into a Word document. Save it and you’ll have a file. If you mean the document is a physical piece of paper and not on your computer, you can either scan it or just take a picture of it with your phone.
See more answers
Ask a Question
200 characters left
Include your email address to get a message when this question is answered.
Submit
Advertisement
Video
Thanks for submitting a tip for review!
About This Article
Article SummaryX
1. Open a Word document.
2. Click a place in the document.
3. Click Insert.
4. Click the Object drop-down.
5. Choose the type of file to insert.
6. Select a file to insert.
7. Click OK.
Did this summary help you?
Thanks to all authors for creating a page that has been read 455,641 times.
Is this article up to date?
To insert an object, click Object on the Insert tab.
Contents
- 1 Where is the Insert Object tool in Word?
- 2 How do you insert an object in Word?
- 3 Where is the insert object in Word o365?
- 4 What is insert in MS Word?
- 5 How do I open an OLE file in Word?
- 6 How do you insert an object?
- 7 How do I insert multiple objects in Word?
- 8 What are objects in MS Word?
- 9 Which tab is used to insert action button?
- 10 What are the 2 options when inserting an object?
- 11 Why can’t I see insert object in Powerpoint?
- 12 How do I insert an object in Word 2016?
- 13 What object Cannot be insert in a Word document from Insert tab?
- 14 How do I insert an attachment into an icon in Word?
- 15 Where is the Insert tab on the ribbon bar?
- 16 Where on the Insert tab could you add a symbol?
- 17 Where can I find OLE objects in Word?
- 18 How do I fix Ole action in Word?
- 19 Which of the following object can be inserted in your document?
- 20 How do I insert multiple boxes in Word?
You can insert an existing file into a Word document and insert text in Word around it.
- Open Document and Click “Insert”
- Open the Word document and click the “Insert” tab on the ribbon menu at the top of the screen.
- Click the “Object” Button.
- Click the “Object” button in the Text group to open the Object dialog box.
How do you insert an object in Word?
Link or Embed a file
- Go to Insert > Object.
- Select Create from File.
- Select Browse and choose the file you want to use.
- Select Insert.
- Choose Display as icon to embed, or Link to file for a link.
- Select OK.
Where is the insert object in Word o365?
Make sure you have the file you want to attach present on your system. Once the document is open, go to the Insert tab on the ribbon and on the Text toolbox, select the Object button. From the menu that opens, select ‘Object’. A new window will open.
What is insert in MS Word?
Insert is a file menu and Ribbon section in software that allows the user to add something (e.g., picture) into a document or file. For example, in Microsoft Word, the user may use the Insert tab in the Ribbon to insert a picture of themselves into their document. Tip.
How do I open an OLE file in Word?
You have an Excel embedded OLE object inserted into a formal module as an icon.
- Then, export the module to Word using File -> Export -> Microsoft Office -> Word.
- Then, open the Excel OLE.
- It opens on the same Microsoft Word document instead of opening into a ‘new’ window.
How do you insert an object?
Embed an object in a worksheet
- Click inside the cell of the spreadsheet where you want to insert the object.
- On the Insert tab, in the Text group, click Object .
- In the Object dialog box, click the Create from File tab.
- Click Browse, and select the file you want to insert.
How do I insert multiple objects in Word?
2 Answers
- Copy all your files to clipboard (Ctrl + C)
- Open the word document you would like to embed your files and click the keyboard combinatin Ctrl + Alt + V [Paste Special] and choose files option and click OK.
What are objects in MS Word?
An object is a combination of data and the application needed to modify that data. You can thus embed objects in or link them to documents created with a different application. For instance, an Excel spreadsheet can be embedded within a Microsoft Word document using OLE.
Which tab is used to insert action button?
Put an action button on your slide
On the Insert tab, click Shapes, and then under Action Buttons at the bottom of the menu, click the button shape that you want to add.
What are the 2 options when inserting an object?
There are two options to insert objects: Create New: Insert object directly. Select the type of the object you want to insert in the Object type roll-down list. WPS Spreadsheets supports a variety of object types, such as WPS Spreadsheets Workbook, WordPad document, and Microsoft Excel among others.
Why can’t I see insert object in Powerpoint?
When you see only the frames of the object but not the icon, it’s probably because you have turned on the “Show picture placeholders” option. Click “File” tab then “Options” to open the “Word Options” dialog box. Then click “Advanced” on the left pane.
How do I insert an object in Word 2016?
Microsoft Word 2016
- Open the first document.
- Place the cursor where you want the second document to be inserted.
- From the Insert tab, Text group, click on the down arrow next to Object and choose Text from file.
- Select the file to be inserted.
- Click on Insert.
What object Cannot be insert in a Word document from Insert tab?
Discussion Forum
| Que. | Which type of file cannot be inserted in a word document via Insert Object option |
|---|---|
| b. | Bitmap Image |
| c. | MP3 file |
| d. | Video Clip |
| Answer:MP3 file |
How do I insert an attachment into an icon in Word?
On the Insert tab, click the Object button near the right end. In the dialog that opens, click the Create From File tab. Click the Browse button and locate the document file to insert. Check the box for Display As Icon, and click OK.
Where is the Insert tab on the ribbon bar?
second tab
Insert tab:
Insert Tab is the second tab in the Ribbon.
Where on the Insert tab could you add a symbol?
From the Insert command tab, in the Symbols group, click SYMBOL » select More Symbols… The Symbol dialog box appears. The special character appears in your document.
Where can I find OLE objects in Word?
The Document Inspector detects OLE Objects or packages that have been inserted from the Object dialog box (click Insert > Object in your Office application), or by using copy and paste commands.
How do I fix Ole action in Word?
Solution. The solution is generally simple — switch to MathType and close the dialog box. Sometimes it’s not that simple though. What if you see MathType’s icon in the Windows Taskbar, but clicking it doesn’t bring the window up so you can close the dialog?
Which of the following object can be inserted in your document?
The Insert tab contains various items that you may want to insert into a document. These items include such things as tables, word art, hyperlinks, symbols, charts, signature line, date & time, shapes, header, footer, text boxes, links, boxes, equations and so on.
How do I insert multiple boxes in Word?
Go to Insert > Text Box, and then select one of the pre-formatted text boxes from the list, select More Text Boxes from Office.com, or select Draw Text Box.
In this chapter, we will discuss how to insert text in Word 2010. Many times it is required to go back and insert additional text in an existing line. Microsoft Word provides two ways to insert text in existing text and we will show how to use both the methods of inserting text −
Insert and Add Text
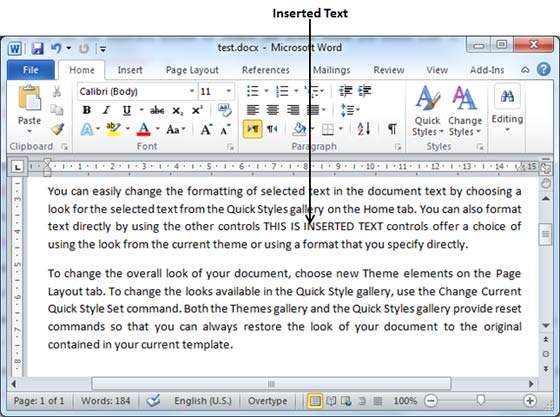
First we will see how inserted text will be added into the existing content without replacing any existing content.
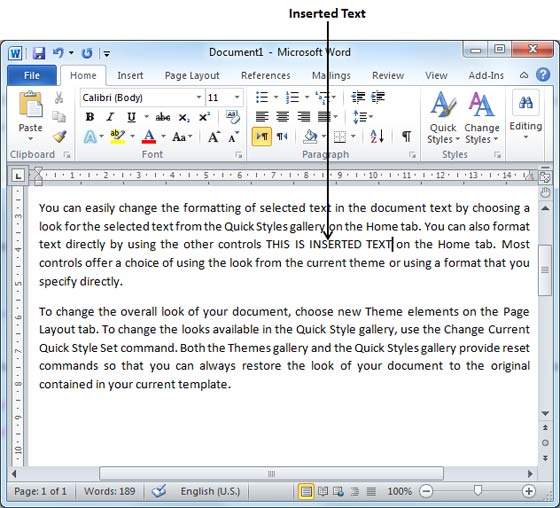
Step 1 − Click the location where you wish to insert text; you can also use the keyboard arrows to locate the place where the text needs to be inserted.
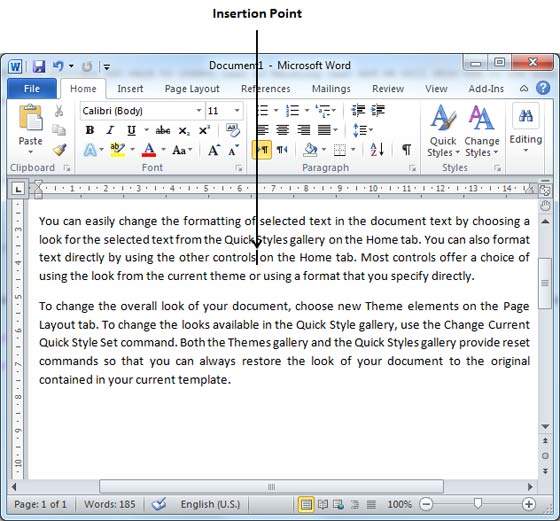
Step 2 − Start typing the text that needs to be inserted. Word inserts the text to the left of the insertion point, moving the existing text to the right
Insert and Replace Text
In the Insertion mode, text will be added into the existing content but same time it will over write all the content which comes in its way.
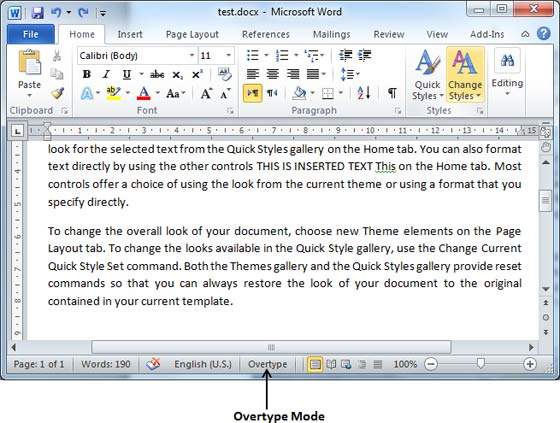
Step 1 − Right-click the status bar and select the Overtype option from the displayed menu.
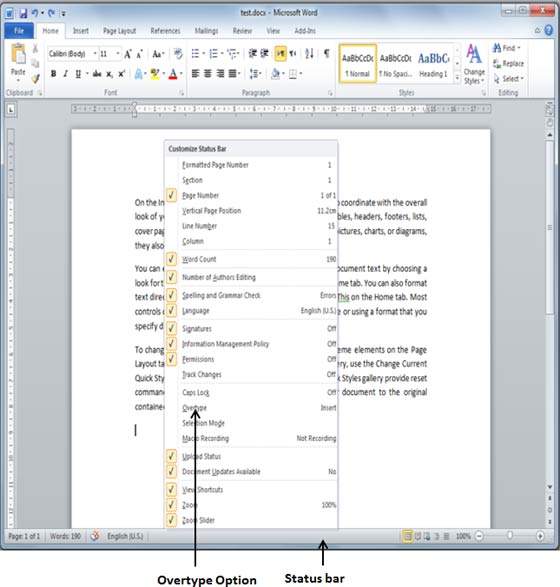
When you select the Overtype option, the status bar will show the insert mode as shown below −
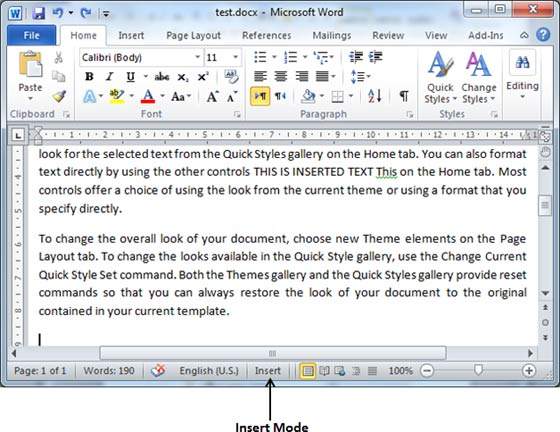
Step 2 − Click on the Insert text available at the status bar and it will switch to the Overtype mode as shown below −
Step 3 − Now click the location where the text needs to be inserted or you can use the keyboard arrows to locate the place where the text needs to be inserted.
Step 4 − Start typing the text that needs to be inserted. Word will replace the existing text with the newly typed text without moving the position of the exiting test.
Note − Microsoft Word 2010 disabled the functionality of the Insert key and it does nothing, so you will have to follow-up with the above mentioned procedure to turn-on or turn-off the Insert mode.
Microsoft Word allows you to embed objects created in other programs into one document. Inserting objects in MS Word can offer data and other resources to support your document’s objectives and create a visually pleasing layout for your recipients’ view. For example, you can include an Excel chart and an image in one Word document to share with your clients and minimize the number of files sent as attachments.
Insert a File into Word
You can insert an existing file into a Word document and insert text in Word around it.
-
Open Document and Click «Insert»
-
Open the Word document and click the “Insert” tab on the ribbon menu at the top of the screen.
-
Click the «Object» Button
-
Click the «Object» button in the Text group to open the Object dialog box.
-
Open the Browse Dialog Box
-
Click the “Create from File” tab and then click “Browse” to open the Browse dialog box.
-
Click on Preferred File
-
Navigate to the preferred file, click this file and then click the “Insert” button on the Browse dialog box to close.
-
Click «OK»
-
Click the “OK” button on the Object dialog box to close. The file opens as an embedded object in a frame in your Word document.
-
Resize and Move as Desired
-
Click the frame border to display the pull handles. Click the handle and drag on the document to resize the object. Click in the object and drag to move the object around your Word document.
-
Return to Word Document
-
Double-click in the object to display the program’s command ribbon and editing tools. Click outside the embedded object to return to the Word command ribbon.
Creating a New Embedded Object
To create a new embedded object, click the “Create New” tab in the Object dialog box, scroll to view the options and then click the file type. For example, click “Microsoft Excel Worksheet” and then click “OK” in the Object dialog box to insert a worksheet.
Microsoft Excel, or whatever the usual program is to create and edit that type of file, will pop up for you to design the embedded object as you see fit. When you close the program, your changes will be reflected in the embedded file.
Linking Versus Embedding Files
You can either link or directly embed a file in a Word document.
To link the original source file and the inserted object, select the “Link to File” check box in the Object dialog box when you’re inserting the object. Updating the source file will display the changes in the Word document. The two files must be transferred together for the inserted object to show up properly.
If you embed the object, it will be included in the Word file and you won’t have to transfer the two objects separately. Note that this will make the Word file take up more disk space.
You can also choose to display the embedded object as an icon rather than directly by checking the «Display as Icon» checkbox in the «Object» dialog box.
Deleting an Unwanted Object
If you embed or link a document in Word, you may later decide you no longer wish to have it present in the file. You can delete the object an save the Word document to remove it. If an object is embedded rather than linked and you need to update its contents, you may wish to delete it and newly embed a revised version.
To delete an unwanted object, simply click the object within the Word document and then press the “Delete” key on your keyboard. Save the file under the same or a new name using the «Save» or «Save As» on the «File» tab of the ribbon menu when done.
Insert Word Document into Word
In some cases you might simply want to insert text in Word, importing the contents of one Word document into another without embedding it.
To do so, click the «Insert» tab on the ribbon menu. Then, click the downward-facing arrow next to «Object» and select «Text from File.» Browse to the file you want and double-click it. Its text will appear in the Word document.
If the document has headers and footers, they will be transferred to the new document or to the current section of the document if it is divided into sections.

When working on a document in Word, you may find that you need to insert text from another Word document. Maybe you’re collaborating with others and combining multiple pieces, for example.
RELATED: How to Collaborate on Documents in Real-Time in Office 2016
There is a better way to collaborate on documents in Office 2016, but there may be times when a fellow collaborator needs to work offline and they send you a document to integrate into the main document. So, we’ll show you how to insert the contents of a Word file into another Word file for situations where online collaboration is not an option. (Sure, you could just open the second document and copy and paste its text, but the method below is often faster.)
For the purposes of this article, we’ll call the file being inserted the “source” file and the file into which you are inserting the source file the “target” file.
To insert the contents of a source Word file into a target Word file, open the target document, place the cursor where you want to insert the source file, and then click the “Insert” tab.

In the “Text” section, click the “Object” button and select “Text from File” from the drop-down menu.
The “Insert File” dialog box displays. Navigate to the folder that contains the source file you want to insert and select the file. Then, click “Insert”.
NOTE: You can also insert text from a text (.txt) file.
The entire contents of the source file (text, images, tables, etc.) will be inserted at the cursor in the target document.
When inserting text from a source document that has styles using the same names as in the target document (for example, the “Normal” style), the style in the target document takes precedence. If you want to keep the formatting of the text from the source document, make sure the style applied to that text in the source document has a different name than any of the styles in the target document. So, if you want the text from the source document to look like the text in the target document, such that the formatting is consistent, you’re good. All you have to do is insert the file or part of the file as we described in this article.
You can also insert text from a text (.txt) file, but you have to insert the entire file in that case, because you cannot add bookmarks to text files.
RELATED: How to Reference Text from Other Documents in Microsoft Word
We previously described a trick where can put common content into one Word document and reference it in other Word documents. The content will even automatically update in all your documents if you change it in the common document because the two are linked using a field. That feature is different from inserting files as described in this article because when you insert content from a source file into a target file, there is no link between the source file and the target file. So, when you change the content in the source file that content is not updated in the target file.
READ NEXT
- › The New NVIDIA GeForce RTX 4070 Is Like an RTX 3080 for $599
- › This New Google TV Streaming Device Costs Just $20
- › HoloLens Now Has Windows 11 and Incredible 3D Ink Features
- › BLUETTI Slashed Hundreds off Its Best Power Stations for Easter Sale
- › Google Chrome Is Getting Faster
- › How to Adjust and Change Discord Fonts
How-To Geek is where you turn when you want experts to explain technology. Since we launched in 2006, our articles have been read billions of times. Want to know more?
| title | description | titleSuffix | ms.date | ms.topic | dev_langs | helpviewer_keywords | author | ms.author | manager | ms.technology | ms.workload | |||||||
|---|---|---|---|---|---|---|---|---|---|---|---|---|---|---|---|---|---|---|
|
How to: Programmatically insert text into Word documents |
Learn how you can programmatically insert text into a Microsoft Word document by using Visual Studio. |
08/14/2019 |
how-to |
|
|
John-Hart |
johnhart |
jmartens |
office-development |
office |
How to: Programmatically insert text into Word documents
[!INCLUDE Visual Studio]
There are three primary ways to insert text into Microsoft Office Word documents:
-
Insert text in a range.
-
Replace text in a range with new text.
-
Use the xref:Microsoft.Office.Interop.Word.Selection.TypeText%2A method of a xref:Microsoft.Office.Interop.Word.Selection object to insert text at the cursor or selection.
[!NOTE]
You can also insert text into content controls and bookmarks. For more information, see Content controls and Bookmark control.
[!INCLUDEappliesto_wdalldocapp]
[!includeAdd-ins note]
Insert text in a range
Use the xref:Microsoft.Office.Interop.Word.Range.Text%2A property of a xref:Microsoft.Office.Interop.Word.Range object to insert text in a document.
To insert text in a range
-
Specify a range at the beginning of a document and insert the text New Text.
The following code example can be used in a document-level customization.
C#
:::code language=»csharp» source=»../vsto/codesnippet/CSharp/Trin_VstcoreWordAutomationCS/ThisDocument.cs» id=»Snippet51″:::
VB
:::code language=»vb» source=»../vsto/codesnippet/VisualBasic/Trin_VstcoreWordAutomationVB/ThisDocument.vb» id=»Snippet51″:::
The following code example can be used in a VSTO Add-in. This code uses the active document.
C#
:::code language=»csharp» source=»../vsto/codesnippet/CSharp/Trin_VstcoreWordAutomationAddIn/ThisAddIn.cs» id=»Snippet51″:::
VB
:::code language=»vb» source=»../vsto/codesnippet/VisualBasic/Trin_VstcoreWordAutomationAddIn/ThisAddIn.vb» id=»Snippet51″:::
-
Select the xref:Microsoft.Office.Interop.Word.Range object, which has expanded from one character to the length of the inserted text.
C#
:::code language=»csharp» source=»../vsto/codesnippet/CSharp/Trin_VstcoreWordAutomationCS/ThisDocument.cs» id=»Snippet52″:::
VB
:::code language=»vb» source=»../vsto/codesnippet/VisualBasic/Trin_VstcoreWordAutomationVB/ThisDocument.vb» id=»Snippet52″:::
Replace text in a range
If the specified range contains text, all text in the range is replaced with the inserted text.
To replace text in a range
-
Create a xref:Microsoft.Office.Interop.Word.Range object that consists of the first 12 characters in the document.
The following code example can be used in a document-level customization.
C#
:::code language=»csharp» source=»../vsto/codesnippet/CSharp/Trin_VstcoreWordAutomationCS/ThisDocument.cs» id=»Snippet53″:::
VB
:::code language=»vb» source=»../vsto/codesnippet/VisualBasic/Trin_VstcoreWordAutomationVB/ThisDocument.vb» id=»Snippet53″:::
The following code example can be used in a VSTO Add-in. This code uses the active document.
C#
:::code language=»csharp» source=»../vsto/codesnippet/CSharp/Trin_VstcoreWordAutomationAddIn/ThisAddIn.cs» id=»Snippet53″:::
VB
:::code language=»vb» source=»../vsto/codesnippet/VisualBasic/Trin_VstcoreWordAutomationAddIn/ThisAddIn.vb» id=»Snippet53″:::
-
Replace those characters with the string New Text.
C#
:::code language=»csharp» source=»../vsto/codesnippet/CSharp/Trin_VstcoreWordAutomationCS/ThisDocument.cs» id=»Snippet54″:::
VB
:::code language=»vb» source=»../vsto/codesnippet/VisualBasic/Trin_VstcoreWordAutomationVB/ThisDocument.vb» id=»Snippet54″:::
-
Select the range.
C#
:::code language=»csharp» source=»../vsto/codesnippet/CSharp/Trin_VstcoreWordAutomationCS/ThisDocument.cs» id=»Snippet55″:::
VB
:::code language=»vb» source=»../vsto/codesnippet/VisualBasic/Trin_VstcoreWordAutomationVB/ThisDocument.vb» id=»Snippet55″:::
Insert text using TypeText
The xref:Microsoft.Office.Interop.Word.Selection.TypeText%2A method inserts text at the selection. xref:Microsoft.Office.Interop.Word.Selection.TypeText%2A behaves differently depending on the options set on the user’s computer. The code in the following procedure declares a xref:Microsoft.Office.Interop.Word.Selection object variable, and turns off the Overtype option if it is turned on. If the Overtype option is activated, then any text next to the cursor is overwritten.
To insert text using the TypeText method
-
Declare a xref:Microsoft.Office.Interop.Word.Selection object variable.
C#
:::code language=»csharp» source=»../vsto/codesnippet/CSharp/Trin_VstcoreWordAutomationCS/ThisDocument.cs» id=»Snippet57″:::
VB
:::code language=»vb» source=»../vsto/codesnippet/VisualBasic/Trin_VstcoreWordAutomationVB/ThisDocument.vb» id=»Snippet57″:::
-
Turn off the Overtype option if it is turned on.
C#
:::code language=»csharp» source=»../vsto/codesnippet/CSharp/Trin_VstcoreWordAutomationCS/ThisDocument.cs» id=»Snippet58″:::
VB
:::code language=»vb» source=»../vsto/codesnippet/VisualBasic/Trin_VstcoreWordAutomationVB/ThisDocument.vb» id=»Snippet58″:::
-
Test to see whether the current selection is an insertion point.
If it is, the code inserts a sentence using xref:Microsoft.Office.Interop.Word.Selection.TypeText%2A, and then a paragraph mark using the xref:Microsoft.Office.Interop.Word.Selection.TypeParagraph%2A method.
C#
:::code language=»csharp» source=»../vsto/codesnippet/CSharp/Trin_VstcoreWordAutomationCS/ThisDocument.cs» id=»Snippet59″:::
VB
:::code language=»vb» source=»../vsto/codesnippet/VisualBasic/Trin_VstcoreWordAutomationVB/ThisDocument.vb» id=»Snippet59″:::
-
The code in the ElseIf block tests to see whether the selection is a normal selection. If it is, then another If block tests to see whether the ReplaceSelection option is turned on. If it is, the code uses the xref:Microsoft.Office.Interop.Word.Selection.Collapse%2A method of the selection to collapse the selection to an insertion point at the start of the selected block of text. Insert the text and a paragraph mark.
C#
:::code language=»csharp» source=»../vsto/codesnippet/CSharp/Trin_VstcoreWordAutomationCS/ThisDocument.cs» id=»Snippet60″:::
VB
:::code language=»vb» source=»../vsto/codesnippet/VisualBasic/Trin_VstcoreWordAutomationVB/ThisDocument.vb» id=»Snippet60″:::
-
If the selection is not an insertion point or a block of selected text, then the code in the Else block does nothing.
C#
:::code language=»csharp» source=»../vsto/codesnippet/CSharp/Trin_VstcoreWordAutomationCS/ThisDocument.cs» id=»Snippet61″:::
VB
:::code language=»vb» source=»../vsto/codesnippet/VisualBasic/Trin_VstcoreWordAutomationVB/ThisDocument.vb» id=»Snippet61″:::
You can also use the xref:Microsoft.Office.Interop.Word.Selection.TypeBackspace%2A method of the xref:Microsoft.Office.Interop.Word.Selection object, which mimics the functionality of the Backspace key on your keyboard. However, when it comes to inserting and manipulating text, the xref:Microsoft.Office.Interop.Word.Range object offers you more control.
The following example shows the complete code. To use this example, run the code from the
ThisDocumentorThisAddInclass in your project.C#
:::code language=»csharp» source=»../vsto/codesnippet/CSharp/Trin_VstcoreWordAutomationCS/ThisDocument.cs» id=»Snippet56″:::
VB
:::code language=»vb» source=»../vsto/codesnippet/VisualBasic/Trin_VstcoreWordAutomationVB/ThisDocument.vb» id=»Snippet56″:::
See also
- How to: Programmatically format text in documents
- How to: Programmatically define and select ranges in documents
- How to: Programmatically extend ranges in documents