
![]()
Download Article
![]()
Download Article
This wikiHow teaches you how to insert the contents of and/or a link to another document into a Microsoft Word document on Windows or Mac.[1]
Steps
-

1
Open a Microsoft Word document. To do so, double-click the blue app that contains or is shaped like a W. Then click File at the top of the screen and Open….
- To create a new document, click New in the file menu.
-
2
Click the place in the document where you want to insert the file.
Advertisement
-
3
Click the Insert tab. It’s at the top of the window.
-
4
Click the
next to Object. It’s in the Text group on the right side of the tool bar at the top of the window.
- On Mac, click Text to expand the group.
-
5
Choose the type of file to insert.
- Click Object… to insert a PDF, image, or another type of non-text file into your Word document. Then click From File… on the left side of the dialog box that opens.
- If you prefer to insert a link to and/or icon of the file, rather than the entire document, click Options on the left side of the dialog box and check Link to File and/or Display as Icon.
- Click Text from File… to insert the text of another Word or text document into the current Word document.
- Click Object… to insert a PDF, image, or another type of non-text file into your Word document. Then click From File… on the left side of the dialog box that opens.
-
6
Select the file to insert.
-
7
Click OK. The file contents, a linked icon, or the text of the file will be inserted into your Word document.


Advertisement
Add New Question
-
Question
I like that I can copy the file and paste to a blank page within another Word file. Is there a way to paste a document that’s more than one page?

Open Microsoft Word. On the top left menu choose Insert. Choose File. Browse through your file system to the file you want. Click on the file name. Choose Insert. For an existing document, place the cursor at the point you want to insert the document, then follow the above instructions. You can also choose a range of pages substituting the final Insert with Range.
-
Question
How do I insert a file into a Word document?
Read and follow the instructions listed in the article above.
-
Question
I need to email a document that is not already in a file. What do I do?
Okay, where is the document? All documents are files. If you don’t like the current format, save it to another format, or copy the material into another file in a standard format. If desperate, take a screenshot by pressing the PrintScreen key and pasting it into a Word document. Save it and you’ll have a file. If you mean the document is a physical piece of paper and not on your computer, you can either scan it or just take a picture of it with your phone.
See more answers
Ask a Question
200 characters left
Include your email address to get a message when this question is answered.
Submit
Advertisement
Video
Thanks for submitting a tip for review!
About This Article
Article SummaryX
1. Open a Word document.
2. Click a place in the document.
3. Click Insert.
4. Click the Object drop-down.
5. Choose the type of file to insert.
6. Select a file to insert.
7. Click OK.
Did this summary help you?
Thanks to all authors for creating a page that has been read 455,641 times.
Is this article up to date?
Word for Microsoft 365 Word 2021 Word 2019 Word 2016 Word 2013 Word 2010 Word 2007 More…Less
Inserting a document
You can insert the content of previously-created Word documents into a new or different Word document.
-
Click or tap where you want to insert the content of the existing document.
-
Go to Insert and select the arrow next to Object
. -
Select Text from File.
-
Locate the file that you want and then double-click it.
-
To add in the contents of additional Word documents, repeat the above steps as needed.
 .
. 
Important: If you want to insert the header and footer also, be sure to insert the text from the file in a new section so that the header and footer are applied to only those pages. For more info on sections, see Insert a section break.
Need more help?

Если вы работаете с большим по объему текстовым документом MS Word, для ускорения рабочего процесса вы можете принять решение разбить его на отдельные главы и разделы. Каждая из этих составляющих может находиться в разных документах, которые явно придется объединить в один файл, когда работа над ним будет близиться к концу. О том, как это сделать, мы расскажем в данной статье.
Урок: Как скопировать таблицу в Ворде
Наверняка, первое, что вам приходит в голову, когда возникает необходимость объединить два и более документов, то есть, вставить один в другой, это просто копировать текст из одного файла и вставлять его в другой. Решение так себе, ведь данный процесс может занять немало времени, да и все форматирование в тексте, вероятнее всего, будет испорчено.
Урок: Как изменить шрифт в Word
Другой метод — создание одного основного документа их вложенных в него “составляющих” документов. Метод тоже не самый удобный, да и весьма запутанный. Хорошо, что есть еще один — самый удобный, да и просто логичный. Это вставка содержимого составляющих файлов в главный документ. О том, как это сделать, читайте ниже.
Урок: Как вставить таблицу из Ворда в презентацию
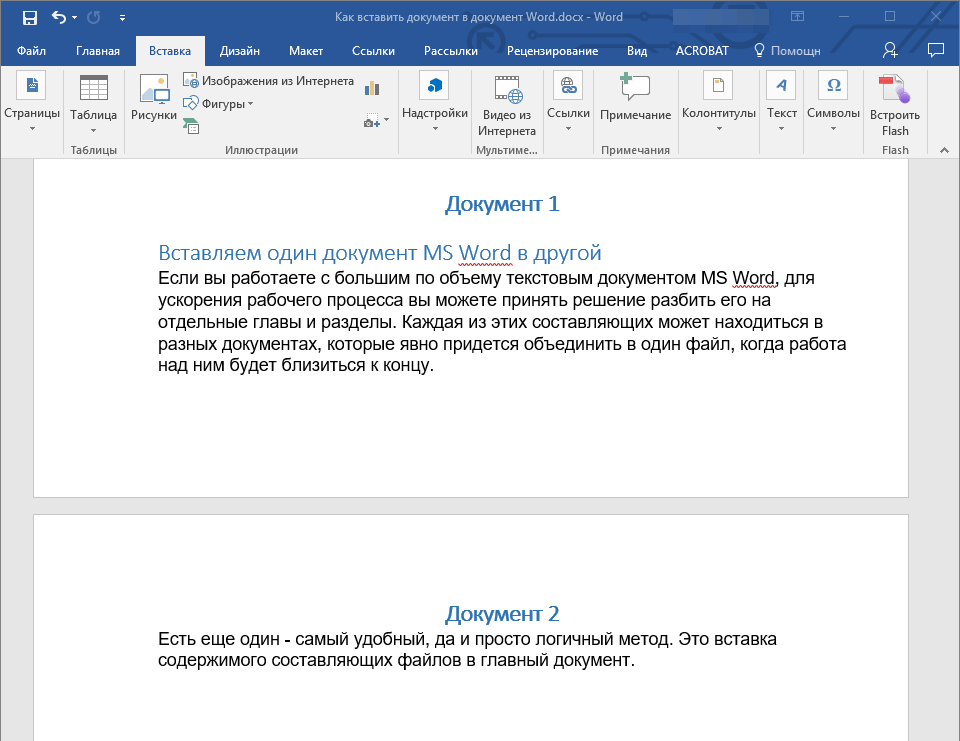
1. Откройте тот файл, с которого должен начинаться документ. Для наглядности мы назовем его “Документ 1”.

2. Установите указатель курсора в том месте, куда необходимо вставить содержимое другого документа.
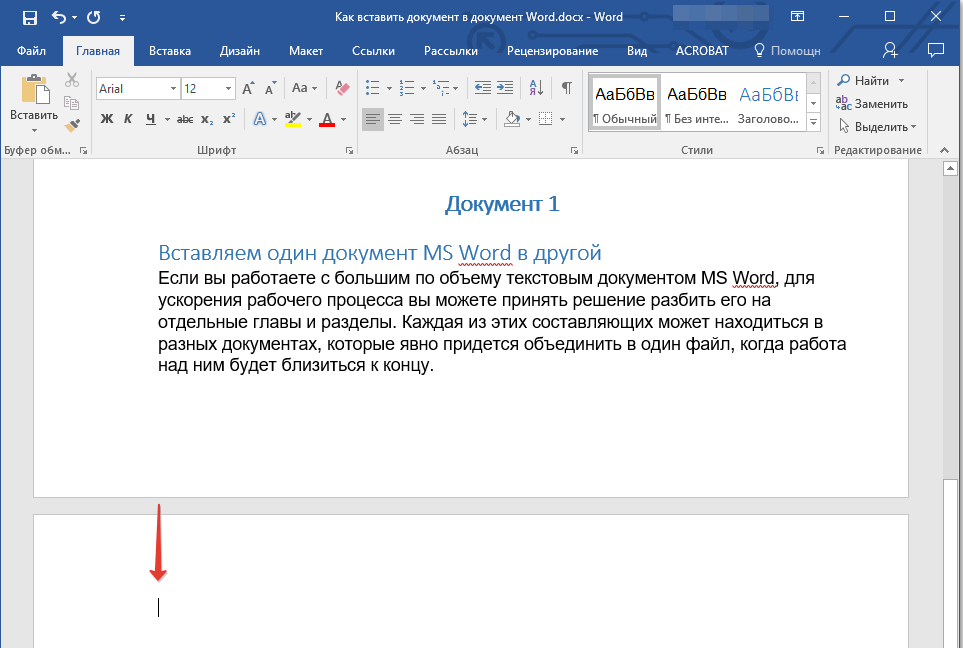
- Совет: Рекомендуем в этом месте добавить разрыв страницы — в таком случае “Документ 2” будет начат с новой страницы, а не сразу за “Документом 1”.
Урок: Как вставить разрыв страницы в MS Word
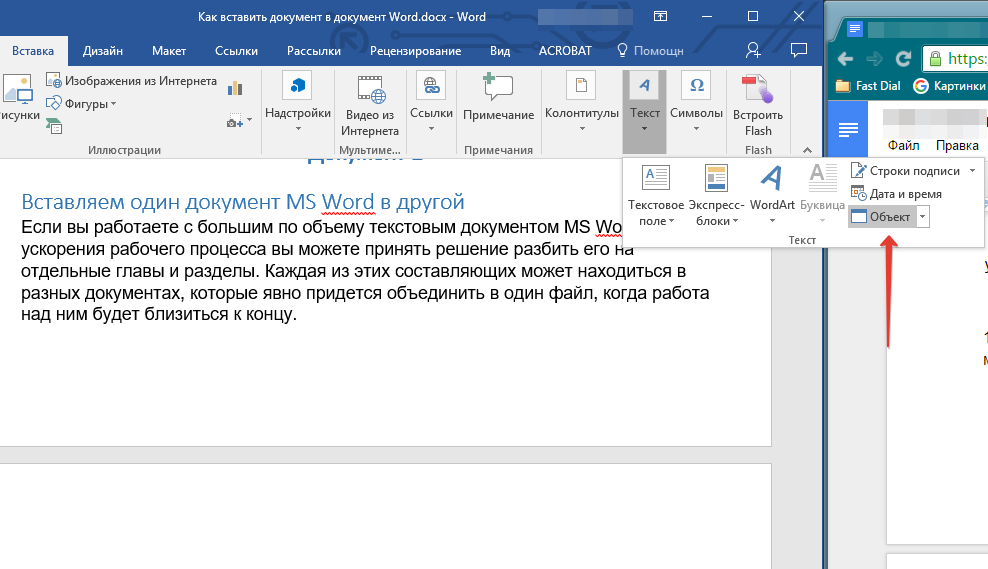
3. Перейдите во вкладку “Вставка”, где в группе “Текст” разверните меню кнопки “Объект”.
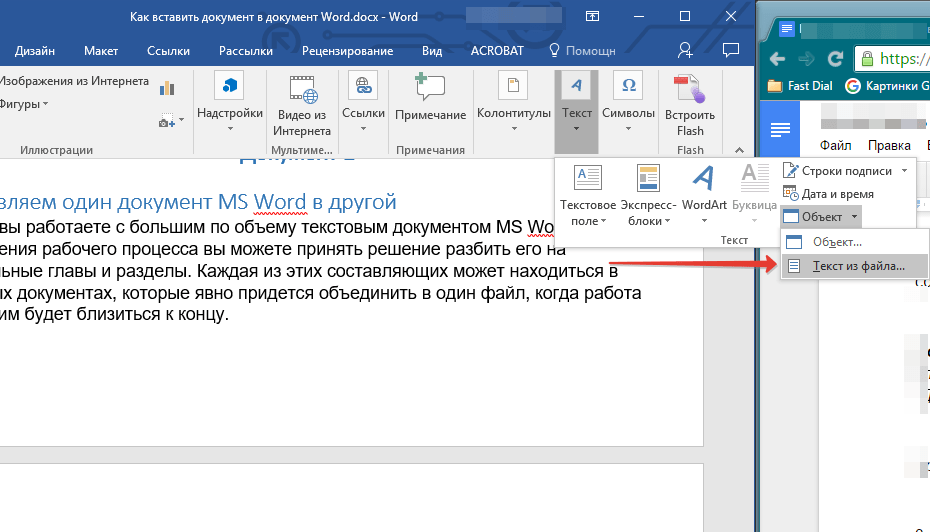
4. Выберите пункт “Текст из файла”.

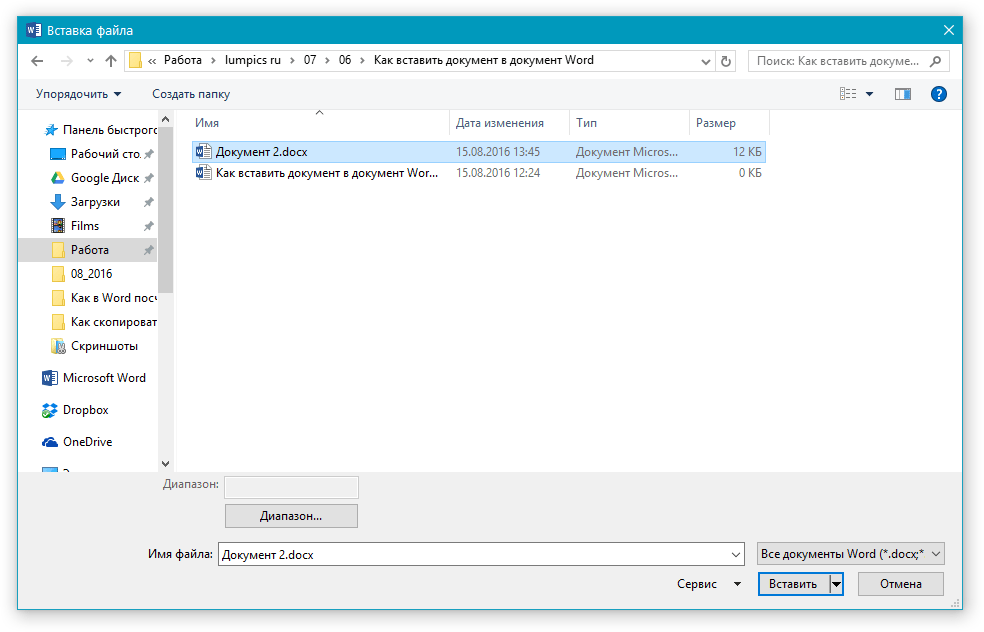
5. Выберите файл (так называемый “Документ 2”), содержимое которого вы хотите вставить в основной документ (“Документ 1”).
Примечание: В нашем примере используется программа Microsoft Word 2016, в предыдущих версиях этой программы во вкладке “Вставка” нужно выполнить следующие действия:
- кликнуть по команде “Файл”;
- в окне “Вставка файла” найти необходимый текстовый документ;
- нажать на кнопку “Вставить”.
6. Если в основной документ вы хотите добавить более одного файла, повторите вышеописанные действия (2-5) необходимое количество раз.
7. Содержимое сопутствующих документов будет добавлено в основной файл.
В конечном итоге вы получите целостный документ, состоящий из двух или более файлов. Если в сопутствующих файлах у вас были колонтитулы, к примеру, с номерами страниц, они тоже будут добавлены в основной документ.
- Совет: Если форматирование текстового содержимого разных файлов отличается, лучше привести его к единому стилю (конечно,если это необходимо) до того, как вы будете вставлять один файл в другой.
На этом все, из этой статьи вы узнали, как вставить содержимое одного (или нескольких) документа Ворд в другой. Теперь вы можете работать еще продуктивнее.
Еще статьи по данной теме:
Помогла ли Вам статья?

If the content of another Microsoft Word document is relevant to the content in a Word doc you’re currently working on, you can embed or migrate the text of that document into your current document. Here’s how.
First, open the Word document that you would like to add the contents of, or embed, another Word document to.
RELATED: How to Insert a PDF into Microsoft Word
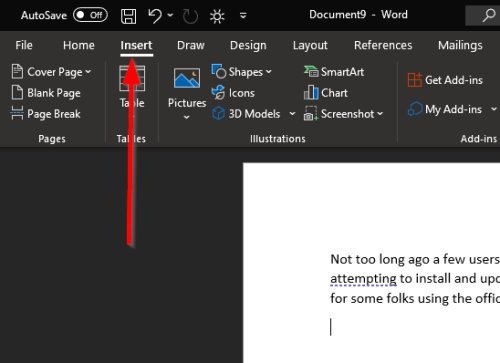
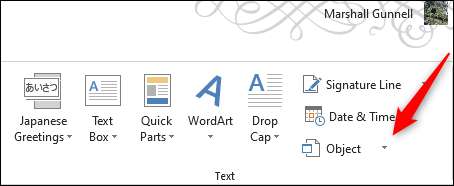
Next, head over to the “Text” group of the “Insert” tab and click the down arrow next to the “Object” option.

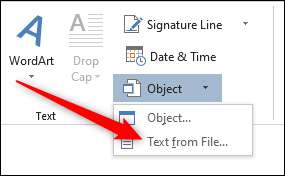
A drop-down menu will appear. There are two options to choose from here: “Object” and “Text From File.”
- Object: Embeds an object such as a Word document or Excel chart
- Text From File: Inserts the text from another file into your Word document
The “Text From File” option is essentially a quicker way to copy and paste the content of another file into this one.
Try it out by clicking the “Text From File” option in the drop-down menu.
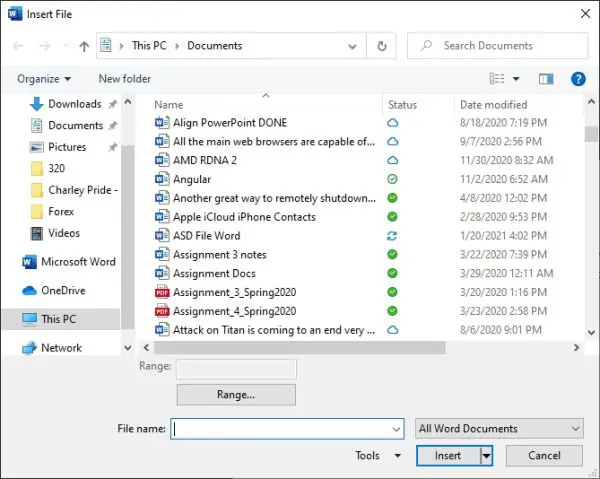
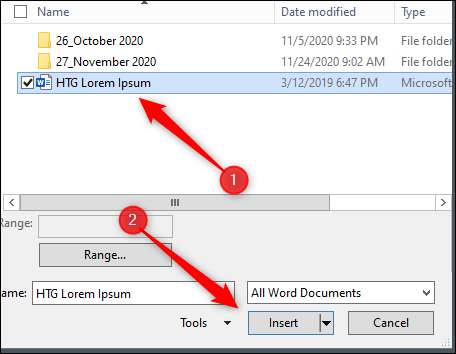
File Explorer (Finder on Mac) will open. Find the file you would like to copy the text from, select it, then click “Insert.”
The contents of that Word doc will now appear in the current Word document. This works well if there isn’t a lot of content in the other Word document, but if there is, embedding it may be a better option.
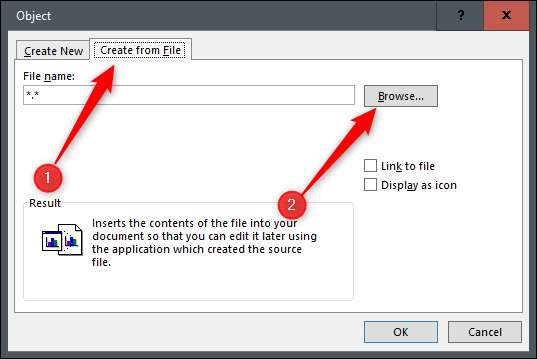
Back at the “Object” drop-down menu (Insert > Text group > Object), click the “Object” option.
The “Object” window will appear. Select the “Create From File” tab and then click “Browse.” The “Create From File” option will appear as a button in the bottom-left corner of the window on Mac.
File Explorer (Finder on Mac) will appear. Find the file you want to embed, select it, then click “Insert.”
The file path of the selected file will now appear in the text box next to “Browse.” Now, you need to decide how you want to insert the object. You have two options:
- Link to File: Inserts the contents of the selected file into your Word document and creates a link back to the source file. Changes made to the source file will be reflected in your document. Selecting “Link to File” by itself will insert the content of the other file inside a text box.
- Display as Icon: Inserts an icon to show the reader that there is an embedded object. This is ideal when saving space is imperative.
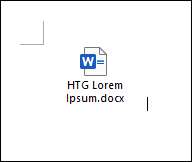
We’ll check both options in this example.
The file will now be embedded in your Word document. Double-clicking the icon will open the second Word file.
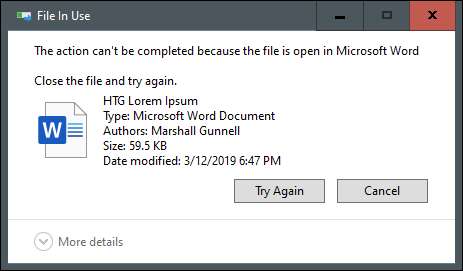
One caveat with this method is moving the source file would break the embedded object’s link. For this reason, Microsoft prevents you from being able to move the source file to a different location. If you try, you’ll receive this message:
If you need to move the source file to another location, you’ll need to remove the embedded link, move the source file, and then re-embed the file following the steps in this article.
READ NEXT
- › How to Use Outline View in Microsoft Word
- › How to Adjust and Change Discord Fonts
- › HoloLens Now Has Windows 11 and Incredible 3D Ink Features
- › The New NVIDIA GeForce RTX 4070 Is Like an RTX 3080 for $599
- › BLUETTI Slashed Hundreds off Its Best Power Stations for Easter Sale
- › This New Google TV Streaming Device Costs Just $20
- › Google Chrome Is Getting Faster
How-To Geek is where you turn when you want experts to explain technology. Since we launched in 2006, our articles have been read billions of times. Want to know more?
How to embed files, including other Word files, into a Word document
Updated on September 6, 2022
What to Know
- Open Word doc > place curser where you want to insert file > select Insert tab.
- Next, select Object drop-down arrow > choose Text from File > select document > Insert.
This article explains how to insert one Word document into another — even when the copied document includes headers and footers. Instructions apply to Word 2019, Word 2016, Word 2013, Word 2010, and Word for Microsoft 365.
How to Insert a Word Document Into Another Word Document
If you have an existing Microsoft Word document that would augment a document you’re working on, you have a few options. If you want to add an entire document to a second Word doc, your best bet is knowing how to insert a document into Word.
Word inserts the document into the current document without changing the formatting applied to either document. Images, tables, shapes, and other objects in the existing document carry over into the new Word file as well.
-
Start Word and open the document into which you want to insert another Word document.
Alternatively, select New > Blank Document to open a new, blank Word document to insert an existing document into.
-
Place the cursor on the spot in the document where you want to insert an existing Word file.
-
Select the Insert tab.
-
Select the drop-down arrow next to Object in the Text group.
-
Choose Text from File in the drop-down list that appears. The Insert from File dialog box will open.
If you select Object from the Object drop-down menu, you can embed an existing Word document as a clickable file from the Create from File tab of the Object dialog box that appears. Alternatively, you can create a new, blank document that becomes a clickable object when saved using the Create New tab in that dialog box. This is a useful way to reference a document without importing the text into your existing document.
-
Navigate to the Word file you want to insert into the current Word document and select it.
-
Select Insert. Word will insert the document into the current document.
-
Save the changes to the combined file, if desired.
-
You can repeat the steps to insert additional Word docs into the Word file you are currently working on.
Any changes made to the contents of the inserted document does not affect the original Word document.
How to Insert a Word Document With Headers or Footers Into Word
If the file you want to insert has headers and footers you want to carry over into the new file, add a section break before selecting the insertion point in the new document.
-
Place the cursor on the spot in the document where you want to insert an existing Word file.
-
Select the Layout tab.
-
Select the Breaks drop-down arrow in the Page Setup group.
-
Either select Next Page to add a section break and insert the Word document starting on the next page, or select Continuous to add a section break and insert the Word document starting on the same page.
-
Insert the Word document using the same steps listed above. The header and footer will only be applied to the pages of the newly inserted document.
Thanks for letting us know!
Get the Latest Tech News Delivered Every Day
Subscribe
Download PC Repair Tool to quickly find & fix Windows errors automatically
Did you know it is possible to insert a Word document into another Word document? Yes, this is very much possible to accomplish, and it’s not hard to get done either. Most people are more inclined to open the document, copy the content from within it, then paste it into another opened Word document. That’s not a wrong way to do it, but we believe it is more time-consuming from our point of view.
Adding the document to another opened document is the easiest way, and like always, we’re going to explain how to do this in the best way possible.
- Open a Word document
- Select the Insert tab
- Choose Text from File
- Add the Word file to your document
Let us discuss this in more detail, shall we?
1] Open a Word document
The first step to take here is to open a Microsoft Word document. You can do this by firing up the app, then choose which file you want to open.
2] Select the Insert tab
Once the document is opened, you must look to the Ribbon and be sure to click on the Insert tab. You should now see quite a few options to choose from, but you are looking for one in particular.
3] Choose Text from File

Before going down this path, make sure to have an idea of which Text-based document you want to insert. When you’ve finally settled on one, click the down arrow beside the Object icon, then from there, select Text from File.
If you’re confused as to where the Object icon is, well, it can be found close to the Text Box.
4] Add the Word file to your document
After selecting Text from File, a small window will appear, giving you the ability to choose your file. Double-click on the preferred file, then right away, the contents from it will appear in your current document.
You can also do this with PDF documents. Just bear in mind that Microsoft Word will convert such files into a Word format for compatibility reasons.
Read next: How to convert Table to Text and Text to Table in Word.

Vamien has studied Computer Information Services and Web Design. He has over 10 years of experience in building desktop computers, fixing problems relating to Windows, and Python coding.
Word allows you to insert other files with data and functionality from another document or program directly into your Word document.
Microsoft calls these additions ‘Objects’ which makes it sound overly technical and difficult but it’s not. Don’t get fazed by all the nerd talk about ‘objects’, that’s programmer speak that’s leaked out into the real world.
Whenever you see the word ‘Object’ think ‘Another file’.
Objects are just other files or sometimes, parts of other files. Word or text files, graphs, Excel worksheets, PDF’s, PowerPoint files or a lot more.
You can either create a new object within your Word document or insert an existing file. You can also choose to either embed or link the object.
Embedding
Embedding an object just takes a snapshot or copy of the file at the time you embedded it. If you later change the original file, the changes are not reflected in your document.
- Use this to keep a copy of the file at a particular time like end of financial year or when contract is finalized.
- Embedding can also hide files and documents from prying eyes, that’s explained in our ebook Beating Bots, Spies and Cock-ups.
Linking
Linking an object creates a live link to the original file. If you make changes to the original file, the changes will appear in the object in your Word document. See Putting Excel into Word
To insert an object in Word, go to Insert | Object.

Insert all the Text from Another File
If you have another text document, such as another Word file, plain text file, or even a PDF file, you can easily insert all of the text from that file into your document.
To do this, select the Text from File option.

The Insert File dialog will open for you to navigate to the file that you want to insert.
NOTES:
- The content will be inserted along with all its formatting from the source file. If the original is a large, complex document, this may take some time.
- If you select a PDF document, Word will do the best it can to convert it into Word, along with all its formatting. It may not look exactly like the original file, especially if the source file contains a lot of graphics. Very complex PDF files may take excessive time or may not be able to be imported.
Insert a New Object
To insert any other kind of object other than a text file, select the Object option.

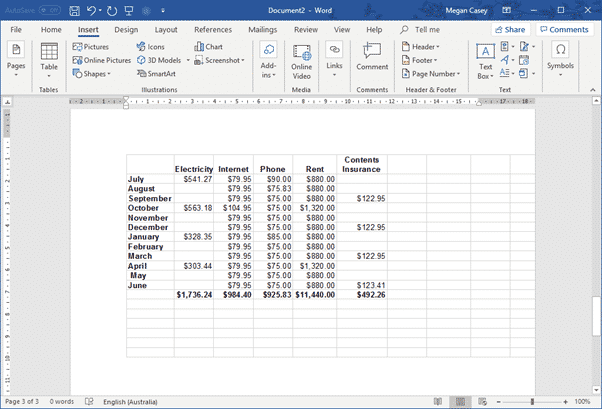
The Object dialog will open with the Create New tab selected by default. You will see that there is an extensive list of object types available to choose from. In this example we will choose to insert a new Excel worksheet in the document.

An Excel worksheet will appear in the document, and the Excel ribbon and tools will appear above it, just as if you are working in an Excel file.

You can now drag the edges to show as much of the worksheet as you wish, enter whatever data, and perform whatever functions you wish within the worksheet.
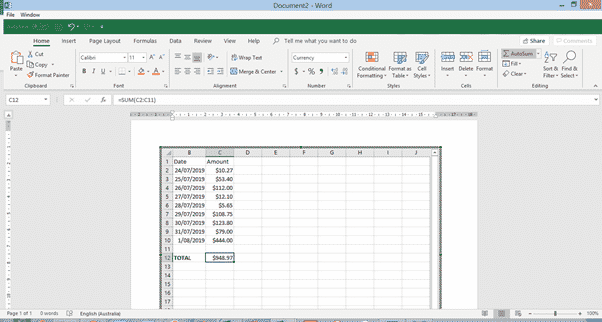
When you’re done, click anywhere outside the object, and the Excel ribbon will disappear, but the worksheet will still appear as a table in your document. You can then double-click within the object to enter and edit it again.
NOTES:
- When you insert a new object in this way, you can click within the object any time to edit it.
- If the Excel worksheet contains more data than fits in the visible window in your document, the part that you have visible when you click out of the object is what will appear in your document when you click out of the object.
Embed an Existing Object
To insert an existing object in your document, click the Create from File tab in the Object dialog and browse to the file you want to insert.

A section of the file will appear in the document, and the reader can double-click on it to open it and view the whole file. The part of the file that displays in the document varies depending on the type of file:
- A PowerPoint presentation will show the first slide only. Double-clicking will allow the reader to click through the whole presentation.
- An Excel file with multiple worksheets will display the worksheet that was open the last time the file was saved. Double-clicking will give access to all worksheets.
- A PDF file will display the first page of the document. (Unlike the Insert Text from File option, with this method the inserted object will still be a PDF file, not converted to Word.)

PowerPoint presentation embedded in a Word document
An Excel worksheet embedded in a Word document
For more see Putting Excel into Word
NOTES:
- An embedded object is just a snapshot of the file at the time you embedded it. It no longer has any link to the original file, and any subsequent changes made to the original will have no effect on the object in your document.
- If the object is an editable file, such as an Excel file, you can edit it after you have inserted it. Double-click on the object, and the interface of the original application will open within your document, just as described above for inserting a new object.
Link an Existing Object
To embed an object and maintain a live link between it and the original file, again, select the Create from File tab in the Object dialog, but this time also click the “Link to file” box.
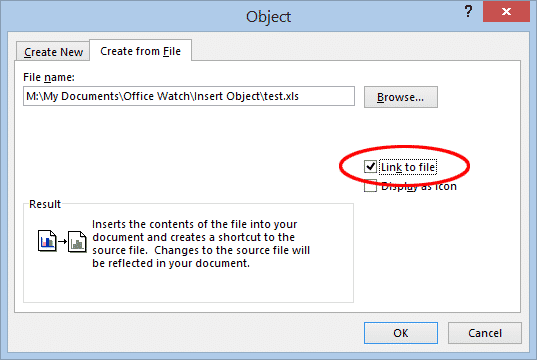
The object will appear in the document just like an embedded object, but with one big difference. In this case, if any changes are made to the original file, those changes will be reflected in the object in your document. You also will not be able to edit the object in the document – double-clicking on, for example, an Excel object will open the original Excel document in a separate window.
Refreshing the Link
Sometimes a change to the original file will not immediately appear in the object in your document. To ensure that you are looking at the latest information, right-click on the object and select Update Link.

Displaying an Icon Instead of the Object
There is one more choice in the Object dialog that we have not touched on yet. Whether you are inserting a new object, or embedding or linking an existing object, you have the option to just display an icon in your document rather then the object itself. The reader or editor can then click on the icon to open the file to view or edit it.

By default, the icon for the program the file is created in will show, but you can click Change Icon and choose your own icon file to use instead. The Change Icon button also allows you to edit the caption that appears under the icon in your document.

Inserted objects displayed as icons

If the content of another Microsoft Word document is relevant to the content in a Word doc you’re currently working on, you can embed or migrate the text of that document into your current document. Here’s how.
First,
open the Word document
that you would like to add the contents of, or embed, another Word document to.
RELATED:
How to Insert a PDF into Microsoft Word
Next, head over to the “Text” group of the “Insert” tab and click the down arrow next to the “Object” option.
A drop-down menu will appear. There are two options to choose from here: “Object” and “Text From File.”
-
Object:
Embeds an object such as a Word document or Excel chart -
Text From File:
Inserts the text from another file into your Word document
The “Text From File” option is essentially a quicker way to copy and paste the content of another file into this one.
Try it out by clicking the “Text From File” option in the drop-down menu.
File Explorer (Finder on Mac) will open. Find the file you would like to copy the text from, select it, then click “Insert.”
The contents of that Word doc will now appear in the current Word document. This works well if there isn’t a lot of content in the other Word document, but if there is, embedding it may be a better option.
Back at the “Object” drop-down menu (Insert > Text group > Object), click the “Object” option.

The “Object” window will appear. Select the “Create From File” tab and then click “Browse.” The “Create From File” option will appear as a button in the bottom-left corner of the window on Mac.
File Explorer (Finder on Mac) will appear. Find the file you want to embed, select it, then click “Insert.”

The file path of the selected file will now appear in the text box next to “Browse.” Now, you need to decide how you want to
insert the object
. You have two options:
-
Link to File:
Inserts the contents of the selected file into your Word document and creates a link back to the source file. Changes made to the source file will be reflected in your document. Selecting “Link to File” by itself will insert the content of the other file inside a text box. -
Display as Icon
: Inserts an icon to show the reader that there is an embedded object. This is ideal when saving space is imperative.
We’ll check both options in this example.

The file will now be embedded in your Word document. Double-clicking the icon will open the second Word file.
One caveat with this method is moving the source file would break the embedded object’s link. For this reason, Microsoft prevents you from being able to move the source file to a different location. If you try, you’ll receive this message:
If you need to move the source file to another location, you’ll need to remove the embedded link, move the source file, and then re-embed the file following the steps in this article.