
Вставка диапазона со сдвигом ячеек вправо или вниз методом Insert объекта Range. Вставка и перемещение строк и столбцов из кода VBA Excel. Примеры.
Range.Insert – это метод, который вставляет диапазон пустых ячеек (в том числе одну ячейку) на рабочий лист Excel в указанное место, сдвигая существующие в этом месте ячейки вправо или вниз. Если в буфере обмена содержится объект Range, то вставлен будет он со своими значениями и форматами.
Синтаксис
|
Expression.Insert(Shift, CopyOrigin) |
Expression – выражение (переменная), возвращающее объект Range.
Параметры
| Параметр | Описание | Значения |
|---|---|---|
| Shift | Необязательный параметр. Определяет направление сдвига ячеек. Если параметр Shift опущен, направление выбирается в зависимости от формы* диапазона. | xlShiftDown (-4121) – ячейки сдвигаются вниз; xlShiftToRight (-4161) – ячейки сдвигаются вправо. |
| CopyOrigin | Необязательный параметр. Определяет: из каких ячеек копировать формат. По умолчанию формат копируется из ячеек сверху или слева. | xlFormatFromLeftOrAbove (0) – формат копируется из ячеек сверху или слева; xlFormatFromRightOrBelow (1) – формат копируется из ячеек снизу или справа. |
* Если диапазон горизонтальный или квадратный (количество строк меньше или равно количеству столбцов), ячейки сдвигаются вниз. Если диапазон вертикальный (количество строк больше количества столбцов), ячейки сдвигаются вправо.
Примеры
Простая вставка диапазона
Вставка диапазона ячеек в диапазон «F5:K9» со сдвигом исходных ячеек вправо:
|
Range(«F5:K9»).Insert Shift:=xlShiftToRight |
Если бы параметр Shift не был указан, сдвиг ячеек, по умолчанию, произошел бы вниз, так как диапазон горизонтальный.
Вставка вырезанного диапазона
Вставка диапазона, вырезанного в буфер обмена методом Range.Cut, из буфера обмена со сдвигом ячеек по умолчанию:
|
Range(«A1:B6»).Cut Range(«D2»).Insert |
Обратите внимание, что при использовании метода Range.Cut, точка вставки (в примере: Range("D2")) не может находится внутри вырезанного диапазона, а также в строке или столбце левой верхней ячейки вырезанного диапазона вне вырезанного диапазона (в примере: строка 1 и столбец «A»).
Вставка скопированного диапазона
Вставка диапазона, скопированного в буфер обмена методом Range.Copy, из буфера обмена со сдвигом ячеек по умолчанию:
|
Range(«B2:D10»).Copy Range(«F2»).Insert |
Обратите внимание, что при использовании метода Range.Copy, точка вставки (в примере: Range("F2")) не может находится внутри скопированного диапазона, но в строке или столбце левой верхней ячейки скопированного диапазона вне скопированного диапазона находится может.
Вставка и перемещение строк
Вставка одной строки на место пятой строки со сдвигом исходной строки вниз:
Вставка четырех строк на место пятой-восьмой строк со сдвигом исходных строк вниз:
Вставка строк с использованием переменных, указывающих над какой строкой осуществить вставку и количество вставляемых строк:
|
1 2 3 4 5 6 7 8 9 10 11 12 13 14 15 16 17 18 19 20 21 22 |
Sub Primer1() Dim n As Long, k As Long, s As String ‘Номер строки, над которой необходимо вставить строки n = 8 ‘Количесто вставляемых строк k = 4 ‘Указываем адрес диапазона строк s = n & «:» & (n + k — 1) ‘Вставляем строки Rows(s).Insert End Sub ‘или то же самое с помощью цикла Sub Primer2() Dim n As Long, k As Long, i As Long n = 8 k = 4 For i = 1 To k Rows(n).Insert Next End Sub |
Перемещение второй строки на место шестой строки:
|
Rows(2).Cut Rows(6).Insert |
Вторая строка окажется на месте пятой строки, так как третья строка заместит вырезанную вторую строку, четвертая встанет на место третьей и т.д.
Перемещение шестой строки на место второй строки:
|
Rows(6).Cut Rows(2).Insert |
В этом случае шестая строка окажется на месте второй строки.
Вставка и перемещение столбцов
Вставка одного столбца на место четвертого столбца со сдвигом исходного столбца вправо:
Вставка трех столбцов на место четвертого-шестого столбцов со сдвигом исходных столбцов вправо:
Перемещение третьего столбца на место седьмого столбца:
|
Columns(3).Cut Columns(7).Insert |
Третий столбец окажется на месте шестого столбца, так как четвертый столбец заместит вырезанный третий столбец, пятый встанет на место четвертого и т.д.
Перемещение седьмого столбца на место третьего столбца:
|
Columns(7).Cut Columns(3).Insert |
В этом случае седьмой столбец окажется на месте третьего столбца.
| title | keywords | f1_keywords | ms.prod | api_name | ms.assetid | ms.date | ms.localizationpriority |
|---|---|---|---|---|---|---|---|
|
Range.Insert method (Excel) |
vbaxl10.chm144149 |
vbaxl10.chm144149 |
excel |
Excel.Range.Insert |
e612bbc8-3942-3349-f157-c0459805794a |
05/11/2019 |
medium |
Range.Insert method (Excel)
Inserts a cell or a range of cells into the worksheet or macro sheet and shifts other cells away to make space.
Syntax
expression.Insert (Shift, CopyOrigin)
expression A variable that represents a Range object.
Parameters
| Name | Required/Optional | Data type | Description |
|---|---|---|---|
| Shift | Optional | Variant | Specifies which way to shift the cells. Can be one of the following XlInsertShiftDirection constants: xlShiftToRight or xlShiftDown. If this argument is omitted, Microsoft Excel decides based on the shape of the range. |
| CopyOrigin | Optional | Variant | The copy origin; that is, from where to copy the format for inserted cells. Can be one of the following XlInsertFormatOrigin constants: xlFormatFromLeftOrAbove (default) or xlFormatFromRightOrBelow. |
Return value
Variant
Remarks
There is no value for CopyOrigin that is equivalent to Clear Formatting when inserting cells interactively in Excel. To achieve this, use the ClearFormats method.
With Range("B2:E5")
    .Insert xlShiftDown
    .ClearFormats
End With
Example
This example inserts a row above row 2, copying the format from the row below (row 3) instead of from the header row.
Range("2:2").Insert CopyOrigin:=xlFormatFromRightOrBelow
[!includeSupport and feedback]
In this Article
- Insert a Single Row or Column
- Insert New Row
- Insert New Column
- Insert Multiple Rows or Columns
- Insert Multiple Rows
- Insert Multiple Columns
- Insert – Shift & CopyOrigin
- Other Insert Examples
- Insert Copied Rows or Columns
- Insert Rows Based on Cell Value
- Delete Rows or Columns
This tutorial will demonstrate how to use VBA to insert rows and columns in Excel.
To insert rows or columns we will use the Insert Method.
Insert a Single Row or Column
Insert New Row
To insert a single row, you can use the Rows Object:
Rows(4).InsertOr you can use the Range Object along with EntireRow:
Range("b4").EntireRow.InsertInsert New Column
Similar to inserting rows, we can use the Columns Object to insert a column:
Columns(4).InsertOr the Range Object, along with EntireColumn:
Range("b4").EntireColumn.InsertInsert Multiple Rows or Columns
Insert Multiple Rows
When inserting multiple rows with the Rows Object, you must enter the rows in quotations:
Rows("4:6").InsertInserting multiple rows with the Range Object works the same as with a single row:
Range("b4:b6").EntireRow.InsertInsert Multiple Columns
When inserting multiple columns with the Columns Object, enter the column letters in quotations:
Columns("B:D").InsertInserting multiple columns with the Range Object works the same as with a single column:
Range("b4:d4").EntireColumn.InsertVBA Coding Made Easy
Stop searching for VBA code online. Learn more about AutoMacro — A VBA Code Builder that allows beginners to code procedures from scratch with minimal coding knowledge and with many time-saving features for all users!

Learn More
Insert – Shift & CopyOrigin
The Insert Method has two optional arguments:
- Shift – Which direction to shift the cells
- CopyOrigin – Which cell formatting to copy (above, below, left, or right)
The Shift argument is irrelevant when inserting entire rows or columns. It only allows you to indicate to shift down or shift to the right:
- xlShiftDown – Shift cells down
- xlShiftToRight – Shift cells to the right
As you can see, you can’t shift up or to the left.
The CopyOrigin argument has two potential inputs:
- xlFormatFromLeftorAbove – (0) Newly-inserted cells take formatting from cells above or to the left
- xlFormatFromRightorBelow (1) Newly-inserted cells take formatting from cells below or to the right.
Let’s look at some examples of the CopyOrigin argument. Here’s our initial data:
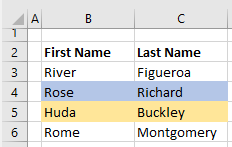
This example will insert a row, taking the formatting from the above row.
Rows(5).Insert , xlFormatFromLeftOrAbove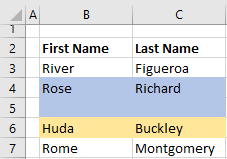
This example will insert a row, taking the formatting from the below row.
Rows(5).Insert , xlFormatFromRightOrBelow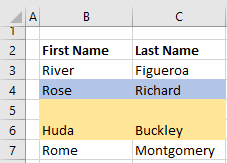
Other Insert Examples
Insert Copied Rows or Columns
If you’d like to insert a copied row, you would use code like this:
Range("1:1").Copy
Range("5:5").Insert
Here we copy Row 1 and Insert it at Row 5.
VBA Programming | Code Generator does work for you!
Insert Rows Based on Cell Value
This will loop through a range, inserting rows based on cell values:
Sub InsertRowswithSpecificValue()

Dim cell As Range

For Each cell In Range("b2:b20")
    If cell.Value = "insert" Then
        cell.Offset(1).EntireRow.Insert
    End If
Next cell

End Sub
Delete Rows or Columns
To delete rows or columns, simply use the Delete method.
Rows(1).Delete

Range("a1").EntireRow.Delete

Columns(1).Delete

Range("a1").EntireColumn.DeleteHome / VBA / How to Insert a Row using VBA in Excel
In this tutorial, we will look at how to insert a row or a column using a VBA code in Excel. We will also explore what are the different ways to write a macro for this.
To insert a row using a VBA code, you need to use the “Entire Row” property with the “Insert” method. With the entire row property, you can refer to the entire row using a cell and then insert a new row there. By default, it will insert a single row before the cell that you have mentioned.

- First, specify a cell using the range object.
- Now, enter a dot (.) to get the list of properties and methods.
- After that, select the “Entire Row” property or type it.
- In the end, again enter a dot (.) and select the “Insert” method or type it.
Range("A1").EntireRow.InsertYour code is ready here to insert a row. Now when you run this code, it will instantly insert a new row before cell A1.
Insert Multiple Rows
There are two ways to insert multiple rows in a worksheet that I have found. The first is the same insert method that we have used in the above example.
With this, you need to specify a range whose count is equivalent to the count of rows you want to insert. Now let’s say you want to insert 5 rows after, in that case, you can use a code like the following.

To be honest, I haven’t found this method quite useful because you need to change the range if you want to change the count of the rows.
So here’s the second method.
Dim iRow As Long
Dim iCount As Long
Dim i As Long

iCount = InputBox(Prompt:="How many rows you want to add?")
iRow = InputBox _
(Prompt:="After which row you want to add new rows? (Enter the row number")

For i = 1 To iCount
    Rows(iRow).EntireRow.Insert
Next i
When you run this code, it asks you to enter the number of rows that you want to add and then the row number where you want to add all those rows. It uses a FOR LOOP (For Next) to loop that number of times and insert rows one by one.
Insert Rows Based on the Cell Values
If you want to insert rows based on a cell value, then you can use the following code.
Dim iRow As Long
Dim iCount As Long
Dim i As Long

iCount = Range("A1").Value
iRow = Range("B1").Value

For i = 1 To iCount
    Rows(iRow).EntireRow.Insert
Next i
When you run this macro, it takes the count of rows from cell A1 and the row where you want to add rows from cell B1.
Insert a Row without Formatting
When you insert a row where the above row has some specific formatting, in that case, the row will also have that formatting automatically. And the simplest way to deal with this thing is to use clear formats. Consider the following code.
Rows(7).EntireRow.Insert
Rows(7).ClearFormats
When you run the above code, it inserts a new row before the 7th row. Now, what happens, when you insert a row before the 7th row that new row becomes the 7th row, and then the second line of code clears the formats from that row.
Insert Copied Row
You can also use the same method to copy a row and then insert it somewhere else. See the following code.
Application.CutCopyMode = False

With Worksheets("Data")

.Rows(5).Copy
.Rows(9).Insert Shift:=xlShiftDown

End With

Application.CutCopyMode = True
More Tutorials
- Count Rows using VBA in Excel
- Excel VBA Font (Color, Size, Type, and Bold)
- Excel VBA Hide and Unhide a Column or a Row
- Excel VBA Range – Working with Range and Cells in VBA
- Apply Borders on a Cell using VBA in Excel
- Find Last Row, Column, and Cell using VBA in Excel
- Merge Cells in Excel using a VBA Code
- Select a Range/Cell using VBA in Excel
- SELECT ALL the Cells in a Worksheet using a VBA Code
- ActiveCell in VBA in Excel
- Special Cells Method in VBA in Excel
- UsedRange Property in VBA in Excel
- VBA AutoFit (Rows, Column, or the Entire Worksheet)
- VBA ClearContents (from a Cell, Range, or Entire Worksheet)
- VBA Copy Range to Another Sheet + Workbook
- VBA Enter Value in a Cell (Set, Get and Change)
- VBA Insert Column (Single and Multiple)
- VBA Named Range | (Static + from Selection + Dynamic)
- VBA Range Offset
- VBA Sort Range | (Descending, Multiple Columns, Sort Orientation
- VBA Wrap Text (Cell, Range, and Entire Worksheet)
- VBA Check IF a Cell is Empty + Multiple Cells
⇠ Back to What is VBA in Excel
Helpful Links – Developer Tab – Visual Basic Editor – Run a Macro – Personal Macro Workbook – Excel Macro Recorder – VBA Interview Questions – VBA Codes
Содержание
- Range.Insert method (Excel)
- Syntax
- Parameters
- Return value
- Remarks
- Example
- Support and feedback
- VBA Insert Row or Column
- Insert a Single Row or Column
- Insert New Row
- Insert New Column
- Insert Multiple Rows or Columns
- Insert Multiple Rows
- Insert Multiple Columns
- VBA Coding Made Easy
- Insert – Shift & CopyOrigin
- Other Insert Examples
- Insert Copied Rows or Columns
- Insert Rows Based on Cell Value
- Delete Rows or Columns
- VBA Code Examples Add-in
- Метод Insert (Excel Graph)
- Синтаксис
- Параметры
- Пример
- Поддержка и обратная связь
- VBA Insert Rows on Worksheets and Tables
- The VBA Tutorials Blog
- The Guessable Method
- The Table Row
- The Shift
- The Entire Row Property
- Conclusion
- Excel VBA Insert Row: Step-by-Step Guide and 9 Code Examples to Insert Rows with Macros
- Insert Rows in Excel
- Excel VBA Constructs to Insert Rows
- Insert Rows with the Range.Insert Method
- Purpose of Range.Insert
- Syntax of Range.Insert
- Parameters of Range.Insert
- How to Use Range.Insert to Insert Rows
- Specify Rows with the Worksheet.Rows Property
- Purpose of Worksheet.Rows
- Syntax of Worksheet.Rows
- How to Use Worksheet.Rows to Insert Rows
- Specify the Active Cell with the Application.ActiveCell Property
- Purpose of Application.ActiveCell
- Syntax of Application.ActiveCell
- How to Use Application.ActiveCell To Insert Rows
- Specify a Cell Range with the Worksheet.Range Property
- Purpose of Worksheet.Range
- Syntax of Worksheet.Range
- Parameters of Worksheet.Range
- How to Use Worksheet.Range to Insert Rows
- Specify a Cell with the Worksheet.Cells and Range.Item Properties
- Purpose of Worksheet.Cells and Range.Item
- Syntax of Worksheet.Cells and Range.Item
- Parameters of Worksheet.Cells and Range.Item
- How to use Worksheet.Cells and Range.Item to Insert Rows
- Specify a Cell Range a Specific Number of Rows Below or Above a Cell or Cell Range with the Range.Offset Property
- Purpose of Range.Offset
- Syntax of Range.Offset
- Parameters of Range.Offset
- How to Use Range.Offset to Insert Rows
- Specify Entire Row with the Range.EntireRow Property
- Purpose of Range.EntireRow
- Syntax of Range.EntireRow
- How to Use Range.EntireRow to Insert Rows
- Clear Row Formatting with the Range.ClearFormats Method
- Purpose of Range.ClearFormats
- Syntax of Range.ClearFormats
- How to Use Range.ClearFormats to Insert Rows
- Copy Rows with the Range.Copy Method
- Purpose of Range.Copy
- Syntax of Range.Copy
- Parameters of Range.Copy
- How to Use Range.Copy to Insert Rows
- Related VBA and Macro Tutorials
- Excel VBA Code Examples to Insert Rows
- Example Workbooks
- Example #1: Excel VBA Insert Row
- VBA Code to Insert Row
- Process Followed by Macro
- VBA Statement Explanation
- Effects of Executing the Macro
- Example #2: Excel VBA Insert Multiple Rows
- VBA Code to Insert Multiple Rows
- Process Followed by Macro
- VBA Statement Explanation
- Effects of Executing the Macro
- Example #3: Excel VBA Insert Row with Same Format as Row Above
- VBA Code to Insert Row with Same Format as Row Above
- Process Followed by Macro
- VBA Statement Explanation
- Effects of Executing the Macro
- Example #4: Excel VBA Insert Row with Same Format as Row Below
- VBA Code to Insert Row with Same Format as Row Below
- Process Followed by Macro
- VBA Statement Explanation
- Effects of Executing the Macro
- Example #5: Excel VBA Insert Row without Formatting
- VBA Code to Insert Row without Formatting
- Process Followed by Macro
- VBA Statement Explanation
- Effects of Executing the Macro
- Example #6: Excel VBA Insert Row Below Active Cell
- VBA Code to Insert Row Below Active Cell
- Process Followed by Macro
- VBA Statement Explanation
- Effects of Executing the Macro
- Example #7: Excel VBA Insert Copied Row
- VBA Code to Insert Copied Row
- Process Followed by Macro
- VBA Statement Explanation
- Effects of Executing the Macro
- Example #8: Excel VBA Insert Blank Rows Between Rows in a Data Range
- VBA Code to Insert Blank Rows Between Rows in a Data Range
- Process Followed by Macro
- VBA Statement Explanation
- Effects of Executing the Macro
- Example #9: Excel VBA Insert a Number of Rows Every Number of Rows in a Data Range
- VBA Code to Insert a Number of Rows Every Number of Rows in a Data Range
- Process Followed by Macro
- VBA Statement Explanation
- Effects of Executing the Macro
Range.Insert method (Excel)
Inserts a cell or a range of cells into the worksheet or macro sheet and shifts other cells away to make space.
Syntax
expression.Insert (Shift, CopyOrigin)
expression A variable that represents a Range object.
Parameters
| Name | Required/Optional | Data type | Description |
|---|---|---|---|
| Shift | Optional | Variant | Specifies which way to shift the cells. Can be one of the following XlInsertShiftDirection constants: xlShiftToRight or xlShiftDown. If this argument is omitted, Microsoft Excel decides based on the shape of the range. |
| CopyOrigin | Optional | Variant | The copy origin; that is, from where to copy the format for inserted cells. Can be one of the following XlInsertFormatOrigin constants: xlFormatFromLeftOrAbove (default) or xlFormatFromRightOrBelow. |
Return value
There is no value for CopyOrigin that is equivalent to Clear Formatting when inserting cells interactively in Excel. To achieve this, use the ClearFormats method.
Example
This example inserts a row above row 2, copying the format from the row below (row 3) instead of from the header row.
Support and feedback
Have questions or feedback about Office VBA or this documentation? Please see Office VBA support and feedback for guidance about the ways you can receive support and provide feedback.
Источник
VBA Insert Row or Column
In this Article
This tutorial will demonstrate how to use VBA to insert rows and columns in Excel.
To insert rows or columns we will use the Insert Method.
Insert a Single Row or Column
Insert New Row
To insert a single row, you can use the Rows Object:
Or you can use the Range Object along with EntireRow:
Insert New Column
Similar to inserting rows, we can use the Columns Object to insert a column:
Or the Range Object, along with EntireColumn:
Insert Multiple Rows or Columns
Insert Multiple Rows
When inserting multiple rows with the Rows Object, you must enter the rows in quotations:
Inserting multiple rows with the Range Object works the same as with a single row:
Insert Multiple Columns
When inserting multiple columns with the Columns Object, enter the column letters in quotations:
Inserting multiple columns with the Range Object works the same as with a single column:
VBA Coding Made Easy
Stop searching for VBA code online. Learn more about AutoMacro — A VBA Code Builder that allows beginners to code procedures from scratch with minimal coding knowledge and with many time-saving features for all users!
Insert – Shift & CopyOrigin
The Insert Method has two optional arguments:
- Shift – Which direction to shift the cells
- CopyOrigin – Which cell formatting to copy (above, below, left, or right)
The Shift argument is irrelevant when inserting entire rows or columns. It only allows you to indicate to shift down or shift to the right:
- xlShiftDown – Shift cells down
- xlShiftToRight – Shift cells to the right
As you can see, you can’t shift up or to the left.
The CopyOrigin argument has two potential inputs:
- xlFormatFromLeftorAbove – (0) Newly-inserted cells take formatting from cells above or to the left
- xlFormatFromRightorBelow (1) Newly-inserted cells take formatting from cells below or to the right.
Let’s look at some examples of the CopyOrigin argument. Here’s our initial data:
This example will insert a row, taking the formatting from the above row.
This example will insert a row, taking the formatting from the below row.
Other Insert Examples
Insert Copied Rows or Columns
If you’d like to insert a copied row, you would use code like this:
Here we copy Row 1 and Insert it at Row 5.
Insert Rows Based on Cell Value
Delete Rows or Columns
To delete rows or columns, simply use the Delete method.

VBA Code Examples Add-in
Easily access all of the code examples found on our site.
Simply navigate to the menu, click, and the code will be inserted directly into your module. .xlam add-in.
Источник
Метод Insert (Excel Graph)
Вставляет ячейку или диапазон ячеек в таблицу и перемещает другие ячейки в сторону, чтобы освободить место.
Синтаксис
expression. Insert (SHIFT)
выражение (обязательно). Выражение, возвращающее один из объектов списка Применяется к.
Параметры
| Имя | Обязательный или необязательный | Тип данных | Описание |
|---|---|---|---|
| Shift | Необязательный | XlInsertShiftDirection | Определяет способ сдвига ячеек. Может быть одной из следующих констант XlInsertShiftDirection : xlShiftToRight или xlShiftDown. Если этот аргумент опущен, Graph принимает решение на основе формы диапазона. |
Пример
В этом примере новая строка вставляется перед четвертой строкой таблицы.
В этом примере новые ячейки вставляются в диапазонЕ A1:C5 в таблице и сдвигаются вниз.
Поддержка и обратная связь
Есть вопросы или отзывы, касающиеся Office VBA или этой статьи? Руководство по другим способам получения поддержки и отправки отзывов см. в статье Поддержка Office VBA и обратная связь.
Источник
VBA Insert Rows on Worksheets and Tables
The VBA Tutorials Blog
Inserting a row in a spreadsheet seems like a straightforward task. If you don’t overthink it, you could probably guess right now how to .Insert a Row into the Rows collection without looking up anything else. However, one of my favorite Bertrand Russell quotes applies here: everything is vague to a degree you do not realize until you have tried to make it precise.
In that spirit, what exactly is meant by row? Is it the row of a table? The row of the entire sheet? Can a single cell be a row if we constrain ourselves to a single column? Let’s take a look at the different ways to insert rows.
The Guessable Method
I’m going to call this method the guessable method, because, well, even non-programmers could probably guess how it do it. Let’s say you want a new Row 2. Perhaps you need to load some data into it because you’re using a worksheet as a reverse chronological database for sales — against all advice, might I add. Tip: don’t use Excel as a database. VBA works in Access, too.
To add a new Row 2, it really is as simple as
To be more precise, this accesses the Rows collection and uses the .Insert method for the second entry. .Insert pertains to many objects, but VBA interpolates you would like to insert a row when accessing the Rows collection.
If you’d like to inject several rows, you need to put the range into quotes:
This method inserts entire rows, from Column A all the way to Column XFD or whatever your rightmost column is. While this is the guessable method because it’s simple, simplicity is not the only method or even the preferred method for all use cases.
The Table Row
In spreadsheet terminology, “row” can be, believe it or not, a somewhat nebulous term. While Rows(1).Insert does indeed insert a row, this type of row spans the entire worksheet. This method isn’t all that useful if you only want to change part of a table or if you have two tables side-by-side and you only want to target one of them.
Let’s say you use a UserForm to gather data about orders, then have two subroutines that run: one injects new orders into the left table, while the other changes the inventory table on the right. Rows.Insert will not produce the desired result here because you don’t want to shift rows in the inventory table on the right while updating the order table on the left.
To target a row within a table, you can target the top row of the table using the range in two ways. One way is specify the columns and rows in your statement:
In fact, you could even drop the .Rows part from this and get the same result, because Excel understands this range is indeed a single row.
Alternatively, if you prefer to use relative locations:
The second method is useful if you already have a named range for the table or have a looping process. This version does indeed require the .Rows part to specify which part of the range to change. Otherwise, Excel wouldn’t know whether you wanted to insert rows or columns.
With all the macro examples in this section, we’re not inserting an entire row across your whole spreadsheet, like we did in our first example. We’re simply inserting cells in a row within a defined range.
Make powerful macros with our free VBA Developer Kit
It’s easy to copy and paste a macro like this, but it’s harder make one on your own. To help you make macros like this, we built a free VBA Developer Kit and wrote the Big Book of Excel VBA Macros full of hundreds of pre-built macros to help you master file I/O, arrays, strings and more — grab your free copy below.
The Shift
The .Insert method takes two optional inputs: Shift and CopyOrigin . Since they’re optional you don’t need to use them, but they can be useful in some instances.
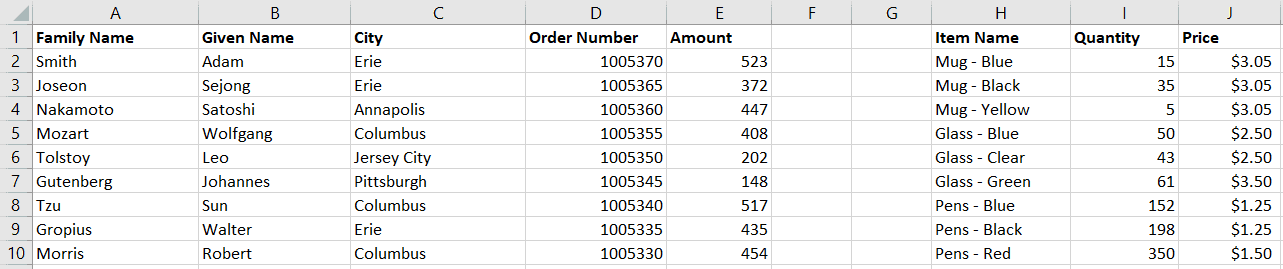
If you’re targeting a range, such as the first row of the Inventory table, normally you would shift the cells down. However, you can also shift the targeted cells to the right. This is precisely why Excel asks this question:
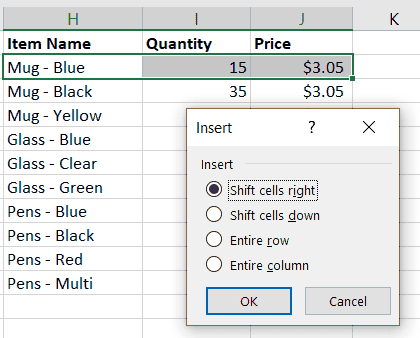
Excel GUI Prompt for How to Shift after Insert Cells
In most cases, you’ll probably be using xlShiftDown , which is the default for .Insert when referring to rows. However, sometimes you might want to copy to the right, say for a visual check after the subroutine runs:
This will produce the following result, where the range H2:J2 was inserted and the original values were moved to the right:
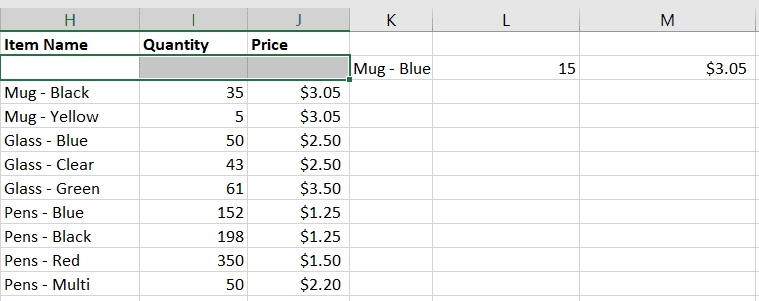
Cells Shifted to Right
The other optional parameter chooses where to copy the format of the inserted cells from. The default is xlFormatFromLeftOrAbove . In our table example, if we insert at «A2:E2» , we copy the cell formatting from «A1:E1» . Since this is our header, the inserted cells are initially set as bolded font. In order to ensure we have non-bold font, you should explicitly specify the CopyOrigin parameter:
This ensures that the inserted cells use the format of the cells below the range before the insertion instead of what’s above (the header format).
The Entire Row Property
The Excel GUI prompt above also allows you to insert an Entire Row . From our example earlier, this would affect the order table on the left and all other cells on the sheet, including the inventory table on the right. It’s equivalent to the Guessable Method, except the initial reference is a range of cells rather than the Rows collection directly.
To replicate the GUI’s Insert Entire Row from this example, you’ll add the the EntireRow property of the Range object:
This is most useful if you only have a cell location (especially a relative location, so you don’t know the true location) and you want to insert a full row.
Conclusion
Now you can insert rows across the entire sheet or only for specific ranges using VBA. In the latter case, you can now also choose whether to shift the cells down or to the right of the newly-inserted cells. And finally, you can choose the format of the new cells from the surrounding, existing cells.
You also learned a little about the EntireRow property, which can be useful in same instances, especially when programming complex macros where you don’t know the exact cell reference.
Ready to do more with VBA?
We put together a giant PDF with over 300 pre-built macros and we want you to have it for free. Enter your email address below and we’ll send you a copy along with our VBA Developer Kit, loaded with VBA tips, tricks and shortcuts.
Before we go, I want to let you know we designed a suite of VBA Cheat Sheets to make it easier for you to write better macros. We included over 200 tips and 140 macro examples so they have everything you need to know to become a better VBA programmer.
This article was written by Cory Sarver, a contributing writer for The VBA Tutorials Blog. Visit him on LinkedIn and his personal page.
Источник
Excel VBA Insert Row: Step-by-Step Guide and 9 Code Examples to Insert Rows with Macros
 In certain cases, you may need to automate the process of inserting a row (or several rows) in a worksheet. This is useful, for example, when you’re (i) manipulating or adding data entries, or (ii) formatting a worksheet that uses blank rows for organization purposes.
The information and examples in this VBA Tutorial should allow you to insert rows in a variety of circumstances.
This VBA Tutorial is accompanied by Excel workbooks containing the data and macros I use in the examples below. You can get immediate free access to these example workbooks by clicking the button below.

Use the following Table of Contents to navigate to the section you’re interested in.
Table of Contents
Insert Rows in Excel
When working manually with Excel, you can insert rows in the following 2 steps:
- Select the row or rows above which to insert the row or rows.
- Do one of the following:
- Right-click and select Insert.
- Go to Home > Insert > Insert Sheet Rows.
- Use the “Ctrl + Shift + +” keyboard shortcut.

You can use the VBA constructs and structures I describe below to automate this process to achieve a variety of results.
Excel VBA Constructs to Insert Rows
Insert Rows with the Range.Insert Method
Purpose of Range.Insert
Use the Range.Insert method to insert a cell range into a worksheet. The 2 main characteristics of the Range.Insert method are the following:
- Range.Insert can insert a single cell or a cell range. For purposes of this VBA Tutorial, you’re interested in inserting entire rows.
- To make space for the newly-inserted cells, Range.Insert shifts other cells away.
Syntax of Range.Insert
“expression” is a Range object. Therefore, I simplify as follows:
Parameters of Range.Insert
- Parameter: Shift.
- Description: Specifies the direction in which cells are shifted away to make space for the newly-inserted row.
- Optional/Required: Optional.
- Data type: Variant.
- Values: Use a constant from the xlInsertShiftDirection Enumeration:
- xlShiftDown or -4121: Shifts cells down.
- xlShiftToRight or -4161: Shifts cells to the right.
- Default: Excel decides based on the range’s shape.
- Usage notes: When you insert a row: (i) use xlShiftDown or -4121, or (ii) omit parameter and rely on the default behavior.
- Parameter: CopyOrigin.
- Description: Specifies from where (the origin) is the format for the cells in the newly inserted row copied.
- Optional/Required: Optional.
- Data type: Variant.
- Values: A constant from the xlInsertFormatOrigin Enumeration:
- xlFormatFromLeftOrAbove or 0: Newly-inserted cells take formatting from cells above or to the left.
- xlFormatFromRightOrBelow or 1: Newly-inserted cells take formatting from cells below or to the right.
- Default: xlFormatFromLeftOrAbove or 0. Newly-inserted cells take the formatting from cells above or to the left.
How to Use Range.Insert to Insert Rows
Use the Range.Insert method to insert a row into a worksheet. Use a statement with the following structure:
For these purposes:
- Range: Range object representing an entire row. Use the Worksheet.Rows or Range.EntireRow properties to return a Range object that represents the entire row. Please refer to the sections about the Rows and EntireRow properties below.
- xlInsertFormatOriginConstant: xlFormatFromLeftOrAbove or xlFormatFromRightOrBelow. xlFormatFromLeftOrAbove is the default value. Therefore, when inserting rows with formatting from row above, you can usually omit the CopyOrigin parameter.
You can usually omit the Shift parameter. By default, VBA decides how to shift the cells based on the range’s shape. When inserting a row, this usually results in Excel shifting the cells down.
Specify Rows with the Worksheet.Rows Property
Purpose of Worksheet.Rows
Use the Worksheet.Rows property to return a Range object representing all the rows within the worksheet the property works with.
Worksheet.Rows is read-only.
Syntax of Worksheet.Rows
“expression” is a Worksheet object. Therefore, I simplify as follows:
How to Use Worksheet.Rows to Insert Rows
Use the Worksheet.Rows property to specify the row or rows above which new rows are inserted.
To insert a row, use a statement with the following structure:
“row#” is the number of the row above which the row is inserted.
To insert multiple rows, use a statement with the following structure:
“firstRow#” is the row above which the rows are inserted. The number of rows VBA inserts is calculated as follows:
Specify the Active Cell with the Application.ActiveCell Property
Purpose of Application.ActiveCell
Use the Application.ActiveCell property to return a Range object representing the active cell.
Application.ActiveCell is read-only.
Syntax of Application.ActiveCell
“expression” is the Application object. Therefore, I simplify as follows:
How to Use Application.ActiveCell To Insert Rows
When you insert a row, use the Application.ActiveCell property to return the active cell. This allows you to use the active cell as reference for the row insertion operation.
Use the Range.Offset property to return a Range object a specific number of rows above or below the active cell. Use the Range.EntireRow property to return a Range object representing the entire row or rows above which to insert the new row. Please refer to the sections about the Offset and EntireRow properties below.
To insert a row above the active cell, use the following statement:
To insert a row a specific number of rows above or below the active cell, use a statement with the following structure:
Specify a Cell Range with the Worksheet.Range Property
Purpose of Worksheet.Range
Use the Worksheet.Range property to return a Range object representing a single cell or a cell range.
Syntax of Worksheet.Range
“expression” is a Worksheet object. Therefore, I simplify as follows:
Parameters of Worksheet.Range
- Parameter: Cell1.
- Description:
- If you use Cell1 alone (omit Cell2), Cell1 specifies the cell range.
- If you use Cell1 and Cell2, Cell1 specifies the cell in the upper-left corner of the cell range.
- Required/Optional: Required.
- Data type: Variant.
- Values:
- If you use Cell1 alone (omit Cell2): (i) range address as an A1-style reference in language of macro, or (ii) range name.
- If you use Cell1 and Cell2: (i) Range object, (ii) range address, or (iii) range name.
- Description:
- Parameter: Cell2.
- Description: Cell in the lower-right corner of the cell range.
- Required/Optional: Optional.
- Data type: Variant.
- Values: (i) Range object, (ii) range address, or (iii) range name.
How to Use Worksheet.Range to Insert Rows
When you insert a row, use the Worksheet.Range property to return a cell or cell range. This allows you to use a specific cell or cell range as reference for the row insertion operation.
Use the Range.Offset property to return a Range object a specific number of rows above or below the cell or cell range. Use the Range.EntireRow property to return a Range object representing the entire row or rows above which to insert the new row or rows. Please refer to the sections about the Offset and EntireRow properties below.
To insert rows above the cell range specified by Worksheet.Range, use a statement with the following structure:
To insert rows a specific number of rows above or below the cell range specified by Worksheet.Range use a statement with the following structure:
If the cell range represented by the Worksheet.Range property spans more than 1 row, the Insert method inserts several rows. The number of rows inserted is calculated as follows:
Please refer to the section about the Worksheet.Rows property above for further information about this calculation.
Specify a Cell with the Worksheet.Cells and Range.Item Properties
Purpose of Worksheet.Cells and Range.Item
Use the Worksheet.Cells property to return a Range object representing all the cells within a worksheet.
Once your macro has all the cells within the worksheet, use the Range.Item property to return a Range object representing one of those cells.
Syntax of Worksheet.Cells and Range.Item
Worksheet.Cells
“expression” is a Worksheet object. Therefore, I simplify as follows:
Range.Item
“expression” is a Range object. Therefore, I simplify as follows:
Worksheet.Cells and Range.Item Together
Considering the above:
However, Item is the default property of the Range object. Therefore, you can generally omit the Item keyword before specifying the RowIndex and ColumnIndex arguments. I simplify as follows:
Parameters of Worksheet.Cells and Range.Item
- Parameter: RowIndex.
- Description:
- If you use RowIndex alone (omit ColumnIndex), RowIndex specifies the index of the cell you work with. Cells are numbered from left-to-right and top-to-bottom.
- If you use RowIndex and ColumnIndex, RowIndex specifies the row number of the cell you work with.
- Required/Optional: Required.
- Data type: Variant.
- Values: You usually specify RowIndex as a value.
- Description:
- Parameter: ColumnIndex.
- Description: Column number or letter of the cell you work with.
- Required/Optional: Optional.
- Data type: Variant.
- Values: You usually specify ColumnIndex as a value (column number) or letter within quotations (“”).
How to use Worksheet.Cells and Range.Item to Insert Rows
When you insert a row, use the Worksheet.Cells and Range.Item properties to return a cell. This allows you to use a specific cell as reference for the row insertion operation.
Use the Range.Offset property to return a Range object a specific number of rows above or below the cell. Use the Range.EntireRow property to return a Range object representing the entire row above which to insert the row. Please refer to the sections about the Offset and EntireRow properties below.
To insert a row above the cell specified by Worksheet.Cells, use a statement with the following structure:
To insert a row a specific number of rows above or below the cell specified by Worksheet.Cells, use a statement with the following structure:
Specify a Cell Range a Specific Number of Rows Below or Above a Cell or Cell Range with the Range.Offset Property
Purpose of Range.Offset
Use the Range.Offset property to return a Range object representing a cell range located a number of rows or columns away from the range the property works with.
Syntax of Range.Offset
“expression” is a Range object. Therefore, I simplify as follows:
Parameters of Range.Offset
- Parameter: RowOffset.
- Description: Number of rows by which cell or cell range is offset.
- Required/Optional: Optional.
- Data type: Variant.
- Values:
- Positive number: Moves down the worksheet.
- Negative number: Moves up the worksheet.
- 0: Stays on the same row.
- Default: 0. Stays on the same row.
- Parameter: ColumnOffset.
- Description: Number of columns by which cell or cell range is offset.
- Required/Optional: Optional.
- Data type: Variant.
- Values:
- Positive number: Moves towards the right of the worksheet.
- Negative number: Moves towards the left of the worksheet.
- 0: Stays on the same column.
- Default: 0. Stays on the same column.
- Usage notes: When you insert a row, you can usually omit the ColumnOffset parameter. You’re generally interested in moving a number of rows (not columns) above or below.
How to Use Range.Offset to Insert Rows
When you insert a row, use the Range.Offset property to specify a cell or cell range located a specific number of rows below above another cell or cell range. This allows you to use this new cell or cell range as reference for the row insertion operation.
Use properties such as Application.ActiveCell, Worksheet.Range and Worksheet.Cells to specify the base range the Offset property works with. Please refer to the sections about the ActiveCell, Range and Cells properties above.
Specify Entire Row with the Range.EntireRow Property
Purpose of Range.EntireRow
Use the Range.EntireRow property to return a Range object representing the entire row or rows containing the cell range the property works with.
Range.EntireRow is read-only.
Syntax of Range.EntireRow
“expression” is a Range object. Therefore, I simplify as follows:
How to Use Range.EntireRow to Insert Rows
When you insert a row, use the Range.EntireRow property to return the entire row or rows above which the new row or rows are inserted.
Use properties such as Application.ActiveCell, Worksheet.Range and Worksheet.Cells to specify the range the EntireRow property works with. Please refer to the sections about the ActiveCell, Range and Cells properties above.
Clear Row Formatting with the Range.ClearFormats Method
Purpose of Range.ClearFormats
Use the Range.ClearFormats method to clear the formatting of a cell range.
Syntax of Range.ClearFormats
“expression” is a Range object. Therefore, I simplify as follows:
How to Use Range.ClearFormats to Insert Rows
The format of the newly-inserted row is specified by the CopyOrigin parameter of the Range.Insert method. Please refer to the description of Range.Insert and CopyOrigin above.
When you insert a row, use the Range.ClearFormats method to clear the formatting of the newly-inserted rows. Use a statement with the following structure after the statement that inserts the new row (whose formatting you want to clear):
“Range” is a Range object representing the newly-inserted row.
Use the Worksheet.Rows or Range.EntireRow properties to return a Range object that represents the newly-inserted row. Please refer to the sections about the Rows and EntireRow properties above.
Copy Rows with the Range.Copy Method
Purpose of Range.Copy
Use the Range.Copy method to copy a cell range to another cell range or the Clipboard.
Syntax of Range.Copy
“expression” is a Range object. Therefore, I simplify as follows:
Parameters of Range.Copy
- Parameter: Destination.
- Description: Specifies the destination cell range to which the copied cell range is copied.
- Required/Optional: Optional parameter.
- Data type: Variant.
- Values: You usually specify Destination as a Range object.
- Default: Cell range is copied to the Clipboard.
- Usage notes: When you insert a copied row, omit the Destination parameter to copy the row to the Clipboard.
How to Use Range.Copy to Insert Rows
Use the Range.Copy method to copy a row which you later insert.
Use a statement with the following structure before the statement that inserts the row:
“Range” is a Range object representing an entire row.
Use the Worksheet.Rows or Range.EntireRow properties to return a Range object that represents a row. Please refer to the sections about the Rows and EntireRow properties above.
- General VBA constructs and structures:
- Introduction to Excel VBA constructs and structures.
- The Excel VBA Object Model.
- How to declare variables in Excel VBA.
- Excel VBA data types.
- Practical VBA applications and macro examples:
- How to copy and paste with Excel VBA.
You can find additional VBA and Macro Tutorials in the Archives.
Excel VBA Code Examples to Insert Rows
Example Workbooks
This VBA Tutorial is accompanied by Excel workbooks containing the data and macros I explain below. If you want to follow and practice, you can get immediate free access to these example workbooks by clicking the button below.
Each worksheet within the workbook contains a single data range. Most of the entries simply state “Data”.

Example #1: Excel VBA Insert Row
VBA Code to Insert Row
The following macro inserts a row below row 5 of the worksheet named “Insert row”.

Process Followed by Macro

VBA Statement Explanation
Worksheets(“Insert row”).Rows(6).Insert Shift:=xlShiftDown
- Item: Worksheets(“Insert row”).
- VBA construct: Workbook.Worksheets property.
- Description: Returns a Worksheet object representing the “Insert row” worksheet.
- Item: Rows(6).
- VBA construct: Worksheets.Rows property.
- Description: Returns a Range object representing row 6 of the worksheet returned by item #1 above.
- Item: Insert.
- VBA construct: Range.Insert method.
- Description: Inserts a new row above the row returned by item #2 above.
- Item: Shift:=xlShiftDown.
- VBA construct: Shift parameter of Range.Insert method.
- Description:
- Shifts rows down (xlShiftDown) to make space for the row inserted by item #3 above.
- You can usually omit this parameter. By default, VBA decides how to shift the cells based on the range’s shape. When inserting a row, this usually results in Excel shifting the cells down.
Effects of Executing the Macro
The following GIF illustrates the results of executing this macro. As expected, VBA inserts a row below row 5 of the worksheet.

Example #2: Excel VBA Insert Multiple Rows
VBA Code to Insert Multiple Rows
The following macro inserts 5 rows below row 10 of the worksheet named “Insert row”.

Process Followed by Macro

VBA Statement Explanation
Worksheets(“Insert row”).Rows(“11:15”).Insert Shift:=xlShiftDown
- Item: Worksheets(“Insert row”).
- VBA construct: Workbook.Worksheets property.
- Description: Returns a Worksheet object representing the “Insert row” worksheet.
- Item: Rows(“11:15”).
- VBA construct: Worksheet.Rows property.
- Description: Returns a Range object representing rows 11 to 15 of the worksheet returned by item #1 above.
- Item: Insert.
- VBA construct: Range.Insert method.
- Description:
- Inserts new rows above the rows returned by item #2 above.
- The number of inserted rows is equal to the number of rows returned by item #2 above. This is calculated as follows:
In this example:
- VBA construct: Shift parameter of Range.Insert method.
- Description:
- Shifts rows down (xlShiftDown) to make space for the rows inserted by item #3 above.
- You can usually omit this parameter. By default, VBA decides how to shift the cells based on the range’s shape. When inserting a row, this usually results in Excel shifting the cells down.
Effects of Executing the Macro
The following GIF illustrates the results of executing this macro. As expected, VBA inserts 5 rows below row 10 of the worksheet.

Example #3: Excel VBA Insert Row with Same Format as Row Above
VBA Code to Insert Row with Same Format as Row Above
The following macro (i) inserts a row below row 20, and (ii) applies the formatting of row 20 to the newly-inserted row.

Process Followed by Macro

VBA Statement Explanation
Worksheets(“Insert row”).Rows(21).Insert Shift:=xlShiftDown, CopyOrigin:=xlFormatFromLeftOrAbove
- Item: Worksheets(“Insert row”).
- VBA construct: Workbook.Worksheets property.
- Description: Returns a Worksheet object representing the “Insert row” worksheet.
- Item: Rows(21).
- VBA construct: Worksheet.Rows property.
- Description: Returns a Range object representing row 21 of the worksheet returned by item #1 above.
- Item: Insert.
- VBA construct: Range.Insert method.
- Description: Inserts a new row above the row returned by item #2 above.
- Item: Shift:=xlShiftDown.
- VBA construct: Shift parameter of Range.Insert method.
- Description:
- Shifts rows down (xlShiftDown) to make space for the row inserted by item #3 above.
- You can usually omit this parameter. By default, VBA decides how to shift the cells based on the range’s shape. When inserting a row, this usually results in Excel shifting the cells down.
- Item: CopyOrigin:=xlFormatFromLeftOrAbove.
- VBA construct: CopyOrigin parameter of Range.Insert method.
- Description:
- Sets formatting of row inserted by item #3 above to be equal to that of row above (xlFormatFromLeftOrAbove).
- You can usually omit this parameter. xlFormatFromLeftOrAbove (or 0) is the default value of CopyOrigin.
Effects of Executing the Macro
The following GIF illustrates the results of executing this macro. As expected, VBA (i) inserts a row below row 20, and (ii) applies the formatting of row 20 to the newly-inserted row.

Example #4: Excel VBA Insert Row with Same Format as Row Below
VBA Code to Insert Row with Same Format as Row Below
The following macro (i) inserts a row below row 25, and (ii) applies the formatting of the row below to the newly-inserted row.

Process Followed by Macro

VBA Statement Explanation
Worksheets(“Insert row”).Rows(26).Insert Shift:=xlShiftDown, CopyOrigin:=xlFormatFromRightOrBelow
- Item: Worksheets(“Insert row”).
- VBA construct: Workbook.Worksheets property.
- Description: Returns a Worksheet object representing the “Insert row” worksheet.
- Item: Rows(26).
- VBA construct: Worksheet.Rows property.
- Description: Returns a Range object representing row 26 of the worksheet returned by item #1 above.
- Item: Insert.
- VBA construct: Range.Insert method.
- Description: Inserts a new row above the row returned by item #2 above.
- Item: Shift:=xlShiftDown.
- VBA construct: Shift parameter of Range.Insert method.
- Description:
- Shifts rows down (xlShiftDown) to make space for the row inserted by item #3 above.
- You can usually omit this parameter. By default, VBA decides how to shift the cells based on the range’s shape. When inserting a row, this usually results in Excel shifting the cells down.
- Item: CopyOrigin:=xlFormatFromRightOrBelow.
- VBA construct: CopyOrigin parameter of Range.Insert method.
- Description: Sets formatting of row inserted by item #3 above to be equal to that of row below (xlFormatFromRightOrBelow).
Effects of Executing the Macro
The following GIF illustrates the results of executing this macro. As expected, VBA (i) inserts a row below row 25, and (ii) applies the formatting of the row below to the newly-inserted row.

Example #5: Excel VBA Insert Row without Formatting
VBA Code to Insert Row without Formatting
The following macro inserts a row below row 30 without applying the formatting from the rows above or below the newly- inserted row.

Process Followed by Macro

VBA Statement Explanation
Lines #4 and #5: Dim myNewRowNumber As Long | myNewRowNumber = 31
- Item: Dim myNewRowNumber As Long.
- VBA construct: Dim statement.
- Description:
- Declares a new variable (myNewRowNumber) as of the Long data type.
- myNewRowNumber represents the number of the newly inserted row.
- Item: myNewRowNumber = 31.
- VBA construct: Assignment statement.
- Description: Assigns the value 31 to myNewRowNumber
Lines #6 and #9: With Worksheets(“Insert row”) | End With
- Item: With | End With.
- VBA construct: With… End With statement.
- Description: Statements within the With… End With statement (lines #7 and #8 below) are executed on the worksheet returned by item #2 below.
- Item: Worksheets(“Insert row”).
- VBA construct: Workbook.Worksheets property.
- Description: Returns a Worksheet object representing the “Insert row” worksheet.
Line #7: .Rows(myNewRowNumber).Insert Shift:=xlShiftDown
- Item: Rows(myNewRowNumber).
- VBA construct: Worksheet.Rows property.
- Description:
- Returns a Range object representing a row (whose number is represented by myNewRowNumber) of the worksheet in the opening statement of the With… End With statement (line #6 above).
- In this example, myNewRowNumber equals 31. Therefore, Worksheet.Rows returns row 31 prior to the insertion of the new row. This is a different row from that returned by Worksheet.Rows in line #8 below.
- This line #7 returns a row prior to the row insertion. This line is that above which the new row is inserted.
- Line #8 below returns a row after the row insertion. This line is the newly-inserted row.
- Item: Insert.
- VBA construct: Range.Insert method.
- Description: Inserts a new row above the row returned by item #1 above.
- Item: Shift:=xlShiftDown.
- VBA construct: Shift parameter of Range.Insert method.
- Description:
- Shifts rows down (xlShiftDown) to make space for the row inserted by item #2 above.
- You can usually omit this parameter. By default, VBA decides how to shift the cells based on the range’s shape. When inserting a row, this usually results in Excel shifting the cells down.
Line #8: .Rows(myNewRowNumber).ClearFormats
- Item: Rows(myNewRowNumber).
- VBA construct: Worksheet.Rows property.
- Description:
- Returns a Range object representing a row (whose number is represented by myNewRowNumber) of the worksheet in the opening statement of the With… End With statement (line #6 above).
- In this example, myNewRowNumber equals 31. Therefore, Worksheet.Rows returns row 31 after the insertion of the new row. This is a different row from that returned by Worksheet.Rows in line #7 above.
- This line #8 returns a row after the row insertion. This line is the newly-inserted row.
- Line #7 above returns a row prior to the row insertion. This line is that below the newly-inserted row.
- Item: ClearFormats.
- VBA construct: Range.ClearFormats method.
- Description: Clears the formatting of the row returned by item #1 above.
Effects of Executing the Macro
The following GIF illustrates the results of executing this macro. As expected, VBA inserts a row below row 30 without applying the formatting from the rows above or below the newly- inserted row.

Example #6: Excel VBA Insert Row Below Active Cell
VBA Code to Insert Row Below Active Cell
The following macro inserts a row below the active cell.

Process Followed by Macro

VBA Statement Explanation
ActiveCell.Offset(1).EntireRow.Insert Shift:=xlShiftDown
- Item: ActiveCell.
- VBA construct: Application.ActiveCell property.
- Description: Returns a Range object representing the active cell.
- Item: Offset(1).
- VBA construct: Range.Offset property.
- Description:
- Returns a Range object representing the cell range 1 row below the cell returned by item #1 above.
- In this example, Range.Offset returns the cell immediately below the active cell.
- Item: EntireRow:
- VBA construct: Range.EntireRow property.
- Description: Returns a Range object representing the entire row containing the cell range returned by item #2 above.
- Item: Insert.
- VBA construct: Range.Insert method.
- Description: Inserts a new row above the row returned by item #3 above.
- Item: Shift:=xlShiftDown.
- VBA construct: Shift parameter of Range.Insert method.
- Description:
- Shifts rows down (xlShiftDown) to make space for the row inserted by item #4 above.
- You can usually omit this parameter. By default, VBA decides how to shift the cells based on the range’s shape. When inserting a row, this usually results in Excel shifting the cells down.
Effects of Executing the Macro
The following GIF illustrates the results of executing this macro. When I execute the macro, the active cell is B35. As expected, inserts a row below the active cell.

Example #7: Excel VBA Insert Copied Row
VBA Code to Insert Copied Row
The following macro (i) copies row 45, and (ii) inserts the copied row below row 40.

Process Followed by Macro

VBA Statement Explanation
Lines #4 and #7: With Worksheets(“Insert row”) | End With
- Item: With | End With.
- VBA construct: With… End With statement.
- Description: Statements within the With… End With statement (lines #5 and #6 below) are executed on the worksheet returned by item #2 below.
- Item: Worksheets(“Insert row”).
- VBA construct: Workbook.Worksheets property.
- Description: Returns a Worksheet object representing the “Insert row” worksheet.
Line #5: .Rows(45).Copy
- Item: Rows(45).
- VBA construct: Worksheet.Rows property.
- Description: Returns a Range object representing row 45 of the worksheet in the opening statement of the With… End With statement (line #4 above).
- Item: Copy.
- VBA construct: Range.Copy method.
- Description: Copies the row returned by item #1 above to the Clipboard.
Line #6: .Rows(41).Insert Shift:=xlShiftDown
- Item: Rows(41).
- VBA construct: Worksheet.Rows property.
- Description: Returns a Range object representing row 41 of the worksheet in the opening statement of the With… End With statement (line #4 above).
- Item: Insert.
- VBA construct: Range.Insert method.
- Description:
- Inserts a new row above the row returned by item #1 above.
- The newly-inserted row isn’t blank. VBA inserts the row copied by line #5 above.
- Item: Shift:=xlShiftDown.
- VBA construct: Shift parameter of Range.Insert method.
- Description:
- Shifts rows down (xlShiftDown) to make space for the row inserted by item #2 above.
- You can usually omit this parameter. By default, VBA decides how to shift the cells based on the range’s shape. When inserting a row, this usually results in Excel shifting the cells down.
Line #8: Application.CutCopyMode = False
- Item: Application.CutCopyMode = False.
- VBA construct: Application.CutCopyMode property.
- Description: Cancels (False) the Cut or Copy mode and removes the moving border that accompanies this mode.
Effects of Executing the Macro
The following GIF illustrates the results of executing this macro. As expected, VBA (i) copies row 45, and (ii) inserts the copied row below row 40.

Example #8: Excel VBA Insert Blank Rows Between Rows in a Data Range
VBA Code to Insert Blank Rows Between Rows in a Data Range
The following macro inserts blank rows within the specified data range. This results in all rows within the data range being separated by a blank row.
![]()
Process Followed by Macro
![]()
VBA Statement Explanation
Lines #4 through #9: Dim myFirstRow As Long | Dim myLastRow As Long | Dim myWorksheet As Worksheet | Dim iCounter As Long | myFirstRow = 5 | Set myWorksheet = Worksheets(“Insert blank rows”)
- Item: Dim myFirstRow As Long.
- VBA construct: Dim statement.
- Description:
- Declares a new variable (myFirstRow) as of the Long data type.
- myFirstRow represents the number of the first row with data in the data range you work with.
- Item: Dim myLastRow As Long.
- VBA construct: Dim statement.
- Description:
- Declares a new variable (myLastRow) as of the Long data type.
- myLastRow represents the number of the last row with data in the data range you work with.
- Item: Dim myWorksheet As Worksheet.
- VBA construct: Dim statement.
- Description:
- Declares a new object variable (myWorksheet) to reference a Worksheet object.
- myWorksheet represents the worksheet you work with.
- Item: Dim iCounter As Long.
- VBA construct: Dim statement.
- Description:
- Declares a new variable (iCounter) as of the Long data type.
- iCounter represents a loop counter.
- Item: myFirstRow = 5.
- VBA construct: Assignment statement.
- Description: Assigns the value 5 to myFirstRow.
- Item: Set myWorksheet = Worksheets(“Insert blank rows”).
- VBA constructs:
- Set statement.
- Workbooks.Worksheets property.
- Description: Assigns the Worksheet object representing the “Insert blank rows” worksheet to myWorksheet.
- VBA constructs:
Lines #10 through #15: myLastRow = myWorksheet.Cells.Find( What:=”*”, LookIn:=xlFormulas, LookAt:=xlPart, SearchOrder:=xlByRows, SearchDirection:=xlPrevious).Row
- Item: myLastRow =.
- VBA construct: Assignment statement.
- Description: Assigns the value returned by items #2 through #9 below to myLastRow.
- Item: myWorksheet.Cells.
- VBA construct: Worksheet.Cells property.
- Description: Returns a Range object representing all cells on myWorksheet.
- Item: Find.
- VBA construct: Range.Find method.
- Description:
- Finds information in the cell range returned by item #2 above and returns a Range object representing the first cell where the information is found.
- In this example, the Range object Range.Find returns represents the last cell with data in last row with data in myWorksheet.
- Item: What:=”*”.
- VBA construct: What parameter of Range.Find method.
- Description: Specifies the data Range.Find searches for. The asterisk (*) is a wildcard and, therefore, Range.Find searches for any character sequence.
- Item: LookIn:=xlFormulas.
- VBA construct: LookIn parameter of Range.Find method.
- Description: Specifies that Range.Find looks in formulas (xlFormulas).
- Item: LookAt:=xlPart.
- VBA construct: LookAt parameter of Range.Find method.
- Description: Specifies that Range.Find looks at (and matches) a part (xlPart) of the search data.
- Item: SearchOrder:=xlByRows.
- VBA construct: SearchOrder parameter of Range.Find method.
- Description: Specifies that Range.Find searches by rows (xlByRows).
- Item: SearchDirection:=xlPrevious.
- VBA construct: SearchDirection parameter of Range.Find method.
- Description: Specifies that Range.Find searches for the previous match (xlPrevious).
- Item: Row.
- VBA construct: Range.Row property.
- Description:
- Returns the row number of the Range object returned by item #3 above.
- In this example, the number returned by Range.Row corresponds to the last row with data in myWorksheet.
Lines #16 and #18: For iCounter = myLastRow To (myFirstRow + 1) Step -1 | Next iCounter
- Item: For | Next iCounter.
- VBA construct: For… Next statement.
- Description:
- Repeats the statement inside the For… Next loop (line #17 below) a specific number of times.
- In this example:
- The macro starts on the last row of the data range as specified by item #2 below.
- Every iteration, the loop counter decreases by 1, as specified by item #4 below. Therefore, the macro moves to the previous row.
- The macro exits the loop after working with the second row in the data range (myFirstRow + 1), as specified by item #3 below.
- Item: iCounter = myLastRow.
- VBA construct: Counter and Start of For… Next statement.
- Description: Specifies myLastRow as the initial value of the loop counter (iCounter).
- Item: To (myFirstRow + 1).
- VBA construct: End of For… Next statement.
- Description: Specifies the value represented by myFirstRow plus 1 (myFirstRow + 1) as the final value of the loop counter.
- Item: Step -1.
- VBA construct: Step of For… Next statement.
- Description: Specifies that the loop counter (iCounter) decreases by 1 (-1) every loop iteration.
Line #17: myWorksheet.Rows(iCounter).Insert Shift:=xlShiftDown
- Item: myWorksheet.Rows(iCounter).
- VBA construct: Worksheet.Rows property.
- Description:
- Returns a Range object representing the row (whose number is represented by iCounter) of myWorksheet.
- Worksheet.Rows returns the row through which the macro is currently looping.
- Item: Insert.
- VBA construct: Range.Insert method.
- Description:
- Inserts a new row above the row returned by item #1 above.
- The macro loops through each line in the data range (excluding the first) as specified by lines #16 and #18 above. Therefore, Range.Insert inserts a row between all rows with data.
- Item: Shift:=xlShiftDown.
- VBA construct: Shift parameter of Range.Insert method.
- Description:
- Shifts rows down (xlShiftDown) to make space for the row inserted by item #2 above.
- You can usually omit this parameter. By default, VBA decides how to shift the cells based on the range’s shape. When inserting a row, this usually results in Excel shifting the cells down.
Effects of Executing the Macro
The following GIF illustrates the results of executing this macro. As expected, VBA inserts blank rows within the specified data range. This results in all rows within the data range being separated by a blank row.
![]()
Example #9: Excel VBA Insert a Number of Rows Every Number of Rows in a Data Range
VBA Code to Insert a Number of Rows Every Number of Rows in a Data Range
The following macro inserts 2 rows every 3 rows within the specified data range.

Process Followed by Macro

VBA Statement Explanation
Lines #4 through 13: Dim myFirstRow As Long | Dim myLastRow As Long | Dim myNRows As Long | Dim myRowsToInsert As Long | Dim myWorksheet As Worksheet | Dim iCounter As Long | myFirstRow = 5 | myNRows = 3 | myRowsToInsert = 2 | Set myWorksheet = Worksheets(“Insert M rows every N rows”)
- Item: Dim myFirstRow As Long.
- VBA construct: Dim statement.
- Description:
- Declares a new variable (myFirstRow) as of the Long data type.
- myFirstRow represents the number of the first row with data in the data range you work with.
- Item: Dim myLastRow As Long.
- VBA construct: Dim statement.
- Description:
- Declares a new variable (myLastRow) as of the Long data type.
- myLastRow represents the number of the last row with data in the data range you work with.
- Item: Dim myNRows As Long.
- VBA construct: Dim statement.
- Description:
- Declares a new variable (myNRows) as of the Long data type.
- myNRows represents the number of rows per block. The macro doesn’t insert rows between these rows.
- Item: Dim myRowsToInsert As Long.
- VBA construct: Dim statement.
- Description:
- Declares a new variable (myRowsToInsert) as of the Long data type.
- myRowsToInsert represents the number of rows to insert.
- Item: Dim myWorksheet As Worksheet.
- VBA construct: Dim statement.
- Description:
- Declares a new object variable (myWorksheet) to reference a Worksheet object.
- myWorksheet represents the worksheet you work with.
- Item: Dim iCounter As Long.
- VBA construct: Dim statement.
- Description:
- Declares a new variable (iCounter) as of the Long data type.
- iCounter represents a loop counter.
- Item: myFirstRow = 5.
- VBA construct: Assignment statement.
- Description: Assigns the value 5 to myFirstRow.
- Item: myNRows = 3.
- VBA construct: Assignment statement.
- Description: Assigns the value 3 to myNRows.
- Item: myRowsToInsert = 2.
- VBA construct: Assignment statement.
- Description: Assigns the value 2 to myRowsToInsert.
- Item: Set myWorksheet = Worksheets(“Insert M rows every N rows”).
- VBA constructs:
- Set statement.
- Workbooks.Worksheets property.
- Description: Assigns the Worksheet object representing the “Insert M rows every N rows” worksheet to myWorksheet.
- VBA constructs:
Lines #14 through #19: myLastRow = myWorksheet.Cells.Find( What:=”*”, LookIn:=xlFormulas, LookAt:=xlPart, SearchOrder:=xlByRows, SearchDirection:=xlPrevious).Row
- Item: myLastRow =.
- VBA construct: Assignment statement.
- Description: Assigns the value returned by items #2 through #9 below to myLastRow.
- Item: myWorksheet.Cells.
- VBA construct: Worksheet.Cells property.
- Description: Returns a Range object representing all cells on myWorksheet.
- Item: Find.
- VBA construct: Range.Find method.
- Description:
- Finds information in the cell range returned by item #2 above and returns a Range object representing the first cell where the information is found.
- In this example, the Range object Range.Find returns represents the last cell with data in last row with data in myWorksheet.
- Item: What:=”*”.
- VBA construct: What parameter of Range.Find method.
- Description: Specifies the data Range.Find searches for. The asterisk (*) is a wildcard and, therefore, Range.Find searches for any character sequence.
- Item: LookIn:=xlFormulas.
- VBA construct: LookIn parameter of Range.Find method.
- Description: Specifies that Range.Find looks in formulas (xlFormulas).
- Item: LookAt:=xlPart.
- VBA construct: LookAt parameter of Range.Find method.
- Description: Specifies that Range.Find looks at (and matches) a part (xlPart) of the search data.
- Item: SearchOrder:=xlByRows.
- VBA construct: SearchOrder parameter of Range.Find method.
- Description: Specifies that Range.Find searches by rows (xlByRows).
- Item: SearchDirection:=xlPrevious.
- VBA construct: SearchDirection parameter of Range.Find method.
- Description: Specifies that Range.Find searches for the previous match (xlPrevious).
- Item: Row.
- VBA construct: Range.Row property.
- Description:
- Returns the row number of the Range object returned by item #3 above.
- In this example, the number returned by Range.Row corresponds to the last row with data in myWorksheet.
Lines #20 and #22: For iCounter = myLastRow To (myFirstRow + myNRows) Step -1 | Next iCounter
- Item: For | Next iCounter.
- VBA construct: For… Next statement.
- Description:
- Repeats the statement inside the For… Next loop (line #21 below) a specific number of times.
- In this example:
- The macro starts on the last row of the data range as specified by item #2 below.
- Every iteration, the loop counter decreases by 1, as specified by item #4 below. Therefore, the macro moves to the previous row.
- The macro exits the loop after working with the row below the first block of rows you want to keep, as specified by item #3 below. Each block of rows has a number of rows equal to myNRows.
- In this example, myNRows equals 3. Therefore, the macro exits the loop after working with the fourth row in the data range.
- Item: iCounter = myLastRow.
- VBA constructs: Counter and Start of For… Next statement.
- Description: Specifies myLastRow as the initial value of the loop counter (iCounter).
- Item: To (myFirstRow + myNRows).
- VBA construct: End of For… Next statement.
- Description: Specifies the value represented by myFirstRow plus myNRows (myFirstRow + myNRows) as the final value of the loop counter.
- Item: Step -1.
- VBA construct: Step of For… Next statement.
- Description: Specifies that the loop counter (iCounter) decreases by 1 (-1) every loop iteration.
Line #21: If (iCounter – myFirstRow) Mod myNRows = 0 Then myWorksheet.Rows(iCounter & “:” & iCounter + myRowsToInsert – 1).Insert Shift:=xlShiftDown
- Item: If | Then.
- VBA construct: If… Then… Else statement.
- Description: Conditionally executes the statement specified by items #3 and #4 below, subject to condition specified by item #2 below being met.
- Item: (iCounter – myFirstRow) Mod myNRows = 0.
- VBA constructs:
- Condition of If… Then… Else statement.
- Numeric expression with Mod operator.
- Description:
- The Mod operator (Mod) (i) divides one number (iCounter – myFirstRow) by a second number (myNRows), and (ii) returns the remainder of the division.
- The condition ((iCounter – myFirstRow) Mod myNRows = 0) is met (returns True) if the remainder returned by Mod is 0.
- The condition is met (returns True) every time the macro loops through a row above which blank rows should be added.
- iCounter represents the number of the row through which the macro is currently looping.
- (iCounter – myFirstRow) is the number of rows (in the data range) above the row through which the macro is currently looping.
- ((iCounter – myFirstRow) Mod myNRows) equals 0 when the number of rows returned by (iCounter – myFirstRow) is a multiple of myNRows. This ensures that the number of rows left above the row through which the macro is currently looping can be appropriately separated into blocks of myNRows. In this example, myNRows equals 3. Therefore, the condition is met every 3 rows.
- VBA constructs:
- Item: myWorksheet.Rows(iCounter & “:” & iCounter + myRowsToInsert – 1).
- VBA constructs:
- Statements executed if the condition specified by item #2 above is met.
- Worksheet.Rows property.
- Description:
- Returns an object representing several rows of myWorksheet. The first row is represented by iCounter. The last row is represented by (iCounter + myRowsToInsert – 1).
- The number of rows Worksheet.Rows returns equals the number of rows to insert (myRowsToInsert).
- iCounter represents the number of the row through which the macro is currently looping.
- (iCounter + myRowsToInsert – 1) returns a row located a number of rows (myRowsToInsert – 1) below the row through which the macro is currently looping. In this example, myRowsToInsert equals 2. Therefore, (iCounter + myRowsToInsert – 1) returns a row located 1 (2 – 1) rows below the row through which the macro is currently looping.
- VBA constructs:
- Item: Insert.
- VBA construct: Range.Insert method.
- Description:
- Inserts new rows above the rows returned by item #3 above.
- The number of inserted rows is equal to the value of myRowsToInsert. This is calculated as follows:
In this example, if the current value of iCounter is 8:
- VBA construct: Shift parameter of Range.Insert method.
- Description:
- Shifts rows down (xlShiftDown) to make space for the rows inserted by item #4 above.
- You can usually omit this parameter. By default, VBA decides how to shift the cells based on the range’s shape. When inserting a row, this usually results in Excel shifting the cells down.
Effects of Executing the Macro
The following GIF illustrates the results of executing this macro. As expected, VBA inserts 2 rows every 3 rows within the specified data range.
Источник
Inserting a row in VBA somewhat differs from inserting a column in VBA. In columns, we used the entire column method to insert rows and the worksheet method with the insert command to insert a row. We also provide a row reference where we want to insert another row similar to the columns.
Insert Row with VBA Excel
We can perform almost all our actions in Excel with VBA coding. For example, we can copy, paste, delete, and do many more things through the VBA language. “Inserting Row” is one such method we often do in Excel. This article will show you how to perform the insert row method in VBA.
Table of contents
- Insert Row with VBA Excel
- How to Insert Row in Excel VBA?
- Method #1 – Using the Insert Method
- Method #2 – Using Entire Row Property
- Method #3 – Using Row Numbers
- Method #4 – Using Active Cell Property
- Method #5 – Using Active Cell Property with Offset Function
- Insert Alternative Rows
- Recommended Articles
- How to Insert Row in Excel VBA?
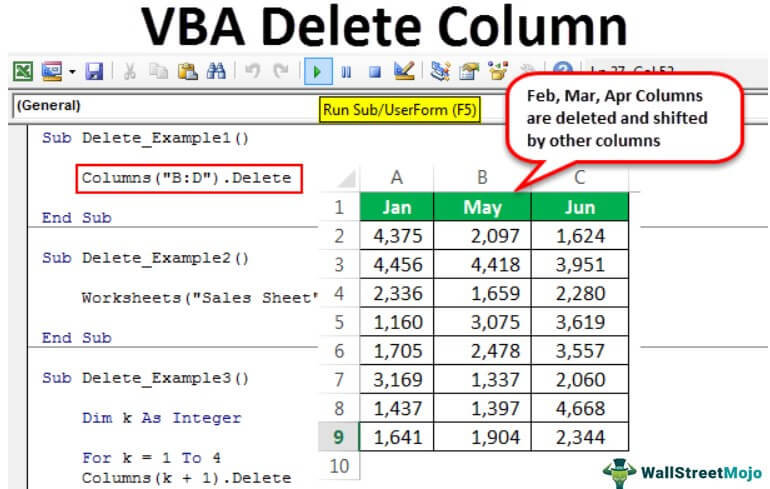
You are free to use this image on your website, templates, etc, Please provide us with an attribution linkArticle Link to be Hyperlinked
For eg:
Source: VBA Insert Row (wallstreetmojo.com)
How to Insert Row in Excel VBA?
Below are the various methods of using VBA to insert a row in Excel.
Method #1 – Using the Insert Method
In VBA, we need to use a similar technique in the Excel worksheet to insert a row. In VBA, we need to use the range objectRange is a property in VBA that helps specify a particular cell, a range of cells, a row, a column, or a three-dimensional range. In the context of the Excel worksheet, the VBA range object includes a single cell or multiple cells spread across various rows and columns.read more to insert the row.
For example, look at the below code.
Code:
Sub InsertRow_Example1()

  Range("A1").Insert

End Sub
This code will move down cell A1 to the B1 and insert the only cell.

It will cause so many problems in terms of handling the data. It will just move the mentioned cell down, and all associated columns remain the same.
Method #2 – Using Entire Row Property
In the top insert row, we can use several methods. The below method will insert the entire row above the selected cell.
Step 1: Mention the cell address first.
Code:
Sub InsertRow_Example2()

  Range("A1").

End Sub

Step 2: Instead of just selecting the “Entire Row” property.
Code:
Sub InsertRow_Example2()

  Range("A1").EntireRow.

End Sub

Step 3: After accessing the entire row property,use the insert method.
Code:
Sub InsertRow_Example2()

  Range("A1").EntireRow.Insert

End Sub

It will insert the row above cell A1. Since A1 is the first row, it will move down the A1 cell to B1.

As you can see in the above image, it has to insert the entire row, not the single cell.
Method #3 – Using Row Numbers
In the above example, we have just used the single-cell address and inserted the row. However, we can also insert it by using row numbers.
Assume you want to insert a row below the 5th row. First, we need to mention the row numbers using the RANGE object.
Code:
Sub InsertRow_Example3()

  Range("6:6").

End Sub
Since we have mentioned the entire row as 6:6, we need to use the Entire Row property here. Then, we can use the “INSERT” method.
Code:
Sub InsertRow_Example3()

  Range("6:6").Insert

End Sub
It will also insert the entire row, not the single cell.

If you want to insert two rows below the 5th row, we need to select 2 rows first and then use the INSERT method.
Sub InsertRow_Example3()

  Range("6:7").Insert

End Sub
It will insert two rows below the 5th row.

Like this, we can insert as many rows as possible in the worksheet.
Method #4 – Using Active Cell Property
We can use the Active Cell VBA property to insert rows. The active cell is nothing but a presently selected cell.
Assume you are in cell B5 and want to insert a row above. Then, you can use the ActiveCell property.
Sub InsertRow_Example4()

  ActiveCell.EntireRow.Insert

End Sub
It will insert the row above the active cell.
Method #5 – Using Active Cell Property with Offset Function
Assume you want to insert a row after two rows of the active cell. We need to use the Offset functionThe OFFSET function in excel returns the value of a cell or a range (of adjacent cells) which is a particular number of rows and columns from the reference point. read more to offset the number of rows.
Assume you are in the B5 cell.

We can use the code below if you want to insert the row after the 2nd row from the active cell.
Code:
Sub InsertRow_Example5()

  ActiveCell.Offset(2, 0).EntireRow.Insert

End Sub
It will insert a row after the 6th row.

Insert Alternative Rows
Inserting alternative rows is what we have come across many times. For example, look at the below data image.

Now, we need to insert alternative rows. Finally, we need to use loops to insert every alternate row.
Code:
Sub InsertRow_Example6()
  Dim K As Integer
  Dim X As Integer

  X = 1

  For K = 1 To 4
    Cells(X, 1).EntireRow.Insert
    X = X + 2
  Next K
End Sub
This will insert rows like this.
You can download this VBA Insert Row Excel here. VBA Insert Row Excel Template
Recommended Articles
This article has been a guide to VBA Insert Row. Here, we learned the top 5 methods to Insert Row in Excel VBA, some practical examples, and a downloadable Excel template. Below are some useful Excel articles related to VBA: –
- VBA IntegerIn VBA, an integer is a data type that may be assigned to any variable and used to hold integer values. In VBA, the bracket for the maximum number of integer variables that can be kept is similar to that in other languages. Using the DIM statement, any variable can be defined as an integer variable.read more
- Top 3 Methods to Insert Row in ExcelThe insertion of an excel row is simply the addition of a new (blank) row to the worksheet. The insertion of a row is eased with the help of shortcuts.read more
- Insert Columns in Excel using VBATo add any columns in VBA, we must use the insert command and the entire column statement. When inserting a single column, use a single column reference, and when adding multiple columns, use multiple column references.read more
- What are ListObjects in VBA ListObject is a way of referring to the excel tables while writing the VBA code. It facilitates the user to create, delete, or format the excel tables with the help of VBA code.read more VBA?VBA ListObject is a way of referring to the excel tables while writing the VBA code. It facilitates the user to create, delete, or format the excel tables with the help of VBA code.read more